Loading ...
Loading ...
Loading ...
916
VISCOSITY GUIDE
A Viscosity Cup (Ford #4 Standard) is included with your Fuji System.
To test the viscosity of the paint material, fill the Viscosity Cup to the
brim and time how long it takes for the liquid to empty out through the
hole. We recommend you experiment to find the ideal viscosity for
your application and record the information for the next time.
Always check with the manufacturer of the coating for assistance in
thinning for spraying. If their product is only designed to be brushed,
they may not be too helpful. But remember that any type of coating
can be sprayed if it is thinned correctly (with the appropriate solvent)
and you have installed the ideal aircap set.
The chart below illustrates how many SECONDS it should take for the
material to flow out of the viscosity cup. This is only an approximate
guide.
Auto 18 - 20 Primers 30 - 40
Lacquers 18 - 20 Sanding Sealers 20 - 22
Enamels 20 - 25 Stains Undiluted
Latex 20 - 30 Creosote Undiluted
Oil-based 20 - 25 Polyurethanes 20 - 25
We suggest thinning around 25% to begin with but this may contra-
vene the air quality control laws for your location. The solvent used for
thinning is usually the solvent mentioned on the can (instructions for
‘cleaning the brushes’). However, please check with the coatings
manufacturer. The aim is to thin as little as possible.
HVLP spraying is more friendly to the environment than most methods
of spraying. It reduces appreciably the amount of unnecessary misting
and fogging (overspray) associated with high-pressure spraying.
Spraying with Nitrocellulose lacquer can be hazardous. The lacquer,
fumes and overspray are toxic, flammable and explosive. If
spraying must be done inside an enclosed area, ventilate well. Spray
close to an open window or door and situate a fan to draw out the
fumes (an explosion-proof motor and explosion-proof lighting will be
necessary).
Please check with the local Authority having jurisdiction on
this matter.
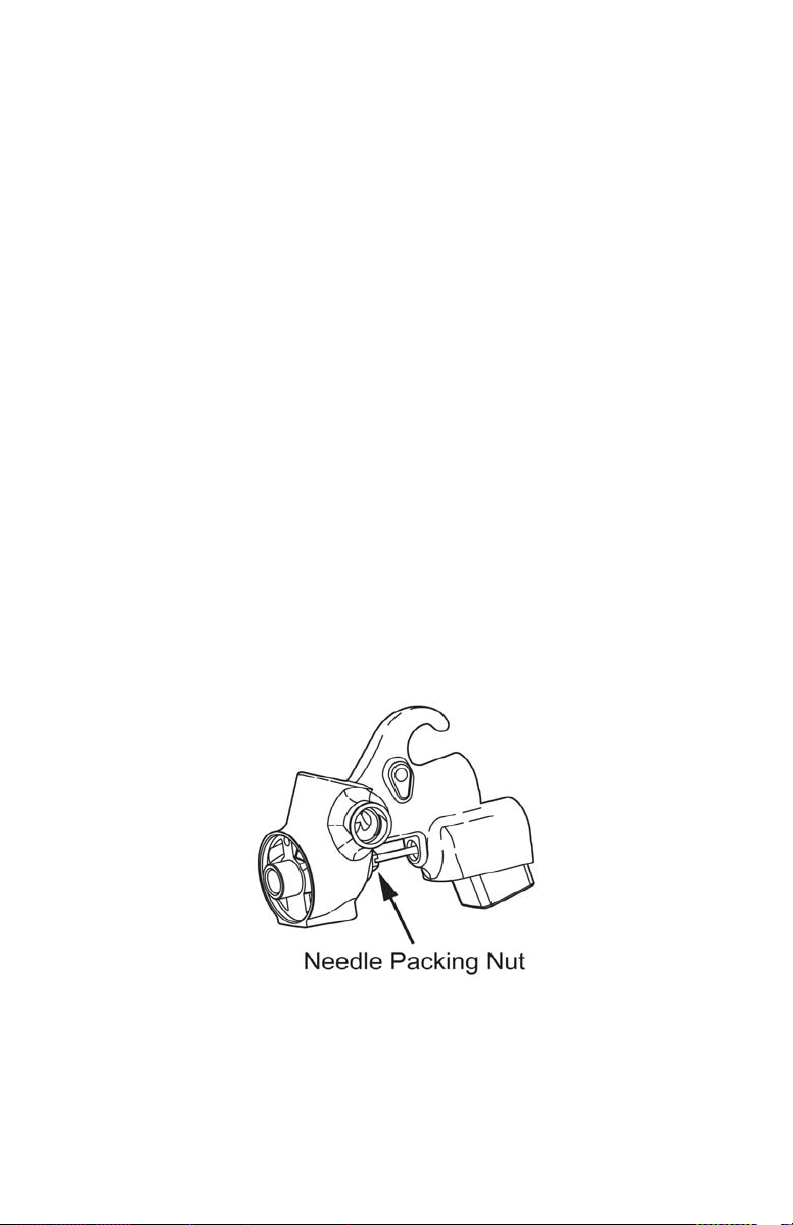
LEAKAGE FROM THE NOZZLE
This occurs when the Needle Packing Nut 5210 is too tight com-
pressing the Needle Packing 5209 too tightly around the Needle.
Half fill the cup with water. Attach the Gun to the Hose and turn on the
Turbine blower to pressurize the Cup. Pull the Trigger and release.
Check the Nozzle for water spurting out.
Use the supplied wrench to GENTLY loosen the Nut (1 or 2 degrees
only at a time). This is a very sensitive adjustment. Again pull the
Trigger and release. Wipe away the water in between adjustments.
Repeat until no water is seen at the Nozzle Hole.
LEAKAGE FROM THE NEEDLE PACKING NUT
This occurs when the Needle Packing Nut is too loose.
Half fill the cup with water. Attach the Gun to the Hose and turn on the
Turbine blower to pressurize the Cup. Use the supplied wrench to
GENTLY tighten the Needle Packing Nut 1 or 2 degrees only. This is
a very sensitive adjustment. Wipe away the water in between
adjustments. Repeat until no water is seen where the Needle passes
through the Needle Packing Nut 5210.
It is a good idea to apply Light Machine Oil or Vaseline to the Needle
Shaft where it passes through the Needle Packing Nut and work it in
and out by pulling the Trigger back and forth. This will lubricate the
Needle Packing 5209.
Loading ...
Loading ...
Loading ...