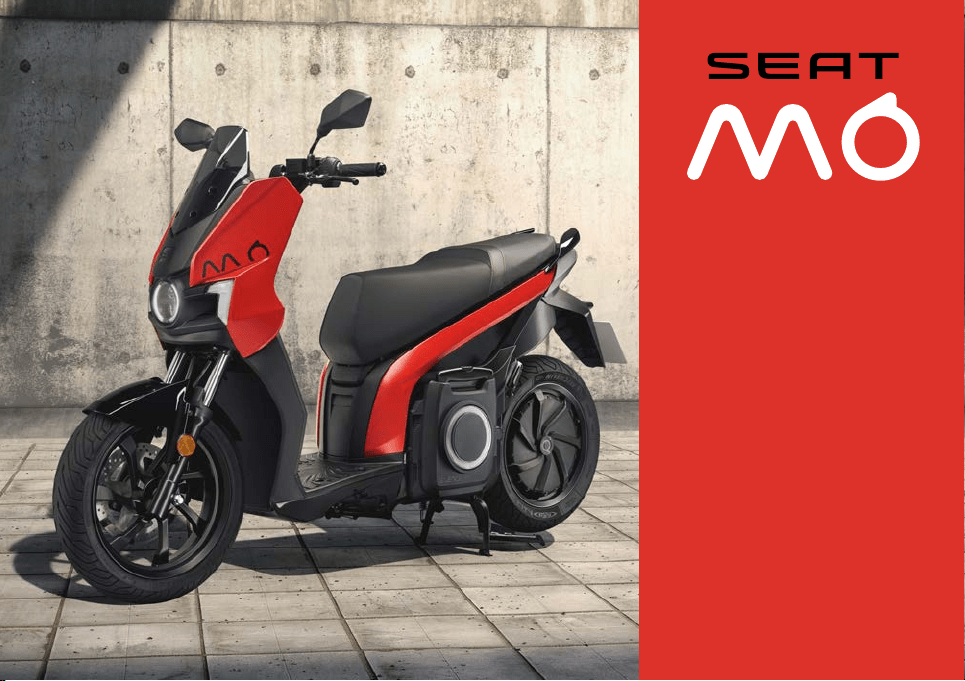
Owner’s manual
SEAT MÓ eScooter 125 (10.20)

Thank you for your trust choosing an eScooter SEAT MÓ
We recommend reading this Instruction Manual carefully to learn more about your eScooter so you can enjoy all its
benefits in your daily driving.
Information about handling is complemented with instructions regarding the operation and maintenance of the
vehicle in order to ensure its safety and maintain its value. Moreover, we want to give you valuable advice and tips to
drive your vehicle eciently and respecting the environment.
We wish you safe and enjoyable motoring.
SEAT, S.A.
EN

About this manual
This manual describes the features of the
eScooter at the time of drafting this text.
Some of the features described below will
be introduced in the future or will only be
available in certain markets.
Some details on the drawings may vary from
its eScooter and must be interpreted as a
standard representation.
The direction indicators (left, right, forwards,
backwards) in this manual refer to the travel
direction of the vehicle unless otherwise
stated.
Trademarks are marked with ®. The absence
of this symbol does not guarantee that the
term is not a trademark.
You can access the information in this manual
using:
• Thematic table of contents that follows the
manual’s general chapter structure.
• Visual table of contents that uses graphics
to indicate the pages containing essential
information, which is detailed in the corre-
sponding chapters.
¬ WARNING
Texts after this symbol contain information
about safety and warn you about possible
accident or injury risks.
O CAUTION
Texts after this symbol indicate possible
damage to the vehicle.
For the sake of the environment
Texts after this symbol contain information
about the protection of the environment.
Note
Texts after this symbol contain additional
information.

Connectivity
The eScooter can be connected to My SEAT
MÓ mobile app, which displays dierent
features such as the location of the eScooter,
remote battery status checking, start-up
authorization, seat opening, scooter locking
and the reception of notifications.
EN

4
Basic components.................. 6
eScooter controls and driving ... 7
Safety
Safe driving.......................... 8
Safety first! ............................. 8
Use and maintenance .................. 8
Clothing and protection ................ 9
Load.................................... 10
Accessories and modifications ......... 10
Checks before driving................. 10
Charge level............................ 10
Lights and indicators.................... 10
Stands.................................. 10
Tyres.................................... 10
Mirrors.................................. 11
Brakes.................................. 11
Brake fluid .............................. 11
Front brake ............................. 11
Rear brake.............................. 11
Brake lever.............................. 12
Adjustment of the brake lever ........... 12
Emergencies
Self-help ............................. 13
First aid ................................. 13
Fire protection .......................... 13
Fuses................................... 13
Changing a fuse........................ 13
Operation
Start-up .............................. 14
Steps to follow.......................... 14
Control instruments and
warning lamps
...................... 15
Instrument panel........................ 15
Instrument cluster operation.......... 16
LCD screen............................. 16
“SET” / “INFO” buttons.................. 18
Warning lights .......................... 19
eScooter controls and driving ... 21
Controls on the left side of the
handlebar .............................. 21
Controls on the right side of the
handlebar .............................. 22
Combined brake and regenerative
brake ................................... 23
Ignition.................................. 24
Lights and visibility ................. 25
Lights ................................... 25
Saddle................................ 26
Open and close seat ................... 26
Seat interior ............................ 26
Stands ................................ 27
Side stand .............................. 27
Centre stand ........................... 27
Motor ................................. 27
Motor (rear wheel) ...................... 27
Battery
Battery pack......................... 28
Introduction............................. 28
Safety instructions ...................... 28
Battery Pack Components.............. 29
Removing the Battery Pack ............. 31
Connector.............................. 32
Connecting charging unit............... 32
Temperature............................ 33
State of charge indicator in % (SoC).... 34
Range .................................. 34
Power Battery Pack Useful Life.......... 34
Battery and charger specifications ..... 35
Table of Contents

5
EN
Maintenance
Maintenance schedule............ 36
Work to perform ........................ 36
Operations and frequency.............. 37
eScooter conservation............ 38
Cleaning and storage (guide for storing
the vehicle) ............................. 38
Warranty ............................. 39
Delivery to the buyer.................... 39
Warranty conditions (grounds for the
warranty being voided) ................. 39
Inspection work .................... 40
eScooter and battery................... 40
Technical data
eScooter identification............ 41
VIN number ............................. 41
Information tag - production
plate.................................... 41
Technical specifications .......... 42
eScooter specifications (eScooter +
motor part) ............................. 42
6
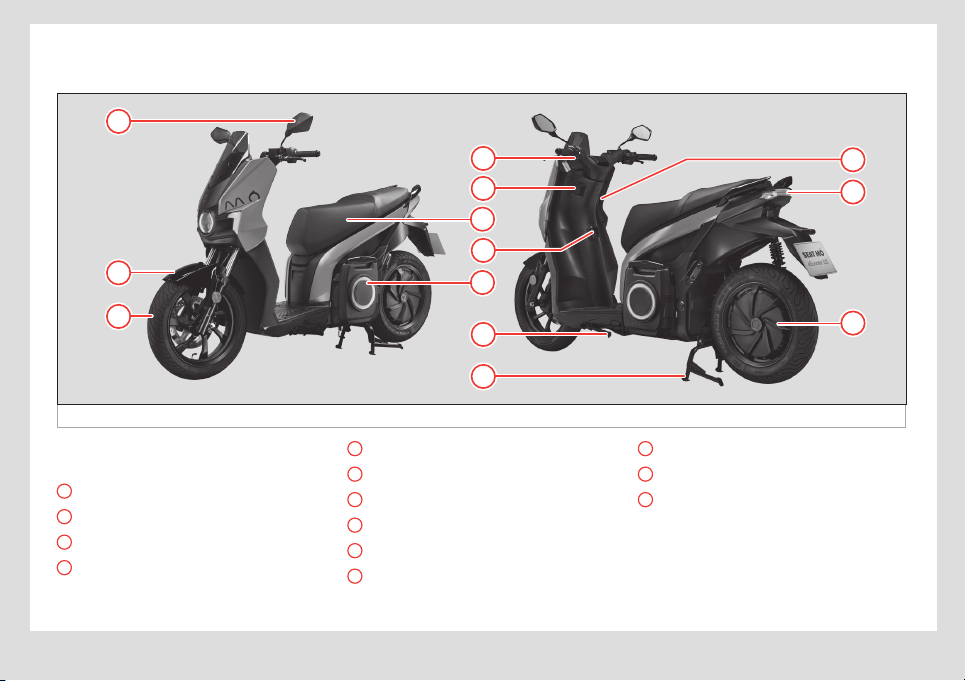
Basic components
Basic components
Fig. 1 Basic components
3
1
11
2
13
12
5
4
7
9
10
8
6
The basic components (from a user stand-
point) that make up the eScooter are:
1
Mirror ››› page11
2
Front mudguard
3
Front wheel
4
Instrument panel ››› page15
5
Electric socket – USB
6
Seat ››› page26
7
Carry hook
8
Battery ››› page28
9
Side stand ››› page27
10
Central stand ››› page27
11
Ignition ››› page24
12
Brake light, indicators
13
Motor (rear wheel) ››› page27
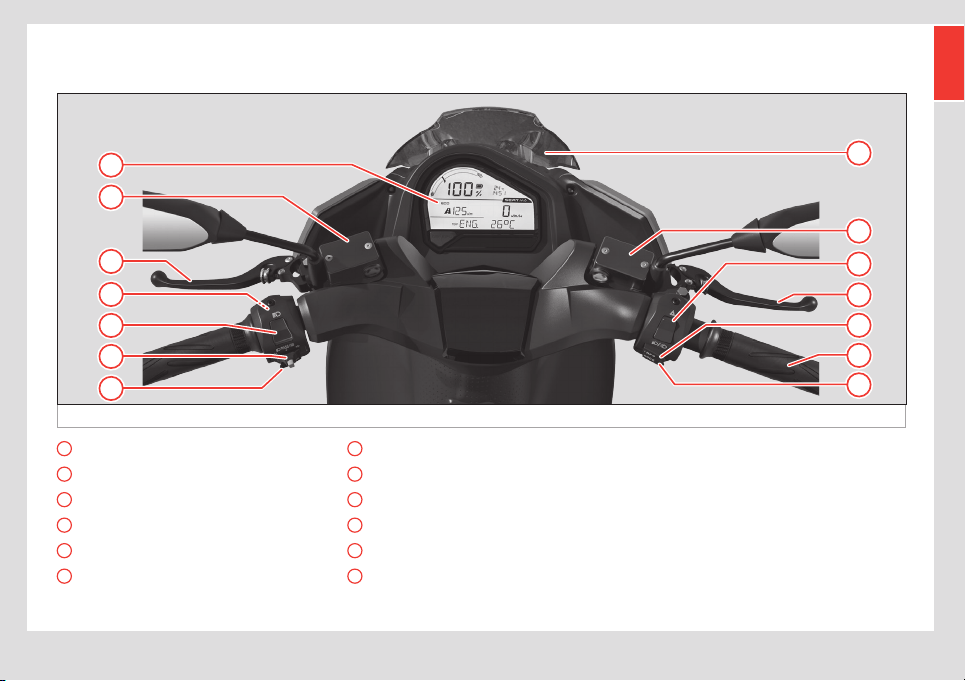
7
eScooter controls and driving
EN
eScooter controls and driving
Fig. 2 eScooter controls and driving
5
3
2
4
1
28
2
9
3
12
10
11
6
7
1
Instrument panel ››› page15
2
Brake fluid reservoir ››› page11
3
Brake ››› page11
4
Reverse gear ››› page21
5
Main beam headlight ››› page21
6
Turn signal selector ››› page21
7
Horn
8
Windscreen
9
Dipped beam headlight ››› page22
10
INFO ››› page22
11
Accelerator ››› page22
12
MODE ››› page22

8
Safe driving
Safety
Safe driving
Safety first!
Driving a vehicle requires your full attention
and can aect your own safety and that of
others. So, you must take responsibility for
any precautions necessary to minimise risk
while using your eScooter.
This section in particular, and the manual in
general, oers information and tips to make
driving your eScooter as safe as possible.
However, it can’t take into account or warn
you of the dangers associated with driving
a vehicle and its maintenance. You must use
common sense to enjoy your eScooter with
as little risk as possible. Below you will find
some important tips.
Use and maintenance
The eScooter is an urban eScooter designed
to be used on the road only, carrying at most
the driver and one passenger. It is also impor-
tant to respect the maximum load indicated
in the corresponding section.
• Drive within your limits: take into account
your personal skills and the road conditions
in order to drive safely. Don’t overestimate
your skills and leave a margin for unexpected
events.
• Do not drink or use drugs before driving:
they will aect your reflexes and your ability
to deal with unexpected events. Don’t let
anyone else drive in that condition either.
• Assess other factors: also take into
account other factors that aect driving,
such as prescription drugs, fatigue or lack of
attention.
• Keep the eScooter in good conditions:
just as you have to be in good shape to drive,
you are responsible for inspecting and main-
taining your eScooter before driving, follow-
ing the instructions in this manual. Inadequate
or no maintenance can be a risk factor.
¬ WARNING
The eScooter is NOT prepared for regular
motorway use, although it is possible to do
so sporadically. The vehicle is designed to
go at a steady speed of 85 km/h without
any critical elements overheating. If the
vehicle is used in Sport mode all the time,
the battery pack (BP) may overheat. So,
the eScooter is fitted with a system that op-
timises the vehicle’s power use and output
to modify settings on the go and avoid this
type of situation.
9
Safe driving
EN
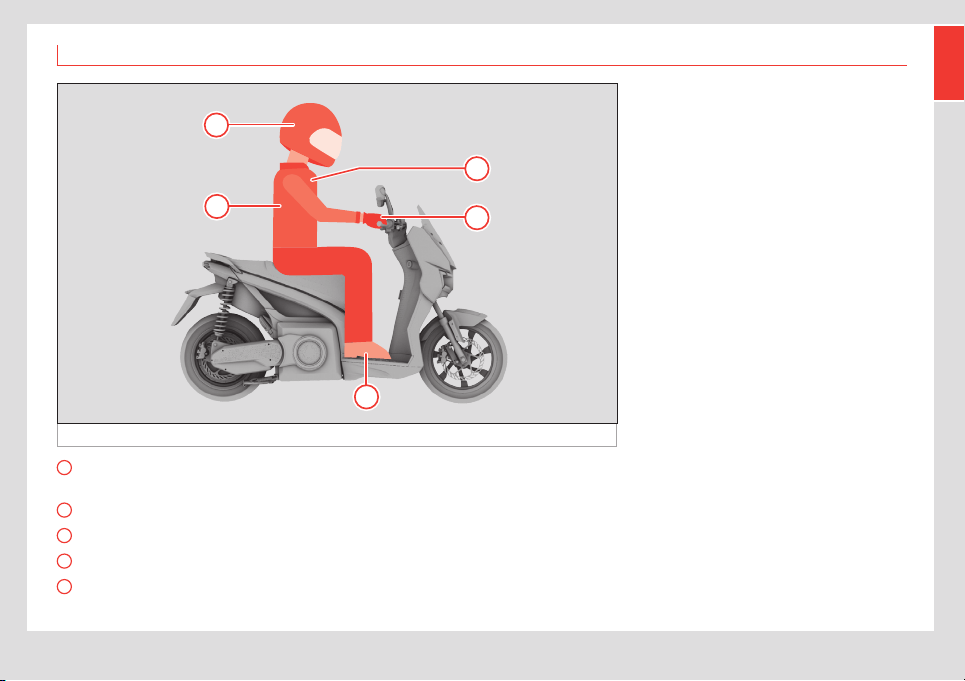
Clothing and protection
Fig. 3 Clothing and protection recommendations
B
D
C
A
E
A
Always wear a helmet. Also protect your
face (visor or glasses)
B
Clothing should never be loose
C
Wear bright or reflective colours
D
Wear gloves
E
Shoes should fit properly, have a low
heel and protect your ankles
For both your safety and that of the pas-
senger, we recommend wearing protecting
clothing suitable for riding a eScooter. Al-
though such clothing does not provide total
protection, it can considerably decrease the
probabilities of injury and the seriousness of
the consequences. Consult a specialist to
choose the clothing that suits you best.
• Always wear a helmet: Proper use of
a helmet is basic and obligatory, both for
the driver and for the passenger. It must be
approved, in good condition and properly
buckled. Helmets reduce the number of head
injuries and their seriousness. We recommend
using full-face helmets (that cover the whole
head) in light, bright colours or with reflector
strips, that are lightweight and fit properly.
• Wear eye protection: Always wear eye
protection: either the helmet’s visor or appro-
priate glasses.
• Other garments: Wear sti boots and
leather gloves to protect feet, ankles and
hands from scratches, cuts and bruises. Wear
a suit or jacket and trousers specifically
designed for riding scooters. These should be
form-fitting and the right size, and we recom-
mend they have reflector strips.
These recommendations also apply to the
passenger if there is one.

10
Safe driving
Load
This eScooter is designed to be driven safely
as long as the maximum load capacity and
proper distribution are respected. Failure to
do so may compromise the stability, braking
power and manoeuvrability of the eScooter.
The maximum mass of the eScooter cannot
be more than 320kg, including the vehicle
itself with its battery and accessories, the
driver and the passenger, when applicable,
and any load. Weight must be distributed
evenly across the two axles.
Remember that the weight of any accesso-
ries that are installed will reduce the addition-
al load that the eScooter can carry.
¬ WARNING
• Distribute the load evenly on the eScoot-
er and try to keep it as close to the centre
as possible.
• Make sure the load is firmly tied down
and avoid carrying loose objects.
• Always make sure tyres are properly
inflated and adjust the rear suspension
to suit the specific load in each case ›››
page10, Tyres. To safely adjust the rear
suspension, contact your ocial dealer or
a specialized workshop.
Accessories and modifications
We recommend using only SEAT accessories,
as they have been designed and tested to
ensure they work properly with this model of
eScooter.
If you use other accessories or modify them in
any way, you must make sure they are select-
ed and installed properly so that they:
• Don’t obstruct the turning radius of the
handlebar or interfere with the use of any of
the controls.
• Don’t reduce the side tilt angle or the
ground clearance.
• Don’t interfere with visibility or the beam of
any of the lights.
• Do not tamper with the eScooter’s electri-
cal or electronic components.
• Comply with legal regulations.
Checks before driving
Charge level
Check the charge level on the LCD screen.
If it is too low, we recommend charging the
battery before using your eScooter.
Lights and indicators
Replace parts if they do not work or have
been damaged, before driving.
When the speedometer lights don’t work
properly, they start blinking more quickly to
indicate that there is a problem.
Stands
Make sure both the side stand and centre
stand are folded away.
The side stand has a sensor that prevents the
eScooter from being driven when it is de-
ployed, but the centre stand does not.
Tyres
Always make sure there are no punctures,
cracks or tears in the tyres, and that the tread
has not worn down. Never drive with worn or
defective tyres. See section ››› page42,
11
Safe driving
EN
Technical specifications to find out about
the correct tyre pressures for the eScooter.
Driving with inappropriate tyre pressures can
damage the tyres and cause an accident, in
addition to limiting their lifespan.
Rear tyre
It is very important to respect the rear tyre
pressure (2.5 bar) as the motor is inside the
rear wheel.
It is important to remember that this eScooter
has more weight on the rear wheel than
conventional scooters (those without an
in-wheel motor), so the rim or motor can be
aected when going over kerbs, potholes or
road humps if travelling at the same speed as
a conventional scooter.
O CAUTION
If you go over kerbs, potholes or road
humps at high speed, you may damage the
vehicle’s rim and/or motor.
Mirrors
Before driving, make sure that both mirrors
are properly adjusted to the current driver of
the eScooter.
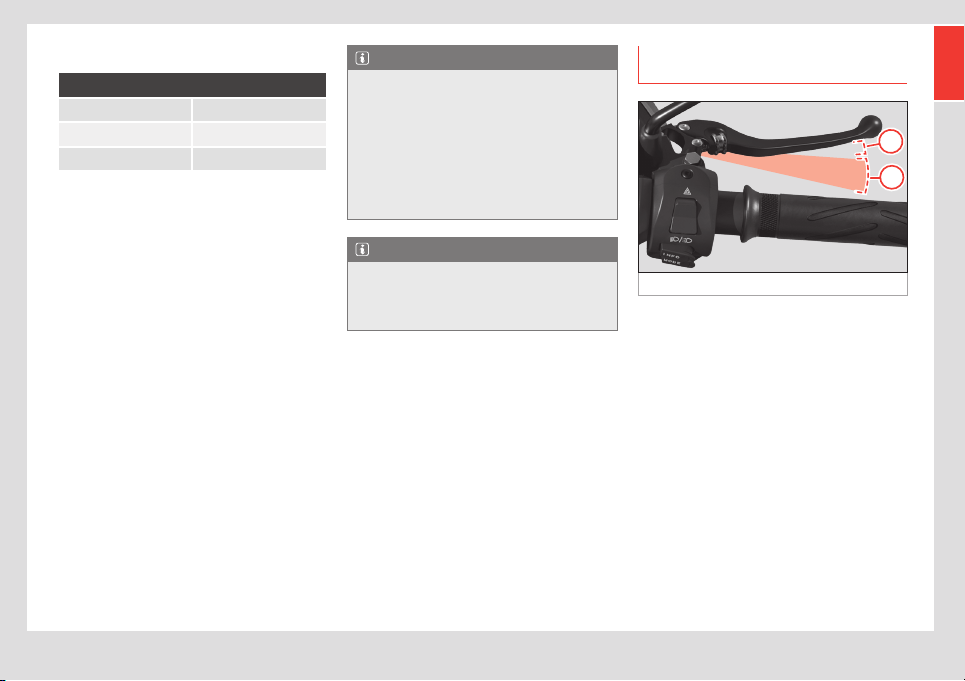
Brakes
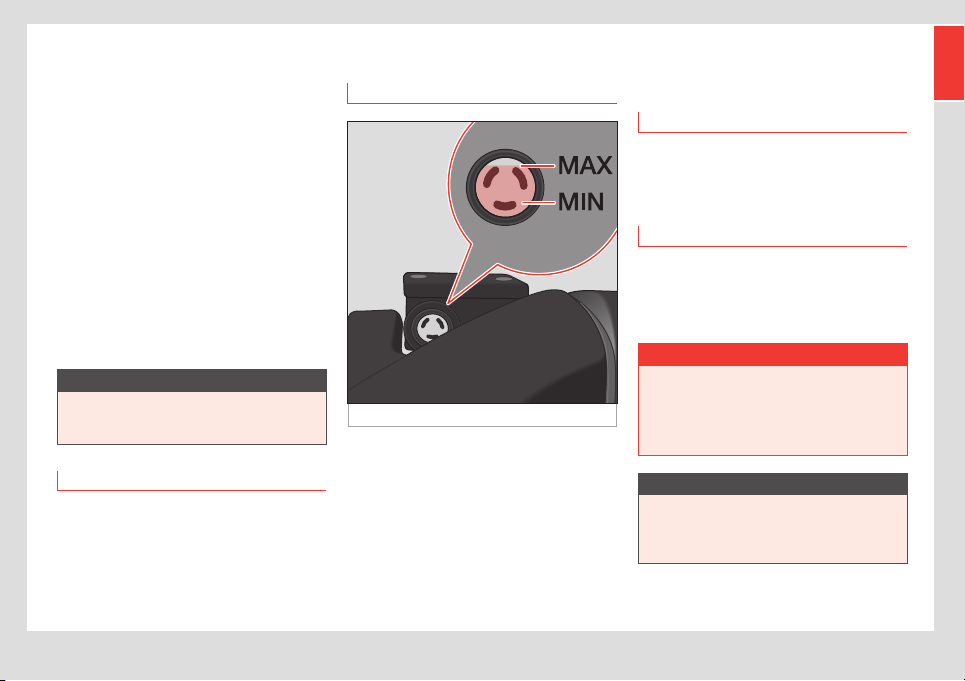
Brake fluid
Fig. 4 Brake fluid
The brake fluid tanks are located on the top
of the handlebar, one on each side. Check
the levels with the eScooter resting on both
wheels, not on its stands, and on a flat sur-
face.
The brake fluid should never fall below the
MIN line on the tank ››› Fig. 4. Air can get
into the tank if it is empty, which can cause
problems in the eScooter’s braking system
and compromise safety on the road.
Levels should always be checked and the
fluid must be changed every 2 years. If there
is not enough brake fluid, add more.
Front brake
The brake pads have safety slots.
If the slots in the friction material are visible,
get your point of sale to replace it.
Rear brake
When the rear brake pads are less than 1mm
thick, they are less eective. Get your point
of sale to replace them. Use DOT4 brake fluid
(never mix old and new fluid).
¬ WARNING
• If you get brake fluid on your skin, wash it
o immediately with water.
• If you get brake fluid in your eyes, flush
with water and seek medical attention
quickly.
O CAUTION
Brake fluid can damage the eScooter’s
paint and plastic parts if spilled Brake
fluid can cause damage and injuries if not
handled properly and safely.
12
Safe driving
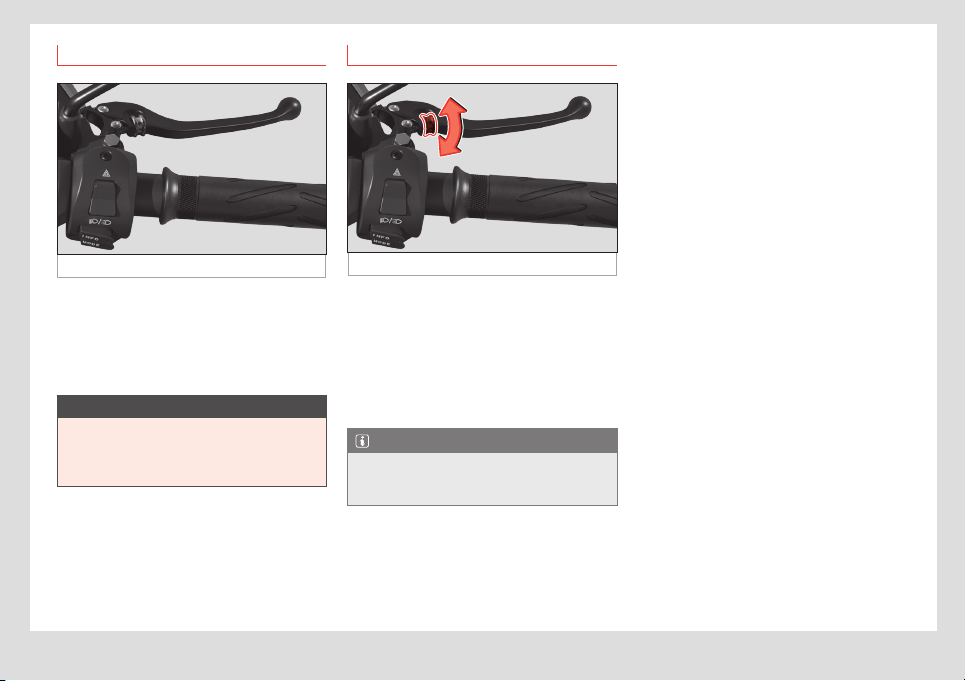
Brake lever
Fig. 5 Brake lever
Make sure that the braking system works
correctly:
• Squeeze the left and right brake levers at
the same time to make sure that they both
resist pressure.
O CAUTION
If you find excessive play in the brake lever,
but the pads are still in good condition,
contact a SEAT Ocial Service as soon as
possible to get it checked.
Adjustment of the brake lever
Fig. 6 Brake lever
The positions of the left and right brake levers
can be adjusted for greater driver comfort.
The regulator is located on the brake lever
itself.
• Turning the regulator forwards or back-
wards moves the position of the brake lever
closer or further away.
Note
Adjusting the brake lever only aects the
position of the lever and has no eect on
the braking power or distance.

13
Self-help
EN
Emergencies
Self-help
First aid
In the case of a broken battery, smoke or
fire, evacuate people from the contaminated
area and ensure as much ventilation as possi-
ble to clear away the gases. Seek medical
attention.
• Contact with eyes: Rinse with plenty of
water (eyes open) for at least 10 minutes.
• Contact with skin: Remove contaminated
clothing and rinse the aected area with
soap and water for at least 15 minutes. Do not
apply grease or creams.
• Inhalation: Take the person outdoors and
ventilate the contaminated area. Administer
oxygen or artificial respiration if necessary.
Fire protection
Extinguishing measures:
• The following can be used: Type D, CO
2
,
dry chemical extinguishers.
• Specific hazards: cells overheating due to
external heat sources or improper use.
Fuses
Changing a fuse
The fuse box is located under a protective
cover, inside the seat compartment ›››
page26.
Fuses colour coded
Colour
Current intensity
in amps
Black 1
Grey 2
Orange 5
The eScooter has 4 fuses:
No. Consumer Amps
1 USB port 1
2 12V power supply 5
3 On-board power supply 2
4 Controller 2
14
Start-up
Operation
Start-up
Steps to follow
Fig. 7 Start-up
1
2
3
• Insert the key into the scooter’s ignition.
• Press and turn the key clockwise to “on”
position
1
.
• Press the left brake lever
2
and the MODE
button
3
at the same time until an audio
signal sounds and READY is shown on the
instrument cluster display. The indicator light
D at the bottom of the instrument cluster will
then come on.
Now you can move o my operating the
accelerator grip.
¬ WARNING
It will only be possible to start-up the
eScooter while it is stopped.
15
Control instruments and warning lamps
EN
Control instruments and warning lamps
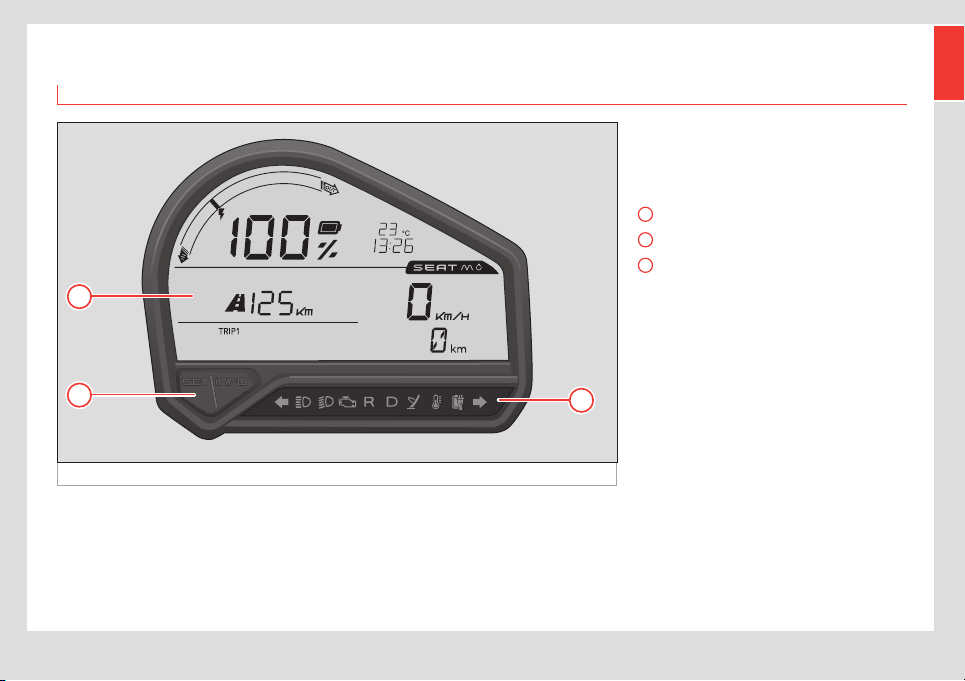
Instrument panel
Fig. 8 Instrument panel
3
2
1
The instrument panel gives you all the infor-
mation you need to know about the eScooter
while driving.
It has:
1
LCD screen ››› page16
2
“SET” and “INFO” buttons ››› page18
3
Indicator lights ››› page19
Its functionalities are explained below.
16
Control instruments and warning lamps
Instrument cluster operation
LCD screen
Fig. 9 LCD screen
1
7
8
9
4
6
5
3
10
2
1
Current indicator
It also indicates whether power is flowing out
of the battery (being used) or into it (being
regenerated through the brake motor or
charging).
2
Charge display
The display shows the SoC (State of Charge).
This is shown as a percentage, so when the
battery is completely drained it will read 0%
and when it is fully charged it will show 100%.
3
Driving mode
Shows the driving mode that is currently
active (ECO, CITY or SPORT).
4
Bluetooth connection
This icon shows that the eScooter’s ECU is
paired with the driver’s smartphone. It blinks
when pairing and stays on once the connec-
tion has been made. The light turns o when
the user disconnects their smartphone.
5
Estimated remaining range
Shows information about the remaining
range, in kilometres or miles. This is approx-
imate and depends on driving style and
current use of power.
17
Control instruments and warning lamps
EN
6
Service
When it’s necessary to perform scheduled
service on the eScooter, according to mile-
age (km), the spanner icon
will appear
automatically.
Once the eScooter has been serviced, the
authorised service will deactivate the icon
and it will not appear again until it is time for
another scheduled service.
The icon is just a reminder and removing it
does not constitute certification of having
passed a revision.
Regardless of the kilometres travelled, the
eScooter must pass at least one revision
each year if it hasn’t reached the kilometres
that trigger the spanner icon.
Read the maintenance section for more
information ››› page36.
7
Ambient temperature
Shows the ambient temperature (in Celsius
or Fahrenheit, depending on the settings). It
shows both positive and negative temper-
atures.
8
Current time
Shows the current time (battery data). The
time can be shown using the 12-hour or 24-
hour clock systems.
9
Speedometer
Shows the eScooter’s current speed. It can
be set to kilometres per hour or miles per
hour.
10
Mileage display and temperature
display
Pressing the INFO button changes the infor-
mation that is displayed: odometer, tempera-
tures, trip recorder 1, trip recorder 2:
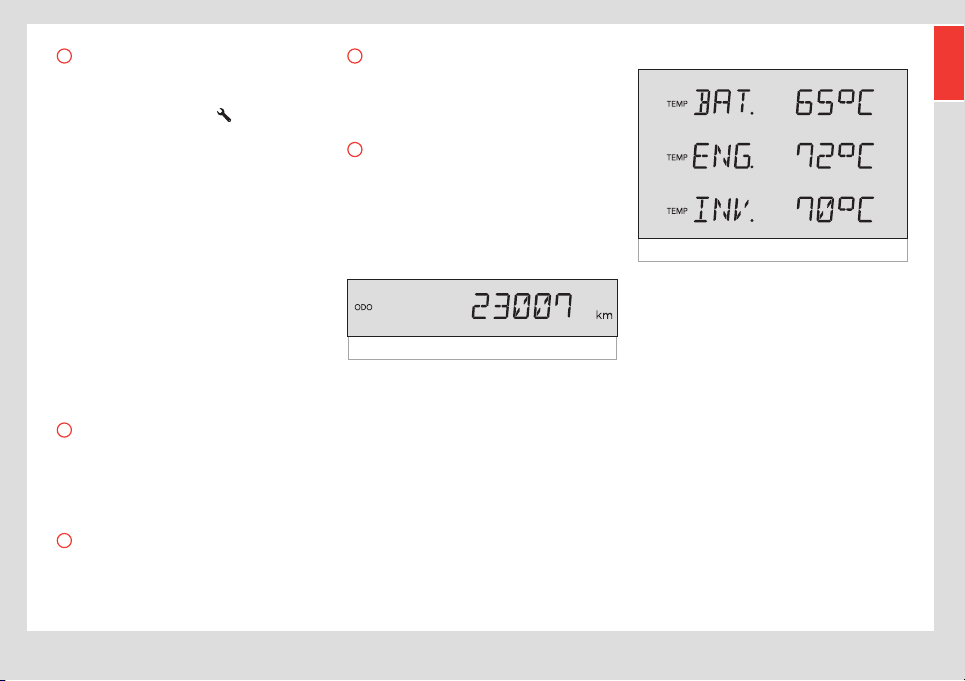
Odometer:
Fig. 10 Odometer
Indicates the total kilometres/miles travelled.
TEMP
Fig. 11 Temperatures
Shows the temperatures of dierent compo-
nents, in Celsius or Fahrenheit.
By holding down the INFO button you can
switch between:
• BAT TEMP: Temperature of the battery pack.
• ENG TEMP: engine temperature.
• INV TEMP: controller temperature.
18
Control instruments and warning lamps
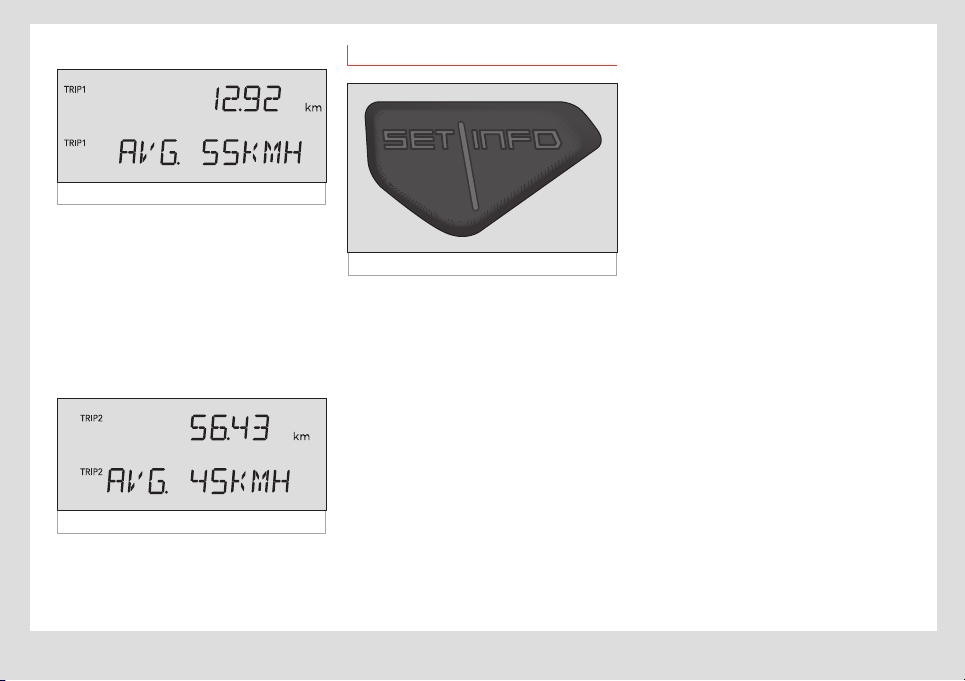
TRIP1
Fig. 12 Partial odometer 1
Partial odometer 1: Shows the kilometres/
miles travelled since the last time it was
reset. Holding down the INFO button switches
between:
• KM/MI: kilometres/miles travelled.
• AVG: Average speed for those kilometres/
miles (in km/h or mi/h).
TRIP2
Fig. 13 Partial odometer 2
Exactly the same as TRIP1.
“SET” / “INFO” buttons
Fig. 14 Instrument cluster buttons
The buttons on the instrument cluster are
INFO (with the same functions as the button
on the right hand side of the handlebar ›››
page22) and SET:
They are used to:
Switching between panels
• Press INFO (single press): move between
the following screens with each press, in this
order: ODO, TEMP, TRIP1, TRIP2.
Change view from trip recorder / average
speed (AVG)
• In TRIP1 or TRIP2, press INFO (press and
hold).
Reset trip recorder
• In TRIP1 or TRIP2, press SET (single press).
The kilometre count will be reset.
Changing the temperatures view
• In TEMP, press INFO (press and hold): to
switch between the BAT TEMP, ENG TEMP and
INV TEMP screens.
Change the time
• Press SET (press and hold): access the time
change mode.
• Press SET (single press): change between
hours, minutes and time mode (they will start
flashing).
• When the hour is flashing, press INFO
(single press) to increase by one unit per
press. Press INFO (press and hold) to quickly
increase the time.
• When the minutes are flashing, press INFO
(single press) to increase by one unit per
press. Press INFO (press and hold) to quickly
increase the minutes.
• When the time mode is flashing, press INFO
(single press) to switch between AM, PM and
24 hour mode.
• Press SET (press and hold) to set the time
and exit the time change mode.

19
Control instruments and warning lamps
EN
Change the units’ system
• Press SET (press while switching the eS-
cooter on): switches from metric system units
(°C, km/h, km) to imperial system measure-
ments (°F, mph, mi), and vice-versa.
Warning lights
Fig. 15 Instrument panel
Warning lights
Left indicator light.
High-beam light.
Low-beam light.
OBD light. Comes on when there is an issue. If the issue disappears, the light should go o
after you start the eScooter 3 times.
Reverse-gear light.
Gear light. This comes on when the eScooter has done all the necessary checks and is
ready to drive.
Side stand indicator. This indicator lights up when the stand is down. The eScooter is not
permitted to move in this situation (automatic safety disconnection).

20
Control instruments and warning lamps
Warning lights
Temperature light. This blinks if any part is near its maximum allowable temperature. It stays
on without blinking when it is over the maximum temperature.
Motor: 212 °F (100 °C) flashing
230 °F (110 °C) always on.
Controller: 158 °F (70 °C) flashing,
167 °F (75 °C) always on.
Battery: 122 °F (50 °C) flashing,
140 °F (60 °C) always on /
41 °F (5 °C) flashing,
14 °F (–10 °C) always on.
Charge gauge. Steady when connected to a power source.
Right indicator light.
21
eScooter controls and driving
EN
eScooter controls and
driving
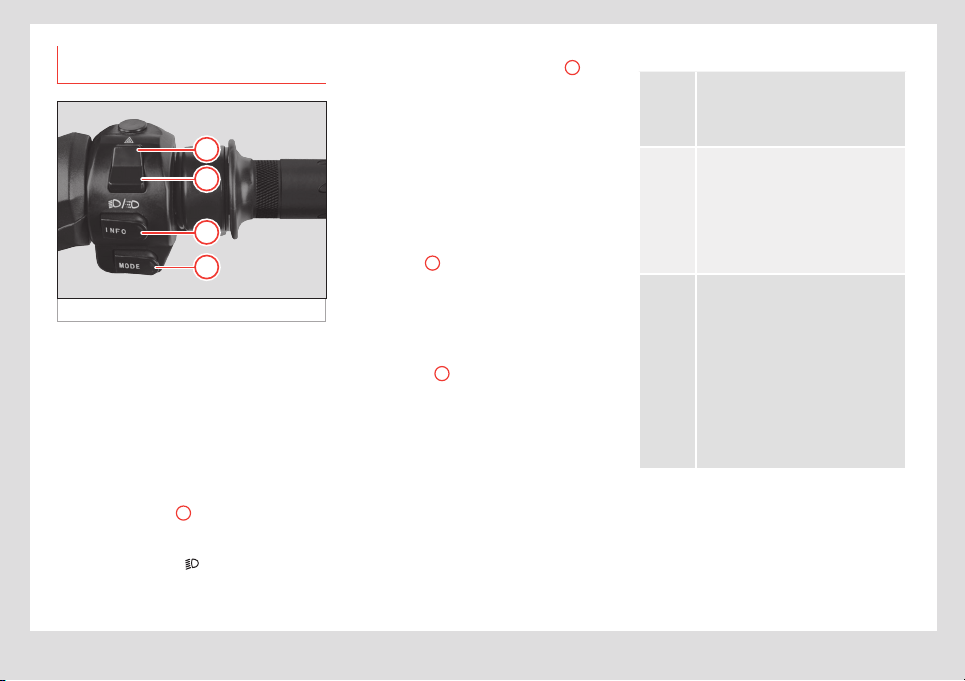
Controls on the left side of the
handlebar
Main beam/flash light selector
Fig. 16 Lamps
1
2
• Position
1
: flash (when pressed down, it
returns to the rest position by itself). Allows
you to flash your high beams to warn other
drivers on the road.
• Position
2
: main beam headlight (switch
remains in the position
2
). To switch on the
high beam, hold down the lever at the top.
In any case, the blue indicator lamp
will
remain lit up on the instrument cluster while
the main beam lights are switched on:
Turn signal selector
• To turn on the turn signals, move the selec-
tor switch right to signal a turn to the right,
and to the left to signal a turn to the left.
• Press the white central button to reset the
position of the selector switch and switch the
indicators o.
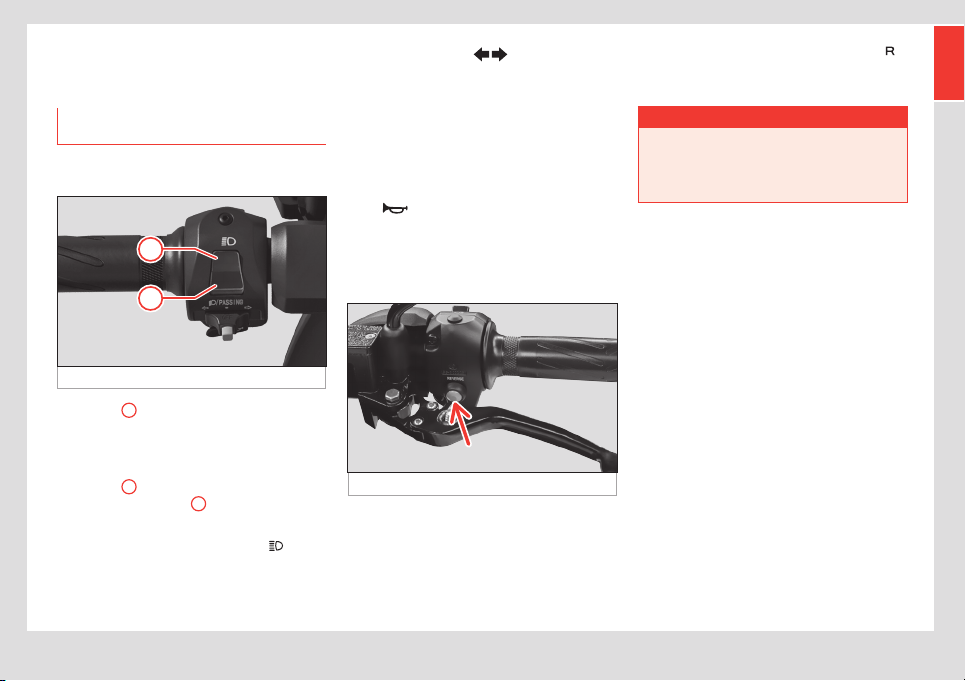
Horn
Press the button with the horn symbol to
sound the horn.
Reverse switch
Fig. 17 Reverse button
The eScooter has a reverse gear. To use
this function, press the button shown on the
image, behind the left hand brake handle
››› Fig. 17 (arrow) and accelerate smoothly
while pressing it down. The indicator lamp
will light up on the instrument cluster and an
intermittent sound will be heard.
¬ WARNING
Be careful, especially the first time you use
reverse gear.
• This helps you manoeuvre while parking
or to reverse out of a parking spot.
22
eScooter controls and driving
Controls on the right side of the
handlebar
Fig. 18 Right hand side of the handlebar
2
1
A
B
Accelerator
• To speed up, rotate the accelerator control
downwards.
• To go back to the neutral position, release
the accelerator.
Dipped beam / warning light selector
• To switch on the dipped beam, move the
selector to position
1
(when it is pressed
down, it returns to the rest position by itself).
Whenever these lights are switched on, the
green indicator lamp
on the instrument
cluster will show this.
• To switch on the emergency (hazard)
lights, move the selector to position
2
(the
button returns to the rest position). Switches
on and o the indicator lights on both sides at
the same time.
You can switch on your hazard lights and
leave them on even after taking the key out
of the eScooter. To do so, switch them on with
the key in and then remove it. After they have
been switched o, they can’t be switched on
again without putting the key back in.
INFO button
A
This button is a duplicate of the INFO button
on the instrument cluster and has the same
functionality ››› page15, Instrument
panel.
MODE button
B
Mode selector: this eScooter has three dif-
ferent driving modes, which can be selected
using the MODE button.
These are:
ECO
“E”
This mode is for more relaxed driving,
with limited speed and acceleration.
It gives the vehicle a longer range.
The full regenerative brake is used.
CITY
“C”
The vehicle has been designed to
drive regularly in CITY “C” mode.
This gives it good performance and
balanced consumption. This is the
default mode when you switch on the
eScooter. It includes limited use of
the regenerative brake.
SPORT
“S”
This driving mode gives you more
power and speed at specific mo-
ments. Frequent use of the SPORT
mode decreases the eScooter’s
range (kilometres it can travel with
a full charge) as it uses more power
and can raise the temperature of the
engine/battery, which could have a
negative eect on performance or
cause the eScooter to shut o. The
full regenerative brake is used.
23
eScooter controls and driving
EN
The top speed for each mode is:
Top speed
ECO 40 mph (64 km/h)
CITY 50 mph (80 km/h)
SPORT 59 mph (95 km/h)
SPORT mode is only available when the
following conditions are met:
• Battery state of charge (SoC): > 20 %
• Battery temperature: < 113 °F (45 °C)
• Motor temperature: < 221 °F (105 °C)
• Inverter temperature: < 158 °F (70 °C)
The current driving mode is shown on the
instrument cluster display ››› page16.
Single click to switch between ECO, CITY and
SPORT modes in the following order:
C-S-C-E-C-S-C-…
When switching between modes, the name
of the next mode will flash on screen for a
few seconds and will stop flashing when it
is chosen. This way, you can jump 3 modes
without having to activate the next mode in
the sequence.
Note
You can go straight from SPORT to CITY.
To go from any mode to ECO, however,
you have to be driving under 55 km/h. For
safety reasons, power will be limited in any
of the following cases:
• Battery temperature: ≥ 113 °F (45 °C)
• Motor temperature: ≥ 230 °F (110 °C)
• Inverter temperature: ≥ 158 °F (70 °C)
Note
If the battery exceeds 140 °F (60 °C), the
eScooter will gradually slow down until it
stops. (before reaching this situation, the
power reduction will be gradual).
Combined brake and regenerative
brake
Fig. 19 Brake lever
A
B
The eScooter is equipped with a combined
brake system that works as follows:
The right brake lever activates a mechanical
break on the front wheel (disc brake) and
the regenerative brake (electronic) on the
rear wheel. The left brake lever activates a
mechanical break on both the front and rear
wheels (both disc brakes through the brake
distributor).
The first part of the front brake lever acti-
vates only the regenerative brake, so it can
be used without activating the mechanical
brake (front disc brake). Then both brakes are
activated together. Using the regenerative
brake helps braking while maintaining the
battery charge.
24
eScooter controls and driving
How to brake with the regenerative brake:
• During the first part of the front brake
lever’s travel (right hand side) ››› Fig. 19
A
,
the regenerative brake operates. This system
brakes the rear wheel electronically and
regenerates energy in the battery.
• If you continue pressing the brake lever ›››
Fig. 19
B
the mechanical brake on the front
wheel will also be activated. Greater pressure
will increase the power of the mechanical
brake.
The regenerative brake that is applied de-
pends on the selected driving mode (see ›››
page22, MODE button).
Ignition
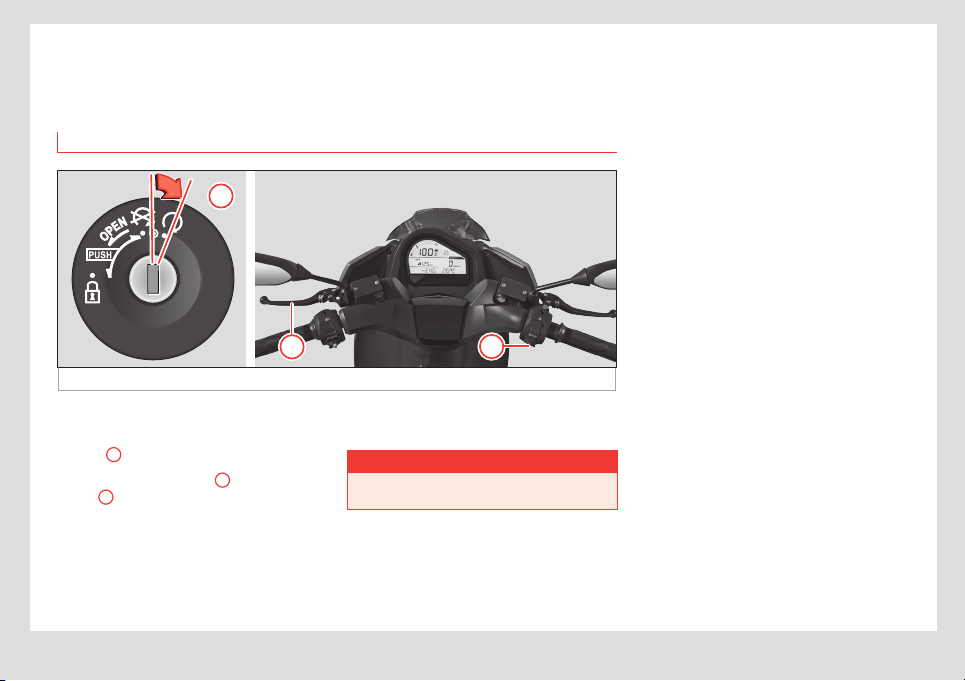
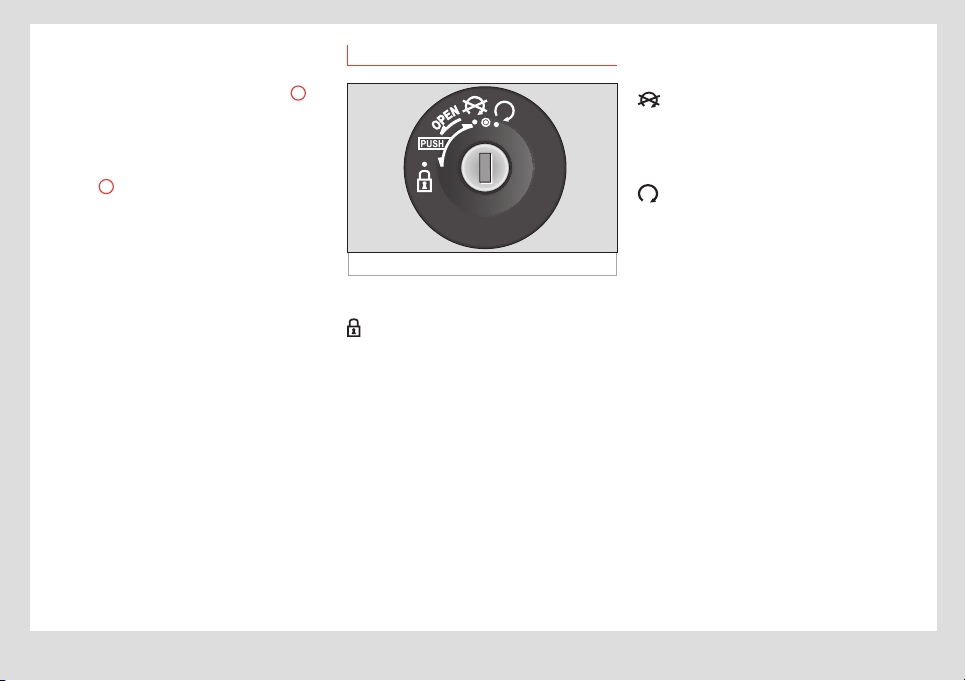
Fig. 20 Ignition lock
Positions:
Steering lock
• Turn the handlebar all the way to the left.
• Put the key in, press it in and turn it to the
left.
Now all the functions are blocked and the
eScooter’s movements are very restricted.
Open the seat
• Turn the key to the left (without pressing
inwards). The seat lock will release.
• You can also open it by pressing both brake
levers at the same time, while the side stand
is down.
To close the seat, push it down from the rear
until you hear the click of the lock.
Switching o / unlocking the steering
All the functions are deactivated but the
handlebar is not locked (the eScooter can be
moved). You can work on the eScooter safely.
Ignition
All functions are ready to be used. The key
cannot be removed in this position.
25
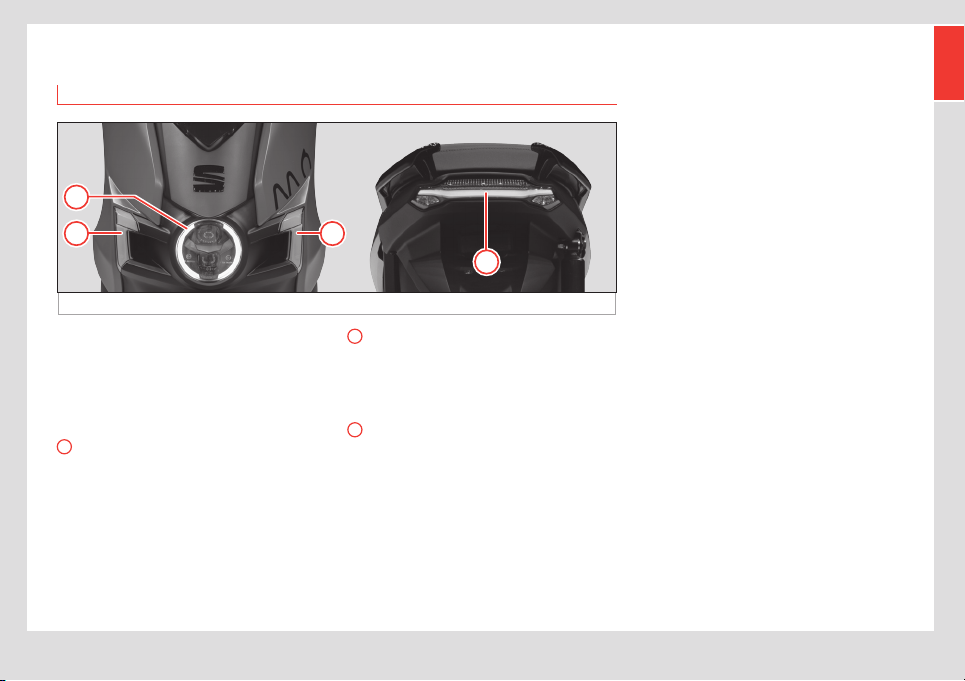
Lights and visibility
EN
Lights and visibility
Lights
Fig. 21 Lights
A
BB
C
All of the lighting on this eScooter is based on
LED technology, including indicators, side-
lights, brake lights, main and dipped beams.
There are no lightbulbs to change.
The various lighting groups are:
A
Front lamp
Includes main and dipped beams, and side-
lights.
B
Front sidelights / turn signals
On either side of the front lamp, there is an
LED group used for the front sidelights and
indicator lights.
C
Rear lights
On the back of the eScooter, there are rear
sidelights, brake lights and rear indicator
lights.
26
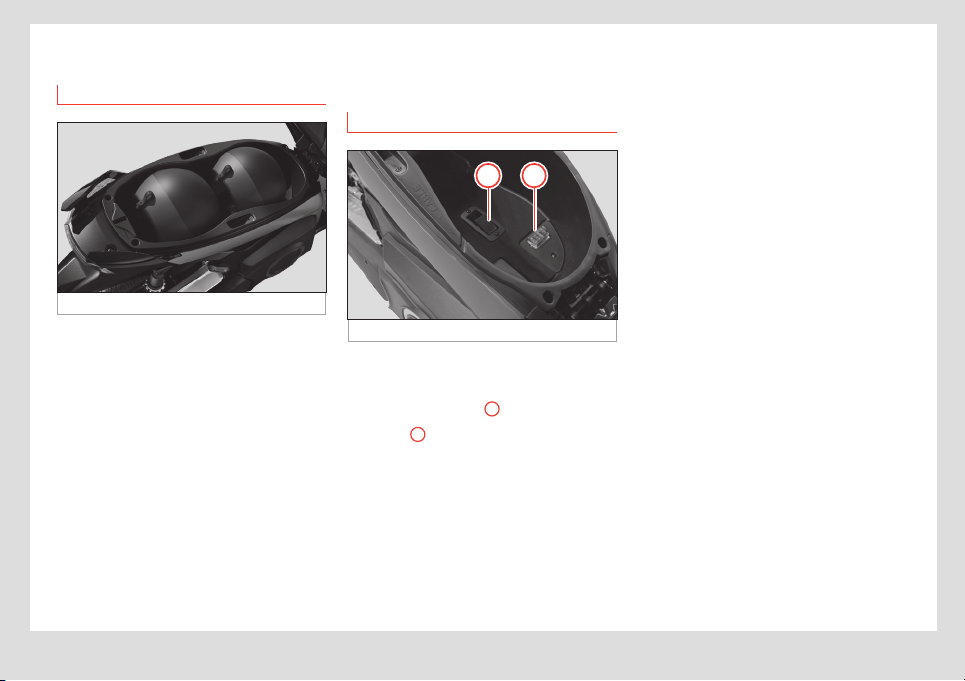
Saddle
Saddle
Open and close seat
Fig. 22 Seat interior
Your eScooter’s seat has room for the driver
and one passenger, plus a large inner com-
partment with enough space for 2 helmets.
Under seat compartment
There are 2 ways to open this compartment:
• Using the key: insert the key into the igni-
tion keyhole, turn to the left and then pull the
seat upwards (see section ››› page24,
Ignition).
• Manually: By pressing both brake levers at
the same time with the side stand in its down
position.
To lock the seat, push it down until the latch
clicks. Make sure it is locked Secure this lock
before moving o.
Seat interior
Fig. 23 Seat interior
A B
The following elements are found inside the
compartment:
• Battery release latch
A
››› page31.
• Fusebox
B
››› page13
• OBD (diagnosis) connector.
27
Stands
EN
Stands
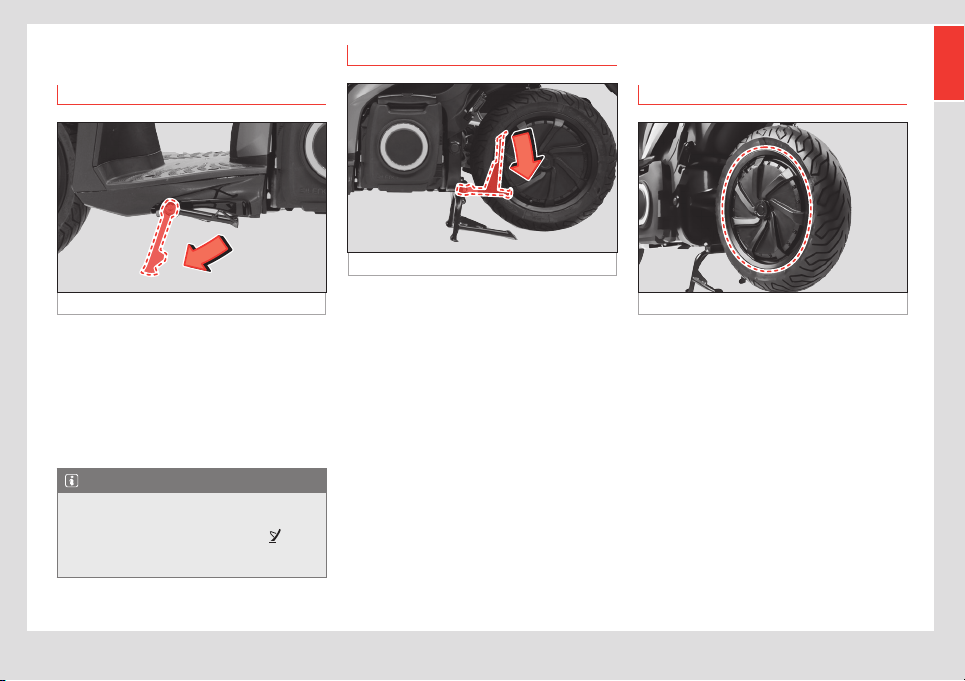
Side stand
Fig. 24 Side stand
The side stand is on the left side of the
eScooter. To lower the stand, press the “U”
shaped leg that protrudes from the stand
downwards.
The side stand should be used when the
ground is too unstable or on a slight incline,
making it impossible to use the centre stand.
Note
The side stand has a sensor that prevents
the scooter from being driven when it is
deployed. When it is deployed, the
indicator light comes on the instrument
cluster comes on.
Centre stand
Fig. 25 Centre stand
The centre stand is at the bottom of the
eScooter. This stand supports the eScooter in
a vertical position.
To put the eScooter on this stand, push the
leg down with your foot while pushing or
pulling the eScooter gently up or down.
The central stand should be used when the
ground is stable or flat, and for long parking
periods or servicing.
Motor
Motor (rear wheel)
Fig. 26 Motor (rear wheel)
The rear wheel of the eScooter houses a
100% electric motor with brushless technolo-
gy (HUB), direct transmission and an air-cool-
ing system.
Its nominal power is 7,000W (L3e homologa-
tion) and it has a maximum speed of 59 mph
(95 km/h).
28
Battery pack
Battery
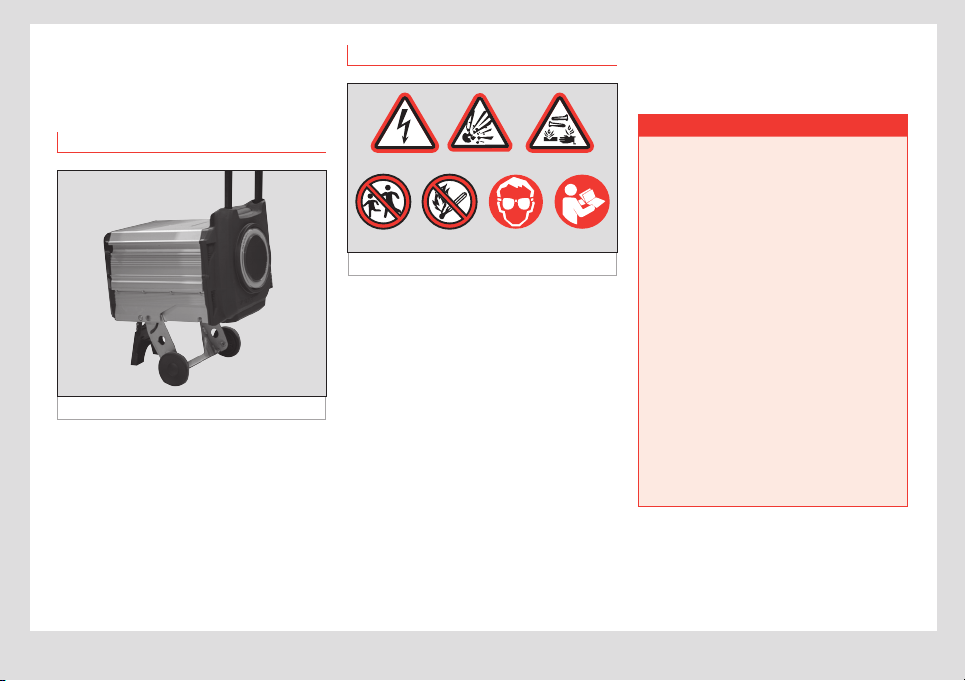
Battery pack
Introduction
Fig. 27 Removable battery
The eScooter has an innovative removable
battery pack with a handle and wheels so it
can be transported like a trolley. This way,
you can either charge it on the eScooter or
wherever you want, by taking the battery to
an electrical socket.
Plus, this battery pack can be used on other
scooters, or even used to power other de-
vices.
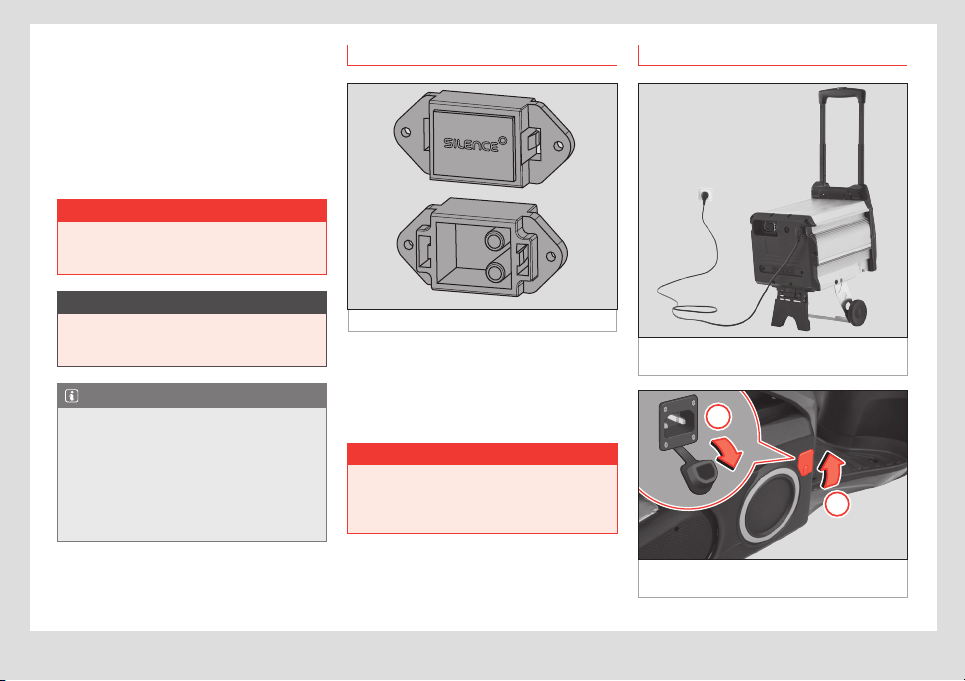
Safety instructions
Fig. 28 Warning signs
The battery can be VERY DANGEROUS when
not on the eScooter.
The battery must be transported in accord-
ance with all applicable laws.
To avoid injuries, burns or electric discharges:
• Never dismantle the battery unit or remove
its covers. This should only be done by
authorized personnel.
• Keep children away from this part of the
eScooter.
• Do not pierce or hit this area when using
elevators, expose it to flames, incinerate, or
expose to liquids, since creating excess heat
can cause a fire and can be very dangerous.
Qualified authorized personnel
Make sure that you read the workshop manu-
al before repairing or replacing the battery.
¬ WARNING
• The battery should always be moved on
its wheels, slowly (max. 3km/h), slower
than the average person walks.
• Avoid mistreating the battery, including
hitting or bouncing it, rolling it over cobble-
stones, stairs or holes, or dropping it (down
stairs, for example), as this could cause it
to catch fire. Avoid all contact with water.
• If there is any indication or you suspect
the Battery Pack has been used incorrectly
or has been dropped, do not plug it in
and call an Ocial Service or specialist
workshop.
• A battery fire can be put out with water
or CO
2
unless the battery is plugged in or
near other batteries. In this case, use a CO
2
extinguisher to put out the fire and take it
to a safer, more isolated location (at least
15m from any exposure: other vehicles,
batteries, etc.). Once in a secure location,
call the emergency services so they can
take control of the situation.
29
Battery pack
EN
¬ WARNING
Never open the battery housing. It can
be very dangerous and completely voids
the warranty. Only authorized personnel
should work on the battery housing.
¬ WARNING
If smoke starts to come out of the battery,
call the fire service urgently and take it out
of any enclosed space.
• The vehicle cannot explode, so there is
no problem with transporting it to a safe
location.
For the sake of the environment
Consult an Ocial Dealer or visit your
Technical Service before replacing and
discarding the battery.
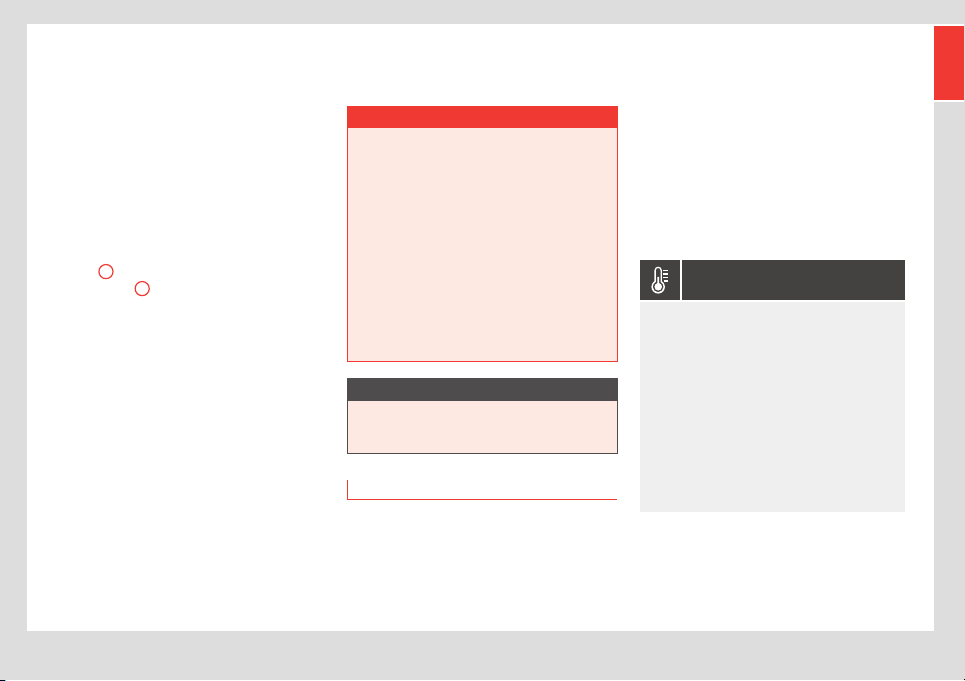
Battery Pack Components
In addition to its basic internal systems, the
removable battery pack has the following
elements:
Trolley removable battery system
This system includes an extendible handle,
two wheels and a support base (to use on
flat, horizontal surfaces). To find out more
about how to remove it from the eScooter,
please see section ››› page31, Remov-
ing the Battery Pack.
Internal charger
Fig. 29 Internal charger
The 600 W internal charger allows the bat-
tery to be charged both inside and outside
the eScooter from any conventional plug
socket using a Schuko-IEC power cable ›››
page32, Connecting charging unit.
30
Battery pack
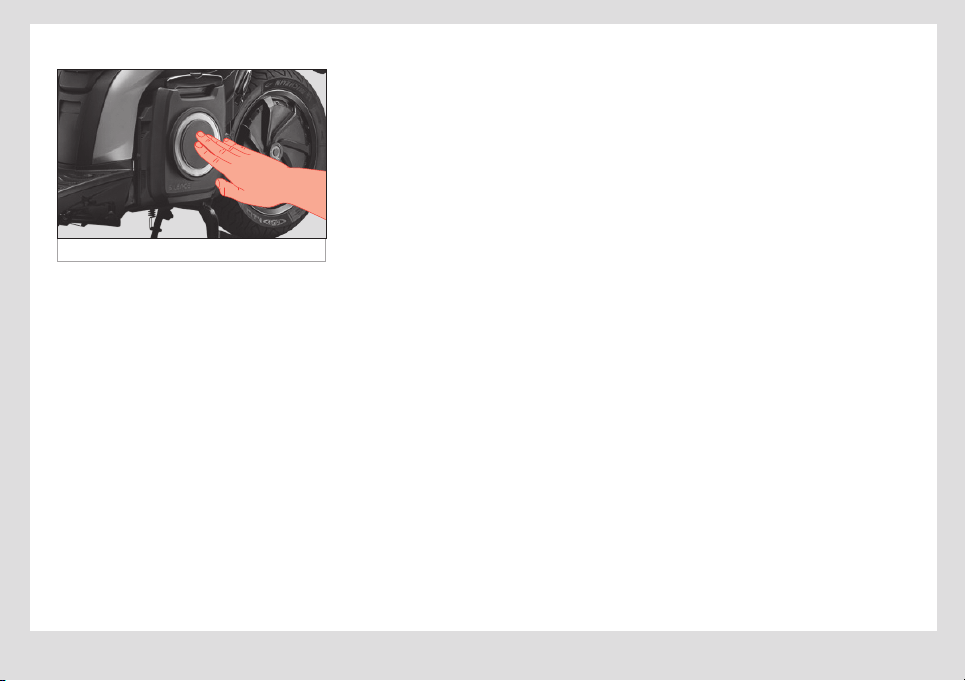
Light ring
Fig. 30 Light ring
Information on the battery charge level is
available whether or not the battery is in the
eScooter, on an LED light ring on one side of
the battery pack.
Tap the inside of the ring to display the fol-
lowing information:
• Not charging: tapping the centre of the
ring displays moving ORANGE and WHITE
light trails. Next the remaining charge
percentage will be shown by a section lit up
in ORANGE (or the entire ring, if the battery is
100% charged). When the battery charge is
low, the entire ring will be lit up in YELLOW.
• Charging: while the battery is charging,
an ORANGE light trail moving around the
ring will alternate with a portion of the ring lit
up, showing the percentage of the battery
charged. When it reaches 100%, the entire
ring will be lit up ORANGE with a WHITE trail
moving around the ring while it remains
plugged in.
If the eScooter ignition is on, the ring will not
light up under any circumstances.
31
Battery pack
EN
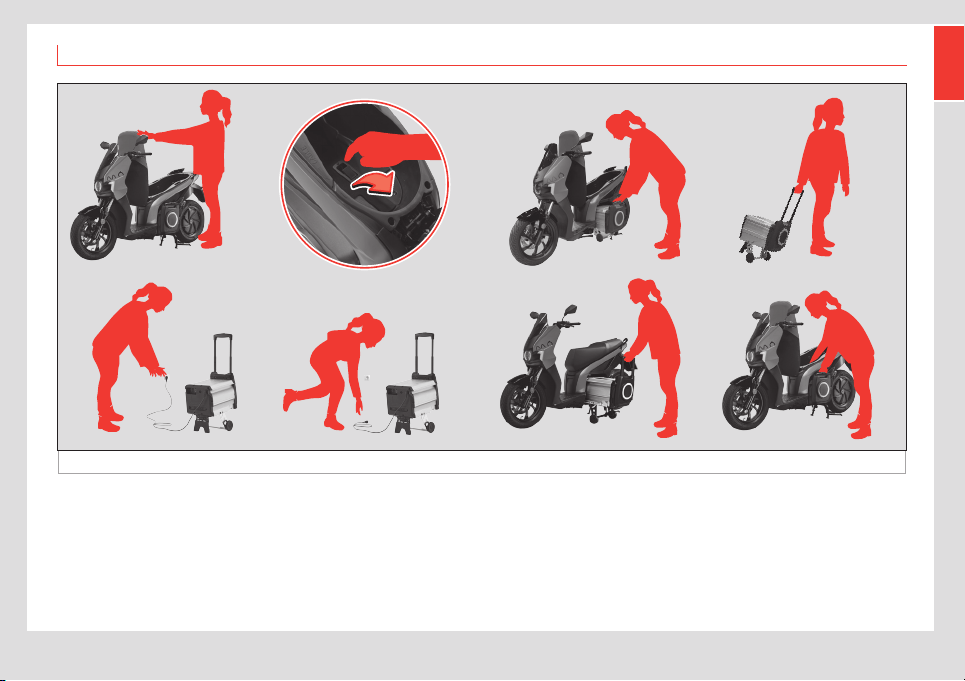
Removing the Battery Pack
Fig. 31 Removing the battery
Follow these steps to remove the battery
pack easily in just seconds (with the
eScooter on the centre stand):
• Open the seat with the key or by squeezing
the 2 brake levers.
• Operate the lever.
• Remove the Battery Pack.
• Transport the Battery Pack.
• Plug it into any socket.
• Once charged, unplug it.
• Transport and insert the Battery Pack into
the eScooter.
• Make sure the battery is secure.
32
Battery pack
The wheels and base of the pack slide out
and fold up automatically when it is removed
or inserted into the eScooter, respectively.
Nevertheless, it is your responsibility to do this
slowly and make sure the wheels and base
deploy correctly, and that when putting it
back in, it is properly anchored (check before
driving).
¬ WARNING
Never remove or insert the battery pack
when the eScooter is charging or with the
ignition switched on.
O CAUTION
Do not unfold the handle before pulling
the pack out. Unfold the handle once the
battery is away from the eScooter.
Note
When the battery does not make good
contact with the eScooter, the following
message is displayed on the instrument
cluster:
BATT OUT
When connected correctly, the usual
information is displayed.
Connector
Fig. 32 Connector cap
Whenever the battery is not in the eScooter,
the eScooter’s (Multicontact) connector must
be covered with the rubber cap designed for
this purpose. Its purpose is to protect it while
the battery is disconnected.
¬ WARNING
Do not put the protective cap on while the
eScooter is plugged in and never allow
the connector to get wet (even with the
cap on).
Connecting charging unit
Fig. 33 Rear of the Battery Pack: charging
socket
Fig. 34 Right hand side of the eScooter:
charging socket
1
2
33
Battery pack
EN
The eScooter battery can be charged both
on the eScooter and separately.
In either case, both the eScooter and the bat-
tery have an IEC male contact for the power
cable. The cable has an IEC socket contact
and a Schuko contact and is normally stored
in the compartment under the seat, where the
male power contact point is located.
The IEC socket in found on the rear of the
battery ››› Fig. 33 and on the right hand side
of the eScooter ››› Fig. 34. To access
theconnector, lift up the rubber cover
(arrow
1
) and then the connector’s rubber
cover (arrow
2
).
The charger (600W) is part of the battery
pack, so all you need to charge the battery is
a power point and the cable. It uses convec-
tion cooling.
• To connect, first plug in the IEC connector
(eScooter or the battery) and then plug into
the mains. It is important to fully charge the
battery after it has been partially used 3 or
4 times.
• To disconnect, first unplug from the mains
and then from the IEC connector. The charg-
ing process can be stopped at any time. Plus,
the control system will stop charging the
battery when it is at 100%.
If the battery temperature is under 32°F (0°C)
or over 122°F (50°C) (due to improper use), it
will not charge.
¬ WARNING
The battery must be charged completely
once every 30 days to keep the warranty
valid.
• To keep the battery’s warranty valid, you
must fully charge the battery (to 100%) at
least once a month. If you know you won’t
be using it for a long time, it is very impor-
tant to leave it with sucient charge to
ensure that it does not reach critical levels.
Batteries that fall below a certain level
of voltage no longer work on their own,
meaning they cannot be charged and must
be taken to an ocial technical service or
specialist workshop.
O CAUTION
Before inserting or removing the battery
pack, ensure that the eScooter isn’t charg-
ing and that the ignition is o.
Temperature
This eScooter has a cell voltage and temper-
ature stabilisation system. To avoid critical
situations, the safety systems limit battery use
if the cell temperature is above safe levels
due to overheating.
• The battery can be used between 14°F
(-10°C) and 122°F (50°C). The performance
of the lithium cells may vary depending on
the temperature.
• The charger won’t charge the battery if
the cell temperature is below 32°F (0°C) or
above 122°F (50°C).
• The current battery temperature is shown
on the eScooter display. If any of the limits
are exceeded (upper or lower, warning or
failure), the following light will come on:
Temperature display
This blinks if any part is near its maximum allow-
able temperature. It stays on without blinking
when it is over the maximum temperature.
Motor: 212 °F (100 °C) flashing
230 °F (110 °C) always on.
Controller: 158 °F (70 °C) flashing,
167 °F (75 °C) always on.
Battery: 122 °F (50 °C) flashing,
140 °F (60 °C) always on /
41 °F (5 °C) flashing,
14 °F (–10 °C) always on.

34
Battery pack
Take the following actions, depending on the
situation:
• Low temperature: Below 32°F (0°C) the
battery does not work in optimal conditions,
we recommend using your eScooter at
temperatures above 32°F (0°C).
• High temperature: Due to extensive use
the battery cannot deliver more power. Avoid
Sport mode and stop the vehicle if it needs to
cool down.
State of charge indicator in %
(SoC)
To obtain as precise a reading as possible for
the state of charge (SoC, as a %), the battery
charging process to 100% must be complet-
ed (at least after 3 or 4 partial charges).
Range
The range of an electric vehicle is the dis-
tance it can travel on a single charge of the
battery.
This is influenced by many factors, including
driving style, load and distribution, tyre pres-
sure and weather conditions, such as wind,
which can decrease the range.
The display shows the estimated number
of kilometres (or miles) of range left. This is
approximate and depends on driving style
and current use of power.
Power Battery Pack Useful Life
Once the useful life cycle of the eScooter’s
battery pack is over, you can deliver it to an
authorized SEAT service for proper process-
ing, thus reducing its environmental impact.
Inform your nearest SEAT service so that it
can pick up and subsequently recycle the
battery.
35
Battery pack
EN
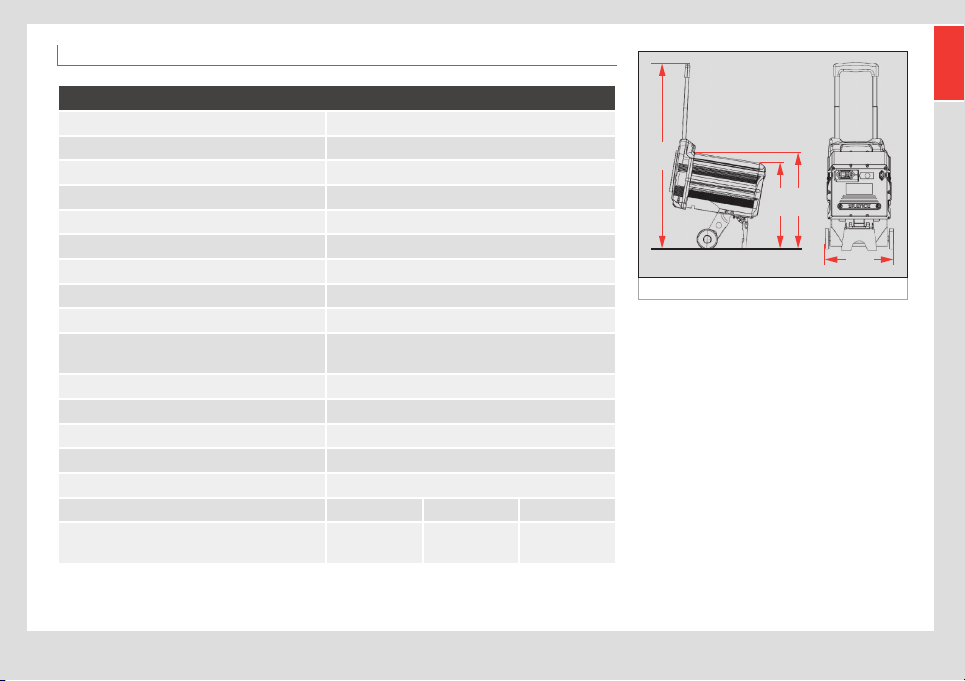
Battery and charger specifications
Battery specifications
Nominal charge 5.6 kWh
Chemistry of the cells Lithium-ion cells
Weight 41kg
Height unfolded 870mm
Housing height 270mm
Wheel width 330mm
Housing depth 440mm
Nominal voltage of the battery 51VDC
Storage temperature without charging -4°F (-20°C) to 176°F (80°C) max.
Operating temperature
32°F (0°C) to 122°F (50°C) (charging)
14°F (–10°C) to 140°F (60°C) (discharging)
Housing material Aluminium and polycarbonate PC
Maximum charge power 35A
Maximum discharge power 250A
Charger type Onboard 90-240 VAC; 600 W
Standard charge time 6-8h
Modes Eco City Sport
Maximum driving distance
85 miles
(137km)
65 miles
(104km)
51 miles
(82km)
Fig. 35 Battery dimensions
870
410
450
330

36
Maintenance schedule
Maintenance
Maintenance schedule
Work to perform
As with any other vehicle on the road, regu-
lar maintenance and inspection is required
before each use.
This is the only way to ensure the safety of
the driver and other road users, while also
guaranteeing an optimal experience with the
eScooter.
Always take your eScooter to a SEAT Ocial
Service Centre for maintenance work, as
they know your eScooter best and have the
right tools to diagnose and repair it.
However, there are some things you can (and
should) check yourself, such as tyre pressure,
brake fluid, etc.
¬ WARNING
• These instructions have been written on
the assumption that the eScooter is used
exclusively in an urban environment. If you
will use it for a purpose other than that for
which it was intended or drive steadily at
a high speed or in overly damp or dusty
conditions, you will have to service the
eScooter more often.
• If the eScooter is involved in an accident,
get a SEAT Ocial Service or a specialist
workshop to inspect the main components.
• Failure to properly maintain the eScooter,
follow instructions or solve a problem be-
fore driving could cause a serious accident.
Always follow this schedule and any advice
from your SEAT distributor.
• There are some basic operations you
may be able to do on your own (the same
ones you would do for a eScooter with a
combustion engine, such as changing the
brake pads). Only you can decide if you are
capable and, therefore, whether or not you
should do these tasks yourself.
• Always read the instructions before
starting and make sure you have all the
materials you need and a clear idea of
what you are going to do.
• Use the centre stand for any operations,
always on a flat, hard horizontal surface.
• Always switch the eScooter o and
remove the keys before carrying out any
operations (unless indicated otherwise
in the instructions) to avoid starting it
accidentally and having an accident with
the motor running.
• Take care with hot parts, particularly the
brake discs if you have been driving your
eScooter recently. Let them cool down first.

37
Maintenance schedule
EN
Operations and frequency
Zone What to do Frequency
Painted parts Clean with shine restorer. Monthly
Rubber parts Clean with special rubber protection products. Monthly
Aluminium parts
Clean with protective spray to prevent rusting.
Remove any rust on the aluminium carefully with steel wool and
soap.
Weekly
Metal parts Use oil to clean and grease the metal parts. Monthly
Saddle Clean with a soft sponge to remove any insects or grime. Every day used
Instrument panel Clean o hardened dirt with a soft sponge. As needed
Tyres
Make sure that the pressure is as indicated in section ›››
page42, Technical specifications.
Weekly
Lights Clean o hardened dirt with a soft sponge. As needed
Screen Clean with a soft sponge to remove insects or grime. Every day used

38
eScooter conservation
eScooter conservation
Cleaning and storage (guide for
storing the vehicle)
Cleaning
Clean the eScooter as indicated in the
previous sections. As with any vehicle, the
eScooter must be cleaned regularly to keep it
in good condition.
It is the user’s responsibility to properly
protect the eScooter from aggressive con-
taminants in the air and the eects of salt on
the roads.
O CAUTION
• Do not clean the battery with a lot of
water or a high-pressure washer.
• Never use harsh detergents on the
eScooter.
• Try to find gentle cleaning products
for the vehicle that are environmentally
friendly.
• When you dry your eScooter, always
use a clean cloth. Dirty cloths can scratch
the flat, shiny surfaces and clean ones will
reduce scratching.
• Never use rough cloths or sponges.
Storage
If you won’t be using your eScooter for a
long period of time, read and follow these
procedures:
• Clean the eScooter and let it dry fully
before putting it away. Any water or damp-
ness could cause problems in the electronic
components.
• Put the eScooter up on its central stand.
• Check the eScooter to make sure there
haven’t been any problems in the past.
• A cover will protect your eScooter from the
elements and is a good investment.
• Put some type of protection on the floor
to protect it from any drips and prevent
damage.
39
Warranty
EN
Warranty
Delivery to the buyer
Fig. 36 Important documentation
VIN (vehicle identification number)
Full name . . . . . . . . . . . . . . . . . . . . . . . . . . . . . . . . . . . . . . . . . .
Street . . . . . . . . . . . . . . . . . . . . . . . . . . . . . . . . . . . . . . . . . . . . . .
City . . . . . . . . . . . . . . . . . . . . . . . . . . . . . . . . . . . . . . . . . . . . . . . .
Postcode . . . . . . . . . . . . . . . . . . . . . . . . . . . . . . . . . . . . . . . . . . .
Country . . . . . . . . . . . . . . . . . . . . . . . . . . . . . . . . . . . . . . . . . . . .
Phone / Mobile . . . . . . . . . . . . . . . . . . . . . . . . . . . . . . . . . . . . .
e-mail . . . . . . . . . . . . . . . . . . . . . . . . . . . . . . . . . . . . . . . . . . . . . .
Delivery date
Distributor Number
This document serves as a basis for process-
ing warranty requests.
Note
Warranty requests cannot be processed
if documents have not been completed or
are incomplete.
Warranty conditions (grounds for
the warranty being voided)
The vehicle has a 2 year design and
manufacturing warranty counted from the
delivery and reception date.
Natural wear due to use of wear parts, such
as tires, brake discs, brake pads, is not includ-
ed in the warranty. The manufacturer and the
designated garage will decide which defec-
tive parts will be replaced or repaired.
There is NO right to the warranty if:
a) If the fault is related to maintenance or
a repair made outside the Ocial SEAT
service network.
b) The vehicle has been modified or
changed in any way, or fitted with parts
that do not form part of the vehicle’s
equipment and are expressly certified by
the manufacturer, if the fault is related to
the modification in question.
c) The vehicle has been used in a sports
competition.
d) The usage, maintenance and service
instructions established in this manual
have not been followed.

40
Inspection work
¬ WARNING
• Regular use: At least once a week, for at
least 10 hours.
• Without regular use: The eScooter should
be fully charged before it is left parked for
more than one week.
The battery must be charged completely
once every 30 days to keep the warranty
valid.
Any agreements that dier from the warran-
ty conditions above must be confirmed in
writing by the manufacturer.
Inspection work
eScooter and battery
The eScooter must pass a series of periodic
inspections, based on the kilometres travelled
or at least once a year (if the eScooter has
not been driven the kilometres necessary to
trigger an inspection within the past year).
The same is true of the battery packs, which
have their own inspection points. For batteries
purchased with the eScooter, the inspections
will be the same as the eScooter and must be
passed at the same time.
The stipulated mileage (km) for both the
eScooter and battery to be serviced is auto-
matically indicated on the eScooter’s display
(the display will show a spanner symbol
to indicate that the eScooter’s number of
kilometres mean that an inspection is due),
as follows:
• first service at 1,000 miles (1,500 km) or
3months,
• second service at 3,000 miles (5,000 km),
• third at 6,000 miles (10,000 km)
• and the next services every 3,000 miles
(5,000 km).
Inspections of the eScooter must be done
within one year of the previous inspection (at
least one per year).
Information on what to inspect is provided
in the corresponding manual/maintenance
plans, for the eScooter and for the battery.

41
eScooter identification
EN
Technical data
eScooter identification
VIN number
Fig. 37 VIN number
The VIN number is an alphanumeric code with
17 digits that identifies your eScooter. The
VIN number is established according to ISO
standards. The VIN number must be given
when ordering replacement parts.
The VIN is engraved directly on the frame, on
the bar of the rear square section on the right
hand side ››› Fig. 37.
Information tag - production
plate
Fig. 38 Information tag
SCUTUM LOGISTIC, S.L.
L3e - A1
dB(A) -
max
min
-1
Kg
320
TYPE: S01A
The eScooter has a tag with the chassis
number, maximum permitted noise, maximum
mass and revolutions per minute.
The tag is on the rear left hand side, oppo-
site the number engraved on the chassis ›››
Fig. 38.

42
Technical specifications
Technical specifications
eScooter specifications (eScooter + motor part)
CHASSIS
Construction
Steel
tubes
MAIN MEASUREMENTS
Total length (mm) 2,026
Total width (mm) 722
Total height (mm) 1,093
Wheelbase (mm) 1,427
Seat height (mm) 780
MASSES
MAM: Maximum Authorised Mass
(kg)
320
MAM front axle (kg) 102
MAM rear axle (kg) 218
Weight of eScooter with battery
(kg)
152
Weight of eScooter without
battery (kg)
111
Battery weight (kg) 41
FRONT WHEEL ASSEMBLY
FRONT WHEEL
Front rim 15”
Front tyre 120/70-15
Front tyre pressure - solo /
with passenger (bar)
1.8 / 2.2
FRONT BRAKE
Type
Disc (hydraulic,
combined)
Diameter (mm) 260
FRONT SUSPENSIONS
Type
Conventional
hydraulic tele-
scopic fork
Travel (mm) 80
REAR WHEEL ASSEMBLY
REAR WHEEL
Rear rim 14”
Rear tyre 140/70-14
Rear tyre pressure - solo /
with passenger (bar)
2.0 / 2.3
REAR BRAKE
Type
Disc (hydraulic,
combined) +
Regenerative
Diameter (mm) 240
REAR SUSPENSION
Type
Single side shock
absorber
Travel (mm) 100

43
Technical specifications
EN
POWERTRAIN
MOTOR
Type
Brushless, on the
wheel. Reversible:
regenerative motor
brake. Reverse gear.
Nominal power (kW) 7
Peak power (kW) 9
Maximum speed of the
eScooter
59 mph (95 km/h)
Ratio power/mass
(kW/kg)
0.046
ENERGY EFFICIENCY
Energy consumption
(Wh/km)
70
Environmental regu-
lations
Euro 5
Range (BP5.6kWh) 85 miles (137 km)

SEAT S.A. is permanently concerned about continuous development of its types and models. For this reason we ask you to understand,
that at any given time, changes regarding shape, equipment and technique may take place on the car delivered. For this reason no
right at all may derive based on the data, drawings and descriptions in this current handbook.
All texts, illustrations and standards in this handbook are based on the status of information at the time of printing. Except for error or
omission, the information included in the current handbook is valid as of the date of closing print.
Re-printing, copying or translating, whether total or partial is not allowed unless SEAT allows it in written form.
SEAT reserves all rights in accordance with the “Copyright” Act.
All rights on changes are reserved.
❀
This paper has been manufactured using bleached non-chlorine cellulose.
© SEAT S.A.
1
EN
Safe driving
Load
The rear top case (if mounted) and the carry
hook have a 3 kg load limit.
Checks before driving
Tyres
Rear tyre
It is very important to respect the rear tyre
pressure, as the motor is hosted inside the
rear wheel.
Controls and driving the
eScooter
Anti-theft mechanism
¬ WARNING
The motor brake is activated as an
anti-theft mechanism, locking the rear
wheel if movement of the eScooter is de-
tected with no key in the ignition (and it has
not been unlocked from the APP), with the
battery installed (according to the version).
Regenerative brake
In some versions, the “CITY” mode will have a
reduced regenerative brake eciency when
compared to other modes or no regenerative
brake. In the latter case, the regenerative
brake will have full eciency in the “SPORT”
and “ECO” modes when the levers are
pressed or a reduced eciency when the
driver stops accelerating.
Battery
Removing the Battery Pack
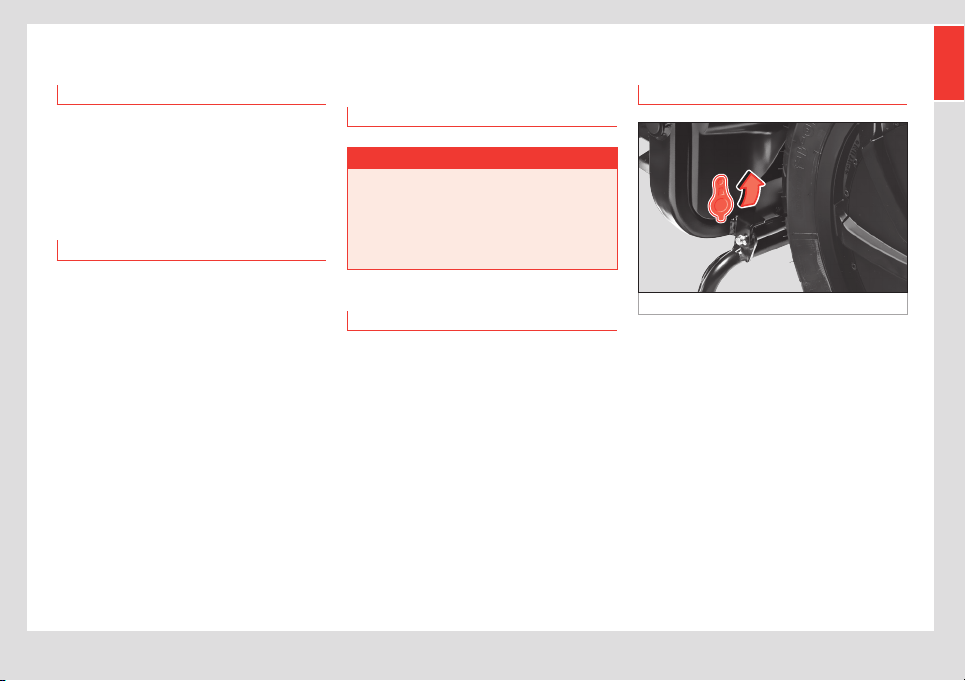
Fig. 1 Left side of the eScooter: safety latch
Safety latch
For greater safety, some versions of the
eScooter feature a latch that prevents the
battery from being removed.
This latch consists of a cylinder that blocks
the battery from being removed; it is fitted in
front of the front wheel and protected by a
rubber cover:
• To operate it, lift the rubber cover and press
it inwards.
• To release it, use the key.

2
Best battery maintenance
practices
The battery’s useful life can be lengthened
by performing the maintenance indicated in
the warranty and following a series of best
practices:
• Avoid using the SPORT mode excessively,
trying to use the CITY mode as much as
possible. This will prevent aggressive driving,
with continued sudden accelerations.
• Do not fully drain the battery and charge
the battery when the charge level is around
25%. This will prevent the battery from going
through full charging cycles, by limiting the
depth of discharge.
• Keep the battery at a temperature of 20-
30°C (making sure that the battery is outside
this range for as little time as possible). When
these temperatures are exceeded (either
above or below), the battery deteriorates at a
faster speed, losing its properties.
Battery specifications
Modes Eco City Sport
Maximum
driving
distance
82 miles
(133km)
64 miles
(104km)
50 miles
(82km)
Inspection
eScooter and battery
The eScooter must be inspected no later
than one year after the last inspection (at
least one per year, the first being carried
out 3 months after purchase).
Technical specifications
Specifications of the eScooter
REAR WHEEL ASSEMBLY
REAR SUSPENSION
Type
Single side shock
absorber (adjustable,
3 positions)
POWERTRAIN
ENERGY EFFICIENCY
Range (BP5.6kWh) 82 miles (133 km)

Owner’s manual
Manual de instrucciones
Betriebsanleitung
Manuel d’instructions
Manuale di istruzioni
Manual de instruções
Instructieboek
Instruktionsbok
SEAT MÓ eScooter 125 (10.20)