Loading ...
Loading ...
Loading ...
22 23
USING YOUR APPLIANCE
To replace the drawer,
1. With the telescopic slides pushed in all the way.
2. Slide the drawer into place over the slides and push
the bin in until it stops. The bin will not be closed all the
way.
3. Open the bin to access the finger tabs at the ends of
the telescopic slides, on each side of the bin. Using
your thumb and forefinger, lift the bin over the end of
the slide and clip in place. If the drawer is not fully
engaged on the slide, it’s possible the drawer won’t
stay on the slide if fully extended.
4. Fully close the bin.
When replacing the drawers after cleaning, we recommend
fitting the lower drawer first.
Wine rack (where fitted)
The wine rack can be used to store various types of bottles
like wine or beer. Bottles should be stored with the bottom
end towards the back of the refrigerator.
Twist ice & serve (where fitted)
Some top mount, bottom mount and single door vertical
freezer models have a twist ice & serve ice cube tray
assembly.
To use, remove the tray, fill with water and place back in
the freezer. Once ice has formed (approximately 3 hours)
simply twist the knob at
the front clockwise until the ice drops into the bin below.
A larger bin is provided in some bottom mount models
along with an ice scoop.
The end of slide must
be clipped into place
SpillSafe™ glass shelves (where fitted)
Spillsafe™ glass shelves
keep spills on the shelf. A
shelf retaining system
minimises accidental
movement of shelves and
they can be adjusted to
various heights. Spillsafe™
glass shelves are not to be
used as slide out shelves. To remove the shelves, gently pull
them forward until the shelf comes clear of the shelf guides.
To return the shelf, make sure there is nothing behind that
may obstruct movement. Gently push the shelf into the
cabinet and back into position.
Bottle Holder (where fitted)
The bottle holder can be
used to store various
types of bottles like wine
or beer. Bottles should be
stored with the bottom
end towards the back of the refrigerator. Selected models
are supplied with a chrome, full-width wine rack.
Freezer drawers
Freezer drawers are fitted to
bottom mount models and
single door all freezer models.
The drawers are mounted on
telescopic extension slides, to
enable full access to the content
in the drawer. Clear plastic
fronts provide easy visibility
of foods.
To remove the drawer for cleaning,
1. Empty food from the drawer.
2. Remove the drawer by pulling it forward and lifting
the front to unhook it from the slides. Once you have
removed the drawer, ensure the slides are pushed back
so they are fully closed.
WARNING
Never close the door while the telescopic slides are
extended. This may damage the slide and/or refrigerator
or cause the slide to become disengaged from the
refrigerator.
USING YOUR APPLIANCE
CARE & MAINTENANCE
Mounting the twist ice & serve to the
other side of the freezer.
Note: this is only possible on Top Mount models.
1. Remove the ice bin and ice cube tray. If the ice tray
assembly is frozen to the carriage, simply squeeze the
tray and shelf together to break the ice.
2. Before you remove the ice carriage, remember to
disengage it from the glass shelf (as shown), as it may
result in damage to the assembly.
3. Remove the centre runner by disengaging it at the front
of the shelf, and removing it from the rear.
4. Refit the runner in to the rear of the shelf on the right
hand side and then engage the front (as shown).
5. Fit the carriage by sliding it into the runners until the
front of the carriage engages with the shelf.
6. Refit the ice tray and ice bin.
Insert into the slot at
the rear of the shelf
Then engage
into the front
of the shelf
5. Fit the carriage by sliding it into the runners until the
front of the carriage engages with the shelf.
6. Refit the ice tray and ice bin.
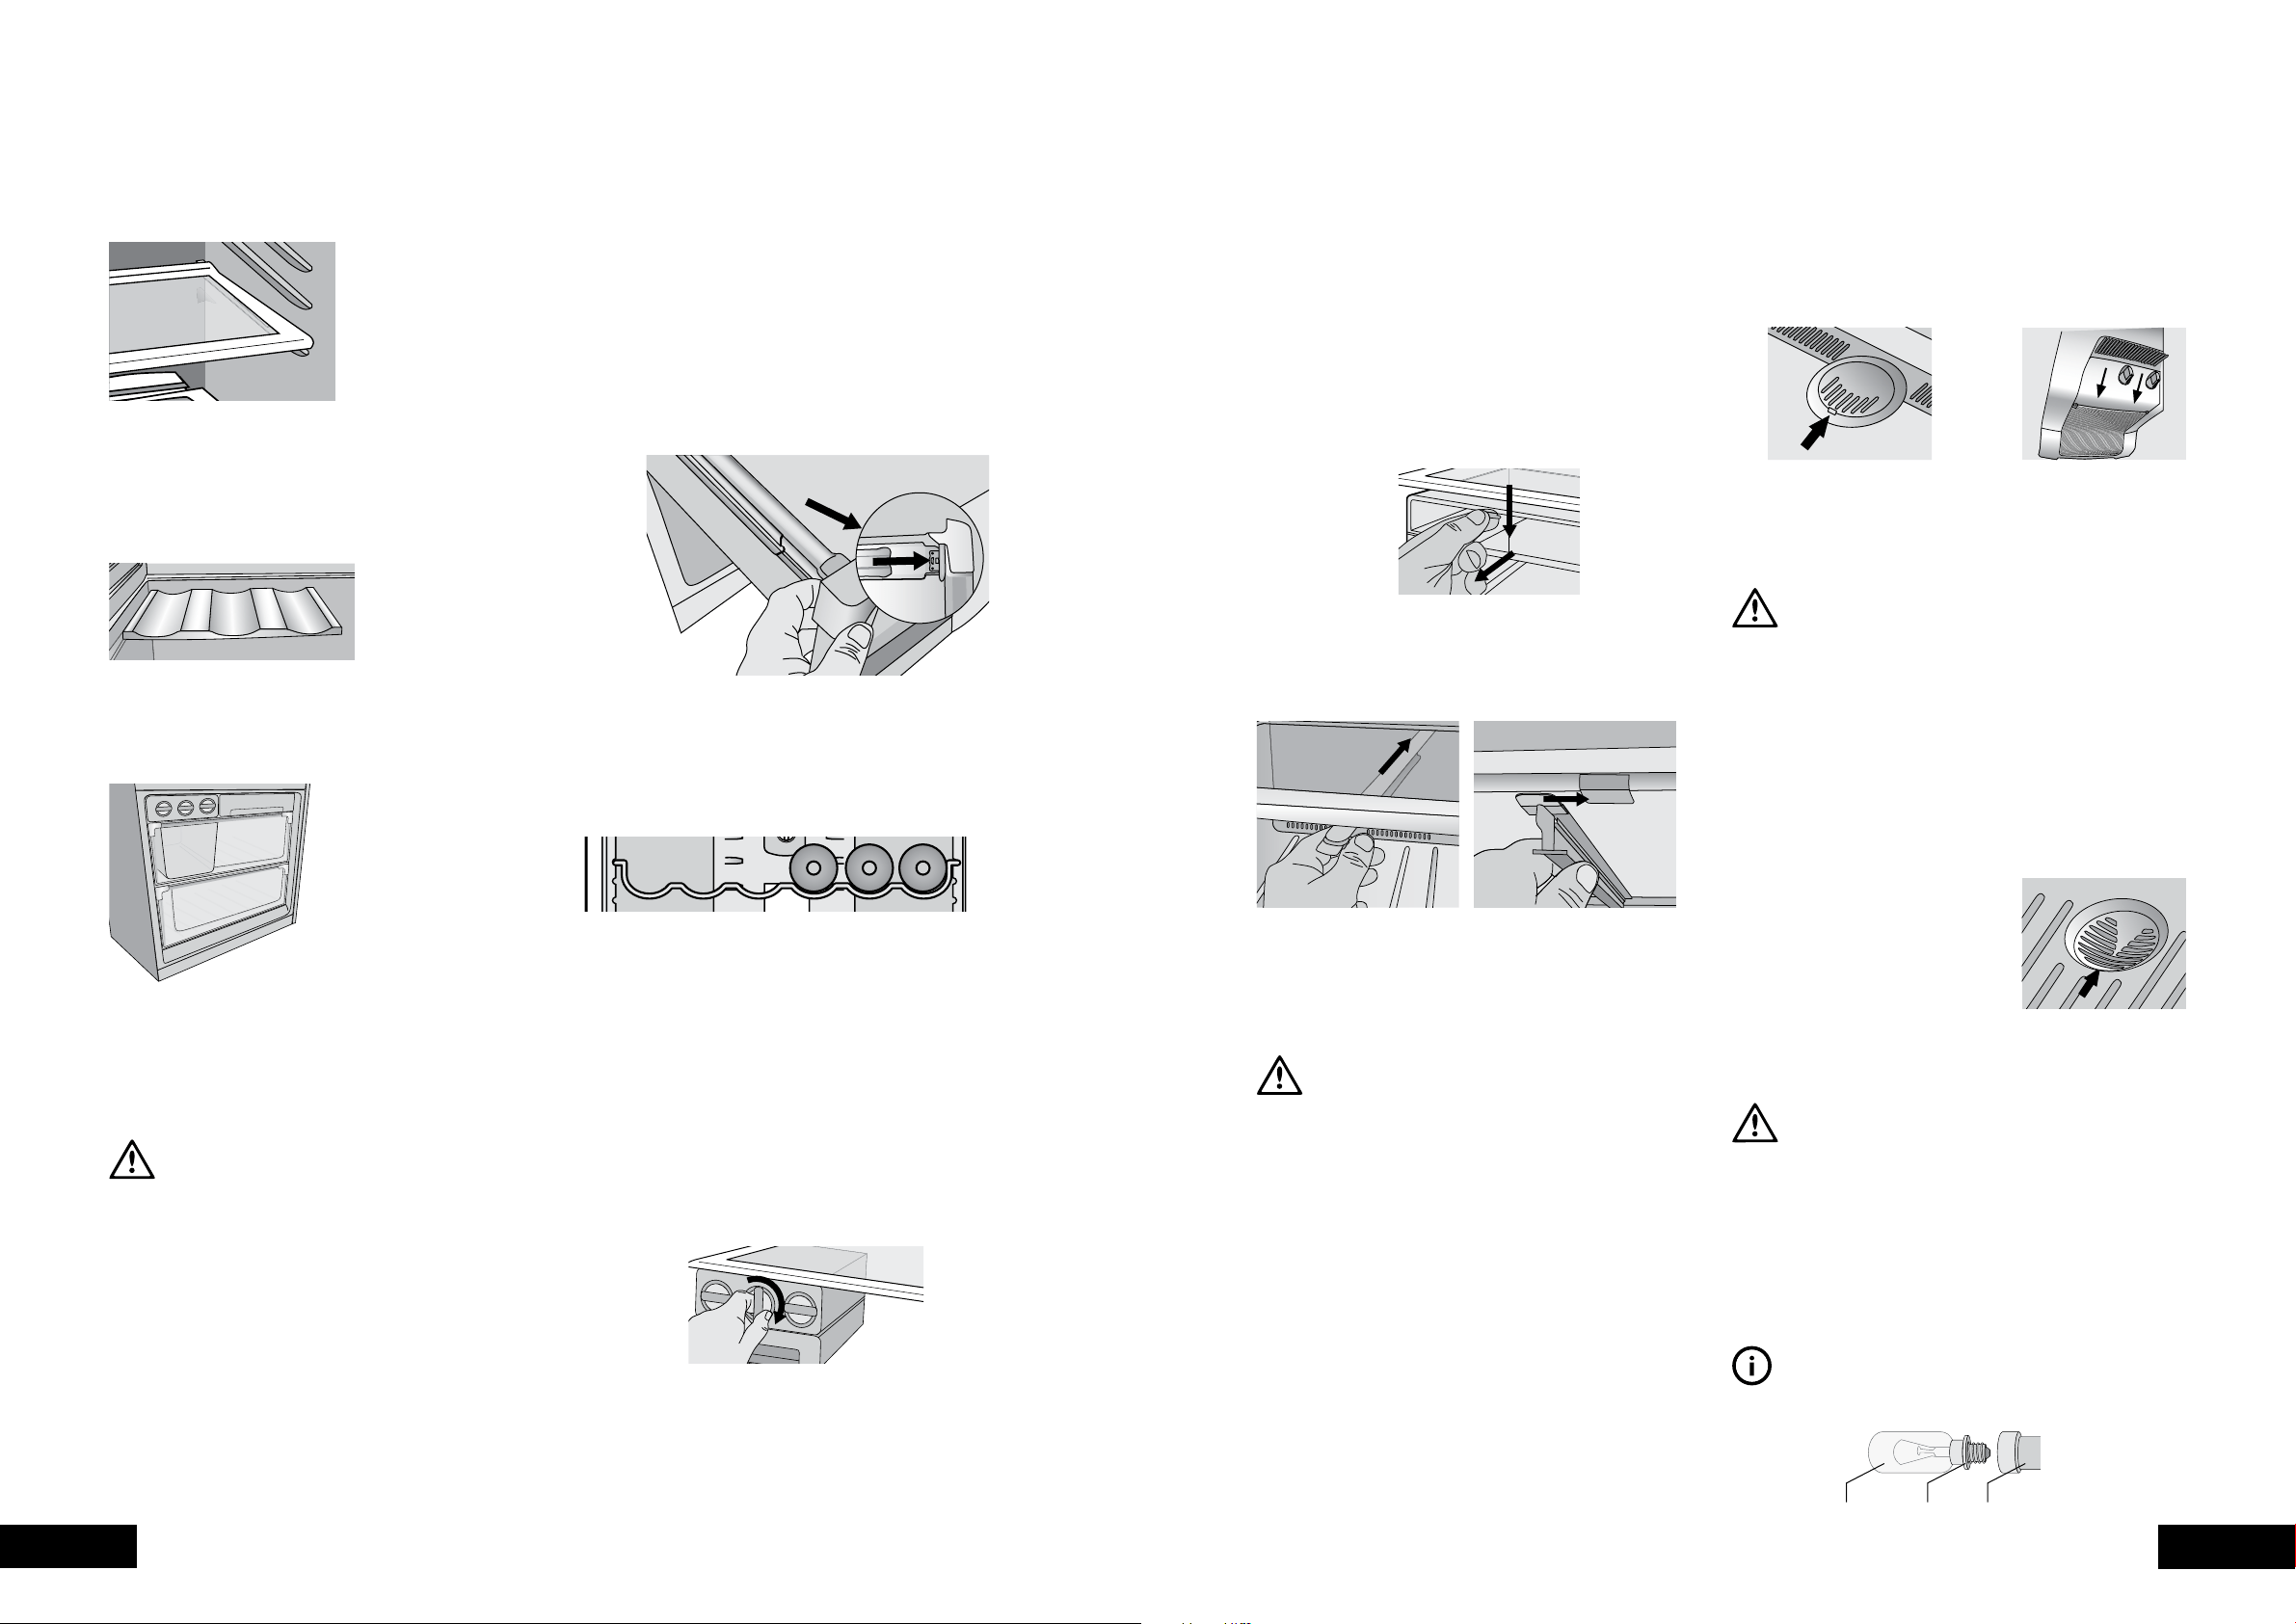
LED lighting (where fitted)
CAUTION
Your refrigerator is fitted with long life LED lighting. In the
unlikely event the LED lights should fail, then the LED lights
should be serviced by the manufacturer, it’s service agent or
similarly qualified technician. Refer to the warranty page for
contact details.
When the door is left open for 15 minutes, the LED light
will dim to 50% brightness to conserve energy and prolong
the life of the LED. If the door is left open for a further 15
minutes, the light will automatically turn off. Close and
reopen the door again to turn the light back on.
USING YOUR APPLIANCE
Changing the refrigerator Light
1. Switch off the power at the power point and remove
the cord by pulling the plug.
2. Carefully unclip the light cover as shown in the pictures.
3. Unscrew the light bulb and replace it with a new bulb
of the same type and wattage. If, when you remove the
light bulb the small rubber “O” ring comes out with the
bulb, fit the “O” ring over the new bulb and screw bulb
into the socket (see diagram at bottom of page).
WARNING
Never insert your finger into the light bulb socket to check
for the presence of the “O” ring.
4. Replace the light cover by hooking the lugs into the
slots and pressing up until it clips in.
5. Wait 5 minutes to ensure pressures in the refrigeration
system are equalised, before turning the refrigerator on
at the power point.
Changing the freezer light (where fitted)
1. Switch off the power at the power point and remove
the cord by pulling the plug.
2. Carefully unclip the light cover
by pulling the light cover tab at
the rear, towards you.
3. Unscrew the light bulb and
replace it with a new one of
the same type and wattage.
If, when you remove the light bulb the small rubber “O”
ring comes out with the bulb, fit the “O” ring over the
new bulb and screw bulb into the socket (see diagram at
bottom of page).
WARNING
Never insert your finger into the light bulb socket to check
for the presence of the “O” ring.
4. Replace the light cover by hooking the light cover lugs
into the front of the housing and pressing the rear of the
cover up until it clips in.
5. Wait 5 minutes to ensure pressures in the refrigeration
system are equalised before turning the refrigerator on
at the power point.
TIPS & INFORMATION
Ensure the ‘O’ ring is in place before replacing the bulb.
CARE AND MAINTENANCE
Light bulb “O” ring Light socket
greater than 350 litre
less than 350 litre
push
pull
Loading ...
Loading ...
Loading ...