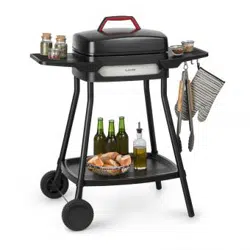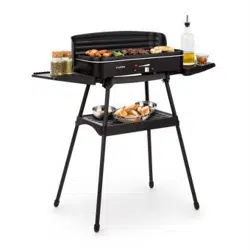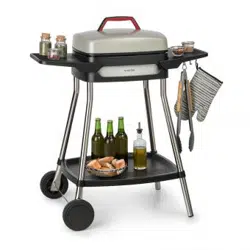
DR. BEEF PRO
Elektrogrill
Electric Grill
Parrilla eléctrica
Grill électrique
Griglia elettrica
www.klarstein.com
10034694


3
DE
Sehr geehrter Kunde,
wir gratulieren Ihnen zum Erwerb Ihres Gerätes. Lesen Sie
die folgenden Hinweise sorgfältig durch und befolgen Sie
diese, um möglichen Schäden vorzubeugen. Für Schäden,
die durch Missachtung der Hinweise und unsachgemäßen
Gebrauch entstehen, übernehmen wir keine Haftung. Scannen
Sie den folgenden QR-Code, um Zugriff auf die aktuellste
Bedienungsanleitung und weitere Informationen rund um das
Produkt zu erhalten.
INHALTSVERZEICHNIS
Sicherheitshinweise4
Einzelteile5
Zusammenbau8
Bedienung12
Reinigung und Pege13
Fehlerbehebung13
Hinweise zur Entsorgung14
Hersteller & Importeur (UK)14
TECHNISCHE DATEN
Artikelnummer 10034694
Stromversorgung 220-240 V ~ 50/60 Hz
English 15
Español 27
Français 39
Italiano 51

4
DE
SICHERHEITSHINWEISE
• Schließen Sie das Gerät so an, dass der Netzstecker jederzeit leicht zugänglich ist.
• Untersuchen Sie das Netzkabel regelmäßig auf Beschädigungen. Falls das
Netzkabel beschädigt ist, muss es vom Hersteller oder einem autorisierten
Fachbetrieb oder einer ähnlich qualizierten Person ersetzt werden.
• Reparaturen dürfen nur von Fachpersonal ausgeführt werden, versuchen Sie nicht
das Gerät selbst zu reparieren.
• Schließen Sie das Gerät nicht an einen Timer oder eine ferngesteuerte Steckdose an.
• Tauchen Sie das Gerät, das Netzkabel und den Stecker niemals in Wasser oder
andere Flüssigkeiten.
• Fassen Sie den Stecker nicht mit nassen Händen an.
• Ziehen sie den Stecker nicht am Kabel aus der Steckdose, sondern halten Sie ihn
beim Abziehen mit der Hand fest.
• Benutzen Sie das Kabel nicht als Handgriff.
• Verlegen Sie das Kabel so, dass keiner darüber stolpert.
• Lassen Sie das Kabel nicht über scharfe Kanten verlaufen.
• Benutzen Sie das Gerät nicht in nassen Räumen oder im Regen.
• Stellen Sie das Gerät so auf, dass es nicht in Wasser fallen kann. Sollte es doch in
Wasser fallen, ziehen Sie sofort den Stecker aus der Steckdose und fassen Sie das
Gerät erst dann an.
• Ziehen Sie den Stecker aus der Steckdose wenn Sie das Gerät nicht mehr benutzen.
• Halten Sie das Gerät fern von offenem Feuer und Wärmequellen.
• Kinder ab 8 Jahren, psychisch, sensorisch und körperlich eingeschränkte Menschen
dürfen das Gerät nur benutzen, wenn sie vorher von einer für sie verantwortlichen
Aufsichtsperson ausführlich mit den Funktionen und den Sicherheitsvorkehrungen
vertraut gemacht wurden und die damit verbundenen Risiken verstehen.
• Halten Sie Kinder vom Grill fern und lassen Sie das Gerät während des Betriebs
nicht unbeaufsichtigt.
• Stellen Sie das Gerät auf einen stabilen, ebenen Untergrund.
• Achten Sie darauf, dass sich um den Grill herum keine leicht entzündlichen
Gegenstände und Materialien benden.
• Halten Sie mindestens 30 cm Abstand zu Wänden.
• Fassen Sie während des Betriebs nicht den Grillrost oder andere heiße Oberächen an.
• Bewegen Sie das Gerät erst wenn es komplett abgekühlt ist. Fassen Sie das Gerät
nur an den dafür vorgesehenen Griffen an.
• Stellen Sie das Gerät nur auf hitzeunempndliche Oberächen. Stellen Sie das
Gerät so auf, dass es nicht zu nah am Rand steht.
• Um einen Hitzestau zu vermeiden, stellen Sie das Gerät nicht direkt unter
Küchenschränke oder regale.
• Stellen Sie das Gerät nicht auf oder in die Nähe eines Herdes.
• Setzen Sie das Gerät nicht allzu hohen Temperaturen und Wetterschwankungen aus.
• Befüllen Sie den Grill niemals mit Flüssigkeiten.
• Falls Teile beschädigt sind, benutzen Sie den Grill nicht weiter.

5
DE
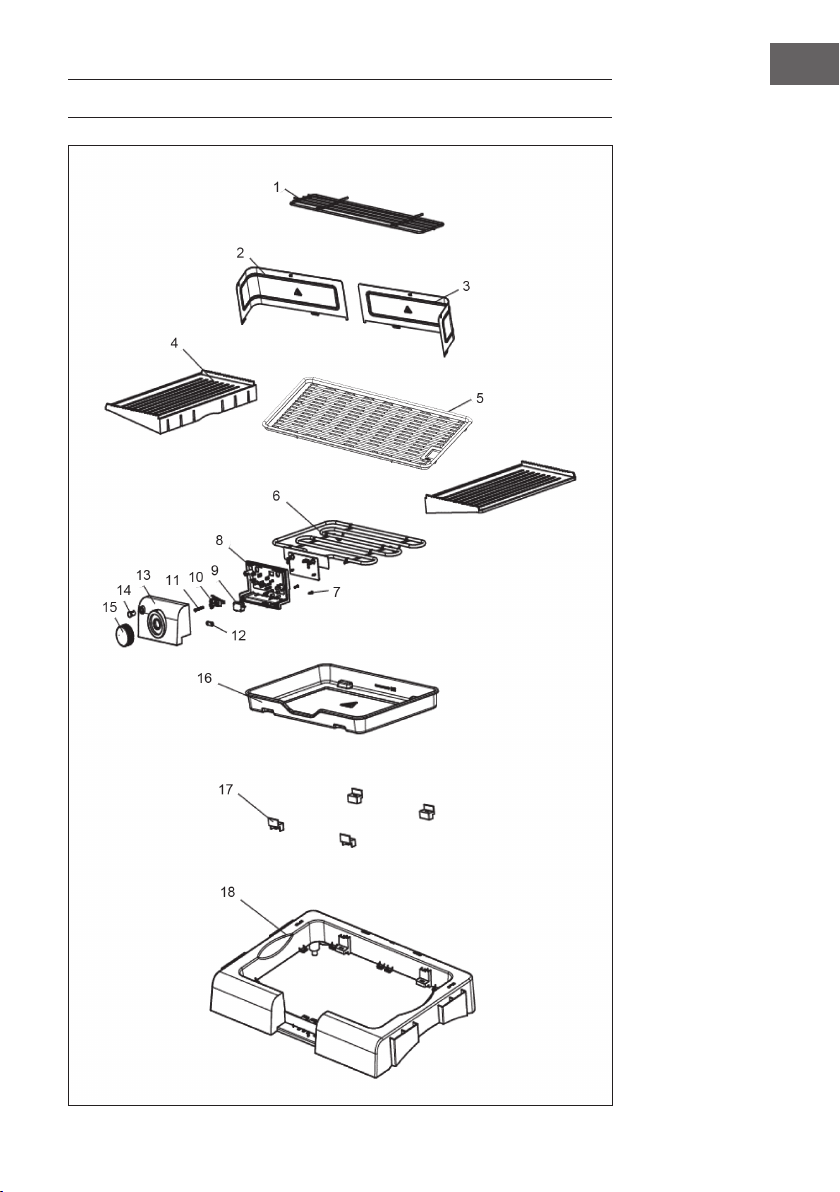
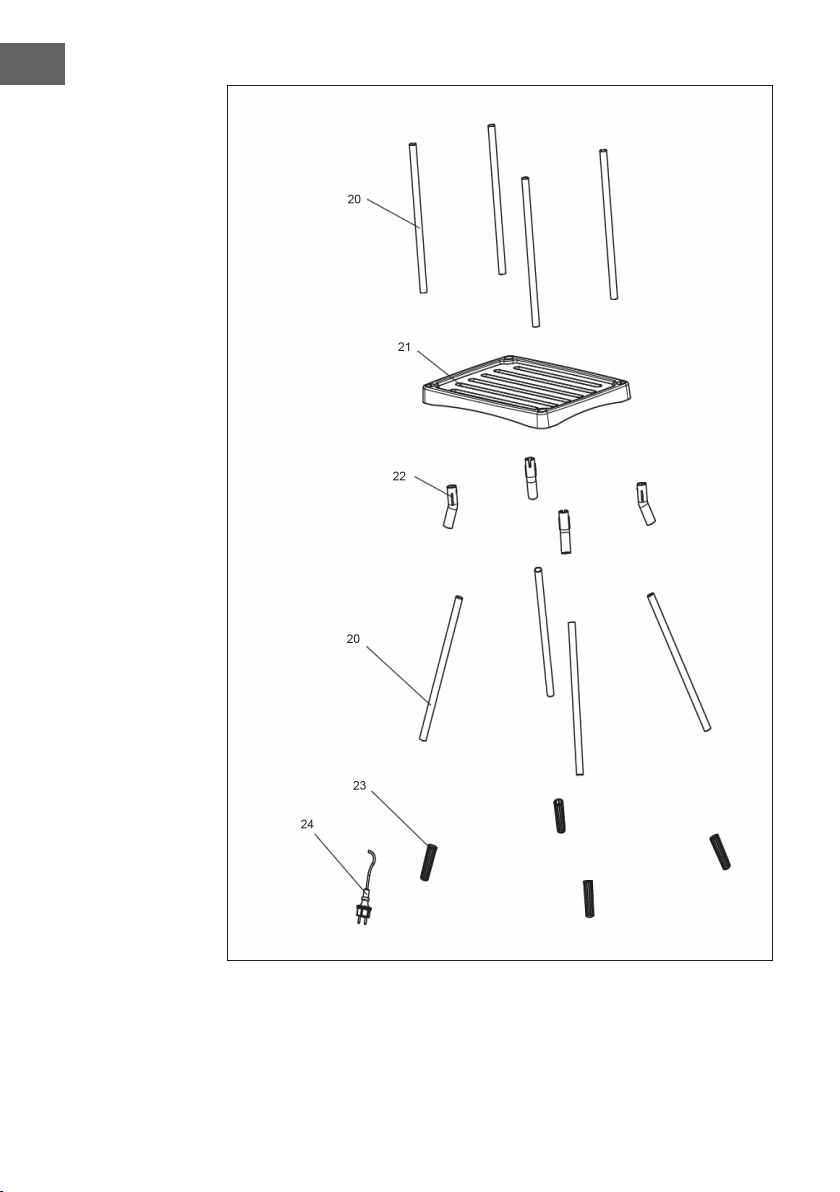
EINZELTEILE

6
DE
7
DE
1
Kleiner Gitterrost
13
Schaltkasten II
2
Windschutz
14
Anzeigeleuchte
3
Windschutz
15
Regler
4
Ablagen
16
Auffangschale für Fett
5
Großer Gitterrost
17
Befestigung der Auffangschale
6
Heizrohr
18
Gehäuse
7
Schrauben
20
Standrohr
8
Schaltkasten I
21
Regalplatte
9
Mikroschalter
22
Verbindungsstücke
10
Thermostat
23
Rohrfüße
11
Schraube
24
Kabel
12
Kabelklemme

8
DE
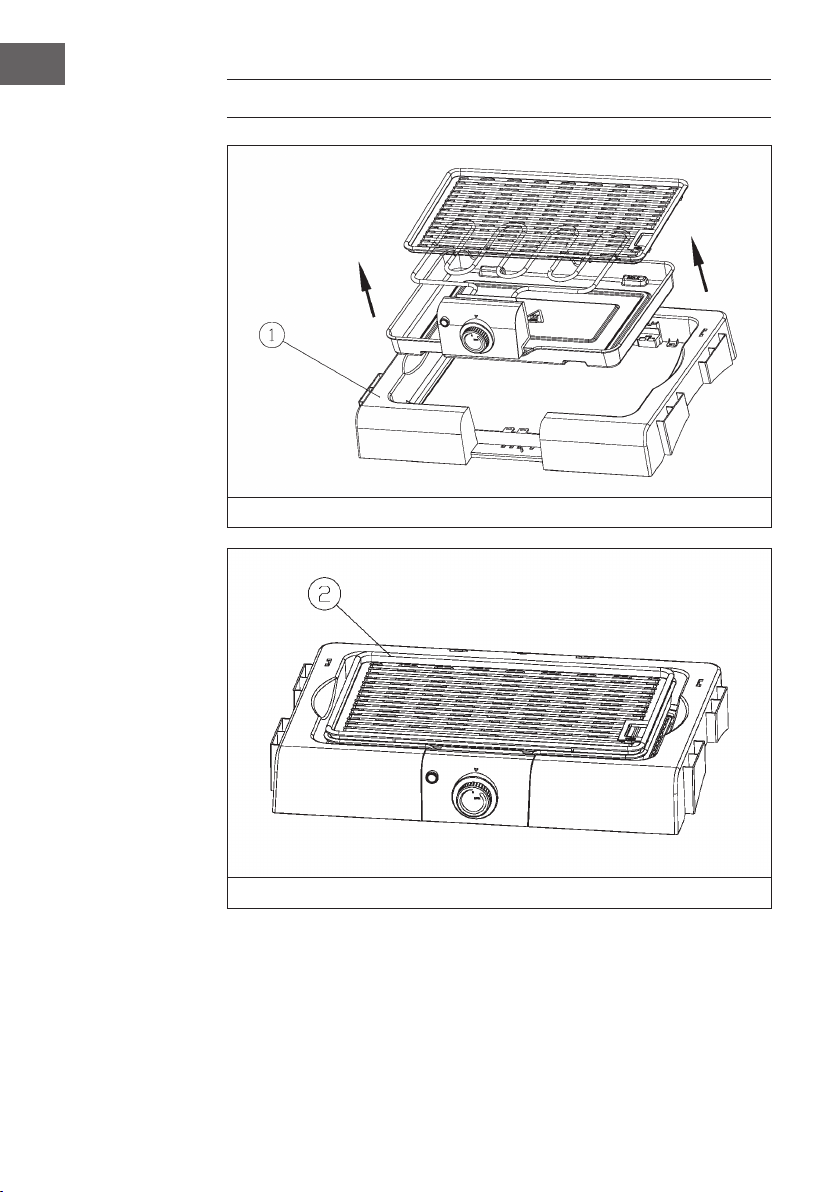
ZUSAMMENBAU
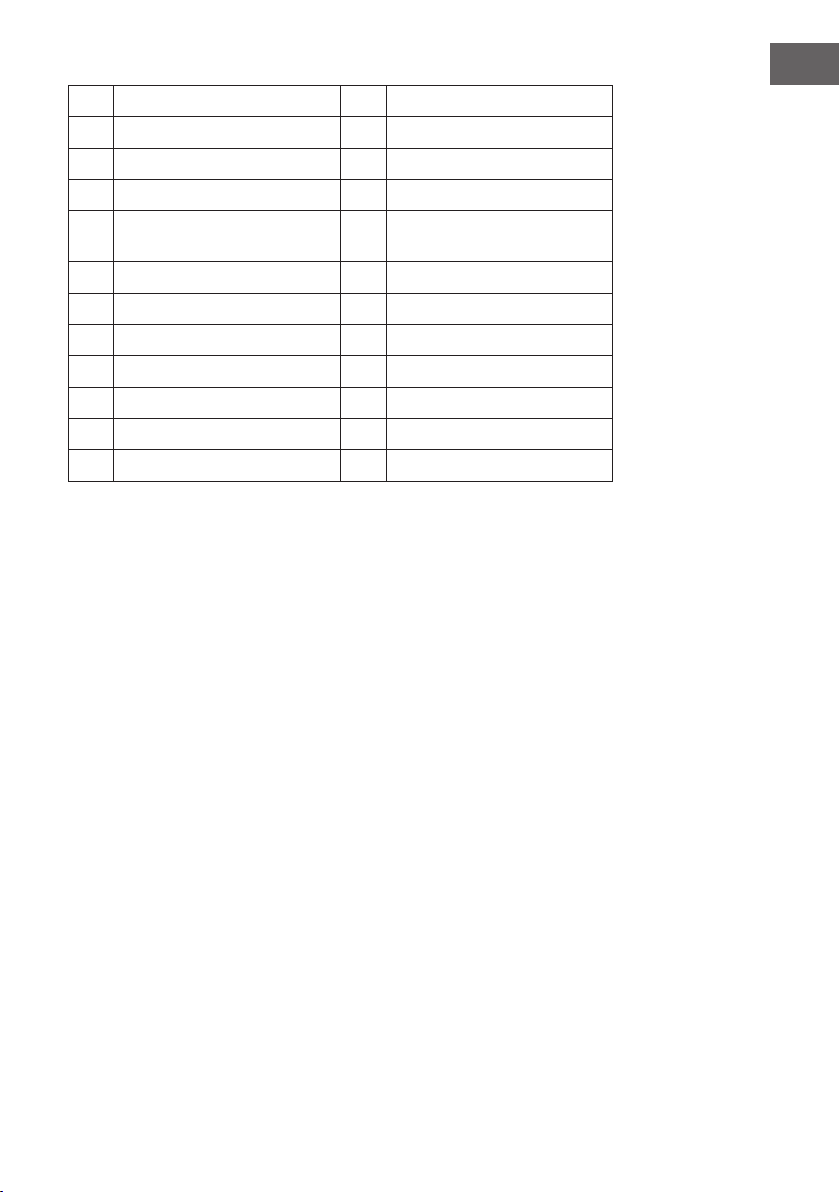
Zur leichteren Reinigung lassen sich die abgebildeten Teile lassen sich in Pfeilrichtung
entfernen.
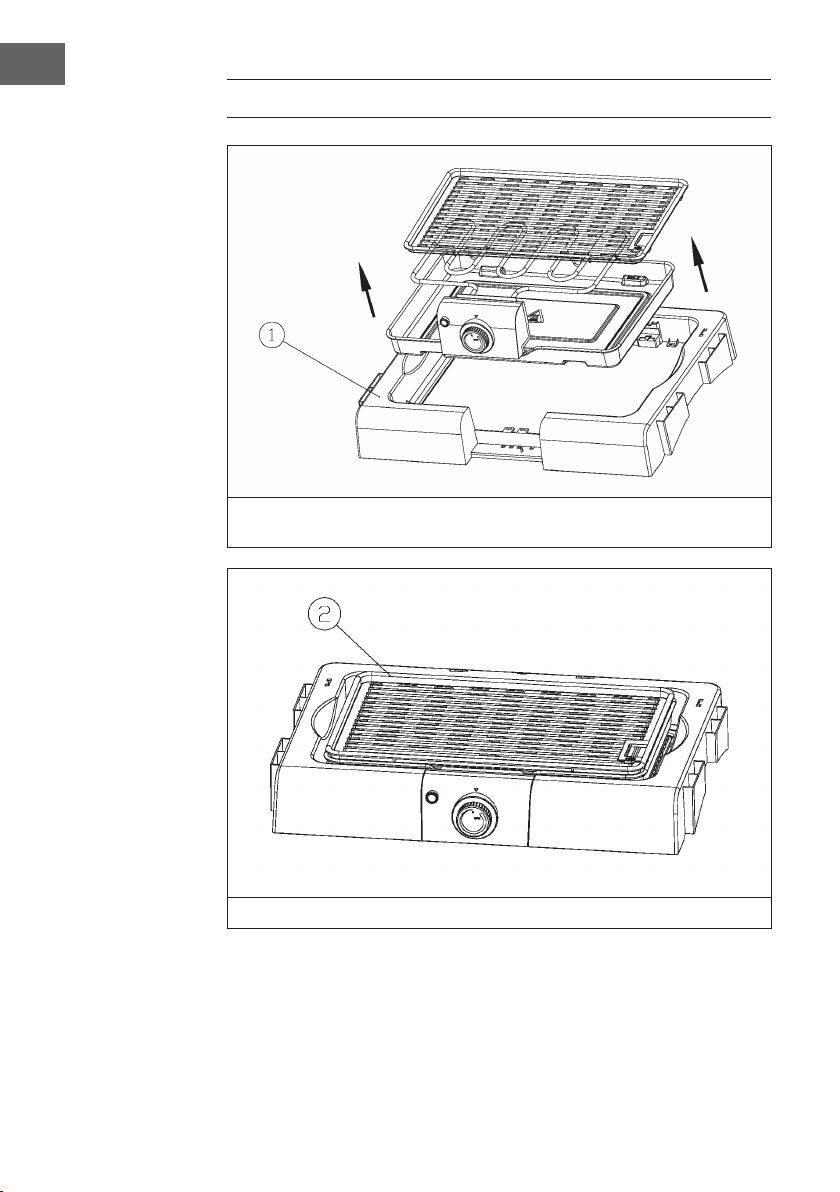
So sieht der zusammengebaute Tischgrill aus.

9
DE
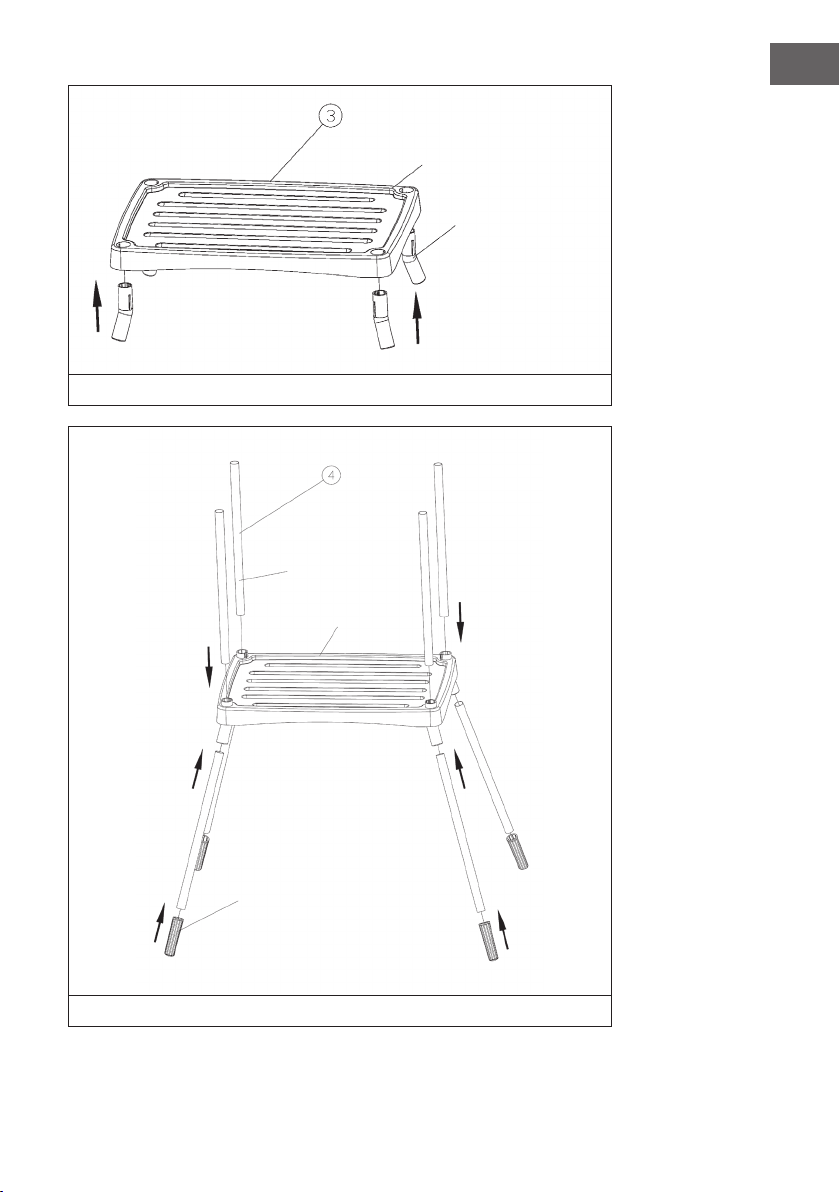
Befestigen Sie die Verbindungsstücke an der Regalplatte.
Befestigen Sie die abgebildeten Teile in Pfeilrichtung.
Regalplatte
Verbindungsstück
Standrohr
Regalplatte
Rohrfüße

10
DE
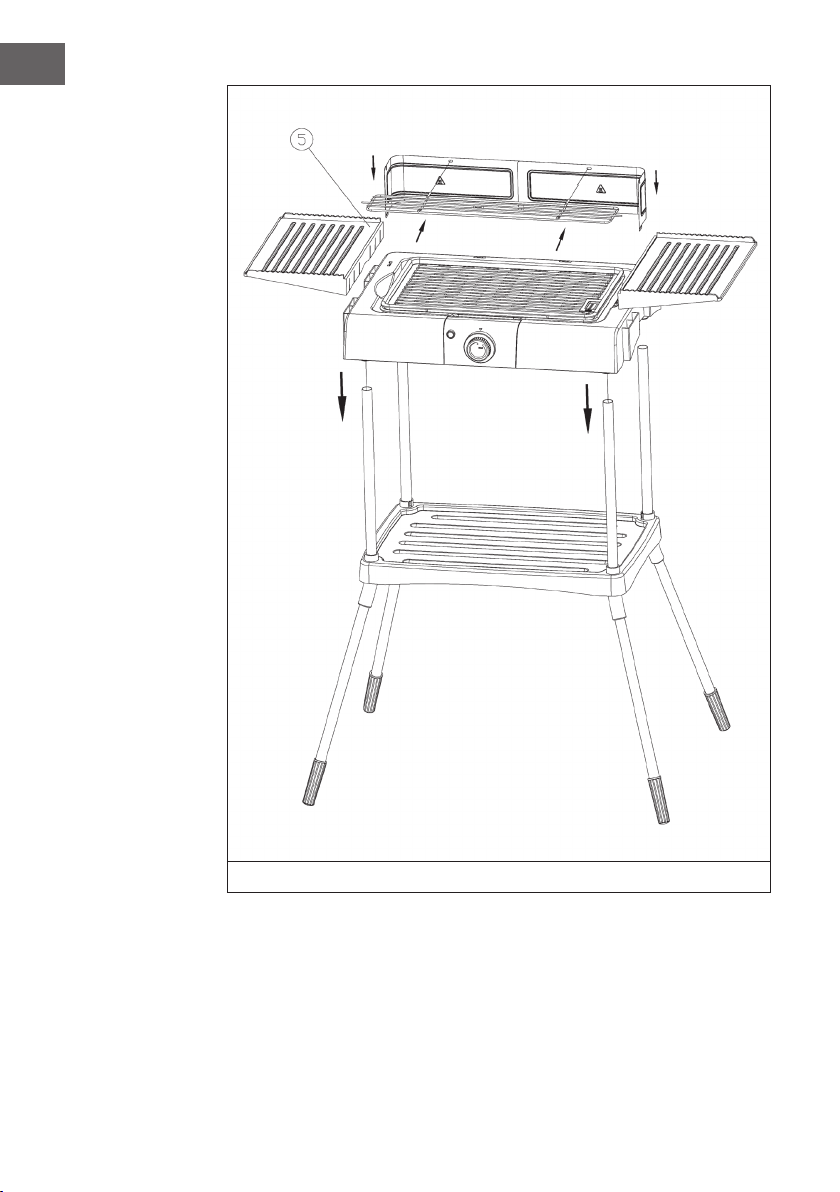
Befestigen Sie die abgebildeten Teile in Pfeilrichtung.

11
DE
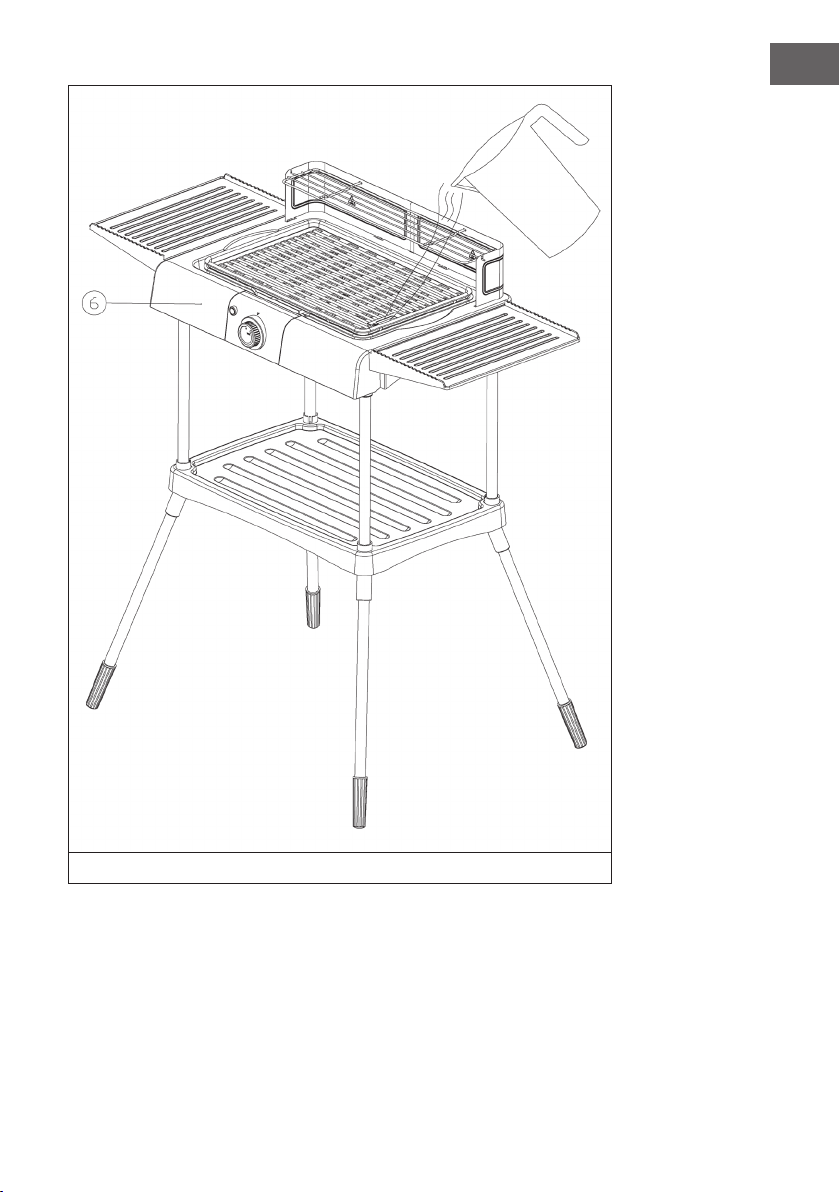
Gießen Sie vor dem Grillen etwas Wasser in die Fettauffangschale.

12
DE
BEDIENUNG
1. Entfernen Sie eventuell vorhandenes Verpackungsmaterial.
2. Montieren Sie das Gerät wie beschrieben.
3. Reinigen Sie den großen Gitterrost (5), den kleinen Gitterrost (1) und die
Auffangschale(16) mit einem feuchten Tuch.
4. Befüllen Sie die Auffangschale (16) bis zur MAX-Markierung mit frischem Wasser.
Hinweis: Befüllen Sie die Auffangschale (16) vor der Benutzung immer mit Wasser,
um Flammenbildung durch Fett aus der Nahrung zu vermeiden. Während des ersten
Gebrauchs kann ein Geruch durch die im Gerät wendeten Materialien entstehen. Der
Geruch ist normal und verschwindet nach kurzer Zeit.
5. Stellen Sie den Thermostat auf die gewünschte Stufe ein: wählen Sie eine niedrige
oder mittlere Temperatur zum Erwärmen oder langsamen Grillen, wählen Sie MAX
zum schnellen Garen und Grillen. Die Kontrollleuchte (14) schaltet sich aus, sobald
die gewünschte Temperatur erreicht ist.
6. Legen Sie das Essen direkt auf das großen Gitterrost (5). Verwenden Sie niemals
Teller, Schalen oder Aluminiumfolie unter dem Grillgut. Die Grillzeit ist abhängig
von der Dicke der Speisen. Drehen Sie das Essen von Zeit zu Zeit.
Hinweis: Die Höhe des Grillrostes kann in drei Stufen eingestellt werden.
7. Nach Gebrauch drehen Sie bitte den Thermostat auf „0“ und ziehen Sie den
Stecker aus der Steckdose.
Hinweis zum Heizelement
Das Heizelement ist mit einem Sicherheitsschalter ausgestattet. Dadurch wird verhindert,
dass das Heizelement außerhalb des Grills läuft wird. Wenn sich die Heizung nicht
einschalten lässt, überprüfen Sie den Anschluss und ob das Heizelement korrekt im
Gehäuse montiert ist.

13
DE
REINIGUNG UND PFLEGE
Wichtige Hinweise
• Ziehen Sie immer zuerst den Stecker aus der Steckdose, bevor Sie das Gerät reinigen.
• Achten Sie darauf, dass kein Wasser ins Gehäuse eindringt, es könnte einen
Kurzschluss auslösen.
• Tauchen Sie den Grill, das Kabel und den Stecker nicht in Wasser oder andere
Flüssigkeiten.
• Benutzen Sie zur Reinigung keine aggressiven Reiniger und keine metallenen oder
scharfen Gegenstände, wie Messer oder Kratzer.
FEHLERBEHEBUNG
Problem Mögliche Ursache Lösung
Das Gerät heizt sich nicht
auf.
Das Gerät ist nicht
angeschlossen.
Stecken Sie den Stecker in
die Steckdose.
Das Gerät geht von
alleine aus.
Sobald die eingestellte
Temperatur erreicht ist
geht der Thermostat
automatisch aus.
Sobald die Temperatur
unterschritten wird
geht der Thermostat
automatisch wieder an.
Drehen Sie den Thermostat
auf eine höhere
Temperatur.

14
DE
HINWEISE ZUR ENTSORGUNG
Wenn es in Ihrem Land eine gesetzliche Regelung zur
Entsorgung von elektrischen und elektronischen Geräten
gibt, weist dieses Symbol auf dem Produkt oder auf der
Verpackung darauf hin, dass dieses Produkt nicht im
Hausmüll entsorgt werden darf. Stattdessen muss es zu
einer Sammelstelle für das Recycling von elektrischen
und elektronischen Geräten gebracht werden. Durch
regelkonforme Entsorgung schützen Sie die Umwelt und die
Gesundheit Ihrer Mitmenschen vor negativen Konsequenzen.
Informationen zum Recycling und zur Entsorgung dieses
Produkts, erhalten Sie von Ihrer örtlichen Verwaltung oder
Ihrem Hausmüllentsorgungsdienst.
HERSTELLER & IMPORTEUR (UK)
Hersteller:
Chal-Tec GmbH, Wallstraße 16, 10179 Berlin, Deutschland.
Importeur für Großbritannien:
Chal-Tec UK limited
Unit 6 Riverside Business Centre
Brighton Road
Shoreham-by-Sea
BN43 6RE
United Kingdom

15
EN
Dear Customer,
Congratulations on purchasing this device. Please read the
following instructions carefully and follow them to prevent
possible damages. We assume no liability for damage caused
by disregard of the instructions and improper use. Scan the QR
code to get access to the latest user manual and more product
information.
CONTENT
Safety Instructions16
Single Parts17
Assembly20
Operation24
Cleaning and Care25
Troubleshooting25
Hints on Disposal26
Manufacturer & Importer (UK) 26
TECHNICAL DATA
Item number 10034694
Power supply
220-240 V ~ 50/60 Hz

16
EN
SAFETY INSTRUCTIONS
• Connect the device so that the mains plug is easily accessible at all times.
• Inspect the power cord regularly for damage. If the power cord is damaged, it
must be replaced by the manufacturer or an authorized service center or a similarly
qualied person.
• Repairs may only be carried out by qualied personnel, do not attempt to repair the
device yourself.
• Do not connect the unit to a timer or a remote control power outlet.
• Never immerse the appliance, power cord or plug in water or other liquids.
• Do not handle the plug with wet hands.
• Do not pull the plug out of the socket by the cable, but hold it rmly by hand when
pulling it off.
• Do not use the cable as a handle.
• Lay the cable in such a way that no one will trip over it.
• Do not let the cable run over sharp edges.
• Do not use the unit in wet rooms or in the rain.
• Place the appliance in such a way that it cannot fall into water. If it does fall into
water, immediately unplug the appliance from the wall outlet and only then touch
the appliance.
• Unplug the appliance from the wall outlet when it is no longer in use.
• Keep the appliance away from open re and heat sources.
• This device may be only used by children 8 years old or older and persons with
limited physical, sensory and mental capabilities and / or lack of experience
and knowledge, provided that they have been instructed in use of the device by a
responsible person who understands the associated risks.
• Keep children away from the grill and do not leave the appliance unattended
during operation.
• Place the appliance on a stable, level surface.
• Make sure that there are no easily inammable objects or materials around the grill.
• Keep at least 30 cm away from walls.
• Do not touch the grill grate or other hot surfaces during operation.
• Do not move the appliance until it has cooled down completely. Only touch the
appliance by the handles provided for this purpose.
• Only place the appliance on surfaces that are insensitive to heat. Position the
appliance so that it is not too close to the edge.
• To avoid heat build-up, do not place the appliance directly under kitchen cabinets
or shelves.
• Do not place the appliance on or near a stove.
• Do not expose the appliance to excessive temperatures and weather variations.
• Never ll the grill with liquids.
• If parts are damaged, do not continue to use the grill.
17
EN
SINGLE PARTS

18
EN

19
EN
1
Small grating
13
Switch box II
2
Wind deector
14
Indicator light
3
Wind deector
15
Governor
4
Shelves
16
Collecting tray for grease
5
Large grating
17
Fixing the drip tray
6
Heating pipe
18
Case
7
Screws
20
Stand pipe
8
Switch box I
21
Shelf plate
9
Microswitches
22
Connectors
10
Thermostat
23
Pipe feet
11
Screw
24
Cord
12
Cable clamp
20
EN
ASSEMBLY
For easier cleaning, the parts shown can be removed in the direction of the arrow.
This is what the assembled table grill looks like.
21
EN
Attach the connectors to the shelf plate.
Fasten the parts shown in the arrow direction.
Shelf plate
Connector
Stand tube
Shelf plate
Tube feet
22
EN
Fasten the parts shown in the arrow direction.
23
EN
Pour some water into the grease drip tray before grilling.

24
EN
OPERATION
1. Remove any packaging material that may be present.
2. Mount the device as described.
3. Clean the large grating (5), the small grating (1) and the collecting tray (16) with a
damp cloth.
4. Fill the drip tray (16) with fresh water up to the MAX mark.
Note: Always ll the drip tray (16) with water before use to prevent the formation
of ames by fat from food. During the rst use, an odour may be created by the
materials used in the appliance. The smell is normal and disappears after a short time.
5. Set the thermostat to the desired level: choose a low or medium temperature for
heating or slow grilling, choose MAX for fast cooking and grilling. The control lamp
(14) switches off as soon as the desired temperature is reached.
6. Place the food directly on the large grid (5). Never use plates, trays or aluminium
foil under the food. The grilling time depends on the thickness of the food. Turn the
food from time to time.
Note: The height of the grill can be adjusted in three steps.
7. After use, please turn the thermostat to „0“ and unplug the appliance.
Note on the heating element
The heating element is equipped with a safety switch. This prevents the heating element
from running outside the grill. If the heater does not turn on, check the connection and
that the heater is correctly mounted in the housing.

25
EN
CLEANING AND CARE
Important Hints:
• Pull the mains plug out of the socket with earthing contact before cleaning.
• Make sure that no liquids penetrate the housing.
• Never submerge the tabletop grill in water or other liquids.
• Do not use any aggressive cleaners such as alkaline- or chlorine-based cleaners
and sharp or metallic cleaning utensils such as knives, hard scrapers or similar.
TROUBLESHOOTING
Problem Possible cause Solution
The tabletop grill does not
heat up.
The tabletop grill is not
connected to the power
supply.
Insert the mains plug in
a socket with earthing
contact.
The tabletop grill switches
off on its own.
The selected temperature
setting has been reached.
The thermostat will auto-
matically switch off.
The thermostat will
automatically switch back
on once the selected
temperature setting is
underrun.
Slide the thermostat
control to a higher
temperature setting.

26
EN
DISPOSAL CONSIDERATIONS
If there is a legal regulation for the disposal of electrical
and electronic devices in your country, this symbol on the
product or on the packaging indicates that this product must
not be disposed of with household waste. Instead, it must be
taken to a collection point for the recycling of electrical and
electronic equipment. By disposing of it in accordance with
the rules, you are protecting the environment and the health of
your fellow human beings from negative consequences. For
information about the recycling and disposal of this product,
please contact your local authority or your household waste
disposal service.
MANUFACTURER & IMPORTER (UK)
Manufacturer:
Chal-Tec GmbH, Wallstrasse 16, 10179 Berlin, Germany.
Importer for Great Britain:
Chal-Tec UK limited
Unit 6 Riverside Business Centre
Brighton Road
Shoreham-by-Sea
BN43 6RE
United Kingdom

27
ES
Estimado cliente:
Le felicitamos por la adquisición de este producto. Lea
atentamente el siguiente manual y siga cuidadosamente las
instrucciones de uso con el n de evitar posibles daños. La
empresa no se responsabiliza de los daños ocasionados por
un uso indebido del producto o por haber desatendido las
indicaciones de seguridad. Escanee el código QR para obtener
acceso al manual de usuario más reciente y otra información
sobre el producto.
ÍNDICE DE CONTENIDOS
Indicaciones de seguridad28
Piezas individuales29
Montaje32
Funcionamiento36
Limpieza y cuidado37
Detección y resolución de problemas37
Retirada del aparato38
Fabricante e importador (Reino Unido) 38
DATOS TÉCNICOS
Número de artículo 10034694
Suministro eléctrico
220-240 V ~ 50/60 Hz

28
ES
INDICACIONES DE SEGURIDAD
• Coloque el aparato de tal manera que el enchufe sea fácilmente accesible.
• Compruebe regularmente el cable de alimentación. Si el cable de alimentación
está dañado, deberá ser sustituido por el fabricante, un servicio técnico autorizado
o una personal igualmente cualicada.
• No intente reparar el aparato usted mismo. Contacte siempre con personal
especializado.
• No conecte el aparato a tomas de corriente manejadas por control remoto ni con
temporizador.
• No sumerja el aparato, el cable de alimentación ni el enchufe en agua ni en
ningún otro líquido.
• No toque el enchufe con las manos mojadas.
• Para desconectar el aparato no tire del cable, sino del cuerpo del enchufe.
• No utilice el cable como un asidero.
• Coloque el cable de tal manera que nadie pueda pisarlo ni tropezar con él.
• No deje que el cable quede colgando sobre cantos alados.
• No utilice el aparato en estancias húmedas o expuesto a la lluvia
• Coloque el aparato de tal manera que no exista riesgo de sumergirse en el
agua. En caso de que esto sucediera, desconecte el enchufe inmediatamente y a
continuación retire el aparato del agua.
• Desconecte el enchufe de la toma de corriente cuando no utilice el aparato.
• Mantenga el aparato lejos de fuentes de ignición y fuentes de calor.
• Este aparato puede ser utilizado por niños mayores de 8 años y personas con
discapacidades físicas, sensoriales y mentales y/o con falta de experiencia y
conocimientos, siempre y cuando hayan sido instruidos sobre el uso del aparato y
comprendan los peligros y riesgos asociados.
• Mantenga a los niños alejados del aparato y no deje el aparato en marcha si no
se encuentra bajo supervisión.
• Coloque el aparato en una supercie plana y estable.
• Asegúrese de que no existen objetos o materiales fácilmente inamables alrededor
de la parrilla.
• Mantenga una distancia de al menos 30 cm entre el aparato y las paredes.
• Durante el funcionamiento del aparato, no toque la rejilla ni otras supercies calientes.
• Mueva el aparato solo cuando se haya enfriado por completo. Agarre el aparato
solamente por las asas previstas para tal n.
• No coloque el aparato sobre supercies que no resistan el calor. Coloque el aparato
de tal manera que no exista riesgo de que se caiga de la supercie de trabajo.
• Para evitar acumulación de calor, no coloque el aparato directamente bajo un
mueble o estantería de cocina.
• No coloque el aparato cerca o encima de un horno.
• No exponga el aparato a altas temperaturas ni a uctuaciones de temperatura.
• Nunca llene la parrilla de líquido.
• En caso de avería, no continúe utilizando la parrilla.

29
ES
PIEZAS INDIVIDUALES

30
ES
31
ES
1
Rejilla pequeña
13
Caja de control II
2
Protector contra el viento
14
Indicador luminoso
3
Protector contra el viento
15
Perilla
4
Bandeja
16
Bandeja de recogida para grasa
5
Rejilla grande
17
Fijadores para la bandeja de
recogida
6
Elemento calefactor
18
Carcasa
7
Tornillos
20
Patas
8
Caja de control I
21
Placa
9
Microinterruptor
22
Pieza de unión
10
Termostato
23
Tapones para patas
11
Tornillo
24
Cable
12
Abrazadera de cable
32
ES
MONTAJE
Para facilitar la limpieza, las piezas mostradas se pueden desmontar en la dirección
de la echa.
Este es el aspecto de la parrilla montada.

33
ES
Fije las piezas de unión en la placa.
Fije las piezas ilustradas en la dirección de la echa.
Placa
Pieza de unión
Patas
Placa
Tapones para
patas

34
ES
Fije las piezas ilustradas en la dirección de la echa.

35
ES
Vierta un poco de agua en la bandeja de recogida para grasa antes de asar.

36
ES
FUNCIONAMIENTO
1. Retire cualquier material de embalaje que pueda estar presente.
2. Monte el aparato siguiendo las ilustraciones.
3. Limpie la rejilla grande (5), la rejilla pequeña (1) y la bandeja de recogida (16)
con un paño húmedo.
4. Llene la bandeja de recogida (16) con agua fresca hasta la marca «MAX».
Atención: Llene siempre la bandeja de recogida (16) con agua antes de usarla,
para evitar que se formen llamas por la grasa de los alimentos. Durante el primer uso
puede generarse un olor por los materiales utilizados en el aparato. El olor inicial es
normal y desaparecerá en un periodo breve de tiempo.
5. Ajuste el termostato al nivel deseado: seleccione una temperatura baja o
media para calentar o asar lentamente, seleccione «MAX» para cocinar y asar
rápidamente. La luz de control (14) se apaga en cuanto se alcanza la temperatura
deseada.
6. Coloque el alimento directamente en la rejilla grande (5). Nunca utilice platos,
tazones o papel de aluminio debajo de los alimentos que asar. El tiempo de asado
depende del grosor de los alimentos. Voltee los alimentos de vez en cuando.
Atención: La altura de la parrilla se ajusta en tres pasos.
7. Después de usar la parrilla, gire el termostato a «0» y desconecte el enchufe de la
toma de corriente.
Indicaciones sobre el elemento calefactor
El elemento calefactor dispone de un fusible de seguridad. De este modo se evita que
el elemento calefactor se salga de la parrilla. Si el elemento calefactor no se enciende,
compruebe la conexión y si el elemento calefactor está correctamente montado en la
carcasa.

37
ES
LIMPIEZA Y CUIDADO
Indicaciones importantes
• Antes de limpiar el aparato, apáguelo y desconéctelo de la toma de corriente.
• Asegúrese de que el agua no salpique el aparato, podría provocar un
cortocircuito.
• No sumerja la parrilla, el enchufe ni el cable en agua ni ningún otro líquido.
• No utilice limpiadores agresivos ni otros objetos metálicos ni alados, como
cuchillos o rascadores, para limpiar la parrilla.
DETECCIÓN Y RESOLUCIÓN DE PROBLEMAS
El aparato no se calienta. El aparato no está
enchufado.
Conecte el enchufe en la
toma de corriente.
El aparato se apaga solo. El termostato se apaga
automáticamente cuando
se haya alcanzado la
temperatura seleccionada.
Cuando la temperatura
descienda del valor
seleccionado, el
termostato volverá a
encenderse.
Gire el termostato hasta
un valor superior.
38
ES
INDICACIONES SOBRE LA RETIRADA DEL
APARATO
Si en su país existe una disposición legal relativa a la
eliminación de aparatos eléctricos y electrónicos, este
símbolo estampado en el producto o en el embalaje
advierte que no debe eliminarse como residuo doméstico.
En lugar de ello, debe depositarse en un punto de recogida
de reciclaje de aparatos eléctricos y electrónicos. Una
gestión adecuada de estos residuos previene consecuencias
potencialmente negativas para el medio ambiente y la salud
de las personas. Puede consultar más información sobre el
reciclaje y la eliminación de este producto contactando con
su administración local o con su servicio de recogida de
residuos.
FABRICANTE E IMPORTADOR (REINO UNIDO)
Fabricante:
Chal-Tec GmbH, Wallstraße 16, 10179 Berlín, Alemania.
Importador para Gran Bretaña:
Chal-Tec UK limited
Unit 6 Riverside Business Centre
Brighton Road
Shoreham-by-Sea
BN43 6RE
United Kingdom
39
FR
Cher client,
Toutes nos félicitations pour l’acquisition de ce nouvel
appareil. Veuillez lire attentivement les instructions suivantes de
branchement et d’utilisation an d’éviter d’éventuels dommages.
Le fabricant ne saurait être tenu pour responsable des dommages
dus au non-respect des consignes de sécurité et à la mauvaise
utilisation de l’appareil. Scannez le QR-Code pour accéder à
la dernière version du mode d‘emploi et à d‘autres informations
concernant le produit.
SOMMAIRE
Consignes de sécurité40
Pièces détachées41
Assemblage 44
Utilisation48
Nettoyage et entretien49
Résolution des problèmes49
Conseils pour le recyclage50
Fabricant et importateur (UK) 50
FICHE TECHNIQUE
Numéro d’article 10034694
Alimentation électrique
220-240 V ~ 50/60 Hz

40
FR
CONSIGNES DE SÉCURITÉ
• Brancher l’appareil de telle manière à ce que la che d’alimentation soit facilement
accessible à tout moment.
• Contrôler régulièrement l’état du cordon d’alimentation pour déceler d’éventuelles
détériorations. Si le cordon d‘alimentation est endommagé, il doit être remplacé par
le fabricant, une entreprise spécialisée habilitée ou une personne présentant une
qualication analogue.
• Les réparations doivent être effectuées uniquement par un personnel spécialisé et
ne jamais essayer de réparer l’appareil soi-même.
• Ne pas brancher l’appareil à une minuterie ou à une prise de courant
télécommandée.
• Ne jamais plonger le cordon d’alimentation dans l’eau ou dans tout autre liquide.
• Ne pas toucher la che d’alimentation avec des mains humides.
• Ne pas tirer sur le cordon d’alimentation pour débrancher la che de la prise, mais
le saisir fermement au niveau de la che pour le débrancher.
• Ne pas utiliser le câble comme une poignée.
• Disposer le cordon d’alimentation de telle manière à ce que personne ne trébuche dessus.
• Ne pas faire passer le câble au-dessus de rebords coupants.
• Ne pas utiliser l’appareil dans des pièces humides ou sous la pluie.
• Installer l’appareil de sorte à ce qu’il ne puisse pas tomber dans de l’eau. S’il était amené
à tomber à l’eau, débrancher immédiatement l’appareil avant de pouvoir le toucher.
• Débrancher l’appareil après utilisation.
• Tenir l’appareil éloigné des ammes nues et des sources de chaleur.
• Cet appareil peut être utilisé par des enfants de 8 ans ou plus et des personnes
ayant des capacités physiques, sensorielles et mentales limitées et / ou dénuées
d‘expérience et de connaissances, à condition d‘avoir été instruits au fonctionnement
de l‘appareil par une personne responsable et d‘en comprendre les risques associés.
• Tenir les enfants éloignés du grill et ne jamais laisser l’appareil fonctionner sans
surveillance.
• Installer l’appareil sur une surface stable et plane.
• Veiller à ce qu’aucun objet ou substance facilement inammables ne se trouvent
autour de l’appareil.
• Maintenir une distance minimale de 30 cm entre l’appareil et les murs environnants.
• Ne pas toucher la grille ou toute autre surface brûlante pendant le fonctionnement
du grill.
• Déplacer l’appareil uniquement lorsqu’il a complètement refroidi. Manipuler
l’appareil uniquement en saisissant les poignées prévues.
• Installer l’appareil uniquement sur des surfaces thermorésistantes. Ne pas placer
l’appareil trop près du bord.
• Pour éviter une accumulation de chaleur, ne pas placer l’appareil directement sous
un placard ou sous une étagère de cuisine.
• Ne pas placer l’appareil sur une cuisinière ou à proximité de celle-ci.
• Ne pas exposer l’appareil à de trop hautes températures ou à des variations
météorologiques.
• Ne jamais remplir le grill de liquide.
• Si des pièces sont endommagées, arrêter d’utiliser le grill.

41
FR
PIÈCES DÉTACHÉES

42
FR

43
FR
1
Petite grille de cuisson
13
Boîtier de commande II
2
Paravent
14
Voyant
3
Paravent
15
Régulateur
4
Dessertes
16
Bac récupérateur de graisses
5
Grande grille de cuisson
17
Support du bac récupérateur de
graisses
6
Tuyau chauffant
18
Châssis de l'appareil
7
Vis
20
Montant
8
Boîtier de commande I
21
Etagère
9
Micro interrupteur
22
Raccords
10
Thermostat
23
Tuyaux pieds
11
Vis
24
Câble
12
Serre-câble

44
FR
ASSEMBLAGE
Pour faciliter le nettoyage, les pièces illustrées peuvent être retirées dans le sens de la
èche.
Voici à quoi ressemble le barbecue de table assemblé.

45
FR
Fixez les raccords à l‘étagère.
Fixez les pièces illustrées dans le sens de la èche.
Etagère
Raccord
Tube montant
Etagère
Tubes des pieds

46
FR
Fixez les pièces illustrées dans le sens de la èche.

47
FR
Avant de faire des grillades, versez un peu d‘eau dans le bac récupérateur.

48
FR
UTILISATION
1. Retirez tous les matériaux d‘emballage.
2. Montez l‘appareil comme indiqué.
3. Nettoyez la grande grille (5), la petite grille (1) et le bac récupérateur (16) avec un
chiffon humide.
4. Remplissez le bac récupérateur (16) jusqu’à la marque MAX avec de l’eau douce.
Remarque : Remplissez toujours le bac récupérateur (16) avec de l‘eau avant
utilisation pour éviter l‘accumulation de graisse dans les aliments. Lors de la première
utilisation, une odeur peut être provoquée par les matériaux utilisés dans l‘appareil.
L‘odeur est normale et disparaît rapidement.
5. Réglez le thermostat au niveau souhaité : sélectionnez une température basse ou
moyenne pour le réchauffage ou une cuisson lente, sélectionnez MAX pour une
cuisson rapide ou une grillade. Le voyant (14) s‘éteint dès que la température
souhaitée est atteinte.
6. Placez les aliments directement sur la grande grille (5). N‘utilisez jamais d‘assiettes,
de bols ou de papier d‘aluminium sous les aliments. Le temps de cuisson dépend de
l‘épaisseur de la nourriture. Tournez la nourriture de temps en temps.
Remarque: la grille de cuisson peut être réglée à trois hauteurs différentes.
7. Après utilisation, réglez le thermostat sur „0“ et retirez la che de la prise, vériez le
raccordement et assurez-vous que l‘élément chauffant est correctement monté dans
le boîtier.
Remarques concernant l‘élément chauffant
L‘élément chauffant est équipé d‘un interrupteur de sécurité. Cela empêche l‘élément
chauffant de fonctionner à l‘extérieur du barbecue. Si le chauffage ne s‘allume pas,
vériez le raccordement et vériez que l‘élément chauffant est correctement installé dans
le boîtier.

49
FR
NETTOYAGE ET ENTRETIEN
Consignes d’utilisation
• Toujours débrancher l’appareil avant de le nettoyer.
• Veiller à ne pas laisser d’eau s’inltrer dans le corps de l’appareil. Cela pourrait
provoquer un court-circuit.
• Ne pas plonger le grill, le cordon et la che d’alimentation dans l’eau ou dans tout
autre liquide´.
• Ne pas utiliser de produit nettoyant agressif ou d’objet métallique ou tranchant,
comme un couteau ou une éponge métallique.
RÉSOLUTION DES PROBLÈMES
Problème Cause possible Solution
L’appareil ne chauffe pas
assez
L’appareil n’est pas
branché.
Brancher la che dans la
prise.
L’appareil s’éteint
inopinément.
Une fois que la
température sélectionnée
est atteinte, le thermostat
s’éteint automatiquement.
Lorsque la température
réelle devient inférieure
à la température
sélectionnée, le thermostat
se remet automatiquement
en marche.
Mettre le thermostat à une
température plus élevée.

50
FR
INFORMATIONS SUR LE RECYCLAGE
S‘il existe une réglementation pour l‘élimination ou le
recyclage des appareils électriques et électroniques dans
votre pays, ce symbole sur le produit ou sur l‘emballage
indique que cet appareil ne doit pas être jeté avec les
ordures ménagères. Vous devez le déposer dans un point
de collecte pour le recyclage des équipements électriques
et électroniques. La mise au rebut conforme aux règles
protège l‘environnement et la santé de vos semblables des
conséquences négatives. Pour plus d‘informations sur le
recyclage et l‘élimination de ce produit, veuillez contacter
votre autorité locale ou votre service de recyclage des
déchets ménagers.
FABRICANT ET IMPORTATEUR (UK)
Fabricant :
Chal-Tec GmbH, Wallstraße 16, 10179 Berlin, Allemagne.
Importateur pour la Grande Bretagne :
Chal-Tec UK limited
Unit 6 Riverside Business Centre
Brighton Road
Shoreham-by-Sea
BN43 6RE
United Kingdom

51
IT
Gentile cliente,
La ringraziamo per aver acquistato il dispositivo. La preghiamo
di leggere attentamente le seguenti istruzioni per l’uso e di
seguirle per evitare possibili danni tecnici. Non ci assumiamo
alcuna responsabilità per danni scaturiti da una mancata
osservazione delle avvertenze di sicurezza e da un uso
improprio del dispositivo. Scansionare il codice QR seguente,
per accedere al manuale d’uso più attuale e per ricevere
informazioni sul prodotto.
INDICE
Avvertenze di sicurezza52
Singoli componenti53
Montaggio56
Utilizzo60
Pulizia e manutenzione61
Ricerca e risoluzione degli errori61
Smaltimento62
Produttore e importatore (UK) 62
DATI TECNICI
Articolo numero 10034694
Alimentazione
220-240 V ~ 50/60 Hz

52
IT
AVVERTENZE DI SICUREZZA
• Collegare il dispositivo in modo che la spina sia facilmente accessibile in qualsiasi
momento.
• Controllare regolarmente che il cavo di alimentazione non sia danneggiato. Se
il cavo di alimentazione è danneggiato, rivolgersi al produttore o ad un tecnico
qualicato.
• Le riparazioni devono essere eseguite esclusivamente da personale qualicato, non
tentare di riparare il dispositivo autonomamente.
• Non collegare il dispositivo ad un timer o ad una presa con telecomando.
• Non immergere mai il dispositivo, il cavo di alimentazione o la spina in acqua o in
altri liquidi.
• Non toccare la spina con le mani bagnate.
• Non tirare il cavo per staccare la spina, bensì afferrare la spina alla base.
• Non spostare il dispositivo tirando il cavo di alimentazione.
• Installare il dispositivo in modo che nessuno vi possa inciampare.
• Non far scorrere il cavo di alimentazione su spigoli vivi.
• Non utilizzare il dispositivo in ambienti umidi o sotto la pioggia.
• Collocare il dispositivo in un punto dove non possa cadere in acqua. Nel caso
in cui cada in acqua, prima di toccarlo, staccare immediatamente la spina dalla
presa.
• In caso di inutilizzo del dispositivo, staccare la spina dalla presa.
• Tenere il dispositivo lontano da amme libere e da fonti di calore.
• Questo dispositivo può essere utilizzato da bambini a partire da 8 anni e da
persone con limitate capacità siche e psichiche o con conoscenza ed esperienza
limitate, solo se sono stati istruiti sulle modalità d’uso e comprendono i rischi e i
pericoli connessi.
• Tenere i bambini lontano dal dispositivo e non lasciarlo incustodito mentre è in
funzione.
• Collocare il dispositivo su una supercie stabile e piana.
• Assicurarsi che intorno al dispositivo non ci siano oggetti e materiali inammabili.
• Lasciare almeno 30 cm di distanza tra il dispositivo e le pareti.
• Non toccare la griglia o le superci calde quando il dispositivo è in funzione.
• Spostare il dispositivo solo quando si è completamente raffreddato. Afferrare il
dispositivo solo tramite le impugnature.
• Collocare il dispositivo solo su superci resistenti al calore e in modo che non sia
troppo vicino al bordo della supercie.
• Per evitare accumulo di calore, non collocare il dispositivo direttamente sotto mobili
da cucina o mensole.
• Non collocare il dispositivo sopra o vicino ai fornelli da cucina.
• Non esporre il dispositivo a temperature troppo elevate e a sbalzi di temperature.
• Non versare mai liquidi nella griglia.
• Se alcuni componenti sono danneggiati, non utilizzare il dispositivo.

53
IT
SINGOLI COMPONENTI
54
IT

55
IT
1
Griglia piccola
13
Scatola di distribuzione II
2
Paravento
14
Spie di indicazione
3
Paravento
15
Manopola
4
Ripiani
16
Vaschetta di raccolta del grasso
5
Griglia grande
17
Fissaggio della vaschetta di
raccolta
6
Elemento riscaldante
18
Alloggiamento
7
Viti
20
Tubo di sostegno
8
Scatola di distribuzione I
21
Pannello di appoggio
9
Microinterruttore
22
Connettori
10
Termostato
23
Piedi
11
Vite
24
Cavo
12
Morsetto per cavo

56
IT
MONTAGGIO
Per facilitare la pulizia, i componenti rappresentati in immagine possono essere
rimossi in direzione della freccia.
Il grill da tavolo montato ha questo aspetto.

57
IT
Fissare i connettori al pannello di appoggio.
Fissare i componenti in immagine in direzione delle frecce.
Pannello di appoggio
Connettore
Tubo di sostegno
Pannello di appoggio
Piedi

58
IT
Fissare i componenti in immagine in direzione delle frecce.

59
IT
Prima di grigliare, versare un po’ d’acqua nella vaschetta di raccolta del grasso.

60
IT
UTILIZZO
1. Rimuovere il materiale di imballaggio.
2. Montare il dispositivo seguendo le indicazioni.
3. Pulire la griglia grande (5), la griglia piccola (1) e la vaschetta di raccolta (16) con
un panno umido.
4. Riempire la vaschetta di raccolta (16) d’acqua no al segno MAX.
Nota: riempire sempre d’acqua la vaschetta di raccolta (16) prima di utilizzare il
grill, in modo da evitare la formazione di amme a causa del grasso contenuto negli
alimenti. Durante il primo utilizzo può comparire uno strano odore dovuto ai materiali
utilizzati. L’odore è normale e scompare rapidamente.
5. Impostare il termostato sul livello desiderato: selezionare una temperatura bassa
o media per scaldare o grigliare lentamente e selezionare MAX per cuocere
rapidamente e grigliare. La spia di controllo (14) si spegne quando viene raggiunta
la temperatura desiderata.
6. Poggiare gli alimenti direttamente sulla griglia grande (5). Non utilizzare mai piatti,
ciotole o carta stagnola sotto alle pietanze. La durata dipende dallo spessore degli
alimenti. Girare le pietanze di tanto in tanto.
Nota: l’altezza della griglia è regolabile su tre livelli.
7. Dopo l’utilizzo, girare il termostato su “0” e staccare la spina.
Avvertenze sull’elemento riscaldante
L’elemento riscaldante è dotato di un interruttore di sicurezza. In questo modo si evita
che l’elemento riscaldante funzioni al di fuori del grill. Se non è possibile accendere
l’elemento riscaldante, controllare la connessione e se l’elemento riscaldante è montato
correttamente nell’alloggiamento.

61
IT
PULIZIA E MANUTENZIONE
Indicazioni importanti
• Staccare sempre la spina dalla presa di corrente prima di pulire il dispositivo.
• Assicurarsi che l‘acqua non penetri all’interno del dispositivo per evitare un corto
circuito.
• Non immergere mai il dispositivo, il cavo e la spina in acqua o in altri liquidi.
• Non usare detersivi aggressivi o oggetti metallici appuntiti come ad esempio
coltelli.
RICERCA E RISOLUZIONE DEGLI ERRORI
Problema Causa possibile Soluzione
Il dispositivo non riscalda. Il dispositivo non è
collegato alla corrente.
Inserire la spina nella
persa di corrente.
Il dispositivo si spegne
da solo.
Appena la temperatura
impostata è raggiunta,
il termostato si spegne
automaticamente.
Appena la temperatura si
trova al di sotto di quella
impostata, il termostato
si accende di nuovo
automaticamente.
Impostare il termostato
ad una temperatura
maggiore.
62
IT
AVVISO DI SMALTIMENTO
Se nel proprio paese si applicano le regolamentazioni
inerenti lo smaltimento di dispositivi elettrici ed elettronici,
questo simbolo sul prodotto o sulla confezione segnala che
questi prodotti non possono essere smaltiti con i riuti normali
e devono essere portati a un punto di raccolta di dispositivi
elettrici ed elettronici. Grazie al corretto smaltimento dei
vecchi dispositivi si tutela il pianeta e la salute delle persone
da possibili conseguenze negative. Informazioni riguardanti il
riciclo e lo smaltimento di questi prodotti si ottengono presso
l’amministrazione locale oppure il servizio di gestione dei
riuti domestici.
PRODUTTORE E IMPORTATORE (UK)
Produttore:
Chal-Tec GmbH, Wallstraße 16, 10179 Berlino, Germania.
Importatore per la Gran Bretagna:
Chal-Tec UK limited
Unit 6 Riverside Business Centre
Brighton Road
Shoreham-by-Sea
BN43 6RE
United Kingdom