10028784
Elektrischer Grill

2
Inhalt
Technische Daten
Sicherheitshinweise
Sehr geehrter Kunde,
wir gratulieren Ihnen zum Erwerb Ihres Gerätes. Lesen Sie die folgenden Hinweise sorgfältig durch und
befolgen Sie diese, um möglichen Schäden vorzubeugen. Für Schäden, die durch Missachtung der Hinweise
und unsachgemäßen Gebrauch entstehen, übernehmen wir keine Haftung.
.
Artikelnummer 10028784
Stromversorgung 220-240 V 50/60 Hz
Leistung 1400-1600 W
Technische Daten . . . . . . . . . . . . . . . . . . . . . . . . . . . . . . . . . . . . . . . . . . . . . . .2
Sicherheitshinweise . . . . . . . . . . . . . . . . . . . . . . . . . . . . . . . . . . . . . . . . . . . . . .2
Geräteübersicht . . . . . . . . . . . . . . . . . . . . . . . . . . . . . . . . . . . . . . . . . . . . . . . . .5
Montage . . . . . . . . . . . . . . . . . . . . . . . . . . . . . . . . . . . . . . . . . . . . . . . . . . . . .6
Bedienung . . . . . . . . . . . . . . . . . . . . . . . . . . . . . . . . . . . . . . . . . . . . . . . . . . . .8
Reinigung und Pflege . . . . . . . . . . . . . . . . . . . . . . . . . . . . . . . . . . . . . . . . . . . . .9
Hinweise zur Entsorgung . . . . . . . . . . . . . . . . . . . . . . . . . . . . . . . . . . . . . . . . . . .9
Konformitätserklärung . . . . . . . . . . . . . . . . . . . . . . . . . . . . . . . . . . . . . . . . . . . .9
• Dieses Gerät darf von Kindern ab 8 Jahren und Personen mit eingeschränkten körperlichen, sensorischen
und geistigen Fähigkeiten und Kenntnissen verwendet werden, wenn sie in die sichere Verwendung des
Gerätes eingewiesen wurden und die damit verbundenen Gefahren verstehen.
• Kinder dürfen nicht mit dem Gerät spielen.
• Die Reinigung und Wartung darf von Kindern nicht ohne Aufsicht durchgeführt werden. Halten Sie das
Gerät und das Kabel außerhalb der Reichweite von Kindern, die jünger als 8 Jahre sind.
• Dieses Gerät ist nicht dazu geeignet, mit einer externen Zeitschaltuhr oder oder einer separaten Fernbe-
dienung zu betreiben.
• Falls das Netzkabel beschädigt ist, muss es vom Hersteller, seinem Kundendienst oder einer ähnlich qua-
lifizierten Person ersetzt werden, um eine Gefahr zu vermeiden.
• Der Netzstecker muss entfernt werden, bevor Sie das Gerät reinigen. Der Netzstecker muss trocken sein,
bevor er wieder verwendet werden kann.
• Die Temperatur der zugänglichen Flächen kann sehr hoch sein, wenn das Gerät in Betrieb ist.

3
• Überprüfen Sie das Gerät und die Verkabelung regelmäßig. Benutzen Sie sie nicht weiter, falls Probleme
mit dem Gerät auftreten.
• Tauchen Sie das Gerät mit dem Heizelement nicht in Wasser.
• Das Gerät sollte ausgeschaltet werden, wenn es nicht benutzt wird.
• Verwenden Sei das Gerät nur über den Stecker und verwenden Sie nur eine geerdetes Kabel, mit einem
Querschnitt von mindestens 1 mm².
• Berühren Sie beim Grillen das Gerät nicht (Abdeckung oder Rost), um Verbrennungen zu vermeiden.
• Die Temperatur der Oberfläche wird sehr heiß. Halten Sie das Gerät von Zunder fern.
• Das Gerät ist nur zum Grillen geeignet.
• Stellen Sie das Gerät nicht auf eine empfindliche Oberfläche.
• Nur der passende Stecker darf verwendet werden.
• Das Netzkabel muss regelmäßig auf Anzeigen von Schäden überprüft werden. Wenn es beschädigt ist,
darf es nicht verwendet werden.
• Das Gerät muss durch einen Fehlerstromschutzschalter betrieben werden mit einem Differenzstrom vom
nicht mehr als 30 mA.
• Das Gerät muss mit einer Steckdose mit Erdung verbunden werden.
• Holzkohle oder ähnliche entzündbare Brennstoffe dürfen mit dem Gerät nicht verwendet werden.
• Dieses Gerät ist zur Verwendung im Haushalt und ähnlichen Anwendungen bestimmt, z. B. in Teeküchen
in Geschäften, Büros und anderen Arbeitsumgebungen in Gutshäusern, Hotels, Motels und anderen Be-
herbungen bei Verpflegungen nichtgeschäftlicher Art.
• Entfernen Sie während der Benutzung den Deckel vom Grill.
• Die Verwendung einer Fehlstromschutzvorrichtung mit einem Nennausschaltstrom von 30 mA bietet Ih-
nen zusätzlichen Schutz, der sicherstellt, dass 30 mA in der Hausanlage nicht überschritten wird. Lassen
Sie sich vom Elektroinstallateur beraten. Die Gefahr besteht auch bei einem ausgeschalteten Gerät. Daher
sollte der Stecker nach jedem Gebrauch auch gezogen werden.
• Verwenden Sie dieses Gerät in der Nähe von Wasser in Badewannen, Waschbecken oder anderen Gefä-
ßen. Setzten Sie das Gerät weder Regen noch Feuchtigkeit aus.
• Das Gerät darf nicht betrieben werden, wenn
◦ das Gerät, das Gehäuse oder das Netzkabel beschädigt sind.
◦ das Gerät sichtbare Zeichen einer Beschädigung hat.
◦ ein Fehler vermutet wird, nach einem Sturz oder Ähnlichem
• Ziehen Sie den Netzstecker, wenn
◦ während der Benutzung Fehlfunktionen auftreten.
◦ vor dem Reinigen und dem Umstellen des Gerätes von einem Ort zum anderen.
◦ nach der Benutzung.
• Ziehen Sie den Netzstecker nie mit nassen Händen.
• Tragen und ziehen Sie das Gerät nicht am Netzkabel.
• Ziehen Sie das Netzkabel nicht über scharfe Kanten. Verkeilen Sie es nicht.

4
• Tauchen Sie das Netzkabel oder die Thermostatstecker nicht in Wasser oder eine andere Flüssigkeit.
• Verwenden Sie Verlängerungskabel nur, nachdem Sie sich vergewissert haben, dass sie geerdet sind, und
mindestens 10 A führen können.
• Legen Sie das Kabel so, dass ein unbeabsichtigtes Berühren oder Ziehen nicht möglich ist.
• Bringen Sie das Verlängerungskabel nicht in Kontakt mit dem Grillrost.
• Schalten Sie das Gerät immer aus, bevor Sie den Netzstecker ziehen.
• Lassen Sie den Grill abkühlen, bevor Sie Zubehör entfernen oder den Grill reinigen.
• Achtung! Die Grillplatte wird sehr heiß bleibt es auch lange, nachdem der Schalter ausgeschaltet wurde.
Vorsicht vor Verbrennungen! Berühren Sie keine heißen Oberflächen und seien Sie achtsam, wenn Sie
nach dem Gebrauch mit dem Gerät umgehen.
• Stellen Sie den Grill nicht auf eine Kante oder Ecke des Tisches und vermeiden Sie den Kontakt mit heißen
Flächen.
• Stellen Sie das Gerät nicht in der Nähe eines gasbetriebenen oder elektrischen Heizgerätes oder eines
heißen Ofens auf.
• Verwenden Sie das Gerät nur, wenn es auf einer stabilen und trockenen Oberfläche steht.
• Lassen Sie das Gerät nicht unbeaufsichtigt.
• Verwenden Sie das Gerät nicht ohne die Fettauffangschale auf der Basis.
• Bedecken Sie den Grill nicht mit einer Aluminiumfolie oder Auflagen.
• Stellen Sie tadellos sicher, dass das Gerät richtig aufgestellt ist, bevor Sie es betreiben (vor allem, wenn Sie
das Gestell verwenden).
• Achten Sie darauf, dass die Grillplatte nicht das Heizelement berührt. Es besteht Gefahr.
• Achten Sie auf Fettspritzer, wenn Sie fettiges oder saftiges Fleisch grillen.
• Stellen Sie das Gerät auf einen Untergrund, der hitzebeständig ist. Halten Sie den Grill während des Be-
triebs mindesten 10 cm von Wänden fern.
• Benutzen Sie das Gerät, wie es in dieser Bedienungsanleitung beschrieben wird. Eine von der Empfehlung
des Herstellers abweichende Verwendung kann zu einem Brand, einem Stromschlag oder anderen Per-
sonenschäden führen.
• Verwenden Sie aus Sicherheitsgründen kein Zubehör, das vom Hersteller nicht empfohlen wird.
• Nur geschulte Fachleute dürfen elektrische Geräte reparieren. Nicht sachgerechte Reparaturen können ei-
nen beträchtlichen Personenschaden am Verbraucher anrichten.
5
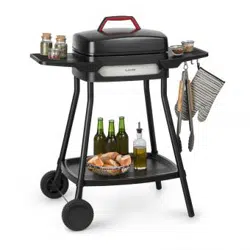
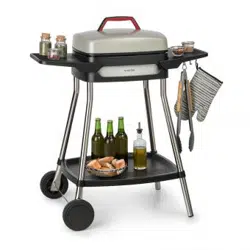
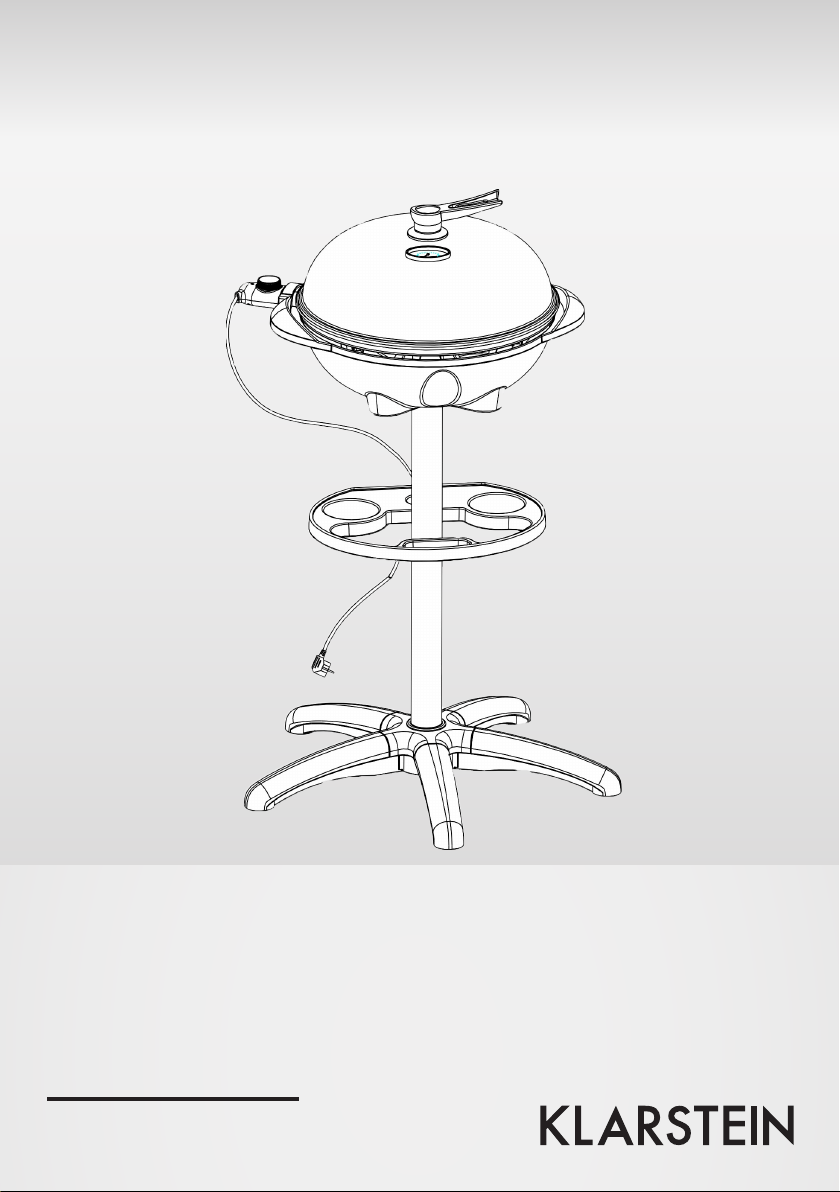
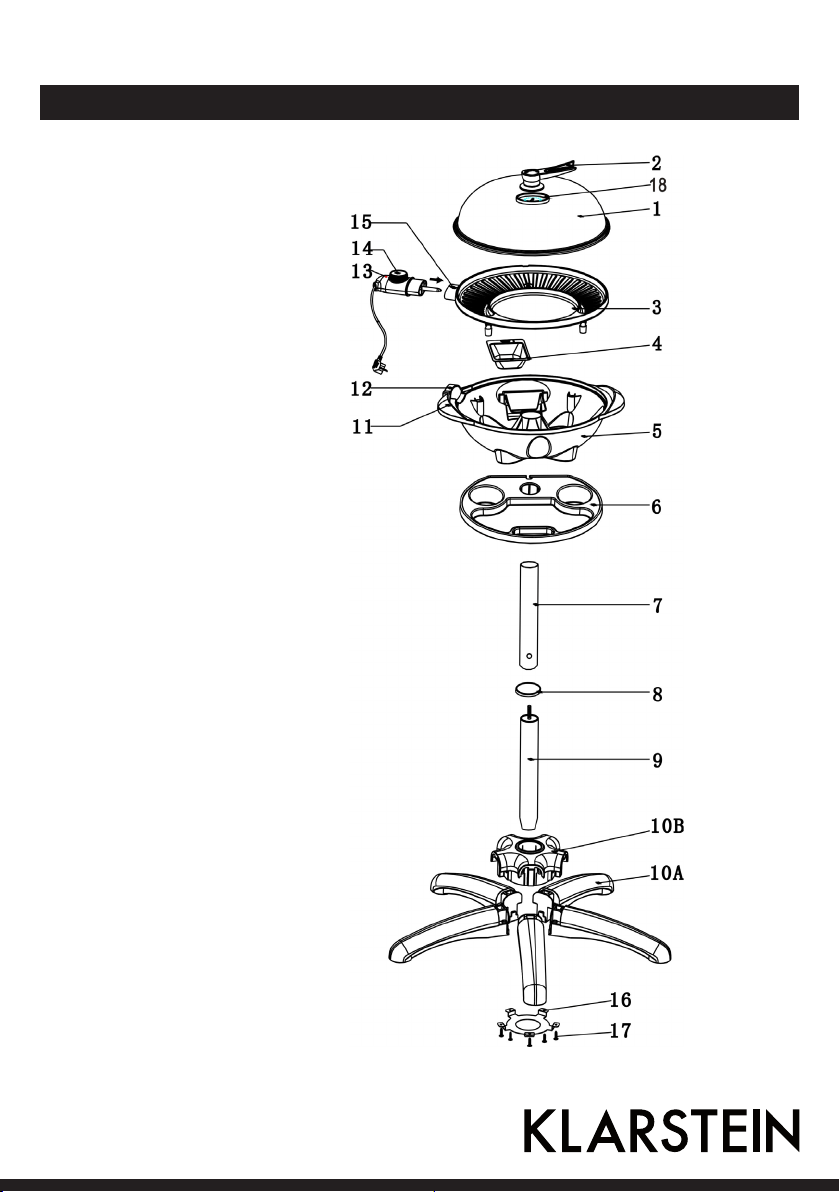
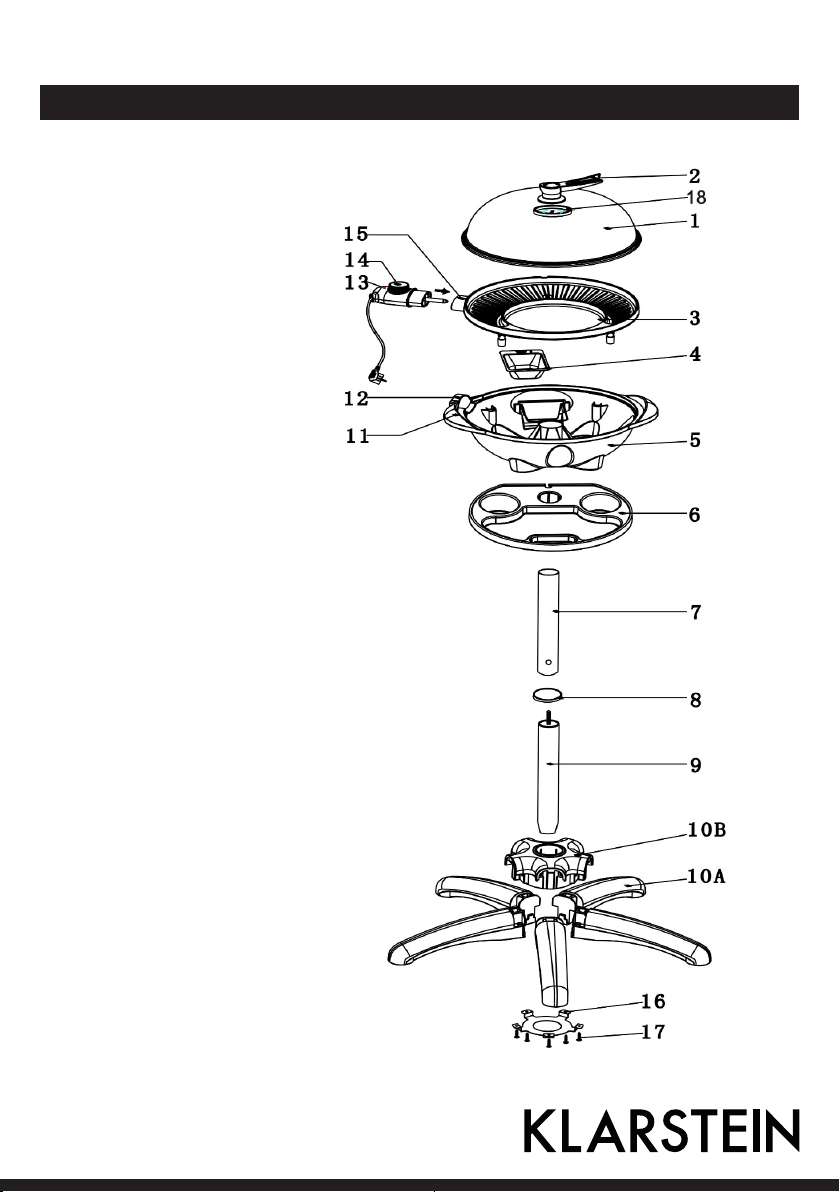
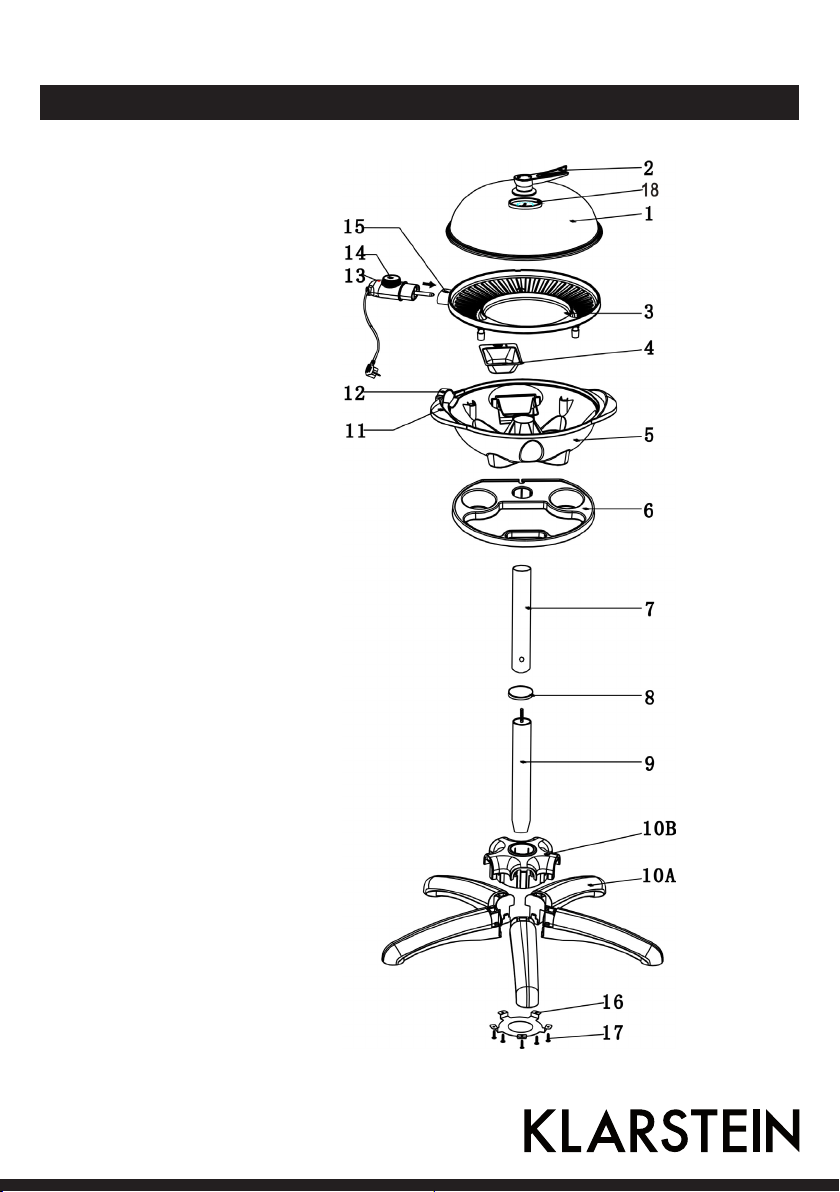
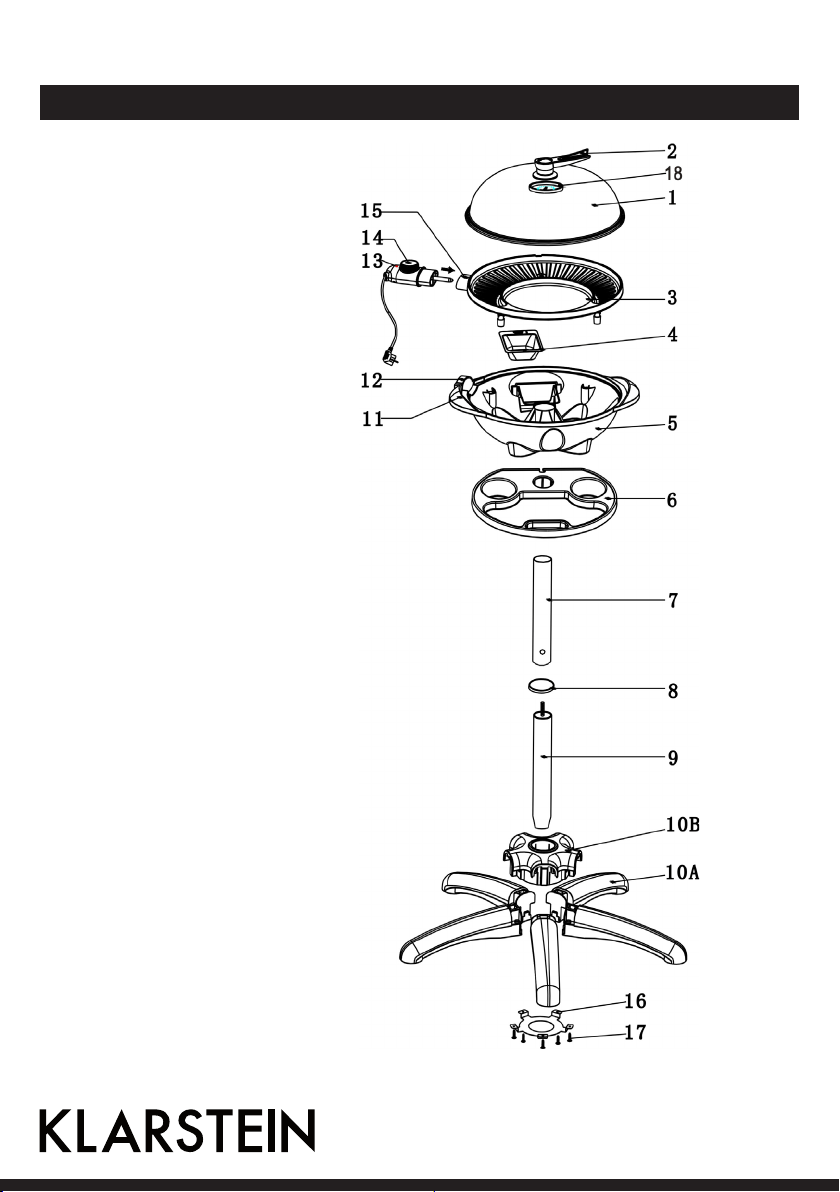
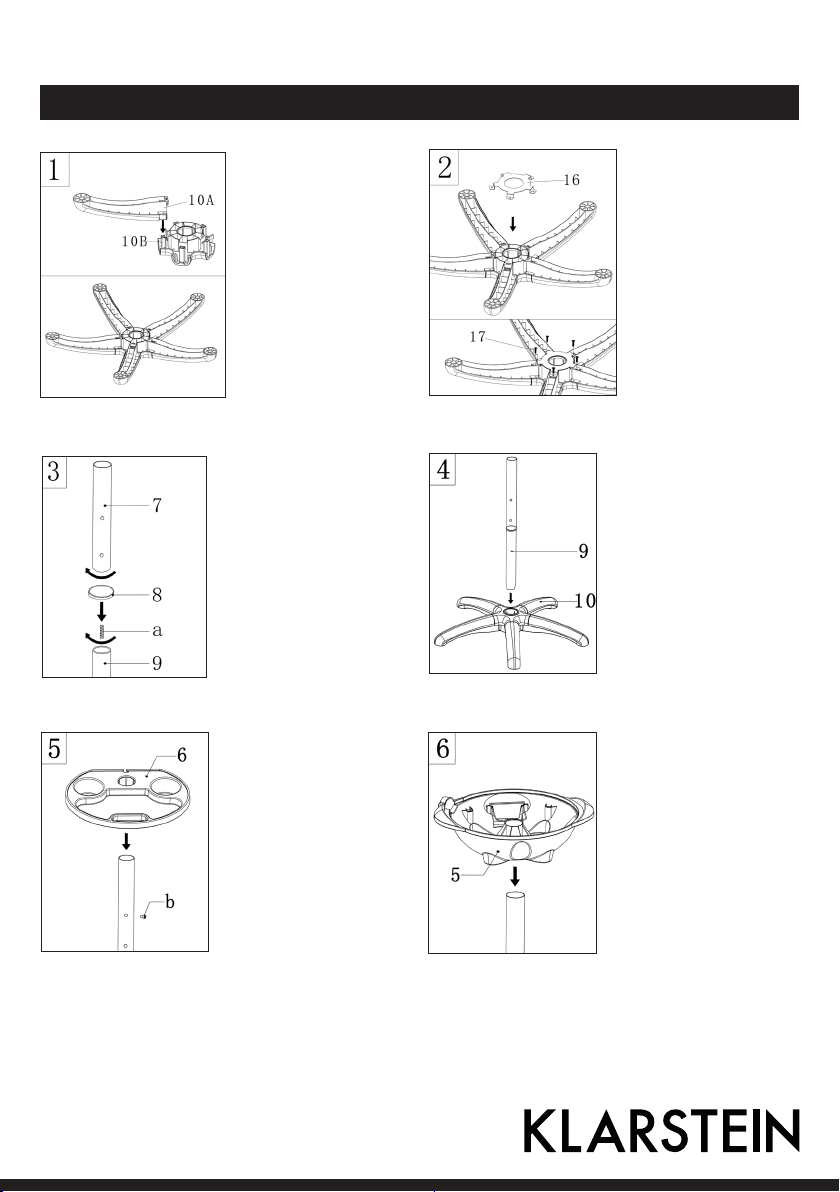
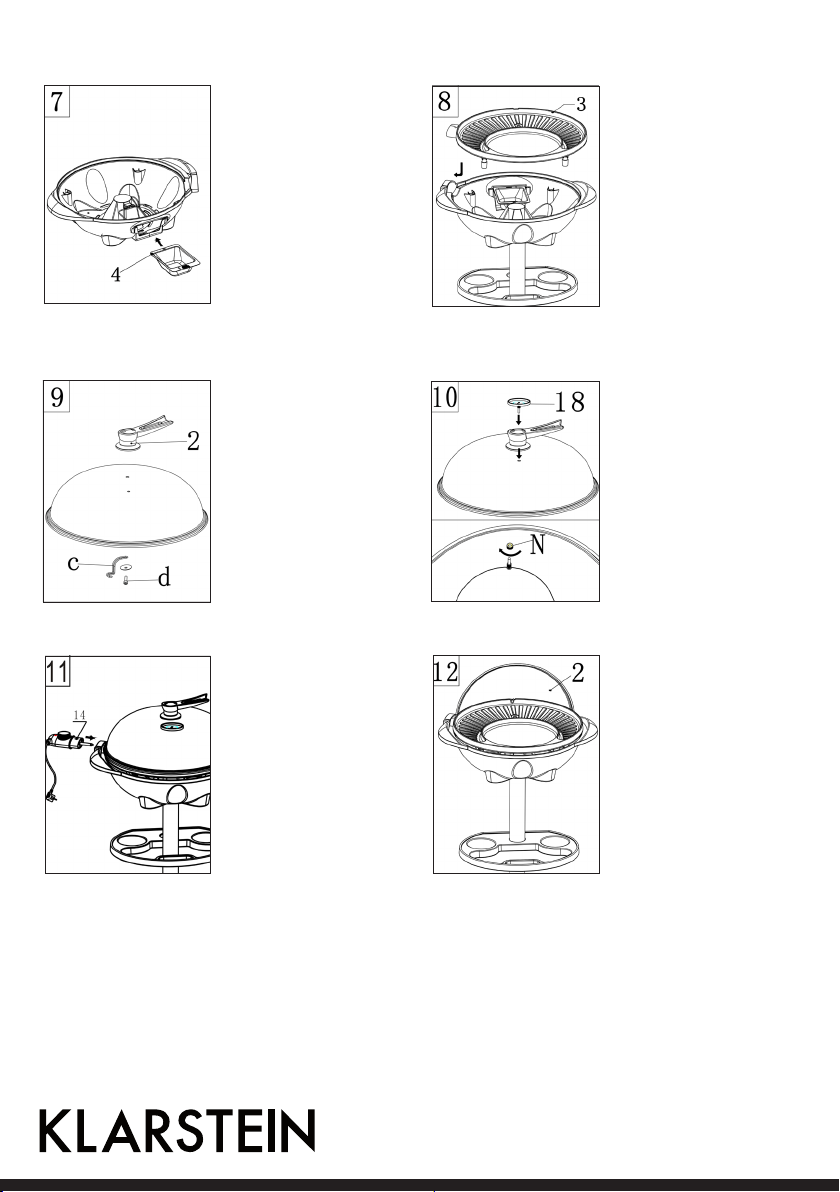
Geräteübersicht
1 Grillhaube
2 Griffe der Haube
3 Grillplatte
4 Fettauffangschale
5 Gerätebasis
6 Zubehör-Ablage
7 Oberes Stativrohr
8 Verzierung
9 Unteres Stativrohr
10 A Standfuß
B Standbasis
11 Griff der Gerätebasis
12 Öffnung für die Gerätesteckdose
13 Lampe für die Temperaturanzeige
14 Abnehmbarer Temperaturregler
mit Kabel
15 Gerätesteckdose
16 Unterlegscheibe
17 Schrauben
18 Thermometer

6
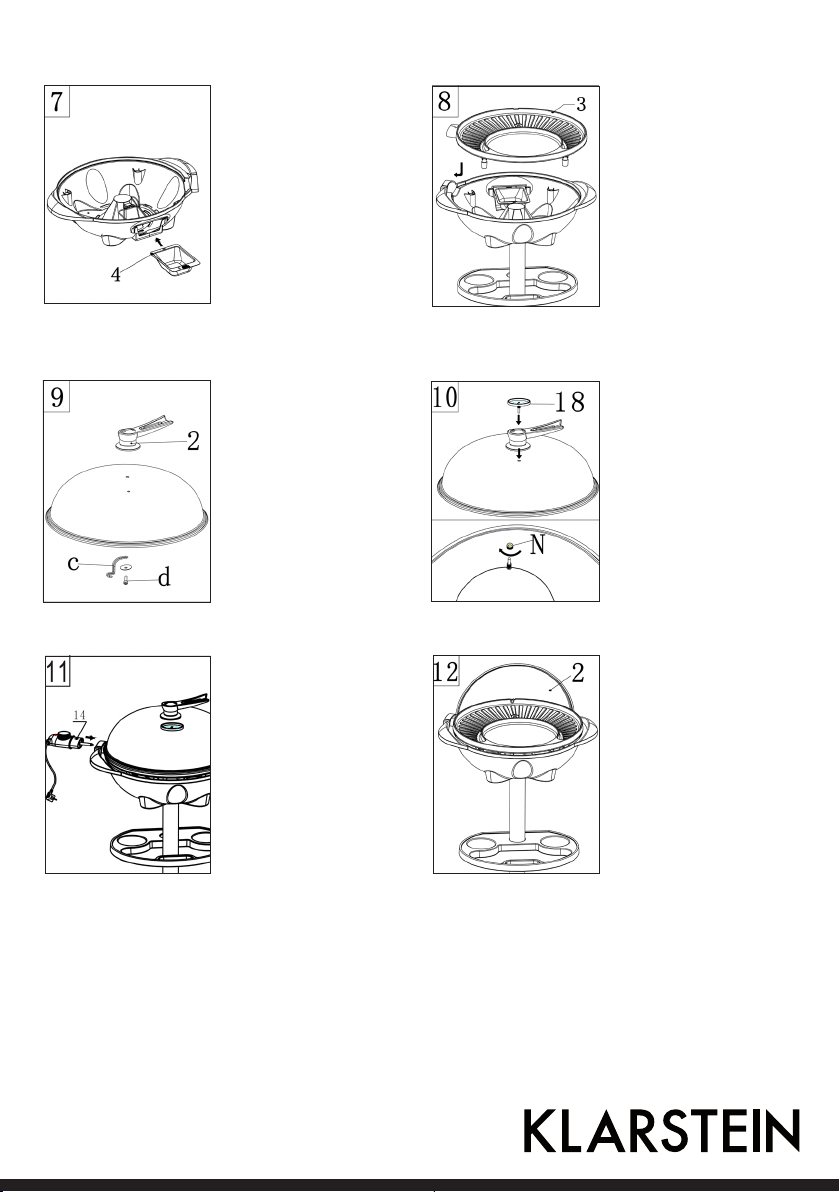
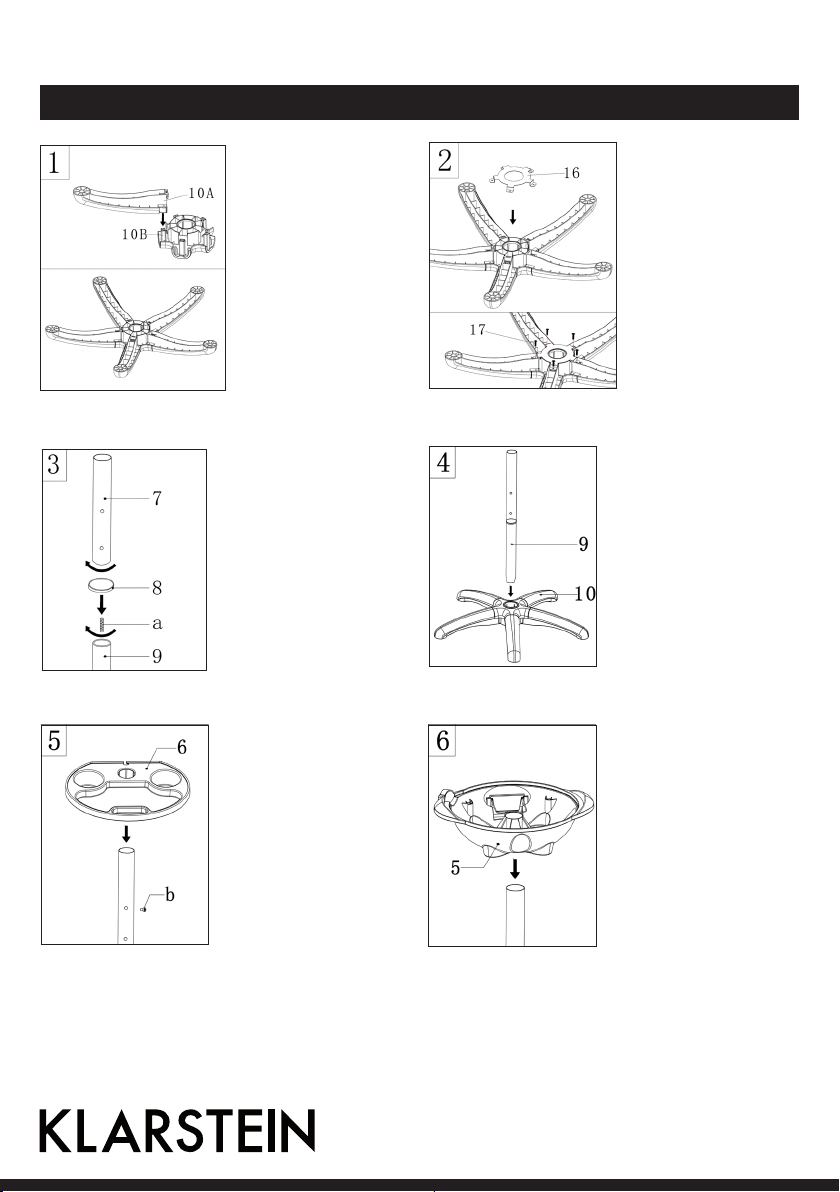
Montage
Stecken Sie die Füße
(10A) fest in den So-
ckel (10B). Wenn ein
Fuß richtig einrastet
klickt es.
Verbinden Sie den
Sockel (10) und das
untere Stativrohr (9)
miteinander, um den
Grillständer zu vervoll-
ständigen.
(Der Grill kann auch
ohne den Ständer ver-
wendet werden.)
Stellen Sie die schüs-
selförmige Gerätebasis
(5) auf den Grillständer.
(Achten Sie darauf,
dass der Grillständer
auf trockenem, fla-
chem und stabilem
Untergrund steht.)
Legen Sie die Unter-
legscheibe (16) auf
den Sockel und zie-
hen Sie die Schrau-
ben (17) auf der Un-
terlegscheibe fest,
um den Sockel und
die Standfüße fest
miteinander zu ver-
binden.
Schrauben Sie die
Hälfte des Stangen-
gewindes (a) in das
untere Stativrohr (9).
und verbinden Sie
beide Rohre mitei-
nander. Stellen Sie
sicher, dass Sie fest
miteinander ver-
schraubt sind.
Befestigen Sie die
Schraube (b) im obe-
ren Stativrohr (7).
Stecken Sie die Zu-
behör-Ablage (6) auf
das obere Stativrohr.
Stellen Sie sicher,
dass die Ablage gut
befestigt ist.
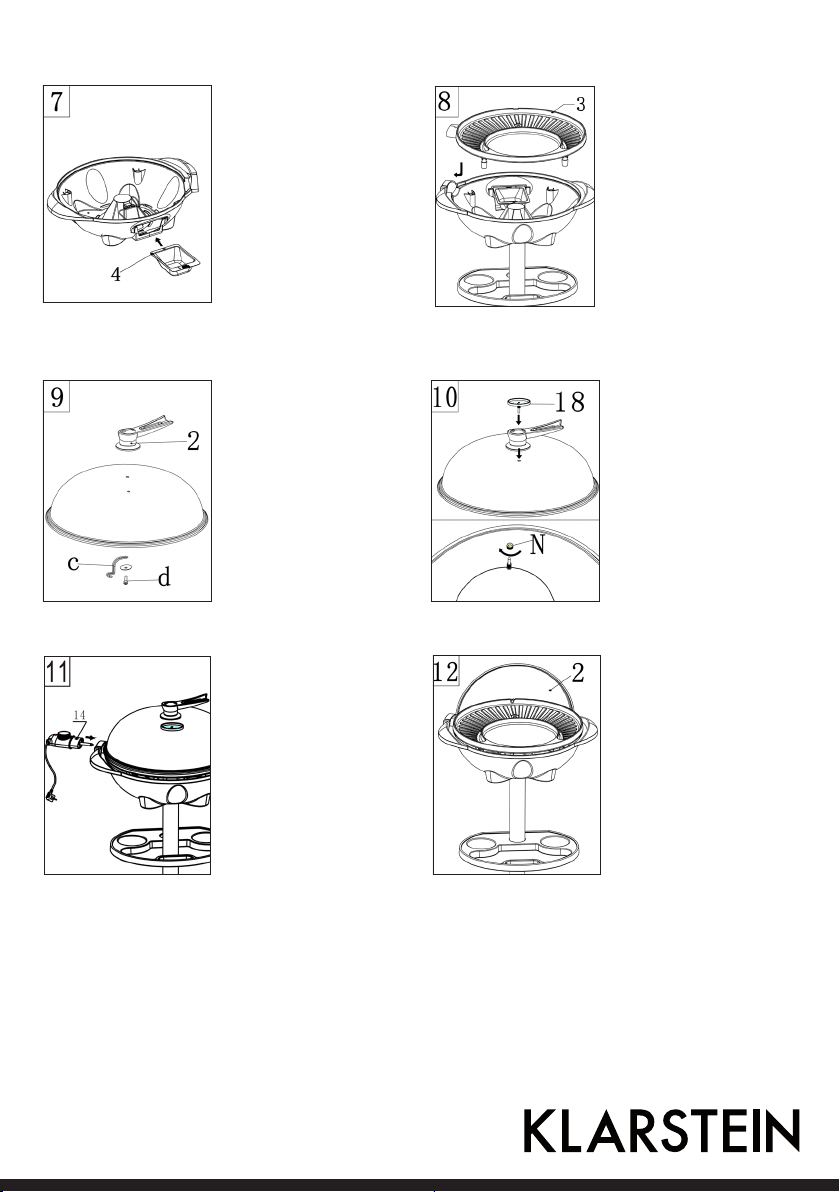
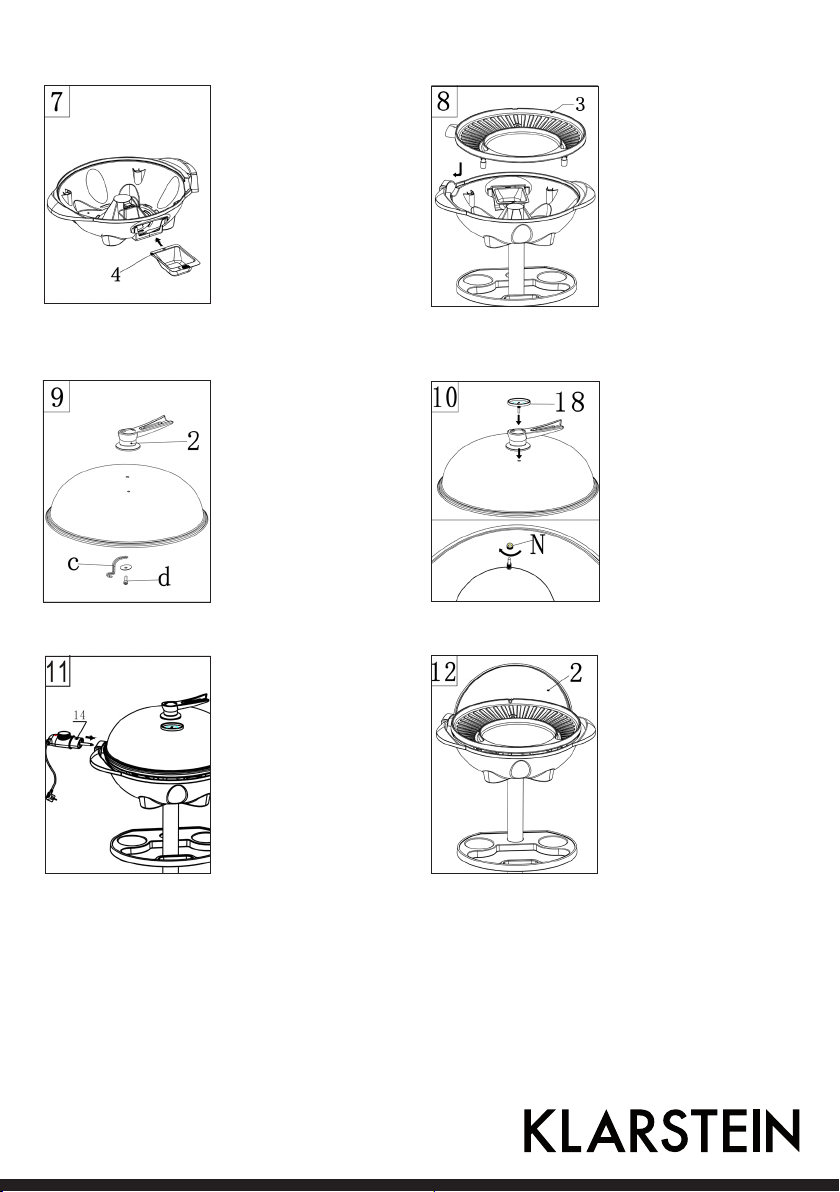
7
Stellen Sie die Grill-
platte (3) auf das Gerät
(5). Führen Sie die Ge-
rätesteckdose (15) in
die dafür vorgesehene
Öffnung (12). Stellen
Sie anschließend die
Grillplatte waagerecht
auf die Gerätebasis.
Führen Sie das Ther-
mometer (18) in das
Loch der Grillhaube
und verschrauben Sie
es auf der Rückseite
der Haube mit der ei-
ner Schraube und der
Mutter (N).
Die Grillhaube (2) kön-
nen Sie öffnen und zur
Seite drehen, indem
Sie sie an der Kante der
Grillplatte einhaken.
Stellen Sie die Fettauf-
fangschale(4) in die Hal-
terung, die zur Geräte-
basis gehört.
Montieren Sie den Griff
(2) in die Grillhaube mit
der Schraube (e), der
Dichtung (d) und dem
Haken (c).
Dann stellen Sie die
Grillhaube auf die Grill-
platte.
Drücken Sie den ab-
nehmbaren Tempera-
turregler (14) so weit Sie
können nach oben in
den Sockel des Geräte-
basis.

8
Bedienung
Bevor Sie das Gerät zum ersten Mal benutzen
• Entfernen Sie die Verpackung und reinigen Sie die Grillplatte (3), Fettauffangschale (4) und die Grillhaube
(1) vollständig.
Das Gerät benutzen
1. Schließen Sie das Gerät an die Stromversorgung an.
2. Stellen Sie den Temperaturregler (14) auf die gewünschte Temperatur ein. (Gewöhnlich braucht das Gerät
3 Minuten zum Aufheizen.)
3. Die Lampe für die Temperaturanzeige (13) geht aus, sobald die gewünschte Temperatur erreicht ist.
4. Legen Sie das Grillgut auf die Grillplatte.
Garzeiten
Hier ist eine Tabelle der empfohlenen Garzeiten. Für verschiedene Gewichte und Größen des Grillguts wer-
den verschiedene Garzeiten benötigt, abhängig davon, ob Sie mit oder ohne Grillhaube grillen.
Grillgut Temperatureinstellung Garzeit (in Minuten)
Steak/Rind 5 15-20
Lamm 5 12-18
Hähnchenkeulen 5 25-30
Kotelett 5 20-25
Hähnchenflügel 5 15-20
Schweinefilet 4-5 9-10
Ganzer Fisch 5 12-15
Kebab 3-4 10-12
Diverse Würstchen 3-4 12-15
Grilltipps
• Ihr Fleisch wird zarter, wenn Sie es vor dem Grillen über Nacht marinieren. Marinade besteht immer aus Öl
(um es saftig werden zu lassen), Essig (um es zart zu machen) und einer Mischung aus Gewürzen.
• Benutzen Sie immer Zangen oder eine Form von Spatel, um das Grillgut zu wenden. Wenn Sie eine Gabel
zum Drehen verwenden, trocknet das Grillgut aus und die Antihaftbeschichtung wird beschädigt.
• Grillen Sie Fleisch nicht zu lange. Selbst Schweinefleisch ist besser, wenn es noch etwas rosa und saftig
ist, wenn es serviert wird.
9
Reinigung und Pflege
• Wenn das Grillgut auf der Grillplatte klebt, reiben Sie die Platte hin und wieder mit einem in Öl getränkten
Küchentuch ab.
1. Trennen Sie das Gerät von der Stromversorgung.
2. Lassen Sie den Grill vollständig abkühlen.
3. Nehmen Sie den Temperaturregler aus der Gerätesteckdose.
4. Reinigen Sie die Grillplatte und die Fettauffangschale mit lauwarmen Spülwasser und einem feuchten
Tuch. Verwenden Sie keine Schwämme aus Stahlwolle, Bürsten oder Scheuerlappen, um Schäden an der
Beschichtung zu vermeiden.
5. Trocknen Sie die Gerätebasis (5) mit einem feuchten Tuch. Fettspritzer können durch eine mildes
Reinigungsmittel entfernt werden.
Hinweis: Die Grillplatte hat eine Antihaftbeschichtung. Zerkratzen Sie diese Beschichtung weder durch den Grill-
noch den Reinigungsvorgang.
Hinweise zur Entsorgung
Befindet sich die linke Abbildung (durchgestrichene Mülltonne auf Rädern) auf dem Produkt,
gilt die Europäische Richtlinie 2002/96/EG. Diese Produkte dürfen nicht mit dem normalen
Hausmüll entsorgt werden. Informieren Sie sich über die örtlichen Regelungen zur getrenn-
ten Sammlung elektrischer und elektronischer Gerätschaften. Richten Sie sich nach den örtli-
chen Regelungen und entsorgen Sie Altgeräte nicht über den Hausmüll. Durch die regelkon-
forme Entsorgung der Altgeräte werden Umwelt und die Gesundheit ihrer Mitmenschen vor
möglichen negativen Konsequenzen geschützt. Materialrecycling hilft, den Verbrauch von
Rohstoffen zu verringern.
Konformitätserklärung
Hersteller: CHAL-TEC Vertriebs- + Handels GmbH, Wallstraße 16, 10179 Berlin.
Dieses Produkt entspricht den folgenden Europäischen Richtlinien:
2004/108/EG (EMV)
2006/95/EG (LVD)
2011/65/EU (RoHS)
10
Contents
Technical Data
Security Instructions
Dear Customer,
Congratulations on purchasing this equipment. Please read this manual carefully and take care of the fol-
lowing hints on installation and use to avoid technical damages. Any failure caused by ignoring the men-
tioned items and cautions mentioned in the operation and installation instructions are not covered by our
warranty and any liability.
.
Item number 10028784
Voltage 220-240 V 50/60 Hz
Power consumption 1400-1600 W
Technical Data . . . . . . . . . . . . . . . . . . . . . . . . . . . . . . . . . . . . . . . . . . . . . . . .10
Security Instructions . . . . . . . . . . . . . . . . . . . . . . . . . . . . . . . . . . . . . . . . . . . . . 10
Product Overview . . . . . . . . . . . . . . . . . . . . . . . . . . . . . . . . . . . . . . . . . . . . . . 13
Installation . . . . . . . . . . . . . . . . . . . . . . . . . . . . . . . . . . . . . . . . . . . . . . . . . . . 14
Operation . . . . . . . . . . . . . . . . . . . . . . . . . . . . . . . . . . . . . . . . . . . . . . . . . . . 16
Cleaning and Care . . . . . . . . . . . . . . . . . . . . . . . . . . . . . . . . . . . . . . . . . . . . . . 17
Disposal Considerations . . . . . . . . . . . . . . . . . . . . . . . . . . . . . . . . . . . . . . . . . . 17
Declaration of Conformity . . . . . . . . . . . . . . . . . . . . . . . . . . . . . . . . . . . . . . . . . 18
• This appliance can be used by children aged from 8 years and above and persons with reduced physical,
sensory or mental capabilities or lack of experience and knowledge if they have been given supervision or
instruction concerning use of the appliance in a safe way and understand the hazards involved.
• Children shall not play with the appliance. Cleaning and user maintenance shall not be made by children
without supervision Keep the appliance and its cord out of reach of children less than 8 years.
• Appliances are not intended to be operated by means of an external timer or separate remote-control
system.
• If the supply cord is damaged, it must be replaced by the manufacturer, its service agent or similarly quali-
fied persons in order to avoid a hazard.
• The connector must be removed before the appliance is cleaned and that the appliance inlet must be
dried before the appliance is used again.
• The temperature of accessible surfaces may be high when the appliance is operating.
• Please check the device and the electrical wire timely, and stop using if you find some problems of the
device.

11
• Never immerse the appliance with heating element.
• The appliance should be switched off at mains when not in use.
• Use only one appliance per plug and always use an earthed extension cable, with cross section of at least
1.0 mm
2.
• Do not touch the appliance (cover or grill plate) when cooking in order to prevent any risk of burning.
• The temperature of the surface will be very high when using, please keep it away from tinder.
• This appliance is only use for cooking.
• Never place your appliance on a fragile surface
• Only the appropriate connector must be used.
• The supply cord should be regularly examined for signs of damage, and if the cord is damaged, the appli-
ance must not be used.
• The appliance must be supplied through a residual current device (RCD) having a rated residual operating
current not exceeding 30 mA.
• The appliance is to be connected to a socket-outlet having an earthing contact.
• Charcoal or similar combustible fuels must not be used with this appliance.
• This appliance is intended to be used in household and similar applications such as: – staff kitchen areas
in shops, offices and other working environments; – farm houses; – by clients in hotels, motels and other
residential type environments; bed and breakfast type environments.
• Remove the lid from the appliances during use.
• The installation of a faulty current protective device with a rated breaking current offers you additional
safety by ensuring that 30 mA will not be exceeded in the house installation. Let your installation electri-
cian advice you. Danger also exists with appliance which have been switched off, this is why, after use, the
plug should be removed for the mains.
• Do not use this appliance near the water contained in bath-tubs, washbasins or other receptacles neither
expose it to rain or other humidity.
• The appliance must not be operated (disconnect the mains plug immediately) when:
◦ the appliance, casing or cable is damaged
◦ the appliance shows visible signs of damage.
◦ a fault is suspected after a fall or the like
• Disconnect the main plug:
◦ in case of faults during use.
◦ before cleaning or moving the appliance from place to place.
◦ after use
• Never pull the plug out of the socket by the flex or with wet hands.
• Never carry nor pull the appliance by the flex.
• Don’t pull the flex over sharp edges. Don’t wedge it.
• Never immerse the mains cord or the thermostat plug in water or any other liquid.

12
• Only use extension leads after having made sure that their condition is faultless and use an earthed wise
with a minimum capacity of 10 A.
• Put the wire so that unintentional touching or drawing is impossible.
• Never bring the extension wire in touch with the hot grill plate.
• Always switch off the appliance before removing the mains plug.
• Before removing attachments or cleaning the grill, allow to cool completely.
• Take care! The grill plate will get very hot, and it stays hot for a long time after it has been switched off.
Beware of burns! Do not touch any hot surfaces and take care when handling the appliance after use.
• Do not stand the grill over the edge or corner of the table and avoid contact with the hot surfaces.
• Do not place the appliance on or near a hot gas electrical burner, or in a heated oven.
• Only use the appliance when it is placed on a stable and dry surface.
• Do not leave the appliance unattended.
• Do not use the appliance without the fat collecting bowl or the base.
• Never cover the grill plate with aluminium foil or trays (this might damage the non-stick coating)
• Make sure without fail that the device is installed correctly before you put this into operation (first of all if
using the stand).
• Please, ensure that the grill plate must not touch the heating element-injury danger!
• Beware of fat spitting while grilling fat or juicy meat.
• Place the appliance on a surface that is resistant to heat. Keep the electric grill at least 10 cm from any walls
when in operation.
• Use this appliance only as described in this manual. Any other use not recommended by the manufacturer
may cause fire, electric shock or injury to persons.
• For safety reasons do not use attachments that were not recommended or supplied by the manufacturer.
• Only trained personnel should repair electrical appliances. Unskilled repairs can cause considerable danger
to the user.
13
Product Overview
1 Metal grill hood
2 Handle of hood
3 Grill Plate
4 Fat collecting bowl
5 Base of appliance
6 Condiment tray
7 Upper stand tube
8 Decoration
9 Nether stand tube
10 A Stand foot
B Stand base
11 Handle of base
12 Opening for appliance socket
13 Temperature indicator lamp
14 Detachable temperature regulator
with cable
15 Appliance socket
16 Washer
17 Screws
18 Thermometer

14
Installation
Install the stand feet
(10A) into the stand
base (10B) properly.
There will be a “click”
sound when the
stand foot is fixed
completely
Connect the grill stand
base (10) and the neth-
er tube (9) together to
form the complete grill
stand. (The grill can be
used with or without
this stand).
Place the bowl-shaped
base of the appliance
(5) onto the grill stand.
(Making sure that the
grill stand is placed on a
dry flat, stable surface).
Place the washer (16)
onto the stand base,
and then install the
screws (17) into the
washer to fix the
stand feet and stand
base firmly.
Install half of the
threaded rod (a) in
the nether tube (9)
Put the decoration
(8) on the neither
tube (9) and assem-
ble both tubes to-
gether; ensure that
they are fixed well.
Install the screw (b)
into upper tube (7),
and then put the
condiment tray on
the upper tube (Mak-
ing sure that the tray
is fixed well)
15
Place the grill plate (3)
on the base of the ap-
pliance (5). First of all
insert the appliance
socket (15) into the
opening intended for
it (12), then set the grill
plate horizontally on
the appliance base.
Insert the thermometer
(18) into the hole of the
grill hood and then fix it
with the screw and nut
(N) into the back side of
the hood.
The metal hood (2) can
be opened and placed
on the side by being
hooked up on the edge
of grill plate
Put the fat collecting
bowl (4) into the bracket
supplied for it in the base
of the appliance, buckle
the hole of fat collecting
bowl onto the screw to
fix it well (The flat col-
lecting bowl can be filled
with little water to make
it easier to clean).
Install the handle (1) to
the metal hood with the
screw (e) , gasket (d) and
hook (c).
Then place the hood on
the grill plate.
Push the detachable
temperature regulator
(14) as far as it will go
into the grill’s appliance
socket
.
16
Operation
Before using the appliance for the first time
• Remove all the packaging materials and wash the grill plate (3), fat collecting bowl (4) and metal grill hood
(1) thoroughly.
• Dry all the different parts thoroughly. This applies especially to the appliance socket (14) .Never immerse
the detachable temperature regulator (13) in water.
• Heat the grill to its maximum setting for about 3-5 minutes, with the metal grill hood closed and without
putting any food on it. Residues left from the manufacturing process may cause some smell and smoke
when the appliance is used for the first time.
Operating the appliance
1. Connect the appliance to the mains electricity supply.
2. Set the temperature regulator (14) to the required temperature level (it usually takes about 3 minutes to
heat up).
3. The temperature indicator lamp (13) will go out as soon as the required temperature has been reached.
4. Place the food to be grilled on the grill plate (3).
Cooking times
The following are recommended cooking times. Different times will be required for different weights and
sizes of foods to be grilled, and depending on whether you are grilling with or without the metal grill hood
Food to be grilled Temperature grade setting Cooking time
Steak/beef 5 15-20 mins
Lamb 5 12-18 mins
Chicken drumsticks 5 25-30 mins
Chops 5 20-25 mins
Chicken wings 5 15-20 mins
Fillet of pork 4-5 9-10 mins
Whole fish 5 12-15 mins
Kebabs 3-4 10-12 mins
Various sausages 3-4 12-15 mins
17
Cleaning and Care
Tips for grilling
• Your meat will be tendered if you marinade it overnight before cooking (the marinade is always made of oil
(to and moistness), vinegar (to tenderize) and a mixture of seasonings).
• Always use tongs or some form of scoop to turn the grilled food (using a fork to turn the food will dry it out
and damage the non-stick coating).
• Only turn meat and fish once during grilling. You do not need to turn it more than once and too much
turning dries food out.
• Never cook meat for too long. Even pork is better if it is served when it is still somewhat pink and juicy.
• If cooked food sticks to the grill plate, rub the plate with a piece of kitchen paper soaked in oil from time
to time.
1. Disconnect the appliance from the mains electricity supply.
2. Allow the grill to cool completely.
3. Take the detachable temperature regulator (13) out of the appliance socket.
4. Clean the grill plate (3) and grease collecting bowl (4) with warm washing-up water and damp cloth. Do
not use steel wool pads, brush or abrasives to avoid any damages to the coating of grill.
5. Wipe the base of the appliance (5) with a damp cloth. Fat splashes can be removed with a mild cleaning
agent.
Note: The grill plate has a non-stick coating. Do not scratch this coating during either the grilling or the cleaning
stages.
Tip: Protect the appliance from dust and dirt if it is not to be used for a prolonged length of time (wrap it in a plastic
bag). Store it in a dry place.
Disposal Considerations
According to the European waste regulation 2002/96/EC this symbol on the product or on
its packaging indicates that this product may not be treated as household waste. Instead it
should be taken to the appropriate collection point for the recycling of electrical and elec-
tronic equipment. By ensuring this product is disposed of correctly, you will help prevent
potential negative consequences for the environment and human health, which could oth-
erwise be caused by inappropriate waste handling of this product. For more detailed infor-
mation about recycling of this product, please contact your local council or your household
waste disposal service.

18
Declaration of Conformity
Producer: CHAL-TEC Vertriebs- + Handels GmbH, Wallstraße 16, 10179 Berlin.
This product is conform to the following European Directives:
2004/108/EC (EMC)
2006/95/EC (LVD)
2011/65/EU (RoHS)
19
Indice
Dati tecnici
Avvertenze di sicurezza
Gentile cliente,
La ringraziamo per aver scelto il nostro prodotto. La preghiamo di leggere e di seguire attentamente le se-
guenti istruzioni per evitare eventuali danni tecnici.
Decliniamo ogni responsabilità in caso di danni dovuti a una mancata osservanza delle norme di sicurezza e
ad un uso improprio del prodotto.
Numero articolo 10028784
Alimentazione 220-240 V 50/60 Hz
Potenza 1400-1600 W
Dati tecnici . . . . . . . . . . . . . . . . . . . . . . . . . . . . . . . . . . . . . . . . . . . . . . . . . . . 19
Avvertenze di sicurezza . . . . . . . . . . . . . . . . . . . . . . . . . . . . . . . . . . . . . . . . . . . 19
Descrizione del dispositivo . . . . . . . . . . . . . . . . . . . . . . . . . . . . . . . . . . . . . . . . . 22
Montaggio . . . . . . . . . . . . . . . . . . . . . . . . . . . . . . . . . . . . . . . . . . . . . . . . . . . 23
Utilizzo . . . . . . . . . . . . . . . . . . . . . . . . . . . . . . . . . . . . . . . . . . . . . . . . . . . . . 25
Pulizia e manutenzione . . . . . . . . . . . . . . . . . . . . . . . . . . . . . . . . . . . . . . . . . . . 26
Smaltimento . . . . . . . . . . . . . . . . . . . . . . . . . . . . . . . . . . . . . . . . . . . . . . . . .26
Dichiarazione di conformità . . . . . . . . . . . . . . . . . . . . . . . . . . . . . . . . . . . . . . . . 26
• Il dispositivo può essere utilizzato da bambini dagli 8 anni in su e da persone con capacità fisiche, sensoriali
o mentali ridotte, ma solo se sotto sorveglianza e solo dopo essere state messe a conoscenza del funzio-
namento del dispositivo e dei pericoli ad esso connessi.
• Non permettere ai bambini di giocare con il dispositivo.
• Non far pulire o maneggiare il dispositivo dai bambini se non sono sorvegliati. Tenere il dispositivo e il cavo
di alimentazione fuori dalla portata dei bambini sotto gli 8 anni.
• Il dispositivo non deve essere collegato a una presa elettrica temporizzata programmabile né a un termi-
nale con comando a distanza.
• In caso il cavo di alimentazione sia danneggiato, farlo sostituire dal produttore, dal centro assistenza clienti
o da personale qualificato in modo da ridurre ogni tipo di rischio.
• Prima di pulire il dispositivo, disinserire la spina e, a seguito della pulizia, prima di utilizzare nuovamente il
dispositivo, far asciugare completamente la presa.
• Mentre il dispositivo è acceso, il barbecue raggiunger temperature molto alte.

20
• Controllare regolarmente il cavo e il dispositivo e in caso si riscontrino dei problemi, non utilizzare il di-
spositivo.
• Non immergere il dispositivo e l’elemento riscaldante nell’acqua.
• A fine utilizzo spegnere il dispositivo.
• Non collegare assieme due o più prolunghe. In caso si utilizzi una prolunga, accertarsi che questa sia con
messa a terra e che abbia un diametro di minimo 1 mm2.
• Durante l’utilizzo, non toccare il dispositivo (il coperchio o la graticola) per evitare scottature.
• La temperatura delle superfici diventa molto alta, tenere quindi il dispositivo lontano da sostanze infiam-
mabili.
• Il dispositivo è destinato esclusivamente a grigliare gli alimenti.
• Non collocare il dispositivo su superfici delicate.
• Utilizzare solo un connettore adatto.
• Controllare regolarmente che il cavo di alimentazione sia integro. Se presenta dei danni, non utilizzarlo.
• Il dispositivo deve essere alimentato mediante un sistema di protezione differenziale (RCD) avente una
corrente residua nominale non superiore a 30 mA.
• Il dispositivo deve essere collegato a una presa elettrica con messa a a terra.
• Non utilizzare carbonella e sostanze infiammabili simili per accendere il dispositivo.
• Questo dispositivo non è per uso commerciale, ma strettamente domestico e per impieghi simili, come
per esempio angoli cucina di negozi, uffici e altri ambienti di lavoro; in motel e in strutture ricettive e resi-
denziali affini.
• Durante l’utilizzo rimuovere il coperchio.
• L’utilizzo di un dispositivo di protezione differenziale con una corrente residua nominale non superiore
ai 30mA, garantisce che la rete elettrica domestica non superi i 30 mA. Per l’installazione si consiglia di
consultare un tecnico elettricista. Il pericolo di un sovraccarico di corrente sussiste anche a quando il dispo-
sitivo è spento, pertanto è necessario disinserire la spina dalla corrente elettrica ogni volta a fine utilizzo.
• Non utilizzare il dispositivo nelle vicinanze di vasche da bagno, lavelli o altri recipienti contenenti acqua.
Non esporre il dispositivo a pioggia e a umidità.
• Non utilizzare il dispositivo se:
• Il dispositivo, l’alloggiamento o il cavo sono danneggiati.
• Il dispositivo riporta segni visibili di guasti.
• Si riscontrano dei malfunzionamenti a seguito di cadute e simili.
• Disinserire la spina:
• Se durante l’utilizzo si riscontrano dei malfunzionamenti.
• Prima di eseguire la pulizia del dispositivo o prima di spostarlo da un luogo all’altro.
• A fine utilizzo.
• Non disinserire la spina con le mani bagnate.
• Non disinserire la spina dalla presa tirando il cavo di alimentazione.
• Non dislocare il cavo su bordi taglienti. Non accorciarlo.
• Non immergere il cavo o il termostato nell’acqua o in altri liquidi.

21
• Utilizzare una prolunga solo dopo aver accertato che questa sia con messa a terra e adatta a una corrente
di minimo 10 A.
• Dislocare il cavo in modo che non sia di intralcio o intoppo.
• La prolunga non deve entrare in contatto con la graticola.
• Spegnere sempre il dispositivo dal termostato prima di disinserire il cavo dalla presa elettrica.
• Far raffreddare completamente il barbecue prima di rimuovere gli accessori o prima di pulirlo.
• Attenzione! la griglia rimane calda per molto tempo anche dopo aver spento il dispositivo. Attenzione alle
scottature. Non toccare le superfici e dopo l’utilizzo prestare molta attenzione se si è nelle vicinanze del
dispositivo.
• Non collocare il dispositivo ai bordi o agli angoli di un tavolo ed evitare che entri in contatto con superfici
calde.
• Non collocare il dispositivo nelle vicinanze di fornelli a gas, di fornelli elettrici o di forni.
• Non lasciare il dispositivo incustodito.
• Non utilizzare il dispositivo senza la vaschetta raccogli- grasso alla sua base.
• Non coprire la graticola con fogli di alluminio o vassoi.
• Prima di metterlo in funzione, accertarsi sempre che il dispositivo sia collocato stabilmente e correttamen-
te, soprattutto se si utilizza il cavalletto.
• Fare attenzione che la griglia non entri in contatto con l’elemento riscaldante: può essere pericoloso.
• Quando si grigliano carni particolarmente ricche di grassi, fare attenzione agli spruzzi di grasso.
• Collocare il dispositivo su una superficie resistente al calore e durante l’utilizzo posizionarlo ad almeno 10
cm di distanza dalle pareti.
• Utilizzare il dispositivo seguendo le istruzioni descritte nel presente manuale. Un utilizzo non conforme
alle istruzioni può provocare incendi, scosse elettriche e apportare lesioni alle persone.
• Per motivi di sicurezza, adoperare esclusivamente gli accessori consigliati dal produttore.
• Far riparare il dispositivo solo da personale qualificato. Riparazioni eseguite da personale non qualificato
possono recare danni a chi lo utilizza.
22
Descrizione del dispositivo
1 Coperchio
2 Manico del coperchio
3 Griglia
4 Vaschetta raccogli-grasso
5 Base del dispositivo
6 Vassoio accessorio
7 Tubo stativo superiore
8 Guarnizione
9 9 Tubo stativo inferiore
10 A Piedi d’appoggio
B Base d’appoggio
11 Impugnatura della base del
dispositivo
12 Apertura per la presa del
termostato
13 Indicatore temperatura
14 Termostato estraibile con cavo
elettrico
15 Presa per il termostato
16 Rondella di bloccaggio
17 Viti
18 Termometro

23
Montaggio
Inserire i piedi di ap-
poggio (10A) nelle
fessure poste sotto
la base d’appoggio
(10B). Un click in-
dicherà che i piedi
d’appoggio sono
incastrati completa-
mente.
Inserire il tubo stativo
inferiore (9) nel foro al
centro della base d’ap-
poggio precedente-
mente assemblata (10).
L’elemento di supporto
del barbecue è cosi
completato.
(Il barbecue può essere
utilizzato anche senza
l’elemento di supporto).
Sull’elemento di sup-
porto collocare la base
del barbecue a forma di
ciotola (5).
(Accertarsi che l’ele-
mento di supporto sia
collocato su una super-
ficie piana, asciutta e
stabile).
Collocare la rondel-
la di bloccaggio (16)
sotto la base d’ap-
poggio e, avvitando
le viti (17) alla ron-
della di bloccaggio,
fissare la base d’ap-
poggio ai piedi d’ap-
poggio.
Avvitare metà della
barretta filettata (a)
nel tubo stativo infe-
riore (9). Quindi unire
ambedue i tubi stati-
vi, accertandosi che
siano ben avvitati
l’uno all’atro.
Infilare la vite (b) nel
tubo stativo superio-
re (7). Quindi inserire
il vassoio accessorio
(6) nel tubo stativo
superiore e accertarsi
che sia ben incastra-
to.
24
Posizionare orizzontal-
mente la griglia (3) sulla
base del dispositivo a
forma di ciotola (5) in
modo che la presa per
il termostato (15) si in-
serisca nell’apposita
apertura (12) posta alla
base del barbecue.
Inserire il termome-
tro (18) nel foro del
coperchio e avvitarlo
dalla parte interna del
coperchio tramite una
vite e un dado (N).
Il coperchio (2) può
essere sollevato e, fis-
sandolo al gancio sul
bordo della griglia, può
essere usato come para
schizzi.
Inserire la vaschetta rac-
cogli-grasso (4) nell’ap-
posita apertura.
Fissare il manico (2) al
coperchio (1) utilizzando
la vite (e), la guarnizione
(d) e il gancio (c).
Collocare il coperchio
sulla griglia.
Infilare il termostato
estraibile (14) nell’appo-
sito attacco fino al com-
pleto inserimento.
25
Utilizzo
Prima di utilizzare il dispositivo per la prima volta:
• Rimuovere i materiali di imballaggio e lavare accuratamente la griglia (3), la vaschetta raccogli-grasso (4) e
il coperchio (1).
Impiego del dispositivo
1. Collegare il dispositivo alla rete elettrica.
2. Impostare il termostato (14) sulla temperatura desiderata. (Normalmente sono necessari circa 3 minuti
affinché il dispositivo si riscaldi.)
3. L’indicatore luminoso della temperatura (13) si spegne non appena viene raggiunta la temperatura
impostata.
4. Disporre gli alimenti sulla griglia.
Tempi di cottura
Nella seguente tabella vengono indicati i tempi di cottura consigliati. Tuttavia questi variano in base alla gran-
dezza e al peso degli alimenti da grigliare, coma anche se si usa o meno il coperchio.
Alimenti da grigliare Temperatura consigliata Tempi di cottura (in minuti)
Bistecca/ Manzo 5 15-20
Agnello 5 12-18
Cosce di pollo 5 25-30
Costolette 5 20-25
Ali di pollo 5 15-20
Filetto dio maiale 4-5 9-10
Pesche intero 5 12-15
Kebab 3-4 10-12
Vari tipi di würstel 3-4 12-15
Consigli per grigliare
• Per una notte lasciare marinare la carne in modo che diventi più tenera. La marinatura consiste di olio (per
rendere la carne succosa), aceto (per intenerirla) e spezie varie.
• Utilizzare una pinza o una spatola per rigirare gli alimenti disposti sulla griglia. Se per fare questo si utilizza
una forchetta, la carne viene disidratata risultando così stopposa e inoltre si danneggia il rivestimento
antiaderente.

26
Pulizia e manutenzione
• Non grigliare troppo a lungo la carne. La stessa carne di maiale è più saporita e appetitosa se viene servita
leggermente rosata.
• Se gli alimenti si attaccano alla griglia, passarci sopra un panno da cucina impregnato di olio.
1. Scollegare il dispositivo dalla corrente elettrica.
2. Far raffreddare completamente il barbecue.
3. Disinserire il termostato dalla sua presa.
4. Pulire la griglia e la vaschetta raccogli-grasso sotto acqua corrente calda e con un panno umido. Non
utilizzare pagliette, spazzole o tessuti abrasivi in modo da evitare di danneggiare le superfici.
5. Asciugare la base del dispositivo con un panno umido. I resti di grasso possono essere rimossi utilizzando
un detergente neutro.
Nota. La griglia ha un rivestimento antiaderente. Si consiglia quindi di non sfregarla né mentre si griglia né durante
le operazioni di pulizia..
Smaltimento
Se sul prodotto è presente il simbolo qui a sinistra (un cassonetto dei rifiuti mobile barrato), si
applica la direttiva europea 2002/96/CE. Questi prodotti non possono essere smaltiti insie-
me ai rifiuti normali. Informarsi sulle disposizioni locali vigenti in merito alla raccolta differen-
ziata di apparecchiature elettriche ed elettroniche. Non smaltire i vecchi dispositivi insieme ai
rifiuti domestici. Attraverso uno smaltimento responsabile e conforme alle direttive, è possi-
bile salvaguardare l´ambiente e chi ci circonda da possibili conseguenze negative. Il riciclaggio
di materiali aiuta a ridurre il consumo di materie prime.
Dichiarazione di conformità
Produttore: Chal-Tec Vertriebs Handels GmbH, Wallstrasse 16, 10179 Berlino, Germania
Questo prodotto è conforme alle seguenti direttive europee:
2004/108/CE (EMC)
2006/95/CE (LVD)
2011/65/UE (RoHS)

27
Sommaire
Données techniques
Consignes de sécurité
Chère cliente, cher client,
Toutes nos félicitations pour l’acquisition de ce nouvel appareil. Veuillez lire attentivement les instructions de
branchement et d’utilisation afin d’éviter d’éventuels dommages techniques. Le fabricant ne saurait être tenu
pour responsable des dommages dus au non-respect des consignes de sécurité et à la mauvaise utilisation
de l’appareil.
Numéro d’article 10028784
Alimentation électrique 220-240 V 50/60 Hz
Puissance 1400-1600 W
Données techniques . . . . . . . . . . . . . . . . . . . . . . . . . . . . . . . . . . . . . . . . . . . . . 27
Consignes de sécurité . . . . . . . . . . . . . . . . . . . . . . . . . . . . . . . . . . . . . . . . . . . . 27
Aperçu de l’appareil . . . . . . . . . . . . . . . . . . . . . . . . . . . . . . . . . . . . . . . . . . . . .29
Montage . . . . . . . . . . . . . . . . . . . . . . . . . . . . . . . . . . . . . . . . . . . . . . . . . . . .30
Utilisation . . . . . . . . . . . . . . . . . . . . . . . . . . . . . . . . . . . . . . . . . . . . . . . . . . .32
Entretien et nettoyage . . . . . . . . . . . . . . . . . . . . . . . . . . . . . . . . . . . . . . . . . . .33
Informations sur le recyclage . . . . . . . . . . . . . . . . . . . . . . . . . . . . . . . . . . . . . . .33
Déclaration de conformité . . . . . . . . . . . . . . . . . . . . . . . . . . . . . . . . . . . . . . . . . 33
• Pour réduire tout danger d’électrocution, ne retirer aucun panneau protecteur. L’appareil contient des élé-
ments qui ne sont pas accessibles à l’utilisateur. Seul un professionnel qualifié est autorisé à effectuer les
réparations nécessaires.
• Ne pas exposer l’appareil à la pluie ou à l’humidité. Ne pas placer de récipients contenant des liquides, tels
que des vases, sur l’appareil.
• Ne pas laisser d’objet métallique tomber sur l’appareil.
• Ne pas poser d’objet lourd sur l’appareil.
• Utiliser uniquement des accessoires recommandés par le fabricant.
• Une réparation est nécessaire si l’appareil a été endommagé d’une quelconque manière, si des liquides ou
des objets sont tombés dessus, si l’appareil a été exposé à la pluie ou à l’humidité, s’il ne fonctionne pas
correctement ou s’il a subi une chute. Ne pas réparer l’appareil soi-même.
• L’appareil ne peut être utilisé par des enfants de plus de 8 ans et/ou par des personnes dont les capacités
physiques et mentales sont réduites, ou par des personnes manquant d’expérience ou de connaissances,

28
seulement une fois que celles-ci aient été entièrement sensibilisées aux consignes d’utilisation et de sécu-
rité. Veiller à ce que les enfants ne jouent pas avec l’appareil.
• Ne pas brancher l’appareil à une prise télécommandée ou à une minuterie externe.
• Ne pas utiliser l’appareil si le cordon d’alimentation ou la fiche sont endommagés. Dans ce cas, les faire
remplacer par le fabricant.
• Débrancher l’appareil avant de le nettoyer. Bien sécher l’appareil avant de le réutiliser.
• Vérifier régulièrement l’état du thermostat. En cas de dysfonctionnements, changer la pièce endommagée
par une pièce identique.
• Ne jamais plonger l’appareil, et surtout le thermostat, dans de l’eau ou d’autres liquides.
• Si une rallonge doit être utilisée, la brancher à une prise avec mise à terre.
• Brancher l’appareil à l’une des prises de votre domicile. La tension du circuit électrique ne doit pas dépasser
les 30 mA.
• Lorsque l’appareil est utilisé, il devient très chaud. Ne pas toucher les surfaces sous risque de brûlure.
• Installer l’appareil sur une surface stable et plate.
• Débrancher l’appareil lorsqu’il n’est pas en fonctionnement.
• Laisser l’appareil complétement refroidir avant de le nettoyer, de le stocker ou de le ranger.
• Le barbecue est chauffé électriquement. Ne pas utiliser de charbon ou d’autre matériel inflammables.
• L’appareil est destiné à un usage domestique ou pour un environnement similaire.
29
Aperçu de l’appareil
1 Couvercle
2 Poignée
3 Plaque de grill
4 Collecteur de graisse
5 Tablette
6 Tube de support supérieur
7 Elément décoratif
8 Tube de support inférieur
9 A Pieds
B Disque de soutien
10 Poignée
11 Ouverte pour le branchement
12 Témoin lumineux de la
température
13 Thermostat avec cordon
d’alimentation et fiche
14 Réceptacle de la cuve
15 Rondelle
16 Vis
17 Thermomètre
30
Montage
Introduire les pieds
(10A) dans le sup-
port central (110B)
jusqu’à ce qu’ils s’en-
clenchent.
Insérer le tube de sup-
port inférieur (9) dans
le support central (10)
pour compléter l’élé-
ment de support.
Le barbecue peut être
utilisé avec ou sans
pied. Pour utiliser le
barbecue sans pied, le
placer sur une surface
stable, plane et résis-
tante à la chaleur.
Placer la cuve (5) sur le
tube de support supé-
rieur.
Placer le disque de
soutien (16) sur la
partie inférieure du
support central et
le fixer à l’aide des
vis (17), comme l’in-
dique l’illustration ci-
contre.
Visser la tige filetée
(a) dans le tube de
support inférieur (9).
Insérer ensuite l’élé-
ment de décoration
(8) puis visser le tube
supérieur (7) sur le
tube inférieur (9).
Insérer la vis (b) dans
l’un des trous du tube
de support, à la hau-
teur de votre choix.
Faire ensuite glisser
la tablette (6) dans le
tube de support su-
périeur.
31
Placer la grille (8) sur
la cuve. Le port pour le
thermostat et le bran-
chement doit s’insérer
parfaitement dans le
réceptacle de la cuve à
cet effet.
Introduire le thermo-
mètre (18) dans le trou
du couvercle. Bien
le fixer en vissant un
écrou (N) de l’autre côté
du couvercle.
Le couvercle (2) peut
s’ouvrir et être rabaissé
sur le côté en l’accro-
chant au crochet.
Introduire le collecteur
de graisse (9) dans l’ou-
verture de la cuve.
Fixer la poignée (2) et le
crochet (c) au couvercle
à l’aide d’une vis (d) et
d’une rondelle.
Connecter l’unité de
branchement/thermos-
tat au barbecue.

32
Utilisation
Avant la première utilisation
• Retirer tous les éléments d’emballage et nettoyer la plaque de grill (3), le collecteur de graisse (4) et le
couvercle (1) avec précaution
Utilisation de l’appareil
1. Rraccorder la fiche du cordon d‘alimentation à une prise de courant.
2. Régler le thermostat à la température de votre choix. Attendre environ 3 minutes pour que l’appareil
chauffe)
3. Le témoin lumineux de la température s’éteint automatiquement dès que l’appareil atteint la température
préréglée.
4. Placer les aliments sur la grille .
Temps de cuisson
Vous trouverez ci-dessous un tableau récapitulatif des temps de cuisson conseillés. Le poids et la taille des
aliments ainsi que l’usage du couvercle peuvent faire varier les temps de cuisson.
Aliments Réglage de la température Temps de cuisson (en minutes)
Steak/Bœuf 5 15-20
Agneau 5 12-18
Cuisses de poulet 5 25-30
Côtelette 5 20-25
Ailes de poulet 5 15-20
Filet de porc 4-5 9-10
Poisson entier 5 12-15
Kébab 3-4 10-12
Plusieurs saucisses 3-4 12-15
Astuces
• Pour une viande plus tendre, la laisser mariner toute la nuit dans de l’huile (pour que la viande reste ju-
teuse), du vinaigre (pour la rendre plus tendre) et dans un mélange d’épices.
• Toujours utiliser des pinces ou des spatules pour retourner les aliments pour éviter de dessécher les ali-
ments et d’endommager le revêtement antiadhésif.

33
Entretien et nettoyage
• Ne pas laisser la viande griller trop longtemps. La viande de porc est meilleure lorsqu’elle est servie légè-
rement saignante et juteuse.
• Si les aliments collent à la plaque du grill, la frotter avec de l’essuie-tout imbibé d’un peu d’huile.
1. Débrancher l’appareil.
2. Laisser le grill complétement refroidir.
3. Retirer le thermostat de son réceptacle.
4. Nettoyer la plaque du grill et le collecteur de graisse avec de l’eau savonneuse tiède et un torchon
humide. Ne pas utiliser d’éponge en laine d’acier, de brosse ou de serpillière pour ne pas endommager le
revêtement.
5. Passer un torchon humide sur la base de l’appareil (5). Les éclaboussures de graisse peuvent être éliminées
à l’aide d’un détergent léger..
Indication : la plaque du grill est constituée d’un revêtement antiadhésif. Veiller à ne pas le rayer lors du nettoyage.
Informations sur le recyclage
Vous trouverez sur le produit l’image ci-contre (une poubelle sur roues, barrée d‘une croix),
ce qui indique que le produit se trouve soumis à la directive européenne 2002/96/CE. Ren-
seignez-vous sur les dispositions en vigueur dans votre région concernant la collecte séparée
des appareils électriques et électroniques. Respectez-les et ne jetez pas les appareils usagés
avec les ordures ménagères. La mise en rebut correcte du produit usagé permet de préserver
l’environnement et la santé. Le recyclage des matériaux contribue à la préservation des res-
sources naturelles.
Déclaration de conformité
Fabricant : CHAL-TEC Vertriebs- + Handels GmbH, Wallstraße 16, 10179 Berlin, Allemagne
Ce produit est conforme aux directives européennes suivantes :
2004/108/CE (CEM)
2006/95/CE (LVD)
2011/65/UE (RoHS)

34
Índice
Datos técnicos
Indicaciones de seguridad
Estimado cliente:
Le felicitamos por la adquisición de este producto. Lea atentamente el siguiente manual y siga cuidadosa-
mente las instrucciones de uso con el fin de evitar posibles daños. La empresa no se responsabiliza de los
daños ocasionados por un uso indebido del producto o por haber desatendido las indicaciones de seguridad.
.
Artikelnummer 10028784
Suministro eléctrico 220-240 V 50/60 Hz
Consumo de energía 1400-1600 W
Datos técnicos . . . . . . . . . . . . . . . . . . . . . . . . . . . . . . . . . . . . . . . . . . . . . . . .34
Indicaciones de seguridad . . . . . . . . . . . . . . . . . . . . . . . . . . . . . . . . . . . . . . . . .34
Descripción del aparato . . . . . . . . . . . . . . . . . . . . . . . . . . . . . . . . . . . . . . . . . . . 36
Montaje . . . . . . . . . . . . . . . . . . . . . . . . . . . . . . . . . . . . . . . . . . . . . . . . . . . . . 37
Uso . . . . . . . . . . . . . . . . . . . . . . . . . . . . . . . . . . . . . . . . . . . . . . . . . . . . . . .39
Limpieza y cuidado . . . . . . . . . . . . . . . . . . . . . . . . . . . . . . . . . . . . . . . . . . . . .40
Indicaciones para la retirada del aparato . . . . . . . . . . . . . . . . . . . . . . . . . . . . . . . .40
Declaración de conformidad . . . . . . . . . . . . . . . . . . . . . . . . . . . . . . . . . . . . . . . .40
• Para reducir el riesgo de descargas eléctricas, no abra el armazón de la barbacoa. El aparato contiene
piezas que no son accesibles al usuario. Las reparaciones deberán llevarse a cabo solamente por personal
técnico cualificado.
• No exponga el aparato al agua ni a la humedad ni coloque encima recipientes que contengan líquido,
como jarrones.
• No deje caer objetos de metal sobre el aparato.
• No coloque objetos pesados encima del aparato.
• Utilice exclusivamente los acesorios recomendados por el fabricante.
• Será necesario reparar el aparato cuando este ha sufrido algún tipo de daño; es decir, cuando se han fil-
trado líquidos en su interior, cuando han caído objetos sobre él, cuando el aparato se ha visto expuesto a
la lluvia o humedad, cuando no funciona correctamente o cuando se ha dejado caer. No intente reparar el
aparato usted mismo.
• El aparato podrá ser utilizado por niños mayores de 8 años y por personas con discapacidades físicas o
psíquicas solamente si estas han recibido previamente instrucciones sobre el funcionamiento del aparato

35
y si están supervisadas por otra persona. Los niños deberán estar vigilados para evitar que juegen con el
aparato.
• No conecte el aparato a tomas de corriente con temporizador ni con control remoto.
• Si el cable de alimentación o el enchufe están dañados, no utilice el aparato y contacte con el fabricante
para que sustituya la pieza defectuosa.
• El cable de alimentación ha de desenchufarse antes de proceder a limpiar el aparato. Deje que los conec-
tores se sequen completamente tras la limpieza antes de encender de nuevo el aparato.
• Compruebe que el termostato funciona perfectamente. Si detecta alguna anomalía, sustituya la pieza por
otra idéntica.
• Nunca sumerja el aparato ni el termostato en agua ni en ningún otro líquido.
• Si utiliza un alargador, este debe contar con una toma de tierra y una sección del cable de al menos 1 mm.
• El suministro eléctrico podrá realizarse a través de una toma de corriente doméstica habitual. El fusible
para el circuito eléctrico utilizado no debe superar los 30 mA.
• El aparato se calentará mucho durante su funcionamiento. No toque su superficie, podría quemarse.
• Coloque el aparato en una superficie plana y estable.
• Apague inmediatamente el aparato cuando no lo utilice.
• Deje que el aparato se enfríe por completo antes de limpiarlo, empaquetarlo o guardarlo.
• La barbacoa eléctrica se calienta por medio de la electricidad, por lo que no debe utilizar carbón ni ningún
otro combustible.
• El aparato está concebido para un uso doméstico o similar.
Piezas pequeñas/partes el embalaje
• Mantenga las piezas pequeñas (p.ej. tornillos y otro material de montaje) y las partes del embalaje fuera
del alcance de los niños para evitar que se atraganten. No permita que los niños pequeños jueguen con los
plásticos, pueden provocar riesgo de asfixia.
Transporte
• Conserve el embalaje original. Para proteger el aparato durante el transporte introdúzcalo en su embalaje
original.
Limpieza
• No utilice líquidos volátiles, como sprays insecticidas. El exterior del aparato podría dañarse si se frota
demasiado fuerte. Limpie la parrilla y la bandeja recoge grasa con agua tibia, un detergente no abrasivo y
un paño suave. El recubrimiento antiadherente de la parrilla es propenso a rayarse al contacto con objetos
duros. No utilice lana de acero u objetos similares para limpiarla. Limpie el resto de superficies con un paño
suave y húmedo. Proteja el aparato del polvo y de la suciedad guardándolo en su embalaje si no lo utiliza
durante un periodo de tiempo prolongado.
36
Descripción del aparato
1 Tapa
2 Asa
3 Parrilla
4 Bandeja recoge grasa extraíble
5 Base de la parrilla
6 Bandeja
7 Soporte superior
8 Embellecedor
9 Soporte inferior
10 A. Base
B. Patas
11 Asa
12 Conector para el termostato
13 LED indicador de temperatura
14 Termostato con cable y enchufe
15 Conexión a la red eléctrica
16 Junta
17 Tornillos
18 Termómetros
37
Montaje
Encaje las patas (16b)
en los enganches de
la base (16a) hasta
que queden comple-
tamente fijos.
Una el soporte a las
patas para completar la
base de apoyo. La bar-
bacoa puede utilizarse
con o sin patas. En el
segundo caso, deberá
colocarla en una su-
perficie plana, estable y
resistente al calor.
Encaje la parte infe-
rior de la parrilla (con
forma de fuente) en el
soporte.
Coloque la junta (17)
en la parte inferior de
las patas y atorníllela
tal y como se indica
en la ilustración.
Enrosque la barra
roscada en el sopor-
te inferior. Coloque
a continuación el
embellecedor y por
último el soporte su-
perior.
Introduzca los torni-
llos (b) en uno de los
orificios para conse-
guir la altura deseada
y coloque la bandeja
sobre el soporte.
38
Encaje la parrilla en su
base. El termostato y el
conector de la red eléc-
trica deberán colocarse
exactamente en el lu-
gar indicado.
Introduzca el termó-
metro (18) en el orifico
de la tapa y enrósquelo
por la parte interior de
la misma con un torni-
llo y una tuerca (N).
Puede abrir la tapa y
moverla hacia un lado
colgándola en el borde
de la parrilla.
SIntroduzca la bandeja
recoge grasa en la aber-
tura correspondiente.
Fije el asa a la tapa con
un tornillo, una arandela
y añada el gancho para
colgar.
Encaje el termostato ex-
traíble con conector a la
red en el compartimen-
to correspondiente.

39
Uso
Antes del primer uso
• Retire el embalaje y limpie la parrilla (3), la bandeja recoge grasa (4) y la tapa (1).
Utilizar el aparato
1. Conecte el aparato al suministro eléctrico.
2. Ajuste el regulador de temperatura (14) para conseguir la temperatura deseada (el aparato necesita unos
tres minutos para calentarse).
3. La luz del indicador de temperatura (13) se apagará cuando se haya alcanzado la temperatura seleccionada.
4. Coloque los alimentos sobre la parrilla
Tiempos de cocción
A continuación le presentamos una tabla con los tiempos de cocción recomendados. Dependiendo del peso
y tamaño del alimento, se necesitará un tiempo de cocción distinto, además de la diferencia entre cocinar
con o sin tapa.
Alimento Ajuste de temperatura Tiempo de cocción (minutos)
Filete/ternera 5 15-20
Cordero 5 12-18
Muslo de pollo 5 25-30
Chuleta 5 20-25
Alitas de pollo 5 15-20
Filete de cerdo 4-5 9-10
Pescado (entero) 5 12-15
Kebab 3-4 10-12
Salchichas 3-4 12-15
Consejos de preparación
• Si quiere que la carne quede más tierna, puede marinarla la noche anterior. La marinada se prepara con
aceite (para mantener la carne jugosa), vinagre (para enternecerla) y una mezcla de especias.
• Utilice siempre tenazas o espátulas para darle la vuelta a los alimentos. Si utiliza un tenedor, el alimento se
resecará y la capa antiadherente de la parrilla podría dañarse.
• No mantenga los alimentos en la parrilla durante demasiado tiempo. Se recomienda que la carne de cerdo
conserve un color rosado y esté jugosa antes de servirla.
40
Limpieza y cuidado
• Si el alimento se queda pegado a la parrilla, frote esta última con un paño empapado en aceite
1. Desenchufe el aparato.
2. Deje que la parrilla se enfríe completamente.
3. Extraiga el regulador de temperatura del conector del aparato.
4. Limpie la parrilla y la bandeja recoge grasa con agua tibia con jabón y un paño húmedo. No utilice
estropajos de acero, cepillos ni bayetas abrasivas para no dañar la superficie antiadherente.
5. Seque la base del aparato (5) con un paño húmedo. Puede retirar las salpicaduras de grasa con un
producto no abrasivo.
Advertencia: la parrilla está provista de una capa antiadherente. No rasque esta capa ni durante la preparación
de alimentos ni durante la limpieza de la parrilla.
Indicaciones para la retirada del aparato
Si el aparato lleva adherida la ilustración de la izquierda (el contenedor de basura tachado)
entonces rige la normativa europea, directiva 2002/96/CE. Este producto no debe arrojar-
se a un contenedor de basura común. Infórmese sobre las leyes territoriales que regulan la
recogida separada de aparatos eléctricos y electrónicos. Respete las leyes territoriales y no
arroje aparatos viejos al cubo de la basura doméstica. Una retirada de aparatos conforme a
las leyes contribuye a proteger el medio ambiente y a las personas a su alrededor frente a
posibles consecuencias perjudiciales para la salud. El reciclaje ayuda a reducir el consumo de
materias primas.
Declaración de conformidad
Fabricante : CHAL- TEC Vertriebs -+ Handels GmbH , Wallstraße 16, 10179 Berlin, Alemania
Este producto cumple con las siguientes directivas europeas:
2004/108/CE (EMC)
2011/65/UE (refundición RoHS 2)
2006/95/CE (baja tensión)