
10030556
Grill mit Konvektor- und Räucherfunktion

2
Sehr geehrter Kunde,
wir gratulieren Ihnen zum Erwerb Ihres Gerätes. Lesen Sie die folgenden Hinweise sorgfältig durch und
befolgen Sie diese, um möglichen Schäden vorzubeugen. Für Schäden, die durch Missachtung der Hinweise
und unsachgemäßen Gebrauch entstehen, übernehmen wir keine Haftung.
Sicherheitshinweise
• Die Missachtung der Sicherheitshinweise kann zum Tode, einer ernsthaften Verletzung oder Verlust von
Eigentum führen. Lesen und befolgen Sie vor der Benutzung die Bedienungsanleitung.
• Das Gerät ist ausschließlich für den Außengebrauch bestimmt.
• Verwenden Sie das Gerät nie in einem Haus, Wohnwagen, Zelt, Werkstatt oder einem umschlossenen
Bereich, da sich Kohlenmonoxid bilden und zum Tod führen kann.
• Verwenden Sie den Grill nicht als Heizgerät.
• Stellen Sie den Grill von Gebäuden, trockenem Laub und entflammbaren Material entfernt auf. Vermeiden
Sie belebte Bereiche. Garen Sie an einem gut belüfteten Ort. Achten Sie auf fliegende Funken.
• Verwenden Sie den Grill nur, wenn alle Teile fest sitzen und das Gerät stabil ist.
• Tragen Sie keine lose Kleidung mit langen Hemdzipfeln, Rüschen oder Schürzenbändern in der Nähe des
Grills, wenn Sie ihn anzünden.
• Lassen Sie Kinder nie das Gerät bedienen oder in dessen Nähe spielen. Halten Sie Tiere und Zuschauer
fern.
• Lassen Sie niemanden um den Grill herum Tätigkeiten ausführen, während er in Betrieb ist und direkt
danach. Betreiben Sie den Grill nicht in der Nähe entflammbarer Oberflächen.
• Berühren Sie nach dem Anzünden nicht die Kohle, um nachzusehen, ob sie heiß ist.
• Lassen Sie die Kohle komplett herunterbrennen und lassen Sie die Asche 48 Stunden abkühlen.
• Entsorgen Sie kalte Asche, indem Sie sie in schwere Aluminiumfolie einwickeln und Sie in einen nicht
brennbaren Behälter tun. Achten Sie darauf, dass sich in der Umgebung kein brennbares Material befindet.
• Bewegen Sie den Grill nicht, während er in Benutzung ist. Fassen Sie ihn nicht am Gehäuse oder Deckel
an, da dies sehr heiß sein kann.
• Verbrennen im Gerät Sie keinen Abfall, Laub, Papier, Pappe oder Sperrholz. Die Verwendung von Hartholz
wird empfohlen. Verwenden Sie möglichst kein Hartholz wie Kiefer oder Zedernholz, da sie zu Funkenflug
neigen.
• Halten Sie alle Schrauben und Muttern fest angezogen, um sicherzustellen, dass der Grill in einem sicheren
Betriebszustand ist.
Hinweis: Nach längerer Anwendung bleicht das Metall aus.
3
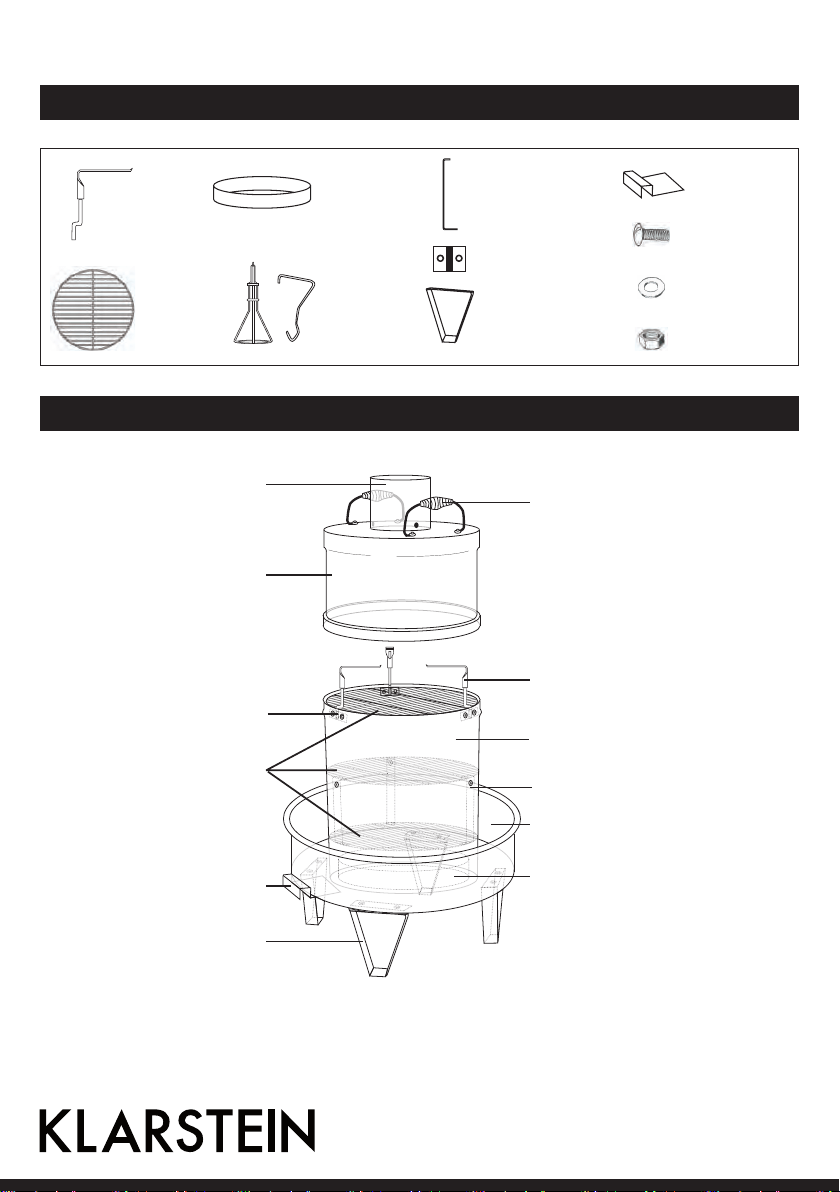
Lieferumfang
3 Roste (B)
Tropfschale
halterung
Griff (C)
3 Bügel
3 Ripen-
aufhänger
3 Halterungen
4 Beine (D)
Ascheklappe
17 Schrauben (F)
9 Unterleg-
scheiben (H)
9 Muttern (G)
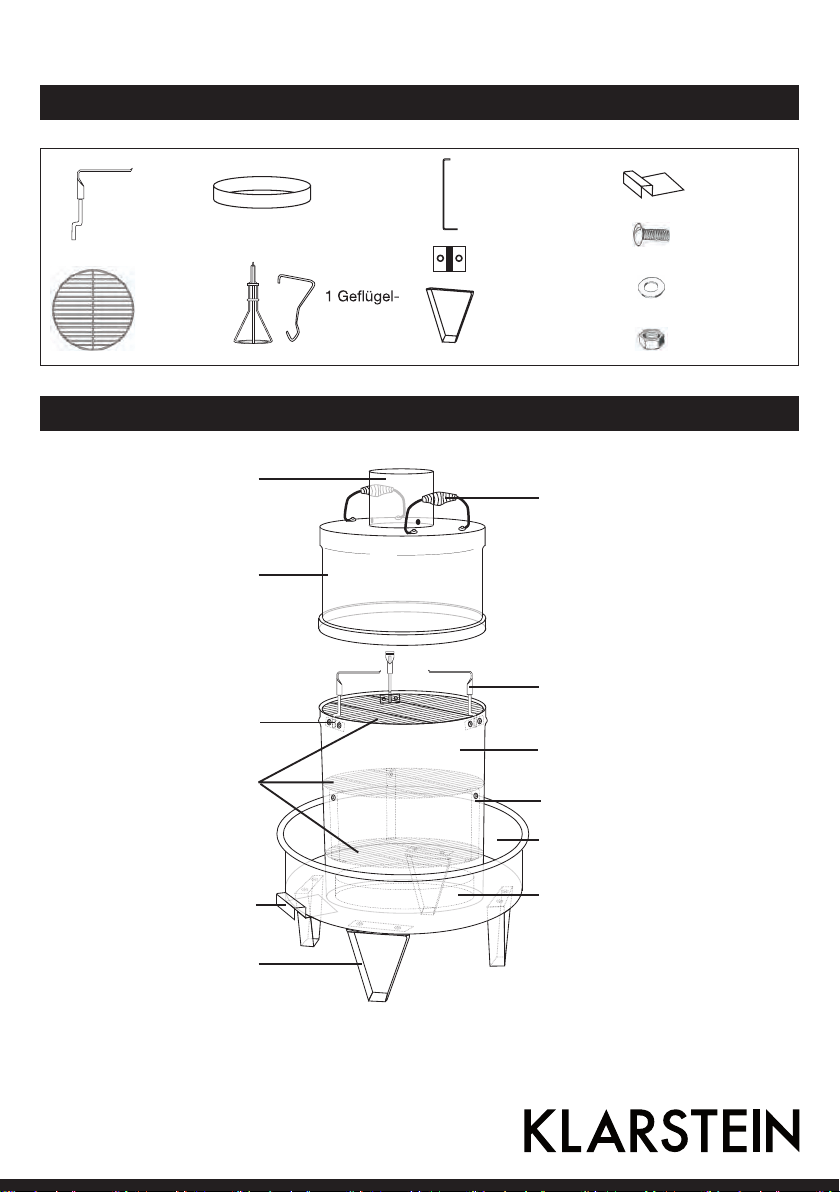
Geräteübersicht
Garröhre
Deckel
Bein (D)
Bügel
(innen) (I)
Unterer Ring
Auffangschale
Ascheklappe
Oberer Ring
Griffe
Halterung für
Aufhängung (E)
Rost (B)
Rippenaufhänger (A)
4
Zusammenbau
(
D)
(F)
(F)
(H)
(G)
(I)
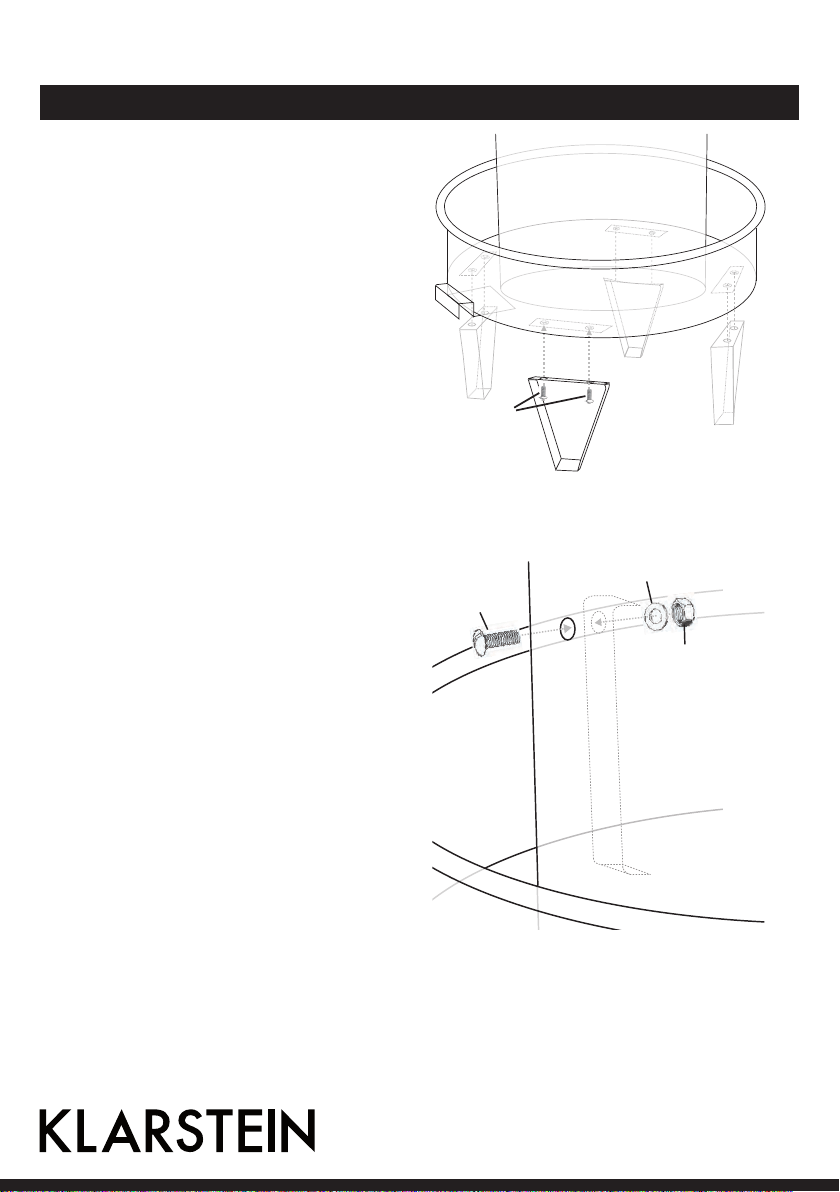
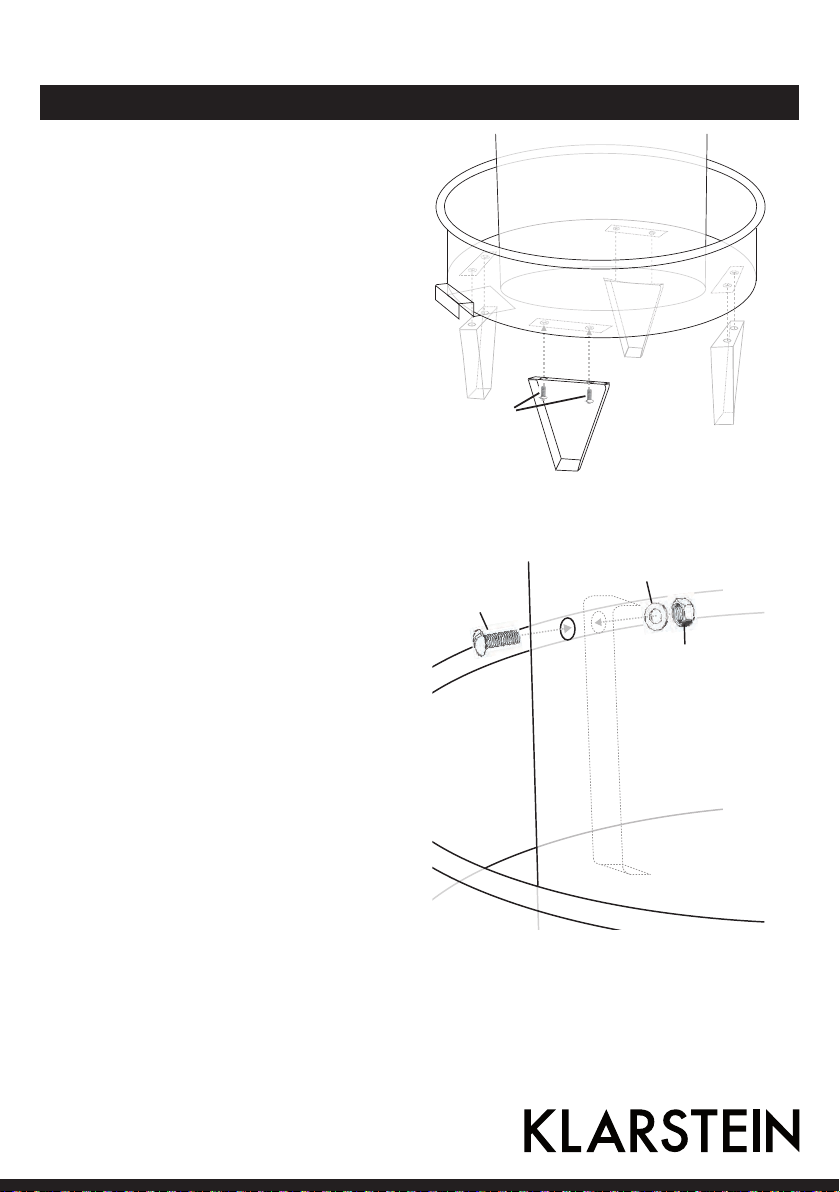
Schritt 1
Anbringen der Füße
1. Richten Sie die Bohrungen der Beine (D) mit
den beiden Bohrungen der Meteallstreifen
aus. unten dem unteren Ring aus.
2. Stecken Sie Schrauben (F) durch
die ausgerichteten Bohrungen und
ziehen Sie die Schrauben mit einem
Kreuzschlitzschraubendreher fest.
3. Wiederholen Sie die Schritte 1 und 2 bei den
verbleibenden Beinen.
Schritt 2
Anbringen der Haltebügel
1. Richten Sie die Bohrungen oben am Bügel (I)
mit der Bohrung in der Mitte der Röhre auf aus.
Stecken Sie jeweils eine Schraube (F) durch die
Bohrung.
2. Stecken Sie eine Unterlegscheibe (H) von
innen über jede Schraube. Schrauben Sie eine
Mutter (G) mit einem Schraubenschlüssel
und einem Kreuzschlitzschraubendreher zum
Festhalten der Schrauben an.
3. Wiederholen Sie die Schritte für die
verbleibenden Haltebügel.
5
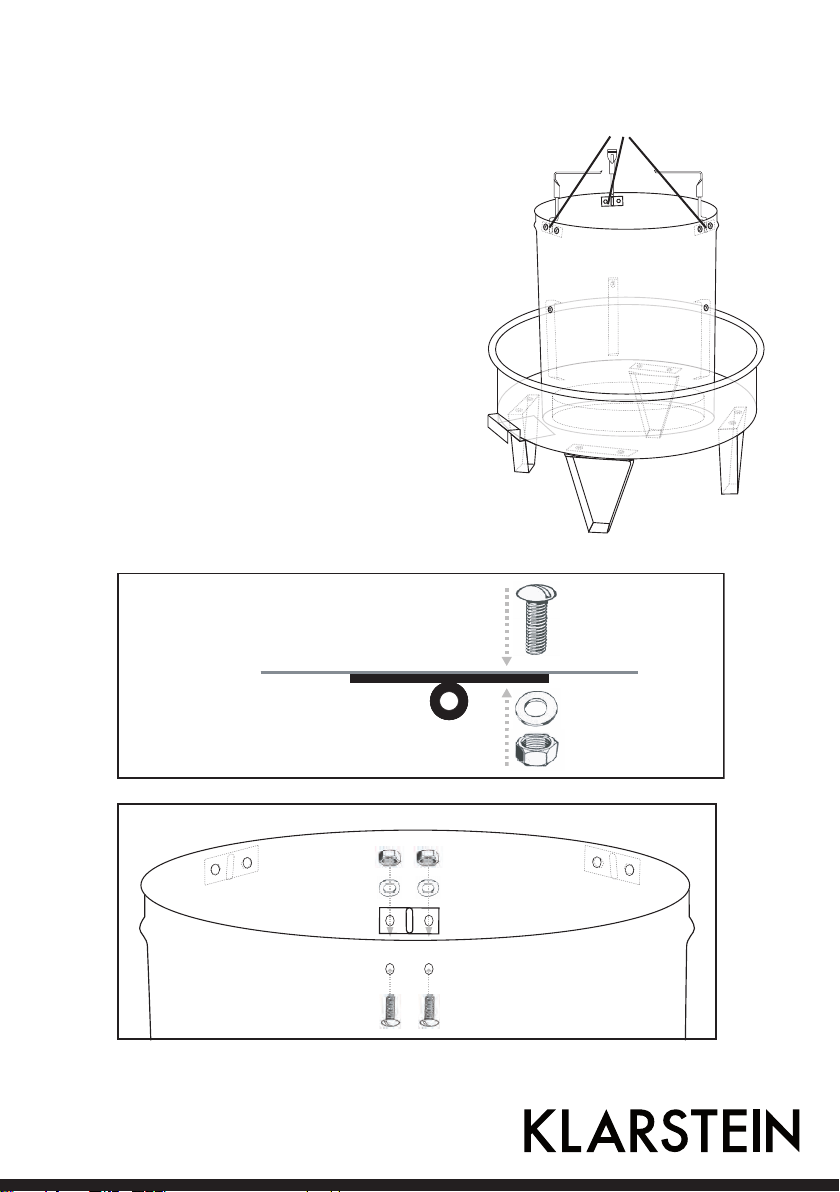
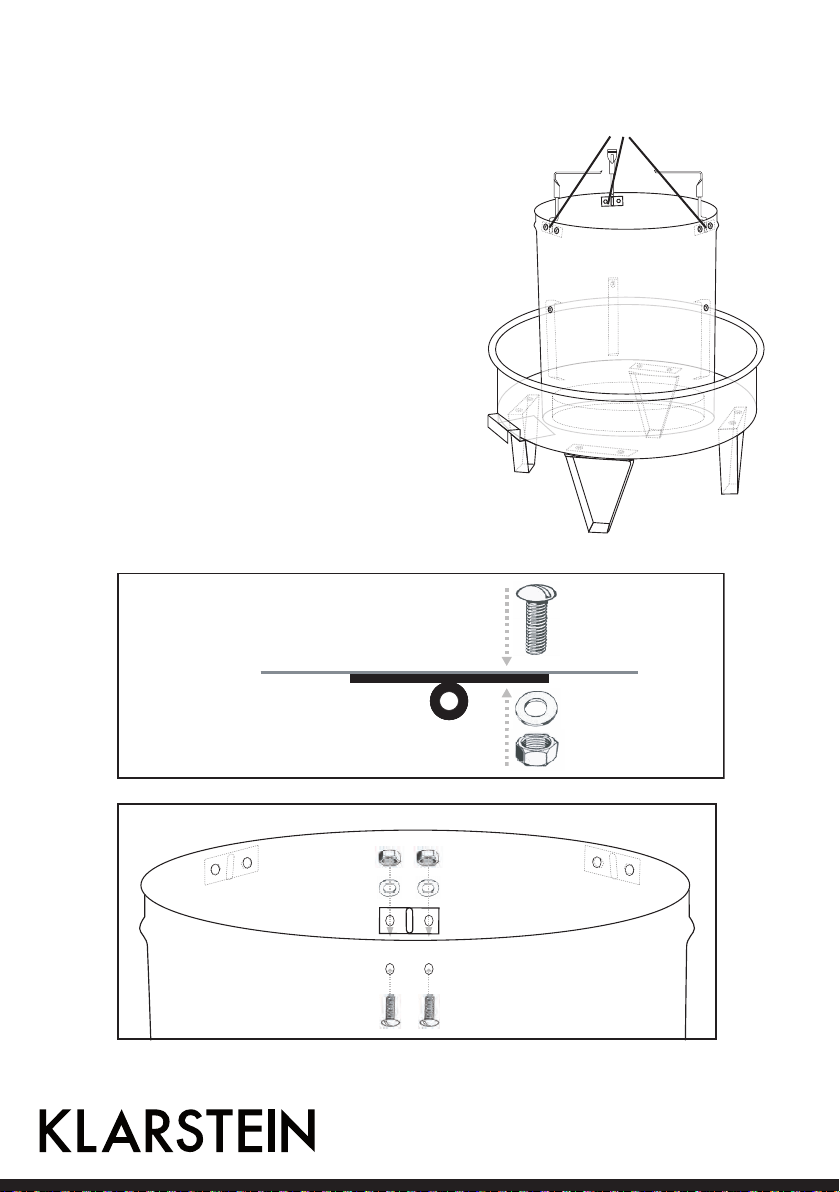
Schritt 3
Anbringen der Rippenaufhänger
1. Richten Sie die Bohrungen der Halterung für
die Aufhängung (A) mit den oberen beiden
Bohrungen der Röhre aus und führen Sie zwei
Schrauben (F) durch diese Bohrungen.
2. Legen Sie eine Unterlegscheibe (H)
und eine Mutter (G) von innen über die
Schraube. Schrauben Sie eine Mutter (G)
mit einem Schraubenschlüssel und einem
Kreuzschlitzschraubendreher zum Festhalten
der Schrauben an.
3. Wiederholen Sie die Schritte für die
verbleibenden Rippenaufhänger.
(A)
(F)
Top View
Outside
Inside
(H)
(G)
(A)
Side View
(A)
(F)
(H)
(G)
Ansicht von oben
Seitenansicht

6
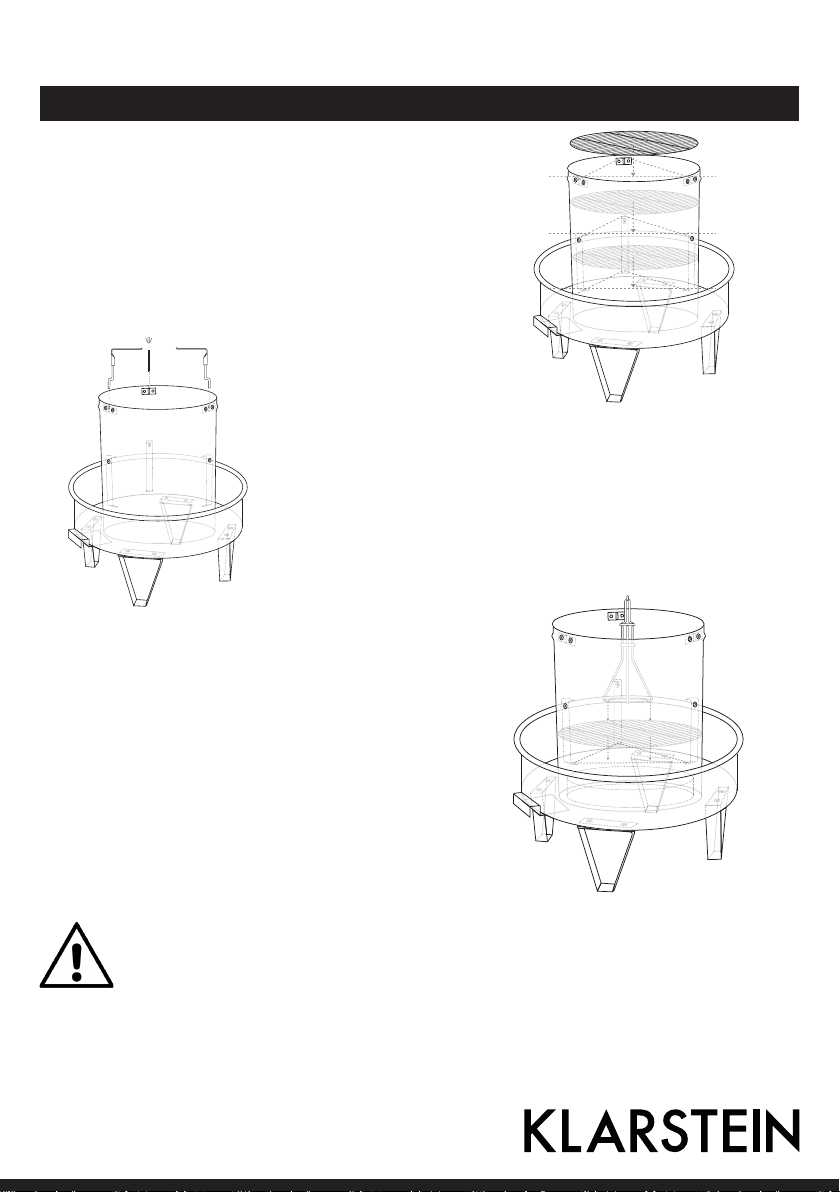
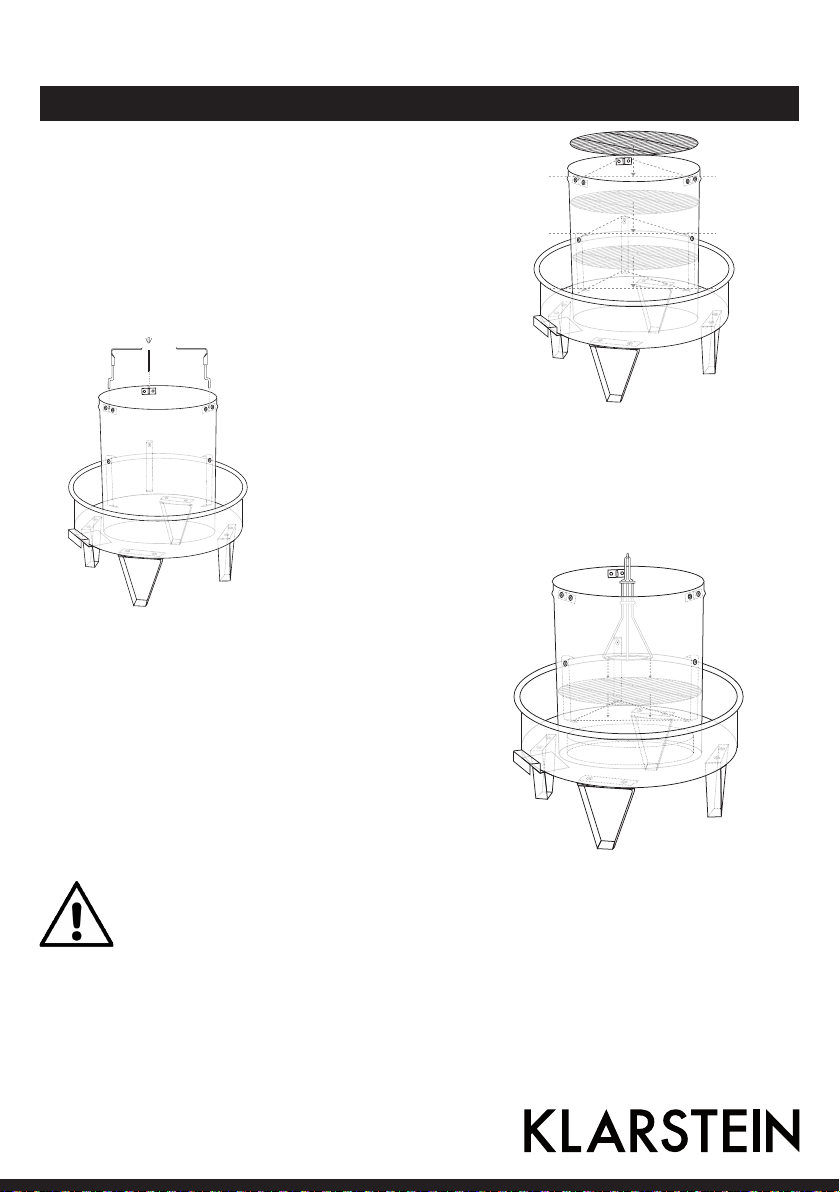
Verwendung des Zubehörs
3 Grillroste
Braten, kleine Hähnchen, Schweinefilet,
Schweinekotelett, Hähnchenflügel, Hähnchenhälften
oder-teile, Fischfilet und Meeresfrüchte.
Die Grillroste können herausgenommen werden.
3 Rippenaufhänger
Auffhängen von Rippen: Nehmen Sie alle Grillroste
heraus. Durchstechen Sie die Rippen mit einem
Messer zwischen der zweiten und dritten Rippe.
Hersteller: Chal-Tec GmbH Wallstr. 16 10179 Berlin
Geflügelhalterung und Griff
Ganze Truthähne und große Brathähnchen:
Nehmen Sie den Hals und Innereien aus dem
Truthahn.Stecken Sie die Geflügelhalterung in die
Bauchhöle des Geflügels. Die Spitze des Ständers
muss aus dem Hals herausragen.
Nehmen Sie die beiden Grillroste heraus. Verwenden
Sie dazu den Hebegriff, um die Geflügelhalterung auf
den unteren Grillrost zu platzieren. Die Halterung muss
ausbalanciert sein. Nach der Zubereitung verwenden
Sie den Griff, um die Halterung herauszunehmen.
Warnung: Erstickungsgefahr
Die Verwendung des Grill im Haus kann zu einer Kohlenmonoxidvergiftung führen.

7
Dear Customer,
Congratulations on purchasing this equipment. Please read this manual carefully and take care of the fol-
lowing hints on installation and use to avoid technical damages. Any failure caused by ignoring the items
and cautions mentioned in the operation and installation instructions are not covered by our warranty and
any liability.
Safety Instructions
• Failure to follow these instructions could result in death, serious injury, and/or property loss. Read and
follow instructions carefully before using the barbecue! Always read the owners manual before using the
device and follow specific usage, assembly and safety procedures.
• The appliance is designed for OUTDOOR HOUSEHOLD USE Only.
• Never use the appliance inside a house, trailer, tent, garage, or any enclosed area because carbon monox-
ide may accumulate and cause death.
• Do not use the appliance as a space heater. Set up the barbecue way from buildings, dry leaves, or any
combustible materials. Avoid high traffic areas and always cook in a well-ventilated area. Be mindful of
windblown sparks.
• Do not ever use the grill unless all parts of the unit are firmly in place and the unit is stable.
• Do not wear loose clothing with hanging shirt tails, frills, or apron strings around the barbecue when light-
ing or cooking.
• Never allow children to operate the grill or play near it. Keep animals and bystanders out of the barbecue
area.
• Do not allow anyone to conduct activities around the appliance when it is in use, or immediately following
its use. Never operate the appliance near combustible surfaces.
• Once the appliance has been lit, do not touch the charcoals to see if they are hot.
• Allow coals to burn out completely and let the ashes cool for 48 hours before disposing of them.
• Dispose of cold ashes by wrapping them in heavy-duty aluminium foil and putting them in a non-combus-
tible container. Be sure there are no other combustible materials in or near the container.
• Do not burn trash, leaves, paper, cardboard or plywood in the barbecue. The use of seasoned hardwood is
recommended. Avoid using softwood such as pine or cedar because they are likely to throw sparks.
• Keep all screws and nuts tight to be sure barbecue is in safe working condition.
• Inspect on regular basis to ensure that the barbecue is operational.
NOTE: After repeated use, a discolouration of the metal will occur.
8
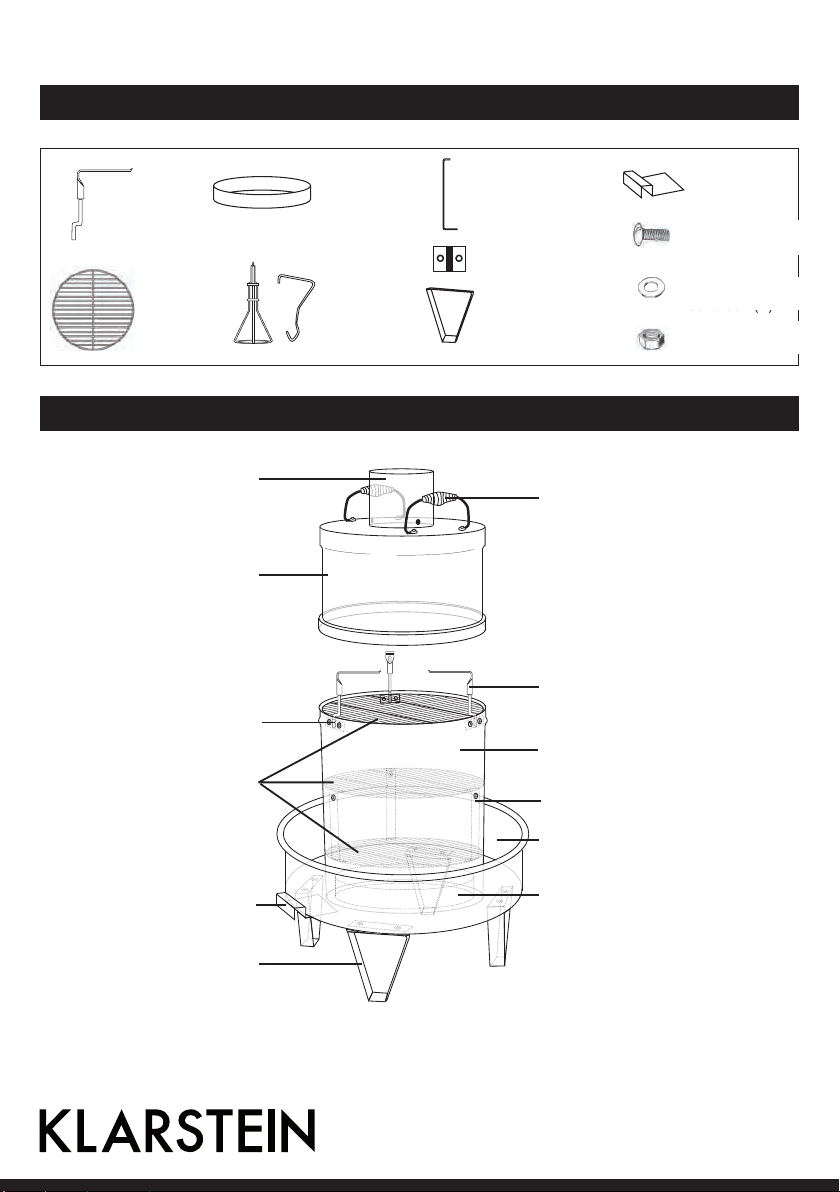
Scope of Supply
3 R ib
Hangers
(A)
3 Cooking
Grates (B)
Drip Pan
1 Poultry
Post & Lifting
Handle (C)
3 “U” Brackets (I)
3 Rib Hanger
Receptacles (E)
4 Triangular
Legs (D)
Door
Ash Removal
17 Screws (F)
9 Washers (H)
9 Nuts (G)
Product Description
Cooking Cylinder
Lid
Triangular
Leg (D)
“U” Bracket
(inside) (I)
Lower Charcoal Rin
g
Uper
Charcoal Ring
Drip Pan
Ash removal door
Heat Resistant Coil
Handles
Rib Receptacle (E)
Cooking
Grates (B)
Rib Hanger (A)

9
Assembly
(
D)
(F)
(F)
(H)
(G)
(I)
Step 1
Attach the legs
1. Align the two holes of the legs (D) with the two
holes on the metal strips located underneath
the lower charcoal ring.
2. Place screw (F) in aligned holes and tighten
using a Phillips head screwdriver.
3. Repeat steps 1 and 2 for remaining legs.
Step 2
Attach the "U" brackets
1. Align the hole at the top of the “u” bracket
(I) with the hole in the center of the cooking
cylinder and slide one screw (F) through the
aligned holes.
2. Place washer (H) and
nut (G) over screw on
the inside of the cooking cylinder. Tighten nut
(G) using Crescent wrench and Phillips head
screwdriver.
3. Repeat steps 1 and 2 for the remaining “u”
brackets.

10
Step 3
Attach the receptables
1. Align the two holes of the Rib Receptacle (A)
with the top two holes in the cooking cylinder
and slide two screws (F) through the aligned
holes.
2. Place washer (H) and nut (G) over screw on
the inside of the cooking cylinder. Tighten nut
(G) using Crescent wrench and Phillips head
screwdriver.
3. Repeat steps 1 and 2 for remaining Rib
Receptacles.
(A)
(F)
Top View
Outside
Inside
(H)
(G)
(A)
Side View
(A)
(F)
(H)
(G)
11
Use of the Attachments
3 Cooking Grates
Roasts, small chickens, pork tenderloins, pork chops,
chicken wings, chicken halves/parts, fish filet and
seafood—Grates are removable and can be used
individually to accommodate larger cuts of meat
or can be used together to accommodate large
quantities.
3 Rib Hangers
Ribs—Remove all cooking grates. With a knife, pierce
ribs between the 2nd and 3rd bone on the wide end
of the rack. Hang ribs vertically by sliding rib hanger
through the opening.
Producer: Chal-Tec GmbH Wallstr. 16 10179 Berlin. Germany
Poultry Stand and Lifting Handle
Whole turkeys and large roaster chickens—Ensure neck
and giblets are removed from poulty product. Insert
poultry stand into large cavity of the poultry product,
ensuring the top of the poultry stand is exposed
through the neck. Remove the top two cooking
grates. use lifting handle to place stand on the bottom
cooking grate. Ensure stand is well balanced on
cooking grate. When cooking is complete, use lifting
handle to remove poultry stand.
Warning: Danger of Suffocation
Using the cooker indoors can cause carbon monoxide poisoning.

10030556
Barbecue à convection et fumoir

13
Chère cliente, cher client,
Toutes nos félicitations pour l’acquisition de ce nouvel appareil. Veuillez lire attentivement et respecter les
instructions de ce mode d’emploi afin d’éviter d’éventuels dommages. Nous ne saurions être tenus pour
responsables des dommages dus au non-respect des consignes et à la mauvaise utilisation de l’appareil.
Consignes de sécurité
• Le non-respect des consignes de sécurité peut entraîner la mort, des blessures graves ou la perte de biens.
Lire et respecter le mode d’emploi avant d’utiliser l’appareil.
• L’appareil est uniquement destiné à une utilisation en extérieur.
• Ne jamais utiliser l’appareil dans une maison, un camping-car, une tente, un atelier ou dans toute pièce
fermée, car il dégage du monoxyde de carbone pouvant entraîner la mort.
• Ne pas utiliser le barbecue comme système de chauffage.
• Tenir le barbecue à distance des bâtiments, des feuilles mortes et des matériaux inflammables. Éviter les
zones passantes. Cuire dans un lieu bien aéré. Attention aux projections de flammèches.
• Utiliser le barbecue uniquement lorsque toutes les pièces sont fixées et que l’appareil est stable.
• Ne pas porter de vêtements lâches avec un long pan de chemise, des froufrous ou de ruban de tablier à
proximité du barbecue au moment de l’allumer.
• Ne jamais laisser les enfants utiliser le barbecue ou jouer à proximité. Tenir les animaux et les badauds à
l’écart.
• Ne laisser personne effectuer des actions autour du barbecue pendant et immédiatement après son fonc-
tionnement. Ne pas faire fonctionner le barbecue à proximité de surfaces inflammables.
• Ne pas toucher le charbon après l’allumage pour vérifier s’il est chaud.
• Laisser le charbon brûler complètement et laisser les cendres refroidir pendant 48 heures.
• Jeter les cendres froides en les emballant dans des feuilles d’aluminium puis dans un récipient non inflam-
mable. S’assurer qu’aucun matériau inflammable ne se trouve à proximité.
• Ne pas déplacer le barbecue pendant son utilisation. Ne pas le saisir au niveau de la coque ou du couvercle,
car ils peuvent être extrêmement brûlants.
• Ne pas brûler de déchets, de feuilles mortes, de papier ou de bois contreplaqué dans l’appareil. Il est re-
commandé d’utiliser du bois dur. Si possible, ne pas utiliser de bois dur comme le pin ou le cèdre, car ils ont
tendance à provoquer des projections de flammèches.
• S’assurer que les vis et les écrous sont bien vissés pour garantir le fonctionnement sécurisé du barbecue.
Remarque : le métal déteint après une longue utilisation.
14
Contenu de l’emballage
3 Roste (B)
Tropfschale
halterung
Griff (C)
3 Bügel
3 Ripen-
aufhänger
3 Halterungen
4 Beine (D)
Ascheklappe
17 Schrauben (F)
9 Unterleg-
scheiben (H)
9 Muttern (G)
Aperçu de l’appareil
Garröhre
Deckel
Bein (D)
Bügel
(innen) (I)
Unterer Ring
Auffangschale
Ascheklappe
Oberer Ring
Griffe
Halterung für
Aufhängung (E)
Rost (B)
Rippenaufhänger (A)
3 crochets
pour entre-
côte
3 grils (B)
Anneau supérieur
Poignée
Crochets pour entre-
côte (A)
Cylindre de cuisson
Arceau (interne) (I)
Anneau inférieur
Bac de récupération
Couvercle
Support d’accroche (E)
Grils (B)
Clapet de cendres
Pied (D)
Bac de récu-
pération
1 support de
volaille
Poignée (C)
3 arceaux
Clapet de
cendres
17 vis (F)
9 rondelles (H)
9 écrous (G)
3 supports
4 pieds (D)

15
Montage
(
D)
(F)
(F)
(H)
(G)
(I)
Étape 1
Montage des pieds
1. Aligner les trous des pieds (D) avec les deux
trous de la bande métallique sous l’anneau
inférieur.
2. Enfoncer les vis (F) dans les trous et les visser
avec un tournevis en croix.
3. Répéter les étapes 1 et 2 pour les autres pieds.
Étape 2
Montage de l’arceau de maintien
1. Aligner les trous du haut au niveau de l’arceau (I)
avec les trous du milieu du cylindre. Introduire
une vis (F) dans chaque trou.
2. Passer une rondelle (H) sur les vis par l’intérieur.
Visser un écrou (G) avec une clé et utiliser un
tournevis en croix pour serrer la vis.
3. Répéter l’opération pour les arceaux de
maintien restants.

16
Étape 3
Montage de l’arceau de maintien
1. Aligner les trous du support d’accrochage (A)
avec les trous du haut du cylindre et introduire
deux vis (F) dans les trous.
2. Placer une rondelle (H) et un écrou (G) de
l’intérieur sur les vis. Visser un écrou (G) avec
une clé et utiliser un tournevis en croix pour
serrer la vis.
3. Répéter l’opération pour l’autre accroche pour
entrecôte.
(A)
(F)
Top View
Outside
Inside
(H)
(G)
(A)
Side View
(A)
(F)
(H)
(G)
Vue du dessus
Vue latérale
17
Utilisation des accessoires
3 grils
Pour griller de petits poulets, du filet de porc, des
côtelettes de porc, des ailes de poulet, des pilons de
poulet, du filet de poisson et des fruits de mer.
Les grils sont amovibles.
Trois crochets pour entrecôte
Pour accrocher l’entrecôte, retirer tous les grils. Piquer
l’entrecôte avec un couteau entre la deuxième et
troisième côte.
Fabricant : Chal-Tec GmbH Wallstr. 16 10179 Berlin. Allemagne
Support pour volaille et poignée
Dinde ou poulet entier :
Enlever le cou et les entrailles de la dinde. Piquer le
support de volaille dans l’ouverture ventrale de la
volaille. La pointe du support doit sortir par le cou.
Sortir les deux grils. Utiliser pour cela la poignée de
levage pour placer le support de volaille et le gril du
bas. Le support doit être bien équilibré. Après cette
préparation, utiliser la poignée pour sortir le support.
Attention : risques d‘étouffement
L’utilisation du gril à l’intérieur d’une maison peut provoquer une intoxication au monoxyde de
carbone.

10030556
Griglia con funzione convettore e affumicatore

19
Gentile cliente,
La ringraziamo per aver acquistato il nostro prodotto. La preghiamo di leggere attentamente le seguenti
istruzioni e di seguirle per evitare eventuali danni. Non ci assumiamo alcuna responsabilità per danni
derivati da una mancata osservazione delle avvertenze di sicurezza e da un uso improprio del dispositivo.
Avvertenze di sicurezza
• Un utilizzo improprio del dispositivo può comportare morte, gravi infortuni o il danneggiamento di altri
oggetti. Prima dell´uso leggere e seguire il manuale di istruzioni.
• Il dispositivo è per un uso esclusivamente esterno.
• Non utilizzare mai il dispositivo in casa, in camper, in tenda, in officina o in altri ambienti chiusi poiché la
formazione di monossido di carbonio può causare la morte.
• Non utilizzare la griglia come dispositivo per il riscaldamento.
• Collocare la griglia lontano da foglie secche e da materiale infiammabile. Evitare di utilizzare il dispositivo in
zone trafficate. Grigliare in un luogo ben arieggiato. Prestare attenzione alle scintille.
• Utilizzare la griglia solo se tutti i componenti sono ben fissati e il dispositivo è stabile.
• Non indossare indumenti larghi con maniche lunghe, collane o simili vicino alla griglia durante l´accensione.
• I bambini non devono utilizzare il dispositivo o giocare nelle sue vicinanze. Tenere lontano gli animali.
• Non eseguire alcuna attività intorno alla griglia mentre è in funzione e subito dopo l´uso. Non accendere la
griglia vicino a superfici infiammabili.
• Non toccare il carbone subito dopo averlo acceso per controllare se è caldo.
• Far spegnere completamente il carbone e far raffreddare la cenere.
• Smaltire la cenere fredda avvolgendola in fogli di alluminio resistenti e metterla in un contenitore non
infiammabile. Assicurarsi che nelle vicinanze non ci sia materiale infiammabile.
• Non spostare la griglia durante l´uso. Non toccare l´alloggiamento o il coperchio poiché questo diventa
molto caldo quando la griglia è in funzione.
• Non bruciare nella griglia immondizia, foglie secche, carta o compensato. Si consiglia l´utilizzo di legno
duro. Tuttavia non utilizzare cedro o pino poiché tendono a formare scintille.
• Serrare saldamente tutte le viti e i dadi per un utilizzo sicuro del dispositivo.
Nota: dopo un utilizzo prolungato del dispositivo, il metallo si scolorisce.

20
Consegna
3 Roste (B)
Tropfschale
halterung
Griff (C)
3 Bügel
3 Ripen-
aufhänger
3 Halterungen
4 Beine (D)
Ascheklappe
17 Schrauben (F)
9 Unterleg-
scheiben (H)
9 Muttern (G)
Descrizione del prodotto
Garröhre
Deckel
Bein (D)
Bügel
(innen) (I)
Unterer Ring
Auffangschale
Ascheklappe
Oberer Ring
Griffe
Halterung für
Aufhängung (E)
Rost (B)
Rippenaufhänger (A)
3 ganci
3 griglie (B)
Anello superiore
Impugnature
Ganci (A)
Cilindro di cottura
Staffa (interna) (I)
Anello inferiore
Vaschetta raccogli-
gocce
Coperchio
Supporto per gancio (E)
Griglia (B)
Sportello cenere
Gamba (D)
Bac de
récupération
1 impugnatura
per pollame
(C)
3 staffe
Sportello
cenere
17 viti (F)
9 rondelle (H)
9 dadi (G)
3 supporti
4 gambe (D)

21
Montaggio
(
D)
(F)
(F)
(H)
(G)
(I)
Fase 1
Assemblare le gambe
1. Allineare i fori delle gambe (D) ad entrambi i
fori dei listelli in metallo situati sotto l´anello
inferiore.
2. Inserire le viti (F) attraverso i fori allineati e
serrarle con un cacciavite a croce.
3. Ripetere le fasi 1 e 2 con le gambe restanti.
Fase 2
Assemblare le staffe
1. Allineare i fori posti in alto sulla staffa (I) con il
foro al centro del cilindro. Inserire una vite (F)
ciascuna attraverso i fori allineati.
2. Inserire una rondella (H) e un dado (G) sopra
la vite dall´interno del cilindro. Utilizzare
una chiave inglese e un cacciavite a croce per
serrare il dado.
3. Ripetere la procedura per le staffe rimanenti.

22
Fase 3
Assemblare i ganci
1. Allineare i fori del supporto per il gancio (A) a
entrambi i fori superiori del cilindro e inserire
due viti (F) attraverso i fori allineati.
2. Inserire una rondella (H) e un dado (G) sulla
vite dall´interno del cilindro. Serrare il dado (G)
utilizzando una chiave inglese e un cacciavite
a croce.
3. Ripetere la procedura con i ganci restanti.
(A)
(F)
Top View
Outside
Inside
(H)
(G)
(A)
Side View
(A)
(F)
(H)
(G)
Visione dall´alto
Fuori
Dentro
Visione laterale

23
Utilizzo degli accessori
3 griglie
Arrostire pollo, filetto di maiale, cotoletta di maiale, ali
di pollo, mezzo pollo, pesce e frutti di mare.
Le griglie sono rimovibili.
3 ganci
Appendere i ganci: estrarre tutte le griglie. Punzecchiare
la carne con un coltello.
Produttore : Chal-Tec GmbH Wallstr. 16 10179 Berlino. Germania
Supporto per il pollame e impugnatura
Tacchino intero e pollo grande:
Rimuovere il collo e le interiora del tacchino. Inserire il
supporto nella cavità addominale del pollo. La punta
del supporto deve fuoriuscire dal collo.
Togliere entrambe le griglie. Utilizzare l´impugnatura
per posizionare il supporto sulla griglia inferiore. Il
supporto deve essere bilanciato. Al termine della
cottura, utilizzare l´impugnatura per estrarre il
supporto.
Attenzione: pericolo di soffocamento
L´utilizzo in casa della griglia può comportare un avvelenamento da monossido di carbonio.

10030556
Parrilla con convector y función de ahumador

25
Estimado cliente,
La ringraziamo per aver acquistato il nostro prodotto. La preghiamo di leggere attentamente le seguenti
istruzioni e di seguirle per evitare eventuali danni. Non ci assumiamo alcuna responsabilità per danni derivati
da una mancata osservazione delle avvertenze di sicurezza e da un uso improprio del dispositivo.
Indicaciones de seguridad
• El no seguimiento de estas indicaciones de seguridad puede provocar la muerte, una lesión grave o la pér-
dida de la garantía. Lea y siga este manual de instrucciones antes de la utilización del aparato.
• El aparato solamente es apto para un uso en exteriores.
• Nunca utilice el aparato dentro de una vivienda, vivienda móvil, tienda de campaña, taller o una zona
cerrada; se generará monóxido de carbono que puede provocar la muerte.
• No utilice la parrilla como radiador.
• Mantenga el aparato alejado de edificios, hojas secas y materiales inflamables. Evite las zonas con mucho
movimiento. Prepare los alimentos en una zona bien ventilada. Tenga cuidado con las chispas generadas.
• Utilice la parrilla solamente cuando todas las piezas se encuentren en su posición y el aparato se haya
instalado de una manera estable.
• No utilice ropa suelta con mangas largas, volantes o tiras decorativas cerca de la parrilla cuando la encienda.
• No deje que los niños controlen el aparato ni jueguen a su alrededor. Mantenga a los animales y a otras
personas alejadas del aparato.
• No deje que nadie realice ningún tipo de actividad junto a la parrilla mientras esté en funcionamiento. No
ponga en marcha la parrilla cerca de superficies inflamables.
• No toque el carbón después de prenderle fuego para comprobar si está caliente.
• Deje que el carbón se queme completamente y deje que las cenizas se enfríen durante 48 horas.
• Retire las cenizas frías envolviéndolas en papel de aluminio grueso y tírelas a un contenedor no combusti-
ble. Asegúrese de que no existe material inflamable cerca del aparato.
• No mueva la parrilla durante su utilización. No toque la carcasa ni la tapa, estas alcanzarán temperaturas
muy elevadas.
• No queme en el aparato basura, hojas, papel, cartón ni contrachapado. Se recomienza la utilización de
madera dura. No utilice en la medida de lo posible madura dura de pino ni cedro, pues producirán chispas.
• Apriete bien todos los tornillos y tuercas para garantizar que la parrilla se encuentra en buen estado.
Advertencia: tras un uso prolongado, el metal perderá color.

26
Contenido del envío
3 Roste (B)
Tropfschale
halterung
Griff (C)
3 Bügel
3 Ripen-
aufhänger
3 Halterungen
4 Beine (D)
Ascheklappe
17 Schrauben (F)
9 Unterleg-
scheiben (H)
9 Muttern (G)
Descripción del aparato
Garröhre
Deckel
Bein (D)
Bügel
(innen) (I)
Unterer Ring
Auffangschale
Ascheklappe
Oberer Ring
Griffe
Halterung für
Aufhängung (E)
Rost (B)
Rippenaufhänger (A)
3 Colgadores
para costilla
3 parrillas
(B)
Junta superior
Asas
Colgador para costillas
(A)
Cilindro de cocción
Percha (interior) (I)
Junta inferior
Bandeja antigoteo
Tapa
Soporte para el colga-
dor (E)
Parrilla (B)
Eliminador de ceniza
Pata (D)
Bandeja anti-
goteo
1 Mango y
soporte para
ave (C)
3 perchas
Eliminador de
ceniza
17 Tornillos (F)
9 Arandelas (H)
9 Tuercas (G)
3 supporti
4 Patas (D)
27
Montaje
(
D)
(F)
(F)
(H)
(G)
(I)
Paso 1
Montaje de las patas
1. Alinee los orificios de las patas (D) con ambos
orificios de los postes metálicos situados en la
parte inferior de la junta inferior.
2. Encaje los tornillos (F) a través de los orificios
alineados y apriételos con un destornillador de
estrella.
3. Repita los pasos 1 y 2 para las patas restantes.
Paso 2
Montaje de las perchas de sujeción
1. Alinee los orificios en la parte superior de la
percha (I) con los orificios situados en medio
del poste. Encaje un tornillo (F) en el orificio.
2. Coloque una arandela (H) en la parte interior
de cada tornillo. Atornille una tuerca (G) con
una llave y un destornillador de estrella para
apretar los tornillos.
3. Repita el proceso para las perchas restantes.
28
Paso 3
Montaje de los colgadores para costilla
1. Alinee los orificios del soporte para el colgador
(A) con ambos orificios de los postes superiores
y coloque 2 tornillos (F) en dichos orificios.
2. Coloque una arandela (H) y una tuerca (G) en
la parte interior de cada tornillo. Atornille una
tuerca (G) con una llave y un destornillador de
estrella para apretar los tornillos.
3. Repita los pasos para los colgadores de costilla
restantes.
(A)
(F)
Top View
Outside
Inside
(H)
(G)
(A)
Side View
(A)
(F)
(H)
(G)
Vista desde arriba
exterior
dentro
Vista lateral

29
Utilización de los accesorios
3 parrillas para asar
Asados, pollos pequeños, filetes de cerdo, chuletas de
cerdo, alitas de pollo, mitades de pollo o partes, filetes
de pescado y mariscos.
Las parrillas pueden extraerse.
3 olgadores para costilla
Colgar costilla: retire todas las parrillas. Clave un
cuchillo entre el segundo y el tercer hueso de la tira
de costilla.
Fabricante : Chal-Tec GmbH, Wallstraße 16, 10179 Berlín (Alemania)
Soporte para aves y mango
Pavos y pollos asados enteros:
Retire el cuello y las entrañas del pavo. Encaje el
soporte para ave en el abdomen de la misma. La
punta del soporte debe salir por la parte del cuello.
Retire ambas parrillas. Utilice el mango elevador para
colocar el soporte para aves en la parrilla inferior. El
soporte debe quedar equilibrado. Tras la preparación,
utilice el mango para retirar el soporte.
Advertencia: riesgo de asfixia
La utilización de la parrilla dentro de la vivienda puede provocar intoxicación por monóxido de
carbono.