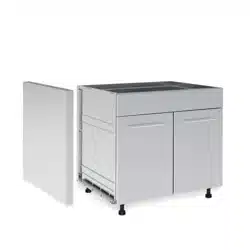
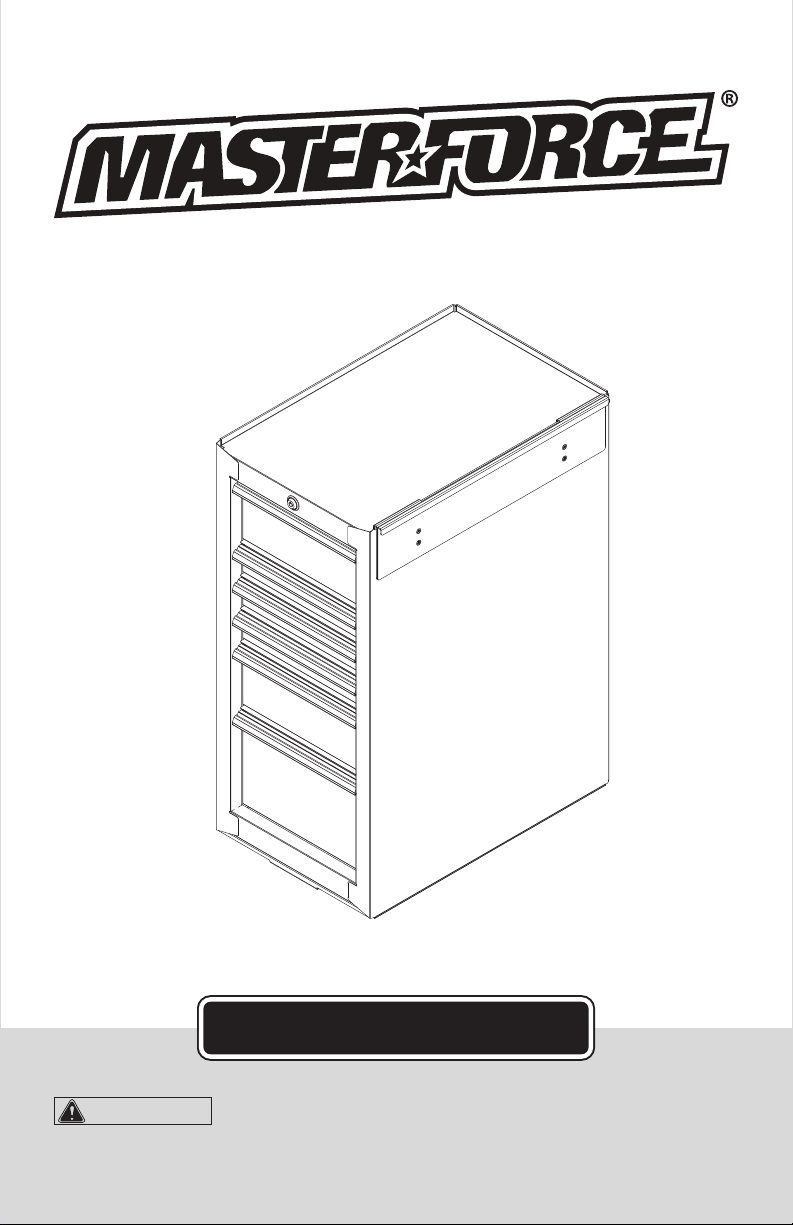
16" Side Cabinet
Model #: 245-1988/245-1996/245-2000
CAUTION:
To reduce the risk of injury, user must read
and understand operator’s manual. Save these instructions
for future reference.
OPERATOR’S MANUAL
Actual product
may differ slightly
from image shown.

Page 1
TABLE OF CONTENTS
Safety Symbols ......................................................................... 2
Safety Instructions ..................................................................... 3
Parts List ................................................................................... 4
Assembly and Operation ........................................................... 5
Maintenance and Safety ............................................................ 7
WARNING
Cancer and Reproductive Harm – www.P65Warnings.ca.gov
Page 2
SAFETY SYMBOLS
Model #: _______________________________
Place of purchase: ______________________
Date of purchase: _______________________
Receipt # of purchase: __________________
CAUTION:
1. Read and follow all safety and assembly
instructions before using this product for
the first time.
2. Fill in the following information and retain
the manual for future reference:
Do not open more than one drawer at a time.
Do not step on drawers.
Do not allow children near the unit.
Lock drawers before moving the unit.
Do not lift unit by yourself.
Page 3
SAFETY INSTRUCTIONS
The purpose of safety symbols is to attract your attention to possible dangers. The safety
symbols, and the explanations with them, deserve your careful attention and understanding.
The symbol warnings do not by themselves eliminate any danger. The instructions and
warnings they give are no substitute for proper accident prevention measures.
WARNING:
Be sure to read and understand all safety instructions in this manual,
including all safety alert symbols such as “DANGER,” “WARNING,” and “CAUTION,”
before using this product. Failure to follow all instructions listed below may result in
electric shock, re and/or serious personal injury.
SYMBOL MEANING
SAFETY ALERT SYMBOL: Indicates DANGER, WARNING, or CAUTION. May be
used in conjunction with other symbols or pictographs.
DANGER:
Failure to obey this warning WILL result in death or serious injury to
yourself or to others. Always follow the safety precautions to reduce the risk of personal
injury.
WARNING:
Failure to obey this safety warning CAN result in death or serious
injury to yourself or to others. Always follow the safety precautions to reduce the risk
of personal injury.
CAUTION:
Failure to obey this safety warning MAY result in personal injury to
yourself or others or property damage. Always follow the safety precautions to reduce
the risk of personal injury.
Page 4
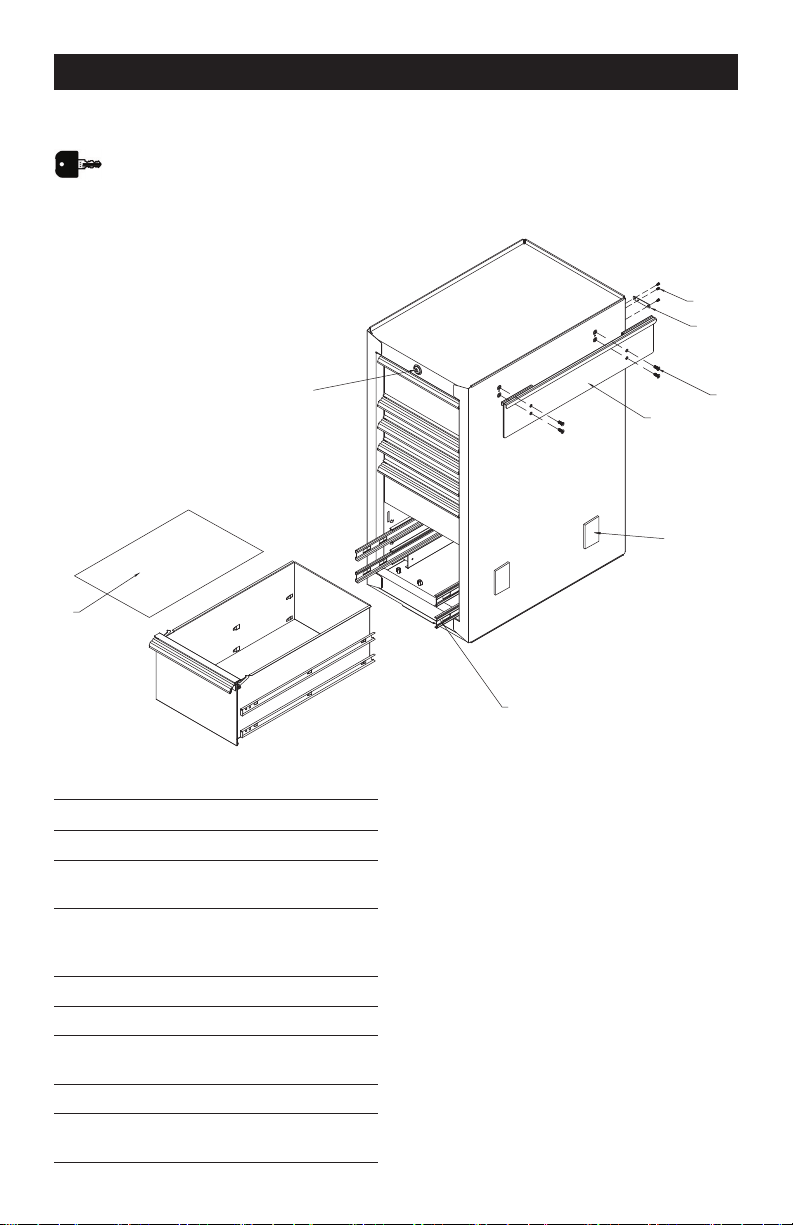
For service regarding parts, assembly or warranty information, please call 1-800-459-4409.
The keys are taped to the inside
of the top drawer of the cabinet.
Ref# Description Part# Qty
1 M6 x 16 Hex Bolt 321023 3 pcs
2 Connecting
Channel
236365 1 pc
3 M6 x 16
Countersink
Screw
320052 4 pcs
4 Hanger 118102 1 pc
5 EVA Pad 600100 2 pcs
6 Slide Set 300176 –
300177
7 sets
7 Drawer Liner 551900 6 pcs
8 Lock and Key
(1201–1210)
304054 1 pc
NOTE: Replacement keys may be ordered,
using the required code which appears on
the face of the lock.
Give this information for service parts:
part number and quantity.
8
3
4
5
6
7
1
2
PARTS LIST
Page 5
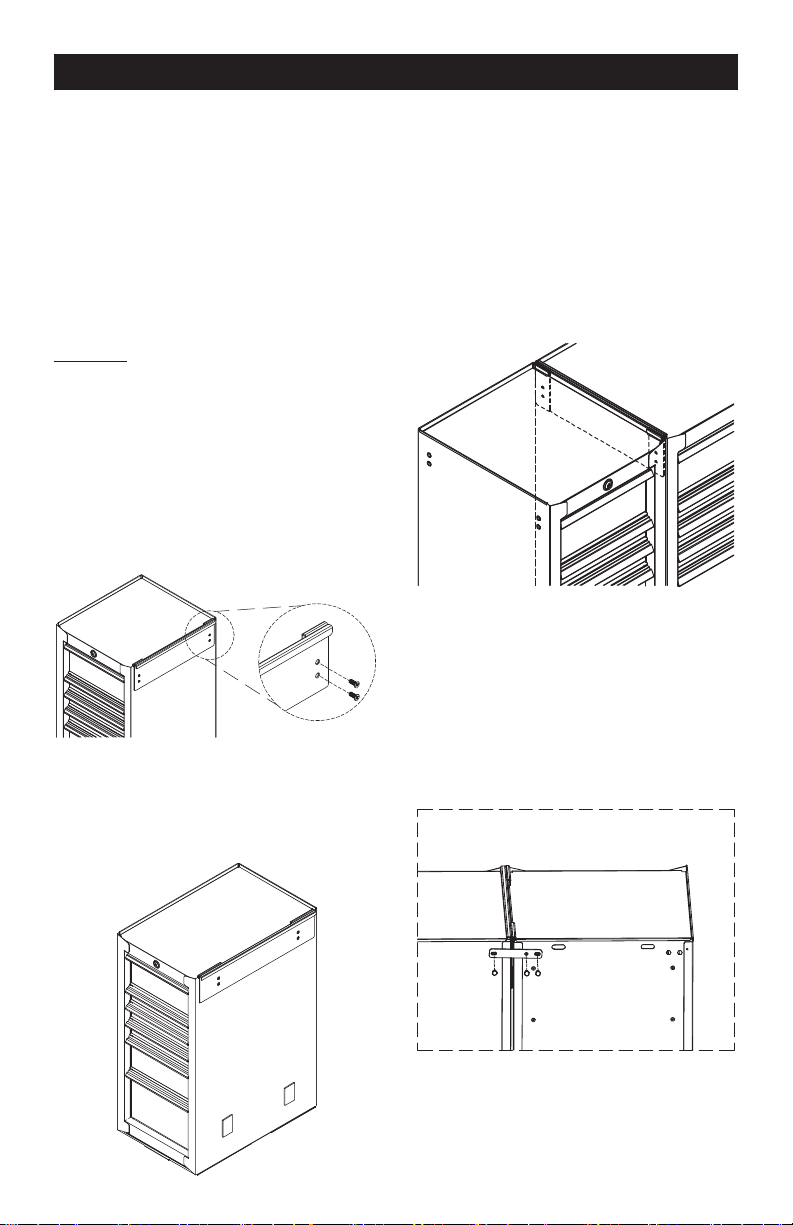
NECESSARY TOOLS REQUIRED
FOR ASS EMBLY
• 10mm socket
• Extension ratchet
• Phillips screwdriver
IMPORTANT: THE UNIVERSAL MOUNTING
SYSTEM ON THIS SIDE CABINET FITS
MOST ROLLING TOOL CABINETS. THE
TOP LID OF THE CABINET MUST BE
MORE THAN 1/2" HIGH AND AT LEAST
24" DEEP.
INSTALL THE HANGER
The hanger will mount on either side of this
cabinet. The side cabinet will also accept
the side handle of your rolling cabinet.
To install the hanger, position it over the
holes in the side cabinet and attach with
the 4 M6 x 16 countersink screws. Tighten
securely.
ATTACH THE EVA PADS
Attach the two EVA pads to the side cabinet
in the locations indicated below.
HANG THE
SIDE CABINET
NOTE: Two or more people may be required
to complete this step.
CAUTION: This product should not be
mounted on an empty cabinet.
Hang the side cabinet on the top lip of your
rolling cabinet.
CONNECT
THE CABINETS
Position the connecting channel on the
back of the cabinets. Attach the connecting
channel to the side cabinet with two
M6 x 16 hex bolts and to the roller cabinet
with one M6 x 16 hex bolt.
ASSEMBLY AND OPERATION
Page 6
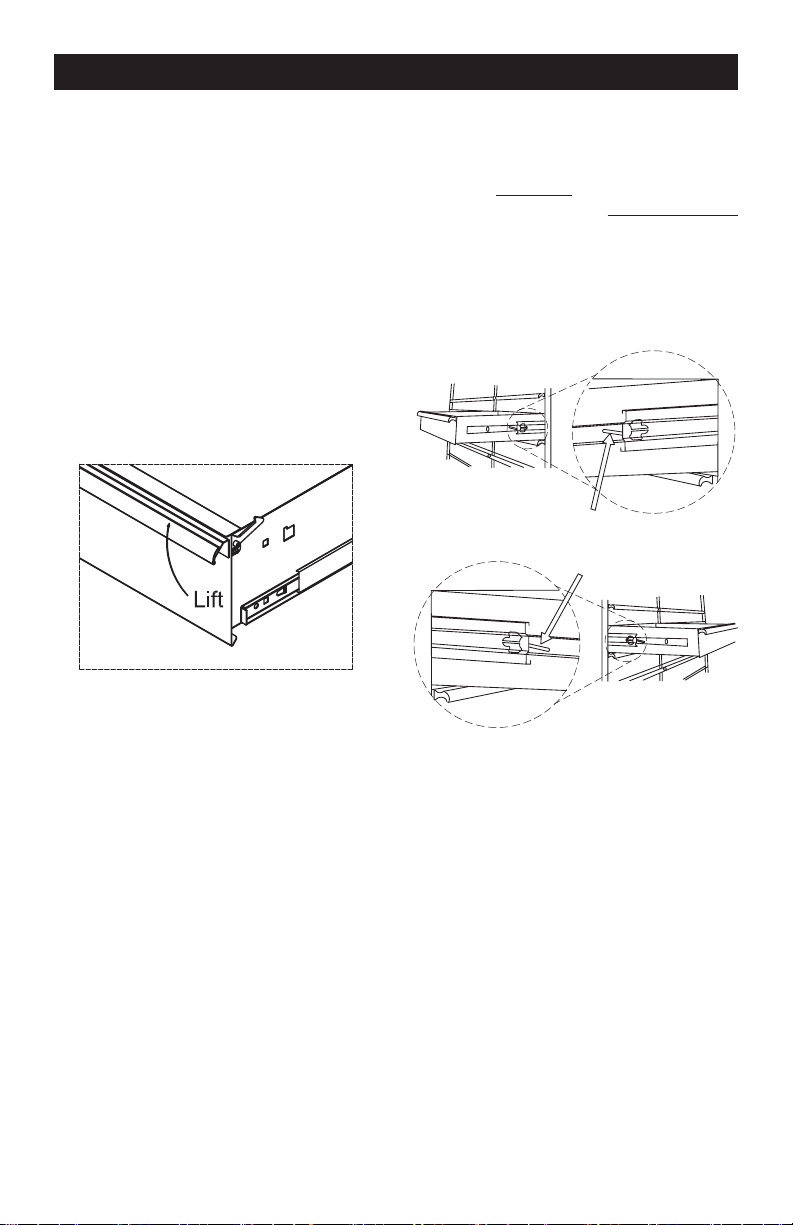
ASSEMBLY AND OPERATION
RAISE AND RELEASE
DRAWER FRONTS
These units are equipped with the raise
and release drawer front system.
To open, lift up on the drawer front while
pulling out towards you.
To close, shut the drawer firmly until the
latch engages.
If the drawer does not stay closed, the
drawer contents may be the obstruction,
or the hook may be slightly bent or it may
be rubbing up against the drawer slides. To
resolve this problem, lightly bend the hook
until the drawer engages in the slide.
TO REMOVE DRAWERS
Pull the drawer out so it is almost fully
extended. PUSH UP on the black release
lever on one side, while PULLING DOWN
on the black release lever on the other side.
While holding the levers in the positions as
instructed above, pull the drawer outward
until it is released from the drawer slide.
PUSH UP (ONE SIDE)
PULL DOWN (OTHER SIDE)
TO REPLACE DRAWERS
Extend the drawer slides from the tool
cabinet. Insert the brackets on each
side of the drawer into the slots in the
cabinet slides, being careful that they
are positioned properly. Once properly
inserted, completely close the drawer to
set the slides in their proper positions.
Page 7
MAINTENANCE
Lubricate the slides twice a year with
a product like WD40 or other quality
lubricant. This is especially important when
the temperature decreases, as the bearing
can become stiff.
Periodically clean the drawer fronts,
drawer trim, and other surfaces with mild
detergent and water.
Auto wax will preserve the storage unit’s
luster finish. Apply the wax as you would to
a car. The wax will also help protect the unit
against scratches.
Grease and oil can be removed with most
standard cleaning fluids. For safety, use a
nonflammable cleaning fluid.
SAFETY
WARNING:
Lock the dra-
wers before moving this product.
The drawers could come open and
make the product unstable and tip,
which may cause personal injury or
product damage.
CAUTION:
The maximum weight
for each drawer should be no more than
110 lbs. If the drawer has two sets of slides,
the load can be no greater than 220 lbs.
CAUTION:
The maximum
product weight, including contents, should
be no more than 450 lbs.
WARNING:
DO NOT stand on
this product or lean on the drawers.
WARNING:
WEAR SAFETY
GLASSES when removing or repositioning
the slides. The tool could slip which may
cause personal injury.
CAUTION:
BE CAREFUL when
opening more than one drawer. The product
could become unstable and tip, which may
cause personal injury or product damage.
WARNING:
DO NOT mount this
product on a truck bed or any other moving
object. This may cause personal injury or
product damage.
CAUTION:
Secure this product
properly before moving it with a forklift.
WARNING:
DO NOT alter this
product in any manner. For example, do not
weld external lockbars or attach electrical
equipment. This may cause product
damage or personal injury.
CAUTION:
Keep this product on
level surfaces. The product may become
unstable and tip if stored or moved on an
uneven surface, which may cause personal
injury or product damage.
WARNING:
DO NOT attach or
mount this product to a vehicle. Mounting
this product to any vehicle in any manner
will void the warranty.
MAINTENANCE AND SAFETY

Page 8
NOTES

Page 9
NOTES

Page 10
SAVE YOUR RECEIPTS
THIS WARRANTY IS VOID WITHOUT THEM
Page #
16" Side Cabinet
LIMITED LIFETIME WARRANTY
MASTERFORCE
®
Tool Cabinets and Chests have been manufactured to the
highest standards of quality and workmanship and are warranted to be free from
defects in materials and workmanship under normal use for the lifetime that you
own the product. If any part of the product is found to be defective during normal
use, the defective product or part will be replaced at our discretion. This warranty
does not cover products that are damaged through accident, abuse, misuse,
commercial/industrial applications or neglect. This warranty also does not
cover any losses, injuries or costs including indirect, incidental or consequential
damages. This warranty may not be transferred or sold. When requesting warranty
service please have the model number, cash register receipt and the date of
purchase available when you call. If the product is defective, we will replace
the defective part at no cost to you. Some states do not allow the exclusion or
limitation of incidental or consequential damages, so the above limitations or
exclusions may not apply to you. This warranty gives you specific legal rights and
you may have other rights, which vary from state to state.
For questions / comments, technical assistance or repair parts,
call toll free: 1-800-459-4409 (M–F, 8am–4:30pm, CST)

©2017 Menard, Inc., Eau Claire, WI 54703 V4 08/2020