
WHISPERWIND
Standventilator
Stand Fan
Ventilador de pie
Ventilateur sur pied
Ventilatore verticale
www.klarstein.com
10034670 10034671


3
DE
Sehr geehrter Kunde,
wir gratulieren Ihnen zum Erwerb Ihres Gerätes. Lesen Sie
die folgenden Hinweise sorgfältig durch und befolgen Sie
diese, um möglichen Schäden vorzubeugen. Für Schäden,
die durch Missachtung der Hinweise und unsachgemäßen
Gebrauch entstehen, übernehmen wir keine Haftung. Scannen
Sie den folgenden QR-Code, um Zugriff auf die aktuellste
Bedienungsanleitung und weitere Informationen rund um das
Produkt zu erhalten.
INHALTSVERZEICHNIS
Sicherheitshinweise4
Einzelteile6
Geräteübersicht7
Zusammenbau8
Display und Tastenfunktionen9
Bedienung10
Reinigung und Pege13
Hinweise zur Entsorgung14
Hersteller & Importeur (UK)14
TECHNISCHE DATEN
Artikelnummer 10034670, 10034671
Stromversorgung 220-240 V ~ 50/60 Hz
Leistung 30 W
Maximale Luftgeschwindigkeit 4,58 m/s
Maximaler Luftdurchsatz 25,52 m³/min
English 15
Español 27
Français 39
Italiano 51

4
DE
SICHERHEITSHINWEISE
• Entfernen Sie die Verpackung und versichern Sie sich, dass kein Teil während
des Transports beschädigt wurde. Falls Teile beschädigt wurden wenden Sie sich
umgehend an den Kundendienst.
• Kinder könnten sich an den Verpackungsmaterialien und Altgeräten verletzen.
Entsorgen Sie das Verpackungsmaterial daher umgehend.
• Kinder ab 8 Jahren, psychisch, sensorisch und körperlich eingeschränkte Menschen
dürfen das Gerät nur benutzen, wenn sie vorher von einer für sie verantwortlichen
Aufsichtsperson ausführlich mit den Funktionen und den Sicherheitsvorkehrungen
vertraut gemacht wurden und die damit verbundenen Risiken verstehen.
• Prüfen Sie vor der Benutzung die Spannung auf der Geräteplakette. Schließen Sie
das Gerät nur an Steckdosen an, die der Spannung des Geräts entsprechen.
• Benutzen Sie das Gerät nur für den vorgesehenen Verwendungszweck
entsprechend der Beschreibung in der Bedienungsanleitung.
• Halten Sie sich beim Zusammenbau genau an die Anleitung. Eine falsche
Vorgehensweise kann zu irreparablen Schäden am Gerät führen.
• Schalten Sie das Gerät aus und ziehen Sie den Stecker aus der Steckdose, bevor
Sie das Gerät reinigen oder wenn Sie es nicht mehr benutzen.
• Falls das Gerät nicht ordnungsgemäß funktioniert, schalten Sie es umgehend aus
und wenden Sie sich an einen Fachbetrieb in Ihrer Nähe.
• Falls das Netzkabel oder der Stecker beschädigt sind, müssen sie vom Hersteller,
einem autorisierten Fachbetrieb oder einer ähnlich qualizierten Person ersetzt
werden.
• Schließen Sie das Gerät nicht an Mehrfachsteckdosen an.
• Benutzen Sie kein Verlängerungskabel.
• Schließen Sie das Gerät nicht an Zeitschaltuhren oder ferngesteuerte Steckdosen an.
• Benutzen oder verstauen Sie das Gerät nicht in der Nähe von Wärmequellen, wie
Heizungen.
• Tauchen Sie das Gerät und den Stecker niemals in Wasser oder andere
Flüssigkeiten. Falls Wasser darauf ausläuft, ziehen Sie umgehend den Stecker aus
der Steckdose und lassen Sie das Gerät von einem Fachbetrieb überprüfen.
• Wenn Sie das Gerät erstmals benutzen, entfernen die alle Folien und das komplette
Verpackungsmaterial.
• Ziehen sie den Stecker nicht am Kabel aus der Steckdose, sondern halten Sie ihn
beim Abziehen mit der Hand fest.
• Bevor Sie den Stecker in die Steckdose stecken, versichern Sie sich, dass das Gerät
ausgeschaltet ist.
• Ziehen Sie das Netzkabel nicht in die Länge.
• Achten Sie das darauf, dass alle Luftein- und Luftauslässe frei und nicht zugedeckt
sind, damit sich das Gerät nicht überhitzt.
• Achten Sie darauf, dass das Netzkabel nicht über scharfe Kanten oder
Oberächen verläuft.

5
DE
• Hängen Sie das Gerät nicht an der Decke oder Wand auf, außer es ist für diesen
Betrieb ausgelegt.
• Lassen Sie um das Gerät herum genug Platz zu Wänden, Möbeln oder anderen
Geräten, um eine bestmögliche Leistung zu erzielen.
• Benutzen Sie das Gerät nicht in der Nähe von Gasöfen oder Gasheizungen.
• Stellen Sie das Gerät nicht in die Nähe oder direkt unter Vorhänge.
• Decken Sie das Gerät nicht ab.
• Setzen Sie sich und andere Personen nicht dem direkten Luftstrom aus, damit Sie
sich nicht erkälten.
• Wenn Sie das Gerät nicht mehr benutzen, verstauen Sie es in der
Originalverpackung an einem trockenen Ort.
• Ziehen Sie immer den Stecker aus der Steckdose, bevor Sie das Gerät reinigen,
warten, verstauen oder wenn Sie es nicht mehr benutzen.
• Benutzen Sie das Gerät nicht in der Nähe explosiver oder entammbarer Stoffe
oder Flüssigkeiten.
• Das Gerät ist nicht für den kommerziellen Gebrauch, sondern nur für Gebrauch im
Haushalt und in ähnlichen Umgebungen vorgesehen. Dazu zählen Küchen in Büros,
Bauernhöfen, Hotels, Motels und Einrichtungen, die Bed & Breakfast anbieten.
6
DE
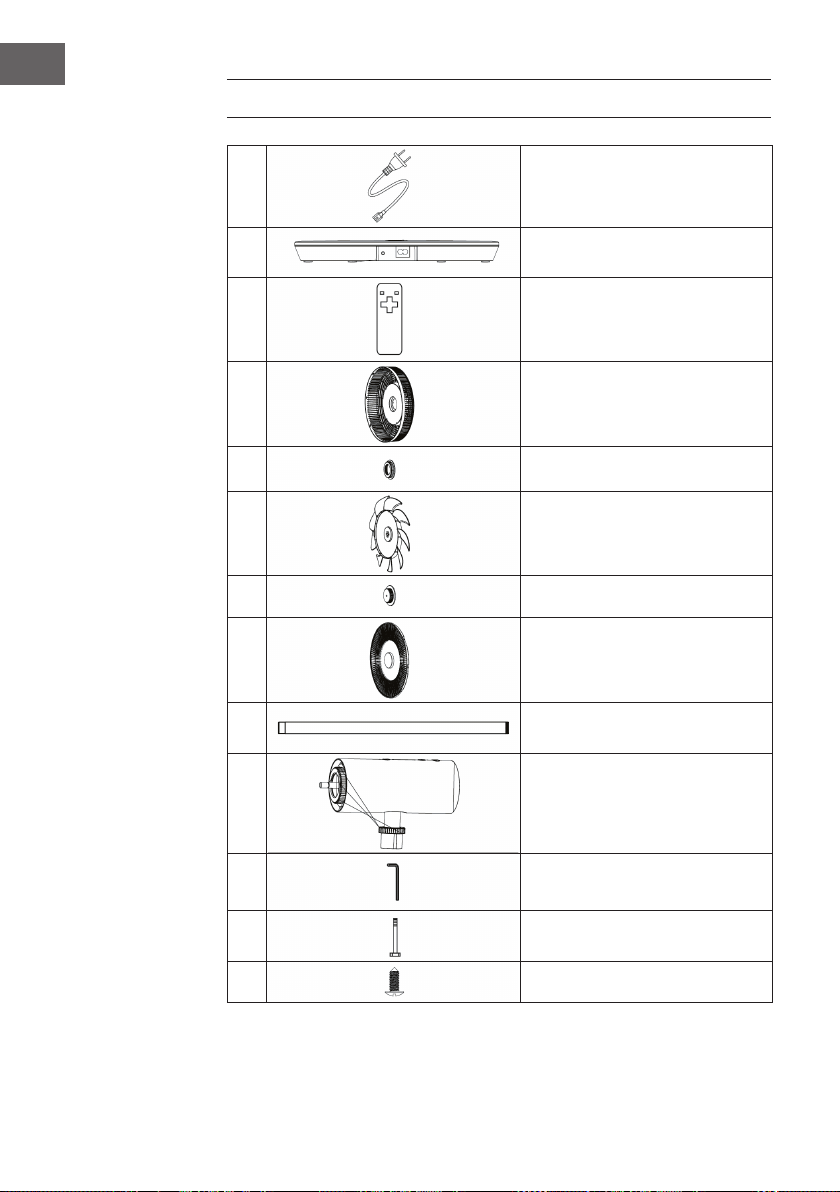
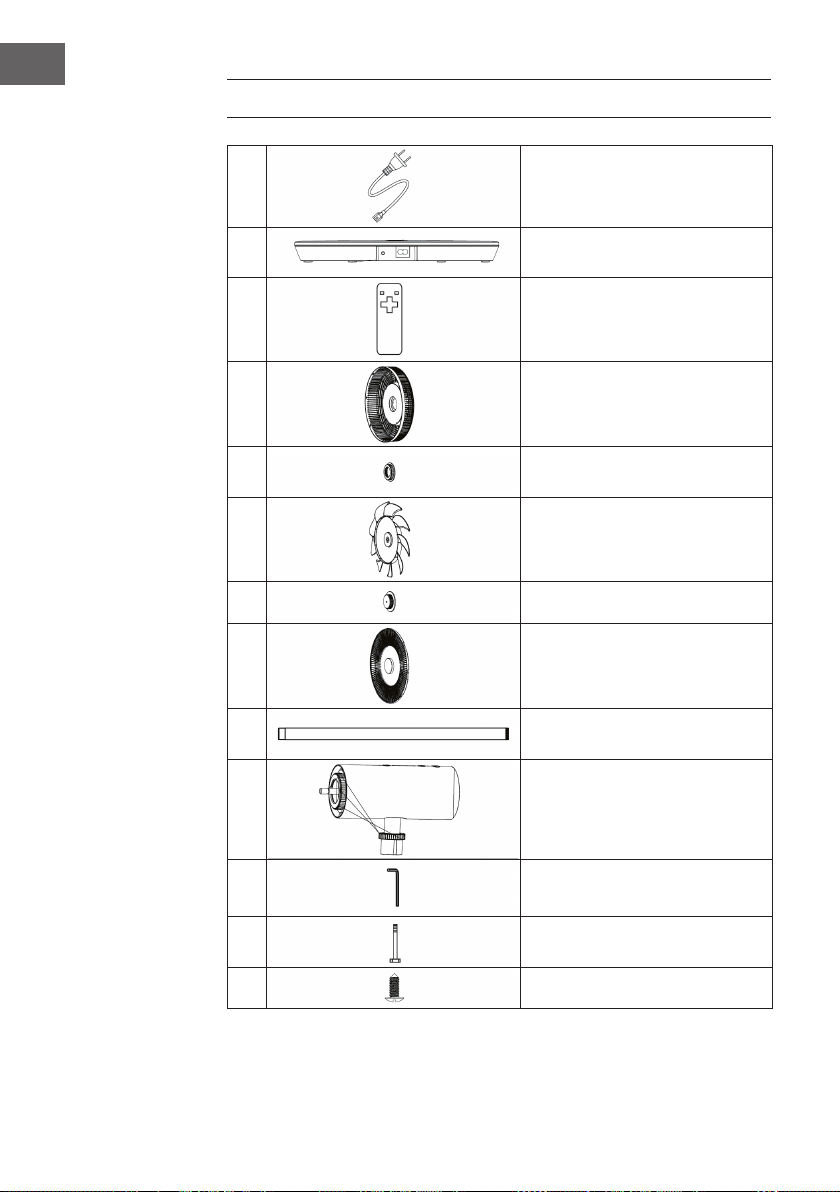
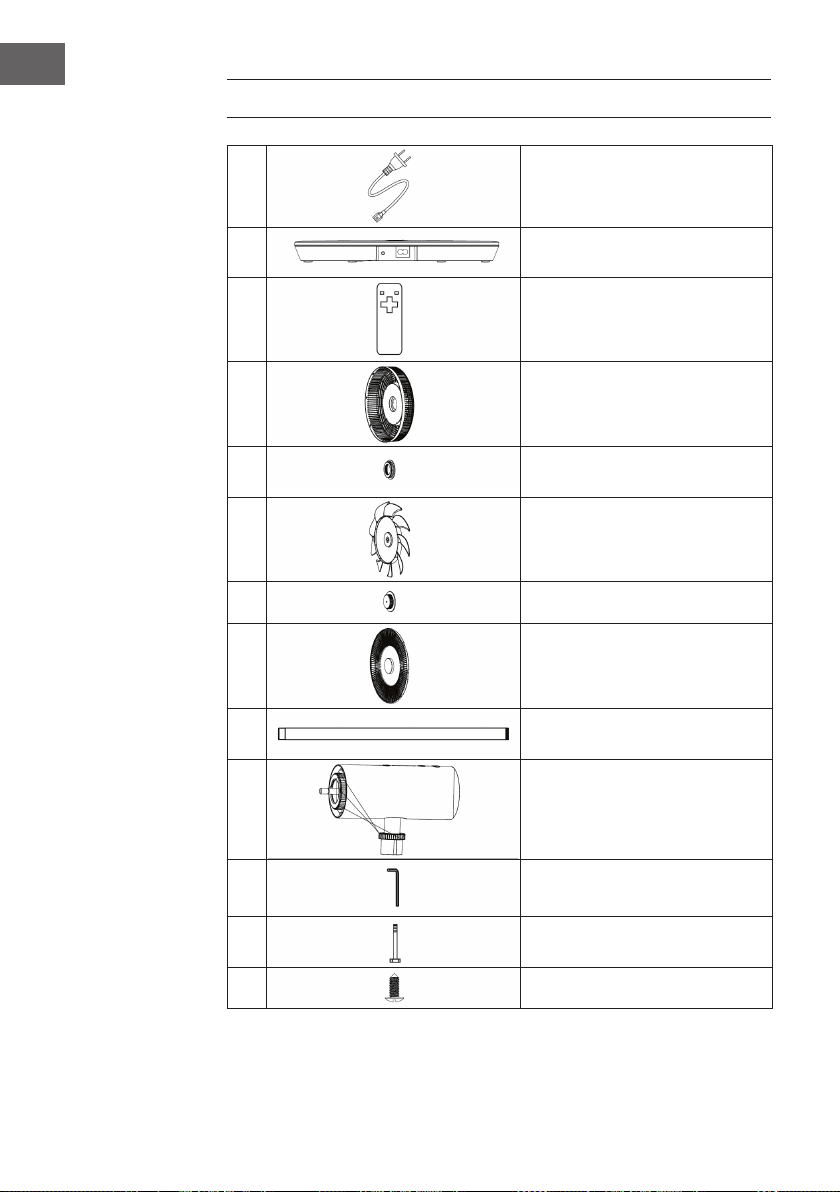
EINZELTEILE
1
Netzkabel
2
Basis
3
Fernbedienung
4
Hinteres Schutzgitter
5
Mutter des hinteren Schutzgitters
6
Lüfterblätter
7
Mutter der Rotorblätter
8
Vorderes Schutzgitter
9
Verbindungsrohr
10
Ventilatorkopf
11
Inbusschlüssel
12
Inbusschraube M6
13
Schraube (Schutzgitter)

7
DE
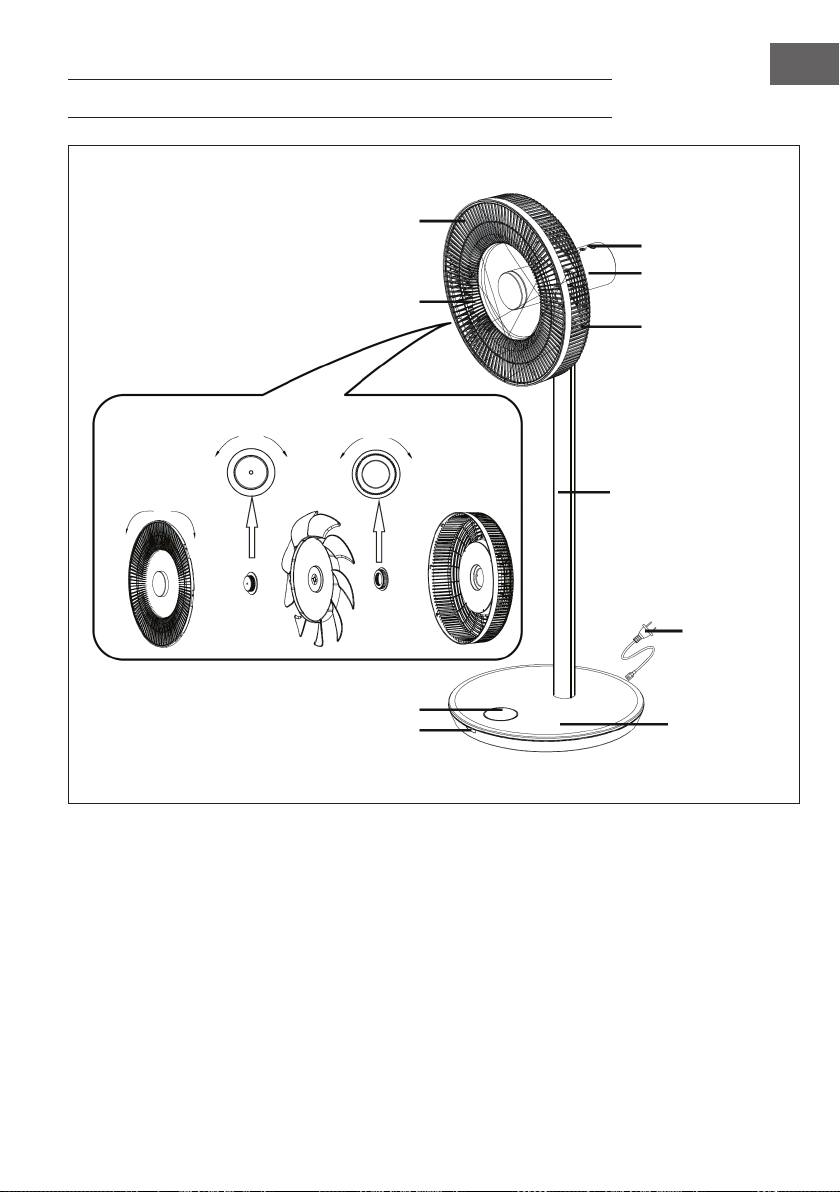
GERÄTEÜBERSICHT
Bedienfeld
Motor
Hinteres Gitter
Verbindungsrohr
Netzkabel
Basis
Display
Vorderes Gitter
Lüfterblätter
lösen schließen
schließen lösen lösen schließen
Empfängerfenster
8
DE
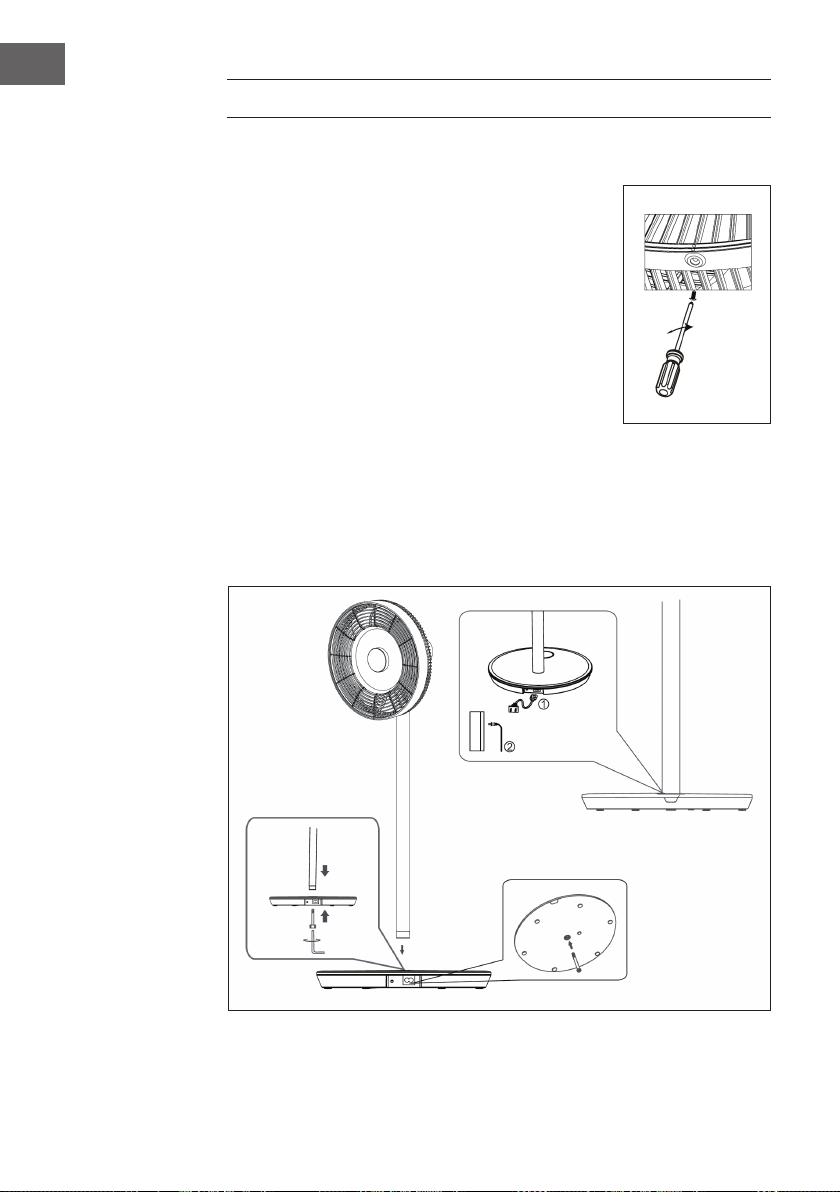
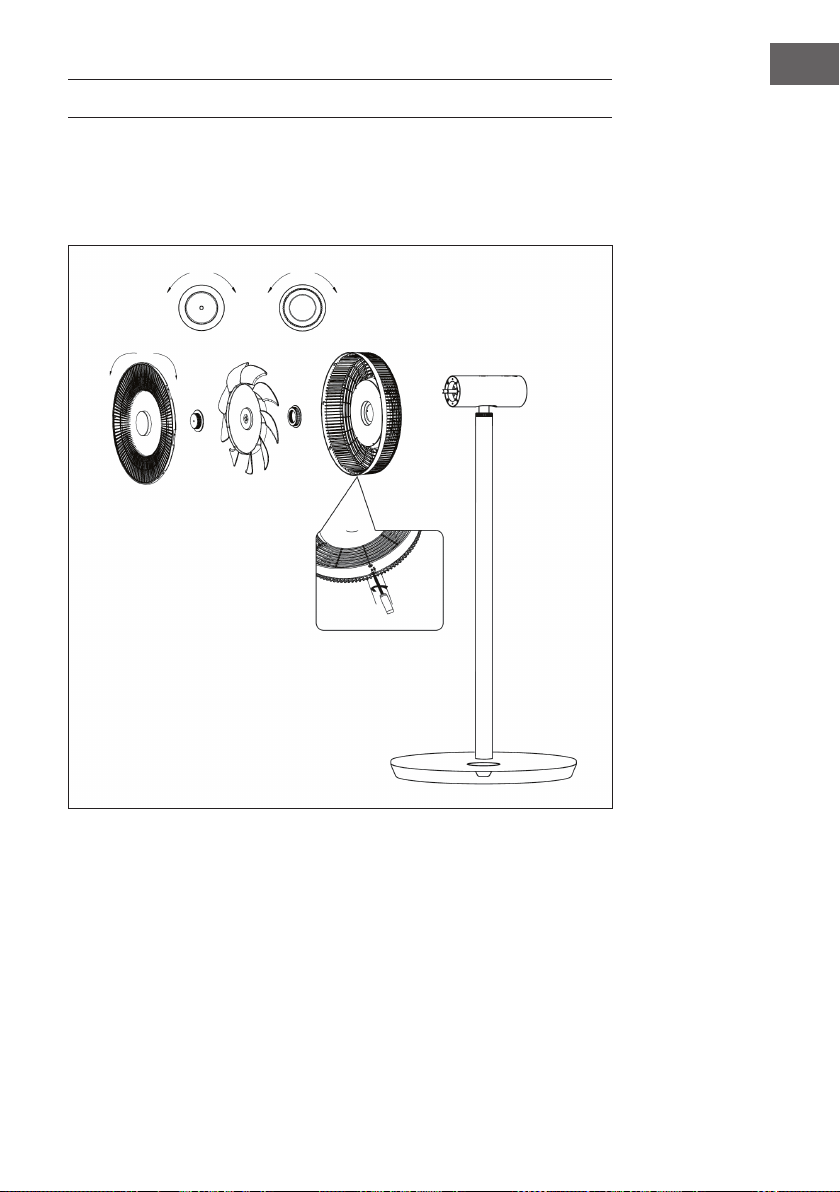
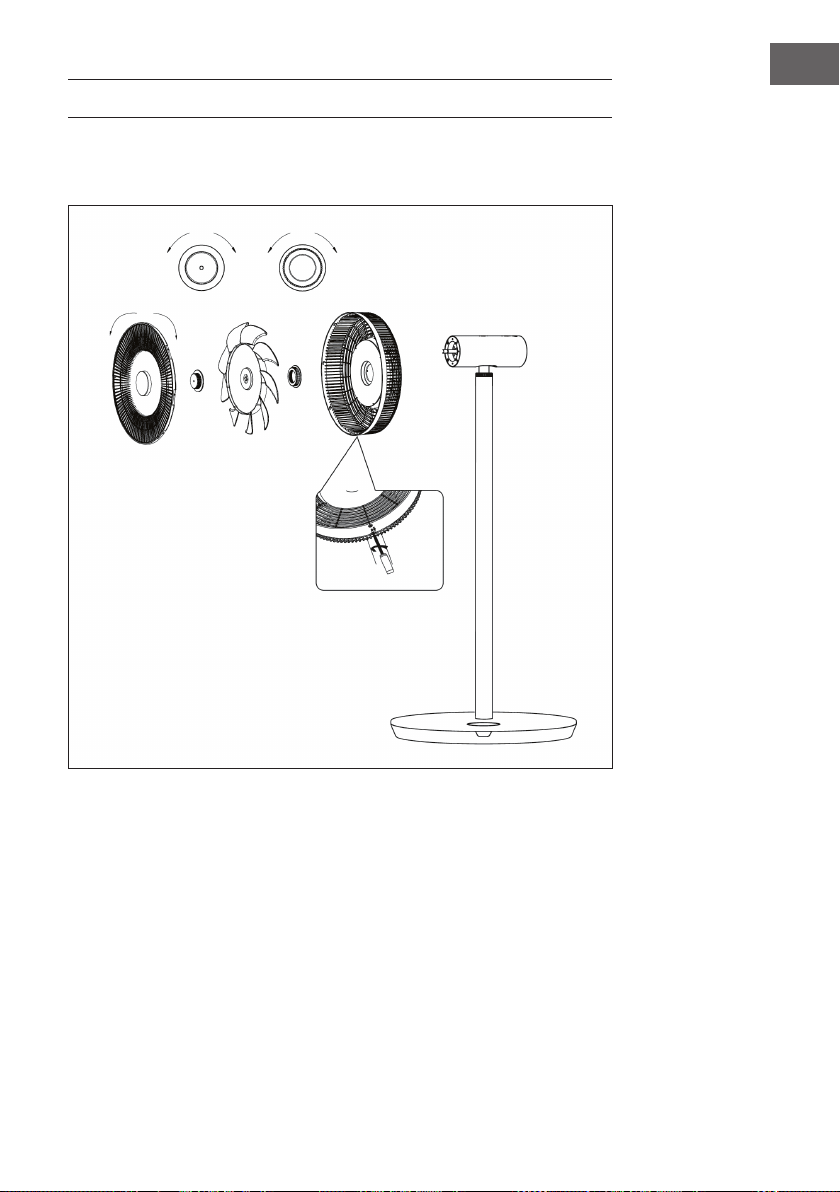
ZUSAMMENBAU
Installation der Schutzgitter
• Montieren Sie das vordere Schutzgitter wie in der
Geräteübersicht dargestellt und drehen Sie es dann
im Uhrzeigersinn, um den Positionierungspunkt in die
Vertikale zu bringen.
• Ziehen Sie die Schrauben an, um die Installation
abzuschließen.
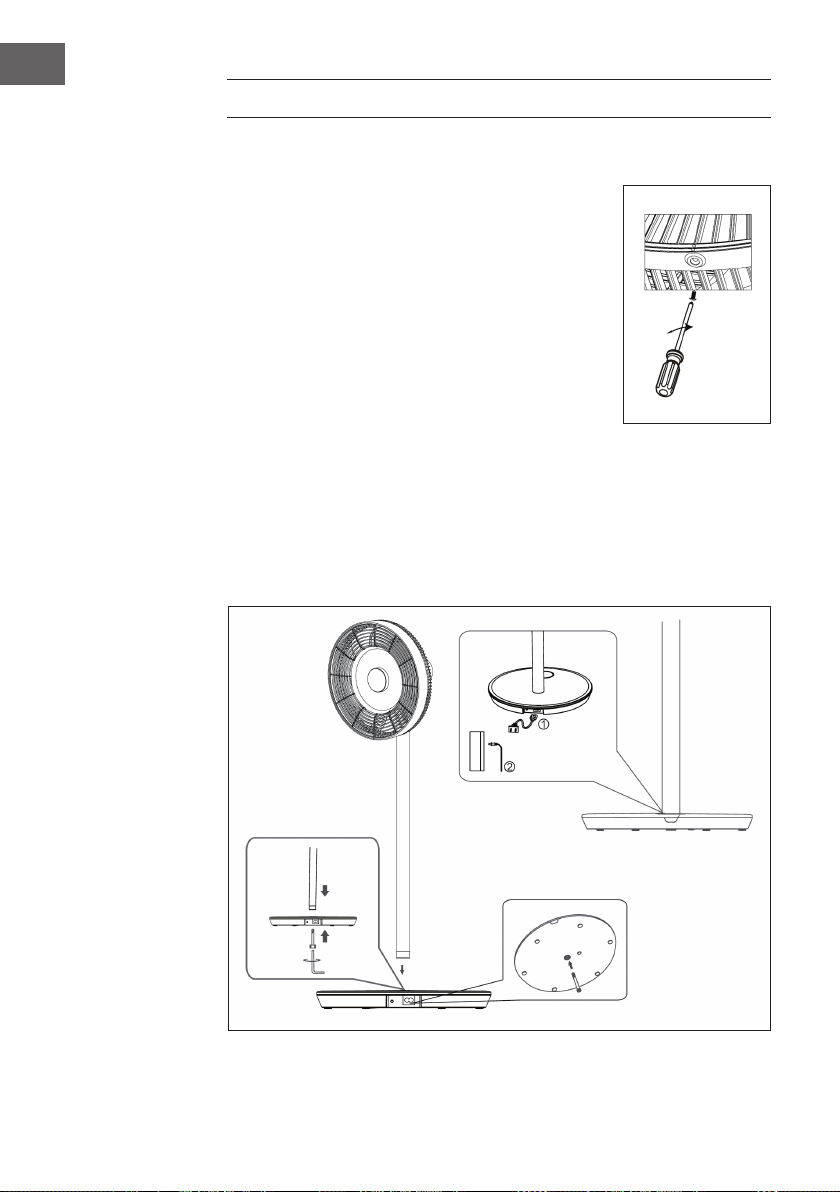
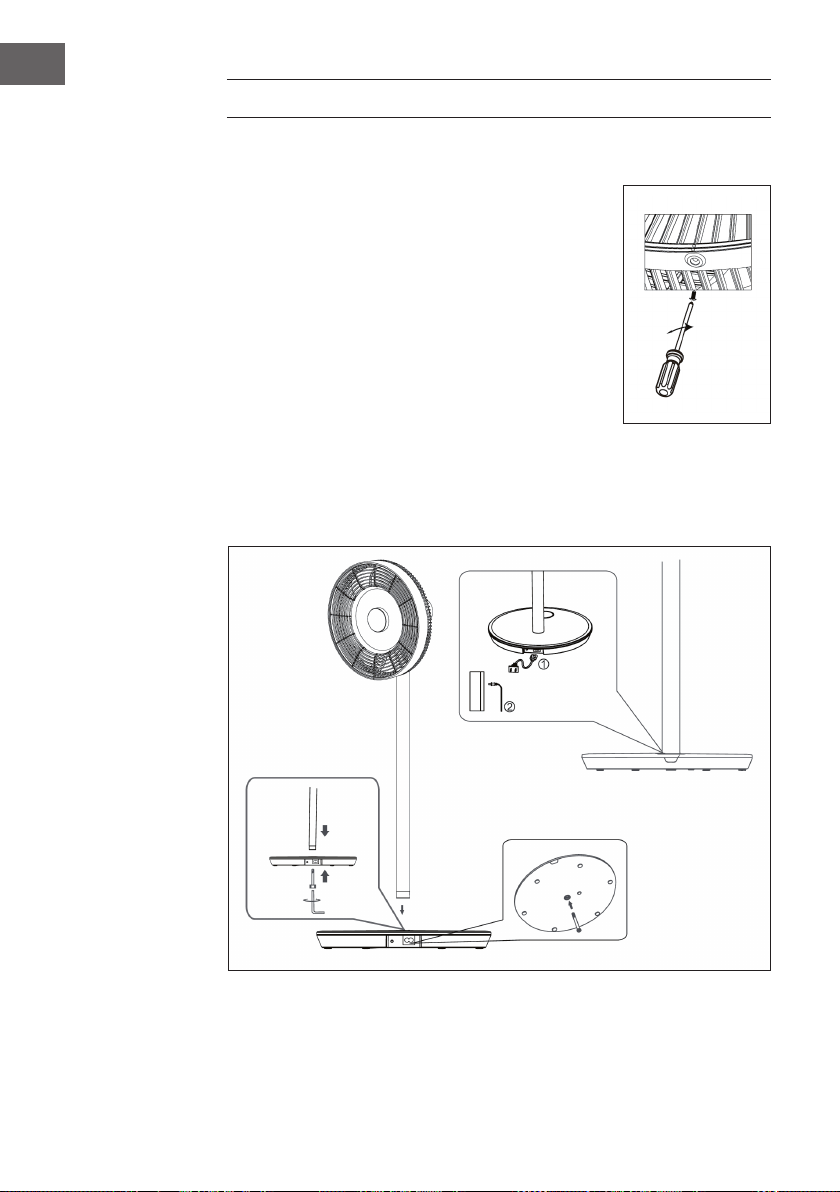
Installation der Basis
Setzen Sie das Verbindungsrohr auf die Basis. Stecken Sie die
Inbusschraube M6 von unten in die Basis und ziehen Sie die
Schraube im Uhrzeigersinn mit dem Inbusschlüssel fest.
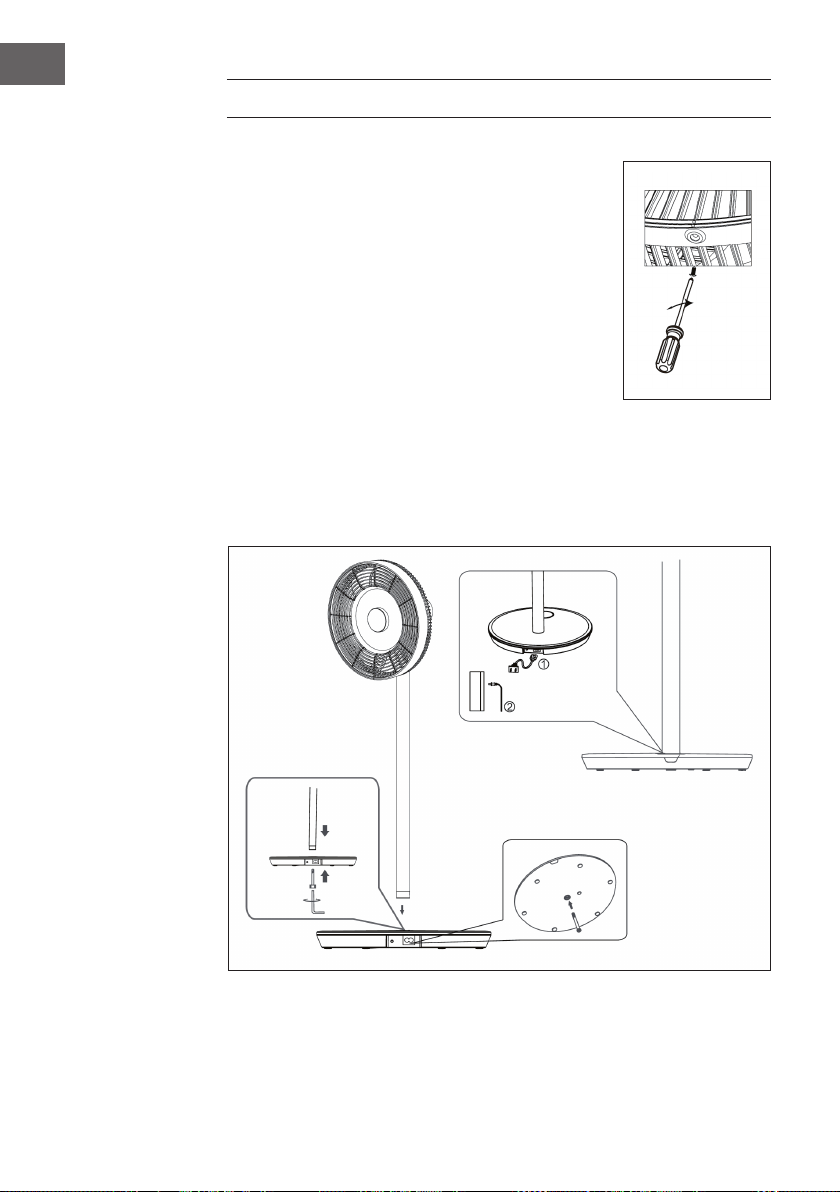
Installation der Stromversorgung
1. Stecken Sie die eine Seite des Netzkabels in den rechteckigen Anschluss an der
Gerätebasis.
2. Stecken Sie den Netzstecker am anderen Ende des Netzkabels in die Steckdose.
Sobald das Gerät angeschlossen ist, ertönt ein Piepton.

9
DE
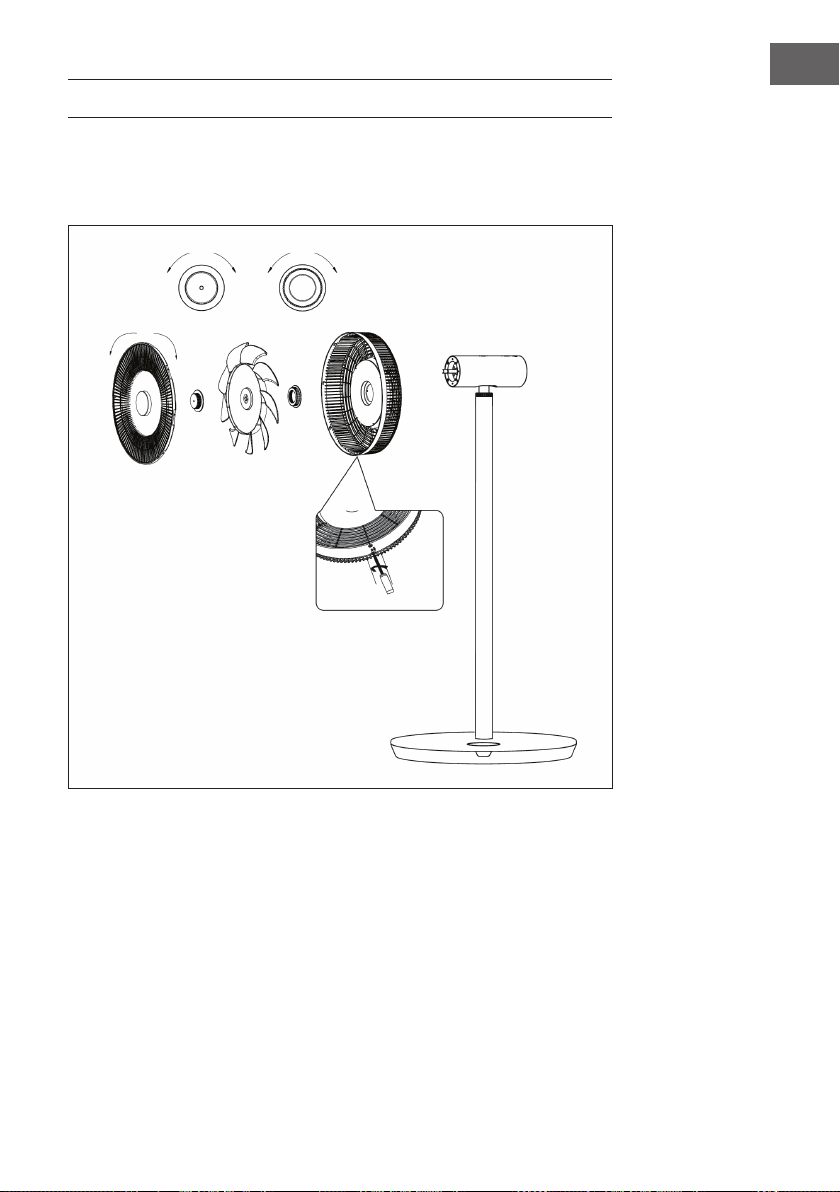
Installation des Ventilatorkopfes
• Setzen Sie den Ventilatorkopf auf das Verbindungsrohr,
indem Sie den Nut am Verbindungsrohr ausrichten
(siehe Bild).
• Ziehen Sie die Mutter des Verbindungsrohrs fest.
Beenden Sie die Installation des Ventilatorkopfes,
indem Sie sich vergewissern, dass er nicht wackelt.
DISPLAY UND TASTENFUNKTIONEN
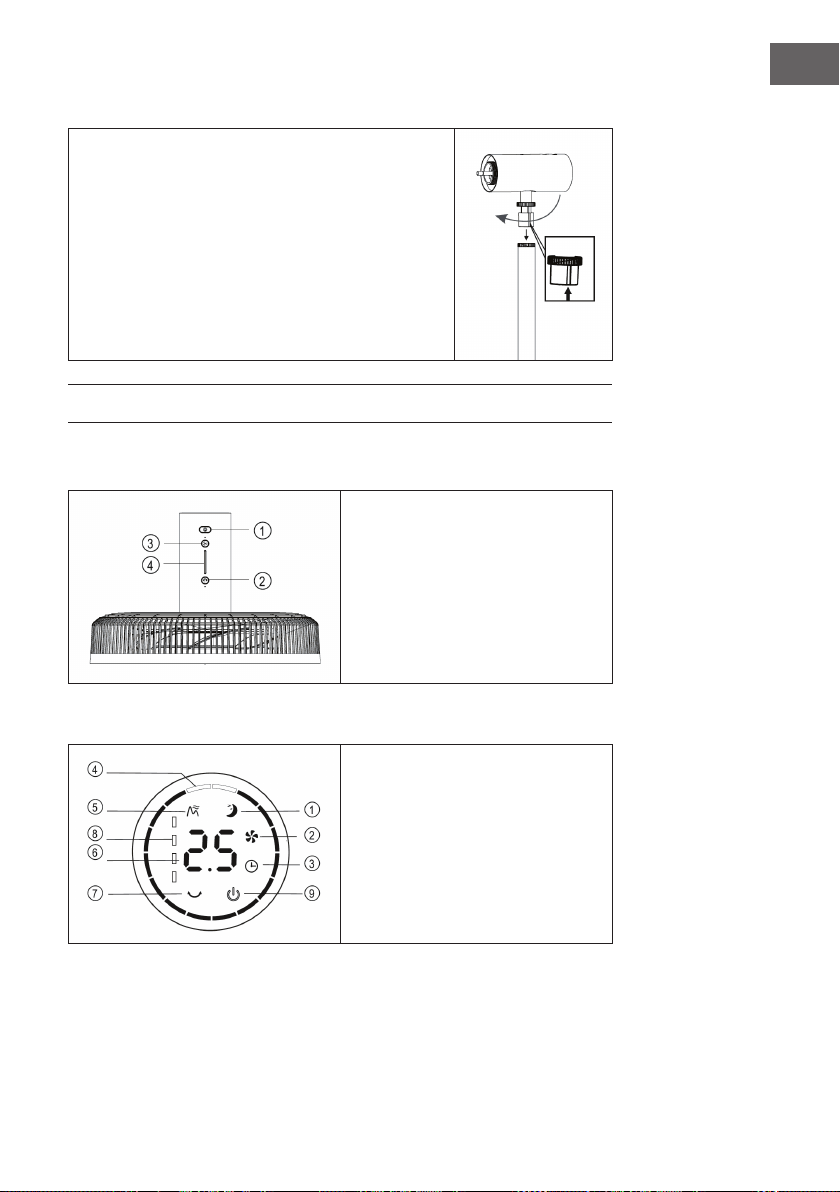
Bedienfeld
1 Ein/Aus
2 Schwingen
3 Geschwindigkeit
4 Anzeigeleuchte
Displayanzeigen
1 Schlaf-Modus
2 Normaler Modus
3 Timer
4 Schwingwinkel
5 Natürlicher Modus
6 Timer/Geschwindigkeit
7 Batteriestandanzeige
8 Ein/Aus

10
DE
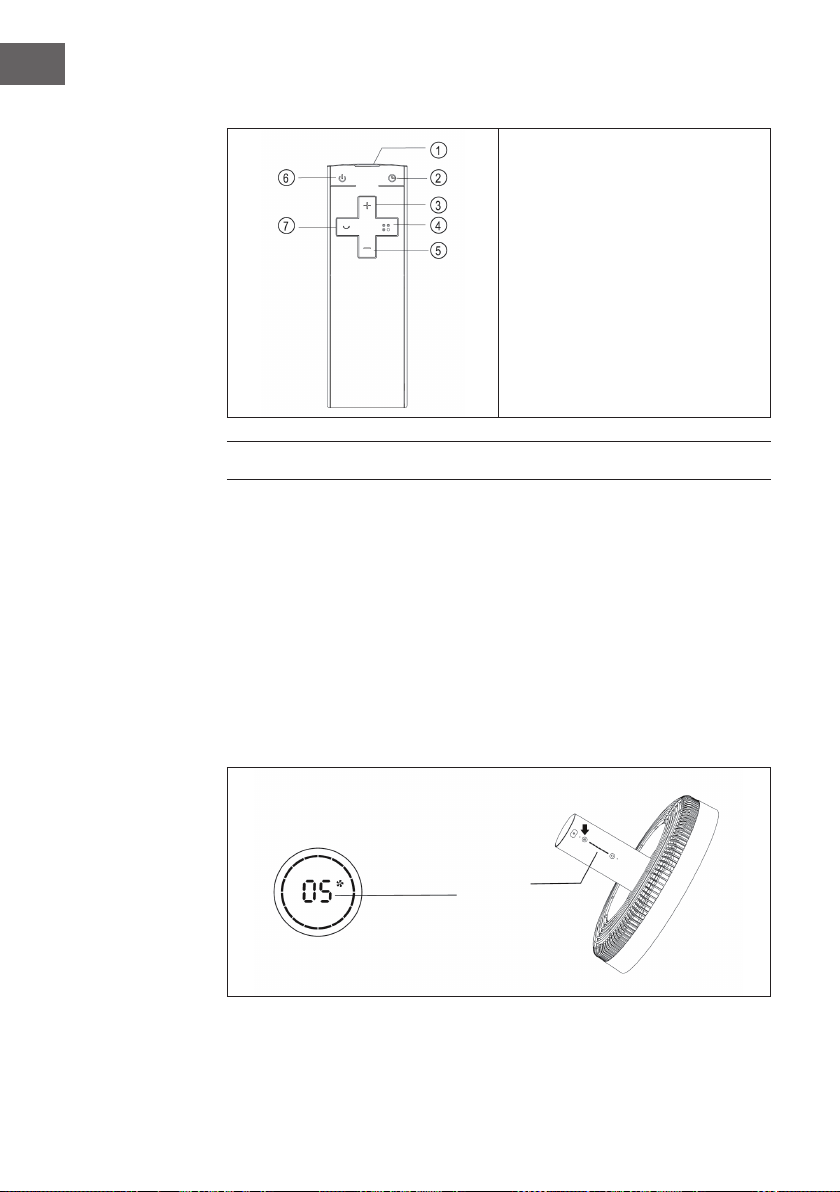
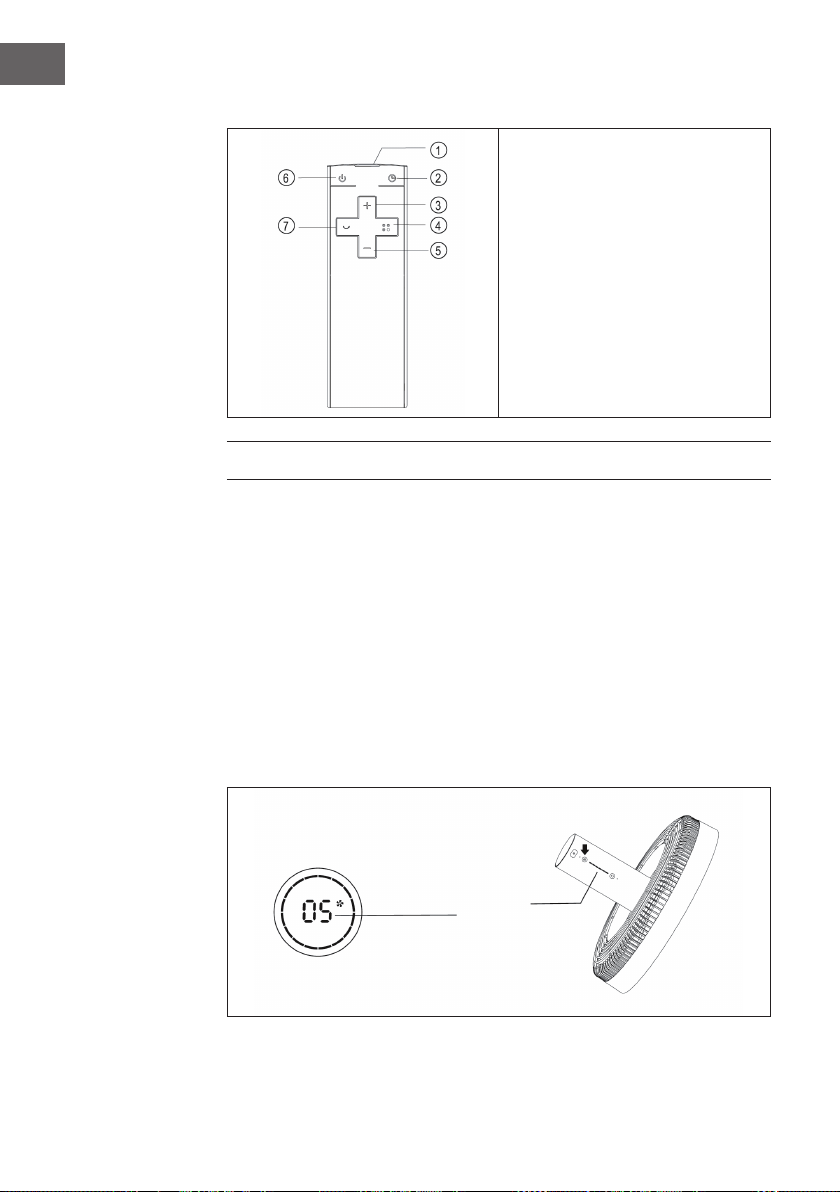
Fernbedienung
1 Sender
2 Timer
3 Geschwindigkeit erhöhen
4 Modus
5 Geschwindigkeit verringern
6 Ein/Aus
7 Schwingen
BEDIENUNG
Gerät ein-/ausschalten
• Drücken Sie die EIN/AUS-Taste am Ventilatorkopf. Ein Piepton ertönt und
signalisiert, dass der Ventilator startet.
• Der Drehzahlregler leuchtet, das Ventilatorsymbol in der Digitalanzeige leuchtet
und der Ventilator beginnt zu arbeiten.
• Drücken Sie die Taste erneut, um den Ventilator wieder auszuschalten.
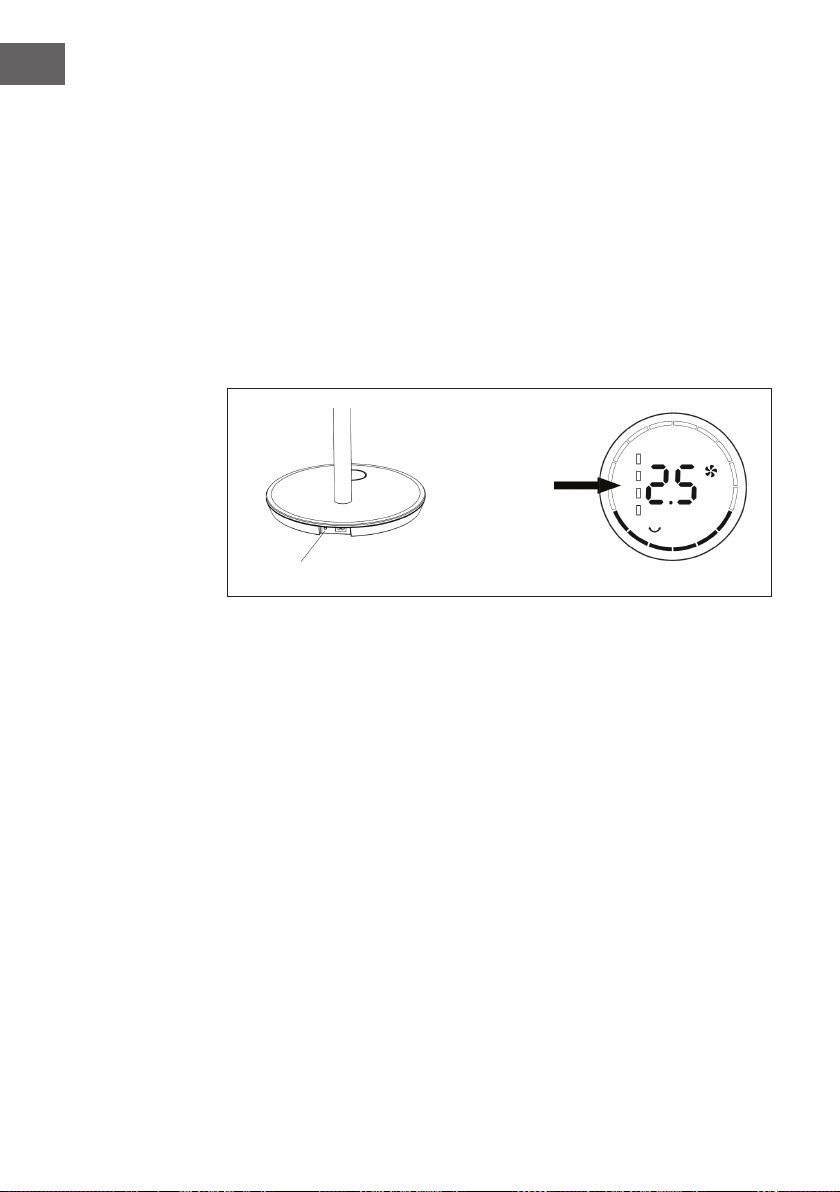
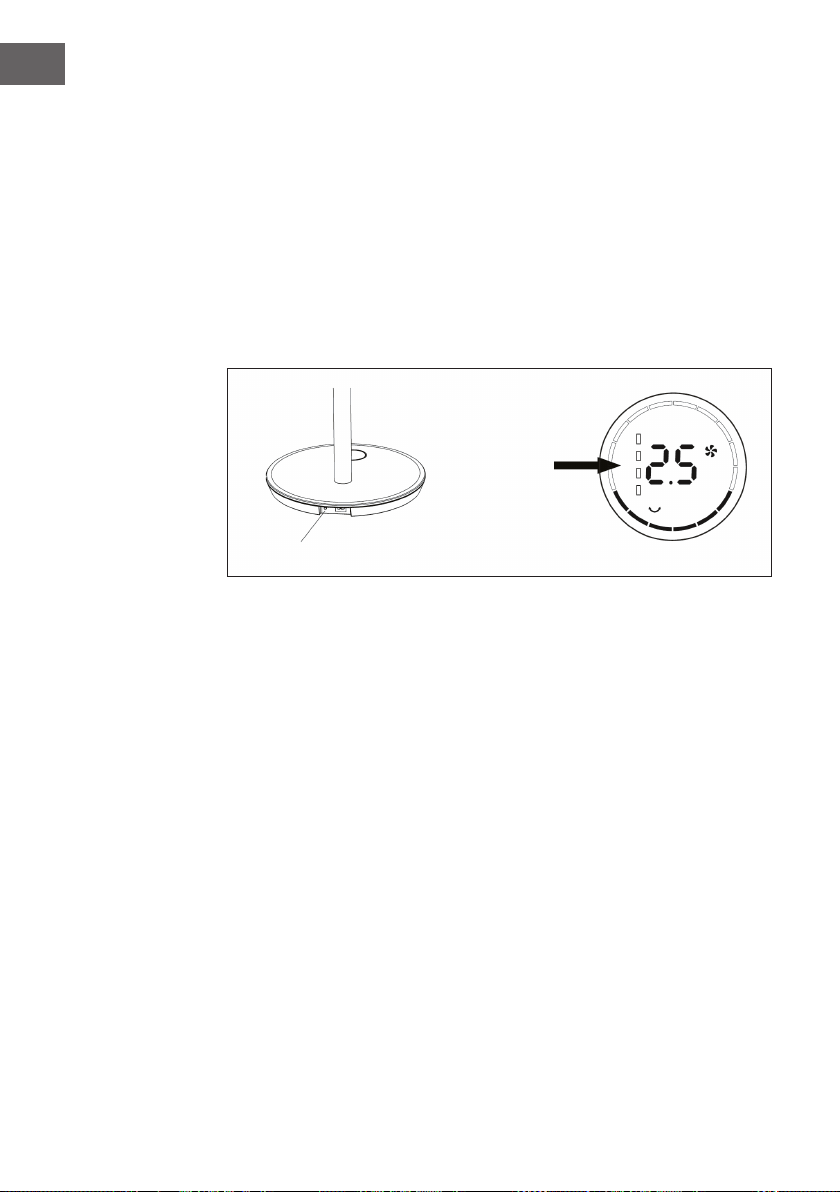
Geschwindigkeit einstellen
Drücken Sie mehrmals auf die Taste GESCHWINDIGKEIT, um die Geschwindigkeitsstufe
1 bis 12 auszuwählen. Am Ventilatorkopf bendet sich eine Anzeige, welche die aktuell
eingestellte Geschwindigkeit anzeigt.
Anzeige

11
DE
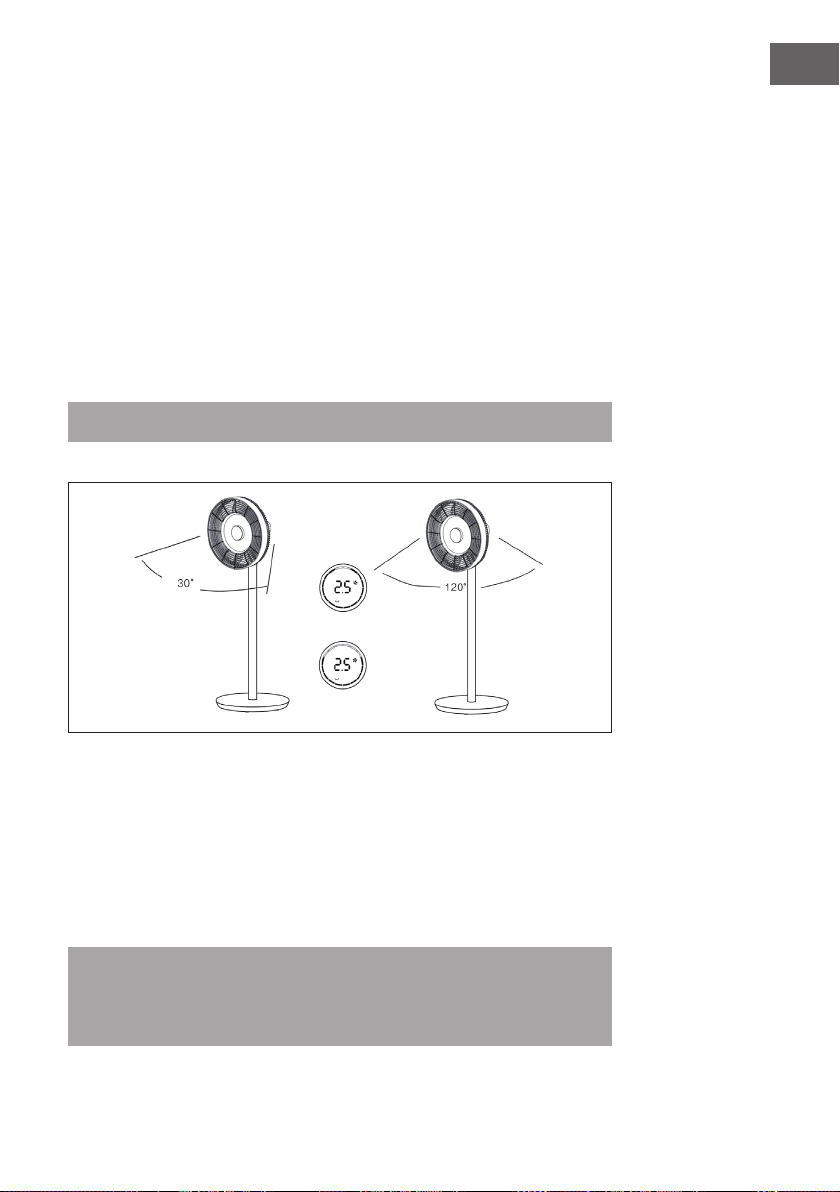
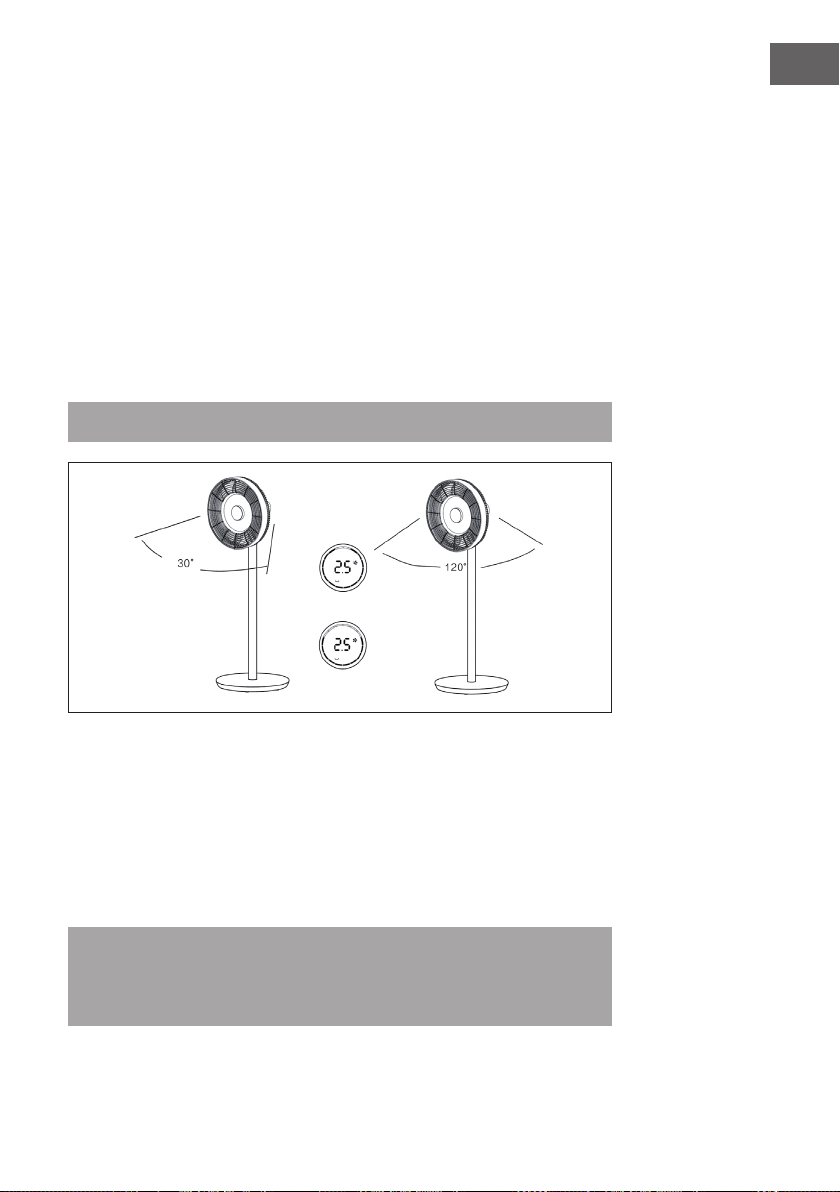
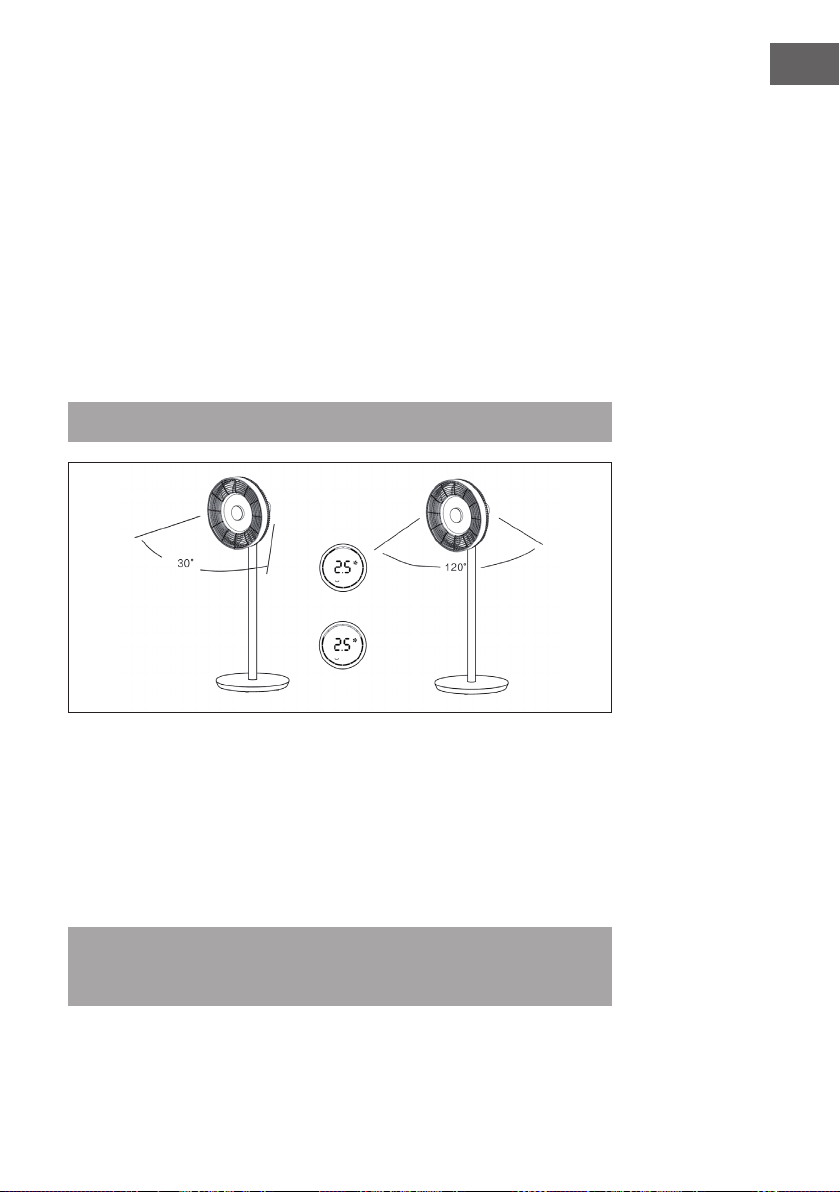
Schwingfunktion starten
Drücken Sie die Taste SCHWINGEN am Ventilatorkopf. Ein Piepton ertönt und der
Ventilator beginnt hin- und hin- und herzuschwingen. Der Standardwinkel ist 30°. Die
Schwinganzeige geht an und der grüne Kreis der Digitalanzeige leuchtet. Drücken Sie
diese Taste lange, um die Schwingfunktion zu beenden.
Schwingwinkel einstellen
Drücken Sie die Taste SCHWINGEN am Ventilatorkopf. Ein Piepton ertönt und
der Ventilator beginnt hin- und herzuschwingen. Der Standardwinkel ist 300°. Die
Schwinganzeige geht an und der grüne Kreis der Digitalanzeige leuchtet. Drücken
sie mehrfach auf die Taste SCHWINGEN, um einen der folgenden Schwingwinkel
auszuwählen: 30° > 60° > 90° > 120°. Der grüne Kreis der Digitalanzeige verändert
sich entsprechend. Drücken Sie diese Taste lange, um die Schwingfunktion zu beenden.
Hinweis: Auf der Fernbedienung erfolgt die Einstellung gleichermaßen.
Timer einstellen
Drücken Sie die Taste TIMER am Ventilatorkopf. Sobald die Zeitanzeige nach dem
Piepton leuchtet, können Sie den Ausschalt-Timer einstellen. Drücken Sie mehrmals auf
die Taste, um den Timer zwischen 0 und 12 Stunden einzustellen.
• Von 0-6 Stunden lässt sich die Zeit in 0,5-Stunden-Schritten einstellen.
• Von 6-12 Stunden lässt sich die Zeit in 1-Stunden-Schritten einstellen.
• Wenn Sie 0 Stunden wählen, wird die Timerfunktion beendet.
Hinweis: Wenn Sie den Timer über die Fernbedienung einstellen, drücken Sie
zunächst die Taste TIMER und benutzen Sie dann die Tasten (+) oder (-), um die
gewünschte Zeit einzustellen. Warten Sie dann 6 Sekunden, bis die eingestellte Zeit
automatisch übernommen wird.
12
DE
Modus einstellen
Drücken Sie mehrmals auf die Taste MODE, um einen der folgenden Modi einzustellen:
Natürlicher Modus > Schlaf-Modus > Normaler Modus. Je nach Modus variiert/
verändert sich die Ventilatorgeschwindigkeit in bestimmten Abständen.
Kabellose Benutzung
(gilt nur für das Wireless-Modell)
Ziehen Sie den Stecker aus der Steckdose und entfernen Sie das Netzkabel von
der Basis. Drücken Sie die Batteriesteuertaste auf der Basis. Ein Piepton ertönt und
signalisiert, dass das Gerät nun über den eingebauten Akku mit Strom versorgt wird.
Drücken Sie die EIN/AUS-Taste am Ventilatorkopf oder an der Fernbedienung, um den
Ventilator zu starten.
Zeigt den
Batteriestand an
Batteriesteuertaste
13
DE
REINIGUNG UND PFLEGE
• Schalten Sie den Ventilator vor der Reinigung aus und ziehen Sie den Stecker aus
der Steckdose.
• Demontieren Sie das vordere Gitter, das hintere Gitter und die Lüfterblätter, indem
Sie die Muttern wie dargestellt lösen:
• Wischen Sie die Oberäche mit einem feuchten Tuch ab. Reinigen Sie sie nicht mit
harten Gegenständen wie Stahlwolle oder mit ätzenden Reinigungsmitteln wie
Desinfektionsmitteln, um Oberächenkratzer und Beschädigungen zu vermeiden.
• Wenn Sie das Gerät bewegen möchten, ziehen Sie vorher den Stecker aus der
Steckdose.
lösen schließen
lösen schließen
schließen lösen
Entfernen Sie die Schraube mit dem
Schraubenzieher und drehen Sie
dann das vordere Gitter gegen den
Uhrzeigersinn, um es zu demontieren.

14
DE
HINWEISE ZUR ENTSORGUNG
Wenn es in Ihrem Land eine gesetzliche Regelung zur
Entsorgung von elektrischen und elektronischen Geräten
gibt, weist dieses Symbol auf dem Produkt oder auf der
Verpackung darauf hin, dass dieses Produkt nicht im
Hausmüll entsorgt werden darf. Stattdessen muss es zu
einer Sammelstelle für das Recycling von elektrischen
und elektronischen Geräten gebracht werden. Durch
regelkonforme Entsorgung schützen Sie die Umwelt und die
Gesundheit Ihrer Mitmenschen vor negativen Konsequenzen.
Informationen zum Recycling und zur Entsorgung dieses
Produkts, erhalten Sie von Ihrer örtlichen Verwaltung oder
Ihrem Hausmüllentsorgungsdienst.
Dieses Produkt enthält Batterien. Wenn es in Ihrem Land
eine gesetzliche Regelung zur Entsorgung von Batterien
gibt, dürfen die Batterien nicht im Hausmüll entsorgt werden.
Informieren Sie sich über die örtlichen Bestimmungen zur
Entsorgung von Batterien. Durch regelkonforme Entsorgung
schützen Sie die Umwelt und die Gesundheit Ihrer
Mitmenschen vor negativen Konsequenzen.
HERSTELLER & IMPORTEUR (UK)
Hersteller:
Chal-Tec GmbH, Wallstraße 16, 10179 Berlin, Deutschland.
Importeur für Großbritannien:
Chal-Tec UK limited
Unit 6 Riverside Business Centre
Brighton Road
Shoreham-by-Sea
BN43 6RE
United Kingdom

15
EN
Dear Customer,
Congratulations on purchasing this device. Please read the
following instructions carefully and follow them to prevent
possible damages. We assume no liability for damage caused
by disregard of the instructions and improper use. Scan the QR
code to get access to the latest user manual and more product
information.
CONTENT
Safety Instructions16
Single Parts18
Product Overview19
Assembly20
Display and Key Functions21
Operation22
Cleaning and Care25
Hints on Disposal26
Manufacturer & Importer (UK) 26
TECHNICAL DATA
Item number 10034670, 10034671
Power supply 220-240 V ~ 50/60 Hz
Power 30 W
Maximum air velocity 4,58 m/s
Maximum air ow rate 25,52 m³/min

16
EN
SAFETY INSTRUCTIONS
• Remove the packaging and make sure that the appliance is intact. If in doubt, do
not use it and contact qualied personnel only.
• Packaging materials (plastic bags, polystyrene, staples etc.) Must be kept out of the
reach of children as they could be hazardous.
• This device may be only used by children 8 years old or older and persons with
limited physical, sensory and mental capabilities and / or lack of experience
and knowledge, provided that they have been instructed in use of the device by a
responsible person who understands the associated risks.
• Before connecting the appliance, check that the appliance rating corresponds to
the mains rating.
• This appliance must only be used for the purpose for which it has been
manufactured. As a stand fan. The manufacturer is not responsible for any damage
caused by improper or incorrect use.
• The installation/assembly of the device will be made according to the indications of
the manufacturer. A wrong procedure may cause damages to persons, animals or
objects, for which the manufacturer cannot be considered responsible
• Before cleaning or carrying out maintenance on the appliance, disconnect it from
the electrical mains by removing the plug from the electrical outlet or by switching
off the system switch.
• If the appliance is faulty and/or operating incorrectly, switch it off without
tampering with it. If the above is disregarded, the safety of the appliance may be
compromised.
• If the supply cord is damaged, it must be replaced by the manufacturer, its service
agent or similarly qualied persons in order to avoid a hazard.
• Do not power the device using multiple sockets.
• Do not use adapters and/or extension cable
• The device must not be switched on using external timers and/or other remote
control devices which are not specied in this manual.
• Do not use or store the device near heat sources (heaters, stoves).
• Do not dip the device in water or other liquids; in case the accidental fall in the
water do not try to take it out, but rst of all unplug immediately the power cable
from the socket.
• If you use the device for the rst time, make sure to remove any label or protective
sheet which blocks its proper functioning.
• Plug and unplug the power cable with dry hands and hold it rmly.
• Before plugging the plug into a wall outlet, make sure that the unit is switched off.
• Always unplug the power cable to avoid the overheating and avoid stretching it.
• Make sure that all air intakes and outlets are free and not covered so that the unit
does not overheat.
• Avoid placing the power cable on abrasive or sharp surfaces or in positions where
it can be damaged easily.

17
EN
• Do not hang the fan on the wall or ceiling unless this type of installation is provided
and explained in this manual.
• Place the device at a proper distance from the objects or surrounding walls making
sure that its functioning will not cause accidental damages.
• Do not use the device near gas stoves or open ames in general.
• Do not use the device near curtains or textiles.
• Do not cover the device during functioning.
• Do not expose yourself for a long period to the air ow generated by the device
because it can cause damage to the health
• If the fan must be stored for a long period and is not used regularly, place the fan in
its original packaging in a dry place.
• Always remember to unplug the power cable of the device if it is not used for a long
period, before storing, cleaning or performing any maintenance operation.
• Do not use the appliance in the presence of potentially ammable or explosive
liquids or gases.
• This product is intended for household use only and not for commercial / industrial
or outdoor use.

18
EN
SINGLE PARTS
1
Power cord
2
Base
3
Remote control
4
Rear protective grille
5
Rear guard nut
6
Fan blades
7
Nut of fan blades
8
Front protective grille
9
Connecting tube
10
Fan head
11
Allen wrench
12
Allen screw m6
13
Screw (protective grid)
19
EN
PRODUCT OVERVIEW
Control panel
Motor
Rear grille
Connecting tube
Power cord
Base
Display
Front grille
Fan blades
Loose Tight
Tight Loose Loose Tight
Receiving window
20
EN
ASSEMBLY
Installation of the protective grilles
• Mount the front guard grille as shown in the Device
Overview and then rotate it clockwise to bring the
positioning point into a vertical position.
• Tighten the screws to complete the installation.
Installing the Base
Place the connecting tube on the base. Insert the Allen screw
M6 into the base from below and tighten the screw clockwise
with the Allen wrench.
Installing the Power Supply
• Plug one side of the power cord into the rectangular connector on the base of the
unit.
• Plug the power plug at the other end of the power cord into the wall outlet. A beep
will sound as soon as the unit is connected.

21
EN
Installation of the fan head
• Place the fan head on the capillary tube by aligning the
groove on the capillary tube (see gure).
• Tighten the capillary tube nut. Finish installing the fan
head by making sure it does not wobble.
DISPLAY AND KEY FUNCTIONS
Control panel
1 On/Off
2 Swing
3 Speed
4 Indicator light
Display
1 Sleep mode
2 Normal mode
3 Timer
4 Swing angle
5 Natural mode
6 Timer/Speed
7 Battery level indicator
8 On/Off
22
EN
Remote Control
1 Transmitter
2 Timer
3 Increase speed
4 Mode
5 Decrease speed
6 On/Off
7 Swing
OPERATION
Switch device on/off
• Press the ON/OFF button on the fan head. A beep will sound and indicate that the
fan is starting.
• The speed controller lights up, the fan symbol in the digital display lights up and the
fan starts operating.
• Press the button again to switch off the fan.
Setting the speed
Press the SPEED button repeatedly to select the speed level from 1 to 12. There is a
display on the fan head indicating the currently set speed.
Indicating light

23
EN
Start swing function
Press the SWING button on the fan head. A beep will sound and the fan will begin to
oscillate back and forth. The default angle is 30°. The swing indicator lights up and
the green circle of the digital indicator lights up. Press and hold this button to stop the
oscillation.
Setting the swing angle
Press the SWING button on the fan head. A beep will sound and the fan will begin to
oscillate back and forth. The default angle is 300°. The swing indicator lights up and
the green circle of the digital indicator lights up. Press the SWING button several times
to select one of the following swing angles: 30° > 60° > 90° > 120°. The green circle
of the digital display changes accordingly. Press and hold this key to end the swing
function.
Note: The same setting is made on the remote control.
Setting the timer
Press the TIMER button on the fan head. As soon as the time indicator lights up after the
beep, you can set the off timer. Press the button repeatedly to set the timer between 0
and 12 hours.
• From 0-6 hours, the time can be set in 0.5-hour increments.
• From 6-12 hours, the time can be set in 1-hour increments.
• If you select 0 hours, the timer function is cancelled.
Note: When setting the timer using the remote control, rst press the TIMER button
and then use the (+) or (-) buttons to set the desired time. Wait 6 seconds until the set
time is automatically set.

24
EN
Set mode
Press the MODE button repeatedly to set one of the following modes: Natural Mode >
Sleep Mode > Normal Mode. Depending on the mode, the fan speed will vary/change
at certain intervals.
Wireless use
(applies only to the wireless model)
Unplug the power cord from the outlet and remove the power cord from the base. Press
the battery control button on the base. A beep will sound, indicating that the unit is now
powered by the built-in battery. Press the ON/OFF button on the fan head or remote
control to start the fan.
Indicates the
battery level
Battery control button
25
EN
CLEANING AND CARE
• Switch off the fan before cleaning and unplug it from the wall outlet.
• Remove the front grille, rear grille and fan blades by loosening the nuts as shown:
• Wipe the surface with a damp cloth. Do not clean with hard objects such as steel
wool or caustic detergents such as disinfectants to avoid surface scratches and
damage.
• To move the unit, unplug it from the wall outlet rst.
Loose Tight
Loose Tight
Tight Loose
Remove the screw with the screwdriver
and then turn the front grille
counterclockwise to remove it.

26
EN
DISPOSAL CONSIDERATIONS
If there is a legal regulation for the disposal of electrical
and electronic devices in your country, this symbol on the
product or on the packaging indicates that this product must
not be disposed of with household waste. Instead, it must be
taken to a collection point for the recycling of electrical and
electronic equipment. By disposing of it in accordance with
the rules, you are protecting the environment and the health of
your fellow human beings from negative consequences. For
information about the recycling and disposal of this product,
please contact your local authority or your household waste
disposal service.
This product contains batteries. If there is a legal regulation
for the disposal of batteries in your country, the batteries must
not be disposed of with household waste. Find out about local
regulations for disposing of batteries. By disposing of them in
accordance with the rules, you are protecting the environment
and the health of your fellow human beings from negative
consequences.
MANUFACTURER & IMPORTER (UK)
Manufacturer:
Chal-Tec GmbH, Wallstrasse 16, 10179 Berlin, Germany.
Importer for Great Britain:
Chal-Tec UK limited
Unit 6 Riverside Business Centre
Brighton Road
Shoreham-by-Sea
BN43 6RE
United Kingdom
27
ES
Estimado cliente:
Le felicitamos por la adquisición de este producto. Lea
atentamente el siguiente manual y siga cuidadosamente las
instrucciones de uso con el n de evitar posibles daños. La
empresa no se responsabiliza de los daños ocasionados por
un uso indebido del producto o por haber desatendido las
indicaciones de seguridad. Escanee el código QR para obtener
acceso al manual de usuario más reciente y otra información
sobre el producto.
ÍNDICE DE CONTENIDOS
Indicaciones de seguridad28
Componentes30
Descripción del aparato31
Montaje32
Pantalla y funciones de los botones33
Utilización34
Limpieza y cuidado37
Retirada del aparato38
Fabricante e importador (Reino Unido) 38
DATOS TÉCNICOS
Número de artículo 10034670, 10034671
Suministro eléctrico 220-240 V ~ 50/60 Hz
Potencia 30 W
Velocidad máxima del aire 4,58 m/s
Caudal de aire máximo 25,52 m³/min

28
ES
INDICACIONES DE SEGURIDAD
• Retire el embalaje y asegúrese de que no se ha dañado ninguna pieza durante el
transporte. En caso de que se hayan dañado piezas, contacte inmediatamente con
le servicio de atención al cliente.
• Los niños pueden lesionarse con el material de embalaje y los aparatos usados.
Por ello, tire el material de embalaje inmediatamente.
• Este aparato puede ser utilizado por niños mayores de 8 años y personas con
discapacidades físicas, sensoriales y mentales y/o con falta de experiencia y
conocimientos, siempre y cuando hayan sido instruidos sobre el uso del aparato y
comprendan los peligros y riesgos asociados.
• Compruebe la tensión en la placa del aparato antes de su uso. Conecte el aparato
solo en enchufes que se correspondan con la corriente del aparato.
• Utilice el aparato solo para el uso indicado en la descripción en el manual.
• Siga cuidadosamente las instrucciones de montaje. Un procedimiento incorrecto
puede ocasionar daños irreparables en el aparato.
• Apague el aparato y retire el cable del enchufe antes de limpiarlo o cuando no lo
vaya a utilizar durante mucho tiempo.
• En caso de que el aparato no funcione correctamente, apáguelo inmediatamente y
contacte con un profesional cerca de usted.
• En caso de que el cable de corriente o el enchufe estén dañados, deben ser
sustituidos por el fabricante, un especialista autorizado o una persona cualicada.
• No conecte la unidad a regletas de enchufes.
• No utilice alargadores de cable.
• No conecte la unidad a temporizadores o tomas remotas.
• No use ni almacene el aparato cerca de fuentes de calor, como radiadores.
• Nunca sumerja en agua u otros líquidos el aparato, el cable o el enchufe. En caso
de que le entre agua, desconecte inmediatamente el cable del enchufe y deje que
un profesional compruebe el aparato.
• Cuando utilice el aparato por primera vez, retire todos los plásticos y el material de
embalaje.
• No tire directamente del cable para desconectarlo del enchufe, sujete el enchufe
con una mano al tirar.
• Antes de enchufar el enchufe en un tomacorriente de pared, asegúrese de que la
unidad esté apagada.
• No estire el cable de alimentación.
• Asegúrese de que todas las entradas y salidas de aire estén libres y descubiertas
para que el aparato no se sobrecaliente.
• Compruebe que el cable de corriente no discurre por bordes puntiagudos o
supercies calientes.

29
ES
• No cuelgue el aparato del techo o la pared, a no ser que esté diseñado para esto,
• Deje suciente espacio alrededor del aparato para que llegue a paredes, muebles
y otros aparatos de la manera más ecaz.
• No use ni almacene el aparato cerca de hornos o radiadores de gas.
• No use el aparato cerca de otras fuentes de calor o debajo de cortinas.
• No tape el aparato.
• No se coloque ni ponga a otras personas directamente delante del ujo de aire
para evitar resfriarse.
• Cuando no vaya a usar más el aparato, guárdelo en el paquete original en un
lugar seco.
• Desenchufe siempre el aparato si no va a usarlo durante mucho tiempo, antes de
limpiarlo o repararlo.
• No use el aparato cerca de sustancias o líquidos explosivos o inamables.
• El aparato no es apto para el uso comercial, sino solo para el uso doméstico y en
entornos similares. Por ejemplo, ocinas, granjas, hoteles, moteles e instituciones
que ofrecen Bed & Breakfast.
30
ES
COMPONENTES
1
Cable de alimentación
2
Base
3
Mando a distancia
4
Rejilla de protección trasera
5
Tuerca de la rejilla de
protección trasera
6
Aspas del ventilador
7
Tuerca de las aspas del rotor
8
Rejilla de protección delantera
9
Poste de conexión
10
Cabezal del ventilador
11
Llave Allen
12
Tornillo Allen M6
13
Tornillo (rejilla de protección)

31
ES
DESCRIPCIÓN DEL APARATO
Panel de control
Motor
Rejilla trasera
Poste de conexión
Cable de
alimentación
Base
Pantalla
Rejilla delantera
Aspas del ventilador
soltar apretar
apretar soltar soltar apretar
Ventana del receptor

32
ES
MONTAJE
Instalación de la rejilla de protección
• Monte la rejilla de protección delantera como se
representa en la descripción general y, a continuación,
gírela en sentido horario para lograr el punto de
posicionamiento vertical.
• Apriete los tornillos para nalizar la instalación.
Instalación de la base
Coloque el poste de conexión en la base. Encaje el tornillo
allen M6 en la parte inferior de la base y apriete el tornillo en
sentido horario con la llave allen.
Instalación del suministro eléctrico
1. Conecte un extremo del cable de alimentación a la toma cuadrada de la base del
aparato.
2. Conecte el enchufe del otro extremo del cable a la toma de corriente. En cuanto el
aparato esté conectado, suena un pitido.

33
ES
Instalación del cabezal del ventilador
• Coloque el cabezal del ventilador en el poste de
conexión orientando la muesca hacia el poste de
conexión (véase imagen).
• Apriete la tuerca del poste de conexión. Finalice la
instalación del cabezal del ventilador asegurándose
de que no se tambalee.
PANTALLA Y FUNCIONES DE LOS BOTONES
Panel de control
1 On/off
2 Oscilación
3 Velocidad
4 Indicador luminoso
Indicadores del display
1 Modo noche
2 Modo normal
3 Temporizador
4 Ángulo de oscilación
5 Modo natural
6 Temporizador/Velocidad
7 Indicador del estado de la batería
8 On/off

34
ES
Mando a distancia
1 Emisor
2 Temporizador
3 Aumentar la velocidad
4 Modo
5 Reducir la velocidad
6 On/off
7 Oscilación
UTILIZACIÓN
Apagar/encender aparato
• Pulse el botón ON/OFF del cabezal del ventilador. Escuchará un pitido para
indicar que el ventilador se pone en marcha.
• El regulador de revoluciones de ilumina, el símbolo del ventilador se ilumina en la
pantalla digital y el ventilador empieza a funcionar.
• Pulse de nuevo el botón para apagar el ventilador.
Ajustar la velocidad
Pulse varias veces el botón VELOCIDAD para elegir uno de los niveles de velocidad del
1 al 12. En el cabezal del ventilador encontrará un indicador que muestra la velocidad
actual.
Indicador
35
ES
Iniciar función de oscilación
Pulse el botón OSCILACIÓN en el cabezal del ventilador. Suena un pitido y el
ventilador comienza a oscilar de un lado a otro. El ángulo estándar es de 30°. El
indicador de oscilación se enciende y el círculo verde de la pantalla digital se ilumina.
Mantenga pulsado el botón para nalizar la función de oscilación.
Ajustar el ángulo de oscilación
Pulse el botón OSCILACIÓN en el cabezal del ventilador. Suena un pitido y el ventilador
comienza a oscilar de un lado para otro. El ángulo estándar es de 300°. El indicador
de oscilación se enciende y el círculo verde de la pantalla digital se ilumina. Pulse
varias veces el botón OSCILACIÓN para seleccionar uno de los siguientes ángulos de
oscilación: 30° > 60° > 90° > 120°. El círculo verde de la pantalla digital se cambia
según corresponda. Mantenga pulsado el botón para nalizar la función de oscilación.
Nota: En el mando a distancia se realizan los ajustes del mismo modo.
Ajustar el temporizador
Pulse el botón TEMPORIZADOR en el cabezal del ventilador. En cuanto se ilumine el
indicador de tiempo tras el pitido, podrá congurar el temporizador de apagado. Pulse
varias veces el botón para regular el temporizador entre 0 y 12 horas.
• De 0-6 horas se puede congurar el tiempo en intervalos de 0,5 horas.
• De 6-12 horas se puede congurar el tiempo en intervalos de 1 hora.
• Si selecciona 0 horas, se desactiva la función del temporizador.
Nota: Si congura el temporizador a través del mando a distancia, pulse primero el
botón TEMPORIZADOR y utilice a continuación los botones (+) o (-) para congurar
el tiempo deseado. Espere 6 segundos hasta que se acepte el tiempo ajustado
automáticamente.
36
ES
Ajustar modo
Pulse varias veces el botón MODE para seleccionar uno de los siguientes modos:
Modo natural > Modo noche > Modo normal. En función del modo varía/se modica
la velocidad del ventilador en intervalos determinados.
Uso inalámbrico
(solo para el modelo inalámbrico)
Desconecte el enchufe de la toma de corriente y el cable de la base del aparato. Pulse
el botón de control de batería de la base. Suena un pitido para indicar que el aparato
ahora recibirá suministro eléctrico a través de la batería. Pulse el botón ON/OFF del
cabezal del ventilador o del mando a distancia para iniciar el ventilador.
Muestra el nivel
de la batería
Botón de control de la batería

37
ES
LIMPIEZA Y CUIDADO
• Apague el ventilador y desconecte el enchufe de la toma de corriente antes de
limpiarlo.
• Desmonte la rejilla delantera, la rejilla trasera y las aspas del ventilador soltando la
tuerca como aparece en la imagen:
• Limpie la supercie con un paño húmedo. No la limpie con objetos duros, como
lana de acero u otros productos de limpieza abrasivos como desinfectantes, para
evitar arañazos superciales y daños.
• Desconecte el enchufe de la toma de corriente cuando desee mover el aparato.
soltar apretar
soltar apretar
apretar soltar
Retire los tornillos con el destornillador y
gire luego la rejilla delantera en sentido
antihorario para desmontarla.
38
ES
INDICACIONES SOBRE LA RETIRADA DEL
APARATO
Si en su país existe una disposición legal relativa a la
eliminación de aparatos eléctricos y electrónicos, este
símbolo estampado en el producto o en el embalaje
advierte que no debe eliminarse como residuo doméstico.
En lugar de ello, debe depositarse en un punto de recogida
de reciclaje de aparatos eléctricos y electrónicos. Una
gestión adecuada de estos residuos previene consecuencias
potencialmente negativas para el medio ambiente y la salud
de las personas. Puede consultar más información sobre el
reciclaje y la eliminación de este producto contactando con
su administración local o con su servicio de recogida de
residuos.
Este producto contiene baterías. Si en su país existe una
disposición legal relativa a la eliminación de baterías, estas
no deben eliminarse como residuo doméstico. Infórmese
sobre la normativa vigente relacionada con la eliminación de
baterías. Una gestión adecuada de estos residuos previene
consecuencias potencialmente negativas para el medio
ambiente y la salud de las personas.
FABRICANTE E IMPORTADOR (REINO UNIDO)
Fabricante:
Chal-Tec GmbH, Wallstraße 16, 10179 Berlín, Alemania.
Importador para Gran Bretaña:
Chal-Tec UK limited
Unit 6 Riverside Business Centre
Brighton Road
Shoreham-by-Sea
BN43 6RE
United Kingdom

39
FR
Chère cliente, cher client,
Toutes nos félicitations pour l’acquisition de ce nouvel appareil.
Veuillez lire attentivement et respecter les instructions de ce mode
d’emploi an d’éviter d’éventuels dommages. Le fabricant ne
saurait être tenu pour responsable des dommages dus au non-
respect des consignes de sécurité et à la mauvaise utilisation
de l’appareil. Scannez le QR-Code pour accéder à la dernière
version du mode d‘emploi et à d‘autres informations concernant
le produit.
SOMMAIRE
Consignes de sécurité40
Pièces détachées42
Aperçu de l‘appareil43
Assemblage 44
Écran et fonction des touches45
Utilisation46
Nettoyage et entretien49
Informations sur le recyclage50
Fabricant et importateur (UK)50
FICHE TECHNIQUE
Numéro d'article 10034670, 10034671
Alimentation 220-240 V ~ 50/60 Hz
Puissance 30 W
Vitesse maximale de l'air 4,58 m/s
Débit d'air maximal 25,52 m³/min

40
FR
CONSIGNES DE SÉCURITÉ
• Retirez l‘emballage et assurez-vous qu‘aucun élément n‘a été endommagé pendant
le transport. Si des pièces ont été endommagées, adressez-vous sans attendre au
service client.
• Les matériaux d‘emballage et les vieux appareils représentent un danger pour les
enfants qui peuvent se blesser avec. Pour cette raison, éliminez immédiatement les
matériaux d‘emballage.
• Cet appareil peut être utilisé par des enfants de 8 ans ou plus et des personnes
ayant des capacités physiques, sensorielles et mentales limitées et / ou
dénuées d‘expérience et de connaissances, à condition d‘avoir été instruits au
fonctionnement de l‘appareil par une personne responsable et d‘en comprendre les
risques associés.
• Avant l‘utilisation, vériez la tension sur la plaque signalétique de l‘appareil.
Branchez l’appareil uniquement sur des prises fournissant la tension prévue.
• Utilisez l‘appareil uniquement aux ns prévues et décrites dans ce mode d‘emploi.
• Lors de l‘assemblage, tenez-vous en strictement aux indications fournies. Un
mauvais assemblage peut causer des dégâts irrémédiables à l‘appareil.
• Eteignez l‘appareil et débranchez-le de la prise avant de le nettoyer ou lorsque
vous ne l‘utilisez plus.
• Si l‘appareil ne fonctionne pas normalement, éteignez-le immédiatement et
adressez-vous à un spécialiste près de chez vous.
• Si le câble secteur ou la che sont endommagés, faites-les remplacer par le
fabricant un service professionnel agréé ou une personne de qualication
équivalente.
• Ne branchez pas l‘appareil sur une prise multiple.
• N‘utilisez pas de rallonge.
• Ne branchez pas l‘appareil sur une prise à minuterie ou commandée à distance.
• N‘utilisez pas et ne rangez pas l‘appareil à proximité de sources de chaleur telles
que des radiateurs.
• Ne plongez jamais l‘appareil ni la che dans l‘eau ou dans d‘autres liquides. Si
vous renversez de l‘eau dessus, débranchez immédiatement la che de la prise et
faites contrôler l‘appareil par un spécialiste.
• Lorsque vous utilisez l‘appareil pour la première fois, retirez tous les lms de
protection et les matériaux d‘emballage.
• Ne tirez pas sur le câble pour débrancher l‘appareil mais tenez la che bien
fermement.
• Avant de brancher la che dans une prise murale, assurez-vous que l‘appareil est
éteint.
• Ne tendez pas le câble secteur.
• Veillez à ce que toutes les entrées et sorties d‘air soient libres et non recouvertes
pour que l‘appareil ne surchauffe pas.
• Veillez à ce que le câble secteur ne passe pas sur des arêtes vives ou des surfaces
coupantes.

41
FR
• N‘accrochez pas l‘appareil au plafond ou au mur, sauf s‘il est prévu pour cette
utilisation.
• Laissez sufsamment d‘espace tout autour de l‘appareil entre lui et les murs,
meubles et autres objets, pour obtenir une puissance idéale.
• N‘utilisez pas l‘appareil à proximité de fours à gaz ou de radiateurs à gaz.
• Ne placez pas l‘appareil sous un rideau ni à proximité.
• Ne recouvrez pas l‘appareil.
• Ne vous asseyez pas, vous ou d‘autres personnes, directement face au ux d‘air
pour ne pas vous enrhumer.
• Lorsque vous n‘utilisez plus l‘appareil, remettez-le dans son emballage d‘origine et
conservez-le dans un endroit sec.
• Débranchez toujours la che de la prise avant de nettoyer l‘appareil, de
l‘entretenir, de le ranger, ou lorsque vous ne l‘utilisez plus.
• N‘utilisez pas l‘appareil à proximité de substances ou liquides inammables ou
explosifs.
• L’appareil n’est pas destiné à une utilisation commerciale mais au cadre domestique
et dans des conditions similaires. Cela comprend les cuisines de bureaux, les
auberges, hôtels, motels et installations proposant des services de type bed &
breakfast.

42
FR
PIÈCES DÉTACHÉES
1
Câble d'alimentation
2
Base
3
Télécommande
4
Grille de protection arrière
5
Ecrou de la grille de protection arrière
6
Pales de ventilateur
7
Ecrou du rotor de ventilateur
8
Grille de protection avant
9
Tube de raccordement
10
Tête de ventilateur
11
Clé Allen
12
Vis Allen M6
13
Vis (grille de protection)

43
FR
APERÇU DE L‘APPAREIL
Panneau de
commande
Moteur
Grille arrière
Tube raccord
Câble
d‘alimentation
Base
Ecran
Grille avant
Pales de ventilateur
desserrer serrer
serrer desserrer desserrer serrer
Fenêtre du capteur
44
FR
ASSEMBLAGE
Installation des grilles de protection
• Montez la grille de protection avant comme indiqué dans
l‘aperçu de l‘appareil, puis tournez-la dans le sens des
aiguilles d‘une montre pour déplacer le point de repère à
la verticale.
• Serrez les vis pour terminer l‘installation.
Installation de la base
Placez le tube raccord sur la base. Insérez la vis Allen M6
par le bas dans la base et serrez-la dans le sens des aiguilles
d‘une montre à l‘aide de la clé Allen.
Installation de l‘alimentation
1. Branchez une extrémité du cordon d’alimentation sur la prise rectangulaire à la
base de l’appareil.
2. Branchez la che d‘alimentation à l‘autre extrémité du cordon d‘alimentation dans
la prise.
Lorsque vous branchez l‘appareil, un bip retentit.
45
FR
Installation de la tête e ventilateur
• Placez la tête du ventilateur sur le tube raccord en
alignant la rainure sur le tube raccord (voir illustration).
• Serrez l‘écrou du tube raccord. Terminez l‘installation
de la tête du ventilateur en veillant à ce qu‘elle ne
vacille pas.
ÉCRAN ET FONCTION DES TOUCHES
Panneau de commande
1 Marche /Arrêt
2 Oscillation
3 Vitesse
4 Voyants
Voyants à l‘écran
1 Mode nuit
2 Mode normal
3 Minuterie
4 Angle d‘oscillation
5 Mode naturel
6 Minuterie /vitesse
7 Indicateur de niveau de pile
8 Marche /Arrêt
46
FR
Télécommande
1 Emetteur
2 Minuterie
3 Pour augmenter la vitesse
4 Mode
5 Pour réduire la vitesse
6 Marche/Arrêt
7 Oscillation
UTILISATION
Pour allumer et éteindre l‘appareil
• Appuyez sur la touche ON/OFF de la tête du ventilateur. Un bip retentit et signale
que le ventilateur démarre.
• Le régulateur de vitesse s’allume, le symbole du ventilateur sur l’afchage
numérique s’allume et le ventilateur commence à fonctionner.
• Appuyez à nouveau sur la touche pour éteindre le ventilateur.
Réglage de la vitesse
Appuyez plusieurs fois sur la touche SPEED pour sélectionner les niveaux de vitesse 1 à
12. Un indicateur se trouve sur la tête du ventilateur pour donner la vitesse actuellement
réglée.
Anzeige
47
FR
Pour démarrer la fonction oscillation
Appuyez sur la touche OSCILLATION de la tête du ventilateur. Un bip retentit et le
ventilateur se met à osciller. L‘angle standard est de 30°. L‘indicateur oscillant s‘allume
et le cercle vert de l‘indicateur numérique s‘allume. Appuyez longuement sur cette
touche pour arrêter la fonction d‘oscillation.
Pour régler l‘angle d‘oscillation
Appuyez sur la touche OSCILLATION de la tête du ventilateur. Un bip retentit et le
ventilateur se met à osciller. L‘angle standard est de 300°. L‘indicateur oscillant s‘allume
et le cercle vert de l‘indicateur numérique s‘allume. Appuyez plusieurs fois sur la touche
SWING pour sélectionner l’un des angles suivants : 30 °> 60 °> 90 °> 120 °. Le cercle
vert de l‘afchage numérique change en conséquence. Appuyez longuement sur cette
touche pour arrêter la fonction d‘oscillation.
Remarque : les commandes sont les mêmes sur la télécommande.
Réglage de la minuterie
Appuyez sur le bouton TIMER de la tête du ventilateur. Dès que la durée s‘allume après
le bip, vous pouvez régler la minuterie d‘extinction. Appuyez plusieurs fois sur la touche
pour régler la minuterie entre 0 et 12 heures.
• de 0-6 heures vous pouvez régler la minuterie par tranche de 0,5 heure.
• de 6-12 vous pouvez régler la minuterie par tranche de 1 heure.
• Si vous choisissez 0 heure, vous quittez la fonction minuterie.
Remarque : Si vous réglez la minuterie à l‘aide de la télécommande, appuyez
d‘abord sur la touche TIMER, puis utilisez les touches (+) ou (-) pour régler la
durée souhaitée. Attendez ensuite 6 secondes jusqu‘à ce que la durée réglée soit
automatiquement acceptée.

48
FR
Réglage du mode
Appuyez plusieurs fois sur la touche MODE pour entrer dans l‘un des modes suivants:
Mode naturel > Mode nuit > Mode normal. En fonction du mode, la vitesse du
ventilateur varie à certains intervalles.
Utilisation sans l
(Uniquement pour le modèle sans l)
Débranchez la che de la prise et retirez le cordon d’alimentation de la base. Appuyez
sur la touche de contrôle de la batterie sur la base. Un bip retentit et indique que
l‘appareil est maintenant alimenté par la batterie intégrée. Appuyez sur la touche ON /
OFF de la tête du ventilateur ou de la télécommande pour démarrer le ventilateur.
Indicateur de
charge de la
batterie
Touche de contrôle de la batterie sur

49
FR
NETTOYAGE ET ENTRETIEN
• Éteignez le ventilateur avant de le nettoyer et débranchez la che de la prise.
• Démontez la grille avant, la grille arrière et les pales du ventilateur en desserrant
les écrous comme indiqué.:
• Essuyez la surface avec un chiffon humide. Ne nettoyez pas avec des objets durs
tels que de la laine d‘acier ou des détergents corrosifs tels que des désinfectants
pour éviter les rayures et les dommages de la surface.
• Si vous souhaitez déplacer l‘appareil, débranchez d‘abord la che de la prise.
desserrer serrer
desserrer serrer
serrer desserrer
Retirez la vis avec le tournevis, puis
faites pivoter la grille avant dans le sens
antihoraire pour la démonter.

50
FR
INFORMATIONS SUR LE RECYCLAGE
S‘il existe une réglementation pour l‘élimination ou le
recyclage des appareils électriques et électroniques dans
votre pays, ce symbole sur le produit ou sur l‘emballage
indique que cet appareil ne doit pas être jeté avec les
ordures ménagères. Vous devez le déposer dans un point
de collecte pour le recyclage des équipements électriques
et électroniques. La mise au rebut conforme aux règles
protège l‘environnement et la santé de vos semblables des
conséquences négatives. Pour plus d‘informations sur le
recyclage et l‘élimination de ce produit, veuillez contacter
votre autorité locale ou votre service de recyclage des
déchets ménagers.
Ce produit contient des piles. S‘il existe une réglementation
pour l‘élimination ou le recyclage des piles dans votre pays,
vous ne devez pas les jeter avec les ordures ménagères.
Renseignez-vous sur les dispositions locales relatives à la
collecte des piles usagées. La mise au rebut conforme aux
règles protège l‘environnement et la santé de vos semblables
des conséquences négatives.
FABRICANT ET IMPORTATEUR (UK)
Fabricant :
Chal-Tec GmbH, Wallstraße 16, 10179 Berlin, Allemagne.
Importateur pour la Grande Bretagne :
Chal-Tec UK limited
Unit 6 Riverside Business Centre
Brighton Road
Shoreham-by-Sea
BN43 6RE
United Kingdom

51
IT
Gentile cliente,
La ringraziamo per aver acquistato il dispositivo. La preghiamo
di leggere attentamente le seguenti istruzioni per l’uso e di
seguirle per evitare possibili danni tecnici. Non ci assumiamo
alcuna responsabilità per danni scaturiti da una mancata
osservazione delle avvertenze di sicurezza e da un uso
improprio del dispositivo. Scansionare il codice QR seguente,
per accedere al manuale d’uso più attuale e per ricevere
informazioni sul prodotto.
INDICE
Norme di sicurezza52
Singoli componenti54
Descrizione del dispositivo55
Assemblaggio56
Display e tasti funzione57
Utilizzo58
Pulizia e manutenzione61
Hints on disposal62
Produttore e importatore (UK) 62
DATI TECNICI
Numero articolo 10034670, 10034671
Alimentazione 220-240 V ~ 50/60 Hz
Potenza 30 W
Velocità massima di ventilazione 4,58 m/s
Massimo spostamento d’aria 25,52 m³/min

52
IT
NORME DI SICUREZZA
• Rimuovere il materiale di imballaggio e assicurarsi che nessun componente si
sia danneggiato durante il trasporto. Se ci sono dei componenti danneggiati,
contattare immediatamente il servizio clienti.
• I bambini possono farsi male con il materiale di imballaggio e con i vecchi
apparecchi. Smaltire immediatamente il materiale di imballaggio.
• Questo dispositivo può essere utilizzato da bambini a partire da 8 anni e da
persone con limitate capacità siche e psichiche o con conoscenza ed esperienza
limitate, solo se sono stati istruiti sulle modalità d’uso e comprendono i rischi e i
pericoli connessi.
• Prima dell‘uso controllare la tensione sulla targhetta del dispositivo. Collegare il
dispositivo solo ad una presa che corrisponde alla tensione indicata.
• Utilizzare il dispositivo solo per lo scopo previsto come descritto nel manuale di
istruzioni.
• Attenersi alle istruzioni per il montaggio. Una procedura errata può causare danni
irreparabili al dispositivo.
• Spegnere il dispositivo e staccare la spina dalla presa prima della pulizia o in caso
di inutilizzo.
• Se il dispositivo non funziona correttamente, spegnerlo immediatamente e
contattare un centro assistenza nelle vicinanze.
• Se il cavo di alimentazione o la spina sono danneggiati, devono essere sostituiti
dal produttore, da un centro assistenza autorizzato o da un tecnico qualicato.
• Non collegare il dispositivo a prese multiple.
• Non utilizzare una prolunga.
• Non collegare il dispositivo a timer o a prese con telecomando.
• Non utilizzare o conservare il dispositivo vicino a fonti di calore come termosifoni.
• Non immergere mai il dispositivo e la spina in acqua o in altri liquidi. Nel caso in
cui venga versata accidentalmente acqua sul dispositivo, staccare immediatamente
la spina dalla presa e far controllare il dispositivo da un tecnico qualicato.
• Prima di utilizzare il dispositivo per la prima volta, rimuovere completamente il
materiale di imballaggio.
• Non staccare la spina tirando il cavo di alimentazione, bensì afferrare la spina alla
base.
• Prima di inserire la spina nella presa, assicurarsi che il dispositivo sia spento.
• Non tirare il cavo di alimentazione.
• Accertarsi che tutte le prese d‘aria non siano ostruite, per evitare che il dispositivo si
surriscaldi.
• Accertarsi che il cavo di alimentazione non scorra su spigoli o superci taglienti.

53
IT
• Non appendere il dispositivo al softto o alla parete a meno che il dispositivo non
sia progettato per questo utilizzo.
• Lasciare abbastanza spazio intorno al dispositivo con le pareti, i mobili o con altri
apparecchi per ottenere le migliori prestazioni possibili.
• Non utilizzare il dispositivo vicino a stufe a gas o a riscaldatori a gas.
• Non posizionare il dispositivo vicino o direttamente sotto le tende.
• Non coprire il dispositivo.
• Non esporre se stessi o gli altri al usso d‘aria diretto per evitare di raffreddarsi.
• In caso di inutilizzo del dispositivo, conservarlo nella confezione originale in un
luogo asciutto.
• Staccare sempre la spina dalla presa prima di eseguire la pulizia e la
manutenzione del dispositivo, prima di conservarlo o in caso di inutilizzo.
• Non utilizzare il dispositivo vicino a sostanze o liquidi esplosivi o inammabili.
• Il dispositivo non è per un uso commerciale, bensì domestico e in ambienti simili
come cucine di ufci, agriturismi, hotel, motel e bed & breakfast.
54
IT
SINGOLI COMPONENTI
1
Cavo di alimentazione
2
Base
3
Telecomando
4
Griglia di protezione posteriore
5
Dado della griglia di protezione
posteriore
6
Pale della ventola
7
Dado delle pale della ventola
8
Griglia di protezione anteriore
9
Tubo di collegamento
10
Testa del ventilatore
11
Chiave a brugola
12
Vite a brugola M6
13
Vite (griglia di protezione)

55
IT
DESCRIZIONE DEL DISPOSITIVO
Pannello di controllo
Motore
Griglia posteriore
Tubo di collegamento
Cavo di
alimentazione
Base
Display
Griglia anteriore
Pale della ventola
svitare avvitare
avvitare svitare svitare avvitare
Finestra ricevitore
56
IT
ASSEMBLAGGIO
Installazione della griglia di protezione
• Montare la griglia anteriore come mostrato nella
descrizione del dispositivo e ruotarla poi in senso orario,
per portare il punto di posizionamento in verticale.
• Stringere le viti per concludere l’installazione.
Installazione della base
Posizionare il tubo di collegamento sulla base. Inserire la vite
a brugola M6 nella base da sotto e stringerla in senso orario
con la chiave a brugola.
Installazione dell’alimentazione
1. Collegare un lato del cavo di alimentazione nella connessione rettangolare sulla
base del dispositivo.
2. Collegare l’altra estremità alla presa elettrica. Quando il dispositivo è acceso,
viene emesso un segnale acustico.

57
IT
Installazione della testa del ventilatore
• Posizionare la testa del ventilatore sul tubo di
collegamento, orientando la cavità sul tubo (v.
immagine).
• Stingere saldamento il dado del tubo di collegamento.
Terminare l’installazione della testa del ventilatore
assicurandosi che non traballi.
DISPLAY E TASTI FUNZIONE
Pannello di controllo
1 On/Off
2 Oscillazione
3 Velocità
4 Spie di indicazione
Indicazioni del display
1 Modalità notturna
2 Modalità normale
3 Timer
4 Inclinazione di oscillazione
5 Modalità naturale
6 Timer/Velocità
7 Indicazione stato batterie
8 On/Off

58
IT
Telecomando
1 Trasmettitore
2 Timer
3 Aumentare velocità
4 Modalità
5 Diminuire velocità
6 On/Off
7 Oscillazione
UTILIZZO
Accendere/spegnere il dispositivo
• Premere ON/OFF sulla testa del ventilatore. Viene emesso un segnale acustico per
indicare che il ventilatore si avvia.
• La regolazione dei giri si accende, il simbolo del ventilatore si illumina sullo
schermo digitale e il ventilatore inizia a funzionare.
• Premere di nuovo il tasto per spegnere il ventilatore.
Impostare la velocità
Premere più volte il tasto VELOCITÀ per selezionare tra i livelli 1 e 12. Sulla testa del
ventilatore c’è un’indicazione che mostra la velocità attuale.
Anzeige
59
IT
Avviare l’oscillazione
Premere OSCILLAZIONE sulla testa del ventilatore. Viene emesso un segnale acustico
e il ventilatore inizia a muoversi da un lato all’altro. L’inclinazione standard è di 30°.
L’indicazione di oscillazione si accende e il cerchio verde dello schermo digitale si
illumina. Premere a lungo questo tasto per disattivare l’oscillazione.
Impostare l’inclinazione di oscillazione
Premere OSCILLAZIONE sulla testa del ventilatore. Viene emesso un segnale acustico
e il ventilatore inizia a muoversi da un lato all’altro. L’inclinazione standard è di 30°.
L’indicazione di oscillazione si accende e il cerchio verde dello schermo digitale
si illumina. Premere più volte OSCILLAZIONE per impostare una delle seguenti
inclinazioni: 30° > 60° > 90° > 120°. Il cerchio verde dello schermo digitale cambia di
conseguenza. Premere a lungo questo tasto per disattivare l’oscillazione.
Avvertenza: sul telecomando è possibile realizzare l’impostazione allo stesso modo.
Impostare il timer
Premere TIMER sulla testa del ventilatore. Non appena l’indicazione del tempo si
illumina dopo il segnale acustico, è possibile impostare il timer di spegnimento. Premere
più volte il tasto per impostare il timer tra 0 e 12 ore.
• Tra 0 e 6 ore il timer viene impostato in intervalli di 0,5 ore.
• Tra 6 e 12 ore il timer viene impostato in intervalli di 1 ora.
• Se si selezionano 0 ore, la funzione timer si disattiva.
Avvertenza: se si imposta il timer con il telecomando, premere prima TIMER e
utilizzare poi (+) e (-) per regolare il tempo. Attendere poi 6 secondi, no a quando
viene salvato il tempo impostato.

60
IT
Impostare la modalità
Premere più volte MODE per impostare una delle seguenti modalità: naturale > notturna
> normale. In base alla modalità, la velocità di ventilazione varia/cambia a determinati
intervalli.
Utilizzo senza li
(solo per il modello wireless)
Staccare la presa dalla spina e il cavo dalla base. Premere il tasto di controllo della
batteria sulla base. Viene emesso un segnale acustico che segnala che il dispositivo
viene ora alimentato tramite la batteria integrata. Premere ON/OFF per avviare il
ventilatore.
Zeigt den
Batteriestand an
Batteriesteuertaste
61
IT
PULIZIA E MANUTENZIONE
• Prima di pulire il ventilatore, spegnerlo e staccare la spina.
• Smontare la griglia anteriore, posteriore e le pale della ventola, svitando i dadi in
questo modo:
• Pulire le superci con un panno umido. Non pulire con oggetti duri, come lana
d’acciaio o detergenti corrosivi come disinfettanti, in modo da evitare graf o
danni.
• Se volete spostare il dispositivo, staccare prima la spina.
svitare avvitare
svitare avvitare
avvitare svitare
Rimuovere la vite con il cacciavite e
ruotare poi la griglia in senso antiorario
per smontarla.

62
IT
AVVISO DI SMALTIMENTO
Se nel proprio paese si applicano le regolamentazioni
inerenti lo smaltimento di dispositivi elettrici ed elettronici,
questo simbolo sul prodotto o sulla confezione segnala che
questi prodotti non possono essere smaltiti con i riuti normali
e devono essere portati a un punto di raccolta di dispositivi
elettrici ed elettronici. Grazie al corretto smaltimento dei
vecchi dispositivi si tutela il pianeta e la salute delle persone
da possibili conseguenze negative. Informazioni riguardanti il
riciclo e lo smaltimento di questi prodotti si ottengono presso
l’amministrazione locale oppure il servizio di gestione dei
riuti domestici.
Il prodotto contiene batterie. Se nel proprio paese si
applicano le regolamentazioni inerenti lo smaltimento di
batterie, non possono essere smaltite con i normali riuti
domestici. Preghiamo di informarvi sulle regolamentazioni
vigenti sullo smaltimento delle batterie. Grazie al corretto
smaltimento dei vecchi dispositivi si tutela l’ambiente e la
salute delle persone da conseguenze negative.
PRODUTTORE E IMPORTATORE (UK)
Produttore:
Chal-Tec GmbH, Wallstraße 16, 10179 Berlino, Germania.
Importatore per la Gran Bretagna:
Chal-Tec UK limited
Unit 6 Riverside Business Centre
Brighton Road
Shoreham-by-Sea
BN43 6RE
United Kingdom