TFT18KLD TFT18KLDA TFT18KLDC TFT18KLDE
TFT18KLDG TFT18KLDH TFT18KLDK TFT18KLDM
T01364
A MAJOR CAUSE OF FIRES IS FAILURE
TO MAINTAIN REQUIRED CLEARANCES
(AIR SPACES) BETWEEN COMBUSTIBLE MATERIALS.
IT IS OF UTMOST IMPORTANCE THAT
THIS PRODUCT BE INSTALLED ONLY IN
ACCORDANCE WITH THESE INSTRUCTIONS.
IMPORTANT: RETAIN FOR FUTURE REFERENCE.
READ CAREFULLY.
RANGER
OWNER'S
MANUAL
SMOKE IT FORWARD
POST YOUR COOKS WITH
#TRAEGERGRILLS
T01364_Ranger_OM_EN.indd 1 9/9/19 8:58 AM

2
• Know the symptoms of carbon monoxide poisoning:
headache, dizziness, weakness, nausea, vomiting,
sleepiness, and confusion. Carbon monoxide
reduces the blood’s ability to carry oxygen.
Low blood oxygen levels can result in loss
of consciousness and death.
• See a doctor if you or others develop cold- or
u-like symptoms. Carbon monoxide poisoning,
which can easily be mistaken for a cold or u, is
often detected too late.
• Alcohol consumption and drug use increase the
effects of carbon monoxide poisoning.
• Carbon monoxide is especially toxic to mother
and child during pregnancy, infants, the elderly,
smokers, and people with blood or circulatory system
problems, such as anemia or heart disease.
• Only use your Traeger
®
Grill outdoors on a
noncombustible oor and away from combustible
materials.
• Never use gasoline, gasoline-type lantern fuel,
kerosene, charcoal lighter uid, or ammable liquids
to start or “freshen up” a re in this appliance. Keep
all such liquids well away from this appliance when
in use.
Please read this entire manual before installation and use of this pellet-burning appliance. Failure to follow these
instructions could result in property damage, bodily injury, or even death. Contact local building or re ofcials
about restrictions and installation inspection requirements in your area.
Cooking with a hardwood re brings years of enjoyment – to you and your lucky friends and family. Your new
Traeger
®
Grill is specially designed to make cooking easier while giving you optimal performance with the most
savory-avored food.
As with all grills and cooking appliances, any time you burn a material—whether it be wood, gas, or charcoal—
organic gases are formed during the cooking process. One gas that can be particularly harmful in concentrated
quantities is carbon monoxide. In an outdoor, open-air environment, carbon monoxide should naturally dissipate
and not harm you.
WARNING! Follow these guidelines to prevent this colorless, odorless gas from poisoning you, your family, pets,
or others:
IMPORTANT: READ CAREFULLY AND RETAIN FOR FUTURE REFERENCE.
If you are assembling this unit for someone else, provide this manual for the owner to read and save for
future reference.
IMPORTANT SAFETY
DANGER!
For North American Consumers:
• Plug into an appropriate 3-prong outlet.
• An electrical supply with GFCI protection is required.
To protect against shock hazard, locate a grounded/
earthed 3-prong receptacle in reach of the 6' (1.8-m)
power cord. When installing the receptacle, follow
the National Electrical Code and local codes and
ordinances.
For Consumers in the European Union:
• Plug into an appropriate earthed outlet.
• Do not remove earth prong or modify plug in any
way. Do not use an adapter or extension cord.
DANGER!
• Hazardous voltage is present, which can shock,
burn, or cause death. Disconnect the power cord
before servicing the grill unless otherwise noted
in this Owner’s Manual.
• Never use or store ammable liquids near the grill.
• Never use gasoline or lighter uid to manually light
your grill.
READ ALL INSTRUCTIONS BEFORE INSTALLING AND USING
THE APPLIANCE
T01364_Ranger_OM_EN.indd 2 9/9/19 8:58 AM
traegergrills.com
|
3
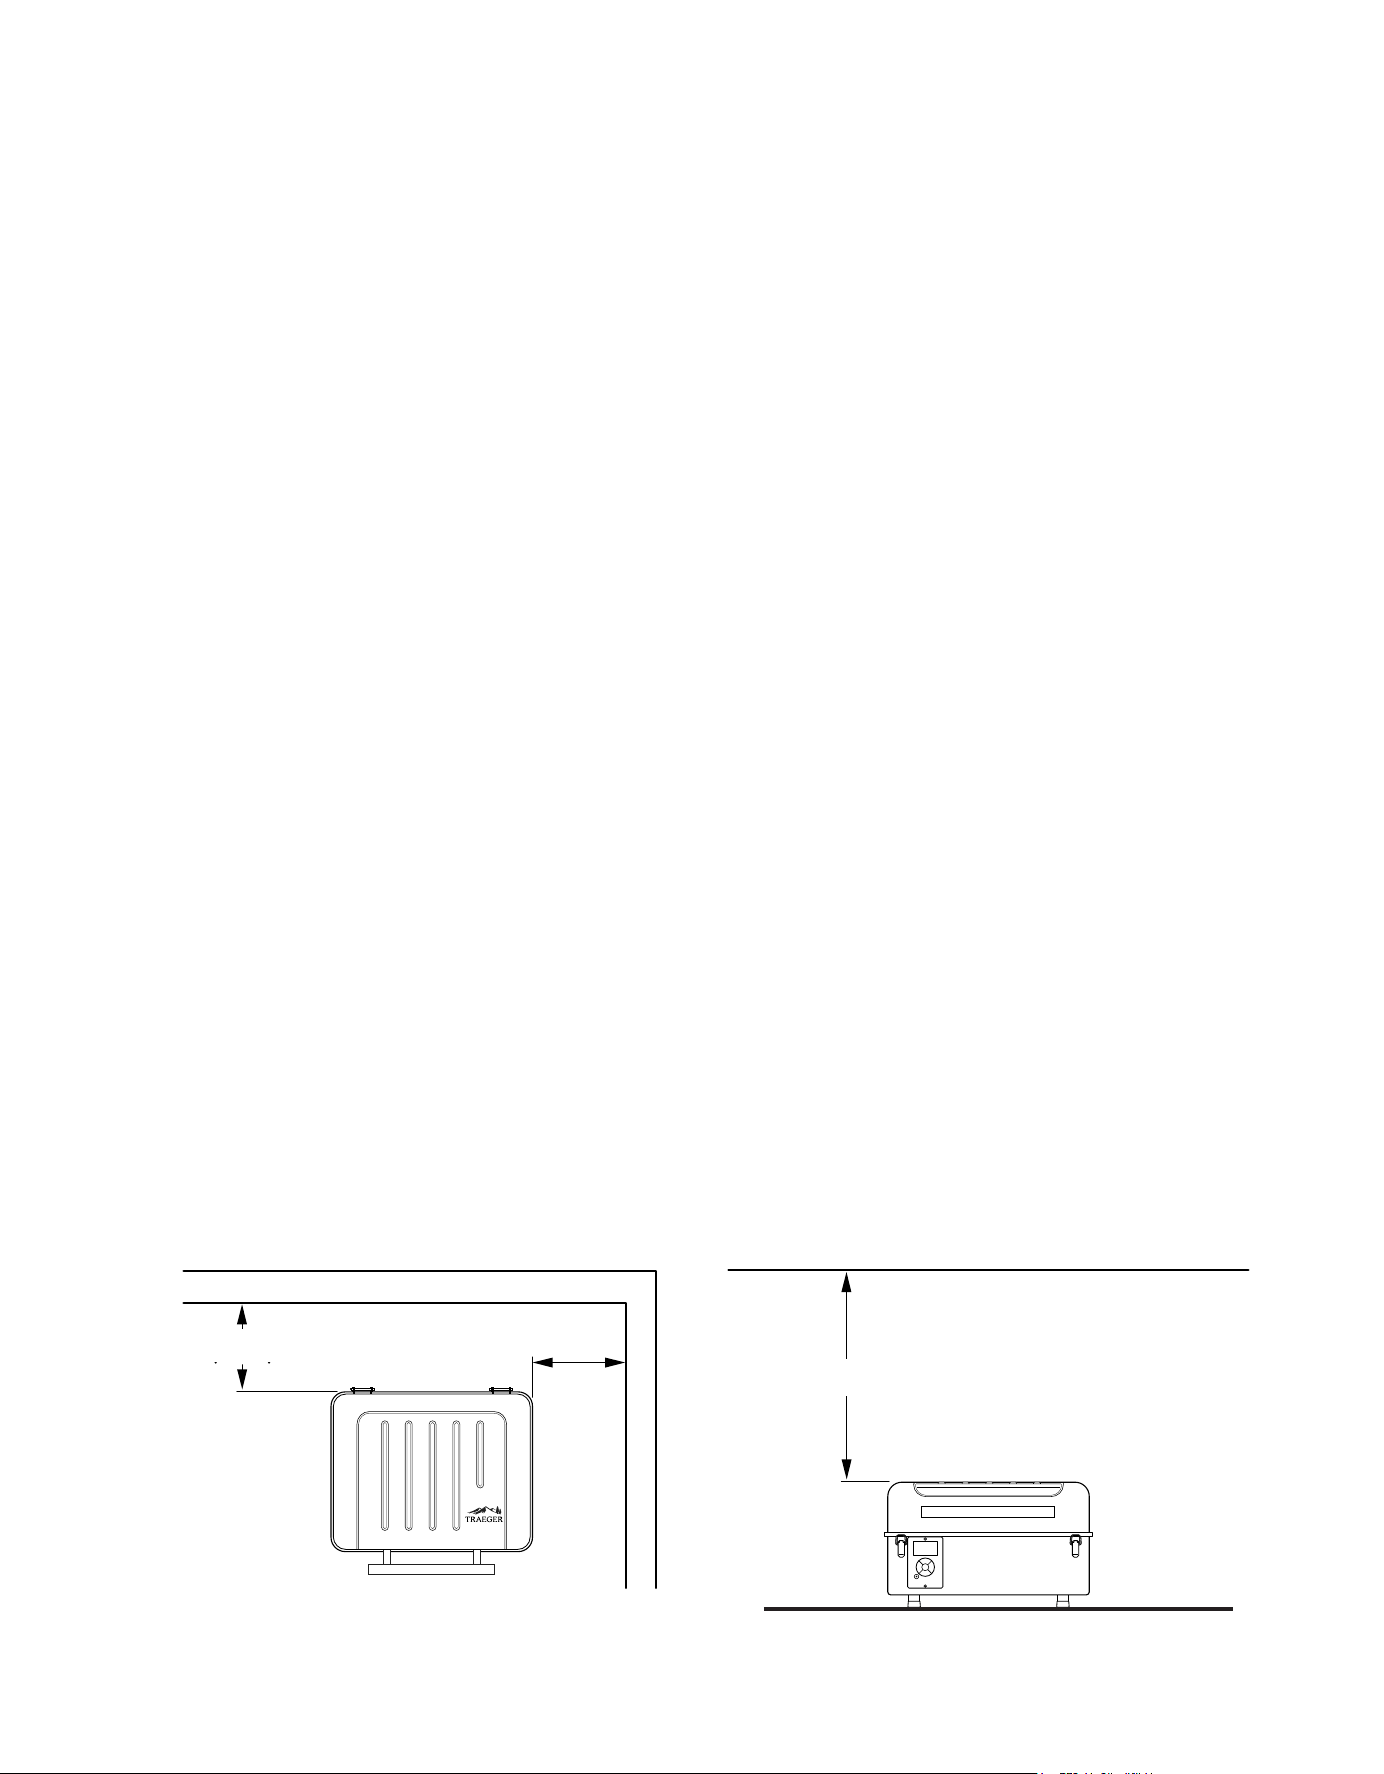
SAVE THESE INSTRUCTIONS
40.00"
(102 cm)
12.00"
(30 cm)
12.00"
(30 cm)
18.00"
(45.7 cm)
18.00"
(45.7 cm)
WARNING!
Smoke Hazard
A pellet overow condition can occur during start-up,
resulting in unusually thick, white smoke that lasts a
long time. If this occurs, power down your grill with
the Main Power switch and unplug. If this condition
continues long enough, gases can build up from partial
ignition and fully ignite, causing the lid to “burp.” If
this burp occurs and your grill has not been properly
maintained as described in “Maintaining Your Grill” on
pages 22-23, a grease re could result. To remedy this
condition, let the grill cool down completely, remove all
internal components, and thoroughly clean all ash and
pellets from the grill and repot (see page 22, “Cleaning
the Ash from Inside and Around the Firepot”).
WARNING!
Burn Hazard
Many parts of the grill will become very hot during
operation. Care must be taken to avoid burns, both
during operation and afterwards, while the grill is still hot.
• Never leave the grill unattended when young children
are present.
• Never move the grill when it is operating.
• Let the grill cool thoroughly before moving or
attempting to transport.
WARNING!
Fire Hazard
• When operating this grill, maintain a MINIMUM
distance of 18 inches (45.7 cm) from the grill to
combustibles.
• When operating this grill under overhead
combustibles, a MINIMUM of 40 inches (102 cm)
is required.
WARNING!
Air Contaminant Hazard
• Assemble and operate this grill ONLY per the instructions
in the Assembly Guide and this Owner’s Manual.
• This grill is intended for OUTDOOR USE ONLY.
• Never use heating fuel pellets in the grill, due to
potential hazardous contaminants and additives
that may be present.
CAUTION!
• Always store wood pellets in a dry location, away
from heat-producing appliances and other fuel
containers.
• Keep the grill clean. See the cleaning instructions
in this Owner’s Manual.
• Do not use accessories not specied for use with
this grill.
• For best results and avor, use genuine
TRAEGER
®
BRAND HARDWOOD PELLETS.
• Even if there is ample room in the grill, be cautious of
loading excessive amounts of food that can release
large quantities of ammable grease, for example
more than a pound of bacon, especially if the grill
has not been well-maintained. If your previous cooks
have produced large quantities of ammable grease,
it is highly recommended that the grease be cleaned
from the grill before using it again.
For Consumers in the European Union:
• This appliance is not intended for use by persons
(including children) with reduced physical, sensory,
or mental capabilities, or lack of experience and
knowledge, unless they have been given supervision
or instruction concerning use of the appliance by a
person responsible for their safety.
• Children should be supervised to ensure they do not
play with the appliance.
T01364_Ranger_OM_EN.indd 3 9/9/19 8:58 AM

4
WE’VE GOT YOU
COVERED
RUBS
SAUCES
TraegerGrills.com/Shop
TraegerGrills.com/Dealers
PELLETS
T01364_Ranger_OM_EN.indd 4 9/9/19 8:58 AM
traegergrills.com
|
5
Register your grill
online
for a FREE
Traeger ebook
Go online at
traegergrills.com/register
TABLE OF CONTENTS
2 Important Safety
6 Adding Flavor to Your Fire
8 Assembling Your Grill
10 Getting to Know Your Grill
13 Initial Firing Instructions
15 Subsequent Start-Up
16 Using Your Grill
17 Using the Meat Probe
18 Ranger Features
20 Operating Tips
21 Troubleshooting
22 Maintaining Your Grill
26 Service and Support
27 Warranty
T01364_Ranger_OM_EN.indd 5 9/9/19 8:58 AM
6
PELLETS
SPECIALTY SIZES
PELLET GUIDE
HARD W OOD
ALDER
APPLE
CHERRY
HICKORY
MAPLE
MESQUITE
OAK
PECAN
GOOD FOR ANYTHING. GREAT FOR:
OUR HARDWOOD PELLETS COME IN
8 GREAT VARIETIES!
BIG GAME BLEND
33-lb. (15-kg) bag
Traeger and Realtree
have teamed up to bring
you an exclusive blend
of hickory and red and
white oak, with woodsy
rosemary undertones.
This avor is big enough
for big game.
ADDING FLAVOR TO YOUR FIRE
Creating 100% food-grade hardwood pellets comes naturally to Traeger. Our U.S. mills process pure
hardwood, blended for the perfect balance of smoke to heat and for superior quality you can taste every time.
Crafting the highest-quality hardwood pellets on the market starts from the ground up. We built our mills
in regions of the country to be near hardwood sources. Also, we dedicate our manufacturing entirely to food-
grade pellets only, which maintains the purity of our machinery.
TRAEGER
®
BRAND HARDWOOD PELLETS only contain two natural ingredients: our signature blend of
hardwoods and a simple soybean oil. When manufacturing the premium hardwood pellets that elevate your
meal to the next level, less is always more. No additives, no llers, no binding agents – just simple, natural
avor.
HICKORY
10-lb. (4.5-kg) box
Our most popular
pellet avor now
comes in an easy-to-
transport 10-lb. box.
T01364_Ranger_OM_EN.indd 6 9/9/19 8:58 AM

traegergrills.com
|
7
20-LB (9-KG) BAGS
HICKORY
20-lb. (9-kg) bag
The most widely
used pellets in
barbecue, hickory
pellets release a
rich avor that
complements
most meats.
ALDER
20-lb. (9-kg) bag
Versatile because
of its mild avor
and aroma, alder
gives off ample
smoke without
overwhelming even
the most delicate
avors.
OAK
20-lb. (9-kg) bag
Stronger than cherry
or apple and lighter
than hickory, oak is
great to use with sh
and beef.
CHERRY
20-lb. (9-kg) bag
A very avorful
pellet, cherry wood
lends itself to
applications where
you want to add a
hearty smoke avor.
APPLE
20-lb. (9-kg) bag
Most often used
with poultry and
pork, apple pellets
offer a lightly sweet
smoke that helps
enhance mild-
avored meats.
MAPLE
20-lb. (9-kg) bag
Mild, with a hint of
sweetness, maple
pellets are great for
pork and especially
veggies.
PECAN
20-lb. (9-kg) bag
Deliciously nutty
and even a little
spicy, pecan pellets
are great with
veggies, beef, pork,
poultry, or even
baked goods.
MESQUITE
20-lb. (9-kg) bag
A favorite of Texas
BBQ, mesquite
pellets infuse your
meat with a robust
smoke avor.
T01364_Ranger_OM_EN.indd 7 9/9/19 8:59 AM
8
ASSEMBLING YOUR GRILL
READ ALL INSTRUCTIONS BEFORE INSTALLING AND USING
THE APPLIANCE
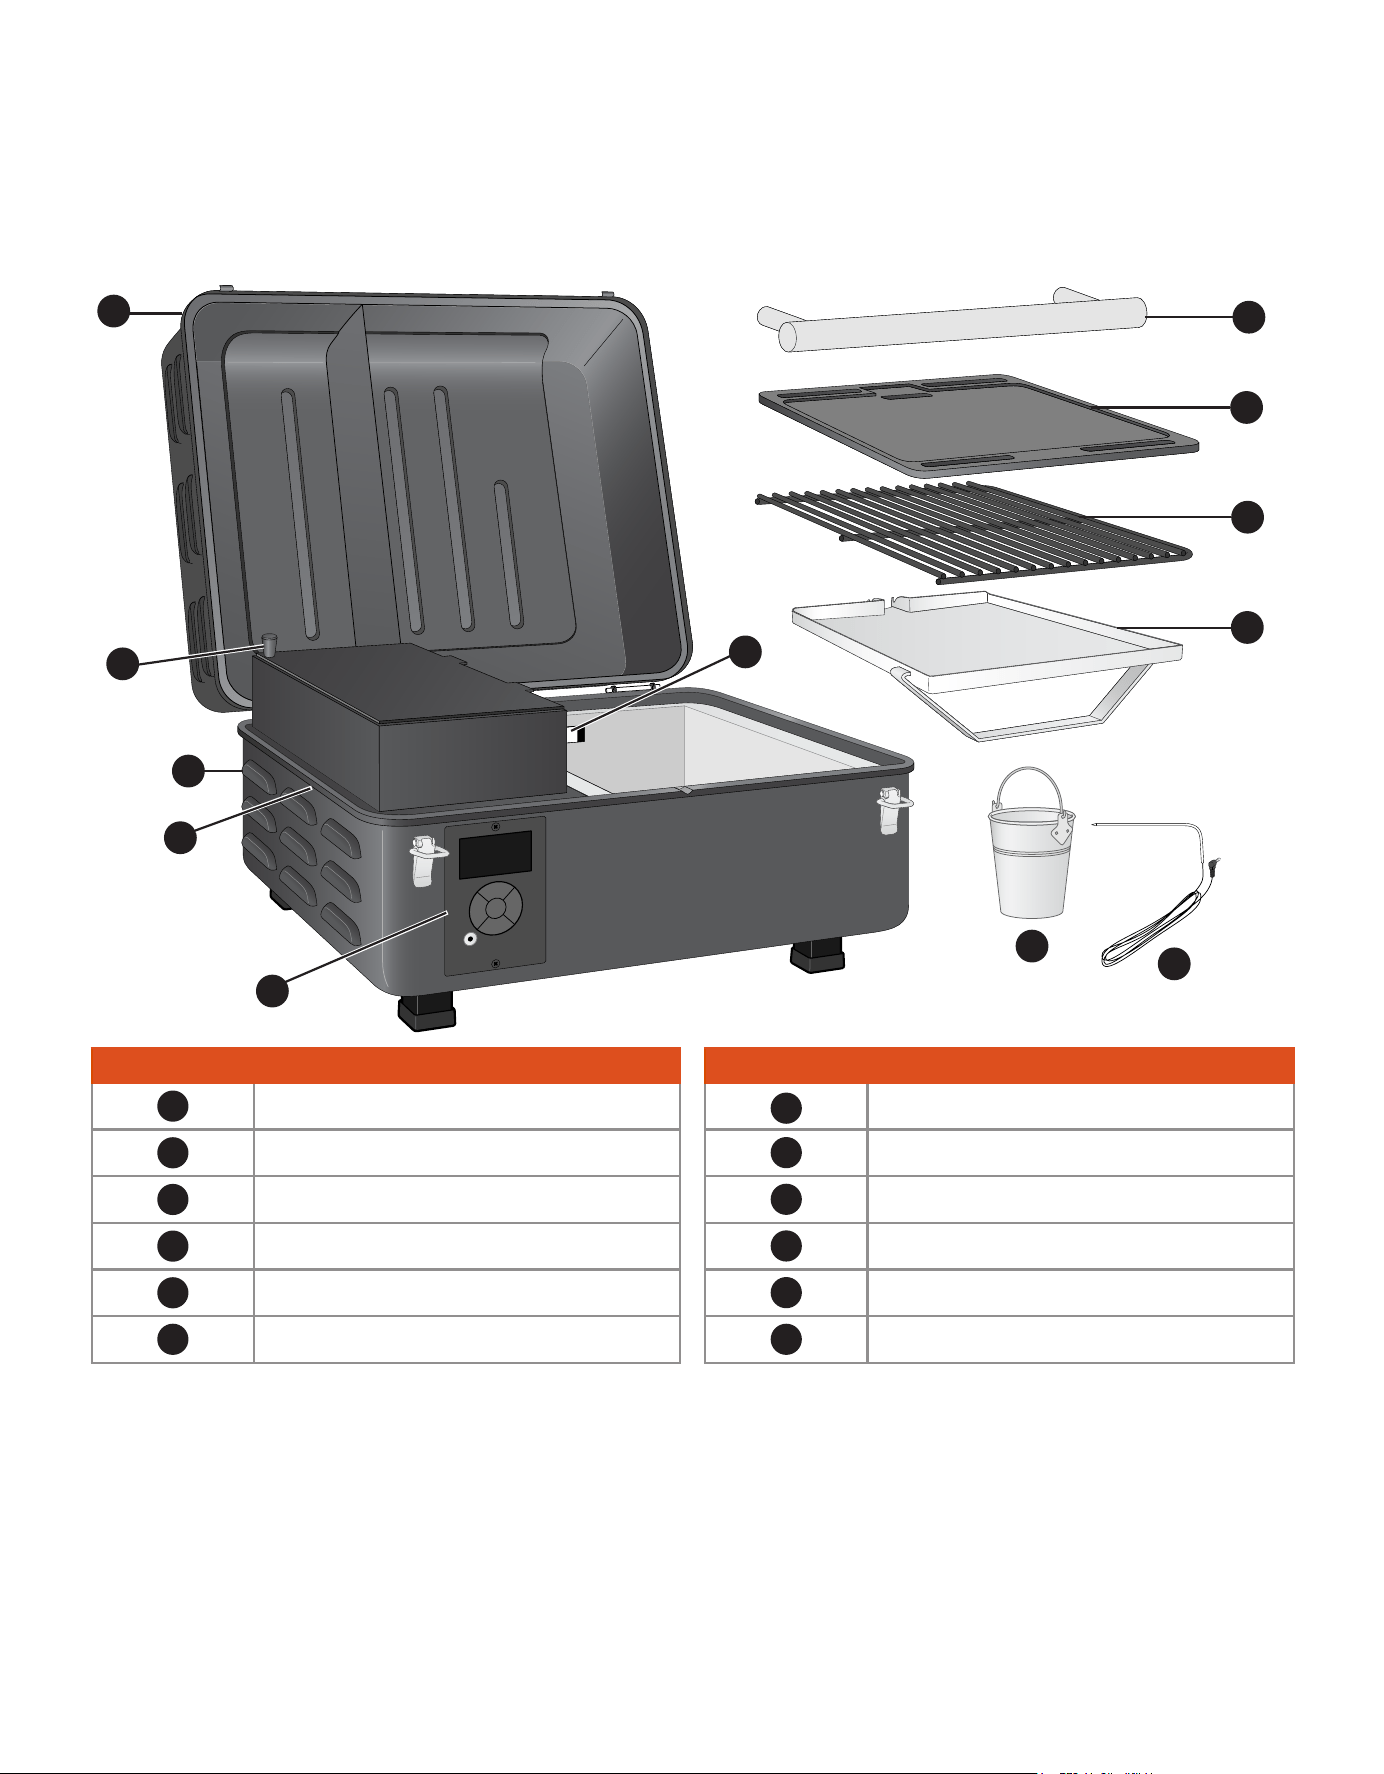
PARTS LIST
6
7
8
1
2
4
HARDWARE PACK
C
D
B
A
Part Description
1
Grill Lid
2
Grill Body
3
Feet with Caps
4
Lid Handle
Part Description
5
Cast-Iron Griddle
6
Grill Grate
7
Grease Drip Tray
8
Grease Bucket
E
3
5
F
* NOTE: Handle bolts, washers, and Mica
washers are shipped installed on the handle.
Shape may
vary.
Bolts: 1/4-20x
5/8" (6 pcs.)*
Washers: 1/4" Flat
(6 pcs.)*
#2 Phillips
Screwdriver
Legs (4 pcs.)
Leg End Caps
(4 pcs.)
Mica Washers
(2 pcs.)*
T01364_Ranger_OM_EN.indd 8 9/9/19 8:59 AM
traegergrills.com
|
9
2
3
4
In this step:
4
A
x 2
B
x 2
C
x 1
F
x 2
In this step:
7
8
In this step:
6
INSTALL LID HANDLE
INSTALL GREASE DRIP TRAY AND BUCKET
INSTALL PORCELAIN-COATED GRILL GRATE
NOTE: Be sure the grease drain spout on the
grease drip tray extends through the opening
in the back of the grill.
IMPORTANT: Always be sure to position
the grease drain bucket under the spout
during use!
1
In this step:
3
A
x 4
B
x 4
C
x 1
D
x 4
E
x 4
INSTALL LEGS
NOTE: Handle hardware is installed
on handle.
T01364_Ranger_OM_EN.indd 9 9/9/19 8:59 AM
10
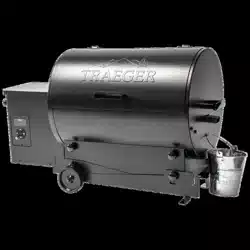
GETTING TO KNOW YOUR GRILL
GRILL PARTS AND FEATURES
1
2
10
11
12
5
4
7
8
Part Description
1
Grill Lid
2
Lid Handle
3
Cast-Iron Griddle
4
Porcelain-Coated Grill Grate
5
Grease Drip Tray
6
Grease Drain Port (back of grill)
Part Description
7
Meat Probe
8
Grease Bucket
9
Digital Controller with AGL
10
Pellet Hopper
11
Main Power Switch (back of grill)
12
Pellet Hopper Lid
3
6
9
T01364_Ranger_OM_EN.indd 10 9/9/19 8:59 AM
traegergrills.com
|
11
PELLET HOPPER
COMPACT DESIGN
GRILLING SPACE
NO FIREFIGHTING
HIGH-TECH CONTROLS
You don’t have to worry about drippings aring
up and causing nasty reballs that destroy your
meal, because Traeger
®
Wood Fired Grills cook
using indirect heat. All drippings are safely
channeled into an external grease bucket for
easy disposal.
NOTE: For proper, recommended
maintenance, see “Maintaining Your Grill”
on pages 22 and 23.
With 184 in.
2
(0.12 m
2
) of grilling space, your
Traeger
®
Ranger Grill gives you 16,000 BTU
of cooking power in a small footprint.
Keep Warm can be used to pause the cook
cycle at any time during grilling. Simply press
KEEP WARM again to resume cooking. Keep
Warm maintains the grill temperature at
165°F (74°C).
A 9-lb.-capacity (4.1 kg) pellet hopper will keep
you cooking for hours, getting you away from
the grill and back to entertaining friends and
family.
Take Traeger'ing on the go! The compact
design is perfect for camping or tailgating,
allowing you to enjoy that great Traeger avor,
no matter where you go.
T01364_Ranger_OM_EN.indd 11 9/9/19 8:59 AM
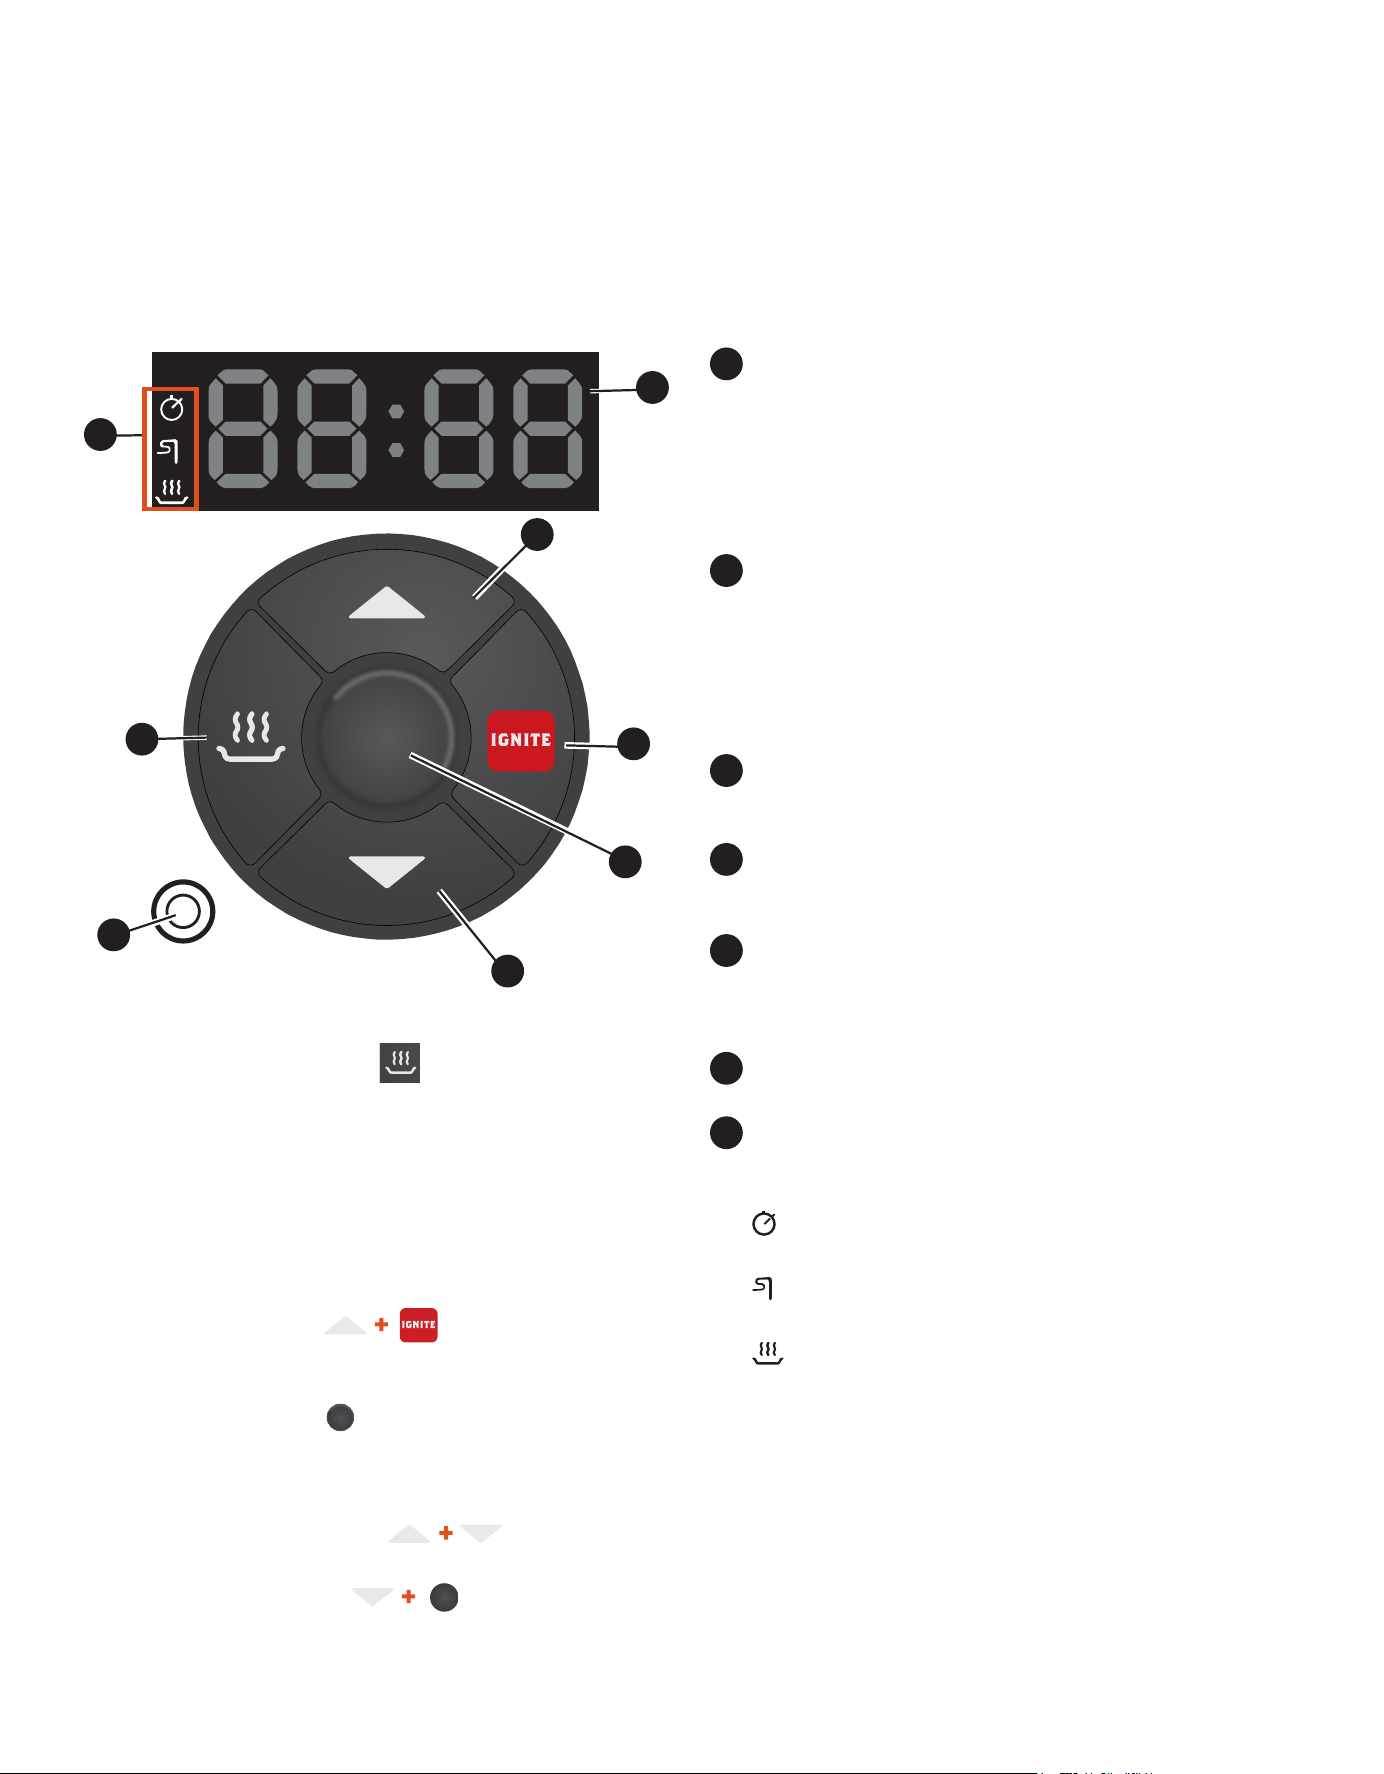
12
Your Traeger
®
Ranger Grill is equipped with a digital controller with AGL (Advanced Grilling Logic). Before you
begin using the grill, it will be helpful to familiarize yourself with the different features of the control panel.
YOUR CONTROL PANEL AND DISPLAY
GETTING TO KNOW YOUR GRILL (cont.)
1
2
2
6
1
CENTER BUTTON
Use this button to turn on the grill and cycle
through TEMPERATURE > TIMER > PROBE
ALARM modes. Press and hold for two seconds
to cancel a setting. To put the grill in the
Shutdown Cycle, press and hold the button for
two seconds in Temperature Adjustment mode.
2
UP/DOWN BUTTONS
Press the UP/DOWN buttons to increase or
decrease temperature or time. Press and hold
to increase or decrease the time rapidly.
NOTE: Press and hold the UP and DOWN
buttons at the same time for 3 seconds to
switch between Celsius and Fahrenheit.
3
STATUS DISPLAY
Shows current temperature, time remaining
in timer mode, or probe cooking temperature.
4
MEAT PROBE JACK
Plug the meat probe into the jack for probe
cooking.
5
KEEP WARM
This feature maintains the grill temperature
at 165°F (74°C) to keep food warm without
overcooking it.
6
IGNITE
Press IGNITE to start the grill.
7
INDICATOR LIGHT PANEL
The icons on this panel will light up when the
corresponding feature is active.
The Timer icon will light when the timer
is active.
The Meat Probe icon will light once the probe
is plugged in and recognized by the grill.
The Keep Warm icon will light while this
feature is active.
4
5
7
3
ARC CONTROLLER GUIDE
KEEP WARM FUNCTION
Keep Warm can be used to pause the cook cycle at
any time during grilling. Simply press KEEP WARM
again to resume cooking. Keep Warm maintains the
grill temperature at 165°F (74°C).
PRESS AND HOLD FUNCTIONS
NOTE: For the following, when the grill is in
standby mode, press and hold the buttons indicated
for 2 seconds.
PRIME THE AUGER
“Pri” will ash on the display, and the auger will
prime for 30 seconds. Repeat to cancel.
GRILL SHUTDOWN
“OFF” will ash on the display nine times. Grill will
display “COOL DN” for 15 minutes as it cools down.
To cancel, repeat while “OFF” is ashing.
CHANGE BETWEEN °F/°C
Grill will change the display between °F and °C.
DISPLAY FIRMWARE
Firmware will scroll across the display.
NOTE: The letter “v” will display as “u.”
T01364_Ranger_OM_EN.indd 12 9/9/19 8:59 AM
traegergrills.com
|
13
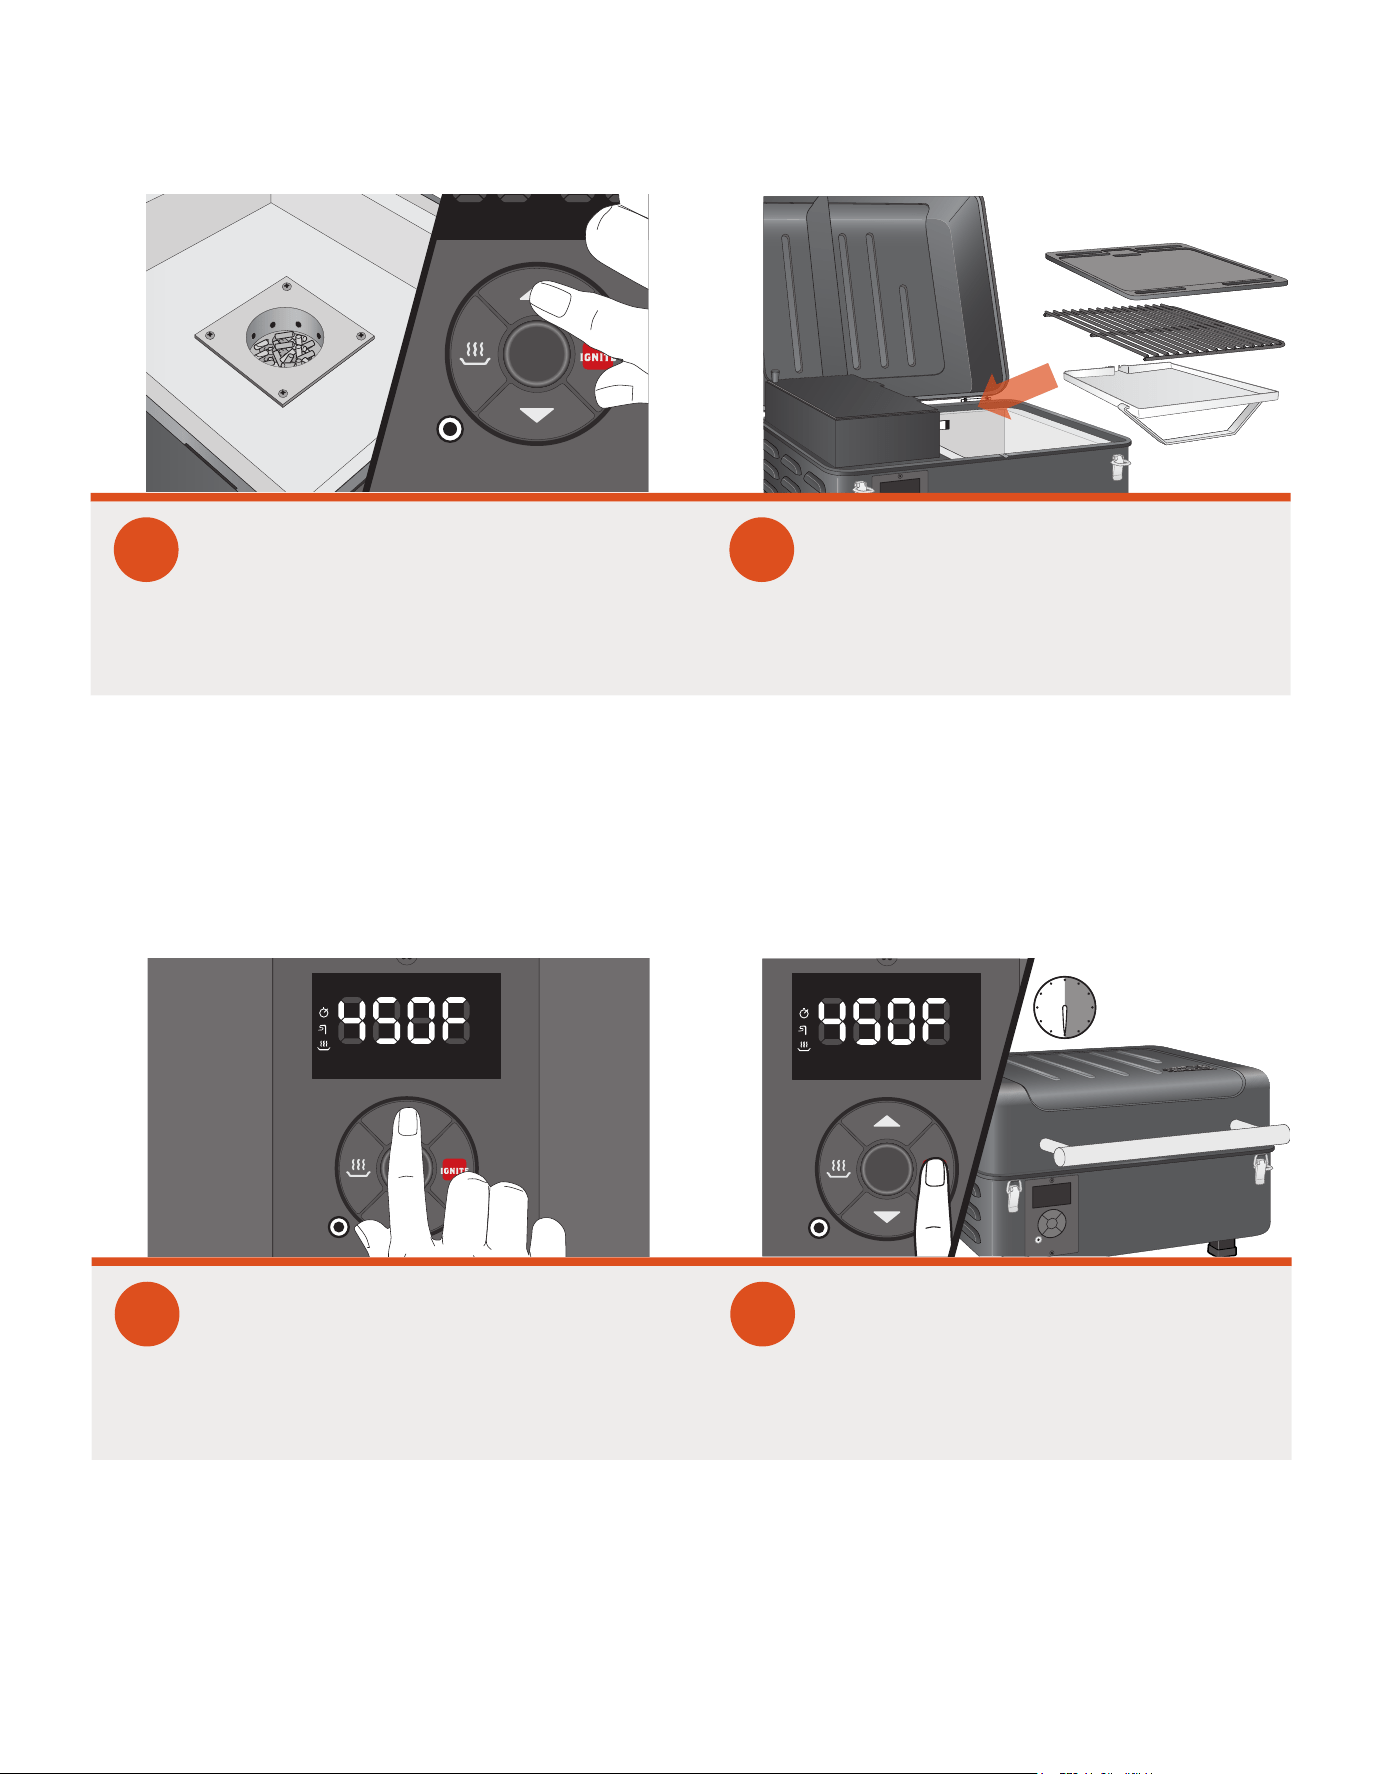
INITIAL FIRING INSTRUCTIONS
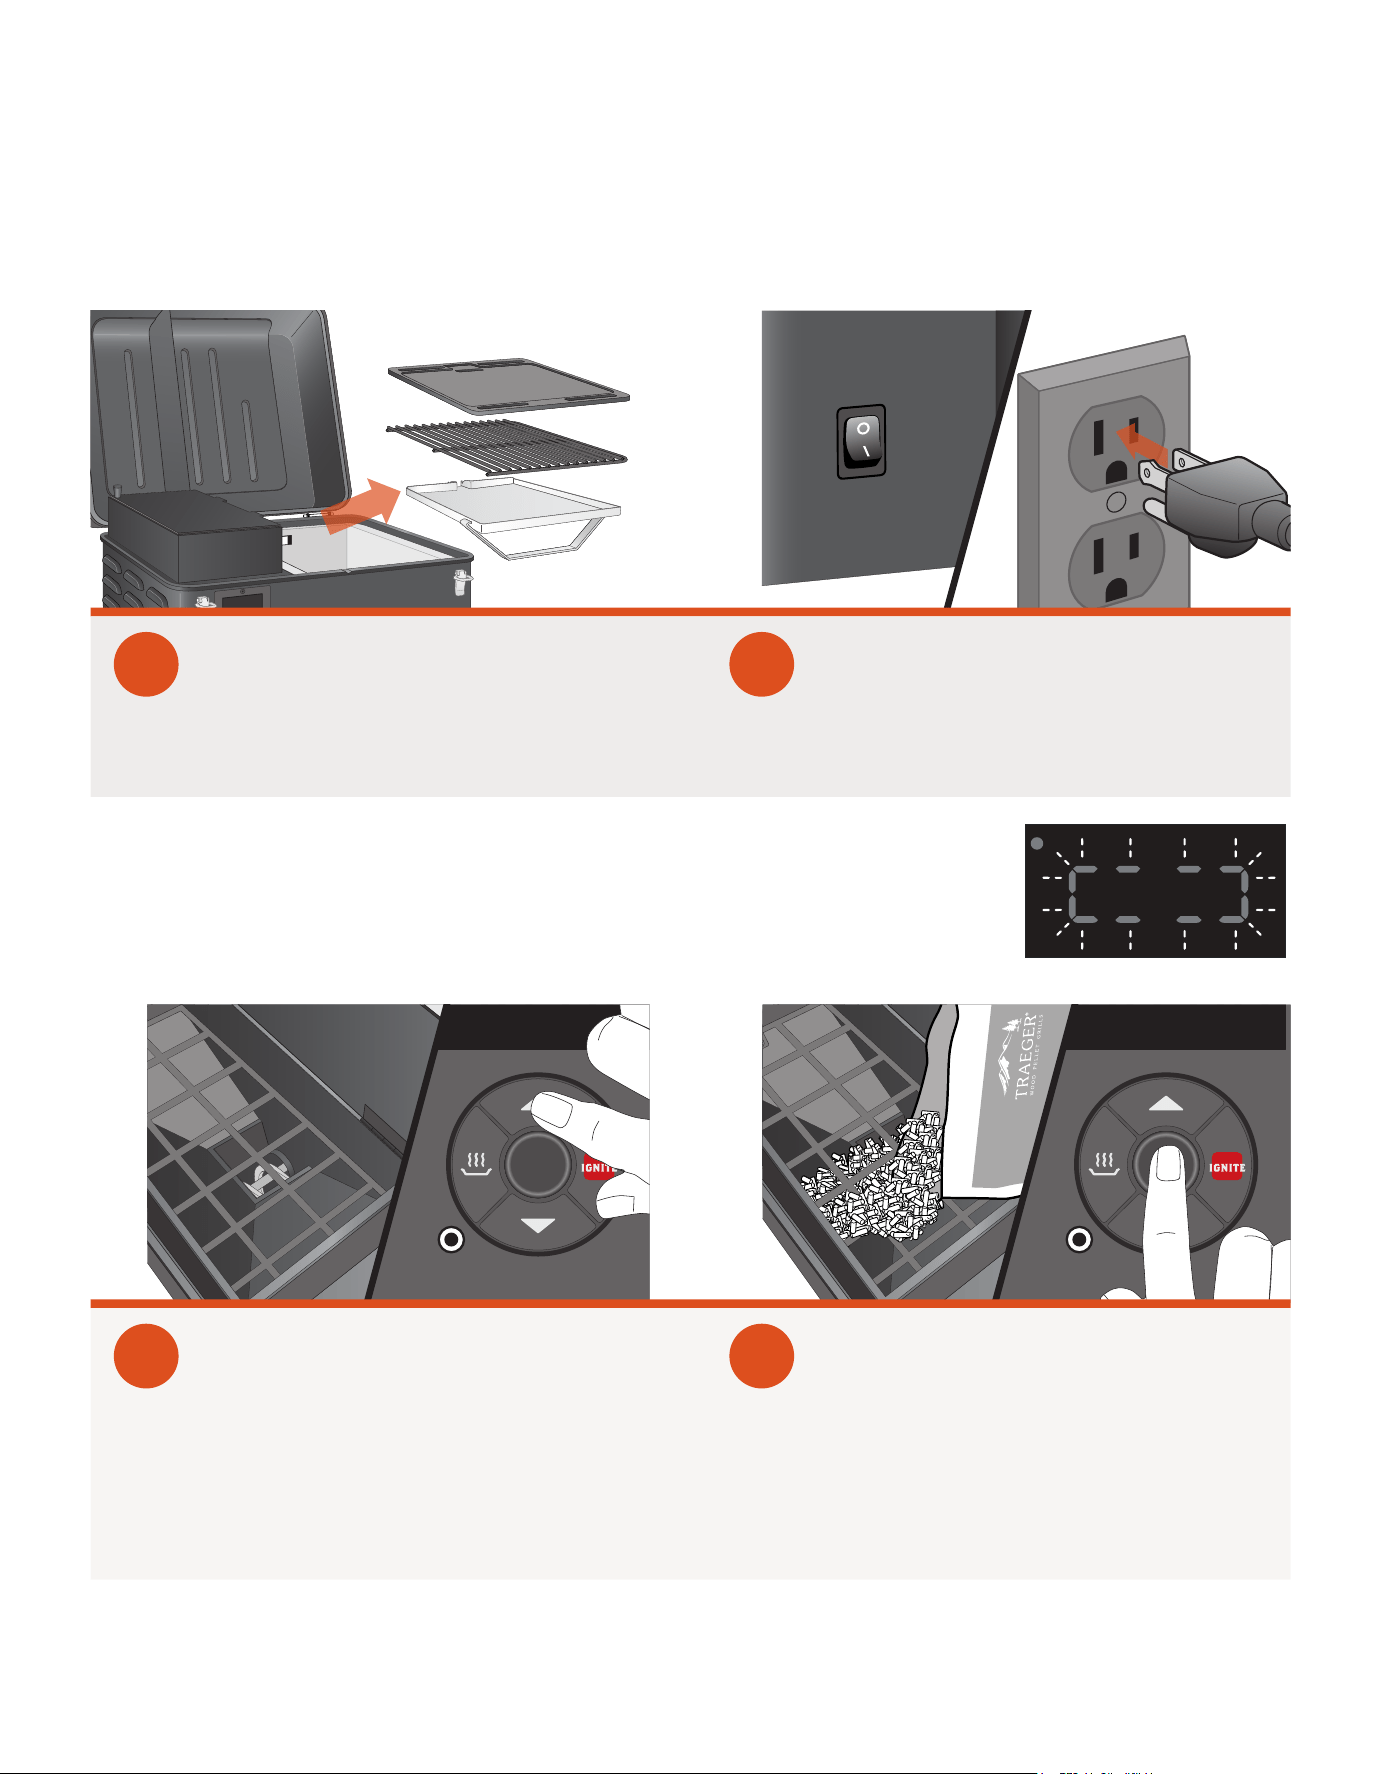
To be used on initial ring or anytime the grill runs out of pellets. In order to ensure
proper operation of the grill, you must rst prime the pellet hopper’s auger by allowing the auger
tube to be “charged” with pellets.
1
Remove the grill grate, cast-iron
griddle, and grease drip tray from
the inside of the grill.
2
With the Main Power switch in the
OFF (O) position, plug the power cord
into an appropriate grounded/earthed
electrical outlet. Once the grill is
plugged in, ip the Main Power
switch to ON (I).
3
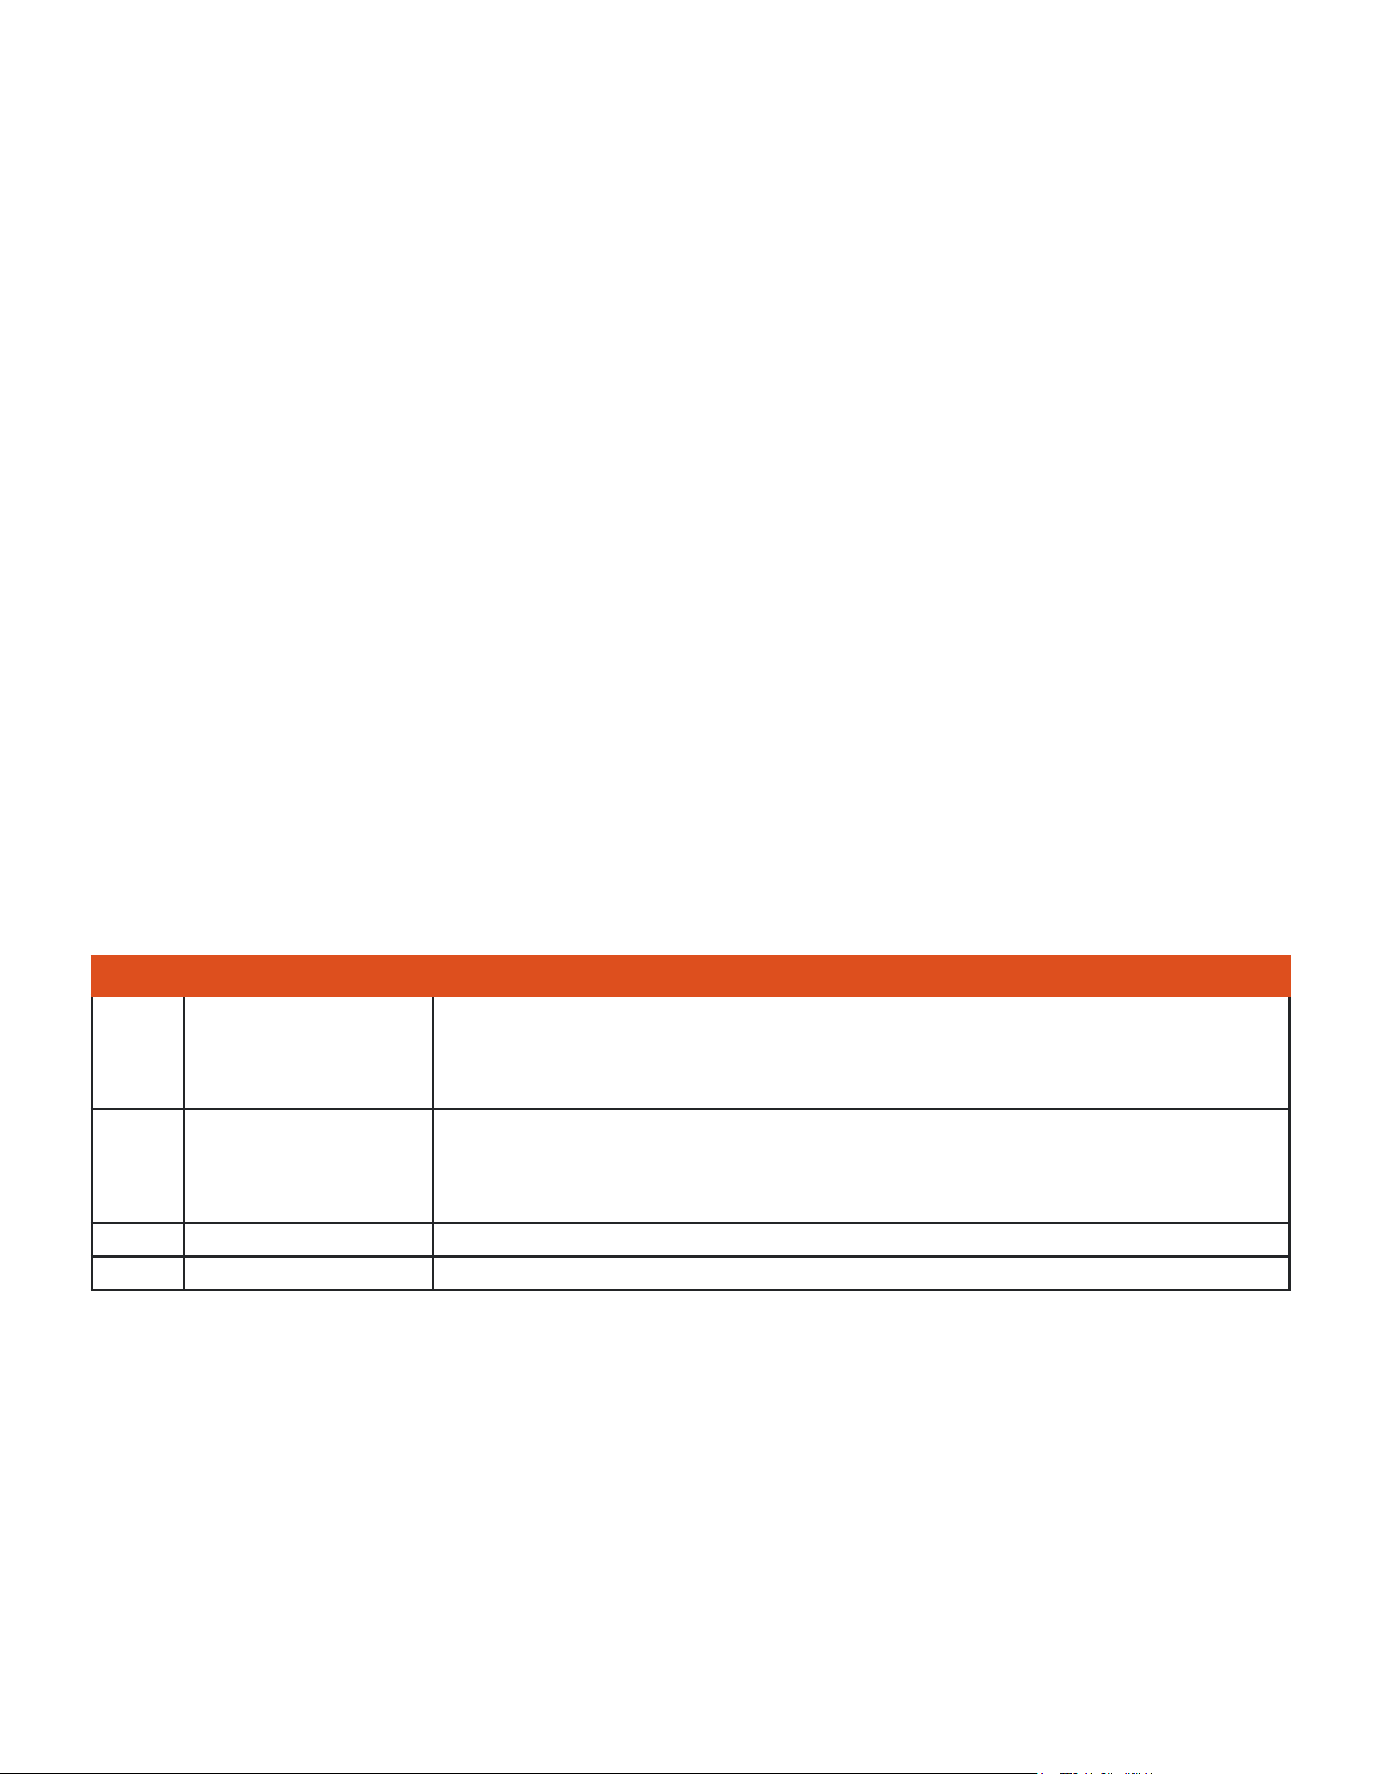
Make sure there are no foreign objects
in the auger. With the grill in Idle
mode, press and hold the UP and
IGNITE buttons simultaneously. The
display will ash “Pri” and the auger
will begin priming.
4
Fill the hopper with your choice of
TRAEGER
®
BRAND HARDWOOD
PELLETS. The auger tube should take
approximately 2 minutes to ll with
pellets and begin dispensing into the
repot.
WARNING! Use ONLY TRAEGER
®
BRAND HARDWOOD PELLETS. Never
use heating fuel pellets in the grill.
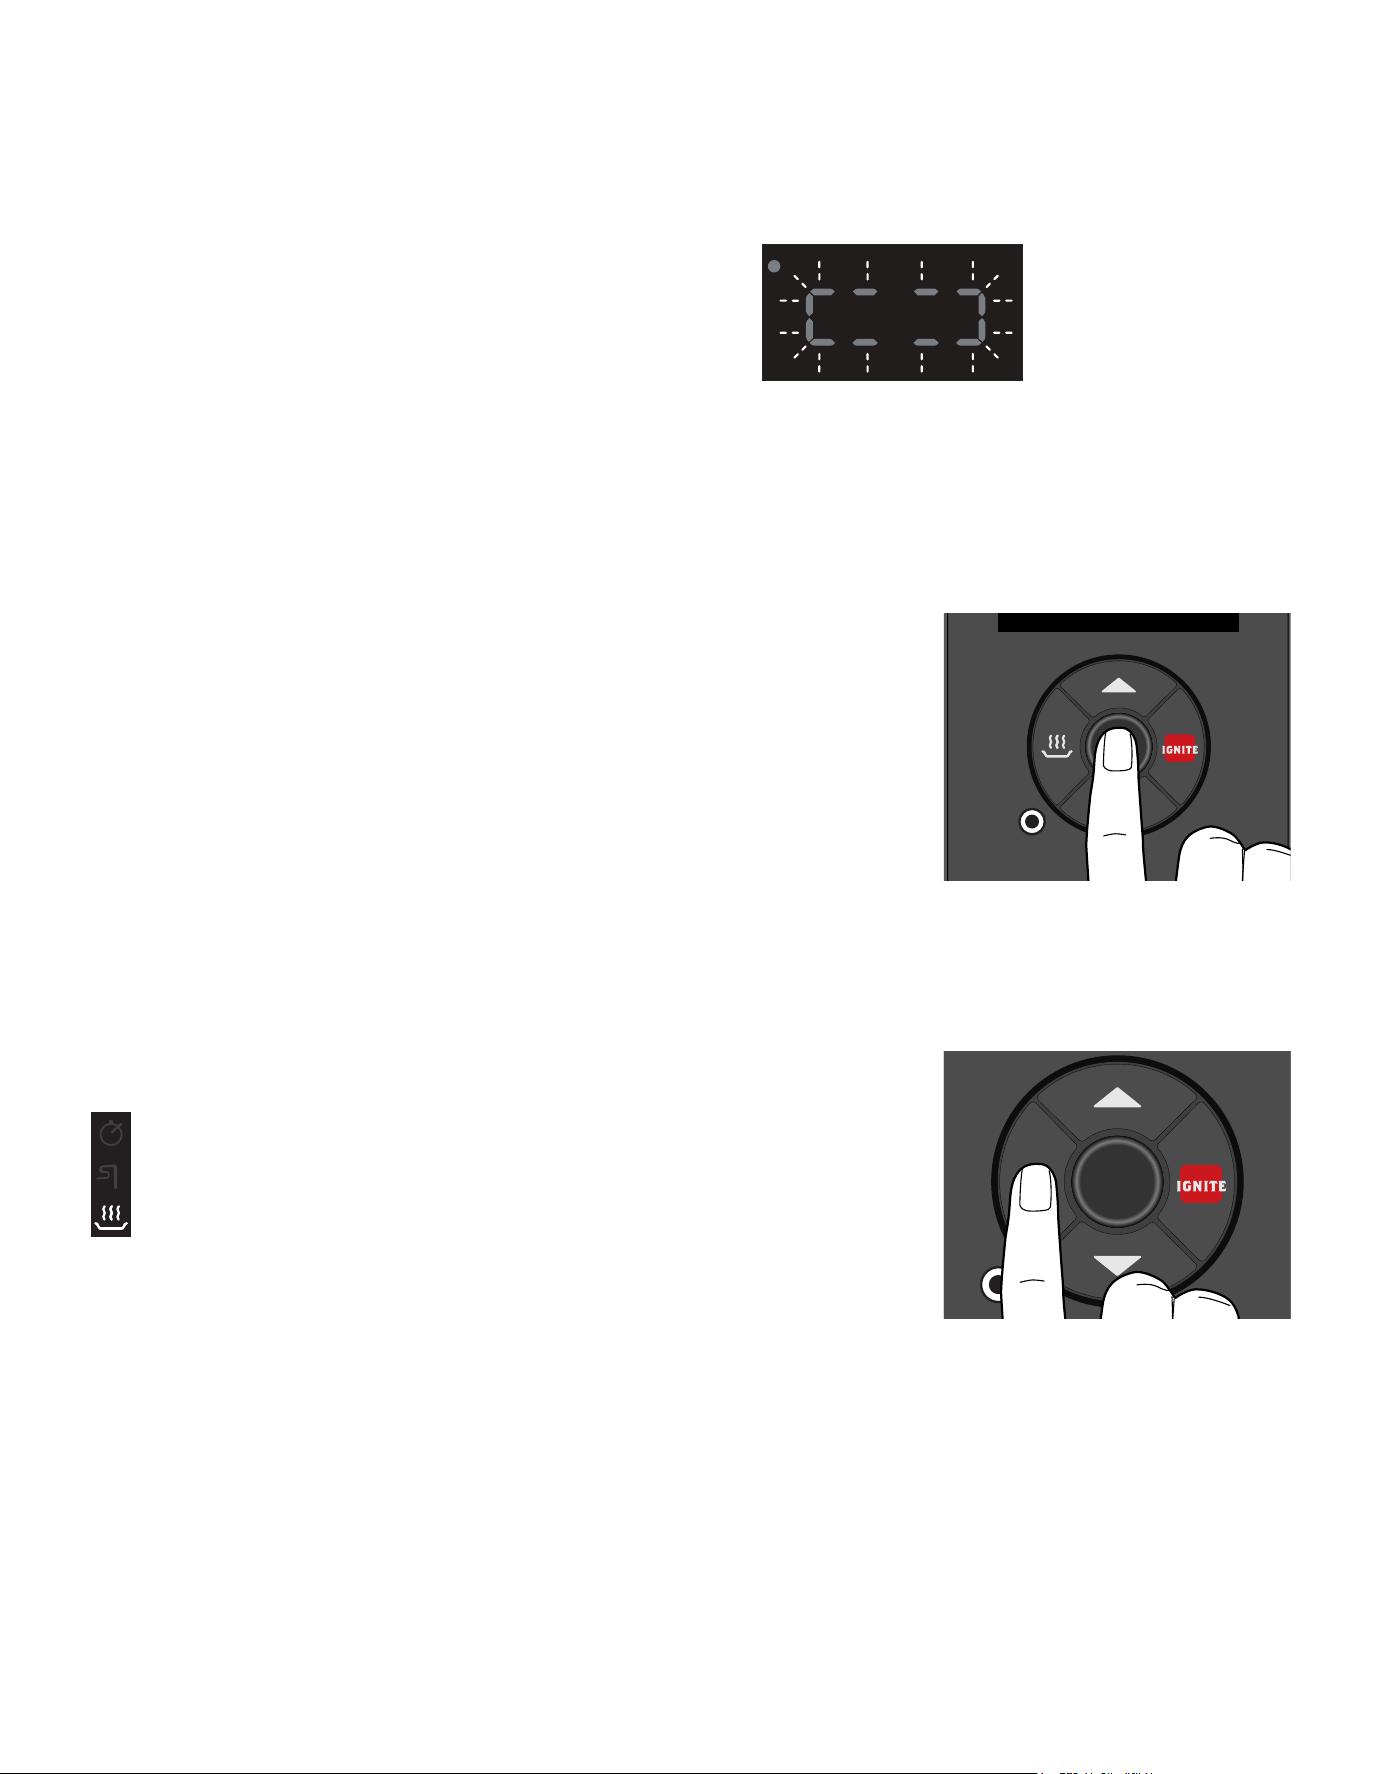
NOTE: Once you turn on your grill, it will enter Idle mode,
and the display’s dashed border will pulse. This indicates
your grill is awaiting a command, and is not actively
operating. The grill MUST be in Idle mode to prime
the auger.
T01364_Ranger_OM_EN.indd 13 9/9/19 8:59 AM
14
Recommendation: For easy cleanup, line the
grease drip tray with Traeger
®
Aluminum Drip Tray
Liners or heavy-duty aluminum foil. If using foil, be
sure the edges and ends of the foil are tight against
the bottom of the grease drip tray. Replace foil after
each cook to reduce the possibility of a grease re.
Please see “Maintaining Your Grill” on page 22 for
more details.
WARNING!
• When operating this grill, maintain a minimum clearance of 18 in. (45.7 cm) from grill to combustibles.
• For best results and avor, always use genuine TRAEGER
®
BRAND HARDWOOD PELLETS. Never use
heating fuel pellets in the grill.
• Clean the grease drip tray after every use to reduce the possibility of a grease re. Please see “Maintaining
Your Grill” on page 22 for more details.
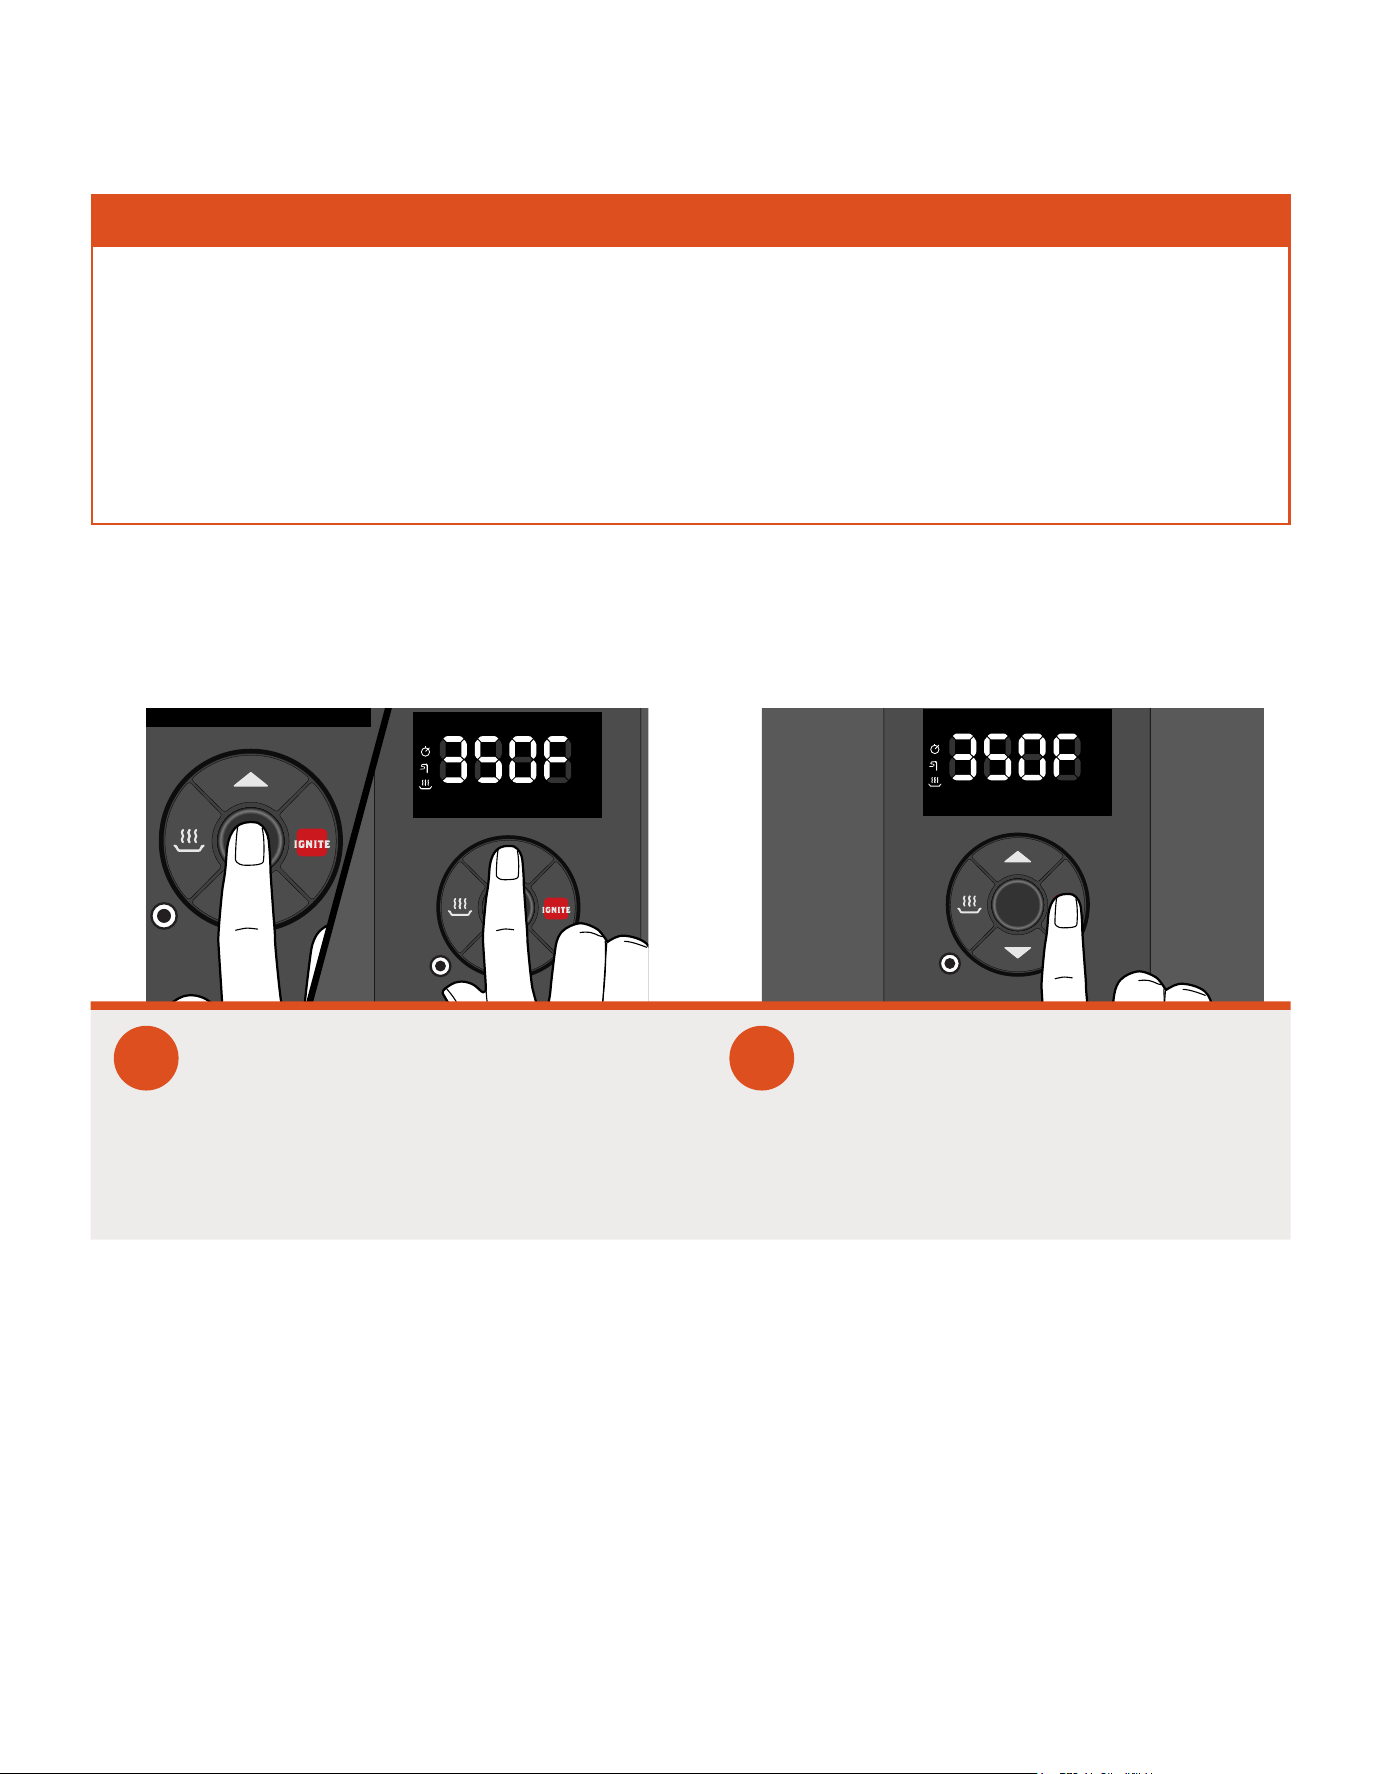
INITIAL FIRING INSTRUCTIONS (cont.)
5
Continue priming until a small amount
of pellets are in direct contact with
the hot rod in the repot. Press and
hold the UP and IGNITE buttons
simultaneously to stop priming and
return the grill to Idle mode.
6
Now you’re ready to place the grease
drip tray, grill grate, and cast-iron
griddle back into the grill. Place the
grease bucket under the grease drain
on the back of the grill to catch grease
drippings.
7
Press the UP button until the
temperature display reads 450°F
(250°C).
NOTE: To change between Celsius (C)
and Fahrenheit (F), press and hold the
UP and DOWN buttons simultaneously.
8
Press the IGNITE button. Let the grill
run at 450°F (250°C) for 30 minutes
with the lid closed to complete the
seasoning process.
T01364_Ranger_OM_EN.indd 14 9/9/19 8:59 AM
traegergrills.com
|
15
INITIAL FIRING INSTRUCTIONS (cont.)
CONTROL SHUTDOWN CYCLE
The control for this grill comes with an automatic
shutdown cycle. When nished cooking on
your grill, press and hold the Center button for
3 seconds. The display will ash “OFF” for several
seconds, then scroll “COOL Dn” followed by the
actual temperature until the grill cools down to
a safe temperature.
While the controller is ashing “OFF,” you can
cancel the Shutdown Cycle by pressing and
holding the Center button for two seconds.
Always allow the Shutdown Cycle to completely
nish before powering off your grill at the Main
Power switch. The Shutdown Cycle ensures the
re is suppressed and the grill ignites properly
on the next use.
DANGER! Turning off the Main Power switch
will cut power to the grill components only.
When servicing the control or any other parts,
ensure that the power supply is disconnected
to avoid an electrical shock hazard.
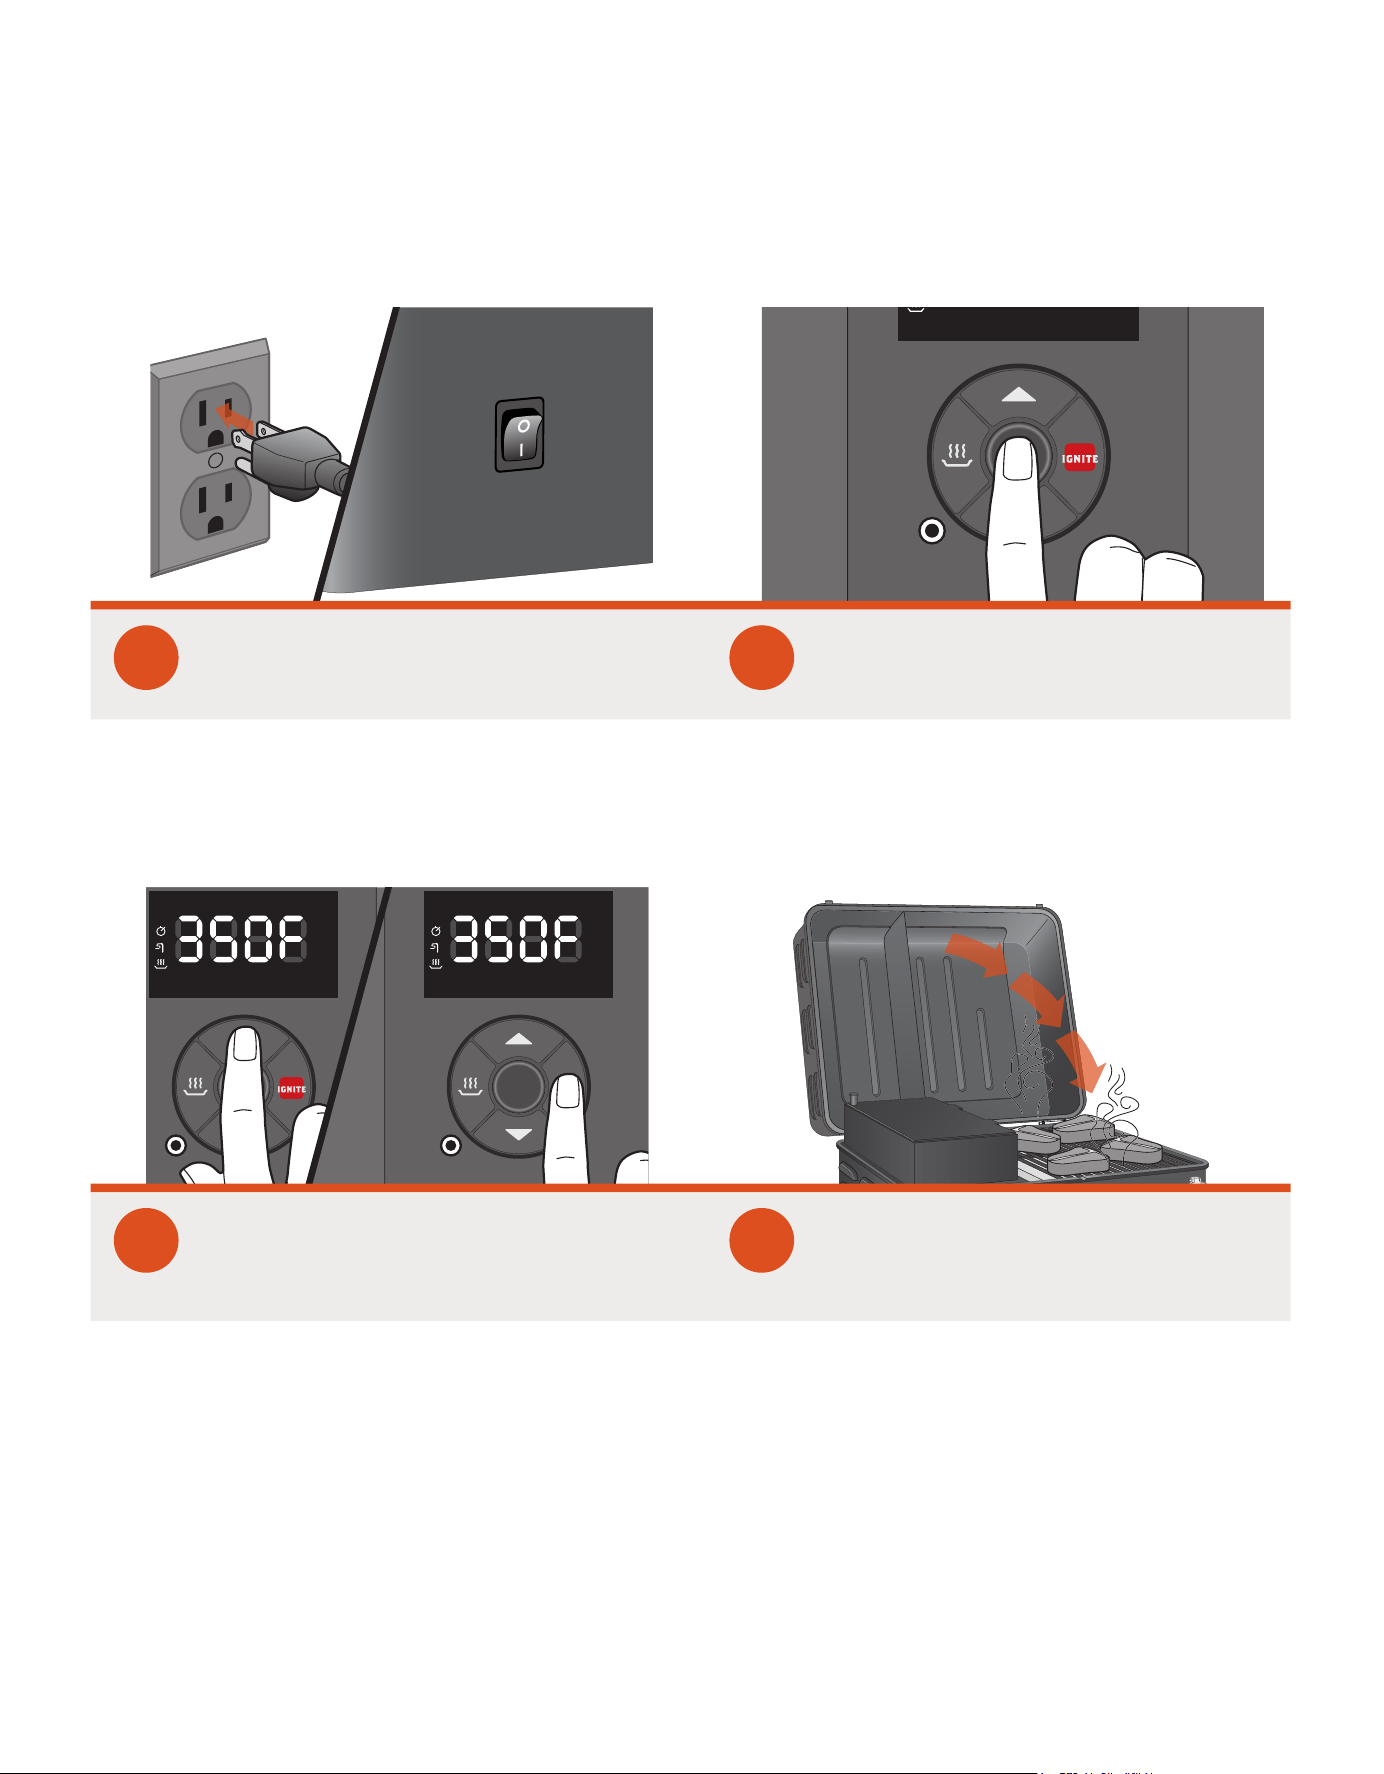
SUBSEQUENT START-UP
1
With the Main Power switch set to ON (I),
press the Center button once to wake
the grill controller. Set the desired
temperature with the UP button.
2
Once the desired temperature is
displayed, press IGNITE. Allow grill
to preheat until desired temperature
is achieved.
NOTE: If the grill fails to achieve
the selected temperature, please see
“Operating Tips” on page 20 for more
information.
NOTES:
• Once you press the IGNITE button, your Traeger
®
Ranger Grill will always begin with an ignition
and preheat cycle.
• WARNING! When operating this grill, maintain a
minimum clearance of 18 in. (45.7 cm) from grill
to combustibles.
T01364_Ranger_OM_EN.indd 15 9/9/19 8:59 AM
16
You will need to start with these four steps every time you use your grill.
NOTE: Whenever your grill is not in use, it should be disconnected from the electrical outlet.
USING YOUR GRILL
WARNING!
• When operating this grill, maintain a minimum clearance of 18 inches (45.7 cm) from grill to
combustibles.
• Use ONLY TRAEGER
®
BRAND HARDWOOD PELLETS, which are specically made to work in our grills.
Never use heating fuel pellets in the grill.
Plug appearance may vary by region.
1
Plug power cord into an appropriate
grounded/earthed electrical outlet
and ip Main Power switch to ON (I).
2
Press the UP, DOWN, or Center button
to wake the grill controller.
3
Once your grill is on, press the
UP button to select your desired
temperature, then press IGNITE
to start the preheat cycle.
4
Once preheating is complete, load food
into the grill and close the grill lid.
T01364_Ranger_OM_EN.indd 16 9/9/19 8:59 AM
traegergrills.com
|
17
Your Traeger
®
Ranger Grill includes a meat probe for monitoring internal food temperature, or for cooking to a
goal temperature.
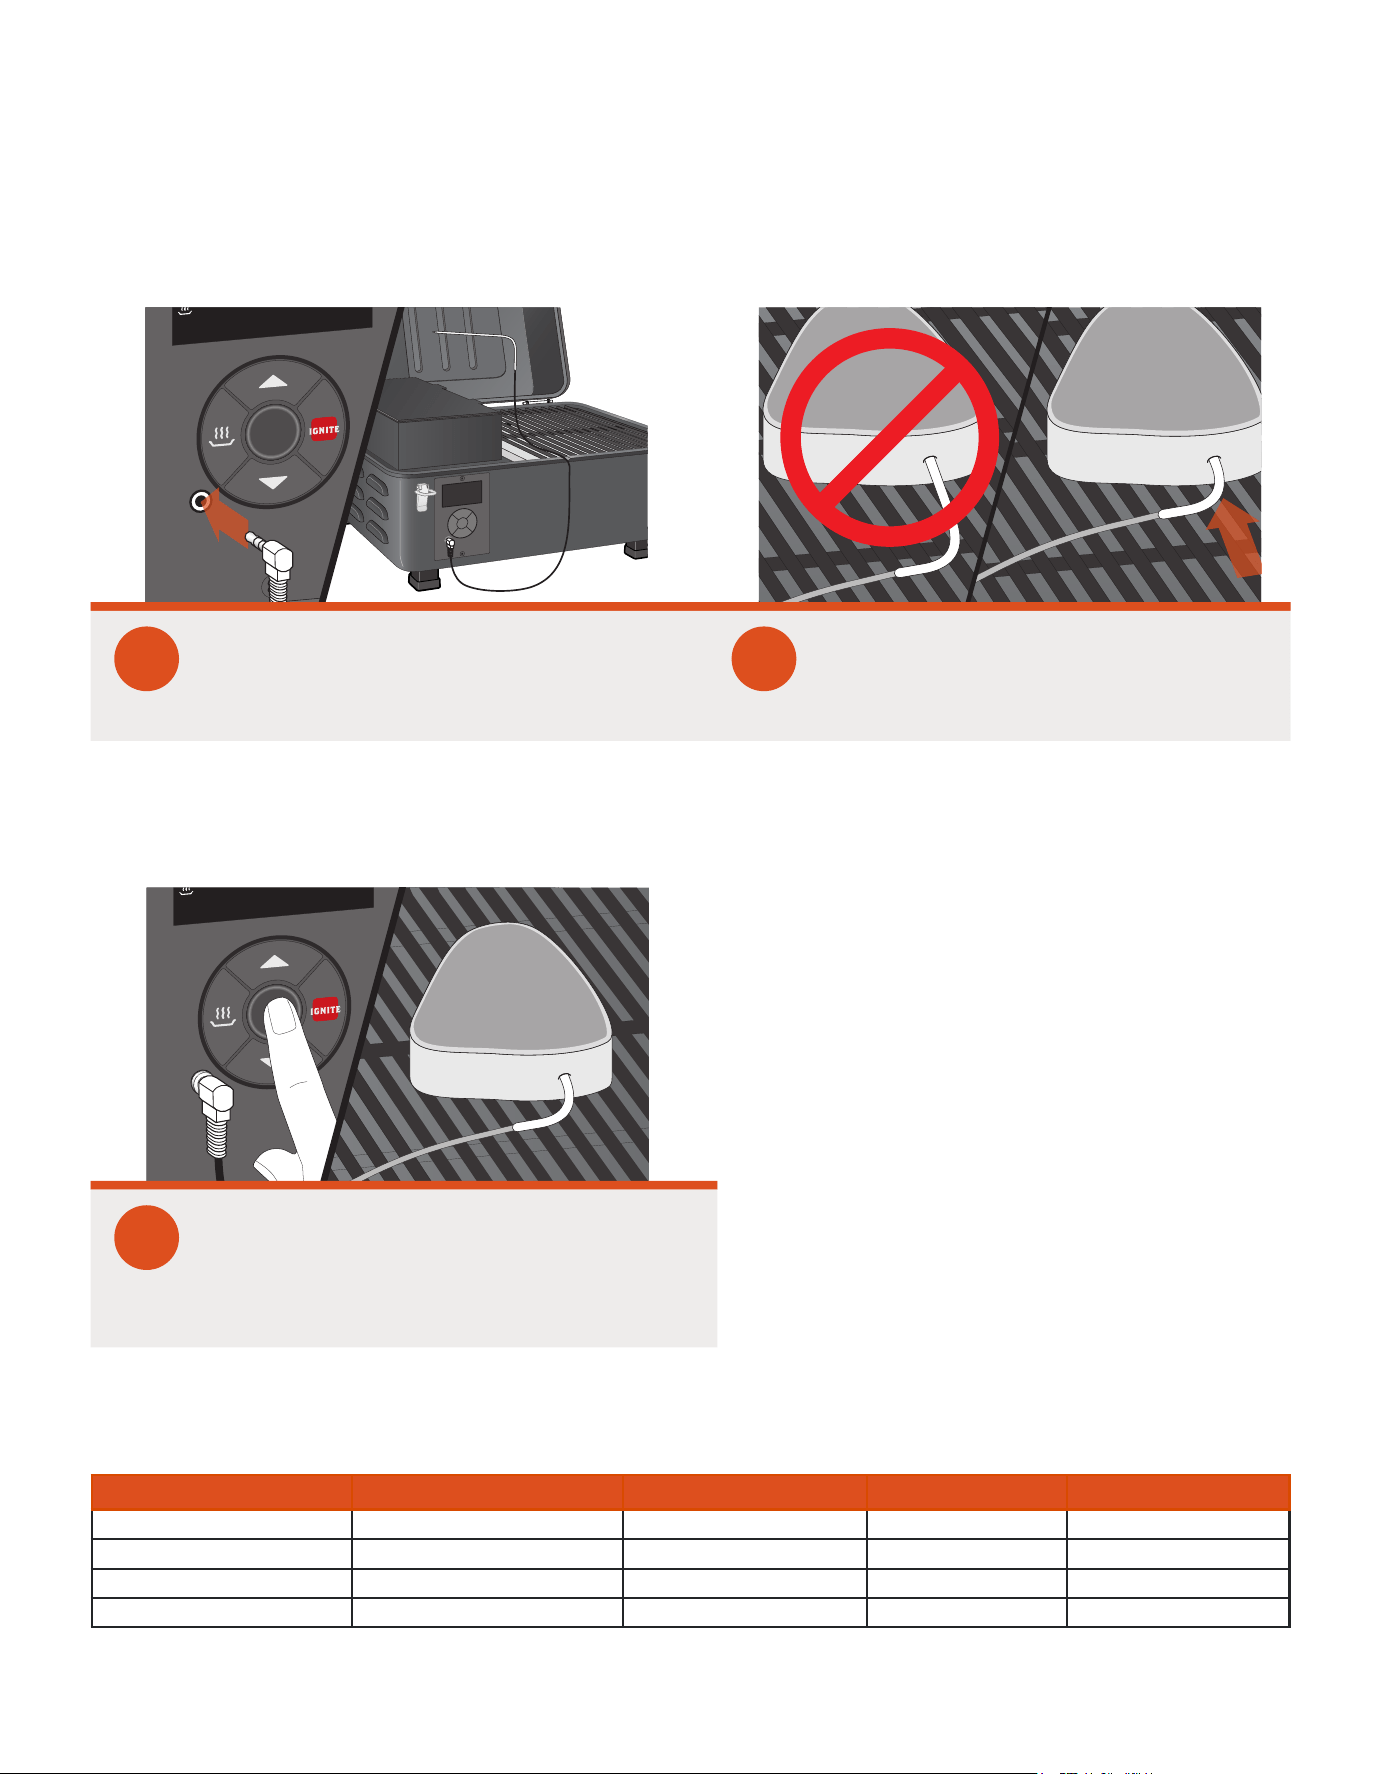
USING THE MEAT PROBE
RANGE BEEF LAMB PORK POULTRY
Well 170°F/77°C 160°F/71°C 170°F/77°C 170°F/77°C
Medium 160°F/71°C 155°F/68°C
160°F/71°C
170°F/77°C
Medium Rare 145°F/63°C 145°F/63°C 170°F/77°C
Rare 135°F/57°C 170°F/ 77°C
MEAT TEMPERATURE RECOMMENDATIONS
3
Reading the temperature: Press
the Center button on the control.
The probe temperature will display
for 5 seconds, then revert back to
the temperature of the grill.
1
Insert the meat probe’s plug into the jack
on the lower left corner of the controller,
then route the probe cable through the
notch in the grill front, as shown.
2
Insert probe tip into meat. Make sure
it is not in the fatty portion or touching
bone, but is halfway into the thickest
part of the meat.
T01364_Ranger_OM_EN.indd 17 9/9/19 8:59 AM
18
RANGER FEATURES
TIMER
IDLE MODE
Your Traeger
®
Ranger Grill comes equipped with a convenient timer. The Timer function does not impact grill
operation; you can use it to notify you of other needed steps during cooking, like loading vegetables into the
grill or basting your food.
NOTE: When adjusting time, press and hold the UP or DOWN buttons to advance the time rapidly.
To set the Timer:
1. With the grill controller on, press the Center button once
to enter Timer mode. The hours digits will ash.
2. Press the UP button to select hours; press the Center
button to conrm and move to minutes.
3. Press the UP button to select minutes; press the Center
button to conrm. The Timer icon will appear and time
will begin counting down.
To cancel the Timer:
1. Press the Center button until the time remaining is displayed.
2. Press and hold the Center button for 2 seconds to cancel the Timer.
To adjust the Timer:
1. Press the Center button until the time remaining is displayed.
2. Use the UP or DOWN buttons to adjust the time as needed.
3. Press the Center button to conrm. The Timer icon will appear and time will resume counting down.
Throughout this manual, you will be instructed to perform
some actions while the grill is in Idle mode. When the grill
is in Idle mode, the display’s dashed border will pulse
to indicate it is not actively operating and is awaiting a
command. The grill automatically enters Idle mode when
you rst turn it on.
KEEP WARM
Keep Warm can be used to pause the cook cycle at any time
during grilling. Press KEEP WARM to activate the function and
maintain the grill temperature at 165°F (74°C). Press KEEP
WARM again to resume cooking.
T01364_Ranger_OM_EN.indd 18 9/9/19 8:59 AM

traegergrills.com
|
19
CAST-IRON GRIDDLE
DRIP TRAY LINERS
GRILL COVER
This versatile piece of cast-iron cooking equipment makes
cooking outdoors simple. It’s pre-seasoned and distributes
heat evenly for epic grilling experiences. The smooth cooking
surface is perfect for frying up bacon and cooking pancakes,
hash browns, and grilled cheese.
To use:
Simply lift out the grill grate and insert the cast-iron griddle
into place, aligning the pin on the bottom of the griddle with
the hole at the back of the grill.
Make grill maintenance a breeze with our Drip Tray Liners.
Made of heat-proof aluminum, they’re lightweight and
disposable so you can clean up quickly and Traeger on.
Liners should rest fully on the grease pan and not cover
any areas outside of the grease pan. Doing so will affect
the temperature and performance of the grill.
Protect your Traeger
®
Ranger Grill with a premium custom cover, designed to withstand the elements.
This durable grill cover is available for purchase at traegergrills.com.
T01364_Ranger_OM_EN.indd 19 9/9/19 8:59 AM

20
OPERATING TIPS
1. You can change the temperature at any time
during grilling to increase or decrease cooking
temperature.
To change between Fahrenheit and Celsius:
a. Press and hold the UP and DOWN buttons
simultaneously for 3 seconds.
b. Press the Center button to conrm and
exit.
You will now see temperatures displayed in the
format you’ve chosen.
WARNING! To prevent grease ignitions, never
cook high-fat foods such as bacon, burgers, etc.
above a temperature of 350°F (176.7°C).
2. WARNING! Your Traeger
®
Ranger Grill
should never be moved while it is hot. If you
are transporting your grill in a vehicle after
cooking on it, make sure the re is completely
out and the grill is COLD before placing it in any
vehicle. Never put water into the repot; it will
jam the auger.
3. Your Traeger
®
Ranger Grill is designed to operate
with the lid closed. Cooking with the lid open
greatly lengthens your cooking time.
4. CAUTION! Never add pellets by hand to a
hot repot. This is dangerous and you may be
seriously burned. If you run out of pellets and
lose your re while cooking, rell the pellet
hopper and refer to “Subsequent Start-Up” on
page 15, allowing the grill to cool completely,
and start again.
5. CAUTION! Make sure the grease drip tray is
properly seated on its locating brackets. If not
seated properly, direct heat and ame could come
up out of the repot and cause a grease re in the
grill.
6. Always take into account the type of food you are
cooking:
• Thin foods need high heat and shorter cook
times, while thicker foods need low heat and
longer cook times.
• Vegetables take longer to cook than meats at
the same cooking temperatures.
• Always check that the internal temperature
of the meat that you are cooking reaches safe
temperatures to eat.
• The Keep Warm function is not designed to
properly cook your food.
7. WARNING! If the re in the repot goes out
while smoking and there are sufcient pellets still
in the pellet hopper, it is important to follow these
steps. Failure to do so may cause a hazardous
“overring” of your grill due to an excess of
unburned pellets in the repot.
DANGER! Turn the Main Power switch at the
back of the grill to OFF (O) and disconnect the
power cord. Allow the grill to cool thoroughly.
Open the lid and remove all food, the grill grate,
griddle, and the grease drip tray.
WARNING! Smoke Hazard
A pellet overow condition can occur during
startup, resulting in unusually thick, white
smoke that lasts a long time. If this occurs, power
down your grill with the Main Power switch and
unplug. If this condition continues long enough,
gases can build up from partial ignition and
fully ignite, causing the lid to “burp.” If this
burp occurs and your grill has not been properly
maintained as described in “Maintaining Your
Grill” on pages 22-23, a grease re could result.
To remedy this condition, let the grill cool down
completely, remove all internal components, and
thoroughly clean all ash and pellets from the grill
and repot (see page 22, “Cleaning the Ash from
Inside and Around the Firepot”).
WARNING! Remove all unburned pellets and
ash from inside and around the repot. (See
instructions for proper handling and disposal
of ash on page 23.)
Before replacing grease drip tray and the grill
grate, plug the power cord into an appropriate
grounded/earthed electrical outlet and turn the
Main Power switch ON (I). Pellets should fall into
the repot and the hot rod should begin to heat (it
will start to turn red). CAUTION! Do not touch
the hot rod.
When ames start to come out of the repot, turn
the Main Power switch OFF (O). Let the grill cool
down. Now you’re ready to place the grease drip
tray, grill grate, and food back into the grill.
8. CARBON MONOXIDE:
WARNING! Follow these guidelines to prevent
this colorless, odorless gas from poisoning you,
your family, your pets, or others.
• Know the symptoms of carbon monoxide
poisoning: headaches, dizziness, weakness,
nausea, vomiting, sleepiness, and confusion.
Carbon monoxide reduces the blood’s ability to
carry oxygen. Low blood oxygen levels can result
in loss of consciousness and death.
• See a doctor if you or others develop cold-
or u-like symptoms while cooking or in the
vicinity of this appliance. Carbon monoxide
poisoning, which can easily be mistaken for
a cold or u, is often detected too late.
• Alcohol consumption and drug use increase
the effects of carbon monoxide poisoning.
T01364_Ranger_OM_EN.indd 20 9/9/19 8:59 AM
traegergrills.com
|
21
OPERATING TIPS (cont.)
TROUBLESHOOTING
• Carbon monoxide is especially toxic to
mother and child during pregnancy, infants,
the elderly, smokers, and people with blood
or circulatory system problems, such as anemia
or heart disease.
9. GREASE MANAGEMENT:
CAUTION!
Grease res are caused by not
properly maintaining the grill and failing to clean
the Traeger Grease Management System (TGMS)
on a consistent basis (see “Maintaining Your Grill”
on page 22).
• In the unlikely event of a grease re while
cooking, turn the Main Power switch OFF (O)
to reduce the amount of oxygen in the cooking
chamber. Disconnect the grill power cord from
the electrical outlet and keep the lid closed
until the re is completely out.
• Never keep the lid open during a grease re. If
the re does not go out, lightly sprinkle baking
soda on the re.
CAUTION! Be careful not to burn yourself.
• If this does not put out the re, carefully remove
the food from the grill and keep the lid closed
until the re is completely out. Again, be careful
not to burn yourself.
• When the grill is completely cool, remove all
internal components.
• Clean any grease accumulation from the TGMS.
Replace the grease drip tray, grill grate, and
cast-iron griddle, restart the grill, and resume
cooking.
Although rare, you may see an error message display on your control panel. Please refer to the following chart
for potential issues and how to resolve them:
CODE ERROR SOLUTION
LEr Low temperature This will occur if the temperature of the grill falls below 120°F (49°C) for
10 minutes, causing the grill to go into shutdown mode. To x, remove any
pellets from the repot. Turn the controller off and then on again and restart
your grill. If the problem persists, call customer service.
HEr High temperature This error will occur when the temperature in the grill reaches temperatures
above 550°F (288°C) for more than 45 seconds. Let the grill cool, then turn off
the grill. Clear out any remaining pellets from the repot and restart your grill.
If the problem persists, call customer service.
Er1 Temp sensor loose Check to make sure your temp sensor is correctly plugged into the controller.
Er2 Temp sensor bad Your temp sensor is faulty and needs to be replaced.
T01364_Ranger_OM_EN.indd 21 9/9/19 8:59 AM

22
MAINTAINING YOUR GRILL
CREOSOTE AND GREASE FORMATION
AND REMOVAL
When wood pellets are burned slowly, they produce
tar and other organic vapors that combine with
expelled moisture to form creosote. The creosote
vapors condense in the relatively cool exhaust vent of
a slow-burning re. As a result, creosote accumulates
on the exhaust vent lining. When ignited, creosote
makes an extremely hot re. Airborne grease
particles will travel through the cooking chamber and
may accumulate on the grill louvers (slatted openings
for smoke exhaust) which could contribute to a re.
The Traeger Downdraft Exhaust should be inspected
at least twice a year to determine when a creosote
and/or grease buildup has occurred.
Also, grease drippings from the food will fall onto
the grease drip tray and be channeled into the grease
drain and then out of the grill through the grease
drain tube, to be collected in the grease bucket.
These are the components of the Traeger Grease
Management System (TGMS). Grease will accumulate
in all of these locations.
All components of the TGMS should be inspected
before each use for signs of grease buildup.
When creosote or grease has accumulated, it should
be removed to reduce the risk of re.
Even if there is ample room in the grill, be cautious
of loading excessive amounts of food that can release
large quantities of ammable grease – for example,
more than a pound of bacon – especially if the grill
has not been well-maintained. If your previous cooks
have produced large quantities of ammable grease,
it is highly recommended that the grease be cleaned
from the grill before using it again.
1. CLEANING INSIDE SURFACES:
WARNING!
Turn the Main Power switch OFF (O)
and disconnect the power cord.
CAUTION! Accumulated grease is easier to
clean off when the grill is still warm—not hot.
Be careful not to burn yourself. Gloves are
recommended.
Periodically clean the grease out of the grease
drip tray and grease drain. If too much grease
is allowed to build up in the grease drip tray
or is allowed to plug the grease drain, a grease
re could result. We recommend cleaning these
locations regularly.
Remove the grill grates and the grease drip tray.
Scrape the grease accumulation from inside the
grease drip tray using a stiff, nonmetallic tool.
The drip tray may be washed in hot, soapy
water. Wipe up remaining grease residue with
paper towels or disposable rags. Paper towels
or disposable rags can also be used to wipe
some of the grease off of the interior surfaces
of the grill.
2. CLEANING OUTSIDE SURFACES:
DANGER! Turn the Main Power switch OFF (O)
and disconnect the power cord.
Use a disposable rag or cloth dampened with
warm, soapy water to wipe the grease from the
outside of the grill. DO NOT use oven cleaner,
abrasive cleansers, or abrasive cleaning pads
on the outside grill surfaces.
3. OUTDOOR STORAGE:
CAUTION!
If the grill is stored outdoors
during the rainy season, care should be taken
to ensure that water does not get into the pellet
hopper. Wood pellets expand greatly when wet
and will jam your auger. Always cover your
grill with the Traeger
®
Grill Cover when not
in use. This custom-t cover can be purchased
at traegergrills.com.
4. CLEANING THE GRILL GRATES:
CAUTION!
Cleaning the grill grates works best
while they are still warm. Be careful not to burn
yourself. We recommend keeping a long-handled
cleaning brush near the grill. After removing your
food, give the grill grate a quick brushing. It takes
only a minute and it will be ready the next time
you want to use the grill.
5. CLEANING THE ASH FROM INSIDE AND
AROUND THE FIREPOT (every 20 hours
of use):
DANGER! Turn the Main Power switch OFF (O)
and disconnect the power cord.
WARNING! Make sure that the grill is COLD
before cleaning the ash.
WARNING! Disposal of ashes should be done
only according to the following instructions.
T01364_Ranger_OM_EN.indd 22 9/9/19 8:59 AM

traegergrills.com
|
23
Excess ash in the repot may cause your re
to go out. The repot should be inspected
occasionally and cleaned to remove the ash
buildup. Again, cleaning the ash from in and
around the repot should be done only when
the grill is COLD.
Remove the grill grate, griddle, and grease drip
tray to provide access to the repot and the
interior of the grill. Much of the ash outside of
the repot can be removed from the grill with a
small metal replace shovel or other similar tool.
WARNING! A dedicated vacuum cleaner is the
best way to remove ashes from the repot, but
this must be done with extreme care to avoid
the risk of re. Again, cleaning the ash from
the repot should be done only when the grill
is COLD.
A utility-type vacuum cleaner that has a metal
collection canister without a bag would be best
for this task. However, almost any vacuum
cleaner will work safely if this procedure is
properly followed.
After ensuring that the ash in the repot is
COLD, vacuum the ash from the inside of the
repot.
a. If your vacuum cleaner is a bagless model,
empty any previously accumulated debris
from the collection chamber. Then vacuum
the ashes from the inside of the repot.
Once the repot is clean, empty the
collection chamber into the metal container
described below without delay. Make sure
that there is no remaining ash residue left
in the collection chamber.
b. If your vacuum cleaner is a model
that uses a disposable bag, install
an unused bag in the machine. Then
vacuum the ashes from the inside of
the repot. Once the repot is clean,
remove the bag from the vacuum
cleaner and place it in the metal
container described below without
delay.
6. DISPOSAL OF ASHES:
WARNING! Ashes should be placed in a
metal container with a tight-tting lid. The
closed container of ashes should be placed
on a noncombustible oor or on the ground,
well away from all combustible materials,
pending nal disposal. When the ashes are
disposed of by burial in soil or otherwise
locally dispersed, they should be retained in
the closed container until all cinders have
cooled thoroughly.
7. If the supply cord is damaged, it must
be replaced by a special cord assembly
available from the manufacturer or its
service agent.
T01364_Ranger_OM_EN.indd 23 9/9/19 8:59 AM

24
NOTES
T01364_Ranger_OM_EN.indd 24 9/9/19 8:59 AM

traegergrills.com
|
25
NOTES
T01364_Ranger_OM_EN.indd 25 9/9/19 8:59 AM

26
TRAEGER’S LEGENDARY VIP-365 customer service
is the best out there. If you have any questions about your
Traeger
®
Ranger Grill or need tips on cooking your rst
Thanksgiving turkey, our seasoned experts have your back.
We’re here for you 365 days a year including holidays, because
we’re cooks—not bankers.
For 24/7 assistance with assembly or installation, parts, or
customer service (English only, please), you can phone, email,
or write us at:
TRAEGER'S VIP-365 CUSTOMER SERVICE
Phone: 1-800-TRAEGER
6:00 AM – 8:00 PM MT
Email: [email protected]
TRAEGER PELLET GRILLS LLC
1215 E. Wilmington Ave.
Salt Lake City, UT 84106
1-800-TRAEGER
T01364_Ranger_OM_EN.indd 26 9/9/19 8:59 AM

traegergrills.com
|
27
3-YEAR WARRANTY
Traeger Pellet Grills LLC warrants this barbecue grill against defects in
material and workmanship under normal use and maintenance for a period
of three (3) years from the date of original purchase.
Traeger Pellet Grills LLC will provide a replacement part for any part found to
be defective. Original part(s) approved for return by Traeger’s Parts Department
must be returned prepaid.
This warranty does not include labor charges connected with the
determination or replacement of defective parts, or freight charges to ship
these parts.
Traeger Pellet Grills LLC shall not be liable under this or any implied warranty
for incidental or consequential damages. This warranty gives the retail
customer specic legal rights and the customer may have other rights which
vary from state to state.
This warranty shall be void if the unit is not assembled or operated in
accordance with the operation instructions provided with this unit; the
unit is resold or traded to another owner; components, or accessories
not compatible with the unit have been used; the unit has been used
in a commercial or food service application; or the user has abused or
otherwise failed to maintain the unit.
To process a warranty claim, Traeger Pellet Grills LLC may require proof of
your date of purchase. You should retain your sales slip or invoice along with
this certicate with your valuable documents.
®
T01364_Ranger_OM_EN.indd 27 9/9/19 8:59 AM

Traeger Pellet Grills LLC
1215 E. Wilmington Ave.
Salt Lake City, UT 84106
traegergrills.com
T01364_Ranger_OM_EN.indd 28 9/9/19 8:59 AM