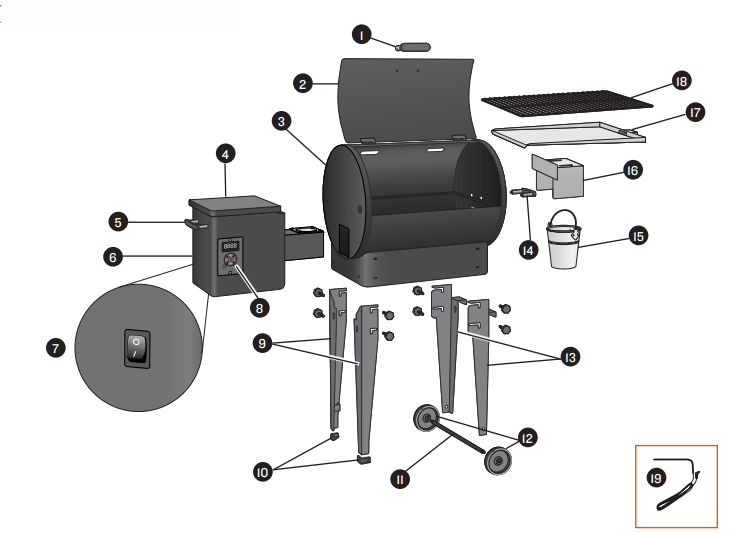
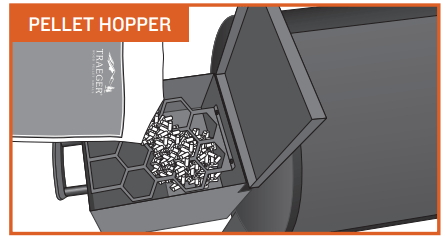
An 8-pound (3.6 kg) capacity pellet hopper will keep you cooking for hours. Pair that with Traeger’s Digital Arc Controller and delicious food is just a “click” away.
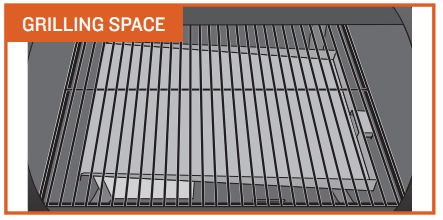
GRILLING SPACE
With 300 in.2 (0.19 m2 ) of grilling space, your Traeger® Grill has the real estate for party-sized orders of T-bones or racks of ribs.
BARREL SHAPE
Traeger’s signature barrel shape creates a vortex of convection. It circulates hot, smoky air around the cooking chamber, surrounding your food with wood-fired heat for even cooking on all sides.
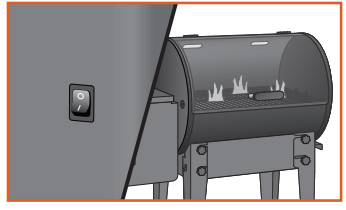
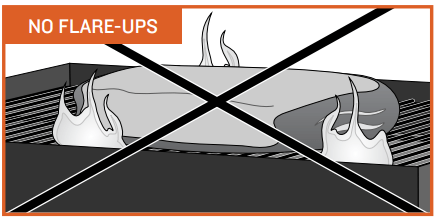
NO FLARE-UPS
You don’t have to worry about drippings flaring up and causing nasty fireballs that destroy your meal because Traeger® Wood Fired Grills cook by using indirect heat. Most drippings are safely channeled into an external grease bucket for easy disposal.
TIP: Take care of your Traeger® Grill by using a new Traeger drip tray liner before each cook to help keep your grill clean.
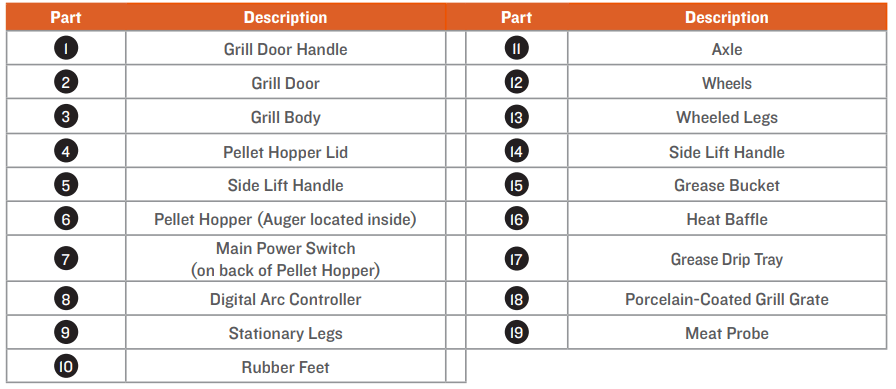
YOUR CONTROL PANEL AND DISPLAY
Your Traeger® Grill is equipped with a Digital Arc Controller. Before you begin using the grill, it will be helpful to familiarize yourself with the different features of the control panel.
CENTER BUTTON Use this button to turn on the grill and cycle through Temperature > Timer > Probe Alarm modes. Press and hold for two seconds to cancel a setting. To put the grill in the shut-down cycle, press and hold the button for two seconds in Temperature Adjustment mode.
“UP”/“DOWN” BUTTONS Press the “Up”/“Down” buttons to increase or decrease temperature or time. Press and hold to increase or decrease the time rapidly.
NOTES: Press and hold the “Up” and “Down” buttons at the same time for 3 seconds to switch between Celsius and Fahrenheit.
IGNITE Press IGNITE to start the grill.
MEAT PROBE JACK Plug the meat probe into the jack for probe cooking.
KEEP WARM This feature maintains the grill temperature at 165°F (74°C) to keep food warm.
STATUS DISPLAY Shows current temperature, time remaining in Timer mode, or probe cooking temperature.
INDICATOR LIGHT PANEL The icons on this panel will light up when the corresponding feature is active.
The Timer icon will light when the timer is active.
The Meat Probe icon will light once the probe is plugged in and recognized by the grill.
The Keep Warm icon will light while this feature is active.
SEASONING YOUR GRILL
TO BE USED ON INITIAL FIRING ONLY.
In order to ensure proper and safe operation of the grill, follow the instructions below, first, to prime the auger (“charge” the auger tube with pellets) and, second, to season your grill (run your grill at a high temperature).
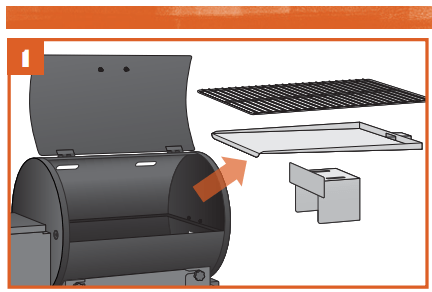
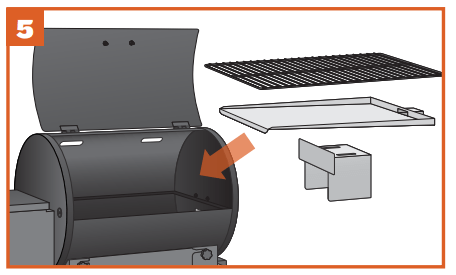
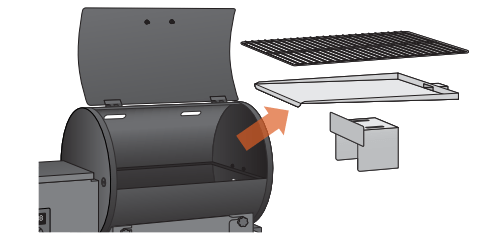
Remove the porcelain-coated grill grate, grease drip tray, and heat baffle from the inside of the grill.
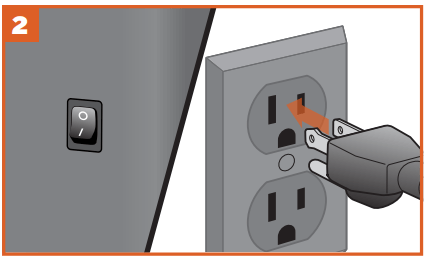
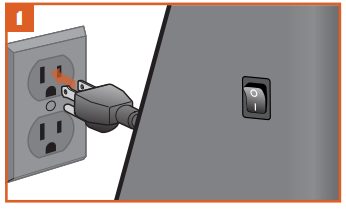
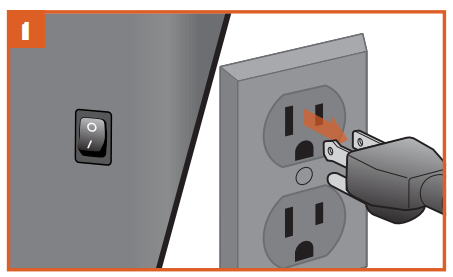
PLUG APPEARANCE MAY VARY BY REGION.
With the main power switch on the back of the grill hopper in the OFF (O) position, plug the power cord into an appropriate grounded/earthed GFCI electrical outlet.
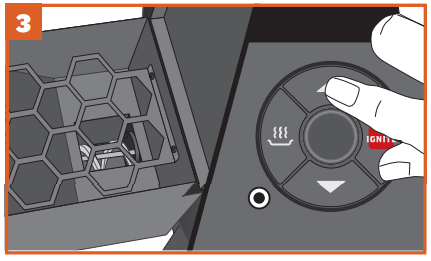
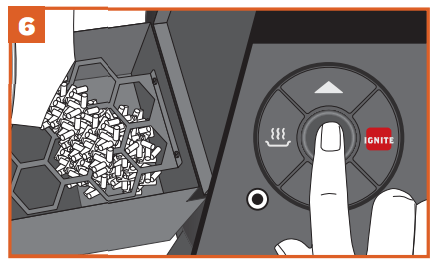
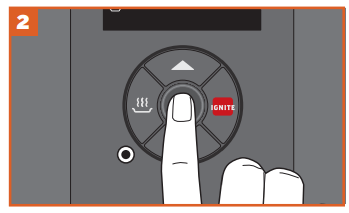
Open the hopper lid. Make sure there are no foreign objects in the auger before adding pellets to the hopper. Turn grill on: Flip the main power switch on the back of the grill to ON (I). With the grill in Idle mode, press and hold the “Up” and IGNITE buttons simultaneously. The display will flash “Pri” and the auger will begin priming.
NOTE: Once you turn on your grill, it will enter Idle mode, and the display’s dashed border will pulse. This indicates your grill is awaiting a command, and is not actively operating. The grill MUST be in Idle mode to prime the auger.
Check that there is air movement from the draft inducer fan by placing your fingers over the firepot. If the hot rod is getting hot, it will turn red.
DANGER! Do not touch the hot rod.
Press and hold the center button for two seconds in Temperature Adjustment mode to put the grill into the shut-down cycle.
Fill the hopper with your choice of TRAEGER® BRAND HARDWOOD PELLETS. After adding pellets to the hopper, close the hopper lid. We recommend you fill the hopper with pellets at least to the safety grate in the hopper. The auger tube should take approximately 2 minutes to fill with pellets and begin dispensing into the firepot.
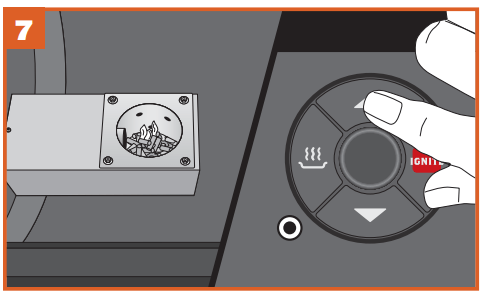
To confirm that pellets have reached the firepot, simply check to see that they are moving from the auger tube into the firepot. You only need a few pellets in the firepot to properly ignite your grill and begin the seasoning process.
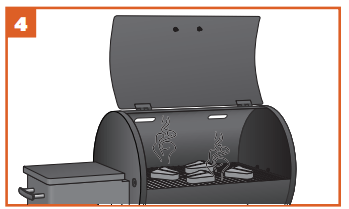
Continue priming until a small amount of pellets are in direct contact with the hot rod in the firepot. Press and hold the “Up” and IGNITE buttons simultaneously to stop priming and return the grill to Idle mode.
Now you’re ready to place the heat baffle, grease drip tray, and porcelain-coated grill grate back into the grill.
RECOMMENDATION: For easy cleanup, line the grease drip tray with Traeger® Aluminum Drip Tray Liners or heavy-duty aluminum foil. If using foil, be sure the edges and ends of the foil are tight against the bottom of the grease drip tray. Replace foil after each cook to reduce the possibility of a grease fire. Please see “Maintaining Your Grill” on page 25 for more details.
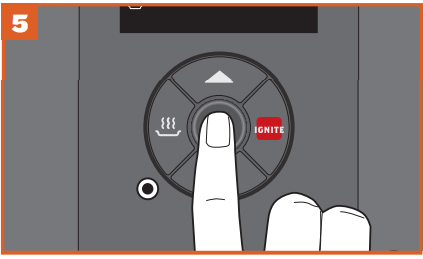
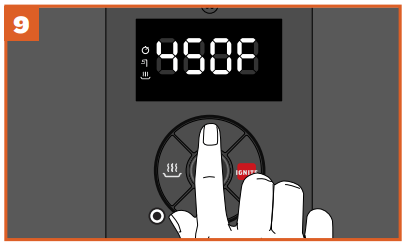
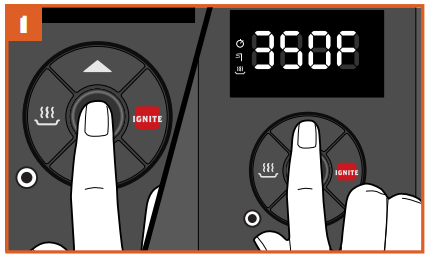
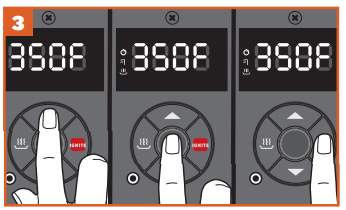
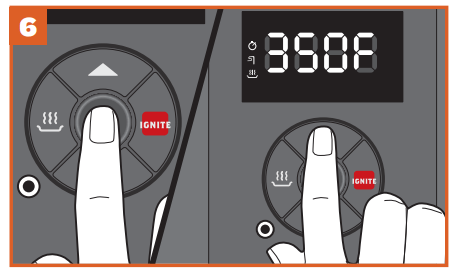
Press the “Up” button until the temperature display reads 450°F (250°C).
NOTE: To change between Celsius (C) and Fahrenheit (F), press and hold the “Up” and “Down” buttons simultaneously
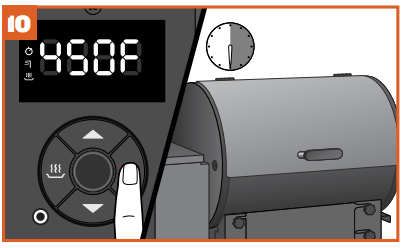
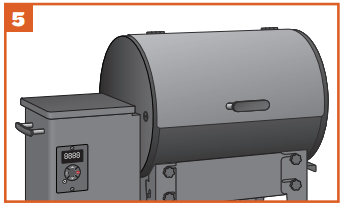
Press the IGNITE button. Let the grill run at 450°F (250°C) for 30 minutes with the door closed to complete the seasoning process.
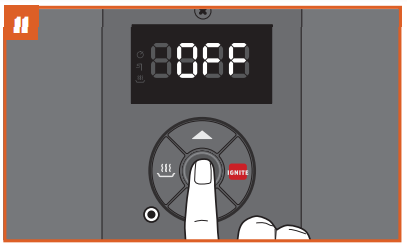
The controller for this grill comes with an automatic shut-down cycle. When finished cooking on your grill, press and hold the center button for 3 seconds. The display will flash “OFF” for several seconds, then scroll “COOL Dn” followed by the actual temperature until the grill cools down to a safe temperature. While the controller is flashing “OFF,” you can cancel the shut-down cycle by pressing and holding the center button for two seconds.
CONTROLLER SHUT-DOWN CYCLE
Always allow the shut-down cycle to completely finish before powering off your grill at the main power switch. The shut-down cycle ensures the fire is suppressed and the grill ignites properly on the next use.
DANGER! Turning off the main power switch will cut power to the grill components only. When servicing the controller or any other parts, ensure that the power supply is disconnected to avoid an electrical shock hazard.
SUBSEQUENT STARTUP
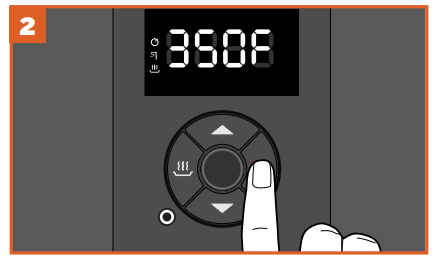
With the door closed and the main power switch set to ON (I), press the center button once to wake the grill controller. Set the desired temperature with the “Up” button.
Once the desired temperature is displayed, press IGNITE. Allow grill to preheat until desired temperature is achieved.
NOTES:
If the grill fails to achieve the selected temperature, please see “Operating Tips” on page 28 for more information.
Once you press the IGNITE button, your Traeger® Grill will always begin with an ignition and preheat cycle.
USING YOUR GRILL
YOU WILL NEED TO BEGIN WITH THESE STEPS EVERY TIME YOU USE YOUR GRILL.
PRE-GRILLING CHECKLIST
Check for and do needed maintenance:
Clean the Traeger® Grease Management System:
Grill Grate
Drip Tray
Grease Trough
Grease Chute
Grease Bucket
Remove ash (after approximately 20 hours of cooking).
Check power cord for twists, damage or fraying.
Make sure grill is correctly assembled with all parts present before using grill:
Heat Baffle
Drip Tray
Grill Grate
Make sure you have proper airflow:
Rear Exhaust
Make sure grill is a safe distance from combustibles (see page 2).
Make sure grill is on a level surface.
Inspect pellets:
Make sure you have enough pellets in the hopper.
Make sure pellets are not wet.
Close the hopper lid.
Close grill door.
YOU WILL NEED TO BEGIN WITH THESE STEPS EVERY TIME YOU USE YOUR GRILL.
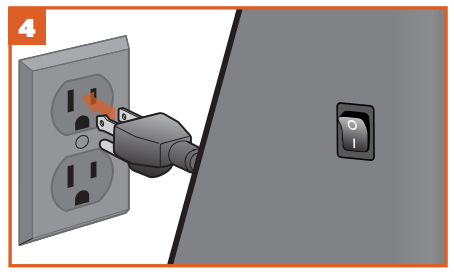
PLUG APPEARANCE MAY VARY BY REGION.
WARNING! Ground Fault Circuit Interrupter (GFCI) protection must be provided on the circuit or outlet used to power the grill.
Press the “Up,” “Down,” or center button to wake the grill controller.
Once your grill is on, press the “Up” or “Down” button to select your desired temperature, press the center button, then press IGNITE to start the preheat cycle. Make sure the door is closed.
WARNING!
When operating this grill, maintain a minimum clearance of 18 inches (45.7 cm) from grill to combustibles, such as wooden railings or home siding.
Never operate this grill under a combustible ceiling or overhang.
Only operate grill outdoors.
Use ONLY TRAEGER® BRAND HARDWOOD PELLETS, which are specifically made to work in our grills. Never use heating fuel pellets in the grill.
Once preheating is complete, load food into the grill. See page 20 if using the meat probe prior to loading food into the grill.
NOTE: Always run your grill through the full shut-down cycle when you are finished using your grill. To initiate the shut-down cycle, press and hold the center button for two seconds in Temperature Adjustment mode.
WARNING! We recommend you clean the grease drip tray and TGMS frequently to reduce the possibility of a grease fire. Please see “Maintaining Your Grill” on page 25 for more details.
Close the grill door to proceed with cooking. Unlike a gas grill, you must keep the grill door shut during cooking.
IN CASE OF FIRE:
WARNING! With regular maintenance and cleaning of your Traeger® Grill, a grease fire is unlikely. In the unlikely event of fire, immediately turn the grill OFF (O) and leave the grill door closed until the fire is out. Do not unplug the power cord. Do not throw water on the unit. Do not try to smother the fire. With the grill door closed, the fire will be starved of oxygen and burn itself out. If an uncontrolled fire does occur, call the Fire Department.
COOKING WITH THE MEAT PROBE
Use this method when your recipe specifies an internal goal temperature for your food.
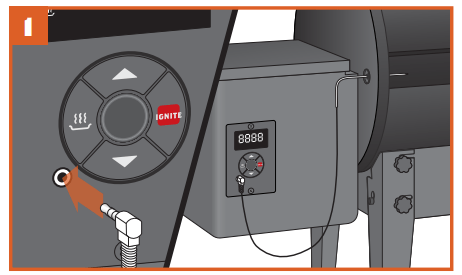
Insert the meat probe’s plug into the jack on the lower left corner of the controller, then thread probe through the access hole grommet on the left side of the grill barrel, as shown.
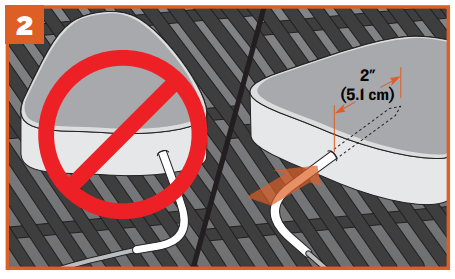
Insert the probe tip into the thickest part of the meat—not in the fatty portion or touching bone. The probe needs to be in the meat at least 2" (5.1 cm). This probe may not be suitable if you can’t insert the probe into the thickest part of the meat and 2" (5.1 cm) inches into the meat.
WARNING!
• Meat probe is extremely hot during and after cooking. Use caution when removing.
• Improper placement of the meat probe or improper meat probe calibration could result in raw or undercooked meats, poultry, seafood, shellfish, or eggs, which may increase your risk of foodborne illness.
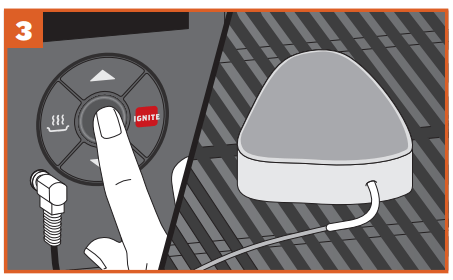
Reading the temperature: Press the center button on the control. The probe temperature will display for 5 seconds, then revert back to the temperature of the grill. After removing your food from the grill, always use a meat thermometer to confirm that you have actually achieved the target internal meat temperature.
WARNING! Consuming raw or undercooked meats, poultry, seafood, shellfish, or eggs may increase your risk of foodborne illness.
REIGNITING YOUR GRILL
WARNING! If at any time the grill fails to light, or the fire in the firepot goes out while cooking or smoking and there are sufficient pellets in the pellet hopper, it is important that you follow these steps. Failure to do so may cause a hazardous “over-firing” of your grill due to an excess of unburned pellets in the firepot.
DANGER! If the grill failed to light or the fire went out, turn the main power switch OFF (O) and disconnect the power cord. If the grill is still hot, allow it to cool thoroughly
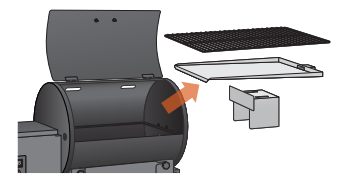
Open the door and remove all food, the porcelain-coated grill grate, the grease drip tray, and the heat baffle.
WARNING! After the grill, pellets, and ash have completely cooled, remove all unburned pellets and ash from inside and around the firepot. (See instructions for proper handling and disposal of ash on page 26.)
Plug power cord into an appropriate grounded electrical outlet and restart the grill. Pellets should fall into the firepot and the hot rod should begin to heat (it will start to turn red).
CAUTION! Do not touch the hot rod.
When flames start to come out of the firepot, turn the main power switch OFF (O). Let the grill completely cool. Place the heat baffle, grease drip tray, and porcelaincoated grill grate back into the grill.
With the main power switch set to ON (I), press the center button once to wake the grill controller. Set the desired temperature with the “Up” button.
NOTE: If the procedure is not successful, see the “Frequently Asked Questions” section on page 27 for troubleshooting tips or contact Traeger’s customer service (see page 30) to help diagnose the problem.
MAINTAINING YOUR GRILL
WARNING Fire Hazard: Grease fires are most frequently caused by failing to properly maintain the grill by not cleaning the grease from the unit on a consistent basis.
WARNING Turn the main power switch on back of the grill hopper OFF (O) and disconnect the power cord before initiating any of the maintenance below.
CLEANING YOUR TRAEGER GREASE MANAGEMENT SYSTEM (“TGMS”):
During your cooks, grease drippings will fall onto (i) the grease drip tray and be channeled into (ii) the grease drain (the “Trough”) and then out of the grill through (iii) the grease drain tube, (iv) to be collected in the grease bucket. These four components are the components of the Traeger® Grease Management System (TGMS). Grease will accumulate in all of these locations and should be regularly cleaned to reduce the risk of fire.
How often you need to clean the TGMS depends on the fat content of your food. Fattier foods will require cleaning of the TGMS more often, and sometimes you will need to clean the TGMS after every cook.
Visible pieces of food and bits of hardened grease or other buildup indicate a need for cleaning.
All components of the TGMS should be inspected before each use for signs of grease buildup.
CAUTION Accumulated grease is easier to clean off when the grill is still warm—not hot. Be careful not to burn yourself. Heat-protective gloves are recommended.
Clean the grease out of the V-shaped grease drain (the “Trough”) and grease drain tube. We recommend cleaning these locations regularly.
Remove all grill grates and the grease drip tray. This will provide access to the V-shaped grease drain and grease drain tube opening inside the grill. Scrape the grease accumulation from inside the V-shaped grease drain and grease drain tube using a stiff, nonmetallic tool. Much of the loosened grease can be pushed down through the grease drain tube and will fall into the grease bucket. Wipe up remaining grease residue with paper towels or disposable rags.
Regularly clean the grease out of the grill barrel on the interior bottom and sides. If grease is allowed to build up, a grease fire could result.
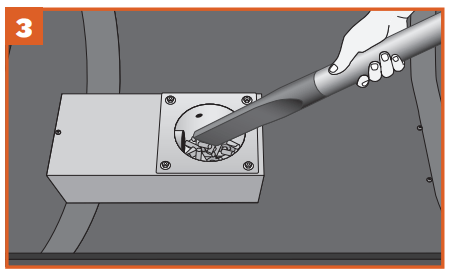
Scrape the grease accumulation from inside the barrel using a stiff, nonmetallic tool. Much of the loosened grease can be removed using paper towels or disposable rags. Excessive scraped-off residue can be cleaned using a vacuum cleaner as described in Step 4 page 26) when cleaning the firepot of ashes.
Inspect and clean the heat baffle for any grease or debris.
NOTE: Traeger’s drip tray liners can help keep your grill clean and can help reduce the risk of flare-ups.
2. CREOSOTE REMOVAL:
When wood pellets are burned slowly, they produce tar and other organic vapors that combine with expelled moisture to form creosote. The creosote vapors condense in the relatively cool exhaust vent of a slowburning fire. As a result, creosote accumulates on the exhaust vent lining. When ignited, creosote makes an extremely hot fire. Airborne grease particles will travel through the cooking chamber, and some of this airborne grease will accumulate on the exhaust vent lining, similar to creosote. This could contribute to a fire.
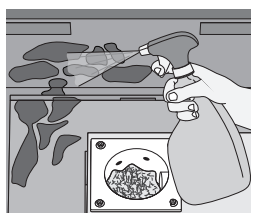
Periodically scrape the creosote and grease accumulation from the inside of the vertical and horizontal sections of the flue pipe or interior lining using a stiff, nonmetallic tool. A wooden paint stir stick, for example, would work for this task. Once the creosote and grease residue has been loosened from the interior lining and ventilation gaps in this downdraft system, much of it can be removed with paper towels or disposable rags. Do not spray water or other liquid cleaners onto the inside of your grill to remove creosote.
NOTE: The Traeger® Downdraft Exhaust System should be inspected at least twice a year to determine when a creosote and/or grease buildup has occurred.
When creosote or grease has accumulated, it should be removed to reduce the risk of a fire.
3. OUTSIDE STORAGE:
CAUTION If the grill is stored outside, care should be taken to ensure that water does not get into the pellet hopper. Wood pellets expand greatly when wet and will jam your auger. Always cover your grill when not in use with a Traeger® Grill Cover. This custom-fit cover can be purchased at traeger.com.
4. CLEANING THE ASH FROM INSIDE AND AROUND THE FIREPOT (EVERY 20 HOURS OF USE):
WARNING Make sure that the grill is COLD and ashes are extinguished and COLD before cleaning the ash.
WARNING Disposal of ashes should be done only according to the following instructions.
Excess ash in the firepot will hamper ignition and may cause your fire to go out. The firepot should be inspected occasionally and cleaned to remove the ash buildup. Again, cleaning the ash from in and around the firepot should be done only when the grill and ash are COLD.
Remove the grill grate, grease drip tray, and heat baffle to provide access to the firepot and the interior of the grill. Much of the ash outside of the firepot can be removed from the grill with a small metal fireplace shovel or other similar tool.
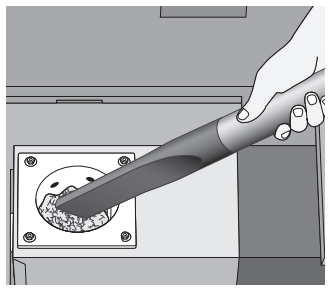
WARNING A dedicated vacuum cleaner is the best way to remove ashes from the firepot, but this must be done with extreme care to avoid the risk of fire. Again, cleaning the ash from in and around the firepot should be done only when the ash is extinguished and the grill and ash are COLD.
A utility-type vacuum cleaner having a metal collection canister without a bag would be best for this task. However, almost any vacuum cleaner will work safely if this procedure is properly followed.
After ensuring that the ash in the firepot is COLD, vacuum the ash from the inside of the firepot.
a. If your vacuum cleaner is a bagless model, empty any previously accumulated debris from the collection chamber. Then vacuum the ash from the inside of the firepot. Once the firepot is clean, empty the collection chamber into the metal container handled in the manner described below under Disposal of Ashes without delay. Make sure that there is no remaining ash residue left in the collection chamber.
b. If your vacuum cleaner is a model that uses a disposable bag, install an unused bag in the machine. Then vacuum the ash from the inside of the firepot. Once the firepot is clean, remove the bag from the vacuum cleaner and place it in a metal container handled in the manner described under Disposal of Ashes below.
5. DISPOSAL OF ASHES:
WARNING Ashes should always be completely cooled before handling. Ashes should be placed in a metal container with a tight-fitting lid. The closed container of ashes should be placed on a noncombustible floor or on the ground, well away from all combustible materials, pending final disposal. Ashes should be retained in the closed container until they are disposed.
6. CLEANING THE GRILL GRATES:
DANGER Cleaning the grill grates works best while they are still warm. Be careful not to burn yourself. Heat-protective gloves are recommended.
We recommend keeping a long-handled cleaning brush near the grill. After removing your food, give the grill grate a quick brushing. It takes only a minute and it will be ready the next time you want to use the grill.
7. CLEANING OUTSIDE SURFACES:
WARNING Turn the main power switch OFF (O) and disconnect the power cord before initiating cleaning.
Use a disposable rag or cloth dampened with Traeger® All Natural Cleaner or warm, soapy water to wipe the grease from the outside of the grill. DO NOT use oven cleaner, abrasive cleansers, or abrasive cleaning pads on the outside grill surfaces.
8. TESTING THE GRILL AFTER CLEANING:
Before replacing the heat baffle, grease drip tray, and the grill grate, plug the power cord into an appropriate grounded/earthed electrical outlet and turn the switch ON (I). After you set the temperature and press IGNITE, pellets should fall into the firepot and the hot rod should begin to heat (it will start to turn red).
CAUTION Do not touch the hot rod.
When flames start to come out of the firepot, run the shut-down cycle. Let the grill cool down. Now you’re ready to place the heat baffle, grease drip tray, grill grate, and food back onto the grill.
9. If the power supply cord is damaged, it must be replaced by a special cord assembly available from Traeger.
FREQUENTLY ASKED QUESTIONS
Following are frequently asked questions along with their answers:
QUESTION
ANSWER
Why won’t my grill power on?
Verify power at the electrical outlet. If the power cord is connected to a GFCI (ground fault circuit interrupter), check and reset if necessary. (Note that a GFCI outlet may be located in a nearby outlet on the same electrical branch circuit.) Initiate start-up. If no ignition, see next answer.
Check power supply cord.
Check your extension cord.
Why won’t my grill ignite?
Verify that you have properly maintained your grill as described in “Maintaining Your Grill” on pages 25-26 and there is not excessive ash in your firepot.
Verify that there are pellets in the pellet hopper and that the auger has been primed (see page 13). Verify that pellets are reaching the firepot. If this is the initial firing or the grill has run out of pellets, allow enough time for the pellets to travel from the pellet hopper to the firepot (can take up to 7 minutes).
If there are no pellets in your firepot, initiate start-up. See “Using Your Grill” on page 18. If there are still no pellets in the firepot, proceed to next answer.
Check the draft inducer fan and the auger drive motor for operation. If both are operating, then the hot rod needs to be replaced. If one or both are not operating, contact Traeger’s customer service (see page 30) for additional troubleshooting help or to place an order.
Why is the temperature of my grill fluctuating? Temperature fluctuations are normal for Traeger® Grills. Any significant fluctuation could be the result of wind, air temperature, improper start-up procedure, improper use, or lack of grill maintenance.
Confirm there are pellets in the pellet hopper.
If you have pellets and they aren’t being delivered, check controller screen for error message and contact customer service (see page 30).
If the auger drive motor is operating (check the small fan blade on the back of the motor), the problem is in the digital control, which will need to be replaced. Contact your Traeger dealer or Traeger’s customer service (see page 30) to place an order
If the auger drive motor is not operating but the draft inducer fan is operating, then the problem is in the auger system, which will need to be checked. With the main power switch OFF (O), locate the small fan blade on the back of the auger drive motor. CAUTION! While watching the fan blade, turn the main power switch ON (I). If the fan blade does not turn, turn the main power switch OFF (O). This indicates a defective auger drive motor, and it will need to be replaced. Contact your Traeger dealer or Traeger’s customer service (see page 30) to place an order. If the fan blade turns a bit and then stops, continue watching and turn the main power switch OFF (O). If the fan blade unwinds slightly, this indicates a jam in the auger system, which will need to be cleared. DANGER! Turn the main power switch OFF (O) and disconnect the power cord. Remove the pellets from the pellet hopper. Check for foreign objects and wet or decomposed pellets, both of which can cause a jam in the auger system. The auger will need to be removed to clear a jam in the auger system. See “How do I remove the auger if it jams?”
Why is the temperature of my grill fluctuating?
Temperature fluctuations are normal for Traeger® Grills. Any significant fluctuation could be the result of wind, air temperature, improper start-up procedure, improper use, or lack of grill maintenance.
How do I remove the auger if it jams?
First, let the grill cool completely to prevent a fire. Remove any covers necessary to access the auger drive motor. Remove the pin connecting the auger drive motor shaft to the auger shaft and the screw retaining the auger bushing into the auger tube. With a small pipe wrench or locking pliers on the auger shaft, turn the auger counterclockwise. It will turn hard until it breaks free; then the auger will turn freely. Remove the auger and clean all pellets, ash, or foreign objects from the auger, auger tube, and firepot. (See instructions for proper handling and disposal of ash on page 26.) Sand the outside surfaces of the auger with medium grit sandpaper. Check the inside of the auger tube and sand it if needed. Vacuum the sanding grit out of the auger tube and firepot when finished. Check that the auger rotates freely. Reattach the auger shaft to the auger drive motor shaft.
How do I protect my paint finish?
Use a protective cover on the grill to protect your paint finish and power cord. A Traeger® Grill Cover is highly recommended. Grill covers are available from your Traeger dealer, or log onto our website, traeger.com.
Every 90 days, thoroughly clean the outside of your grill with Traeger® All Natural Cleaner.
Is it ok to use my grill in the rain (and snow)?
Your grill can be used in a light rain or light snow; but it is an electrical appliance, so take extra precautions to be sure that the power cord and any extension cord are properly joined and the junction of the power cord and the extension cord is positioned so that it is clear of any standing water and snow
Where can I get a new part for my grill?
Contact Traeger's customer service (see page 30) to place an order. Many parts are available on our website at traeger.com.
Be prepared with your grill’s model and serial number (located on the label inside the hopper lid) to accurately identify the necessary part for your specific model.
TROUBLESHOOTING
Although rare, you may see an error or warning message display on your control panel. Please refer to the following chart for a list of error messages and how to resolve them:
CODE
ERROR
SOLUTION
LEr
Low temperature
This will occur when the temperature of the grill falls below 120°F (49°C) for 10 minutes, causing the grill to go into the shut-down cycle. To fix, remove any pellets from the firepot. Turn the controller off and then on again and restart your grill. If the problem persists, contact customer service (see page 30).
HEr
High temperature
This error will occur when the temperature in the grill reaches temperatures above 550°F (288°C) for more than 45 seconds. Let the grill cool, then turn off the grill. Clear out any remaining pellets from the firepot and restart your grill. If the problem persists, contact customer service (see page 30).
Er1
Temperature sensor loose
Check to make sure your temperature sensor is correctly plugged into the controller.
Er2
Temperature sensor bad
Your temperature sensor is faulty and needs to be replaced.


 The Timer icon will light when the timer is active.
 The Meat Probe icon will light once the probe is plugged in and recognized by the grill.
 The Keep Warm icon will light while this feature is active.