Portable Air Conditioner
USER MANUAL
COOL 208-20
SAVE THIS MANUAL FOR FUTURE REFERENCE
In order to continue serving our customers and providing the best products, our product information including our
user manuals may receive updates from time to time. Please check our website for the latest user manuals and product
materials. Ver 4.0 6/28/20

www.rollibot.com
Customer Service: 1-844-585-6295

Dear Rollibot RolliCool Owner,
Welcome to the new age of cool!
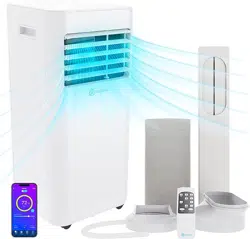
The RolliCool 208-20 is an air conditioner that uses the latest technology to improve
your quality of life. We’ve designed this unit to be fully portable and easy to use in your
home.
The RolliCool 208-20 is designed for indoor use and can be used in dierently sized
spaces. Casters make it easy to move the unit from room to room so you can stay
comfortable anywhere.
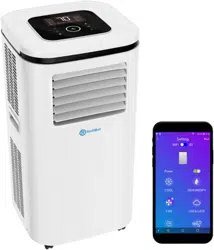
All of the unit’s features are available through the RolliCool app. After pairing your unit
with your smartphone, stay comfortable however you like!
Thank you for being a part of the Rollibot family!
— The RolliBot Team

Contents
Section 1. Information & Safety Warnings . . . . . . . . . . . . . . . . . . . . . . . 5
1.1 – Introduction . . . . . . . . . . . . . . . . . . . . . . . . . . . . . . . . . . . . . . . . 5
1.2 – Safety Warnings . . . . . . . . . . . . . . . . . . . . . . . . . . . . . . . . . . . . . 5
1.3 – FCC Information . . . . . . . . . . . . . . . . . . . . . . . . . . . . . . . . . . . . . 6
1.4 – Disposal at End-of-Life . . . . . . . . . . . . . . . . . . . . . . . . . . . . . . . . . 6
Section 2. RolliCool Parts . . . . . . . . . . . . . . . . . . . . . . . . . . . . . . . . . . . 7
2.1 – Box Contents . . . . . . . . . . . . . . . . . . . . . . . . . . . . . . . . . . . . . . . 7
2.2 – Components Overview . . . . . . . . . . . . . . . . . . . . . . . . . . . . . . . . . 7
2.3 – Control Panel . . . . . . . . . . . . . . . . . . . . . . . . . . . . . . . . . . . . . . . 8
Section 3. Setting Up the Unit . . . . . . . . . . . . . . . . . . . . . . . . . . . . . . . . 10
Section 4. Wireless Setup . . . . . . . . . . . . . . . . . . . . . . . . . . . . . . . . . . . 13
4.1 App Installation. . . . . . . . . . . . . . . . . . . . . . . . . . . . . . . . . . . . . . . 13
4.2 App Pairing . . . . . . . . . . . . . . . . . . . . . . . . . . . . . . . . . . . . . . . . . 13
4.3 Amazon Alexa Setup . . . . . . . . . . . . . . . . . . . . . . . . . . . . . . . . . . . 14
4.4 Overcoming Connectivity Issues. . . . . . . . . . . . . . . . . . . . . . . . . . . . 15
Section 5. How to Use the RolliCool . . . . . . . . . . . . . . . . . . . . . . . . . . . . 16
5.1 – Timer . . . . . . . . . . . . . . . . . . . . . . . . . . . . . . . . . . . . . . . . . . . . 16
5.2 – Fan Mode . . . . . . . . . . . . . . . . . . . . . . . . . . . . . . . . . . . . . . . . . 16
5.3 – Cool Mode . . . . . . . . . . . . . . . . . . . . . . . . . . . . . . . . . . . . . . . . . 17
5.4 – Dehumidify Mode . . . . . . . . . . . . . . . . . . . . . . . . . . . . . . . . . . . . 17
Section 6. Maintenance . . . . . . . . . . . . . . . . . . . . . . . . . . . . . . . . . . . . 18
6.1 – How to Clean the Filters . . . . . . . . . . . . . . . . . . . . . . . . . . . . . . . . 18
6.2 – How to Drain the Unit . . . . . . . . . . . . . . . . . . . . . . . . . . . . . . . . . . 18
Section 7. Storage. . . . . . . . . . . . . . . . . . . . . . . . . . . . . . . . . . . . . . . . 19
Section 8. Troubleshooting. . . . . . . . . . . . . . . . . . . . . . . . . . . . . . . . . . 20
Section 9. Warranty . . . . . . . . . . . . . . . . . . . . . . . . . . . . . . . . . . . . . . 22
9.1 – Violation . . . . . . . . . . . . . . . . . . . . . . . . . . . . . . . . . . . . . . . . . . 22
9.2 – Information . . . . . . . . . . . . . . . . . . . . . . . . . . . . . . . . . . . . . . . . 22

5
RolliBot RolliCOOL 208-20 Portable AC User Manual
Section 1. Information & Safety Warnings
1.1 – Introduction
This user manual will guide you through the functions and usage of your RolliCool 208-20
Portable AC unit. It is important that you follow all instructions and pay attention to all notes
that appear throughout this manual. Consult this manual before you attempt to use your
RolliCool. If you have questions not answered by this manual or are in need of repair or non-
routine service, contact customer service at 1-844-585-6295. Before contacting customer
service, please have your purchase information ready as this may be needed during the call. This
information may be recorded below.
Date of Purchase:
Place of Purchase:
1.2 – Safety Warnings
When reading this manual, note these icons:
• Notes with this icon MUST be read, understood, and obeyed to prevent injury or damage etc.
• Notes with this icon include relevant information.
Overall Usage
• Do not insert objects into the product.
• The product is not a toy. Do not leave children unsupervised around the product.
• The product is designed for indoor use only.
• Keep the product upright at all times.
• Do not use the product near any of the following places:
• Near anything ammable
• Direct sunlight
• Damp areas
• Dusty areas
• Do not use wax, thinner, or solvents when cleaning the air conditioner.
• Clean your lters once or more every couple of weeks.
• Do not place any obstacles in front of the any air inlet or outlet.
• Do not pull on the power cords or cables.
• In the event that the product is malfunctioning, shut the power o immediately.
• Switch o the product before cleaning.
• Only use parts you have received from RolliBot
R
or that have been included in the
original packaging.
• Do not use the product for any purpose other than described in this user manual.
Installation Warnings
• Do not install the product on a sloped surface.
• Do not install the product in direct sunlight.
• Do not install the product in places with open ames or ammable gas.
• Do not use extension cords etc. Only plug the product into a grounded wall outlet.

6
RolliBot RolliCOOL 208-20 Portable AC User Manual
• Avoid installing the product in damp areas.
• Make sure to drain the product with the included drainage pipe.
1.3 – FCC Information
DECLARATION OF CONFORMITY:
This device complies with Part 15 of the FCC Rules.
Operation is subject to the following two conditions: (1) This device may not cause harmful
interference, and (2) this device must accept any interference received, including interference
that may cause undesired operation.
FCC RELATED INFORMATION:
This equipment has been tested and found to comply with the limits for a Class B digital
device, pursuant to Part 15 of the FCC Rules. These limits are designed to provide reasonable
protection against harmful interference in a residential installation. This equipment generates,
uses, and can radiate radio frequency energy and, if not installed and used in accordance with
the instructions, may cause harmful interference to radio communications. However, there is
no guarantee that interference will not occur in a particular installation. If this equipment does
cause harmful interference to radio or television reception, which can be determined by turning
the equipment o and on, the user is encouraged to try to correct the interference by one or
more of the following measures:
• Reorientorrelocatethereceivingantenna.
• Increasetheseparationbetweentheequipmentandreceiver.
• Connecttheequipmentintoanoutletonacircuitdierentfromthattowhichthe
receiver is connected.
• Consultthedealeroranexperiencedradio/TVtechnicianforhelp.
The manufacturer is not responsible for any radio or TV interference caused by unauthorized
modications to this equipment. Such modications could void the user’s authority to operate
the equipment.
1.4 – Disposal at End-of-Life
This product must not be disposed of by incineration, landlling, or mixing with household
trash. Improper disposal of this unit may cause serious injury. The refrigerants contained inside
the RolliCool present chemical risks to the environment. The recommended disposal for any
RolliCool 208-20 Portable AC unit at its end-of-life is to dispose of the entire unit by contacting
your local recycling company. Local regulations and laws pertaining to the recycling and
disposal of any RolliCool unit and/or products containing them will vary according to your
country, state, and local governments. You must check laws and regulations corresponding to
where you live in order to dispose of your RolliCool unit properly. It is the user’s responsibility to
dispose of their equipment properly in accordance with local regulations and laws.
For additional information about where you should drop o your RolliCool unit, please contact
your local or regional waste management oce, your household waste disposal service, or your
point-of-sale.
7
RolliBot RolliCOOL 208-20 Portable AC User Manual
Section 2. RolliCool Parts
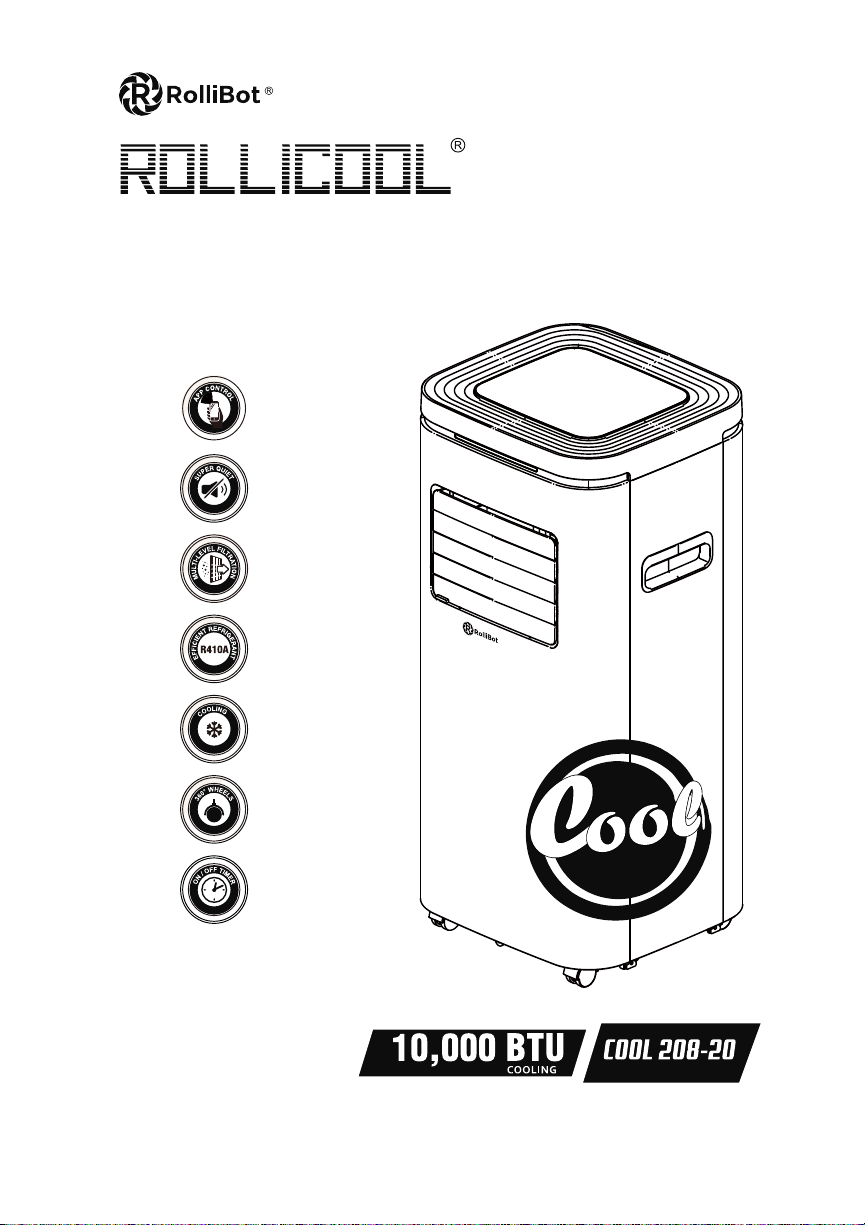
2.1 – Box Contents
• 1 x RolliCool 208-20 Portable AC unit
• 1 x Drainage Pipe
• 1 x Air Filter (pre-installed)
• 1 x Exhaust Pipe
• 1 x Exhaust Pipe Outer Connector
• 1 x Exhaust Pipe Inner Connector
• 1 x Window Kits
• 2 x Screw Fastener (Screw Base x 2, Screw Head x 2, Washer x 1)
RolliCool 208-20 Portable AC unit
Drainage Pipe
Exhaust PipeExhaust Pipe Outer Connector
Screw Base x 2 Screw Head x 2 Washer
Exhaust Pipe Inner Connector
Window Kits
A B C
2.2 – Components Overview
1
2
4
3
1
Control Panel
Casters
4
Open Air Vents (non-oscillating)
5
2
Closed Air Vents (non-oscillating)
3
Front Housing
5
8
RolliBot RolliCOOL 208-20 Portable AC User Manual
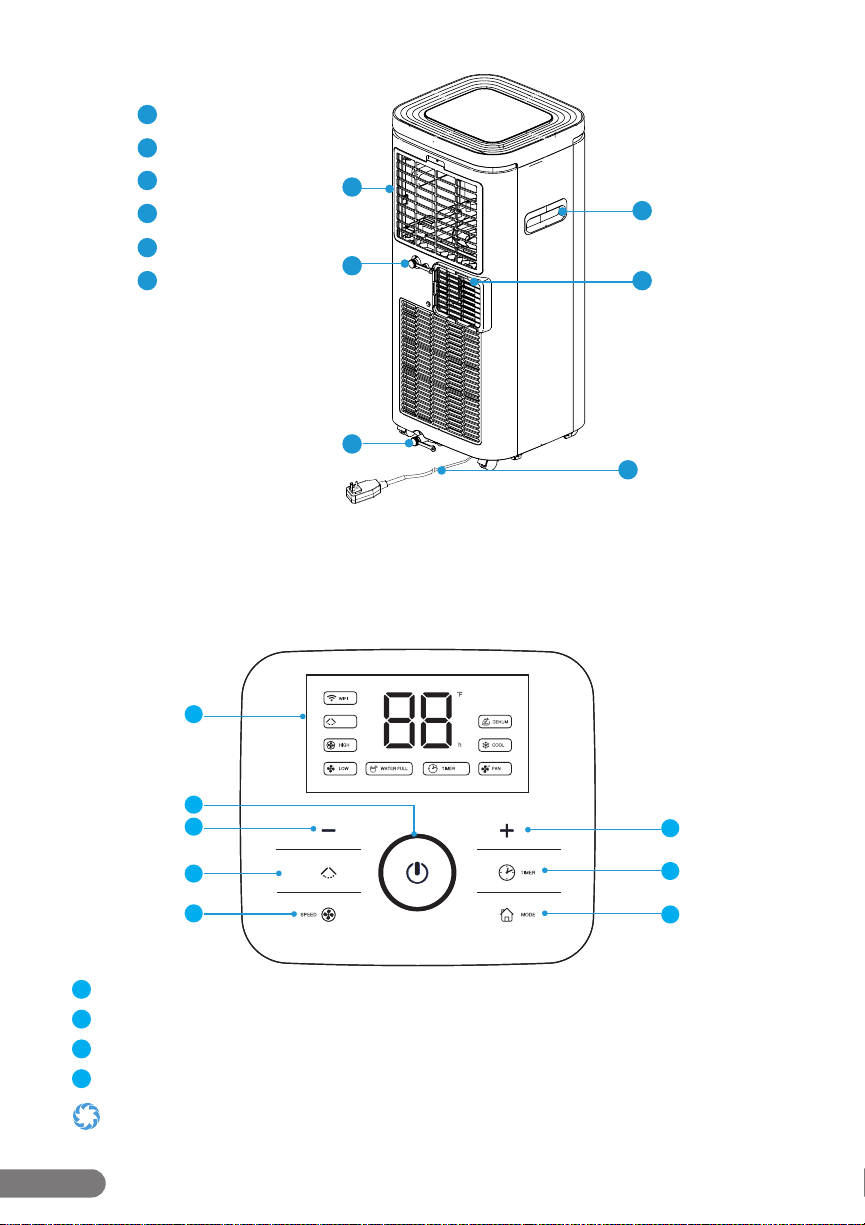
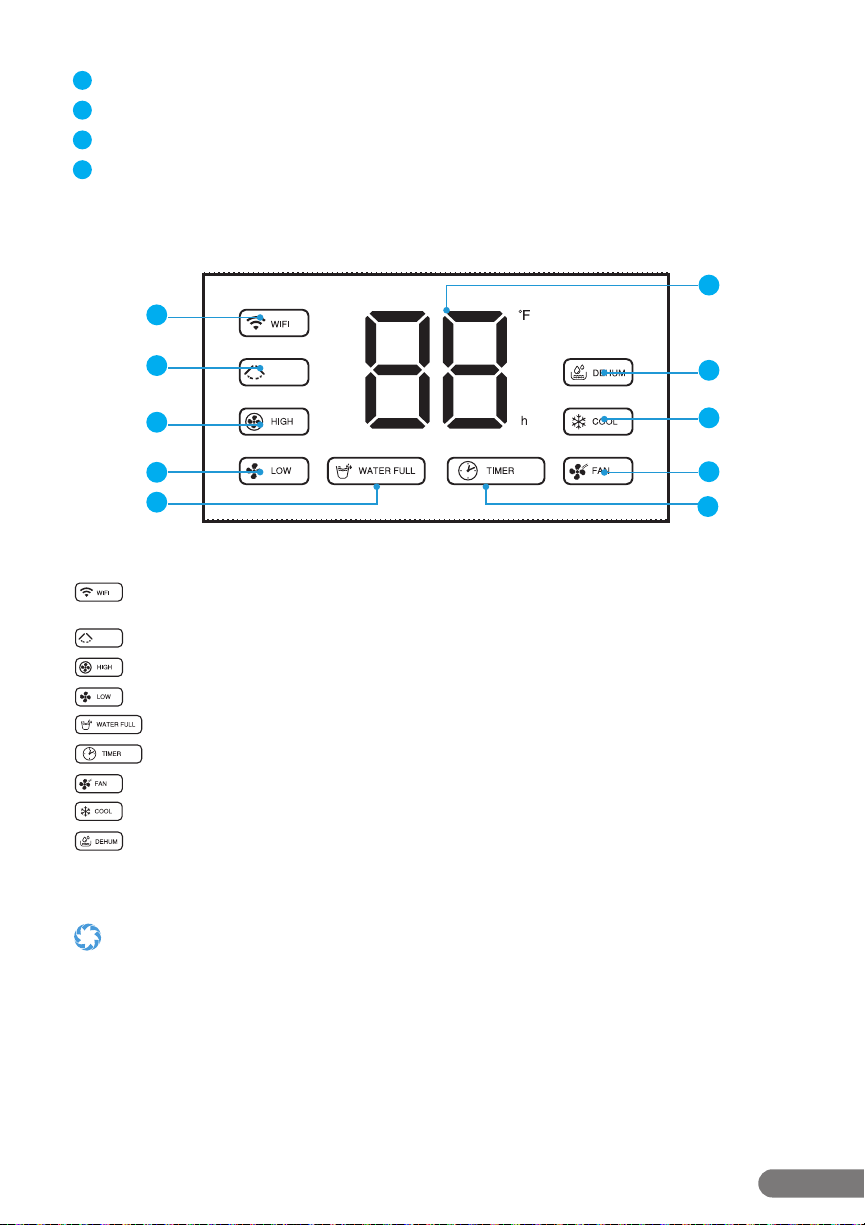
2.3 – Control Panel
The 208 features an LED control panel which turns on when the unit turns on and includes on-
screen buttons.
Buttons & Parts
OSCILLATE
OSCILLATE
1
3
2
4
5
6
7
8
1
Display: This section will light up to show temperature and other information.
2
Power Button: Press to turn the unit on or o.
3
Down Button: Press to lower temperature or adjust timer duration.
4
Oscillate Button: Press to turn on or o oscillate function.
Only the inner louvers oscillate (see Section 2.2 - Components Overview, item #5). The outer vents open and close only and are
primarily used for dust protection during storage.
6
7
8
9
11
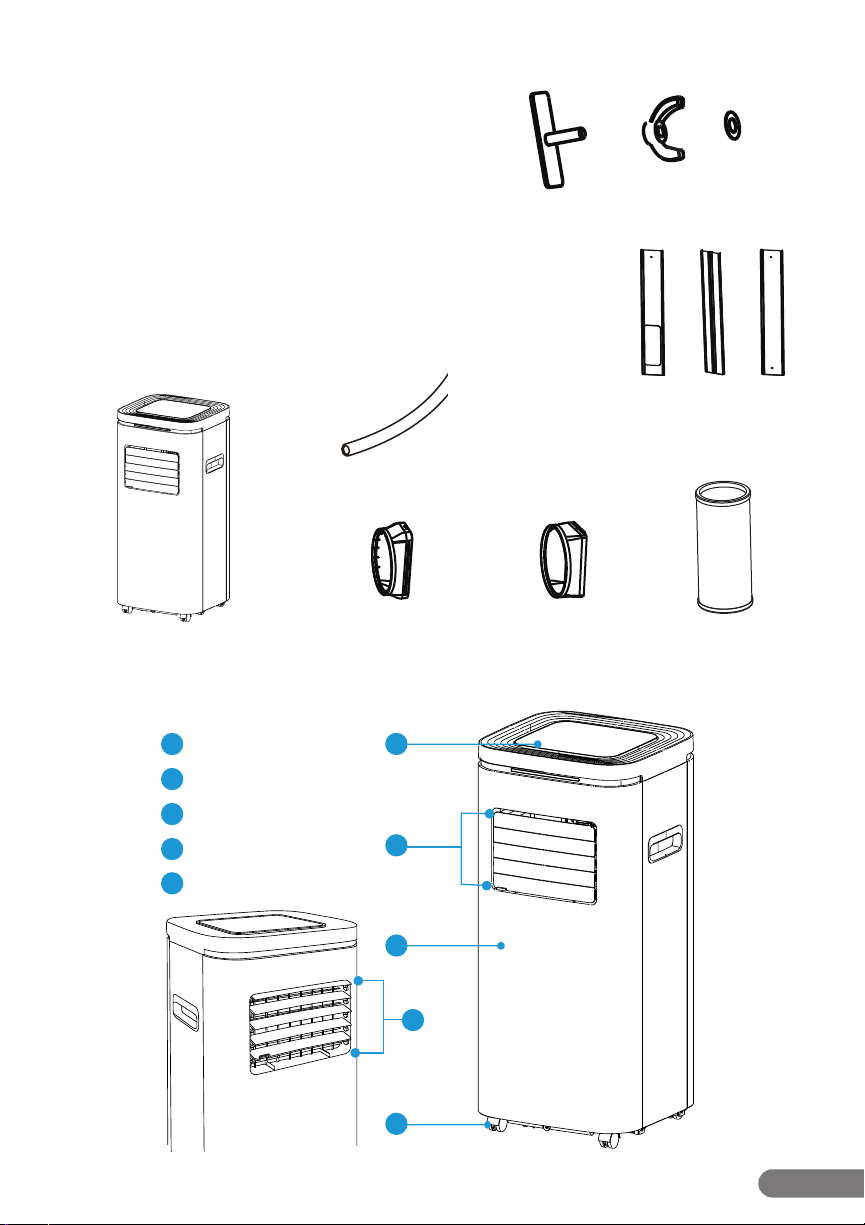
6
Upper Filter
7
Upper Drainage Opening
8
Lower Drainage Opening
9
Handle
10
Air Vents (Non-Oscillating)
11
Power Cord
10
9
RolliBot RolliCOOL 208-20 Portable AC User Manual
5
Speed: Press to cycle through 2 fan speeds (High or Low).
6
Mode Button: Press to cycle between cool, dehumidify, and fan modes.
7
Timer Button: Press to turn timer mode on or o.
8
Up Button: Press to raise temperature or adjust timer duration.
Display Icons
OSCILLATE
OSCILLATE
1
2
3
4
5
6
7
8
9
10
WIFI: This icon will light up when the unit connecting the cell phone via wi or
bluetooth.
Oscillate: This icon will light up when the unit is in Oscillate mode.
High: This icon will light up when the speed is high.
Low: This icon will light up when the speed is low.
Water Full: This icon will light up when the unit is full of water.
Timer Mode: This icon will light up when the timer has been programmed.
Fan Mode: This icon will light up when the unit is in fan mode.
Cool Mode: This icon will light up when the unit is in cool mode.
Dehumidify Mode: This icon will light up when the unit is in dehumidify mode.
• Schedulingcanbedoneand/oradjustedviathecontrolpanelortheapp.SeeSection4forinformationabouttheapp.
• ThecontrolpaneldisplaysFahrenheittemperatureasdefault,anditcan’tbechanged.
OSCILLATE
OSCILLATE
OSCILLATE
OSCILLATE
OSCILLATE
OSCILLATE
OSCILLATE
OSCILLATE
OSCILLATE
OSCILLATE
OSCILLATE
OSCILLATE
OSCILLATE
OSCILLATE
OSCILLATE
OSCILLATE
OSCILLATE
OSCILLATE
10
RolliBot RolliCOOL 208-20 Portable AC User Manual
Section 3. Setting Up the Unit
• Beforeusingtheunit,keepituprightforatleasttwohours.
• Donotuseextensioncordsetc.Onlyplugtheunitintoagroundedwalloutlet.
• Donotusetheunitinbathroomsorotherexcessivelyhumidenvironments.
• Afterinstallation,keeptheunitatleast11.8in.fromthewallsatalltimes.
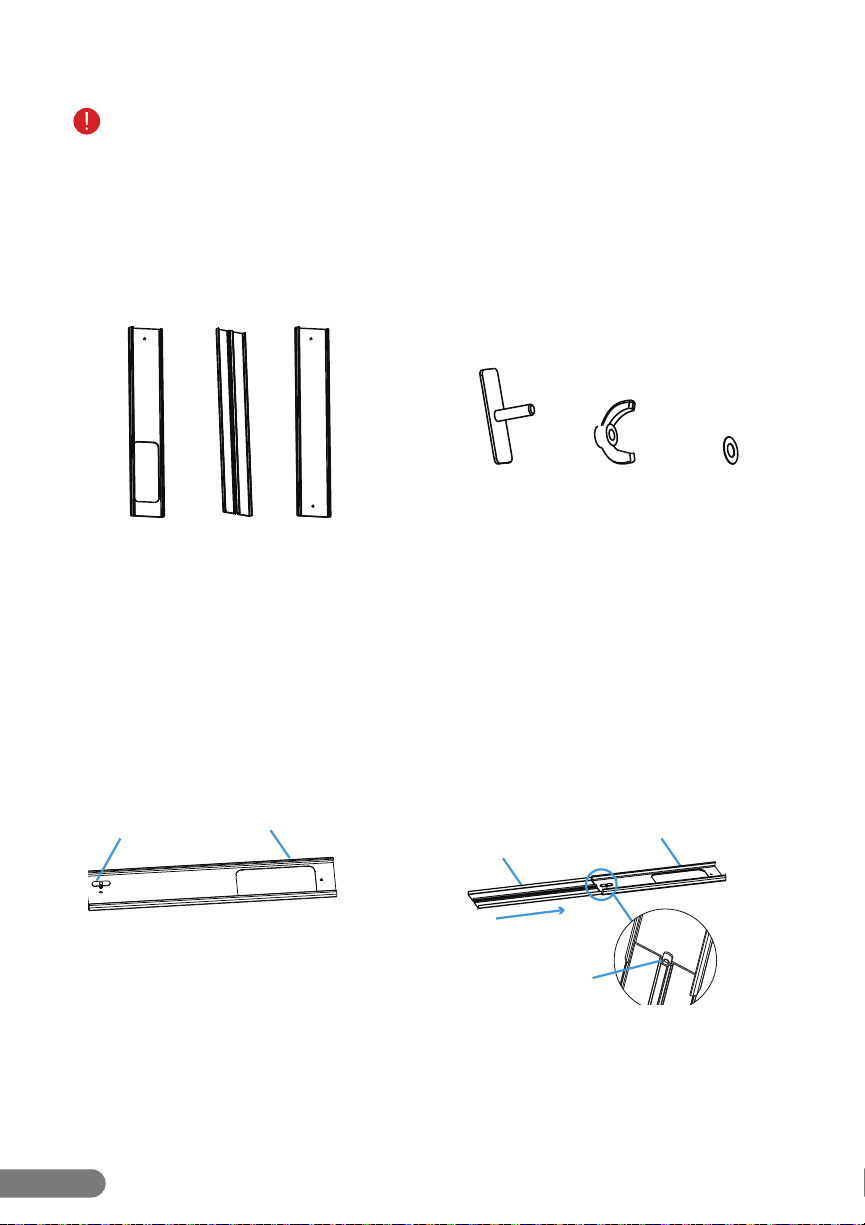
Window Kit Parts
B CA
Screw Head WasherScrew Base
Sections
These sections thread into one another and
should be placed within a window gap.
Screw Fastener
These parts are used to secure the sections
together and can be loosened or tightened
when adjusting the sections according to
window height.
Installation
Step 1. Take out one screw base to insert it
into one end of section A.
Step 2. Thread section B onto the end of
section A and make sure the screw base is also
inserted into the screw hole of section B.
A
A
B
Screw Base
Screw Base
11
RolliBot RolliCOOL 208-20 Portable AC User Manual
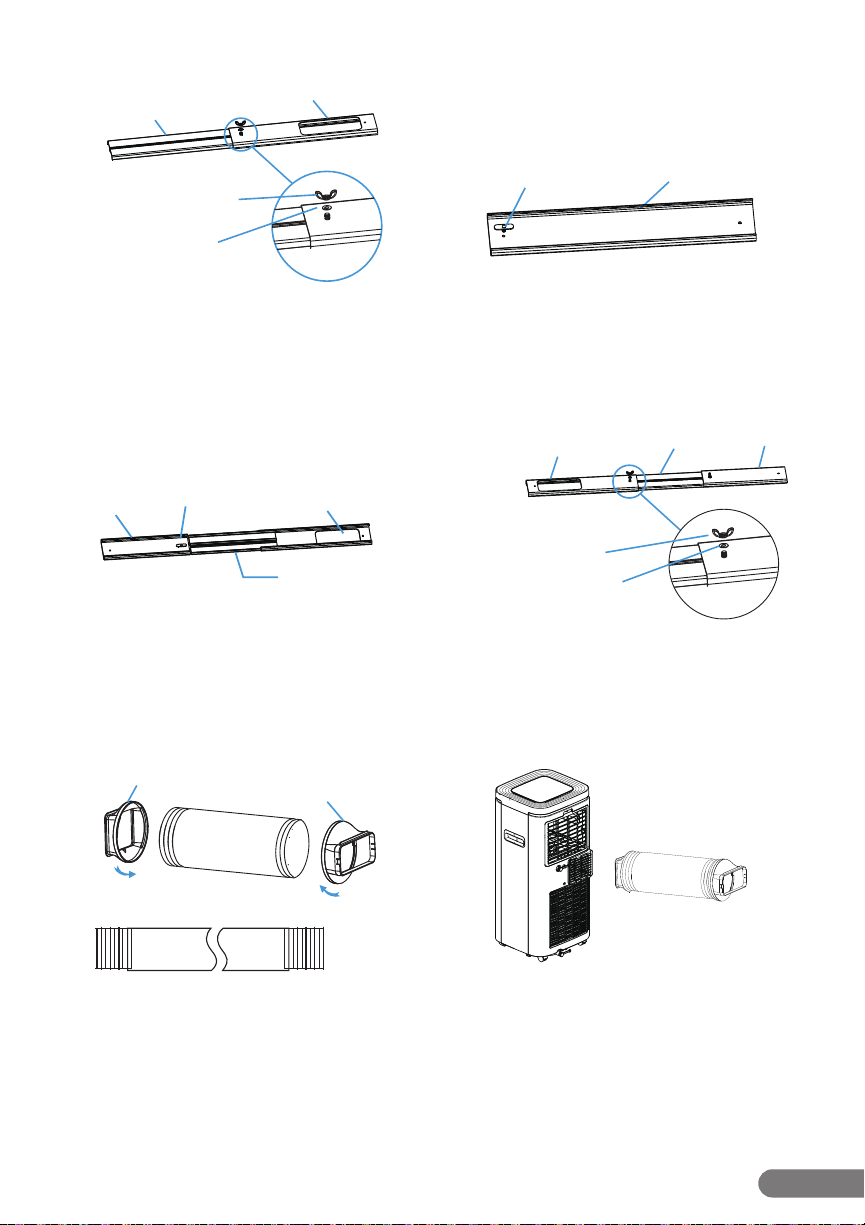
Step 3. Flip over sections A & B to the other
side, and place the washer, screw head, then
tighten sections A & B together.
B
B
B
A
A
A
C
C
C
B
B
B
A
A
A
C
C
C
Screw Base
B
B
B
A
A
A
C
C
C
Screw Base
B
B
B
A
A
A
C
C
C
Screw Head
Washer
B
B
B
A
A
A
C
C
C
Screw Head
Washer
Step 4. Take out the other screw base and
insert it into the screw hole of section C.
Step 5. Thread section C onto the end of
section B. Make sure the screw base is also
inserted into the other screw hole of section B.
Step 6. Flip over sections A, B & C to the other
side, and place the left washer, screw head,
then tighten the sections B & C together.
Step 7. Insert the connectors into both sides
of the exhaust pipe and rotate them to secure
them. When rotating the connectors, both the
inner connector and outer connector rotate
clockwise to secure them onto the pipe.
Unfurl the pip to the necessary length.
Step 8. Install the exhaust pipe onto the back
side of unit. Slide it from right to left to t the
air vent.
B
B
B
A
A
A
C
C
C
Inner Connector
Outer Connector
12
RolliBot RolliCOOL 208-20 Portable AC User Manual
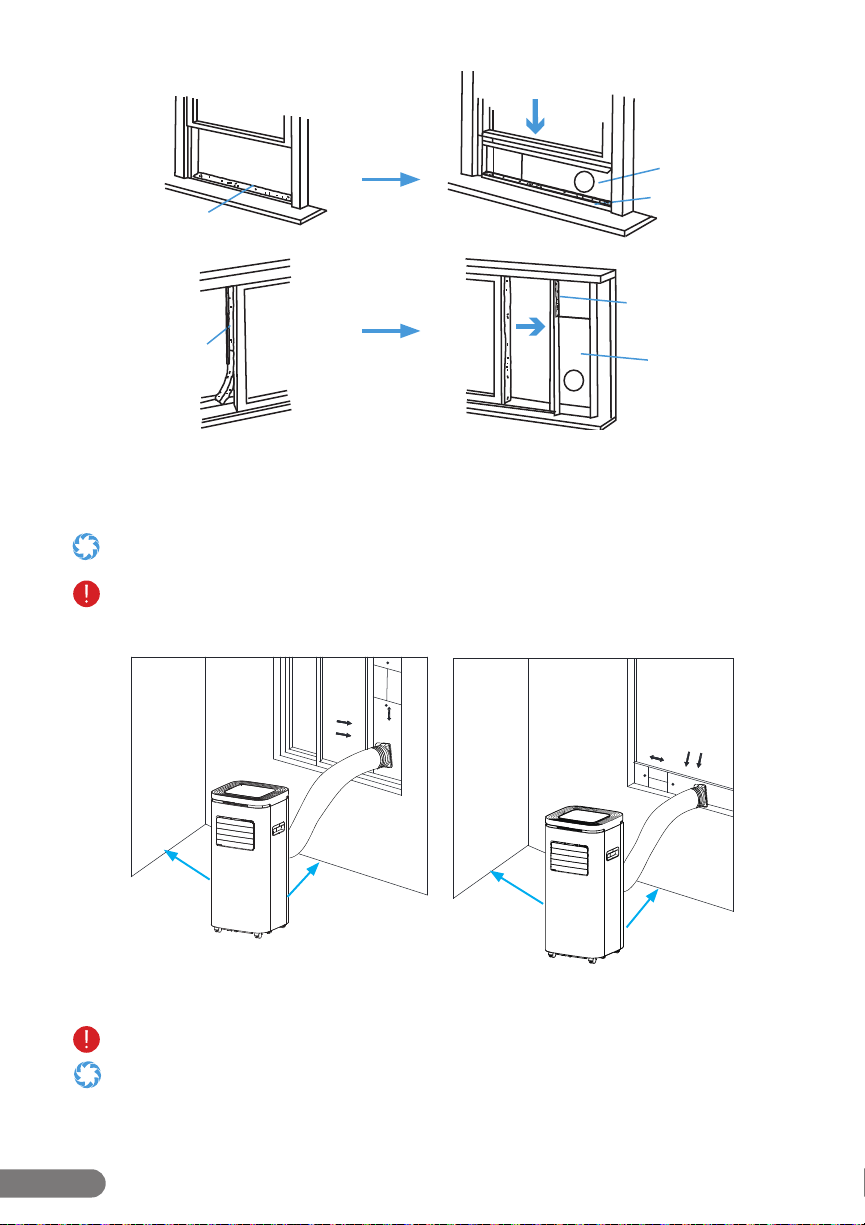
Step 9. Cut the weather seal (not included) according to the size of the window and stick it
on the window frame. Then install the assembled window kit into a gap between the window
and the frame, then frame. Push the window nearly closed to secure it. Turn the screw head to
tighten or loosen the screw fastener and adjust the sections as needed.
For smaller windows, the window kit can be cut for a better t, using a hacksaw or some other large cutting tool. Do not use
hand scissors, kitchen knives or other small cutting utensils.
Using the weather seal with the window kit is preferable, as it will create a better window seal; however, it may leave behind
residue that could be dicult to clean. While the weather seal is not included with your Rollicool, it is readily available at
most local hardware stores.
Step 10. Align the outer connector with the window kit’s outlet, then ax the exhaust pipe
onto the window kit.
Do not skip this step. You must attach the exhaust pipe to the window kit for proper ventilation.
•Makesuretheexhaustpipeisnotbentorkinkedasthismayinhibitairowand/ordamagetheunit.
• Makesurethatthemachineisplacedinaatpositionandtheairoutletisnotblocked
• Makesurethemachineisplacedatleast11.8in.(30cm)awayfromthewall.
11.8 in.
11.8 in.
11.8 in.
11.8 in.
Window Kit
Window Kit
Weather Seal
(Not included)
Weather Seal
(Not included)
Weather Seal
(Not included)
Weather Seal
(Not included)

13
RolliBot RolliCOOL 208-20 Portable AC User Manual
Section 4. Wireless Setup
For your convenience, there is an app for the device. The app is compatible with most Android
and iOS smartphones. Additionally, the unit can also be paired with Alexa and other products
from the Amazon Echo Family.
You must have the RolliCool app on your smartphone to use Alexa with the RolliCool.
4.1 App Installation
Step1. Use your smartphone to search the Play or App Store for the “RolliCool” application.
Step2. Download and install the app according to your operating system.
4.2 App Pairing
The Rollicool connectivity is only compatible with 2.4 GHz Wi-Fi networks. When pairing to app,
your mobile device and the AC unit must be on the same 2.4 GHz network.
• Bluetooth®willbecomeenabledandstayenabledaslongastheRolliCoolisturnedon.
• ForinstructionsonhowtoturnonBluetooth®,consultmaterialsforyoursmartphone.
• AswithmostBluetooth®devices,itisrecommendedtokeeptheconnecteddevicesatleast32ft.withineachother.The
connection may be terminated or fail to work properly if the connected devices are too far apart.
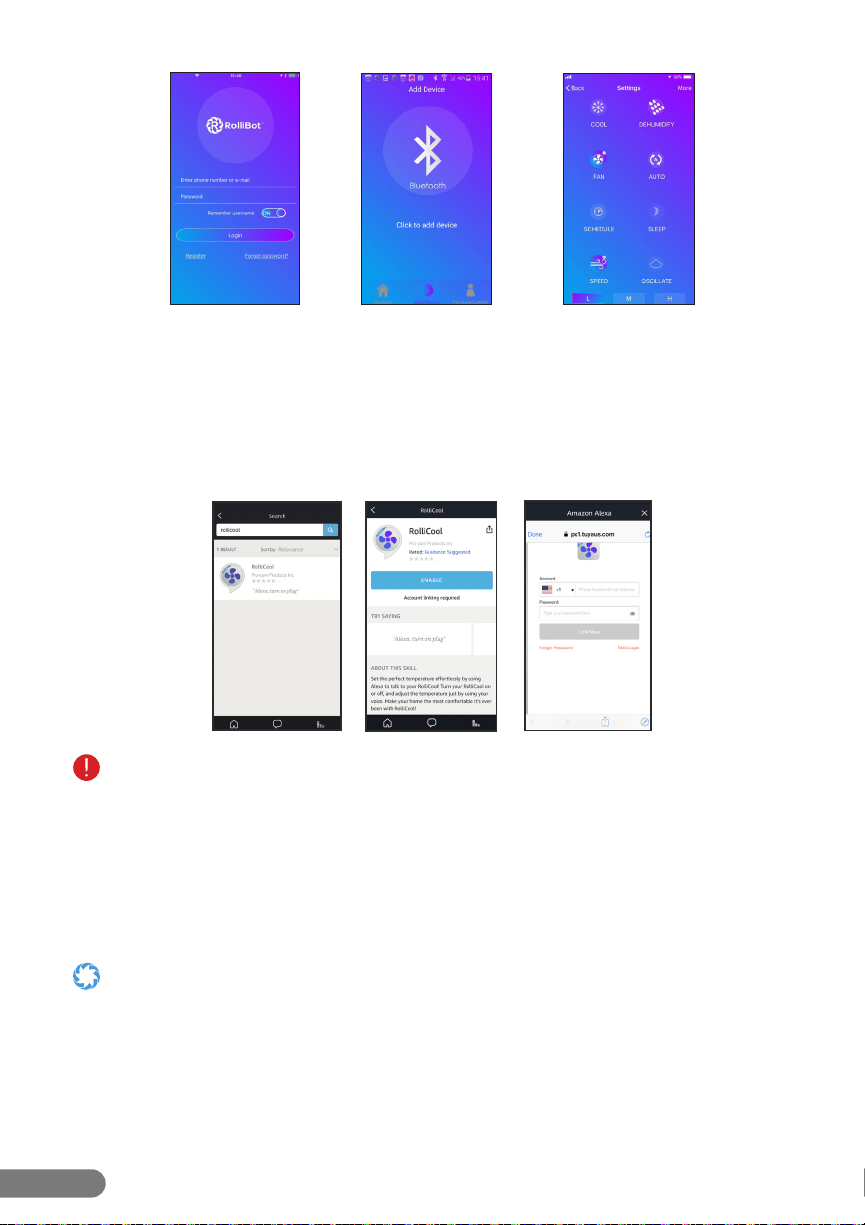
Step 1. Turn on the AC unit. Then turn on Bluetooth on your mobile device. Open the
Rollicool app.
Step 2. Register for an account. Then sign in with your Rollicool account details on the
app (g. 1).
Step 3. Select the desired device type and tap the icon.
Step 4. Select the access mode, WIFI or BT (g.2). Enter access details as needed. The unit may
beep and the “WIFI” light should start blinking. This indicates that the unit is pairing.
TheRollicoolACunitisonlycompatiblewith2.4GHzWi-Finetworks.Makesure:
• Yourmobiledeviceisconnectedtoa2.4GHzWi-FinetworkwhenpairingwiththeRollicoolapp.
• Youselectthe2.4GHznetworkwhenselectingaWi-Finetworkontheappduringsetup.
Refertosection4.4OvercomingConnectivityIssuesifyouexperienceproblemspairingtheappoverWi-Fi.
Step 5. After connecting successfully, the app can be used to set cooling schedules, change
cooling modes and more (g. 3).
Your device may had a dierent model name by default. To change the device name, tap “More” in the upper corner then
select “Rename device” to enter a new name for your COOL208. Do not use “AC”, “A/C”, “A-C”, or similar iterations, as
this will interfere with some Alexa features.
After powered down for an extended time, the RolliCool app may not automatically sync with your RolliCool once you turn
the unit back on. Wait a few minutes, then restart the AC unit. Follow the pairing steps to pair your smartphone with the
unit again.
14
RolliBot RolliCOOL 208-20 Portable AC User Manual
Fig. 1 Fig. 2 Fig. 3
4.3 Amazon Alexa Setup
Step 1. Search “RolliCool“ in the Amazon Alexa app home screen (g. 4).
Step 2. Select the RolliCool app and tap “ENABLE“ (g. 5).
Step 3. Login your RolliCool account and tap ”Link Now”. Follow any additional in-app
instructions as needed (g. 6).
Fig. 4
Fig. 5 Fig. 6
Search for RolliCool in the Skill page.
ChangethenameofyourRolliCool208-20beforepairingwithAlexa;otherwise,Alexawon’tbeabletoidentifythedefault
name(RolliCool-smart-12517).Do not use “AC”, “A/C”, “A-C”, or similar iterations, as this will interfere with some
Alexa features. Mostfeaturescanbeusedbypressingthebuttonsontheunit’scontrolpanel,
through Alexa voice commands, or via the Rollicool app.
List of Alexa Commands:
1. “Turn on <device name>”: Powers on the RolliCool 208-20.
2. “Turn o <device name>”: Powers o the RolliCool 208-20.
3. “Set temperature to <degree>”: Sets RolliCool temperature to specied number.
•MakesureAmazonAlexaappandRolliCoolareconnectedtothesamewi-;otherwise,Alexamaynotbeabletodiscover
your AC unit.
•Makesureyou’reconnectingtoastablewi-network.Ifyourwi-isunstable,Alexamaydisconnectand/orworkcorrectly
with your RolliCool.
•YoumusthavetheRolliCoolapponyoursmartphonetouseAlexawiththeRolliCool.

15
RolliBot RolliCOOL 208-20 Portable AC User Manual
4.4 Overcoming Connectivity Issues
Follow the recommendations below if you’re unable to pair the AC unit with the Rollicool app on
your mobile device:
Case 1. Your router broadcasts separate Wi-Fi bands. (The separate bands can have the
same or dierent SSID broadcast name. This is the name that’s displayed when
your devices are trying to connect to your Wi-Fi network. E.g., MyHomeWiFi.)
Option 1. Make sure the mobile device that you’re using for App Pairing is
connected to the 2.4 GHz network. Visit your smartphone’s instructions for
switching Wi-Fi networks.
Somerouters/internetprovidersmayattachanidentiertothenameofyournetwork,designatingwhichis2.4GHzand
whichis5GHz.(E.g.,myATT24GHZandmyATT5GHZ)Besuretoselectthe2.4GHzband.
Case 2. Your Internet service provider combines the 2.4 GHz and 5 GHz bands into a single
band with the same SSID broadcasted name).
Option 1. Check your router settings. You may have an option to use dierent
names and passwords for 2.4 GHz and 5 GHz bands. If so:
Step 1. Go into your router settings and select the option to use dierent
names and passwords for 2.4 GHz and 5 GHz bands.
Step 2. Temporarily change the Wi-Fi SSID broadcast name of the 5 GHz
network only. Be sure to use the same password; only change the name.
(Visit the online tech support for your internet provider or your router
manufacturer for step-by-step procedure.)
The SSID name change can be as simple as adding a single letter to the name or changing a single letter.
Anydeviceusingyour5GHzWi-Finetworkwillstopworking.Thisisonlytemporary.
Step 3. Connect the mobile device that you’re using for App Pairing to the
2.4 GHz network.
Step 4. Complete the app pairing steps from section 4.2.
Step 5. Return to your router settings. Select the option to change your
5 GHz Wi-Fi SSID’s broadcasted name (the one you changed in Step 2).
Change the 5GHz back to its original name.
Anydeviceconnectedtothe5GHzWi-FiNetworkshouldbeginworkingagain.Ifnot,youmaysimplyneedtosign-intothose
devices again.
Step 6. (Optional) De-select the option to use dierent names and
passwords for 2.4 GHz and 5 GHz bands from Step 1.
Option 2. Setup/app-pair using an older mobile device that’s only capable of
connecting to 2.4 GHz Wi-Fi networks.
Step 1. Connect to the 2.4 GHz Wi-Fi Network. If you have a dual-band
network with a single name, the older device should only connect to the
2.4 GHz band.
Step 2. Complete the app pairing steps from section 4.2.
With all options, when the Rollicool has been disconnected for an extended period, you may need to follow these steps again.
For smaller windows, the window kit can be cut down for a better t, using a hacksaw or some other large cutting tool. Do not
use hand scissors, kitchen knives or other small cutting utensils.
Only the inner louvers oscillate (see Section 2.2 - Components Overview, item #5). The outer vents open and close only
and are primarily used for dust protection during storage.

16
RolliBot RolliCOOL 208-20 Portable AC User Manual
Section 5. How to Use the RolliCool
The COOL208 features a number of ways to keep comfortable. Most features can be used by
pressing the buttons on the unit’s control panel or via the app.
• Inmostcases,theappcanbeusedasanalternativecontrolmethod.
• Youmustattachthedrainagehosetotheupperdrainingopeningwhenusingcoolordehumidifymodes.SeeSection6.2
for more information.
•Youmustconnecttheexhaustpipetothewindowforproperventilation.SeeSection3(step10)formoreinformation.
5.1 – Timer
With this mode, the unit will automatically turn on or o and regulate temperature according to
the selected times.
• TurningonthetimermodewhentheunitisOFFwillsetthenumberofhoursbeforetheunitwillturnon(seebelow).
• TurningonthetimermodewhentheunitisONwillsetthenumberofhourstheunitwillturno(seebelow).
• Aftersettingthetimer,theACunitwillentertimermode.While
in this mode, the unit will operate according to the selected timer
duration. Pressing the timer button again will turn timer mode
o and cancel any duration setting.
To Set a Turn On Time
3. When the unit is OFF, press the timer button on the
control panel.
4. Use the up and down buttons to select the time the
AC unit will turn on. For example, selecting “03” will
prompt the unit to turn on in 3 hours.
5. After the selection is complete, the display’s Timing
light will turn on.
When a schedule is active, the unit will not turn on if the chosen
temperature is higher than the indoor temperature.
To Set a Shut off Time
1. When the unit is ON, press the timer button on the control panel.
2. Use the up and down buttons to select the time the AC unit will turn o. For example,
selecting “03” will prompt the unit to turn o in 3 hours.
3. After the selection is complete, the display will show the current indoor temperature and the
display’s TIMER light will turn on.
5.2 – Fan Mode
With this mode, the unit will turn on and begin using the fan to promote air circulation.
1. Press the power button on the control panel.
2. Press the mode button on the control panel until the display’s FAN light turns on.
3. Use the speed button to switch between fan speeds.
Notch
Filter
17
RolliBot RolliCOOL 208-20 Portable AC User Manual
5.3 – Cool Mode
With this mode, the unit will turn on and regulate
temperature as selected.
1. Press the power button on the control panel.
2. Press the mode button on the control panel until
the display’s COOL light turns on.
3. Use the up and down buttons to set the desired
temperature 62~86°F (16~30°C).
4. Use the speed button to switch between fan
speeds.
You must attach the drainage hose to the upper draining opening
when using cool mode.
In cool mode, the unit will not turn on if the chosen temperature is higher than
the indoor temperature.
5.4 – Dehumidify Mode
With this mode, the unit will turn on and begin removing moisture from the air.
1. Connect the drainage hose to the upper drainage opening. Set a container near the unit to
collect the water (if needed). Then place the end of the drainage pipe in the container.
2. Press the power button on the control panel.
3. Press the mode button on the control panel until the display’s DEHUM light turns on.
You must attach the drainage hose to the upper draining opening when using dehumidify mode.
In dehumidify mode, the fan speed is automatically set to low and cannot be adjusted.

18
RolliBot RolliCOOL 208-20 Portable AC User Manual
Section 6. Maintenance
Proper maintenance will help improve your RolliCool’s performance. Periodically, the RolliCool
will need its lters cleaned. For optimal performance, the lters should be cleaned at least twice
a month.
• Ifanytypeofnon-routinemaintenanceisneeded,suchasanymaintenancenotdescribedinSection6ofthis
manual, please contact customer service or a certied HVAC professional as the unit contains refrigerant.
• Wipetheexteriorcleanwithnon-abrasivecloth.Ifneeded,clothcanbedampenedwithwater.
• Donotuseharshchemicalstocleanasthesemaydamagetheunit.
6.1 – How to Clean the Filters
• PleasemakesureyourACunitiscompletelypoweredobeforeperforminganytypeofmaintenance.
•
Do not scrape the air lters as they may sustain damage.
• Ahandvacuummaybeusedtocleanthelters.
• Replacetheltersaftercleaning.DonotusetheRolliCoolwithoutthelter.
• Ifwaterhasbeenusedtocleananylter,ensureitiscompletelydriedbeforereinstalling.DoNOTdryanyltersin
direct sunlight.
Cleaning the Filter
1. Reach under the notch and remove the lter and soak them in lukewarm water or use a
vacuum to clean the lter. Mild detergents may be used.
2. After the lter have completely dried, reinstall it.
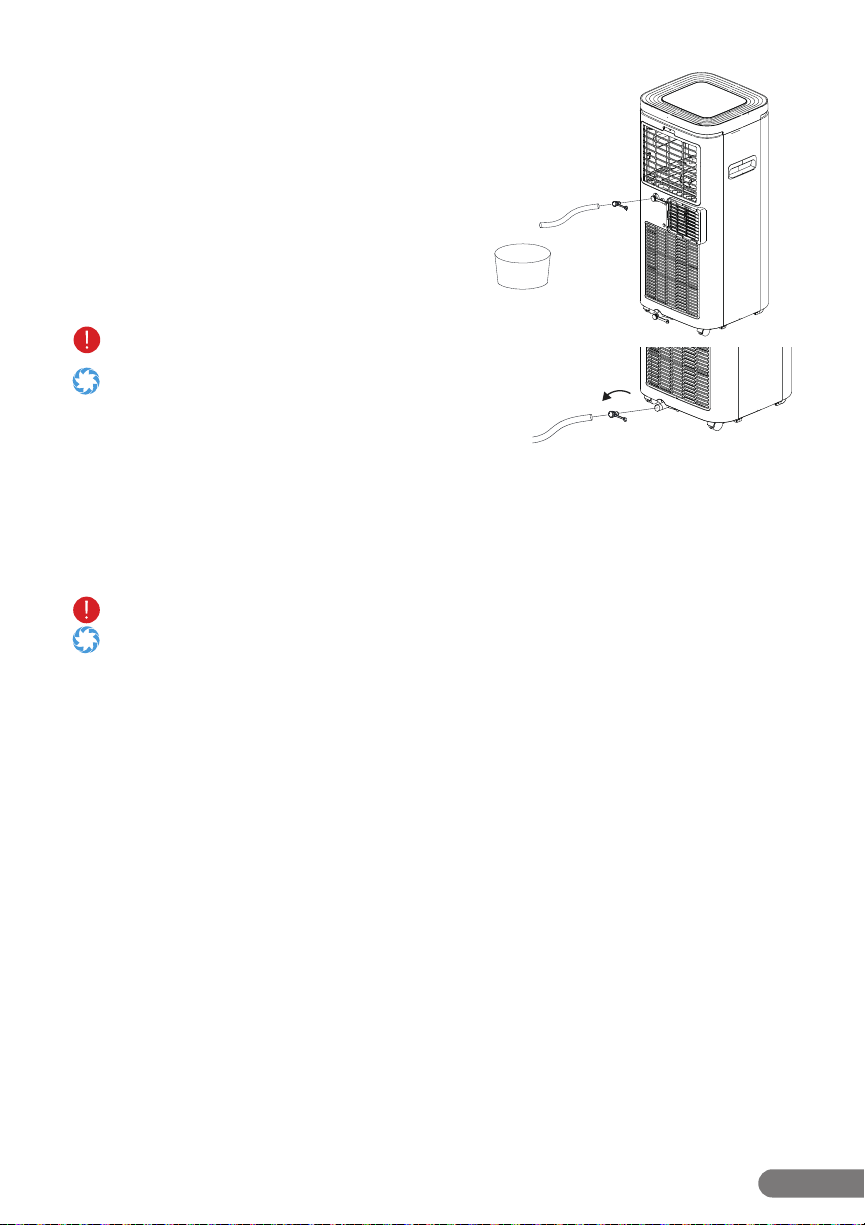
6.2 – How to Drain the Unit
In most cases, the AC unit will not require draining. In the event that draining is necessary, the
unit will sound an alarm and the display’s “water full” light will turn on to indicate the water
reservoir inside is full.
• PleasemakesureyourACunitiscompletelypoweredobeforeperforminganytypeofmaintenance.
• Ifrelocatingtheunitbeforedraining,moveitcarefullysoasnottospillthewaterinsidethereservoir.
• Makesurethedrainagepipehasadequatespaceunderneathfordraining.Ifusingthelowerdrainageopening,ensure
there is a suitable area for water runo. If using the upper drainage opening, fetch a container for water runo before
connecting the pipe.
• Keepthedrainagecoverandthewaterplugonatalltimeswhennotdrainingtheunit.
• Whendrainingtheunit,donotallowthepowercordtocomeincontactwithwater.
• Duringdrainage,theunitmaybetiltedslightbackwardstopromotefasterdrainage.
• Keepinmindtheunitmayholdmorewaterthanexpected.Donotuseasmallcontainertodrain.OrdraintheRolliCool
208-20 outdoors.
Using the Upper & Lower Drainage Openings
1. Turn o and unplug the unit, then move it to a suitable location for drainage. Set a
container near the unit for water runo if needed, then place the end of the drainage pipe
in the container.

19
RolliBot RolliCOOL 208-20 Portable AC User Manual
2. Remove the cap from the opening and connect the drainage pipe to the unit via the opening.
Ifthedrainagepipeistoostiand/orcannotbeattached,trysoakingtheendinhotwatertosoftenitrst.
3. Allow the water to drain.
After draining is complete, it is recommended to turn the unit on and run it in Fan Mode at the lowest speed for at least two
hours in order to ensure the Drainage Pipe dries inside.
4. Detach the pipe and reinstall the cap.
Section 7. Storage
Store your RolliCool 310-20 in a dry, indoor environment. Properly storing your RolliCool will
help improve performance and expectancy.
Step 1. Turn the AC unit o.
Step 2. Remove the exhaust pipe and window kit as needed for storage with the unit.
Step 3. Drain the unit of any water and ensure all parts are completely dry.
Step 4. Turn the unit on and run it in fan mode at the lowest speed for at least two hours in
order to ensure the inner reservoir is dried inside.
Step 5. Turn o the unit and install the power cord’s plug into its xture on the back of the unit.
• Alwaysturntheunitobeforetransportingorstoring.
• Covertheunittoprotectitfromdust.Donotstoreinadustyenvironment.Aswithallelectronicdevices,dustmaycause
damage over time.
• Storetheunitindoorsatadryandstabletemperature.Donotstoreinanunheatedgarage,shed,orotherlocationswith
extreme temperature uctuations.

20
RolliBot RolliCOOL 208-20 Portable AC User Manual
Section 8. Troubleshooting
Problem Possible Cause(s) Solution(s)
The unit does
not work.
There is no electricity.
Turn it on after connecting it to a socket
with electricity.
The overow indicator is on. Drain the water inside.
The system is protected
Wait 3 minutes until the temperature is
lowered then restart the unit.
The cooling
eect is weak.
There is direct sunlight.
Cover any direct sunlight coming
through the windows.
Doors or windows are open; there
are a lot of people; or there are
other sources of .
Close doors and windows.
The lter is dirty. Clean or replace the lter.
The air inlet or outlet is blocked. Clear obstructions.
Excessive noise
The unit is not placed on a at
surface.
Place the unit on a at and stable surface.
Leaking while
moving
Water reservoir is full. Drain the water reservoir before moving
The drainage plug may be cracked. Check the drain stop plug for cracks
Display not on
Power plug and socket contact
bad or power cord disconnect, no
power.
Check the power plug, power cord or
socket and connect it again.
There is unusual
sound
It is normal to have a slightly
stronger vibration sound in the rst
few minutes before power-up.
Will disappear after few minutes.
Water beads on
the surface
In areas of relatively high humidity,
air outlet, control panel, and other
parts may produce condensation.
It is a normal phenomenon.
Long-term cooling operation in
open spaces with windows open.
Closing windows, doors, etc. may resolve
excessive condensation.
Low fan speed may also lead to
increased condensation.
Increase the fan speed.
The opening angle of the louvers
(adjustable vents) is too small.
Increase the angle of the louvers
(adjustable vents) or set it to Oscillate
mode.
Oscillator doesn’t
work.
Oscillator function never engaged.
Engage the oscillator function using the
on-screen display or Rollibot app.
User is looking at the outer vent.
The oscillating louvers are inside
the outer vent. (See Section 2.2 -
Components Overview, item #5
for detailed view.)
The outer air vent is for storage purposes
and will only open and close. With the
vents open, activate oscillation function,
and look inside the vents. The oscillating
louvers are vertical and should be
moving. If not, power the unit o and
then back on.
Outer air vent is closed.
Open the outer air vent. The oscillating
louvers are inside the outer air vent and
are vertical.
When the RolliCool encounters errors, the display may show certain error codes. Refer to the
table below.

21
RolliBot RolliCOOL 208-20 Portable AC User Manual
Code Possible Cause Solution(s)
E1 Humidity sensor failure. Contact customer service for troubleshooting.
E2 Defrosting temp. sensor failure Contact customer service for troubleshooting.
E4
Environment temp.
sensor failure
Contact customer service for troubleshooting.
E7 Full water alarm Drain the water reservoir.
If none of the above information resolves your issue, please visit our website at www.rollibot.
com or contact customer service at 1-844-585-6295.

22
RolliBot RolliCOOL 208-20 Portable AC User Manual
Section 9. Warranty
9.1 – Violation
The RolliCool 208-20 Portable AC Unit cannot be repaired or serviced within its warranty period
if any of the following has occurred:
The warranty has expired
Damageoccurredduringorinrelationtonon-routineand/orunauthorizeddisassembly
Failuretoprovideavalidproofofpurchasewhenrequestingserviceorrepair
Damage occurred as a result of natural disaster etc.
Damage occurred due to unexpected factors or man-made reasons (including mis-operation, uid found in any openings,
improper insertion or pulling, hauling, bumping, improper voltage input and others).
9.2 – Information
One Year Limited Hardware Warranty
Your RolliCool 208-20 Portable AC Unit (“Product”) includes a One Year Limited Hardware Warranty
(“Warranty”). The Warranty covers product defects in materials and workmanship under normal use. This
Warranty is limited to residents of the United States and Canada only and is available only to original
purchasers. This Warranty gives you specic legal rights, and you may also have other rights which vary from
state to state.
This Warranty starts on the date of your purchase and lasts for one year (the “Warranty Period”). The Warranty
Period is not extended if the Product is repaired or replaced. We may change the availability of this limited
warranty at our discretion, but any changes will not be retroactive.
Warranty services are provided by Rollibot Warranty Pro (“WP”). If a hardware defect arises and a valid claim
is received within the Warranty Period, at its option and to the extent permitted by law, WP will: (1) repair the
hardware defect by using new or refurbished parts that are equivalent to new in performance and reliability;
or (2) exchange the Product with a product that is new or refurbished which is substantially equivalent to
the original product. This Warranty is for one replacement only of like-items and does not cover items out of
production if the product is no longer made or stocked. This Warranty is not assignable or transferable. The
original purchaser may call WP’s toll-free number at 1-844-585-6295 for a service request.
When a product or part is exchanged, any replacement item becomes your property, and the replaced item
becomes WP’s property. This warranty only covers technical hardware defectiveness during the warranty
period and under normal use conditions. WP does not warrant uninterrupted or error-free operation of this
Product.
This Warranty does not cover any damage due to: (a) transportation; (b) storage; (c) improper use; (d)
failure to follow the product instructions or to perform any preventive maintenance; (e) modications; (f)
unauthorized repair; (g) normal wear and tear; or (h) external causes such as accidents, abuse, or other
actions or events beyond our reasonable control.
Important: Do not disassemble the Product. Disassembling the Product will void this Warranty. Only WP or a
party expressly authorized by WP should perform service on this Product.
DISCLAIMER OF WARRANTY: THE REMEDIES DESCRIBED ABOVE ARE YOUR SOLE AND EXCLUSIVE REMEDIES
AND OUR ENTIRE LIABILITY FOR ANY BREACH OF THIS LIMITED WARRANTY. OUR LIABILITY SHALL UNDER NO
CIRCUMSTANCES EXCEED THE ACTUAL AMOUNT PAID BY YOU FOR THE DEFECTIVE PRODUCT, NOR SHALL
WE UNDER ANY CIRCUMSTANCES BE LIABLE FOR ANY CONSEQUENTIAL, INCIDENTAL, SPECIAL OR PUNITIVE
DAMAGES OR LOSSES, WHETHER DIRECT OR INDIRECT.
SOME STATES DO NOT ALLOW THE EXCLUSION OR LIMITATION OF INCIDENTAL OR CONSEQUENTIAL
DAMAGES, SO THE ABOVE LIMITATION OR EXCLUSION MAY NOT APPLY TO YOU.
THE DURATION AND REMEDIES OF ALL IMPLIED WARRANTIES, INCLUDING WITHOUT LIMITATION THE
WARRANTIES OF MERCHANTABILITY AND FITNESS FOR A PARTICULAR PURPOSE ARE LIMITED TO THE
DURATION OF THIS EXPRESS LIMITED WARRANT


Copyright © 2020. Rollibot, LLC. All Rights Reserved