Loading ...

Version 20190806 Page
2
PACKING LIST:
Please check and make sure all parts are in good condition before installation. Any questions, please do NOT return to
dealer, but email us (info@payandpack.com) and contact us on PayandPack.com immediately, we will do our best to solve
problems. Thank you.
1. Remote transmitter (1), Remote receiver box w/ 18” wire (1)
2. Wall mount cover plate (1), Switch box screw (2), Slide switch button (1)
3. Installation Instructions (1)
Fig. 1 Transmitter Handset
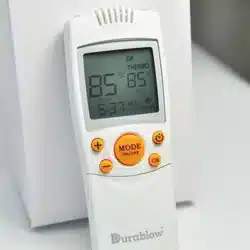
Fig. 2 LCD display on transmitter
LCD DISPLAY ICONS (Fig. 2)
1. LOW BATTERY - Once it appears which means battery power is low. Replace batteries in 2 weeks.
2. TIMER – Indicates time remaining before system shuts OFF. Maximum 9-hour setting for timer programming.
3. MODE – Indicates system operation modes. ON means the system is manually ON. OFF means the entire
system is OFF. THERMO
*2
means the system will automatically cycle ON/OFF, with the desired set temperature.
4. SET – Indicates desired set room temperature of THERMO
*2
mode. (works with ROOM)
5. FLAME – Indicates burner / valve is at ON position.
6. CLOCK – Indicates the current time.
7. ROOM – Indicates CURRENT room temperature.
8. °F / °C – Indicates degrees in Fahrenheit or Celsius (convertible).
BASIC TRANSMITTER FUNCTIONS & MODES
IMPORTANT: The transmitter requires two AAA-size 1.5V batteries (excluded). New (fully charged) batteries are required for
proper functionality of the system. Insert batteries into the transmitter battery compartment on the back, positioning the (+)
and (-) ends of the batteries as indicated on the casing. (Fig. 1) When the batteries are inserted properly, LCD will display
initial numbers.
CAUTION: Due to the temperature-monitoring components in the transmitter, it is important to allow the transmitter to
detect the room temperature before accurately displaying room temperatures on the screen. Normally it takes 5 to 15
minutes for every first time placing this transmitter in a new location / environment.
To begin the mode cycle (Fig. 3), press and release the MODE button (Fig. 1) until the LCD screen reads OFF (Fig. 4).
Step 1: Press the MODE button to manually turn ON the receiver (Fig. 5). Timer is available in this mode.
The receiver will make sounds of quick BEEP X 2 (♫, ♫).
Loading ...
Loading ...
Loading ...