Documents: Go to download!
User Manual
- Owner's manual - (English, Spanish)
- COLD WEATHER OPERATION
- HANDLE POSITIONING FOR NORMAL OPERATION
- TANK INSTALLATION INSTRUCTIONS
- ADDITIONAL INFORMATION REGARDING OPTIONAL ACCESSORIES TO CONNECT A 20 LB LP TANK
- EMERGENCY INDOOR USE
- MAINTENANCE
- TROUBLESHOOTING
Table of contents
USER'S MANUAL RADIANT HEATER
COLD WEATHER OPERATION
- Cold weather is generally defined as ambient temperatures below 32 degrees F.
- 1 lb. propane cylinders have difficulty producing sufficient gas at lower temperatures and can “freeze-up”, reducing the time of operation by as much as 50-70%. For this reason, it is recommended to use only 20 lb. propane tanks under these conditions.
- If a 1 lb. tank is used in cold weather, such as in an ice fishing hut, following are some operating suggestions;
- Expect operating times to be significantly reduced.
- Never use only a single 1lb. tank on the Grab N Go 18K models.
- Never set the heater directly on the ice. Set the heater on a rigid piece of flame retardant insulation and make sure the ventilation slots on the bottom of the heater are not obstructed.
- Elevate the heater slightly above the ground level. Insure the unit is level and secure and cannot be knocked over.
- Adequate ventilation and combustion air must be provided.
- Maintain all clearances as specified on Page 4.
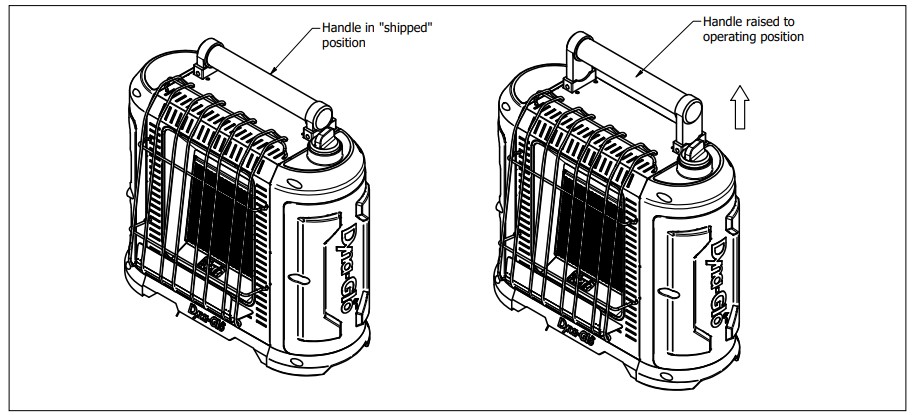
HANDLE POSITIONING FOR NORMAL OPERATION
The heater ships with the handle in a compact position that must be raised for normal operation (Fig. 1a)
- Grab handle and pull directly upward until the handle snaps into position.
- Do not lower the handle to the previous location. The “UP” position is the normal operating orientation.
TANK INSTALLATION INSTRUCTIONS
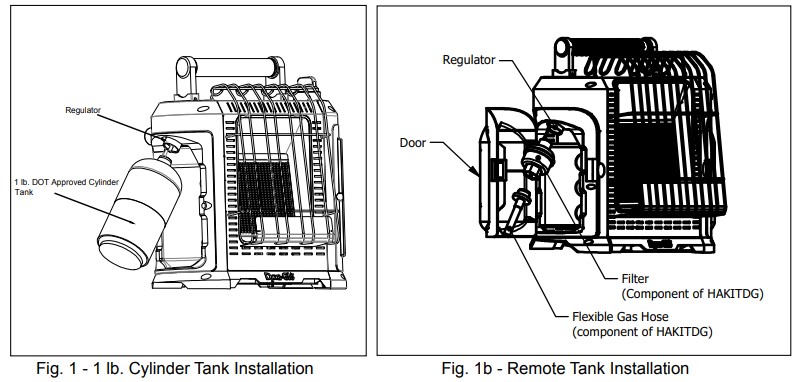
Tank Installation for DOT Certified 1 lb. Propane Cylinder(s) (Fig. 1)
- Open easy access tank compartment door(s). (On 18K Model Only)
- Locate regulator and swivel it upward by hand to provide better access for cylinder
- Attach cylinder(s) to swivel mount by gently turning clockwise until it is hand tight. Do not overtighten. Do not use tools to tighten.
- Check for gas leaks by using a 50% soap-water solution at the joint of the regulator and cylinder.
Tank Installation for 20 lb. Propane Cylinder (Fig. 1b)
- Open easy access tank compartment door. (On 18K Model Only)
- Locate regulator and swivel it upward by hand to provide better access.
- Attach Fuel Filter, Model HAKITDG to swivel mount by gently turning clockwise until it is hand tight. Do not over tighten. Do not use tools to tighten.
- Attach GHP hose end adapter (No. HAKITDG ) to fuel filter by gently turning clockwise until it is hand tight. Attach other end of hose to the LP cylinder. Do not overtighten. Do not use tools to tighten.
- Make sure heater control knob is in the "off" position. Open the LP cylinder valve and check for leaks by using a 50% soap-water solution at all threaded connections.
- Close the Door and make sure the hose is routed through the cutout on the underside of the door.
- Close the access door as needed.
ADDITIONAL INFORMATION REGARDING OPTIONAL ACCESSORIES TO CONNECT A 20 LB LP TANK
- Please note: this heater may be operated with (1) remote refillable propane cylinder max. 20 Lbs.
- Any CSA certified hose with a CGA 600 fitting and excess flow device, that is appropriate for this application, may be used to connect a 20 lb. propane tank.
- Non-certified or handmade hoses and adapters may not be used to connect a 20 lb. propane tank.
- The use of a fuel filter is also recommended but not mandatory. The fuel filter can reduce potential contaminants from the 20 lb. LP tank/hose and extend the life of the heater.
- We recommend using the Dyna-Glo 20 lb. tank connection kit model# HAKITDG, which includes (1) 12’ extension hose and (1) fuel filter (sold separately).
EMERGENCY INDOOR USE
- Adequate combustion air and ventilation must be provided when the appliance is in use. Refer to General Safety Instructions on Page 4 for additional information.
- Only disposable 1 lb. cylinders, marked as PROPANE can be used with this heater.
- NEVER bring a refillable propane cylinder indoors. A fire or explosion can occur causing property damage, serious injury, or death.
- The LP-gas cylinder(s) must be constructed and marked in accordance with the specifications for LP-gas cylinders of the U.S. Department of Transportation (DOT).
- Not for use in a Bedroom or Bathroom.
MAINTENANCE
|
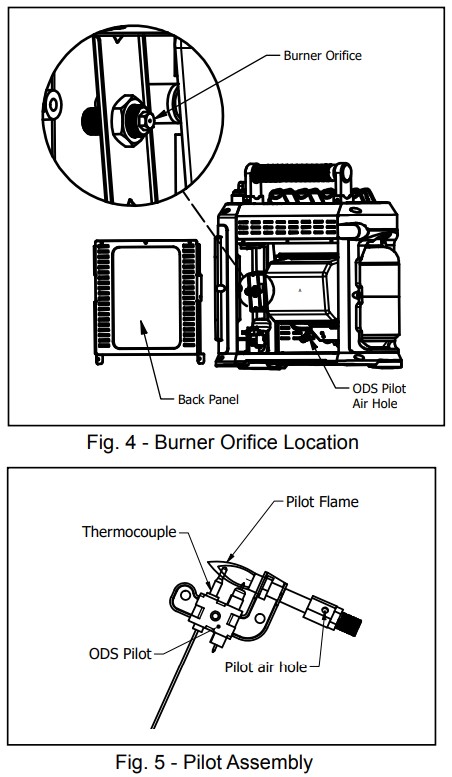
Always keep the heater area clear and free from combustible materials, gasoline and other flammable vapors and liquids. Keep the vent areas (slots in the bottom and the top at the front of heater) clear at all times so combustion air and ventilation is not obstructed. Visually inspect the pilot flame and burner periodically during use so combustion air and ventilation is not obstructed. The pilot flame should be blue in color (not yellow) and will extend beyond the thermocouple. The flame will surround the thermocouple just below the tip, see Figure 5. A slight yellow flame may occur where the pilot flame and main burner flame meet. The burner(s) should be bright orange (with a slight blue color around the border, a red-orange haze that is visible on the burner is acceptable) and without a noticeable flame. A blue flame that rolls out at the top indicates an accumulation of dust, lint or spider webs inside the main burner assembly. If the pilot is yellow or the burner has a noticeable flame, cleaning may be required. Use the following procedure to inspect main burner assembly. It is necessary to periodically check the burner(s) orifice and burner venturi tube to make sure they are clear of insects/nests or spider webs that may accumulate over time. It is strongly recommended that these maintenance instructions be performed annually. A clogged tube can lead to a fire. 1. Allow heater to thoroughly cool before performing any maintenance. 2. Remove disposable 1 lb. cylinder(s) from heater or turn OFF gas supply at remote cylinder valve, and disconnect hose from heater. 3. Remove back panel by removing the top three screws, lower two rear screws and two screws behind the doors of the 18K. 4. Inspect interior of casing assembly for accumulation of dust, lint or spider webs. If necessary, clean interior of casing assembly with a vacuum cleaner or apply air pressure. Do not damage any components within casing assembly when you are cleaning. 5. Inspect and clean main burner orifice located at bottom of burner venturi tube by using a vacuum or apply air pressure at orifice opening. 6. Inspect and clean pilot (mounted to bracket) by using a vacuum or apply air pressure through the holes in the pilot indicated by the arrows in Figure 5. WARNING: Never use needles, wires, or similar cylindrical objects to clean the pilot to avoid damaging the calibrated orifice that controls the gas flow. 7. Apply air pressure into burner assembly to remove dust, lint or spider webs. 8. Reinstall back panel. |
 |
TROUBLESHOOTING
WARNING: If you smell gas:
- Do not attempt to light appliance.
- Extinguish any open flame.
- Disconnect fuel supply.
- Leave the area immediately.
- Allow gas to dissipate 5 minutes before relighting the appliance
IMPORTANT: Operating heater where impurities in air exist may create odors. Cleaning supplies, paint, paint remover, cigarette smoke, cements and glues, new carpet or textiles, etc., create fumes. These fumes may mix with combustion air and create odors.
WARNING: Turn off and let cool before servicing. Only a qualified service person should service and repair heater.
CAUTION: Never use a wire, needle, or similar object to clean ODS/pilot. This can damage ODS/ pilot unit.
| PROBLEM | POSSIBLE CAUSE | CORRECTIVE ACTION |
|---|---|---|
| When ignitor knob is turned, there is no spark at ODS/pilot |
|
|
| When ignitor knob is turned, there is a spark at ODS/ pilot but no ignition. |
|
|
| ODS/pilot lights but flame goes out when control knob is released. |
|
|
| Burner(s) does not light afterODS/pilot is lit. |
|
|
| Burner backfiring during combustion. |
|
|
| High yellow flame during burner combustion |
|
|
| Gas odor during combustion. |
|
|
| Heater produces a clicking/ticking noise just after burner is lit or shut off. |
|
|
| Heater shuts off in use (ODS operates) |
|
|
| Gas odor exists even when control knob is in OFF position. |
|
|
| Moisture/condensation noticed on windows. |
|
|
| Slight smoke or odor during initial operation |
|
|
See other models: HA10R TT15000M DGT-240 IR30DTDG-2 IR6PMDG-1
