Prior to operating heater, make sure the electrical outlet is of the configuration and capacity appropriate for the heater. See outlet configuration on front page of manual. This heater is for use on 240 volts. The cord has a plug as shown in Figure 1. No adapter is available for this blade configuration, and none should be used. The type outlet is a 240 volt grounding outlet. When properly installed, it provides a ground connection through the cord to the heater to protect the operator from electric shock.
WARNING: BE CAREFUL NOT TO DIRECT THE HEATER TOWARD DRAPERIES, FURNITURE, OR OTHER OBJECTS THAT COULD BE DAMAGED BY HEAT. DO NOT PLACE THE HEATER WHERE A SMALL CHILD MAY FALL OVER THE HEATER. DO NOT PLACE THE HEATER WHERE THE POWER CORD MAY BE WALKED ON, TRIPPED OVER OR OTHERWISE SUBJECTED TO HARD USAGE.
INSTALLATION
FLOOR APPLICATION
The heater is for floor mounting. Place the heater on floor or other flat surface and insert plug into the proper wall outlet.
WALL OR CEILING MOUNTING
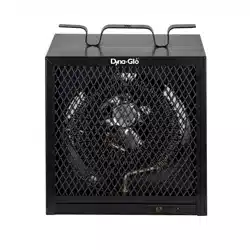
The EG4800DG and EG5600DG garage heaters include a wall / ceiling mounting bracket. The bracket should be mounted to a structure that is capable of supporting the combined weight of the heater and the bracket. Ideally, the bracket should be secured to a wall stud, roof truss, or onto a solid block wall using the proper mounting hardware. The heater should be mounted as close to the power supply as possible to avoid the use of an extension cord.
Drill two holes in a wall/ceiling, the distance of the holes should match the bracket.
Screw two M10*30 screws (not included) to wall/ ceiling, make sure the bracket is secured.
Hang the heater as shown below, secure the heater to the bracket by inserting a bolt through a washer (included) into the pre-drilled holes.
Secure the bolt with a lock washer and nut (included). Tighten with a wrench.
OPERATION
The heater must be properly installed before it is used.
Set thermostat to its full counterclockwise position. Plug the unit into a properly grounded 240V outlet. Set the thermostat to the farthest clockwise position. The fan should come on and the unit will start heating the room. When the room reaches comfort level, turn the thermostat counterclockwise until the heater turns off.
The heater will cycle automatically around this preset temperature. To increase temperature, turn the thermostat knob clockwise. To lower temperature, turn the thermostat counterclockwise. Do not attempt to tamper with the thermostat.
MAINTENANCE
CLEANING AND STORAGE
The heater should be cleaning twice for a year. Turn thermostat off and remove plug from electrical outlet and make sure that the heating element of the heater is cool before cleaning heater. Use a soft cloth for dusting. For cleaning, use only a damp rag and non-abrasive dish detergent. Do not use abrasive chemical cleaners as these may harm the finish. If heater is used in very dusty location, use a vacuum cleaner dust brush to remove dust and other foreign material from the grilles. Always unplug cord and wrap around heater handle when not in use. Move heater to a safe location for storage.
SERVICE
This heater does not require any routine maintenance other than occasional cleaning to prevent clogging of intake grille opening. To clean air intake grille, use vacuum with brush attachment or high pressure air. The motor is permanently lubricated. Do not operate the heater with a damaged cord or plug or if the heater malfunctions or has been damaged in any manner. Any other servicing should be performed by qualified service personnel. Return heater to authorized service facility for examination, electrical, or mechanical adjustment, or repair.
WARNING: OPERATION OF THE SAFETY THERMAL LIMIT CONTROL INDICATES THE HEATER HAS BEEN SUBJECTED TO SOME ABNORMAL CONDITIONS. IT IS RECOMMENDED THAT THE HEATER BE CHECKED BY A REPUTABLE ELECTRICIAN OR REPAIR SERVICE TO INSURE THE HEATER HAS NOT BEEN DAMAGED.
REPLACEMENT PARTS
TROUBLESHOOTING
PROBLEM
ROOT CAUSE
CORRECTIVE ACTION
Unit is not heating.
The overheat protection has activated.
Inspect the garage heater and check that the air inlets and outlets are not blocked as this may cause overheating. Switch off the circuit breaker to the garage heater for 30 minutes and allow it to cool down. Turn the power back on and operate.
The breaker has tripped
Reset the breaker at the fuse panel and restart the heater
Garage heater emits a burning smell
The room temperature has already reached the set thermostat temperature
Adjust the temperature setting to make sure the thermostat setting temperature is higher than current room temperature.
During production dust and/ or oil debris gathered on heating coils.
Make sure the room is well ventilated. Allow the garage heater to run until the smell is dissipated.
Check and make sure there is no combustible material within 0.9 meters (3 feet) of the garage heater.
Remove the combustible material around the garage heater.
This heater must be mounted at least 8 feet off the floor, for specific clearances, please check the "LOCATING HEATER" section in the instruction manual
Relocate the garage heater so there is enough space between the heater and adjacent wall and floor.