
Loading ...
Loading ...
Loading ...
Installation • Operation 4
For parts or assistance, call Simer Customer Service at 800-468-7867
Installation
1. This unit can be installed in sump pit with
minimum diameter of 12”(30cm) and depth
of 12” (30cm). Sump pit may be constructed
of tile, concrete, steel or plastic. Check local
codes for approved materials.
2. Install pump on solid, level foundation, as near
as possible to center of sump pit. Do not hang
pump from discharge pipe or power cord.
Risk of burns. Pump must be level
(column must be vertical) when operating. If
motor is tilted, internal start/run switch may
overheat and damage motor.
3. Pump should not be installed on clay, earth or
sand surfaces. Clean sump pit of small stones
and gravel which could clog the pump. Keep
pump inlet screen clear.
4. Thread discharge pipe into pump body
carefully to avoid stripping or crossing threads.
NOTICE Do not use ordinary pipe joint
compound on plastic pipe or pump. Pipe joint
compound can attack plastics and damage pump.
5. To reduce motor noise and vibrations, a short
length of rubber hose (1-5/8”(41mm) I.D., e.g.
radiator hose) can be connected into discharge
line near pump using suitable clamps.
Risk of electric shock. Can shock,
burn or kill. Pump is designed for 115V., 60
HZ operation and requires an individual branch
circuit of 15 amperes capacity. It is supplied
with a 3-wire cord set with grounding-type plug
for use in a 3-wire, grounded outlet. Do not
cut off the round grounding prong. For safety,
outlet must always be electrically grounded to
a suitable electrical ground such as a grounded
water pipe or a properly grounded metallic
raceway or ground wire system.
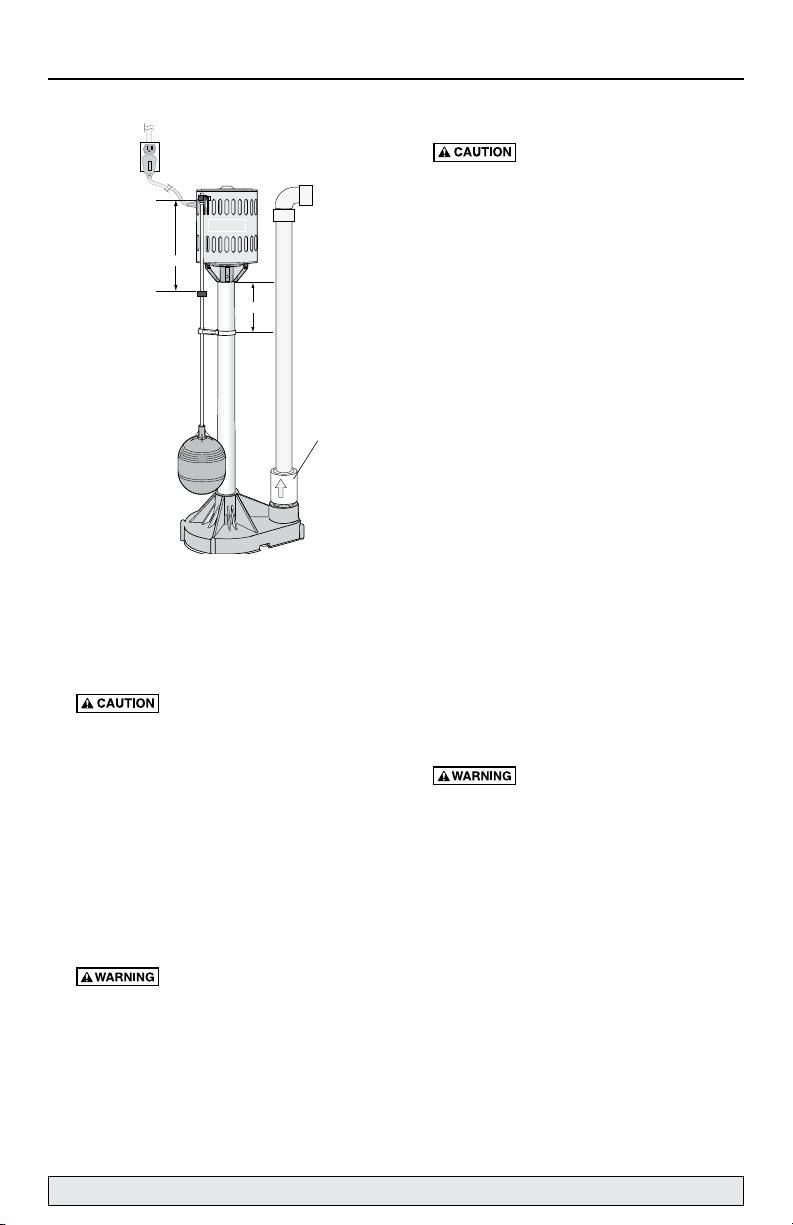
6. Locate Float Rod Guide (Key No. 6) about 6”
(16cm) below motor. Clamp guide to column
with screw provided.
Risk of flooding. Can cause
personal injury and/or property damage. Be
sure that guide is securely clamped so that float
rod is vertical and can move up and down
freely. If float is angled or binds, pump may not
start, allowing flooding to occur.
7. Screw float onto threaded end of rod.
Threads on rod will cut threads into corrosion
resistantafloat.
8. Insert plain end of float rod up through eye of
rod guide.
9. Slide one rod stop on float rod before passing
rod through eye of pump switch. Slide 2nd rod
stop on rod after passing through eye of switch.
Position 2nd rod stop flush with top of rod.
10. Position lower rod stop to within 8”(20cm) of
switch lever arm. With lower rod stop in this
position, pump will automatically cycle at
approximately 2-1/2”(6cm) off and 10-12”(25-
30cm) on. For faster cycling, move lower rod
stop closer to switch lever arm.
11. If pump discharge line is exposed to outside
subfreezing atmosphere, then portion of
line exposed must be installed so any water
remaining in pipe will drain to outfall by
gravity. Failure to do this can cause water
trapped in discharge to freeze which could
result in damage to pump.
12. Install an in-line check valve to prevent flow
backwards through pump after pump shuts off.
NOTICE Simer check valves are equipped
with an air bleed hole to prevent airlocking the
pump. If using a check valve that is not a Simer
valve, drill a 1/8” (3.2mm) hole in discharge
pipe just above pump body but below the
check valve to prevent air locks.
13. After all piping and controls have been
installed, unit is ready for operation.
14. Run pump through one cycle to check float
switch operation.
Risk of sudden starts. Can
cause electrical shock and personal
injury.
The pump motor is equipped with
automatic resetting thermal protector and
may restart unexpectedly. Protector tripping
is an indication of motor overloading as a
result of operating pump at low heads (low
discharge restriction), excessively high or low
voltage, inadequate wiring, incorrect motor
connections, or a defective motor.
5098 0705
Discharge
About 6"
About 8"
Check
Valve
(Purchase
Separately)
Loading ...
Loading ...
Loading ...