
www.klarstein.com
CREAMBERRY
Eiscrememaschine
Ice Cream Maker
Máquina de helado
Machine à crème glacée
Gelatiera
10028924 10028925


3
DE
Sehr geehrter Kunde,
wir gratulieren Ihnen zum Erwerb Ihres Gerätes. Lesen Sie
die folgenden Hinweise sorgfältig durch und befolgen Sie
diese, um möglichen Schäden vorzubeugen. Für Schäden,
die durch Missachtung der Hinweise und unsachgemäßen
Gebrauch entstehen, übernehmen wir keine Haftung. Scannen
Sie den folgenden QR-Code, um Zugriff auf die aktuellste
Bedienungsanleitung und weitere Informationen rund um das
Produkt zu erhalten.
INHALTSVERZEICHNIS
Sicherheitshinweise4
Geräteübersicht6
Vor dem ersten Betrieb 6
Inbetriebnahme und Bedienung7
Reinigung und Pege 9
Fehlerbehebung10
Hinweise zur Entsorgung10
Rezepte11
Hinweise zur Entsorgung12
Hersteller & Importeur (UK)12
TECHNISCHE DATEN
Artikelnummer 10028924, 10028925
Stromversorgung 220-240 V ~ 50-60 Hz
Leistung 7,3 - 9,5 W
English 13
Español 23
Français 33
Italiano 43

4
DE
SICHERHEITSHINWEISE
• Lesen Sie sich alle Hinweise sorgfältig durch und bewahren Sie die
Bedienungsanleitung zum Nachschlagen gut auf.
• Prüfen Sie vor der Benutzung die Spannung auf der Geräteplakette und schließen
Sie das Gerät nur an Steckdosen an, die der Spannung des Geräts entsprechen.
• Falls das Netzkabel beschädigt ist, muss es vom Hersteller, einem autorisierten
Fachbetrieb oder einer ähnlich qualizierten Person ersetzt werden.
• Drehen Sie das Gerät nicht auf den Kopf und neigen Sie es nicht mehr als 45°.
• Tauchen Sie das Gerät nie komplett in Wasser oder andere Flüssigkeiten und
achten Sie drauf, dass Stecker und Netzkabel nicht nass werden.
• Ziehen Sie den Stecker aus der Steckdose, wenn Sie das Gerät nicht mehr
benutzen oder reinigen.
• Lassen Sie um das Gerät herum 8 cm Platz, um ausreichende Luftzirkulation zu
gewährleisten.
• Benutzen Sie nur Zubehör, das vom Hersteller ausdrücklich dafür zugelassen ist.
• Kinder, physisch und körperlich eingeschränkte Menschen sollten das Gerät nur
benutzen, wenn sie vorher von einer Aufsichtsperson ausführlich mit den Funktionen
und den Sicherheitsvorkehrungen vertraut gemacht wurden. Achten Sie darauf,
dass Kinder nicht mit dem Gerät spielen.
• Benutzen Sie das Gerät nicht in der Nähe von Flammen, heißen Kochplatten oder Öfen.
• Schalten Sie das Gerät nicht mehrmals hintereinander ein und aus. Warten Sie
mindestens 5 Minuten, bevor sie das Gerät wieder einschalten, um den Kompressor
nicht zu beschädigen.
• Stecken Sie keine Bleche oder andere Objekt ins Gerät, um Feuer und Kurzschlüsse
zu vermeiden.
• Wenn Sie das Eis entnehmen, schlagen Sie nicht gegen den Behälter oder den
Rand des Behälters, um ihn nicht zu beschädigen.
• Schalten Sie das Gerät erst ein, wenn Sie den Behälter und das Rührmesser
angebracht haben.
• Die Temperatur für Zutaten beträgt 25±5°C. Kühlen Sie die Zutaten nicht vor,
andernfalls könnte das Messer blockieren, bevor die Eiscreme fertig zubereitet ist.
• Entfernen Sie das Rührmesser nicht, solange es in Betrieb ist.
• Verwenden Sie das Gerät nicht im Freien.
• Reinigen Sie das Gerät nicht mit Scheuerpulver oder Scheuerschwämmen.
• Bewahren Sie im Gerät keine explosiven Substanzen auf, wie beispielsweise
Sprühdosen mit leicht entzündlichen Treibgasen.
• Das Gerät ist nicht für den kommerziellen Gebrauch, sondern nur für Gebrauch im
Haushalt und in ähnlichen Umgebungen vorgesehen.

5
DE
Besondere Hinweise
• Achten Sie bei der Positionierung des Gerätes darauf, dass das Netzkabel nicht
eingeklemmt oder beschädigt ist.
• Achten Sie darauf, dass sich keine Mehrfachsteckdosen oder Netzteile auf der
Rückseite des Geräts be nden.
Um eine Kontamination von Lebensmitteln zu vermeiden, beachten Sie bitte die
folgenden Anweisungen:
• Reinigen Sie regelmäßig Ober ächen, die mit Lebensmitteln in Berührung kommen
können.
WARNUNG
Achten Sie bei Gebrauch, Wartung und Entsorgung des Gerätes auf
das linke Symbol, das sich auf der Rückseite oder am Kompressor des
Gerätes be ndet. Dieses Symbol warnt vor möglichen Bränden. In den
Kältemittelleitungen und im Kompressor be nden sich brennbare Stoffe.
Halten Sie das Gerät bei Gebrauch, Wartung und Entsorgung von
Feuerquellen fern.

6
DE
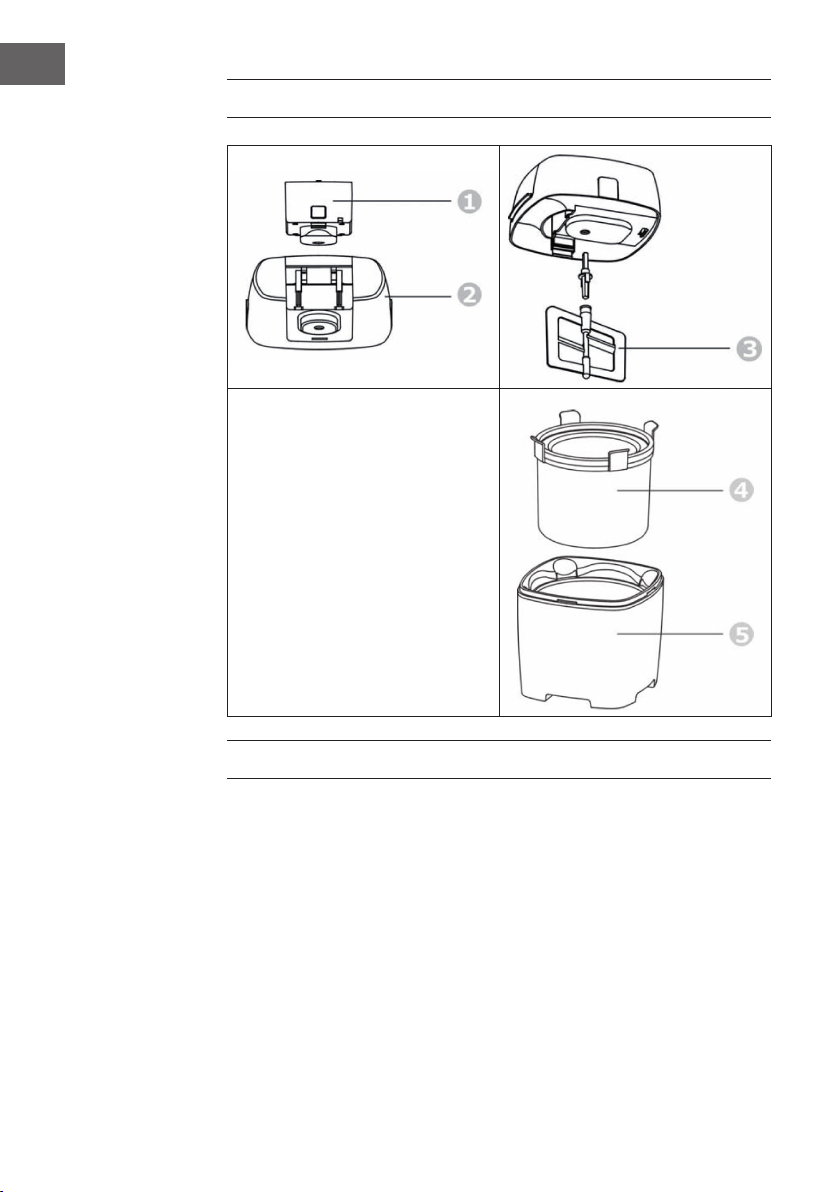
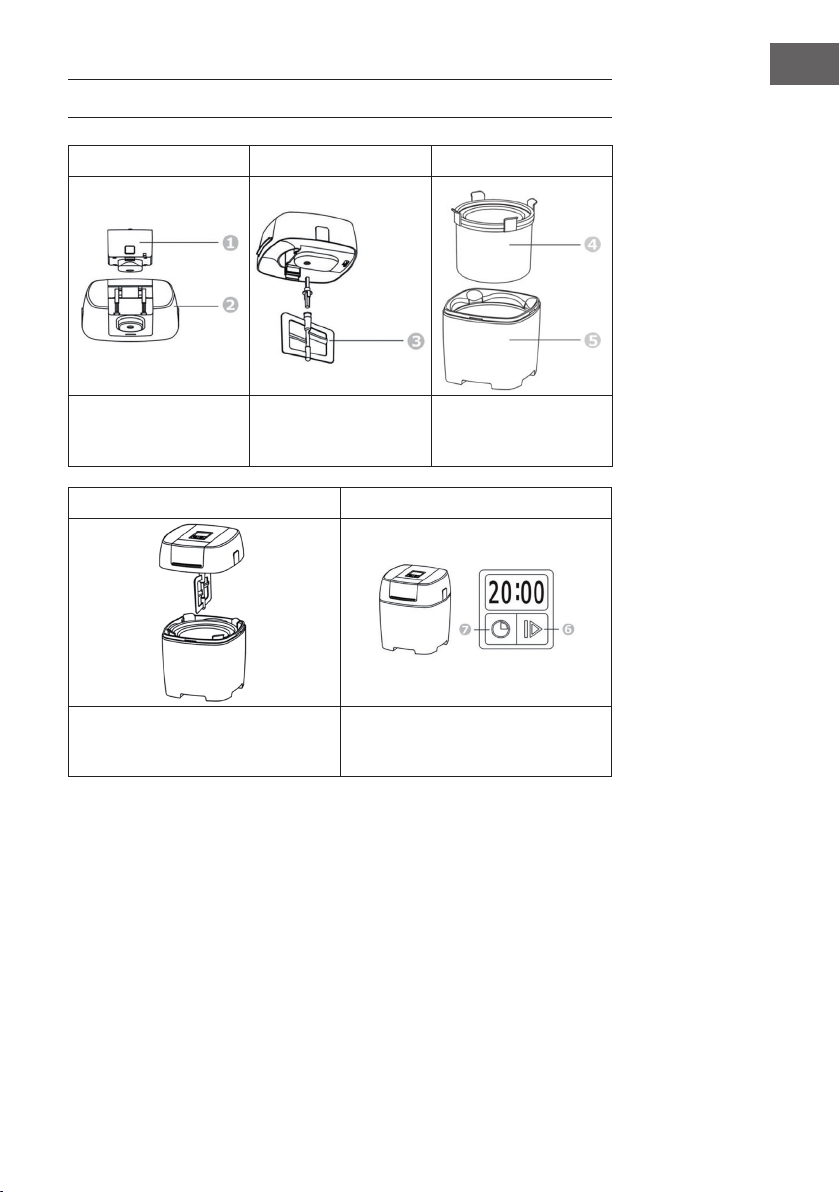
GERÄTEÜBERSICHT
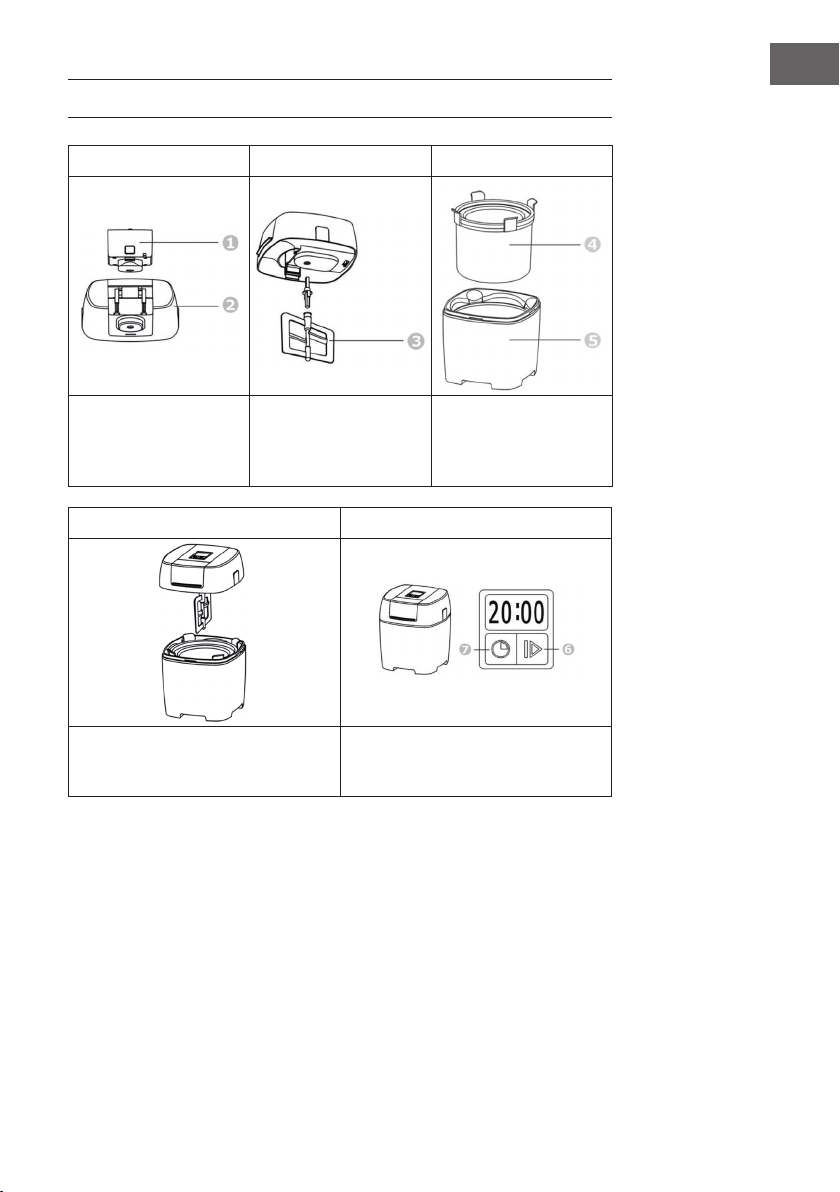
1 Antrieb
2 Deckel
3 Rührstab
4 Innere Schüssel
5 Äußere Schüssel
VOR DEM ERSTEN BETRIEB
1. Entfernen Sie das komplette Verpackungsmaterial.
2. Waschen Sie alle Teile mit klarem Wasser ab (siehe „Reinigung und Pege“).
3. Stellen Sie die innere Schüssel mindestens 8 Stunden ins Gefrierfach.
4. Bereiten sie die Eiscreme-Zutaten vor (siehe „Rezepte“) und stellen Sie die
Mischung in den Kühlschrank.
7
DE
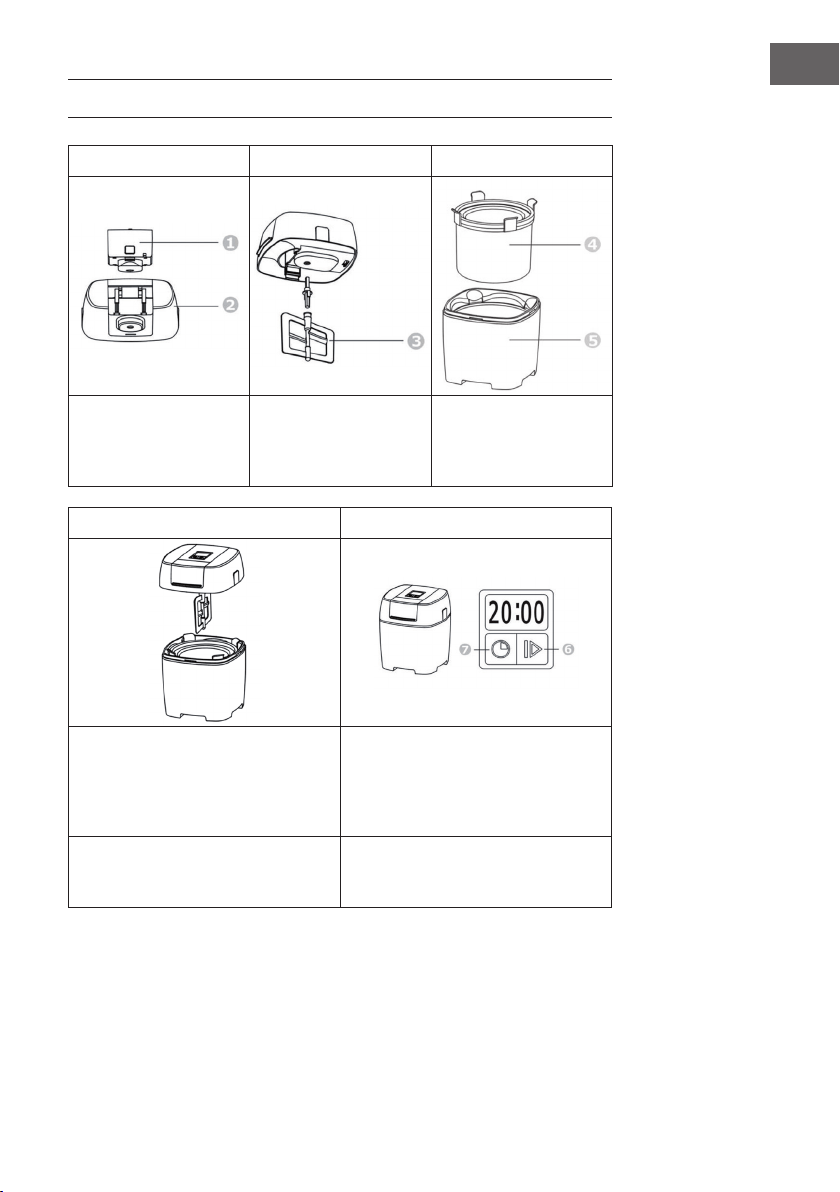
INBETRIEBNAHME UND BEDIENUNG
1 2 3
Drücken Sie den Antrieb
in den Deckel, bis es im
Deckel einrastet.
Stecken Sie den Rührstab
in den Antrieb.
Nehmen Sie die innere
Schüssel aus dem
Gefrierfach und setzen Sie
sie in die äußere Schüssel.
4 5
Setzen Sie den Deckel mit dem Antrieb
und dem Rührstab auf die Eisbehälter.
Stecken Sie den Stecker in die Steckdose.
Ein Piepton ertönt und das Display zeigt
„20:00“ an.
8
DE
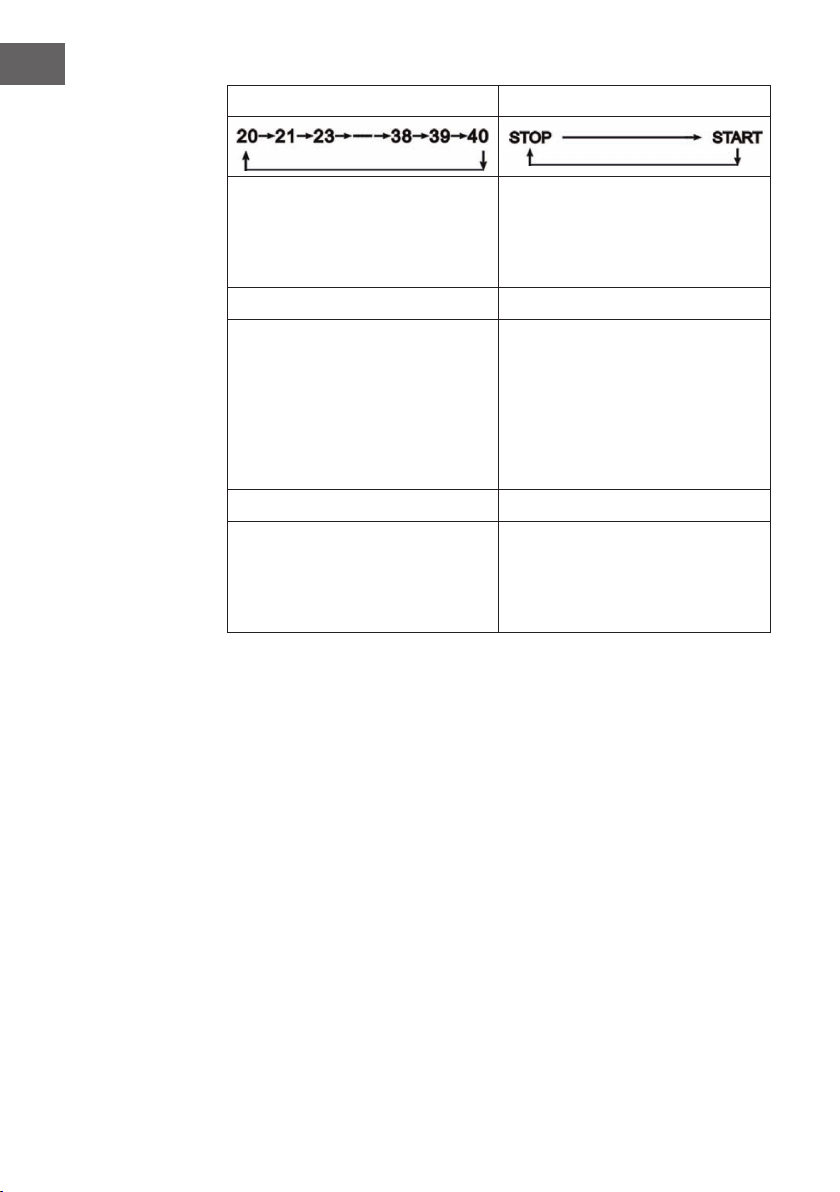
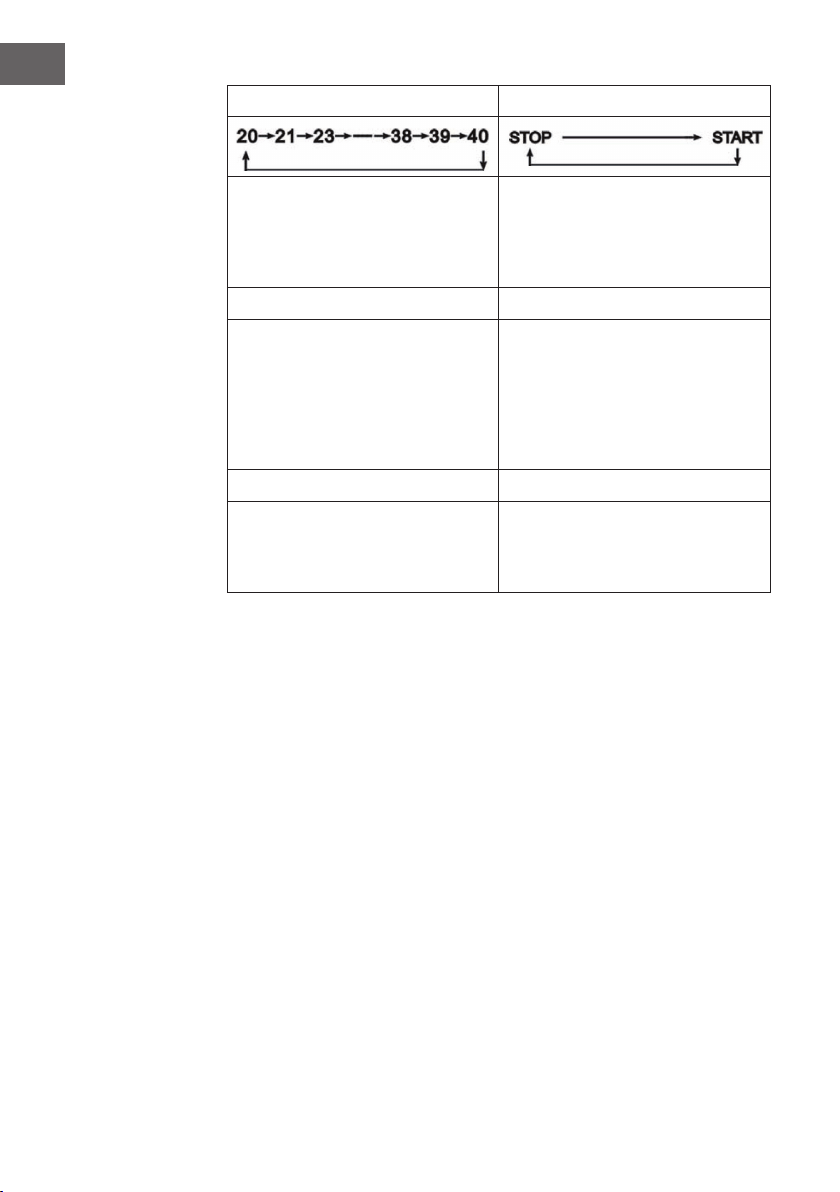
6 7
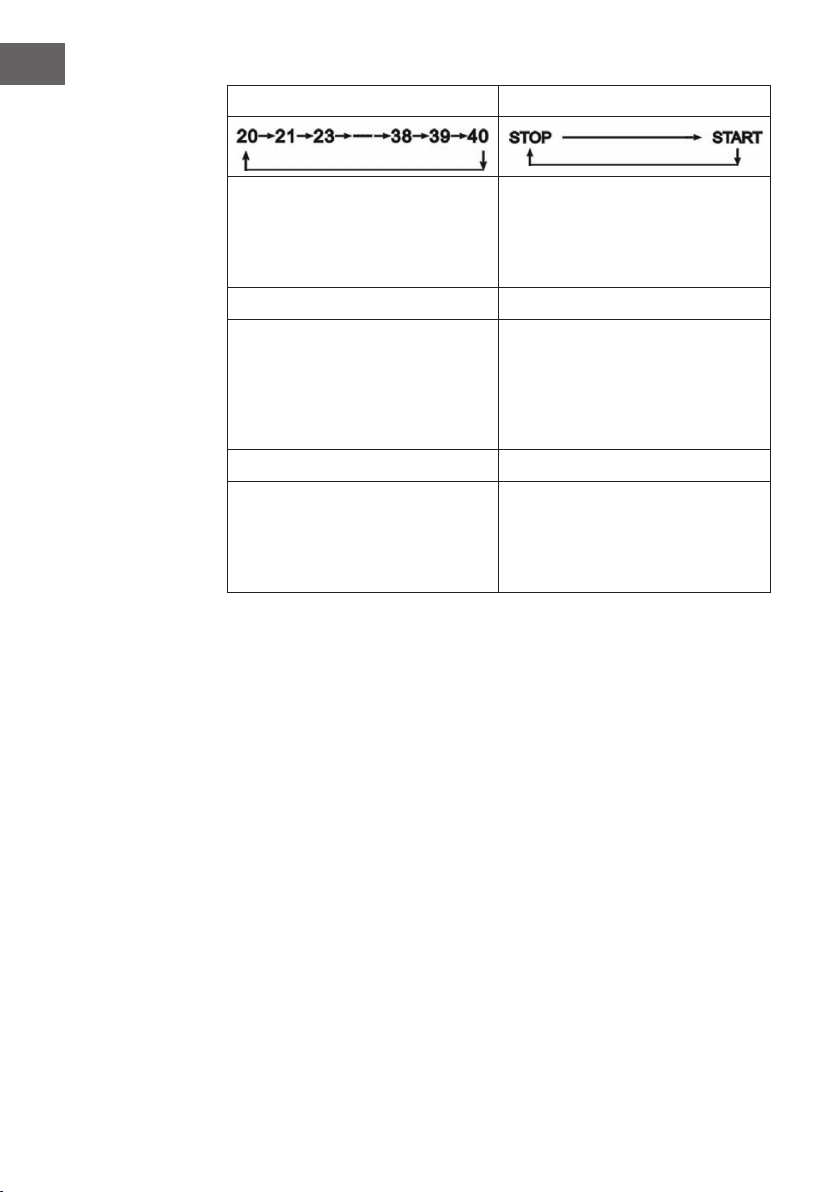
Jedes Mal wenn Sie auf die Reset-Taste
(7) drücken wird die Zeit um eine Minute
erhöht und ein Piepton ertönt. Sie können
eine Zeit zwischen 20 und 40 Minuten
einstellen.
Jedes Mal wenn Sie auf die Power-Taste
(6) drücken, wird das Gerät im Wechsel
gestartet und angehalten, während ein
Piepton ertönt.
8 9
Drücken Sie auf die Power-Taste,
nachdem Sie die Zeit eingestellt haben.
Auf dem Dis- play wird die verbleibende
Zeit angezeigt und heruntergezählt
Bevor sie die Eismischung hinzugeben,
können Sie die Maschine anhalten
und die Zeit nochmal ändern,
falls erforderlich. Das Gerät muss
eingeschaltet werden, bevor Sie die
Eismischung in die Schüssel geben, damit
sie nicht sofort an der Innenseite der
inneren Schüssel anfriert.
10 11
Gießen Sie die vorbereitete Eismischung
in die innere Schüssel und lassen Sie
zum oberen Rand hin 5 cm Platz, da die
Mischung während dem Gefrieren an
Volumen zunimmt.
Lassen Sie die Eismischung im Gerät,
bis die gewünschte Festigkeit erreicht ist,
was in der Regel nach 15-30 Minuten
der Fall ist.
Wichtige Hinweise zur Bedienung
• Schalten Sie das Gerät während des Gefrierprozesses nicht ein oder aus, damit
die Eismischung nicht am Boden der inneren Schüssel festfriert und den Rührstab
behindern.
• Um eine Überhitzung des Antriebs zu vermeiden, wechselt die Drehrichtung, sobald
die Eismasse zu dick wird. Stoppen Sie das Gerät, sobald sich die Drehrichtung des
Rührstabs ändert. Falls sich der Antrieb über- hitzen sollte, sorgt ein eingebauter
Sicherheitsmechanismus dafür, dass das Gerät automatisch anhält. Falls das
passiert, ziehen Sie den Stecker und lassen Sie das Gerät abkühlen, bevor Sie es
weiter benutzen.
• Um ein bestmögliches Ergebnis zu erzielen, berührt der Rührer während des
Betriebs die Innenwand der inneren Schüssel.

9
DE
• Sobald die eingegebene Zeit abgelaufen ist hält das Gerät automatisch an. Ziehen
Sie den Stecker aus der Steckdose, bevor Sie den Deckel abnehmen. Das Eis ist
nun bereit zum Verzehr. Die Eiscreme ist direkt nach der Produktion noch etwas
cremig. Wenn sie ihr Eis fester mögen, füllen Sie es in einen Behälter um und stellen
Sie es noch eine Weile ins Gefrierfach.
• Benutzen Sie keine Metallgegenstände, um das Eis aus der Schüssel zu entfernen.
Wichtige Hinweise zur inneren Schüssel
• Nehmen Sie die innere Schüssel erst kurz vor der Eiszubereitung aus dem
Gefrierfach. Bewahren Sie die innere Schüssel im Gefrierschrank auf, damit Sie
immer bereit zur Benutzung ist. packen Sie die innere Schüssel in einen Plastikbeutel
und stellen Sie sie aufrecht ins Gefrierfach.
• Achten Sie darauf, dass die innere Schüssel trocken ist, bevor Sie sie ins Gefrierfach
stellen.
• Durchstecken Sie die innere Schüssel nicht und erwärmen Sie sie nicht.
• Der Gefrierschrank, indem Sie die Schüssel aufbewahren sollte eine
Innentemperatur von -18 °C oder da- runter haben. Lassen Sie die Schüssel
mindestens 8 Stunden im Gefrierschrank, bevor Sie Eis zubereiten.
• Um bestmögliche Ergebnisse zu erzielen, lassen Sie die Zutaten vor der
Eiszubereitung im Kühlschrank her- unterkühlen. Die Zugabe von Alkohol behindert
den Gefrierprozess.
REINIGUNG UND PFLEGE
Wichtige Hinweise zur Reinigung
• Ziehen Sie den Stecker aus der Steckdose, bevor Sie das Gerät auseinanderbauen
und reinigen.
• Tauchen Sie das Gerät, den Stecker und das Netzkabel nicht in Wasser oder
andere Flüssigkeiten.
• Waschen Sie die Teile nicht im Geschirrspüler.
• Benutzen Sie zur Reinigung keine Scheuerschwämme, Schwämme aus Stahlwolle
oder Scheuermittel.
Innere Schüssel
Warten Sie, bis die innere Schüssel Raumtemperatur erreicht hat. Entnehmen Sie die
Schüssel und reinigen Sie die Innenseite. Tauchen Sie die Schüssel nicht komplett in
Wasser und trocknen Sie sie nach der reinigung sorgfältig ab.
Äußere Schüssel
Wischen Sie die äußere Schüssel ab und trocknen Sie sie danach sorgfältig ab.
10
DE
Rührstab
Ziehen Sie den Rührstab aus dem Antrieb. Waschen Sie ihn ab und trocknen Sie ihn
sorgfältig ab.
Deckel
Waschen Sie den Deckel ab und trocknen Sie ihn sorgfältig ab.
Antrieb
Wischen Sie den Antrieb mit einem feuchten Lappen ab und trocknen Sie ihn ab.
FEHLERBEHEBUNG
Problem Mögliche Ursache Lösung
Das Gerät läuft nicht. Das Gerät ist nicht
eingeschaltet oder die
Sicherung ist kaputt.
Versichern Sie sich dass
das Gerät eingesteckt und
eingeschaltet ist.
Das Gerät kann die
Eiszubereitung nicht
beenden.
Das Gerät steht neben
einer Wärmequelle oder
um das Gerät ist zu wenig
Platz.
Stellen Sie das Gerät an
einem kühlen Ort auf und
lassen sie um das Gerät
herum genug Platz zur
Luftzirkulation.
Der Deckel wurde zu oft
oder zu lange geöffnet.
Schließen Sie den Deckel
fest und öffnen Sie ihn
nicht unnötig oft.
HINWEISE ZUR ENTSORGUNG
Bendet sich die linke Abbildung (durchgestrichene Mülltonne
auf Rädern) auf dem Produkt, gilt die Europäische Richtlinie
2012/19/EU. Diese Produkte dürfen nicht mit dem normalen
Hausmüll entsorgt werden. Informieren Sie sich über die
örtlichen Regelungen zur getrennten Sammlung elektrischer
und elektronischer Gerätschaften. Richten Sie sich nach
den örtlichen Regelungen und entsorgen Sie Altgeräte nicht
über den Hausmüll. Durch die regelkonforme Entsorgung
der Altgeräte werden Umwelt und die Gesundheit ihrer
Mitmenschen vor möglichen negativen Konsequenzen
geschützt. Materialrecycling hilft, den Verbrauch von
Rohstoffen zu verringern.

11
DE
REZEPTE
Bananeneis
Zutaten:
1 reife Banane
200 ml fettarme Milch
100 ml Sahne
50 g Puderzucker
Zubereitung:
Bananen mit der Gabel zerquetschen.
Milch, Sahne und Puderzucker dazu
geben und die Mischung bei laufendem
Rührer in die innere Schüssel geben
und lassen sie solange darin, bis die
gewünschte Festigkeit erreicht ist.
Himbeer-Joghurt-Eis
Zutaten:
200 g frische Himbeeren
100 g Puderzucker
200 ml Joghurt
Zubereitung:
Zerquetschen oder pürieren Sie die
Himbeeren. Um ein glatteres Püree
zu erhalten, entfernen Sie die Kerne
mit Hilfe eines Siebs. Geben Sie den
Puderzucker und Joghurt hinzu. Geben
Sie die Mischung bei laufendem Rührer
in die innere Schüssel geben und lassen
sie solange darin, bis die gewünschte
Festigkeit erreicht ist.
Schoko-Minz-Eis
Zutaten:
200 ml fettarme Milch
200 ml Sahne
50 g Puderzucker
50 g Schokoraspeln
Pefferminz-Extrakt
Zubereitung:
Geben Sie Milch und Puderzucker
in einen kleinen Topf und erhitzen
Sie beides bei niedriger Flamme, bis
sich der Zucker aufgelöst hat. Lassen
Sie die Mischung abkühlen. Geben
dann die Sahne und einige Tropfen
Pfefferminz-Extrakt zur Milch. Geben
Sie die Mischung bei laufendem Rührer
in die innere Schüssel und fügen Sie die
Schokoraspeln hinzu, sobald die Masse
zu gefrieren beginnt. Entnehmen Sie das
Eis, sobald es die gewünschte Festigkeit
hat.

12
DE
Erdbeereis
Zutaten:
250 g frische Erdbeeren
100 g Puderzucker
100 g Sahne
Zitronensaft von 1/2 Zitrone
Zubereitung:
Pürieren Sie die Erdbeeren und geben
Sie die übrigen Zutaten hinzu. Geben
Sie die Mischung bei laufendem Rührer
in die innere Schüssel und lassen Sie
sie solange darin, bis die gewünschte
Festigkeit erreicht ist.
HINWEISE ZUR ENTSORGUNG
Wenn es in Ihrem Land eine gesetzliche Regelung zur
Entsorgung von elektrischen und elektronischen Geräten
gibt, weist dieses Symbol auf dem Produkt oder auf der
Verpackung darauf hin, dass dieses Produkt nicht im
Hausmüll entsorgt werden darf. Stattdessen muss es zu
einer Sammelstelle für das Recycling von elektrischen
und elektronischen Geräten gebracht werden. Durch
regelkonforme Entsorgung schützen Sie die Umwelt und die
Gesundheit Ihrer Mitmenschen vor negativen Konsequenzen.
Informationen zum Recycling und zur Entsorgung dieses
Produkts, erhalten Sie von Ihrer örtlichen Verwaltung oder
Ihrem Hausmüllentsorgungsdienst.
HERSTELLER & IMPORTEUR (UK)
Hersteller:
Chal-Tec GmbH, Wallstraße 16, 10179 Berlin, Deutschland.
Importeur für Großbritannien:
Chal-Tec UK limited
Unit 6 Riverside Business Centre
Brighton Road
Shoreham-by-Sea
BN43 6RE
United Kingdom

13
EN
Dear Customer,
Congratulations on purchasing this device. Please read the
following instructions carefully and follow them to prevent
possible damages. We assume no liability for damage caused
by disregard of the instructions and improper use. Scan the QR
code to get access to the latest user manual and more product
information.
CONTENT
Safety Instructions14
Product Overview16
Before rst Use 16
Use and Operation17
Cleaning and Care19
Troubleshooting20
Hints on Disposal20
Recipes21
Disposal Considerations22
Manufacturer & Importer (UK)22
TECHNICAL DATA
Item number 10028924, 10028925
Power supply 220-240 V ~ 50-60 Hz
Power consumtion 7,3 - 9,5 W

14
EN
SAFETY INSTRUCTIONS
• Read all the safety and operating instructions carefully and retain them for future
reference.
• Ensure the voltage is compliant with the voltage range stated on the rating label,
and ensure the earthing of the socket is in good condition.
• If the supply cord is damaged, it must be replaced by the manufacturer or its service
agent or a similarly qualied person in order to avoid a hazard.
• Do not upend this product or incline it over a 45° angle.
• To protect against risk of electric shock, do not pour water on cord, plug and
ventilation, immerse the appliance in water or any other liquid.
• Unplug the appliance after using or before cleaning.
• Keep the appliance 8 cm from other objects to ensure the good heat releasing.
• Do not use the accessories which are not recommended by Manufacturer.
• This appliance can be used by children aged from 8 years and above and persons
with reduced physical, sensory or mental capabilities or lack of experience and
knowledge if they have been given supervision or instruction concerning use of
the appliance in a safe way and understand the hazards involved. Children shall
not play with the appliance. Cleaning and user maintenance shall not be made by
children without supervision. Children should be supervised to ensure that they do
not play with the appliance.
• Do not use the appliance close by ames, hot plates or stoves.
• Do not switch on the power button frequently (ensure 5 min. interval at least) to
avoid the damage of compressor.
• Metal sheet or other electric objects are not allowed to be inserted into the
appliance to avoid re and short circuit.
• When take out the ice cream, do not knock the barrel or edge of barrel to protect
the barrel from damage.
• Do not switch on the power before install well the barrel or blender blade.
• The initial temperature of the ingredients is 25±5°C. Do not put the ingredients into
freezer for pre-freeze, as it will easily make the blender blade blocked before the ice
cream is in good condition.
• Do not remove the blender blade when the appliance is on working.
• Do not use outdoors.
• Never clean with scouring powders or hard implements.
• Do not store explosive substances such as aerosol cans with a ammable propellant
in this appliance.
• This appliance is intended to be used in household and similar applications.

15
EN
Special Notes
• When positioning the unit, make sure that the power cord is not pinched or
damaged.
• Make sure that there are no multiple sockets or power supplies on the back of the
unit.
To avoid contamination of food, please follow the instructions below:
• Regularly clean surfaces that may come into contact with food.
WARNING
When using, servicing and disposing of the unit, pay attention to the left
symbol on the rear of the unit or on the compressor. This symbol warns
of possible res. There are ammable substances in the refrigerant lines
and in the compressor. Keep the appliance away from sources of re
during use, maintenance and disposal.

16
EN
PRODUCT OVERVIEW
1 Power unit
2 Lid
3 Paddle
4 Inner bowl
5 Outer bowl
BEFORE FIRST USE
1. Remove all of the packaging.
2. Wash the parts: see “Cleaning and Care”.
3. Eight hours in advance, place the inner bowl into a freezer.
4. Prepare the ice cream or sorbet mix (see „Recipes“). Allow the mix to cool in the
refrigerator.

17
EN
USE AND OPERATION
1 2 3
Fit the power unit into the
lid, It will click into place.
Fit the paddle into the po-
wer unit.
Take the inner bowl from
the freezer and put it into
the outer bowl.
4 5
Lower the assembled lid/power unit/
paddle onto the bowl and It will click
into place.
Insert the plug into outlet,and a “beep”
can be heard immediately.The running
time” 20:00” is indicated automatically
on LCD.
18
EN
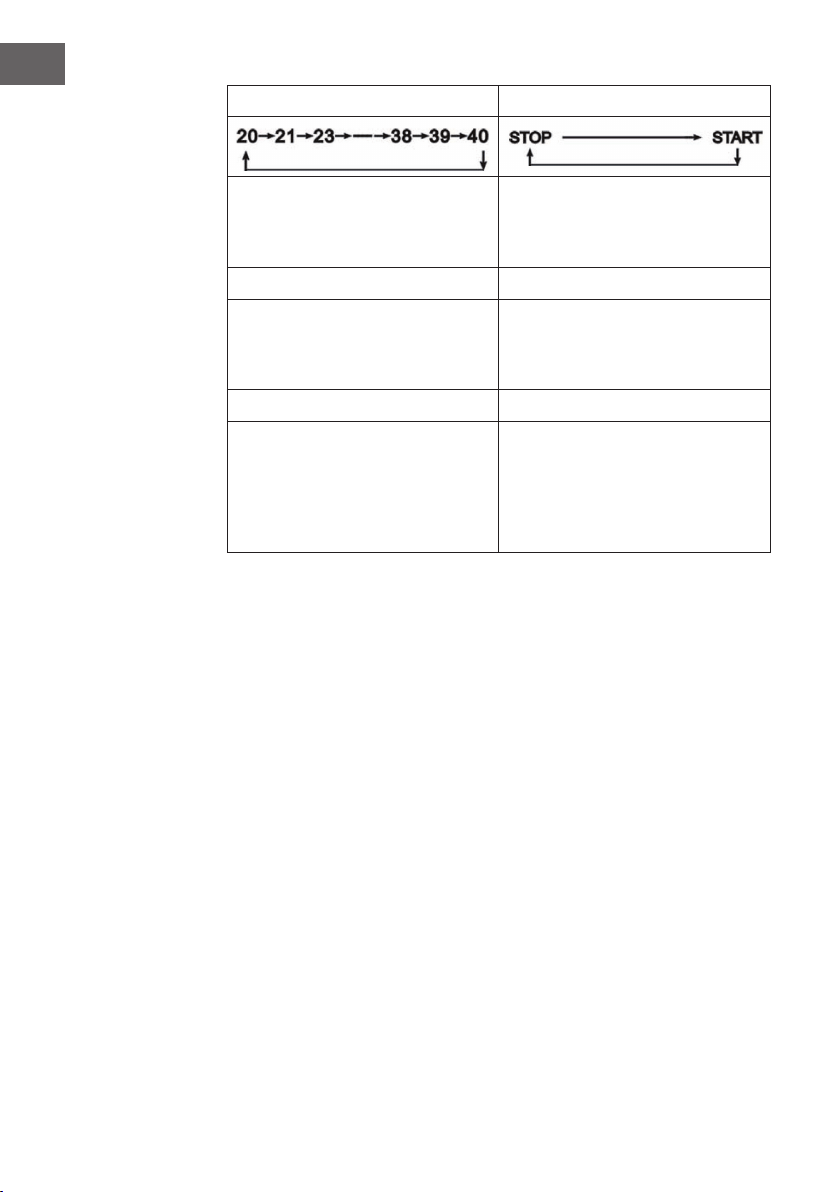
6 7
Each time the Reset button is pressed, the
running time is added one minute with a
“beep” in sequence:
You can choose the running time from
20 minutes to 40 minutes. Each time the
Power button is pressed, the machine is
changed with a “beep” in sequence.
8 9
Press the Power button after the running
time is set.The machine is turned on , the
remaining time “XX:XX” is indicated on
LCD and counts down at once.
Before adding the mixture you can stop
the machine and reset the running time
again that you want.
10 11
1Use the chute and pour the ice cream
or sorbet mix into the inner bowl. When
pouring mixture into the bowl, always
stop at least 5 cm (2 inch) from the top,
as the mixture will increase in volume
during freezing.
1Allow the mixture to churn until frozen
or the desired consistency is reached. This
can take up to 15 to 30 minutes, but most
recipes will be ready in less time.
Important Notes on Use
• Do not stop and start the machine during the freezing process, as the mixture may
freeze in contact with the bowl and prevent movement of the paddle.
• To avoid overheating the motor, the direction of rotation will change if the mixture
becomes too thick. If the direction of rotation continues to change, stop the machine
when the mixture is ready.
• In the unlikely event of the motor overheating, a safety cut out will operate causing
the motor to stop. If this happens, unplug the machine and allow the power unit to
cool.
• For the best result of ice cream, the paddle will contact with the inside of the inner
bowl when the paddle moves.
• When the setting time is over, the machine is stopped automatically, unplug the
machine and remove the power unit/lid. The ice cream is ready to serve.

19
EN
• The ice cream produced should be a soft spoonable type. This can be transferred
to a separate container for storage in the freezer or if you wish to rm the ice cream
before eating.
• Do not use metal utensils to remove mix from the bowl.
Important Notes on Use of the Inner Bowl
• Do not remove the inner bowl from the freezer until ready to make ice cream..
• We suggest that you keep the inner bowl in the freezer so that it is ready for use.
Place in a plastic bag before freezing. Freeze the inner bowl in the upright position.
• Always make sure the inner bowl is thoroughly dry before placing in the freezer.
• Do not puncture or heat the inner bowl.
• The inner bowl should be placed in a freezer that is operating at a temperature of
-18 °C or below for 8 hours before use.
• For best results always refrigerate the ingredients before making ice cream.
• The addition of alcohol to recipes inhibits the freezing process.
CLEANING AND CARE
Important Hints on Cleaning
• Always switch off, unplug and dismantle before cleaning.
• Never put the power unit in water or let the cord or plug get wet.
• Do not wash parts in the dishwasher.
• Do not clean with scouring powders, steel wool pads, or other abrasive materials.
Inner Bowl
Allow the inner bowl to reach room temperature before attempting to clean. Take out
the inner bowl and wash the inside of the bowl, then dry thoroughly. Do not immerse in
water.
Outer Bowl
Wash then dry thoroughly.

20
EN
Paddle
Remove the paddle from the power unit. Wash then dry thoroughly.
Lid
Wash the lid then dry thoroughly.
Power unit
Wipe with a damp cloth, then dry.
TROUBLESHOOTING
Problem Possible Cause Solution
The ice cream maker
does not
work.
There is a power failure. A
house fuse has blown.
Ensure the maker is
plugged in and the power
socket is turned on.
Ice cream maker can not
nish the
ice cream.
The maker is placed too
close to a heat source. No
sufcient ventilation.
Keep the cooler away
from sunshine or other
heat sources.
Place the ice cream maker
in good ventilation and
keep any items away from
the fans.
The lid is opened too
frequently or for a long
period of time.
Close the lid tightly and
do not open the lid too
frequently in operation.
HINTS ON DISPOSAL
According to the European waste regulation 2012/19/EU this
symbol on the product or on its packaging indicates that this
product may not be treated as household waste. Instead it should
be taken to the appropriate collection point for the recycling of
electrical and electronic equipment. By ensuring this product is
disposed of correctly, you will help prevent potential negative
consequences for the environment and human health, which
could otherwise be caused by inappropriate waste handling of
this product. For more detailled information about recycling of
this product, please contact your local council or your household
waste disposal service.

21
EN
RECIPES
Banana Ice Cream
Ingredients:
1 Large ripe banana
200 ml Skimmed milk
100 ml Heavy cream
50 g Confectioner’s sugar
Preparation:
Mash the bananas until smooth. Mix in
the milk, heavy cream and sugar. Pour
the mixture into the freezer bowl with the
paddle running. Allow to freeze until the
desired consistency is achieved.
Raspberry Frozen Yoghurt
Ingredients:
200 g Fresh raspberries
100 g Confectioner’s sugar
200 ml Natural yoghurt
Preparation:
Mash the raspberries or puree them.
For a smooth result remove the pips
by sieving. Add the sugar and natural
yoghurt and mix together. Pour the
mixture into the freezer bowl with the
paddle running. Allow to freeze until the
desired consistency is achieved.
Chocolate Mint Ice Cream
Ingredients:
200 ml Skimmed milk
50 g Confectioner’s sugar
200 ml Heavy cream
Peppermint extract
Grated chocolate
Preparation:
Place the milk and sugar into a saucepan.
Place over a low heat and stir until the
sugar has dissolve, then leave until cold.
Stir the cream and a few drops of the
peppermint essence into cooled milk.
Pour the mixture into freezer bowl with
the paddle running. When the mixture
starts to freeze add the grated chocolate
down the chute. Allow to freeze until the
desired consistency is achieved.
22
EN
Strawberry Ice Cream
Ingredients:
250 g fresh strawberries
100 g Confectioner’s sugar
100 ml Heavy cream
Juice from 1/2 small size lemon
Preparation:
Puree the strawberries until smooth,
add the remaining ingredients. Pour the
mixture into the freezer bowl with the
paddle running. Allow the mixture to
freeze until the desired consistency is
achieved.
DISPOSAL CONSIDERATIONS
If there is a legal regulation for the disposal of electrical
and electronic devices in your country, this symbol on the
product or on the packaging indicates that this product must
not be disposed of with household waste. Instead, it must be
taken to a collection point for the recycling of electrical and
electronic equipment. By disposing of it in accordance with
the rules, you are protecting the environment and the health of
your fellow human beings from negative consequences. For
information about the recycling and disposal of this product,
please contact your local authority or your household waste
disposal service.
MANUFACTURER & IMPORTER (UK)
Manufacturer:
Chal-Tec GmbH, Wallstrasse 16, 10179 Berlin, Germany.
Importer for Great Britain:
Chal-Tec UK limited
Unit 6 Riverside Business Centre
Brighton Road
Shoreham-by-Sea
BN43 6RE
United Kingdom

23
ES
Estimado cliente:
Le felicitamos por la adquisición de este producto. Lea
atentamente el siguiente manual y siga cuidadosamente las
instrucciones de uso con el n de evitar posibles daños. La
empresa no se responsabiliza de los daños ocasionados por
un uso indebido del producto o por haber desatendido las
indicaciones de seguridad. Escanee el código QR para obtener
acceso al manual de usuario más reciente y otra información
sobre el producto:
ÍNDICE DE CONTENIDOS
Indicaciones de seguridad24
Descripción del aparato26
Antes del primer uso 26
Puesta en marcha y uso27
Limpieza y cuidado29
Resolución de problemas30
Retirada del aparato30
Recetario31
Indicaciones sobre la retirada del aparato32
Fabricante e importador (Reino Unido)32
DATOS TÉCNICOS
Número de artículo
10028924, 10028925
Suministro eléctrico
220-240 V ~ 50-60 Hz
Potencia
7,3 - 9,5 W

24
ES
INDICACIONES DE SEGURIDAD
• Lea atentamente estas indicaciones y conserve el manual de instrucciones para
consultas posteriores.
• Antes de utilizar el aparato, compruebe la tensión del mismo en la placa técnica y
conéctelo a tomas de corriente que se adecuen a esos valores.
• Si el cable de alimentación está dañado deberá ser reparado por un servicio
técnico autorizado o una persona igualmente cualicada.
• No vuelque el aparato ni lo incline más de 45°.
• Nunca sumerja el aparato completamente en agua ni en ningún otro líquido y
asegúrese de que ni el enchufe ni el cable de alimentación se mojan.
• Desenchufe el aparato cuando no lo utilice o al limpiarlo.
• Deje una distancia de 8 cm alrededor de la máquina para garantizar suciente
ventilación.
• Utilice accesorios expresamente recomendados por el fabricante.
• Las personas, incluidos niños, con discapacidades físicas, psíquicas o sensoriales o
carentes de la experiencia y conocimiento necesarios no podrán utilizar el aparato
salvo que estén bajo supervisión o hayan sido previamente instruidas sobre su
utilización y las indicaciones de seguridad y se hayan familiarizado con sus
funciones. No deje que los niños jueguen con el aparato.
• No utilice el aparato cerca de fuentes de ignición ni fogones u hornos calientes.
• No apague y encienda el aparato varias veces seguidas. Espere durante al menos
5 minutos antes de encender el aparato de nuevo para no dañar el compresor.
• No introduzca chapas ni otros objetos eléctricos en el aparato para evitar un
incendio o un cortocircuito.
• Al sacar el helado no golpee el recipiente ni el canto del mismo para no dañarlo.
• Encienda el aparato cuando haya colocado el recipiente y la pala mezcladora.
• La temperatura inicial de los ingredientes es de 25±5 °C. No congele previamente
los ingredientes, podría bloquear la pala mezcladora antes de que el helado esté
listo.
• No retire la pala mezcladora mientras esté en funcionamiento.
• No utilice este aparato al aire libre.
• No limpie el aparato con polvos o esponjas abrasivas.
• No almacene en el aparato sustancias explosivas, como sprays con gases
propulsores inamables.
• Este aparato no está indicado para un uso comercial, sino doméstico o similar.

25
ES
Notas especiales
• Cuando coloque la unidad, asegúrese de que el cable de alimentación no esté
pellizcado ni dañado.
• Asegúrese de que no haya varias tomas o fuentes de alimentación en la parte
posterior de la unidad.
Para evitar la contaminación de los alimentos, siga las siguientes instrucciones:
• Limpie regularmente las super cies que puedan entrar en contacto con los
alimentos.
ADVERTENCIA
Cuando utilice, repare y elimine la unidad, preste atención al símbolo
izquierdo en la parte posterior de la unidad o en el compresor. Este
símbolo advierte de posibles incendios. Hay sustancias in amables en las
líneas de refrigerante y en el compresor. Mantenga el aparato alejado de
fuentes de fuego durante su uso, mantenimiento y eliminación.

26
ES
DESCRIPCIÓN DEL APARATO
1 Motor
2 Tapa
3 Varilla mezcladora
4 Recipiente interior
5 Recipiente exterior
ANTES DEL PRIMER USO
1. Retire el material de embalaje.
2. Lave todas las piezas con agua (consulte “Limpieza y cuidado”).
3. Introduzca el recipiente interior al menos durante 8 horas en el congelador.
4. Prepare los ingredientes para el helado (consulte “Recetario”) e introduzca la
mezcla en el frigoríco.

27
ES
PUESTA EN MARCHA Y USO
1 2 3
Encaje el motor en la tapa
hasta que quede jo.
Encaje la varilla en el
motor.
Retire el recipiente
interior del congelador
e introdúzcalo en el
recipiente exterior.
4 5
Encaje la tapa con el motor y la varilla
en el recipiente para el helado.
Enchufe el aparato. Este emitirá un pitido
y en el display aparecerá “20:00”.
28
ES
6 7
Cada vez que pulse el botón Reset
(7) el tiempo aumentará en un minuto
acompañado de una señal acústica.
Puede ajustar el tiempo entre 20 y 40
minutos.
Cada vez que pulse el botón Power (6),
el aparato se pondrá en marcha o se
deten- drá y emitirá además un pitido.
8 9
Pulse el botón Power cuando haya
ajustado el tiempo. En el display
aparecerá la cuenta atrás del tiempo
seleccionado.
Antes de introducir la mezcla, puede
detener la máquina y modicar el tiempo
si lo considera oportuno. El aparato
debe estar encendido antes de introducir
la mezcla en el recipiente para que no se
congele en el recipiente interior.
10 11
1Vierta la mezcla preparada en el
recipiente interior y deje 5 cm de
espacio en la parte superior, pues la
mezcla aumentará su volumen durante la
preparación.
1Deje la mezcla en el aparato hastas
que se haya conseguido la consistencia
deseada. Normalmente necesitará entre
15 y 30 minutos.
Indicaciones de uso importantes
• No apague ni encienda el aparato durante el proceso de congelación para que el
helado no se pegue al recipiente interior y bloquee la varilla.
• Para evitar que el motor se sobrecaliente, la varilla cambiará su dirección de
movimiento cuando el helado haya alcanzado cierta consistencia. Detenga
el aparato cuando cambie la dirección de movimiento. En caso de que el
motor se sobrecaliente, el mecanismo de seguridad del aparato lo detendrá
automáticamente. En ese caso, desenchufe la heladera y deje que se enfríe antes
de seguir utilizándola.
• Para conseguir los mejores resultados, la varilla tocará la pared del recipiente
interior mientras esté en fun- cionamiento.

29
ES
• Cuando haya transcurrido el tiempo seleccionado, el aparato se detendrá
automáticamente. Desenchúfelo antes de retirar la tapa. El helado está listo
para consumir, aunque puede que esté más cremoso de lo habitu- al. Si quiere
conseguir una mayor consistencia, transéralo a otro recipiente e introdúzcalo en
el congelador.
• No utilice objetos de metal para retirar el helado del recipiente de la heladera.
Indicaciones importantes con respecto al recipiente interior
• Retire el recipiente interior del congelador antes de preparar el helado. Conserve
el recipiente interior en el congelador para que la máquina siempre esté lista
para usarse. Guarde el recipiente interior en una bolsa de plástico y colóquelo
verticalmente en el congelador.
• Asegúrese de que el recipiente interior está seco antes de meterlo en el
congelador.
• No pinche ni caliente el recipiente.
• El congelador deberá estar una temperatura de -18 °C o menos. Deje el recipiente
al menos 8 horas en el congelador antes de preparar el helado.
• Para conseguir los mejores resultados, deje que los ingredientes para el helado se
enfríen antes de preparar- lo. Si añade alcohol al proceso evitará que la mezcla se
congele.
LIMPIEZA Y CUIDADO
Indicaciones de limpieza importantes
• Desenchufe el aparato antes de desmontarlo o limpiarlo.
• Nunca sumerja el aparato, el enchufe ni el cable de alimentación en agua ni en
ningún otro líquido.
• No lave las piezas de la heladera en el lavavajillas.
• No utilice esponjas abrasivas, lana de acero ni otro producto abrasivo para
limpiar la heladera.
Recipiente interior
Espere hasta que el recipiente interior haya alcanzado la temperatura ambiente.
Retire el recipiente y limpie su interior. No lo sumerja completamete en agua y séquelo
completamente tras su limpieza.
Recipiente exterior
Frótelo y séquelo completamente.
30
ES
Varilla
Retire la varilla del acople del motor. Lávela y séquela.
Tapa
Lave y seque la tapa completamente.
Motor
Frote el motor con un paño húmedo y séquelo.
RESOLUCIÓN DE PROBLEMAS
Problema Posible causa Solución
El aparato no funciona. El aparato no está
enchufado o el fusible
está fundido.
Asegúrese de que el
aparato esté conectado y
encendido.
El aparato no puede
terminar con la
preparación del helado.
El aparato está cerca de
una fuente de calor o hay
poco espacio alrededor
del aparato.
Coloque el aparato
en un lugar fresco y
deje suciente espacio
alrededor del aparato.
La tapa se ha abierto
demasiadas veces o
durante un periodo de
tiempo prolongado.
Cierre la tapa y no la abra
salvo que sea necesario.
RETIRADA DEL APARATO
Si el aparato lleva adherida la ilustración de la izquierda (el
contenedor de basura tachado) entonces rige la normativa
europea, directiva 2012/19/UE. Este producto no debe
arrojarse a un contenedor de basura común. Infórmese
sobre las leyes territoriales que regulan la recogida separada
de aparatos eléctricos y electrónicos. Respete las leyes
territoriales y no arroje aparatos viejos al cubo de la basura
doméstica. Una retirada de aparatos conforme a las leyes
contribuye a proteger el medio ambiente y a las personas a
su alrededor frente a posibles consecuencias perjudiciales
para la salud. El reciclaje ayuda a reducir el consumo de
materias primas.

31
ES
RECETARIO
Helado de plátano
Ingredientes:
1 plátano maduro
200 ml de leche desnatada
100 ml de nata
50 g de azúcar glas
Preparación:
Aplaste el plátano con un tenedor.
Añada la leche, la nata y el azúcar glas
e introduzca la mezcla en el recipiente
para removerla con la varilla hasta
que haya alcanzado la consistencia
deseada.
Helado de frambuesa y
yogur
Ingredientes:
200 g de frambuesas frescas
100 g de azúcar glas
200 ml de yogur
Preparación:
Aplaste o triture las frambuesas. Para
conseguir un puré más homogéneo, retire
las pepitas con un colador. Añada el
azúcar y el yogur. Introduzca la mezcla
en el recipiente interior y remuévala
con la varilla hasta que consiga la
consistencia deseada.
Helado de menta y chocolate
Ingredientes:
200 ml de leche desnatada
200 ml de nata
50 g de azúcar glas
50 g de virutas de chocolate
Extracto de menta
Preparación:
Mezcle la leche y el azúcar glas en un
cazo pequeño y caliéntelo a fuego lento
hasta que el azúcar se haya disuelto.
Deje que la mezcla se enfríe. Añada la
nata y un poco de extracto de menta.
Remuévalo todo lentamente con la varilla
y añada las virutas de chocolate cuando
la mezcla haya empezado a congelarse.
Retire el helado cuando haya alcanzado
la consistencia deseada.
32
ES
Helado de fresa
Ingredientes:
250 g de fresas
100 g de azúcar glas
100 g de nata
Zumo de limón de medio limón
Preparación:
Triture las fresas y añada el resto de
ingredientes. Ponga toda la mezcla en
el recipiente interior para mezclarla con
la varilla. Retire le mezcla cuando haya
alcanzado la consistencia deseada.
INDICACIONES SOBRE LA RETIRADA DEL
APARATO
Si en su país existe una disposición legal relativa a la
eliminación de aparatos eléctricos y electrónicos, este
símbolo estampado en el producto o en el embalaje
advierte que no debe eliminarse como residuo doméstico.
En lugar de ello, debe depositarse en un punto de recogida
de reciclaje de aparatos eléctricos y electrónicos. Una
gestión adecuada de estos residuos previene consecuencias
potencialmente negativas para el medio ambiente y la salud
de las personas. Puede consultar más información sobre el
reciclaje y la eliminación de este producto contactando con
su administración local o con su servicio de recogida de
residuos.
FABRICANTE E IMPORTADOR (REINO UNIDO)
Fabricante:
Chal-Tec GmbH, Wallstraße 16, 10179 Berlín, Alemania.
Importador para Gran Bretaña:
Chal-Tec UK limited
Unit 6 Riverside Business Centre
Brighton Road
Shoreham-by-Sea
BN43 6RE
United Kingdom
33
FR
Cher client,
Toutes nos félicitations pour l’acquisition de ce nouvel
appareil. Veuillez lire attentivement les instructions suivantes de
branchement et d’utilisation an d’éviter d’éventuels dommages.
Le fabricant ne saurait être tenu pour responsable des dommages
dus au non-respect des consignes de sécurité et à la mauvaise
utilisation de l’appareil. Scannez le QR-Code pour accéder à
la dernière version du mode d‘emploi et à d‘autres informations
concernant le produit:
SOMMAIRE
Consignes de sécurité34
Aperçu de l’appareil36
Avant la première utilisation36
Mise en marche et utilisation37
Nettoyage et entretien39
Résolution des problèmes40
Conseils pour le recyclage40
Recettes41
Informations sur le recyclage42
FICHE TECHNIQUE
Numéro d’article
10028924, 10028925
Alimentation
220-240 V ~ 50-60 Hz
Puissance
7,3 - 9,5 W

34
FR
CONSIGNES DE SÉCURITÉ
• Veuillez lire attentivement toutes les indications et conservez ce mode d’emploi
soigneusement pour pouvoir le consulter à tout moment.
• Brancher l’appareil à une prise dont la tension correspond à celle indiquée sur la
plaque signalétique de l’appareil.
• Si le cordon d’alimentation est endommagé, le faire remplacer par le fabricant, un
atelier autorisé ou un professionnel qualié.
• Ne pas retourner l’appareil et ne pas l‘incliner à plus de 45°.
• Ne pas faire tremper l’appareil complétement dans l’eau ou tout autre liquide.
S’assurer de ne pas mouiller le cordon d’alimentation et la che.
• Débrancher l’appareil lorsqu’il ne va pas être utilisé pendant une période prolongée ou
pour le nettoyer.
• Maintenir un espace libre de 8 centimètres autour de l’appareil pour assurer une
ventilation sufsante.
• Utiliser seulement les accessoires recommandés par le fabricant.
• Les enfants ainsi que les personnes dont les capacités physiques et mentales
sont réduites doivent utiliser l’appareil uniquement après avoir été entièrement
sensibilisés aux consignes de sécurité et aux fonctions de l’appareil par une
personne responsable de leur sécurité. Veiller à ce que les enfants ne jouent pas
avec l’appareil.
• Ne pas utiliser l’appareil à proximité de ammes, de plaques électriques chaudes
ou de fours.
• Ne pas allumer et éteindre l’appareil plusieurs fois de suite. Attendre au moins 5
minutes avant de rallumer l’appareil pour ne pas endommager le compresseur.
• Ne pas introduire d’objets (métalliques ou non) dans l’appareil pour éviter tout
risque d’incendie et de court-circuit.
• Pour extraire la glace, ne pas donner de coup sur l’appareil ou sur les bords du
récipient pour ne pas les endommager.
• Ne pas allumer l’appareil avant d’avoir installé le récipient et les lames.
• La température des aliments doit être de 25 ± 5 °C. Ne pas pré-congeler les
aliments avant de préparer la glace, ou les lames pourraient se bloquer.
• Ne pas retirer les lames lorsque l’appareil est en fonctionnement.
• Ne pas utiliser l’appareil en extérieur.
• Ne pas nettoyer l’appareil avec de la poudre abrasive ou avec une éponge abrasive.
• Ne pas stocker de substances explosives dans l’appareil telles que des bombes
aérosols contenant du gaz facilement inammable.
• L’appareil n’a pas été conçu pour un usage commercial, mais pour un usage
domestique ou dans un environnement similaire.

35
FR
Remarques particulières
• Lors du positionnement de l‘appareil, assurez-vous que le cordon d‘alimentation
n‘est pas pincé ou endommagé.
• Assurez-vous qu‘il n‘y a pas de prises multiples ou d‘alimentations multiples à
l‘arrière de l‘appareil.
Pour éviter la contamination des aliments, veuillez suivre les instructions ci-dessous :
• Nettoyer régulièrement les surfaces qui peuvent entrer en contact avec les aliments.
MISE EN GARDE
Lors de l‘utilisation, de l‘entretien et de la mise au rebut de l‘appareil,
faites attention au symbole de gauche à l‘arrière de l‘appareil ou sur le
compresseur. Ce symbole avertit d‘un éventuel incendie. Il y a des
substances in ammables dans les conduites de uide frigorigène et
dans le compresseur. Tenez l‘appareil à l‘écart de toute source
d‘incendie pendant son utilisation, son entretien et son élimination.
36
FR
APERÇU DE L’APPAREIL
1 Moteur
2 Couvercle
3 Pale rotative
4 Récipient interne
5 Récipient externe
AVANT LA PREMIÈRE UTILISATION
1. Défaire l’emballage.
2. Nettoyer tous les éléments de l’appareil à l’eau claire (cf. « Nettoyage et entretien »)
3. Placer le récipient interne dans le congélateur pendant au moins 8 heures.
4. Préparer le mélange des ingrédients (cf. « Recettes ») et placer celui-ci dans le
réfrigérateur.
37
FR
MISE EN MARCHE ET UTILISATION
1 2 3
Introduire le moteur dans
le couvercle de sorte à
l’encliqueter.
Introduire la pale rotative
dans le moteur.
Sortir le récipient
interne du congélateur
et l’emboîter dans le
récipient externe.
4 5
6. Chaque pression sur la touche « reset
» (7) prolonge le temps de préparation
d’une minute et produit un bip sonore. Le
temps de préparation se règle entre 20 et
40 mi- nutes.
7. Chaque pression sur la touche «
power »
(6) démarre et arrête l’appareil
successive- ment, tout en produisant un
bip sonore.

38
FR
6 7
Chaque pression sur la touche « reset
» (7) prolonge le temps de préparation
d’une minute et produit un bip sonore. Le
temps de préparation se règle entre 20 et
40 mi- nutes.
Chaque pression sur la touche « power
» (6) démarre et arrête l’appareil
successive- ment, tout en produisant un
bip sonore.
8 9
Appuyer sur la touche « power »
après avoir paramétrer le temps de
préparation. L’afchage indiquera le
temps restant ainsi que le décompte.
Avant d’introduire le mélange, il est
possi- ble d’arrêter la machine et de
modier de nouveau le réglage du
temps, si nécessaire. Il faut mettre
l’appareil en marche avant de verser le
mélange dans le récipient, pour qu’il ne
se congèle pas immédiatement contre les
parois du récipient interne.
10 11
1Verser le mélange dans le récipient
interne et laisser un espace libre de
5 cm en sur- face, car le mélange
deviendra plus volu- mineux pendant la
congélation.
1Laisser le mélange glacé dans
l’appareil jusqu’à obtention de la
consistance souhai- tée, en règle
générale au bout de 15 à 30 minutes.
Remarques importantes sur l’utilisation de l’appareil
• Ne pas allumer ou éteindre l’appareil pendant le processus de congélation pour
éviter que le mélange de glace ne se durcisse au contact du récipient interne et
n’entrave la pale rotative.
• Pour éviter la surchauffe du moteur, le sens de rotation s’inverse dès que la glace
devient trop épaisse. Ar- rêter l’appareil dès que la pale change de sens de
rotation. En cas de surchauffe du moteur, un mécanisme intégré de sécurité s’active
automatiquement et arrête l’appareil. Si tel est le cas, débrancher l’appareil et le
laisser refroidir avant de l’utiliser de nouveau.
• Pour un résultat optimal, la pale rotative efeure les parois du récipient interne
pendant l’opération.

39
FR
• Dès que le temps de préparation est écoulé, l’appareil s’arrête automatiquement.
Débrancher l’appareil avant de soulever le couvercle. La glace est désormais prête
à être consommée. La crème glacée est encore quel- que peu crémeuse après la n
de sa fabrication. Pour obtenir une glace plus dure, transvaser le contenu dans un
autre récipient et le mettre au congélateur encore un moment.
• Ne pas utiliser d’objets métalliques pour retirer la glace du récipient.
Remarques importantes sur le récipient interne
• Sortir le récipient interne du congélateur juste avant la préparation de la glace.
Conserver le récipient interne au congélateur pour qu’il soit toujours prêt à l’emploi.
Emballer le récipient dans un sac plastique et le mettre à plat dans le congélateur.
• Veiller à ce que le récipient interne soit sec avant de le mettre au congélateur.
• Ne pas percer le récipient interne et ne pas le réchauffer.
• Le congélateur dans lequel le récipient est conservé doit avoir une température
égale ou inférieure à -18 °C. Laisser le récipient au congélateur pendant au moins
8 heures avant de préparer la glace.
• Pour un résultat optimal, laisser les ingrédients refroidir au réfrigérateur avant la
préparation de la glace. L’ajout d’alcool ralentit le processus de congélation.
NETTOYAGE ET ENTRETIEN
Remarques importantes sur le nettoyage
• Débrancher l’appareil avant de le démonter et de le nettoyer.
• Ne pas plonger l’appareil, la che et le cordon d’alimentation dans l’eau ou dans
tout autre liquide.
• Ne pas laver les composants dans un lave-vaisselle.
• Ne pas utiliser d’éponge abrasive, d’éponge en laine d’acier ou de détergent pour
nettoyer l’appareil.
Récipient interne
Attendre que le récipient interne soit à température ambiante. Retirer le récipient et
en nettoyer les parois internes. Ne pas plonger entièrement le récipient dans l’eau. Le
sécher méticuleusement après nettoyage.
Récipient externe
Nettoyer le récipient externe et le sécher méticuleusement.
40
FR
Pale rotative
Retirer la pale rotative du moteur. La laver et la sécher méticuleusement.
Couvercle
Laver le couvercle et le sécher méticuleusement
Moteur
Essuyer le moteur à l’aide d’un chiffon humide et le sécher.
RÉSOLUTION DES PROBLÈMES
Problème Cause possible Solution
L’appareil ne fonctionne
pas.
L’appareil n’est pas allumé
ou bien le fusible est hors
service.
Assurez-vous que
l’appareil est bien branché
et allumé.
L’appareil ne peut pas
terminer la préparation de
la glace.
L’appareil est à proximité
d’une source de chaleur
ou l’appareil n’est pas
bien ventilé.
Installez l’appareil
dans un endroit frais
et laissez sufsamment
de place autour de lui
pour permettre à l’air de
circuler.
Le couvercle a été enlevé
trop souvent ou trop
longtemps.
Fermez bien le couvercle
et ne l’ouvrez pas trop
souvent.
CONSEILS POUR LE RECYCLAGE
Le pictogramme ci-contre apposé sur le produit signie que
la directive européenne 2012/19/UE s‘applique (poubelle
à roues barrée d’une croix). Ces produits ne peuvent être
jetés dans les poubelles domestiques courantes. Renseignez-
vous concernant les règles appliquées pour la collecte
d’appareils électriques et électroniques. Conformez-vous
aux réglementations locales et ne jetez pas vos anciens
produits avec les ordures ménagères. Le respect des règles
de recyclage des vieux produits aide à la protection de
l’environnement et de la santé de votre entourage contre
les conséquences négatives possibles. Le recyclage des
matériaux aide à réduire l’utilisation des matières premières.

41
FR
RECETTES
Sorbet à la banane
Ingrédients :
1 banane mûre
200 ml de lait allégé en matières grasses
100 ml de crème
50 g de sucre glace
Préparation :
Écraser les bananes avec une fourchette.
Incorporer le lait, la crème et le sucre
glace. Verser le mélange dans le
récipient interne pendant la rotation de la
pale et l’y laisser jusqu’à obtention de la
consistance souhaitée.
Sorbet aux framboises et au
yaourt
Ingrédients :
200 g de framboises fraîches
100 g de sucre glace
200 ml de yaourt
Préparation :
Écraser grossièrement les framboises
ou en faire un coulis. Pour obtenir un
coulis uide, séparer les grains avec
une passoire. Ajouter le sucre glace et
le yaourt. Verser le mélange dans le
récipient interne pendant la rotation de la
pale et l’y laisser jusqu’à obtention de la
consistance souhaitée.
Glace menthe-chocolat
Ingrédients :
200 ml de lait allégé en matières grasses
200 ml de crème
50 g de sucre glace
50 g de copeaux de chocolat
Extrait de menthe
Préparation :
Verser le lait et le sucre glace dans une
petite casserole et chauffer le tout à
feu bas, jusqu’à dissolution du sucre.
Laisser le mélange refroidir. Incorporer
la crème et l’extrait de menthe au lait.
Verser le mélange dans le récipient
interne pendant la rotation de la pale
puis ajouter les copeaux de chocolat dès
que le mélange commence à congeler.
Retirer la glace après obtention de la
consistance souhaitée.
42
FR
Sorbet à la fraise
Ingrédients :
250 g de fraises fraîches
100 g de sucre glace
100 ml de crème
Jus de citron de ½ citron
Préparation :
Écraser les fraises et ajouter les autres
ingrédients. Verser le mélange dans le
récipient interne pendant la rotation de la
pale et l’y laisser jusqu’à obtention de la
consistance souhaitée.
INFORMATIONS SUR LE RECYCLAGE
S‘il existe une réglementation pour l‘élimination ou le
recyclage des appareils électriques et électroniques dans
votre pays, ce symbole sur le produit ou sur l‘emballage
indique que cet appareil ne doit pas être jeté avec les
ordures ménagères. Vous devez le déposer dans un point
de collecte pour le recyclage des équipements électriques
et électroniques. La mise au rebut conforme aux règles
protège l‘environnement et la santé de vos semblables des
conséquences négatives. Pour plus d‘informations sur le
recyclage et l‘élimination de ce produit, veuillez contacter
votre autorité locale ou votre service de recyclage des
déchets ménagers.
FABRICANT ET IMPORTATEUR (UK)
Fabricant :
Chal-Tec GmbH, Wallstraße 16, 10179 Berlin, Allemagne.
Importateur pour la Grande Bretagne :
Chal-Tec UK limited
Unit 6 Riverside Business Centre
Brighton Road
Shoreham-by-Sea
BN43 6RE
United Kingdom

43
IT
Gentile cliente,
La ringraziamo per aver acquistato il dispositivo. La preghiamo
di leggere attentamente le seguenti istruzioni per l’uso e di
seguirle per evitare possibili danni tecnici. Non ci assumiamo
alcuna responsabilità per danni scaturiti da una mancata
osservazione delle avvertenze di sicurezza e da un uso
improprio del dispositivo. Scansionare il codice QR seguente,
per accedere al manuale d’uso più attuale e per ricevere
informazioni sul prodotto.
INDICE
Fabricant et importateur (UK)42
Avvertenze di sicurezza44
Descrizione del prodotto46
Avvertenze per il primo utilizzo46
Messa in funzione e utilizzo47
Pulizia e manutenzione49
risoluzione dei problemi50
Smaltimento50
Ricette51
Avviso di smaltimento52
Produttore e importatore (UK)52
DATI TECNICI
Articolo numero
10028924, 10028925
Alimentazione
220-240 V ~ 50-60 Hz
Potenza
7,3 - 9,5 W

44
IT
AVVERTENZE DI SICUREZZA
• Leggere attentamente tutte le indicazioni di sicurezza e conservare il presente
libretto d’istruzioni per consultazioni future.
• Prima di accendere il dispositivo, controllare la tensione sulla targhetta identicativa
e collegare il dispositivo solo a prese con tensione corrispondente a quella
indicata.
• Nel caso in cui il cavo di rete sia danneggiato, questo deve essere sostituito dal
produttore, da un centro assistenza specializzato o da una persona qualicata.
• Non capovolgere il dispositivo e non inclinarlo più di 45°.
• Non immergere il dispositivo in acqua o in altri liquidi e prestare attenzione che la
spina e il cavo di rete non si bagnino.
• Staccare la spina dalla presa in caso di inutilizzo prolungato o prima di pulirlo.
• Lasciare 8 cm di spazio intorno al dispositivo, per garantire un’adeguata
circolazione dell’aria.
• Utilizzare solo accessori autorizzati dal produttore.
• I bambini, le persone con limiti sici e mentali dovrebbero usare il dispositivo solo
se un supervisore ha prima illustrato loro le funzioni e le avvertenze di sicurezza.
Prestare attenzione che i bambini non giochino con il dispositivo.
• Non utilizzare il dispositivo nelle vicinanze di amme vive, fornelli accesi o forni.
• Non accendere e spegnere il dispositivo più volte consecutive. Attendere almeno 5
minuti prima di riaccendere il dispositivo per non danneggiare il compressore.
• Non inlare oggetti nel dispositivo per evitare il pericolo d’incendio o di corto
circuito.
• Rimuovere con la massima cautela il gelato dal contenitore per danneggiarlo.
• Accendere il dispositivo solamente dopo aver inserito il contenitore e la lama per
mescolare.
• La temperatura per gli ingredienti è di 25±5°C. Non preraffreddare gli ingredienti,
altrimenti la lama per mescolare potrebbe bloccarsi prima di terminare la
preparazione.
• Rimuovere la lama per mescolare solo quando questa non è più in funzione.
• Non utilizzare il dispositivo all’aperto.
• Non pulire il dispositivo con polveri o spugne abrasive.
• Non conservare all’interno del dispositivo sostanze esplosive come ad esempio
bombolette spray contenenti gas propellenti.
• Il dispositivo non è destinato ad un uso commerciale, ma esclusivamente per un uso
domestico e in ambienti simili.

45
IT
Note speciali
• Quando si posiziona l‘unità, assicurarsi che il cavo di alimentazione non sia
schiacciato o danneggiato.
• Assicurarsi che non vi siano prese multiple o alimentatori sul retro dell‘unità.
Per evitare la contaminazione degli alimenti, seguire le seguenti istruzioni:
• Pulire regolarmente le super ci che possono venire a contatto con gli alimenti.
AVVERTENZA
Durante l‘uso, la manutenzione e lo smaltimento dell‘unità, prestare
attenzione al simbolo a sinistra sul retro dell‘unità o sul compressore.
Questo simbolo avverte di possibili incendi. Ci sono sostanze
in ammabili nelle linee frigorifere e nel compressore. Tenere
l‘apparecchio lontano da fonti di incendio durante l‘uso, la
manutenzione e lo smaltimento.

46
IT
DESCRIZIONE DEL PRODOTTO
1 Testa motore
2 Coperchio
3 Pala mescolatrice
4 Ciotola interna
5 Ciotola esterna
AVVERTENZE PER IL PRIMO UTILIZZO
1. Rimuovere il materiale d’imballaggio.
2. Lavare tutti i componenti con acqua pulita (vedere “Pulizia e manutenzione”).
3. Lasciare la ciotola nel congelatore per almeno 8 ore.
4. Preparare gli ingredienti per il gelato (vedere la sezione “Ricette”) e introdurre la
miscela nel congelatore.
47
IT
MESSA IN FUNZIONE E UTILIZZO
1 2 3
Fissare la testa motore nel
coperchio no al suo com-
pleto inserimento.
Inserire la pala mescolatri-
ce nella testa motore.
Togliere la ciotola interna
dal congelatore e inserirla
nella ciotola esterna.
4 5
Inserire l’unità assemblata (testa motore,
coperchio e pala mescolatrice) nella
cio- tola.
Inserire la spina nella presa. Il dispositivo
emette un segnale acustico e sul display
compare il tempo rimanente “20:00”.
48
IT
6 7
Ogni volta che si preme il tasto Reset (7),
il tempo rimanente aumenta di un minu-
to e viene emesso un segnale acustico.
Il tempo impostabile è compreso tra i 20
e i 40 minuti.
Ogni volta che si preme il tasto Power
(6), il dispositivo si accende e si arresta
ed emet- te un segnale acustico.
8 9
Dopo aver impostato il tempo, premere il
tasto Power. Sul display appare il tempo
rimanente.
Prima di versare la miscela, è possibile
ar- restare il dispositivo e modicare
il tempo impostato. Prima di versare
la miscela nella ciotola accendere il
dispositivo: in questo modo la miscela
non si congela subito nel- la parte
interna della ciotola.
10 11
1Versare la miscela nella ciotola interna
e lasciare 5 cm di spazio nel margine
supe- riore, poiché durante il processo la
miscela aumenta di volume.
1Lasciare la miscela nella ciotola no
al raggi- ungimento della consistenza
desiderata, di solito 15-30 minuti.
Avvertenze importanti per l’utilizzo
• Non accendere o spegnere il dispositivo durante il processo di preparazione del
gelato afnché la miscela non si depositi sul fondo della ciotola e non blocchi la
pala mescolatrice.
• Se la miscela diventa troppo densa, la direzione di rotazione della pala si modica
e si evita il surriscalda- mento del motore. Arrestare il dispositivo appena la miscela
è pronta. Inoltre, un meccanismo di sicurezza integrato arresta automaticamente
il dispositivo per evitare il surriscaldamento del motore. Se ciò dovesse vericarsi,
staccare la spina e far raffreddare il dispositivo prima di rimetterlo in funzione.
• Durante il funzionamento la pala mescolatrice tocca la parete interna della ciotola,
in questo modo si otten- gono risultati ottimali.

49
IT
• Allo scadere del tempo impostato, il dispositivo si arresta automaticamente. Prima
di rimuovere il coperchio, staccare la spina dalla presa. Il gelato è pronto da
servire. Appena pronto il gelato è cremoso; se si desidera una consistenza più
solida, travasarlo in un contenitore e lasciarlo per un po’ nel congelatore.
• Non utilizzare oggetti in metallo per rimuovere il gelato dalla ciotola.
Avvertenze importanti per l’utilizzo della ciotola interna
• Togliere la ciotola interna dal congelatore poco prima della preparazione del
gelato. Conservare la ciotola in- terna nel congelatore in modo da essere già
pronta per il prossimo utilizzo. Mettere la ciotola in un sacchetto di plastica e
collocarla in posizione verticale nel congelatore.
• Non forare la ciotola interna e non riscaldarla.
• La temperatura del congelatore deve essere di -18°C o inferiore. Prima di
procedere con la preparazione del gelato, lasciare la ciotola per almeno 8 ore nel
congelatore.
• Per ottenere risultati ottimali, si consiglia di mettere in frigorifero gli ingredienti
prima della preparazione del gelato. L’aggiunta di alcool ostacola il processo di
congelamento.
PULIZIA E MANUTENZIONE
Importanti avvertenze per la pulizia
• Staccare la spina dalla presa prima di smontare o di pulire il dispositivo.
• Non immergere mai il dispositivo, la spina e il cavo di rete in acqua o in altri liquidi.
• Non lavare i componenti in lavastoviglie.
• Non utilizzare pagliette o abrasivi per pulire il dispositivo.
Ciotola interna
Attendere che la ciotola interna si sia raffreddata. Rimuovere la ciotola e lavare la parte
interna. Non immergere la ciotola in acqua e asciugarla con cura.
Ciotola esterna
Lavare la ciotola esterna e asciugarla con cura.
50
IT
Pala mescolatrice
Rimuovere la pala mescolatrice. Lavarla e asciugarla con cura.
Coperchio
Lavare il coperchio e asciugarlo con cura.
Testa motore
Pulire la testa motore con un panno umido e asciugarla.
RISOLUZIONE DEI PROBLEMI
Problema Causa possibile Soluzione
Il dispositivo non funziona. Il dispositivo non è acceso
oppure il fusibile è rotto.
Assicurarsi che la spina sia
inserita nella presa e che il
dispositivo sia acceso.
Il dispositivo non riesce a
terminare la produzione
del gelato.
Il dispositivo è collocato
vicino ad una fonte di
calore oppure c’è poco
spazio intorno ad esso.
Collocare il dispositivo in
un luogo fresco e lasciare
intorno abbastanza
spazio afnché l´aria
possa circolare.
Il coperchio è stato aperto
troppo spesso o troppo
a lungo.
Chiudere correttamente il
coperchio e non aprirlo
troppo spesso inutilmente.
SMALTIMENTO
Se sul prodotto è presente la gura a sinistra (il cassonetto
dei riuti mobile sbarrato), si applica la direttiva europea
2012/19/UE. Questi prodotti non possono essere smaltiti con
i riuti normali. Informarsi sulle disposizioni vigenti in merito
alla raccolta separata di dispositivi elettrici ed elettronici.
Non smaltire i vecchi dispositivi con i riuti domestici. Grazie
al corretto smaltimento dei vecchi dispositivi, si proteggono
il pianeta e la salute delle persone da possibili conseguenze
negative. Il riciclo di materiali aiuta a ridurre il consumo di
materie prime.

51
IT
RICETTE
Gelato alla banana
Ingredienti:
1 banana matura
200 ml di latte parzialmente scremato
100 ml di panna
50 g di zucchero a velo
Preparazione:
Schiacciare le banane con la forchetta.
Aggiungere latte, panna e zucchero a
velo e versare la miscela nella ciotola
interna con la pala mescolatrice in
funzione. Lasciare la miscela nella ciotola
no al raggiungimento della consistenza
desiderata.
Gelato alla fragola e allo yogurt
Ingredienti:
200 g di fragole fresche
100 g di zucchero a velo
200 ml di yogurt
Preparazione:
Schiacciare o frullare le fragole. Per
ottenere una miscela più liquida,
rimuovere i semi. Aggiungere lo zucchero
a velo e lo yogurt nella ciotola interna
con la pala mescolatrice in funzione.
Lasciare la miscela nella ciotola no
al raggiungimento della consistenza
desiderata.
Gelato menta e cioccolato
Ingredienti:
200 ml di latte parzialmente scremato
200 ml di panna
50 g di zucchero a velo
50 g di scaglie di cioccolato
Estratto di menta
Preparazione:
Riscaldare in un pentolino a amma
bassa il latte e lo zucchero a velo e far
sciogliere lo zucchero. In seguito far
raffreddare la miscela. Aggiungere la
panna e qualche goccia di estratto di
menta. Versare la miscela nella ciotola
interna con la pala mescolatrice in
funzione. Aggiungere le scaglie di
cioccolato appena la miscela inizia a
congelarsi. Togliere il gelato quando ha
raggiunto la consistenza desiderata.
52
IT
Gelato alla fragola
Ingredienti:
200 ml di latte parzialmente scremato
200 ml di panna
50 g di zucchero a velo
50 g di scaglie di cioccolato
Estratto di menta
Preparazione:
Riscaldare in un pentolino a amma
bassa il latte e lo zucchero a velo e far
sciogliere lo zucchero. In seguito far
raffreddare la miscela. Aggiungere la
panna e qualche goccia di estratto di
menta. Versare la miscela nella ciotola
interna con la pala mescolatrice in
funzione. Aggiungere le scaglie di
cioccolato appena la miscela inizia a
congelarsi. Togliere il gelato quando ha
raggiunto la consistenza desiderata.
AVVISO DI SMALTIMENTO
Se nel proprio paese si applicano le regolamentazioni
inerenti lo smaltimento di dispositivi elettrici ed elettronici,
questo simbolo sul prodotto o sulla confezione segnala che
questi prodotti non possono essere smaltiti con i riuti normali
e devono essere portati a un punto di raccolta di dispositivi
elettrici ed elettronici. Grazie al corretto smaltimento dei
vecchi dispositivi si tutela il pianeta e la salute delle persone
da possibili conseguenze negative. Informazioni riguardanti il
riciclo e lo smaltimento di questi prodotti si ottengono presso
l’amministrazione locale oppure il servizio di gestione dei
riuti domestici.
PRODUTTORE E IMPORTATORE (UK)
Produttore:
Chal-Tec GmbH, Wallstraße 16, 10179 Berlino, Germania.
Importatore per la Gran Bretagna:
Chal-Tec UK limited
Unit 6 Riverside Business Centre
Brighton Road
Shoreham-by-Sea
BN43 6RE
United Kingdom