Loading ...
Loading ...
Loading ...
9
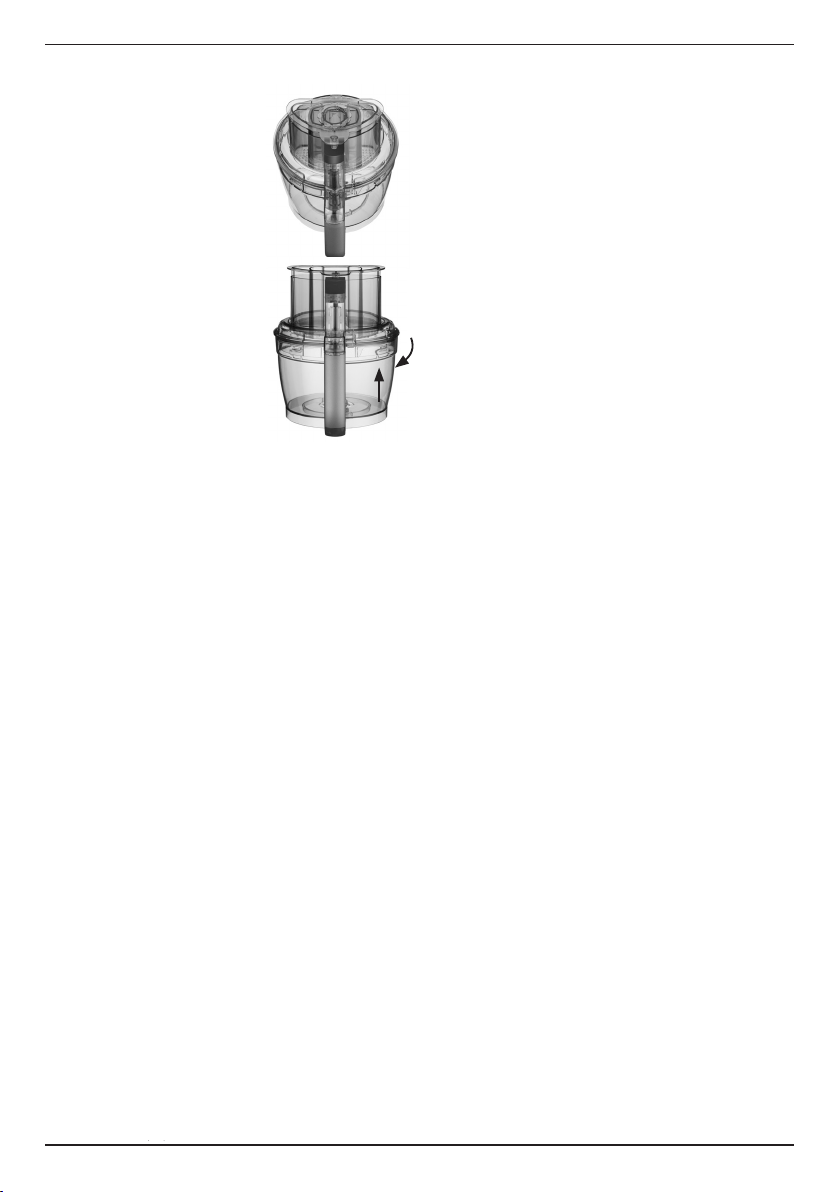
Main Work Bowl Cover Operation
1. Place the lid over the
work bowl with the
feed-tube assembly
shifted slightly to the
right of the handle.
Be sure to assemble
the hub pin into the
center of the lid.
2. Once the cover is fully
seated, rotate the cover
to the left (clockwise)
to engage the lid locking
mechanism and interlock.
3. To remove the lid, rotate
the lid approximately
¹/
¹
²
of a turn to the
right to disengage the
interlock and locking
mechanism.
Work Bowls
The two nested work bowls offer versatile food
processing options and save you time by
minimizing cleanup. Use only the small work
bowl when processing smaller quantities.
Optimize efficiency when making recipes that
require multiple bowls by starting with the smaller
work bowl. For example, prepare a crumb topping
in the small work bowl before mixing batter for a
cake in the large work bowl. Or emulsify dressing
before shredding broccoli, carrots and cabbage for
vegetable slaw.
Chopping certain foods may scratch or cloud the
work bowl; this will not affect the functionality of
your work bowl.
Machine Controls
High and Low Control Buttons
The High and Low controls are buttons that allow
the machine to run until Off is selected.
1. Properly assemble the machine.
2. Add ingredients to the work bowl, either
through the feed tube or directly into the bowl.
Lock lid into place.
3. Press the High or Low button. The motor
will start.
4. Press the Off button when finished.
Pulse Button
The Pulse control is a button that allows the machine
to run only while it is being pressed. This capability
provides more accurate control of the duration and
frequency of processing. Unless otherwise specified,
a pulse should be about 2 seconds.
With the machine properly assembled and
engaged, and ingredients in the work bowl,
press the Pulse button repeatedly as needed.
CHOPPING/
MIXING BLADES
Blade Operation
The BladeLock feature is designed to keep the
blade in place during processing, pouring, lifting,
and handling tasks — but is not permanently
attached. Handle with care. Always check to
be sure the blade is securely locked before
turning the bowl upside down.
Large Blade Operation
With your large work bowl assembled on the base,
grasp the large chopping/mixing blade by its hub,
align it over the center of the bowl, place it onto the
shaft and push down until it locks into place. Always
check to be sure the blade is securely locked before
turning the bowl upside down. (To remove blade, first
take the bowl off the base and put it on a flat surface.
Rest the heel of your hand on the rim of the bowl and
pull blade up by its hub gently and carefully.)
Small Blade Operation
With the large work bowl in place on the base,
place the stem adapter onto the hub in the center
of the bowl. Next, put the small work bowl into the
large bowl, positioning it over the adapter. Grasp
the small chopping/mixing blade by its hub, placing
it on the stem adapter. Push down firmly to lock. (To
remove, first take the bowl off the base and put it on a
flat surface. Rest the heel of your hand on the rim of the
bowl and pull blade up by the hub gently and carefully.)
Chopping
(using the Chopping/Mixing Blade)
• For raw ingredients:
Peel, core and/or remove seeds and pits. Food
should be cut into even, ½- to 1-inch pieces.
Foods cut into same-size pieces produce
the most even results.
• Pulse food in 1- to 2-second increments to
chop. For the finest chop, either hold the Pulse
button down or press High or Low to run the
machine continuously. Watch ingredients
closely to achieve desired consistency, and
scrape the work bowl as necessary. Low speed
is recommended for making doughs and
batters. High speed is recommended for most
Loading ...
Loading ...
Loading ...