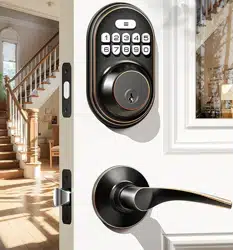
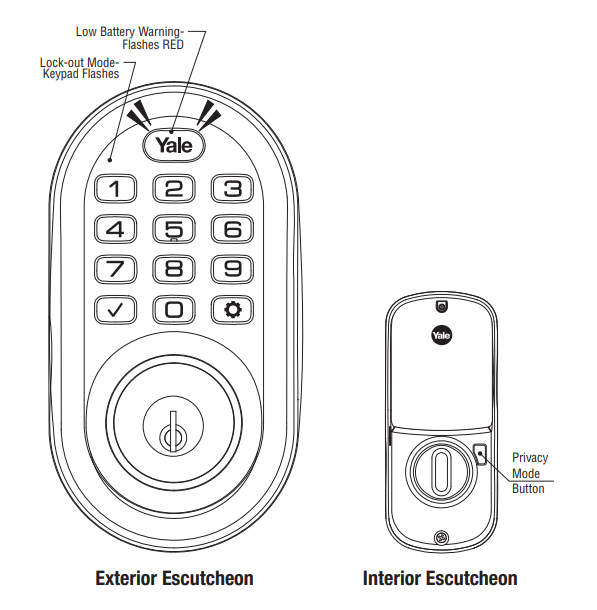
Congratulations, you've installed the Yale Assure Lock ® ® Push Button Deadbolt ( 216)! YRD Continue with Programming Instructions to customize your product.
Programming Instructions
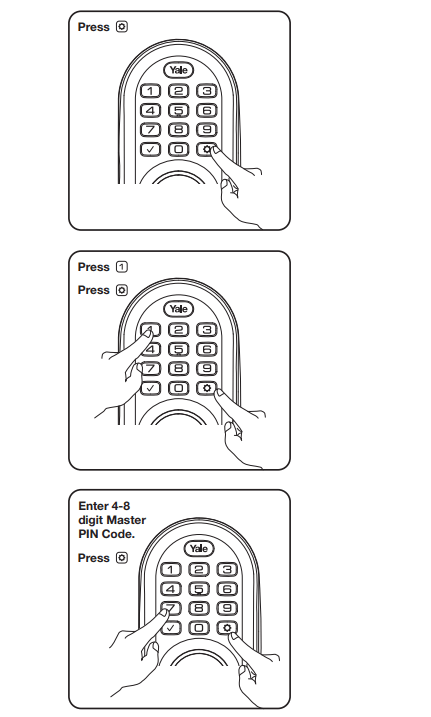
1 Creating Master Code PIN
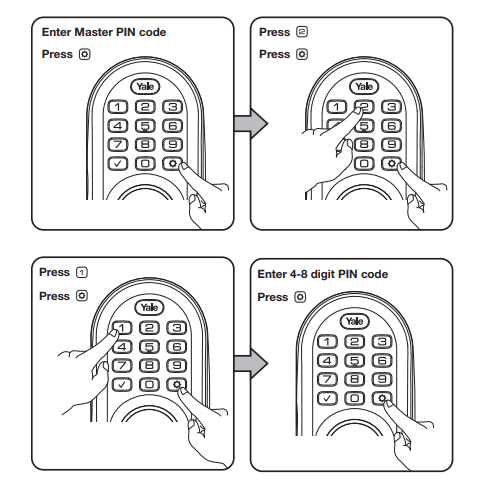
2 Creating User Codes
PIN Master code must be created first. PIN
*Max User Codes = 250 with Network Module. Max User Codes = 25 without.
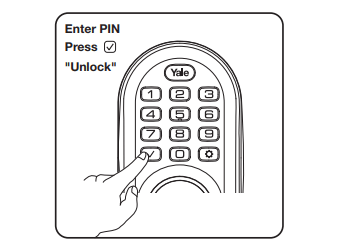
3 Unlocking Door with Code PIN
Resetting Lock to Factory Default
When lock is reset to factory defaults all user codes (including the Master code*) are deleted and all PIN programming features are reset to original default settings (see below).
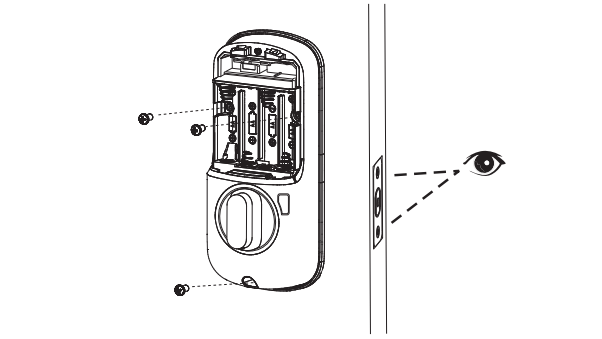
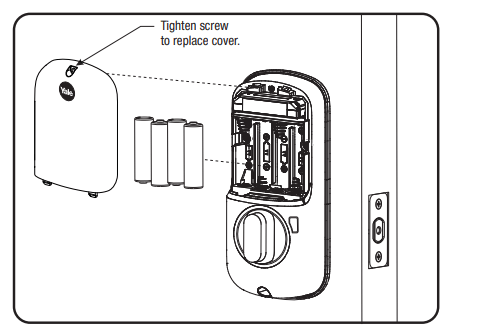
Remove the battery cover and batteries.
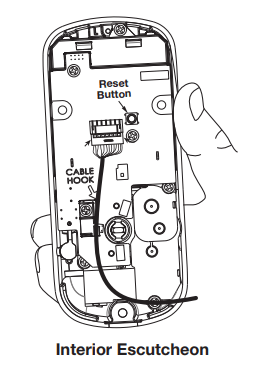
Remove the interior escutcheon to access the reset button.
The reset button (see image at right) is located beside the cable connector. PCB
While pressing the reset button (minimum of 3 seconds) reinstall batteries. Release reset button.
Replace battery cover.
Upon reset, Master Code creation is the only PIN option available and must be performed prior to any other programming of the lock
Factory Settings
Settings
Factory Setting
Master PIN Code
Registration required*
Automatic Re-lock
Disabled
Inside Indicator Light
Disabled (Off)
One Touch Locking
Enabled
Privacy Button Setting
Disabled
Audio Mode
Enabled
Lockout Mode
Disabled
Automatic Re-lock Time
30 Seconds
Wrong Code Entry Limit
5 Times
Shutdown Time
60 Seconds
Definitions
All Code Lockout Mode: This feature is enabled by the Master code. When enabled, it restricts all user (except Master) PIN code access. When attempting to enter a code while the unit is in Lockout, the keypad flashes 8 times and the lock beeps 3 times as well.
Audio Mode: Choosing Disable (3) in Audio mode shuts off the code confirmation tone play-back for use in quiet areas. Audio mode is enabled or disabled through feature programming by the Master code.
Automatic Re-lock Time: After a successful unlock, the unit will automatically re-lock after thirty (30) seconds.
Low Battery: When battery power is low, the Status Indicator flashes RED. If battery power is completely lost, use the key override.
Master PIN Code: The Master PIN code is used for programming and for feature settings. It must be created prior to programming the lock. The Master code will also operate (unlock/lock) the lock.
Network Module Setting: This setting is available thru the main Menu (7) and allows the lock to connect with a network controller. It is also available through the wireless button on the interior escutcheon.
One Touch Locking: When the latch is retracted, activating the keypad will extend the latch (during Automatic Relock duration or when Automatic Re-lock is disabled).
Privacy Mode: Privacy mode is disabled by default. Enable Privacy mode by pressing the privacy button for 4 seconds to put the lock in do-not-disturb mode (all pin codes are disabled).
Shutdown Time: The unit will shut down (flashing keypad) for sixty (60) seconds and not allow operation after the wrong code entry limit has been met.
Tamper Alert: Audible alarm sounds if attempting to forcibly remove outside lock from door.
User PIN Code: The User code operates the lock. Maximum number of user codes is 250 with Network Module; without Network Module, maximum is 25 user codes.
Wrong Code Entry Limit: After five (5) unsuccessful attempts at entering a valid PIN code, the unit will shut down and not allow operation.
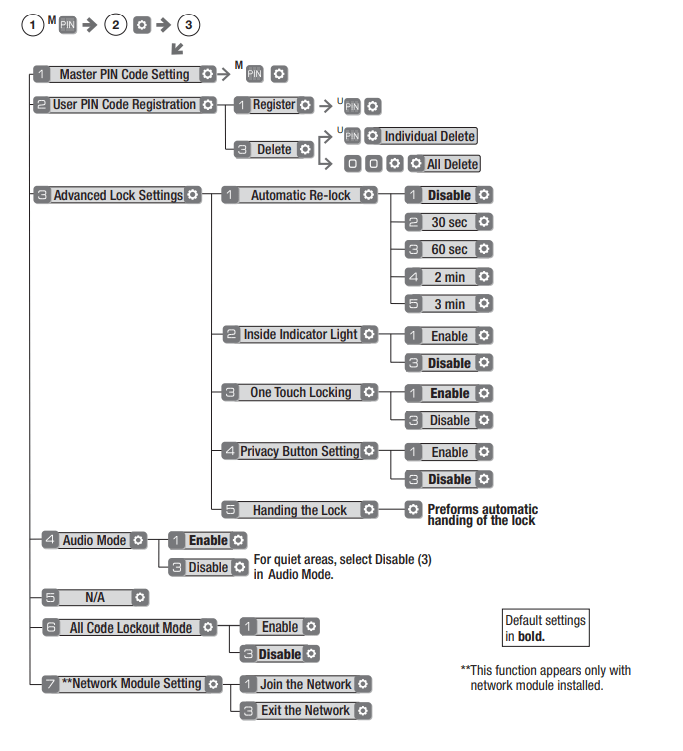
Feature Programming Through Menu Mode Using Master PIN code*
1. Enter the 4-8 digit Master PIN code followed by the ® key.
2. Enter digit corresponding to the function to be performed followed by the (O) key.
*The Master PIN code must be registered prior to any other programming of the lock.
Programming Troubleshooting
Lock does not respond -door is open and accessible.
Press each keypad button for response when pressed.
Check batteries are installed and oriented correctly (polarity) in the battery case.
Check batteries are in good condition; replace batteries* if discharged.
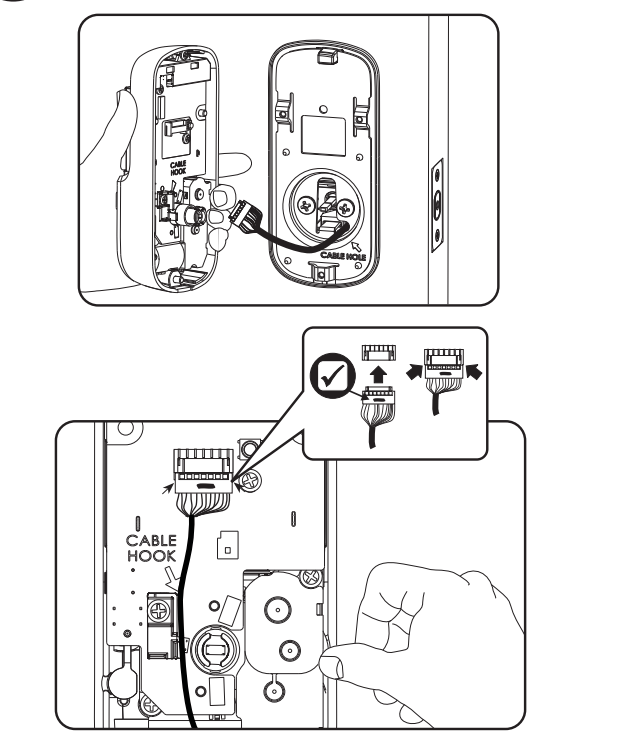
Check to see if cable is fully connected and not pinched.
Lock does not respond -door is locked and inaccessible.
Batteries may be completely discharged.
Use key to gain entry and replace batteries*.
Unit chimes to indicate code acceptance, but the door will not open.
Check to see if there is another locking device on the door.
Check the door gaps for any foreign objects between door and frame.
Check that the cable is firmly connected to the PC board.
Unit operates to allow access, but will not automatically re-lock.
Check to see if Auto Re-lock Mode is enabled.
If low battery indicator is lit (see below), change batteries*.
PIN codes will not register.
PIN codes must consist of 4 to 8 digits to register.
The same PIN code cannot be used for multiple users.
Registration/management of PIN codes is set by the authority of the Master Code.
Contact the Master user.
User codes must be entered within 5 seconds or the process will have to be restarted.
Check mark0 or gear® cannot be used as part of the PIN code.
Upon entering a PIN code and pressing the (*) key, the lock gives a series of beeps, flashes red & blue LEDs 7 times, and does not unlock.
All Code Lockout Mode is enabled.
Only the Master can enable/disable All Code Lockout Mode.
Contact the Master user.
Upon entering a PIN code and pressing the (*) key, there are different tones.
Check to see if the lock is set to All Code Lockout Mode.
Setting/managing All Code Lockout Mode is done through Master Code only. Contact the Master user.
The unit operates, but it makes no sound.
Enable Audio Mode.
The unit displays intermittent RED flashes.
This is the Low Battery indicator alerting that it is time to replace the batteries. Replace all four (4) batteries* with new AA Alkaline batteries.
Upon entering a PIN code and pressing the (*) key, the unit responds with a series of beeps and the keypad flashes three times.
The digits entered were incorrect or incomplete. Re-enter the correct code followed by the check mark (*) key.
Hardware Troubleshooting
Cycle lock in both the locked and unlocked positions. If problems are found:
Door is binding
a. Check that door and frame are properly aligned and door is free swinging.
b. Check hinges: They should not be loose or have excessive wear on knuckles.
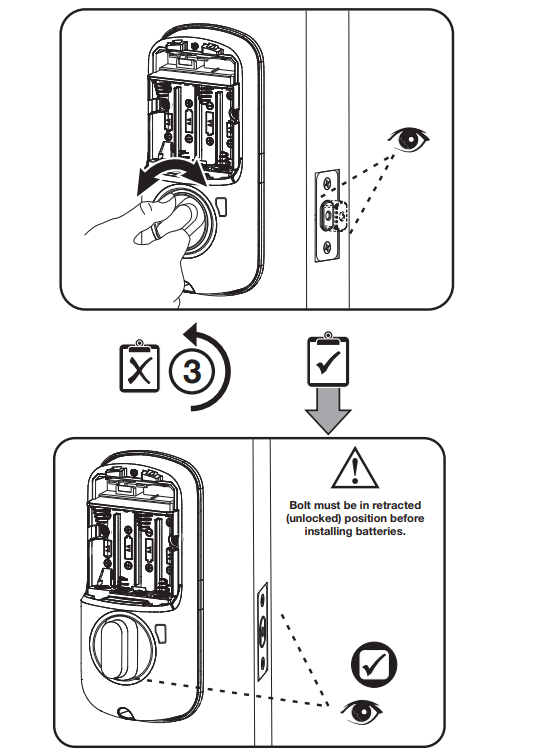
Bolt will not deadlock
a. Check for sufficient clearance of the bolt within the strike-side jamb. Correct this by increasing the depth of the pocket for the bolt.
b. Check for misalignment of bolt and/or strike which may be preventing bolt from properly entering the strike. With the door open, extend and retract the bolt; if it is smooth, check the strike alignment.
Bolt does not extend or retract smoothly
a. Bolt and strike are misaligned, see above.
b. Check the backset of door relative to adjustments already made to bolt.
c. Verify proper door preparation and re-bore holes that are too small or misaligned.
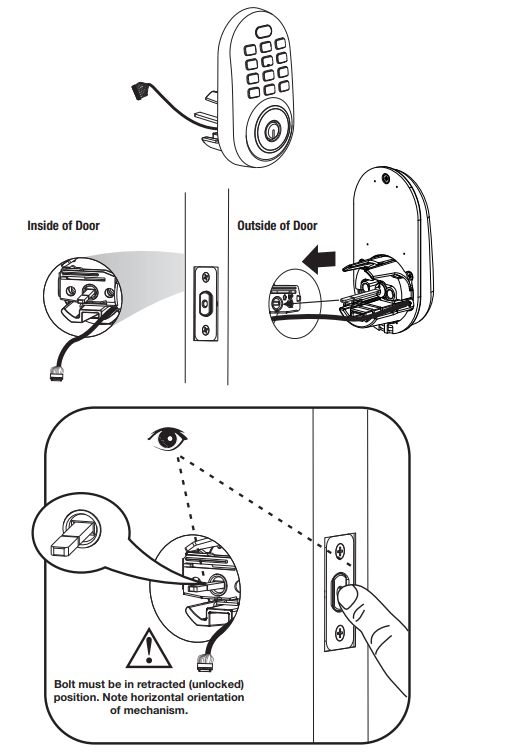
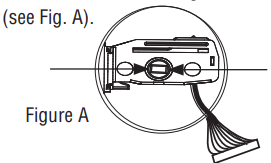
d. Verify keypad wire harness is routed under the bolt (see Fig. A).
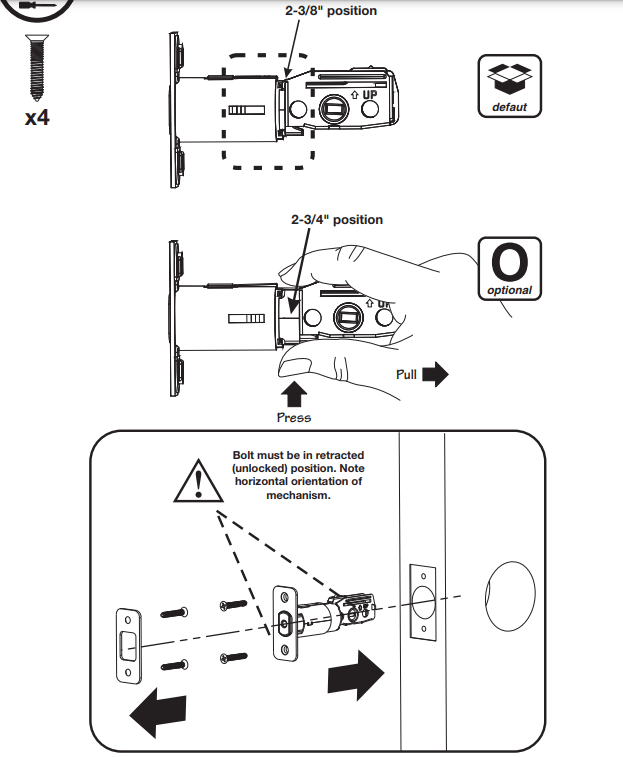
e. Verify bolt is installed with correct side up (Fig. A).
Keypad numerics are scrolling
Remove interior escutcheon and check to ensure that the wire harness lies flat against the back recessed area and is properly routed along the side of the escutcheon and tucked under the plastic cable guide.
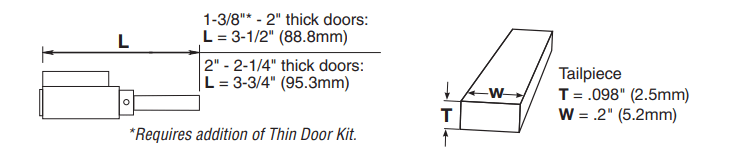
Changing Lock: Replacing Cylinder
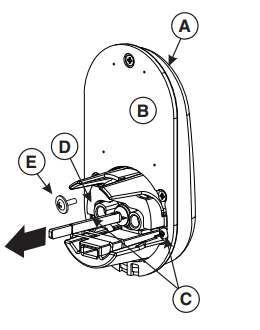
1. To Remove cylinder:
A. Remove outside escutcheon from door.
B. Remove rubber gasket.
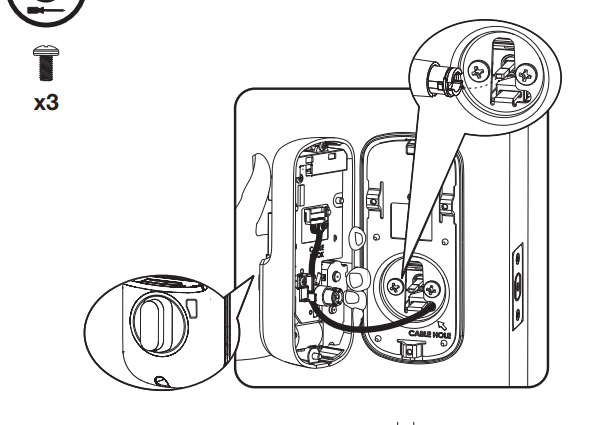
C. Remove two screws holding plastic guide in place.
D. Remove plastic guide.
E. Remove screw with washer holding cylinder in place (visible after removing plastic guide).
F. Remove cylinder housing by pulling cylinder tailpiece away from escutcheon.
Before installing cylinder, be sure tailpiece is correct length (see below).
2. To install new cylinder:
A. Reverse previous steps for removing cylinder.
FCC:
Class B Equipment
This equipment has been tested and found to comply with the limits for a Class B digital device, pursuant to Part 15 of the FCC Rules. These limits are designed to provide reasonable protection against harmful interference in a residential installation. This equipment generates, uses, and can radiate radio frequency energy and, if not installed and used in accordance with the instructions, may cause harmful interference to radio communications. However, there is no guarantee that interference will not occur in a particular installation. If this equipment does cause harmful Interference to radio or television reception, which can be determined by turning the equipment off and on, the user is encouraged to try to correct the interference by one or more of the following measures:
Reorient or relocate the receiving antenna.
Increase the separation between the equipment and receiver.
Connect the equipment into an outlet on a circuit different from that to which the receiver is connected.
Consult the dealer or an experienced radio/TV technician for help.
Warning: Changes or modifications to this device, not expressly approved by Yale Security Inc. could void the user's authority to operate the equipment.
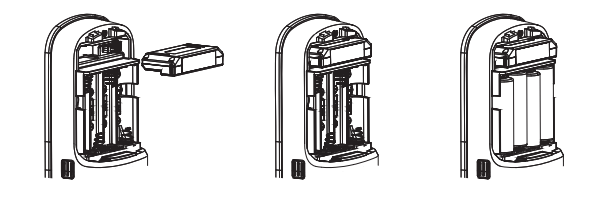
Installing the Z-Wave® Plus Module
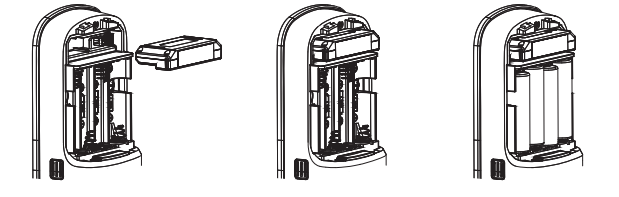
IMPORTANT: the batteries must be removed prior to removing and/or inserting the network module:
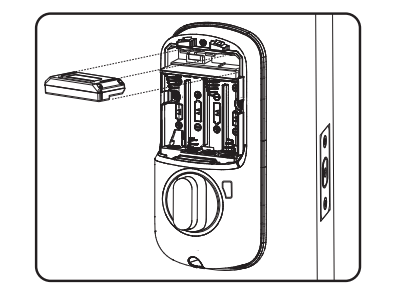
Remove battery cover and batteries.
Remove and/or insert Network Module.
Reinstall batteries and battery cover.
Enrolling/Unenrolling the Network Module:
This device is a security enabled Z-Wave Plus product that is able to use encrypted Z-Wave Plus messages to communicate to other security enabled Z-Wave Plus products. This device must be used in conjunction with a Security Enabled Z-Wave Controller in order to fully utilize all implemented functions. This product can be operated in any Z-Wave network with other Z-Wave certified devices from other manufacturers. All non-battery operated nodes within the network will act as repeaters regardless of vendor to increase reliability of the network.
To Enroll/Add the Module (Inclusion Mode):
Enter the 4-8 digit Master PIN code followed by the key.
Press the 7 key followed by the key.
Press the 1 key followed by the key.
To Unenroll/Remove the Module (Exclusion Mode):
Enter the 4-8 digit Master PIN code followed by the key.
Press the 7 key followed by thekey.
Press the 3 key followed by the key.
Factory Reset - If No Controller:
See the Lock Installation Manual
Please use this procedure only when the network primary controller is missing or otherwise inoperable.
For System Integrators: Specific Z-Wave Plus association and parameter information for your lock is available at YaleHome.com/ZwavePlus.
Installing the ZigBee Module ®
IMPORTANT: the batteries must be removed prior to removing and/or inserting the network module:
Remove battery cover.
Remove batteries.
Remove and/or insert network module.
Reinstall batteries.
Replace cover.
Enrolling/Unenrolling the Network Module:
This device is a security enabled ZigBee product that is able to use encrypted ZigBee messages to communicate to other security enabled ZigBee products. This device must be used in conjunction with a Security Enabled ZigBee Controller in order to fully utilize all implemented functions. This product can be operated in any ZigBee network with other ZigBee certified devices from other manufacturers. All non-battery operated nodes within the network will act as repeaters regardless of vendor to increase reliability of the network.
To Enroll/Add the Module (Inclusion Mode):
Enter the 4-8 digit Master PIN code followed by the key.
Press the 7 key followed by the key.
Press the 1 key followed by the key.
To Unenroll/Remove the Module (Exclusion Mode):
Enter the 4-8 digit Master PIN code followed by the key.
Press the 7 key followed by thekey.
Press the 3 key followed by the key.
Yale Assure App Quick Start Guide
Step 1 Download the App
Yale Assure App
Once you have successfully installed your Assure Lock with Bluetooth, download the free Yale Assure app from the App Store or Google Play Store
Step 2 Turn On Turn On Bluetooth
Ensure Bluetooth is enabled on your smartphone (this can be adjusted in your phone settings) and open the Yale Assure app. For the best experience, we recommend allowing the app to access your location and send you notifications.
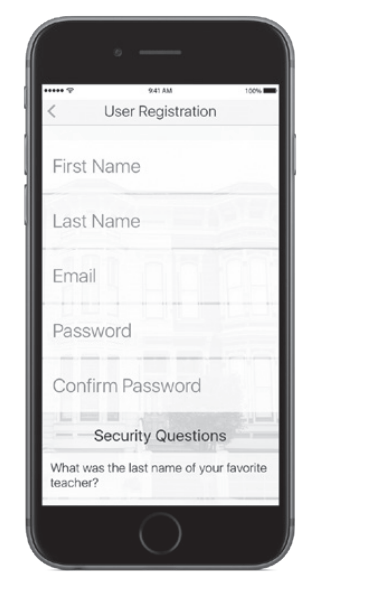
Step 3 Create Account
Create a new account, or sign into your existing account if this is not your first Assure Lock with Bluetooth. Once your account has been created, the app will take you through a quick tutorial.
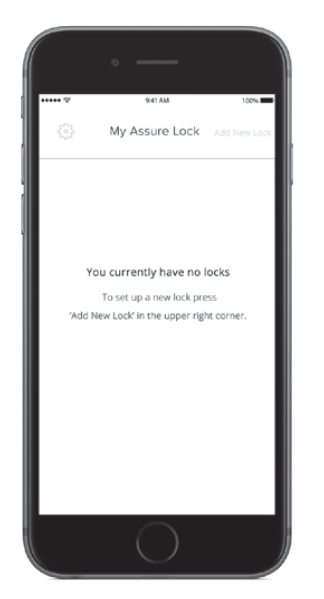
Step 4 Add Lock
Tap 'Add Lock' and follow the on-screen instructions. During this process, please do not walk away from your Assure Lock with Bluetooth or close your Yale Assure app.
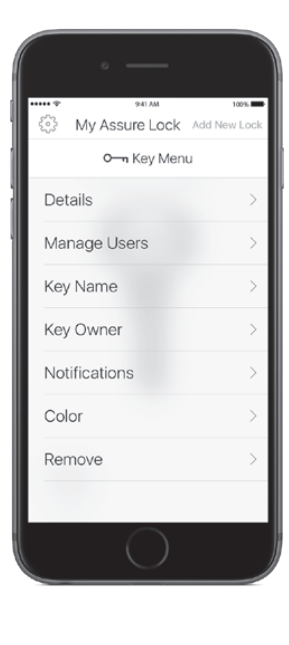
Step 5 Key Settings
Tap the key to adjust notifications, add/manage digital key users and customize your key settings. Tap 'Manage Users' to share a digital key with another Yale Assure app user.
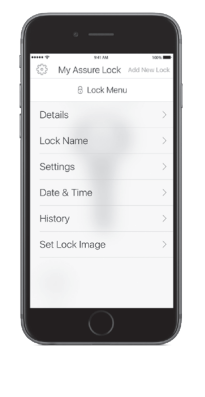
Step 6 Lock Settings
Tap the lock icon in the bottom left corner to customize the name of your lock, adjust lock settings (e.g. wrong code limits, one-touch locking, operating mode) and view access history.
Sharing Digital Keys
Never worry again about lending keys or hiding a key under the welcome mat. Sharing digital keys with friends and family is easy using the Yale Assure app. Tap on the key that you'd like to grant access to and then tap 'Manage Users,'
The app will populate your phone's contacts. You can send a permanent key, or a scheduled key that's only valid during set times. Tap on a user and select 'Remove User' at any time to block their access.
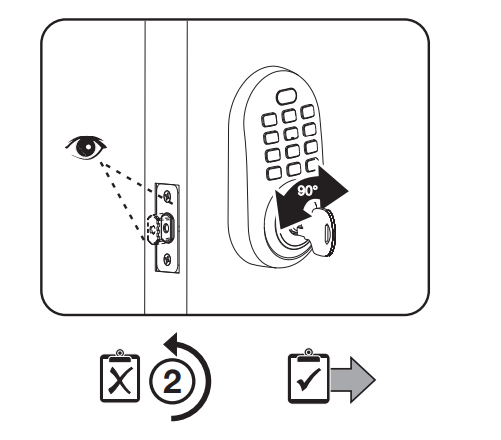
Twist & Go
As an added level of security, the Yale Assure app features a unique unlocking mode called, Twist & Go. This mode will require you to rotate your smartphone 90° to the left and then 90° to the right before tapping the check mark on the keypad to unlock. This prevents unintended unlocking that can happen with other Bluetooth-enabled locks.
Don't sacrifice security for convenience. With Yale, you can have both!
Before You Start, Download the Yale Secure App
Follow the steps on the back of this guide after you install your Yale Assure Lock.
Yale Secure app
Note: This lock is not for use with the Yale Assure app
Yale Customer Service: 1-855-213-5841
Yale® and Assure Lock® are registered trademarks of Yale Security Inc., an ASSA ABLOY Group Company.
Reproduction in whole or in part without the express written permission of Yale Security Inc. is prohibited.
Get Started
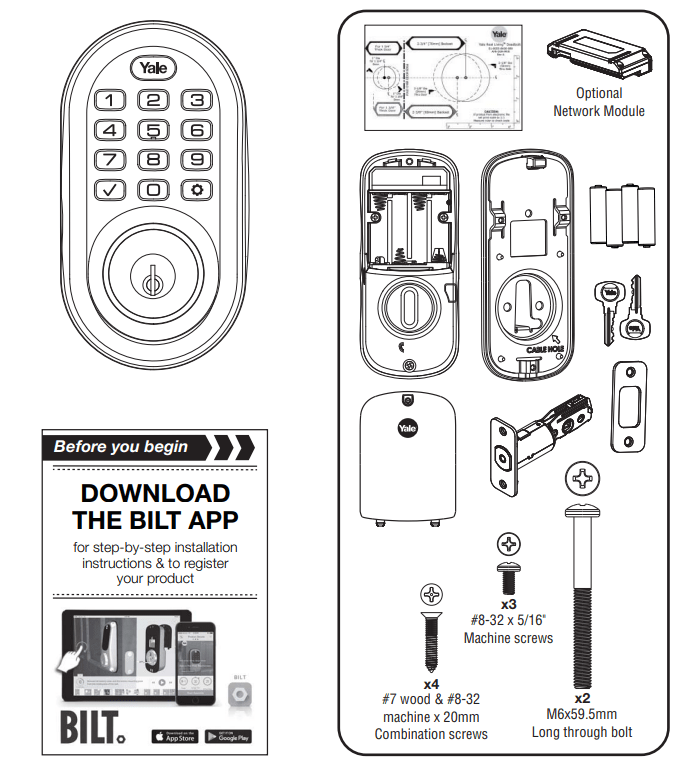
1.Install your lock
Follow the printed installation manual in the box for instructions on how to install your Yale Assure Lock ®
You can view 3D, interactive instructions on your smartphone or tablet by downloading the BILT app and searching for your Yale lock.
2. Turn on Bluetooth®
After installing your lock and downloading the Yale Secure app, go into your iPhone or iPad settings and ensure Bluetooth is turned on.
3. Install the module
Now, install your Yale iM1 Network Module:
Remove the battery cover and batteries
Insert the iM1 Network Module, with its visible pins in the bottom right corner, into the slot above the battery compartment
Reinstall batteries and battery cover
Enter your master pin code followed by
Press 7, followed by
Press 1, followed by
4. Create your home
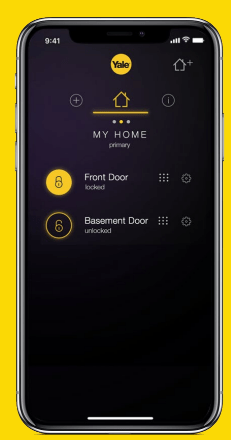
Open the Yale Secure app and create a new home by tapping the icon in the top right corner.
5. Add a lock
Tap the icon next to your home name to add a new lock. Tap the Yale lock when it appears as an available device. Using your iPhone® or iPad®, scan the 8-digit Accessory Set-Up Code located on the back of your iM1 Installation Manual (inside the Network Module box). You can also manually enter this code in the app.
6. Name your lock
This is the name you’ll use for Siri® commands so choose something simple like “Front Door”.
Lock and unlock from anywhere!
When you have an Apple TV ® (4th Gen or later) or iPad® (iOS 10.3 or later) set up as a home hub, you can lock and unlock your door, manage pin codes and receive notifications from anywhere!
Features
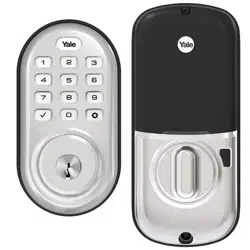
Upgrade your deadbolt with the Assure Lock and enjoy the convenience of unlocking and locking your door using the backlit keypad; you'll never have to carry around your keys again. Create unique entry codes for friends and family and remove codes whenever you need to. The lock is Grade 2 certified and backed Yale, the world's favorite lock since 1840. Get a Yale Smart Module to your Assure Lock to add it to your smart home.
Lose your keys, for good: Unlock your door using your entry code on the keypad, and leave the bulky keychain behind. For use with your smartphone or smart home system, Yale Access Wi-Fi Kit is required (sold separately).
Auto-Lock for peace of mind: You didn’t forget to lock the door, your lock did it for you. Rest easy knowing that your door is locked every time you leave the house and when you go to bed at night.
Easy to install on any door: Not so handy? Not a problem. Yale Assure locks are super easy to install and are guaranteed to fit standard doors (doors 1-¾” to 2-¼” thick. Doors under 1-⅜” require thin door kit).
Stop hiding keys: Sharing codes is the new hide-a-key. Give unique codes to friends, family, and other people you trust, and never put a key under the doormat again.
Upgrade to Wi-Fi with Yale Access: Use just the keypad for now, and upgrade to a smart lock whenever you’re ready. Our Yale Access Wi-Fi Kit (sold separately) lets you use your phone as your key.
Comes with a couple keys, just in case: If you’re not ready to lose your keys for good, two physical keys are included in the box.
Modern look for your modern life: Yale Assure locks feature clean lines, a slim profile, and come in a variety of beautiful finishes, including satin nickel, oil rubbed bronze, and black suede, to match any home’s design.
Works great in any weather: Yale Assure Locks can withstand temperatures from -22°F to 140°F, and our easy-to-use keypad is glare-resistant and glove-friendly.
Long battery life: Four (4) AA batteries last an average of 18 months, and a low battery indicator will tell you when it’s time to change them.
Trusted every day for over 180 years: Yale locks come with a limited lifetime warranty for finish and mechanical and 24/7 customer support. A brand trusted for generations.
Questions
Does this lock work with the Z-Wave Plus Smart Module?
Yes! Remove the battery cover and you will see the empty slot at the top just above the batteries. Remove the batteries and insert ANY of the various modules available from Yale including the "Z-Wave Plus Smart Module" into the top slot. With the new module installed, perform a factory reset on the lock and re-install the batteries and battery cover. You are now ready to program the lock. (NOTICE: A factory reset is required to pair the lock with the new module and will erase all user settings including any user codes previously programmed into the lock. You will need to program the lock as if you are setting it up for the first time, starting with the master pin code.) Anyone local in the Southeast Florida area are welcomed to reach out to us if they prefer to have an expert assist with this service
How do you convert this to a Schlage keyway?
Order part # "AYRD200-SCKD-26" a local locksmith. The old cylinder comes out easily once you remove the retaining screw from the back of the lock. Be very careful not to damage or lose this small screw. Slide in the new cylinder in the correct orientation (only goes in one way) and re-install the retaining screw. Re-assemble the lock on the door and your lock now works with a Schlage SC1 key. Anyone local in Southeast Florida, who wants help with this service or needs to have their cylinders re-keyed at the same time, are welcomed to reach out to us for assistance.

 key.
key.
 Yale Assure App Quick Start Guide
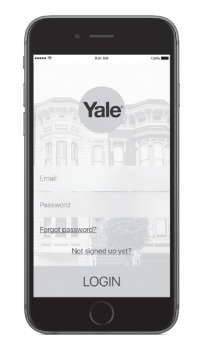

 Yale Secure app


 icon in the top right corner.