Loading ...
Loading ...
Loading ...
Remote Control Functions
7
BDS 280/580
7. Subwoofer Output: Use the supplied mono RCA audio cable to connect this jack to
the subwoofer’s Line-Level IN LFE jack.
8. Antenna Wi-Fi: Connect the antenna accessory labeled Wi-Fi here for improved
Wi-Fi reception.
9. FM Radio Antenna Output: Connect the supplied FM antenna to this terminal.
10. Coaxial Digital Audio (S/PDIF) Input: Connect the coaxial digital output of an
audio source component here. The signal may be a Dolby Digital bit stream, a DTS bit
stream or a standard PCM digital-audio bit stream.
11. IR Remote Input: When the IR sensor on the front panel is blocked (for example,
when the system is installed inside a cabinet); connect an optional IR receiver to the
Remote IR Input connector.
12. HDMI Output (ARC): Connect the BDS system’s HDMI output to your TV’s HDMI
input. If your TV is 3D capable, then you can watch 3D content in 3D either from the BDS
system’s built-in disc player or from other 3D-capable source devices connected to the
BDS system’s HDMI Input connectors (see below). The system’s HDMI output connection
also contains an Audio Return Channel (ARC) that carries a digital audio signal from
your TV or video display back to the BDS. It allows you to listen to HDMI devices that are
connected directly to your TV (such as a digital TV tuner) without making an additional
connection from the device to the BDS system.
NOTE: You must enable the ARC output of your TV. Consult your TV’s instruc-
tion manual for information.
13. HDMI Inputs: You can connect up to three additional source devices to the BDS
system provided the source devices have HDMI connectors. The HDMI connection
transmits digital audio and video signals between devices, so you do not have to
make any additional audio connections for devices you want to connect via an HDMI
connector. The BDS system will pass 3D video signals from 3D capable HDMI source
devices to the TV via the HDMI output connector.
Some HDMI inputs have special functionalities:
• HDMI 1/MHL input: This input accepts both HDMI and MHL connections.
MHL can be used with many mobile smart devices to mirror their audio
and video content on the BDS system while powering the device (check the
owner’s manual of your device). This connector is also compatible with the
Roku Streaming Stick, which allows access to Roku services, controlled by
the BDS remote control.
• HDMI 3 (Apple) input: This input accepts any HDMI source device, but if
connected to Apple products, such as the Apple TV or Mac Mini, the BDS
remote can be used to control them (this input on the remote control is pre-
programmed with standard Apple device remote commands).
14. USB Input: You can use the USB port to play audio files from an Apple iOS device
connected to the port, and to play MP3 and WMA audio files and show video and
picture files from a USB device inserted into the port. Insert the connector or device
into the USB port oriented so it fits all the way into the port. You may insert or remove
the connector or device at any time - there is no installation or ejection procedure. You
can also use the USB port to perform firmware upgrades. If an upgrade for the BDS
operating system is released in the future, you will be able to download it to the BDS
system using this port. Complete instructions will be provided at that time.
IMPORTANT: Do not connect a PC or other USB host/controller to this port, or
you may damage both the BDS system and the other device.
NOTE: This USB port is rated for 1A output and it suggests that it is certi-
fied to charge iPhone and iPod devices. There is a USB connector on the
front panel as well with similar functionality, rated for 2.1A to additionally
charge iPad devices.
15. Network Connector: Use a Cat. 5 or Cat. 5E cable (not supplied) to connect the
BDS system’s Network connector to your home network to enjoy content from AirPlay,
DLNA, and streaming services, as well as control from the Harman Kardon Remote app
for iOS and Android. Additionally, system upgrades can be downloaded and installed
from compatible devices that are joined to the network.
16. WPS Button: You can connect to the Internet using the WPS button.
17. AC Power Input: After you have made and verified all other connections, plug the
supplied AC power cord into this input and into an unswitched AC outlet.
Remote Control Functions
Power button: The BDS system has four different power modes:
• OFF (ON/Standby indicator not illuminated): When the rear-panel Main
Power switch is in the OFF position or the power cord is unplugged the BDS
system is off and will not respond to any commands. Plugging the power
cord into a live AC outlet and setting the Main Power switch in the On posi-
tion will put the system into the Standby mode.
• Standby (Power indicator glows solid amber): The Standby mode minimizes
energy consumption when you are not using the BDS system. When the sys-
tem is in Standby, it will not automatically turn on or play audio in response
to a signal from an AirPlay device or a Bluetooth device. When the system
is in Standby, pressing the Power button turns it on. To put the system into
Standby when it is on, press the Power button for more than two seconds.
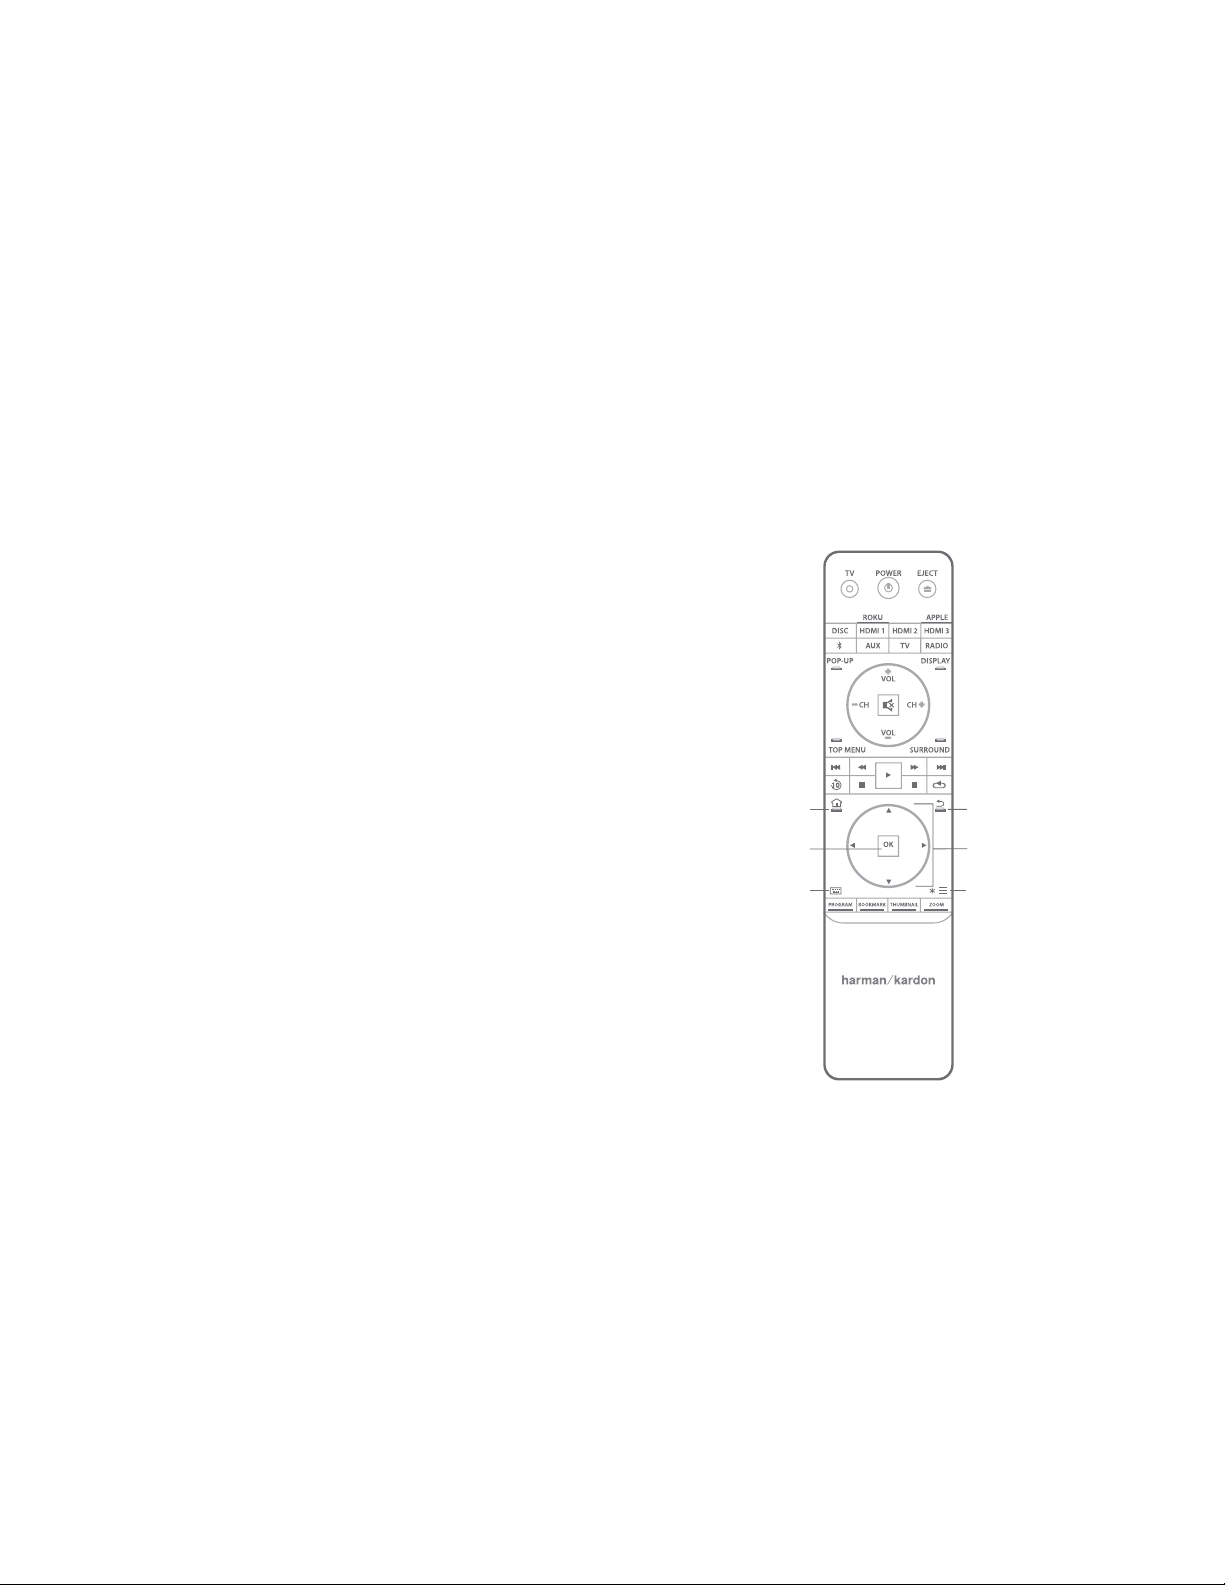
BACK
BUTTON
CURSOR
CONTROLS
OPTIONS
BUTTON
KEYBOARD
BUTTON
OK
BUTTON
HOME
BUTTON
Loading ...
Loading ...
Loading ...