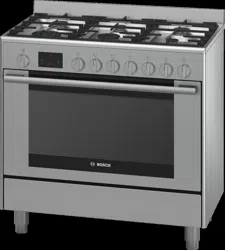
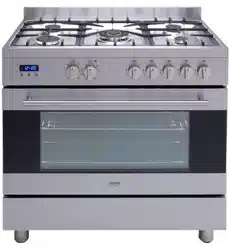
Use this section to familiarise yourself with your new appliance. You will find information about the control panel and hob, as well as the oven, types of heating and accessories.
Depending on the appliance model, individual details may differ.
Explanation
1
Splatter guard
2
Hob
3
Control panel
4
Oven
5
Storage compartment
The control panel
Explanation
1
Control knob for oven temperature
2
Pyrolytic self-cleaning indicator light
3
Control panel
4
Control knob for oven functions
5
Control knob for hotplates
Control panel
Here, you can see an overview of the control panel. All of the symbols never appear in the display at the same time. Depending on the appliance model, individual details may differ.
Buttons
The sensors are located under the individual buttons. They must not be pressed too firmly. Only touch the corresponding symbol.
Buttons and display
You can use the buttons to set various additional functions. On the display, you can read the values that you have set.
The time-setting option that is currently selected in the display is indicated by brackets [ ] around the corresponding symbol. Exception: For the clock, the symbol only lights up if the time is being changed.
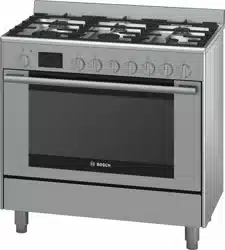
The hob
: Warning - Risk of burns!
Hot air flows out from the ventilation opening on the hob. Never touch the ventilation opening.
Please note that, in the case of appliances with a hob cover, the burners in the oven must also only be switched on if the hob cover is open.
Explanation
1
Wok burner (14.0 MJ/h)
2
High-output burner (12.0 MJ/h)
3
Standard burner (7.0 MJ/h)
4
Ventilation opening
5
Economy burner (4.0 MJ/h)
Types of gas burner
Gas burners
Pot/pan diameter
Economy
burner
12 - 14 cm
Standard
burner
16 - 22 cm
High output burner
18 - 26 cm
Wok burner
18 - 26 cm
Precautions for use
The following advice is intended to help you save energy and prevent pan damage:
Use pans which are the right size for each burner. Do not use small pans on large burners. The flame must not touch the sides of the pan.
Do not use damaged pans, which do not sit evenly on the hob. Pans may tip over. Only use pans with a thick, flat base.
Do not cook without using a lid and make sure the lid is properly fitted. This wastes energy.
Always centre the pan over the burner, not to one side. Otherwise it could tip over. Do not place large pans on the burners near the control knobs. These may be damaged by the very high temperatures.
Place the pans on the pan supports, never directly on the burner.
Make sure that the pan supports and burner caps are correctly positioned before using the appliance. Pans should be placed on the hob carefully.
Do not strike the hob and do not place excessive weight on it.
Never use two burners or heat sources to heat one single pan.
Do not use grill pans, earthenware casserole dishes, etc. for a long period of time on maximum power.
Control knob for hotplates
This control knob is used to adjust the heat setting of the gas burner hotplates.
The symbols above the control knob show you the gas burner to which the control knob belongs.
The oven
In order to operate the oven, you require two operating knobs: The function selector and the temperature selector.
Control knob for oven Function selector
Use the function selector to set the type of heating.
Type of heating
Use
Hot air
For baking and cooking on one or more levels.
The fan distributes the heat from the ring heating element in the back panel evenly around the cooking compartment.
Eco
For energy-optimised cooking of selected dishes.
Heat is emitted evenly from the top and bottom.
Top/bottom heating and fan
For cakes with very moist toppings.
Heat is emitted evenly from the top and bottom. The fan circulates the hot air around the food.
Top/bottom
heating
For traditional baking and roasting on one level. Especially suitable for cakes with moist toppings.
Heat is emitted evenly from the top and bottom.
Bottom heating and fan
For the final baking stage (such as for moist fruit flans), for boiling down, for dishes in a bain marie.
Heat is emitted from below. The fan circulates the hot air around the food.
Bottom heat and hot air
For preparing pizza and dishes that require a lot of heat from underneath.
The bottom heating element and the ring heating element in the back panel heat up.
Hot air grill
For roasting poultry, whole fish and larger pieces of meat.
The whole area below the grill element becomes hot. The fan circulates the hot air around the food.
Full-surface grill
For grilling flat items, such as steaks or sausages, for making toast, and for browning food.
The whole area below the grill element becomes hot.
Grill/rotary spit
Grill: For individual portions or smaller quantities of steak, sausages, fish and toast.
Rotary spit: For roasts, rolled joints and poultry
Pyrolytic selfcleaning
For running a cooking compartment self-cleaning programme.
Temperature selector
You can use the temperature selector to set the temperature.
Setting
Meaning
Off
50 - 280
Temperature range in °C
There is a limit stop between settings 280 and o. Do not turn the selector beyond this point.
The storage drawer
To open the storage drawer, take hold of the middle of the panel and pull it towards you.
This drawer can be used to store hob or oven accessories.
Warning - Risk of fire!
Never leave flammable items in the storage drawer.
Cooling fan
The hot air escapes via the ventilation opening. The cooling fan switches on and off as required. Caution. Do not cover the ventilation slots. Otherwise the oven will overheat.
To ensure that the cooking compartment cools down more quickly after operation, the cooling fan continues to run for a certain period afterwards.
Before using for the first time
In this section, you can find out what you must do before using your oven or hob to prepare food for the first time. Read the following section beforehand.
Remove the appliance packaging and dispose of it appropriately.
Setting the clock
After the appliance has been connected, the symbol and four zeros flash in the display.
1. Set the clock.
The clock in the display shows 12:00. The time symbols light up and the brackets are around .
2. Use the + or - button to set the clock.
After a few seconds, the time that has been set is adopted.
Baking out the oven
Preparing the appliance
1. Remove accessories and hook-in racks from the cooking compartment.
2. Fully remove any remaining packaging, such as small pieces of polystyrene, from the cooking compartment.
3. Some parts are covered with a protective film. Remove the protective film.
4. Remove the protective film in the warming drawer.
5. Clean the outside of the appliance with a soft, damp cloth.
6. Clean the cooking compartment with hot soapy water.
Heating up the oven
To remove the new cooker smell, heat up the oven
when it is empty and closed.
1. Turn the temperature selector to the maximum temperature.
2. Switch off the oven after 45 minutes.
Recleaning the oven
1. Clean the cooking compartment with hot soapy water.
2. Fit the hook-in racks.
Cleaning the burner caps and cups
1. Clean the burner caps (A) and cups (B) with water and washing-up liquid.
2. Dry the parts well.
3. Place the burner cup (B) onto the burner (C).
4. Position the burner cap (A) exactly on the burner cup (B).
Cleaning the accessories
Before using the accessories, clean them thoroughly
using a cloth and warm soapy water.
Fitting the threaded bushes for the rotary spit
1. From above, place the threaded bushes into the holes at the four corners of the universal pan.
2. Counter the ring nuts from below.
3. Use a screwdriver to tighten the threaded bushes.
Operating the appliance
You have already learnt about the controls and how they work. Now we will explain how to set your appliance. You will learn about what happens when you switch the appliance on and off, and how to select the operating mode.
Hob
Switching on the gas burner
Notes
■ Appliances with a hob cover must only be switched on if the hob cover is open.
■ The burner caps must always be positioned exactly on top of the burner cups. The slots on the burner cup must be free from obstruction. All parts must be dry.
■ Ensure that the burner is not subjected to draughts caused by air conditioning systems, fans or similar appliances.
1. Press the control knob for the required burner and turn it to the position.
The gas burner ignites.
2. Keep the control knob pressed for a few seconds until the flame stabilises.
3. Set the desired flame setting.
Setting
Meaning
Economy flame, lowest power
Large flame, highest power
The flame is not stable between positions o and . Always select a position between and .
If the flame goes out
Switch off the control knob. Wait one minute and switch the burner on again.
If the gas burner does not ignite
In the event of a power cut or damp ignition plugs, light the gas burner with a gas lighter or a match.
Switching off the gas burner
Turn the control knob for the required hotplate to position o.
Oven
Operating the oven Switching on the oven
Note: Always keep the appliance door closed when it is in operation.
1. Turn the function selector to the desired operating mode.
2. Turn the temperature selector to set the desired temperature.
The oven switches on.
The indicator lamp is lit when the oven is heating up. It goes out during pauses in heating.
Note: The indicator lamp also lights up when the function selector is in the off position and a temperature is set. The oven only begins to heat up when an operating mode is set.
Note: In order to save as much energy as possible, it takes longer for the appliance to heat up with the ECO heating function than with other heating functions.
Note: With the ECO heating function, the cooking compartment is lit for 1 minute after the oven door has been closed or the heating function has been selected. After a minute, the interior lighting will switch itself off automatically.
Note: If the power supply is interrupted, the appliance will stop. When the power supply is restored, the appliance will not automatically resume operation. The time and operating mode will need to be reset. If the self-cleaning programme is stopped early, the cooking compartment may not be completely clean.
Switching off the oven
1. Turn the function selector to the o position.
2. Turn the temperature selector to the o position.
The oven switches off.
Rotary spit
Preparing the rotary spit
1. Slide a retaining clip onto the rotary spit and screw on the handle.
2. Place the roast as close as possible to the centre of the rotary spit.
3. Use retaining clips to secure the roast in place.
4. Use milled screws to secure the retaining clips.
Inserting the rotary spit
1. Insert the rotary spit frame into the threaded bushes
2. Place the rotary spit onto the rotary spit frame and unscrew the handle.
3. Slide the universal pan into shelf position 1 and slide the rotary spit into the motor mount.
4. Close the appliance door.
Switching on the rotary spit
Note: When using the rotary spit, preheat the oven using the type of heating. Only set the type of heating once the rotary spit has been inserted.
1. Turn the control knob for the oven to the position.
2. Set the temperature.
Note: Add some water to the universal pan in order to catch any fat that drips out.
Removing the rotary spit
1. Opening the appliance door
2. Slowly pull the universal pan until it is halfway out of the cooking compartment.
3. Completely remove the universal pan from the cooking compartment and set it on the worktop.
4. Screw on the handle and remove the grill spit from the grill spit frame.
Time-setting options
Your oven has various time-setting options. You can use the button to call up the menu and switch between the individual functions. As long as the symbols are lit, you can implement settings. The [ ] brackets show you which time-setting function you have currently selected. You can use the + or- button to directly change a time-setting function that has already been set, if its time symbol is in brackets.
Timer
You can use the timer as a kitchen timer. It runs independently of the oven. The timer has its own signal. In this way, you can tell whether it is the timer or a cooking time which has elapsed.
1. Press the button once.
The time symbols light up in the display and the brackets are around .
2. Use the + or - button to set the timer duration. Default value for +button = 10 minutes Default value for -button = 5 minutes
After a few seconds, the time setting is adopted. The timer starts. The [] symbol lights up in the display and the timer duration counts down. The other time symbols go out.
The timer duration has elapsed
A signal sounds. 00:00 is shown in the display. Use the button to switch off the timer.
Changing the timer duration
Use the + or - button to change the timer duration. After a few seconds, the change is adopted.
Cancelling the timer duration
Use the - button to reset the timer duration to 00:00. The change will be adopted after a few seconds. The timer is switched off.
Checking the time settings
If several time-setting options are set, the relevant symbols are illuminated on the display. The symbol for the time-setting option that is visible in the display is shown in brackets.
To call up the timer, cooking time, end time or clock, press the button repeatedly until the brackets are around the relevant symbol. The display shows the value for a few seconds.
Cooking time
The cooking time for your dish can be set on the oven. When the cooking time has elapsed, the oven switches itself off automatically. This means that you do not have to interrupt other work to switch off the oven. The cooking time cannot be accidentally exceeded.
Example in the picture: cooking time 45 minutes.
1. Use the function selector to set the type of heating.
2. Set the temperature or grill setting using the temperature selector.
3. Press the button twice.
00:00 is shown in the display. The time symbols light up and the brackets are around .
4. Use the + or - button to set the cooking time. Default value for + button = 30 minutes Default value for - button = 10 minutes
The oven will start up after a few seconds. The cooking time counts down in the display and the [] symbol lights up. The other time symbols go out.
The cooking time has elapsed
A signal sounds. The oven stops heating. 00:00 is shown in the display. Press the button. You can set a new cooking time using the + or - button. Or press the button twice and turn the function selector to the off position. The oven switches off.
Changing the cooking time
Use the + or - button to change the cooking time. After a few seconds, the change is adopted. If the timer has been set, press the button beforehand.
Cancelling the cooking time
Use the - button to reset the cooking time to 00:00. After a few seconds, the change is adopted. The cooking time is cancelled. If the timer has been set, press the button beforehand.
End time
You can change the time at which you want your dish to be ready. The oven will start automatically and finish at the desired time. You can, for example, put your dish in the cooking compartment in the morning and set the cooking time so that it is ready at lunch time.
Ensure that food is not left in the cooking compartment for too long as it may spoil.
Example in the picture: It is 10:30, the cooking time is 45 minutes and you want the oven to finish cooking at 12:30.
1. Set the cooking time. —— "Cooking time" on page 18
2. Set the function selector.
3. Set the temperature selector.
4. Press the button twice.
5. Use the + or - button to set the cooking time.
6. Press the button.
The brackets are around . The time when the dish will be ready is displayed.
7. Use the + or - button to delay the end time.
After a few seconds, the oven will apply the settings and switch to standby. The display shows the time at which the dish will be ready and the symbol is displayed in brackets. The and symbols go out. When the oven starts, the cooking time counts down in the display and the symbol is displayed in brackets. The symbol goes out.
The cooking time has elapsed
A signal sounds. The oven stops heating. 00:00 is shown in the display. Press the button. You can set a new cooking time using the + or - button. Or press the button twice and turn the function selector to the off position. The oven switches off.
Changing the end time
Use the + or - button to change the end time. After a few seconds, the change is adopted. If the timer has been set, first press the button twice. Do not change the end time if the cooking time has already started to elapse. The cooking result would no longer be correct.
Cancelling the end time
Use the - button to reset the end time to the current time. After a few seconds, the change is adopted. The oven starts. If the timer has been set, first press the button twice.
Clock
After the appliance is connected or following a power cut, the symbol and four zeros flash in the display.
1. Set the clock.
The clock in the display shows 12:00. The time symbols light up and the brackets are around .
2. Use the + or - button to set the clock.
After a few seconds, the time that has been set is adopted.
Changing the clock
No other time-setting option should have been set.
1. Press the button four times.
The time symbols light up in the display and the brackets are around .
2. Use the + or - button to change the clock.
After a few seconds, the time that has been set is adopted.
Changing the basic settings
Your oven has various basic settings. These settings can be customised to suit your requirements.
No other time-setting option should have been set.
1. Press and hold the button for approx. 4 seconds. The current basic setting for the clock display is shown in the display, e.g. c1 1 for selection 1.
2. Use the + or - button to change the basic setting.
3. Confirm by pressing the button.
The next basic setting appears in the display. You can scroll through all levels with the button and change the setting with the + or - button.
4. To finish, press and hold the button for approx. 4 seconds.
All basic settings are applied.
You may change the basic settings at any time.
Childproof lock
The oven has a childproof lock to prevent children from switching it on by accident.
The oven will not respond if any attempts to apply settings are made.You can still set the clock and the timer when the childproof lock is activated.
If the heating function and temperature or grill setting have been set, the childproof lock interrupts heating.
Note: If a hob is being used, it will not be affected by the childproof lock on the oven.
Activating the childproof lock
No cooking time or end time should be set.
Press and hold the button for approx. 4 seconds.
The symbol will appear on the display. The childproof lock has now been activated.
Deactivating the childproof lock
Press and hold the button for approx. 4 seconds.
The symbol will go out on the display. The childproof lock has now been deactivated.
Cleaning agent
With good care and cleaning, your appliance will retain its appearance and remain fully functioning for a long time to come. We will explain here how you should correctly care for and clean your appliance.
Suitable cleaning agents
Observe the following information to ensure that the different surfaces are not damaged by using the wrong type of cleaning agent.
Do not use any of the following on the hob:
■ Undiluted washing-up liquid or dishwasher detergent,
■ Abrasive materials, scouring sponges,
■ Aggressive cleaners such as oven spray or stain removers,
■ High-pressure cleaners or steam jet cleaners.
Do not use any of the following on the oven:
■ Any harsh or abrasive cleaning agents,
■ Cleaning agents with a high concentration of alcohol,
■ Hard scouring pads or sponges,
■ High-pressure cleaners or steam cleaners.
Wash new sponge cloths thoroughly before use.
Warning - Risk of burns!
The appliance becomes very hot. Never touch the interior surfaces of the cooking compartment or the heating elements. Always allow the appliance to cool down. Keep children at a safe distance.
Area
Cleaning
Appliance exterior
Hot soapy water:
Clean with a dish cloth and then dry with a soft cloth. Do not use glass cleaner or a glass scraper.
Stainless steel front
Hot soapy water:
Clean with a dish cloth and then dry with a soft cloth.
Remove flecks of limescale, grease, starch and albumin (e.g. egg white) immediately. Corrosion can form under such flecks.
Special stainless steel cleaning products suitable for hot surfaces are available from our after-sales service or from specialist retailers. Apply a very thin layer of the cleaning product with a soft cloth.
Aluminium and plastic
Glass cleaner:
Clean with a soft cloth.
Gas hob and pan supports
Hot soapy water.
Use very little water. Water must not be allowed to enter the appliance through the base of the burners.
Clean boiled-over liquids and spilt food immediately.
You can remove the pan supports. Do not clean the pan supports in the dishwasher.
Gas burners, hotplate
Remove the burner cups and caps, clean them with soapy water.
The gas outlet openings must remain free from obstruction.
Ignition plugs: Small, soft brush.
The gas burners only work properly when the ignition plugs are clean. Dry all parts thoroughly. Ensure that they are positioned correctly when they are refitted.
The burner caps are coated in black enamel. The colour may change over time. This does not affect their function.
Do not clean the burner caps in the dishwasher.
Enamel surfaces (smooth surfaces)
Hot soapy water:
Clean with a dish cloth and then dry with a soft cloth. Remove flecks of limescale, grease, starch and albumin (e.g. egg white) immediately. Corrosion can form under such flecks.
Special stainless steel cleaning products suitable for hot surfaces are available from our after-sales service or from specialist retailers. Apply a very thin layer of the cleaning product with a soft cloth.
Door panels
Hot soapy water:
Clean with a dish cloth and then dry with a soft cloth.
Do not use a glass scraper or a stainless steel scouring pad.
Glass cover for the interior lighting
Hot soapy water:
Clean with a dish cloth and then dry with a soft cloth.
If the cooking compartment is heavily soiled, use oven cleaner.
Door seal Do not remove.
Hot soapy water:
Clean with a dish cloth. Do not scour.
Rails
Hot soapy water:
Soak and clean with a dish cloth or brush.
Accessories
Hot soapy water:
Soak and clean with a dish cloth or brush.
If there are heavy deposits of dirt, use a stainless steel scouring pad.
Notes
■ Slight differences in colour on the front of the appliance are caused by the use of different materials, such as glass, plastic and metal.
■ Shadows on the door panels, which look like streaks, are caused by reflections made by the interior lighting.
■ Enamel is baked on at very high temperatures.This can cause some slight colour variation. This is normal and does not affect operation.
The edges of thin trays cannot be completely enamelled. As a result, these edges can be rough. This does not impair the anti-corrosion protection.
Keeping the appliance clean
Always keep the appliance clean and remove dirt immediately so that stubborn deposits of dirt do not build up.
Tips
■ Clean the cooking compartment after each use. This will ensure that dirt cannot be baked on.
■ Always remove flecks of limescale, grease, starch and albumin (e.g. egg white) immediately.
■ Use the universal pan for baking very moist cakes.
■ Use suitable ovenware for roasting, e.g. a roasting dish.
Cleaning the cooking compartment
1. Pour 0.4 litres of water into the centre of the cooking compartment floor.
2. Set the type of heating .
3. Use the temperature controller to set 50 °C.
4. Switch off the appliance after 18 minutes.
5. Allow the appliance to cool down.
6. Clean the cooking compartment with a cloth.
Cleaning Function
Your appliance has a self-cleaning function. You can use the self-cleaning function to clean the cooking compartment.
Pyrolytic self-cleaning
You can use "Pyrolytic self-cleaning" mode to clean the cooking compartment with no effort at all. The cooking compartment is heated up to a very high temperature.Residues from roasting, grilling and baking will burn.
Running this cleaning programme requires approximately 5-10 kilowatt hours. The cleaning programme runs for 3 hours.
Note: For your safety, the cooking compartment door locks automatically. It cannot be opened again until the lock indicator light goes out.The interior lighting remains off during cleaning.
Before running the cleaning function Caution!
Shelf supports and pull-out rails get demaged if they are left in the cooking compartment when it is cleaned. Before you start the cleaning function, remove the shelf supports and pull-out rails from the cooking compartment.
1. Remove the shelf supports and pull-out rails from the cooking compartment.
2. Remove the worst of the food residues and remnants from the cooking compartment.
3. Clean the inside of the appliance door and along the edges of the cooking compartment in the area around the seal. Do not scrub the seal.
Starting
1. Turn the function selector to the heating function.
2. Turn the temperature selector to 280 °C.
The appliance will start the self-cleaning programme.
Notes
■ Moving the function selector or the temperature selector while the cleaning cycle is in progress will stop the pyrolytic self-cleaning programme.
■ Activating the childproof lock while the cleaning cycle is in progress will stop the pyrolytic selfcleaning programme.
While the self-cleaning programme is in progress, the appliance door is automatically locked.
One minute after the cleaning cycle (pyrolytic selfcleaning) has begun, the oven door is locked to prevent it from being opened. The indicator light lights up to show that this door lock has been activated. Once the door lock has been activated, it is no longer possible to select any functions. To select functions, wait until the indicator light goes out. Even if you cancel the selfcleaning programme shortly after the door lock is activated, it may take several minutes until you can open the oven door.
Note: You can continue to use the duration and end time while the pyrolytic self-cleaning programme is in progress. To achieve a good cleaning result in a lightly soiled oven, set the programme to run for at least 2 hours. The self-cleaning programme can be set to run for up to 3 hours, after which the programme will switch itself off automatically. Take into account the maximum 3-hour programme duration when setting the end time.
Cancelling
To cancel the programme, turn the function selector to o.
Ending
Once the self-cleaning function has run through to the end, a short audible signal will sound five times. The appliance door cannot be opened until the temperature falls below 300 °C and the symbol goes out.
Once the cleaning function has ended
Once the cooking compartment has cooled down, use a damp cloth to wipe off the ash that has been left behind in the cooking compartment and around the appliance door.
Notes
■ Very bad soiling may cause white deposits to remain on the enamel surfaces. This is residue from the food and is harmless. It does not affect performance. You can remove these residues using lemon juice if required.
■ In case of bad soiling, it’s possible that the cleaning cycle doesn’t clean the oven completly. In this case, perform a second cleaning cycle.
Rails
Removing the hook-in racks
The hook-in racks are each fixed to the side panels of the cooking compartment at three points.
1. Grip the front of the hook-in rack and pull it to the middle of the cooking compartment.
The front hook of the hook-in rack will release from the hole.
2. Fold out the hook-in rack further and pull it from the rear holes of the side panel.
3. Remove the hook-in rack from the cooking compartment.
Inserting the hook-in rack
1. Insert the hooks of the hook-in rack into the rear holes in the side panel.
2. Press the front hook of the hook-in rack into the hole.
Appliance door
With good care and cleaning, your appliance will retain its appearance and remain fully functional for a long time to come. This will tell you how to clean the appliance door.
Removing and installing the door panels
To facilitate cleaning, you can remove the glass panels from the oven door.
Removing the door panels
1. Open the oven door fully.
2. Lock the two hinges on the left and right using the locking pin.
Note: The locking pins must be fully inserted into the holes in the hinges.
3. Using both hands, lift the bottom of the inner panel slightly until the fastening pins come out of the holder.
4. Carefully pull the top part of the inner panel out of the retaining strip and lift it to completely free the panel from the door.
5. Remove the two middle panels along with their holders.
Note: The two middle panels are not fastened using retaining pins; instead, they are held in place using holders.
6. Remove the holders to separate the two middle panels from one another.
7. Clean the panels with glass cleaner and a soft cloth.
Fitting the door panels
1. Reinsert the two middle panels.
Notes
- You will know that you have inserted the two middle panels correctly when you can see the "Low-E" symbol on both panels.
- Make sure that the panels are seated correctly. All holders must lay flat against the outer panel.
2. Reinsert the inner panel.
Note: The panel must first be inserted into the retaining bar. The two fastening pins must then engage in the holders provided for them.
3. Remove the locking pins and close the oven door.
Removing and fitting the appliance door
If the oven is very heavily soiled, the oven door can be removed for easier cleaning. Normally, however, this is not necessary.
Removing the appliance door
1. Open the oven door fully.
2. Lock both hinges on the left and right using the locking pin (a).
Note: The locking pins must be fully inserted into the holes in the hinges.
3. Grip the oven door on either side with both hands and close the oven door by approx. 30° (b).
4. Raise the oven door slightly and pull it out.
Note: Do not fully close the oven door. The hinges could become bent and the enamel could be damaged.
Fitting the appliance door
1. Grip the oven door on either side with both hands.
2. Slide the hinges into the slots in the oven (a).
Note: The notch below the hinges must engage into the frame of the oven
3. Lower the door downwards.
4. Remove the locking pins.
Trouble shooting
Fault Table
Fault
Possible cause
Remedy/information
The appliance is not working.
The circuit breaker is faulty
Look in the fuse box and check that the circuit breaker is in working order.
Power failure
Check whether the kitchen light works.
Zeros are flashing on the display.
Power failure
Reset the clock.
The oven light has stopped working.
The oven light bulb is faulty
Replace the oven light bulb. (see section entitled "Replacing the oven light bulb")
The gas burner will not ignite.
Power failure or damp ignition plugs
Light the gas burner with a gas lighter or a match.
The burner cap is not positioned correctly
Check whether the burner cap is positioned correctly.
The oven is not heating.
The fuse is faulty
Check and, if necessary, replace the fuse.
The function selector has not been set
Set the function selector.
All food that is cooked in the oven burns within an extremely short period of time.
Faulty thermostat
Call the after-sales service.
The door panel steams up when the oven is hot.
Normal occurrence; caused by the difference in temperature
Not possible; this has no effect on oven performance.
The oven door will not open when the cleaning cycle is complete.
The door lock is active
Turn the function selector to the "Off" position and wait until the appliance has cooled down.
The door lock is faulty
Call our after-sales service if the oven door still cannot be opened after an extended period.
The oven will not heat or stops heating unexpectedly. The symbol flashes every 0.5 seconds.
Faulty thermostat
Call the after-sales service.
The oven stops heating unexpectedly. The symbol flashes every 2 seconds.
The appliance is too hot.
Switch off the appliance and allow it to cool down. If the fault occurs again when you next switch the appliance on, call our after-sales service.
The cleaning function will not start. The symbol flashes every 4 seconds.
The oven door was opened when the door lock was active.
Switch the appliance off and then on again.Wait a couple of minutes before starting a new cleaning cycle.
The fan is not turning.
The fan stops when you open the oven door. This way, less hot air escapes.
Close the oven door.
Error messages
If an error message with appears, press the button. The message disappears. A time function that has been set is cleared. If the error message does not disappear, please contact the after-sales service. You can take remedial action yourself if the following error message is displayed.
Replacing the oven light bulb
If the oven light bulb fails, it must be replaced. Replacement heat-resistant bulbs can be obtained from the after-sales service or from specialist retailers. Please specify the E number and FD number of your appliance. Do not use any other type of bulb.
Warning - Risk of electric shock!
When replacing the cooking compartment bulb, the bulb socket contacts are live. Before replacing the bulb, unplug the appliance from the mains or switch off the circuit breaker in the fuse box.
1. Allow the cooking compartment to cool down.
2. Open the appliance door.
3. Place a tea towel in the cooking compartment to prevent damage.
4. Remove the hook-in racks.
5. Remove the glass cover. To do this, open the glass cover at the front with your hand. Should you experience difficulties removing the glass cover, use a spoon to help.
6. Remove the oven light bulb.
7. Replace the oven light bulb with a bulb of the same type:
Voltage: 230 V;
Power: 40 W;
Fitting: G9;
Temperature resistance: 300 °C
8. Refit the glass cover for the oven light bulb.
9. Refit the hook-in racks.
10. Remove the tea towel.
11. Switch the circuit breaker back on.
12. Check that the oven lighting is working again.
#1 Do you offer a service to take away old freestanding oven and delivery and install of new ?
Yes if you reside in an area where the installation covers they will have a fee attached to this for you place your postcode into the postcode selector, select your suburb, then select the product and there should be a fee attached below the add to cart on the main page. When you check out there will a calendar with the earliest delivery & install date for you.
#2 In the reviews of this oven, there is mention of a clicking sound that comes on and off as the oven heats, please can you comment on this.
This sound is very normal. The oven consists of a relay which clicking on and off inside to control the power to its heating element. The sound should be very faint however if it causes any disturbance it might indicate a fault, in which case we'd need to get a technician out to assess.
#3 Do the sides of the oven heat have heat shields? Specs do mention the door but not the sides
Thank you for your question, in regards to heat shields i have not heard of this terminology in long time, i take it this question is referring to installation between cupboards, all products coming into Australia must meet a very strict guidelines before a product is allowed to be sold onto the Australian market. This product comes supplied with cooling cavity fan system, like any stove on the market as long as the product is installed as per suppliers details there will not be an issue for you.
this model is to be hardwired and requires a single-phase connection 13.3amps required.
#5 Does this cooker require to be hardwired by a licensed electrician?
Yes it does and fortunately we offer installation of the appliance with delivery. You can add on a Freestanding Dual Fuel Oven/Upright Stove Installation onto your order for an additional charge.


 symbol only lights up if the time is being changed.


 Hot air
 Eco
Eco Top/bottom heating and fan
 Top/bottom
 Bottom heating and fan
 Bottom heat and hot air
 Hot air grill
 Full-surface grill
 Grill/rotary spit
 Pyrolytic selfcleaning

 symbol and four zeros flash in the display.

 position.


 type of heating. Only set the
  type of heating once the rotary spit has been inserted.
 button to call up the menu and switch between the individual functions. As long as the symbols are lit, you can implement settings. The [ ] brackets show you which time-setting function you have currently selected. You can use the + or- button to directly change a time-setting function that has already been set, if its time symbol is in brackets.
 .
. cooking time,
  end time or


 and
and  symbol is displayed in brackets. The
 button for approx. 4 seconds.
 .
. goes out.The interior lighting remains off during cleaning.
 heating function.
 indicator light goes out. Even if you cancel the selfcleaning programme shortly after the door lock is activated, it may take several minutes until you can open the oven door.


 symbol flashes every 0.5 seconds.
 appears, press the
  button. The message disappears. A time function that has been set is cleared. If the error message does not disappear, please contact the after-sales service. You can take remedial action yourself if the following error message is displayed.