USER MANUAL
900mm COOKING APPLIANCES
WFE912SA
WFE914SA
WFE916SA
WFE946SA
WVE916SA

2
CONTENTS
Important safety instructions .............................................................. 3
Description of your appliance ............................................................. 5
WFE912SA .................................................................................. 5
WFE914SA .................................................................................. 6
WFE916SA .................................................................................. 7
WFE946SA .................................................................................. 8
WVE916SA .................................................................................. 9
Before operating your appliance for the first time ............................. 10
Installing your oven accessories ....................................................... 11
Getting to know your cooktop ............................................................ 13
Using your ceramic cooktop .............................................................. 16
Using your oven ................................................................................ 20
Cooking test ...................................................................................... 26
Cooking guide ................................................................................... 27
Dealing with cooking problems ......................................................... 30
Cleaning your appliance .................................................................... 31
Cleaning oven accessories ................................................................ 32
Catalytic liners .................................................................................. 34
Storage ............................................................................................. 34
Solving problems .............................................................................. 35
Installing your appliance ................................................................... 36
Warranty ............................................................................................ 47
ENVIRONMENTAL TIPS
INFORMATION ON DISPOSAL FOR USERS
•Mostofthepackagingmaterialsarerecyclable.
Pleasedisposeofthosematerialsthroughyourlocal
recyclingdepotorbyplacingtheminappropriate
collectioncontainers.
•Ifyouwishtodiscardthisproduct,pleasecontactyour
localauthoritiesandaskforthecorrectmethodof
disposal.
Congratulationsandthankyouforchoosingourproduct.
Wearesureyouwillfindyournewapplianceapleasure
touseandagreatassettoyourcooking.Beforeyou
usetheappliance,werecommendyoureadthroughthe
wholeusermanualwhichprovidesadescriptionofthe
productanditsfunctions.
Toavoidtherisksthatarealwayspresentwhenyouuse
anappliance,itisimportantthattheapplianceisinstalled
correctlyandthatyoureadthesafetyinstructionscarefully
toavoidmisuseandhazards.Werecommendthatyou
keepthisinstructionbookletforfuturereferenceandpassit
ontoanyfutureowners.
ThisappliancecomplieswiththerequirementsofAustralian
StandardAS/NZ60335.2.6.Gasappliancesalso
complywiththerequirementsofAS4551.
CONDITIONSOFUSE
Thisapplianceisintendedtobeusedinhousehold
andsimilarapplicationssuchas:
•Staffkitchenareasinshops,officesandother
workingenvironments
•Farmhouses
•Byclientsinhotels,motelsandotherresidential
typeenvironments
•Bedandbreakfasttypeenvironments.
THISAPPLIANCESHOULDNOTBEUSEDINA
COMMERCIALENVIRONMENT.
•Theapplianceguaranteeislimitediftheappliance
isusedwithinanondomesticenvironment.This
includessemicommercial,commercialorcommunal
applicationssuchasclubsorschools.
Record model and serial number here:
Model:.................................................
Serial No:.............................................
TIPS & INFORMATION
IMPORTANT –CHECK FOR ANY DAMAGE OR MARKS.
Ifyoufindtheovenisdamagedormarked,youmust
reportitwithin7daysifyouwishtoclaimfordamage/
marksunderthemanufacturerswarranty.Thisdoesnot
affectyourstatutoryrights.
CONTENTSCONGRATULATIONS
3
SAFETY
Thesewarningshavebeenprovidedintheinterestofsafety.
YouMUSTreadthemcarefullybeforeinstallingorusing
theappliance.
Thesymbolsyouwillseeinthisbooklethavethesemeanings:
WARNING
This symbol indicates information concerning your personal safety
TIPS & INFORMATION
This symbol indicates tips and information about use of the appliance
E
VIRONMENTAL TIPS
This symbol indicates tips and information about economical and
ecological use of the appliance
This symbol indicates never to do this
This symbol indicates to always do this
WARNING
GENERAL WARNINGS
IMPORTANT SAFETY INSTRUCTIONS
NSTALLATION, CLEANING AND SERVICING
Anauthorisedpersonmustinstallthisappliance.
(CertificateofCompliancetoberetained)
Beforeusingtheappliance,ensurethatallpacking
materialsareremovedfromtheappliance.
Inordertoavoidanypotentialhazard,the
enclosedinstallationinstructionsmustbefollowed.
Ensurethatallspecifiedvents,openingsand
airspacesarenotblocked.
Wheretheapplianceisbuiltintoacabinet,thecabinet
materialmustbecapableofwithstanding85°C.
Onlyauthorisedpersonnelshouldcarryoutservicing.
(CertificateofCompliancetoberetained)
Alwaysensuretheapplianceisswitchedoffbefore
cleaningorreplacingparts.
Donotusesteamcleaners,asthismaycause
moisturebuildup.
Alwayscleantheapplianceimmediatelyafterany
foodspillage.
Thisappliancemustbeearthed.
Duetotheweight(floormounted95-100kg,builtin
70kg)andsizeofcookers,2personsarerequiredto
manuallymanoeuvrethem.Removelooseitemssuch
astrivets,ovenracks&traystominimiseweight.
Donotusethehandletoliftthecooker,insteadopen
theovendoorandlifttheroofoftheovencavity.
Takecarewhenliftingtoavoidanysharpedgesnot
intendedforlifting.
Thisappliancemustnotbeusedasaspaceheater.
Inordertoavoidfire,theappliancemustbekept
cleanandventskeptunobstructed
Donotsprayaerosolsinthevicinityofthis
appliancewhilstitisinoperation.
Donotuseorstoreflammablematerialsinthis
appliancestoragedrawerornearthisappliance.
Donotlinethebottomoftheovenwithfoilor
cookware.
Alwaysusegloveswhenhandlinghotitemsinside
theoven.
Alwaysturnthegrilloffimmediatelyafteruseasfat
leftbehindmaycatchfire.
Donothanganyobjectsfromthehobasitmay
blocktheairvents.
Donotmodifythisappliance.
Tomaintainsafeoperation,itisrecommended
thattheproductbeinspectedevery5yearsbyan
authorisedserviceperson.
DonotinstallmodelWFE912inmarinecraft,
caravansormobilehomesastheburnersofthis
modelarenotfittedwithflamesafeguard.
Donotinstallanaftermarketlidorcoveroverthis
appliance.
4
WARNING
OVEN
Duringusetheappliancebecomeshot.Care
shouldbetakentoavoidtouchingthehotsurfaces
insidetheoven.
Switchtheapplianceoffbeforeremovingtheoven
lightglassforglobereplacement.
Toavoidanaccident,ensurethatovenshelvesand
fittingsarealwaysinsertedintotheappliancein
accordancewiththeinstructions.
Donotusethedoorasashelf.
Donotpushdownontheopenovendoor.
Donotcoverthegrillinsertwithfoil,asfatleftthere
maycatchfire.
Alwayskeepthegrilldishcleanasanyfatthere
maycatchfire.
GAS COOKTOPS
Donotallowpotstoboildry,asdamagetoboth
panandcooktopmayresult.
Donotoperatethecooktopforanextendedperiod
oftimewithoutapotorpanontheburner.
Donotallowlargecookwaretooverhangthe
cooktopontotheadjacentbenchtop.Thiswill
causescorchingtothebenchtopsurface
Donotallowcookingpotsorpanstointrudeinto
theareawhichisclosetothecontrols.
Ensureburnerbodiesandtrivetsareproperlylocated.
CERAMIC COOKTOPS
Donotplaceheatresistantmats,wirematsor
aluminiumfoilunderpotsandpans.
Donotallowpotstoboildry,asdamagetoboth
panandcooktopmayresult.
Donotusethehotplateasextrabenchspaceoras
acuttingboard.
Donotallowlargecookwaretooverhangthe
cooktopontotheadjacentbenchtop.Thiswill
causescorchingtothebenchtopsurface.
Donotuseroundbottomwoksorsimilarutensils
whichcouldleadtooverheatingofthehotplates
andpossibledamagetothecookingsurface.
Usethestoredheatinthehotplatebyturningthe
controltooffbeforethefinalfewminutesofcooking.
Donotslidepansacrossthesurfaceoftheceramic
glassasitcouldresultinscratchingofthesurface.
Theceramiccooktopisnotintendedtobe
operatedbymeansofanexternaltimerorseparate
remote-controlsystem.
WARNING
CHILD SAFETY
Thisapplianceisnotintendedforusebypersons
(includingchildren)withreducedphysical,sensory
ormentalcapabilities,orlackofexperience
andknowledge,unlesstheyhavebeengiven
supervisionorinstructionconcerninguseofthe
appliancebyapersonresponsiblefortheirsafety.
Childrenshouldbesupervisedtoensurethatthey
donotplaywiththeappliance.
Duringusethisappliancebecomeshot.Care
shouldbetakentoavoidtouchinghotsurfaces,eg.
Ovendoor,heatingelements..
Accessiblepartswillalsobecomehotwheninuse.
Toavoidburnsandscaldschildrenshouldbekept
away.
Alwaysturnpanhandlestothesideorrearto
preventaccidentalknockingandtokeepoutof
reachofchildren.
IMPORTANT SAFETY INSTRUCTIONS
SAFETY
5
O
F
F
O
F
F
O
F
F
O
F
F
H
L
O
I
O
F
F
H
L
O
I
COOK
BAKE
H
L
O
I
H
L
O
I
H
L
O
I
H
L
O
I
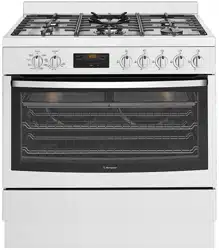
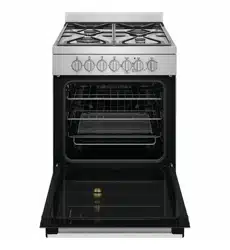
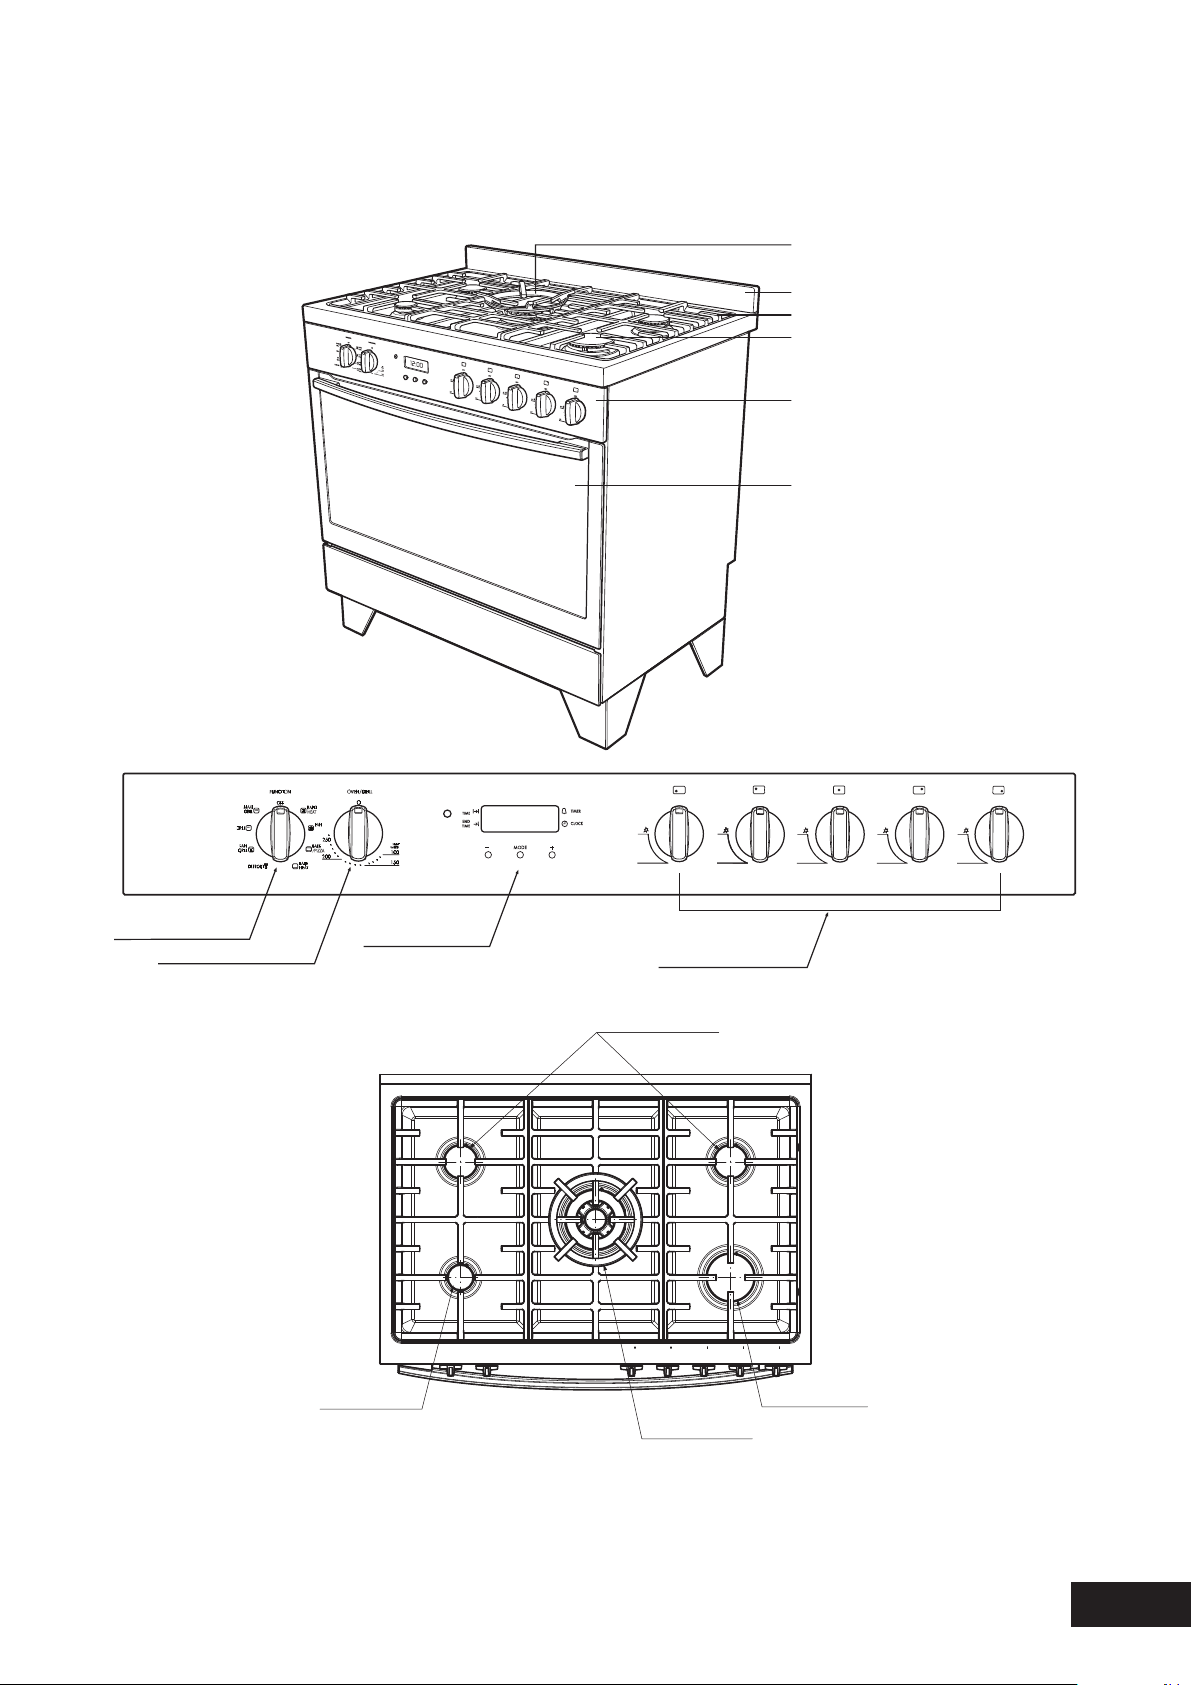
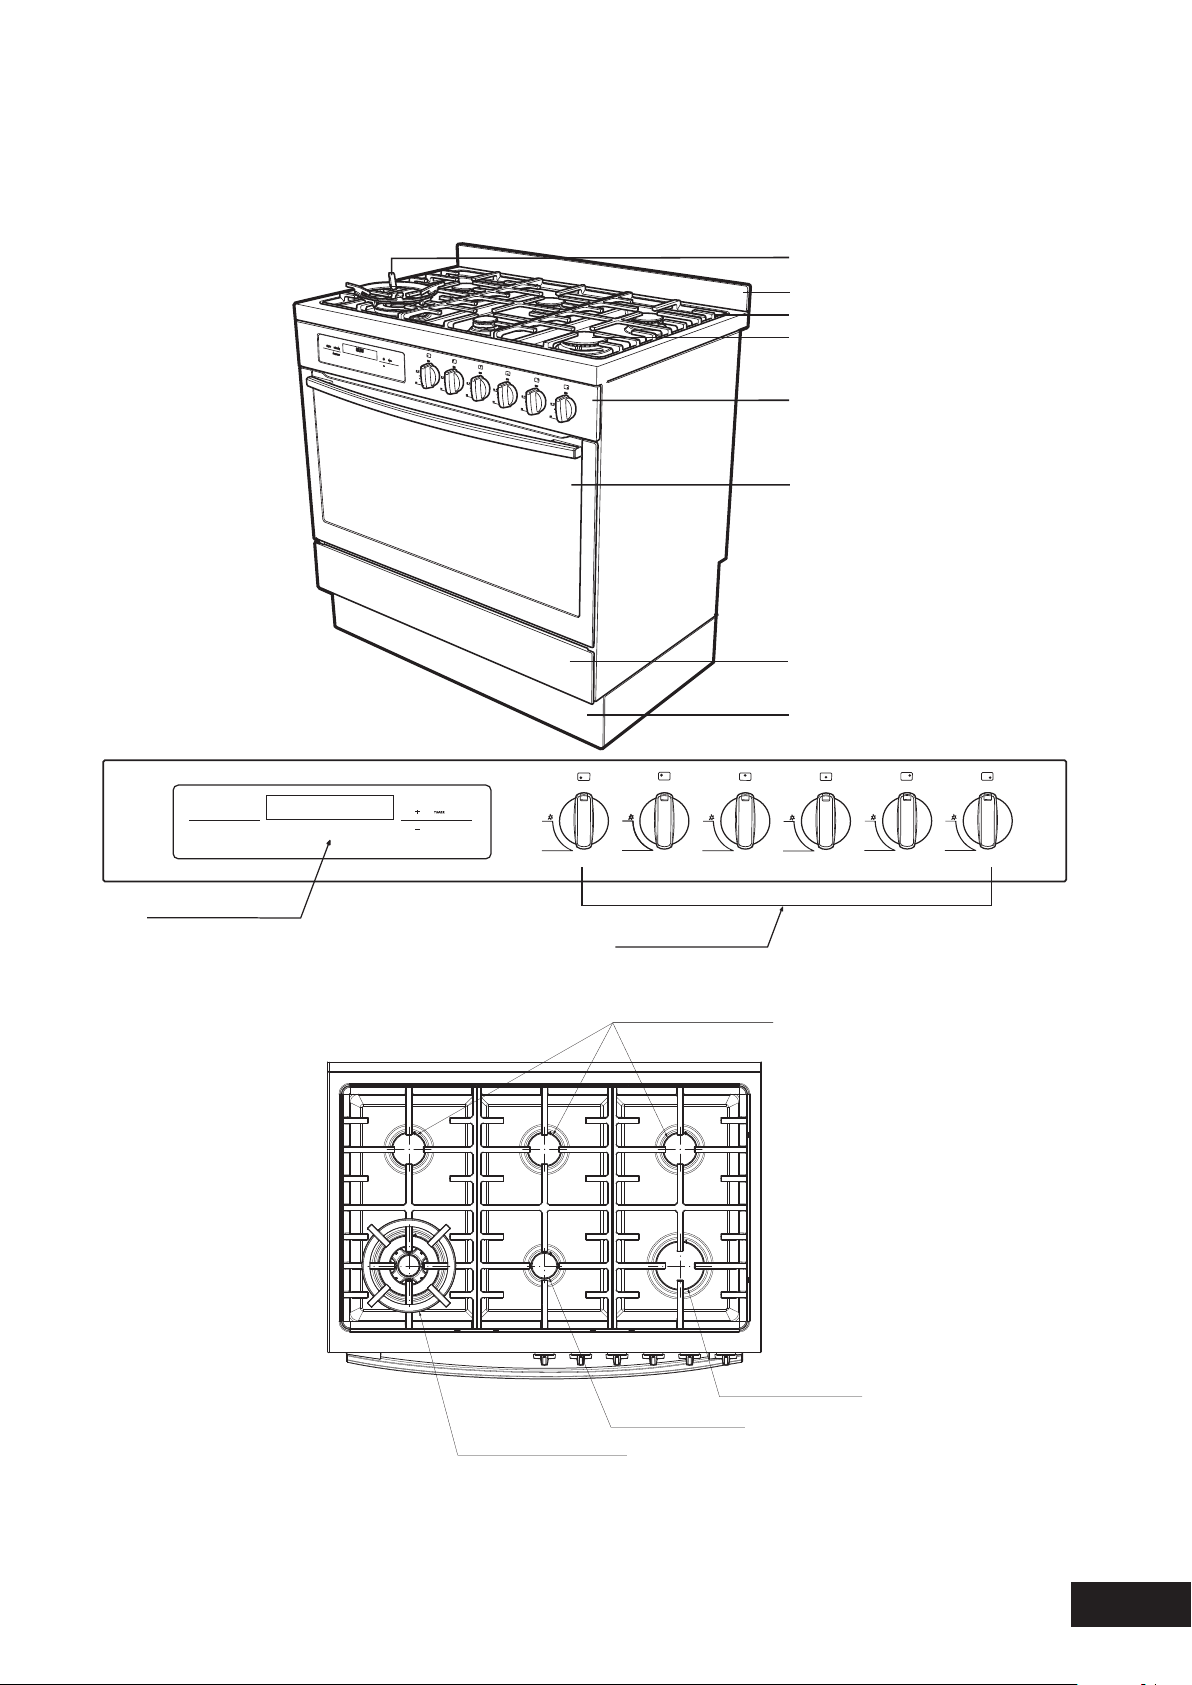
MODEL WFE912SA
Gas hob, multi-function electric oven with electronic timer
Removablewoktrivet
Removablecastirontrivet
Gasburner
Controlpanel
Ovendoor
Ovenfunctionselector
Oventemperaturecontrol
Clock/Timerdisplay
Gashobburnercontrols
Mediumheatburner
Highheatburner
Intenseheatwokburner
Lowheatburner
Stainlesssteelsplashback
(optionaltot)
DESCRIPTION
Control Panel
Gas Hob
6
O
F
F
O
F
F
O
F
F
O
F
F
H
L
O
I
O
F
F
H
L
O
I
H
L
O
I
H
L
O
I
H
L
O
I
H
L
O
I
BAKE
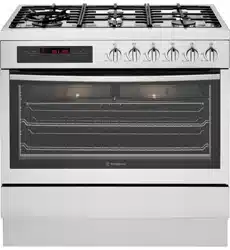
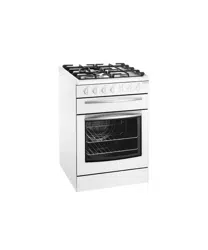
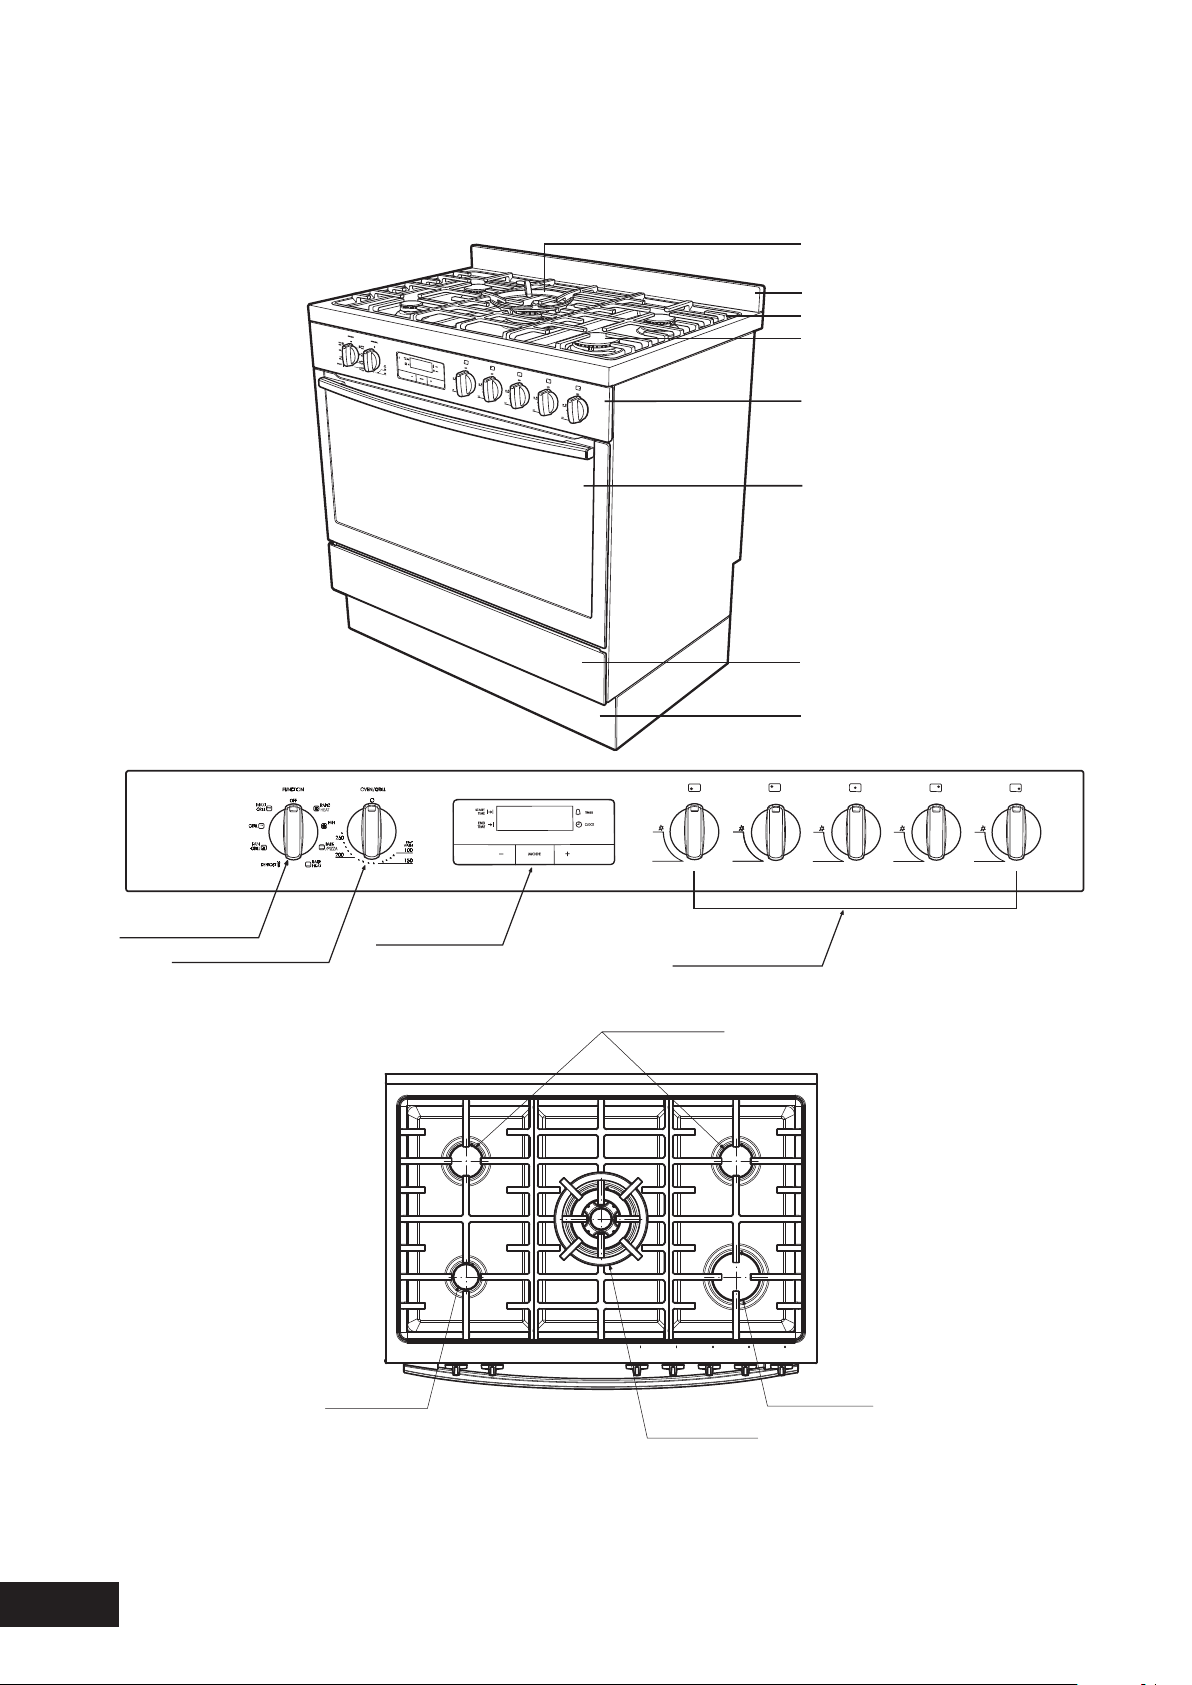
MODEL WFE914SA
Gas hob with flame safeguard, multi-function electric oven with touch control timer
Control Panel
Gas Hob
Removablewoktrivet
Removablecastirontrivet
Gasburner
Controlpanel
Ovendoor
Storagecompartment
Stainlesssteelkickpanel
Ovenfunctionselector
Oventemperaturecontrol
Clock/Timerdisplay
Gashobburnercontrols
Mediumheatburner
Highheatburner
Intenseheatwokburner
Lowheatburner
12:00
DESCRIPTION
Stainlesssteelsplashback
(optionaltot)
7
O
F
F
H
L
O
I
O
F
F
H
L
O
I
H
L
O
I
O
F
F
H
L
O
I
O
F
F
H
L
O
I
O
F
F
H
L
O
I
O
F
F
H
L
O
I
ON/OFF
FUNCTION
FAST HEAT UP
Control Panel
Gas Hob
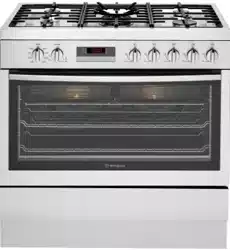
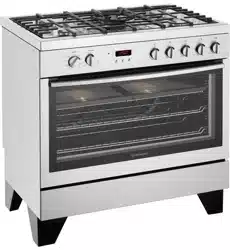
MODEL WFE916SA
Gas hob with flame safeguard, programmable touch control electric oven
Removablewoktrivet
Removablecastirontrivet
Gasburner
Controlpanel
Ovendoor
Storagecompartment
Stainlesssteelkickpanel
Programmablecontroller
Gashobburnercontrols
Mediumheatburner
Highheatburner
Intenseheatwokburner
Lowheatburner
DESCRIPTION
Stainlesssteelsplashback
(optionaltot)
8
ON/OFF
FUNCTION
FAST HEAT UP
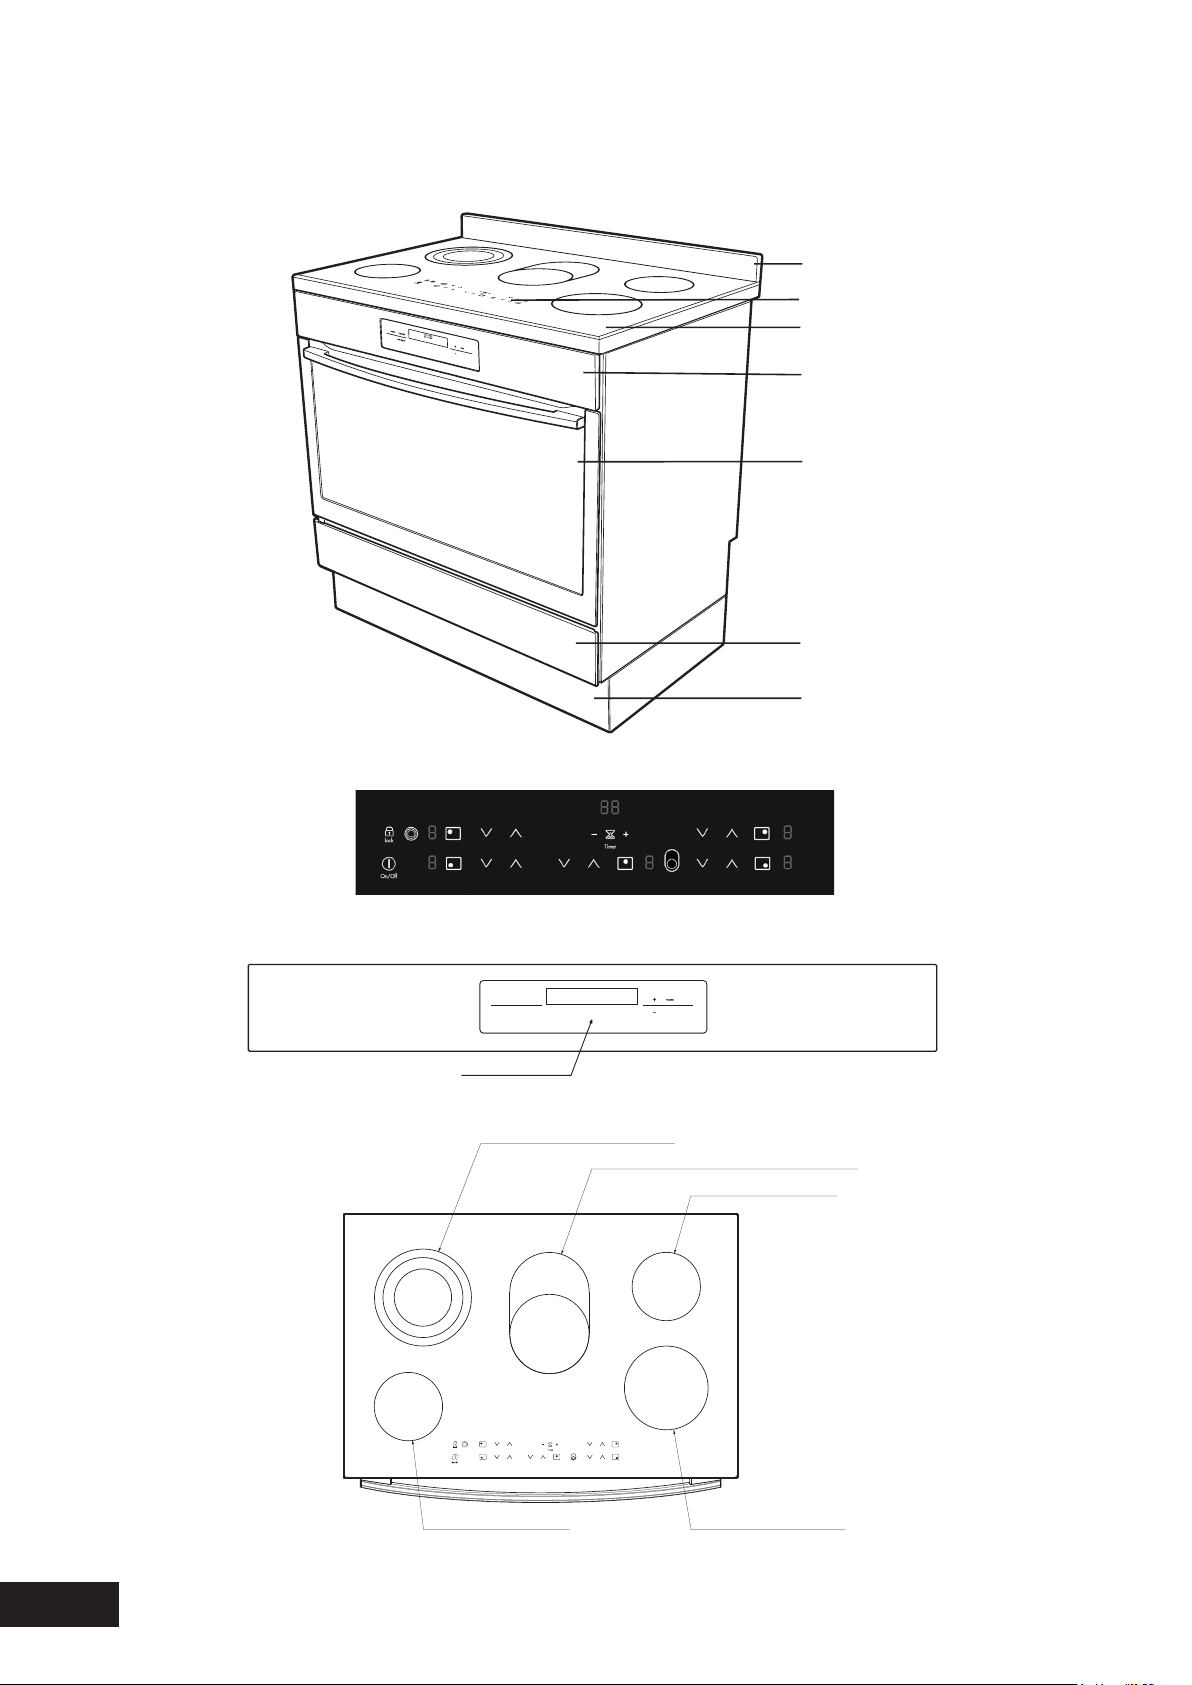
MODEL WFE946SA
Touch control electric ceramic hob, programmable touch control electric oven
Hobelementcontrols
Ceramicglasshob
Ovencontrolpanel
Ovendoor
Storagecompartment
Stainlesssteelkickpanel
Tripleringcookingzone
Multi-purposedoublecookingzone
Smallcookingzone
Smallcookingzone
Mediumcookingzone
Stainlesssteelsplashback
Programmablecontroller
Ceramic hob touch controls
Control Panel - oven programmable controller
Ceramic Hob
DESCRIPTION
9
ON/OFF
FUNCTION
FAST HEAT UP
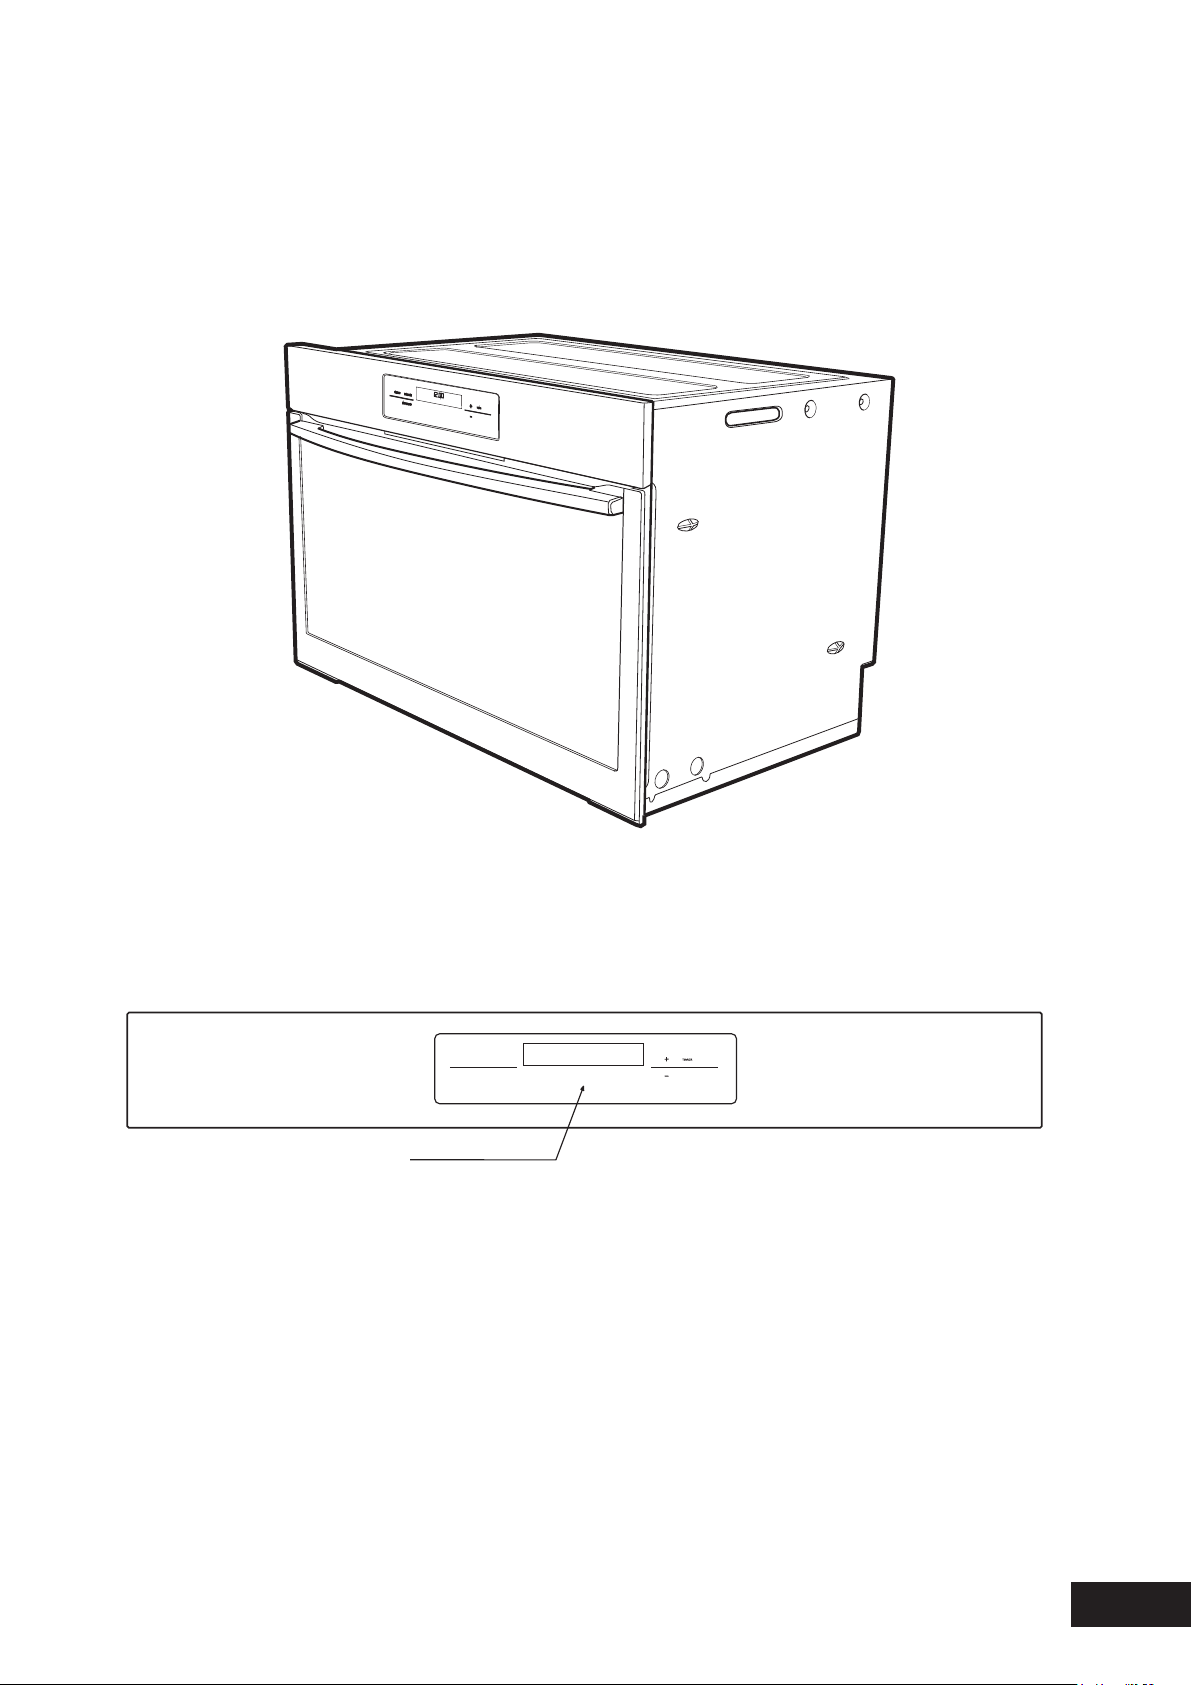
MODEL WVE916SA
Programmable touch control electric oven
Programmablecontroller
Control Panel - oven programmable controller
DESCRIPTION
10
OPERATION
BEFORE OPERATING YOUR APPLIANCE
FOR THE FIRST TIME
TIPS & INFORMATION
SETTING THE TIME
Ifyouhavepurchasedamodelfittedwithanelectronicor
programmabletimer,youMUSTsetthetimeofdaybefore
youcanoperateyourappliance.
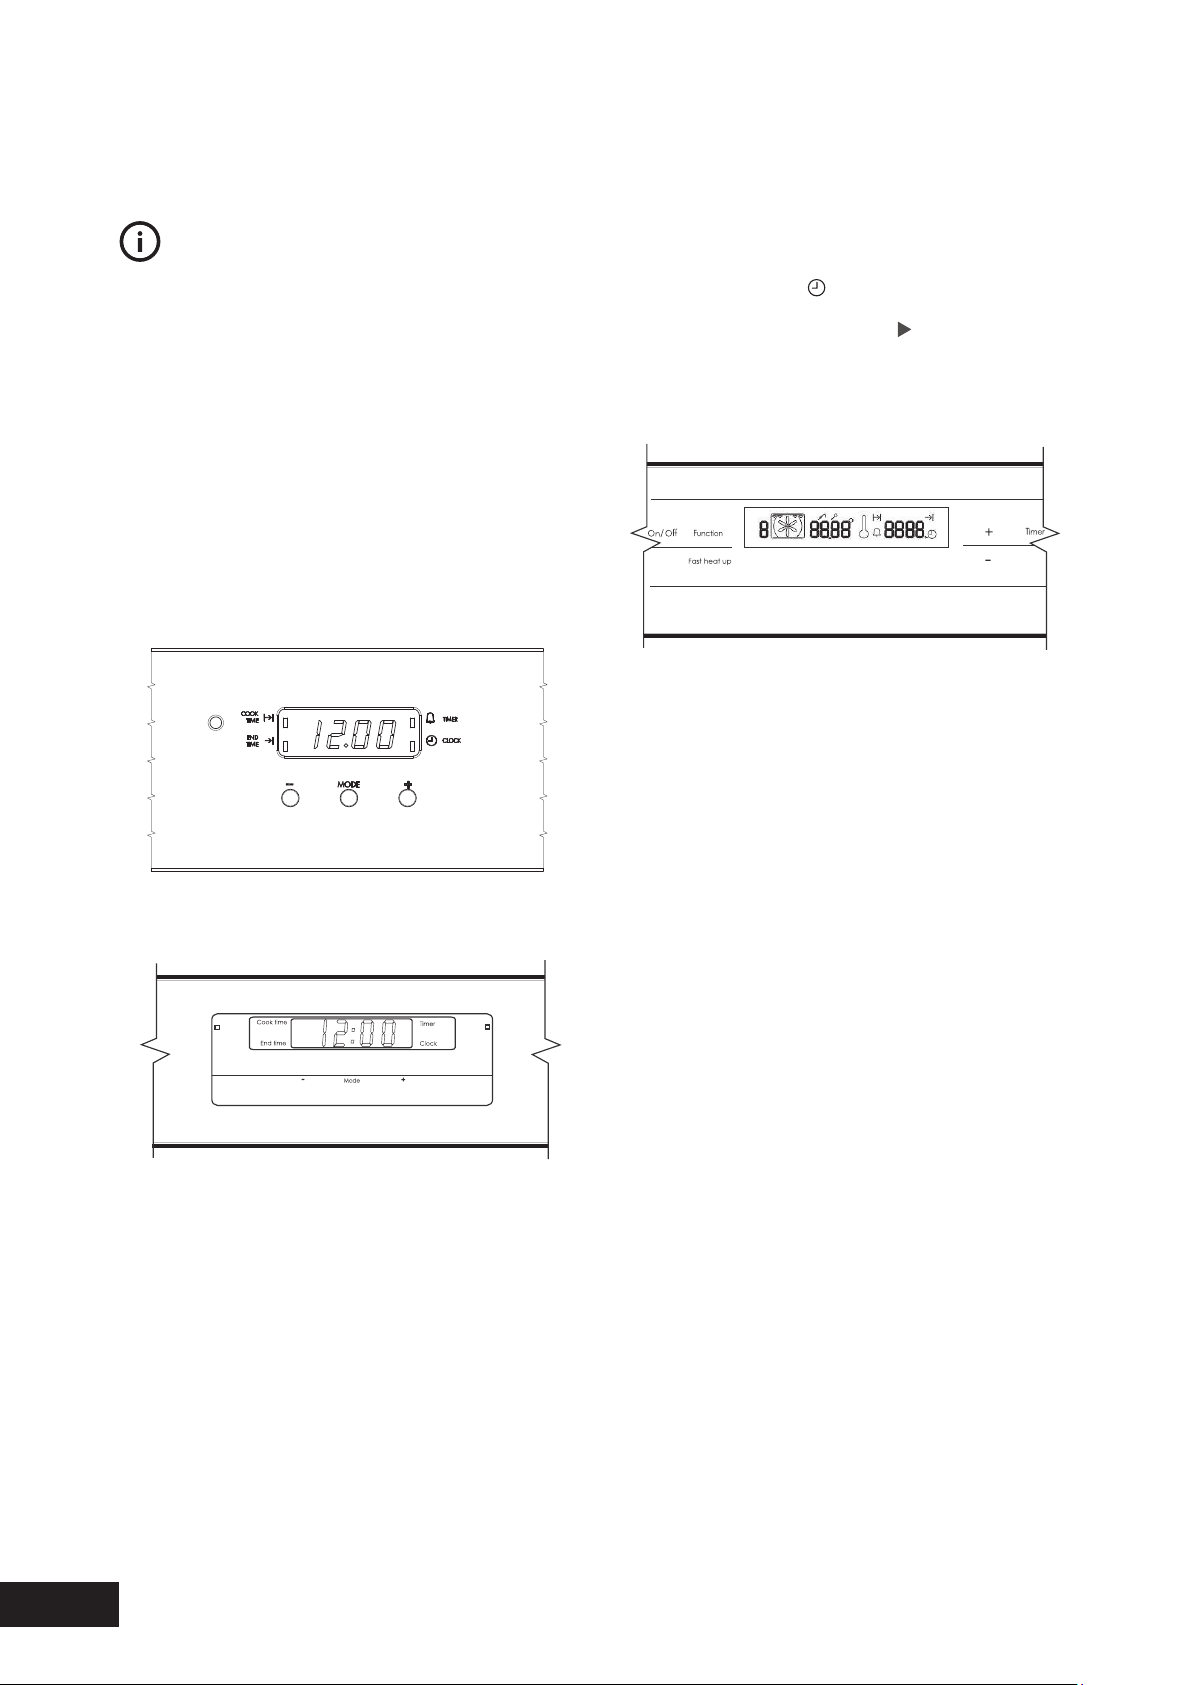
PUSH BUTTON AND TOUCH CONTROL ELECTRONIC CLOCK
MODELS WFE912 & WFE914
•Aftertheappliancehasbeenelectricallyconnected
“12.00”willbedisplayedandthe“clock”indicator
willflash.
•Tosetthetimeofday,press–or+.5secondsafter
thelastchange,the“clock”indicatorwilldisappear,
confirmingthetimehasbeenset.
NOTE: The clock has a 24-hour display.
PROGRAMMABLE CONTROLLER: MODELS WFE916, WFE946 & WVE916
•Aftertheappliancehasbeenelectricallyconnected,
thesetclocksymbol
willflashontheclockdisplay.
•Tosetthetimeofday,press–or+.5secondsafter
thelastchangethetimerarrow willdisappear,
confirmingthetimehasbeenset.Oncethetimehas
beenentered,theclockadvancesminutebyminute.
NOTE: The clock has a 24-hour display.
MODEL WFE912
MODEL WFE914
PREPARING YOUR APPLIANCE FOR THE FIRST TIME
•Pleaseremoveallinternalboxesandbagsfromthe
ovenbeforeoperation.
•Pleasewipeouttheoveninteriorpriortooperation
withwarmsoapywaterandpolishdrywithasoft
cleancloth.Donotclosetheovendooruntilthe
oveniscompletelydry.
•Newappliancescanhaveanodourduringfirst
operation.Itisrecommendedto‘runin’youroven
beforeyoucookforthefirsttime.Runtheovenat
180ºCfor2-4hoursandensurethattheroomis
wellventilated.
•DONOTlinetheovenwithfoil,itwilldamage
theenamel.
11
INSTALLATION
INSTALLING YOUR OVEN ACCESSORIES
SIDE RACKS
Thesideracksthatcomewithyourovenarefittedinthe
followingmanner
•Insertthe2rearpegsintotheholesprovided
•Locatethefrontpegintothefrontaccessholeandpush
infirmly.
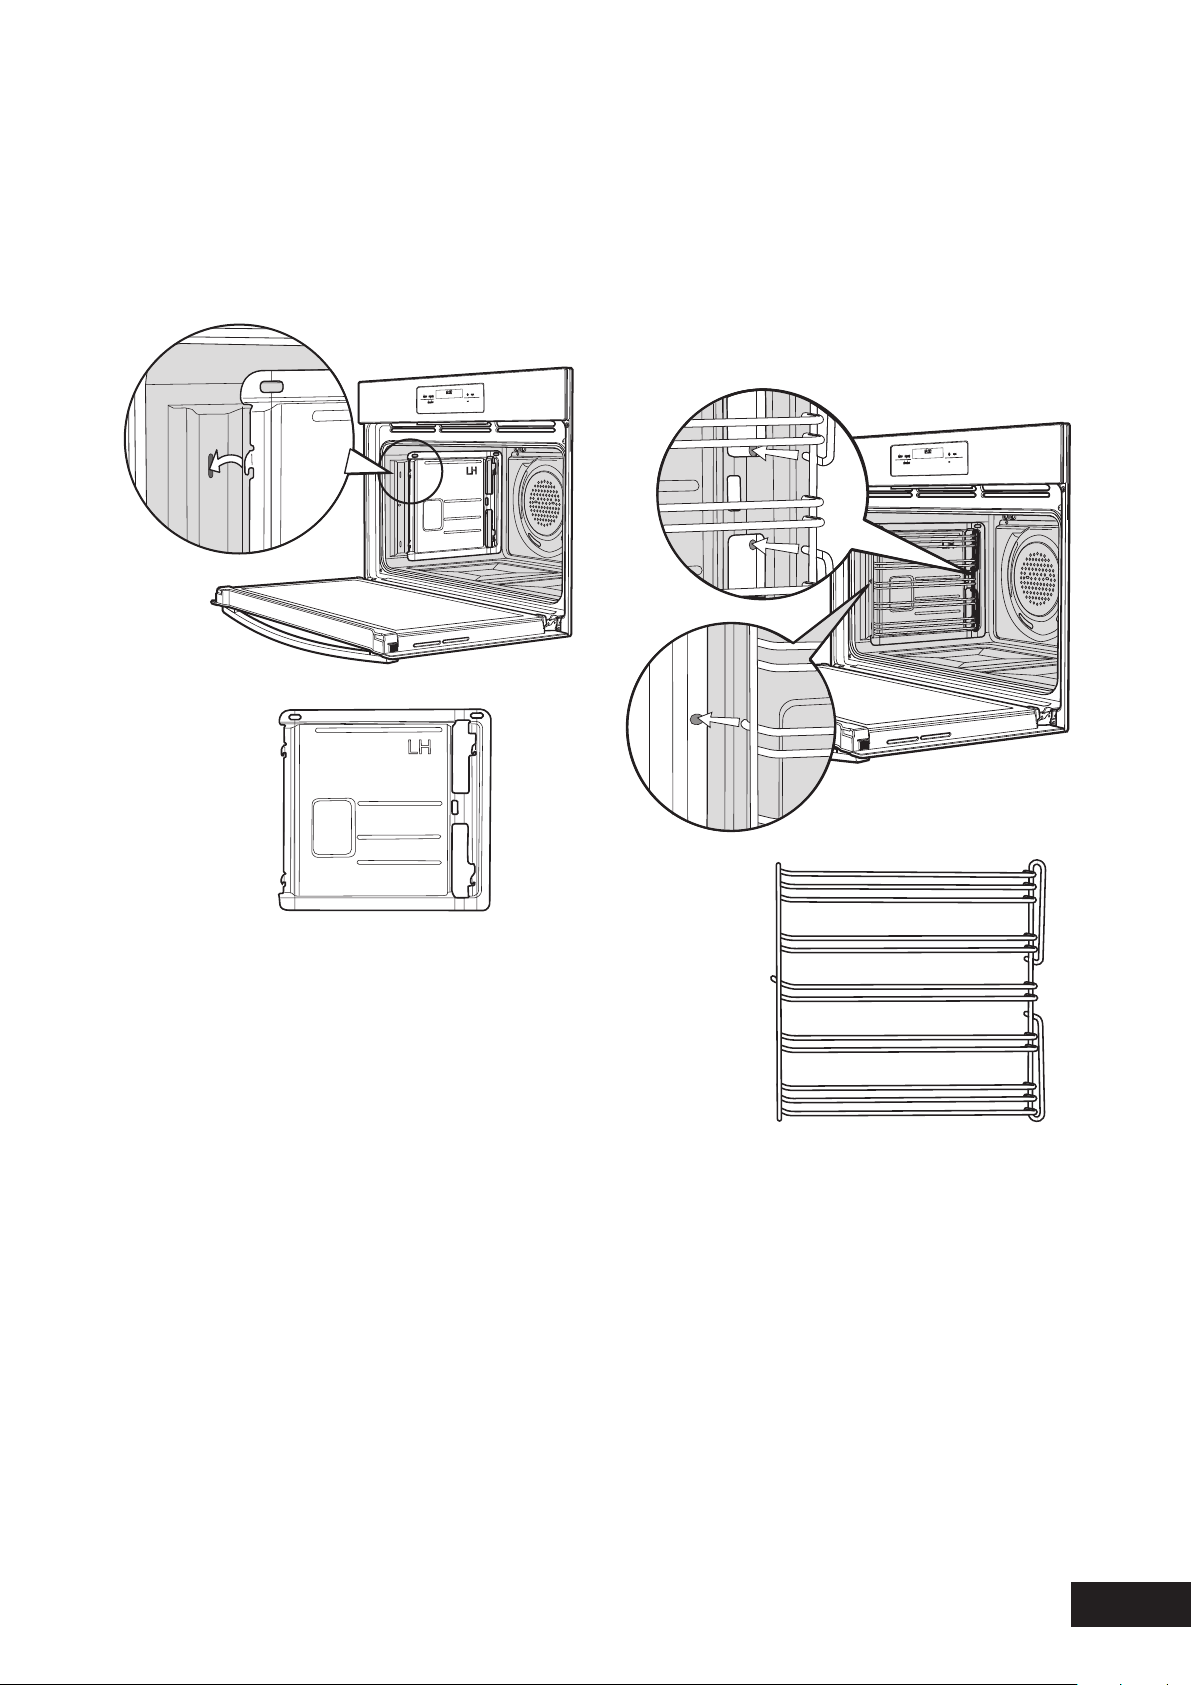
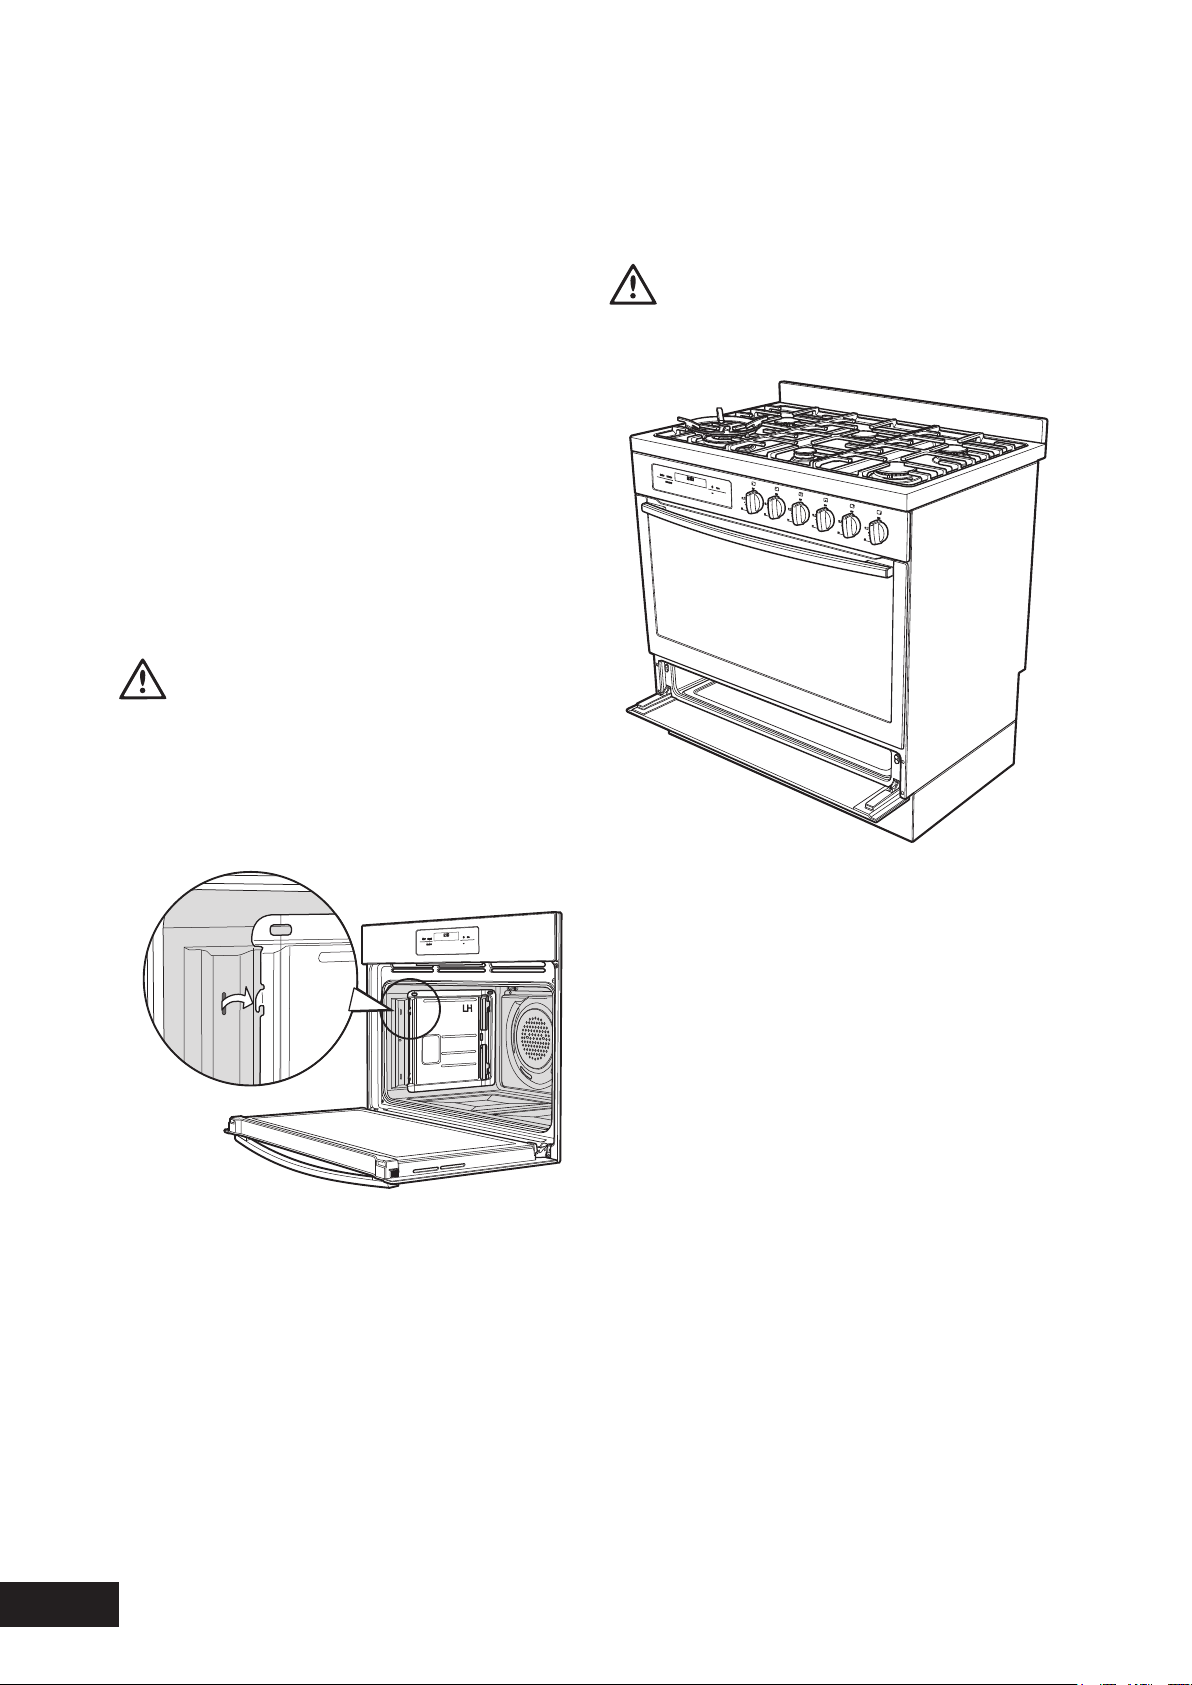
CATALYTIC LINERS (ON SELECTED MODELS)
Catalyticlinersarecoatedwithaspeciallyformulatedenamel
coating.Thisporouscoatingenablesthe“selfcleaning”
process–seeCleaning your appliancesectionformore
details.Catalyticlinersmustbeinstalledfirstbutyoucanomit
them,ifyouwish,withnoeffecttocookingperformance.
Theirsolepurposeistomakeovencleaningeasier.
•Thecatalyticlinerswillattachtoeachsideofyour
oven.Therewillbealefthandandrighthand
version.Thisismarkedonthepanel.
•Positionthefirstlinerasperthediagram.Theblack,
shinysideofthelinershouldbefacingtheoven
wall,thehookspointingdownandtheword‘LH’
positionedtothetoprearportionoftheoven.The
righthandsidewillbeamirrorimageofthis.
•Linethehooksupwiththeslotsprovidedintheoven
wall,pushtheminandthenallowthelinertoslide
downtoitsfinalposition.
•Theaccessholeforthesideracksshouldbevisible
whenthelineriscorrectlypositioned–seediagram.
PRIOR TO INSTALLING ACCESSORIES, REMOVE ALL PACKAGING
AND REMOVE PLASTIC FILM FROM EXTERNAL PANELS
12
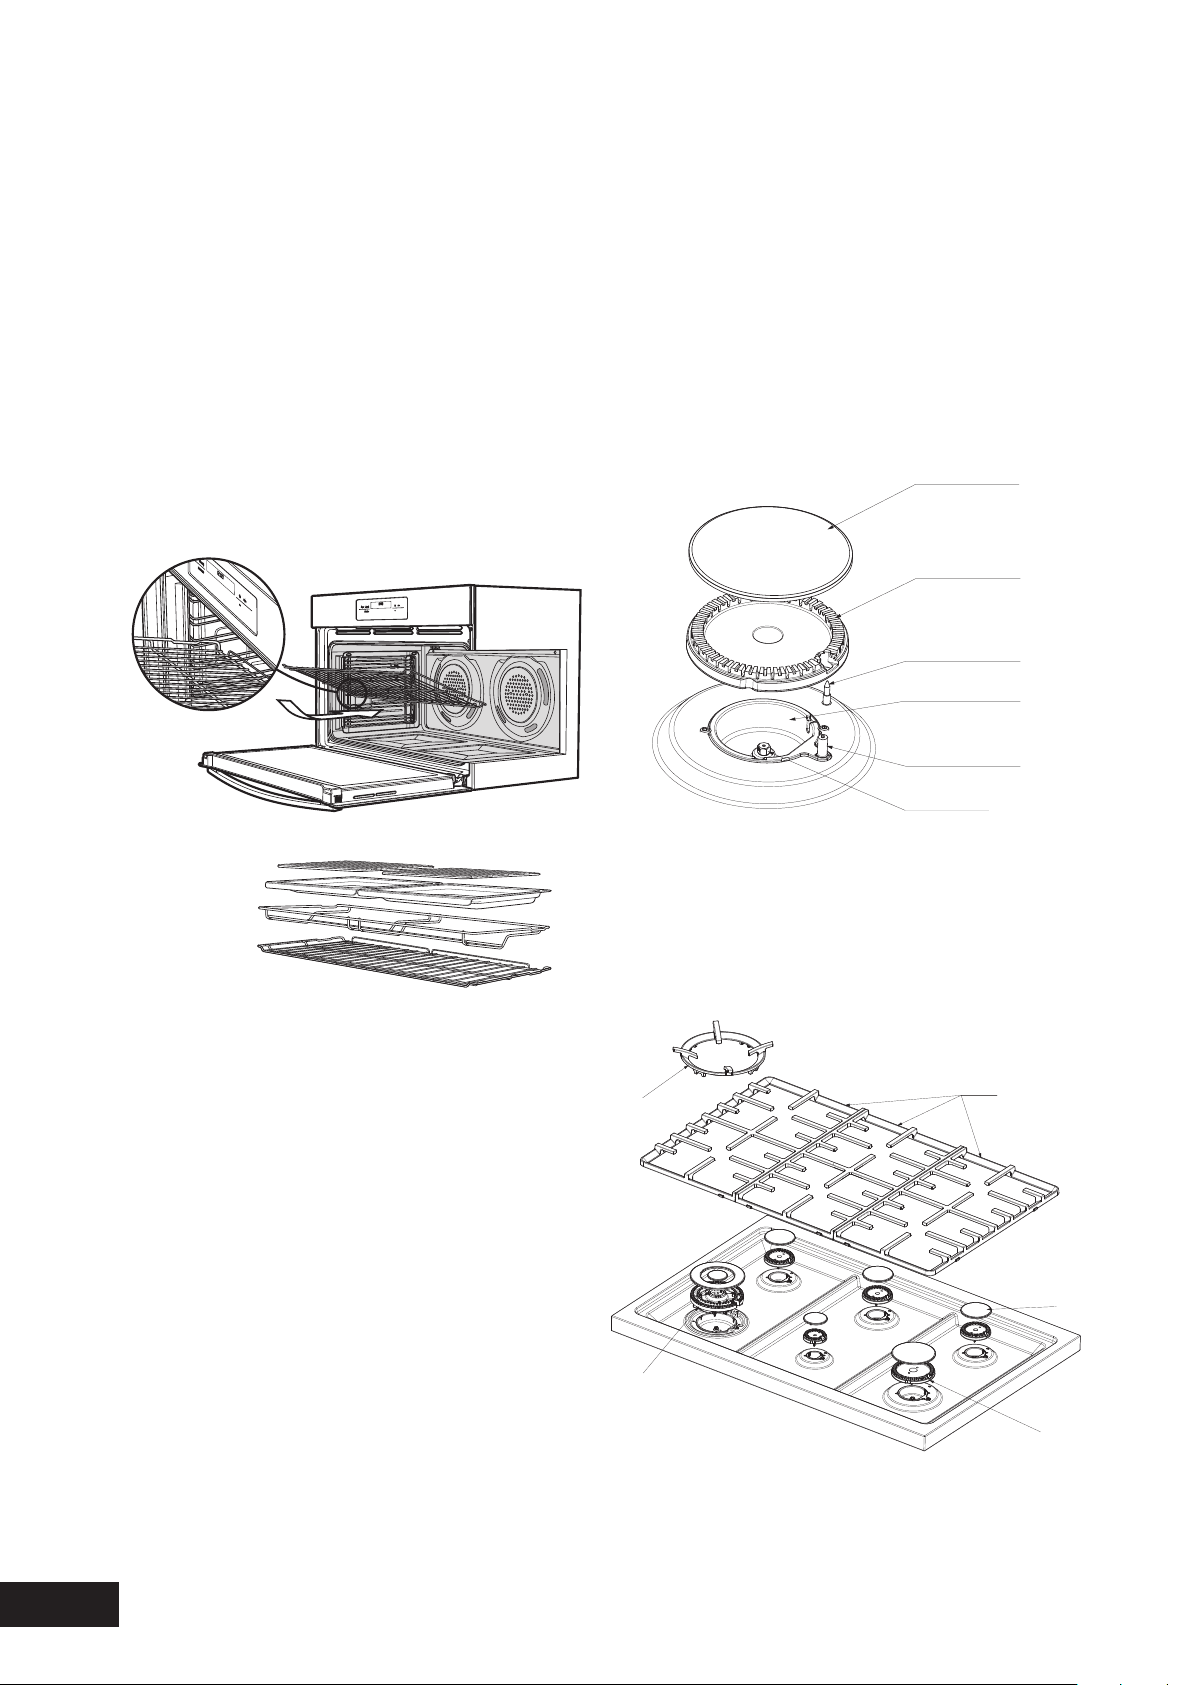
INSTALLING BURNERS
•Theburnercrownmustbefittedcorrectlyintotheburner
cupordamagewilloccurduringoperation.
•Todothis,ensurethatthe2ribsoneithersideofthe
sparkplugholearepositionedintothe2slotsonthe
burnercup.
•Theburnercapissimplypositionedoverthetopofthe
burnercrown.
NOTE: When the burner is correctly fitted it will sit level
on the hob.
INSTALLING TRIVETS
•Therubberfeetonthetrivetslocateintothecontours
ofthehob
•Takecarewhenplacingthetrivetsasdroppingthemmay
damagethehobortrivet
•Thewoktrivetsitsontopofthetrivetabovethewokburner
INSTALLATION
INSTALLING BURNERS AND TRIVETS
INSTALLING YOUR OVEN ACCESSORIES
Burnercap
Burnercup
Burnercrown
Flame
safeguardsensor
Ignition
sparkplug
Injector
Woktrivet
Trivets
Burnercap
Burnercrown
Wokburner
SHELVES AND TRAYS
Theshelvesaredesignedsothattheyhavemaximumtravel
butcannotbeaccidentallypulledrightout.Thetraysare
designedinthesamewayandfitstraightintothesideracks.
•Locatetherearedgeoftheshelf/trayinbetween2
guiderailsofthesiderack–seediagram.Ensurethe
samerailpositionsonbothsidesoftheovenare
beingengaged.
•Withthefrontedgeraised,begintoslidetheshelfinto
theoven.
•Oncetheindentshavepassedthefrontedgeoftheside
rack,theshelfcanbepushedcompletelyin.
•Whenfullyinsertedtheshelf/trayshouldnotinterfere
withthecloseddoor.
13
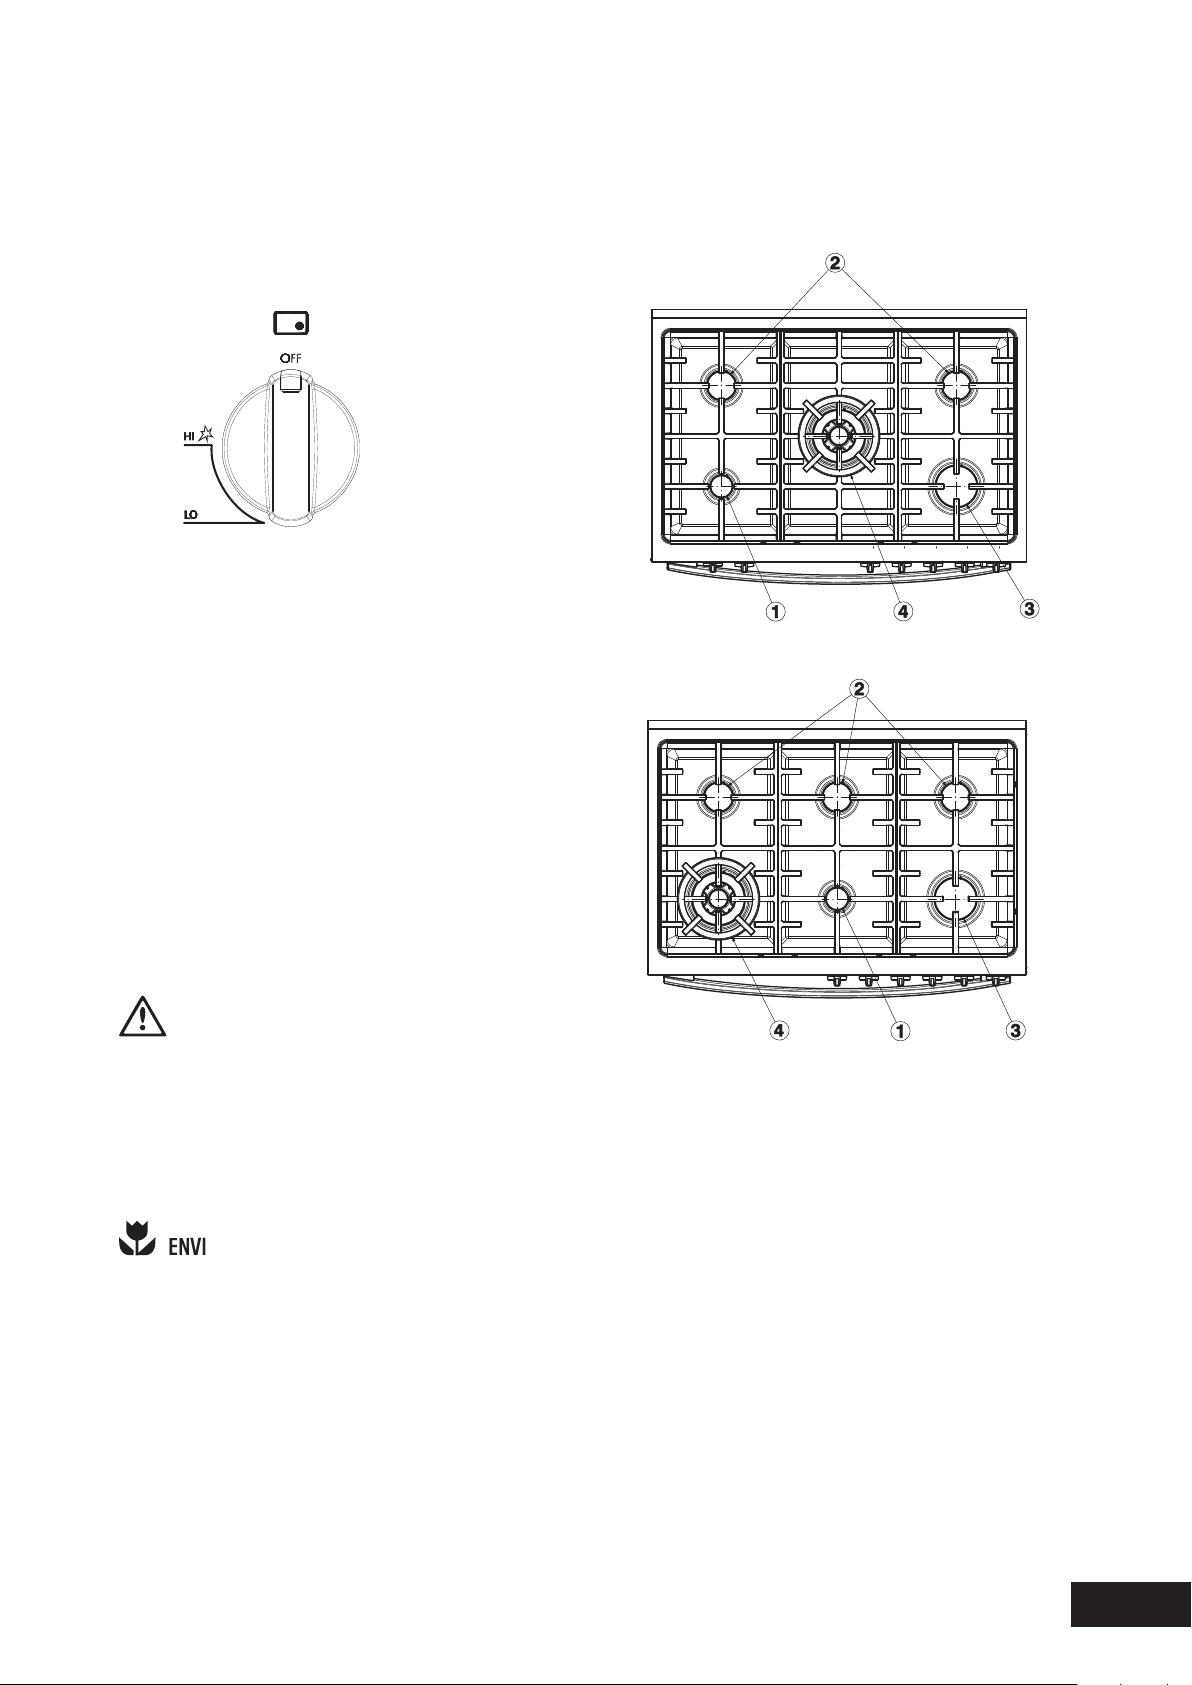
GETTING TO KNOW YOUR GAS COOKTOP
Trivets
Burnercap
Burnercrown
USAGE
USING YOUR GAS HOTPLATES
LIGHTING BURNERS
Electronic ignition
Thesehobsarefittedwithmainspoweredelectronic
ignition.Whentheappliancehasbeenconnectedand
thepowerison,depressinganyknobwillreleasesparks
toallburners.Tolightaburner,depressthecorresponding
knobandwhilecontinuingtodepressknobturnanticlockwise
to‘HI’position.Theknobmaybereleasedoncetheflame
isestablished,andturnedfurtheranticlockwisetoreduce
theflameheightasdesired.
Flame safeguard models WFE914 & WFE916
Modelswithflamesafeguardhavethesameignition
procedureaselectronicignition,butrequiretheknobto
continuetobedepressedafterflameisestablishedfor
approximately5seconds.Iftheflamegoesoutwhen
theknobisreleased,simplydepresstheknobagain,this
timeholdingitdownwithslightlymoreforceforthesame
lengthoftime.
WARNING
•Keephandsclearofburnerswhenlighting.
•Ifburnerdoesnotlightwithin5seconds,turnknobto‘Off’
position,allowgastodisperse,thentrylightingagain.
•BurnersMUSTbeoperatedbetween‘HIGH’and‘LOW’
settingsonly.
VIRONMENTAL TIPS
Toconservegas,placethepancentrallyovertheburner
andadjusttheflamesothatitdoesnotgopasttheedge
ofthecookware.
NOTE: In the absence of electrical power, carry out the
ignition directly to the burner with a hand held ignition
source.
1. LOW HEAT BURNER (5.1MJ/H)
Usedforsimmeringwithsmallcookwareitems.
2. MEDIUM HEAT BURNER (9.0MJ/H)
Usedfornormalcookingandsimmeringwithmidsize
cookwareitems.
3. HIGH HEAT BURNER (12.1MJ/H)
Usedforfastheatingwithlargesizecookwareitems.
4. INTENSE HEAT WOK BURNER (14.4MJ/H)
Usedforveryfastheatingwithwoksandotherlarge
sizecookwareitems.Usewoktrivetprovidedwhen
cookingwithawok.
MODEL WFE912 & WFE914
MODEL WFE916
NOTE: Gas controls turn anticlockwise from ‘Off’
and have limited movement.
14
USAGE
CERAMIC HOTPLATES MODEL WFE946
Thecooktopismadefromceramicglass,atough,durable
materialthatwithstandsheatingandcoolingwithout
breaking.Itisstrongenoughtoholdtheheaviestutensils.
However,itmustberememberedthatasitisGLASS,itmay
break.Treatitaccordingly!
Shouldyouhaveanyquestionsabouttheglassinyournew
appliance,pleasecontacttheservicecentrebydialling
1300363640.
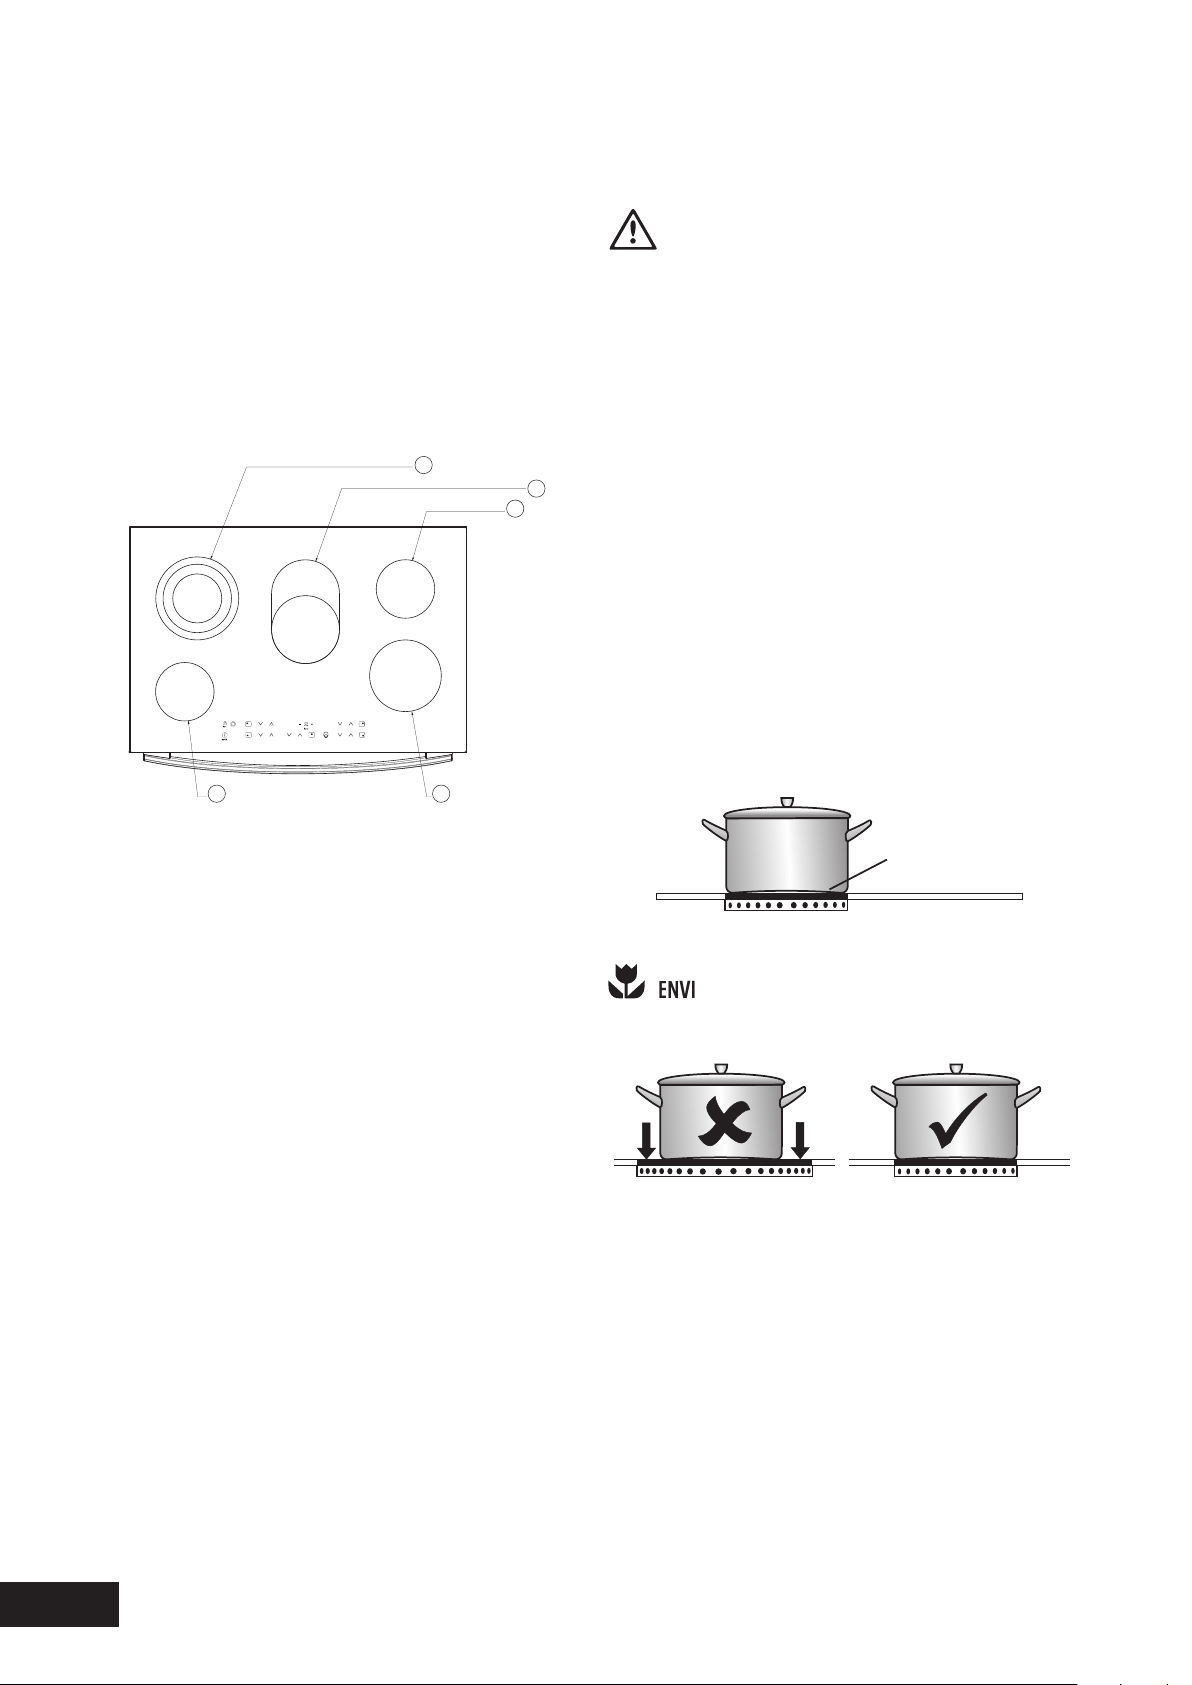
1. SINGLE COOKING ZONE 1200W
2. SINGLE COOKING ZONE 1800W
3. TRIPLE COOKING ZONE 2300/1600/800W
4. MULTI-PURPOSE COOKING ZONE 2200/1400W
WARNING
Iftheceramicglassiscracked,switchofftheapplianceto
avoidthepossibilityofelectricshock.
Theheatingelementsareconcealedunderthesmoothglass
surfacewhichhasapatterntoshowthelocationofthe
elements.
•Usepanswithsmooth,cleananddrybottomstoavoid
scratchingorburningresidueintotheglass.
•Ensurethepanbottomisthesamesizeastheworking
element.
•Wedonotrecommendceramicglasspansbecause
theydonotconductheatwell.
•Stainlesssteelorenamelledsaucepansarebest.
•Donotusepanswithcopperoraluminiumbottoms
becausetheycanleavetraceswhicharedifficultto
removefromtheglass.
•Ifbuyingnewutensilsselectenamelledsteelpans
with2-3mmthickbottomsorstainlesssteelpanswith
sandwichbottoms4-6mmthick.Thepanbottom
shouldbeflat,orpreferably,slightlyconcaveatroom
temperaturesothatitliesflatontheglasssurfacewhen
hot.
Aflatorslightlyconcave
panispreferablefor
ceramichotplates
12
3
4
1
Thebottomofpansandcookingzonesshouldbethesamesize
VIRONMENTAL TIPS
GETTING TO KNOW YOUR CERAMIC COOKTOP
15
USAGE
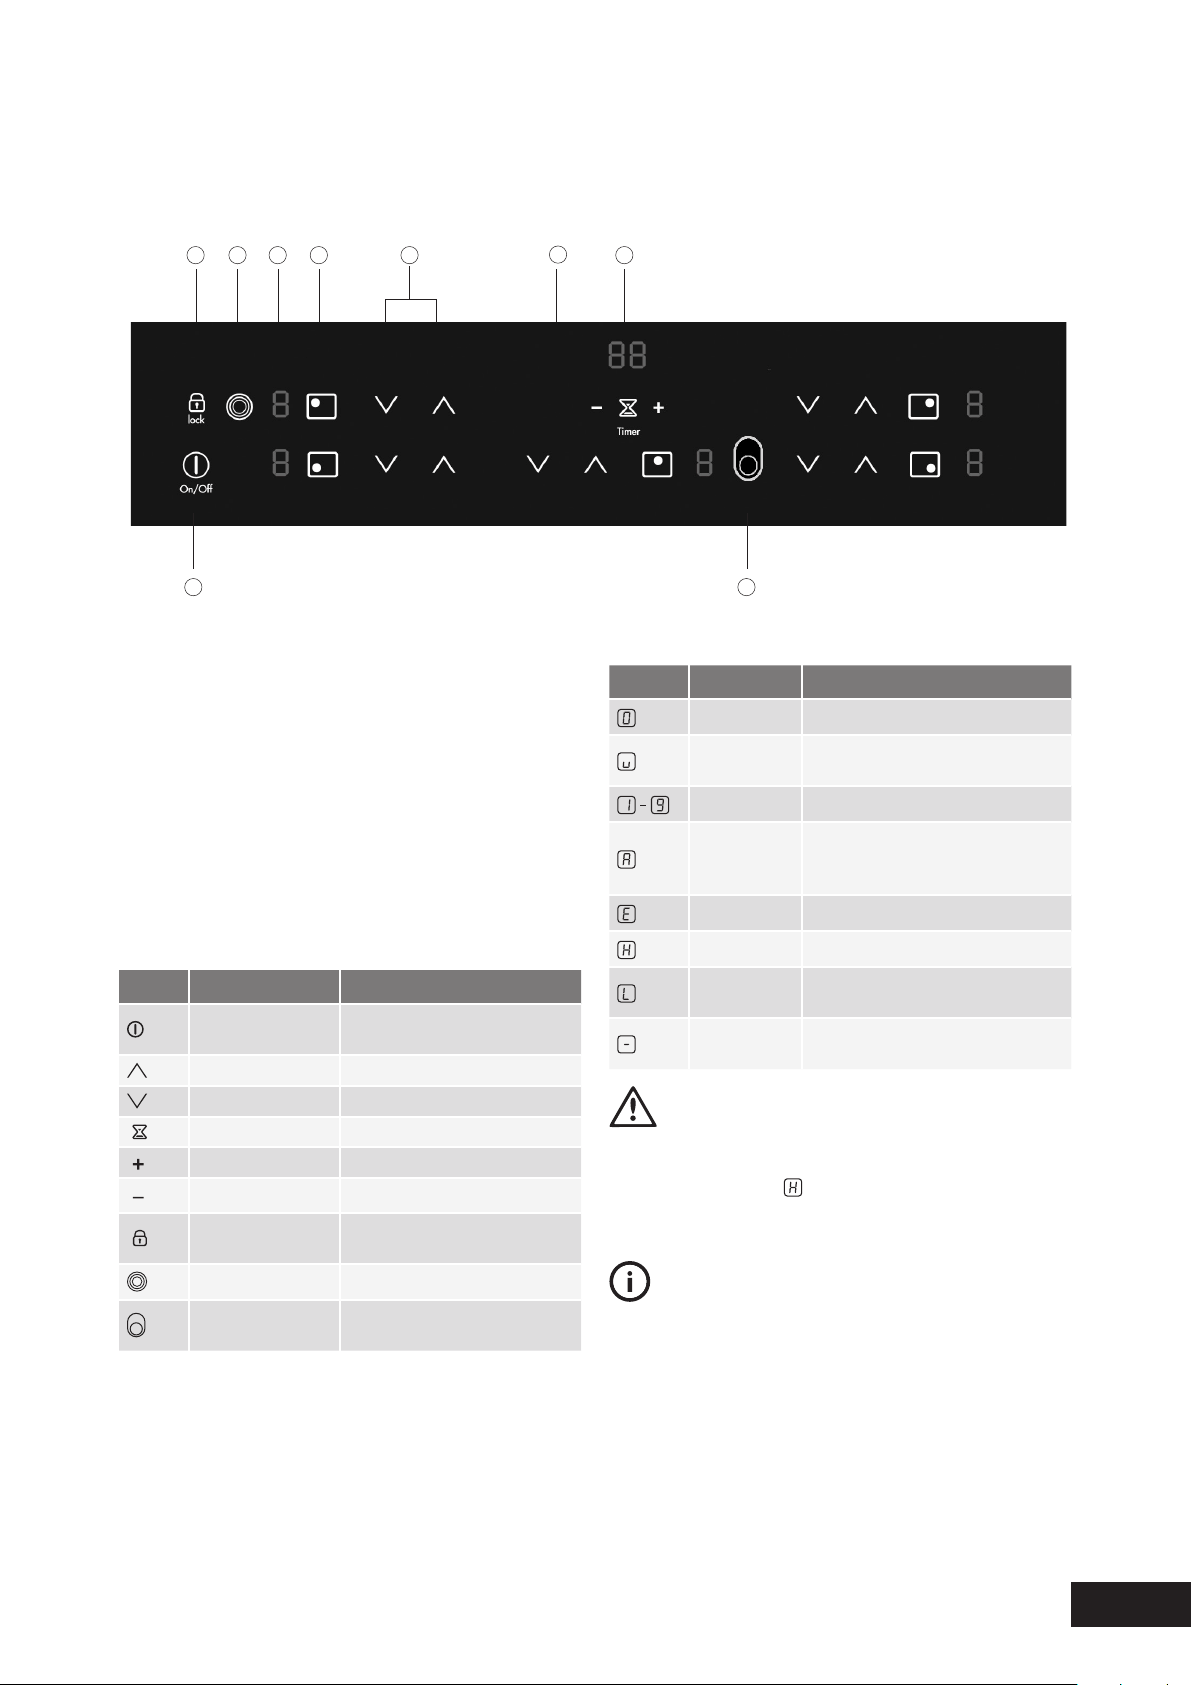
CERAMIC COOKTOP CONTROLS
1. ON/OFF WITH POWER INDICATOR
2. LOCK WITH PILOT LIGHT
3. TRIPLE RING COOKING ZONE
4. DISPLAY
5. ZONE INDICATOR
6. HEAT SETTING SELECTION
7. TIMER SETTING SELECTION
8. TIMER DISPLAY
9. MULTIPURPOSE COOKING ZONE
TheapplianceisoperatedusingTouchControlsensor
fields.Functionsarecontrolledbytouchingsensorfieldsand
confirmedbydisplaysandacousticsignals.Touchthesensor
fieldsfrombelow,withoutcoveringothersensorfields.
1
3245678
9
ICONS SENSOR FIELD
FUNCTION
On/Off
Toswitchtheapplianceon
andoff
IncreasesettingsToincreaseheatsettings
ReducesettingsToreduceheatsettings
TimerToselecttimersettings
IncreasesettingsToincreaseTimertime
ReducesettingsToreduceTimertime
Lock
Tolock/unlockthecontrol
panel
TripleringswitchToswitchouterringsonandoff
Multi-purposezone
switch
Toswitchouterringonandoff
DISPLAYS
ICONS
DISPLAY DESCRIPTION
Cookingzoneisswitchedoff
Keepwarm
settings
Keepwarmsettingisset
HeatsettingsHeatsettingisset
Automatic
warmup
function
Automaticwarm-upfunctionis
activated
ErrorMalfunctionhasoccurred
ResidualheatCookingzoneisstillhot
Childsafety
device
Lock/childsafetydeviceis
activated
Automatic
switchoff
Switchoffisactive
WARNING
Riskofburnsfromresidualheat.Afterbeingswitchedoff,the
cookingzonesneedsometimetocooldown.Lookatthe
residualheatindicator.
TIPS & INFORMATION
Residualheatcanbeusedformeltingandkeepingfoodwarm.
Thesetouchcontrolsapplytothehobonly.Theovenis
operatedindependently.
GETTING TO KNOW YOUR CERAMIC COOKTOP
16
OPERATION
CONTROL PANEL
DISPLAY
Switchon
Touch
for2seconds
/
Switchoff
Touch
for2seconds
/ none
CONTROL PANEL
DISPLAY
Toincrease
Touch
to
Todecrease
Touch
to
Toswitchoff
Touch
and
atthesametime
TRIPLE COOKING
ZONE
CONTROL PANEL
INDICATOR LIGHT
Toswitchonthe
middlering
Touch
for
1-2seconds
Oneindicatorlightislit
Toswitchonthe
outsidering
Touchfor
1-2seconds
Twoindicatorlights
arelit
Toswitchoffthe
outsidering
Touchfor
1-2seconds
Thesecondindicator
lightgoesout
Toswitchoffthe
middlering
Touchfor
1-2seconds
Thefirstindicatorlight
goesout
MULTI-PURPOSE ZONE SENSOR FIELD
INDICATOR LIGHT
Toswitchonthe
outsidering
Touch
for
1-2seconds
islit
Toswitchoffthe
outsidering
Touch
for
1-2seconds
goesout
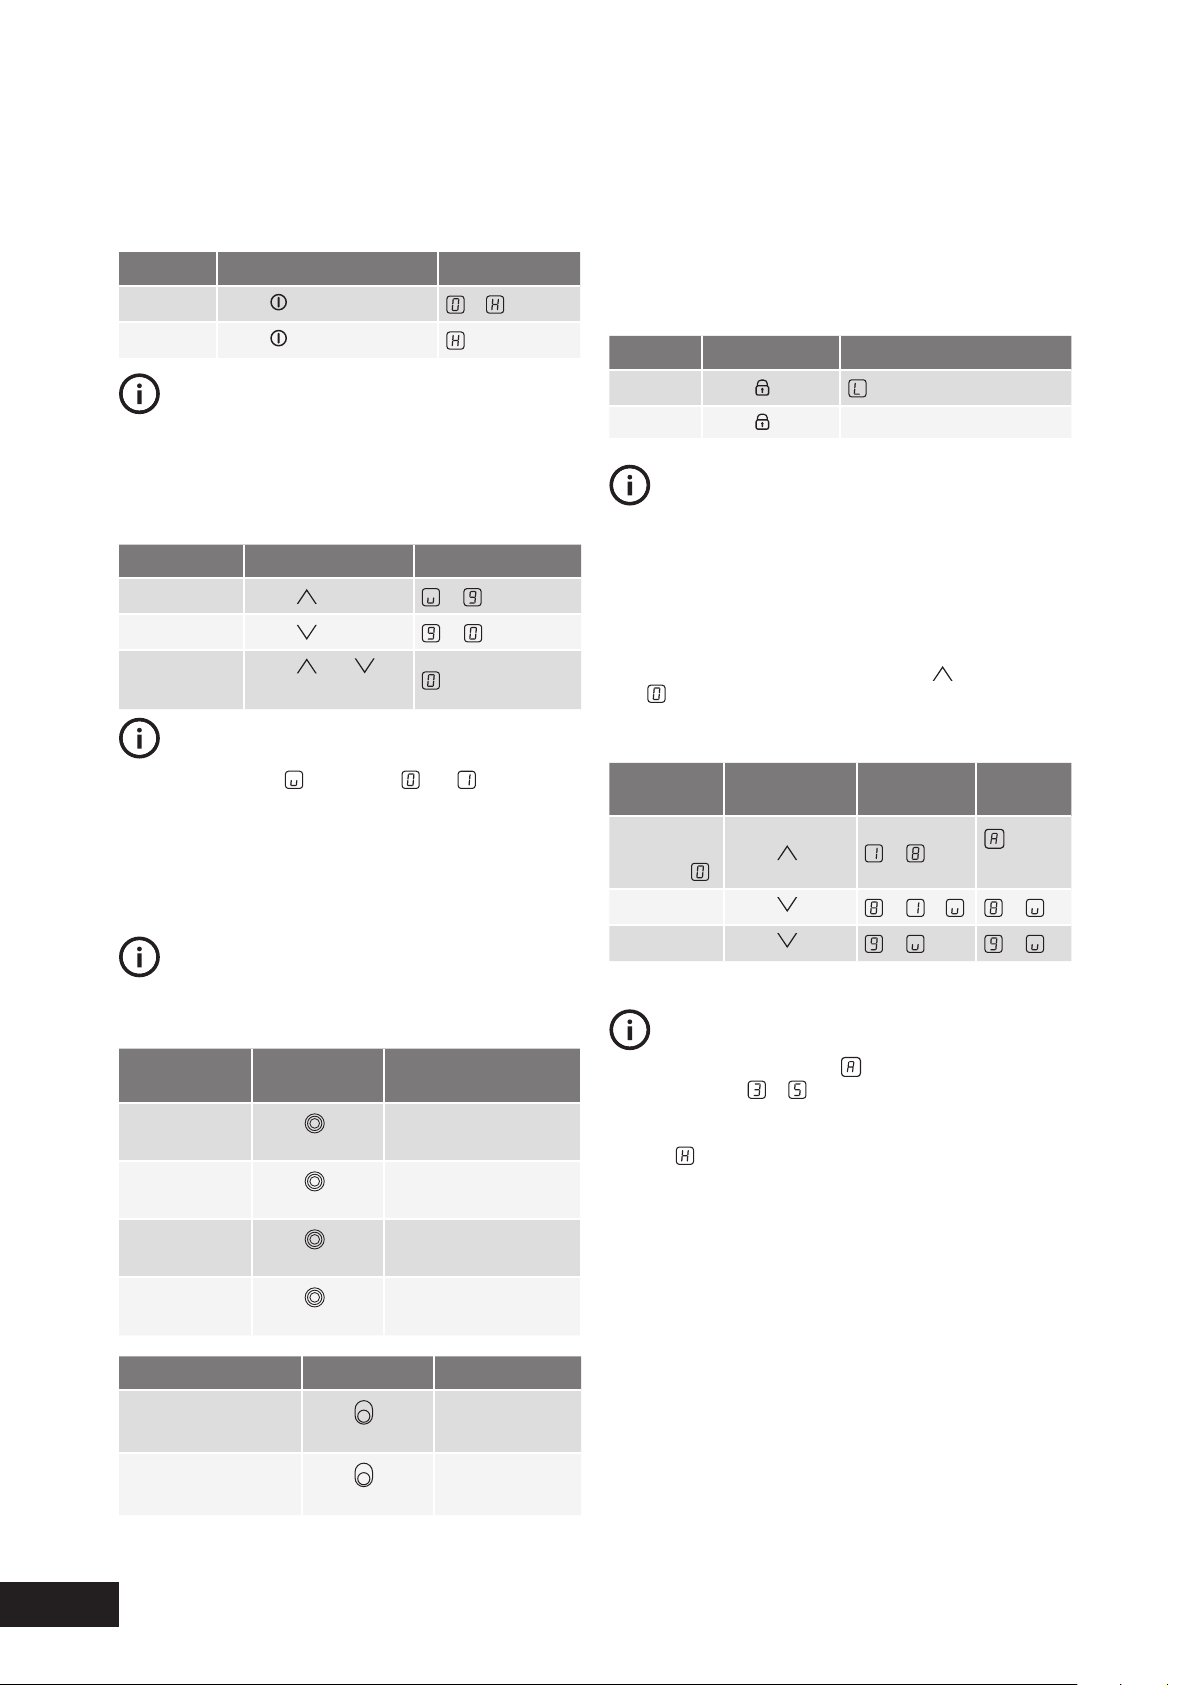
SWITCHING THE CERAMIC COOKTOP ON AND OFF
USING YOUR CERAMIC COOKTOP
TIPS & INFORMATION
Afterswitchingon,withinapprox.10secondsaheatsetting
orafunctionmustbeset,otherwisetheapplianceautomatically
switchesitselfoff.
SETTING THE HEAT SETTING
Thekeepwarmsetting
liesbetweenand.Itisusedto
keepfoodwarm.
SWITCHING THE OUTSIDE RING ON AND OFF
Byswitchingtheoutsideringsonoroff,theeffectiveheating
surfacecanbematchedtothesizeofthecookware.
TIPS & INFORMATION
Beforeanoutsideringcanbeswitchedon,theinsideringmust
beswitchedon.
TIPS & INFORMATION
LOCKING/UNLOCKING THE CONTROL PANEL
Thecontrolpanel,withtheexceptionofthe‘On/Off’sensor
field,canbelockedatanytimeinordertopreventthe
settingsbeingchangedeg.Bywipingoverthepanelwith
acloth.
TIPS & INFORMATION
Whenyouswitchtheapplianceoff,thelockingfunctionis
automaticallyswitchedoff.
USING THE AUTOMATIC WARM-UP FUNCTION
Allcookingzonesareequippedwithanautomaticwarmup
function.Whensettingaheatsettingusing
,whenstarting
from,thecookingzoneswitchestofullpowerforacertain
amountoftimeandthenautomaticallyswitchesbacktothe
heatsettingset.
TIPS & INFORMATION
Ifduringtheautomaticwarmupahigherheatsettingis
selected,e.g.fromto,theautomaticwarmupisadjusted.
Ifthereisstillresidualheatonthecookingzone
(display),theautomaticwarmupisnotperformed.
CONTROL PANEL
DISPLAY
Switchon
Touch
(for5seconds)
Switchoff
Touch
thepreviouslysetheatsettings
CONTROL PANEL
POSSIBLE HEAT
SETTINGS
DISPLAY
Switchon
(onlywhen
startingat)
Touch
to
(after
5seconds)
Switchoff
Touch
to/to
Notused
Touch
toto
17
OPERATION
USING YOUR CERAMIC COOKTOP
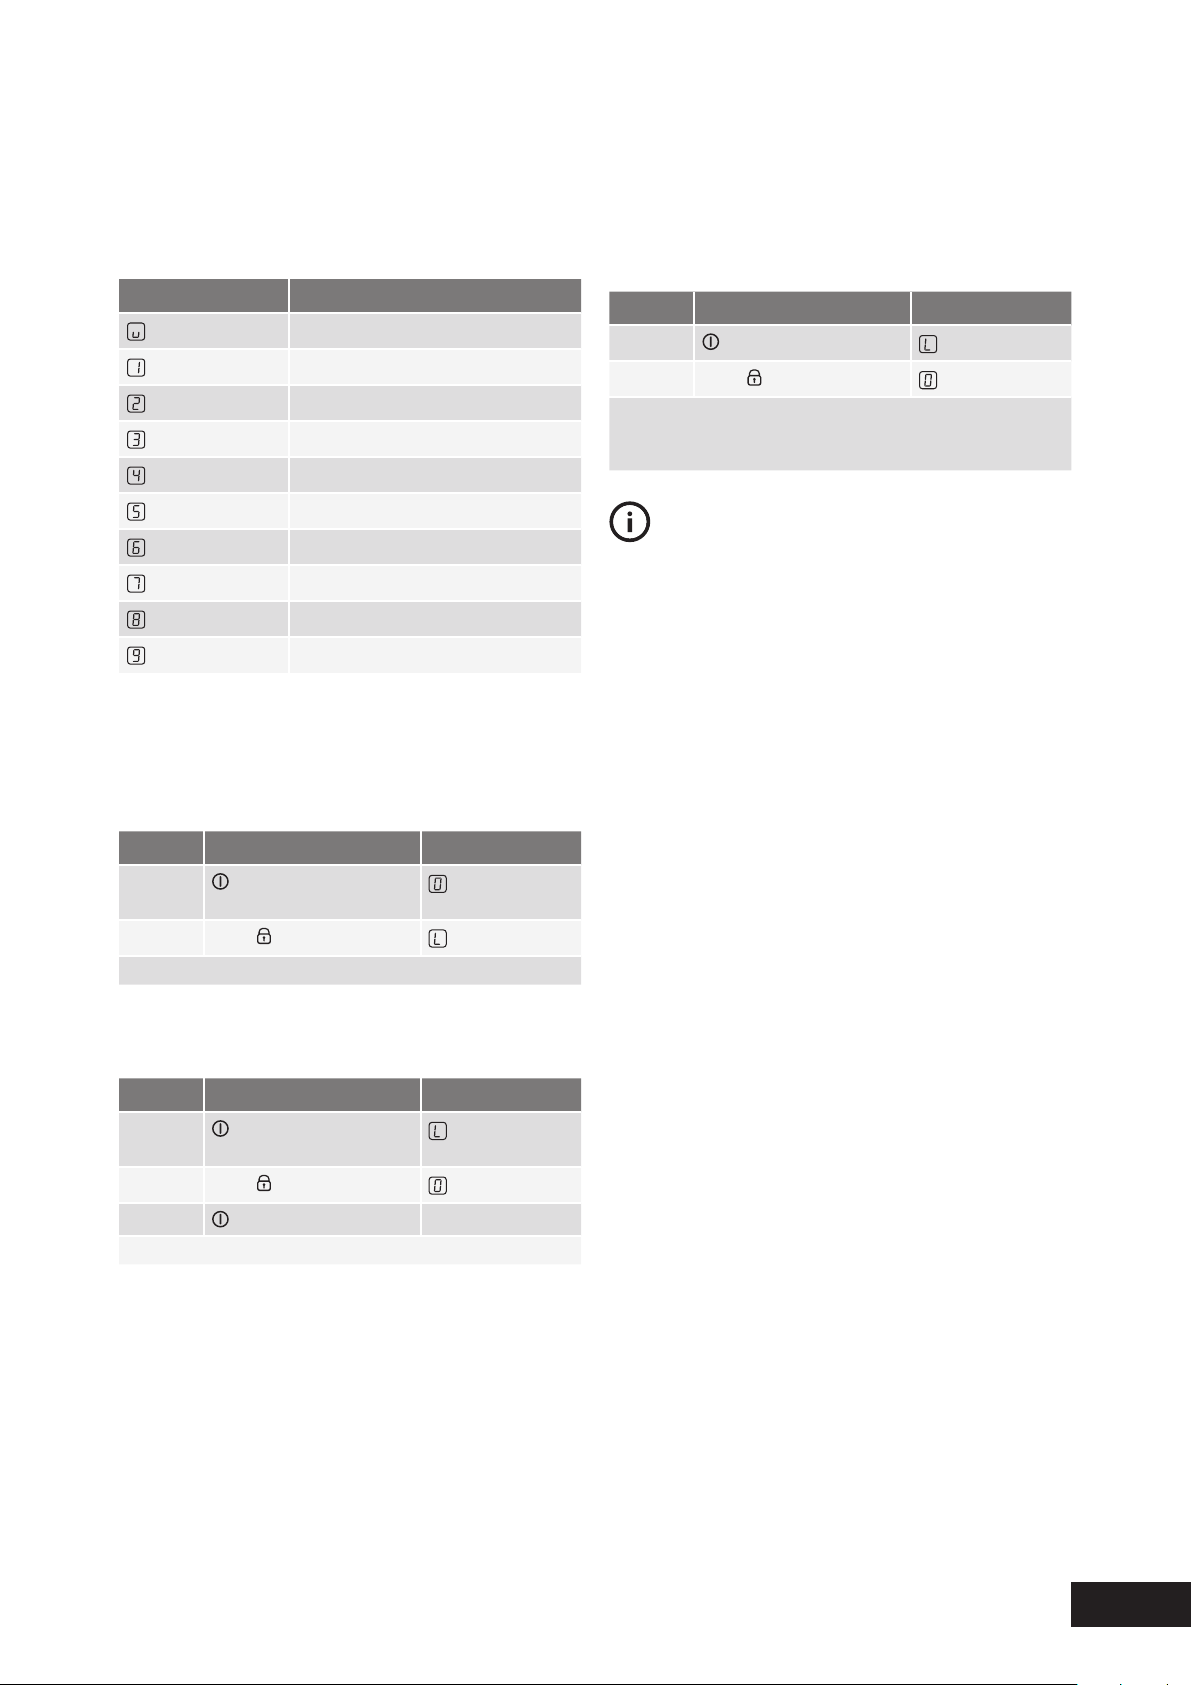
USING THE CHILD SAFETY DEVICE
Thechildsafetydevicepreventsunintentionaluseofthe
appliance.
SWITCHING ON THE CHILD SAFETY DEVICE
STEP CONTROL PANEL
DISPLAY
1.
Switchtheapplianceon
(Donotsetaheatsetting)
2.
Touch
for4seconds
Thechildsafetydeviceisswitchedon
SWITCHING OFF THE CHILD SAFETY DEVICE
STEP CONTROL PANEL
DISPLAY
1.
Switchtheapplianceon
(Donotsetaheatsetting)
2.
Touch
for4seconds
lightsup
3.
Switchtheapplianceoff
Thechildsafetydeviceisswitchedoff
Thechildsafetydevicecanonlybeswitchedonoroff,ifno
heatsettingisset.
Thelengthoftimethattheautomaticwarmupfunction
operatesdependsontheheatsettingselected.
HEAT SETTING
AUTOMATIC WARM UP (MIN:SEC)
0.30
1.00
1.40
4.50
6.30
10.10
2.00
3.30
4.30
–––
OVERRIDING THE CHILD SAFETY DEVICE
Thechildsafetydevicecanbeswitchedoffinthiswayfora
singlecookingsession;itremainsactivatedafterwards.
STEP CONTROL PANEL
DISPLAY
1.
Switchtheapplianceon
2.
Touch
for4seconds
lightsup
Untiltheapplianceisnextswitchedoff,itcanbeusedas
normal.Afterswitchingofftheappliance,thechildsafety
deviceisactiveagain
TIPS & INFORMATION
Afteroverridingthechildsafetydevice,aheatsettingora
functionmustbesetwithinapprox.10seconds,otherwise
theapplianceautomaticallyswitchesitselfoff.
18
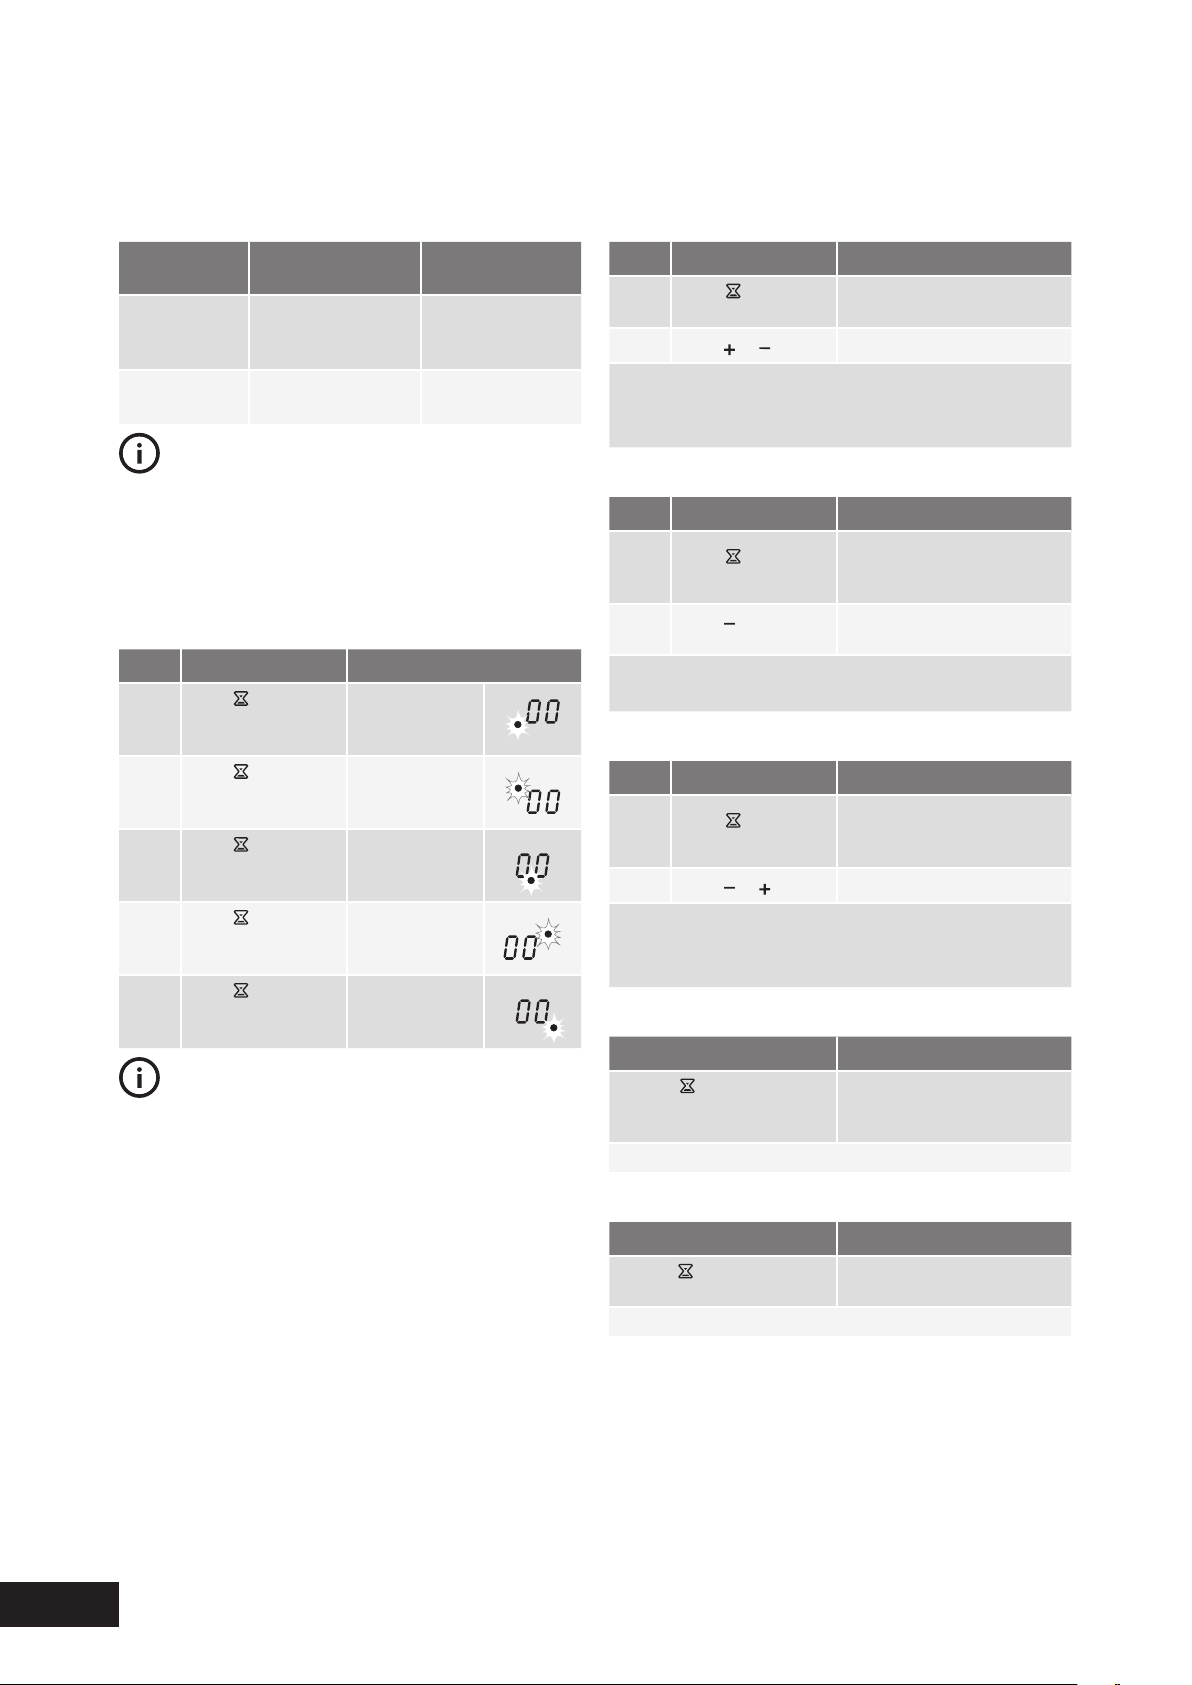
USING THE TIMER
FUNCTION CONDITION
OUTCOME AFTER THE
TIME HAS LAPSED
Automatic
cut-out
aheatsettingisset
acousticsignal
00
flashesCooking
zoneswitchesoff
Countdown
timer
cookingzonesnot
inuse
acousticsignal00
flashes
TIPS & INFORMATION
Ifaheatsettingissetonthecookingzoneinadditiontoa
countdowntimer,thecookingzoneisswitchedoffafterthe
timesethaselapsed.
Ifacookingzoneisswitchedoff,thetimerfunctionsetisalso
switchedoff.
SELECTING A COOKING ZONE
STEP CONTROL PANEL
DISPLAY
1.
Touch
once
Pilotlightoffirst
cookingzone
flashes
2.
Touch
once
Pilotlightof
secondcooking
zoneflashes
3.
Touch
once
Pilotlightofthird
cookingzone
flashes
4.
Touch
once
Pilotlightof
fourthcooking
zoneflashes
5.
Touch
once
Pilotlightoffifth
cookingzone
flashes
TIPS & INFORMATION
Ifthepilotlightisflashingmoreslowly,theheatsettingcanbe
setormodified.
Ifothertimerfunctionsareset,afterafewsecondstheshortest
remainingtimeofallthetimerfunctionsisdisplayedandthe
correspondingpilotlightflashes.
SETTING THE TIME
STEP CONTROL PANEL
DISPLAY
1.
Select
cooking
zone
Pilotlightforthecookingzone
selectedflashes
2.
Touch
or
00to99minutes
Afterafewsecondsthepilotlightflashesmoreslowly
Thetimeisset
Thetimecountsdown
SWITCHING OFF THE TIMER FUNCTION
STEP CONTROL PANEL
DISPLAY
1.
Select
cooking
zone
Pilotlightofcookingzone
selectedflashesfaster.
Timeremainingisdisplayed
2.
Touch
Theremainingtimecounts
backwardsto00
Thepilotlightgoesout
Thetimerfunctionfortheselectedcookingzoneisswitchedoff
CHANGING THE TIME
STEP CONTROL PANEL
DISPLAY
1.
Select
cooking
zone
Pilotlightofcookingzone
selectedflashesfaster.
Timeremainingisdisplayed
2.
Touch
or
01to99minutes
Afterafewsecondsthepilotlightflashesmoreslowly
Thetimeisset
Thetimecountsdown
DISPLAYING THE TIME REMAINING FOR A COOKING ZONE
CONTROL PANEL FIELD
DISPLAY
1.Selectcookingzone
Pilotlightofcookingzone
selectedflashesfaster.
Timeremainingisdisplayed
Afterafewsecondsthepilotlightflashesmoreslowly
SWITCHING OFF THE ACOUSTIC SIGNAL
CONTROL PANEL FIELD
ACOUSTIC SIGNAL
1.Touch
theacousticsignalto
acknowledge
Theacousticsignalstops
USING YOUR CERAMIC COOKTOP
OPERATION

19
USING YOUR CERAMIC COOKTOP
AUTOMATIC SWITCH OFF
Cooking surface
•Ifafterswitchingonthecookingsurface,aheat
settingisnotsetforacookingzonewithinapprox.
10seconds,thecookingsurfaceautomatically
switchesitselfoff.
•Ifoneormoresensorfieldsarecoveredbyobjects(a
pan,cloths,etc.)forlongerthanapprox.10seconds,
asignalsoundsandthecookingsurfaceswitches
offautomatically.
•Ifallcookingzonesareswitchedoff,thecooking
surfaceautomaticallyswitchesitselfoffafterapprox.
10seconds.
Control panel
•Whentheapplianceisswitchedoff,ifoneormore
ofthesensorfieldsonthecontrolpanelarecovered
formorethan10seconds,anacousticsignalsounds.
Theacousticsignalswitchesitselfoffautomatically
whenthesensorfieldsarenolongercovered.
Cooking zones
Ifoneofthecookingzonesisnotswitchedoffaftera
certaintime,oriftheheatsettingisnotmodified,the
relevantcookingzoneswitchesoffautomaticallyand
is displayed.Beforebeingusedagain,thecookingzone
mustbesetto.
HEAT SETTING
SWITCHES OFF AFTER
,–
6hours
–
5hours
4hours
–
1.5hours
OPERATION
20
USAGE
USING YOUR OVEN
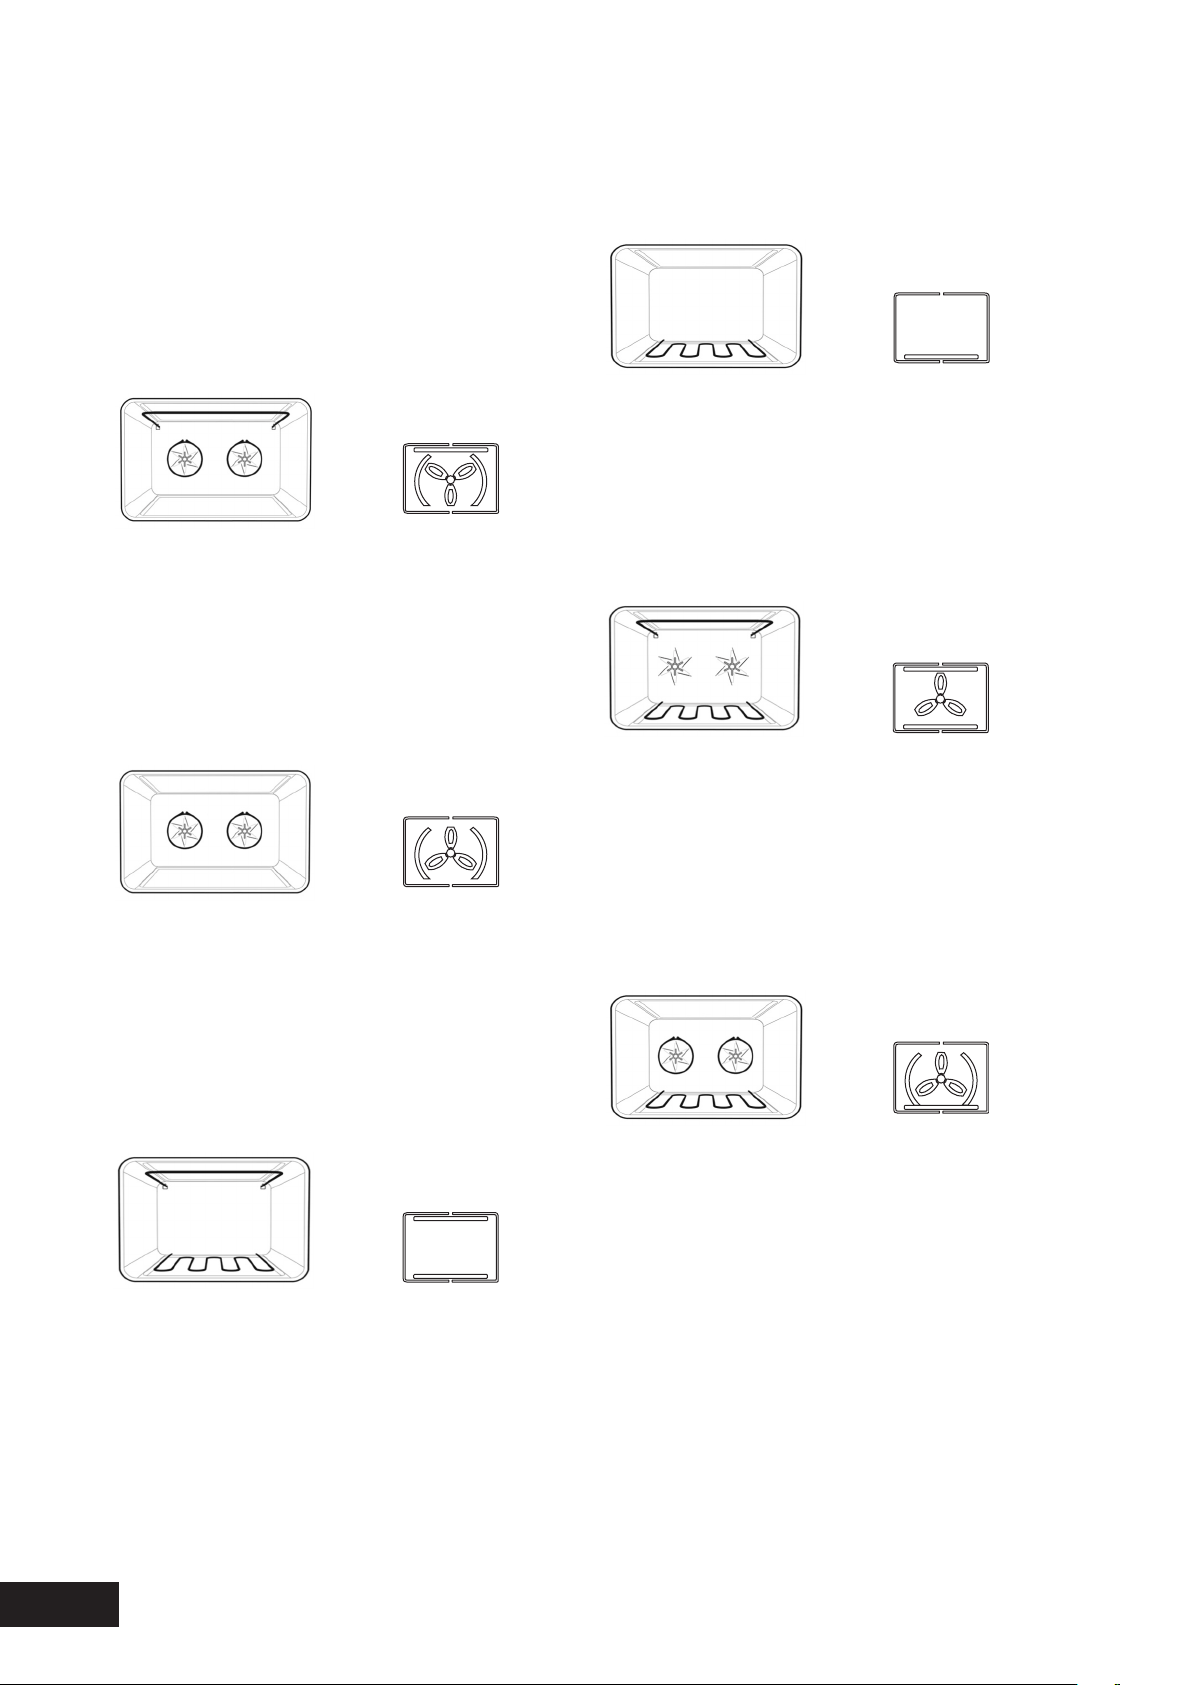
UNDERSTANDING YOUR OVEN FUNCTIONS
Thefollowingliststheovenfunctionsavailablewiththe
programmablecontroller(modelsWFE916,WFE946&
WVE916).Multifunctionmodels(WFE914&WFE912)
haveallovenfunctionsexceptforFanAssist,Pizzaand
FastHeatUp.
RAPID HEAT
Function 1
Heatcomesfromtheelementssurroundingthefansaswell
asthesmallerelementabovethefood.Thisallowsyouto
preheatyouroven30%quickerthanonstandard“Bake”.
“RapidHeat”isidealforcookingfrozenpre-cookedfoods
suchassavourydishes,pastries,pizzas,minimeals(TV
dinners),meatpiesandfruitpies.Simplyplacethefoodin
theovenstraightfromthefreezerandheat–idealforbusy
people.Cookintheupperhalfoftheovenforbestresults.
FAN BAKE
Function 2
Heatcomesfromtheelementssurroundingthefans.The
fanscirculatethehotairaroundtheovencavitysothat
youcanputyourfoodindifferentplacesintheovenand
stillcookthematthesametime.Youcanusethe“Fan
Bake”functionformulti-shelfcooking,reheatingcooked
foods,pastriesandcompleteovenmeals.Itwillcookata
lowertemperatureandbefasterthanbaking.Pleasenote
thatsomevariationinbrowningisnormal.
BAKE/PIZZA
Function 3
Heatcomesfromtwoelements,oneaboveandone
belowthefood.Thebottomelementisacleanheat
elementandisbelowtheflooroftheoven.Bothelements
arecontrolledbythethermostatandwillturnonandoff
tomaintainthesettemperature.Youcanusethe“Bake”
functionforsingletraysofbiscuits,scones,muffins,cakes,
slices,casseroles,bakedpuddings,roastsanddelicate
eggdishes.
Function 4
Heatcomesfromtheelementbelowtheflooroftheoven.
TheElementiscontrolledbythethermostatandwillturnon
andofftomaintainthesettemperature.The“BaseHeat”
functioncanbeusedtoaddextrabrowningtothebases
ofpizzas,piesandpastries.Cookinthelowerhalfofthe
ovenwhenyouareusingonlyoneshelf.Forbestresults,
usesilverorshinytrays.
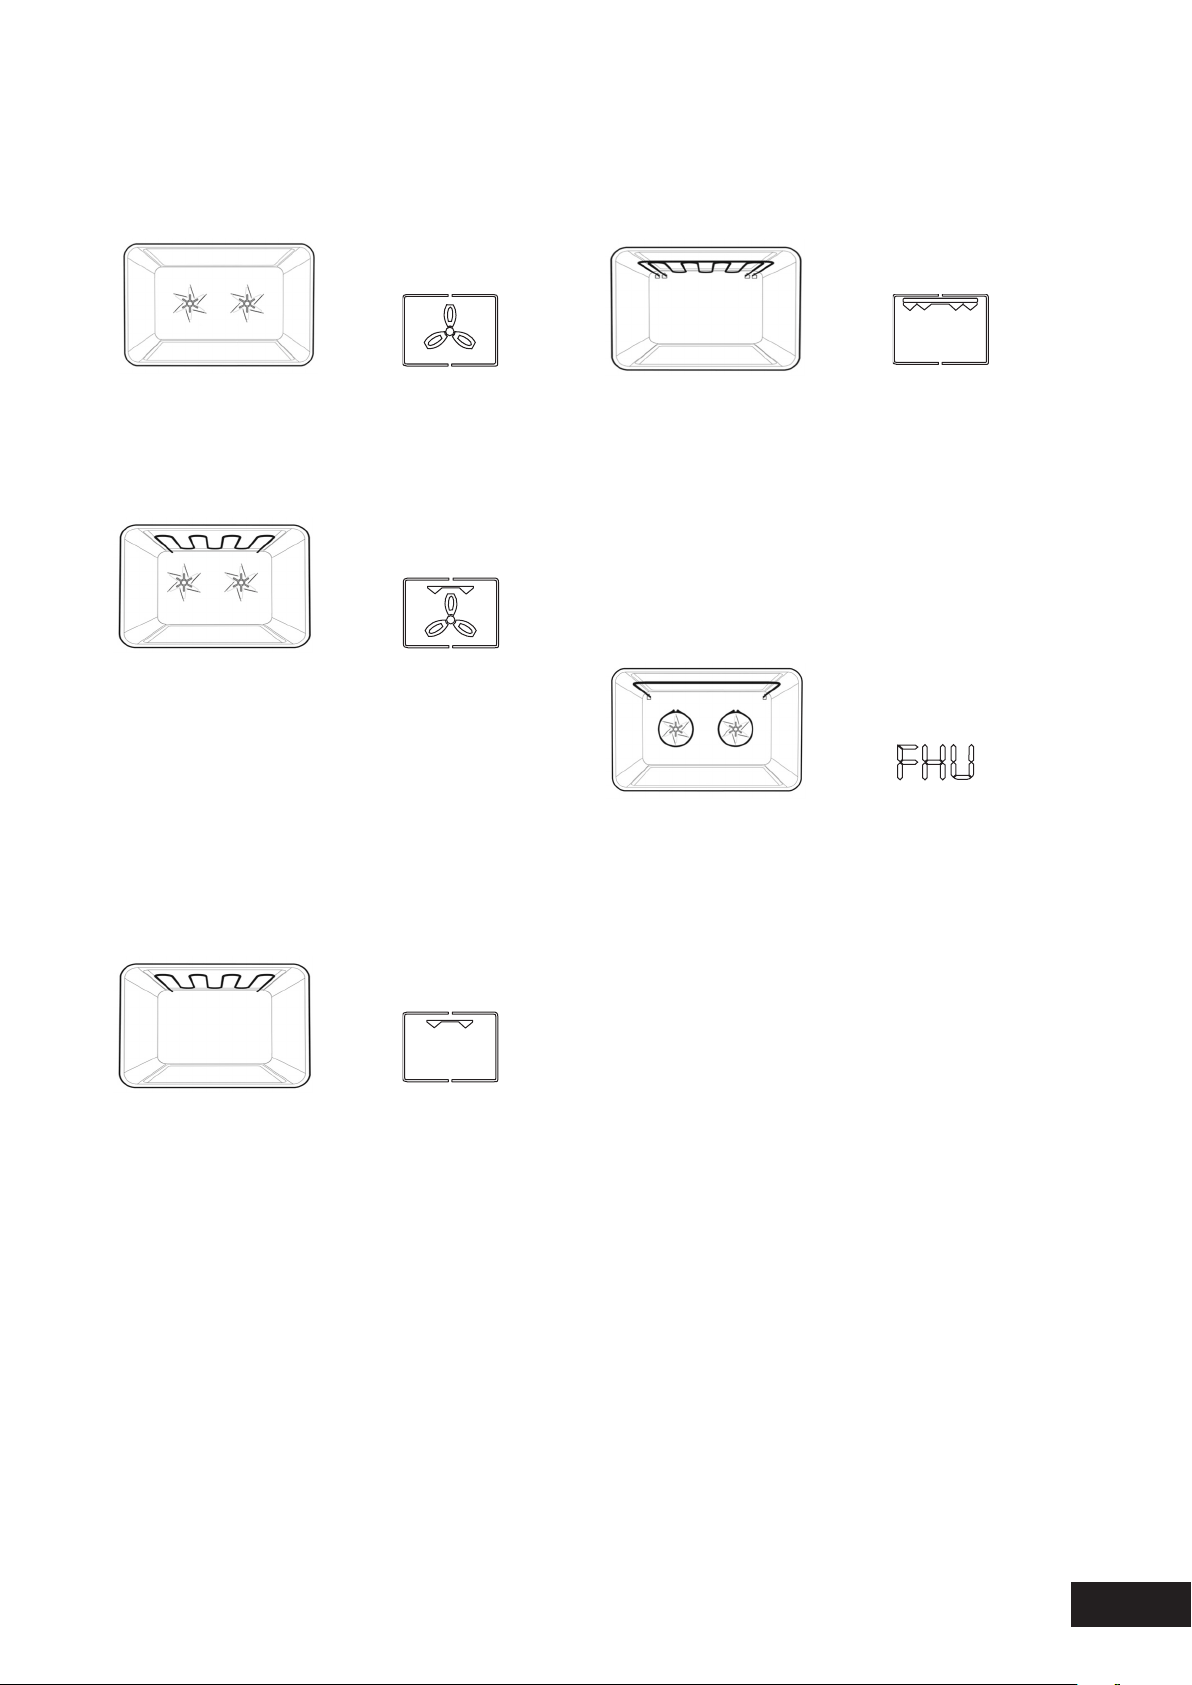
FAN ASSIST
Function 5
Heatcomesfromtwoelements,oneaboveandone
belowthefood.Thefanscirculatethehotairaroundthe
ovencavitysothatyoucanputthefoodindifferentplaces
intheovenandstillcookthematthesametime.You
shouldonlyuseamaximumof2shelveswith“FanAssist”.
Donotusethebottomshelf.Iftwoshelvesareused,food
ontheshelfinthehigherpositionwillcookfirstandshould
thenberemovedtoallowthefoodonthelowershelfto
finishcooking.
PIZZA
Function 6
“Pizza”isacombinationof“BaseHeat”and“FanBake”
andoffersyouthecombinedbenefitsofbothfunctions.
Heatcomesfromtheelementssurroundingthefansaswell
asthecleanheatelementbelowtheovenfloor.
The“Pizza”functionisidealforfoodsthatrequirecooking
andbrowningonthebase.Itisgreatforfoodssuchas
pizzas,quiches,meatpiesandfruitpies.Simplyplace
thefoodinthemiddleoftheovenandsetthedesired
temperature.
BASE HEAT
21
USING YOUR OVEN
USAGE
Function 7
The“Defrost”functionuseslowtemperatureairthatis
circulatedbythefans.Youcandefrost(thaw)yourfood
beforeyoucookit.Youcanalsouse“Defrost”toraise
youryeastdoughandtodryfruit,vegetablesandherbs.
FAN GRILL
Function 8
“FanGrill”offersyouthebenefitsofboth“Bake”and
traditional“Grill”functions.Thegrillelementturnsonand
offtomaintainthesettemperaturewhilethefanscirculate
theheatedair.Theovendoorremainsclosedforfangrill.
Youcanuse“FanGrill”forlargecutsofmeattogiveyou
aresultthatissimilarto“rotisserie”cookedmeat.
Putyourfoodonashelfinthesecondlowestshelf
position.Putthegrilldishonthelowestshelfpositionto
catchanyspills.Whenusing“FanGrill”itisnotnecessary
toturnthefoodoverduringthecookingcycle.Setthe
temperatureto180°C.
GRILL
Function 9
The“Grill”directsradiantheatfromthepowerfulupper
elementontothefood.Youcanusethe“Grill”functionfor
tendercutsofmeat,steak,chops,sausages,fish,cheese
toastiesandotherquickcookingfoods.Grillwiththeoven
doorclosed.Preheatyourgrillfor3minutestogetthebest
results.Thiswillhelpsealinthenaturaljuicesofsteak,chops
etc.forabetterflavour.Youcanslideyourgrilldishintoeither
ofthe2spaceswithintheupperpairsofsupportrails.
Function 10
“MaxiGrill”directsradiantheatfrom2powerfulupper
elementsontothefood.Youcanusethe“MaxiGrill”
functionfortendercutsofmeat,steak,chops,sausages,
fish,cheesetoastiesandotherquickcookingfoods.
Grillwiththeovendoorclosed.
“MaxiGrill”allowsyoutotakefulladvantageofthelarge
grilldishareaandwillcookfasterthannormal“Grill”.For
bestresultsitisrecommendedtopreheatyourgrillfor3
minutes.Thiswillhelpsealinthenaturaljuicesofsteak,
chopsetc.forabetterflavour.Youcanslideyourgrilldish
intoeitherofthe2spaceswithintheupperpairsofsupportrails.
FAST HEAT UP
“FastHeatUp”canbeselectedintheinitialheatup
phaseofanycookingfunction.During“FastHeatUp”
theheatcomesfromtheelementssurroundingthefansas
wellasthesmallerelementabovethefood.Thisallows
youtopreheatyouroven30%quickerthanonstandard
“Bake/Pizza”.SeeUsingyourprogrammablecontrollerto
operatetheoveninstructionsformoreinformation.
COOLING/VENTING FAN
Yourbuilt-inapplianceisfittedwithacoolingfan.
Thispreventsyourkitchencabinetfromoverheatingand
reducesthecondensationinsidetheoven.Itwilloperate
wheneveryouareusingyourovenorgrillandwillblow
warmairacrossthetopoftheovendoor.Insome
appliancesthecoolingfanmaycontinuetooperateafter
theapplianceisturnedoff.Itwillswitchoffbyitselfonce
oveniscool
CONDENSATION
Excesscondensationmayfogtheovendoor.Thismay
happenwhenyouarecookinglargequantitiesoffood
fromacoldstart.Youcanminimizecondensationby:
•Keepingtheamountofwaterusedwhilstcooking
toaminimum.
•Makingsurethattheovendoorisfirmlyclosed.
•Bakingcustardinabakingdishthatisslightly
smallerthanthewatercontainer.
•Cookingcasseroleswiththelidon.
NOTE: If you are using water in cooking, this will turn
to steam and may condense outside your appliance.
This is not a problem or fault with your oven.
DEFROST
MAXI GRILL

22
OPERATING THE PUSH BUTTON & TOUCH CONTROL CLOCK
MODELS WFE912 & WFE914 ONLY
GENERAL FEATURES
Yourtouchcontrolclockhasthefollowingfeatures:
•Timer–allowsyoutosetacountdowntimethatwill
beepwhenthesettimehaselapsed.
•Cookingduration–Youcansetacookingduration.
Atimerwillcountdownthepresetcookingtime,beep
whenthetimehaselapsedandturntheovenoff.
•Endcookingtime–youcansetacookingfinishtime.
Atimerwillcountdownthepresetcookingtime,beep
whenthefinishtimehasbeenreachedandturnthe
ovenoff.
•Delayedstartcookingtime–Youcancombinethe
cookingtimeandstopcookingtimetoswitchtheoven
onandoffataspecifictimeduringtheday.
NOTE: Your touch control clock only operates with
your main oven.
SETTING THE TIME OF DAY
Youmustsetthetimeofdaybeforeyoucanoperateyour
appliance.Whenpowerissuppliedtoyouroven“12.00“
willbedisplayedandthe“clock”indicatorIwillflash.
1.Tosetthetimeofdayinhoursandminutes,press
–or+.5secondsafterthelastchange,the“clock”
indicatorIwilldisappear,confirmingthetimehas
beenset.
NOTE: The clock has a 24-hour display.
CHANGE THE TIME OF DAY (DAYLIGHT SAVING)
1.Press“mode”untilthe“clock”indicatorIbegins
flashing.
2.Press–or+tochangethetime.5secondsafterthe
lastchange,the“clock”indicatorIwilldisappear,
confirmingthetimehasbeenset.
SETTING THE TIMER
1.Press“mode“untilthe“timer”indicatorIbeginsflashing.
2.Setthecountdowntimeyouwantbyusing–and+.
5secondsafterthelastchangethe“timer”indicatorI
willstopflashing,confirmingthetimerhasbeenset.
3.Tostopthebeeper,press–,+or“mode”.
USAGE
USING YOUR OVEN
OPERATING YOUR OVEN TEMPERATURE AND FUNCTION SELECTORS
MODELS WFE912 & WFE914
Tosettheoven,turnthefunctionselectortothedesired
cookingfunctionandthenturnthetemperatureselector
tothedesiredtemperature.Anindicatorlightabovethe
temperatureselectorwillcomeon.Whenthetemperature
isreachedtheheatingsourceswitchesitselfoffandthe
indicatorlightgoesout.Whentheoventemperaturefalls
belowthedesiredsetting,theheatingsourceswitcheson
andtheindicatorlightcomesonagain.
Oncethefoodiscooked,turnthetemperatureselectoroff
inananticlockwisedirection.Donotforceitrightroundin
aclockwisedirectionasthiswillresultindamagetothe
thermostat.Turnthemultifunctionselectoroff.
PREHEATING YOUR OVEN WITH “RAPID HEAT”
Topreheatyourovenselectthe“RapidHeat”function.This
functionallowsyouroventoreachthepresettemperature
quickerthananyothercookingfunction.
1.Turnthefunctionselectorto“RapidHeat”
2.Setthedesiredpreheattemperature,byrotatingyour
oventemperatureselector.Whentheindicatorlightabove
thetemperatureselectorgoesout,theovenhasreached
thedesiredtemperature.Selecttheovenfunctionyourequire
forcookingorbakingandplacethefoodintheoven.
MODEL WFE912
MODEL WFE914
Oven
indicator
Oven
indicator
BAKE

23
USING YOUR OVEN
USAGE
SETTING THE COOKING DURATION
1.Checktheclockdisplaysthecorrecttimeofday.
2.Selectthedesiredovenfunctionandtemperature.
Theovenindicatorlightwillglowandtheheating
sourcewillcomeon.
3.Press“mode“untilthe“cooktime”indicatorI
beginsflashing.
4.Setthecookingdurationyouwantbyusing–or+.
5secondsafterthelastchange,the“cooktime”
indicatorIwillstopflashing,andthetimeofdaywill
bedisplayed.
NOTE: Do not forget to add preheating time if necessary.
SETTING THE COOKING END TIME
1.Checktheclockdisplaysthecorrecttimeofday.
2.Selectthedesiredovenfunctionandtemperature.
Theovenindicatorlightwillglowandtheheating
sourcewillcomeon.
3.Press“mode“untilthe“endtime”indicatorI
beginsflashing.
4.Enterthetimeofdayyouwanttofinishcooking
bypressing–or+.5secondsafterthelastchange,
the“endtime”indicatorIwillstopflashingandthe
currenttimeofdaywillbedisplayed.
SETTING THE DELAYED START COOKING TIME
1.Programthe“cooktime“and“endtime“asdescribed
intherelevantsections.Onceboththe“cooktime“
and“endtime“havebeenset,the“cooktime“and
“endtime”indicatorswillstopflashingandthecurrent
timeofdaywillbedisplayed.
TO CHECK OR CANCEL SETTINGS
1.Tocheckyoursettings,press“mode”untilthesetting
youwantisdisplayed.Aredlightwillflashnexttothe
mode(cooktime,endtimeetc)thatiscurrentlyon
display.
2.Tocancel“delayedstart”press“mode”untilalight
flashesnextto“cooktime”.Pressandhold“–”until
theclocknolongerreverses(“0:00”andyouwillhear
abeep).Ifyouhaveleftthetemperatureandfunction
knobsatasettingtheovenwillstartoncethe“end
time”lightstopsflashing.
3.Tocancel“autooff”press“mode”untilalightflashes
nextto“cooktime”.Pressandhold“–”untiltheclock
nolongerreverses(“0:00”andyouwillhearabeep).
Thisautomaticallycancels“delayedstart”.Ifyou
haveleftthetemperatureandfunctionknobsata
setting,theovenwillstartoncethe“cooktime”light
stopsflashing.Becauseyouhavecancelled“autooff”
theovenwillcontinuetoheatuntilyoumanuallyturn
itoff.
ON COMPLETION OF COOKING
Theovenwillturnoff,thetimerwillbeepandthe“end
time”and/or“cooktime”indicatorswillflash.
1.Turnthefunctionandtemperaturecontrolstotheoff
position.
2.Press“+”or“–”or“mode”tostopthetimerfrom
beeping.
SWITCHING THE CLOCK DISPLAY ON AND OFF
1.Presstogether“+”and“–”for2secondstoswitch
’off’thedisplay.
2.Presstogether“+”and“–”for2secondstoswitchthe
clockdisplay’on’again.
NOTE: If a timer mode is set, then it is not possible to
switch the display off.
24
USAGE
USING YOUR OVEN
SETTING THE TIME OF DAY
Aftertheappliancehasbeenelectricallyconnectedthe
“setclock”symbol
willflashontheclockdisplay.
1.Tosetthetimeofdayinhoursandminutespressthe
–or+.5secondsafterthelastchangethe“timerarrow”
willdisappear,confirmingthetimehasbeenset.
NOTE: The clock has a 24-hour display.
CHANGE THE TIME OF DAY (DAYLIGHT SAVING)
1.Switchofftheappliancebypressing“On/Off”.
2.Press“Timer”asmanytimesasnecessaryuntilthe
“setclock”symbol
and“timerarrowflashon
theclockdisplay.
3.Press“+”or“–”tochangethetime.5secondsafterthe
lastchangethe“setclock”symbol
and“timerarrow
willdisappear,confirmingthetimehasbeenset.
SETTING THE OVEN FUNCTION
1.Switchontheappliancebypressingthe“On/Off”.
Theovenlightswilllight.
2.Pressthe“Function”asmanytimesasnecessaryuntil
thedesiredfunctionappears.Thesuggestedcooking
temperatureappearsinthedisplayandthedegrees
symbol“°”flashes.Ifthesuggestedtemperatureisnot
changedwithinapproximately5secondsthedegrees
symbol“°”stopsflashingandtheovenbeginstoheat.
Thesuggestedtemperaturedisplayisreplacedwith
theovencentretemperatureandathermometericon.
Thethermometericonrisesslowly,indicatingthe
degreetowhichtheoveniscurrentlybeingheated.
CHANGING THE OVEN TEMPERATURE
1.Pressthe–or+,todecreaseorincreasethetemperature.
NOTE: The temperature can only be adjusted when the
degrees symbol “°” is flashing. The temperature setting
changes in increments of 5°C. To change the temperature
after the degrees symbol “°” stops flashing, press the
“Function” and then press the – or + to change the
temperature.
SETTING THE COOKING TIME
1.Selectthedesiredovenfunctionandcooking
temperature.
2.Pressthe“Timer”asoftenasnecessary,untilthe“cook
time”❘➔❘ symbolappears.
3.Setthedesiredcookingtimebyusingthe–or+,
whilstthe“timerarrow”isflashing.After5seconds
fromthelasttimeadjustmentthe“timerarrow”will
disappearandyourapplianceisnowprogrammed.
4.Whenthesettimehaselapsed,asignalwillsound.
Tostopthesignal,press“+”or“–”.
SETTING THE STOP TIME
1.Selectthedesiredovenfunctionandcooking
temperature.
2.Pressthe“Timer”asoftenasnecessary,untilthe“end
time”➔❘ symbolappearsflashing.
3.Setthedesiredswitch-offtimeusingthe–or+whilst
the“timerarrow”isflashing.After5secondsfrom
thelasttimeadjustmentthe“timerarrow” will
disappearandyourapplianceisnowprogrammed.
4.Whenthesettimehaselapsed,asignalwillsound.
Tostopthesignal,press“+”or“–”.
SETTING THE DELAYED START COOKING TIME
The“cooktime”and“stoptime”functionscanbe
combinedtoswitchtheovenonandoffataspecifictime
duringtheday.
1.Selectthedesiredovenfunctionandcookingtemperature.
2.Press“Timer”asoftenasnecessary,untilthe“cook
time”❘➔❘ symbolappears.
3.Setthedesiredcookingtimebyusing–or+,whilst
the“timerarrow”isflashing.
4.Press“Timer”asoftenasnecessary,untilthe“end
time”➔❘ symbolappearsflashing
5.Setthedesiredswitch-offtimeusingthe–or+whilst
the“timerarrow”isflashing.The“cooktime”❘➔❘
and“endtime”➔❘ arrowsarelittoconfirmthatthe
ovenhasbeenprogrammed.
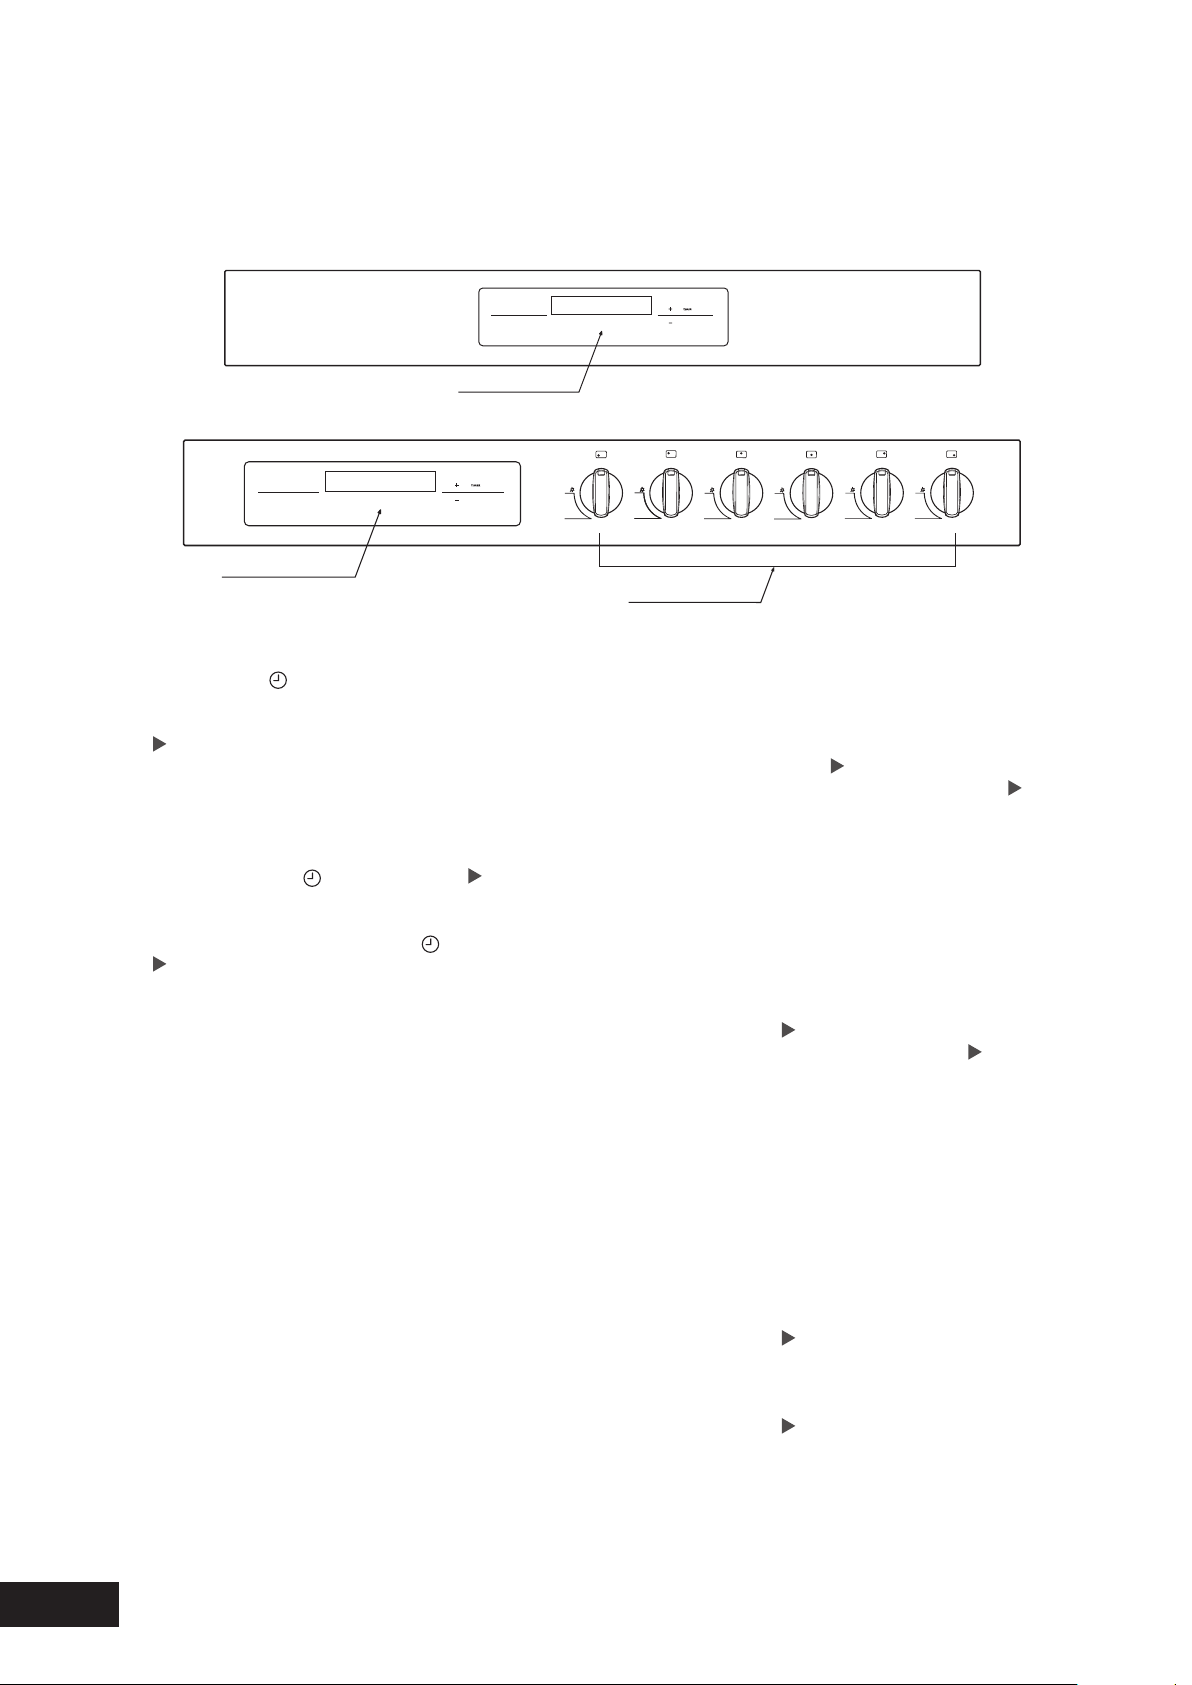
USING YOUR PROGRAMMABLE CONTROLLER TO OPERATE THE OVEN
ON/OFF
FUNCTION
FAST HEAT UP
Programmablecontroller
O
F
F
H
L
O
I
O
F
F
H
L
O
I
H
L
O
I
O
F
F
H
L
O
I
O
F
F
H
L
O
I
O
F
F
H
L
O
I
O
F
F
H
L
O
I
ON/OFF
FUNCTION
FAST HEAT UP
Programmablecontroller
Gashobburnercontrols
MODELS WFE946 & WVE916
MODEL WFE916

25
USAGE
USING YOUR OVEN
ON COMPLETION OF COOKING
Whenthesettimehaselapsed,asignalwillsoundfor
1minute,theovenwillswitchoffandtheremainingtime
indication“0.00”willappearonthedisplay.
1.Tostopthesignal,press“+”or“–”.
SETTING THE MINUTE MINDER
Forsettingacountdownperiod.Whentheperiodoftime
haselapsed,anaudiblesignalissounded.
NOTE: This feature has no effect on the oven operation.
1.Press“Timer”asoftenasnecessary,untilthe“minute
minder”symbolappearsflashing.Setthedesired
lengthoftimeusing–or+whilstthe“timerarrow”
isflashing.After5secondsfromthelasttimeadjustment
the“timerarrow”willdisappearandtheminute
minderhasbeenset.Oncethesettimehaselapsed,
asignalwillsoundfor1minute.Thetimeindication
“0.00”andaflashing“minuteminder”symbolwill
appearonthedisplay.
2.Tostopthesignal,press“+”or“–”.
DEMONSTRATION MODE – PROGRAMMABLE CONTROLLER MODELS
Fordisplaypurposes,theappliancehasademonstration
modetoenabledemonstrationofovenfunctionalitywithout
consumingpower.Indemonstrationmode,thedisplay,the
lightandthefanonlyareoperational.
Whentheapplianceisindemonstrationmodeandthe
displayisswitchedon,theclocksymbolwillbeon.
Iftheapplianceisindemonstrationmode,tooperatethe
appliancenormallythedemonstrationmodewillneedto
bedeactivated.
Todeactivatedemonstrationmode
1.Press“On/Off”untilthedisplayreturnstostandbymode.
2.Presssimultaneouslythe“Timer”and“-“for5seconds.
USING FHU (FAST HEAT UP) MODE
Toquicklyandefficientlypreheatyouroven,itis
recommendedtoselectthe“FastHeat”cookingfeature.
1.Ensuretheapplianceisonbypressingthe“On/
Off”.Theovenlightswilllight.
2.Selectthedesiredovenfunctionbypressing“Function”.
3.Setthecookingtemperaturebypressingthe–or+
todecreaseorincreasethetemperature.
NOTE: The temperature can only be adjusted when
the degrees symbol “°” is flashing.
Thetemperaturesettingchangesinincrementsof5°C.
4.Pressthe“FastHeat”.Theletters“FHU”willappearon
thetemperaturedisplay.
5.Whenthesettemperatureisreachedthebuzzer
willsoundandthesettemperaturewillbedisplayed.
NOTE: “FHU” cannot be selected if the oven temperature
is above the preset temperature.
ACTIVATING THE CHILD-PROOF LOCK
Whenthechildlockisengaged,theovencannotbe
switchedon.
1.Switchofftheapplianceusingthe“On/Off”.
2.Press“Function”and–atthesametime,holduntil
theword“SAFE”isdisplayed.
Thechild-prooflockisnowengaged.
NOTE: When the child-proof lock function is active the
time of day and minute minder can only be set.
RELEASING THE CHILD-PROOF LOCK
1.Press“Function”and–atthesametime,holduntilthe
word“SAFE”isclearedfromthedisplay.Thechild-proof
lockisnowreleasedandtheovenisreadytouse.
BEEP ON TOUCH
Thebeepsoundcanbeactivatedanytimewhenasymbol
ispressed.
1.Ensuretheovenisoffbypressing“On/Off”.
2.Press“Function”and+simultaneouslyfor2seconds,
asinglebeepwillsoundtoconfirmtheoperation.
Repeattheaboveproceduretoresetthebeepontouch
mode.Asdefault,thebeepontouchmodeisoff.
SAFETY CUT-OUT FEATURE
Theovenautomaticallyswitchesitselfoffifthetemperature
isnotadjustedortheapplianceisleftoperatingaftera
periodoftime.Theovenswitchesitselfoffafter:
•20hourswhensetbetween30°Cand120°C
•8.5hourswhensetbetween120°Cand200°C
•5.5hourswhensetbetween200°Cand250°C

26
OPERATION
COOKING TEST
GET TO KNOW YOUR NEW OVEN WITH THIS ‘SIMPLE TEST CAKE’
Althoughwestriveforaperfectperformingoven,it’s
possiblethattherewillbesomevariationincolourwhen
baking.Therefore,wesuggestthissimple,easyand
delicioustomakeSimpleTestCake,itcanhelpyou
understandyournewoven.Allovensdosometimeshave
hotorcoldspots,thereforeitisimportanttojudgewith
youreyeasyoumayrequiretorotateduringbaking.
‘SIMPLE TEST CAKE’
125gbutter,softenedtoroomtemperature
1cupcastersugar
1teaspoonpurevanillaessence
4largeeggs
2cupsself-raisingflour
pinchofsalt
4tablespoons(80ml)full-creammilk
METHOD:
1.Butterbaseandsidesoftwo,20cmstraight-sided
roundorsquarecakepans.Thenlinethebasewith
greaseprooforbakingpaper.
2.Preheatoventomoderate‘180ºC’(170ºCfan
forced)andensureovenshelfisinthecentreposition
ofoven.
3.Creamsoftenedbutterandsugaruntillightincolour.
4.Addvanillaessence.
5.Theneggsoneatatime,beatingwellaftereach
addition.
6.Siftflourandsaltintothemixtureandbeatuntil
wellcombined.
7.Addmilkandbeatorstirtocombine.
8.Spoonmixtureequallybetweenpreparedcakepans.
9.Bakeinpreheatedoven,middleshelfforabout25to
35minutesoruntilwhentestedwithafinecakeskewer
itcomesoutcleanortheedgesofthecakeshave
comeawayslightlyfromthesidesofthecakepans.
10.Removefromoventowirecakerackandrestfor5
minutesbeforeremovingfromcakepans.
Coolcompletely.
ToServe:sandwichtogetherwithyourfavouritejamor
conserve,anddusttopwithpureicingsugar.
FOOT NOTE:
If desired substitute butter for either margarine or olive
oil spread. Recipe is based on the Australian standard
metric 250ml cup and 20ml tablespoon sets.
27
COOKING GUIDE
COOKING
•Forbestbakingresultspreheatovenfor30minutes
•Selectthecorrectshelflocationforfoodbeingcooked.
•Thegrilltraycanbeusedintheovenasabakingdish,
exceptinovenshelflocation1.
•Makesuredisheswillfitintotheovenbeforeyou
switchiton.
•Keepedgesofbakingdishesatleast40mmfromthe
sideoftheoven.Thisallowsfreecirculationofheat
andensuresevencooking.
•Donotopentheovendoormorethannecessary.
•Donotplacefoodswithalotofliquidintotheoven
withotherfoods.Thiswillcausefoodtosteamand
notbrown.
•Aftertheovenisturnedoffitretainstheheatforsome
time.Usethisheattofinishcustardsortodrybread.
•Donotusealotofcookingoilwhenroasting.Thiswill
preventsplatteringoilonthesidesoftheovenand
theovendoor.Polyunsaturatedfatscanleaveresidue
whichisverydifficulttoremove.
•Whencookingthingswhichrequireahighheatfrom
below(e.g.tarts),placethecookingdishonascone
trayinthedesiredshelfposition.
•Forspongesandcakesusealuminium,brightfinished
ornon-stickutensils.
•Removeunnecessarytraysordisheswhenroasting
orbaking.
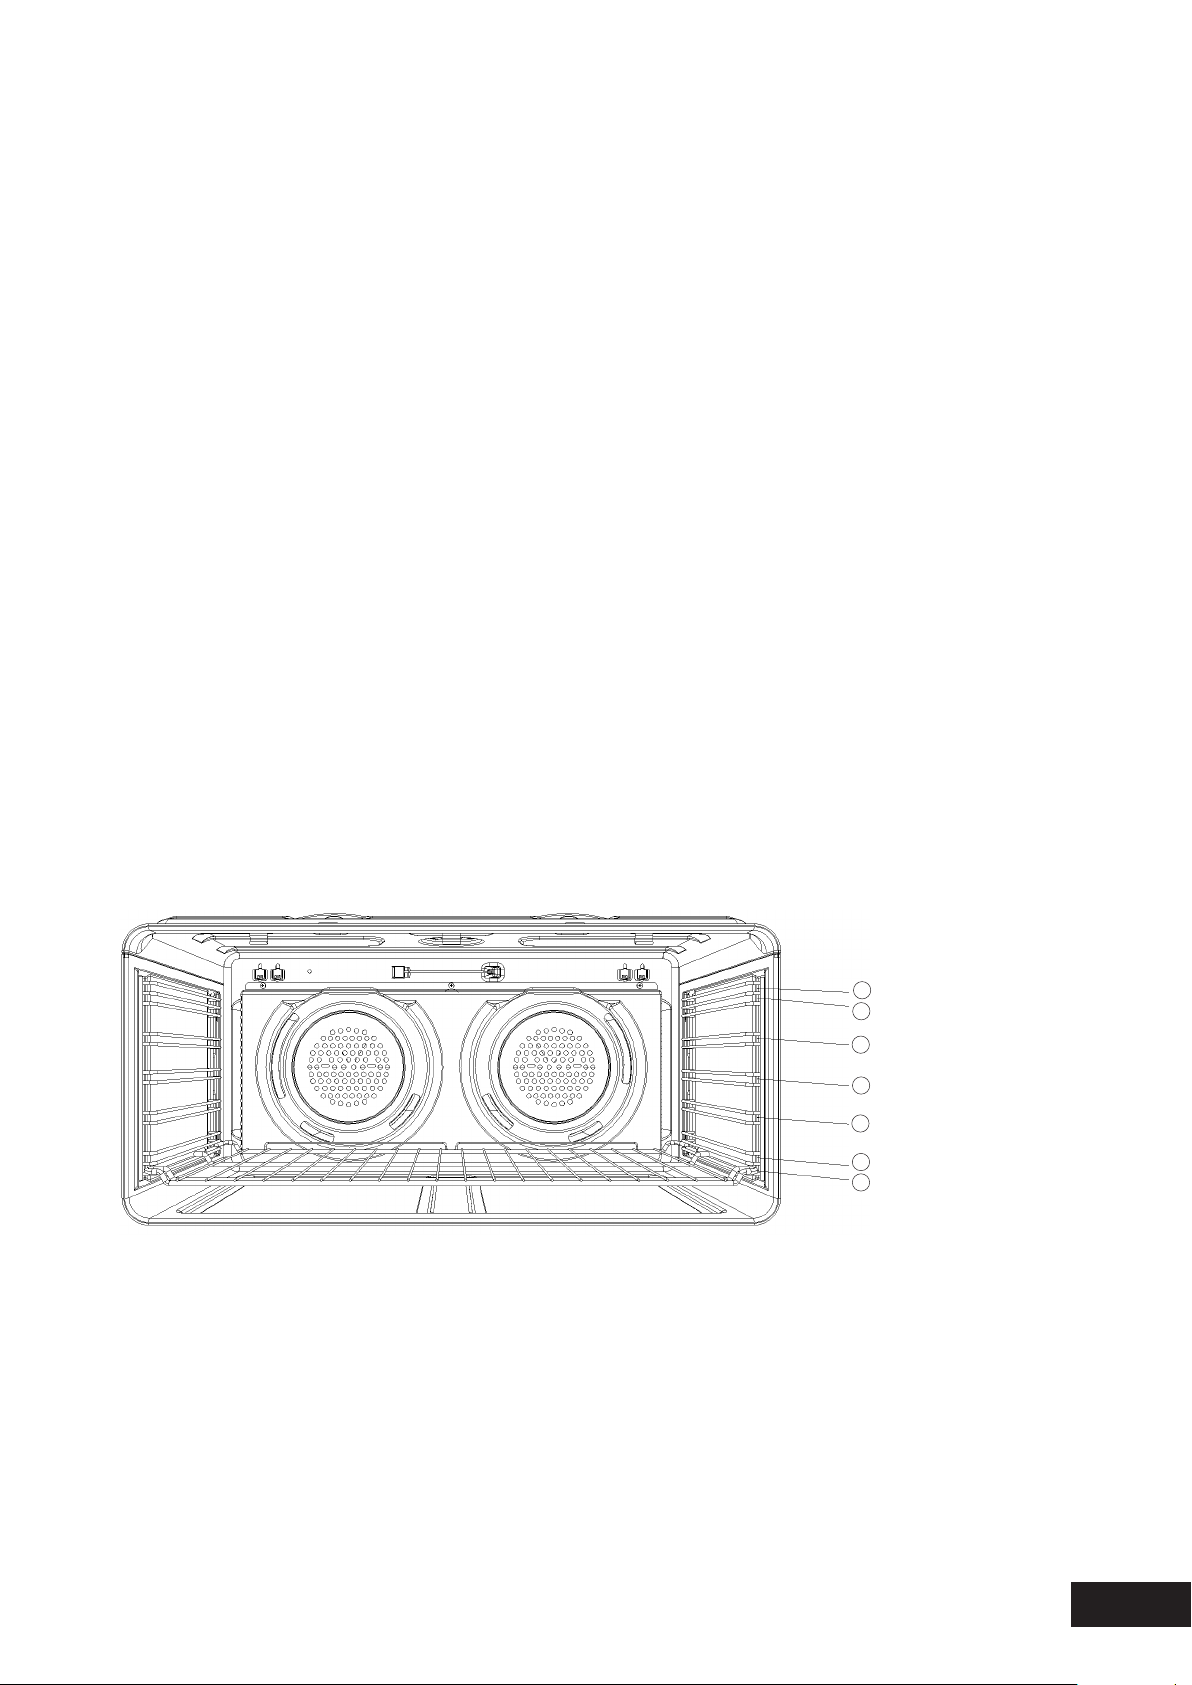
OVEN SHELF LOCATION
Yourovenhassevenpositionsforshelves.
Thesearenumberedfrom1(thelowestshelfposition)
to7(thehighestshelfposition).Seediagram.
Togivemaximumspaceaboveandbelowtheshelves,
loadtheminthisway:
•Whencookingwith1shelf,useposition3or4.
•Whencookingwith2shelves,useposition3and5
Usetheovenefficiently,bycookingmanytraysoffoodat
thesametime.Forexample:
•Cook2traysofscones,smallcakesorsausagerolls.
7
6
5
4
3
2
1
28
COOKING
COOKING GUIDE
CHOOSING THE BEST OVEN SETTINGS
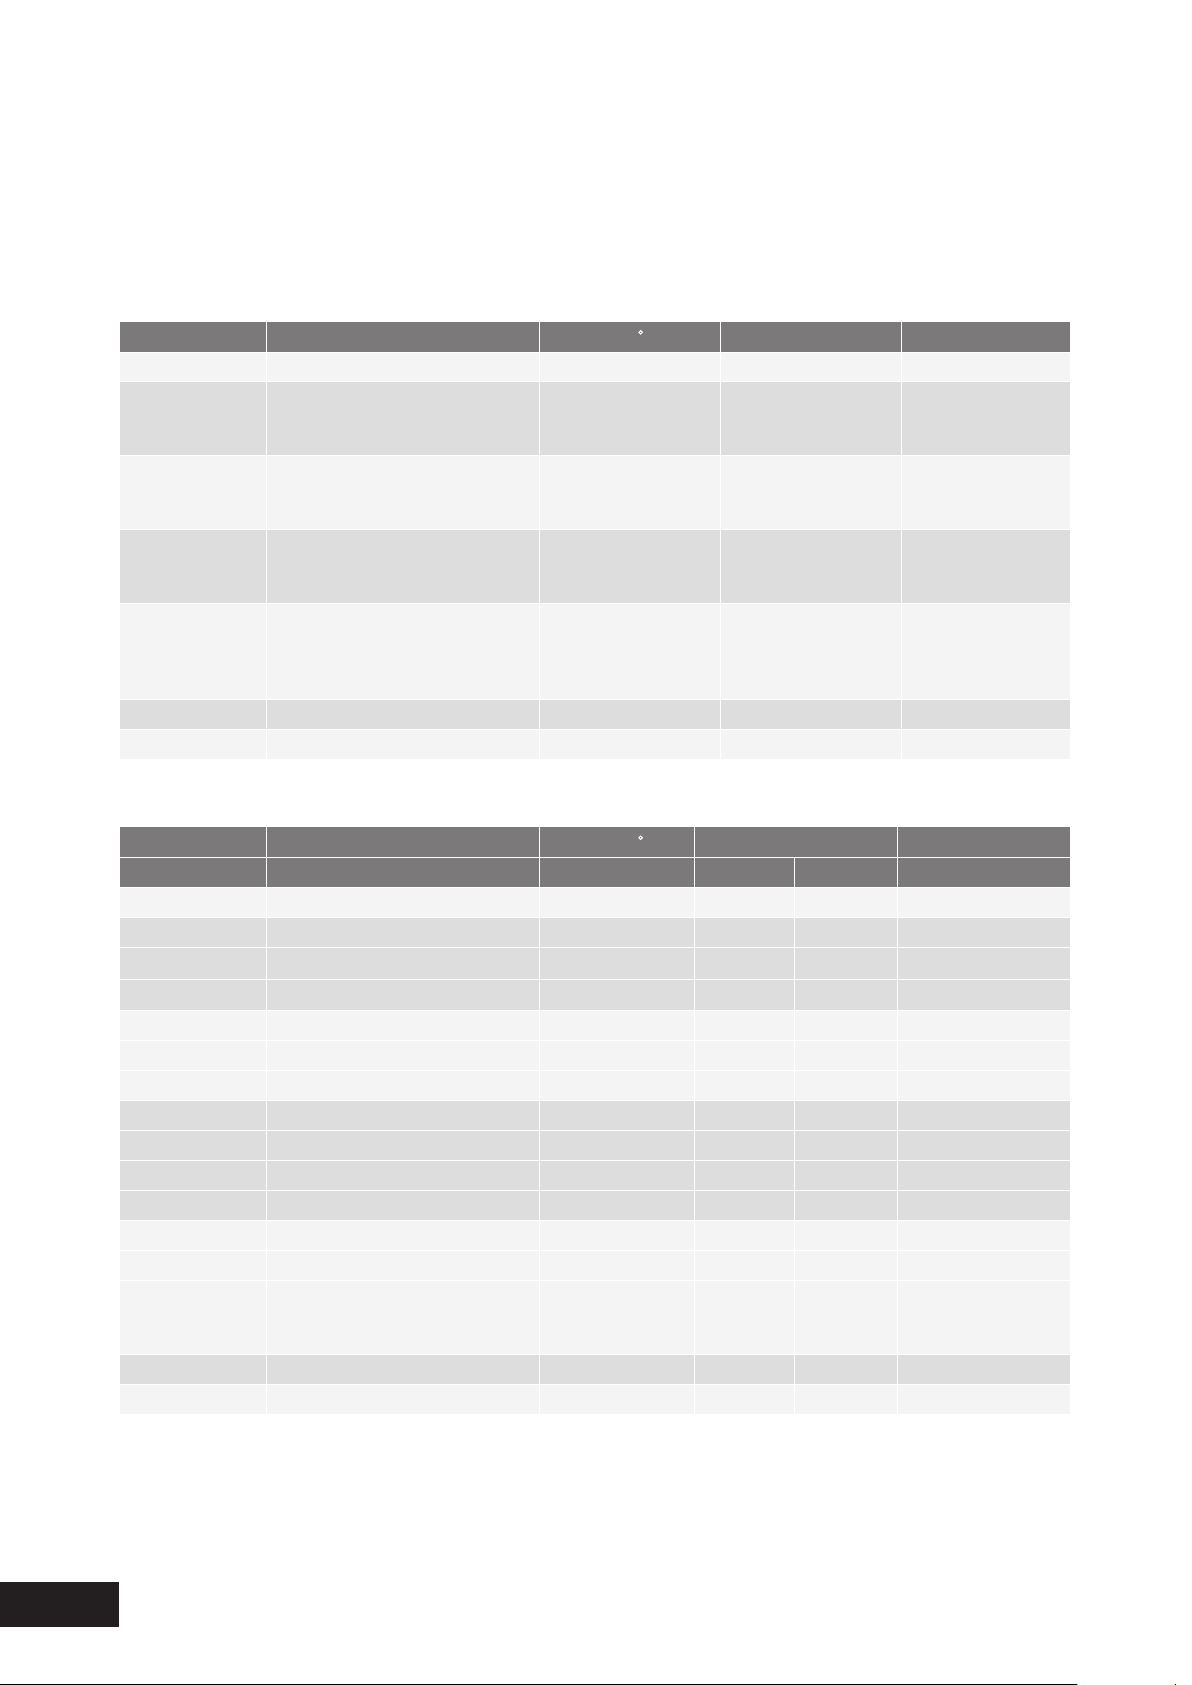
Thefollowingtableisintendedasaguideandexperiencemayshowsomevariationincookingtimesnecessarytomeet
individualrequirements.Werecommendthatyoupreheatyourovenfor30minutes.
MODES WITHOUT OVEN FAN
FOOD TEMPERATURE C OVEN SHELF POSITION* TIME IN MINUTES
SconesPlainorfruit2203or410–15
BiscuitsRolled
Spooned
Shortbreadbiscuits
170
190
160
3
3
3
13–18
13–18
30–35
MeringuesHard–individual
Soft–individual
Pavlova–6egg
110
180
110
3
3
3
90
15–20
75
CakesCupcakes
Sponge–4egg
Shallowbuttercake
190
180
180
3or4
3or4
3
15–20
20–30
25–30
Pastry–shortcrustCornishpasties
Custardtart
200
200/180
3
3
40–45
Pastry8/200
Wholetart10/200
&20/180
Pastry–chouxCreampuffs210325–30
YeastgoodsBread210325–30
MODES WITH OVEN FAN
FOOD TEMPERATURE C OVEN SHELF POSITION* TIME IN MINUTES
SINGLE SHELF MULTI SHELF
SconesPlainorfruit2103or42&510–15
BiscuitsRolled1503or42&513–18
Spooned1803or42&513–18
Shortbread1503or42&513–18
MeringuesHard–individual1003or42&590
Soft–individual1653or42&515–20
Pavlova–6egg1003or42&575
CakesCupcakes1803or42&515–20
Sponge–4egg1703or42&520–30
Shallowbuttercake1703or42&525–30
Richfruitcake1703or42&560
Pastry–shortcrustCornishpasties1803or42&540–45
Custardtart190/1703or42&520–30
WholetartPastry8/190
Wholetart10/190
&20/170
Pastry–chouxCreampuffs2003or42&525–30
YeastgoodsBread20042&525–30
*Countingfromthebottomshelfup.
29
COOKING GUIDE
COOKING
ROASTING MEAT
1.Placethemeatintheovenandsetthetemperature
between180°Cand200°C.(Itisrecommendedto
wrapyourmeatsinanovenroastingbagorfoilto
preventfatsandoilsfromsplattering,makingiteasier
tocleanyouroven.)
2.Usethegrill/ovendishandgrillinsert.
Placethemeatontheinsert.
3.Donotpiercethemeat,asthiswillallowjuicestoescape.
4.Whenthemeatiscooked,taketheroastoutofthe
oven,wrapinaluminiumfoilandleavetostandfor
about10minutes.Thiswillhelpretainthejuiceswhen
themeatiscarved.Thetableshowstemperaturesand
cookingtimesfordifferentkindsofmeat.Thesemay
varydependingonthethicknessorbonecontentof
themeat.
MEAT RECOMMENDED TEMPERATURE MINUTES PER
KILOGRAM
Beef
180°C–200°C
Rare35–40
Medium45–50
Welldone55–60
Lamb
180°C–200°C
Medium40
Welldone60
Veal
180°C–200°C
Welldone60
Pork
180°C–200°C
Welldone60
ROASTING POULTRY AND FISH
1.Placethepoultryorfishinanovensetatamoderate
temperatureof180°C.
2.Placealayeroffoiloverthefishforaboutthree
quartersofthecookingtime.
Thetableshowstemperaturesandcookingtimesfor
differentkindsoffishandpoultry.Thesemayvary
dependingonthethicknessorbonecontentofthemeat.
POULTRY &
FISH
RECOMMENDED TEMPERATURE MINUTES PER
KILOGRAM
Chicken
180°C–200°C
45–50
Duck
180°C–200°C
60–70
Turkey
180°C–200°C
40–45(<10kg)
35–40(>10kg)
Fish
180°C–200°C
20
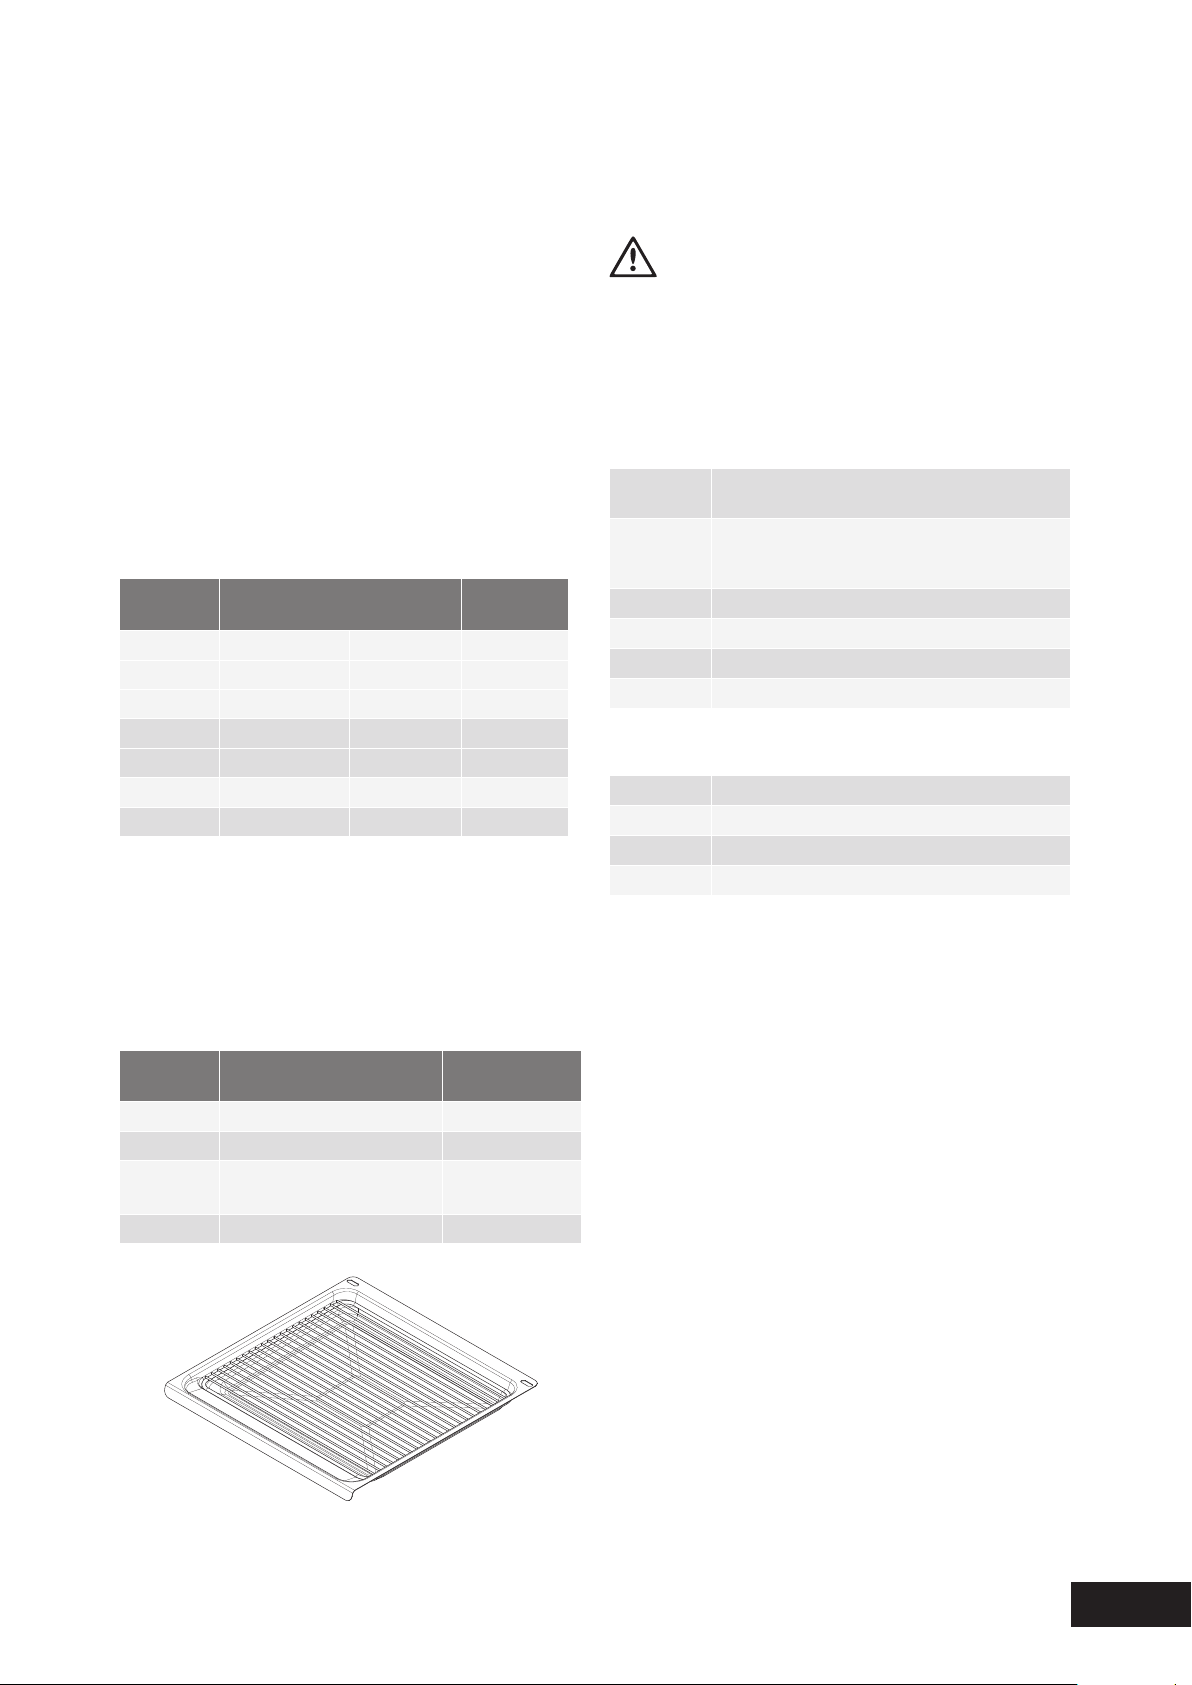
GRILLING GUIDE
NOTE: Always clean the grill/oven dish after every use.
Excessive fat build up may cause a fire.
GRILLING IS CONDUCTED WITH THE OVEN DOOR CLOSED
Asamethodofcooking,grillingcanbeusedto:
•Enhancetheflavoursofvegetables,fish,poultryandmeat.
•Sealthesurfaceofthefoodandretainthenaturaljuices.
Thistableshowshowtogrilldifferenttypesofmeat:
BeefTenderloin,rump,sirloin.Brushwithoilormelted
butter,especiallyifthemeatisverylean.
LambLoinchops,shortloinchops,chumpchops,and
forequarterchops.Removeskinorcutatintervals
tostopcurling.Brushwithoilormeltedbutter.
SausagesPricksausagestostopskinfrombursting.
PoultryDivideintoservingpieces.Brushwithoil.
FishBrushwithoilormeltedbutterandlemonjuice.
BaconRemoverind.Grillflat.
OVEN/GRILL DISH WITH
WIRE RACK INSERT
WARNING
GUIDE TO BETTER GRILLING
Steak15–20minutes
Chops20–30minutes
Fish8–10minutes
Bacon4–5minutes
Nodefinitetimescanbegivenforgrillingbecausethis
dependsonyourowntastesandthesizeofthefood.These
timesshouldonlybeusedasaguideandremembertoturn
thefoodoverhalfwaythroughthecookingprocess.
Forbettergrillingresults,followtheseeasyinstructions:
1.Preheatgrillforatleast5minutes.
2.Chooseonlyprimecutsofmeatorfish.Ifthecutisless
than5mmthickitwilldryout.Ifthecutismorethan
40mmthick,theoutsidemayburnwhilsttheinside
remainsraw.
3.Donotplacealuminiumfoilunderthefoodasthis
preventsfatsandoilsfromdrainingaway,whichcould
resultinafire.
4.Bastethefoodduringcookingwithbutter,oliveoil
ormarinade.Grilledfoodisbetterifmarinated
beforecooking.
5.Usetongstoturnfoodasaforkpiercesthesurfaceand
willletjuicesescape.
FAN GRILL
The“FanGrill”assiststhegrillingprocessbycirculatingthe
heatevenlyaroundthefood.Therecommendedtemperature
settingis180°Cforallfangrillingfunctions.
1.Placethegrilldishonthebottomrack.
2.Placemeat/poultryonanovenshelfabovethegrilldish.
3.Wipeoffanyoilorfatwhichspatterswhiletheoven
isstillwarm.

30
COOKING
PROBLEMS
PROBLEM CAUSES REMEDIES
Unevencooking:•Incorrectshelfposition.
•Oventraytoolarge.
•Traysnotcentralised.
•Airflowinovenuneven.
•Grilldishaffectingthermostat.
–Selectshelfthatputsfoodinthecentreoftheoven.
–Experimentwithothertraysordishes.
–Centretrays.
–Rotatefoodduringcooking.
–Removegrilldishfromovenonbakemodes.
Bakedproductstoobrown
ontop:
•Ovennotpreheated.
•Bakingtinstoolargefortherecipe.
•Bakingtinsnotevenlyspaced.
•Productsnotevenlysizedorspaced
ontrays.
•Bakingtemperaturetoohigh.
–Preheattheoven.
–Usecorrectsizetins.
–Staggerbakingtinsatleast3cmbetweentins
andtheovenwalls.
–Makeintosamesizeandshape,&spread
evenlyovertrays.
–Lowerthetemperature.
Bakedproductstoobrown
onbottom:
•Bakingtinstoolargefortherecipe.
•Bakingtinsaredarkmetalorglass.
•Foodtoolowintheoven.
•Ovendooropenedtoofrequently
duringbaking.
•Bakingtemperaturetoohigh.
•Grilldishaffectingthermostat.
–Usecorrectsizetins.
–Changetoshiny,lighttinsorlowerthe
temperatureby10°C.
–Cookoneshelfhigher.
–Don’topentheovendooruntilatleasthalfthe
cookingtimehaspassed.
–Lowerthetemperature.
–Removegrilldishfromovenonbakemodes.
Cakeshaveacracked,
thickcrust:
•Bakingtemperaturetoohigh.
•Foodtoohighinoven.
•Cakebatterovermixed.
•Pantoodeep.
•Bakingpansdark.
–Lowerthetemperature.
–Cookoneshelflower.
–Mixjustlongenoughtocombineingredients.
–Checksizeofpananduserecommendedsize.
–Changetoshinypans.
Bakedproductsarepale,
flatandundercooked:
•Bakingtemperaturetoolow.
•Foodtoolowinoven.
•Bakingtimetooshort.
•Incorrecttinsize.
–Raisethetemperature.
–Cookoneshelfhigher.
–Increasecookingtime.
–Usecorrectsizetin.
Cakesfalleninthecentre:•Bakingtemperaturetoolow.
•Bakingtimetooshort.
•ProportionsofIngredientsincorrectin
therecipe.
•Openingdoortooearlyinbaking.
–Raisethetemperature.
–Increasecookingtime.
–Checkrecipe.
–Donotopenthedooruntilthelastquarter
ofcookingtime.
Roastmeat&potatoesnot
browninginfanoven:
•Poorhotaircirculation.
•Grilldishaffectingthermostat.
–Elevatefoodontoaracktoallowaircirculation.
–Removegrilldishfromovenonbakemodes.
Juicesrunningoutofmeat:–Donotpiercemeatwithfork,turnwithtongs.
Grilledmeatsovercookedon
outside&rawinthecentre:
–Grillatlowerinsertposition.
Grilledchops&steakscurling:–Cutintofatevery2cm(1/2”).
DEALING WITH COOKING PROBLEMS
(SEE ALSO SOLVING PROBLEMS)

31
CLEANING
WARNING
•Alwaysmakesurethattheoveniselectricallyisolated
beforecleaning.Thiscanbedonebythefunctional
switchnearby
•Donotlinethebottomoftheovenwithfoilorcookware
•Donotusesteamcleaners
STAINLESS STEEL
WARNING
•Theovendoortrim,thecontrolpanelandthestorage
compartmentaredecoratedwithaspecialstainless
steelthatresistsfingermarksandshouldonlybe
cleanedwithwarmwaterandamilddetergent.Do
notusestainlesssteelcleaners,abrasivecleanersor
harshsolventsontheseparts.
NOTE: Make sure you follow the polish or brushing lines
in the stainless steel.
•Allgradesofstainlesssteelcanstain,discolouror
becomegreasy.Youmustcleantheseregularlyby
followingtheproceduresbelowifyouwantyour
appliancetolookitsbest,performwellandhavea
longlife.
•Caremustbetakenwhenwipingexposedstainless
steeledges,theycanbesharp!
•Thestainlesssteelgashobcanbecleanedwith
stainlesssteelcleanersifitbecomessoiledor
discoloured.
•AsuitablecleanercanbepurchasedfromElectrolux
CustomerCareCentres.
GLASS
•Glasssurfacesondoorsandcontrolpanelsarebest
cleanedimmediatelyaftersoiling.
•Adampclothmayhelpremovebakedonfooddeposits.
WARNING
•Thedoorglassonthisapplianceismadefroma
tough,durablematerialthatwithstandsheating
andcoolingwithoutbreaking.However,itmustbe
rememberedthatitisGLASS,itmaybreak.Treatit
accordingly!Shouldyouhaveanyquestionsabout
theglassinyournewappliance,pleasecontactthe
customercarecentrebydialling1300363640.
•Donotuseharshabrasivecleanersorsharpmetal
scraperstocleantheovendoorsincetheycanscratch
thesurface,whichmayresultinshatteringofglass.
GAS HOTPLATE
•Thetrivetscanberemovedforcleaningbycarefully
liftingthemfromthehob.
•Cleanbywashingwithwarmsoapywater.
•Theburnercapsandcrownsarealsoremovablefor
cleaning.
•Ifthecaps,crownsandcupsareheavilysoiled,usea
non-abrasivecleaningcompound.
•Flameportblockagesshouldberemovedbyusinga
matchstickorbrush.
•Donotcleanthemwithabrasiveorcaustictype
cleaners,orcleantheminadishwasher.
CERAMIC HOTPLATE
•Removeallspiltfoodandfatwiththesuppliedrazor
bladescraper,whiletheceramicglassisstillwarmbut
nothot.Wipecleanwithdishwashingdetergentona
dampcloth.
•Ifaluminiumfoil,plasticitemsorhighsugarcontent
foodsareallowedtomeltontheceramicglass,clean
immediatelywiththesuppliedrazorbladescraper
beforethesurfacehascooleddown,otherwisepitting
ofthesurfacecanoccur.
NOTE: Items with high sugar content not only include jam
and fruit, but also vegetables such as peas, tomatoes
and carrots.
•Whentheceramicglassiscool,applyasuitable
cleaner(suppliedwiththeappliance).
•Itisimportanttofollowthecleanermanufacturer’s
instructions.Removeanycleaningresiduefromthe
surfaceasstainingofthecooktopmayoccur.
•Donotuseabrasivespongesorscourers,astheymay
scratchthesurface.
•Anypitting,staining,scratchesorothersurface
deteriorationisexcludedfromthewarranty.
•Allstains/watermarkscanberemovedbyvigorous
cleaning,usingthesuppliedceramiccleaner.
OVEN
•Alwayskeepyourapplianceclean.Ensurethatfatsand
oilsdonotaccumulatearoundelements,burnersorfans.
•Alwayskeeptheovendish,bakingtrays,grilldish
andgrilldishinsertsclean,asanyfatdepositsmay
catchfire.
•Alwayswrapyourmeatsinfoiloranovenroastingbag
tominimisecleaning.Anypolyunsaturatedfatscanleave
avarnish-likeresiduewhichisverydifficulttoremove.
GRILL
•Alwayskeepthegrilldishandgrilldishinsertclean,
asanyfatdepositsmaycatchfire.
CLEANING YOUR APPLIANCE
32
CLEANING YOUR OVEN ACCESSORIES
REMOVING THE TRAYS AND SHELVES FROM YOUR APPLIANCE
•Slidethedishandgrilltraytowardsyouuntilthey
reachthefrontstop.
•Tiltthemupatthefronttoclearthesidesupports,
takingcarenottospillthecontents.
•Liftthemclear.
•Washthetrayandshelvesinhotsoapywater.
•Reversetheabovestepstoputthegrilltrayand
shelvesbackagain.
•Ensurethattheyareplacedbetweenthe2supportwires.
REMOVING THE SIDE RACKS OR SHELF SUPPORTS
•Grasptheshelfsupportatthefront.
•Pullitfirmlyinwards.
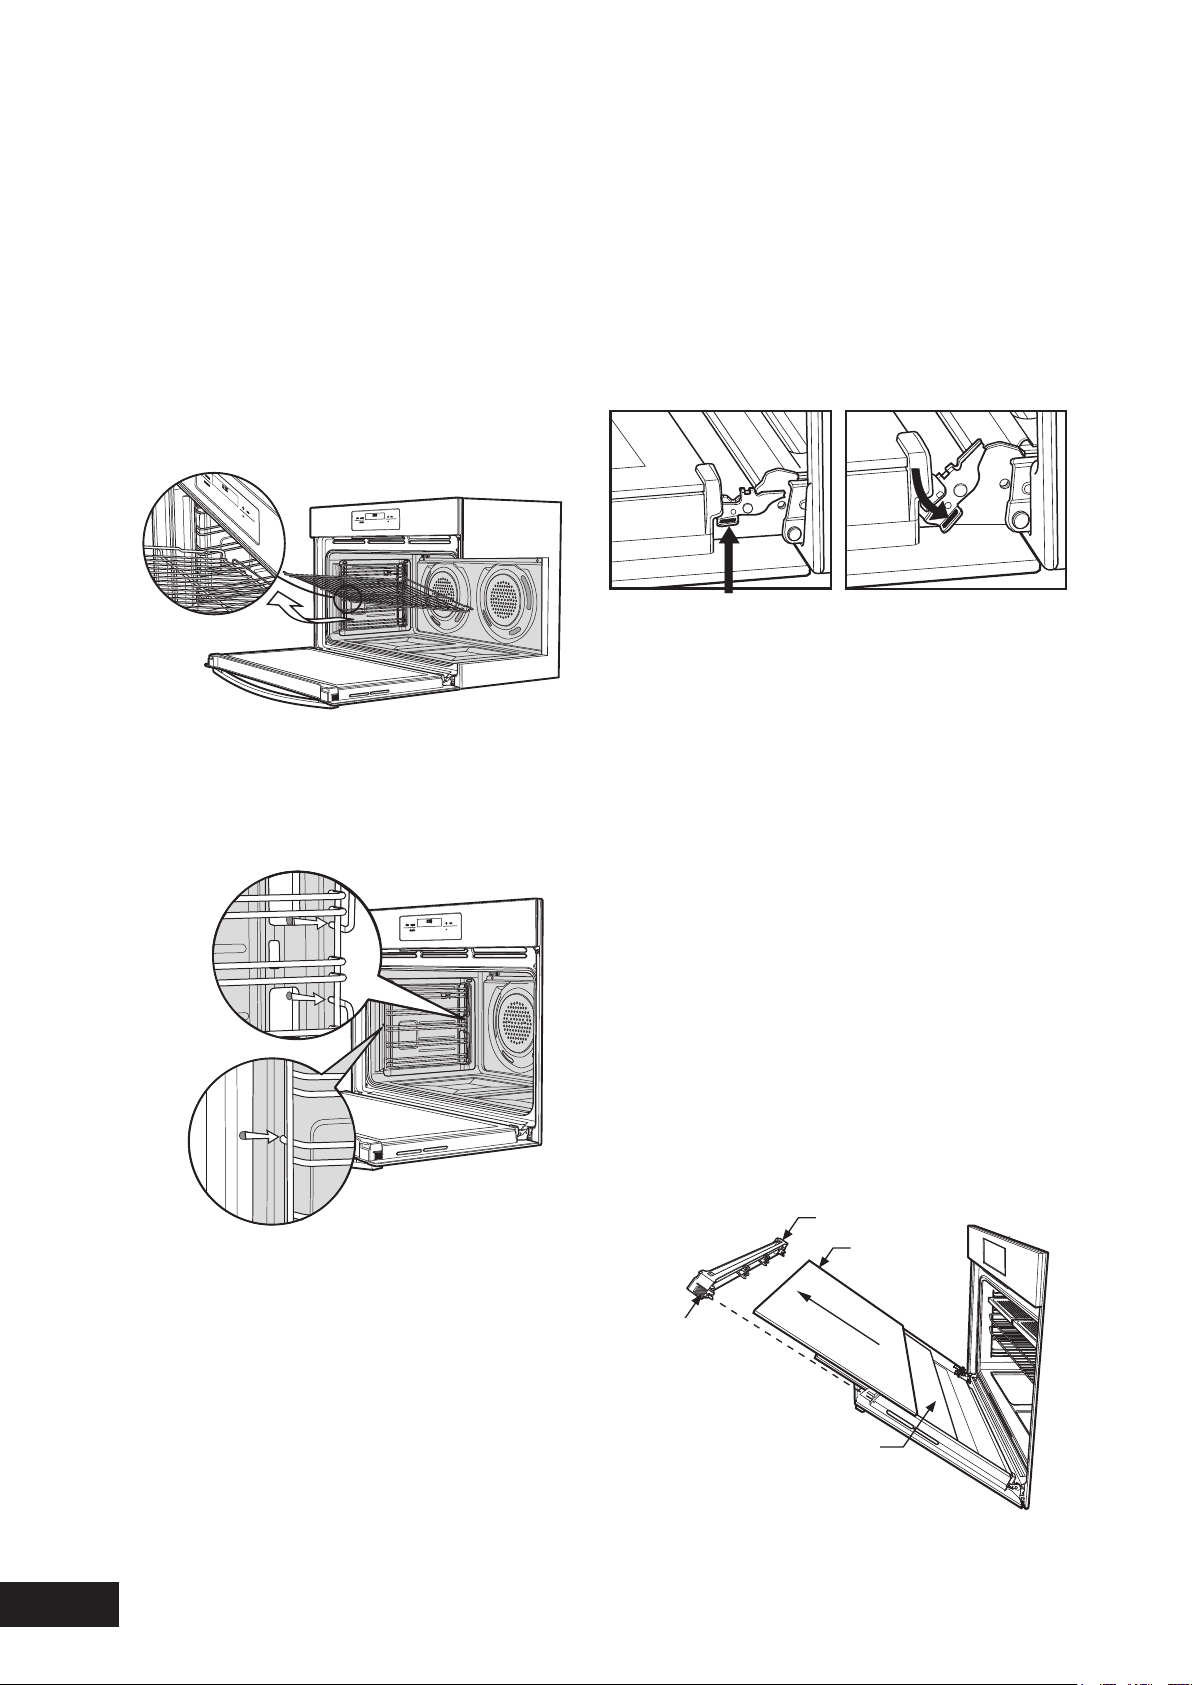
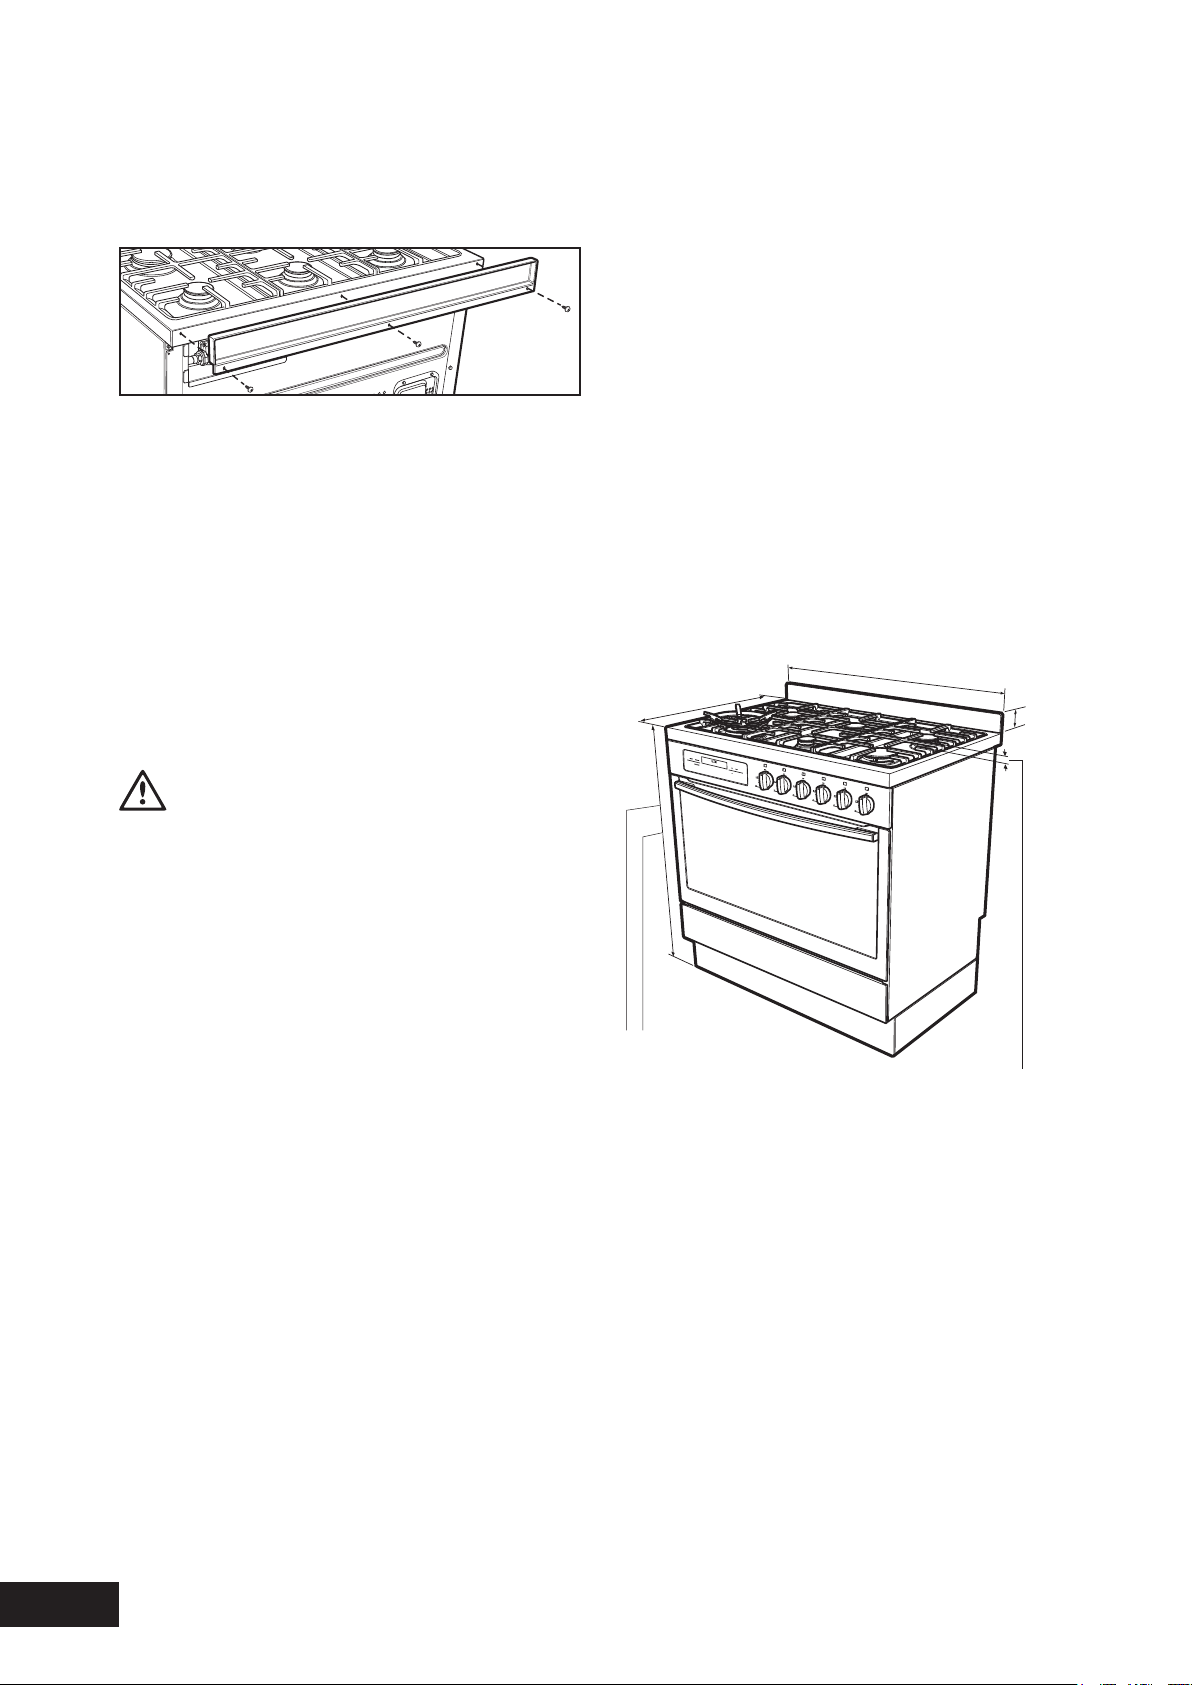
CLEANING YOUR OVEN DOOR
Theovendoorhasbeendesignedtoallowthetwoinner
doorglassestoberemovedforcleaningwithoutremoving
thedoorfromtheproduct.
Removingtheinnerdoorglassforcleaning:
•Openthedoorfullytogainaccesstothehinges
•Pushdownthehingelockingtabasshowninthe
diagramonbothsidesofdoor
•Gentlyclosethedooruntilitstopsinpartiallyopen
positiononthelockingtab(thedoorwillnotfullyclose
withthelockingtabinthedownposition)
•Inthispositionthetopdoortrimcanberemovedby
pushingeachsideontheserratedsurfacetorelease
theclipsandliftthetrimawayfromthedoor
•Toremovetheinnerglass,tilttopofglasstowardsthe
ovenandliftout
•Themiddleglassisremovedinthesameway
•Theinnersideofouterglasscanbecleanedin-situ
wheninnerandmiddleglassisremoved
•Cleanglassusingdetergentandwarmwater,wipe
cleananddrythoroughly
Re-assemblingthedoorglasspanels:
•Replacethemiddleglassbacktothedoor.
Themiddleglassisaclearpaneandorientation
oftheglassisnotimportant
•Replacetheinnerglassbacktothedoor,ensuringthe
sidewithblackceramicpaintfacesawayfromthe
ovencavitywhendoorisclosed
•Fullyopenthedoorandreturnthelockingtabstotheir
normalpositionandclosethedoor
Door top trim
Inner glass
Press here on each
side to release trim clips
Middle glass
CLEANING
Lockingtabup-normalpositionLockingtabdown-forcleaning
Doortoptrim
Innerglass
Presshereon
eachsideto
releasetrimclips
Middleglass
33
CLEANING
CLEANING YOUR OVEN DOOR
WARNING
•DONOTusetheovenwithouttheinnerandmiddle
doorglassfitted.
•NEVERsprayanycausticcleanersonanysurfaceofthe
doorordamagetothesurfacecoatingswillresult.
•DONOTusemetalutensils,scrapers,scourers,or
abrasivecleanerstocleantheglassoranyofthedoor
trims.Thesewilldamageorscratchthesurfacecoatings
anddegradethefinishandappearance.
•DONOTplaceglassindishwasher.
•Useonlywarmwaterandliquiddetergentwithasoft
clothtocleantheglassortrims.
•Beforerefittingtheglasspanestothedoorensurethey
aredriedwithasoftcloth.
•Theglassedgeshavebeenspeciallygroundtoremove
anysharpedges.Howeveritisglass,andshouldbe
handledcarefullytoavoidinjurytoyourpersonand
damagetotheglass.
WARNING
Makesuretheappliancepowerisswitchedoffatthe
isolatingswitchbeforeyouremoveorreplaceparts,toavoid
thepossibilityofelectricshock
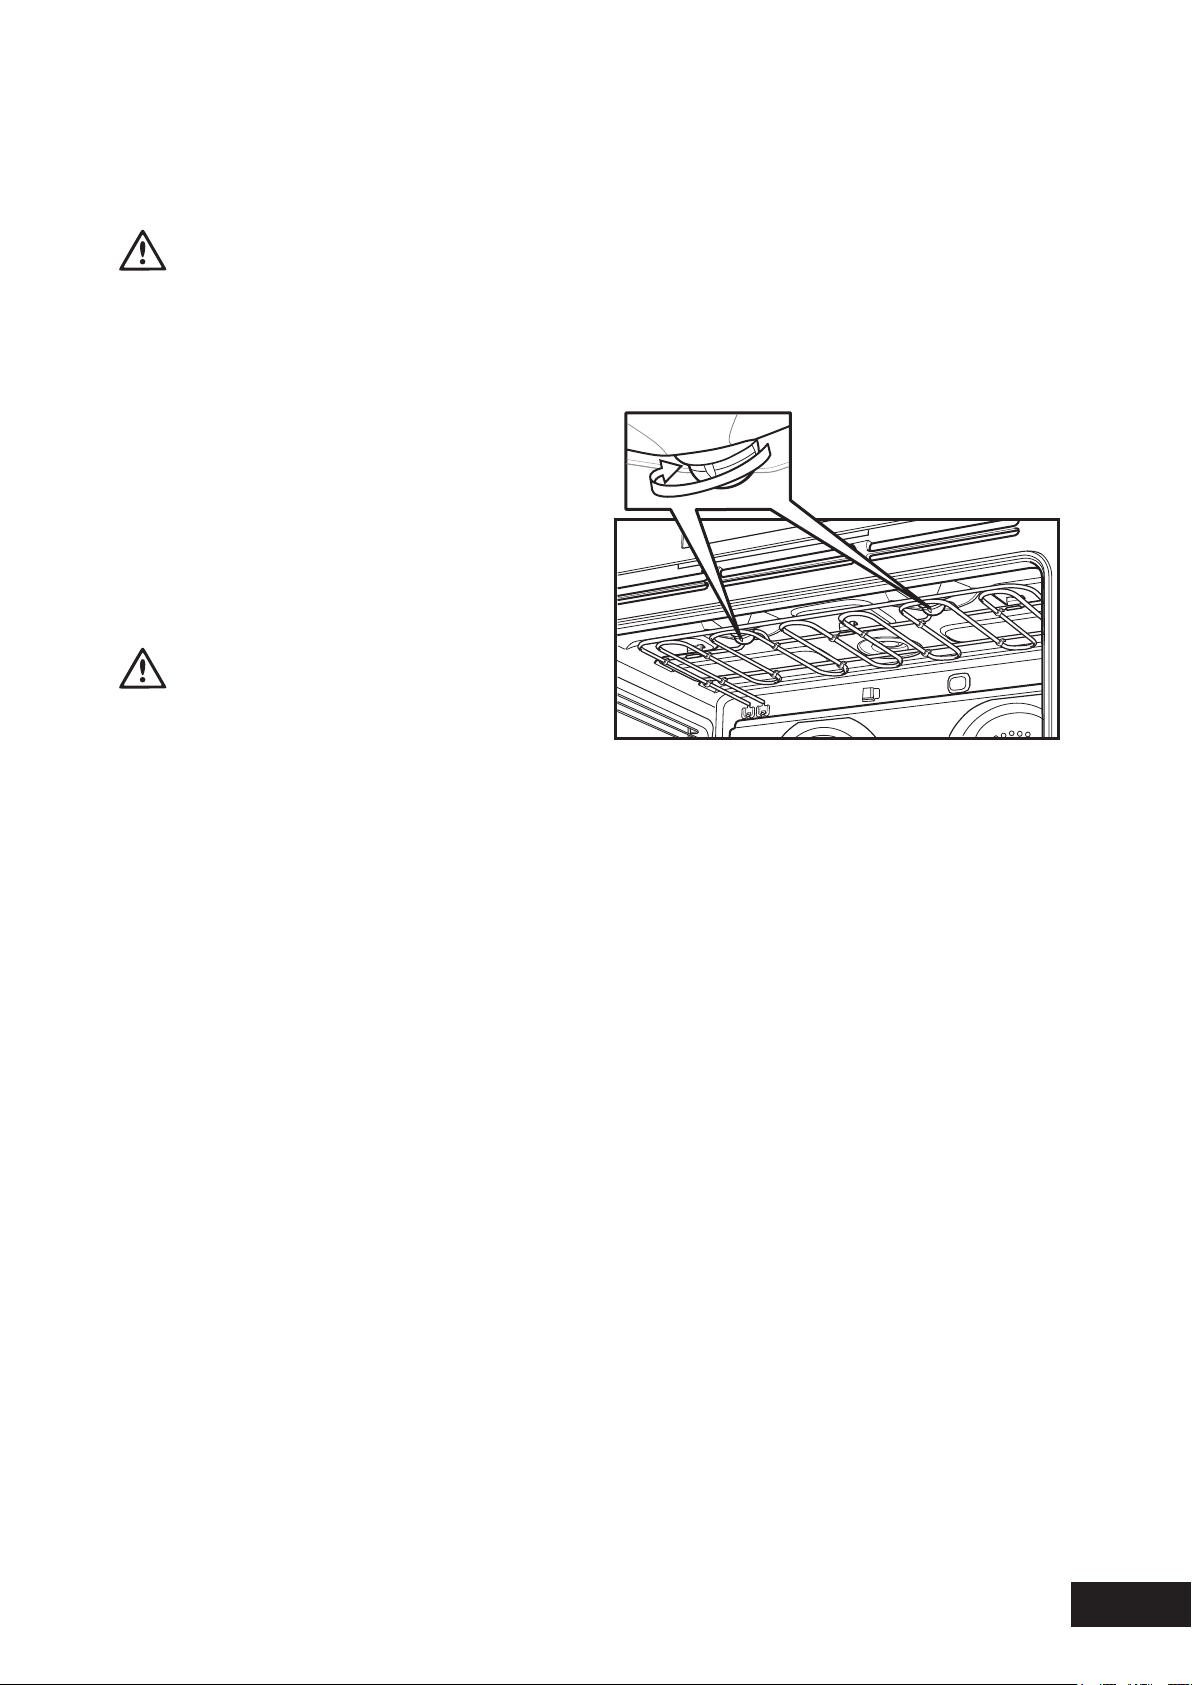
CLEANING YOUR OVEN ACCESSORIES
Lightglasscanberemoved
-turnanti-clockwise
CHANGING THE LIGHT GLOBE
•Thereare2lightglobeslocatedinthetopoftheoven
cavitytowardsthefront.Thelightglobeglassisaccessible
betweenthepassesoftheupperelement.
•Toremove,turnovenlightglassanticlockwise.
•Aspecialhightemperatureresistantglobeshouldbeused.
Thiscanbepurchasedfromthecustomercarecentre.
34
OPERATION
Thecatalyticlinersarecoatedwithaspeciallyformulated
enamelcoating,overabaseofregularenamel.This
enamelcoatinghasaroughsurfacewhichisalsoporous.
Duringnormalcooking,fatsandotherfoodspatteris
partiallyabsorbedintothesurfaceandthenoxidised
away.Thisoxidisationofthefatworksbestiftheoven
issetathightemperatures.Ifyoudoalotoflower
temperaturebaking,sayaroundthenormal180ºC,then
thecleaningprocessmaynotbecomplete.Everynow
andthenyoushouldturntheovenonto260ºCforaround
onehourtocompletelyremovethesoil.
DONOTplacecatalyticlinersinthedishwasher.
CLEANING
Shouldthepanelsbecomeheavilysoiled,theywillneed
tobetakenoutoftheovenandcleanedbyhand.They
shouldbesoakedinwarm,soapywaterforatleast2
hoursandthenwipedcleanwithasoftcloth.
WARNING
•Solidcleaningpowders,creamycleansers,caustic
ovencleaners,steelwoolorotherscourerswillruinthe
catalyticsurfaceandmustNEVERBEUSED.
•Whenrunningtheovenat260°Ctocleanthe
catalyticliners,surfacesundertheseconditionswillbe
hotterthanusualandchildrenshouldbekeptaway.
REMOVING THE CATALYTIC LINERS
•RemoveSideRacks.
•Liftthelineruptodisengagethehooks.
•Thelinersshouldnowbefreetobepulledintowards
thecentreoftheoven.
CATALYTIC LINERS (WHERE FITTED) STORAGE COMPARTMENT (SELECTED MODELS)
Thestoragecompartmentisaccessiblethroughthepivotingdoor.
Unusedovenracksandgrilldishescanbestoredhere.
WARNING
DONOTstoreflammableorcombustibleitemsinthestorage
compartments.Thisisnotacompartmentforwarmingfood.
WVE916SA
CLEANING

35
STORAGE
FAULTS
Ifthereisaproblemwiththeovenand/orgrill,please:
•Checkthepointslistedbelowbeforecallingfor
service.Itmaybepossibletoavoidacallbyfixing
theproblemyourself–andsocontinuecooking.
NOTE: We may charge for service even in the guarantee
period if your problem is due to the causes listed below.
PROBLEM POSSIBLE CAUSE WHAT TO DO
OvenorgrillnotworkingPowernotturnedon.Switchonelectricity
HouseholdfuseblownCheckfuses
ControlsincorrectlysetResetcontrols
CircuitbreakertrippedCheckcircuitbreaker
ClocknotsetSettimeofdayontimer
OvennotheatingenoughFoilortraysonbottomofovenRemovefoilortrays
LightandfansoncontinuouslyTimernotinmanualmodeSettimertomanualmode
OvennotworkingTimernotinmanualmodeSettimertomanualmode
HouseholdfuseblownCheckfuses
OvenlightnotworkingHouseholdfuseblownCheckfuses
CircuitbreakertrippedCheckcircuitbreaker
LampblownorlooseinsocketReplaceortightenlamp
CookersmokingwhenfirstusedProtectiveoilsbeingremovedTurngrillonhighfor30minsandthenthe
ovenon220°Cfor1hour
Toomuchcondensationbuilding
upwhenbaking
ToomuchwaterusedwhencookingReduceamountofwater
Leaveovendooropenaftercooking
SmellswhenfirstusingovenProtectiveoilsbeingremovedThisisnormal
TimerflashingPowerfailureorinterruptionResettimeofday
Burnerwillnotlighteventhough
thesparkerisworking
Knobnothelddownlongenoughin
‘High’positionforflamesafeguard(where
fitted)toengage
Repeatlightingprocedureandholdknobdown
for5secondsin‘High‘position
GassupplyvalveturnedoffTurnongassupplytoappliance
WrongknobturnedoffEnsuretheknobyouareturningcorrespondstothe
burneryouwanttolight
PortblockageinignitionareaEnsuretheportsintheignitionareaarecleananddry
IgnitionsparkplugswetordirtyDryorcleanignitionsparkplugs
Nosparkisobtainedwhen
controlknobisactivated
Electricitysupplyisdisconnectedor
switchedoff
Switchonelectricityorcheckfuses
IgnitionsparkplugswetordirtyDryorcleanignitionsparkplugs
FlamesunevenortendingtoliftFlameportsblockedorwetCleanordryflameports
BurnerincorrectlyfittedEnsurethiscomponentisfittedcorrectly
Flamesnotstayingonwhenknob
released
Knobnothelddownlongenoughin
‘High’positionforflamesafeguard
(wherefitted)toengage
Repeatlightingprocedureandholdknobdown
for5secondsin‘High‘position
Knobnotsetbetween‘High’and‘Low’KnobMUSTbesetbetweenthesepositions
Dirtorspillageonflamesafeguardsensor
(wherefitted)
Cleanflameguardsensortip
Lowheat,slowcookingIncorrectcookingpotorpanbeingusedRefertocooktopsectionforcorrectselection
BenchtoporknobsoverheatingIncorrectcookingpotorpanbeingusedRefertocooktopsectionforcorrectselection
PotorpannotlocatedonburnerproperlyEnsurepotorpaniscentrallylocatedonburner
SOLVING PROBLEMS
FURTHER INFORMATION
Whenyouneedinformation,serviceorreplacementpartsorhave
awarrantyenquiry,pleasecontacttheCustomerCareCentre:
•Australia-1300363640,8.00am-5.00pm
ESTMondaytoFriday
•NewZealand-095732384,8.00am-5.00pm
ESTMondaytoFriday
Pleasehavethefollowinginformationready:Model,
ModelNumber&SerialNumber.Thisisshownonthe
dataplatewhichisvisiblewhentheovendoorisopen.
NOTE: Only authorised personnel should carry out servicing. If the household fuse continues to blow, call the Customer Care Centre.
In the event of a power failure the gas burners may be lit with a hand held igniter and used. Take care to avoid letting unburnt gas
flow for more than 5 seconds when attempting to light the burner.
36
PROBLEMS
INSTALLATION OF THE APPLIANCE
CABINET REQUIREMENTS
ModelsWFE912,WFE914,WFE916,&WFE946are
designedtofitintoa900mmwidegapbetweenstandard
kitchencabinets.Theapplianceintegrateswiththekitchen
cabinetsbymatchingtheheight,depthandkickpanel.
Thecookermayalsobeinstalledattheendofalineof
benchesorwithafreespaceeitherside.Inaddition,a
slot-intypeinstallationiscateredforallowingacontinuous
cabinetrykickpaneltobeused.ModelWVE916
isdesignedtobebuiltintocabinetryeitherbelowa
benchtoporintoaverticalcabinet.
•FormodelWFE946,theminimumclearancetoaside
wallwhichextendsabovetheceramiccooktopis
100mm.
WARNING
•Thecookermustbeinstalledandservicedonlybyan
authorisedperson
•ACertificateofComplianceMUSTbesuppliedtobe
keptbythecustomer
•Thepackingmaterialsmustberemovedbeforeyou
installthecooker
•Thesurroundingkitchencabinetsmustbeable
towithstand85°C.ElectroluxWILLNOTaccept
responsibilityfordamagecausedbyinstallationinto
kitchencabinetswhichcannotwithstand85°C.
•ThepipesusedforinstallationMUSThavesufficientloops
sothecookercanbemovedforservice(gasmodels).
•Thevents,openingsandairspacesMUSTNOTbeblocked.
•Theanti-tiltbracketsandchainorfrontstopsMUSTbe
installedtoavoidaccidentaltipping(floormounted
andslot-inmodels)
•YouMUSTNOTliftorpullthecookerbythedoorhandle
•ThecookerMUSTbecheckedeveryfiveyears
GAS MODEL CLEARANCE REQUIREMENTS
MODELS WFE912, WFE914 &WFE916
•Ensuretheapplianceisinstalledinaccordancewith
clauses6.2.5and6.10.1.1ofAS/NZS5601.1or
clauses6.9.1and6.9.5ofAS/NZS5601.2with
regardtoclearancestocombustiblesurfacesand
materials,andclearancestorangehoodsandexhaust
fans,toensureclearancesof200mmfromburners
toverticalcombustiblesurfacesobservetheminimum
dimensionof100mmfromeachsideofthecookerto
combustiblesurfaces.
•Clearancestocombustiblesurfacesmaybereduced
ifcombustiblesurfacesareprotectedinaccordance
withclause6.10.1.2ofAS/NZS5601.1,orclause
6.9.2ofAS/NZS5601.2.
•Whensettingthecookerheight,ensurethetopof
thecookerisatleast10mmhigherthanthelevel
ofthebenchtop.
INSTALLING SPLASHBACK (MODELS WITH HOB ONLY)
Fitsplashbacktorearofhobwiththreescrewsprovided.
Gashob910mm
(adjustable910-930mm)
Ceramichob906mm
(adjustable906-926mm)
600mm
895mm
60mm
15mm(heightof
trivetabovehob)
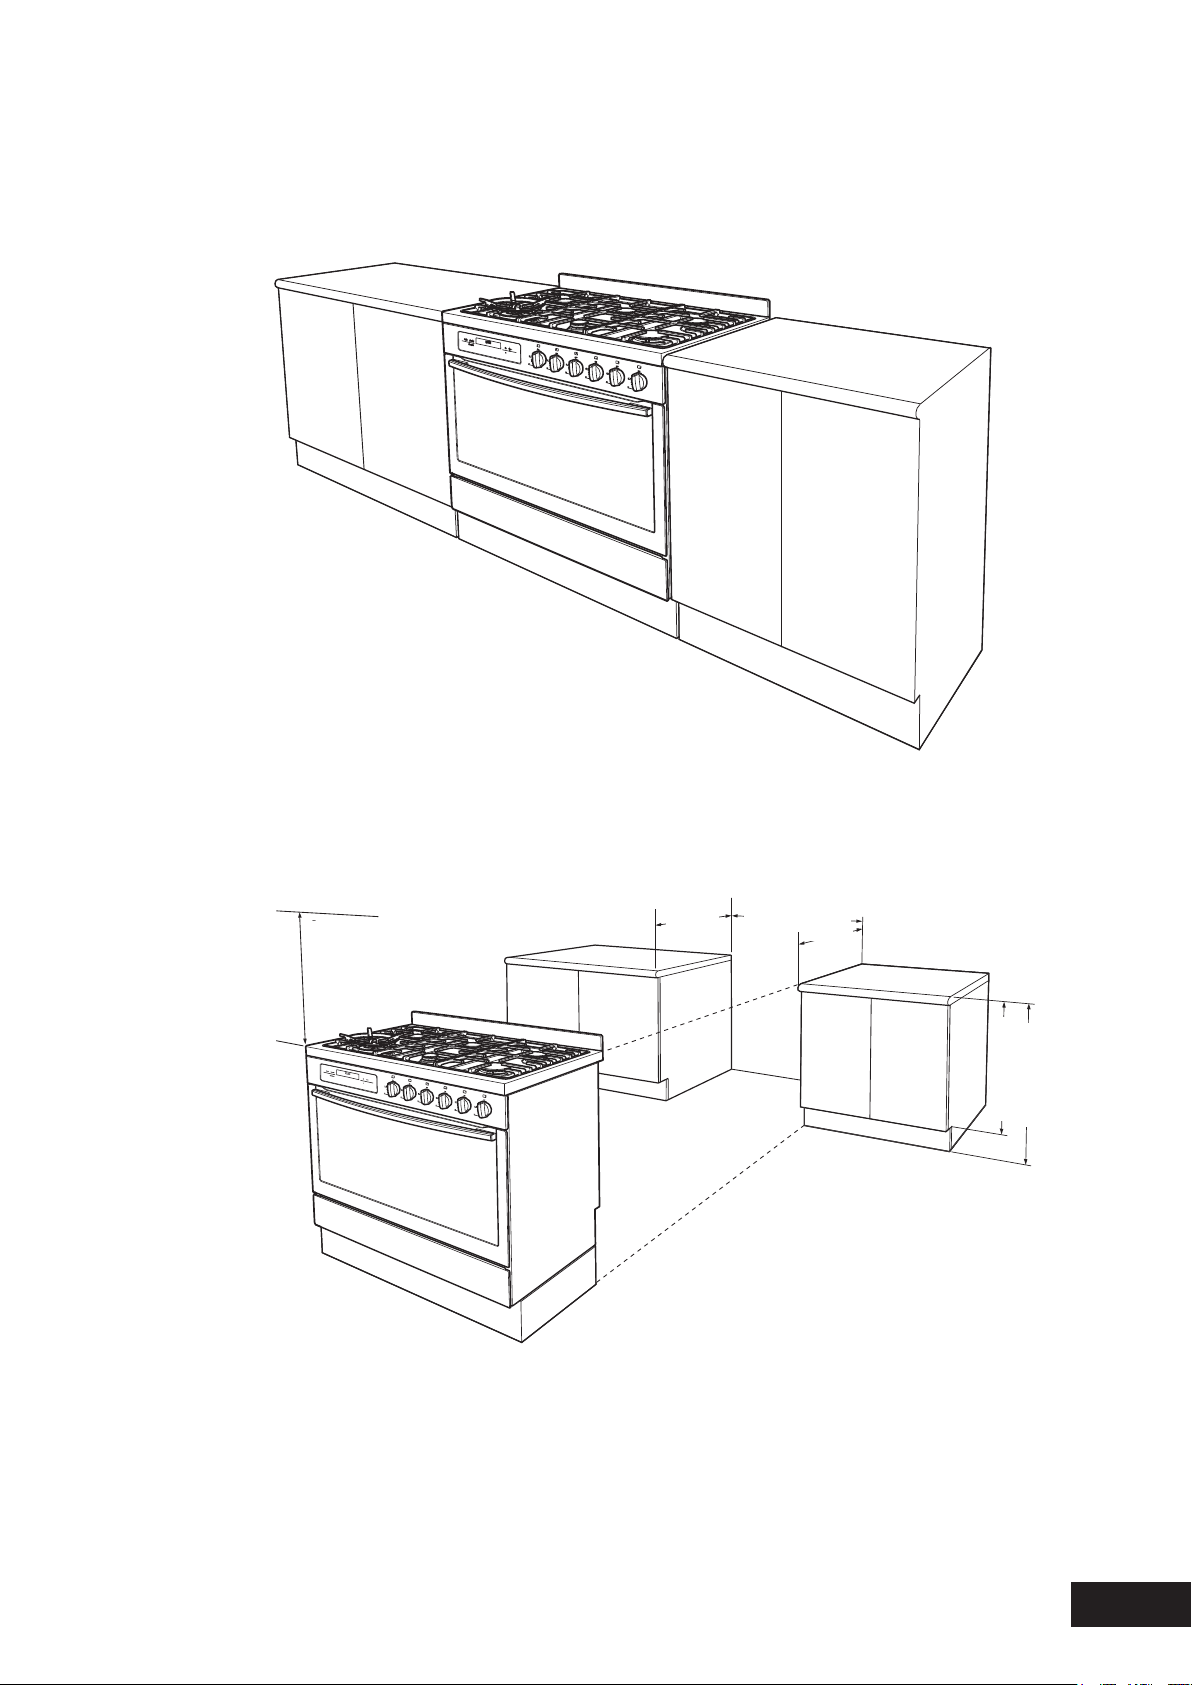
37
INSTALLATION
INSTALLATION OF THE APPLIANCE
Thefloormountedtypeinstallationusestheapplianceas
supplied,andcanbefittedinbetweencabinets,with
cabinetsononesideorwithoutadjacentcabinets.There
isnoclearancerequirementtoadjacentsidecabinets.
Toensurecookerstability,theanti-tiltbracketsmustbe
installed,andtheendofchainattachedtotheappliance
mustbeplacedontohookattachedtotherearwall.
600mm minimum
vertical clearance
from combustible
surfaces
600mm
900mm minimum
755mm NOM
900mm NOM
600mm
FLOOR MOUNTED INSTALLATION
600mmminimum
verticalclearance
fromcombustible
surfaces
600mm
600mm
900mmNOM
755mmNOM
900mmminimum
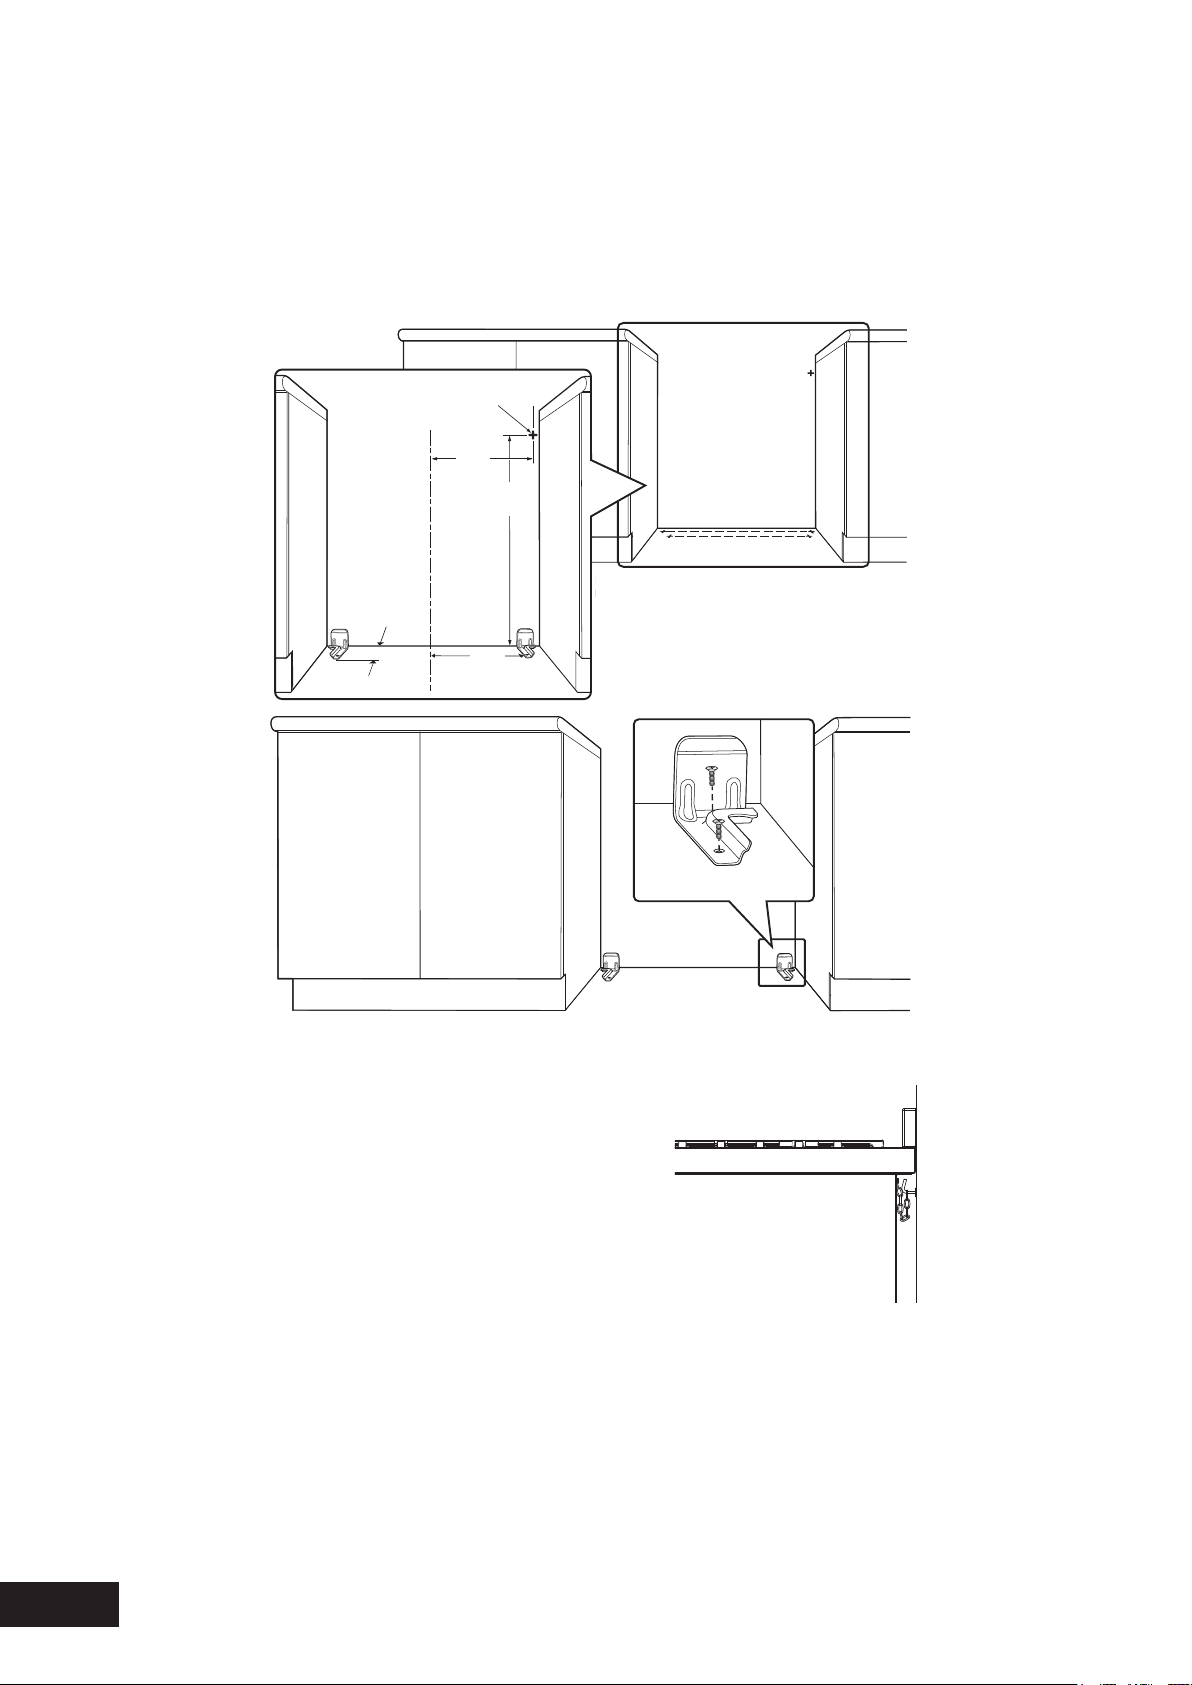
38
INSTALLATION
INSTALLATION OF ANTI-TILT BRACKETS AND HOOK
•Theanti-tiltbracketsmustbesecuredtothefloorat
rearofcavitywithanappropriatefasteneraccording
todimensionsindiagram
•Thehookistobesecuredtothebackwallinthe
locationshownabovewithanappropriatefastener
capableofwithstandinga10kgload
•Connectservicestotheappliancepriortoplacing
intocavity
•Tolocateappliance,slideintocavityandensuring
therearleftandrightfootofappliancearecaptured
bytheanti-tiltbrackets
•Beforetheapplianceisfullypushedintoposition,
placethechainattachedtotherearofappliance
ontothewallhook
Appliance
Wall
Chaininstalled
INSTALLATION OF THE APPLIANCE
Hook
Measurements are to be adjusted to account for the thickness of any skirting
board or tiles coming between the back of the appliance and the wall.
C
L
425
194
376
Holelocationfor
hookinstallation
425
840
376
Measurementsaretobeadjustedtoaccountfor
thethicknessofanyskirtingboardortilescoming
betweenthebackoftheapplianceandthewall
194
FLOOR MOUNTED INSTALLATION (continued)

39
INSTALLATION
SLOT-IN INSTALLATION
INSTALLATION OF THE APPLIANCE
TO REMOVE THE APPLIANCE KICK PANEL
•Removeallloosepartsie.Burnercrowns&caps,
trivets,ovenshelves
•Carefullylaydowntheapplianceontoonesideonto
foampackagingandremovethescrewsasshown
fromeachcornerbracket
• Oncethekickpanelisremoved,fitremovedscrews
backontotheapplianceinthesamelocations.
Remove 4 screws on
each corner bracket
SLOT IN CONVERSION
Toconverttheapplianceforslotininstallationthekickpanel
providedontheapplianceisremovedandtheapplianceis
mountedonaplinth.Thisenablesacontinuouscupboard
kickboardtobeinstalled,givingamoreintegrated
appearance.Thereisnoclearancerequirementbetween
ovenandadjacentsidecabinets.
This surface is to be level
with the top edge of the kickboard
600mm minimum
vertical clearance
from combustible
surfaces
600mm
900mm minimum
755mm maximum
895mm
Remove4screwson
eachcornerbracket
600mmminimum
verticalclearance
fromcombustible
surfaces
600mm
755mmmax
900mmminimum
Thissurfaceistobelevelwith
thetopedgeofthekickboard

40
INSTALLATION
INSTALLATION OF THE APPLIANCE
INSTALLATION OF ANTI-TILT BRACKETS AND STOPS
•Thebracketsaretobesecuredtothebackwallwith
appropriatefasteners.
•Thebottomedgeofthethebracketsrestonthe
horizontalsupportsurface.
•Twostopsaretobescrewedtotheplinthinlocations
asshown(stopsprovided).Thestopslocateintoslotsin
thebaseoftheappliancetopreventtheproductfrom
beingpulledforwardwheninstalled.
•Measurementsfromtherearwallaretobeadjustedif
therearetilesetc.thatcomebetweentheappliance
andthewall.
•Onceservicesareconnected,productcanbelifted
ontotheplinthandpushedbackcarefully,ensuringthe
applianceengagesintobothbracketsattherearand
thefrontstops.
•Iftheproductrequiresremovalforservice,itmustbe
liftedatthefrontapproximately5mmtoclearthefront
stopspriortobeingpulledforward.
+
+
+
+
+
+
+
+
Location of
holes for front stops
Measurements are to be adjusted to account for the thickness of any skirting
board or tiles coming between the back of the appliance and the wall.
4
7
5
C
L
414
183
INSTALLATION SEQUENCE FOR FLOOR MOUNTED
OR SLOT IN INSTALLATION
•Checkthattherequiredservicesarecorrectly
positioned(seeelectrical&gasservicesrequirements)
•Ensurecabinetryhasthecorrectdetails
•Installanti-tiltbracketsandchainhookorfrontstops
asappropriate
•Removeallpackagingfromcooker,removeallloose
partsie.Trivets,burnercrowns,ovenshelves.
•Removeplasticfilmfromcooker.
•Fitsplashbacktocooker
•Slidecookerintopositiontocheckfitmenttoanti-tilt
bracket.Forfloormountedinstallation,checktheheight
andlevelofthecooker.Adjustcookerfeetasrequired.
•Connectgasandelectricalservices
•Placeintoposition
•CompleteCertificateofCompliance.
183
414
475
Locationofholesforfrontstops
Measurementsaretobeadjustedtoaccountforthethicknessofanyskirting
boardortilescomingbetweenthebackoftheapplianceandthewall
Frontstops
SLOT-IN INSTALLATION (continued)

41
900mm
864mm
Cupboarddoor
Cupboarddoor
580mmminimum
Inllpanel
Inllpanel
INSTALLATION
BUILT-IN INSTALLATION
CABINET CONSTRUCTION FOR BUILT IN OVEN
Forthebestintegrationwithinakitchen,installthis
applianceinacupboardthatgivesaflushfitwiththe
surroundingcupboardfronts.Arecessof20mmisideal.
Alternatively,theovencanbeproudmounted.See
diagramsbelowfordetails.
NOTE: Your appliance must be mounted on a flat surface
for the full width and depth of the product.
895mm
596mm
586mm
552mm
572mm
900mm
864mm
Cupboarddoor
Cupboarddoor
560mmminimum
Flush mount option
Proud mount option
Oven Dimensions
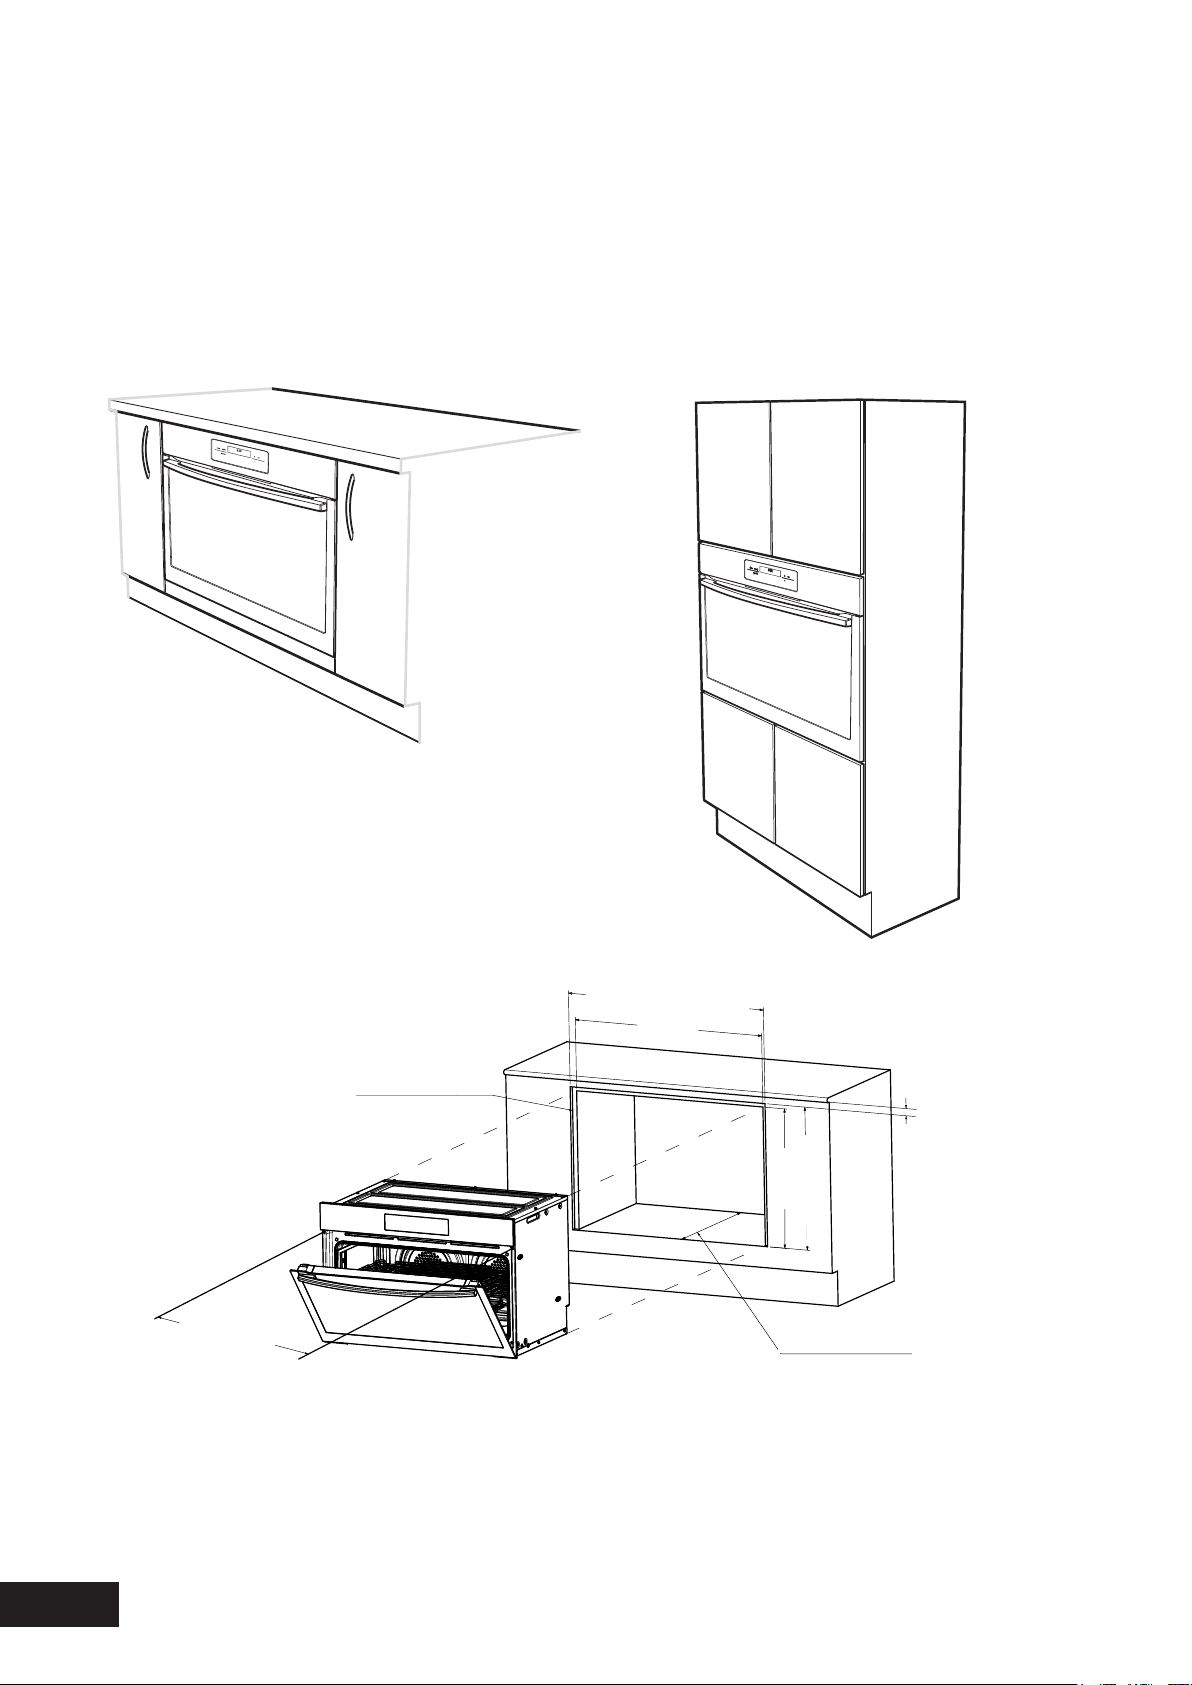
42
INSTALLATION
INSTALLATION OF THE APPLIANCE
NOTE: The appliance must be fixed into position when
installed by fitting 2 screws provided through mounting
holes into cabinet.
If a power point is fitted it must be accessible with the
appliance installed.
UNDERBENCH INSTALLATION
Yourunderbenchovenlooksbestwhenthecontrolpanel
isdirectlyunderthebenchtop.Anupperinfillpanelmay
beaddedifthecooktopplacedabovethebenchtopis
toodeep.*Refertocooktopinstallationinstructionsfor
requiredclearancebetweencooktopandoven.
VERTICAL CABINET INSTALLATION
Theovencanbebuiltintoaverticalcabinetinthesame
mannerasanunderbench.Therequiredcavitydimensions
arethesameandtheproductissecuredtothecabinetin
thesameway.
590mm
864mm
*Refercooktop
installationrequirements
876mm
Mountingholes
600mmush
mountonly
580mmminimumushmount
560mmminimumproudmount
Recesson3sidesrequired
forushmountonly
900mmushmountonly

43
INSTALLATION
WIRING REQUIREMENTS
ThecookerMUSTbeinstalledincompliancewith:
•wiringconnectionsinAS/NZS3000WiringRules
•localregulations,municipalbuildingcodesandother
statutoryregulations
For New Zealand Only:
Thecookingrangemustbeconnectedtothesupplyby
asupplycordfittedwiththeappropriatelyratedplug
thatiscompatiblewiththesocket-outletfittedtothefinal
sub-circuitinthefixedwiringthatisintendedtosupply
thiscookingrange.
Supplycordsizerequired
WFE912/WFE914/WFE916/WVE9161.5mm
2
WFE9466.0mm
2
•AfunctionalswitchMUSTbeprovidednearthe
applianceinanaccessibleposition(AS/NZS3000
-Clause4.7.1).
•WiringMUSTbeprotectedagainstmechanicalfailure
(AS/NZS3000-Clause3.9).
•Thecookerrequiresameansofallpoledisconnection
incorporatedintothefixedwiring.ThisMUSThavea
disconnectiongapof3mm.
•ThecookerMUSTbeproperlyearthed.
NOTE : When connections are made to a multi-phase
230/240V supply, the bridge piece MUST be
removed from between the active connections.
TIPS & INFORMA
TION
BEFORE YOU COOK IN YOUR NEW OVEN IT IS IMPORTANT
THAT THE PROTECTIVE OILS USED IN THE MANUFACTURE OF THE
PRODUCT BE REMOVED.
•Makesurethattheroomiswellventilated(toallow
smoketoescape).
•Runthegrillonhighfor30minuteswithoutgrilldish.
•Thenruntheovenon220°Cfor1hour.
CONNECTING TO SERVICES AND COMMISSIONING
Thisappliancemustbeinstalledbyanauthorisedperson,
accordingtoallcodesandregulationsof:
•Electricalsupplyauthorities.
•Buildingregulations
•Localgovernmentandcouncilauthorities.
•AS/NZS5601.1(particularattentionto6.10.1and
figure6.3,andclause6.10.1.11).
•AS/NZS3000(particularattentiontoclause4.3.11
andclause3.9).
HARD WIRING DETAIL
1.Removeterminalcoverplatefromrearpanelof
appliance.
2.Fitwiresthroughholeincoverplateandmake
connectionstoterminals.
3.Engagewiresintoplasticclip.Secureplasticclipwith
twolongsilverscrews(suppliedinseparatebag).
4.Replacecoverplateontorearpanel.
Dataplategivesinformationaboutrating
islocatedbehindthebottomofthe
ovendoor
Circuitdiagramislocatedonthebackpanelofthe
appliance
ELECTRICAL CONNECTION LOCATION - MODEL WVE916
Entrypointofelectricalcable
99
113
Securingpoints
Plasticclips
Plasticclip
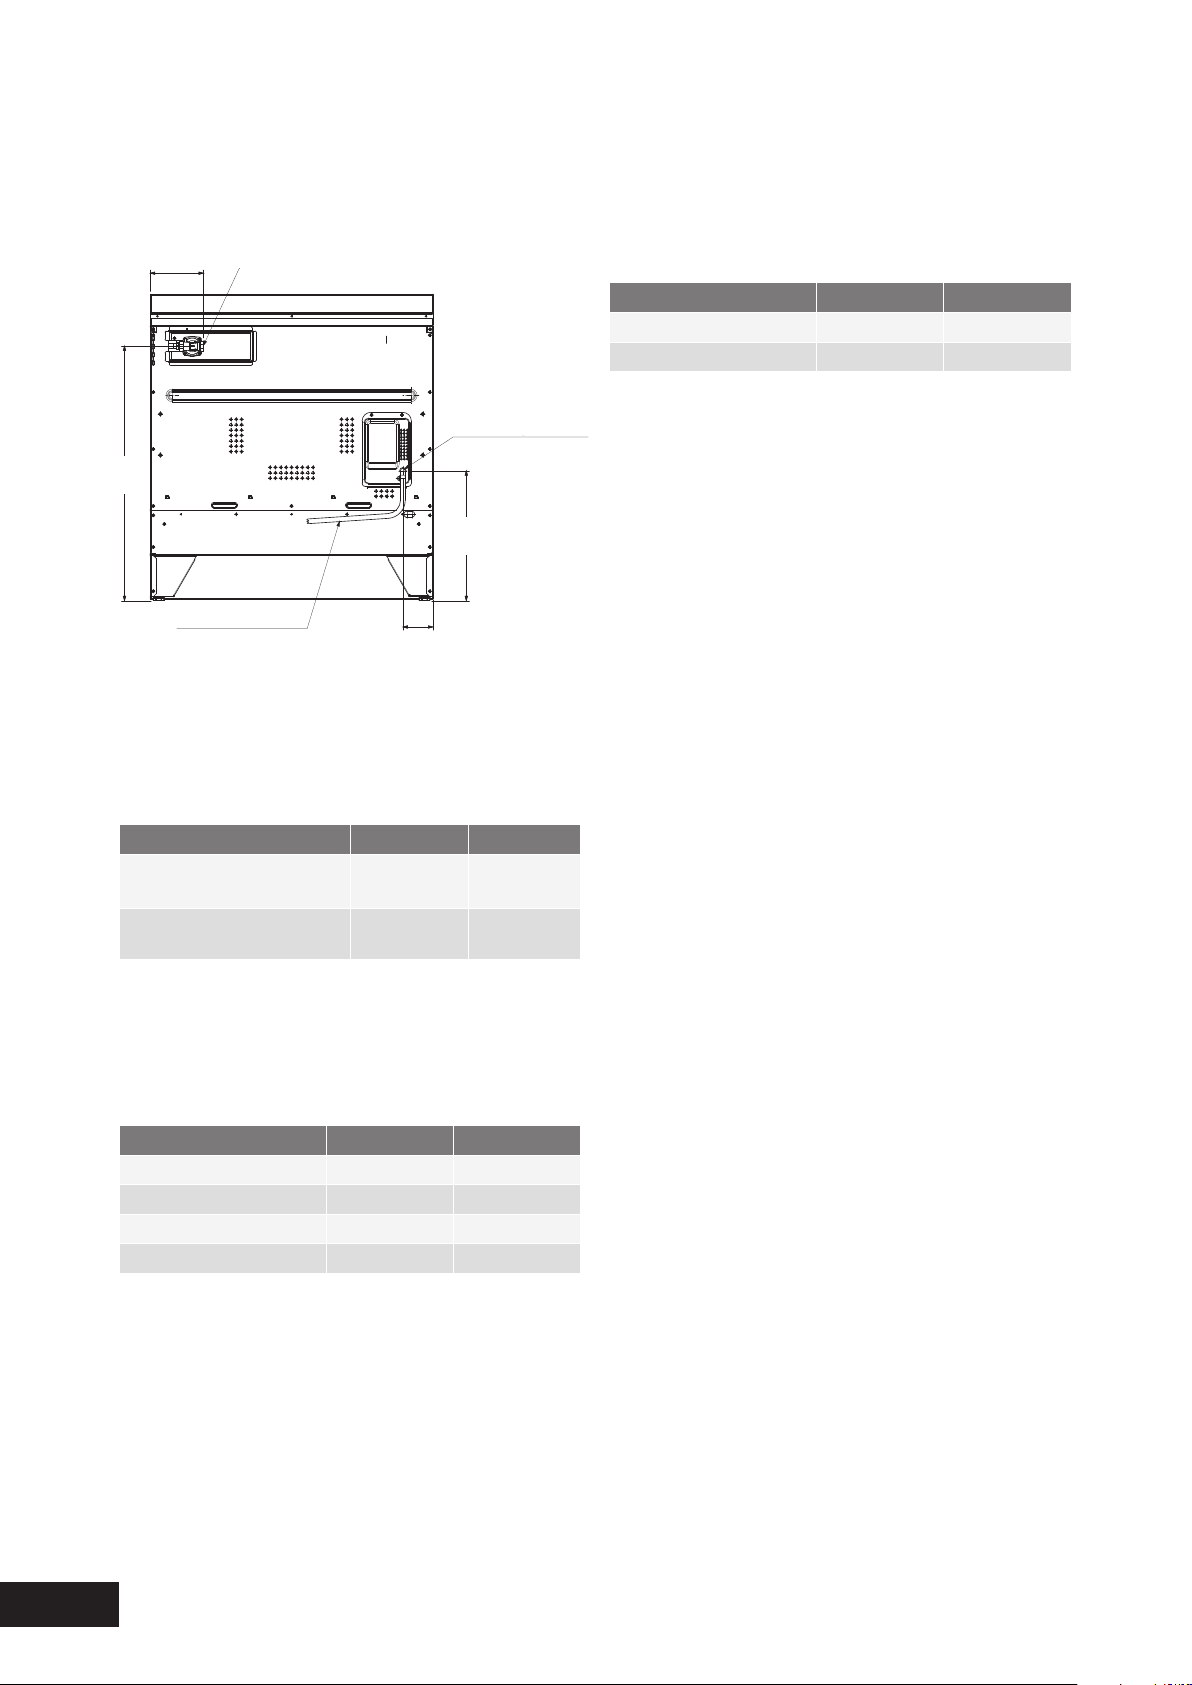
44
ELECTRICAL & GAS CONNECTION LOCATIONS
INSTALLING THE GAS COOKER
GAS TYPE NATURAL GAS UNIVERSAL LPG
Supplypressureatinletto
applianceregulator(iffitted)
1.13(kPa)
Minimum
2.75*
(kPa)
Operatingpressureat
appliancetestpoint
1.00(kPa)2.75(kPa)
*Iftheregulatorisplacedupstreamofthecookerinlet,as
isnormalforcookersoperatingonLPG,thenthesupply
pressureandoperatingpressurearethesame.
Thefollowingtableshowstheinjectorsizesforeach
burner.
INJECTOR ORIFICE NATURAL GAS UNIVERSAL LPG
Lowheatburner1.00mm0.55mm
Mediumheatburner1.35mm0.70mm
Highheatburner1.60mm0.90mm
Intenseheatwokburner1.75mm1.00mm
GAS CONNECTION
Readthesepointsbeforeconnectingtothegassupply:
•Theapplianceispresetfornaturalgasuse,ifLPGis
tobeusedseeConversiontoLPGsection.
•Gasinstallationmustbemadeinaccordancewith
AS5601,thelocalgasfittingregulations,municipal
codesandotherstatutoryregulations.
•Thegasconnectionpointisa½”BSPexternalthread
locatedattherearoftheapplianceasshown.
•Aregulatorissuppliedwhichmustbefittedtothe
appliance.Ensurethatwhenfittedthepressuretest
pointofregulatorisaccessible.
•Theregulatoristobefittedtotheappliance
connectionpoint,thenfithardpipingfromthe
regulatortotheconsumerhardpiping.Ensurethe
installationallowsthewithdrawaloftheappliance.
• Donotuseaflexiblehosetoconnecttheapplianceto
thegassupply.
CHECKING PIPING SIZE
Toworkoutasuitablepipesizeforconnectionuse:
Theinformationinthistable
GAS TYPE NATURAL GAS UNIVERSAL LPG
WFE912&WFE91449.6MJ/h40.9MJ/h
WFE91658.6MJ/h47.4MJ/h
Informationaboutthelengthofrun,numberofelbows,
teesandbends,theavailableservicepressureandthe
supplyrequirements.
NOTE: AS/NZS5601.1 will help you with this matter.
INSTALLATION
MODELS WFE912, WFE914, WFE916 AND WFE946
GAS PRESSURES
Thefollowingtableshowsthesupplyandoperating
pressuresforvariousgases.
168
95
Electricalconnectioncable
806
411
Gasconnectionpointtoregulator
Models:WFE912,WFE914,WFE916
Electricalcable
entrypoint
Models:
WFE912,WFE914,
WFE916,WFE946
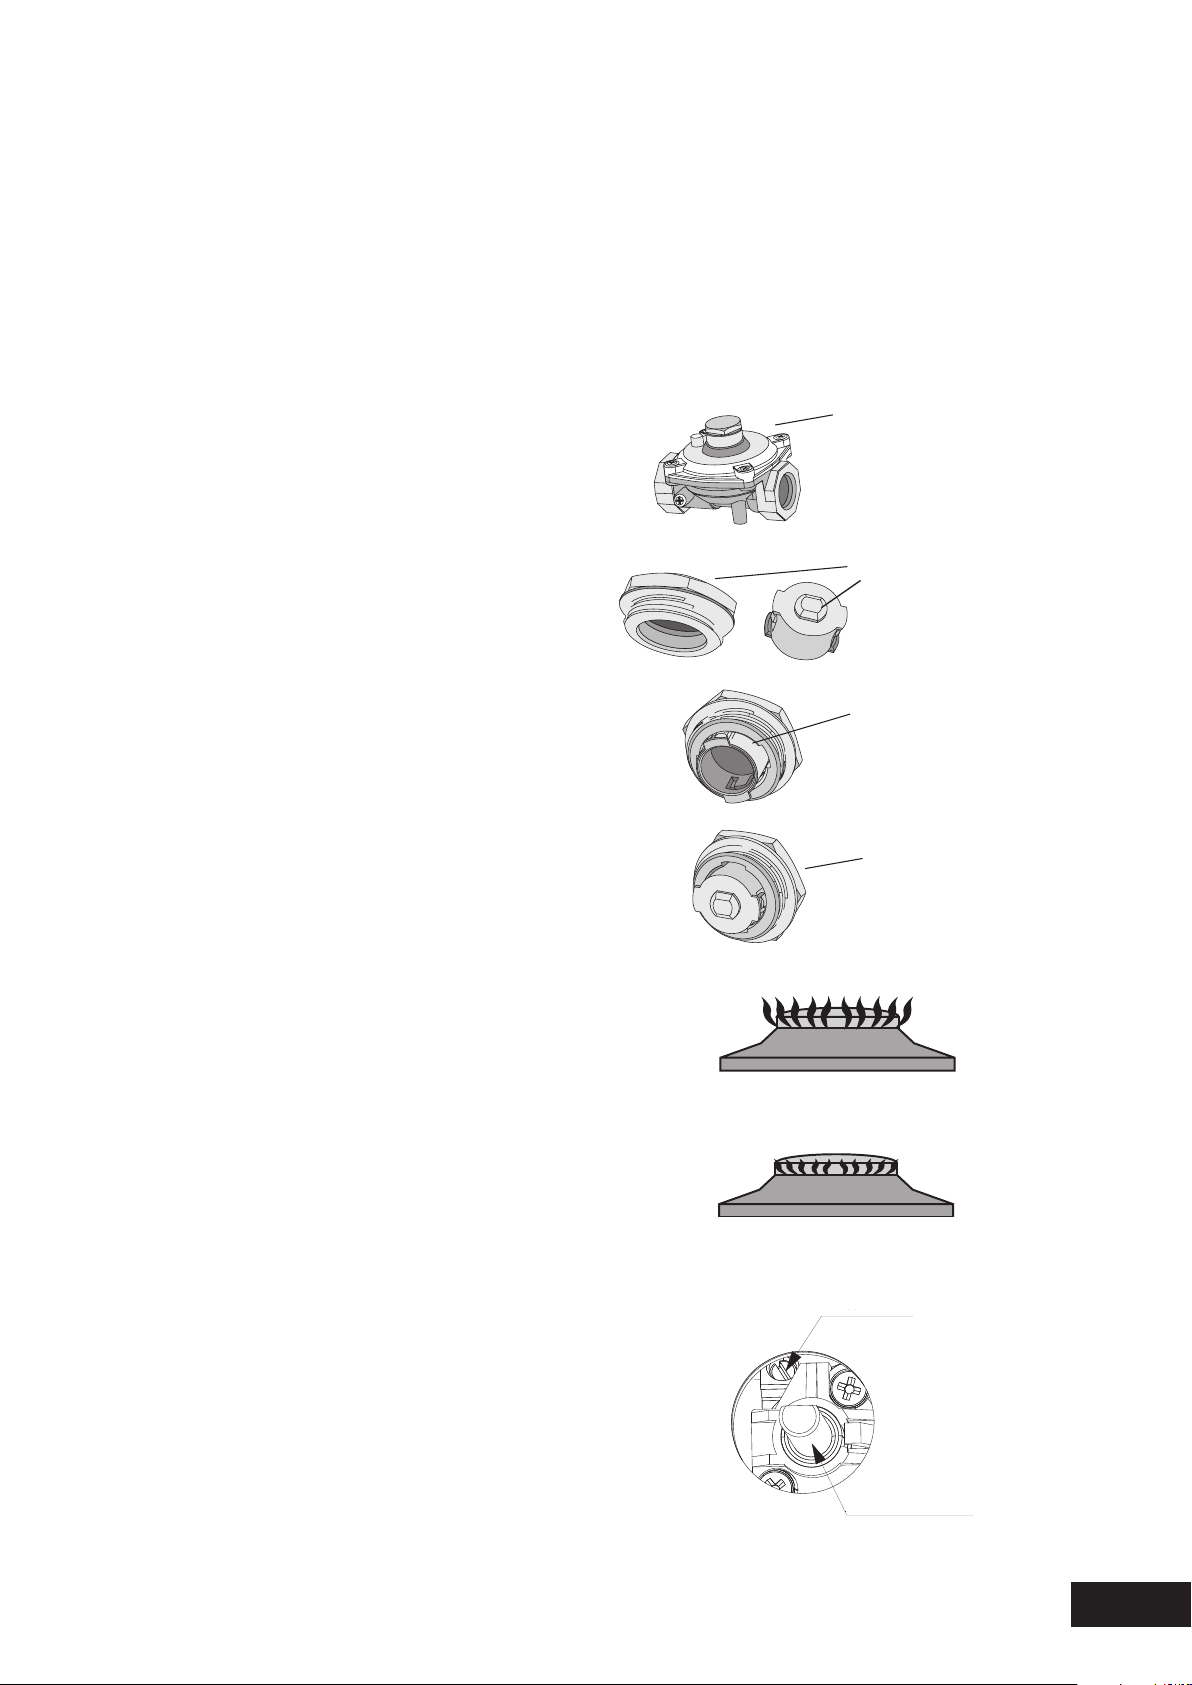
45
INSTALLATION
LPG CONVERSION
MODELS WFE912, WFE914 & WFE916
ThisapplianceissuppliedsetuptoforNaturalGas
usage.Aconversionkitisincludedwiththeproduct
forUniversalLPGusage.Theconversionkitcontains6
injectorsand1LPGsticker.
Pleasefollowtheprocedurebelowifaconversiontosuit
UNIVERSALLPGisrequired.
1.Removethehotplatetrivets,burnercapsandburner
crownstoaccessthehotplateinjectors.Replacethe
factoryfittedinjectorswiththeappropriateinjectors,as
supplied.Refertoinjectororificetableforinjectorsizes.
Theinjectorsizeisstampedonthesideoftheinjector.
2.Unscrewthehexnutfromtheregulator.Thehexnut,brass
washerandnyloninsertwilldisengageasanassembly.
3.Unclipthenyloninsertfromthenutassemblyby
rotatingtheinsert1/4turn,andpullingitfree.
4.Turnovertheinsert,andclipbackintoposition.
5.Refitthehexnutassemblytotheregulatorensuringthat
itisfullyscreweddown.Theregulatorisnowsetfor
connectiontoLPG.
6.Turnonthegassupplyandateachnewconnection
checkforleaksusingsoapywater:eachhotplate
valveshouldbeturnedon,oneatatime,andthe
injectorholeblankedoffforseveralseconds.
7.Theoperationoftheregulatorcanbeconfirmedby
connectingamanometertothepressuretestpoint
locatedonthesideoftheregulatorbodyadjacentto
theoutlet.
Withtheapplianceoperatingchecktheoutletpressure
•whenallburnersoftheapplianceareoperating
atmaximum,
•whenthesmallestburneroftheapplianceis
operatingatminimum.
Undertheseconditionstheoutletpressureshouldnot
varyfromthenominaloutletpressureof2.60kPaby
morethan±0.52kPa.
8.Iftheregulatorappearstonotbeperforming
satisfactorilythencheckthefollowingpoints.
•Iftheoutletpressureisconsistentlytoolowthen
theinletpressuremaybetoolowandadjustment
ofanupstreamregulatormaybeneeded,oran
upstreamregulatororvalvewithinsufficientflow
capacitymaybepresentinthegassupplyline.If
thisissuspectedthenitmaybenecessarytorepeat
thecheckswhilstmeasuringboththeinletandoutlet
pressuretodetermineiftheinletpressureisinthe
range2.75–7.00kPa.
•Checkthattheinserthasbeenfittedcorrectly.
•Checkthattheturretscrewisfullyscreweddown.
•Checkthattheregulatorhasbeenfittedtothegas
supplylineinthecorrectorientation,thearrowonthe
baseofthebodyindicatesthedirectionofgasflow.
Oncethesecheckshavebeencompleted,iftheregulatorstill
failstoperforminasatisfactorymanneritshouldbereplaced.
9.Onebyone,turntheknobstominimumandscrew
inthebypassscrew(accessiblewhentheknobis
removed)untilasmallstableflameresults.Turnthe
knobtomaximumandthenbacktominimumtoensure
thatthecorrectminimumflameismaintained.
10.AttachtheLPGstickertothecooker,nearthegas
supplyinlet.CovertheNaturalGaslabelthatis
factoryfitted.
Hexnutassembly,
fullyscreweddown
Insertorientedfor
naturalgasoperation
HexNutassembly,
removedfrom
regulatorand
insertdisassembled
Insertorientedfor
LPGoperation
Flamesizeadjustedtomaximum
Flamesizeadjustedtominimum
Bypassscrew
Controlknobshaft

46
TESTING THE OPERATION OF THE GAS COOKER
NOTE: You MUST test the cooker after installation, before
you hand it over to the customer. You MUST have a
manometer and a connecting tube.
CHECKING GAS SUPPLY
1.Checkthemanometerzeropointiscorrect.
2.Connectthemanometertothecookerpressuretest
point.ThisislocatedontheregulatororLPGinletfitting.
3.Turnonthegassupplyandtheelectricityandtryto
ignitethegas.
NOTE: It will take additional time to light the gas for the
first time as air needs to be purged from the pipes.
4.Checktheoperatingpressurefortheparticulargastype.
CHECKING THE FUNCTION OF THE REGULATOR
Withtheapplianceoperatingchecktheoutletpressure:
•whenallburnersoftheapplianceareoperatingat
maximum,
•whenthesmallestburneroftheapplianceisoperating
atminimum.
Undertheseconditionstheoutletpressureshouldnotvary
fromthenominaloutletpressurebymorethan±20%ofthe
nominaloutletpressure(ie±0.20kPaforNaturalGas).
Iftheregulatorappearstonotbeperformingsatisfactorily
thencheckthefollowingpoints.
1.Iftheoutletpressureisconsistentlytoolowthenthe
inletpressuremaybetoolowandadjustmentofan
upstreamregulatormaybeneeded,oranupstream
regulatororvalvewithinsufficientflowcapacitymay
bepresentinthegassupplyline.Ifthisissuspected
thenitmaybenecessarytorepeatthecheckswhilst
measuringboththeinletandoutletpressureto
determineiftheinletpressureisintherange1.13–
5kPa.
2.Checkthattheregulatorhasbeenfittedtothegas
supplylineinthecorrectorientation,thearrowonthe
baseofthebodyindicatesthedirectionofgasflow.
Oncethesecheckshavebeencompleted,iftheregulator
stillfailstoperforminasatisfactorymanneritshouldbe
replaced.
TESTING THE COOKER FEATURES
•Observetheflameappearanceoneachburner.Ifitis
muchsmallerorlargerthanexpected,thentheinjector
sizeneedschecking.
NOTE: When flame is unsatisfactory, then refer to the
Electrolux Technical Publications and correct the fault,
if possible.
Whenmaximumflameappearanceiscorrect,thencheck
theturn-downsettingoneachburner.Ifthesettingsappear
tobeincorrect,proceedasfollows:
1.Adjustthebypassscrewmountedonthebodyofeach
hotplatecontrolcock.Thisisaccessiblewhenthe
controlknobandthecontrolpanelareremoved.
2.Checktheignitiononallburnersbothseparatelyand
incombination.
3.Checktheoperationoftheelectricalcomponents,
ifapplicable.
4.Ifyouaresatisfiedthatthecookerisoperating
correctly,thenturnitoffandshowthecustomerhowto
useit.Makesureyouaskthecustomertooperatethe
clockandcontrols.
NOTE: If the cooker cannot be adjusted to perform
correctly, then inform the customer of the problem and
put a warning notice on the cooker. If the problem is
dangerous, then disconnect the cooker. If there is a
fault, then the customer should be advised to contact the
manufacturer’s local service organisation or the retailer.
INSTALLATION
47
INSTALLATION
This document sets out the terms and conditions of the product
warranties for Electrolux Appliances. It is an important document.
Please keep it with your proof of purchase documents in a safe place
for future reference should you require service for your Appliance.
1. In this warranty
(a) ‘acceptable quality’ as referred to in clause 10 of this warranty has
the same meaning referred to in the ACL;
(b) ‘ACL’ means Trade Practices Amendment (Australian Consumer
Law) Act (No.2) 2010;
(c) ‘Appliance’ means any Electrolux product purchased by you
accompanied by this document;
(d) ‘ASC’ means Electrolux’ authorised serviced centres;
(e) ‘Electrolux’ means Electrolux Home Products Pty Ltd of 163
O’Riordan Stree
t, Mascot, NSW 2020, ABN 51 004 762 341 in
respect of Appliances purchased in Australia and Electrolux (NZ)
Limited of 3-5 Niall Burgess Road, Mount Wellington, in respect
of Appliances purchased in New Zealand;
(f) ‘major failure’ as referred to in clause 10 of this warranty has the
same meaning referred to in the ACL and includes a situation when
an Appliance cannot be repaired or it is uneconomic for Electrolux, at
its discretion, to repair an Appliance during the Warranty Period;
(g) ‘Warranty Period’ means:
(i) where the Appliance is used for personal, domestic or household
use (i.e. normal single family use) as set out in the instruction
manual, the Appliance is warranted against manufacturing
defects in Australia for 24 months and in New Zealand for 24
months, following the date of original purchase of the Appliance;
(ii) where the Appliance is used for commercial purposes (including
being used to directly assist a business or where the Appliance is
used in a multi-family communal or share type environment), the
Appliance will then be warranted against manufacturing defects
in Australia for 3 months and in New Zealand for 3 months,
following the date of original purchase of the Appliance.
(h) ‘you’ means the purchaser of the Appliance not having purchased
the Appliance for re-sale, and ‘your’ has a corresponding meaning.
2. This warranty only applies to Appliances purchased and used in Australia
or New Zealand and is in addition to (and does not exclude, restrict, or
modify in any way) any non-excludable statutory warranties in Australia
or New Zealand.
3. During the Warranty Period Electrolux or its ASC will, at no extra charge
if your Appliance is readily accessible for service, without special
equipment and subject to these terms and conditions, repair or replace
any parts which it considers to be defective. Electrolux or its ASC may
use remanufactured parts to repair your Appliance. You agree that
any replaced Appliances or parts become the property of Electrolux.
or similar
perishable parts.
4. Parts and Appliances not supplied by Electrolux are not covered by
this warranty.
5. You will bear the cost of transportation, travel and delivery of the
Appliance to and from Electrolux or its ASC. If you reside outside of the
service area, you will bear the cost of:
(a) travel of an authorised representative;
(b) transportation and delivery of the Appliance to and from Electrolux or
its ASC,
In all instances, unless the Appliance is transported by Electrolux or an
Electrolux authorised representative, the Appliance is transported at the
owner’s cost and risk while in transit to and from Electrolux or its ASC.
6. Proof of purchase is required before you can make a claim under
this warranty.
7. You may not make a claim under this warranty unless the defect claimed
is due to faulty or defective parts or workmanship. Electrolux is not liable
in the following situations (which are not exhaustive):
(a) the Appliance is damaged by:
(i) accident
(ii) misuse or abuse, including failure to properly maintain or service
(iii) normal wear and tear
(iv) power surges, electrical storm damage or incorrect power supply
(v) incomplete or improper installation
(vi) incorrect, improper or inappropriate operation
(vii) insect or vermin infestation
(viii) failure to comply with any additional instructions supplied with
the Appliance;
(b)
(c) the Appliance’s serial number or warranty seal has been removed
or defaced;
(d) the Appliance was serviced or repaired by anyone other than
Electrolux, an authorised repairer or ASC.
8. This warranty, the contract to which it relates and the relationship
between you and Electrolux are governed by the law applicable where
the Appliance was purchased. Where the Appliance was purchased in
New Zealand for business purposes the Consumer Guarantee Act does
not apply.
9. To the extent permitted by law, Electrolux excludes all warranties and
liabilities (other than as contained in this document) including liability for
any loss or damage whether direct or indirect arising from your purchase,
use or non use of the Appliance.
10. For Appliances and services provided by Electrolux in Australia,
the Appliances come with a guarantee by Electrolux that cannot be
excluded under the Australian Consumer Law. You are entitled to a
replacement or refund for a major failure and for compensation for any
other reasonably foreseeable loss or damage. You are also entitled to
have the Appliance repaired or replaced if the Appliance fails to be of
acceptable quality and the failure does not amount to a major failure.
rights and remedies under a law in relation to the Appliances or services
to which the warranty relates.
11. At all times during the Warranty Period, Electrolux shall, at its discretion,
determine whether repair, replacement or refund will apply if an
Appliance has a valid warranty claim applicable to it.
12. For Appliances and services provided by Electrolux in New Zealand,
the Appliances come with a guarantee by Electrolux pursuant to the
provisions of the Consumer Guarantees Act, the Sale of Goods Act and
the Fair Trading Act.
13. To enquire about claiming under this warranty, please follow these steps:
(a) carefully check the operating instructions, user manual and the terms
of this warranty;
(b) have the model and serial number of the Appliance available;
(c) have the proof of purchase (eg an invoice) available;
(d) telephone the numbers shown below.
14. You accept that if you make a warranty claim, Electrolux and its ASC
may exchange information in relation to you to enable Electrolux to meet
its obligations under this warranty.
Warranty
FOR SALES IN AUSTRALIA AND NEW ZEALAND
APPLIANCE: BUILT-IN OVEN, COOKTOP
AND UPRIGHT RANGE COOKER
Important Notice
Before calling for service, please ensure that the steps listed in point 13 above have been followed.
FOR SERVICE
state service centre in Australia
PLEASE CALL 13 13 49
For the cost of a local call (Australia only)
SERVICE AUSTRALIA
ELECTROLUX HOME PRODUCTS
www.electrolux.com.au
FOR SPARE PARTS
state spare parts centre in Australia
PLEASE CALL 13 13 50
For the cost of a local call (Australia only)
FOR SERVICE
authorised service centre in New Zealand
FREE CALL 0800 10 66 10
(New Zealand only)
SERVICE NEW ZEALAND
ELECTROLUX HOME PRODUCTS
www.electrolux.co.nz
FOR SPARE PARTS
state spare parts centre in New Zealand
FREE CALL 0800 10 66 20
(New Zealand only)
GOV_Warr_Apr11

AUSTRALIA
phone:1300363640
fax:1800350067
email:[email protected]
web:www.westinghouse.com.au
NEW ZEALAND
phone:095732384
fax:0800363600
email:[email protected]
web:www.westinghouse.co.nz
For more information on all Westinghouse appliances,
or for dimension and installation information, call into your retailer,
phone or email our customer care team or visit our website:
TOP SERVICE
TopServiceencompassestheaftersalesservice
providedbyTheElectroluxGrouptoconsumers
includingdelivery,homeserviceandspareparts.
Westinghouse. We are part of the Electrolux family.
Share more of our thinking at www.electrolux.com
PartNumber:0342001563IssueC
©2012ElectroluxHomeProductsPtyLtd
ABN51004762341
WMAN_90cmOVEN_Oct12