Loading ...
Loading ...
Loading ...
16 17
16
Figure 14
CARE AND MAINTENANCE
CLEANING COOKTOP
Removing Trivets
1. The trivets located in the recessed area of the hob.
2. They can be removed for cleaning by carefully lifting them from the hob.
3. Clean by washing in warm soapy water. Make sure to dry thoroughly.
4. DO NOT drop the trivet into place. To avoid scratches and damages carefully place the trivets back to its
place.
CLEANING OVEN
IMPORTANT: Before cleaning, make sure all controls are off and the oven is cool. ALWAYS follow the label
instructions on all cleaning products used on this oven. Soap, water and a soft cloth or sponge are suggested first
unless otherwise noted. DO NOT use abrasive cleaning products as it may damage the unit.
Stainless Steel
• DO NOT use soup-filled scouring pads, abrasive cleaners, cooktop cleaner, steel-wool pads, gritty wash
cloths or abrasive paper towels.
• It is recommended to use stainless steel cleaner or polish.
• It is recommended to use vinegar for hard water spots.
• It is recommended to use liquid detergent or all-purpose cleaner. Rinse well with clean water and dry with
soft, lint-free cloth.
• It is recommended to rub in the direction of grain to avoid damage.
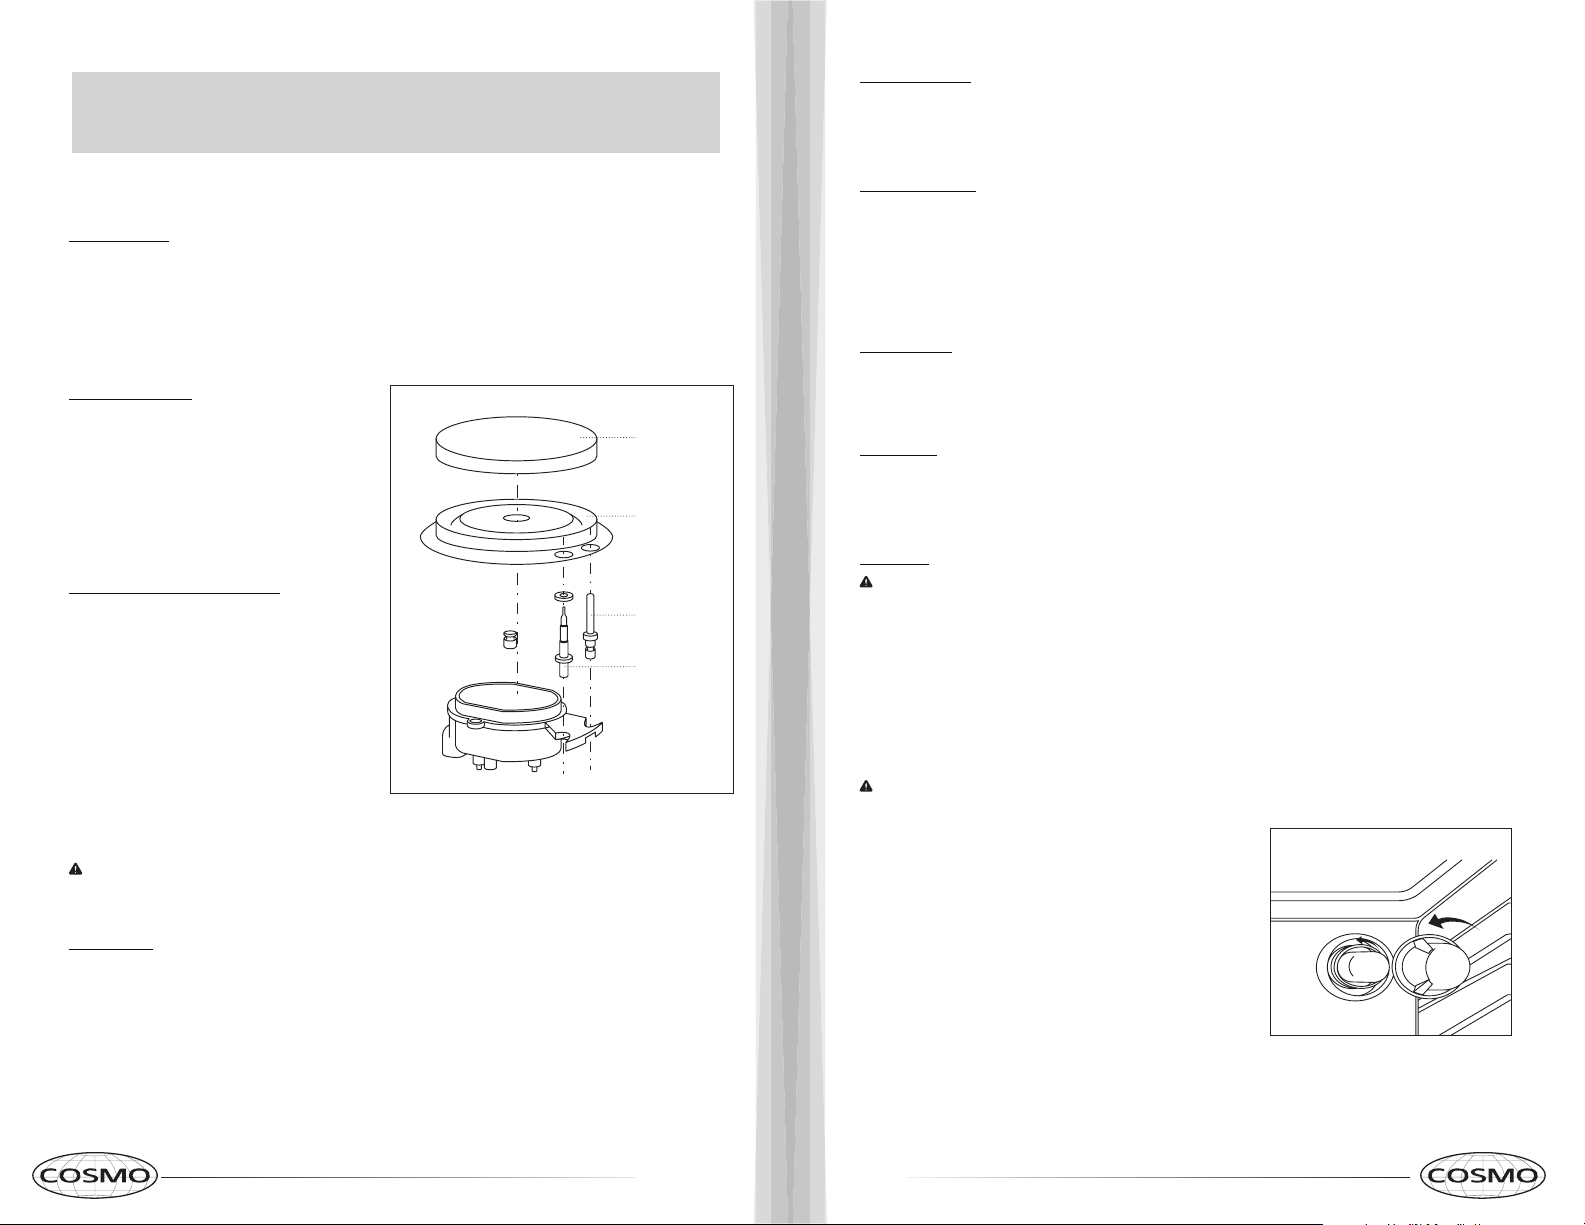
Removing the Burner
1. The burner caps and heads are removable for
cleaning.
2. Blockage of the flame port should be cleaned
using a match stick or brush.
3. If the caps, heads and cups are heavily soiled,
use a non-abrasive cleaning compound to help
remove build-up.
Refitting the Burner Heads and Caps
1. The burner cap must be placed correctly into
the burner head or damage may occur during
operation.
2. To ensure correct placement, make sure the
Ignitor and Flame detector are position into
the 2 slots of the burner head. (Refer to
Figure 14.)
3. The burner cap is simply positioned over the
top of the burner head. (Refer to Figure 14.)
Burner Cap
Burner Head
Ignitor
Flame
Detector
17
Oven Door Exterior
• It is recommended to use glass cleaner and paper towel or non-abrasive plastic scrubbing pad.
• It is recommended to apply glass cleaner to soft cloth or sponge.
• DO NOT apply directly to panel.
Grates and End Caps
• DO NOT clean until the grates and caps have cooled.
• DO NOT reassemble grates and caps if they are still wet.
• To avoid chipping, DO NOT bang grates and caps against each other or hard surfaces.
• It is recommended to utilize mildly abrasive cleaner.
• It is recommended to utilize a non-abrasive cloth or plastic scrubbing pad.
Burner Spreader
• It is recommended to frequently wash the burner spreader with boiling water and detergent to remove any
deposit build up. This will maintain steady flame output.
• ALWAYS dry the burner spreader thoroughly before re-installing.
Control Panel
• DO NOT spray glass cleaner on glass control panel.
• DO NOT use abrasive cleaners, steel wool pads, and gritty wash cloths. Damage may occur.
• Apply glass cleaner to soft cloth or sponge then begin cleaning glass panel.
Oven Cavity
NOTE: At high temperatures, foods react with porcelain, so staining, etching, pitting or faint white spots can
result.
• DO NOT begin cleaning the oven cavity until it has fully cooled.
• DO NOT use oven cleaners.
• It is recommended to use mild detergent and warm water.
• It is recommended to use soft cloth or non-abrasive plastic scrubbing pad.
OVEN LIGHT REPLACEMENT
CAUTION: Before replacing, make sure the oven and cooktop are cool and all control knobs are to the OFF
position.
Figure 15
1. Remove the light cover by rotating it counter-clockwise. (Refer
to Figure 15.)
2. Then remove the light bulb by rotating it counter-clockwise.
3. Replace the old light bulb with a new oven-safe light bulb with
the following characteristics.
• Light bulb is a standard 25 – Watt (G9) appliance bulb
• Voltage: 120V
• Wattage: 25W
4. Re-install light cover by rotating it clockwise.
TABLE CARE AND MAINTENANCE OF
CONTENTS
Loading ...
Loading ...
Loading ...