Loading ...
Loading ...
Loading ...
14 15
14
• Preheat the oven based on your recipe.
• Preheating is great for baking cakes, cookies, pastries and breads.
Baking (Refer to Figure 9.)
NOTE: This oven utilizes a gas burner located under the oven cavity. This
allows the heat to rise naturally to bake foods evenly.
• Push in the temperature control knob for 3 seconds and then release.
• The igniter will continue to spark.
• Then push and turn temperature control knob counter-clockwise to
the desired temperature between MIN (150°F) to MAx.
Broiling (Refer to Figure 10.)
NOTE: This oven utilizes a gas burner located at the top of the oven
cavity for broiling and browning.
• Push in the temperature control knob, and turn clockwise to
automatically ignite the broil burner.
CAUTION: The broil burner will remain on until the temperature control
is returned to the off position.
• ALWAYS utilize the broiler grid & pan when broiling.
• NEVER cover the broiler grid openings with aluminum foil. If the rack
is covered by aluminum foil, the fat cannot drip away from the meat
and may easily ignite.
• DO NOT allow fatty edges hang over the sides of the broiler pan.
Convection Cooking (Refer to Figure 11.)
• During Convection cooking the fan will circulate hot air throughout the
oven. The movement of heated air around the food will help to speed
up cooking by penetrating the cooler outer surfaces. Foods cook more
evenly. Browning and crisping outer surfaces while sealing the moisture in.
• During convection cooking, the bake and broil elements, and the fan
operate to heat the oven cavity. If the oven door is opened during
convection cooking or preheating, the fan turns off immediately and
the element(s) will turn off after 30 seconds. Once the door closed,
the element(s) will turn back on.
NOTE: The convection fan can be turned on and off at any time.
Oven Light (Refer to Figure 12.)
• When the Bake or Broil function is selected the oven light will turn on
automatically and remain on during operation.
• While the oven door is closed, turn the knob to “Light” to turn lights
on and off. Oven lights will turn on when the door is opened.
Oven Display
• The oven display will illuminate when the oven is pre-heating.
• The oven display will turn off when the selected cooking temperature
has been reached.
Figure 10
MIN
MAX
OFF
°F
325
300
350
400
450
Broil
Figure 9
MIN
MAX
OFF
°F
325
300
350
400
450
Broil
Figure 12
OFF
Conv
Fan
Light
Figure 11
OFF
Conv
Fan
Light
15
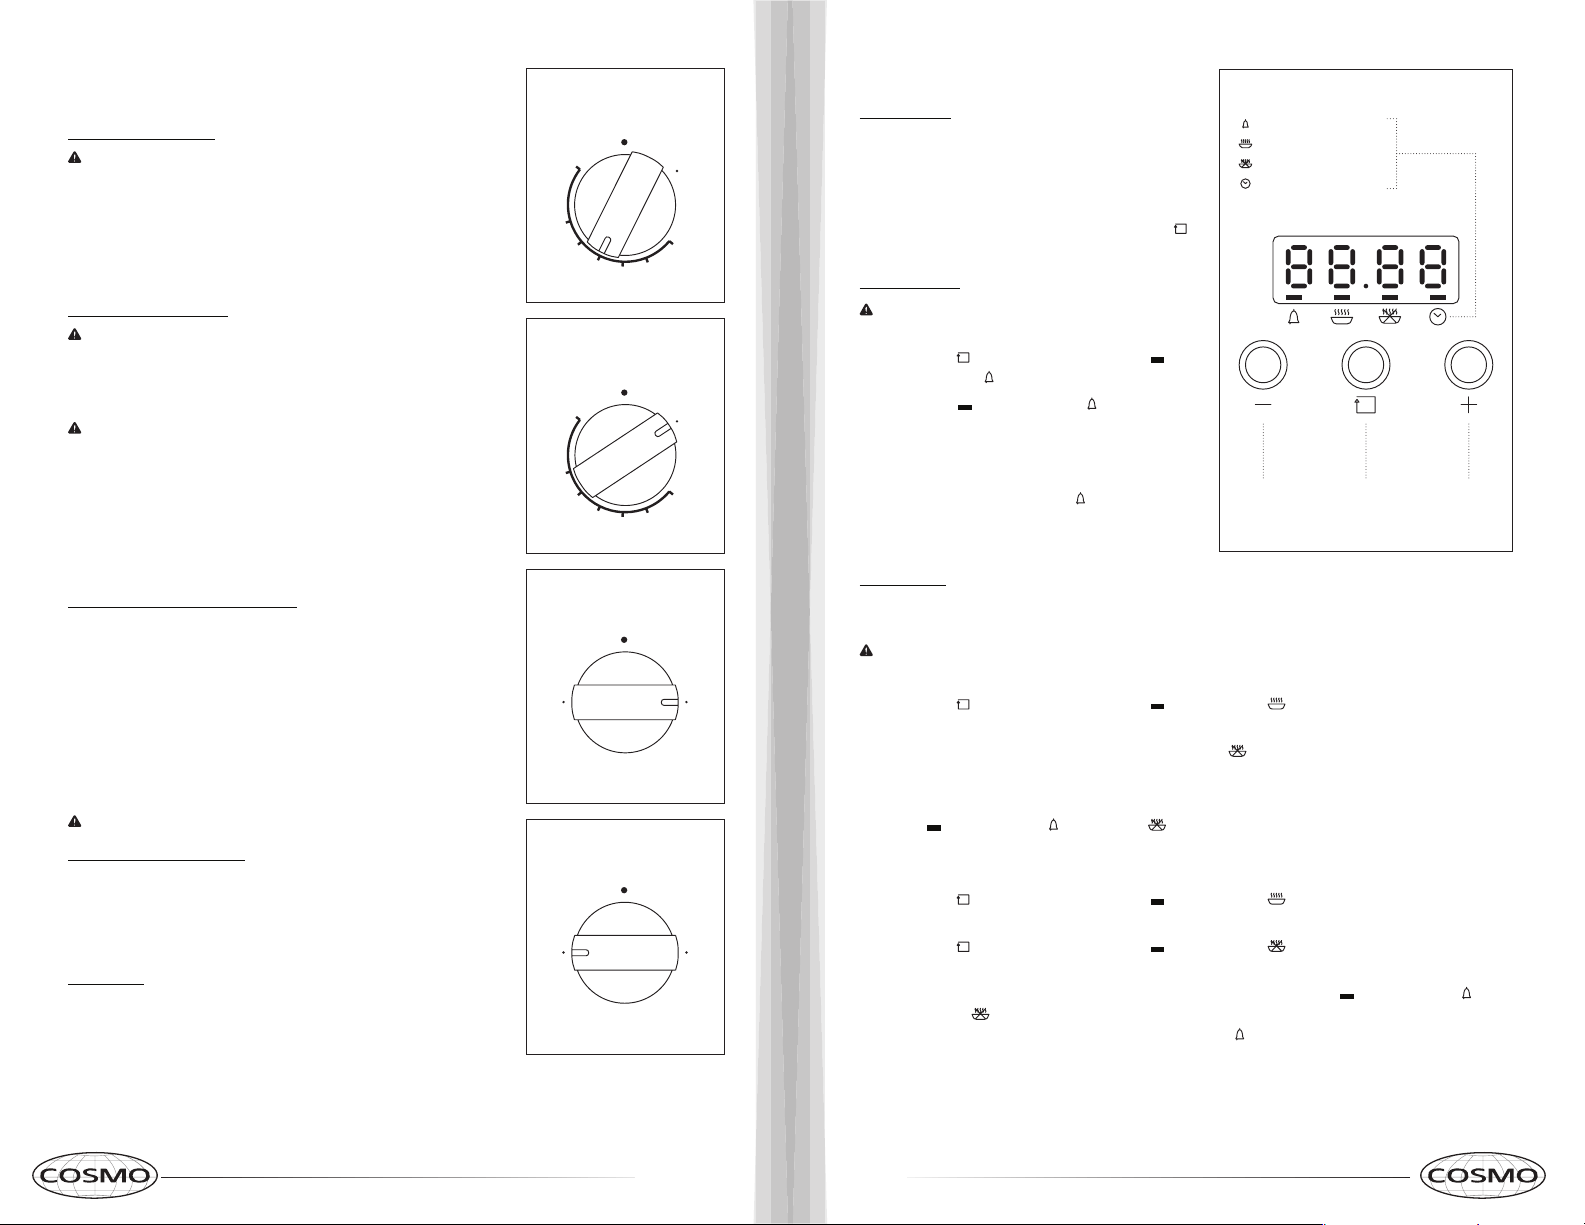
CLOCK & TIMER
Set Time of Day
1. When the range is first connected with power, the
screen will display “12:00”.
2. To set the correct time, press “ + ” or “ - ” button until
the correct time is displayed. After 5 seconds, the
displayed time will be set, or you can press the “
”
button to select manual operation.
Setting the Timer
NOTE: The digital countdown timer can be set up to the
maximum of 23 hours and 59 mins.
1. Press the “
” button repeatedly until the “ ”
symbol above “
” symbol is displayed.
2. Once the “
” symbol is above “ ” symbol then
utilize the “ + ” or “ - ” button to set the timer.
3. The time will automatically be set if no button is
pressed for 5 seconds.
4. When the set time is reached, “
” symbol disappears
and the alarm will ring.
5. To stop the alarm, press any button.
Figure 13
Function
Button
Decrease
Button
Increase
Button
Timer
Start Cooking Time Set
End Cooking Time Set
Clock
Timed Cooking
This feature allows the oven to be set to turn on at a certain time of day, cook for a set length of time and/or
shut off automatically.
CAUTION: Delayed cooking is not recommended for baking breads or cakes, as it may not bake properly.
1. Check to see the clock is set to the correct time of day.
2. Press the “
” button repeatedly until the “ ” symbol above “ ” symbol flashes. Then press the “ + ”
or “ - ” button to the desired time frame.
3. Press the function button repeatedly until the bar above “
” symbol flashes and then press the “ + ” or
“ - ” button to set the time to turn off the oven.
4. Then set the cooking temperature and cooking mode by turning the thermostat knob and the selector knob.
5. The “
” symbols above “ ” symbol and “ ” symbol will flash, indicating that the automatic cooking
feature has been set.
Example: If the cooking time takes 30 mins and you want to finish cooking at 12:30.
• Press the “
” button repeatedly until the “ ” symbol above “ ” symbol flashes and set the cooking
time to 30 minutes.
• Press the “
” button repeatedly until the “ ” symbol above “ ” symbol flashes and set the finish
time to 12:30.
• Once the above settings have been set the current time is displayed and the “
” symbols above “ ”
symbol and “
” will flash indicating that the automatic cooking feature is set. When the clock displays
“12:00”, the oven will start cooking automatically, and the “
” symbol will flash.
Loading ...
Loading ...
Loading ...