Loading ...
Loading ...
Loading ...
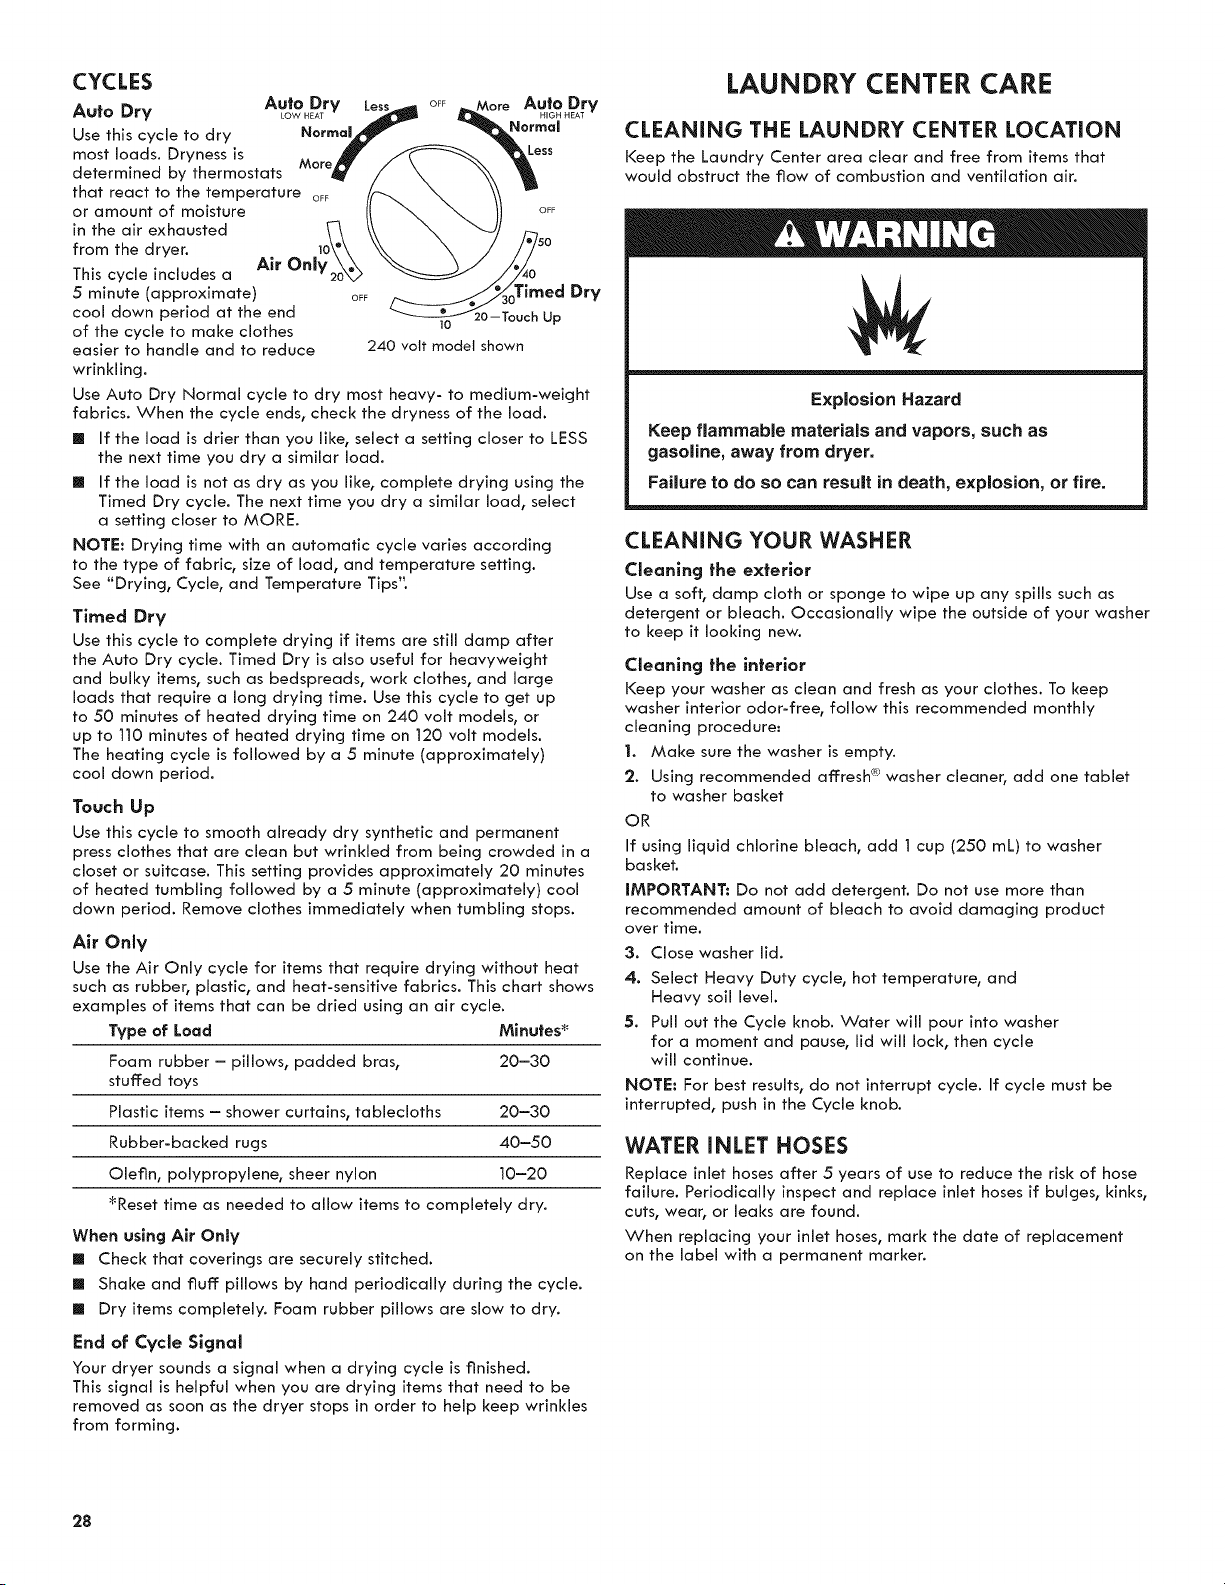
CYCLES
Auto Dr_ AuotODTrY Le_ OFF_Morl[:e_ e Au,toDry
Use this cycle to dry Normal_ _- -_ormaJ
most loads. Dryness is , ,if _ "_Less
determinedbythermostats/ \ l
that react to the temperature OFF //'-_ _ \_
or amount of moisture [I "_ _ II OFF
in the air exhausted _ \\ "_ "x,,J/ r-_
from the dryer. 10\'\ \\ X / /_50
. . Air OnlY'2o_ _/'/_o
This cycle includes a //_0
5 minute (approximate) OFF _ _j_,-',,_30Timed Dry
cool down period at the end "_---_'_20-Touch Up
of the cycle to make clothes ]0
easier to handle and to reduce 240 volt model shown
wrinkling.
Use Auto Dry Normal cycle to dry most heavy- to medium-weight
fabrics. When the cycle ends, check the dryness of the load.
[] If the load is drier than you like, select a setting closer to LESS
the next time you dry a similar load.
[] If the load is not as dry as you like, complete drying using the
Timed Dry cycle. The next time you dry a similar load, select
a setting closer to MORE.
NOTE: Drying time with an automatic cycle varies according
to the type of fabric, size of load, and temperature setting.
See "Drying, Cycle, and Temperature Tips".
Timed Dry
Use this cycle to complete drying if items are still damp after
the Auto Dry cycle. Timed Dry is also useful for heavyweight
and bulky items, such as bedspreads, work clothes, and large
loads that require a long drying time. Use this cycle to get up
to 50 minutes of heated drying time on 240 volt models, or
up to 110 minutes of heated drying time on 120 volt models.
The heating cycle is followed by a 5 minute (approximately)
cool down period.
Touch Up
Use this cycle to smooth already dry synthetic and permanent
press clothes that are clean but wrinkled from being crowded in a
closet or suitcase. This setting provides approximately 20 minutes
of heated tumbling followed by a 5 minute (approximately) cool
down period. Remove clothes immediately when tumbling stops.
Air Only
Use the Air Only cycle for items that require drying without heat
such as rubber, plastic, and heat-sensitive fabrics. This chart shows
examples of items that can be dried using an air cycle.
Type af Laad Minutes _
Foam rubber - pillows, padded bras, 20-30
stuffed toys
Plastic items - shower curtains, tablecloths 20-30
Rubber-backed rugs 40-50
Olefin, polypropylene, sheer nylon 10-20
_Reset time as needed to allow items to completely dry.
When using Air Only
[] Check that coverings are securely stitched.
[] Shake and fluff pillows by hand periodically during the cycle.
[] Dry items completely. Foam rubber pillows are slow to dry.
End of Cycle Signal
Your dryer sounds a signal when a drying cycle is finished.
This signal is helpful when you are drying items that need to be
removed as soon as the dryer stops in order to help keep wrinkles
from forming.
LAUNDRY CENTER CARE
CLEANING THE LAUNDRY CENTER LOCATION
Keep the Laundry Center area clear and free from items that
would obstruct the flow of combustion and ventilation air.
Explosion Hazard
Keep flammable materials and vapors, such as
gasoline, away from dryer.
Failure to do so can result in death, explosion, or fire.
CLEANING YOUR WASHER
Cleanlng the exterior
Use a soft, damp cloth or sponge to wipe up any spills such as
detergent or bleach. Occasionally wipe the outside of your washer
to keep it looking new.
Cleanlncj the interior
Keep your washer as clean and fresh as your clothes. To keep
washer interior odor-free, follow this recommended monthly
cleaning procedure:
1. Make sure the washer is empty.
2. Using recommended affresh <_>washer cleaner, add one tablet
to washer basket
OR
If using liquid chlorine bleach, add 1cup (250 mL) to washer
basket.
iMPORTANT: Do not add detergent. Do not use more than
recommended amount of bleach to avoid damaging product
over time.
3. Close washer lid.
4. Select Heavy Duty cycle, hot temperature, and
Heavy soil level.
5. Pull out the Cycle knob. Water will pour into washer
for a moment and pause, lid will lock, then cycle
will continue.
NOTE: For best results, do not interrupt cycle. If cycle must be
interrupted, push in the Cycle knob.
WATER INLET HOSES
Replace inlet hoses after 5 years of use to reduce the risk of hose
failure. Periodically inspect and replace inlet hoses if bulges, kinks,
cuts, wear, or leaks are found.
When replacing your inlet hoses, mark the date of replacement
on the label with a permanent marker.
28
Loading ...
Loading ...
Loading ...