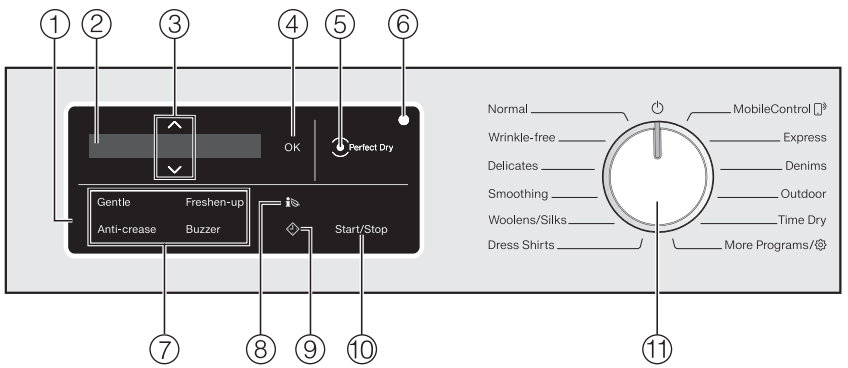
The control field consists of a display and various sensor buttons.
The individual sensor buttons are explained in the following sections.
2. Display
The following values are displayed and/or selected on the display:
The program names, the drying level, and the duration of the selected program
The individual values of the selection lists for the settings
3. Sensor buttons
The values in the display can be changed with the sensor buttons. The sensor button increases the value or moves the selection list up; the sensor button decreases the value or moves the selection list down.
4. OK sensor button
Confirm the selected values with the OK sensor button.
After selecting the program, you can confirm your selection with the OK button or wait until OK goes out by itself.
5. Perfect Dry indicator
With programs with a selectable drying level, the Perfect Dry system calculates the residual moisture present in the laundry to ensure a precise drying result.
The Perfect Dry indicator.
…will flash after the program has started and go out when the program duration appears in the display.
…will light up again when the selected drying level is reached and remain on until the end of the program.
..will remain dark with the following programs: Woolens/Silks, Time Dry, Cold Air.
6. Optical interface
This is used by Miele service technicians as a transmission point.
7. Sensor buttons for extra options
You can select extra options to augment the wash programs.
If a drying program has been selected, the sensor buttons for the possible extra options light up dimly.
8. Sensor button
You can use the sensor button to call up an energy consumption forecast for the selected drying program.
9. Sensor buttons
The sensor button starts the delay start function. With the delay start function, you can delay the start of the program. The start of the program can be delayed from 15 minutes up to a maximum of 24 hours. This allows you to make use of night-time economy electricity rates, for example.
Please see “Delay start” for more information.
10. Start/Stop sensor button
Touching the Start/Stop sensor button starts the selected program or cancels a program that has already been started. The sensor button flashes slowly as soon as it is possible for a program to be started and then lights up constantly after the program has started.
11. Program selector
For selecting programs and for switching off. The tumble dryer is switched on when you select a program, and switched off by turning the program selector to the position.
Operating the sensor buttons
The sensor buttons react to fingertip contact. Selection is possible as long as the respective sensor button is illuminated.
If a sensor button is brightly lit, this means: currently selected
If a sensor button is dimly lit, this means: selection possible
Display
The basic display shows the following for a drying level program:
The selected drying level and the expected program duration
The drying level reached after the start of the program and the remaining program duration
The basic display shows only the program duration for a time-controlled program:
Energy saving tips
This dryer with heat-pump technology is designed for energy-saving drying cycles. However, you can save a little more energy with the following measures as the drying time is not extended unnecessarily.
Make sure your laundry is spun at the maximum spin speed before drying. The higher the spin speed, the greater the savings that can be made in energy and time during drying, e.g., approx. 20% energy can be saved if spun at 1,600 rpm instead of rpm.
Load according to the optimum amount of laundry recommended for the program being used. This will mean that the energy consumption for the amount of laundry is at its most economical.
Make sure that the room temperature is not too high. If there are other heatproducing appliances in the room in which the dryer is located, make sure the room is well ventilated and switch the other appliances off, if possible.
Clean the lint filters in the door opening after every drying cycle.
INITIAL SET-UP
Removing the protective foil and stickers
Remove:
The protective foil from the door
Any stickers from the front and the lid
WARNING Please do not remove any labels (e.g., the data plate) which are visible when you open the door.
Switching on the tumble dryer
Turn the program selector to the Cottons program.
The welcome tone will sound and the welcome screen will light up.
Setting the language
You are requested to set the display language. It is possible to change the language at any time by setting the program selector to the More programs position in the Settings sub-menu.
Touch the sensor button until the language you want appears in the display.
Confirm your selection of the language by touching the OK button.
Setting up Miele@home
Your tumble dryer is equipped with an integrated WiFi module. The dryer can be connected to the household WiFi network.
You will then be able to operate the dryer via the Miele@mobile app.
The following message appears in the display:
Touch the OK sensor button.
Confirm the message by touching the OK sensor button.
You can also start up the Miele@home app at a later time.
Touch the sensor button until the following appears in the display: Set up later. Confirm the message with the OK sensor button.
Select the required connection type from the display.
Connect via WPS
Connect via App
If your WiFi signal strength is not sufficient for the dryer location, please contact your WiFi provider.
Miele@mobile App
The Miele@mobile App is available to download free of charge from the Apple App Store® or from the Google Play Store™.
Connecting with WPS
Your WiFi router must support WPS (WiFi Protected Setup).
Follow the instructions in the display
If the connection fails, you have probably not connected WPS to your router quickly enough. Repeat the steps above.
Tip: If your WiFi router does not support WPS, please connect via the Miele@mobile app.
Connecting via the app
The Miele@mobile app can be used to connect to your network.
Install the Miele@mobile app on your mobile device.
Follow the instructions in the app.
To log in you will need:
Your WiFi network password
The password for your tumble dryer
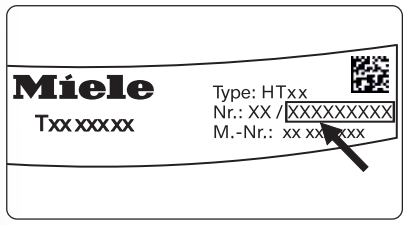
The password for your dryer consists of the last nine digits on the serial number. This can be found on the appliance's data plate
If the connection is successful, the following will appear in the display:
Confirm with the OK sensor button.
Completing the procedure for initial set-up outlined in these instructions
Confirm with the OK sensor button.
Please see “1. Notes on correct laundry care”.
You can then select a program and load the tumble dryer as described in Selecting a program” and “3. Loading the tumble dryer”.
Once a full program cycle is completed the settings will be saved.
1. Notes on correct laundry care
Points to note regarding washed laundry
When washing very heavily soiled items, ensure that you use sufficient detergent and select a high temperature. If in doubt, wash the items several times.
Do not load the drum with items that are still soaking wet. Make sure your laundry is spun at the maximum spin speed before drying. The higher the spin speed, the greater the savings that can be made in energy and time during drying.
New dark colored garments should be washed and dried separately from light colored garments. There is the risk of colors running and discoloring other garments or even plastic components in the dryer. Dark colored fibers can also settle on light colored garments and vice versa.
Starched laundry can be tumble dried. To achieve the usual finish, double the amount of starch should be used.
Preparing the laundry before drying
WARNING Damage due to foreign objects which were not removed from the laundry. Foreign objects can melt, burn, or explode. Ensure that any foreign objects (e.g., detergent dispensing balls, lighters, etc.) have been removed from the laundry.
Risk of fire due to incorrect use and operation. The laundry can burn and destroy the dryer and the surroundings. Read and observe “IMPORTANT SAFETY INSTRUCTIONS”.
Sort the laundry according to the type of fiber and weave, size, garment care label symbol, and the drying level required.
Check seams and stitching to ensure that padding and linings are intact.
This way you will avoid the danger of fillings coming out. These could catch fire when being dried.
Untangle the laundry.
Tie together textile belts and apron ties.
Fasten duvet covers and pillow cases to prevent small items from being rolled up inside them.
Fasten hooks and eyes.
Leave jackets open and undo any long zippers so that textiles dry evenly.
Sew in or remove underwiring from bras.
If necessary, reduce the size of the load for these types of fabric. Easy care fabric tends to crease more, the larger the load. This is particularly the case for garments made from very fine weave fabric, such as dress shirts or blouses.
Drying
Tip: See the “Program chart”. This describes the programs and gives their maximum load.
Always observe the maximum recommended load for each program. This will mean that the energy consumption for the amount of laundry is at its most economical.
Down-filled garments have linings which have a tendency to shrink, depending on the quality of the item. Only use the Smoothing program for these items.
You should only tumble dry pure linen if it is specified as suitable by the manufacturer on the care label, as the surface of the fabric may otherwise become rough. Only use the Smoothing program for these items.
Woolens and wool blends tend to become matted and shrink if tumble dried. Only use the Woolens/Silks program for these items. Jersey fabrics (e.g., T-shirts, underwear) tend to shrink when they are washed for the first time. Therefore, do not over-dry the fabrics to prevent them from shrinking further. Buy jersey fabrics that are one or two sizes bigger.
Select the extra Gentle option for fabric which is particularly heatsensitive or susceptible to creasing.
Selecting the right drying level
Extra dry or Normal Plus if you want to fold the laundry after drying and put it in the closet.
Normal or Slightly dry for textiles that can shrink. Or for light cotton or jersey textiles.
Hand iron or Machine iron if you want to iron the laundry after drying.
2. Selecting a program
Switching on the tumble dryer
The tumble dryer is switched on when you select a program, and switched off by turning the program selector to the position.
Turn the program selector to a program.
When a program is selected, the program name and the maximum load weight of dry laundry) possible for the program will appear in the display for a few seconds.
Selecting a program
There are three possible ways to select a program.
1. Selecting the standard programs with the program selector dial
Turn the program selector.
The selected program will be shown in the display. This will then be replaced by the standard display.
2. Selecting further programs via the “More programs/” position and the display:
Turn the program selector.
The following appears in the display:
Touch the sensor buttons until the program you want appears in the display.
Confirm the program with the OK sensor button.
The selected program will be shown in the display. This will then be replaced by the standard display.
3. Selecting the programs via the MobileControl and theMiele @mobile app
Tip: In order to use MobileControl , the dryer must be logged on to the WiFi network and remote control must be switched on.
Turn the program selector.
Follow the instructions in the display.
Touch the Start/Stop sensor button.
The dryer can now be operated via a mobile device together with the Miele@mobile app.
3. Loading the tumble dryer
Please see “1. Notes on correct laundry care” first. This prevents damage to textiles or the dryer.
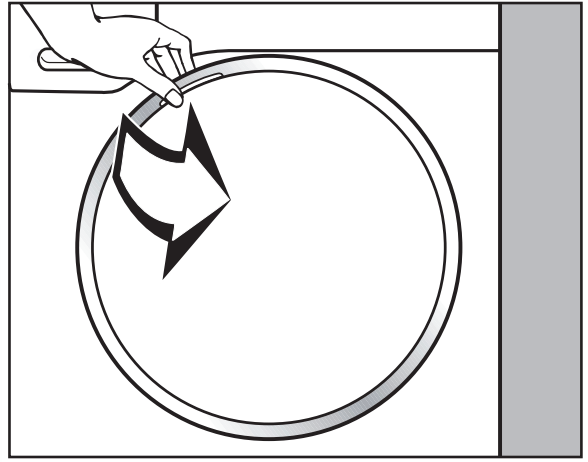
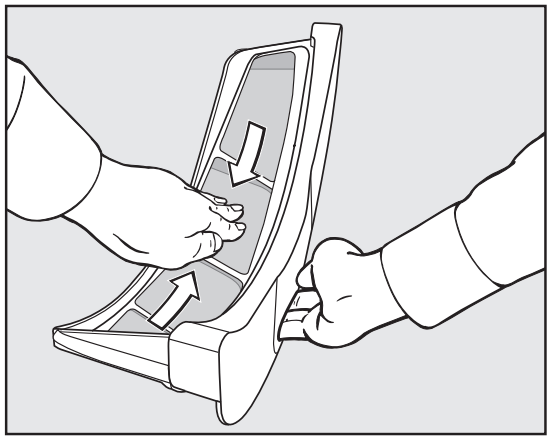
Opening the door
Pull the door open at the side with the orange marker.
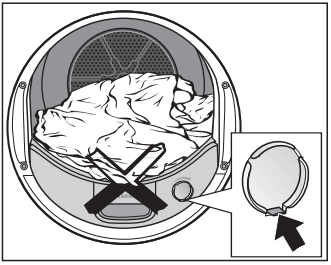
Unfold the laundry and load loosely into the drum.
WARNING Do not overload the drum. Overloading can cause unnecessary wear and tear to the laundry, give a disappointing drying result and cause more creasing.
WARNING When closing the door, make sure that laundry does not get trapped in the door opening. This could damage the laundry
If you are not using a fragrance capsule: The tab must be pushed down completely (see arrow).
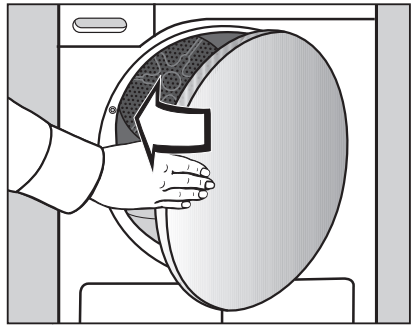
Closing the door
Shut the door with a gentle swing.
4. Selecting program settings
Program settings
Selecting drying levels during drying level programs
The pre-set drying level can be changed if required
Touch the sensor buttons to select a drying level.
Any drying level can be selected for the Normal and Express programs. A more limited range is available when using the other programs.
Time-controlled and other programs
Time Dry, Cold Air, Basket
You can change the duration in 10- minute increments.
Cold Air: 20 min – 1:00 h Time Dry: 20 min – 2:00 h Basket: 40 min – 2:30 h
Touch the sensor buttons to select a duration.
Woolens/Silks, Proofing
The drying result is preset by the dryer and cannot be altered.
Selecting an extra option
Touch a sensor button to select the desired extra option.
The relevant sensor button will light up brightly.
Freshen up and Gentle cannot be combined, see “Extra options” for additional notes.
EcoFeedback
You can use the sensor button to call up an energy consumption forecast for your dryer.
Touch the sensor button.
The estimated energy consumption levels will be displayed as a bar chart.
The more bars visible (I), the higher the energy consumption.
Touch the OK sensor button or wait until the display automatically returns to the standard display.
Delay start/SmartStart
Delay start
With the delay start function, you can delay the start of the program.
This function is active when the setting SmartGrid is switched off.
The hours can be set in the values from 00 to 24. The minutes can be set in 15- minute increments from 00 to 45.
Setting the delay start time
Touch the sensor button. The following will appear in the display:
Set the hours with the sensor buttons. Confirm with the OK sensor button.
The display will change:
Set the minutes with the sensor buttons. Confirm with the OK sensor button.
Tip: The values will count upwards and downwards automatically if you keep your finger on the sensor button.
Changing delay start The selected delay start time can be changed before the program start.
Touch the sensor button.
If desired, change the specified time and confirm with the OK sensor button.
Canceling delay start The selected delay start time can be canceled before the program start.
Touch the sensor button. The selected delay start time will appear in the display.
Set a time value of 00:00 h with the sensor buttons. Confirm with the OK sensor button.
The selected delay start time has been canceled.
After the program start, the selected delay start time can only be changed or deleted by interrupting the program.
SmartStart
The SmartStart function lets you define a time period during which your dryer will start automatically. The start takes place via a signal, e.g., from your energy supplier, that indicates that the electricity rate is particularly economical. Please check with your local utility provider for availability.
This function is active when the SmartGrid setting is switched on.
The time period can be defined between 15 minutes and 24 hours.
During this period, the dryer waits for the signal from the energy supplier. If no signal is sent during the defined period, the dryer starts the drying program.
Setting the timeframe
If you have activated the SmartGrid function in Settings, SmartStart in instead of Start in will appear in the display when you press the sensor button (see “Settings – SmartGrid”).
The procedure for setting this is the same as for setting the time for delay start.
Use the sensor buttons to enter the hour and confirm your entry with the OK sensor button.
The hour will be saved and the minute number pad will be highlighted.
Use the sensor buttons to enter the minutes and confirm your entry with the OK sensor button.
Press the Start/Stop sensor button to start the drying program with SmartStart.
The following will appear in the display:
5. Starting a program
Touch the flashing Start/Stop sensor button.
The Start/Stop sensor button will light up and Drying appears in the display.
Notes
If a delay start time has been selected, then this will count down on the time display. At the end of the delay start time or immediately after the program has started (if no delay start time has been selected), the program duration will appear on the time display.
With a longer delay start time, the drum will rotate occasionally to untangle the laundry. This is not a fault.
The Perfect Dry indicator will only flash/light up with programs with selectable drying levels
This dryer measures residual moisture content in the laundry to ensure perfect drying results.
However, if you load the dryer with little or dry laundry, it will be dried/ aired for a set duration. In this case, Perfect Dry does not light up at the end of the program.
WARNING Avoid overdrying items of laundry and garments. Otherwise they can wear out!
The drying level reached for the selected drying level program will light up in the display.
If End/Cooling down appears, the laundry has cooled down, but the program is not yet finished.
Energy savings
After 10 minutes, the indicators dim and the Start/Stop sensor button starts flashing.
Touch the Start/Stop sensor button to switch the indicators on again (this does not have any effect on a running program).
The drum lighting switches off once the program has started.
6. Program end – removing the laundry
Program end
The program is finished when End/AntiCrease or End appears in the display. The Start/Stop button light goes out.
The dryer will switch off automatically minutes after the end of the Anticrease phase (with programs without an Anti-crease phase it will switch off minutes after the end of the program).
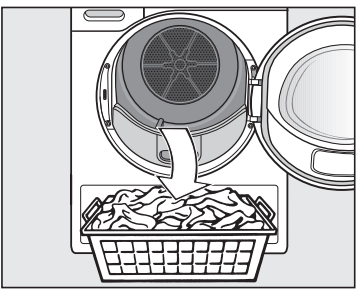
Removing the laundry
Only open the door when the drying process has finished. Otherwise, the laundry will not be properly dried through and cooled down.
Pull the door open at the side with the orange marker.
Remove the laundry.
Items left in the dryer could be damaged by over-drying when the dryer is used the next time. Always remove all items from the drum.
Turn the program selector to
Remove the lint from the 2 lint filters in the door opening: see the “Cleaning and care – Lint filters”
WARNING You must remove the fragrance capsule (if present) beforehand. See “Fragrance capsule”.
Shut the door with a gentle swing.
Empty the condensed water container, if used.
Drum lighting
The inside of the drum lights up so that you don't forget any items of laundry when you empty it. The drum lighting switches off automatically (energy saving).
EXTRA OPTIONS
The drying programs can be augmented with various extra options. However, Freshen up and Gentle cannot be combined.
Gentle
Delicate fabrics (with the symbol on the care label, e.g., acrylic garments) are dried at a lower temperature and the program duration is longer.
Freshen-up
You can use the Freshen up option to help remove or reduce odors in clean dry or damp) clothing.
The drying air is heated up for a specific length of time. After this, the garments are aired to the Normal drying level without any more heat being added.
The drying level cannot be altered.
The option will be more effective if you dampen the garments a little beforehand, use a fragrance capsule, and reduce the load. Please note that odors will not be removed as effectively from parts of garments made of synthetic fibers.
Anti-Crease
After the program has finished, the drum will continue to rotate in a certain rhythm for 2 hours, depending on the selected program. This “Anti-crease rhythm” helps to prevent creasing, if the laundry is not removed immediately after the end of a program.
Buzzer
A buzzer sounds to let you know the program has finished. The continuous buzzer which sounds during error messages is independent of this setting.
Selectable extra options
These extra options can be selected in addition to the program.
These extra options cannot be combined with one another
Can be selected
Cannot be changed/Always active
Cannot be selected
CHANGING THE PROGRAM SEQUENCE
You cannot change to another program once a program has started (this prevents unintentional alterations).
If you try to change a program, Change not possible lights up until the original program is reset.
Exception: The dryer is switched off by turning the program selector to the position.
You will need to cancel the current program before you can select a new one.
Canceling a program
Touch the Start/Stop sensor button. Cancel Program lights up.
Confirm with the OK sensor button. End/Cooling down will light up in the display, depending on the drying duration and the drying temperature reached.
If Program Canceled appears:
Turn the program selector to .
Selecting another program
Close the door.
Turn the program selector to another program.
Touch the Start/Stop sensor button.
Adding or removing laundry
Risk of burns when touching hot laundry of the dryer drum. You could burn yourself. Let the laundry cool down and remove it carefully.
Pull open the door.
Add or remove items.
Close the door.
Touch the Start/Stop sensor button.
The program starts.
Program duration
Altering the program sequence can cause the program duration shown in the display to be adjusted.
CONDENSED WATER CONTAINER
Emptying the condensed water container
The condensed water is collected in the condensed water container.
Empty the condensed water container after every drying program.
The Empty container See indicator will light up if the maximum level of the condensed water container is reached.
To turn the indicator light off: open and close the door while the dryer is switched on.
Remove the condensed water container.
To prevent water from running out, keep it in a horizontal position when carrying it. Hold the condensed water container at the front and towards the back.
Empty the condensed water container.
Replace the condensed water container in the dryer.
It can cause health problems in people and animals.
Do not drink condensed water.
You can use the condensed water in the household (e.g., for steam irons or humidifiers). For this, however, you should pour the condensed water through a fine sieve or a coffee filter bag. This filters the finest pieces of lint, which could possibly cause damage, out of the water.
FRAGRANCE FLACON
Using a fragrance capsule (optional accessory) will add a pleasant fragrance to your laundry.
Before using a fragrance capsule, please read “Important safety instructions – Using a fragrance capsule (optional accessory)”.
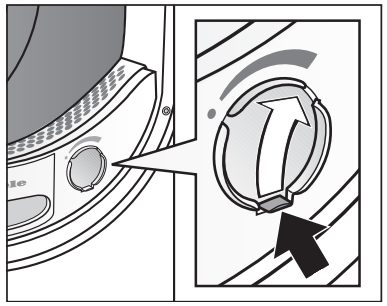
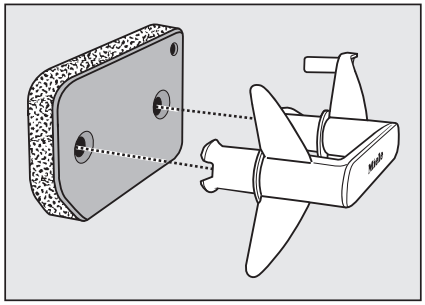
Inserting a fragrance capsule
Only hold the fragrance capsule as illustrated. Do not hold it at an angle or tip it as the fragrance will run out of the capsule.
Hold the capsule securely to prevent opening it by mistake.
Pull off the protective seal.
Open the door of the tumble dryer.
The fragrance capsule is inserted in the upper lint filter. The opening for this purpose is on the right-hand side beside the grip.
WARNING If you are not using a fragrance capsule: the cover must always remain closed (push the cover down completely with the tab).
Open the cover using the tab until the tab is at the top right-hand side as shown.
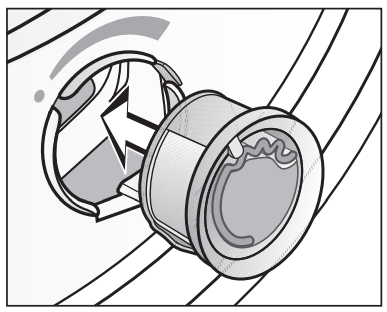
Insert the capsule in the opening as far as it will go.
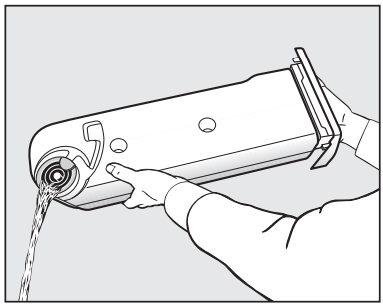
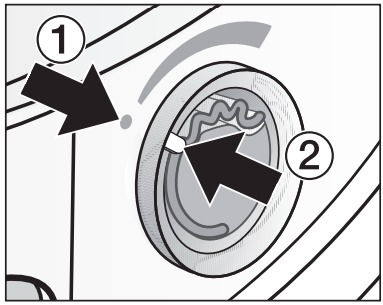
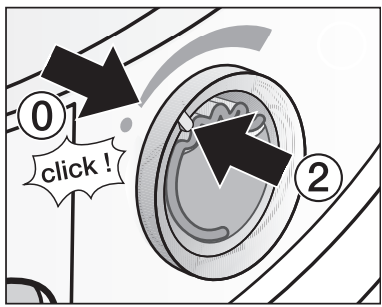
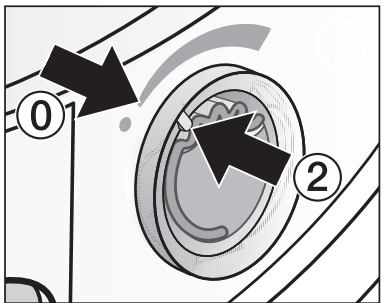
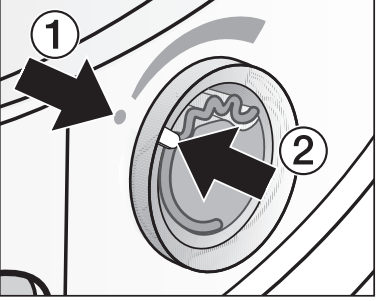
Markers (1) and (2) must line up with one another.
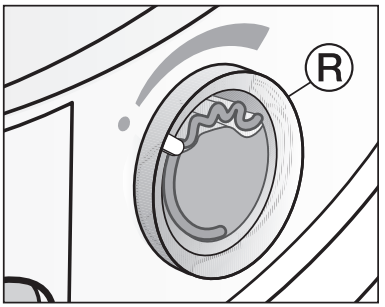
Turn the outer ring (R) clockwise a little.
– You will feel a slight resistance and hear a soft click.
Marker (2) must be in position (0): this is the position at which you can feel a resistance.
Before drying
You can select the intensity of the fragrance.
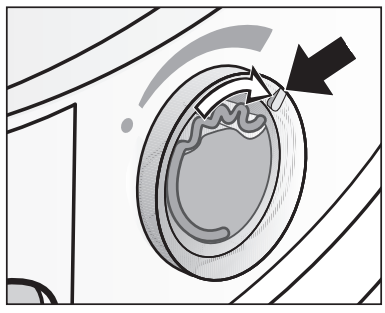
Turn the outer ring clockwise a little.
The further you open the capsule, the more intense the fragrance.
Damp laundry and longer drying durations with sufficient heat transfer are needed for the fragrance to be released into the laundry effectively.
The fragrance will also be noticeable in the room air during the process. The Cool Air program will not generally apply fragrance.
After drying
To avoid the fragrance escaping needlessly:
Turn the outer ring counterclockwise until marker (2) is in position (0).
You will feel a slight resistance. If you want to run the drying cycle without the fragrance capsule from time to time
Remove the fragrance capsule and store it in its original packaging.
Replacing the fragrance capsule
When the fragrance is no longer sufficiently intense:
Turn the outer ring counterclockwise until markers (1) and (2) line up.
Replace the fragrance capsule with a new one.
Fragrance capsules are available to order from Miele dealers or online.
WARNING Never lay the fragrance capsule down on any surface as the fragrance will run out.
Only store the fragrance capsule in its original packaging
When storing the fragrance capsule in its original packaging while you are not using it, e.g., while cleaning the tumble dryer: To prevent the fragrance running out, do not store the packaging upright on its edge or upside down.
Store in a cool, dry place
Store away from direct sunlight
When purchasing new fragrance capsules: Only remove the protective seal just before use
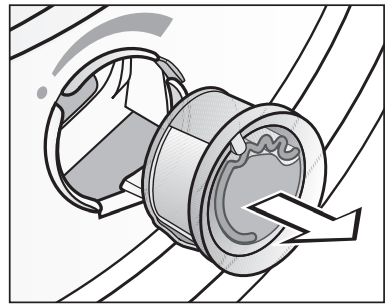
Cleaning the lint filters
The intensity of the fragrance will be diminished if the lint filters and the plinth filter are not cleaned.
WARNING The fragrance filter must be removed before cleaning the lint filter.
WARNING To prevent any fragrance running out of the capsule: When not in use, the fragrance capsule must only be stored in its original packaging as illustrated.
Clean the lint filters and the plinth filter: see “Cleaning and care”.
CLEANING AND CARE
Lint filters
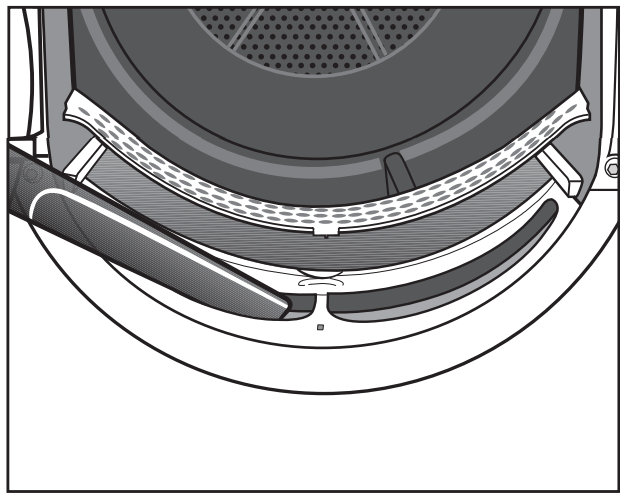
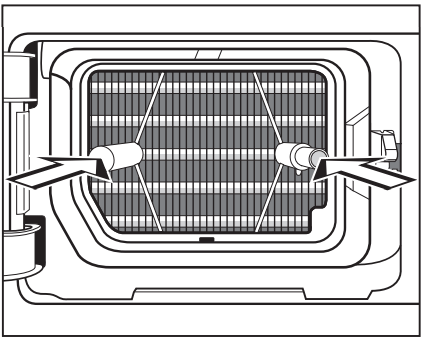
This tumble dryer has 2 lint filters in the door opening: the upper and lower lint filters trap lint produced during the drying process.
NOTE: Clean the lint filters after each drying program. This prevents an extension of the program duration.
NOTE: Also clean the lint filters when Clean plinth filter. See lights up. To turn the indicator light off: Switch the dryer off and then on again / if necessary, confirm with OK.
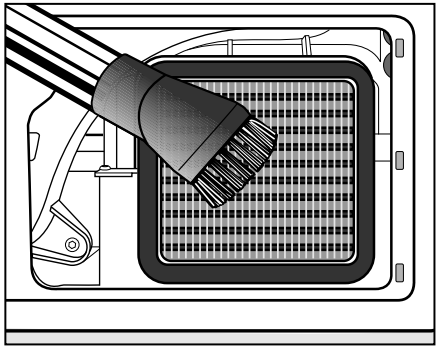
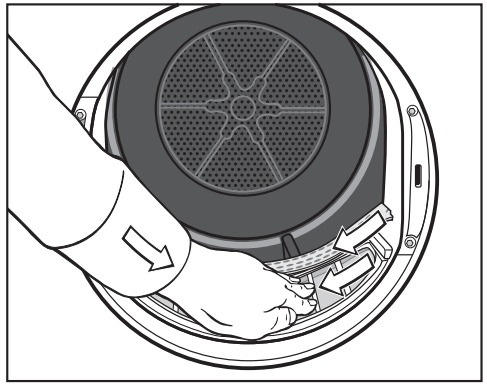
Removing visible lint
Tip: You can also use a vacuum cleaner so that you can remove the lint without touching it.
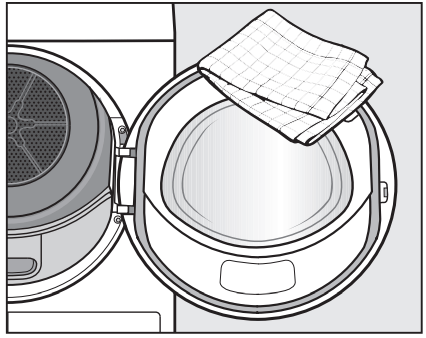
Open the door.
You must remove the fragrance capsule (if present) beforehand. See Fragrance capsule”.
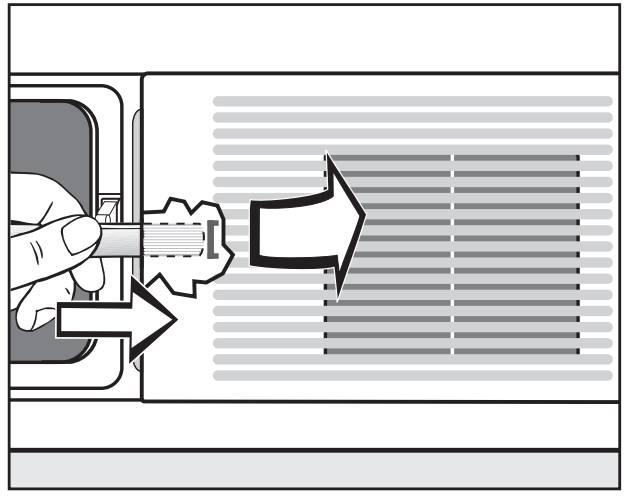
Pull the upper lint filter forward to remove it.
Remove the lint (see arrows).
Remove the lint (see arrows) from the filter surface of all the lint filters and the perforated laundry deflector.
Push the upper lint filter back into position until it clicks.
Close the door.
Cleaning the lint filters and air flow openings thoroughly
If the drying duration has become longer or the surface of the filters is visibly compacted with lint, you should carry out the following cleaning procedure.
Remove the fragrance flacon. See Fragrance flacon”.
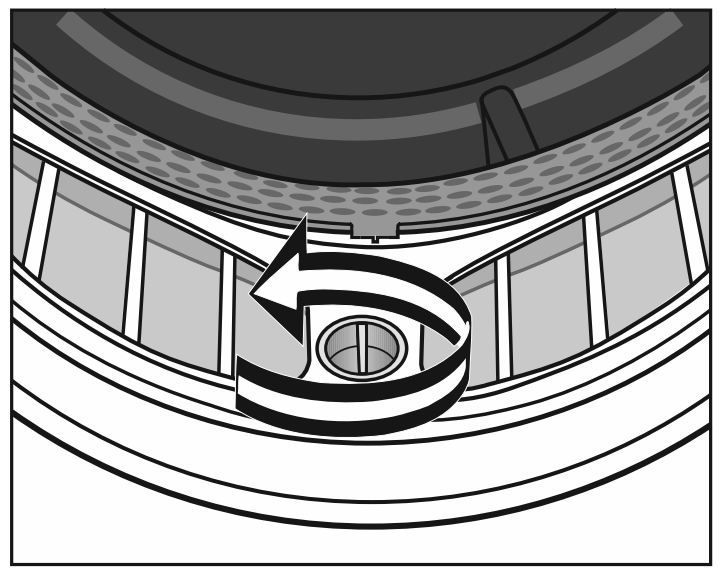
Pull the upper lint filter forward to remove it.
Turn the yellow dial on the lower lint filter in the direction of the arrow (until you hear it click).
Hold the dial and pull the lint filter forward to remove it.
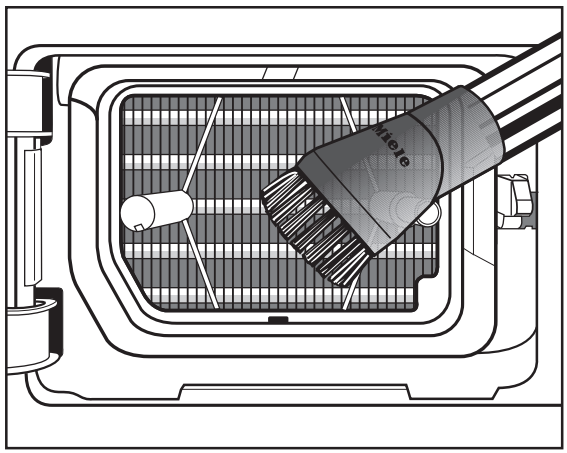
Use a vacuum cleaner with a long crevice nozzle attached to remove any visible lint from the upper air flow openings.
Finally, clean the lint filters with water.
Cleaning the lint filters with water
Wipe the smooth plastic surfaces of the lint filters with a damp cloth to clean them.
Flush the lint filters through with warm running water.
Shake the lint filters thoroughly and then dry them carefully.
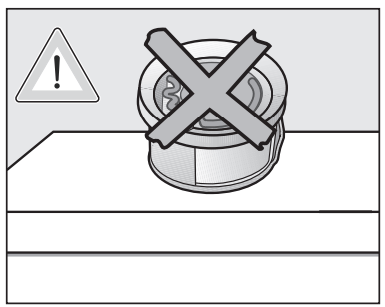
Ensure the filters are dry before replacing them. Wet filters could cause operational faults.
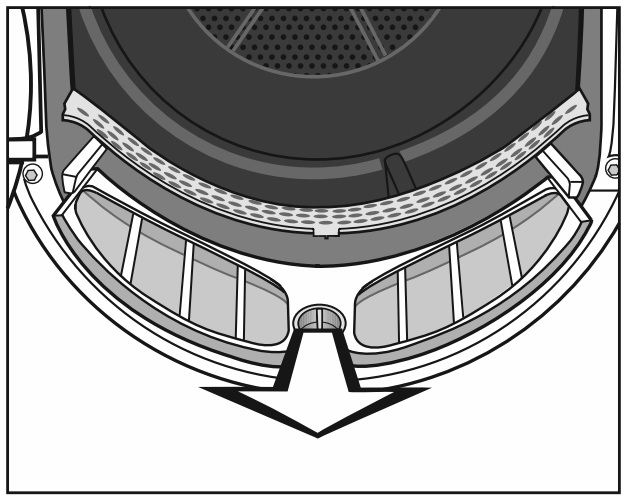
Push the lower lint filter in completely and lock it with the yellow dial.
Push the upper lint filter in completely.
Close the door.
Cleaning instructions when using fabric softener sheets
If you are using fabric softener sheets, please follow these warnings and instructions.
NOTE
First, clean the filters as described in “Cleaning the lint filters with water”. If the surfaces of the lint filters are still strongly compacted with lint, then follow these measures. Please note the plastic and surfaces of the lint filters can be damaged by the cleaning process described below.
If the surfaces of the lint filters are not cleaned, this can extend the drying time and increase the energy consumption.
Option 1
Wipe the surfaces of the lint filters several times with a cleaning cloth with an alcohol base until you have removed the impurities/obstructions.
Option 2
Clean the lint filters in the dishwasher without any other dishes. Use a hightemperature program.
Option 3
Wet the surfaces of the lint filters with a liquid color detergent (e.g., Miele Ultra Color Liquid Laundry Detergent).
Leave it on for approx. 2 hours.
Risk of fire! Then rinse the filter surfaces thoroughly with warm water to remove all residues.
Cleaning the plinth filter
WARNING Clean the plinth filter whenever the Clean plinth filter. See lights up or when the program duration is longer than usual. To turn the indicator light off: Switch the dryer off and then on again / if necessary, confirm with OK.
Removing the plinth filter
Press the round, indented area on the heat exchanger access panel to open it.
The panel will spring open.
Pull the plinth filter out by the handle.
This causes the right-hand guide pin in the dryer to come out. This pin ensures that the heat exchanger access panel can only be closed if the plinth filter is inserted the right way round.
Cleaning
Pull the handle out of the plinth filter.
You can brush off a heavy build-up of lint on the plinth filter or remove it with a vacuum cleaner.
Clean the plinth filter thoroughly under clear, running water.
WARNING Do not add any chlorinecontaining cleaning agents or detergents to the water. In the long run, these detergents could damage the plinth filter material and make it brittle.
WARNING The plinth filter must not be replaced dripping wet. This can cause a fault.
Carefully squeeze the water out of the plinth filter.
Use a damp cloth to remove any lint from the handle.
Cleaning the plinth filter flap
Use a damp cloth to remove any lint. Make sure that you do not damage the rubber seal when doing this.
Check whether the cooling fins are blocked with lint (as follows).
Checking the heat exchanger unit
Risk of injury from sharp cooling fins. You could cut yourself. Do not touch the cooling fins with your hands.
Look to see if lint has accumulated. If there is visible soiling:
WARNING: Damage due to incorrect cleaning of the heat exchanger. The dryer will not dry if the cooling fins are damaged or bent. Use a vacuum cleaner with a dusting brush attached to clean the cooling fins. Only pass the vacuum cleaner brush over them lightly, without applying any pressure.
Carefully vacuum up any visible lint or dirt.
Inserting the plinth filter
Fit the filter back on the handle. Make sure it is the correct way round.
To ensure that the filter is positioned correctly in front of the heat exchanger unit:
First insert the handle with the plinth filter attached over the two guide pins:
The word Miele on the handle must be the correct way up.
Push the plinth filter in completely: This will push in the right-hand guide pin at the same time.
Close the heat exchanger flap.
WARNING Damage or ineffective drying if drying takes place without a plinth filter or when the heat exchanger flap is open. Excessive accumulations of lint can damage the dryer in the long term. If the system is not leak-tight, this can make the drying ineffective. You may only operate the dryer with the plinth filter fitted correctly and the heat exchanger flap closed
Cleaning the dryer
Disconnect the tumble dryer from the electrical supply.
WARNING Damage due to the use of unsuitable care products. Unsuitable care products could damage plastic surfaces and other parts. Do not use any solvents, abrasive cleaners, glass cleaners, or allpurpose cleaners.
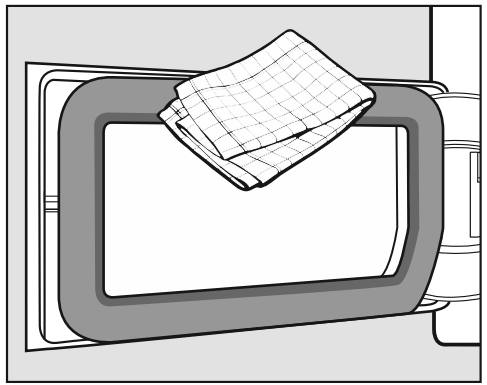
Clean the tumble dryer and the seal on the inside of the door with a slightly damp soft cloth and a mild solution of liquid dish soap and water.
Dry all the parts with a soft cloth.
Frequently Asked Questions
Message
Possible cause and solution
000 lights up after switching on.
Access via a PIN code has been activated.
■ You can enter the code.
See “Settings - PIN Code”.
End/Cooling down
The laundry will be cooled down at the end of the program.
■ Either remove the laundry and spread it out to cool down or leave it in the tumble dryer to cool down during the cooling phase.
i Clean plinth filter. See lights up at the end of a program.
There is a build-up of lint in the airways.
■ Clean the lint filters.
■ Clean the plinth filter. See “Cleaning and care”. To switch off the message:
■ Confirm with OK.
Clean plinth filter. See lights up after a program has been interrupted.
An excessive amount of lint has built up.
■ Clean the lint filters.
■ Clean the plinth filter.
■ Clean the air duct area underneath the plinth filter.
■ Clean the heat exchanger.
To switch off the message:
■ Switch the dryer off and then on again.
Empty container See lights up after a program has been interrupted.
The condensed water container is full or there is a kink in the drain hose.
■ Empty out the condensed water container.
■ Check the drain hose.
To switch off the message:
■ Open and close the door while the dryer is switched on or switch the dryer off and back on again.
Blockage detected. See lights up after a program has been interrupted.
The laundry is unevenly distributed or has rolled up.
■ Open the door and untangle the laundry, and remove a few items, if necessary.
■ Switch the dryer off and then on again.
■ Start a program.
Service Fault F XXX lights up after a program has been interrupted.
There is no obvious cause.
■ Switch the dryer off and then on again.
■ Start a program.
If the program is interrupted again and an error message appears, there is a fault. Contact Miele Technical Service.
Unsatisfactory drying results
Problem
Possible cause and solution
The laundry is not sufficiently dry.
The load consisted of different types of fabric.
■ Finish drying using the Time Dry timed drying program.
■ Select a more suitable program next time.
Tip: You can alter the residual moisture level for some programs. See “Settings”.
The laundry or feather-filled pillows develop a smell after drying.
The laundry was washed with insufficient detergent. Feathers have the property of developing a significant odor when they are warm.
■ Laundry: use sufficient detergent.
■ Pillows: take out of the tumble dryer and air them.
■ Use a fragrance capsule (available as an optional accessory) for your favorite fragrance.
Items made of synthetic fibers are charged with static electricity after drying.
Synthetic fibers tend to attract static charge.
■ Static charge can be reduced by adding a fabric softener to the final rinse in the washing program.
There is a build-up of lint.
Lint is principally the result of friction when garments are being worn and to some extent when they are being washed. Machine drying hardly causes any lint to form.
Lint is collected by the lint filters and the plinth filter and can be removed easily.
■ See “Cleaning and care”.
The drying cycle duration is very long.
Problem
Possible cause and solution
The drying process goes on too long or even switches off.*
The room in which the tumble dryer is located is too warm.
■ Ventilate the room thoroughly.
Detergent residues, hair, and fine lint can clog the filters.
■ Clean the lint filters and the plinth filter.
■ Remove visible lint:
. . . on the bottom left, behind the flap in the heat exchanger cavity (see “Cleaning and care”);
. . . at the bottom right of the cooling fins behind the grille (see the end of this section).
The laundry is unevenly distributed or has rolled up. The tumble dryer has been overloaded.
■ Untangle the laundry and remove a few items.
■ Start a program.
The cool air intake (bottom right grille) is blocked.
■ Move any objects, such as a laundry basket, away from the dryer.
The lint filters and the plinth filter were wet when replaced.
■ The lint filters and the plinth filter must be dry.
The laundry is too damp.
■ Spin using a higher spin speed in the washing machine.
Metallic components, e.g., zippers, have prevented the dryer from registering the correct moisture level.
■ Open the zippers next time.
■ If the problem recurs, dry these items using the Time Dry timed drying program.
General problems with the tumble dryer
Problem
Possible cause and solution
You can hear operating noises (buzzing/ humming).
This is not a fault.
The compressor (heat pump) is operating.
■ No action required. These noises are quite normal and can be heard when the compressor is operating.
A program does not start.
There is no obvious cause.
■ Connect the power plug.
■ Turn on the tumble dryer.
■ Close the door.
■ Check whether the fuse has tripped.
Power outage? When power is restored, any previously running program will restart automatically.
The display is dark and the Start/Stopbutton is flashing slowly
The display has switched off automatically to save energy (Standby mode).
The drum will turn at intervals in the Anti-crease phase.
■ Press any button. Standby will end.
The tumble dryer is switched off at the end of the program.
The tumble dryer switches off automatically. This is not a fault, but a normal function.
■ See “Settings - Appliance switch-off”.
The display is in a different language.
A different language has been selected in “Settings, Language ”.
■ Set the language you want. The flag symbol will guide you.
The interior drum lighting does not come on.
Not a fault. The drum lighting switches off automatically in the following cases:
If the door is closed.
If the door remains open for an extended period of time.
Bottom right grille
WARNING In general, the cooling fins behind the grille on the bottom right do not need cleaning. They should only be cleaned if the drying process is taking an exceptionally long time due to a very high level of dust or lint in the room in which the dryer is located.
First open the flap for the plinth filter (bottom left).
To remove the grille, the catch underneath it needs to be released using a teaspoon.
Insert a spoon handle underneath the grille in the middle.
Press the spoon handle against the catch and lever the grille open.
Remove the grille
WARNING Danger of injury! Do not touch the cooling fins with your hands. You could cut yourself.
WARNING Use a vacuum cleaner with a dusting brush attached to clean the cooling fins. Only pass the vacuum cleaner brush over them lightly, without applying any pressure. Take care not to bend the cooling fins out of shape or to damage them.
Carefully vacuum up any visible lint or dirt.
Re-insert the 3 hooks on the grille into the appropriate holes in the front of the dryer.
Press the grille firmly back into position by pressing it in at the middle on the left.

 sensor button increases the value or moves the selection list up; the
  sensor button decreases the value or moves the selection list down.


 position.

 position in the Settings
 sensor button until the language you want appears in the display.

 sensor button until the following appears in the display: Set up later. Confirm the message with the OK sensor button.

 position.
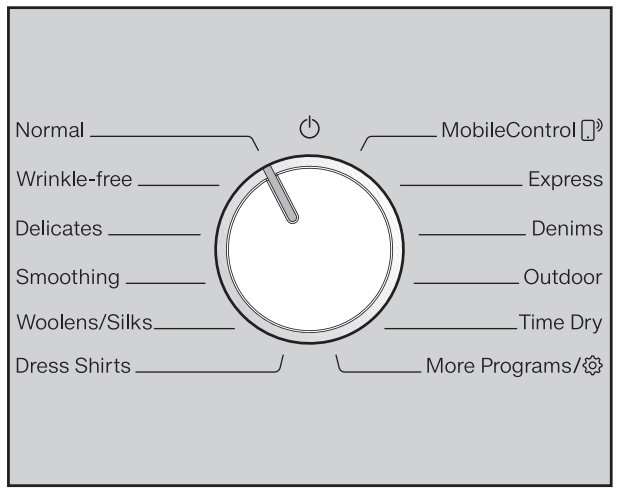
 ” position and the display:
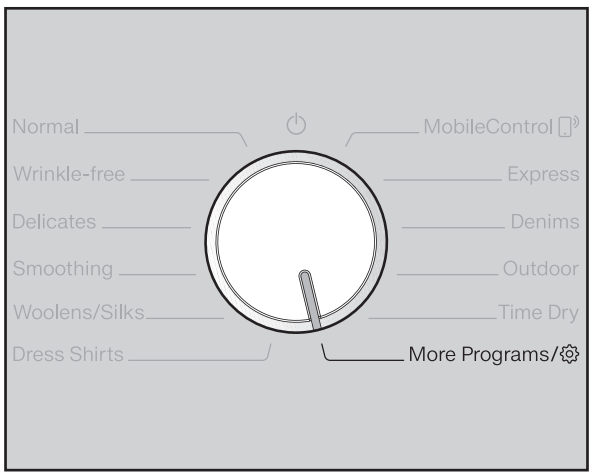

 sensor buttons until the program you want appears in the display.
 and theMiele @mobile app
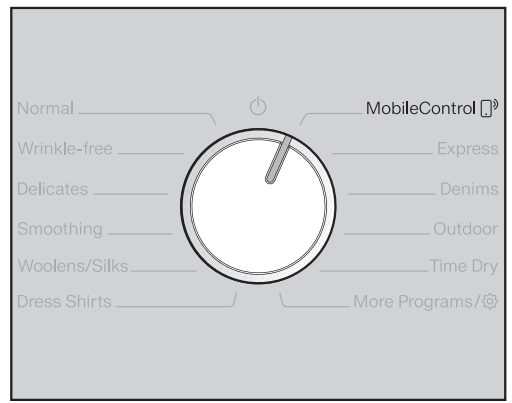

 sensor buttons to select a drying level.

 EcoFeedback
 sensor button to call up an energy consumption forecast for your dryer.
 Delay start/SmartStart
 sensor button. The following will appear in the display:
 sensor buttons. Confirm with the OK sensor button.
 sensor button.
 sensor buttons. Confirm with the OK sensor button.


 symbol on the care label, e.g., acrylic garments) are dried at a lower temperature and the program duration is longer.
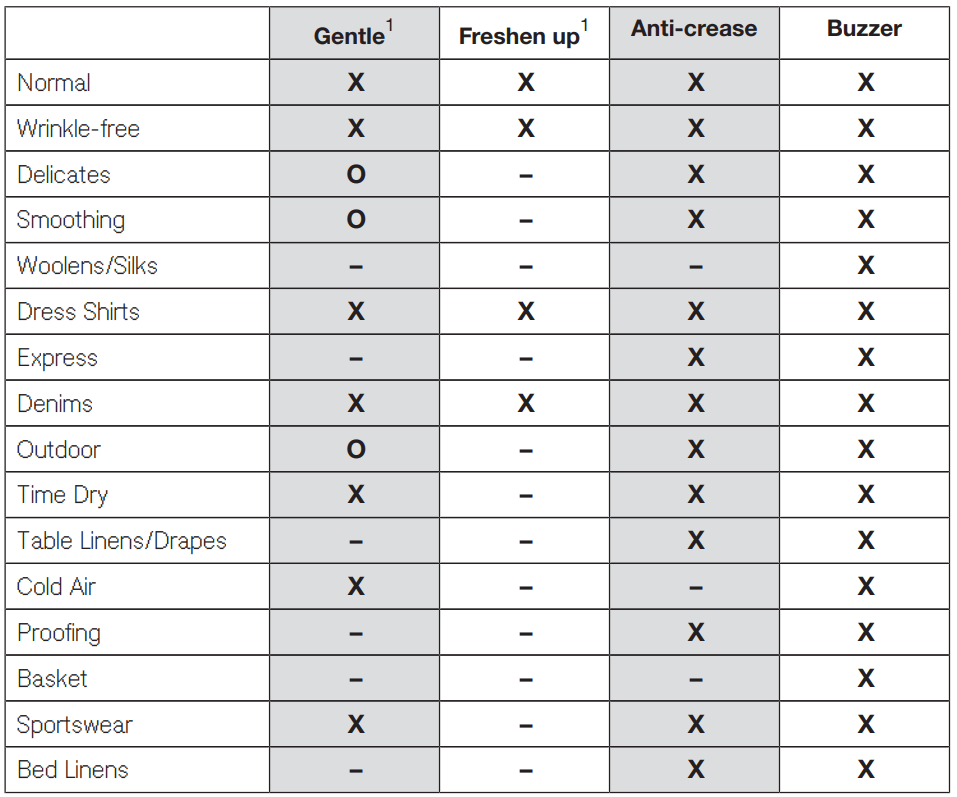
 These extra options cannot be combined with one another
 Can be selected
 Cannot be changed/Always active
 Cannot be selected
 Change not possible lights up until the original program is reset.
 position.
 indicator will light up if the maximum level of the condensed water container is reached.
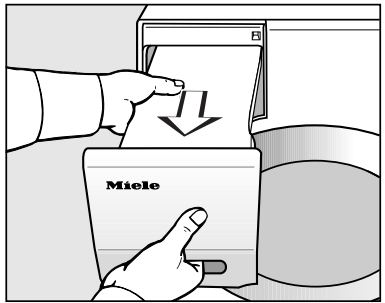
 lights up. To turn the indicator light off: Switch the dryer off and then on again / if necessary, confirm with OK.
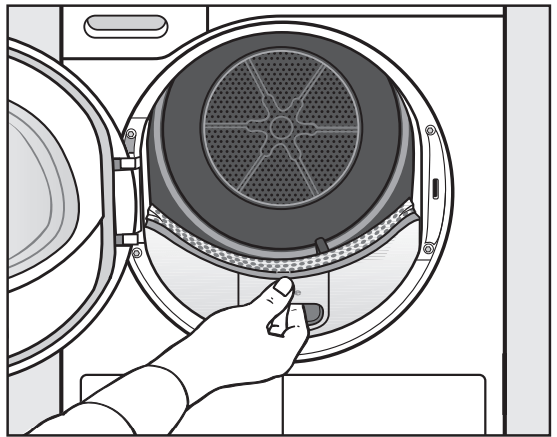
 lights up or when the program duration is longer than usual. To turn the indicator light off: Switch the dryer off and then on again / if necessary, confirm with OK.
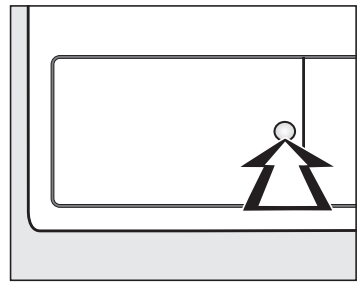


 lights up at the end of a program.
 Clean plinth filter. See
  Empty container See
  Blockage detected. See
  ”.
”.