Loading ...
Loading ...
Loading ...
4
Grease fi lters
The grease fi lters and the bottom panel should be cleaned
fr
equently. Use a warm detergent solution. Grease fi lters
are dishwasher safe.
Wash more often if your cooking style generates greater
grease - like frying foods or wok cooking.
Remove fi lters by pulling latch tabs and rotating fi lters
downward.
OPERATION OPERATION
Always turn ON your hood before you begin cooking in
order to establish an air fl ow in the kitchen. Let the blower run
for a few minutes to clear the air after you turn off the range.
This will help keep the whole kitchen cleaner and brighter.
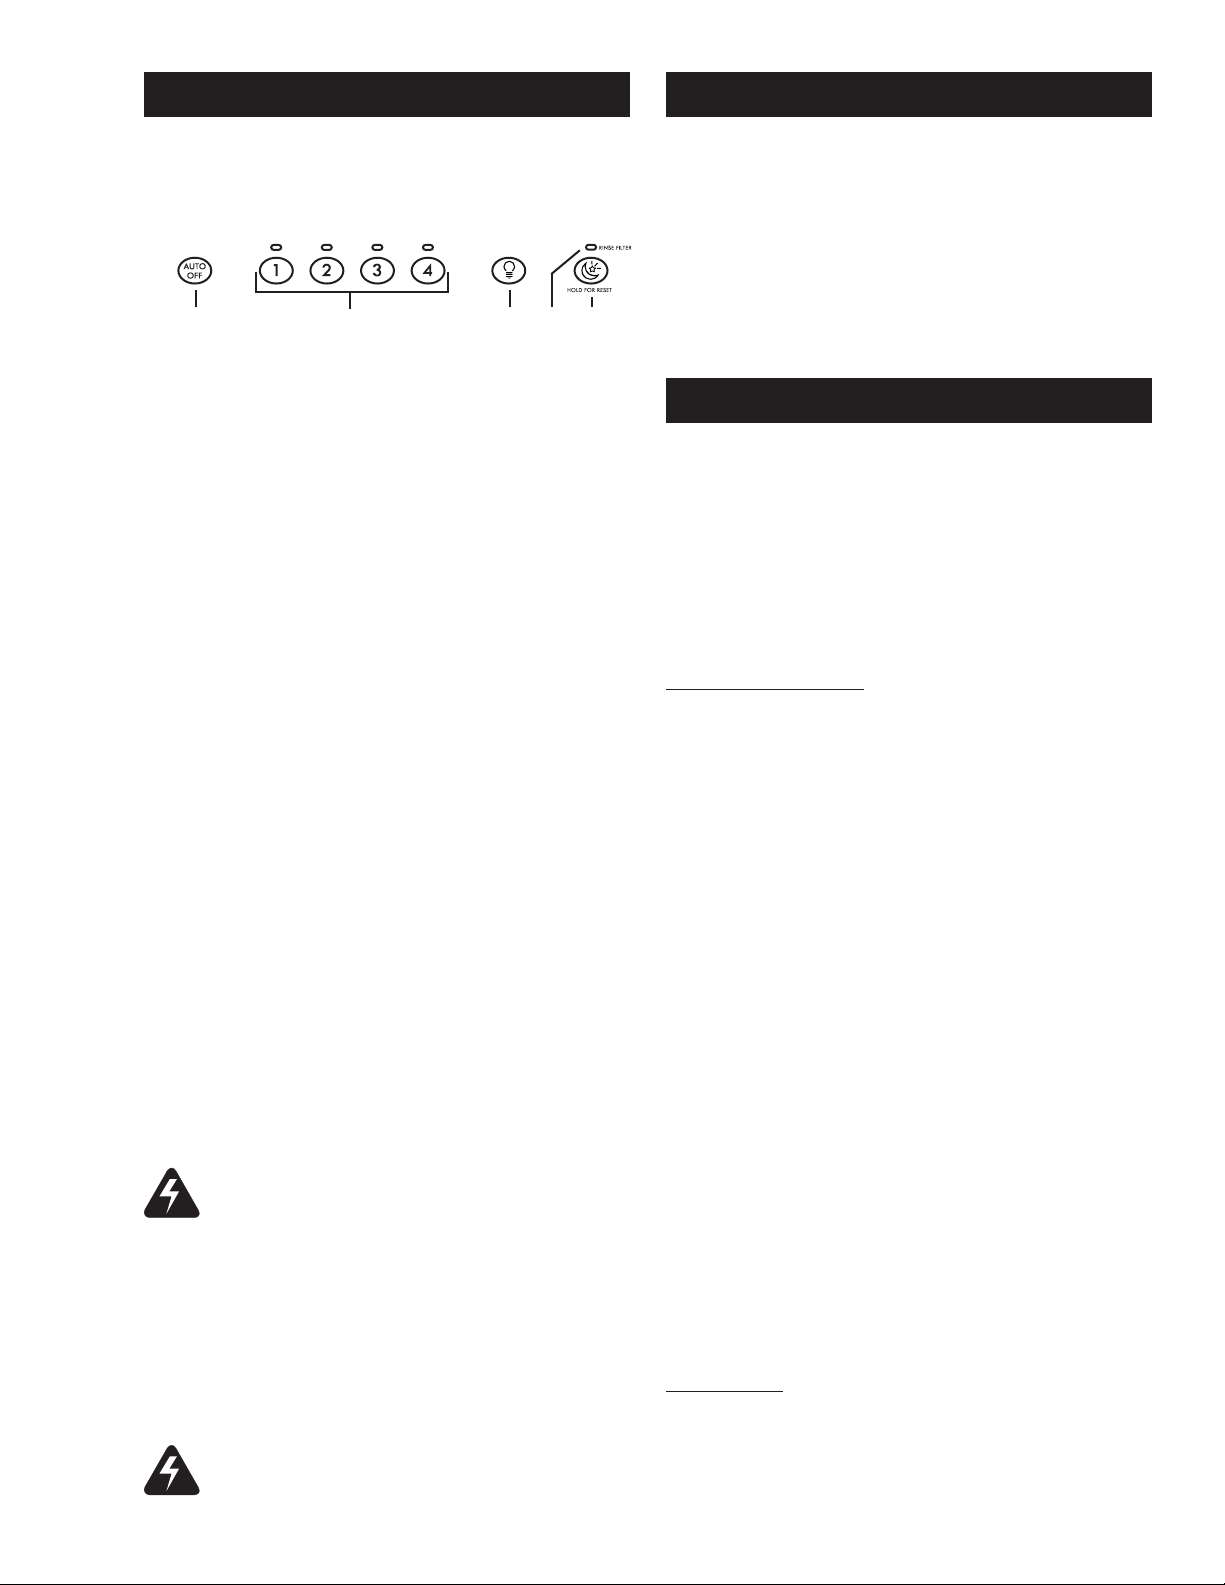
1. Blower Auto OFF switch 4. Filter maintenance indicator
2. ON/OFF Blower speed switches 5. Nightlight switch
3. Halogen lights switch
ON/OFF Blower speed switches
Press the switch corresponding to the desired blower speed.
The light over the switch indicates the selected speed (from 1
for low speed to 4 for high speed). To turn off the blower,
press once more on the corresponding blower speed switch.
NOTE: When speed 1 is chosen, the blower will operate
at high speed for less than one second and then
revert back to speed 1. This operation is normal
and is designed for optimal blower performance.
HEAT SENTRY™
Your hood is equipped with a HEAT SENTRY thermostat.
This thermostat is a device that will turn on or speed up the
blower if it senses excessive heat above the cooking surface.
The light indicator over speed 3 switch will quickly fl ash.
1) If blower is OFF - it turns blower ON to speed 3.
2) If blower is ON at a lower (or higher) speed setting - it
turns blower to speed 3.
When the temperature level drops to normal, the blower
will return to its original setting and the light indicator
over speed 3 switch will stop fl ashing.
Halogen lights switch
This switch provides 3 diff erent lighting levels, according
to your needs. The lighting intensity changes by increments
of 1 (e.g.: Press once for low intensity, once again to get
more, up to three times). From the higher intensity, press
once again to shut off the lights.
Uses 120 Volts, 50 W, MR 16 with GU10 base or PAR 16
with GU10 base, shielded halogen bulbs (included).
WARNING: The HEAT SENTRY thermostat can
start the blower even if the hood is turned OFF. If
this occurs, press the speed 3 switch until its light
indicator stops fl ashing if you must stop the blower.
Hood Cleaning
Stainless steel cleaning:
How to maintain its “BRIGHT LOOK”
Do:
- Regularly wash surfaces with clean cloth or rag soaked
with warm water and mild soap or liquid dish detergent.
- Always clean in the direction of original polish lines.
- Always rinse well with clear water (2 or 3 times) after
cleaning. Wipe dry completely.
- You may also use a specialized household stainless steel
cleaner.
Do not:
- Use any steel or stainless steel wool or any other
scrapers to remove stubborn dirt.
- Use any harsh or abrasive cleaners.
- Allow dirt to accumulate.
- Let plaster dust or any other construction residues
reach the hood. During construction/renovation, cover
the hood to make sure no dust sticks to stainless steel
surface.
Avoid when choosing a detergent:
- Any cleaners that contains bleach will attack stainless
steel.
- Any products containing: chloride, fl uoride, iodide,
bromide will deteriorate surfaces rapidly.
- Any combustible products used for cleaning such
as acetone, alcohol, ether, benzol, etc., are highly
explosive and should not be used close to a range.
Enamel Finish:
Clean with warm water and mild detergent only. If
discoloration occurs, use a good enamel polish such as
automotive polish. (DO NOT use rough abrasive cleaner
or porcelain cleaner).
Auto OFF switch
When a speed is selected, press the Auto OFF switch to
activate the delay function. The corresponding speed
indicator LED will start fl ashing to indicate this function is
activated. The fan will continue to operate for 5 minutes
and will stop automatically. To cancel the delay function,
press the Auto OFF switch once again; the blower will then
work in normal mode.
NOTE: The blower speed can be increased - or decreased -
during Delay mode without starting another
5-minute cycle.
15234
WARNING: In order to prevent the risk of
personal injury, do not install a lamp identifi ed
for use only in enclosed fi xtures.
Filter maintenance indicator
After 24 hours of operation, the fi lter maintenance light
indicator will start blinking. This indicates the fi lters need
to be cleaned in order to maintain effi cient operation of
the unit. The indicator light will blink until the function is
reset by pressing the nightlight switch for 3 seconds.
CLEANING
Nigthlight switch
Press this switch once to turn on the nightlight. Press this
switch once more to shut off the nightlight.
HC0049
Loading ...
Loading ...
Loading ...