Loading ...
Loading ...
Loading ...
8
blade. Thicker blades will require more pulls. After 3 pairs of pulls check for a burr as described
below and as necessary continue to make more pairs of pulls until you create a small burr along
the entire length of the blade.
If you are sharpening a contemporary Asian blade (which probably has been sharpened previ-
ously at 15 degrees) you will find that only a few (2-4) pairs of alternating pulls (alternating left
and right slots) will be needed to develop a burr. Do not over sharpen. When you have developed
a burr along the full blade length proceed to Stage 3.
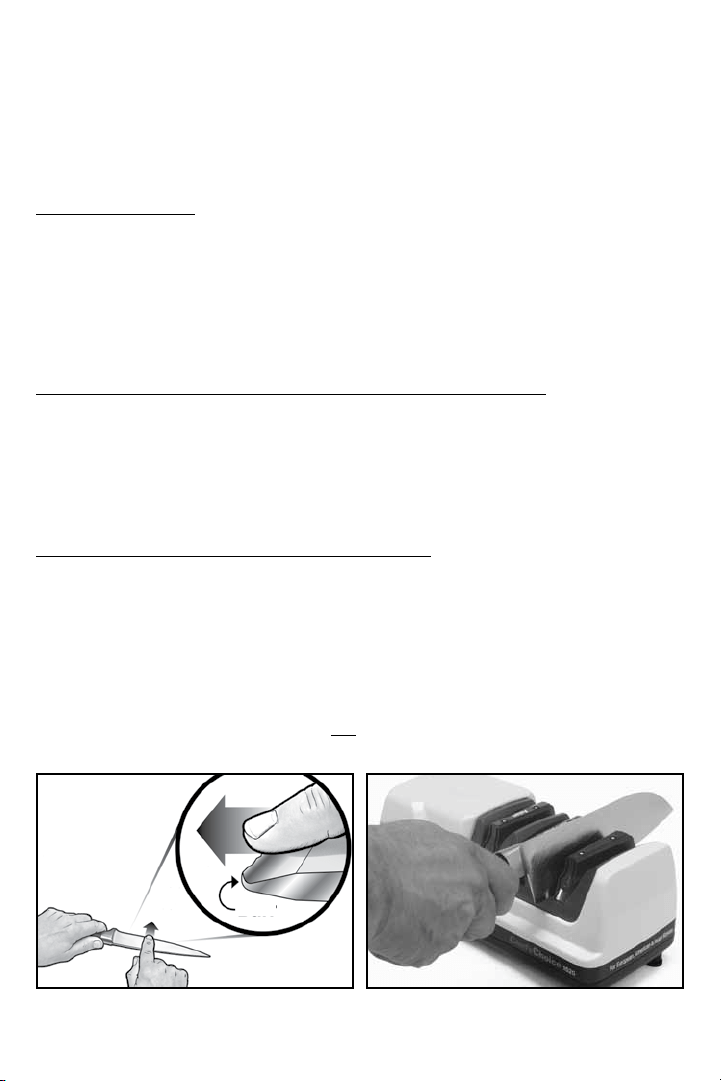
DETECTING THE BURR
To confirm the presence of a burr (see Figure 9) move your forefinger carefully across the edge
in the direction shown. Do not move your finger along the edge – to avoid cutting your finger. If
the last pull was in the right slot, the burr will appear only on the right side of the blade as you
normally hold it and vice versa. The burr, when present, feels like a rough and bent extension
of the edge; the opposite side of the edge feels very smooth by comparison. If there is no burr
continue sharpening in Stage 1, alternating left and right slots until a full burr develops. When a
burr is present along the entire blade length proceed as below to Stage 3.
STROPPING/POLISHING THE CONTEMPORARY ASIAN EDGE IN STAGE 3
Pull the blade through the left slot (see Figure 10) and then through the right slot of Stage 3.
Make 4 pairs of pulls, (each pull 4-5 seconds) alternating each pull in the left and right slots of
Stage 3. You should then make about 4 to 5 pairs of alternating faster pulls in this Stage, about
1-2 seconds per pull for a 5 inch (12 cm) blade to put a final polish on the edge.
Check the blade for sharpness. For a sharper edge make a few more pairs of fast pulls and
check for sharpness. Repeat this procedure as needed to create an exceedingly sharp edge.
RE-SHARPENING THE CONTEMPORARY ASIAN BLADES
Re-sharpen following the Stropping/Polishing procedure in Stage 3 as described above.
Depending on its use, you should be able to re-sharpen to a razor sharp edge 3 or more times
using only Stage 3 before finding it necessary to again hone in Stage 1. Hone in Stage 1 only
when you find it is taking too long or too many pulls in Stage 3 to bring the edge to razor sharp-
ness. In that event, follow the entire honing and stropping/polishing sequence in Stages 1 and
3 as described above.
Note: To recreate the special stronger Trizor
®
edge (discussed in the following section) on the
Asian style blades as you re-sharpen make two pair of pulls (3 second pulls) in Stage 2 after the
burr has been developed in Stage 1. Finish re-sharpening in Stage 3 as described in this section.
Burr
Figure 9. When you create a distinct burr along the
blade edge, it can be detected by sliding finger across
and away from the edge. Caution! See text.
Figure 10. Stropping/Polishing a contemporary Asian
knife in Stage 3.
Loading ...
Loading ...
Loading ...