You can hold the included accessories and the removed stitch finger in this front cover compartment. <A>: Needle set, <B>: Stitch finger (when removed, see CHAPTER 5 "Narrow overlock/ Rolled hemming stitch"), <C>: Tweezers, <D>: Hexagonal driver
*Air openings (on the side and back)
Powering the machine
Turning on the machine
Insert the three-pin plug into the socket on the bottom right side of the machine. Insert the power supply plug into a power outlet.
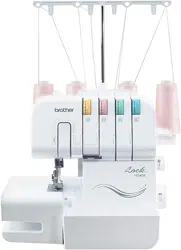
Turn the main power and light switch <A> to "I" mark (to "O" mark to turn off).
Operation
When the foot controller is pressed lightly, the machine runs at a low speed. As the foot controller is pressed further, the machine will increase speed. When the foot controller is released, the machine stops.
NOTE (For U.S.A. only):
Foot controller: Model KD-1902
This foot controller can be used on the machine with product code 884-B02 and 884-B03.
*The product code is shown on the machine rating plate.
Turning direction of hand wheel
The hand wheel <A> turns in a counterclockwise direction (direction of arrow). This is the same direction as an ordinary home sewing machine. The needles move to their highest positions by turning the hand wheel so that the mark <B> on the hand wheel is aligned to the line on the machine.
Opening/ Closing front cover
It is necessary to open the front cover when threading this machine. Slide it to the right (1) and open (2), or close it and slide it to the left.
Attaching/ Removing presser foot
Turn off the main power and light switch or disconnect the electric supply plug.
Raise the presser foot lever. (1)
Turn the hand wheel (2) so that the mark on the hand wheel is aligned to the line on the machine. (See CHAPTERT "Turning direction of hand wheel")
Push the button on the presser foot holder and the standard presser foot will be released. (3) (4)
Raise the presser foot farther by pushing the presser foot lever upward. Then remove the presser foot and store it in a safe location.
Again, raise the presser foot farther by pushing the presser foot lever upward. Then place the presser foot just under the presser foot holder <A> so that the groove in the bottom of the presser foot holder <B> is aligned and catches the bar on the top of the foot <C>. Then lower the presser foot lever to attatch the foot, pushing the button on the presser foot.
Trim trap
The optional trim trap <A> holds the trimmed fabric and thread produced when sewing.
To install: Insert the trim trap <A> until it contacts the front cover.
NOTE: Be sure to position the positioning guide <B> to the one on the machine.
To remove: Slowly pull out the trim trap.
NOTE: The optional trim trap can also be used as the foot controller holder.
Free-arm sewing (removing bed extension)
Free-arm sewing enables tubular pieces to be sewn more easily.
1. Remove the bed extension <A>.
NOTE: Be careful not to lose the removed bed extension.
2. Position the fabric, and start sewing.
Retracting knife
To sew without cutting the fabric edge, you need to retract the knife as follows.
1. Pull up the knife lever <A>, then pull it to the right.
2. Bring down the knife
3. Retract the knife completely, then take your hand off from the lever.
Stitch length
The normal stitch length setting is 3 mm. To change the stitch length, turn the stitch length adjustment dial on the right side of the body.
Shorten the stitch length to a minimum of 2 mm (5/64 inch).
Lengthen the stitch to a maximum of 4 mm (5/32 inch).
<A> Selection mark
Stitch width
The normal stitch width setting for regular overlock stitch is 5mm (13/64 inch). To change the stitch width, turn the stitch width adjustment dial.
Increase the width to a maximum of 7 mm (9/32 inch).
Reduce the stitch width to a minimum of 5 mm inch).
<A> Selection mark
Differential feed
This serger is equipped with two sets of feed dogs under the presser foot to move the fabric through the machine. The differential feed controls the movement of both the front and the rear feed dogs.
When set at 1, the feed dogs are moving at the same speed (ratio of 1). When the differential feed ratio is set at less than 1, the front feed dogs move slower than the rear feed dogs, stretching the fabric as it is sewn. This is effective on lightweight fabric that may pucker. When the differential feed ratio is set at greater than 1, the front feed dogs move faster than the rear feed dogs, gathering the fabric as it is sewn. This function assists in removing the rippling when serging stretch fabrics.
Differential feed adjustment
The normal setting is 1.0 on the differential feed adjustment dial.
To adjust the diffrerential feed, turn the dial on the right bottom of the body.
An example
When stretch material is sewn without using the differential feed, the edge will be wavy.
To get smooth finish, adjust the feed ratio from 1.0 toward 2.0.
(The feed ratio required depends on the elasticity of the material.)
The more elastic the material, the further toward 2.0 the differential feed ratio should be set. Test sew with a scrap of the fabric to find the correct adjustment.
Adjusting the presser foot pressure
Turn the pressure adjustment screw on the top left of the machine. You can adjust by referring the value on the screw.
The normal setting is "2".
Tension adjustment dial
There is a thread tension dial for each needle thread, the lower looper thread and the upper looper thread. The correct thread tension may vary according to the type and thickness of the fabric and the type of thread used. Thread tension adjustments may be necessary for any change in sewing materials.
Tension control
Sewing is possible at position "4" for most circumstances. (Standard: SPAN 60/32)
If the stitch quality is insufficient, select a different tension setting.
If you cannot find the correct tension, refer to the charts on following pages.
Chart of thread tension adjustment, Two needle (Four thread)
A: Reverse
B: Surface
C: Left needle thread
D: Right needle thread
E: Upper looper thread
F: Lower looper thread
Chart of thread tension adjustment, One needle (Three thread)
A: Reverse
B: Surface
C: Needle thread
D: Upper looper thread
E: Lower looper thread
Needle
This machine uses a standard home sewing machine needle.
The recommended needle is 130/705H (#80 or #90).
Needle description
How to check the needle
NOTE: Countermeasures for material breakage <A>.
It can reduce the occurrence of material breakage by using 130/705H SUK (#90) BALL POINT.
Removing/ Installing the needle
<A> Removing/ installing the left needle <B> Removing/ installing the right needle
To remove:
Turn the main power and light switch to the OFF position.
Turn the hand wheel so that the mark on the hand wheel is aligned to the line on the machine. (See CHAPTER 1 "Turning direction of hand wheel")
Loosen the corresponding needle set screw with turning the included hexagonal driver toward (2) in the figure, and remove the needle.
To install:
Turn the main power and light switch to the OFF position.
Turn the hand wheel so that the line on the hand wheel is aligned to the line on the machine.
Hold the needle with its flat side away from you and insert it up as far as it will go.
Tighten the needle set screw securely with turning the included hexagonal driver toward (1) in the figure.
NOTE:
Make sure to insert the needles all the way. If the needles have been inserted correctly, the right needle should be set slightly lower than the left one.
PREPARATION BEFORE THREADING
Thread tree
Raise the telescoping thread tree to its highest position. Make sure that the thread holders are in alignment above the spool pins as illustrated below.
How to use the thread spool cap
When using sewing thread spools, the thread spool cap should be used as illustrated below. Make sure that the spool notch is on the bottom.
How to use the thread net
If you are sewing with loosely spun nylon thread, we recommend that you cover the spool with the net supplied to prevent the thread from slipping off the spool.
Adapt the net to the shape of the spool.
Before threading
1. Turn off the main power and light switch for safety.
2. Raise the presser foot using pressser foot lever
3. Turn the hand wheel so that the mark on the hand wheel <A> is aligned to the line <B> on the machine. (See CHAPTER 1 "Turning direction of hand wheel")
THREADING
Threading has to be done in the following order.
Lower looper
Upper looper
Right noel
Left needle
Threading the lower looper
Run the thread in the sequence illustrated, following the blue color and the numbers next to each threading point.
1. Open the front cover by sliding to the right and guiding the top toward you.
2. Pull the thread off the spool and directly up through the thread holder (1) and the thread plate (2) on the thread tree from back to front.
3. Pass the thread thourgh the hole (3) on the top of machine.
4. Pass the thread through the tension disc (4) which is in the channel next to the blue tension adjustment dial.
5. Guide the thread down the channel and pass the thread through the threading points next to the blue color marks following the numerical order in the accompanying
Lower looper easy threading operation
1. Slide the lower looper threading lever <A> to the right.
The lower looper <B> moves to the position illustrated as below.
2. Pass the thread as illustrated.
3. Pass the thread through the eye of the lower looper.
4. Slowly turn the hand wheel, and make sure the returns to the original position.
NOTE:
If the lower looper thread breaks during sewing, cut and remove thread from both of the needles.
Before re-threading the lower looper, make sure that the lower looper re-threading is done exactly as diagrammed. The machine will not operate properly if the threading is not done in the proper sequence.
Threading the upper looper
Run the thread in the sequence illustrated, points following the green color and the numbers next to each threading point.
Open the front cover by sliding to the right and guiding the top toward you.
Pull the thread off the spool and directly up through the thread holder (1) and the thread plate (2) on the thread tree from back to front.
Pass the thread thourgh the hole (3) on the top of machine.
Pass the thread through the tension disc (4) which is in the channel next to the green tension adjustment dial.
Guide the thread down the channel and pass the thread through the threading next to the green color marks following the numerical order in the accompanying illustration.
Pass the thread through the eye of the upper 2 looper (9).
NOTE:
If the upper looper thread breaks during sewing: This may be caused by the lower looper thread getting caught on the upper looper. If this happens, lower the upperlooper by turning the hand wheel, remove the lower looper thread from the upper looper, and re-thread the upper looper from at least the tension disc.
Threading the right needle
Run the thread in the sequence illustrated below, following the pink color and the numbers next to each threading point.
Pull the thread off the spool and directly up through the thread holder (1) and the thread plate 2) on the thread tree from back to front.
Pass the thread thourgh the hole (3) on the top of machine.
Pass the thread through the tension disc (4) which is in the channel next to the pink tension adjustment dial.
Guide the thread down the channel and across through the threading points (5) (6) (7) next to the pink color marks following the numerical order in the accompanying illustration.
Bring the thread down through the needle bar thread guide and through the right needle (8 from front to back.
<B>: two needles/ <C>: one needle)
Threading the left needle
Run the thread in the sequence illustrated, following the yellow color and the numbers next to each threading point.
Pull the thread off the spool and directly up through the thread holder (1) and the thread plate (2) on the thread tree from back to front.
Pass the thread thourgh the hole (3) on the top of machine.
Pass the thread through the tension disc (4) which is in the channel next to the yellow tension adjustment dial.
Guide the thread down the channel and across through the threading points (5) (6) (7) next to the yellow color marks following the numerical order in the accompanying illustration.
Bring the thread down through the needle bar thread guide and through the left needle (8) from front to back.
<B>: two needles/ <C>: one needle)
SEWING
Stitch selection
Select the stitch pattern before you start sewing. This sewing machine can sew five different stitches by following the simple steps below:
Four-thread overlook stitch
Use all four threads and two needles for producing four-thread overlock stitches. Use: Produces strong seam. Ideal for sewing knits and wovens.
Three-thread overlook stitch 5 mm (3/16 inch)
Use three threads and the left needle, producing 5 mm (3/16 inch) seams.
Use: For overlock stitching on suits, blouses, slacks, etc. Ideal for medium to heavy materials.
NOTE:
Remove the right needle when sewing this overlook stitch.
Three-thread overlook stitch 2.8 mm (7/64 inch)
Use three threads and the right needle, producing 2.8 mm (7/64 inch) seams.
Use: For overlock stitching on suits, blouses, slacks, etc. Ideal for fine to medium materials.
NOTE:
Remove the left needle when sewing this overlook stitch.
Use as decorative or finishing stitch. See ‘Narrow overlock/ Rolled hemming stitch" in this chapter for details.
Test sewing
Test-sew before you start sewing.
1. Set all the thread tension to "4'’.
2. Thread the machine and pull all threads out about 15 cm (6 inches) behind the presser foot.
3. Place a piece of scrap material under the presser foot for test sewing.
NOTE:
Always lift the presser foot before placing the fabric under it. You cannot start sewing by just running the fabric under the foot without lifting the presser foot.
4. Holding all threads with your left hand, turn the hand wheel slowly a few times toward /ou, and check to see that the threads entwine themselves before using the foot controller to sew.
Chaining-off
After test-sewing, continue to depress the foot controller slightly and chain off 10 cm (4 irches). The threads will entwine themselves into a chain automatically.
NOTE:
If the thread tension is not correctly balanced, the chaining-off result will be uneven. If this happens, pull the threads slightly. Check the threading order and adjust the thread tension to create an even chain. (See CHAPTER 1"Tension adjustment dial".)
To start sewing
1. Thread the machine and pull all threads out about 15 cm (6 inches) behind the presser foot.
2. Lift the presser foot and place the material well underneath the presser foot before starting to sew. Slowly sew a few stitches by turning the hand wheel.
3. The fabric will be fed automatically. You need only guide it in the required cirection.
4. Check the stitch formation (stitch chain) to see if it is uniform. If the stitch is not uniform, re-check that the threading has been done properly and in sequence.
5. Follow the Seam Allowance Guide for consistent cutting of the fabric seams. The scale of Seam Allowance Glide shows 9.5, 12.7, 15.9. and 25.4 mm (3/£, 1/2, 5/8. and 1 inches) when the stitch width dial is set to '5*.
To remove work
When the seam is finished, keep the machine running at a low speed to obtain chaining-off. Then cut the stitches 5 cm (2 inches) from the work.
If feeding for chaining-off is not enough, pull the thread gently.
To secure chain
There are two methods available to secure the chain.
Method 1
Secure the chain of the beginning and the end of a stitch with your machine.
At the beginning of a stitch
1. Sew a few stitches, after chaining-off for 5 cm (2 inches).
2. Stop the machine and raise the presser foot.
3. Put the chain under the presser foot, and serge over it pulling toward you.
4. After sewing a few stitches, cut off the extra chain with the knife as illustrated.
At the end of a stitch
1. At the end of the seam, sew one stitch out of the fabric before stopping the machine.
2. Raise the presser foot and the needles, then reverse the fabric.
3. Lower the needles and the presser foot at the same position.
4. Serge over the seam, taking care not to cut the serged seam with a knife.
5. After sewing a few stitches, serge off the fabric as illustrated.
6. Cut the threads with scissors
Method 2
With this method, the chain of the beginning and the end of a stitch can be secured in the same manner.
1. Tie the thread unpicked from chain.
2. Insert the chain into the end of the seam, using a hand sewing needle with large eye.
3. Fix the chain with a drop of fabric glue, and cut the extra stitches after drying.
If threads break during sewing
Remove the material and re-thread in the correct order. Lower looper. Upper looper, right needle and then the left needle (to re-thread, see CHAPTER 3 "Threading'). Replace the material under the presser foot and sew 3-5 cm (1-1/8 to 2 inches) over the previous stitches.
To sew fine materials
1. Adjust the presser foot pressure to prevent the material from puckering and to allow sewing of curves. (See CHAPTER 1 "Adjusting the prnssfir foot pressure*)
2. Loosen the thread tension, but remember that if the tension is too loose, the thread may break and stitches may be skipped.
Narrow overlook/ Rolled hemming stitch
The Narrow overlock/Rolled hemming stitch is a decorative finish for lightweight to midweight fabrics. It is often used to complete the edge of a fabric. This stitch is sewn by removing the left needle and using the 3-thread overlock stitch.
Instructions for both narrow overlook/ Rolled hemming stitches
1. Remove the left needle.
2. Thread the machine for a three thread overlock, using the right needle.
3. Remove the stitch finger <A>.
Storage for the stitch finger <A> is provided on the inside of the front cover.
* The product code is shown on the machine rating plate.
NOTE:
Make sure to install stitch finger when sewing regular overlock stitches.
4. Adjust the stitch width dial up to the "R" position.
5. Adjust the stitch length.
Sot the stitch length adjustment dial to "R to 2 position (for narrow overlook stitch: R to 2, for rolled hemming stitch: R).
TROUBLESHOOTING
This sewing machine is designed for trouble-free operation. However, the following chart indicates trouble which may occur if basic adjustments are not made properly.
Trouble
Cause
Remedy
1. Does not feed
Presser foot pressure too loose
Turn the pressure adjustment screw clockwise to increase the presser foot pressure.
(See page 9.)
2. Needles break
1. Needles bent, or needle tip blunt
Replace with new needle. (See page 13.)
2. Needles incorrectly installed
Install needles correctly. (See page 13.)
3. Material pulled forcibly
Do not press or pull material too hard when sewing.
3. Threads break
1. Improper threading
Thread correctly. (See pages 15-18.)
2. Thread tangled
Check spool pin, thread holders, etc. and remove tangled thread.
3. Thread tension too tight
Adjust the thread tension. (See pages 10-12.)
4. Needles incorrectly installed
Install needles correctly. (See page 13.)
5. Wrong needle used
Use correct needle.
130/705H - suggested (See page 13.)
4. Skipped stitches
1. Needle bent, or needle tip blunt
Replace with new needle. (See page 13.)
2. Needle incorrectly installed
Install needle correctly. (See page 13.)
3. Wrong needle used
Use correct needle.
130/705H - suggested (See page 13.)
4. Improper threading
Thread correctly. (See pages 15-18.)
5. Presser foot pressure too loose
Turn the pressure adjustment screw clockwise to increase the presser foot pressure.
(See page 9.)
5. Stitches are not uniform
Thread tensions are not adjusted properly
Adjust the thread tension. (See pages 10-12.)
6. Fabric is puckered
1. Thread tension too tight
Decrease thread tension when sewing lightweight or fine material. (See pages 10-12.)


 next to the blue color marks following the numerical order in the accompanying


 next to the green color marks following the numerical order in the accompanying illustration.