Instruction Manual for Sewing Machine
Connecting Plugs and Main Power / Sewing Light Switch
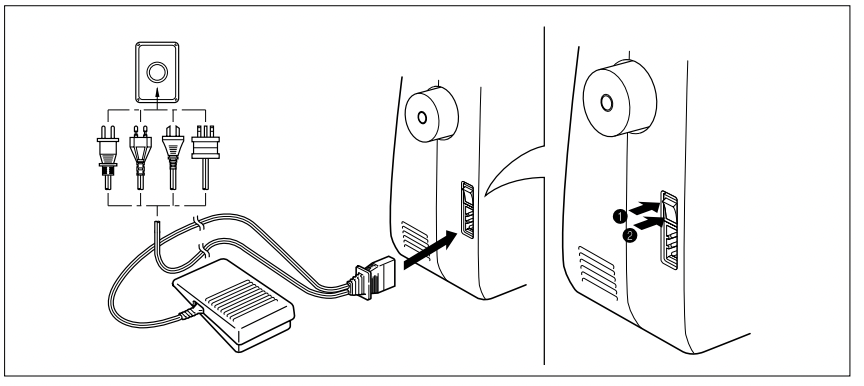
- Connect the three-prong plug into the machine.
- Connect the electrical supply plug into a wall outlet.
- When leaving the sewing machine unattended, the main switch of the machine must be switched off or the plug must be removed from the socket outlet.
Turn on or off the switch for the main power and sew-light.
 Turn on
 Turn off
- When servicing the sewing machine, or when removing covers or changing lamps, the machine or the electrical set must be disconnected from the supply by removing the plug from the socket outlet.
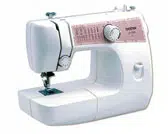
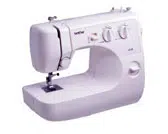
PRINCIPAL PARTS OF YOUR MACHINE
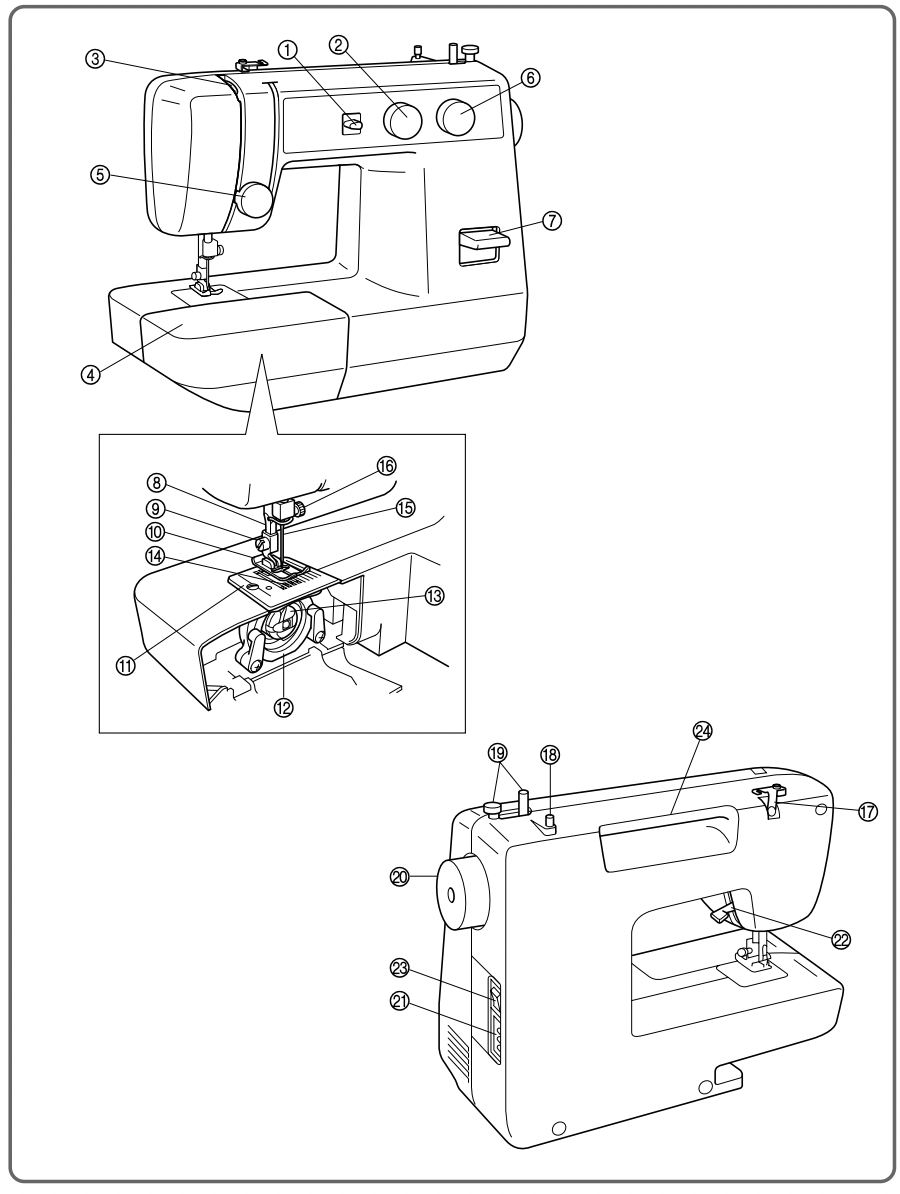
PRINCIPAL PARTS
- Needle Position Selector
- Stitch Width Knob
- Thread Take-up Lever
- Extension Table with Accessory Storage
- Needle Thread Tension Control Dial
- Stitch Length Knob
- Reverse Sewing Lever
- Thread Cutter
- Presser Foot Screw
- Presser Foot (Zigzag)
- Needle Plate (Zigzag)
- Shuttle Hook
- Bobbin Case
- Feed Dogs
- Needle
- Needle Clamp Screw
- Thread Guide/Bobbin Winding Tension Disc
- Spool Pin
- Bobbin Winder
- Balance Wheel
- Foot Controller Jack
- Presser Foot Lever
- Main Power/Sewing Light Switch
- Built-in Handle
ACCESSORIES
- Zipper Foot (1 pc.) (See note.)
- Bobbins (3 pcs.)
- Needle Set (Regular #14) (3 pcs.)
- Twin Needle (1 pc.) (See note.)
- Extra Spool Pin (1 pc.) (See note.)
- Darning Plate (1 pc.)
NOTE: The accessories listed above are stored in the extension table. Some of the accessories listed may not be included with some models.
OPERATING YOUR SEWING MACHINE
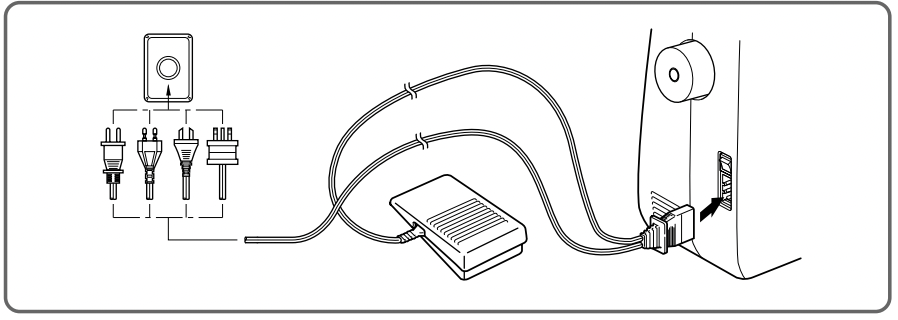
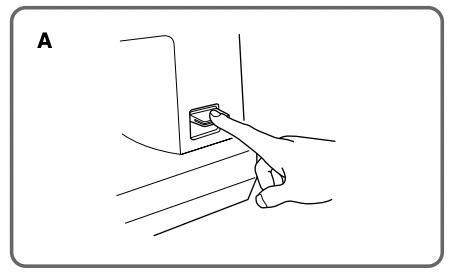
Connecting Plugs
- Insert the foot controller plug, located between the foot controller and the power supply plug on the cord, into the jack on the machine.
- Insert the power supply plug into an electrical outlet.
CAUTION:
- When changing the light bulb or when the sewing machine is not in use, the power supply plug must be disconnected from the wall socket to avoid electrical hazards.
- For U.S.A. only
This appliance has a polarized plug (one blade wider than the other). To reduce the risk of electric shock, this plug is intended to fit in a polarized outlet only one way. If the plug does not fit completely in the outlet, reverse the plug.
If it still does not fit, contact a qualified electrician to install the proper outlet. Do not modify the plug in any way
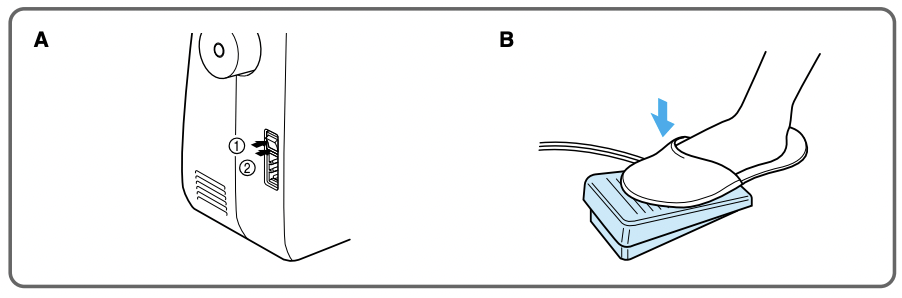
Main Power and Sewing Light Switches
This switch turns the main power and sewing light on or off. (See fig. A.)
- Turn on (toward the “I” mark)
- Turn off (toward the “O” mark)
Foot Controller
When the foot controller is depressed lightly, the machine will run at a low speed. When the pressure on the foot controller is increased, the machine’s speed will increase. When pressure on the foot controller is released, the machine will stop. (See fig. B.)
NOTE:
- Be sure that nothing is placed on the foot controller when the machine is not being used.
- A new sewing machine or one that has not been in use for a long period of time should be oiled as described on page 45. After oiling, be sure to wipe off any excess oil.
Note (For U.S.A. only):
This foot controller can be used for sewing machine model LS1217.
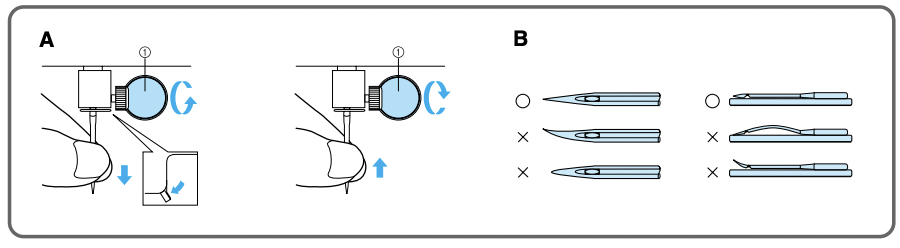
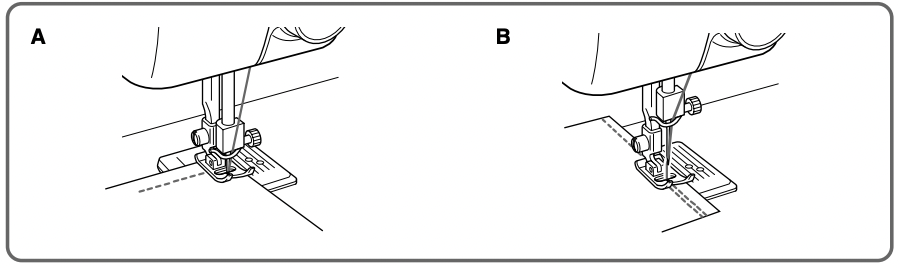
Inserting the Needle
Turn power switch to “O”.
- Remove the power supply plug from the electrical outlet.
- Raise the needle bar to its highest position.
- Lower the presser foot.
- If a needle is already installed, remove it by loosening the needle clamp with a coin and pulling the needle down. (See fig. A.)
- With the flat side toward the back, insert the new needle as far as possible up against the needle stopper.
- Tighten the needle clamp.
1. Coin
Checking the Needle
- The sewing needle must always be straight and sharp for smooth sewing.
- To check if the needle is bent, place the flat side of the needle down as shown in the illustration. (See fig. B.)
- Replace the needle if it is bent or dull.
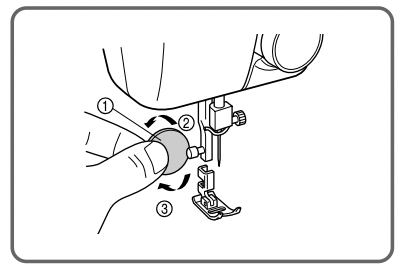
Changing the Presser Foot
It may be necessary to change the presser foot according to your sewing needs.
SNAP-ON TYPE
Turn power switch to “O”.
- Raise the needle to its highest position by turning the balance wheel toward you (counterclockwise), then raise the presser foot lever.
- Use a coin or screwdriver to loosen the presser foot screw and remove the presser foot.
1. Coin
2. Loosen
3. Place the grooved side of the presser foot against the flat side of the presser bar.
4. Securely tighten the presser foot screw with the coin or screwdriver.
3. Tighten
Converting to Free-Arm Style
Free-arm sewing is convenient for sewing tubular and hard-to-reach areas on garments. To change your machine to the free-arm style, lift up on the extension table and pull it out. (See fig. A.)
1. Lift the bottom of the extension table up toward you.
2. Pull the extension table out to remove it.
1 Extension table
Steadying the Machine
When the sewing machine is placed on an uneven surface, turn the rubber cushion on the front right-hand side of the base plate to adjust its height until the sewing machine is stable. (See fig. B.)

VARIOUS CONTROLS
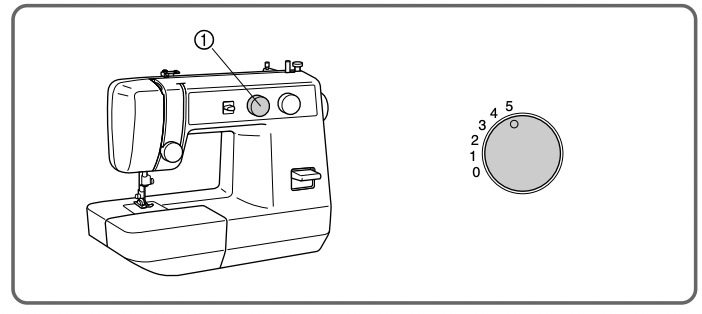
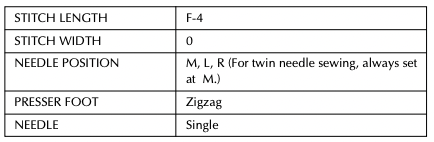
Stitch Length Dial
The stitch length is regulated by turning this knob.
The numbers above the knob represent the stitch length in millimeters (mm).
The larger numbers set a longer stitch length.
When the knob is set to 0, the fabric is not fed. This setting is used for sewing on a button.
The F area is used for making a Satin Stitch (a close zigzag stitch), which can be used in making buttonholes and decorative stitches. The position needed for making the Satin Stitch may need to be adjusted according to the fabric and thread being used. To determine the correct knob position, first test the length settings on a fabric scrap.
- Stitch length dial
- Shorter
- Longer

Reverse Sewing Lever
Reverse sewing is generally used for locking and reinforcing seams. To sew in reverse, hold down the reverse sewing lever while slowly sewing. To return to forward sewing simply release the lever. (See fig. A)
Stitch Width Dial
The width of the zigzag stitch is regulated by operating the stitch width knob.
The numbers above the knob represent the stitch width in millimeters mm).
The larger numbers set a wider stitch width.
When the knob is set at 0, a straight stitch is sewn.
NOTE:
- Do not move the knob while the needle is in the fabric.
- When using the twin needle, the knob should always be set below 3
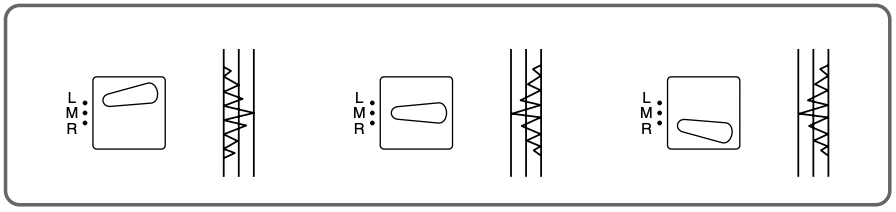
Needle Position Selector
By shifting this lever to L (left), M (middle) or R (right), you can sew straight and zigzag stitches on the baseline.
When you sew close to the edge of the fabric, select L or R so the fabric is fed more easily.
This selector should be set at M (middle) for almost all stitches, but set it to other positions for the following applications.
- Buttonhole Sewing (See page 36.)
- Button Sewing (See page 40.)
- Decorative Stitches (See page 33.)
NOTE:
- Do not move the selector while the needle is in the fabric.
- Always set the selector to M when using the twin needle.
THREADING THE MACHINE
Winding the Bobbin
Place the spool of thread on the spool pin and pass the thread around the bobbin winding tension disc.
1. Bobbin winding tension disc
2. Bobbin winder
2. Pass the end of the thread through the hole in the bobbin from the inside.
3. Place the bobbin onto the bobbin winding shaft and slide the shaft to the right. Turn the bobbin clockwise, by hand, until the spring on the shaft slides into the slit on the bobbin.
3. Spring
4. Slit
4. While holding the end of the thread, gently press on the foot controller to wind the thread around the bobbin a few times, then stop the machine.
5. Trim the excess thread sticking out from the top of the bobbin and continue winding the thread onto the bobbin by pressing down on the foot controller.
NOTE:
The machine stops automatically when the bobbin is full.
6. When the machine stops, cut the thread between bobbin and spool, push the shaft to the left and remove the full bobbin from the shaft.
CAUTION:
Although the needle bar does not move when the bobbin winding shaft is slid toward the bobbin presser, the balance wheel will continue to turn. Therefore, do not touch the balance wheel while the bobbin is being wound.
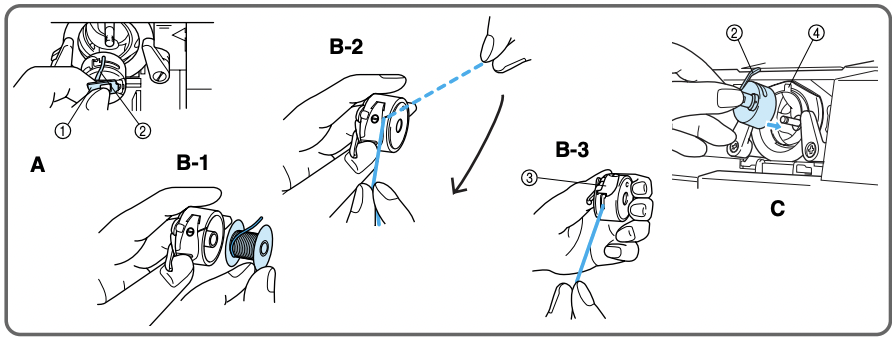
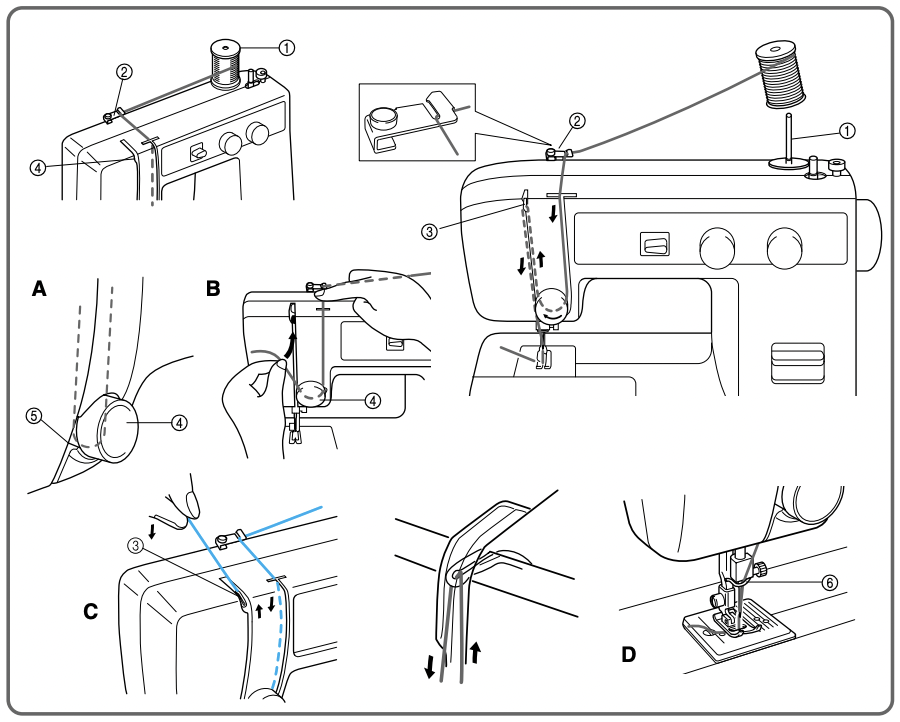
Lower (bobbin) Threading
Turn power switch to “O”
- Raise the needle to its highest position by turning the balance wheel toward you (counterclockwise) and raise the presser foot lever.
- Open the shuttle cover behind the extension table on the front of the machine and remove the bobbin case by pulling its latch toward you and pulling it out from the shuttle race (fig. A).
- Unwind about 10 cm (4") of thread from a full bobbin and insert the bobbin into the bobbin case. (See fig. B-1.) Pull the trailing thread into the slot, then down and to the left, as shown in fig. B-2, until it enters the delivery eye under the tension spring (fig. B-3).
- Holding the bobbin case by the latch, fully insert the bobbin case into the shuttle race and release the latch. Make sure the bobbin case finger fits into the notch at the top of the race as shown in fig. C.
NOTE: If the bobbin case is not properly placed back into the machine, it will fall out from the shuttle immediately after starting to sew.
1. Bobbin case latch
2. Bobbin case finger
3. Tension spring
4. Notch
“CAUTION” - “MOVING PARTS-TO REDUCE THE RISK OF INJURY, DISCONNECT FROM SUPPLY CIRCUIT BEFORE SERVICING. REPLACE COVER.”
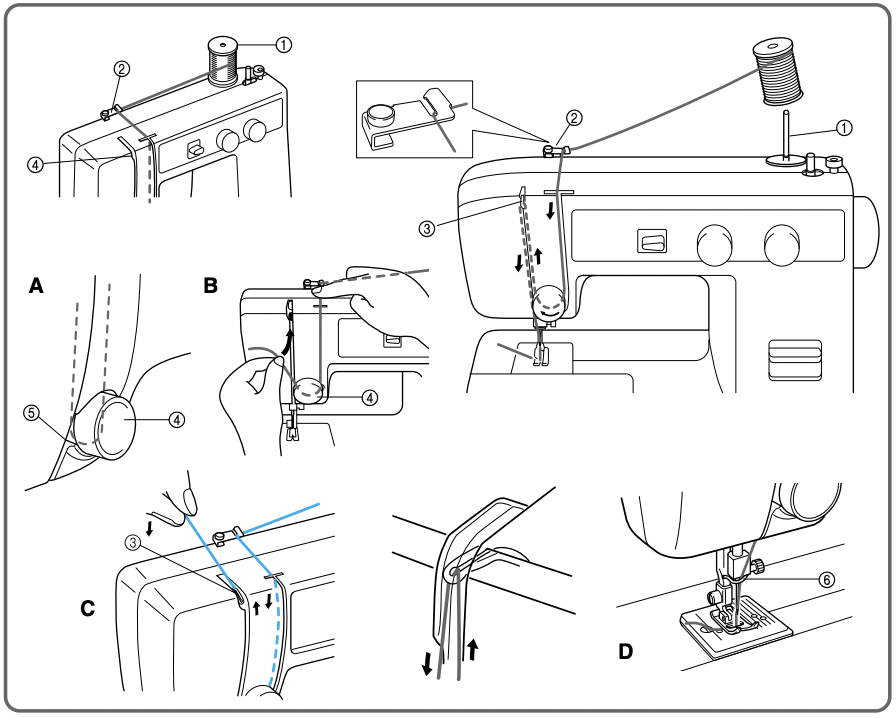
Upper (Needle) Threading
1 Spool pin
2 Thread guide
3 Thread Take Up Lever
4 Upper (needle) Tension
5 Thread Check Spring
6 Lower Thread Guide
- Raise the presser foot using the presser foot lever and turn the balance wheel toward you (counterclockwise) to raise the thread take up lever to the highest position.
- Pull up the spool pin and place a spool of thread on the pin.
- Pass the thread through the first guide as shown and then forward into the right side slot on the front of the machine.
- Guide the thread down from the right slot and around the upper tension to the left seeing that the thread picks up the check spring at the left of the tension area. (fig. A and B)
- Guide the thread up the left side slot making sure that the thread is to the right side of the thread take up lever until the thread is behind the take up lever. Guide the thread to left bringing it up against the take up lever and then continue down towards the needle through the left side slot. This motion should automatically thread the take up lever. (fig. C)
- Bring the thread down to the needle area passing it behind the thread guide just above the needle. (fig. D)
- Thread the needle from front to back leaving a thread tail of about 5 cm (2").
NOTE: If thread is incorrectly fed, the thread may break, cause stitches to be skipped or cause the fabric to pucker.
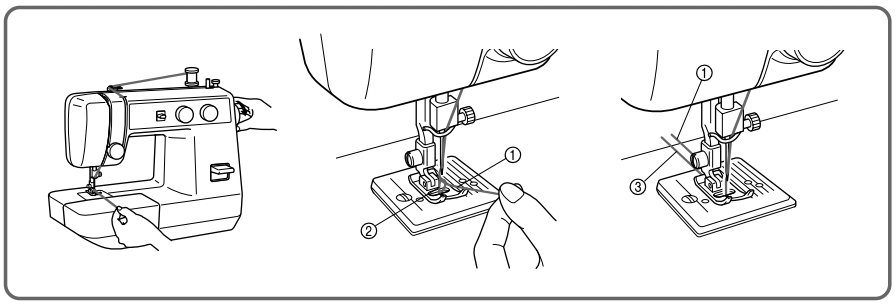
Drawing Up The Bobbin Thread
- Raise the presser foot and the needle to their highest positions.
- With your left hand, hold the end of the upper thread. With your right hand, turn the balance wheel toward you (counterclockwise) until the needle moves down and back up again to its highest position.
- The upper thread should have caught the lower thread in a loop. Pull the upper thread toward you and the lower thread will come up from the bobbin in a large loop.
- Pull out about 15 cm (6") of both threads and place them toward the back of the machine straight behind the presser foot. The upper thread should pass between the toes of the presser foot.
1 Upper thread
2 Lower thread loop
3 Lower thread
Twin-Needle Sewing
Your sewing machine is designed for twin needle sewing, which allows you to sew using two upper threads. You can use the same color or two different colors of thread for decorative stitches. Be sure that the two upper threads used for threading the twin needle have the same weight. If the threads do not have the same weight, the stitching may not be consistent.
INSERTING THE TWIN NEEDLE
Insert the twin needle in the same way that a single needle is inserted. (See note.) The flat side of the needle should face toward the back and the rounded side should face toward you.
SETTING THE EXTRA SPOOL PIN
Place the extra vertical spool pin in the hole found on top right-hand side of the machine. Place the second spool of thread on this pin as shown in fig. A.
TWIN NEEDLE THREADING
Each needle should be threaded separately.
- Threading the Right Needle. Follow the same instructions for single needle threading. See page for more details.
- Threading the Left Needle. Thread the left needle in the same way as the right needle was threaded, but do not pass the thread through the thread guide above the needle before passing it through the eye of the left needle as shown in fig. B
2 Right needle thread passes through this guide.
3 Left needle thread passes in front of this guide.
NOTE:
- Use the zigzag presser foot.
- Use a setting of less than 3 on the stitch width knob.
- Set the needle position selector to M.
Thread Tension
Thread tension will affect the quality of your stitches. It may need to be adjusted when you change fabric or thread type.
NOTE:
It is recommended that a test sample be made on a fabric scrap before sewing on your project.
The basic thread tension setting is “5”.
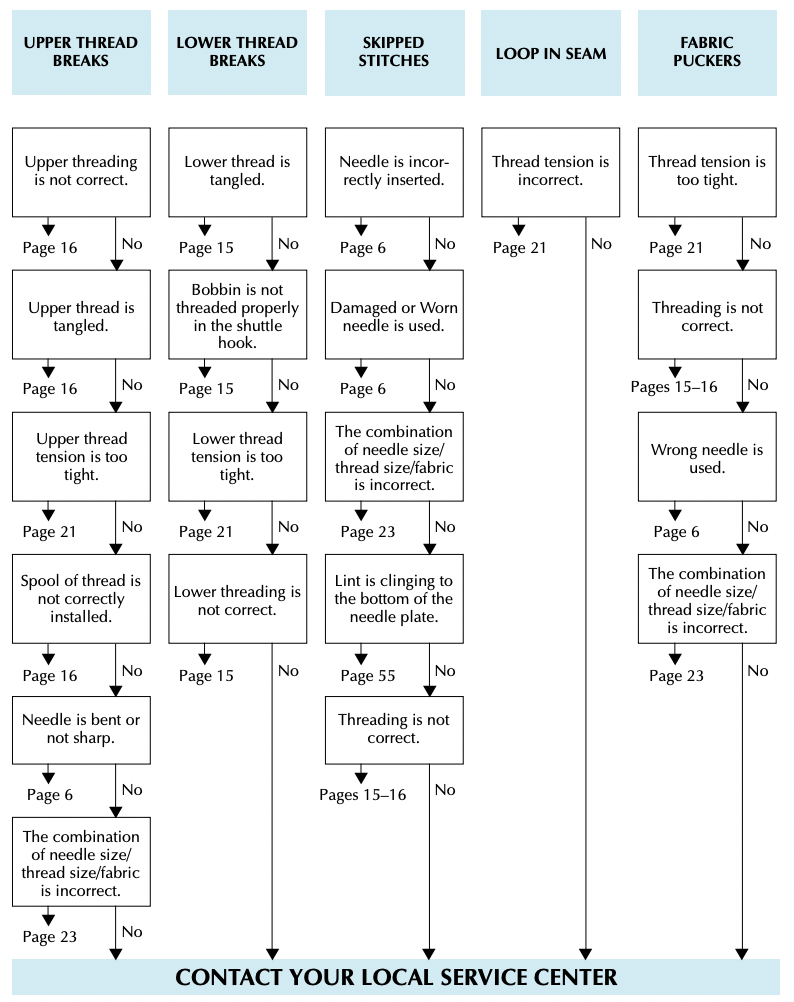
Possible Problems and How To Correct Them
A Upper tension is too tight.
Loops appear on the surface of the fabric.
A-1 Upper tension control dial
Decrease the tension by turning the dial to a lower number.
B Upper tension is too loose.
Loops appear on the reverse side of the fabric.
B-1 Upper tension control dial
Increase the tension by turning the dial to a higher number.
1 Reverse
2 Surface
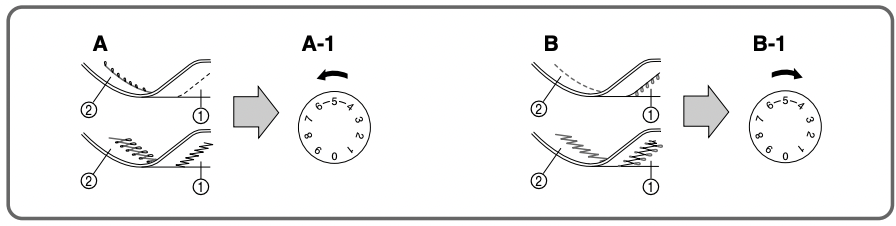
NOTE: The bobbin thread tension has already been adjusted at the factory for general use. For most sewing applications, no adjustment is needed. When sewing with thin thread on thin fabrics, the thread tension may not be adjusted adequately with the upper tension control dial. Therefore, the thread tension must be adjusted according to the procedure described below.
C Bobbin tension is too loose.
Loops appear on the surface of the fabric.
Decrease the thread tension by turning the dial to a lower number. If the result is still not satisfactory, then adjust the bobbin thread tension as explained in C-1.
C-1 Bobbin
Increase the tension in the bobbin by turning the screw with a small screwdriver in a clockwise direction. However, do not turn the screw more than one full turn. Remember to return the screw to its original setting before starting your next project.
D Correct tension
Correct tension is important since too much or too little tension may weaken your seams or cause puckers in your fabric.
1 Reverse
2 Surface
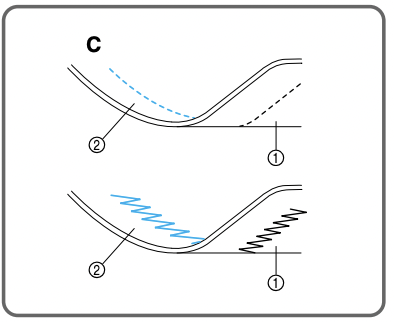
CHART OF SEWING FABRICS, NEEDLES AND THREAD COMBINATIONS
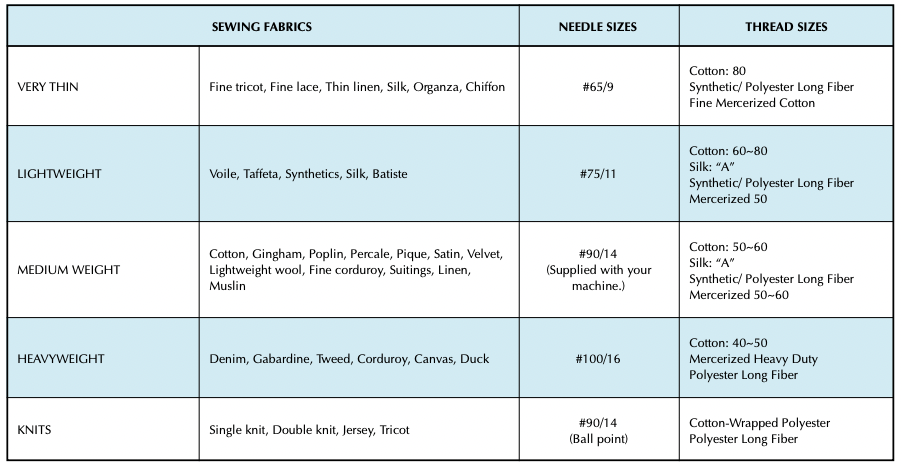
NOTE:
- Select the correct needle and thread size from the above chart.
- Use the same size thread for the upper (spool) and lower (bobbin) threads.
Straight Stitching
Starting Sewing
- Raise the needle to its highest position and lift the presser foot lever.
- Pull up the bobbin thread by turning the balance wheel toward you (counterclockwise) and place both the upper and lower threads toward the back behind the presser foot.
- Place the fabric under the presser foot and position the needle 1 cm (3/8") from the edge of the fabric.
- Lower the presser foot.
- To backtack, press the reverse sewing lever down as far as possible and lightly touch the foot controller. Sew 5 to 10 stitches in the reverse direction.
- Release the reverse sewing button and start sewing in the forward direction by applying pressure to the foot controller.
NOTE:
The backtack or reverse sewing is used for locking the end of seams and reinforcing stitches.

Changing Sewing Directions (fig. A)
- Stop the machine at the point where you wish to change directions with the needle still in the fabric. If the needle ends in the up position turn the balance wheel toward you (counterclockwise) until the needle enters the fabric.
- Raise the presser foot and turn the fabric to line up its new direction using the needle as a pivot point.
- Lower the presser foot and start sewing in the new direction.
NOTE:
For twin needle sewing, raise the needle when changing the sewing direction.
Finishing Sewing (fig. B)
Reverse stitching is used to lock the threads at the end of the seam or wherever reinforcement is needed.
- Stitch to the end of the seam and stop.
- Press the reverse sewing lever down and lightly touch the foot controller to stitch backwards for 1 cm (3/8") from the end of the fabric over the top of the existing stitch.
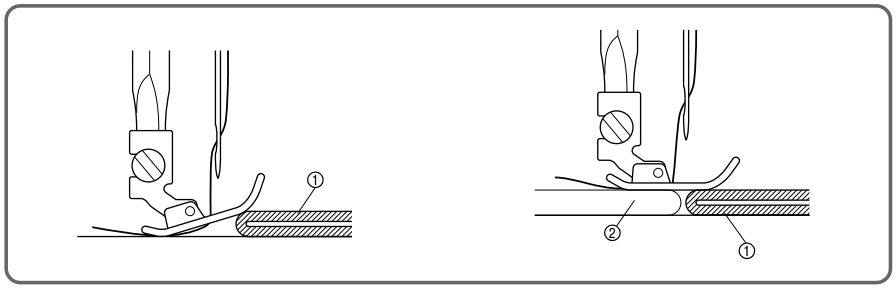
Sewing Fabric Edges
For sewing thin fabric:
While pulling both the needle and bobbin threads toward the back of the machine, start sewing at a slow speed.
For sewing thick fabric:
The fabric does not feed smoothly when the presser foot is slanted as shown in the illustration. If this occurs, place a piece of folded fabric or cardboard under the back of the presser foot to raise it.
1 Fabric
2 Folded fabric or cardboard
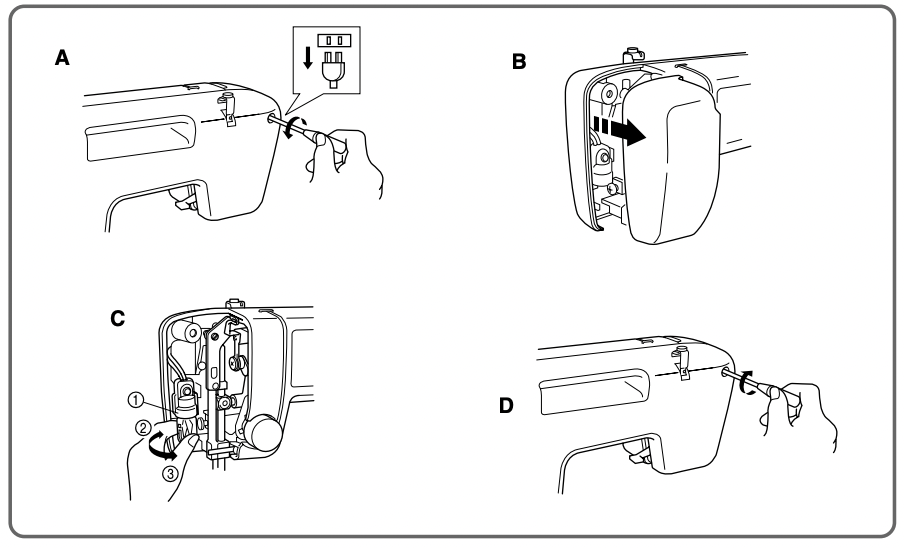
Changing the Bulb
- Remove the power supply plug from the outlet.
- Loosen the face plate screw as shown in fig. A.
- Remove the face plate from the machine as illustrated in fig. B.
- Replace the sewing light bulb. See fig. C.
1 Bulb
2 Loosen
3 Tighten
5. Reattach the face plate and fasten the screw as shown in fig. D.
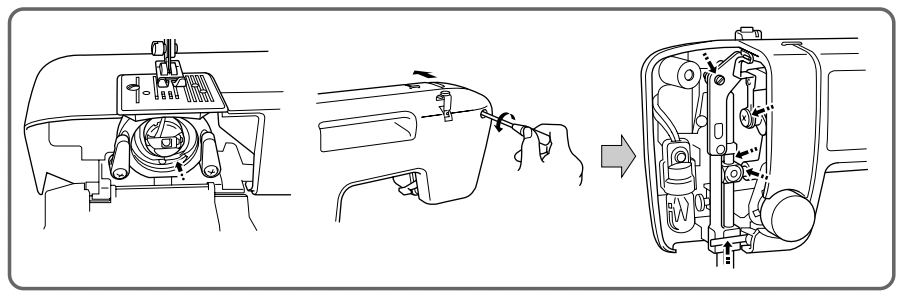
Oiling
- Remove the power supply plug from the outlet.
- Put 2 to 3 drops of oil at each of the points indicated in fig. A.
- After oiling, run the machine at a fast speed without thread installed for a short time.
- Be sure to wipe any excess oil off the machine.
NOTE:
The machine should be oiled once a week if it is used more than one hour a day. If the machine is used more often, oil every day. Sewing machine oil is available from your local sewing machine dealer or service center.
Do not apply too much oil as it may get on your thread and fabric.
Cleaning
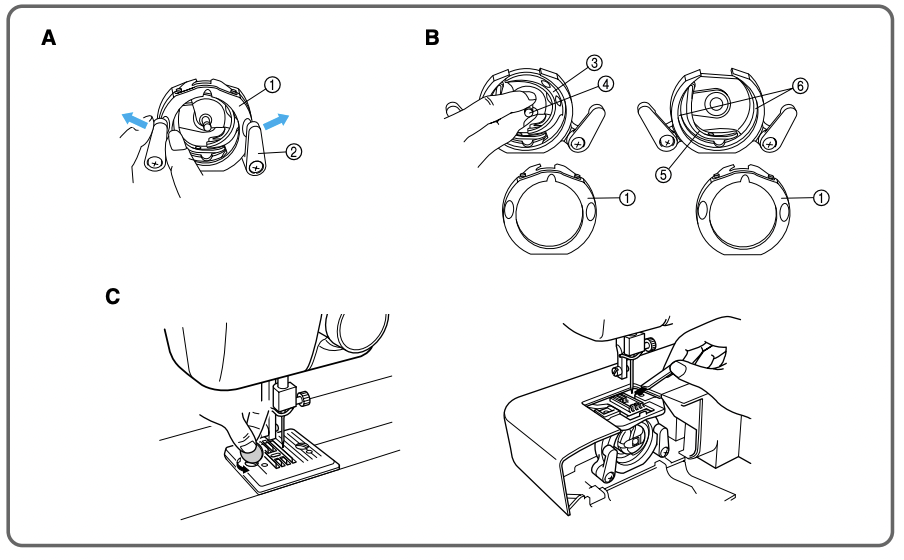
Removing the Shuttle Hook
- Raise the needle to its highest position.
- Open the shuttle cover on the front of the free arm.
- Take out the bobbin case by opening its latch and pulling it out from the shuttle race.
- Slide the latch levers out from the retaining ring and remove the retaining ring. See fig. A.
1 Retaining ring
2 Latch lever
5. Remove the hook by grasping the center post of the hook and pulling it out as shown in fig. B.
3 Hook
4 Hook center post
NOTE: When the needle is lowered, the shuttle hook cannot be removed.
Cleaning the Shuttle Race
1. Remove any accumulated lint and thread with a brush from the retaining ring, hook, driver and race body .
5 Driver
6 Race body
2. A cloth dampened with machine oil should be used to wipe the shuttle race clean of lint.
3. Clean the lint from the shuttle hook using a cloth dampened with machine oil.
4. Reassemble the hook with the notch at the top and push the latch levers back to their positions to hold the retaining ring in place.
NOTE:
If the needle has moved, you will need to return it to its highest position before reinstalling the hook. The hook will not go back into place unless the needle and take-up lever are in their highest positions.
Cleaning the Feed Dogs
- Remove the needle plate using a coin or screwdriver to remove the screws.
- Clean the lint from the upper part of the feed dogs and shuttle race body with a brush.
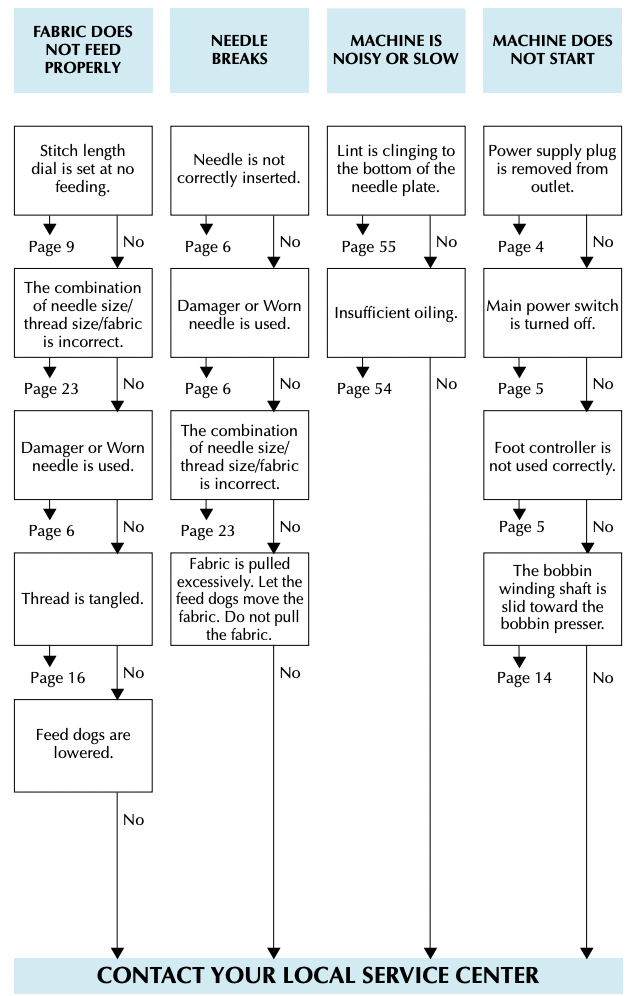
Performance Checklist
Whenever sewing difficulties are encountered, review the section in this instruction manual that details the operation you are performing to make sure you are correctly using the machine. If the problem continues, the following checklist may help you to improve the operation. If you still have difficulties, contact your nearest service center.