You can create an artistic portrait photo, whereby the subject is in focus and the background is blurred. You can also edit the image by applying lighting or color effect to the background.
1. Tap , and tap Portrait.
2. Drag the slide bar to the left or right to adjust the blur strength.
3. When Portrait is available appears on the screen, tap to take a photo.
• The Portrait feature may not work if the camera cannot recognize the subject.
Gallery features
Creating a movie
You can create a new movie by putting images and videos together
1. Tap , select an album, then tap Create movie.
2. Select images or videos for your movie and tap Next.
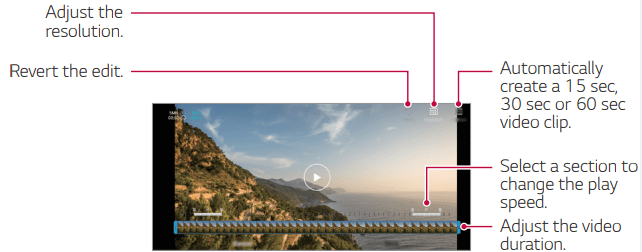
3. Edit the selected images and videos and then tap Save.
Deleting files
You can select images or videos to delete from your video by tapping at the top right corner of its thumbnail.
Adding files
You can select images or videos to add after tapping at the bottom of the screen. You can also select the images or videos you have already previously added.
Rearranging files
To rearrange the images and videos, touch and hold the file you want to move, then dragging it to the desired location.
Adding file effects
Tap to add a theme or background music, or change the font.
Resetting the movie edits
You can reset the edits made to the movie (e.g. play time) by tapping.
Previewing a file
Check your new video before saving it by tapping . After the playback time elapses, the next file is played automatically
Making a GIF
You can easily make a GIF file using recorded video.
1. At the desired starting point while watching a video, tap .
2. Select the length of the GIF you want to create.
• GIF is generated for the time selected from the current time.
• For videos less than 5 seconds, GIF images are automatically generated for the remaining time.
Google Assistant
Google Assistant overview
Your device has the built-in Google Assistant feature. Find answers and get things done while on-the-go.
Sign in
1. Press the Google Assistant key on the left side of the device. or Touch and hold from the Home screen to launch Google Assistant.
2. Tap GET STARTED.
3. Follow the on-screen instructions.
• The device saves your voice data for recognition.
4. Set whether to use the voice match unlock function.
• If you use the voice match unlock function, you can unlock the device even when the device screen is turned off or the device is charging by saying “OK Google” or “Hey Google.”.
5. Tap Save.
Accessing by Voice
1. When the home screen is turned off or locked, say “OK Google” or “Hey Google”.
2. When the Google Assistant screen appears, say a command or ask a question.
Accessing from Home Screen or Any Other Screen
1. Press the Google Assistant key on the left side of the device. or Touch and hold from the Home screen to launch Google Assistant.
2. Say a command or question when you see on the bottom of the screen.
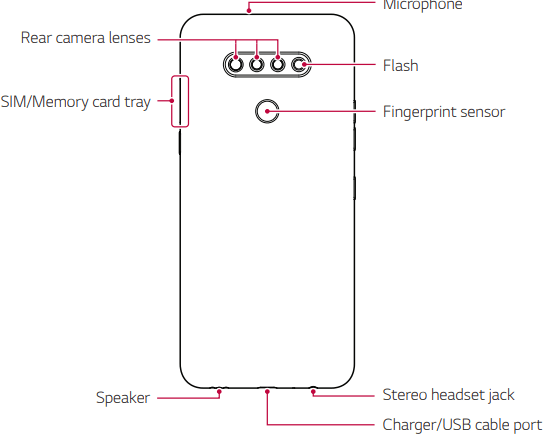
Fingerprint recognition
Fingerprint recognition overview
You must register your fingerprint on your device first before using the fingerprint recognition function. You can use the fingerprint recognition function in the following cases:
• To unlock the screen.
• To view locked contents in QuickMemo+.
• Confirm a purchase by signing in to an app or identifying yourself with your fingerprint.
Precautions for fingerprint recognition
Fingerprint recognition accuracy may decrease due to a number of reasons. To maximize the recognition accuracy, check the following before using the device.
• Ensure that the fingerprint sensor is not damaged by a metallic object, such as coin or key.
• When water, dust or other foreign substance is on the fingerprint sensor or your finger, the fingerprint registration or recognition may not work. Clean and dry your finger before using the fingerprint sensor.
• A fingerprint may not be recognized properly if the surface of your finger has a scar or is not smooth due to being soaked in water
• If you bend your finger or use the fingertip only, your fingerprint may not be recognized. Make sure that your finger covers the entire surface of the fingerprint sensor.
• Scan only one finger for each registration. Scanning more than one finger may affect fingerprint registration and recognition.
• The device may generate static electricity if the surrounding air is dry. If the surrounding air is dry, avoid scanning fingerprints, or touch a metallic object, such as coin or key, to remove static electricity before scanning fingerprints.
Registering fingerprints
You can register and save your fingerprint on the device to use fingerprint identification.
2. Locate the fingerprint sensor on the back of the device and gently put your finger on it to register the fingerprint.
3. Follow the on-screen instructions.
• Repeat scanning the fingerprint by moving your finger little by little until the fingerprint is registered.
4. When the fingerprint registration is done, tap OK.
• Tap Add more to register another fingerprint. If you register only one fingerprint and the corresponding finger is not in a good condition, the fingerprint recognition may not work well. As a preventative measure, register multiple fingerprints.
3. On the fingerprint settings screen, activate the desired function:
• Screen lock: Unlock the screen with a fingerprint.
• Content lock: Access contents you have locked in QuickMemo+ with a fingerprint.
Multi-tasking feature
Multi-Window
You can use two apps at the same time by separating the screen into multiple windows.
1. Tap from the Home touch buttons.
• Recently-used apps appear.
2. Tap at the top of the desired app to use the Multi-Window feature.
• The selected app appears at the top half of the screen.
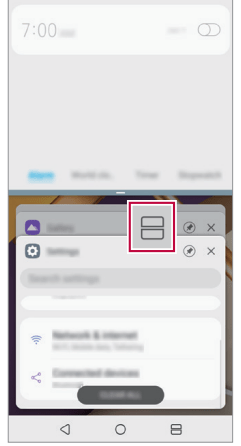
You can also access this feature by doing the following:
1. Touch and hold while using an app.
• Recently-used apps appear on the split screen.
2. Tap at the top of the desired app to use the Multi-Window feature.
• The selected app appears at the bottom of the screen.
Overview screen
The Overview screen provides a preview of your recently-used apps. To view the list of recently-used apps, tap on the Home touch buttons.
• Touch and hold an app and drag it to the top of the screen to start the app with the Multi-Window feature. You can also tap at the top of each app preview.
Basic Functions
Product components and accessories
The following items are included with your device.
• Device
• USB cable
• Charger
• Quick Start Guide
• Ejection pin
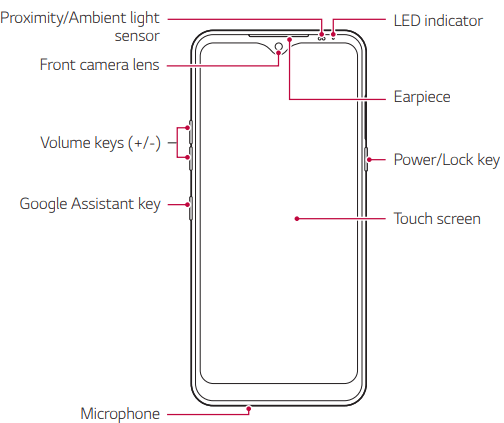
Parts overview
• Proximity/Ambient light sensor
- Proximity sensor: During a call, the proximity sensor turns off the screen and disables touch functionality when the device is in close proximity to the human body. It turns the screen back on and enables touch functionality when the device is outside a specific range.
- Ambient light sensor: The ambient light sensor analyzes the ambient light intensity when the auto-brightness control mode is turned on.
• Volume keys
- Adjust the volume for ringtones, calls or notifications.
- While using the Camera, gently press a Volume key to take a photo. To take continuous photos, press and hold the Volume key.
- Press the Volume Down key twice to launch the Camera app when the screen is locked or turned off. Press the Volume Up key twice to launch Capture+.
• Power/Lock key
- Briefly press the key when you want to turn the screen on or off.
- Press and hold the key when you want to select a power control option.
• Google Assistant key
- Your device has Google Assistant built in. Find answers and get things done while on-the-go. To get started, just tap the Google Assistant key on the side of the phone.
- Activate Google assistant. See Google Assistant for details.
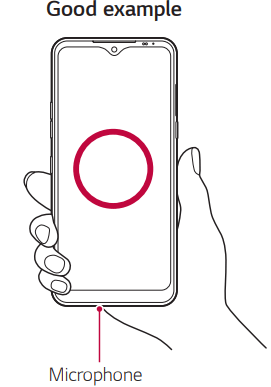
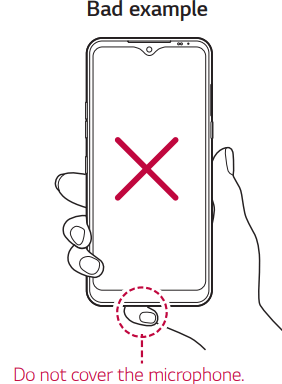
Hold the device correctly as shown below. If you cover the microphone hole with a hand, finger, or protective case while using the device, you may sound unclear during a call.
Turning the power on or off
Turning the power on
When the power is turned off, press and hold the Power/Lock key.
Turning the power off
Press and hold the Power/Lock key, then select Power off.
Restarting the device
When the device is not working properly or does not respond, restart it by following the instructions below.
1. Press and hold the Power/Lock key and the Volume Down key at the same time until the power is turned off.
2. When the device restarts, release the key.
Power control options
Press and hold the Power/Lock key, then select an option.
• Power off: Turn the device off.
• Power off and restart: Restart the device.
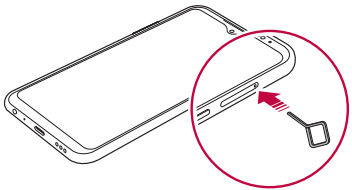
Installing the SIM card
Insert the SIM card provided by your mobile service provider to start using your device.
1. Insert the ejection pin into the hole on the card tray
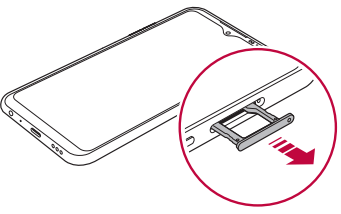
2. Pull out the card tray.
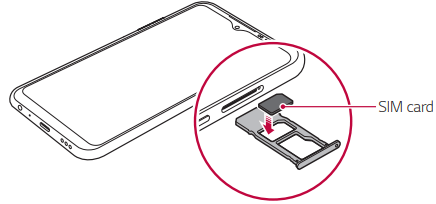
3. Put the SIM card on the card tray with the gold-colored contacts facing downwards.
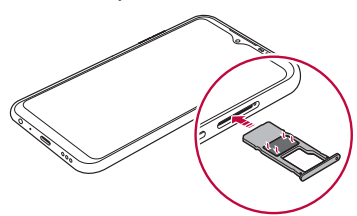
4. Insert the card tray back into the slot.
Precautions when using the SIM card
• Do not lose your SIM card. LG is not responsible for damage and other issues caused by loss or transfer of a SIM card.
• Be careful not to damage the SIM card when you insert or remove it.
Inserting the memory card
Insert the memory card into your device. The device can support up to a 2 TB microSD card. Depending on the memory card manufacturer and type, some memory card may not be compatible with your device
1. Insert the ejection pin into the hole on the card tray.
2. Pull out the card tray.
3. Put the memory card on the card tray with the gold-colored contacts facing downwards.
4. Insert the card tray back into the slot
Removing the memory card
Unmount the memory card before removing it for safety
1. Tap > Settings > Storage >
2. Insert the ejection pin into the hole in the card tray and then pull out the card tray from the device.
3. Remove the memory card from the card tray.
4. Insert the card tray back into the slot.
Battery
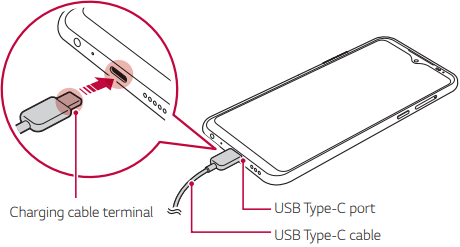
Charging the battery
Before using the device, fully charge the battery
Using the battery efficiently
Battery lifespan may decrease if you keep many apps and functions running simultaneously and continuously. Stop apps and functions from running in the background to increase battery life. To minimize battery consumption, follow these tips:
• Turn off the Bluetooth® or Wi-Fi network function when not using them.
• Set the screen timeout to as short a time as possible.
• Minimize the screen brightness.
• Set a screen lock when the device is not in use.
• Check the battery level while using any downloaded apps.
Touch screen
You can familiarize yourself with how to control your device by using touch screen gestures.
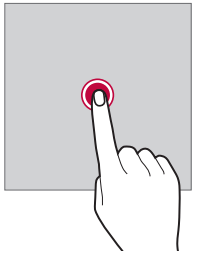
Tapping
Lightly tap with your fingertip to select or run an app or option
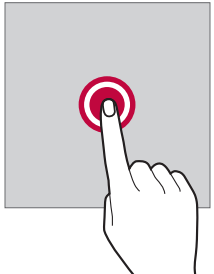
Touching and holding
Touch and hold for several seconds to display a menu with available options.
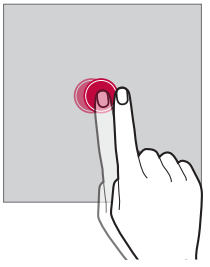
Double-tapping
Tap the screen twice quickly to zoom in or out on a specific app
Dragging
Touch and hold an item, such as an app or widget, then move your finger to a desired location in a controlled motion. You can use this gesture to move an item.
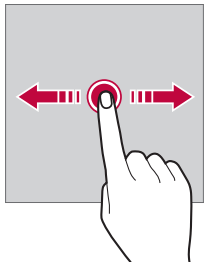
Swiping
Touch the screen with your finger and move it quickly without pausing. You can use this gesture to scroll through a list, a web page, photos, screens, and more.
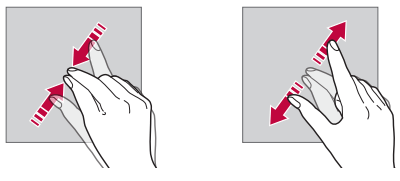
Pinching and spreading
Pinch two fingers to zoom out such as on a photo or map. To zoom in, spread your fingers apart.
Home screen
Home screen overview
The Home screen is the starting point for accessing various functions and apps on your device. Tap on any screen to directly go to the Home screen. You can manage all apps and widgets on the Home screen. Swipe the screen left or right to view all installed apps at a glance.
Home screen layout
You can view all apps and organize widgets and folders on the Home screen.
• Status bar: View status icons, the time and the battery level.
• Weather widget: View the weather information or time for a specific area.
• Google search widget: Perform a Google search by inputting spoken or written keywords.
• Page icon: Display the total number of Home screen canvases. You can tap the desired page icon to go to the page. The icon reflecting the current canvas will be highlighted.
• Quick access area: Fix main apps at the bottom of the screen so that they can be accessed from any Home screen canvas.
• Home touch buttons
- : Return to the previous screen. Close the keypad or pop-up windows.
- : Tap to go to the Home screen. To launch Google Assistant, touch and hold.
- : Tap to view a list of recently used apps or run an app from the list. To delete all the recently used apps, tap CLEAR ALL. To use two apps at the same time with the Multi-Window feature, touch and hold the button while using an app.
Editing the Home touch buttons
You can rearrange the Home touch buttons or add frequently used functions to the Home touch buttons area.
Tap > Settings > Display > Home touch buttons > Button combination and customize the settings.
• Several functions, including QSlide, Notification and Capture+, are provided. A maximum of two additional items can be added.
Status icons
When there is a notification for an unread message, calendar event or alarm, the status bar displays the corresponding notification icon. Check your device's status by viewing notification icons displayed on the status bar
No signal
Data is being transmitted over the network
Alarm is set
Vibrate mode is on
Bluetooth is on
Connected to a computer via USB
Battery level
Airplane mode is on
Missed calls
Wi-Fi is connected
Mute mode is on
GPS is on
Hotspot is on
No SIM card
Notifications panel
You can open the notifications panel by dragging the status bar downward on the main screen.
• You can drag down the notice window or tap the arrow icon to open the list of quick setting icons.
• You can tap to add, delete or arrange icons in the notice window.
• If you touch and hold the icon, the settings screen for the corresponding function appears.
Switching the screen orientation
You can set the screen orientation to automatically switch according to the device's physical orientation. On the notification panel, tap Rotation from the quick access icon list. You can also tap > Settings > Display and activate Auto-rotate screen.
Editing the Home screen
On the Home screen, touch and hold on an empty space, then select the desired action from below.
• To rearrange the Home screen canvases, touch and hold on a canvas, then drag it to a desired location.
• To add a widget to the Home screen, touch and hold on a blank area of the Home screen, then select Widgets.
• To change a wallpaper or theme, touch and hold on a blank area of the Home screen, then select Wallpaper & theme. You can also tap > Settings > Display > Wallpaper & theme, then select a desired wallpaper and theme to apply to the device.
• To configure the Home screen settings, touch and hold on a blank area of the Home screen, then select Home screen settings. See Home screen settings for details.
• To view or reinstall the uninstalled apps, touch and hold on a blank area of the Home screen, then select App trash. See App trash for details.
• To change the default screen, touch and hold on a blank area of the Home screen, move to desired screen, tap , then tap the screen once more.
Viewing the background theme
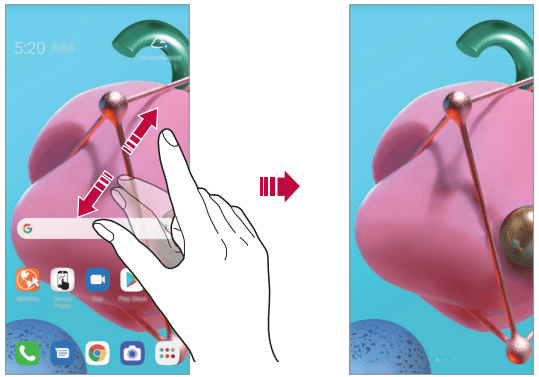
You can view only the background image by hiding the apps and widgets on the Home screen. Spread two fingers apart on the Home screen.
• To return to the original screen, which displays apps and widgets, pinch your fingers on the Home screen or tap .
Moving apps on the Home screen
On the Home screen, touch and hold an app, then drag it to a desired location.
• To keep frequently used apps at the bottom of the Home screen, touch and hold an app, then drag it to the quick access area at the bottom.
• To remove an icon from the quick access area, drag the icon to the Home screen.
Using folders from the Home screen
Creating folders
On the Home screen, touch and hold an app, then drag it over another app.
• A new folder is created and the apps are added to the folder
Editing folders
On the Home screen, tap a folder and do one of the following actions.
• To edit the folder name and color, tap the folder name.
• To add apps, touch and hold an app, then drag it over the folder and release it.
• To remove an app from the folder, touch and hold the app and drag it to outside the folder. If there is only one app remaining in the folder, the folder is removed automatically.
• You can also add or remove apps after tapping in the folder
Home screen settings
You can customize the Home screen settings.
1.Tap > Settings > Display > Home screen.
2. Customize the following settings:
• Select Home: Select a Home screen mode.
• Wallpaper: Change the Home screen background wallpaper.
• Screen swipe effect: Select an effect to apply when the Home screen canvas switches.
• Icon shape: Choose a desired shape for icons.
• Google feed: Enable Google feed to show to the left of Home screen.
• Grid: Change the app arrangement mode for the Home screen.
• Loop Home screen: Enable to allow continuous Home screen scrolling (loop back to the first screen after the last screen).
• Search: Search by swiping down on the Home screen.
• Home screen lock: Turn on to prevent apps and widgets from being rearranged or removed.
Screen lock
Screen lock overview
Your device's screen turns off and locks itself if you press the Power/Lock key. This also happens after the device is left idle for a specified period of time. If you press the Power/Lock key when a screen lock is not set, the Home screen appears immediately. To ensure security and prevent unwanted access to your device, set a screen lock.
Setting a screen lock
There are several screen lock options available.
1. Tap > Settings > Lock screen & security > Select screen lock and then select the method you prefer.
2. Customize the following settings:
• None: Deactivate the screen lock function.
• Swipe: Swipe on the screen to unlock the screen.
• Pattern: Draw a pattern to unlock the screen.
• PIN: Enter a numeric password to unlock the screen.
• Password: Enter an alphanumeric password to unlock the screen.
• Fingerprints: Unlock the screen by using your fingerprint.
Secure start-up settings
For additional security for your device, you can enable the Secure start-up option when setting a screen lock.
• You cannot use all functions, except for emergency calls, until you unlock the device.
• If you forget your decryption password, you cannot restore encrypted data and personal information.
Precautions for the secure start-up feature
• If you forget your decryption password, you cannot restore encrypted data and personal information.
• Be sure to keep your screen lock passwords separately.
• If you enter the screen lock passwords incorrectly more than the specified times, the device automatically resets itself and the encrypted data and your personal information are deleted automatically and they cannot be restored.
• Be cautious not to enter incorrect screen lock passwords more than the specified times.
• When you turn on the device right after the device reboots, encryption also starts. If you stop the encryption arbitrarily, the data may be damaged. Be sure to wait until the reboot is completed.
KnockON
You can turn the screen on or off by double-tapping the screen.
Tap > Settings > Extensions > KnockON to enable the feature
Turning the screen on
Double-tap the middle of the screen.
• Tapping the top or bottom of the screen may decrease the recognition rate.
Turning the screen off
Double-tap on an empty space on the screen. You can also double-tap an empty space on the status bar
Memory card encryption
You can encrypt and protect data saved on the memory card. The encrypted data in the memory card cannot be accessed from another device.
2. Read the on-screen overview of memory card encryption and then tap CONTINUE to continue.
3. Select an option and tap ENCRYPT NOW.
• New data encryption: Encrypt only data that is saved on the memory card after encryption.
• Full encryption: Encrypt all the data currently saved on the memory card.
• Exclude media files: Encrypt all files, except for media files such as music, photos and videos.
Taking screenshots
You can take screenshots of the current screen you are viewing
Via a shortcut
Press and hold the Power/Lock key and the Volume Down key at the same time for at least two seconds.
• Screenshots can be viewed from the Screenshots folder in Gallery.
Via Capture+
On the screen where you want to take a screenshot, drag the status bar downwards, then tap
Do not disturb
You can limit or mute notifications to avoid disturbances for a specific period of time.
Tap > Settings > Sound > Do not disturb.
• Mode and select the mode you want:
- Priority only: Receive sound or vibrate notifications for the selected apps. Even when Priority only is turned on, alarms still sound.
- Total silence: Disable both the sound and vibration.
• Select priorities: Receive alarms and the notifications for the selected apps.
- App notifications: Select apps to receive the notifications.
- Calls from: Set up a range of notifications when receiving a call.
- Repeated calls: Second call from same caller within 15 min is not silenced.
- Messages from: Set up a range of notifications when receiving a message.
• Use Do not disturb: Turn on the Do not disturb feature.
• SCHEDULE: Set the schedule for which you want to turn on the Do not disturb feature.
• Help: View the help for Do not disturb.
Useful Apps
Installing and uninstalling apps
Installing apps
Access an app store to search and download apps.
• You can use SmartWorld, Play Store or the app store provided by your service provider
Uninstalling apps
Uninstalling with the touch and hold gesture
On the Home screen, touch and hold the app to uninstall, then drag it over Delete at the top of the screen.
• Uninstalled apps can be reinstalled within 24 hours of uninstallation. See App trash for details.
Uninstalling by using the settings menu
Tap > Settings > Apps & notifications > App info, select an app, then tap Uninstall.
Uninstalling apps from the app store
To uninstall an app, access the app store from which you download the app and uninstall it.
Installing and uninstalling apps during the setup
When you turn on the device for the first time, you can download recommended apps. You can skip to the next step without installation.
App trash
You can view the uninstalled apps on the Home screen. You can also reinstall apps within 24 hours of uninstallation.
1. Touch and hold an empty area of the Home screen, then tap App trash.
2. Choose the desired option
• Restore: Restore the selected app.
• : Remove the uninstalled apps permanently from the device.
App Shortcuts
On the Home screen, touch and hold an app icon such as Phone, Messages, Camera, Gallery and Settings to display a quick access menu. Use apps more easily through App Shortcuts.
Phone
Voice call
Make a phone call by using one of the available methods, such as manually entering a phone number and making a call from the contact list or the list of recent calls.
Making a call from the keypad
1. Tap > > Dial.
2. Make a call by using a method of your choice:
• Enter a phone number and tap .
• Touch and hold a speed dial number.
• Search for a contact by tapping the initial letter of a contact name in the contact list, and then tap .
Making a call from the contact list
1 Tap > > Contacts.
2 From the contact list, select a contact and tap .
Answering a call
To answer a call, drag on the incoming call screen.
• When the stereo headset is connected, you can make calls by using the call/end button on the headset.
• To answer a call using a shortcut key, tap > Settings > Network & internet > Call > nswer and end calls > Answer call with the Volume Up key.
• To end a call with the Power key, tap > Settings Network & internet > Call > Answer and end calls, and activate End call with the Power key
Rejecting a call
To reject an incoming call, drag across the incoming call screen
• To send a rejection message, drag the rejection message option across the screen.
• To add or edit a rejection message, tap > Settings > Network & internet > Call > Call blocking & Decline with message > Decline with message.
• When a call is coming in, press the Volume Up, Volume Down or Power/ Lock key to mute ringtone or vibration, or to hold the call.
Checking an incoming call while using an app
When a call comes in while using an app, a pop-up notification can be displayed at the top of the screen. You can receive the call, reject the call, or send message from the pop-up screen.
Viewing missed calls
If there is a missed call, the status bar at the top of the screen displays . To view missed call details, drag the status bar downwards. You can also tap > > Call logs.
Functions accessible during a call
During a call, you can access a variety of functions by tapping the on-screen buttons:
• Contacts (This function may vary depending on the service provider): Allows access to your contacts list.
• Hold (This function may vary depending on the service provider): Place the current call on hold.
• Add call (This function may vary depending on the service provider): Allows you to add another caller to initiate a conference call.
• Dialpad: Display or hide the dial pad.
• Speaker: Turn on the speakerphone function.
• Mute: Block your voice so that the other party cannot hear your voice.
• Bluetooth: Switch the call to a Bluetooth device that is paired and connected.
• : End a call.
• : Access additional call options.
Making a three-way calling
You can make a call to another contact during a call.
1. During a call, tap Add call or > Add call (Depending on the service provider).
2. Enter a phone number and tap .
• The two calls are displayed on the screen at the same time, and the first call is put on hold.
3. To start a conference call, tap Merge or Merge calls.
Viewing call records
To view recent call records, tap > > Call logs. Then, you can use the following functions:To view recent call records, tap Call logs. Then, you can use the following functions:
• To view detailed call records, select a contact. To make a call to the selected contact, tap .
• To delete call records, tap > Delete.
Configuring call options
You can configure various call options.
1. Tap > >Dial or Call logs.
2. Tap > Call settings and then configure the options to suit your preferences.
Messages
Sending a message
You can create and send messages to your contacts using the Messages app.
1. Tap > .
2. Tap .
3. Specify a recipient and create a message.
• To attach files, tap .
• To access optional menu items, tap .
4. Tap or to send the message.
Reading a message
You can view exchanged messages organized by contact.
1. Tap > .
2. Select a contact from the message list.
Configuring messaging settings
You can change messaging settings to suit your preferences.
1. Tap > .
2. Tap > Settings from the message list.
Camera
You can use the Camera app to take and share photos and videos. It has many state-of-the-art features such as Portrait, AI CAM, and much more. These features will allow you to easily and creatively capture your world.
Starting the camera
Tap > .
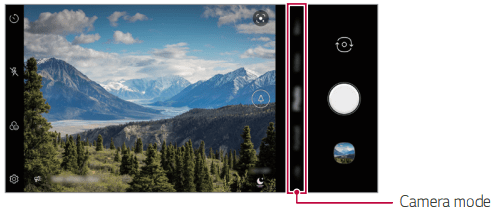
Changing the camera mode
You can select a camera mode that suits your environment to take a photo or record a video easily and conveniently. Tap > ., then swipe left or right over the camera mode area to select the desired mode.
Auto mode
You can take photos or record videos by selecting a variety of camera options.
1 Tap > .
2 To take a photo, tap Photo, and tap . To record a video, tap Video, and tap .
Taking a photo
1. Select a camera mode and tap the subject to focus the camera on.
2. Tap to take a photo.
• You can also press the Volume Down or Volume Up key to take a photo.
Recording a video
1 Select a camera mode and tap the subject to focus the camera on.
2 Tap .
• To take a photo while recording a video, tap .
• To pause the video recording, tap . To resume the video recording, tap .
• While recording a video, you may spread or pinch two fingers to zoom in or out.
• While recording a video, you may tap the desired area to adjust the brightness.
3 Tap to end the video recording
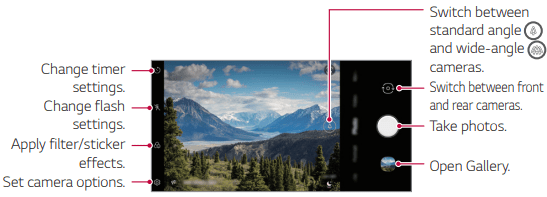
Customizing the camera options
You can customize a variety of camera options to suit your preferences. Tap on the screen.
• : Take a photo or record a video in FullVision.
• : Select values for aspect ratio and size for taking photos.
HDR : Obtain photos in vivid colors and get compensated effects even when they are taken against the light. These functions are provided by the High Dynamic Range (HDR) technology equipped in the camera.
Cheese shutter : Take photos with voice commands.
Tag locations : Save the image with GPS location data.
Grid : Displays guide grids so that you can take photos or record videos based on the horizontal and vertical reference lines.
Help : Provides help information for each camera menu.
Additional options on the front camera
Selfie shot : Take a selfie by selecting its option between Gesture shot and Auto shot.
Save as flipped : Save as flipped images after taking selfies.
Various camera modes
Flash Jump-Cut
Photos taken at a regular interval are saved as a GIF file.
1.Tap .
2. Tap More .
• Photos are taken every 3 seconds and saved as a GIF file.
• Tap on the screen to select the number of photos you want to take.
• While taking photos, tap to create a GIF with the photos taken.
Food
You can optimize the quality of your food photos or videos using the color slide bar and white balance.
1. Tap .
2. Tap More > .
3. To take a photo, tap . To record a video, tap .
• Drag the color slide bar on the screen to adjust the white balance and select the best color.
• If the slide bar is not displayed, tap to adjust the white balance.
YouTube Live
You can record a video and directly upload to YouTube
1 Tap .
2.Tap More >
To use this feature, you need to verify your phone number
Burst shot
You can take continuous shots of photos to create moving pictures. In the Auto mode, touch and hold .
• Continuous shots are taken at a fast speed while is held down.
Other useful features in the Camera app
Auto-Exposure/Auto-Focus lock
You can fix the current exposure level and focus position by touching the screen in the Photo mode. To turn off the feature, tap a blank area on the screen.
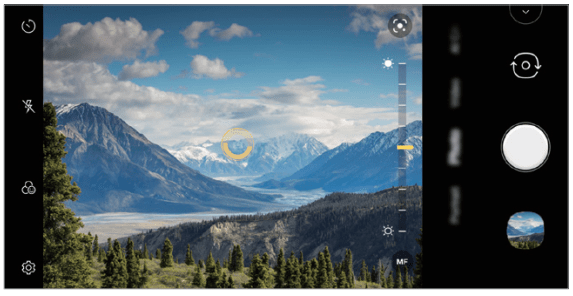
Focus peaking
You can adjust the focus on the subject with the Focus peaking feature. Access Focus peaking by tapping the Manual Focus (MF) button. Move the toggle wheel up or down to focus on the desired area, then take the photo.
Switching between cameras
You can switch between the front and rear cameras to suit your environment. On the camera screen, tap to switch between the front and rear cameras.
Zoom in or out
You can use zoom in or out on the camera screen while taking a photo or recording a video.
• On the camera screen, pinch or spread two fingers to zoom in or out, then use the displayed +/- slide bar.
Selfie shot
You can use the front camera to view your face on the screen and take selfies.
Gesture shot
You can take selfies by using gestures. Show your palm to the front camera and then clench your fist. You can also clench your fist and then open it towards the front camera.
• In three seconds, a photo is taken.
Auto shot
You can use the face detection feature to take selfies easily and conveniently. You can set the device so that, when you look at the screen, the front camera detects your face and takes a selfie automatically.
• The white colored guide frame appears when the front camera detects your face. If the subject within the guide frame stops moving, the guide frame color turns yellow, then the camera takes a photo.
Interval shot
You can take selfies at an interval. While using the front camera, you can show your palm to the camera, then clench your fist twice quickly.
• Four photos are taken at regular intervals after a timer delay of three seconds.
Save as flipped
Before taking a photo with the front camera, tap Save as flipped. The image is flipped horizontally
quick share
You can share a photo or video using a desired app immediately after taking it.
1.Tap , then take a photo or record a video.
2. Tap the app icon that appears on the screen to share it using that app. You can also swipe the icon towards the opposite direction to see what other apps you can use to share your photos and videos.
Gallery
Gallery overview
You can view and manage photos and videos saved on your device.
1. Tap .
• Saved photos and videos are displayed by folder.
2. Tap a folder and select a file.
• View the selected file in full-screen mode.
• While viewing a photo, swipe left or right to view the previous or next photo.
• While viewing a video, swipe left or right to rewind or fast-forward the video.
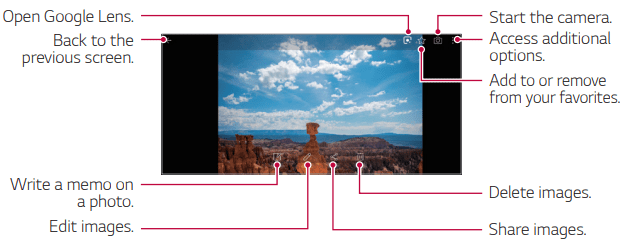
Viewing photos
Writing a memo on the photo
1. While viewing a photo, tap .
2. Write a memo on the photo and tap SAVE.
• The memo is applied to the photo.
Editing photos
1.While viewing a photo, tap .
2 Use a variety of effects and tools to edit the photo.
3 Tap SAVE to save changes.
• The changes are overwritten to the original file.
• To save the edited photo as another file, tap Save copy
Playing a video
Editing videos
1. While viewing a video, tap .
2. Use a variety of effects and edit tools to edit the video.
3. Tap Save to save changes
Creating a video
You can create a new video by putting images and videos together. See Creating a movie for details.
Making a GIF
You can easily make a GIF file using recorded video. See Making a GIF for details.
Deleting files
You can delete files by using one of the following options:
• Touch and hold a file from the file list, then tap Delete.
• Tap in an album, select files to delete, then tap DELETE.
• Deleted files are automatically moved to Trash and they can be restored to Gallery within 7 days.
• In Gallery, tap Trash, then tap to permanently delete the files. In this case, the files cannot be restored.
Sharing files
You can share files by using one of the following options:
• While viewing a photo, tap to share the file by using a desired method.
• While viewing a video, tap Share to share the file by using a desired method.
• Tap in an album to select files and share them using a desired method.
Chrome
Sign in to Chrome and import opened tabs, bookmarks and address bar data from a computer to your device.
Tap
Google apps
You can use Google apps by setting a Google account. The Google account registration window appears automatically when you use a Google app for the first time. If you do not have a Google account, create one from your device. For details on how to use an app, see the Help section in the app.
Drive
Upload, save, open, share and organize files from your device. Files accessible from apps can be accessed from anywhere, including online and offline environments.
Gmail
Register your Google email account to your device to check or send email.
Google
Use the Google to search for web pages, images, news and more by entering or speaking keywords.
Maps
Find your location or the location of a place on the map. View geographical information.
Photos
View or share photos or albums saved on your device.
Play Movies & TV
Use your Google account to rent or purchase movies. Purchased contents can be played anywhere.
YT Music
Stream and browse playlists, albums, and artists from YouTube Music.
YouTube
Search and play videos. Upload videos on YouTube to share them with people around the world.
Keep Notes
Create, edit, and share your text and photo notes with Google Account.
Contacts
Contacts overview
You can save and manage contacts.
Tap > Productivity > Contacts.
Adding contacts
Adding new contacts
1. On the contact list screen, tap .
2. Enter contact details and tap Save.
Importing contacts
You can import contacts from another storage device.
1 On the contact list screen, tap > Manage contacts > Import.
2 Select the source and target locations of the contact you want to import, and then tap OK.
3 Select the vCard file(s) and tap Import.
Adding contacts to the speed dial list
1. On the contact list screen, tap > Speed dial.
2. Tap Add contact from a speed dial number.
3. Select a contact.
Searching for contacts
You can search for contacts by using one of the following options:
• Tap from the top of the contacts list and then enter the contact information or phone number.
• Scroll the contact list up or down.
• From the index of the contact list screen, tap the initial letter of a contact.
Contact list
Editing contacts
1. On the contact list screen, select a contact.
2. On the contact detail screen, tap and edit details.
3. Tap Save to save changes.
Deleting contacts
You can delete contacts by using one of the following options:
• On the contact list screen, touch and hold a contact you want to delete, tap Delete contact, then tap Delete to confirm.
• Tap Delete on the contact list screen, select contacts you want to delete, then tap Delete.
Adding favorites
You can register frequently used contacts as favorites.
1. On the contact list screen, select a contact.
2. On the contact detail screen, tap
Creating groups
1. On the Groups tab, tap .
2. Enter a new group name.
3. Tap Add members, select contacts, then tap Add.
4 Tap Save to save the new group.
QuickMemo+
QuickMemo+ overview
You can make creative notes by using a variety of options on this advanced notepad feature, such as image management and screenshots, which are not supported by the conventional notepad.
Creating a note
1. Tap Productivity QuickMemo+.
2. Tap to create a note.
• : Save a note.
• : Undo the previous edit.
• : Redo the recently deleted edits.
• : Enter a note by using the keypad.
• : Write notes by hand.
• : Erase handwritten notes.
• : Zoom in or out, rotate or erase the parts of a handwritten note.
3.Tap to save the note.
Writing notes on a photo
1. Tap > Productivity > QuickMemo+ > .
2. Tap to take a photo, then tap OK. • The photo is automatically attached into the notepad.
3. Tap or to write notes on the photo.
• Write notes by hand on the photo.
• Enter text below the photo.
4. Tap to save the note.
Writing notes on a screenshot
1. While viewing the screen you want to capture, drag the status bar downwards and then tap .
• The screenshot appears as the notepad background theme. Memo tools appear at the top of the screen.
2. Crop the image (if necessary) and take notes as desired.
• Write notes by hand on the photo.
3. Tap and save the notes to the location of your choice.
• Saved notes can be viewed in either QuickMemo+ or Gallery.
• To save notes in the same location all the time, select the Use as default app checkbox before selecting an app.
Managing folders
You can view notes grouped by the type of the notes
1. Tap > Productivity > QuickMemo+.
2. At the top of the screen, tap and select a menu item:
• All memos: View all notes saved in QuickMemo+.
• My memos: View notes created by QuickMemo+.
• Photo memos: View notes created by .
• Capture+: View notes created by Capture+.
• Trash: View deleted notes.
• New category: Add categories.
• : Rearrange, add or delete categories. To change the name of a category, tap the category.
Clock
Alarm
You can set an alarm to trigger it at a specified time.
1 Tap > Tools > Clock > Alarm.
2 Tap to add a new alarm.
3 Configure the alarm settings and tap SAVE.
World clock
You can view the current time in cities around the world.
1. Tap > Tools > Clock > World clock.
2. Tap and add a city
Timer
You can set the timer to trigger an alarm after a specified period of time.
1.Tap > Tools > Clock >Timer.
2. Set the time and tap Start.
• To suspend the timer, tap Pause. To resume the timer, tap Resume.
3. Tap Stop to stop the timer alarm.
Stopwatch
You can use the stopwatch to record a lap time.
1. Tap > Tools > Clock > Stopwatch.
2. Tap Start to initiate the stopwatch.
• To record a lap time, tap Lap.
3. Tap Pause to suspend the stopwatch.
• To resume the stopwatch, tap Resume.
• To clear all the records and restart the stopwatch, tap Reset.
Calendar
Calendar overview
You can use the calendar to manage events and tasks.
Adding events
1. Tap > Productivity > Calendar.
2. Select a date, tap , then tap Event.
3. Enter event details and tap SAVE.
Syncing events
Tap > Calendars to sync and select a calendar to sync.
Music
You can play and manage songs or music albums.
1. Tap > Media > Music.
2. Select a category.
3. Select a music file.
Calculator
You can use two types of calculators: the simple calculator and the scientific calculator
1. Tap >Tools > Calculator.
2. Use the keypad to make a calculation.
• To restart a calculation, tap .
FM Radio
You can listen to FM Radio.
Tap >Media > FM Radio
Files
You can view and manage files saved on your device
Tap >Productivity > Files
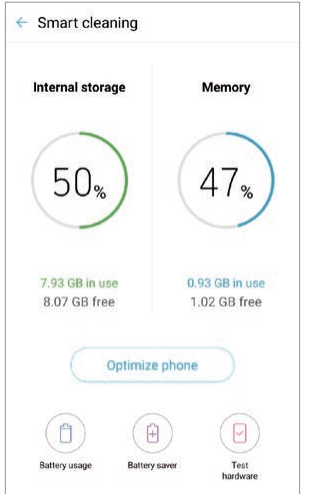
Smart cleaning
You can delete temporary files or apps that are no longer used.
1. Tap > Tools > Smart cleaning.
2. On the Smart cleaning screen, you can access Optimize phone, Battery usage, Battery saver, and Test hardware.
FAQ
This chapter lists some problems you might encounter when using your phone. Some problems require you to call your service provider, but most are easy to fix yourself.
Message
Possible causes
Possible corrective measures
SIM card error
There is no SIM card in the phone or it is inserted incorrectly.
Make sure the SIM card is correctly inserted.
No network connection/ Dropped network
Signal is weak or you are outside the carrier network.
Move toward a window or into an open area. Check the network operator coverage map.
No applications can be set
Not supported by service provider or registration required.
Contact your service provider.
Downloaded application causes a lot of errors.
Remove the application.
Tap Settings.
Tap Apps & notifications moderate-temperature App info.
Tap the app Uninstall.
Calls not available
Dialing error
New network not authorized.
New SIM card inserted.
Check for new restrictions.
Device cannot be turned on
Battery is not charged.
Charge battery. Check the charging indicator on the display.
Message
Possible causes
Possible corrective measures
Charging error
Battery is not charged.
Charge the battery.
Outside temperature is too hot or cold.
Make sure to charge the device in a moderate temperature environment.
Contact problem
Check the charger and its connection to the device.
No voltage
Plug the charger into a different outlet.
Charger defective
Replace the charger.
Wrong charger
Use only original LG accessories.
Number not allowed.
The Fixed dialing number function is on.
Check the Settings menu and turn the function off.
Files do not open
Unsupported file format
Check the supported file formats.
The screen does not turn on when I receive a call.
Proximity sensor problem
If you use a protection tape or case, make sure it has not covered the area around the proximity sensor. Make sure that the area around the proximity sensor is clean.
No sound
Vibration mode
Check the settings status in the sound menu to make sure the device is not in vibration or no interruptions mode.
Message
Possible causes
Possible corrective measures
Hangs up or freezes
Intermittent software/ hardware problem
Restarting the device
If your device freezes or hangs, you may need to close apps or turn off the device and turn it on again.
Performing a boot-up
Press and hold the Power/Lock key and the Volume Down key for about 10 seconds to restart your device.
Resetting the device
If the methods above do not solve your problem, perform a factory data reset.
On the settings screen, tap SystemRestart & resetFactory data reset.
Reset all settings for the device and delete data. Before performing the factory data reset, remember to make backup copies of all important data stored in the device.
If you registered a Google account to the device, you must sign in to the same Google account after resetting the device.
If by "video-capable" you are inquiring if the LG Reflect™ | TracFone, Model # LGL555DLATRFTNY can record video, it can. You can select a camera mode that suits your environment to take a photo or record a video easily and conveniently. While recording a video, you may spread or pinch two fingers to zoom in or out and you can tap the desired area to adjust the brightness
 , and tap Portrait.
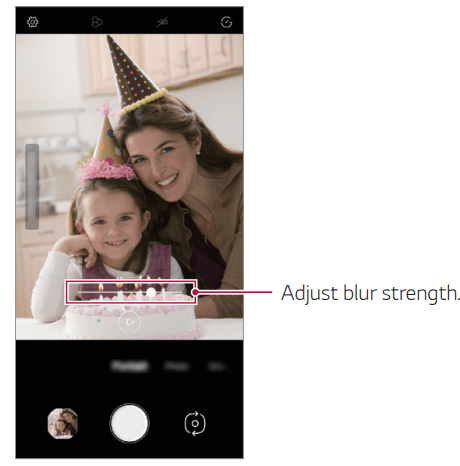
 to take a photo.
 , select an album, then tap
 Create movie.
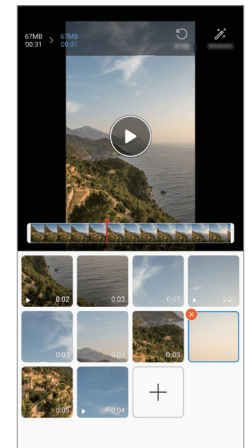
 at the top right corner of its thumbnail.
 at the bottom of the screen. You can also select the images or videos you have already previously added.
 to add a theme or background music, or change the font.
 .
. . After the playback time elapses, the next file is played automatically
 .
. from the Home screen to launch Google Assistant.
 from the Home screen to launch Google Assistant.
 on the bottom of the screen.
 > Settings > Lock screen & security > Fingerprints
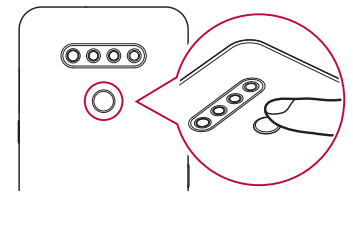
 .
. from the Home touch buttons.
 at the top of the desired app to use the Multi-Window feature.
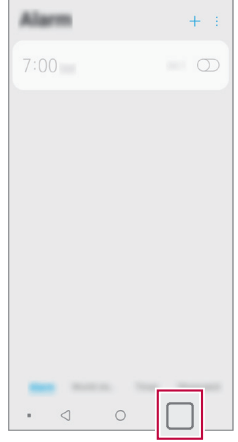

 > Settings > Storage >

 on any screen to directly go to the Home screen. You can manage all apps and widgets on the Home screen. Swipe the screen left or right to view all installed apps at a glance.
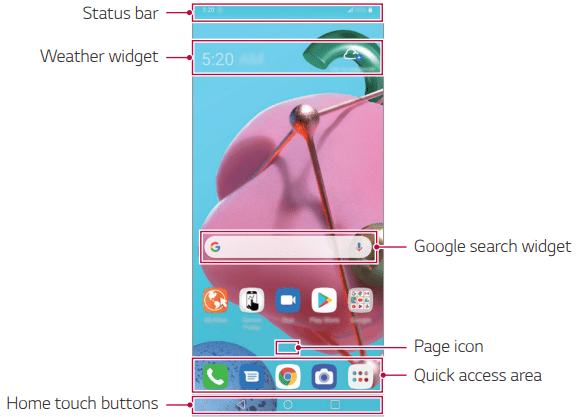
 : Return to the previous screen. Close the keypad or pop-up windows.
 : Tap to go to the Home screen. To launch Google Assistant, touch and hold.
 : Tap to view a list of recently used apps or run an app from the list. To delete all the recently used apps, tap CLEAR ALL. To use two apps at the same time with the Multi-Window feature, touch and hold the button while using an app.
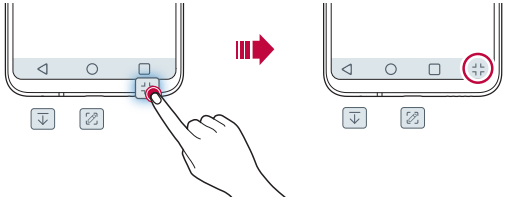
 No signal
 Data is being transmitted over the network
 Alarm is set
 Vibrate mode is on
 Bluetooth is on
 Connected to a computer via USB
 Battery level
 Airplane mode is on
 Missed calls
 Wi-Fi is connected
 Mute mode is on
 GPS is on
 Hotspot is on
 No SIM card
 to add, delete or arrange icons in the notice window.
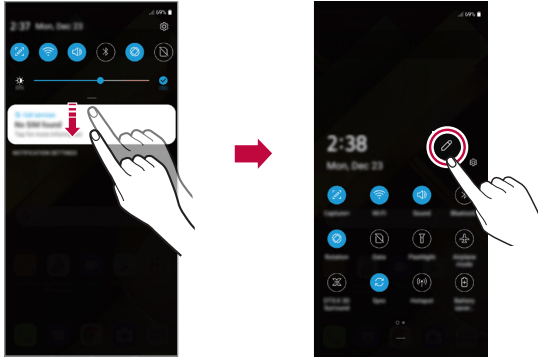
 > Settings > Display and activate Auto-rotate screen.
 , then tap the screen once more.
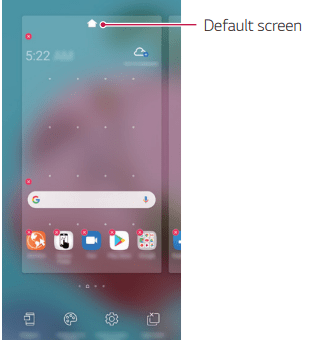
 .
.
 > Settings > Display > Home screen.
 > Settings > Lock screen & security > Select screen lock and then select the method you prefer.
 > Settings > Extensions > KnockON to enable the feature
 > Settings > Lock screen & security > Encryption & credentials > Encrypt SD card.
 > Settings > Sound > Do not disturb.
 > Settings > Apps & notifications > App info, select an app, then tap Uninstall.
 : Remove the uninstalled apps permanently from the device.
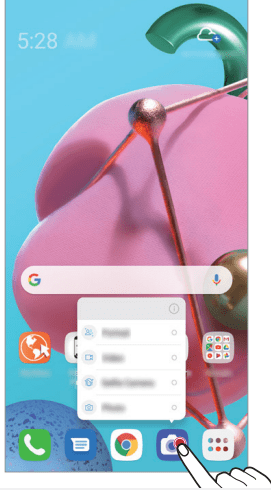
 >
>  > Dial.
 .
. >
>  > Contacts.
 .
. on the incoming call screen.
 > Settings > Network & internet > Call > nswer and end calls > Answer call with the Volume Up key.
 > Settings Network & internet > Call > Answer and end calls, and activate End call with the Power key
 across the incoming call screen
 across the screen.
 > Settings > Network & internet > Call > Call blocking & Decline with message > Decline with message.
 . To view missed call details, drag the status bar downwards. You can also tap
  >
>  > Call logs.
 : End a call.
 : Access additional call options.
 > Add call (Depending on the service provider).
 .
. >
>  > Call logs. Then, you can use the following functions:To view recent call records, tap Call logs. Then, you can use the following functions:
 .
. > Delete.
 >
>  >Dial or Call logs.
 > Call settings and then configure the options to suit your preferences.
 >
>  .
. .
. .
. .
. or
or  to send the message.
 >
>  .
. > Settings from the message list.
 >
>  .
.
 . To record a video, tap Video, and tap
  .
.
 to take a photo.
 .
. .
. . To resume the video recording, tap
  .
.
 on the screen.
 : Take a photo or record a video in FullVision.
 : Select values for aspect ratio and size for taking photos.
 .
. .
. on the screen to select the number of photos you want to take.
 to create a GIF with the photos taken.
 .
. .
. . To record a video, tap
  .
. to adjust the white balance.
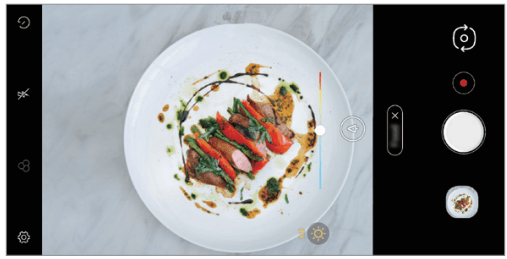

 .
.
 to switch between the front and rear cameras.
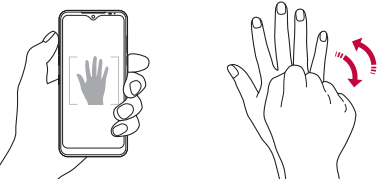

 Save as flipped. The image is flipped horizontally
 , then take a photo or record a video.
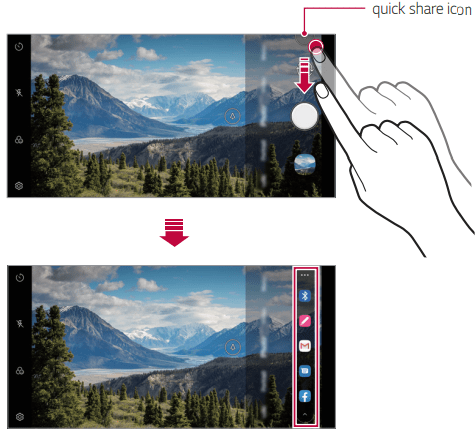
 .
.
 .
. .
. Save copy
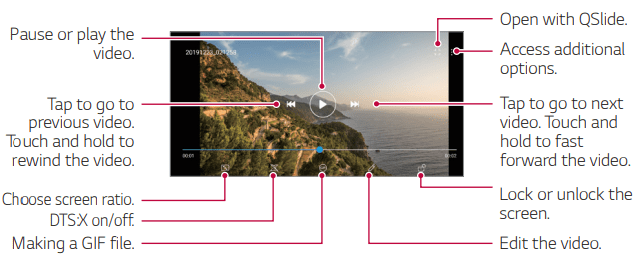
 .
.
 in an album, select files to delete, then tap DELETE.
 Trash, then tap
 to share the file by using a desired method.
 Share to share the file by using a desired method.
 > Productivity > Contacts.
 .
. > Manage contacts > Import.
 from the top of the contacts list and then enter the contact information or phone number.
 and edit details.
 Delete on the contact list screen, select contacts you want to delete, then tap Delete.
 .
. Productivity QuickMemo+.
 to create a note.
 : Save a note.
 : Undo the previous edit.
 : Redo the recently deleted edits.
 : Enter a note by using the keypad.
 : Write notes by hand.
 : Erase handwritten notes.
 : Zoom in or out, rotate or erase the parts of a handwritten note.
 to save the note.
 > Productivity > QuickMemo+ >
  .
. to take a photo, then tap OK. • The photo is automatically attached into the notepad.
 or
or  to write notes on the photo.
 to save the note.
 .
. and save the notes to the location of your choice.
 > Productivity > QuickMemo+.
 and select a menu item:
 .
. : Rearrange, add or delete categories. To change the name of a category, tap the category.
 > Tools > Clock > Alarm.
 to add a new alarm.
 > Tools > Clock > World clock.
 and add a city
 > Tools > Clock >Timer.
 > Tools > Clock > Stopwatch.
 > Productivity > Calendar.
 , then tap Event.
 > Calendars to sync and select a calendar to sync.
 > Media > Music.
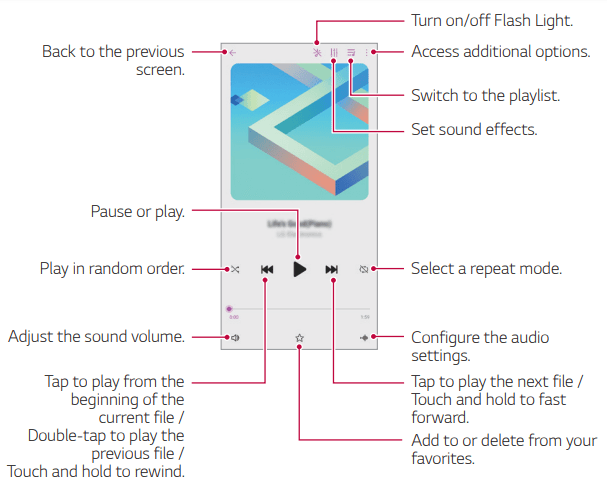
 >Tools > Calculator.
 Settings.
 Uninstall.