WARNING: This product contains chemicals known to the State of California to cause cancer and birth defects or other
reproductive harm. Wash hands after handling.

2
ENG
ENGLISH
TABLE OF CONTENTS
TABLE OF CONTENTS
4 LICENSES
5 ASSEMBLING AND
PREPARING
5 Accessories
6 OptionalAccessories
7 PartsandButtons
8 ConnectingtheStand
8 ConnectingtheSpeaker
9 UsingtheMountingCableTie
10 UsingtheIRReceiver
10 PortraitLayout
11 MountingonaWall
13 REMOTE CONTROL
15 USING THE MONITOR
15 ConnectingtoaPC
15 - RGBConnection
16 - DVIConnection
16 - HDMIConnection
17 - DisplayPortConnection
17 - IRReceiverConnection
18 AdjustingtheScreen
18 - SelectinganImageMode
18 - CustomizingImageOptions
19 - CustomizingPCDisplayOptions
19 AdjustingtheSound
19 - SelectinganSoundMode
20 - CustomizingSoundOptions
20 UsingAdditionalOptions
20 - UsingtheInputList
21 - AdjustingAspectRatio
23 ENTERTAINMENT
23 UsingtheNetwork
23 - ConnectingtoaWiredNetwork
24 - NetworkStatus
25 UsingtheMyMedia
25 - ConnectingUSBStorageDeviceand
UsingSignageDevice
27 - BrowsingFiles
29 - ViewingMovies
32 - ViewingPhotos
35 - ListeningtoMusic
38 - ViewingtheContentsList
39 - DivX®VODGuide
40 - UsingPIP/PBP
41 CUSTOMIZING SETTINGS
41 AccessingMainMenus
42 - PICTURESettings
45 - AUDIOSettings
46 - TIMESettings
47 - OPTIONSettings
51 - PictureIDSettings
52 - NETWORKSettings
53 MAKING CONNECTIONS
54 ExternalDeviceConnection
54 - AV(CVBS)Connection
54 - COMPONENTConnection
55 - HDMIConnection
55 - DVIConnection
56 USBConnection
56 LANConnection
57 DaisyChainConnection
57 - DVImode
58 TROUBLESHOOTING


ENGLISH
4
LICENSES
LICENSES
Supportedlicensesmaydifferbymodel.Formoreinformationofthelicenses,visitwww.lg.com.
ThetermsHDMIandHDMIHigh-DefinitionMultimediaInterface,andthe
HDMIlogoaretrademarksorregisteredtrademarksofHDMILicensingLLC
intheUnitedStatesandothercountries.
ABOUTDIVXVIDEO:DivX isadigitalvideoformatcreatedbyDivX,LLC,a
subsidiaryofRoviCorporation.ThisisanofficialDivXCertified devicethat
playsDivXvideo.Visitdivx.comformoreinformationandsoftwaretoolsto
convertyourfilesintoDivXvideos.
ABOUTDIVXVIDEO-ON-DEMAND:ThisDivX
Certified devicemustberegisteredinordertoplaypurchasedDivXVideo-
on-Demand(VOD)movies.Toobtainyourregistrationcode,locatethe
DivXVODsectioninyourdevicesetupmenu.Gotovod.divx.comformore
informationonhowtocompleteyourregistration.
DivXCertified toplayDivX videouptoHD1080p,includingpremium
content.
DivX ,DivXCertified andassociatedlogosaretrademarksofRovi
Corporationoritssubsidiariesandareusedunderlicense.
CoveredbyoneormoreofthefollowingU.S.patents:7,295,673;7,460,668;
7,515,710;7,519,274
Thewarrantywillnotcoveranydamagescausedbyusingtheproductinanexcessivelydusty
environment.
NOTE
ManufacturedunderlicensefromDolbyLaboratories.Dolbyandthedouble-D
symbolaretrademarksofDolbyLaboratories.
5
ENG
ENGLISH
ASSEMBLING AND PREPARING
ASSEMBLING AND PREPARING
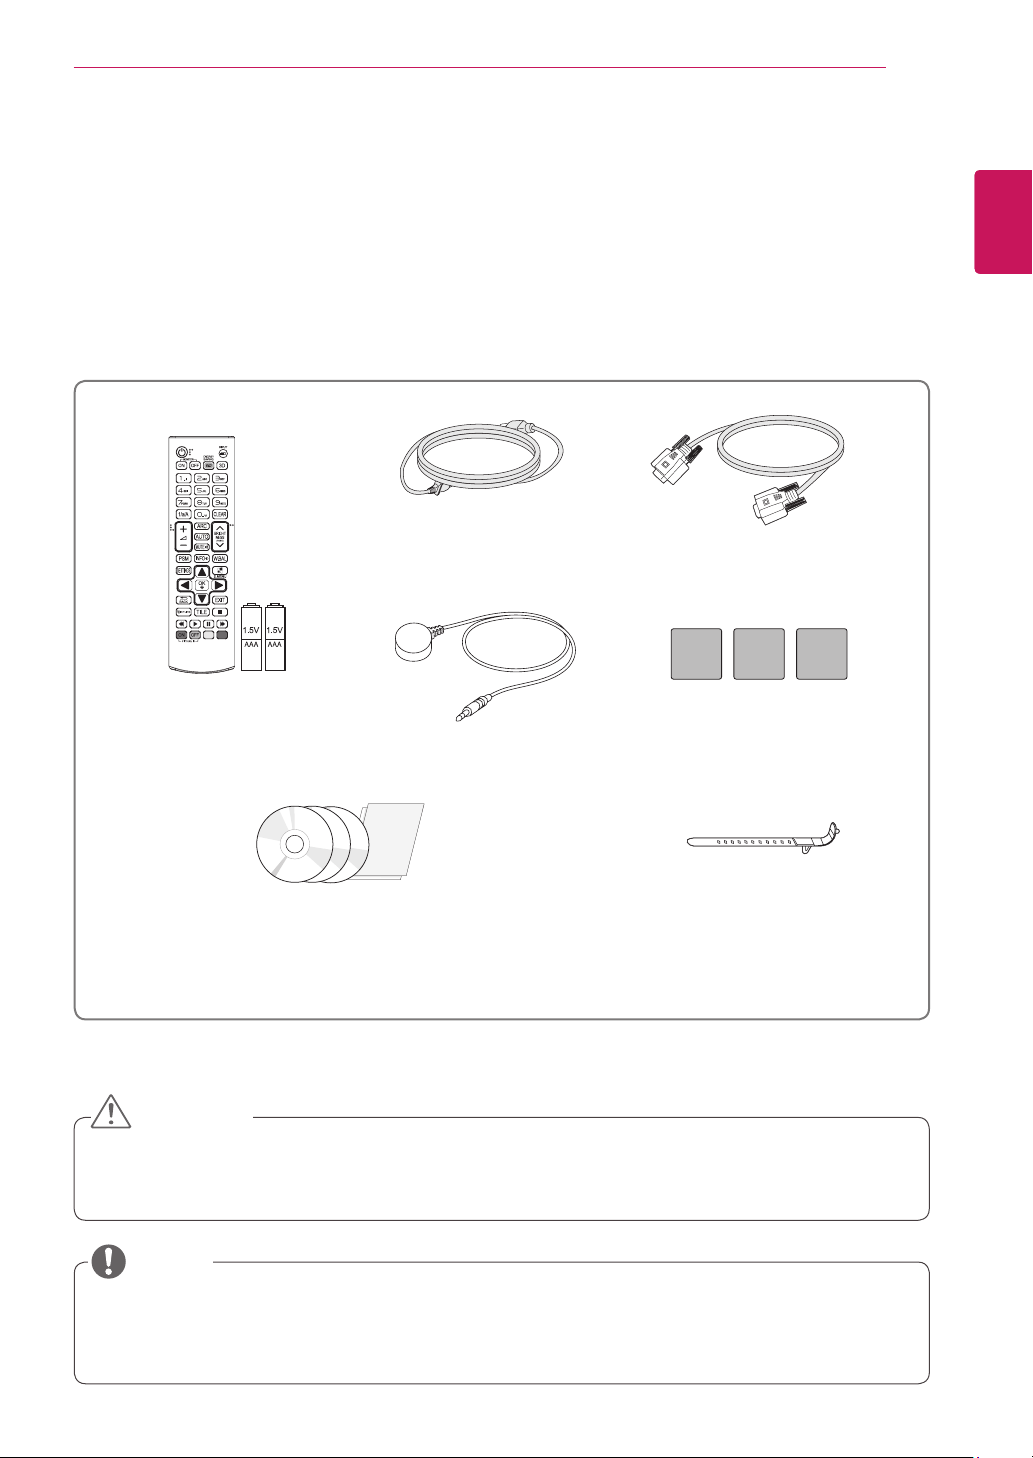
Accessories
Checkyourproductboxforthefollowingitems.Ifthereareanymissingaccessories,contactthelocal
dealerwhereyoupurchasedyourproduct.Theillustrationsinthismanualmaydifferfromtheactualproduct
andaccessories.
Donotuseanypirateditemstoensurethesafetyandproductlifespan.
Anydamagesorinjuriesbyusingpirateditemsarenotcoveredbythewarranty.
Theaccessoriessuppliedwithyourproductmayvarydependingonthemodel.
Productspecificationsorcontentsinthismanualmaybechangedwithoutpriornoticeduetoupgrade
ofproductfunctions.
CAUTION
NOTE
Remote Control and
Batteries
Power Cord
CD (Owner's Manual,
SuperSign Program/ Manual)/
Cards
D-sub 15-pin Signal Cable
Mounting Cable Tie
*Twocabletiesareprovidedwith
the60WL30MSmodel.
IR Receiver Magnetic sheet
6
ENG
ENGLISH
ASSEMBLING AND PREPARING
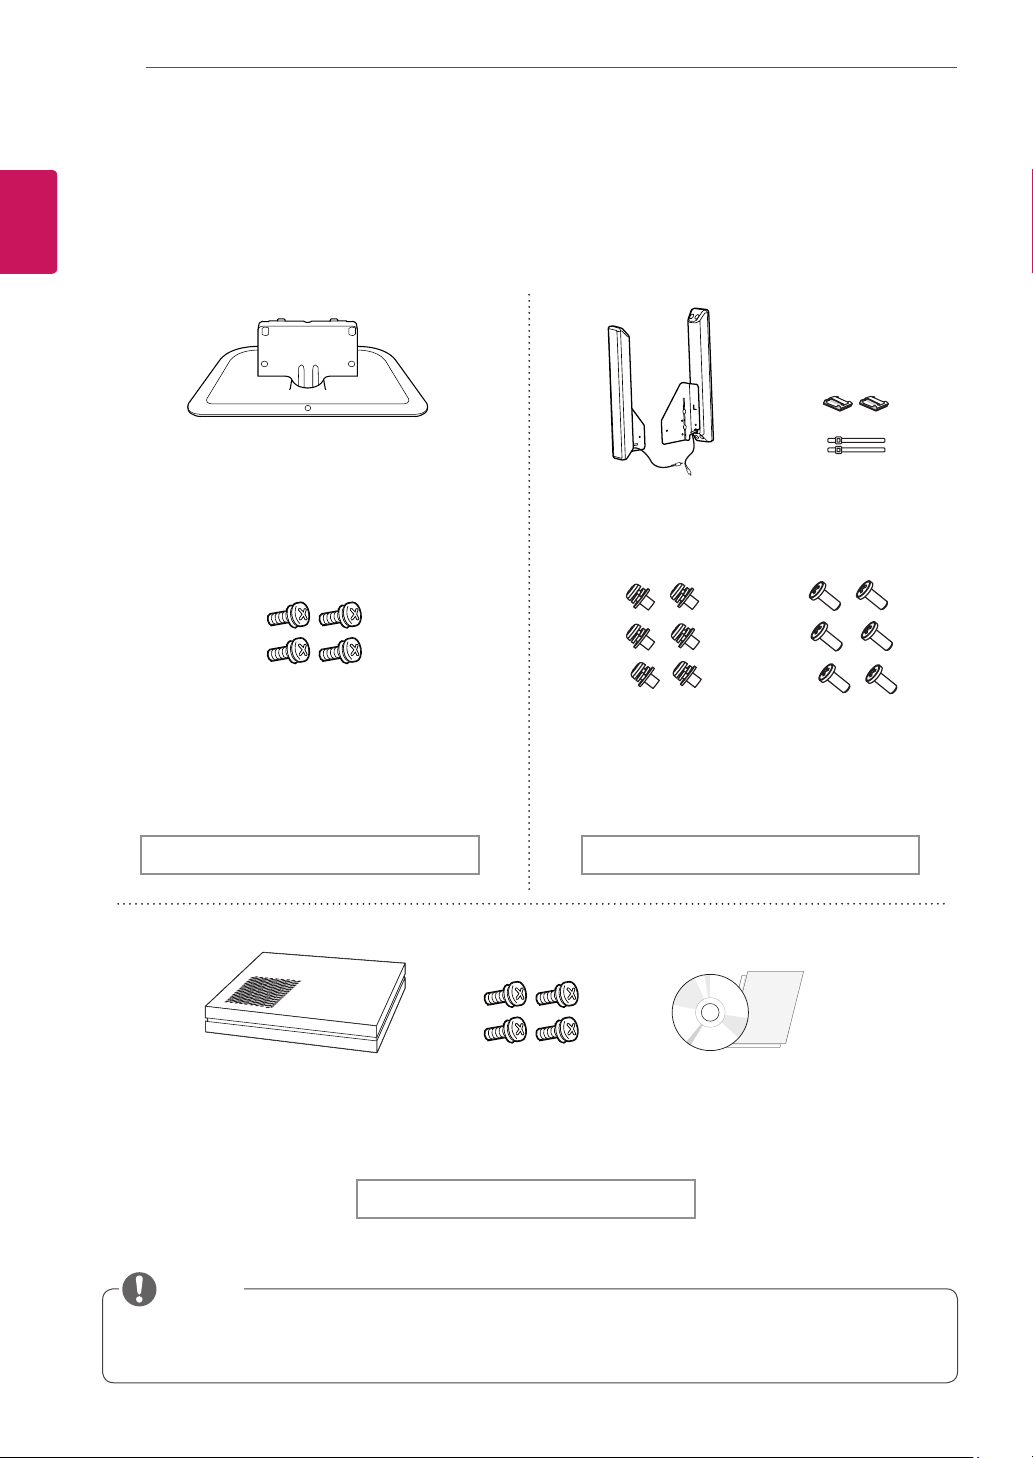
Optional Accessories
Withoutpriornotice,optionalaccessoriesaresubjecttochangetoimprovetheperformanceoftheproduct,
andnewaccessoriesmaybeadded.Theillustrationsinthismanualmaydifferfromtheactualproductand
accessories.
Cableholder/cabletiemaynotbeavailableinsomeareasorforsomemodels.
Optionalaccessoriesarenotincludedforallmodels.
NOTE
Stand
ST-420T(42WL30MS)
ST-470T(47WL30MS)
ST-550T(55WL30MS)
ST-550T(60WL30MS)
Cable holder/
Cable Tie
Screws
Diameter4.0mmxPitch0.7mmx
Length16mm(IncludedSpringWasher)
Speaker
SP-2000
Stand kit Speaker kit
Screws CD(Owner's Manual)/
Cards
Media Player
NC1000/NC1100
NA1000/NA1100
Media Player kit
Screws
Diameter4.0mmx
Pitch0.7mmxLength
8mm(IncludedSpring
Washer)
Screws
Diameter4.0mmx
Pitch1.6mmxLength
10mm

7
ENG
ENGLISH
ASSEMBLING AND PREPARING
Parts and Buttons
Connection PanelScreen Buttons
No. Description
1
Movestheselectionupanddown.
2
Adjuststhevolumelevel.
3
Displaysthecurrentsignalandmode.
Pressthisbuttontoadjustthescreenautomatically(availableonlyinRGBmode)
4
Accessesthemainmenus,orsavesyourinputandexitsthemenus.
5
Changestheinputsource.
6
Turnsthepoweronoroff.
1
2
6
5
4
3

8
ENG
ENGLISH
ASSEMBLING AND PREPARING
2
Usethescrewstosecurethestandontherear
sideoftheproductasshowninthediagram.
Connecting the Stand Connecting the Speaker
-Onlyonsomemodels.
1
Placeasoftclothonthetableandputthe
productwiththescreenfacingdownward.
-Onlyonsomemodels.
1
Connecttheinputsignalcabletothemonitor
beforeinstallingthespeakers.Useacabletie
toorganizethecables.
3
Thenconnectthespeakercable.Afterinstalling
yourspeakers,useholdersandcabletiesto
organizethespeakercables.
2
Mountthespeakerbyusingascrewasshown
inthefollowing.Makesurethepowercableis
disconnected.
9
ENG
ENGLISH
ASSEMBLING AND PREPARING
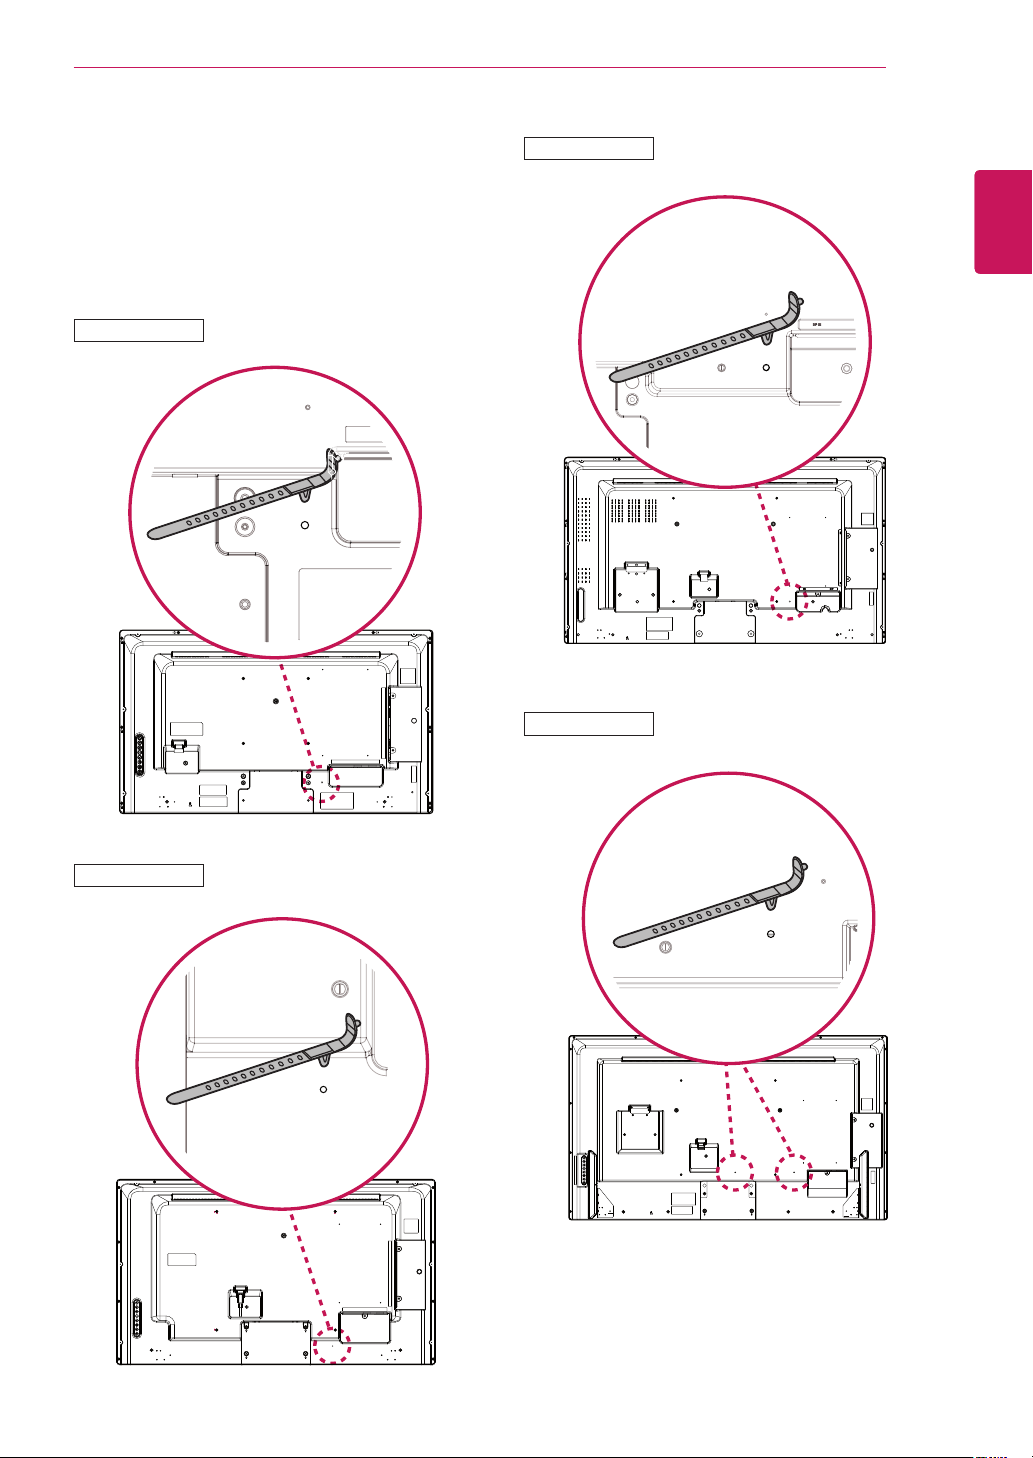
Using the Mounting Cable
Tie
First,connecttheinputsignalcabletobeused.
Insertthecabletieintothebottomholeonthe
backasshowninthefiguretoorganizecables.
42WL30MS
47WL30MS
55WL30MS
60WL30MS
10
ENG
ENGLISH
ASSEMBLING AND PREPARING
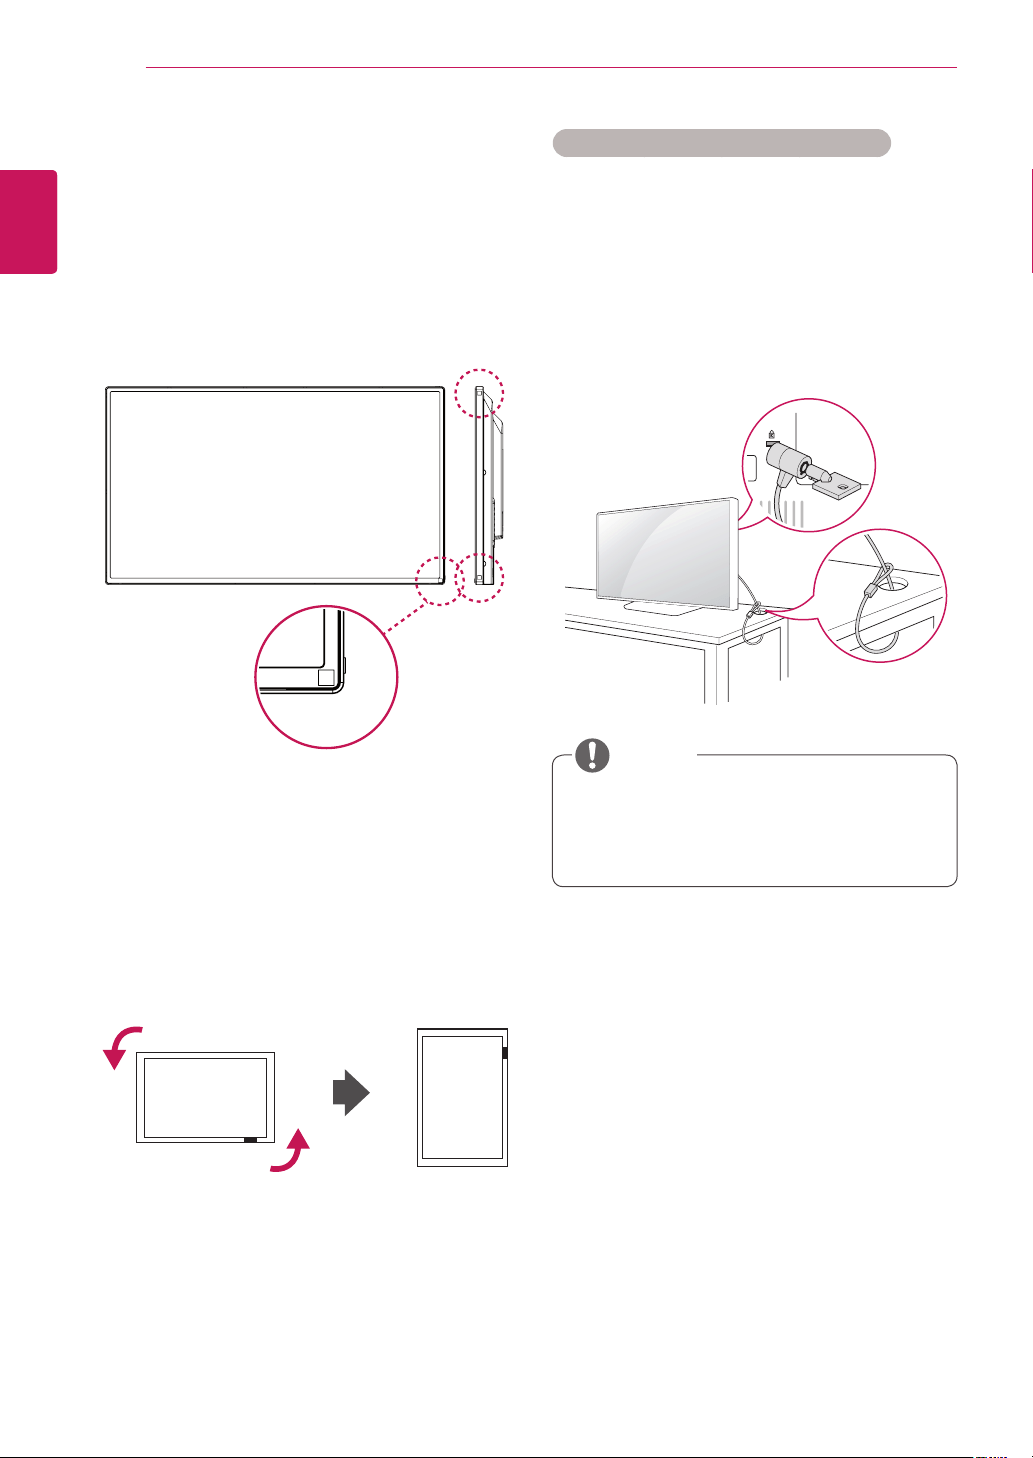
Portrait Layout
Toinstallinportraitmode,rotatetheset
counterclockwise90degreeswhenlookingatfrom
thefront.
Using the Kensington security system
TheKensingtonsecuritysystemconnectoris
locatedatthebackofthemonitorset.Formore
informationofinstallationandusing,refertothe
manualsuppliedwiththeKensingtonsecurity
systemorvisit
http://www.kensington.com
.
ConnecttheKensingtonsecuritysystemcable
betweenthemonitorsetandatable.
TheKensingtonsecuritysystemisoptional.
Youcanobtainadditionalaccessoriesfrom
mostelectronicsstores.
NOTE
Using the IR Receiver
Thisallowsaremotecontrolsensortobeplaced
inacustomlocation.TheIRreceiverismade
withamagnet.Attachthemagneticsheettothe
desiredpositionontheproduct.Itisrecommended
toattachittothelocationillustratedinthefigure
below.
11
ENG
ENGLISH
ASSEMBLING AND PREPARING
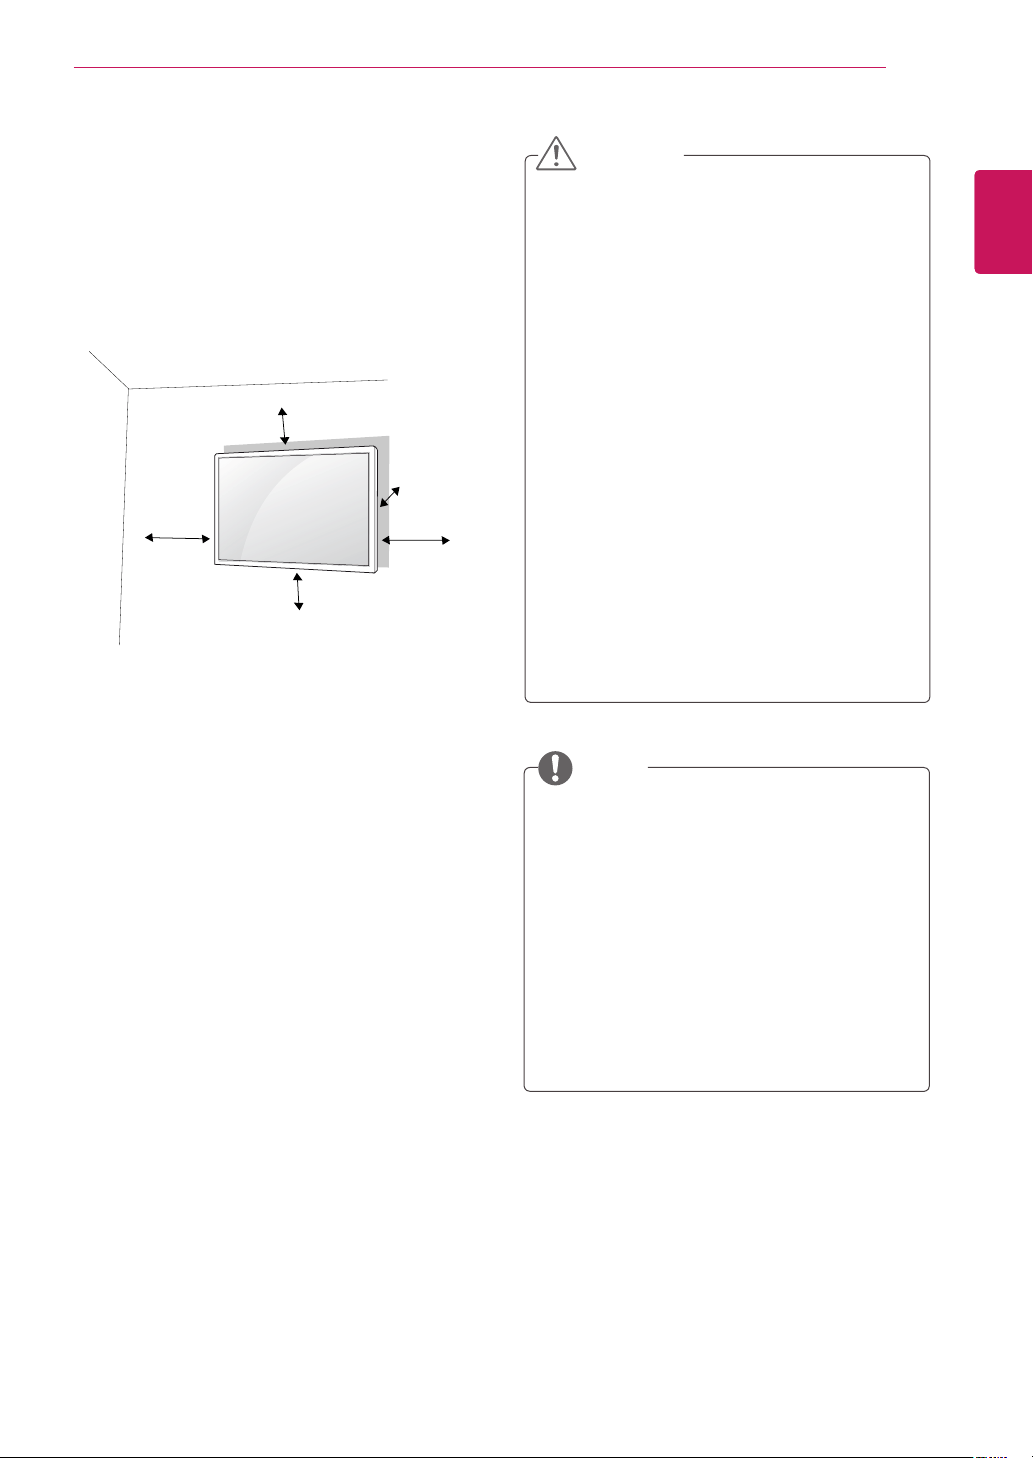
Mounting on a Wall
Forproperventilation,allowaclearanceof10
cmoneachsideandfromthewall.Detailed
installationinstructionsareavailablefromyour
dealer,seetheoptionalTiltWallMountingBracket
InstallationandSetupGuide.
10cm
10cm
10cm
10cm
10cm
Ifyouintendtomountthemonitortoawall,attach
aWallmountinginterface(optionalparts)tothe
backoftheset.
Whenyouinstallthemonitorusingawallmounting
interface(optionalparts),attachitcarefullysoit
willnotfall.
1
Please,useawallmountandscrewsin
accordancewithVESAStandards.
2
Ifyouusescrewslongerthanstandard,the
monitormightbedamagedinternally.
3
Ifyouuseimproperscrews,theproductmight
bedamagedanddropfrommountedposition.
Inthiscase,LGElectronicsisnotresponsible
fordamage.
4
PleaseuseVESAstandardasbelow.
785mm(31inch)orgreater
*Fasteningscrew:Diameter6.0mmxPitch1.0
mmxLength10mm
Disconnectthepowercordfirst,andthen
moveorinstallthemonitorset.Otherwise
electricshockmayoccur.
Ifyouinstallthemonitorsetonaceilingor
slantedwall,itmayfallandresultinsevere
injury.
UseanauthorizedLGwallmountand
contactthelocaldealerorqualified
personnel.
Donotovertightenthescrewsasthismay
causedamagetothemonitorsetandvoid
yourwarranty.
Usethescrewsandwallmountsthatmeet
theVESAstandard.Anydamagesorinjuries
bymisuseorusinganimproperaccessory
arenotcoveredbythewarranty.
Topreventinjury,thisapparatusmustbe
securelyattachedtothewallinaccordance
withtheinstrallationinstructions.(Thisonly
pertainstoAustralia.)
Thewallmountkitincludesaninstallation
manualandnecessaryparts.
Thewallmountbracketisoptional.Youcan
obtainadditionalaccessoriesfromyourlocal
dealer.
Thelengthofscrewsmaydifferdepending
onthewallmount.Besuretousetheproper
length.
Formoreinformation,refertotheinstructions
suppliedwiththewallmount.
CAUTION
NOTE

12
ENG
ENGLISH
ASSEMBLING AND PREPARING
Securing the product to a wall (optional)
(Dependingonmodel)
1
Insertandtightentheeye-bolts,or
p
roduct
bracketsandboltsonthebackofthe
p
roduct.
-Ifthereareboltsinsertedattheeye-bolts
position,removetheboltsfirst.
2
Mountthewallbracketswiththeboltstothe
wall.
Matchthelocationofthewallbracketandthe
eye-boltsontherearofthe
p
roduct.
3
Connecttheeye-boltsandwallbracketstightly
withasturdyrope.
Makesuretokeeptheropehorizontalwiththe
flatsurface.
NOTE
Makesurethatchildrendonotclimbonor
hangonthe
p
roduct.
Useaplatformorcabinetthatisstrongand
largeenoughtosupportthe
p
roductsecurely.
Brackets,boltsandropesareoptional.You
canobtainadditionalaccessoriesfromyour
localdealer.
CAUTION
Ifaproductisnotpositionedinasufficiently
stablelocation,itcanbepotentially
hazardousduetofalling.Manyinjuries,
particularlytochildren,canbeavoidedby
takingsimpleprecautionssuchas:
»
Usingcabinetsorstandsrecommended
bythemanufactureroftheproduct.
»
Onlyusingfurniturethatcansafely
supporttheproduct.
»
Ensuringtheproductisnotoverhanging
theedgeofthesupportingfurniture.
»
Notplacingtheproductontallfurniture
(forexample,cupboardsorbookcases)
withoutanchoringboththefurnitureand
theproducttoasuitablesupport.
»
Notstandingtheproductonclothorother
materialsplacedbetweentheproduct
andsupportingfurniture.
»
Educatingchildrenaboutthedangersof
climbingonfurnituretoreachtheproduct
oritscontrols.
WARNING
13
ENG
ENGLISH
REMOTE CONTROL
REMOTE CONTROL
Thedescriptionsinthismanualarebasedonthebuttonsoftheremotecontrol.Pleasereadthismanual
carefullyandusethemonitorsetcorrectly.
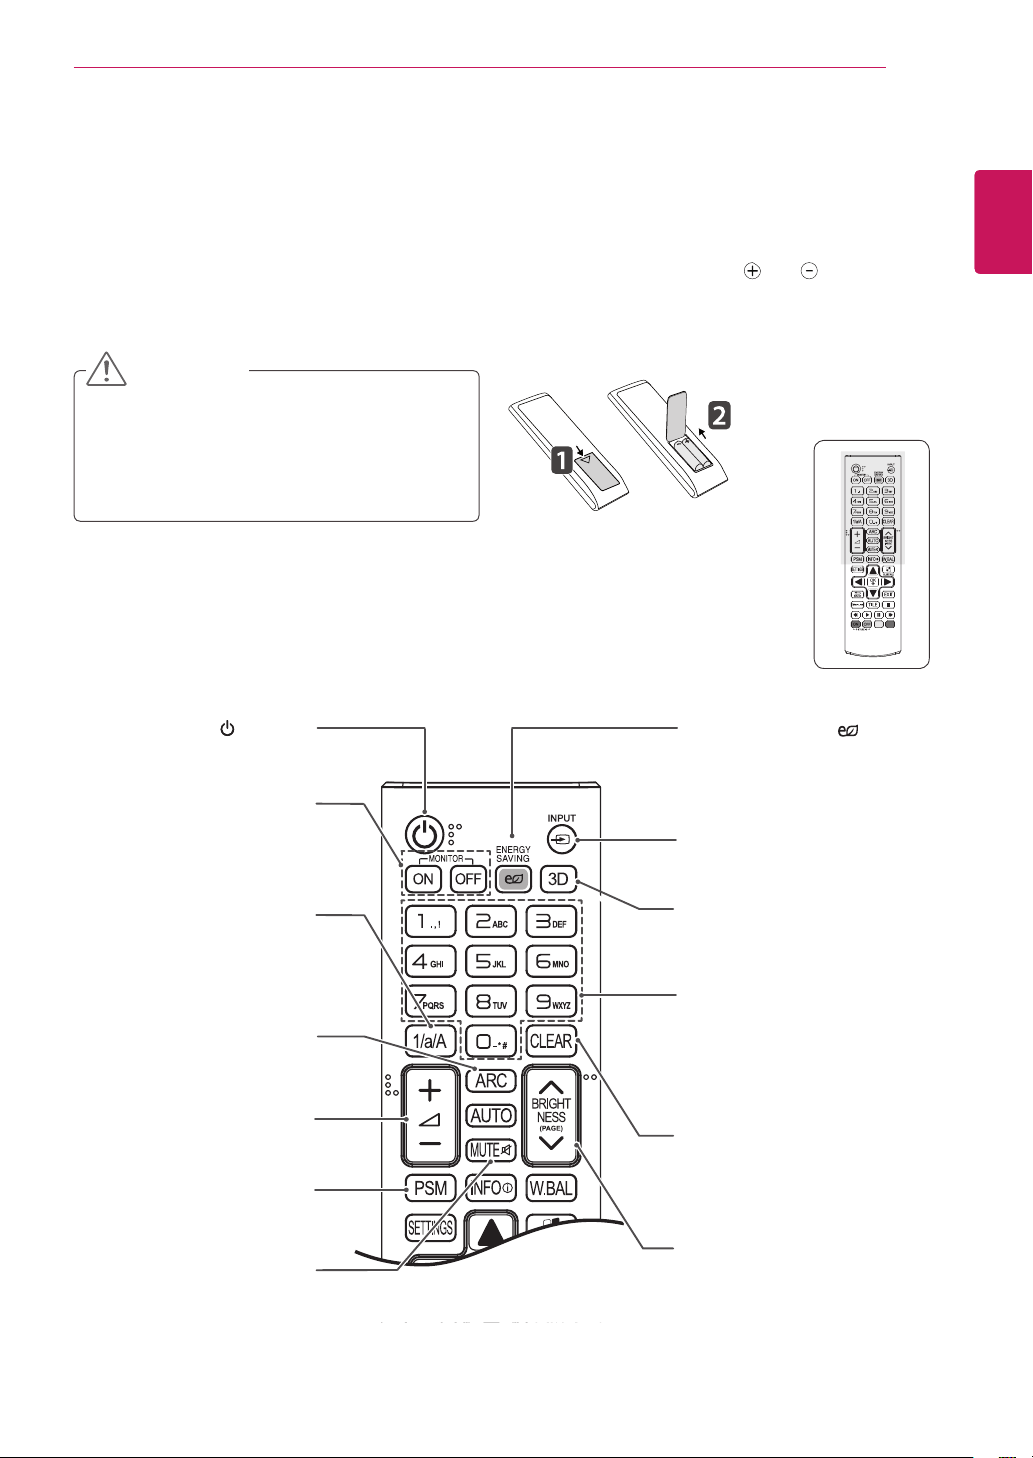
Toreplacebatteries,openthebatterycover,replacebatteries(1.5VAAA)matching and endstothe
labelinsidethecompartment,andclosethebatterycover.
Toremovethebatteries,performtheinstallationactionsinreverse.
Donotmixoldandnewbatteries,asthis
maydamagetheremotecontrol.
Makesuretopointtheremotecontroltothe
remotecontrolsensoronthemonitorset.
CAUTION
ID
BACK
TILE
ON
OFF
EXIT
(POWER)
Turnsthemonitorsetonoroff.
MONITOR ON / OFF
Turnsmultiplemonitorsonor
offsimultaneously.
1/a/A Button
Togglesbetweennumerical
andalphabetical.
ENERGY SAVING( )
Adjuststhebrightnessof
thescreentoreduceenergy
consumption.
INPUT
Selectstheinputmode.
3D
Thisbuttonselectionisnot
applicable.
Number and Alphabet buttons
Entersnumericaloralphabetical
charactersdependingonthe
setting.
CLEAR
Deletestheenterednumerical
oralphabeticalcharacter.
PSM
SelectsthePictureStatus
Mode.
MUTE
Mutesallsounds.
ARC
SelectstheAspectRatio
Mode.
Volume Up / Down
Adjuststhevolumelevel.
BRIGHTNESS Key
Adjustthebrightnessby
pressingtheUpandDown
buttonsontheremotecontrol.
InUSBmode,theOSDmenu
hasthePagefunctiontomove
tothenextfilelist.
14
ENG
ENGLISH
REMOTE CONTROL
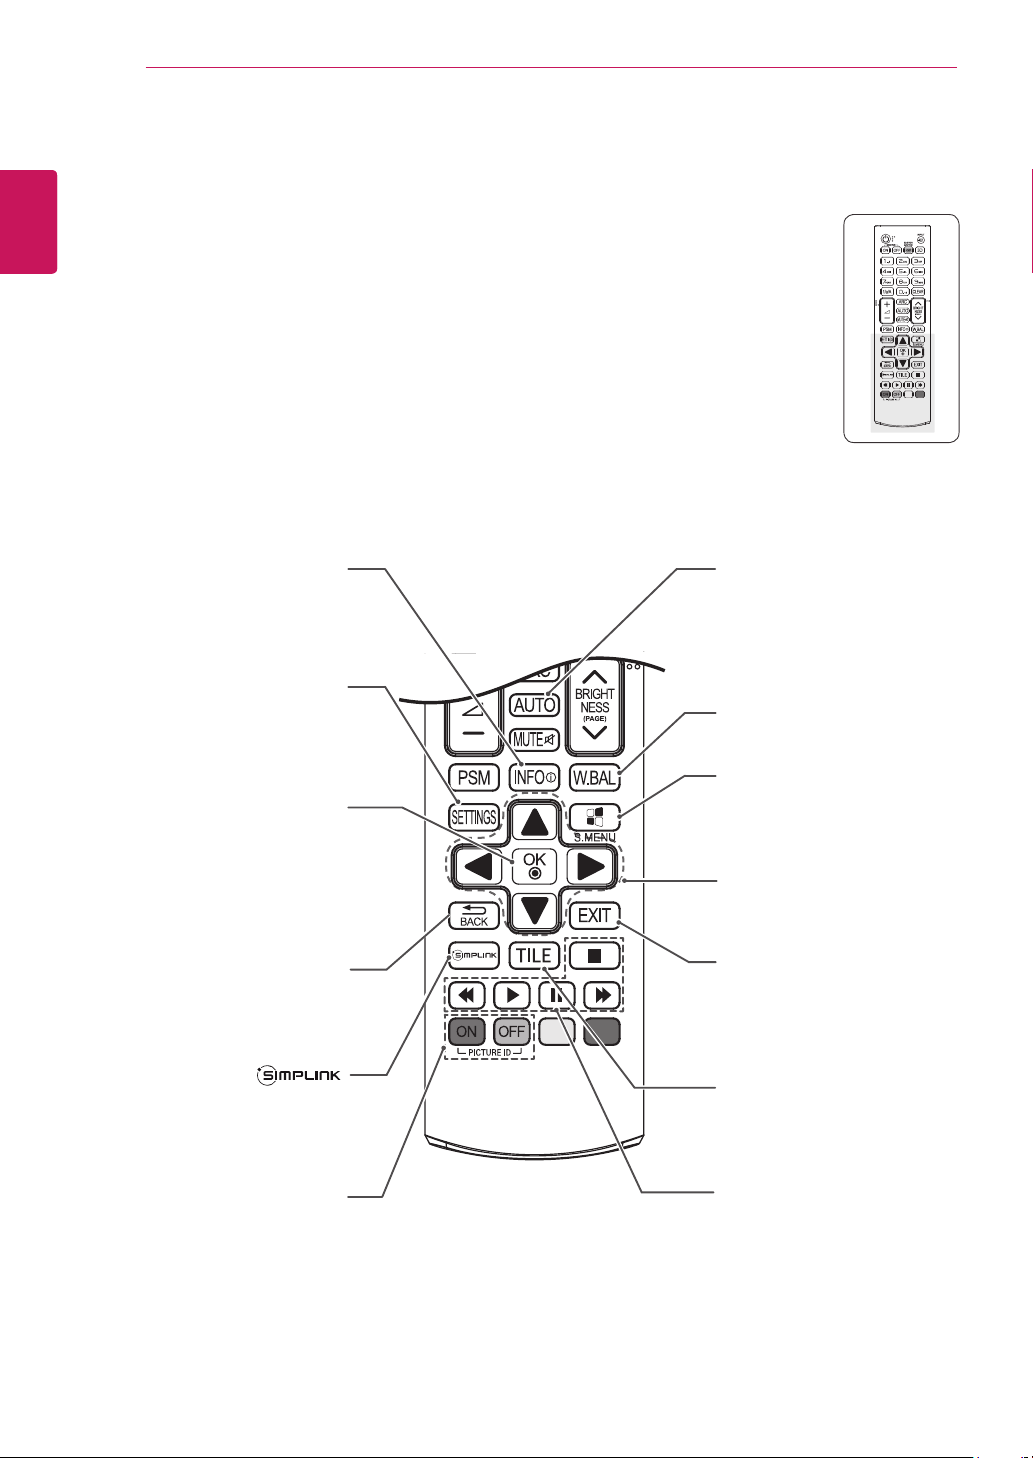
W.BAL
Thisbuttonselectionisnot
applicable.
Navigation buttons
Scrollsthroughmenusor
options.
S.MENU
(SuperSignMenuKey)
Thisbuttonselectionisnot
applicable.
EXIT
Clearsallon-screendisplays
andreturnstomonitorset
viewingfromanymenu.
TILE
SelectstheTILEMode.
INFO
ⓘ
Viewstheinformationofthe
currentlyprogramandthe
screen.
SETTINGS
Accessesthemainmenus
orsavesyourinputandexit
menus.
OK
Selectsmenusoroptionsand
confirmsyourinput.
BACK
Allowstheusertomoveback
onestepinuserinteraction
function.
Thisbuttonselectionisnot
applicable.
USB Menu control buttons
Controlsmediaplayback.
ID ON/OFF
WhenthenumberofPicture
IDisequaltoSetIDyoucan
controlthemonitorwhich
youwantinthemultidisplay
condition.
AUTO
Automaticallyadjustspicture
positionandminimizesimage
instability.(RGBinputonly)
15
ENG
ENGLISH
USING THE MONITOR
USING THE MONITOR
Connecting to a PC
YourmonitorsupportsthePlug&Play*feature.
*Plug&Play:APCwillhaveabuilt-indriverfor
themonitor,noextrasoftwareisneeded.
NOTE
Connectthesignal
inputcableandtighten
itbyturningthescrews
clockwise.
Usethestandard
Macintoshadaptersince
anincompatibleadapter
isavailableinthemarket.
(Differentsignalingsystem)
Donotpressthescreenwithyourfingerfor
alongtimeasthismayresultintemporary
distortiononthescreen.
Avoiddisplayingafixedimageonthescreen
foralongperiodoftimetopreventimage
burn.Useascreensaverifpossible.
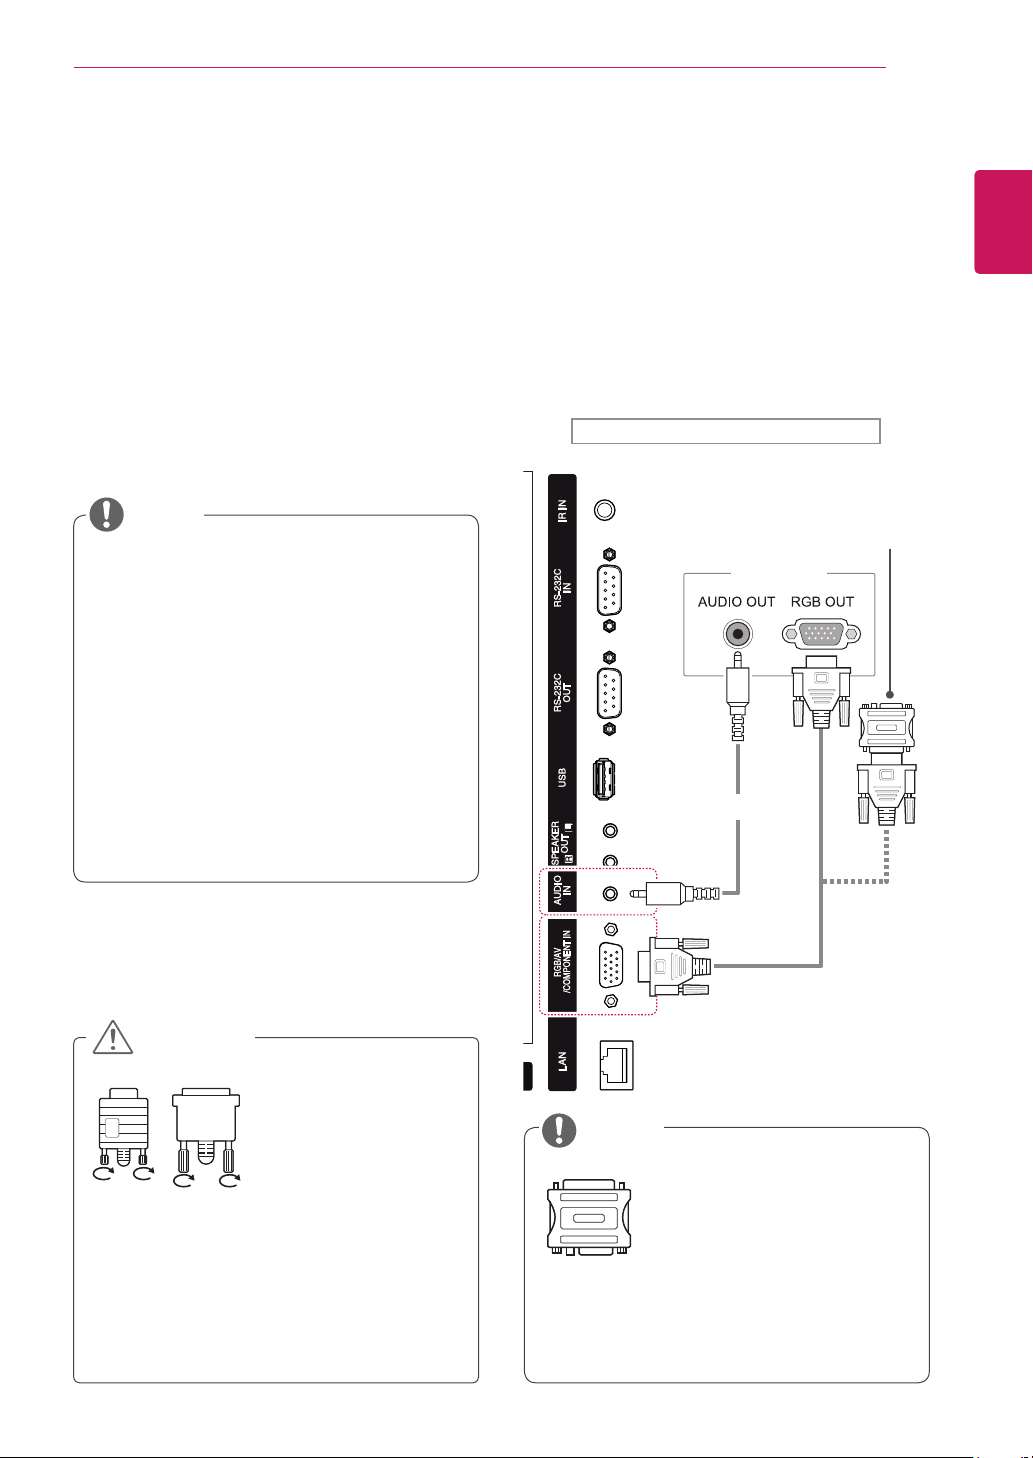
RGB Connection
TransmitsananalogvideosignalfromyourPCto
themonitor.ConnectthePCandthemonitorwith
the15-pinsignalcableasshownanfollowing
illustration.SelectRGBinput.Totransmitanaudio
signal,connectanoptionalaudiocable.
Applecomputersmayrequireanadapterto
connecttothismonitor.Callorvisittheirweb
siteformoreinformation.
ItisrecommendedyouuseanHDMI
connectionforthebestimagequality.
Useashieldedsignalinterfacecable,such
asD-sub15-pinsignalcableandDVI/HDMI
cable,withaferritecoretomaintainstandard
compliancefortheproduct.
Ifyouturnthemonitorsetonwhenthesetis
cold,thescreenmayflicker.Thisisnormal.
Somered,green,orbluespotsmayappear
onthescreen.Thisisnormal.
IfyouuseacablelongerthantheD-sub15-
pinsignalcableprovided,certainimages
mayappearblurry.
CAUTION
NOTE
Backoftheproduct.
PC/MAC
MacintoshAdapter
(notincluded)
(notincluded)
16
ENG
ENGLISH
USING THE MONITOR
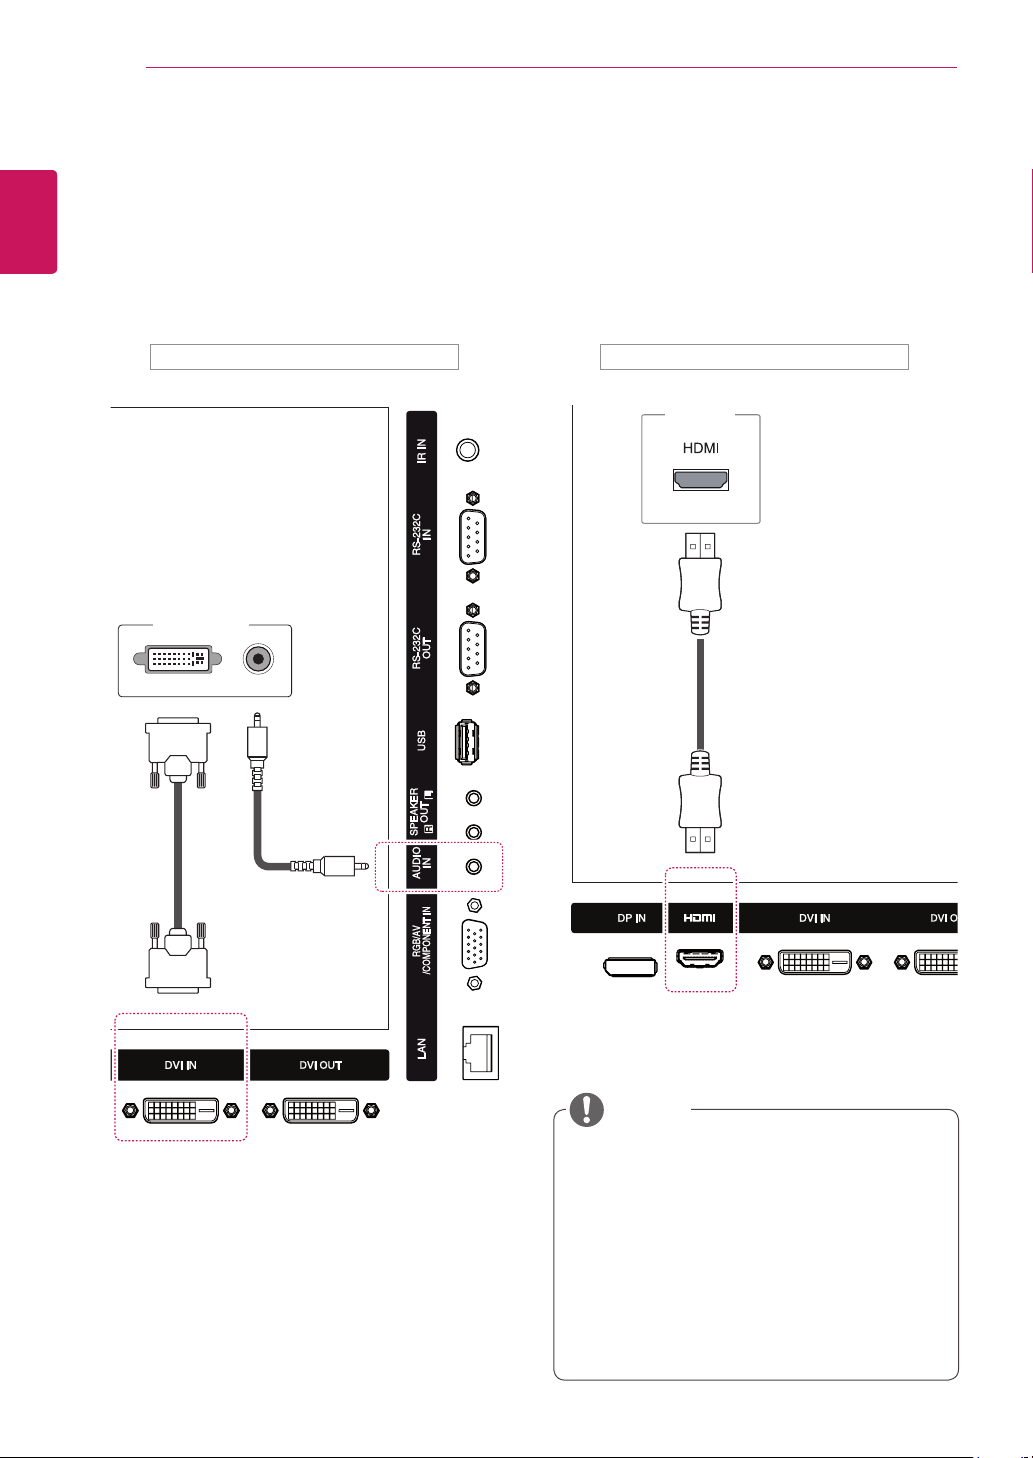
DVI Connection
TransmitsandigitalvideosignalfromyourPCto
themonitor.ConnectthePCandthemonitorwith
aDVIcableasshownthefollowingillustration.
SelectDVIinput.Totransmitanaudiosignal,
connectanoptionalaudiocable.
HDMI Connection
Transmitsthedigitalvideoandaudiosignals
fromyourPCtothemonitor.ConnectthePCand
themonitorwithanHDMIcableasshowninthe
followingillustration.SelectHDMIinput.
UseaHighSpeedHDMI™Cable.
PleasecheckthePCenvironmentifyou
cannothearaudioinHDMImode.SomePCs
requireyoutomanuallychangethedefault
audiooutputtoHDMI.
IfyouwanttouseHDMI-PCmode,youmust
settheinputlabeltoPCmode.
WhenHDMIPCisused,acompatiblity
problemmightoccur.
NOTE
Backoftheproduct. Backoftheproduct.
PC
PC
(notincluded)
(notincluded)
(notincluded)
17
ENG
ENGLISH
USING THE MONITOR
Backoftheproduct.
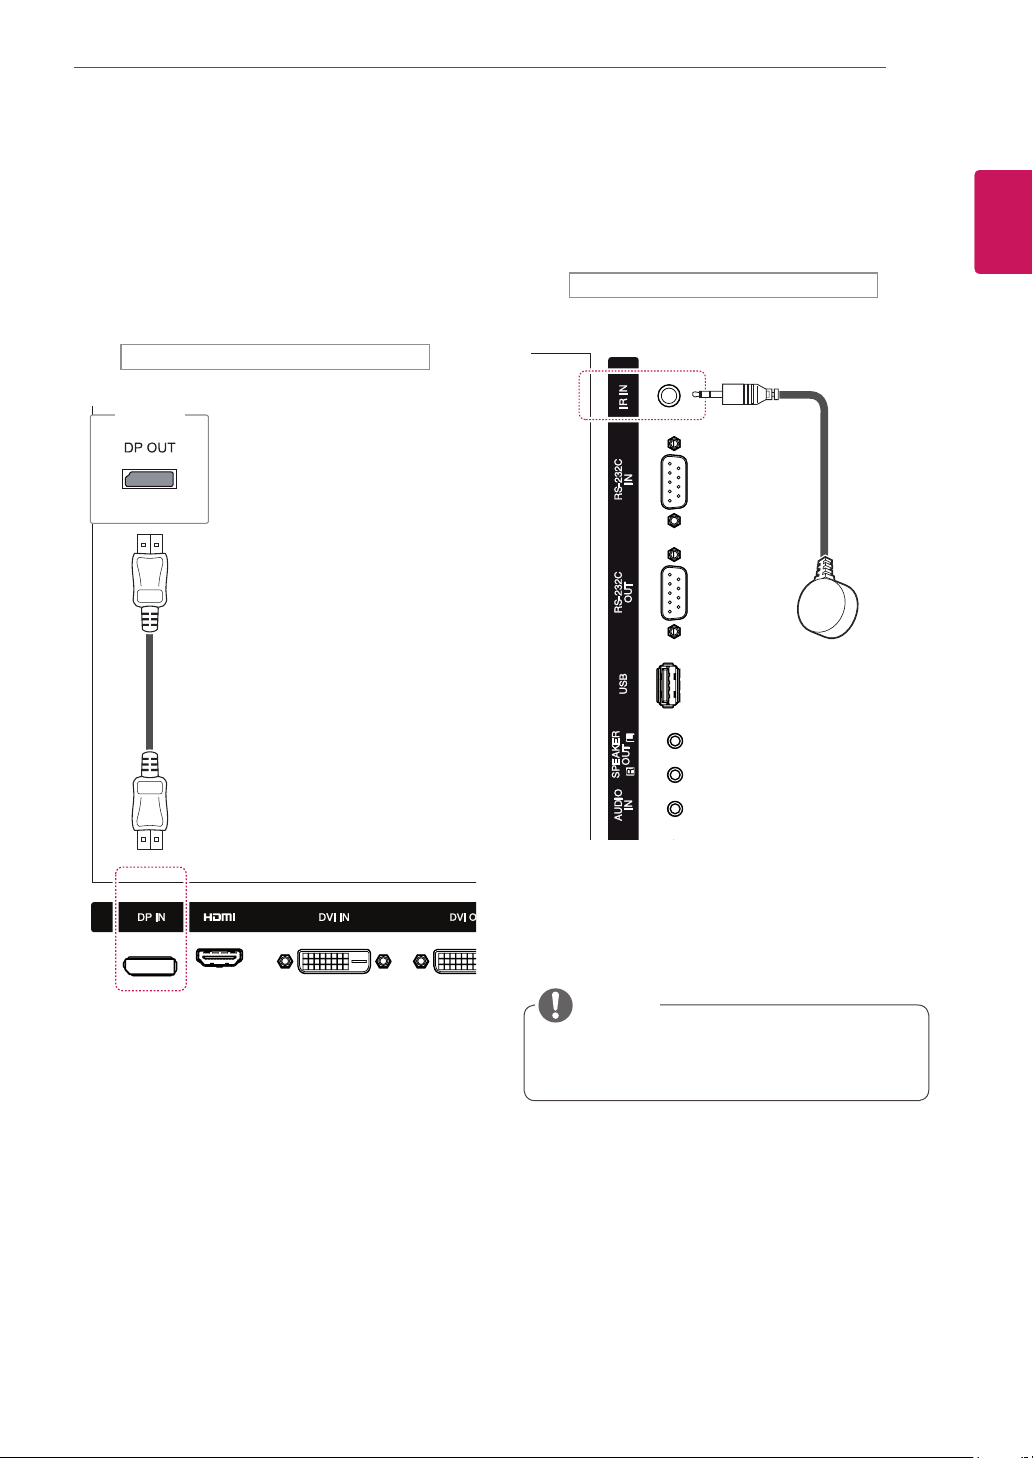
IR Receiver Connection
AllowstheuseofawiredremoteorIRreceiver
extension.
Backoftheproduct.
Makesurethepowercableisdisconnected.
NOTE
(notincluded)
Display Port Connection
Transmitsthedigitalvideoandaudiosignalsfrom
yourPCtothemonitor.ConnectthePCandthe
monitorwithaDisplayPortcableasshowninthe
followingillustrations.SelectDisplayPortinput
source.
PC

18
ENG
ENGLISH
USING THE MONITOR
Adjusting the Screen
Selecting an Image Mode
Displayimagesinitsoptimizedsettingsby
selectingoneofthepresetimagemodes.
1
PressSETTINGStoaccessthemainmenus.
2
Pressthenavigationbuttonstoscrollto
PICTUREandpressOK.
3
Pressthenavigationbuttonstoscrollto
Picture ModeandpressOK.
4
Pressthenavigationbuttonstoscrolltoan
imagemodeyouwantandpressOK.
Customizing Image Options
Customizebasicandadvancedoptionsofeach
imagemodeforthebestscreenperformance.
1
PressSETTINGStoaccessthemainmenus.
2
Pressthenavigationbuttonstoscrollto
PICTUREandpressOK.
3
Pressthenavigationbuttonstoscrollto
Picture ModeandpressOK.
4
Pressthenavigationbuttonstoscrolltoan
imagemodeyouwantandpressOK.
5
Selectandadjustfollowingoptions,andthen
pressOK.
Mode Description
Vivid Adjuststhevideoimagefortheretail
environmentbyenhancingthecontrast,
brightness,color,andsharpness.
Standard Adjuststheimageforthenormal
environment.
Cinema Optimizesthevideoimageforacinematic
looktoenjoymoviesasifyouareina
movietheater.
Sport Optimizesthevideoimageforhighand
dynamicactionsbyemphasizingprimary
Colorssuchaswhite,grass,orskyblue.
Game Optimizesthevideoimageforafast
gamingscreensuchasPCsorgames.
5
Whenyouarefinished,pressEXIT.
Whenyoureturntothepreviousmenu,press
BACK.
Option Description
Backlight Adjuststhebrightnessofthescreen
bycontrollingtheLCDbacklight.If
youdecreasethebrightnesslevel,
thescreenbecomesdarkerandthe
powerconsumptionwillbereduced
withoutanyvideosignalloss.
Contrast Increasesordecreasesthegradient
ofthevideosignal.Youmayuse
contrastwhenthebrightpartofthe
pictureissaturated.
Brightness Adjuststhebaselevelofthesignalin
thepicture.YoumayuseBrightness
whenthedarkpartofthepictureis
saturated.
Sharpness Adjuststhelevelofcrispnessinthe
edgesbetweenthelightanddark
areasofthepicture.Thelowerthe
level,thesoftertheimage.
Color Adjustsintensityofallcolors.
Tint Adjuststhebalancebetweenredand
greenlevels.
Color Temp. Settowarmtoenhancehottercolors
suchasred,orsettocooltomake
picturebluish.
Advanced
Control
Customizestheadvancedoptions.
Refertotheadvancedimageoptions.
Picture Reset Restorestheoptionstothedefault
setting.
6
Whenyouarefinished,pressEXIT.
Whenyoureturntothepreviousmenu,press
BACK.

19
ENG
ENGLISH
USING THE MONITOR
Customizing PC Display Options
Customizeoptionsofeachimagemodeforthe
bestimagequality.
Thisfunctionworksinthefollowingmode:
RGB[PC]mode.
1
PressSETTINGStoaccessthemainmenus.
2
Pressthenavigationbuttonstoscrollto
PICTUREandpressOK.
3
PressthenavigationbuttonstoscrolltoScreen
andpressOK.
4
Selectandadjustfollowingoptions,andthen
pressOK.
Option Description
Resolution Selectsaproperresolution.
Auto
Config.
Setstoadjustthescreenposition,clock,
andphaseautomatically.
Thedisplayedimagemaybeunstablefor
afewsecondswhiletheconfigurationis
inprogress.
Position/
Size/Phase
Adjuststheoptionswhenthepictureis
notclear,especiallywhencharactersare
shaky,aftertheautoconfiguration.
Reset Restorestheoptionstothedefault
setting.
5
Whenyouarefinished,pressEXIT.
Whenyoureturntothepreviousmenu,press
BACK.
Adjusting the Sound
Selecting an Sound Mode
Playthesoundinitsoptimizedsettingsby
selectingoneofthepresetsoundmodes.
1
PressSETTINGStoaccessthemainmenus.
2
PressthenavigationbuttonstoscrolltoAUDIO
andpressOK.
3
PressthenavigationbuttonstoscrolltoSound
ModeandpressOK.
4
Pressthenavigationbuttonstoscrolltoa
soundmodeyouwantandpressOK.
Mode Description
Standard Selectwhenyouwantstandard-quality
sound.
Music Selectwhenyoulistentomusic.
Cinema Selectwhenyouwatchmovies.
Sports Selectwhenyouwatchsportsevents.
Game Selectwhenyouwatchsportsevents.
5
Whenyouarefinished,pressEXIT.
Whenyoureturntothepreviousmenu,press
BACK.

20
ENG
ENGLISH
USING THE MONITOR
Customizing Sound Options
Customizeoptionsofeachsoundmodeforthe
bestsoundquality.
1
PressSETTINGStoaccessthemainmenus.
2
PressthenavigationbuttonstoscrolltoAUDIO
andpressOK.
3
PressthenavigationbuttonstoscrolltoSound
ModeandpressOK.
4
Pressthenavigationbuttonstoscrolltoa
soundmodeyouwantandpressOK.
5
Selectandadjustfollowingoptions,andthen
pressOK.
Option Description
Infinite
Sound
LG'sInfinitySoundoptionprovides
5.1channelstereosoundfromtwo
speakers.
Treble Controlsthedominantsoundsinthe
output.Whenyouturnupthetreble,
itwillincreasetheoutputtothelower
frequencyrange.
Bass Makestheoutputsoundsofter.Ifthe
bassisincreased,thefrequencyofthe
outputalsoincreases.
Reset Resetsthesoundmodetothedefault
setting.
6
Whenyouarefinished,pressEXIT.
Whenyoureturntothepreviousmenu,press
BACK.
Using Additional Options
Using the Input List
1
PressINPUTtoaccesstheInput List.
2
Pressthenavigationbuttonstoscrolltooneof
theinputmodeandpressOK.
Input mode Description
AV WatchvideofromaVCRorother
externaldevices.
Component WatchthecontentsinaDVDor
otherextemaldevices,orthrougha
digitalset-topbox
RGB ViewaPCdisplayonthescreen
HDMI WatchcontentsinaPC,DVD
ofdigitalset-topboxotherhigh
definitiondevices
DVI-D WatchcontentsinaPC,DVD
ofdigitalset-topboxotherhigh
definitiondevices
Display Port WatchcontentsinaPC,DVD
ofdigitalset-topboxotherhigh
definitiondevices
USB Playsthemultimediafilesavedin
theUSB.
Signage Playsmultimediafilessavedin
internalmemory.
21
ENG
ENGLISH
USING THE MONITOR
Ifafixedimagedisplaysonthescreenforalongperiodoftime,itwillbeimprintedandbecome
apermanentdisfigurementonthescreen.Thisisimageburnorburn-inandnotcoveredbythe
warranty.
Topreventimagesticking,donotplayastillimageformorethantwohours.
Iftheaspectratioissetto4:3foralongperiodoftime,imageburnmayoccurontheletterboxedarea
ofthescreen.
Recommendedoperationtimeforoptimumperformanceandreliabilityis12hoursorlessperday.
Youcanalsochangetheimagesizebyaccessingthemainmenus.
TheJustScanmodeoperateswhenavideosignalhasresolutionof720porhigher.
CAUTION
NOTE
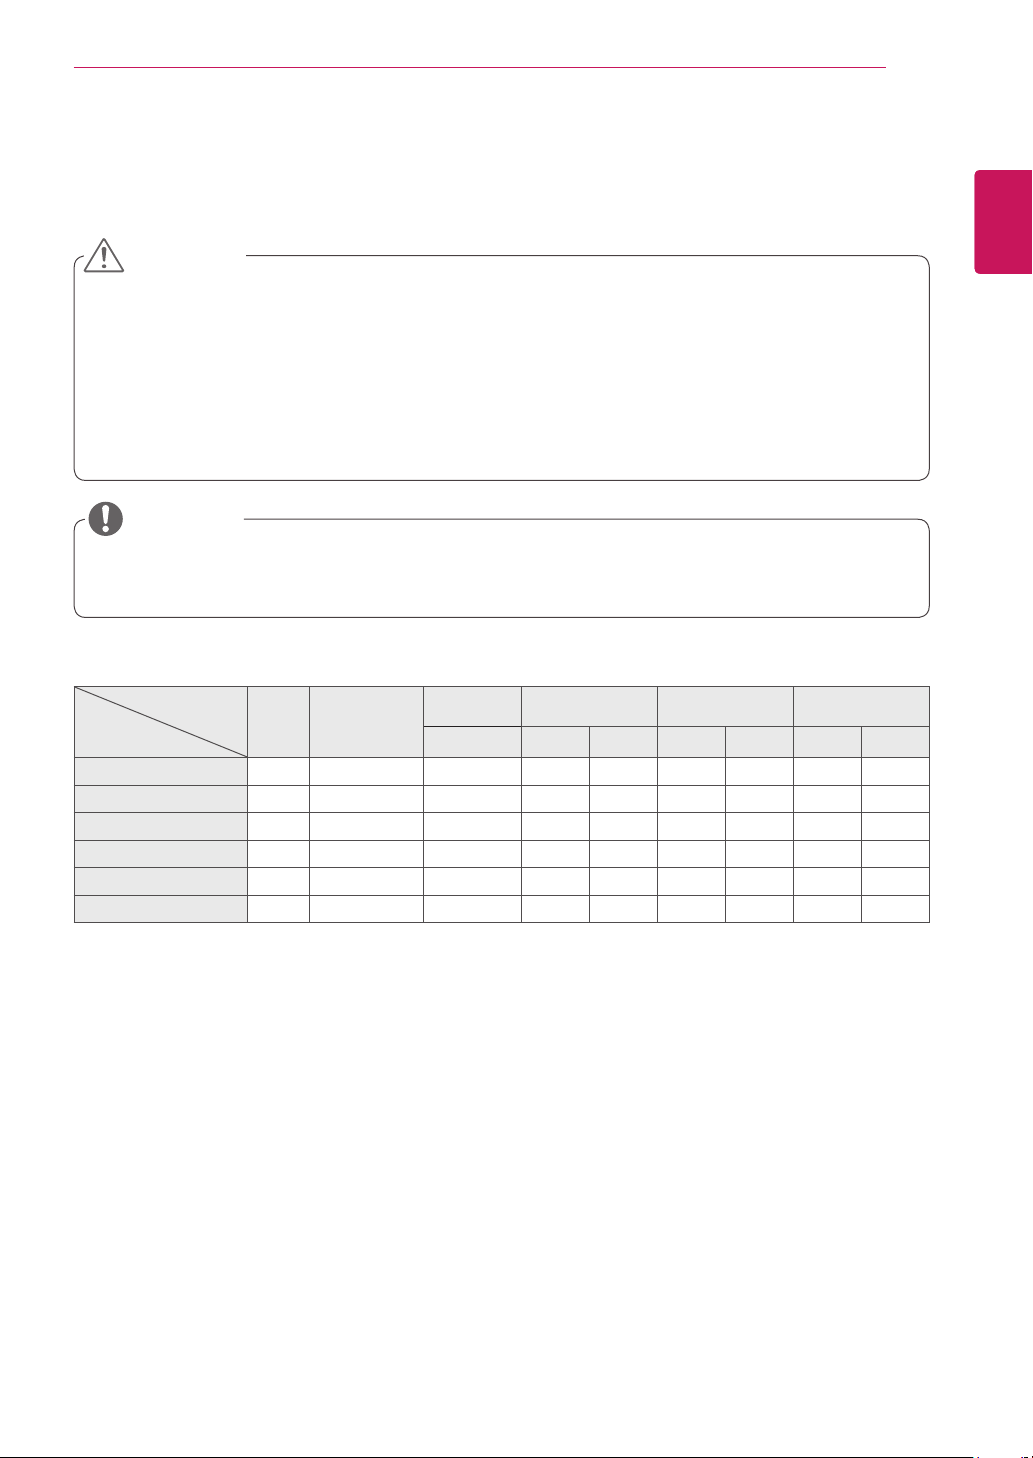
Adjusting Aspect Ratio
ResizetheimagetoviewtheimageatitsoptimalsizebypressingARC whileyouarewatchingmonitorset.
MODE
Aspect Ratio
AV Component RGB DVI HDMI Display Port
PC DTV PC DTV PC DTV PC
16:9
o o o o o o o o o
Just Scan
x o x o x o x o x
1:1
x x o x o x o x o
4:3
o o o o o o o o o
Zoom
o o x o x o x o x
Cinema Zoom 1
o o x o x o x o x
22
ENG
ENGLISH
USING THE MONITOR
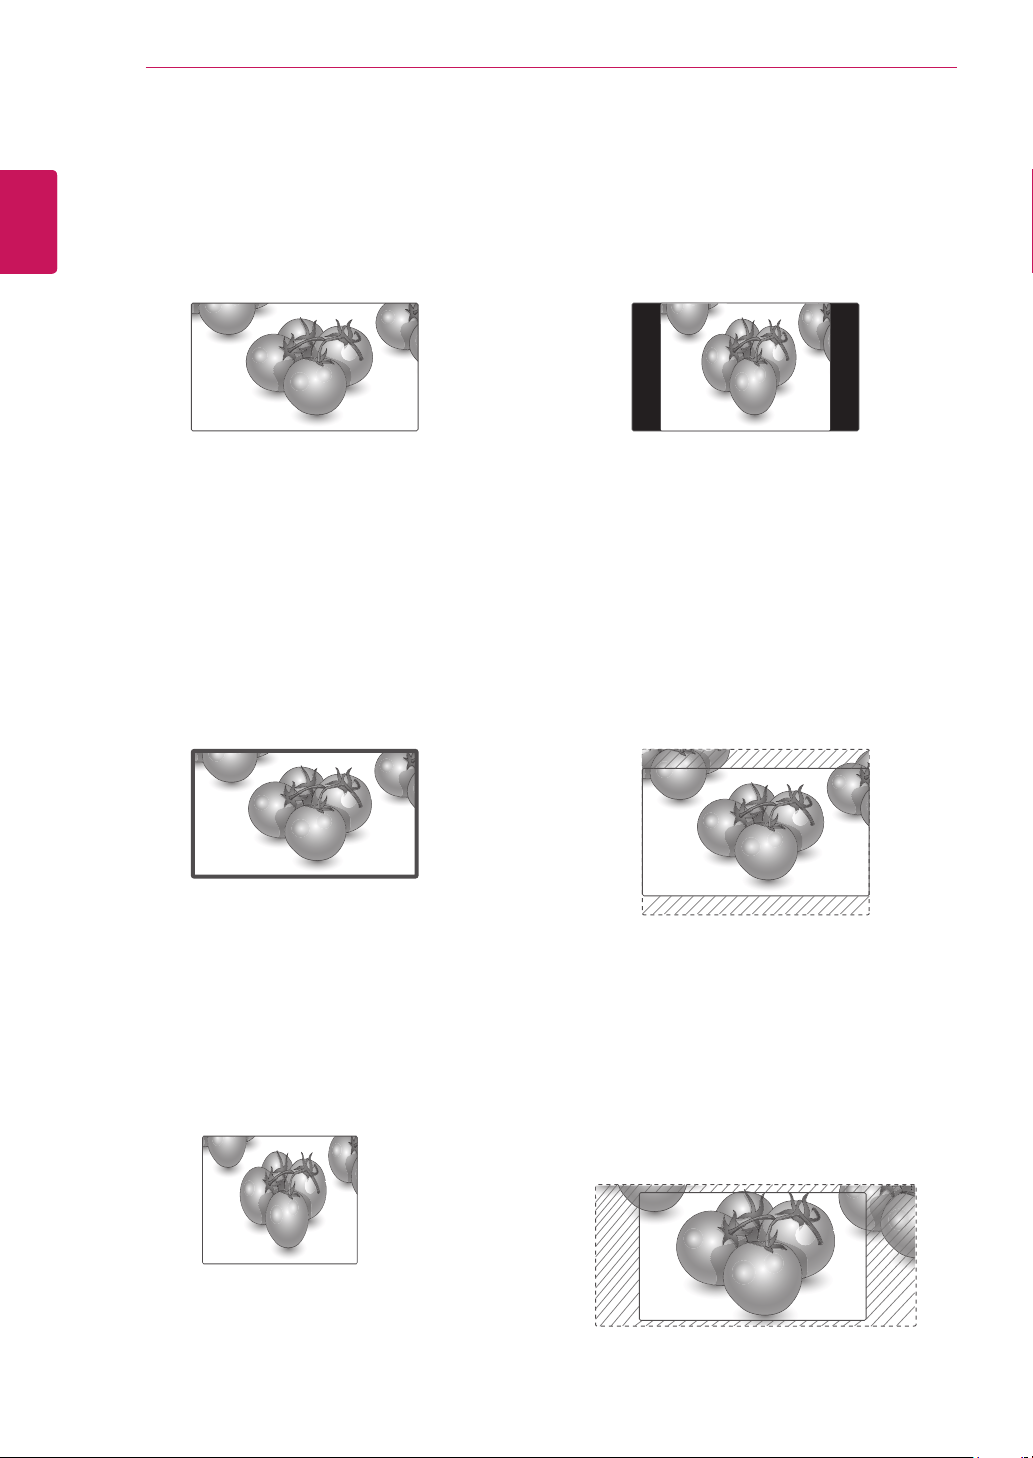
-4:3 :Thisselectionwillallowyoutoviewa
picturewithanoriginal4:3aspectratio,black
barswillappearonboththeleftandrightofthe
screen.
-Zoom :Thisselectionwillallowyoutoviewthe
picturewithoutanyalteration,whilefillingthe
entirescreen.However,thetopandbottomof
thepicturewillbecropped.
-Cinema Zoom 1 :ChooseCinemaZoom
whenyouwanttoenlargethepictureincorrect
proportion.Note:Whenenlargingorreducing
thepicture,theimagemaybecomedistorted.
-16:9 :Thisselectionwillallowyoutoadjustthe
picturehorizontally,inlinearproportion,tofillthe
entirescreen(usefulforviewing4:3formatted
DVDs).
-Just Scan :ThisSelectionwillallowyouview
thepictureofbestqualitywithoutlossoforiginal
pictureinhighresolutionimage.Note:Ifthereis
noiseinoriginalPicture,Youcanseethenoise
attheedge.
-1:1 :Theaspectratioisnotadjustedfromthe
original.(OnlyDisplayPortPC,HDMIPC,DVI
PC,RGBPC)
Just Scan
23
ENG
ENGLISH
ENTERTAINMENT
ENTERTAINMENT
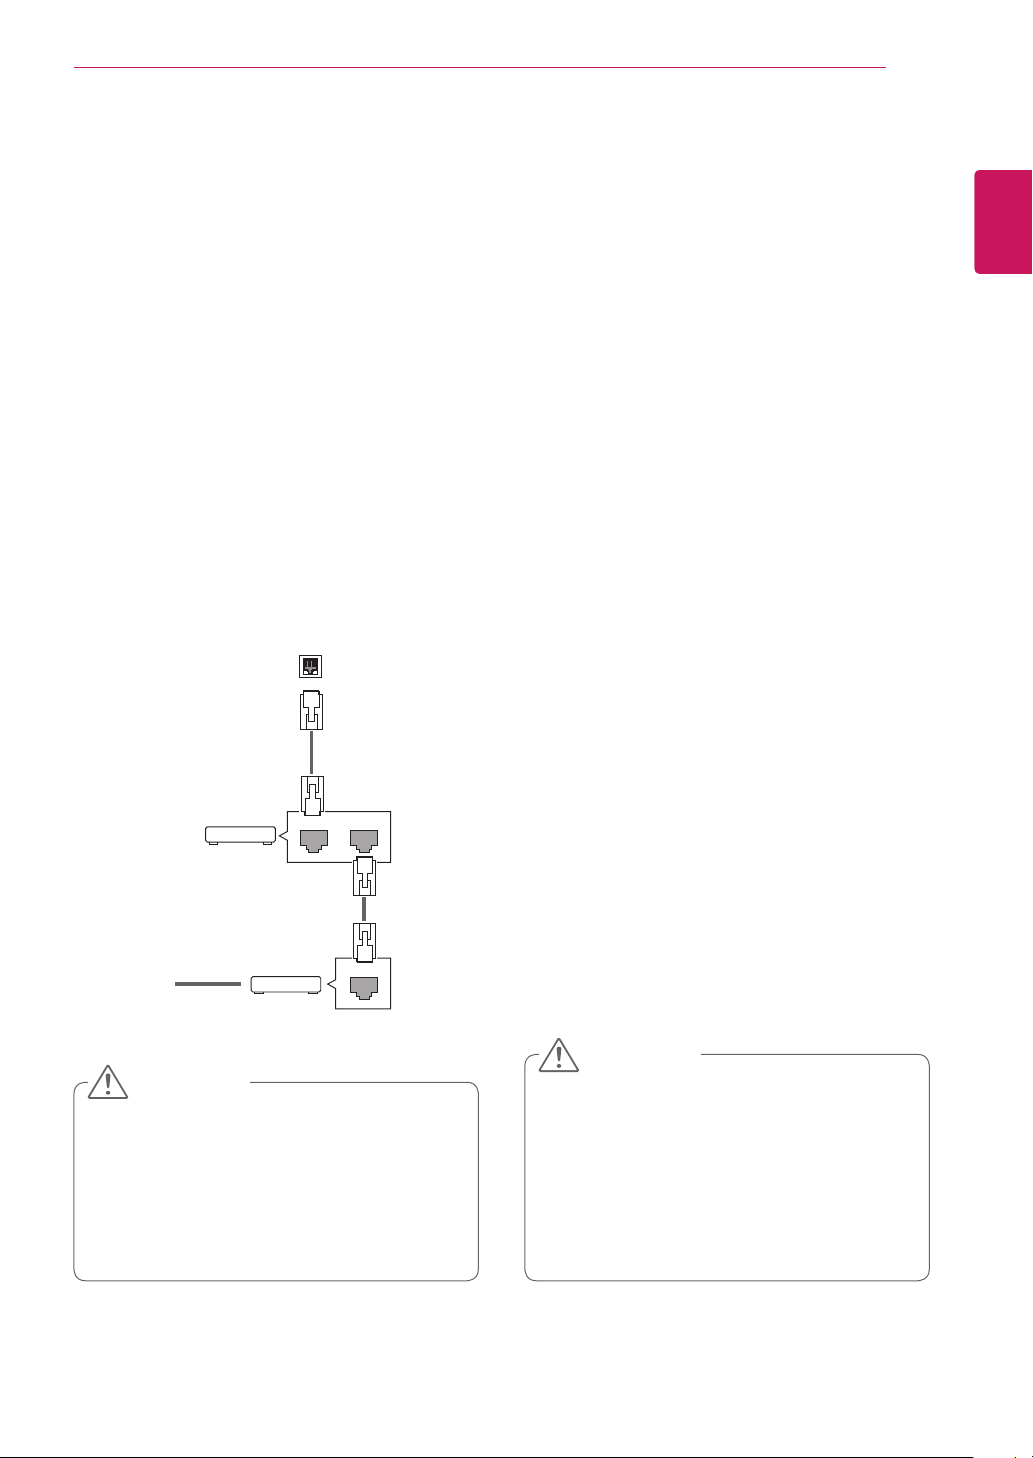
Using the Network
Connecting to a Wired Network
Connectthedisplaytoalocalareanetwork(LAN)
viatheLANportasshowninthefollowingillustra-
tionandsetupthenetworksettings.
Onlysupportswirednetworkconnection.
Aftermakingaphysicalconnection,asmall
numberofhomenetworksmayrequirethedisplay
networksettingstobeadjusted.Formosthome
networks,thedisplaywillconnecttoautomatically
withoutanyadjustments.
Fordetailinformation,contactyourinternetpro-
viderorroutermanual.
Donotconnectamodularphonecabletothe
LANport.
Sincetherearevariousconnectionmeth-
ods,pleasefollowthespecificationsofyour
telecommunicationcarrierorinternetservice
provider.
Networksettingmenuwillnotbeavail-
ableuntilthedisplayconnectedtophysical
network.
Sincetherearevariousconnectionmeth-
ods,pleasefollowthespecificationsofyour
telecommunicationcarrierorinternetservice
provider.
Tosetupthenetworksettings:(Evenifyourdis-
playhasalreadyconnectedautomatically,running
setupagainwillnotharmanything),
1 PressSETTINGStoaccessthemainmenus.
2 PressthenavigationbuttonstoscrolltoNET-
WORKandpressOK.
3 PressthenavigationbuttonstoselectNetwork
SettingandpressOK.
4 Ifyoualreadysetnetworksetting,select
Resetting.Thenewconnectionsettingsresets
thecurrentnetworksettings.
5 SelectIP Auto SettingorIP Manual Setting.
-IfselectingIP Manual Setting,pressthe
navigationandNumberbuttons.IPaddresses
willneedtobeinputmanually.
-IP Auto Setting:Selectthisifthereisa
DHCPserver(Router)onthelocalareanet-
work(LAN)viawiredconnection,thedisplay
willautomaticallybeallocatedanIPaddress.
Ifyou’reusingabroadbandrouterorbroad-
bandmodemthathasaDHCP(Dynamic
HostConfigurationProtocol)serverfunction.
TheIPaddresswillautomaticallybedeter-
mined.
6 Whenyouarefinished,pressEXIT.
LAN
Router
LAN WAN
Cable modem
ETHERNET
@
Internet
Internet
CAUTION
CAUTION

24
ENG
ENGLISH
ENTERTAINMENT
IfyouwanttoaccesstheInternetdirectlyon
yourdisplay,theInternetconnectionshould
alwaysbeon.
IfyoucannotaccesstheInternet,check
thenetworkconditionsfromaPConyour
network.
WhenyouuseNetwork Setting,checkthe
LANcableorcheckifDHCPintherouteris
turnedon.
Ifyoudonotcompletethenetworksettings,
thenetworkmaynotworkproperly.
Tips for Network setting
UseastandardLANcablewiththisdisplay.
Cat5orbetterwithaRJ45connector.
Manynetworkconnectionproblemsduringset
upcanoftenbefixedbyre-settingtherouter
ormodem.Afterconnectingthedisplaytothe
homenetwork,quicklypoweroffand/ordiscon-
nectthepowercableofthehomenetwork
routerorcablemodem.Thenpoweronand/or
connectthepowercableagain.
Dependingontheinternetserviceprovider
(ISP),thenumberofdevicesthatcanreceive
internetservicemaybelimitedbytheapplica-
bletermsofservice.Fordetails,contactyour
ISP.
LGisnotresponsibleforanymalfunctionofthe
displayand/ortheinternetconnectionfeature
duetocommunicationerrors/malfunctionsas-
sociatedwithyourinternetconnection,orother
connectedequipment.
LGisnotresponsibleforproblemswithinyour
internetconnection.
Youmayexperienceundesiredresultsifthe
networkconnectionspeeddoesnotmeetthe
requirementsofthecontentbeingaccessed.
Someinternetconnectionoperationsmaynot
bepossibleduetocertainrestrictionssetby
theInternetserviceprovider(ISP)supplying
yourInternetconnection.
AnyfeeschargedbyanISPincluding,without
limitation,connectionchargesareyourrespon
sibility.
A10Base-Tor100Base-TXLANportis
requiredwhenusingawiredconnectiontothis
display.Ifyourinternetservicedoesnotallow
forsuchaconnection,youwillnotbeableto
connectthedisplay.
ADSLmodemisrequiredtouseDSLservice
andacablemodemisrequiredtousecable
modemservice.Dependingontheaccess
methodofandsubscriberagreementwithyour
ISP,youmaynotbeabletousetheinternet
connectionfeaturecontainedinthisdisplayor
youmaybelimitedtothenumberofdevices
youcanconnectatthesametime.(IfyourISP
limitssubscriptiontoonedevice,thisdisplay
maynotbeallowedtoconnectwhenaPCis
alreadyconnected.)
Theuseofaroutermaynotbeallowedorits
usagemaybelimiteddependingonthepoli-
ciesandrestrictionsofyourISP.Fordetails,
contactyourISPdirectly.
Network Status
1 PressSETTINGStoaccessthemainmenus.
2 PressthenavigationbuttonstoscrolltoNET-
WORKandpressOK.
3 PressthenavigationbuttonstoselectNetwork
Status.
4 PressOKtocheckthenetworkstatus.
5 Whenyouarefinished,pressEXIT.
Option Description
Setting Returntothenetworksettingmenu.
Test
Testthecurrentnetworkstatusafterset-
tingthenetwork.
Close Returntothepreviousmenu.
NOTE
25
ENG
ENGLISH
ENTERTAINMENT
Tips for using USB storage devices
OnlyaUSBstoragedeviceisrecognizable.
IftheUSBstoragedeviceisconnected
throughaUSBhub,thedeviceisnotrecog-
nizable.
AUSBstoragedeviceusinganautomatic
recognitionprogrammaynotberecognized.
AUSBstoragedevicewhichusesitsown
driverwillnotberecognized.
TherecognitionspeedofaUSBstorage
devicemaydependoneachdevice.
Pleasedonotturnoffthedisplayorunplug
theUSBdevicewhentheconnectedUSB
storagedeviceisworking.Whensucha
deviceissuddenlyseparatedorunplugged,
thestoredfilesortheUSBstoragedevice
maybedamaged.
PleasedonotconnecttheUSBstorage
devicewhichwasartificiallymaneuveredon
thePC.Thedevicemaycausetheproductto
malfunction.OnlyuseaUSBstoragedevice
whichhasnormalmusicfiles,imagefiles
ormoviefiles.
PleaseuseonlyaUSBstoragedevicewhich
wasformattedasaFAT32filesystem,NTFS
filesystembywiththeWindowsoperating
system.Incaseofastoragedeviceformat-
tedwithadifferentutilityprogrammewhich
isnotsupportedbyWindows,itmaynotbe
recognized.
PleaseconnectpowertoaUSBstoragede-
vice(over0.5A)whichrequiresanexternal
powersupply.Ifnot,thedevicemaynotbe
recognized.
PleaseconnectaUSBstoragedevicewith
thecableincludedbythedevicemaker.
SomeUSBstoragedevicesmaynotbesup-
portedoroperatesmoothly.
FilealignmentmethodofUSBstoragedevic-
esissimilartoWindowXPandthemonitor
canrecognizeupto100Englishcharacters.
Besuretobackupimportantfilessincedata
storedonaUSBmemorydevicemaybe
damaged.Wewillnotberesponsibleforany
dataloss.
DonotturnthedisplayofforremoveaUSB
storagedevicewhileMYMEDIAmenuis
activated,asthiscouldresultinlossoffiles
ordamagetotheUSBstoragedevice.
BackupyourfilessavedonaUSBstorage
devicefrequently,asyoumayloseordam-
agethefilesandthismaybenotcoveredby
thewarranty.
Ifaninternalstoragedeviceisconnectedto
themonitor,itisrecommendedtouseUSB
storagedevicesonlyforcopyingfiles.
CopyingafilefromUSBstoragedevicesto
Signage(Internalstoragedevice)maytake
sometimedependingonthesizeofthefile.
or
CAUTION
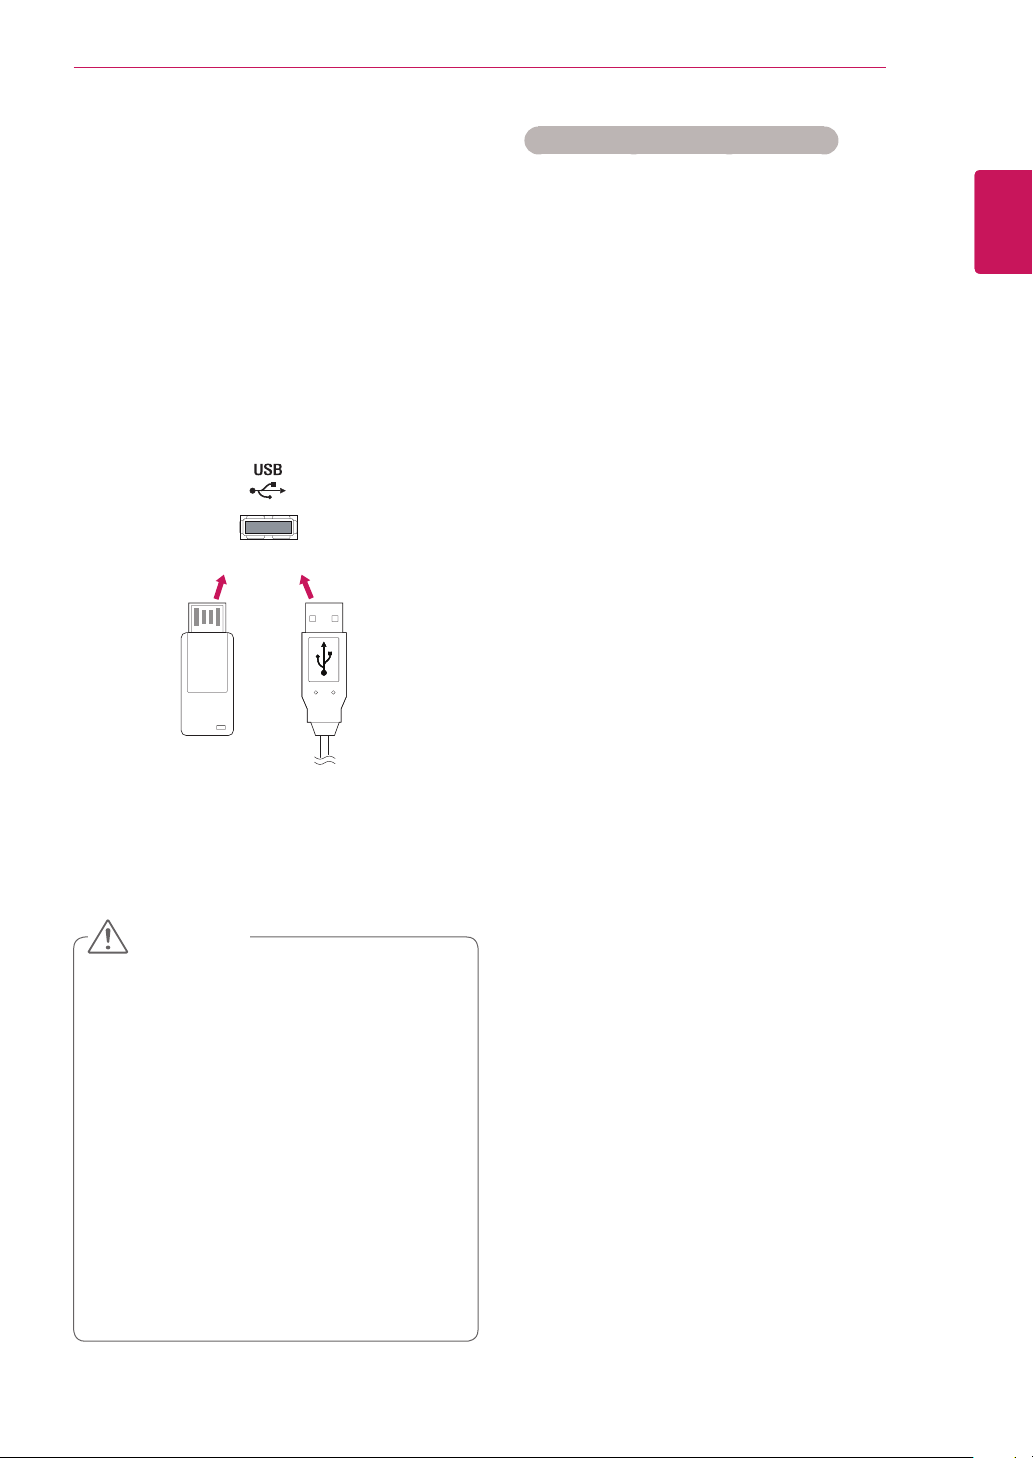
Using the My Media
Connecting USB Storage Device
and Using Signage Device
ConnectUSBstoragedevices,suchasaUSB
flashmemory,oranexternalharddrive,tothe
monitorset,oruseSignage(Internalstoragede-
vice)tousemultimediafeatures.
ConnectaUSBflashmemory,orUSBmemory
cardreader,tothemonitorsetasshowninthe
figurebelowtodisplaytheMY MEDIAscreen.

26
ENG
ENGLISH
ENTERTAINMENT
IftheUSBHDDdoesnothaveanexternal
powersource,theUSBdevicemaynotbe
detected.Sobesuretoconnecttheexternal
powersource.
-Pleaseuseapoweradaptorforanexternal
powersource.
IfyourUSBmemorydevicehasmultiple
partitions,orifyouuseaUSBmulti-card
reader,youcanuseupto4partitionsorUSB
memorydevices.
IfaUSBmemorydeviceisconnectedtoa
USBmulti-cardreader,itsvolumedatamay
notbedetected.
IftheUSBmemorydevicedoesnotwork
properly,disconnectandreconnectit.
HowfastaUSBmemorydeviceisdetected
differsfromdevicetodevice.
IftheUSBisconnectedinStandbyMode,
thatdrivewillautomaticallybeloadedwhen
thedisplayisturnedon.
Therecommendedcapacityis1TBorless
foraUSBexternalharddiskand32GBor
lessforUSBmemory.
Anydevicewithmorethantherecommend-
edcapacitymaynotworkproperly.
IfaUSBexternalharddiskwithaEnergy
Savingfunctiondoesnotwork,turnthe
harddiskoffandonagaintomakeitwork
properly.
USBstoragedevicesbelowUSB2.0are
supportedaswell.Buttheymaynotwork
properlywithvideos.
Amaximumof999foldersorfilescanbe
recognizedunderonefolder.
ItisrecommendedyouuseacertifiedUSB
storagedeviceandcable.Otherwise,aUSB
storagedevicemaynotbedetectedora
playbackerrormayoccur.
OnlyaUSBmemorydevicecanbeused
toplaybackthefilesdistributedandstored
bySuperSignManager.AUSBharddiskor
multi-cardreaderwillnotwork.
OnlyanFAT32fileformattedstoragedevice
canplaybackthefilesdistributedandstored
bySuperSignmanager.
AUSB3.0storagedevicemaynotwork.
DonotremovetheSignagedevice(internal
storagedevice)orturnoffthedisplay
whilecopyingafilefromtheUSBdevice
totheSignagedeviceordeletingafilein
theSignagedevice.Thedevicemaybe
damagedorthesystemmaybeaffected.
TheCopyandDeletefunctionsmaynotbe
availableifyouuseaUSBdeviceformatted
bytheNTFSfilesystem,whichisprovided
bytheWindowsoperatingsystem,oraread-
onlystoragedevice.
Ifthefilesofthecontentslistareinthe
storagedeviceconnectedtothemonitorset,
thecontentisplayedwhenthemonitoris
poweredon.WhenbothUSBstoragedevice
andinternalstoragedeviceareconnectedto
themonitor,themonitorplaysthecontentof
themostrecentlyrecognizedstoragedevice.
27
ENG
ENGLISH
ENTERTAINMENT
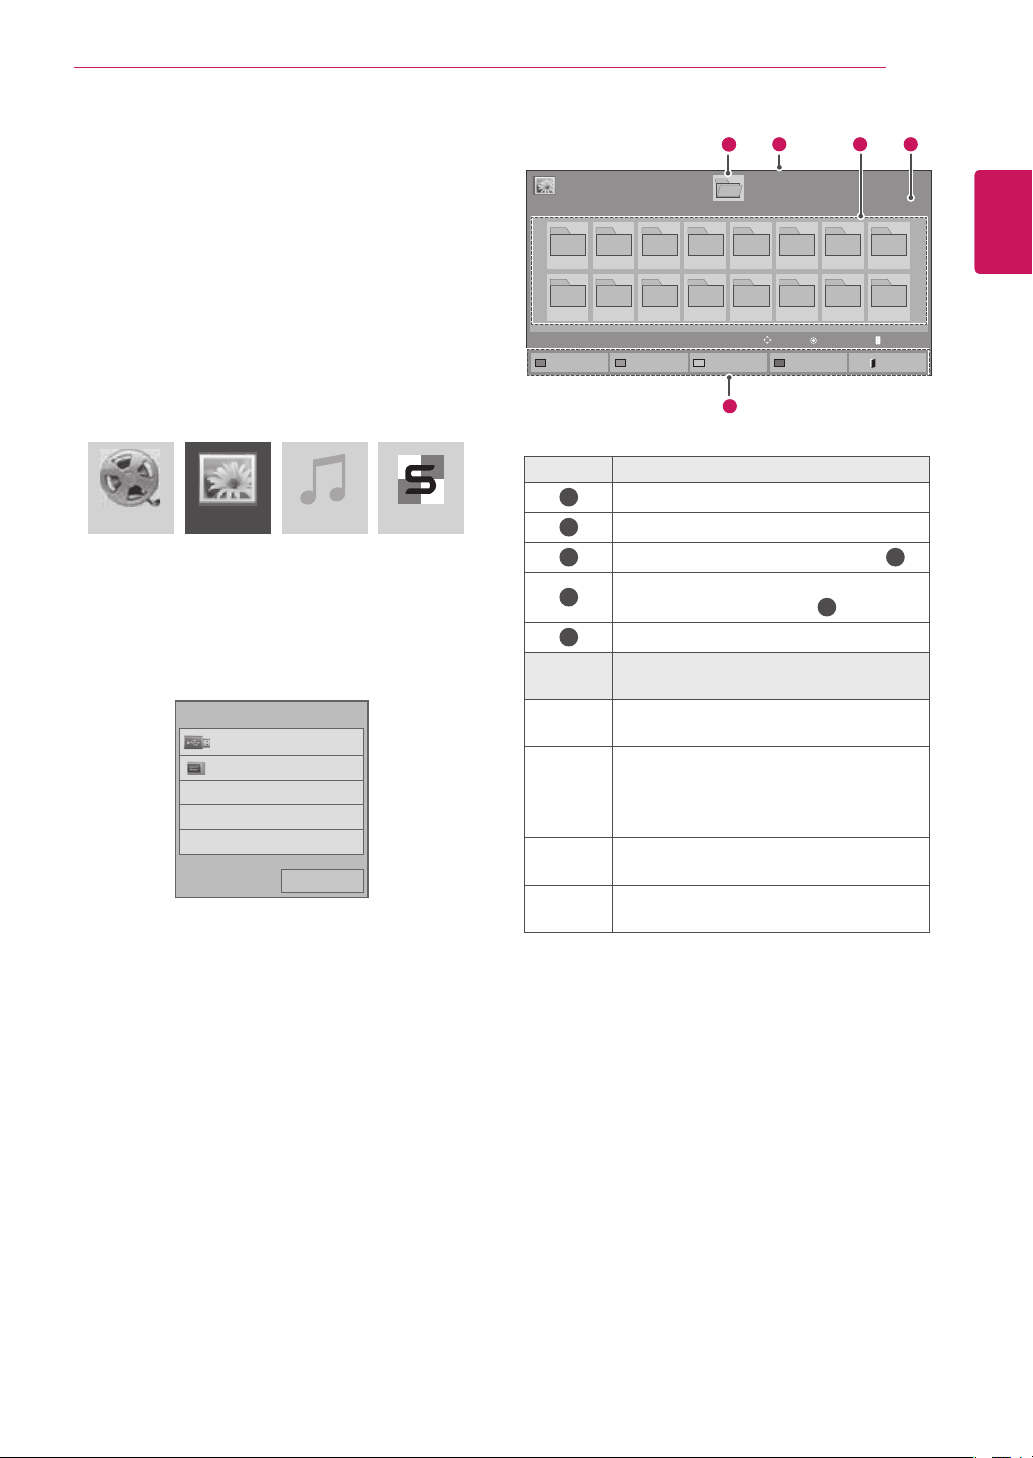
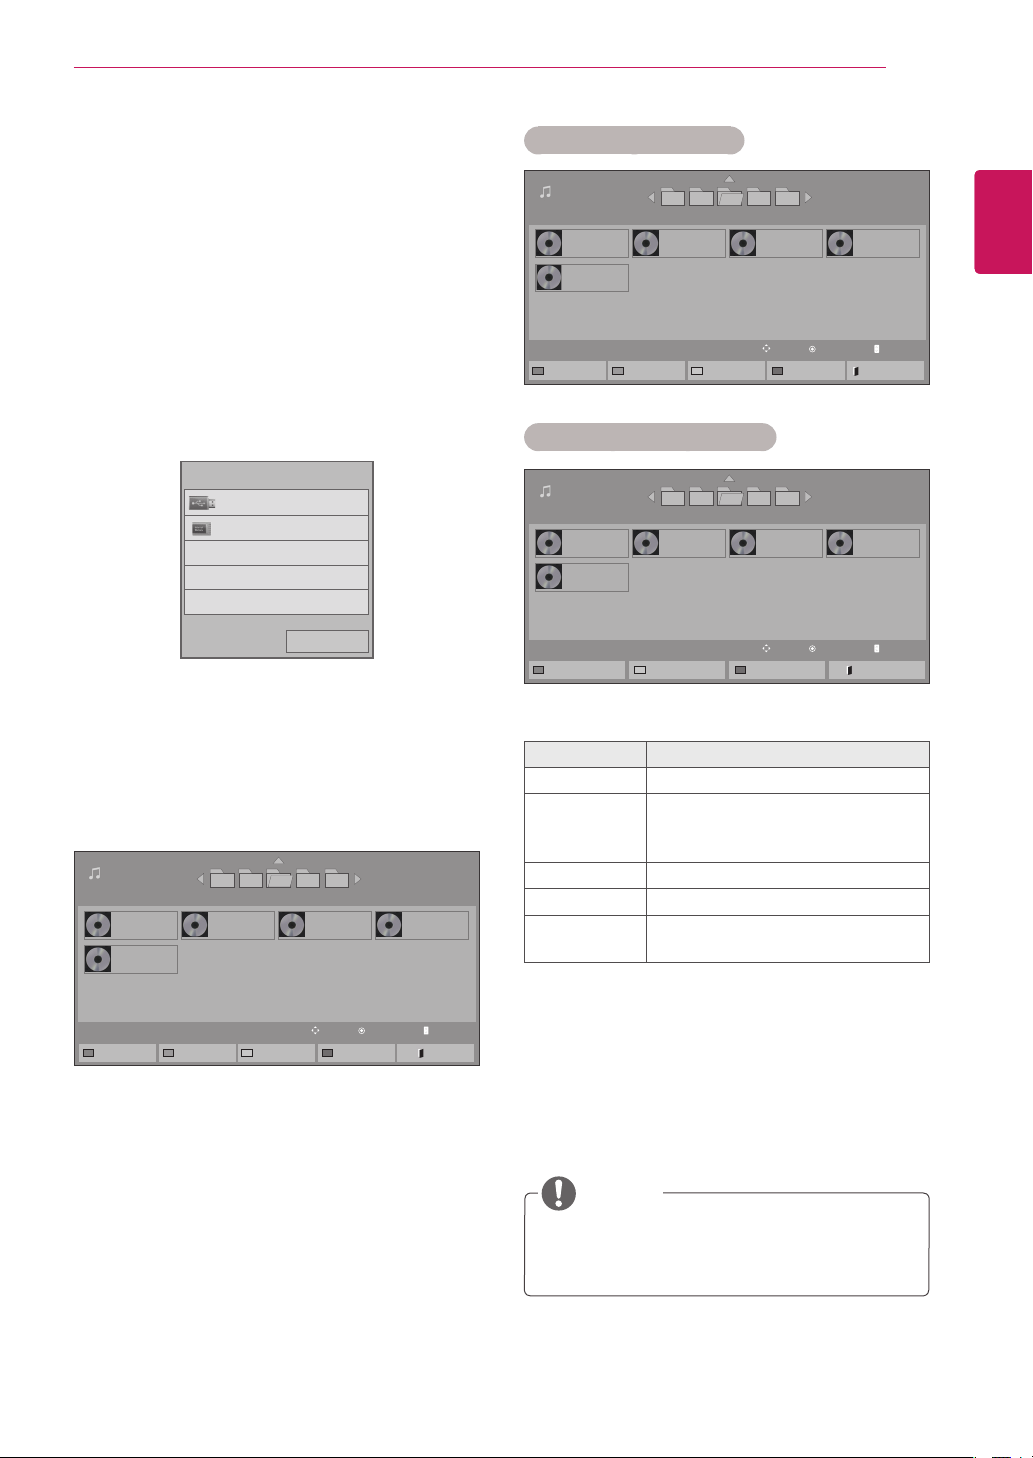
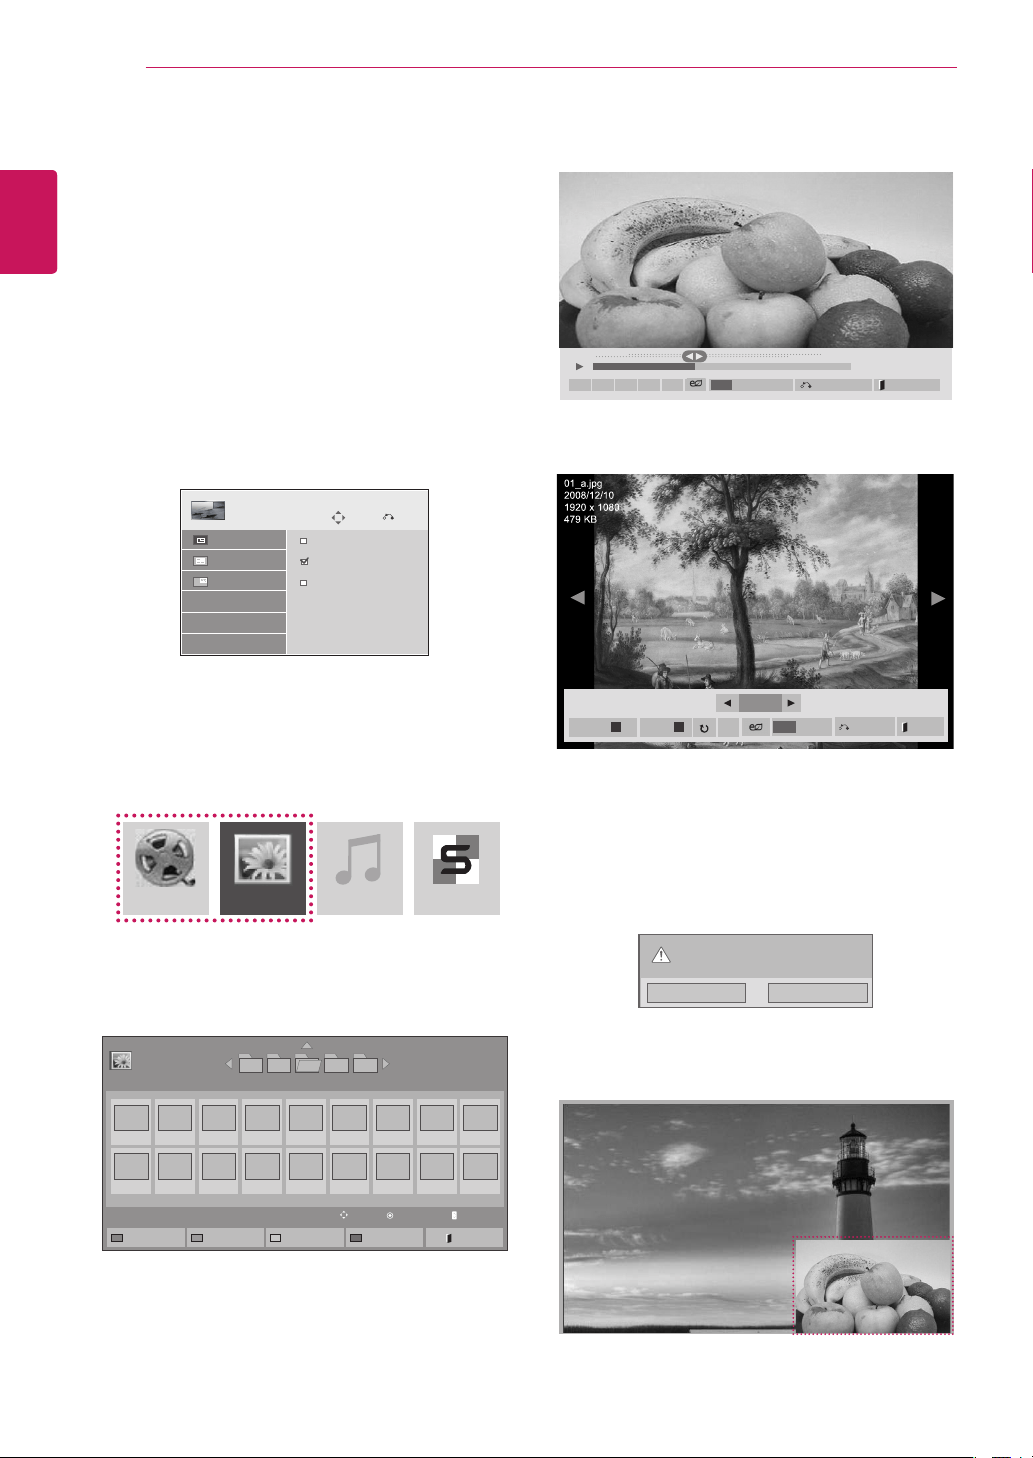
Browsing Files
BrowseforafilesavedonaUSBstorageor
Signagedevice(internalstoragedevice).
1
PressSETTINGStoaccessthemainmenu.
2
PressthesearchbuttontoscrolltoMY MEDIA
andpressOK.
3
PresstheSearchbuttontogototheMovie
List,Photo List,Music List,orContent List
thatyouwant,andpressOK.
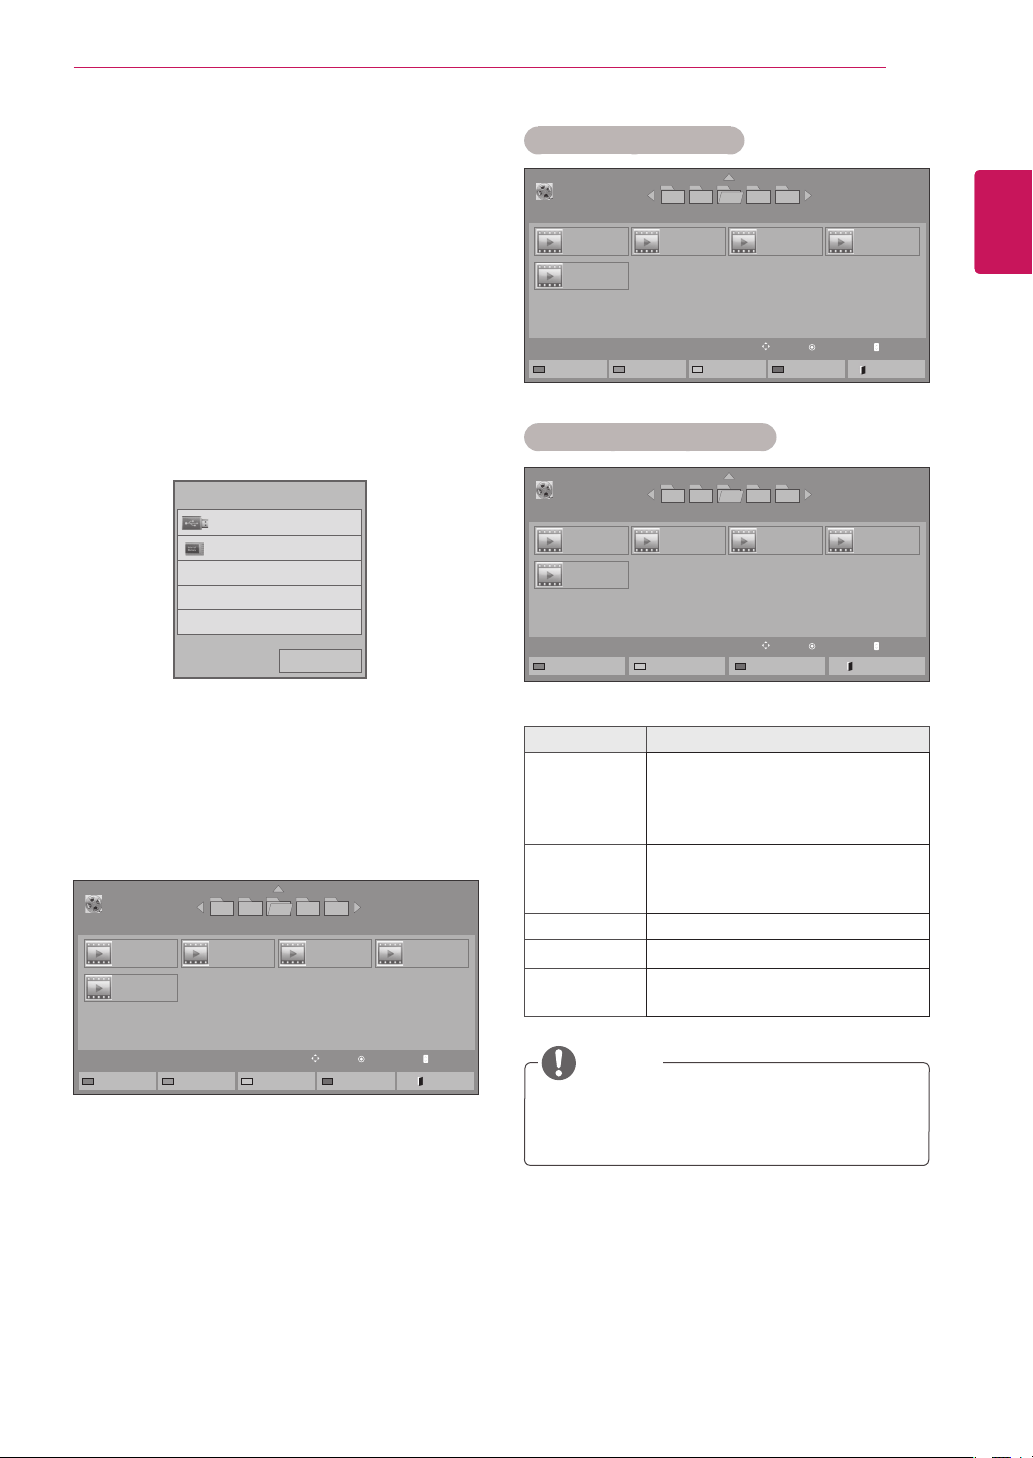
4
IfaUSBstoragedeviceisconnected,the
screenappearsasshownbelow.Pressthe
NavigationbuttontogotoUSBorSignage
andpressOK.
No. Description
1
Upperlevelfolder
2
Currentpage/Totalpages
3
Contentsunderthefolderfocusedon
1
4
Currentpage/Totalpagesofcontents
underthefolderfocusedon
1
5
Remotebutton
Remote
button
Description
Red
button
SelectUSBorSignagedevice.
Green
button
Pressthegreenbuttontotogglebetween
Photo List -> Music List,Music List ->
Contents List,Contents List -> Movie
List or Movie List -> Photo List.
Yellow
button
Amethodtoviewin5largethumbnailor
simplelist.
Blue
button
ConverttoMarkMode.
MovieList PhotoList MusicList
ContentsList
Page1/1
PhotoList
Drive1
Page1/1
USB
001
009
002
010
003
011
004
012
005
013
006
014
007
015
008
016
Changedevice ToPhotoList
ChangeNumbers
MarkMode Exit
View
Move
11
2
5
3 4
PAGE PageChange
Previous
USB
Signage
Pleaseselectthedevice.

28
ENG
ENGLISH
ENTERTAINMENT
Supported file format
Type Supported file format
Movie DAT,MPG,MPEG,VOB,AVI,DIVX,MP4,MKV,TS,T
RP,TP,ASF,WMV,FLV)
Movie(*.mpg/*.mpeg/*dat/*.ts/*.trp/*.tp/*.vob/*.
mp4/*.mov/*.mkv/*.divx/*.avi/*.asf/*.wmv/*.flv/*.
avi(motion-jpeg)/*.
mp4(motion-jpeg)/*.mkv(motion-jpeg))supporting
file
Video format:DivX3.11,DivX4,DivX5.x,DivX6,
Xvid1.00,Xvid1.01,Xvid1.02,Xvid1.03,Xvid1.10
beta-1/beta-2,
Mpeg-1,Mpeg-2,Mpeg-4,H.264/AVC,VC1,
JPEG,SorensonH.263
Audio format:DolbyDigital,AAC,Mpeg,MP3,
LPCM,HE-AAC,ADPCM,WMA
Bit rate:within32kbpsto320kbps(MP3)
External Subtitle format:*.smi/*.srt/*.sub
(MicroDVD,Subviewer1.0/2.0)/*.ass/*.ssa/*.
txt(TMPlayer)/*.psb(PowerDivX)
Internal Subtitle format :only,XSUB(Itisthe
subtitleformatusedinDivX6files)
Photo JPEG
Baseline:64x64to15360x8640
Progressive:64x64to1920x1440
YoucanplayJPEGfilesonly.
Non-supportedfilesaredisplayedintheform
ofpredefinedicon.
File
Extensions
Item Profile
jpeg
jpg
jpe
supported
fileformat
SOF0:
baseline
SOF1:
Extend
Sequential
SOF2:
Progressive
photosize
Min:64x64
Max-Normal
Type:
15360(W)x
8640(H)
Progressive
Type:
1920(W)x
1440(H)
Music MP3
Bitrate32to320
SamplingrateMPEG1Layer3:32kHz,44.1
kHz,48kHz
SamplingrateMPEG2Layer3:16kHz,22.05
kHz,24kHz
SamplingrateMPEG2.5Layer3:8kHz,
11.025kHz,12kHz
Content
(when
using
SuperSign
Manager)
FileExtensions:*.cts/*.cse
Movie
File Extensions:*.mpg/*.mpeg/*.dat/*.ts/*.
trp/*.tp/*.vob/*.mp4/*.mov/*.mkv/*.avi/*.asf/*.
wmv/*.avi(motionJPEG)/*.mp4(motionJPEG)/*.
mkv(motionJPEG)
Video format:MPEG1,MPEG2,MPEG4,H.264/
AVC,DivX3.11,DivX4.12,DivX5.x,DivX6,
Xvid1.00,Xvid1.01,Xvid1.02,Xvid1.03,Xvid
1.10-beta1/2,JPEG,VC1(WVC1/WMV3)
Audio format:MP2,MP3,DolbyDigital,LPCM,
AAC,HE-AAC,LPCM,ADPCM,WMA,MP3
File
Extensions
Item Profile
Photo JPEG
JPG
PNG
BMP
supported
fileformat
SOF0:
baseline
SOF1:
Extend
Sequential
SOF2:
Progressive
Photosize
Min:64x64
MaxType:
1366x768
Music MP3 Bitrate 32kbpsto320
kbps
Sampling
rate
32kHz,44.1
kHz,48kHz
(MPEG1L3)
16kHz,22.05
kHz,24kHz
(MPEG2L3)
8kHz,11.025
kHz,12kHz
(MPEG2.5L3)
29
ENG
ENGLISH
ENTERTAINMENT
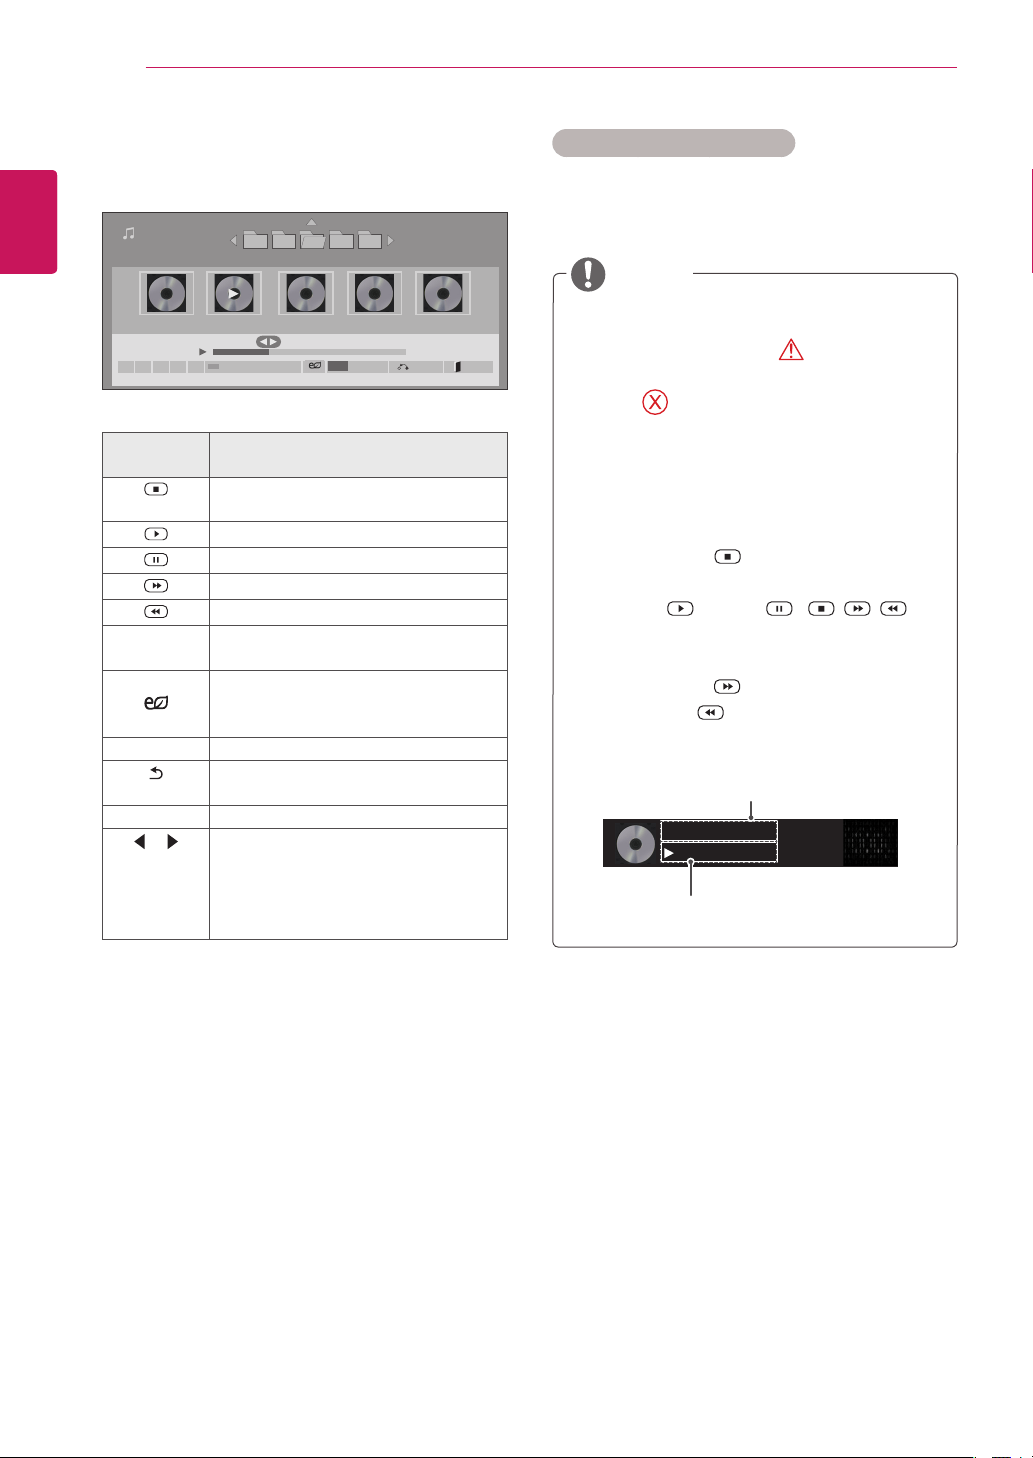
Viewing Movies
PlayvideofilessavedonaUSBstorageor
Signagedevice(internalstoragedevice).
1
PressSETTINGStoaccessthemainmenu.
2
PressthenavigationbuttontoscrolltoMY
MEDIAandpressOK.
3
PressthenavigationbuttontoscrolltoMovie
ListandpressOK.
4
PressthenavigationbuttontogotoUSBor
SignageandpressOK.
5
Pressthenavigationbuttonstoscrolltoafolder
youwantandpressOK.
6
Pressthenavigationbuttonstoscrolltoafile
youwantandpressOK.
Menu Description
Play Marked Playtheselectedvideofiles.
Onceavideofilefinishesplaying,
thenextselectedonewillbeplayed
automatically.
Copy to
Signage
Copyavideofileandmoveitto
Signage.(Thisfunctionisonly
availablewithUSBstoragedevices.)
Delete Deleteavideofile.
Mark All Markallvideofilesonthescreen.
Exit Mark
Mode
PresstheEXITkeytoexittheMark
Mode.
Page1/2
MovieList
005004003 006 007
Page1/1
USB
Changedevice ToPhotoList ChangeNumbers
MarkMode Exit
PlayMove PAGE PageChange
001.-B01.mp4
01:00
005.-B05.mp4
05:00
002.-B02.mp4
02:00
003.-B03.mp4
03:00
004.-B04.mp4
04:00
Page1/2
MovieList
005004003 006 007
Page1/1
USB
PlayMarked CopytoSignage Delete
MarkAll
ExitMarkMode
Mark
Move
PAGE
PageChange
001. - B01.mp4
01:00
005. - B05.mp4
05:00
002. - B02.mp4
02:00
003. - B03.mp4
03:00
004. - B04.mp4
04:00
MarkMode
Mark Mode - USB device
Mark Mode - Signage device
Page1/2
MovieList
005004003 006 007
Page1/1
Signage
MarkMove
PAGE
PageChange
001. - B01.mp4
01:00
005. - B05.mp4
05:00
002. - B02.mp4
02:00
003. - B03.mp4
03:00
004. - B04.mp4
04:00
MarkMode
PlayMarked Delete MarkAll ExitMarkMode
YoucanonlycopyfilesfromaUSBdeviceto
theSignagedevice(internalstoragedevice).
NOTE
Previous
USB
Signage
Pleaseselectthedevice.
30
ENG
ENGLISH
ENTERTAINMENT
Tips for using playing video files
Someuser-createdsubtitlesmaynotwork
properly.
Somespecialcharactersarenotsupported
insubtitles.
HTMLtagsarenotsupportedinsubtitles.
Subtitlesinlanguagesotherthanthesup-
portedlanguagesarenotavailable.
Thescreenmaysuffertemporaryinterrup-
tions(imagestoppage,fasterplayback,etc.)
whentheaudiolanguageischanged.
Adamagedmoviefilemaynotbeplayed
correctly,orsomeplayerfunctionsmaynot
beusable.
Moviefilesproducedwithsomeencoders
maynotbeplayedcorrectly.
Ifthevideoandaudiostructureofrecorded
fileisnotinterleaved,eithervideooraudiois
outputted.
HDvideoswithamaximumof
1920x1080@25/30Por1280x720@50/60P
aresupported,dependingontheframe.
Videoswithresolutionshigherthan
1920X1080@25/30Por1280x720@50/60P
maynotworkproperlydependingonthe
frame.
Moviefilesotherthanthespecifiedtypesand
formatsmaynotworkproperly.
Maxbitrateofplayablemoviefileis20Mbps.
(only,MotionJPEG:10Mbps)
Wedonotguaranteesmoothplaybackof
profilesencodedlevel4.1orhigherinH.264/
AVC.
DTSAudiocodecisnotsupported.
Amoviefilemorethan30GBinfilesizeis
notsupportedforplayback.
ADivXmoviefileanditssubtitlefilemustbe
locatedinthesamefolder.
Avideofilenameanditssubtitlefilename
mustbeidenticalforittobedisplayed.
PlayingavideoviaaUSBconnectionthat
doesn’tsupporthighspeedmaynotwork
properly.
FilesencodedwithGMC(GlobalMotion
Compensation)maynotbeplayed.
Non-supportedfilesaredisplayedthe
previewimagebyicononly .
Abnormalfilesaredisplayedintheformof
bitmap .
NOTE
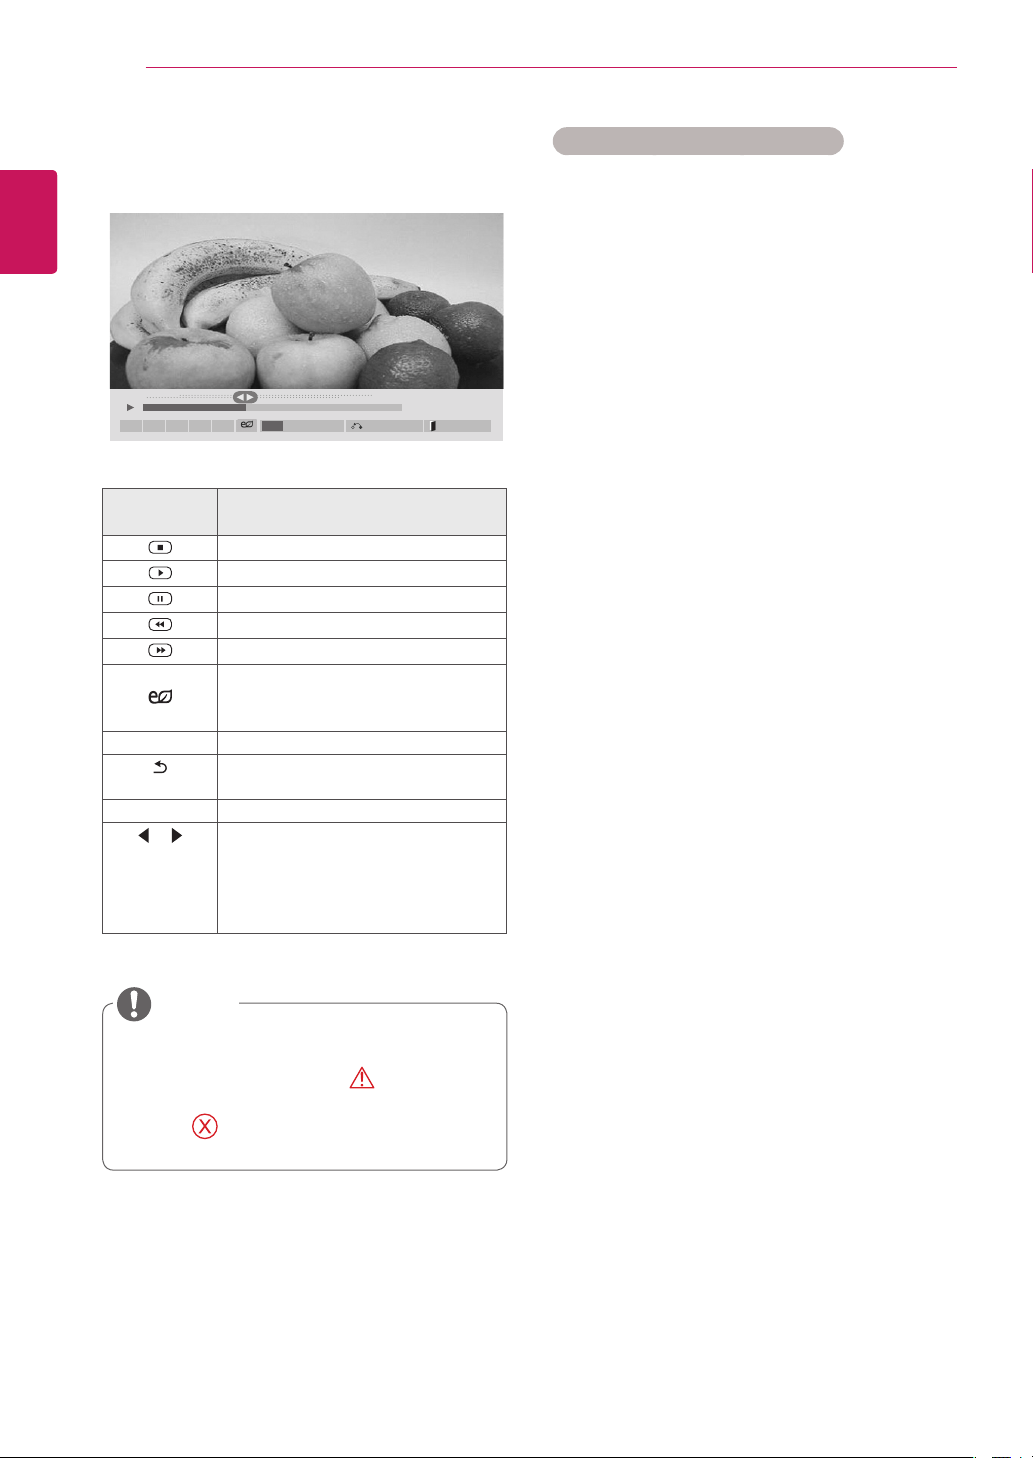
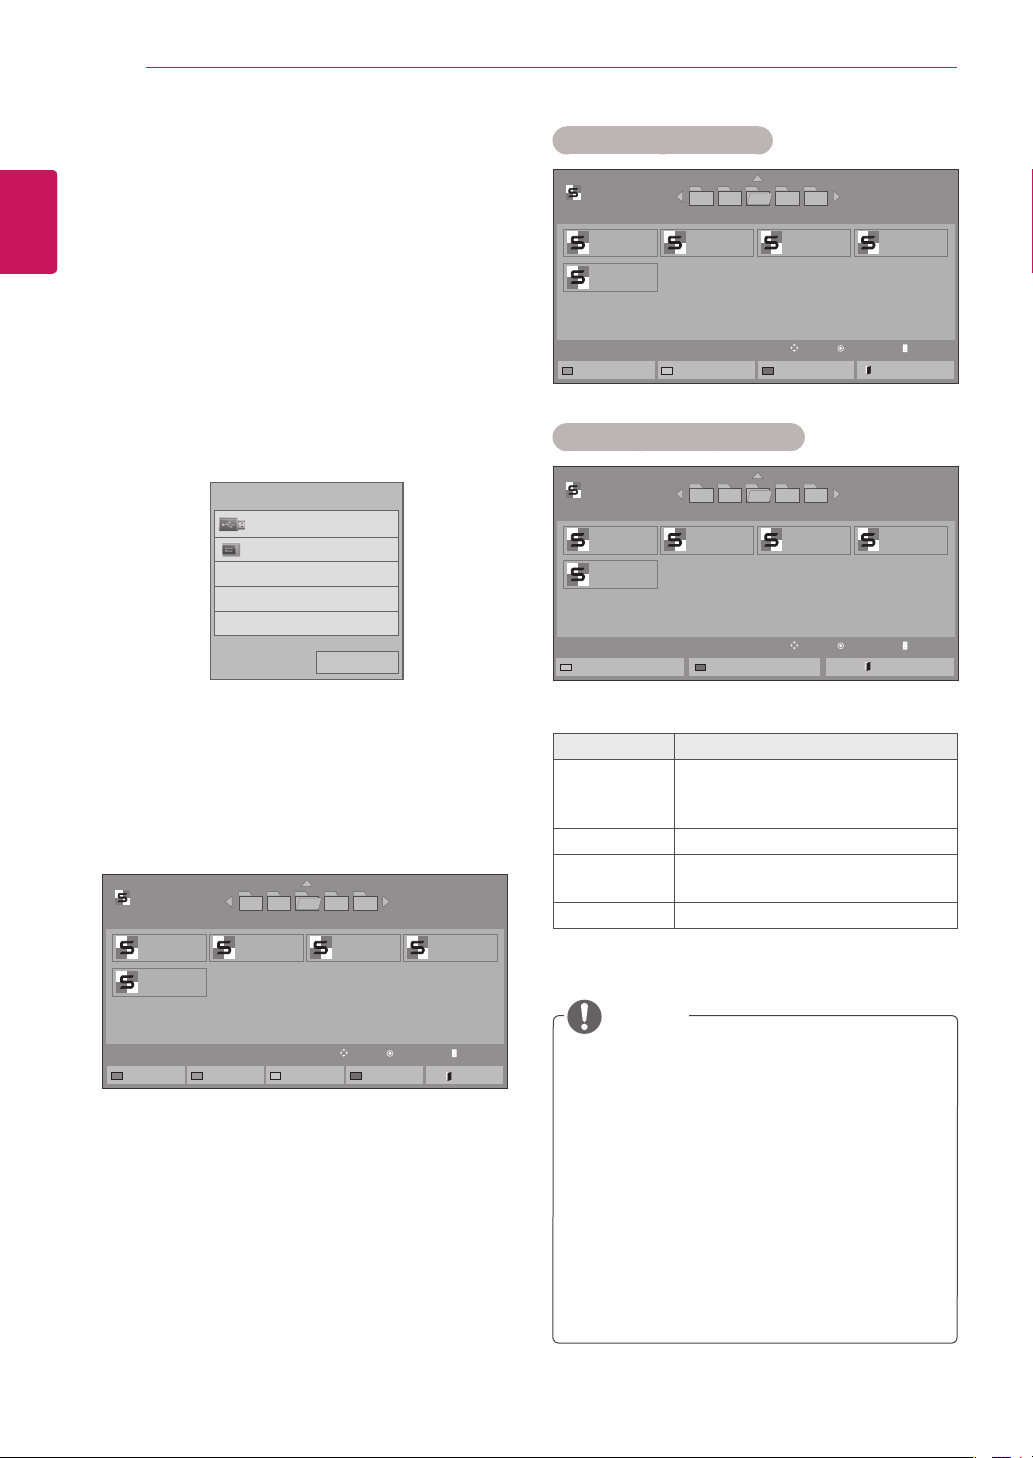
7 Whenplaysavideo,youcansetthefollowing:
Remote
button
Description
Stopstheplayback
Playsavideo
Pausesorresumestheplayback
Scansbackwardinafile
Scansforwardinafile
ENERGY
SAVING
Adjuststhescreenbrightnesstosave
energy.
SETTINGS ShowtheOptionmenu.
BACK
Hidethemenuonthefull-sizedscreen.
EXIT ReturntoMovie List.
or
Skipstospecificpointsinafiledur-
ingplayback.Thetimeofaspecific
pointwillappearonthestatusbar.In
somefiles,thisfunctionmaynotwork
properly.
01:02:30/02:30:25
ꕖꕗ ꕘ ꕚ ꕙ
MENU
Option Hide Exit
31
ENG
ENGLISH
ENTERTAINMENT
Video options
1 PressSETTINGStoaccessthePop-Up
menus.
2 PressthenavigationbuttonstoscrolltoSet
Video Play.,Set Video. or Set Audio. and
pressOK.
TheoptionvalueschangedinMovie List
donotaffectPhoto Listor Music List.
Therefore,theyarenotaffectedbyoption
valueschangedinPhoto ListorMusic List.
TheoptionvalueschangedinPhoto List
andMusic Listdoaffecteachother.
Whenreplayingthevideofileafterstopping,
youcanplayfromwhereitstoppedprevi-
ously.
NOTE
Only10,000ofsyncblockscanbesupported
withinthesubtitlefile.
Whenplayingavideo,youcanadjustthe
picturesizebypressingtheARCbutton.
Subtitlesinyourlanguageareonlysup-
portedwhentheOSDmenuisalsointhis
language.
Thecodepageoptionsmaybedisabledde-
pendingonthelanguageofthesubtitlefiles.
Selecttheappropriatecodepageforthe
subtitlefiles.
Menu Description
Picture Size Selectsyourdesiredpicture
formatduringmovieplay.
Audio
Language
ChangestheLanguageGroupofthe
audioduringmovieplay.Files
withasingleaudiotrackcannotbe
selected.
Subtitle
Language
Turnon/offthesubtitle.
Language ActivatedforSMIsubtitleand
canselectthelanguagewithinthe
subtitle.
Code Page Canselectthefontforsubtitle.
Whensettodefault,samefontas
generalmenuwillbeused.
Sync Adjuststhetimesynchronisationof
thesubtitlefrom-10secsto+10secs
bystepsof0.5secsduringmovie
play.
Position Changesthepositionofthe
subtitleeitherupordownduring
movieplay.
NOTE
SelectSet Video Play.toaccessthefollowing
menus:
Size SelectsyourdesiredSubtitlesize
duringmovieplay.
Repeat Turnon/offrepeatfunctionof
movieplayback.Whenturnedon,the
filewithinthefolderwillbeplayed
backrepeatedly.Evenwhenthe
repeatedplaybackisturnedoff,itcan
runtheplaybackifthefilenameis
similartothepreviousfile.
FormoredetailsabouttheSet Video.menu,see
theCUSTOMIZE SETTINGSsection.Seepage42.
FormoredetailsabouttheSet Audio.menu,see
theCUSTOMIZE SETTINGSsection.Seepage45.

32
ENG
ENGLISH
ENTERTAINMENT
Non-supportedfilesaredisplayedthe
previewimagebyicononly .
Abnormalfilesaredisplayedintheformof
bitmap .
YoucanonlycopyfilesfromaUSBdeviceto
theSignagedevice(internalstoragedevice).
NOTE
Menu Description
View Marked Displaystheselectedphotofile.
Copy to
Signage
Copyaphotofileandmoveitto
Signage.(Thisfunctionisonly
availablewithUSBstoragedevices.)
Delete Deleteaphotofile.
Mark All Markallphotofilesonthescreen.
Exit Mark
Mode
ExittheMarkMode.
Viewing Photos
ViewphotofilessavedonaUSBstorageor
Signagedevice(internalstoragedevice).
1
PressSETTINGStoaccessthemainmenu.
2
PressthenavigationbuttontoscrolltoMY
MEDIAandpressOK.
3
PressthenavigationbuttontoscrolltoPhoto
ListandpressOK.
4
PressthenavigationbuttontogotoUSBor
SignageandpressOK.
5
Pressthenavigationbuttonstoscrolltoa
folderyouwantandpressOK.
6
Pressthenavigationbuttonstoscrolltoafile
youwantandpressOK.
Page1/2
PhotoList
005004003 006 007
Page1/1
USB
Changedevice ToMusicList ChangeNumbers
MarkMode Exit
ViewMove PAGE PageChange
001
010
002
011
003
012
004
013
005
014
006
015
007
016
008 009
017 018
Page1/2
PhotoList
005004003 006 007
Page1/1
USB
ViewMarked CopytoSignage Delete
MarkAll ExitMarkMode
MarkMove PAGE PageChange
MarkMode
001
010
002
011
003
012
004
013
005
014
006
015
007
016
008 009
017 018
Mark Mode - USB device
Mark Mode - Signage device
Page1/2
PhotoList
005004003 006 007
Page1/1
USB
MarkMove PAGE PageChange
MarkMode
001
010
002
011
003
012
004
013
005
014
006
015
007
016
008 009
017 018
ViewMarked Delete MarkAll ExitMarkMode
Previous
USB
Signage
Pleaseselectthedevice.
33
ENG
ENGLISH
ENTERTAINMENT
Option Slide Speed:Selectsaslideshow
speed(Fast,Medium,Slow).
TransitionEffect: Settheviewmode
oftheslideshow.
BGM:Selectsamusicfolderforthe
backgroundmusic.
Hide Hidestheoptionwindow.
Todisplaytheoptions,pressOK.
Exit ReturntoPhoto List.
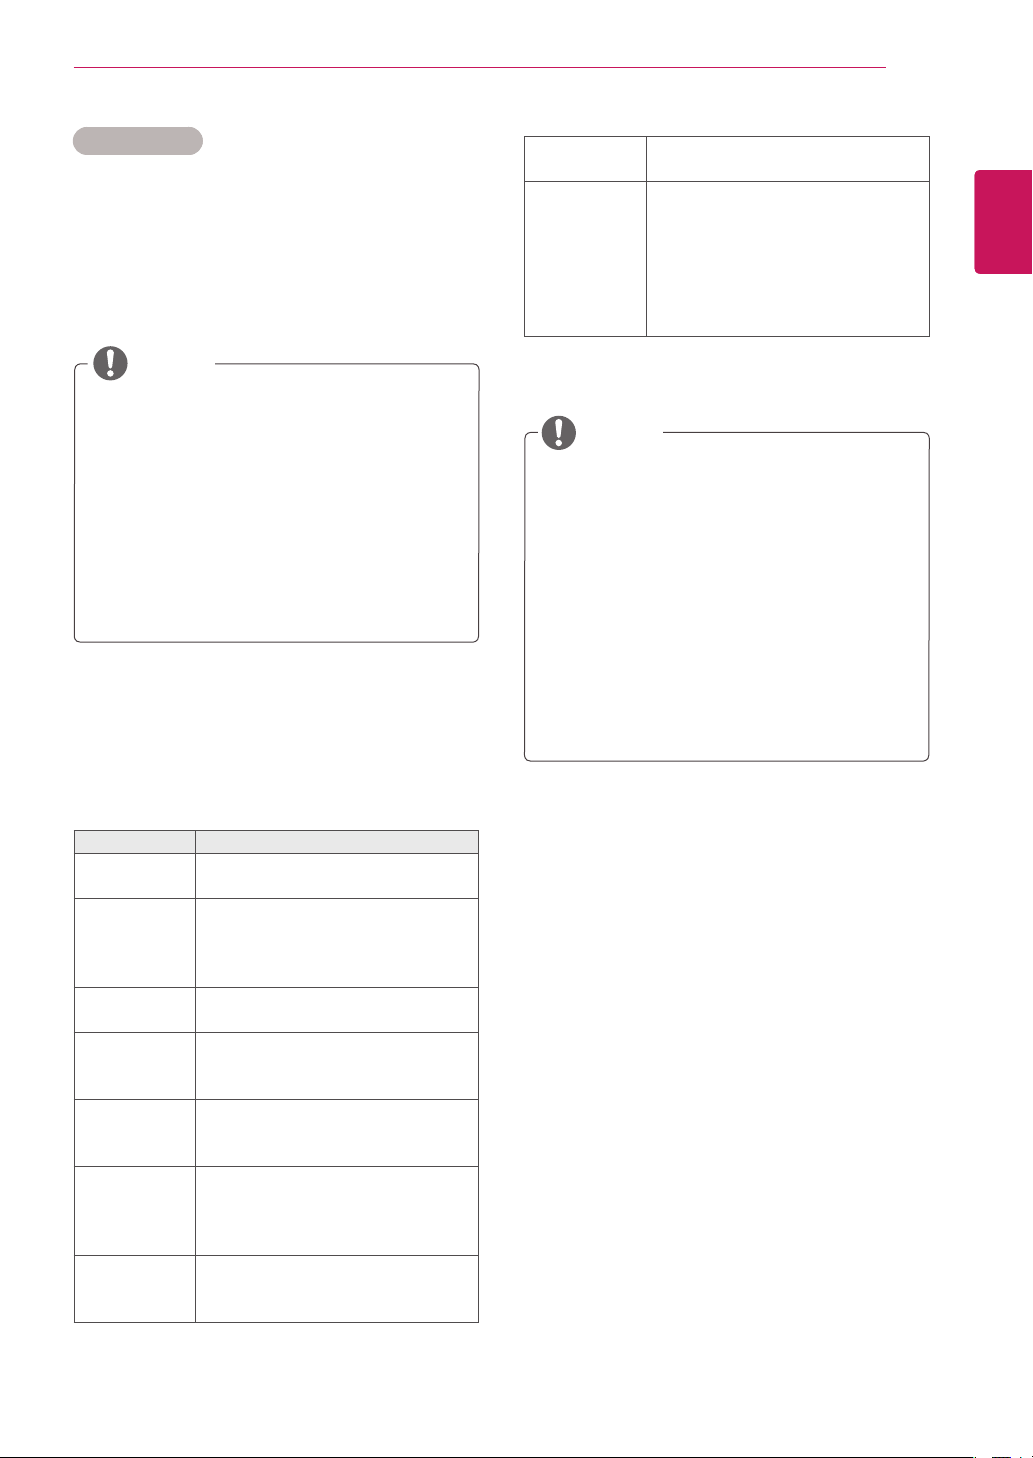
Photo options
1 PressSETTINGStoshowtheOptionmenus.
2 PressthenavigationbuttonstoscrolltoSet
Photo View., Set Video. or Set Audio. and
pressOK.
Menu Description
Slideshow Startsorstopsaslideshowwithse-
lectedphotos.Iftherearenoselected
photos,allphotossavedinthecurrent
folderdisplayduringaslideshow.Toset
aslideshowspeed,selectOption.
BGM Turnsthebackgroundmusiconoroff.
Tosetthebackgroundmusicfolder,
selectOption.
YoucanadjustoptionbySETTINGS
buttonontheremotecontrol.
Rotatesphotosclockwise(90°,180°,
270°,360°).
Viewthephotobyzoomin2,4times.
Adjuststhescreenbrightnesstosave
energy.
Thesupportedphotosizeis
limited.Youcannotrotateaphoto
iftheresolutionoftherotated
widthislargerthanthesupported
resolutionsize.
NOTE
Photoswitharesolutionof
960x540orlesscannotbe
enlarged.
NOTE
Youcannotchangethemusic
folderwhilethebackground
musicisplaying.
YoucanonlyselecttheMP3
foldersavedonthedevicethat
currentlydisplaysthephoto.
NOTE
7 Whenplaysavideo,youcansetthefollowing:
2/13
Slideshow
ꕖ
BGM
ꕗ
Hide
Option
MENU
Exit
ꔦ
NumberofselectedphotosOptions
TheoptionvalueschangedinMovie List
donotaffectPhoto Listor Music List.
Therefore,theyarenotaffectedbyoption
valueschangedinPhoto ListorMusic List.
TheoptionvalueschangedinPhoto List
andMusic Listdoaffecteachother.
NOTE

34
ENG
ENGLISH
ENTERTAINMENT
IfyouselectSet Photo View.,youcanmakeadjustmentsasshownbelow:
1 PressthenavigationbuttonstoscrolltoselectSlide Speed, Transition Effect, or BGM.
2 Pressthenavigationbuttonstoscrolltomakeappropriateadjustments.
Transition Effect Option
Option Description
Sliding Pushesthecurrentslideoutofviewasitplaystothenextslide.
Stairs Pushesthecurrentslideinastaircaseshapeasitplaystothenextslide.
Door Open
/Close
Pushesthecurrentslidelikeopeningorclosingthedoorasitplaystothenextslide.
Shutter Pushesthecurrentslidelikedrawingorpullingdowntheblindasitplaystothenextslide
Fade In Fadestheslideoutslowlybeforeplayingtothenextslide.
FormoredetailsabouttheSet Video.menu,seetheCUSTOMIZE SETTINGSsection.Seepage42.
FormoredetailsabouttheSet Audio.menu,seetheCUSTOMIZE SETTINGSsection.Seepage45.
35
ENG
ENGLISH
ENTERTAINMENT
Listening to Music
ViewphotofilessavedonaUSBstorageor
Signagedevice(internalstoragedevice).
1
PressSETTINGStoaccessthemainmenu.
2
PressthenavigationbuttontoscrolltoMY
MEDIAandpressOK.
3
PressthenavigationbuttontoscrolltoMusic
ListandpressOK.
4
PressthenavigationbuttontogotoUSBor
SignageandpressOK.
5
Pressthenavigationbuttonstoscrolltoafolder
youwantandpressOK.
6
Pressthenavigationbuttonstoscrolltoafile
youwantandpressOK.
Page1/2
MusicList
005004003 006 007
Page1/1
USB
Changedevice ToContentsList ChangeNumbers
MarkMode Exit
PlayMove PAGE PageChange
001. - B01.mp3
01:00
005. - B05.mp3
05:00
002. - B02.mp3
02:00
003. - B03.mp3
03:00
004. - B04.mp3
04:00
Menu Description
Play Marked Displaytheselectedmusicfile.
Copy to
Signage
Copyamusicfileandmoveitto
Signage.(Thisfunctionisonly
availablewithUSBstoragedevices.)
Delete Deleteamusicfile.
Mark All Markallmusicfilesonthescreen.
Exit Mark
Mode
ExittheMarkMode.
Page1/2
MusicList
005004003 006 007
Page1/1
Signage
MarkMove PAGE PageChange
001. - B01.mp3
01:00
005. - B05.mp3
05:00
002. - B02.mp3
02:00
003. - B03.mp3
03:00
004. - B04.mp3
04:00
MarkMode
PlayMarked Delete MarkAll ExitMarkMode
Mark Mode - USB device
Mark Mode - Signage device
Page1/2
MusicList
005004003 006 007
Page1/1
USB
MarkMove PAGE PageChange
001. - B01.mp3
01:00
005. - B05.mp3
05:00
002. - B02.mp3
02:00
003. - B03.mp3
03:00
004. - B04.mp3
04:00
MarkMode
PlayMarked CopytoSignage
Delete MarkAll ExitMarkMode
YoucanonlycopyfilesfromaUSBdeviceto
theSignagedevice(internalstoragedevice).
NOTE
Previous
USB
Signage
Pleaseselectthedevice.
36
ENG
ENGLISH
ENTERTAINMENT
Timeelapsed/Duration
002.B02.mp3
00:31/04:04
filename
Non-supportedfilesaredisplayedthepre-
viewimagebyicononly .
Abnormalfilesaredisplayedintheformof
bitmap .
Adamagedorcorruptedmusicdoesnotplay
butdisplays00:00inplaytime.
Amusicdownloadedfromapaidservicewith
copyrightprotectiondoesnotstartbutdis-
playsinappropriateinformationinplaytime.
IfyoupressOK, buttons,screensaveris
stopped.
ThePLAY( ),Pause( ), , ,
buttonsontheremotecontrolarealsoavail-
ableinthismode.
Youcanusethe buttontoselectthenext
musicandthe buttontoselecttheprevi-
ousmusic.
Tips for playing music files
ThisunitcannotsupporttheID3Tag
embeddedMP3files.
NOTE
7 Whenlisteningtomusic,youcansetthe
following:
MusicList
Page1/2
001.-B01.mp3
01:00
002.-B02.mp3
02:00
003.-B03.mp3
03:00
004.-B04.mp3
04:00
005.-B05.mp3
05:00
002.-B02.mp3
00:40/02:00
ꕖꕗ ꕘ ꕚ ꕙ
MENU
OptionPlaywithPhoto
Hide Exit
Page1/2
005004003 006 007
USB
Remote
button
Description
Stopsplayingbackthefileandmoves
backtotheMusic List.
Playsamusicfile.
Pausesorresumesplayback
Skipstothenextfile
Skipstothepreviousfile
Greenbutton Startplayingtheselectedmusicfiles
andthenmovetothePhoto List.
ENERGY
SAVING
Adjuststhescreenbrightnesstosave
energy.
SETTINGS ShowtheOptionmenu.
BACK
Hidestheoptionwindow.
Todisplaytheoptions,pressOK.
EXIT ReturntoMusic List.
or
Skipstospecificpointsinafiledur-
ingplayback.Thetimeofaspecific
pointwillappearonthestatusbar.In
somefiles,thisfunctionmaynotwork
properly.

37
ENG
ENGLISH
ENTERTAINMENT
1 PressSETTINGStoaccessthepop-upmenus.
2 PressthenavigationbuttonstoscrolltoSet Au-
dio Play. or Set Audio. andpressOK.
Music options
TheoptionvalueschangedinMovie List
donotaffectPhoto Listor Music List.
Therefore,theyarenotaffectedbyoption
valueschangedinPhoto ListorMusic List.
TheoptionvalueschangedinPhoto List
andMusic Listdoaffecteachother.
WhenyouselecttheSet Audio Play,
1 Pressthenavigationbuttonstoscrolltoselect
theRepeatorRandom.
2 Pressthe navigationbuttons toscrolltomake
appropriateadjustments.
NOTE
FormoredetailsabouttheSet Audio.menu,see
theCUSTOMIZE SETTINGSsection.Seepage45.
38
ENG
ENGLISH
ENTERTAINMENT
WhileplayingmediafilesfromContents
List,onlytheBACK,EXIT,orvolumebutton
areavailable.SelectingtheBACKorEXIT
buttonstopsplayingmediafilesandreturns
totheContents List.
IfthereistheAutoPlayfolderintheUSB
deviceanditsfilesareinsupportedformats,
theycanbeplayedbackautomaticallywhen
theUSBdeviceisconnectedtothemonitor.
YoucanonlycopyfilesfromaUSBdeviceto
theSignagedevice(internalstoragedevice).
NOTE
Viewing the Contents List
PlaysbackthestoredfilesusingtheExportoption
inSuperSign Manager.
1
PressSETTINGStoaccessthemainmenu.
2
PressthenavigationbuttontoscrolltoMY
MEDIAandpressOK.
3
Pressthenavigationbuttontoscrollto
Contents ListandpressOK.
4
PressthenavigationbuttontogotoUSBor
SignageandpressOK.
5
Pressthenavigationbuttonstoscrolltoafolder
youwantandpressOK.
6
Pressthenavigationbuttonstoscrolltoafile
youwantandpressOK.
Page1/2
ContentsList
005004003 006 007
Page1/1
USB
Changedevice ToMovieList ChangeNumbers
MarkMode Exit
PlayMove PAGE PageChange
test1.cts
07/01/2011
test5.cts
07/01/2011
test2.cts
07/01/2011
test3.cts
07/01/2011
test4.cts
07/01/2011
Page1/2
ContentsList
005004003 006 007
Page1/1
USB
CopytoSignage Delete
ExitMarkMode Exit
MarkMove PAGE PageChange
MarkMode
test1.cts
07/01/2011
test5.cts
07/01/2011
test2.cts
07/01/2011
test3.cts
07/01/2011
test4.cts
07/01/2011
Menu Description
Copy to
Signage
Copyacontentsfilesandmoveit
toSignage.(Thisfunctionisonly
availablewithUSBstoragedevices.)
Delete Deleteacontentsfiles.
Exit Mark
Mode
ExittheMarkMode.
Exit ExittheOSD.
Page1/2
ContentsList
005004003 006 007
Page1/1
Signage
MarkMove PAGE PageChange
MarkMode
test1.cts
07/01/2011
test5.cts
07/01/2011
test2.cts
07/01/2011
test3.cts
07/01/2011
test4.cts
07/01/2011
Delete
ExitMarkMode Exit
Mark Mode - USB device
Mark Mode - Signage device
Previous
USB
Signage
Pleaseselectthedevice.
39
ENG
ENGLISH
ENTERTAINMENT
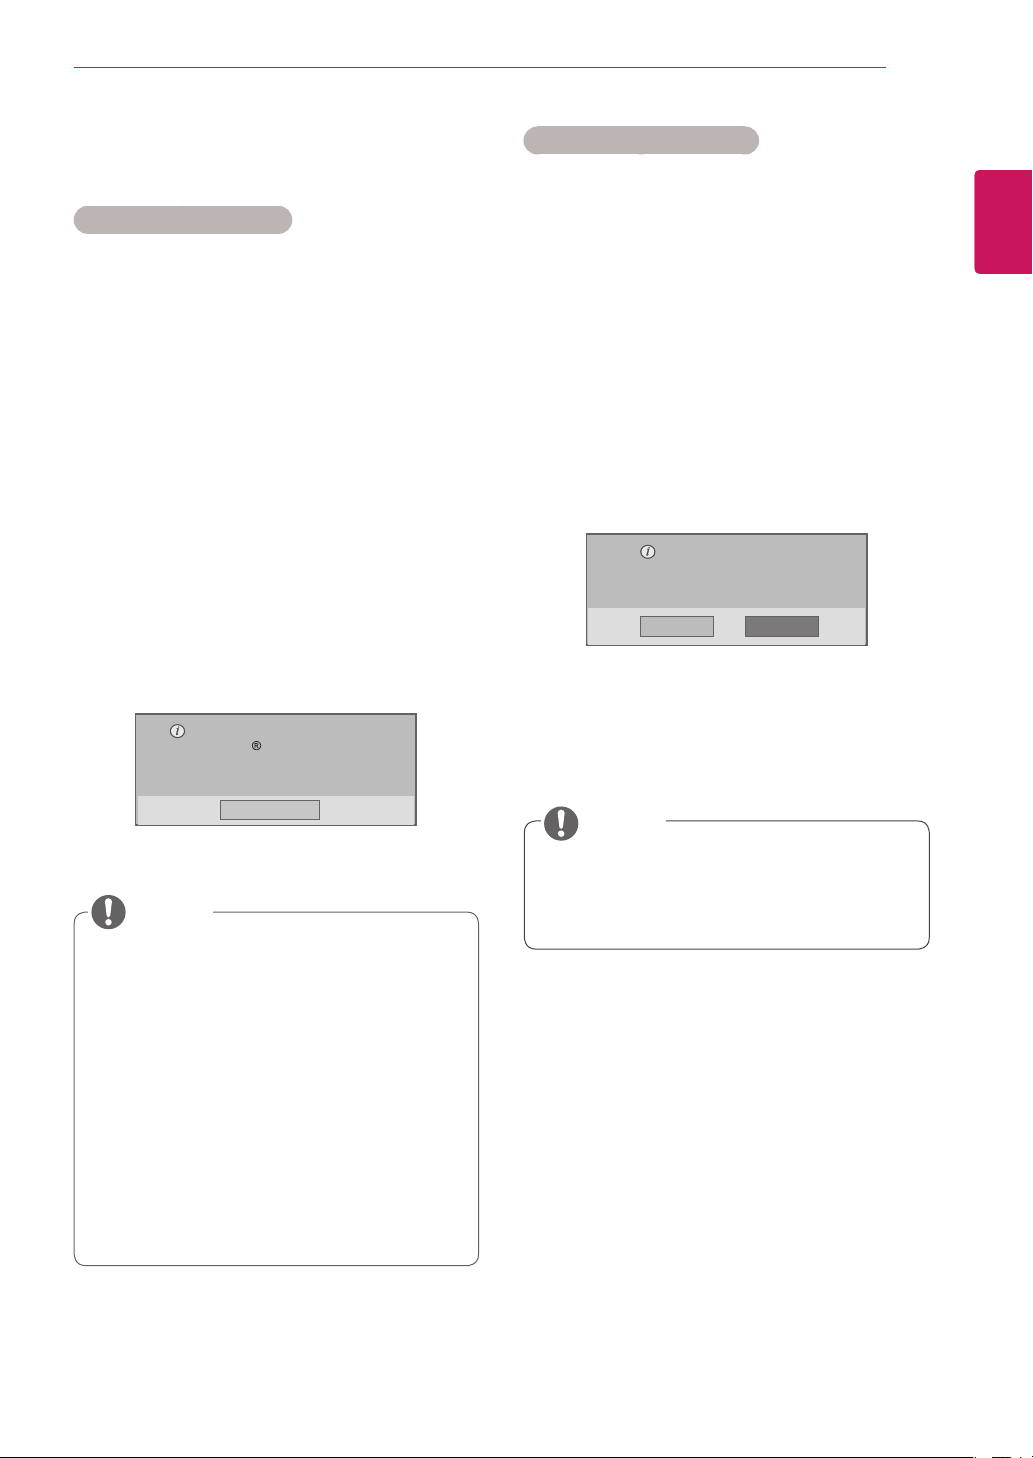
DivX® VOD Guide
DivX® VOD Registration
InordertoplaypurchasedorrentedDivX®VOD
contents,youshouldregisteryourdevicewith10
digitDivXregistrationcodefromyourdeviceat
www.divx.com/vod.
1 PressSETTINGStoaccessthemainmenus.
2 PressthenavigationbuttonstoscrolltoMY
MEDIAandpressOK.
3 PresstheBluebutton.
4 PressthenavigationbuttonstoscrolltoDivX
Reg. CodeandpressOK.
5 Viewtheregistrationcodeofyourdisplay.
6 Whenyouarefinished,press EXIT.
Whenyoureturntothepreviousmenu,press
BACK.
Whileyouarecheckingtheregistrationcode,
somebuttonsmaynotwork.
IfyouusetheDivXregistrationcodeof
anotherdevice,youcannotplaytherented
orpurchasedDivXfile.Makesuretouse
theDivXregistrationcodeassignedtoyour
product.
Thevideooraudiofilesthatarenotcon-
vertedbythestandardDivXcodecmaybe
corruptedornotbeplayed.
TheDivXVODcodeallowsyoutoactivate
upto6devicesunderoneaccount.
Youmustregisteryourdeviceto
playDivX protectedvideos.
Registrationcode:**********
Registerathttp://vod.divx.com
Close
NOTE
Oncethederegistrationisexecuted,you
mustregisteryourdeviceagaintoseeDivX®
VODcontents.
DivX® VOD Deregistration
Youshouldderegisteryourdevicewith8digitDivX
deregistrationcodefromyourdeviceatwww.divx.
com/vod.
1 PressSETTINGStoaccessthemainmenus.
2 PressthenavigationbuttonstoscrolltoMY
MEDIAandpressOK.
3 PresstheBluebutton.
4 PressthenavigationbuttonstoscrolltoDeac-
tivationandpressOK.
5 PressthenavigationbuttonstoselectYesto
confirm.
Deregistrationcode:
********
Deregisterathttp://vod.divx.com
Continuewithregistration?
Yes No
6 Whenyouarefinished,press EXIT.
Whenyoureturntothepreviousmenu,press
BACK.
NOTE
40
ENG
ENGLISH
ENTERTAINMENT
Using PIP/PBP
DisplaysvideosandphotosstoredontheUSB
orSignagedevice(internalstoragedevice)on
asinglemonitorwiththemainandsubscreens
divided.(Seepage50.)
1 PressSETTINGStoaccessthemainmenus.
2 PressthenavigationbuttonstoscrolltoOP-
TIONandpressOK.
3 PressPIP/PBPtoselectPIPorPBPandthen
pressOK.
4 SelectMovieListorPhoto ListfromMy
Media.(WithPIP/PBPselected,theMusic
ListandContents Listaredeactivated.)
Move
PIP/PBP
Off
PIP
PBP
Prev.
Mode
Position
Size
5 SelectafileyouwantandthenpressOK.
6 SelectthePIPorPBPiconfromtheplaylist.
Movie List
Photo List
7 SelecteitherMainorSubforsound.Youmust
toselecttheoutputsoundbeforerunningthe
PIPorPBPfunction.
8 Thesubscreenisdisplayedonthemain
screen.
Selectthesoundpath.
Main Sub
MovieList PhotoList MusicList
ContentsList
Page1/2
PhotoList
005004003 006 007
Page1/1
Signage
Changedevice ToMusicList ChangeNumbers
MarkMode Exit
ViewMove PAGE PageChange
001
010
002
011
003
012
004
013
005
014
006
015
007
016
008 009
017 018
01:02:30/02:30:25
ꕖꕗ ꕘ ꕚ ꕙ
MENU
Option
Hide Exit
2/13
Slideshow
ꕖ
BGM
ꕗ
Hide
Option
MENU
Exit
ꔦ
41
ENG
ENGLISH
CUSTOMIZING SETTINGS
CUSTOMIZING SETTINGS
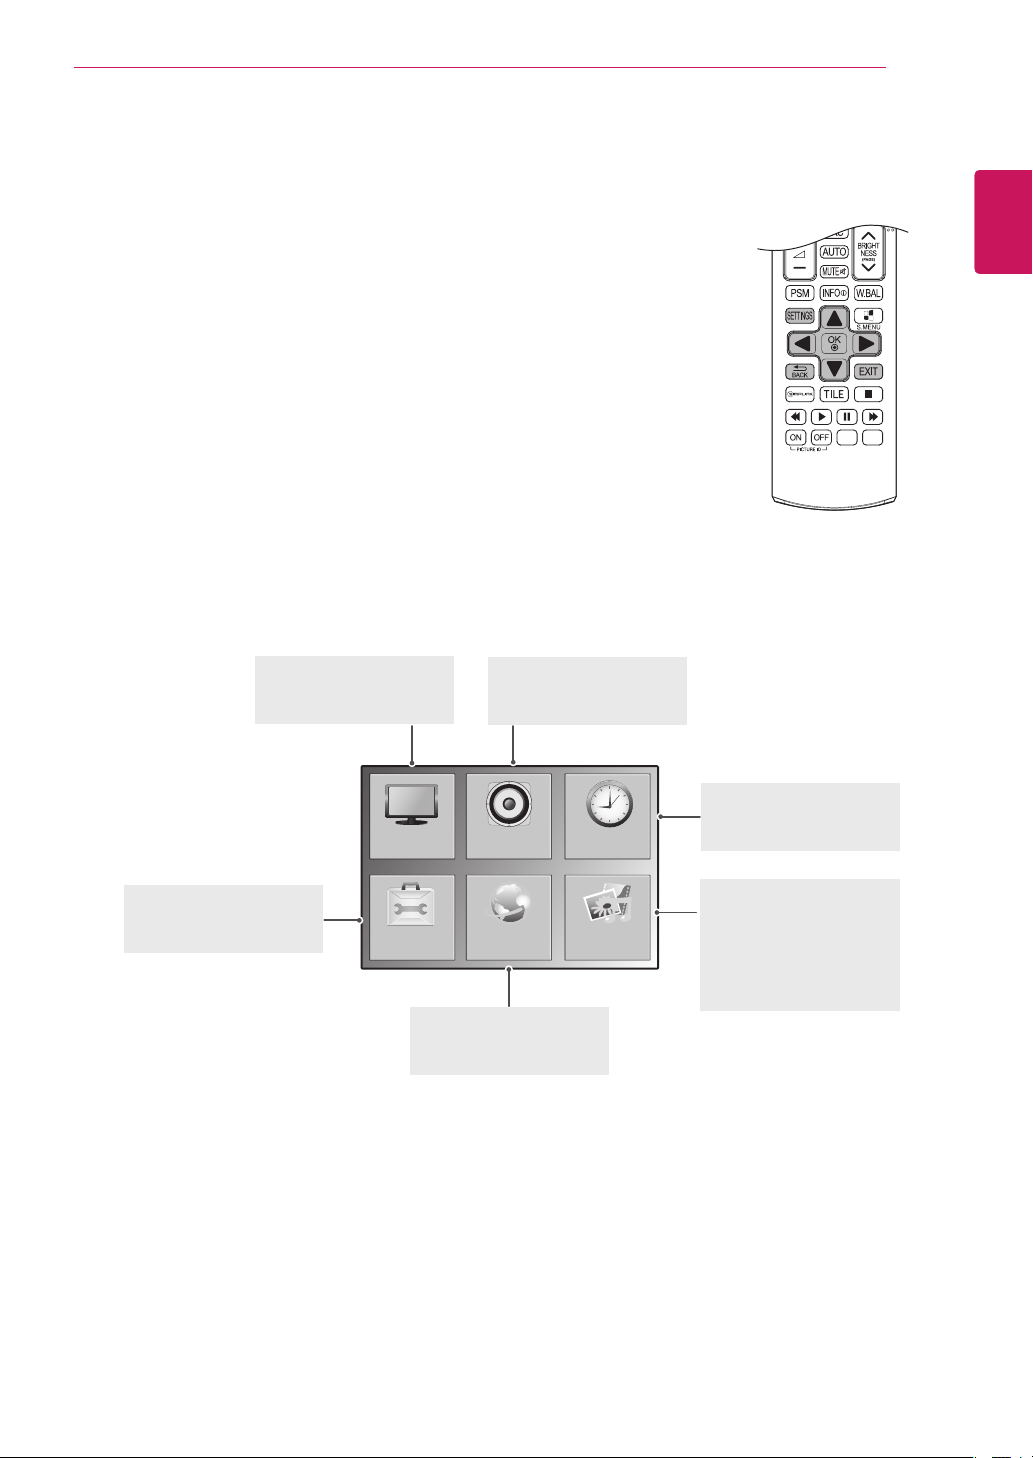
Accessing Main Menus
1
PressSETTINGStoaccessthemainmenus.
2
Pressthenavigationbuttonstoscrolltooneofthefollowingmenusand
pressOK.
3
Pressthenavigationbuttonstoscrolltothesettingoroptionyouwant
andpressOK.
4
Whenyouarefinished,pressEXIT.
Whenyoureturntothepreviousmenu,pressBACK.
OPTION
PICTURE
NETWORK
AUDIO TIME
MY MEDIA
PICTURE (Seepage42.)
Adjuststheimagesize,
quality,oreffect.
AUDIO(Seepage45.)
Adjuststhesoundquality,
effect,orvolumelevel.
NETWORK(Seepage52.)
Setsupthenetwork
setting.
OPTION (Seepage47.)
Customizesthegeneral
settings.
TIME(Seepage46.)
Setsthetime,date,or
Timerfeature.
MY MIDIA(Seepage25.)
Displayandplaymovie,
photoandmusiccontents
storedonyourUSBor
Signagedevice(Internal
storagedevice).
42
ENG
ENGLISH
CUSTOMIZING SETTINGS
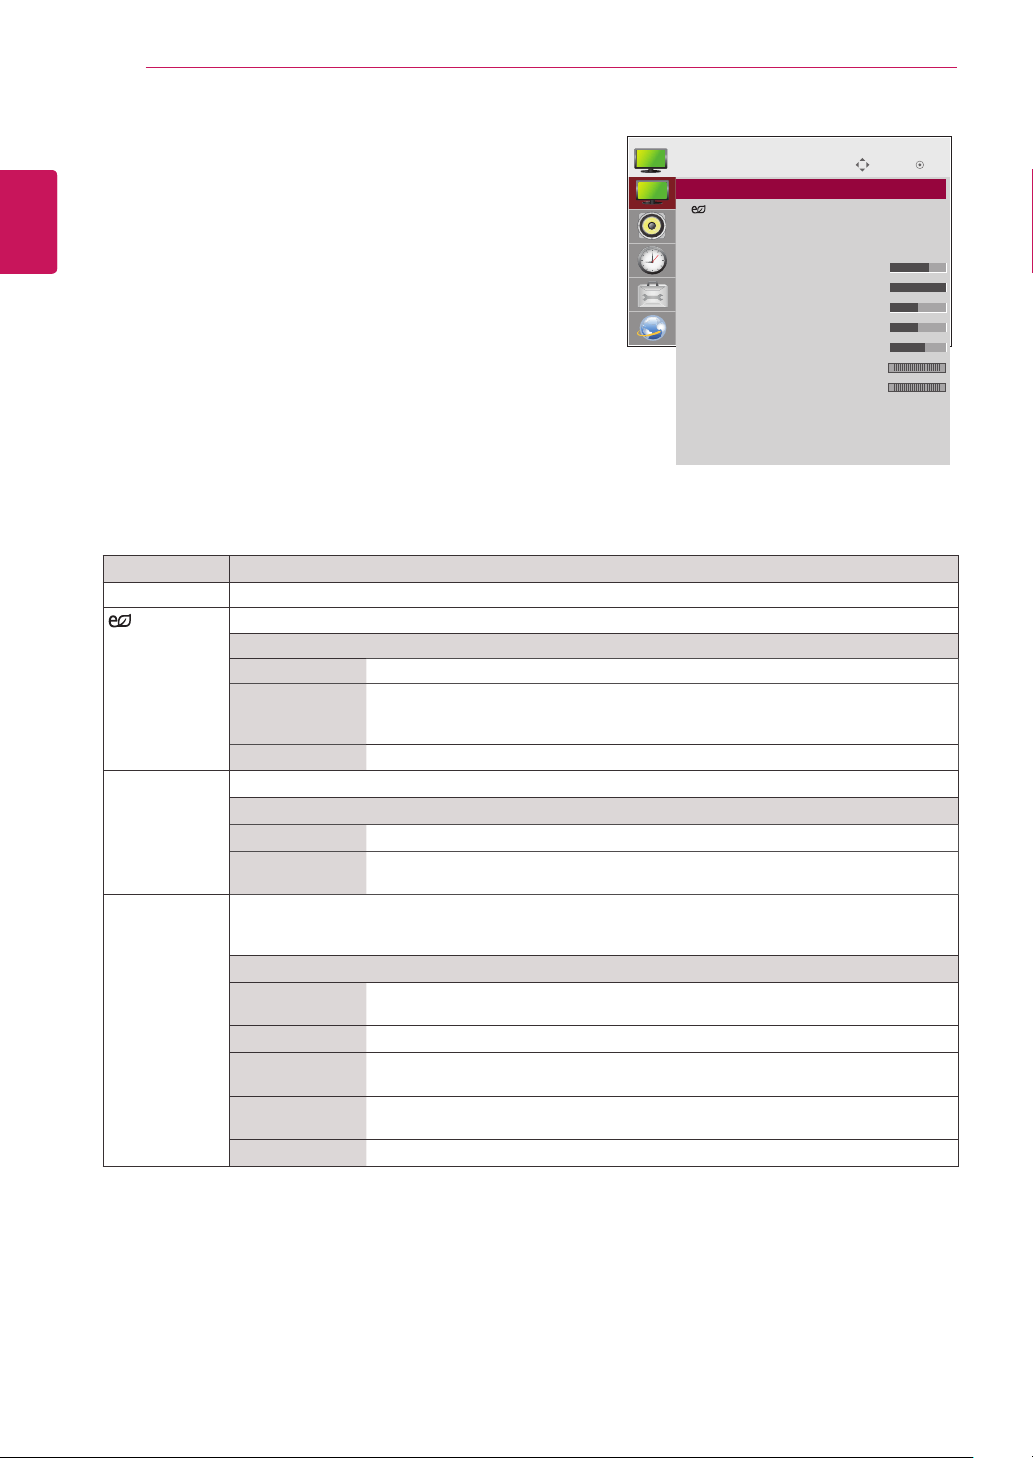
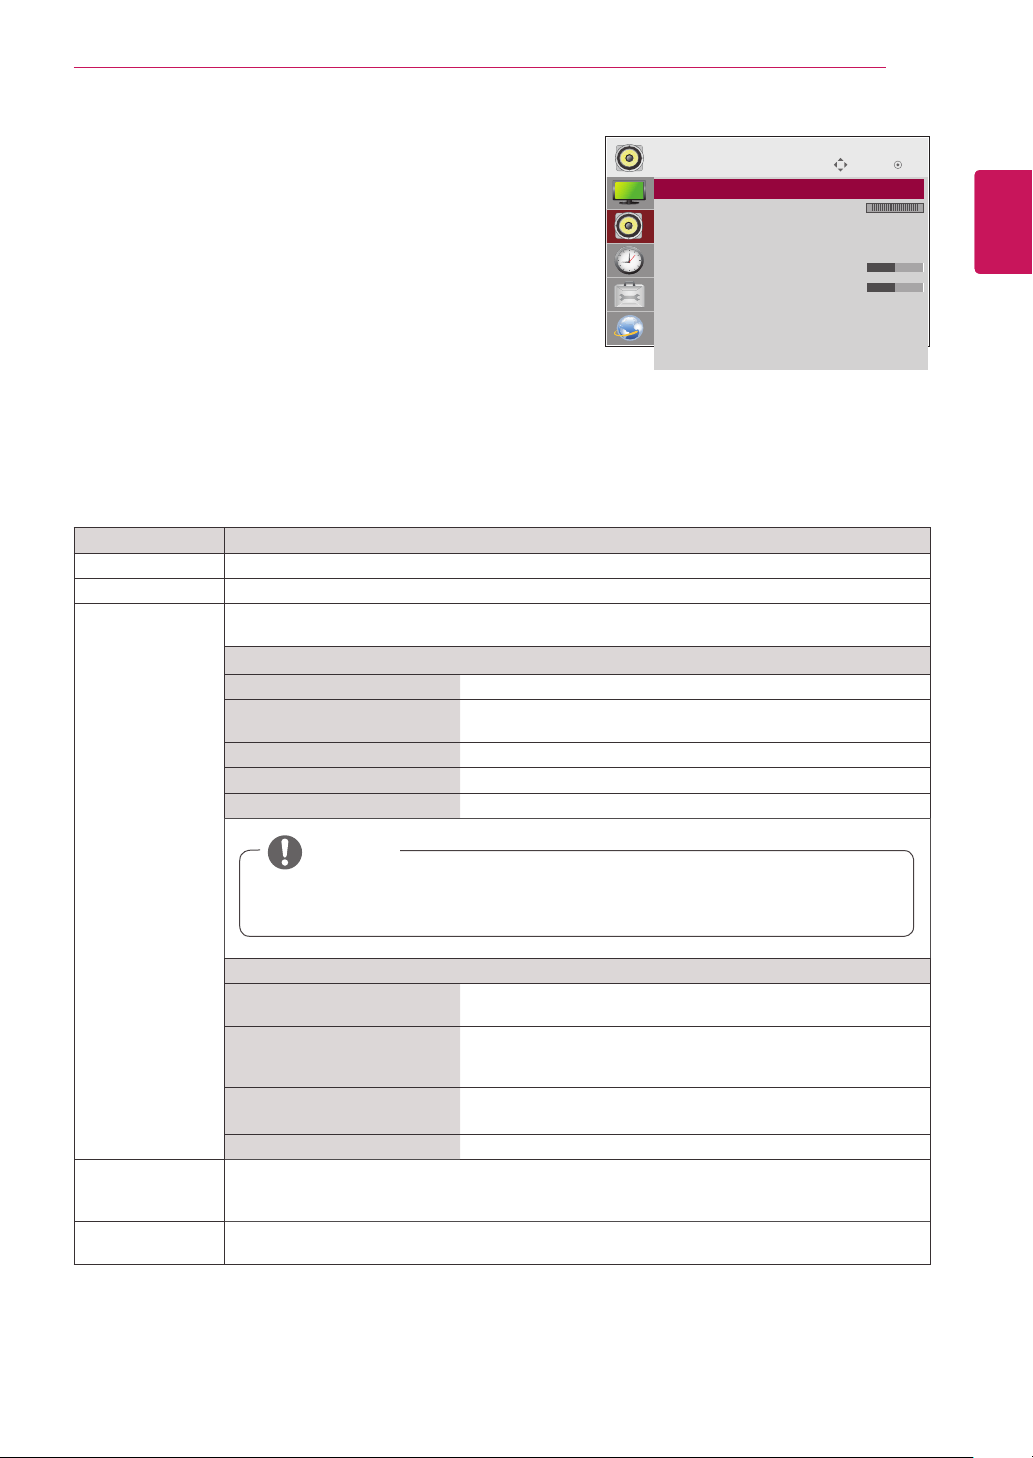
PICTURE Settings
1
PressSETTINGStoaccessthemainmenus.
2
PressthenavigationbuttonstoscrolltoPICTUREand
pressOK.
3
Pressthenavigationbuttonstoscrolltothesettingor
optionyouwantandpressOK.
-Toreturntothepreviouslevel,pressBACK.
4
Whenyouarefinished,pressEXIT.
Whenyoureturntothepreviousmenu,press
BACK.
Theavailablepicturesettingsaredescribedinthefollowing:
Setting Description
Aspect Ratio Changestheimagesizetoviewimagesatitsoptimalsize(Seepage21.).
Energy
Saving
Setstoautomaticallyadjustthescreenbrightnesscorrespondingtothesurroundings.
Level
Off DisablesEnergySavingfunction.
Minimum/
Medium/
Maximum
Selectsthebrightnesslevelofthebacklight.
Screen Off Thescreenturnsoffin3seconds.
Smart Energy
Saving
Adjuststhebacklightandcontrastdependingonthescreenbrightness.
Level
Off DisablestheSmartEnergySavingfunction.
On EnablestheSmartEnergySavingfunctiontosavepowerconsumptionasmuch
asthevaluesetinthesmartenergysavingrate.
Picture Mode Selectsoneofthepresetimageorcustomizesoptionsineachmodeforthebestmonitorsetscreen
performance.Youarealsoabletocustomizeadvancedoptionsofeachmode.
Theavailablepresetpicturemodesvarydependingonthemonitorset.
Mode
Vivid Adjuststhevideoimagefortheretailenvironmentbyenhancingthecontrast,
brightness,color,andsharpness.
Standard Adjuststheimageforthenormalenvironment.
Cinema Optimizesthevideoimageforacinematiclooktoenjoymoviesasifyouareina
movietheater.
Sport Optimizesthevideoimageforhighanddynamicactionsbyemphasizingprimary
Colorssuchaswhite,grass,orskyblue.
Game OptimizesthevideoimageforafastgamingscreensuchasPCsorgames.
Move
OK
PICTURE
ꔋ
•AspectRatio :16:9
•
EnergySaving :Off
•SmartEnergySaving :Off
•PictureMode :Standard
•Backlight 70
•Contrast 100
•Brightness 50
•Sharpness 50
•Color 60
•Tint 0
•ColorTemp. 0
•AdvancedControl
•PictureReset
•Screen
R G
W C
43
ENG
ENGLISH
CUSTOMIZING SETTINGS
IfthePicture ModesettinginthePicturemenuissettoVivid, Standard, Cinema, Sport,orGame,
thesubsequentmenuswillbeautomaticallyset.
YoucannotadjustSharpness,ColorandTintintheRGB/HDMI-PC/DVI-PCmode.
WhenusingtheSmartEnergySavingfunction,thescreenmaylooksaturatedinthewhiteareaofa
stillimage.
IfEnergySavingissettoMinimum,Medium,orMaximum,theSmartEnergySavingfunctionis
disabled.
Picture Mode options
Setting Description
Backlight AdjuststhebrightnessofthescreenbycontrollingtheLCDbacklight.Ifyoudecreasethe
brightnesslevel,thescreenbecomesdarkerandthepowerconsumptionwillbereduced
withoutanyvideosignalloss.
Contrast Increasesordecreasesthegradientofthevideosignal.Youmayusecontrastwhenthebright
partofthepictureissaturated.
Brightness Adjuststhebaselevelofthesignalinthepicture.Youmayusebrightnesswhenthedarkpart
ofthepictureissaturated.
Sharpness Adjuststhelevelofcrispnessintheedgesbetweenthelightanddarkareasofthepicture.
Thelowerthelevel,thesoftertheimage.
Color Adjustsintensityofallcolors.
Tint Adjuststhebalancebetweenredandgreenlevels.
Color Temp . Settowarmtoenhancehottercolorssuchasred,orsettocooltomakepicturebluish.
Advanced Control Customizestheadvancedoptions.Refertotheadvancedimageoptions.(Seepage44.).
Picture Reset Restorestheoptionstothedefaultsetting.
Setting Description
SCREEN
(In RGB
Mode Only)
CustomizesthePCdisplayoptionsinRGBmode.
Option
Resolution Selectsaproperresolution.
AutoConfigure Setstoadjustthescreenposition,clock,andphaseautomatically.
Thedisplayedimagemaybeunstableforafewsecondswhiletheconfigurationis
inprogress.
Position/Size/
Phase
Adjuststheoptionswhenthepictureisnotclear,especiallywhencharactersare
shaky,aftertheautoconfiguration.
Reset Restorestheoptionstothedefaultsetting.
NOTE

44
ENG
ENGLISH
CUSTOMIZING SETTINGS
Setting Description
Dynamic
Contrast
(Off/High/
Medium/Low)
Adjuststhecontrasttokeepitatthebestlevelaccordingtothebrightnessofthescreen.The
pictureisimprovedbymakingbrightpartsbrighteranddarkpartsdarker.(Functionworksinthe
followingmode-Component,HDMI-DTV,DVI-DTV)
Dynamic Color
(Off/High/Low)
AdjustsscreenColorssothattheylooklivelier,richer,andclearer.Thisfeatureenhances
hue,saturationandluminancesothatred,blue,greenandwhitelookmorevivid.(Functionworksin
thefollowingmode-Component,HDMI-DTV,DVI-DTV)
Clear White
(Off/High/Low)
Makethewhiteareaofscreenbrighterandmorewhite.
Skin Color
(-5 to 5)
Itdetectstheskinareaofvideoandadjustsittoexpressanaturalskincolor.
Noise
Reduction
(Off/High/
Medium/Low)
Reducesscreennoisewithoutcompromisingvideoquality.(Functionworksinthefollowingmode-
Component,HDMI-DTV,DVI-DTV)
Digital Noise
Reduction
(Off/High/
Medium/Low)
Thisoptionreducesthenoiseproducedwhilecreatingdigitalvideosignals.
Gamma
(High/Medium/
Low)
Setyourowngammavalue.Onthemonitor,highgammavaluesdisplaywhitishimagesandlow
gammavaluesdisplayhighcontrastimages.
Black Level
(High/Low)
Low:Thepictureofthescreengetsdarker.
High:Thepictureofthescreengetsbrighter.
Setblacklevelofthescreentoproperlevel.
(Functionworksinthefollowingmode-Component,HDMI-DTV,DVI-DTV)
Advanced Control
45
ENG
ENGLISH
CUSTOMIZING SETTINGS
AUDIO Settings
1
PressSETTINGStoaccessthemainmenus.
2
PressthenavigationbuttonstoscrolltoAUDIOandpress
OK.
3
Pressthenavigationbuttonstoscrolltothesettingor
optionyouwantandpressOK.
-Toreturntothepreviouslevel,pressBACK.
4
Whenyouarefinished,pressEXIT.
Whenyoureturntothepreviousmenu,pressBACK.
Theavailableaudiooptionsaredescribedinthefollowing:
Move
OK
AUDIO
ꔋ
• Clear Voice II : Off
• Balance 0
• Sound Mode : Standard
• Infinite Sound: Off
• Treble 50
• Bass 50
• Reset
• Digital Audio Input
• Speaker : On
L R
Setting Description
Clear Voice ll Bydifferentiatingthehumansoundrangefromothers,ithelpsuserslistentohumanvoicesbetter.
Balance Adjustsbalancebetweentheleftandrightspeakersaccordingtoyourroomenvironment.
Sound Mode Thebestsoundtonequalitywillbeselectedautomaticallydependingonthevideotypethatyou're
currentlywatching.
Mode
Standard Themostcommandingandnaturalaudio.
Music Selectthisoptiontoenjoytheoriginalsoundwhenlisteningto
themusic.
Cinema Selectthisoptiontoenjoysublimesound.
Sport Selectthisoptiontowatchsportsbroadcasting.
Game Toenjoydynamicsoundwhenplayingagame.
Option
InfiniteSound LG'sInfinitySoundoptionprovides5.1channelstereosound
fromtwospeakers.
Treble Controlsthedominantsoundsintheoutput.Whenyouturnup
thetreble,itwillincreasetheoutputtothehigherfrequency
range.
Bass Makestheoutputsoundsofter.Whenyouturnupthebass,itwill
increasetheoutputtothelowerFrequency.
Reset Resetsthesoundmodetothedefaultsetting.
Digital Audio
Input
HDMI/Display Port:OutputsthesoundofdigitalsignalfromHDMIthroughthemonitorspeaker.
Audio In:OutputsthesoundthroughthemonitorspeakerbyconnectingHDMItotheAudioIn
port.
Speaker ON:Enablessoundtothemonitorspeaker.(*Themonitorspeakerissoldseparately.)
OFF:Disablessoundtothemonitorspeaker.Usethisoptionwhenusinganexternalsounddevice.
NOTE
Ifsoundqualityorvolumeisnotatthelevelyouwant,itisrecommendedtouseaseparate
hometheatersystemoramplifiertocopewithdifferentuserenvironments.
46
ENG
ENGLISH
CUSTOMIZING SETTINGS
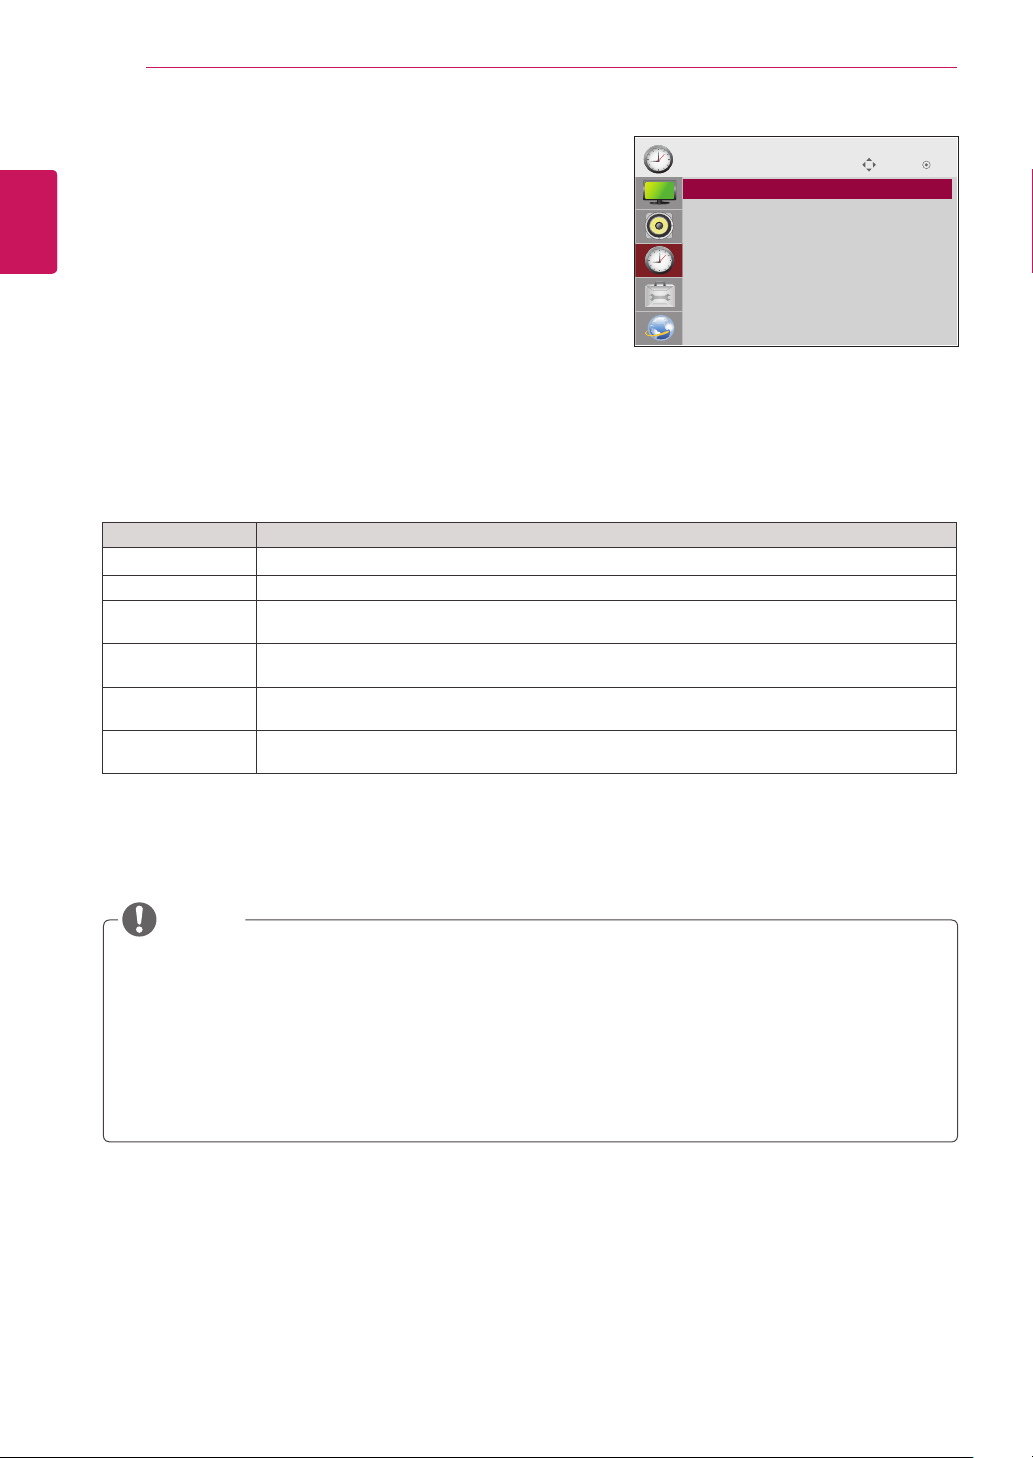
TIME Settings
1
PressSETTINGStoaccessthemainmenus.
2
PressthenavigationbuttonstoscrolltoTIMEandpressOK.
3
Pressthenavigationbuttonstoscrolltothesettingoroption
youwantandpressOK.
-Toreturntothepreviouslevel,pressBACK.
4
Whenyouarefinished,pressEXIT.
Whenyoureturntothepreviousmenu,pressBACK.
Theavailabletimesettingsaredescribedinthefollowing:
Setting Description
Clock Setsthetimefeature.
On/Off Time Setsthetimetoturnonoroffthemonitorset.
Sleep Timer Setsthelengthoftimeuntilthemonitorsettoturnsoff.Whenyouturnthemonitorsetoffandturn
itonagain,theSleepTimerwillbesettooff.
Power on delay Whenconnectingmultiplemonitorsandturningthepoweron,themonitorsareturnedonindividually
topreventoverload.
Auto off IfAutooffisactiveandthereisnoinputsignal,thesetswitchestooffmodeautomaticallyafter15
minutes.
Automatic
Standby
Ifyoudonotusethemonitorformorethan4hours,itwillbeinstandbymodeautomatically.
OffTime/OnTimecanbesavedforuptosevenschedules;themonitoristurnedonoroffatthepreset
timeintheschedulelist.Ifmultiplepresettimesarestoredintheschedulelist,thisfunctionworksatthe
nearesttimefromthecurrenttime.
Oncetheonorofftimeisset,thesefunctionsoperatedailyatthepresettime.
Thescheduledpower-offfunctionworksproperlyonlywhenthedevicetimeissetcorrectly.
Whenthescheduledpower-onandpower-offtimesarethesame,thepower-offtimehaspriorityoverthe
power-ontimeifthesetisturnedon,andviceversaifthesetisturnedoff.
NOTE
Move OK
TIME
ꔋ
• Clock
• Off Time : Off
• On Time : Off
• Sleep Timer : Off
• Power On Delay : Off
• Auto Off : 15 min.
• Automatic Standby : Off
47
ENG
ENGLISH
CUSTOMIZING SETTINGS
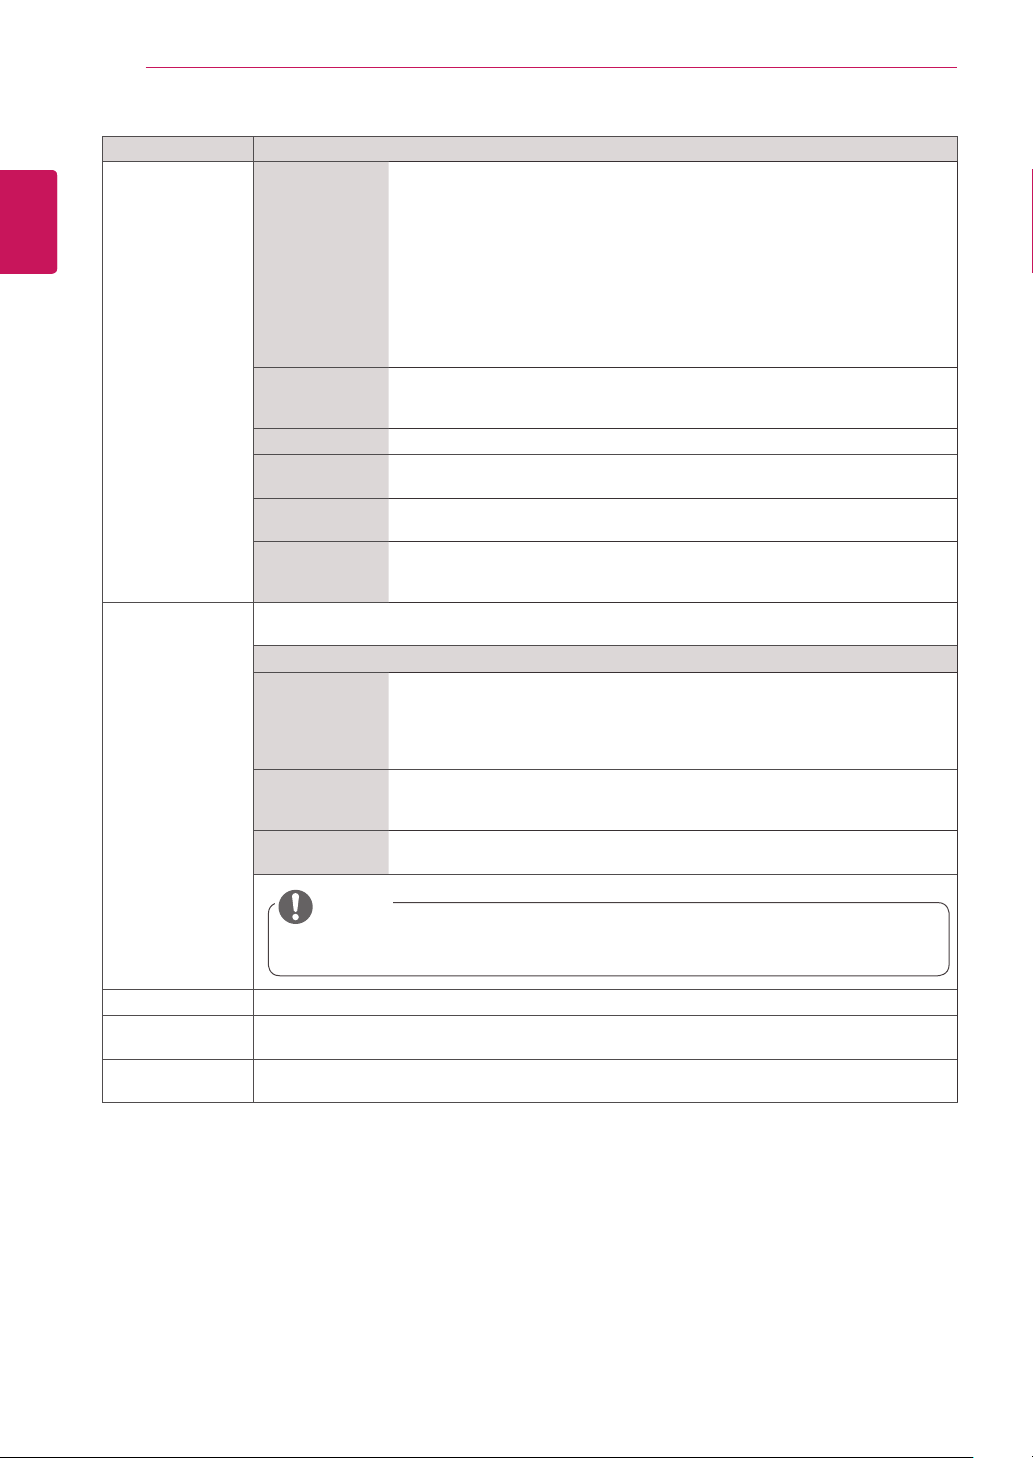
Setting Description
Language Tochoosethelanguageinwhichthecontrolnamesaredisplayed.
ISM Method AfrozenorstillpicturefromaPC/Videogamedisplayedonthescreenforprolongedperiods
couldresultinaimageburnremainingevenwhenyouchangetheimage.Avoidallowingafixed
imagetoremainonthescreenforalongperiodoftime.
Setting
Normal Leaveonnormalifyoudon'tforeseeimageburninbeingaproblem.
Orbiter Mayhelppreventimageburn.However,itisbestnottoallowanyfixedimage
toremainonthescreen.Toavoidapermanentimageonthescreen,the
screenwillmoveevery2minutes.
Inversion Thisfunctioninvertsthepanelcolorofthescreen.Thepanelcoloris
automaticallyinvertedevery30minutes.
WhiteWash Whitewashfillsthescreenwithsolidwhite.Thishelpsremovespermanent
imagesburnedintothescreen.Apermanentimagemaybeimpossibletoclear
entirelywithwhitewash.
DPM Select Ausercanchoosetoturnthepowersavingmodeon/off.
Fail Over Ifthereisnoinputsignal,itautomaticallyswitchestoanotherinputwithsignal.
Setting
Off Stopsautoswitchoftheinputsource.
Auto Switchestoanotherinputsourcewithvideosignalifnovideosignalcomes
fromthecurrentinputsource.
Manual Selectsthepriorityofinputsourceforautoswitch.
Whenseveralinputsourcesarefound,theinputsourcewithahigherpriority
willbeselected.
Factory Reset Selectthisoptiontoreturntothedefaultfactorysettings.
Set ID YoucanassignauniqueSetIDNO(nameassignment)toeachproductwhenseveralproducts
areconnectedfordisplay.Specifythenumber(1to255)usingthebuttonandexit.Usethe
assignedSetIDtoindividuallycontroleachproductusingtheProductControlProgram.
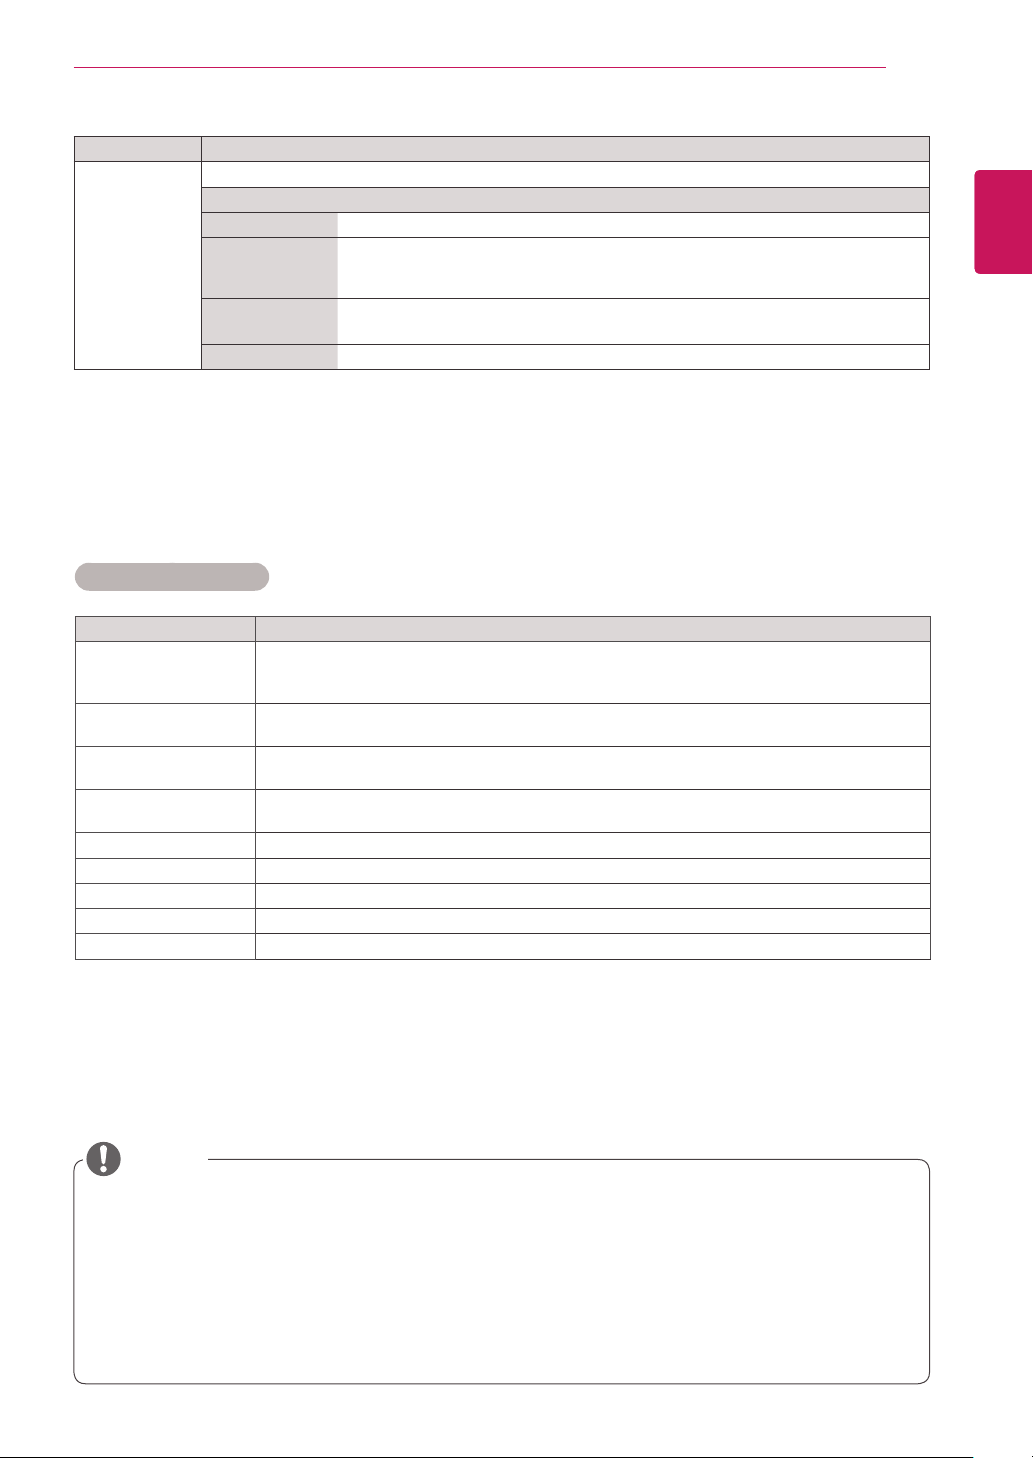
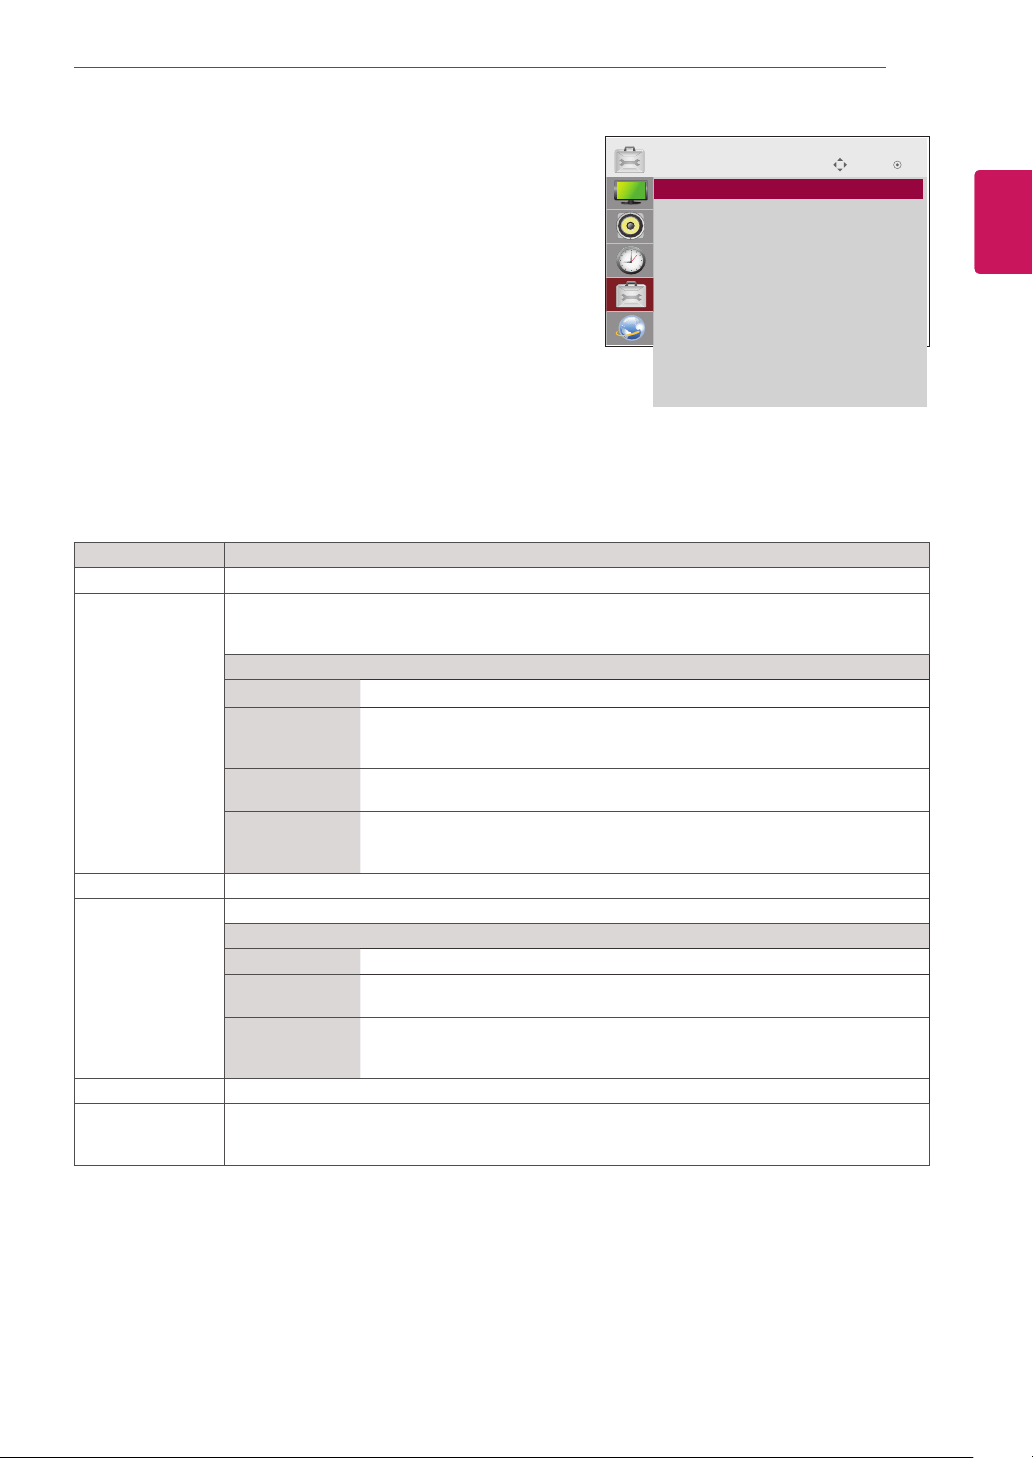
OPTION Settings
1
PressSETTINGStoaccessthemainmenus.
2
PressthenavigationbuttonstoscrolltoOPTIONandpress
OK.
3
Pressthenavigationbuttonstoscrolltothesettingoroption
youwantandpressOK.
-Toreturntothepreviouslevel,pressBACK.
4
Whenyouarefinished,pressEXIT.
Whenyoureturntothepreviousmenu,pressBACK.
Theavailableoptionsettingsaredescribedinthefollowing:
Move OK
OPTION
ꔋ
• Language
• ISM Method : Normal
• DPM Select : On
• Fail Over : Off
• Factory Reset
• Set ID : 1
• Tile Mode
• PIP/PBP
• Key Lock : Off
• USB Content Recovery : Off
• Product/Service Info.
48
ENG
ENGLISH
CUSTOMIZING SETTINGS
Setting Description
Tile Mode TileMode Tousethisfunction
-Mustbedisplayedwithvariousotherproducts.
-MustbeinafunctionthatcanbeconnectedtoDVICableanddistributor.
TilemodeandchooseTilealignmentandsettheIDofthecurrentproductto
setlocation.
*OnlyafterpressingtheSETbuttontheadjustmentsmadetothesettingswill
besaved.
-Tilemode:columnxrow(c=1to15r=1to15)
-15x15available.
-Configurationofanintegrationscreenisalsoavailableaswellas
configurationofOnebyoneDisplay.
AutoConfig. Setstoadjustthescreenposition,clock,andphaseautomatically.
Thedisplayedimagemaybeunstableforafewsecondswhilethe
configurationisinprogress.
Position Movingthescreenpositionhorizontallyandvertically.
Size Adjustthehorizontalandverticalsizeofthescreentakingintoaccountthesize
ofthebezel.
Natural Theimageisomittedbythedistancebetweenthescreenstobenaturally
shown.
Reset FunctiontoinitializeandreleaseTile.
AllTilesettingarereleasedwhenselectingTilerecallandthescreenreturnsto
Fullscreen.
PIP/PBP DisplaysvideosorphotosstoredintheUSBdeviceonasinglemonitorbydividingitintothemain
andsubscreens.
Option
Mode Setsthetypeofsecondaryscreen.
*OFF:Disablesthesecondaryscreen.
*PIP (Picture In Picture):Displaysthesecondaryscreeninthemainscreen.
*PBP (Picture By Picture):Displaysthesecondaryscreennexttothemain
screen.
Position Adjuststhepositionofthesubscreen(topleft,bottomleft,topright,bottom
right)
Thedefaultvalueisthebottomright.
Size Adjuststhesizeofthesubscreen(Size0to10).
ThedefaultsizeofPIP(Size:0)is480x270;themaximumsize10is960x540.
Key Lock Turnsthelocalkeyfunctiononoroff.IfKeyLockisenabled,thelocalkeydoesnotwork.
USB Content
Recovery
ReplaysthecontentinaUSBwhenthepowerisbackonifitisturnedoffduringplayingacontent.
(ThisfunctionoperatesthesamewhenaUSBisdisconnectedandconnectedagain.)
Product/Service
Info.
Displaysthemodelname,softwareversion,serialnumber,IPaddress,MACaddress,Internal
MemroyInfo.,andhomepage.
NOTE
ThePositionandSizeoptionsareenabledonlyinPIPmode.
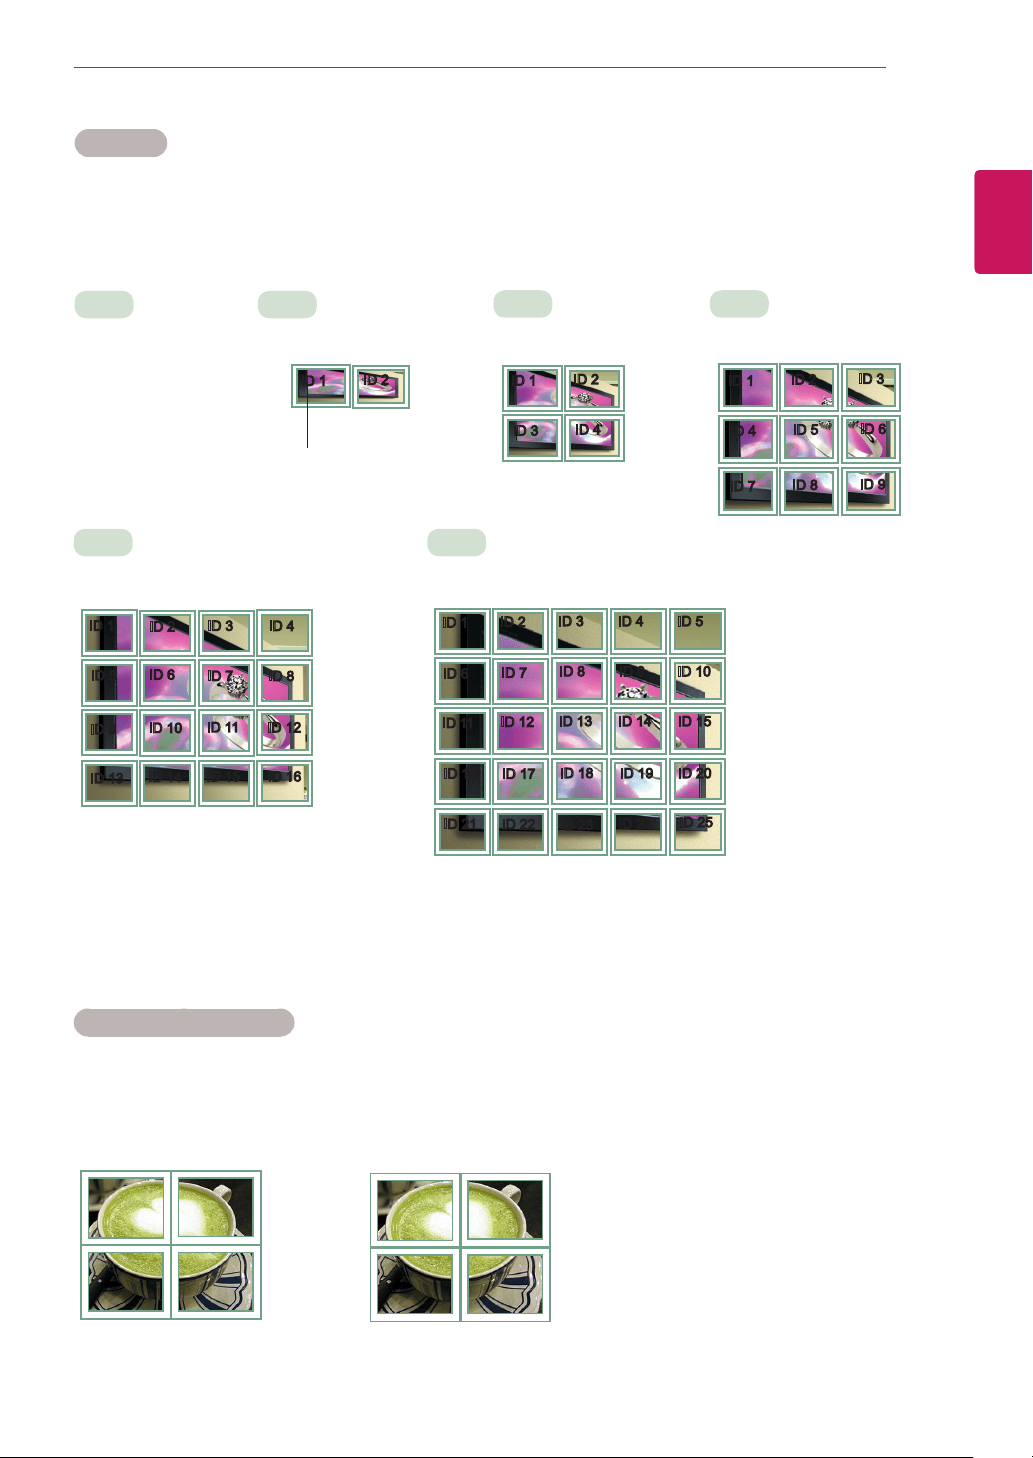
49
ENG
ENGLISH
CUSTOMIZING SETTINGS
Tile Mode
Thismonitorcanbetiledwithadditionalmonitorstocreatealargetileddisplay.
Tile Mode - Natural mode
Whenactive,thepartoftheimagethatwouldnormallybedisplayedinthegapbetweenthemonitorsis
omitted.
ID1
ID2
ID3
ID4
ID1
ID2
ID4
ID5
ID3
ID6
ID7
ID8
ID9
3X3
Whenusing9monitors
ID1
ID2
ID5
ID6
ID3
ID7
ID9
ID10
ID11
ID4
ID8
ID12
ID13
ID14
ID15
ID16
ID1
ID2
ID6
ID7
ID3
ID8
ID11
ID12
ID13
ID4 ID5
ID9 ID10
ID14 ID15
ID16
ID21
ID17
ID22
ID18
ID23
ID19
ID24
ID20
ID25
Off
WhentheTileMode
optionisdisabled
1X2
Whenusing2monitors
2X2
Whenusing4monitors
5X5
Whenusing25monitors
4X4
Whenusing16monitors
ID1
ID2
TileID
Before After
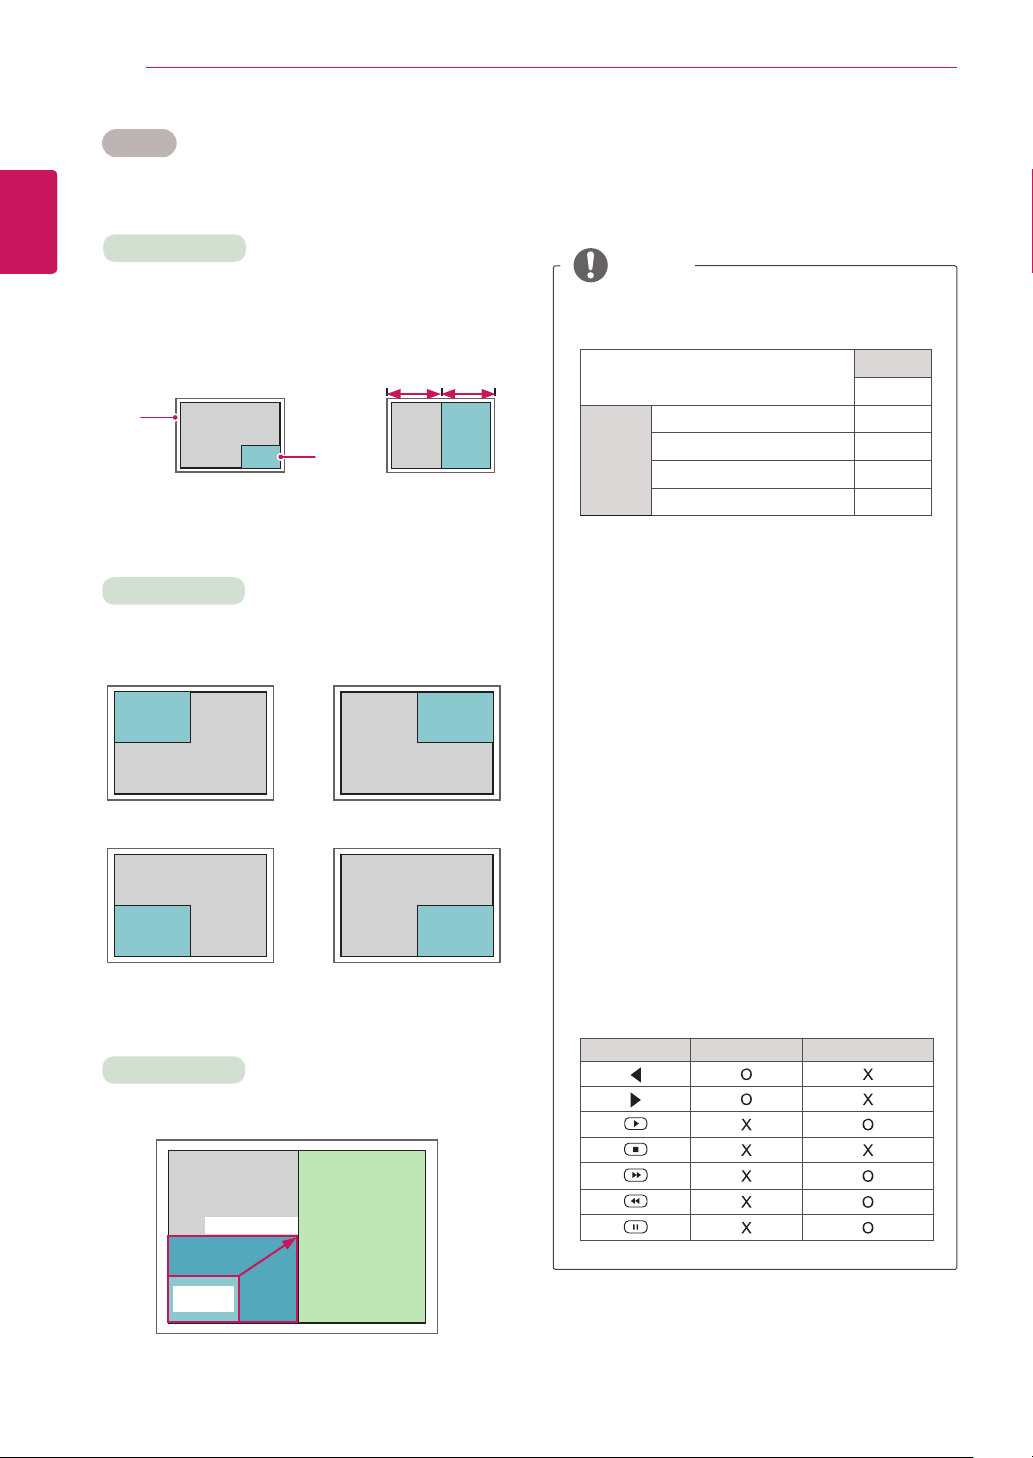
50
ENG
ENGLISH
CUSTOMIZING SETTINGS
PIP/PBP
DisplaysvideosorphotosstoredintheUSBdeviceonasingle
monitorbydividingitintothemainandsubscreens.(Seepage40.)
Position
Mode
Size
top left top right
bottom left bottom right
*PIP (Picture In Picture):DisplaystheSubscreen
inthemainscreen.
*PBP (Picture By Picture):DisplaystheSub
screennexttothemainscreen.
Adjuststhepositionofthesubscreen(topleft,
bottomleft,topright,bottomright)
Adjuststhesizeofthesubscreen(Size0-10).
< 1920x1080 >
PBP
960x1080
0 :
480x270
PIP
10 : 960x540
Thesubscreenisonlysupportedwhenusingthe
USBdevice.
Sub
USB
Main
AV X
Component O
RGB O
HDMI/ DVI-D/ DP O
YoucanonlychangethesizeandpositioninPIP
mode.
WithPBPselected,theAspectRatiooptioninthe
PICTUREmenuisdisabled(Fixedas16:9).
WhilerunningthePBPfunction,theTileModefunction
doesnotwork.
Youmustselecttheoutputsoundbeforerunning
thePIPorPBPfunctions.(SelecteitherMainor
Sub.)
IfyoufailtoselectMainorSubfromthesound
selectionbox,andiftheOSDdisappearsafter
eitheraperiodoftimeorwhentheExitorBack
keyispressed,thePIP/PBPsubscreenisnot
activated.
Youcannotchangethesoundwhilerunningthe
PIPorPBPfunctions.Ifyouwanttochangethe
sound,pleaserestartPIP/PBP.
Thepicturequalityofthesubscreenisset
accordingtothevaluesselectedinthemainmenu,
nottheUSBdevice.
IfyouplayvideosyouselectedinPIP/PBPmode,
thevideoswillplaybackrepeatelyinsuccession.
ThebuttonsbelowworkinPIPmode.
Button Photo Movie
NOTE
Main
screen
Sub
screen
PIP PBP
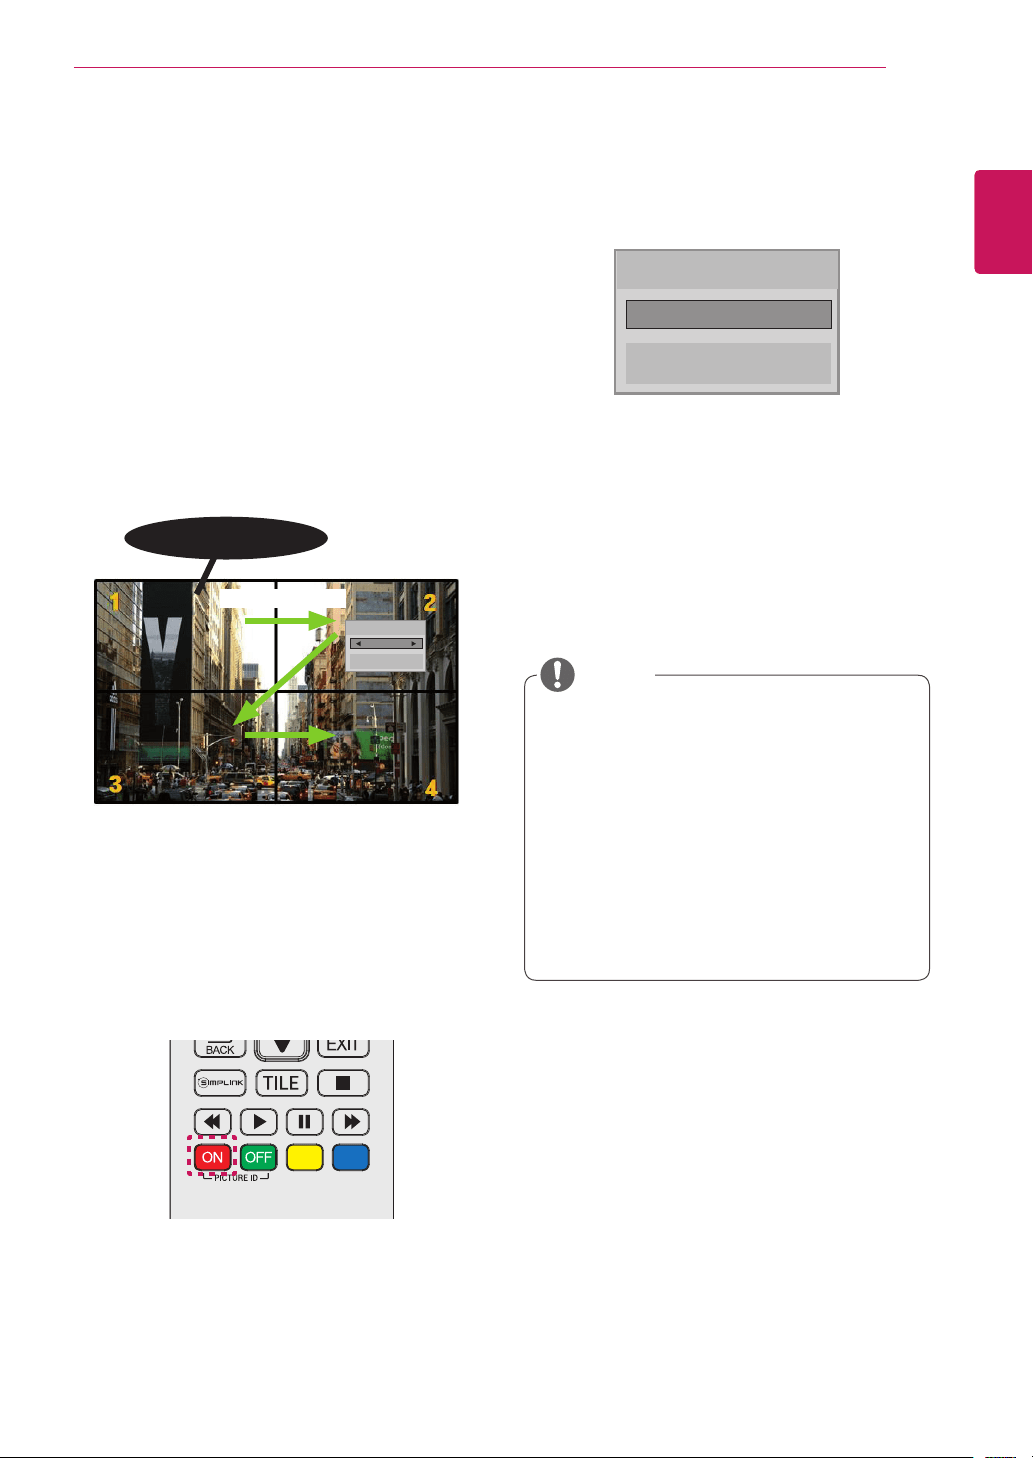
51
ENG
ENGLISH
CUSTOMIZING SETTINGS
Picture ID Settings
Picture IDisusedtochangethesettingsofa
specicdisplayusingasingleIRreceiverfor
multi-vision.Communicationispossiblebetween
amonitorwithanIRreceiverandothermonitors
usingRS232Ccables.Eachmonitorisidentied
byaSet ID.IfyouassignthePicture IDusing
theremotecontrol,onlydisplayswiththesame
Picture IDandSet IDcanbecontrolledremotely.
2 PresstheON (Red)buttonontheremotecon-
troltoassignthePICTURE ID.
1 AssigntheSet IDtotheinstalledmonitorsas
shownbelow:
3 Ifyoupresstheleft/rightbuttonsortheredON
buttonforPICTURE IDrepeatedly,thePicture
IDtogglesbetweenOFFand0to4.Assignthe
Set IDasyoulike.
AsetwithadifferentSet IDthanthe Picture
IDcannotbecontrolledbyIRsignals.
PleaserefertotheInstallation Manualfor
moreinformationontheassigningTotal Set
ID.
NOTE
Picture ID
Close
◄ Off ►
2X2Multi-Vision(TotalSetID:4)
SetIDsareassignedasshowninthepicture.
AUDIO
(RGB/DVI)
REMOTE
CONTROL IN
RS-232C OUT
RS-232C IN
RS-232C OUT
RS-232C IN
RS-232C OUT
RS-232C IN
IR Receiver
RS232C cable
PictureID
Close
Off
IfPicture IDissetto2,theupperright
monitor,thathasaSet IDof2,canbe
controlledbyIRsignals.
IfyoupressthegreenOFFbuttonfor
PICTURE ID,thePicture IDsforallmonitors
areturnedoff.Ifyouthenpressanybutton
ontheremotecontrol,allmonitorscanbe
controlledbyIRsignalsregardlessofSet ID.
ThePicture IDfunctionmaynotworkwhile
MY MEDIAisoperating.

52
ENG
ENGLISH
CUSTOMIZING SETTINGS
Setting Description
Player Name SetstheplayernameusedinSuperSignManager.(Upto20characters)
Network Setting Configurethenetworksettings.
Network Status Displaythenetworkstatus.
-Internetisconnected:Extermallyconnected
-Homenetworkisconnected:Onlyinternallyconnected
-Notconnected:Whenthereisnonetworkconnection
Server IP Setting SetstheIPaddressofthecomputer(server)onwhichSuperSignManagerisinstalled.
Server IP Status Displaystheconnectionstatuswiththeserver.
-Notconnected:WhenthereisnonetworkconnectionwithSuperSignserver
-Waitingforapproval:WhennetworkconnectionwithSuperSignserverhasbeenmade,but
accesstoserverhasnotbeenapprovedbytheserver
-Rejected:WhennetworkconnectionwithSuperSignserverhasbeenmade,butaccessto
serverhasbeenrejectedbytheserver
-Internetisconnected:WhennetworkconnectionwithSuperSignserverhasbeenmadeand
accesstoserverhasalsobeenapprovedbytheserver
NETWORK Settings
1
PressSETTINGStoaccessthemainmenus.
2
PressthenavigationbuttonstoscrolltoNETWORKand
pressOK.
3
Pressthenavigationbuttonstoscrolltothesettingoroption
youwantandpressOK.
-Toreturntothepreviouslevel,pressBACK.
4
Whenyouarefinished,pressEXIT.
Whenyoureturntothepreviousmenu,pressBACK.
Theavailableoptionsettingsaredescribedinthefollowing:
Move OK
NETWORK
ꔋ
• Player Name
• Network Setting : Wired
• Network Status : Not connected
• Server IP Setting
• Server IP Status : Not connected
WhensettingthePlayerName,inputdelaymayoccurifyoupressthebuttonsontheremotecontrol
continuously.
CAUTION
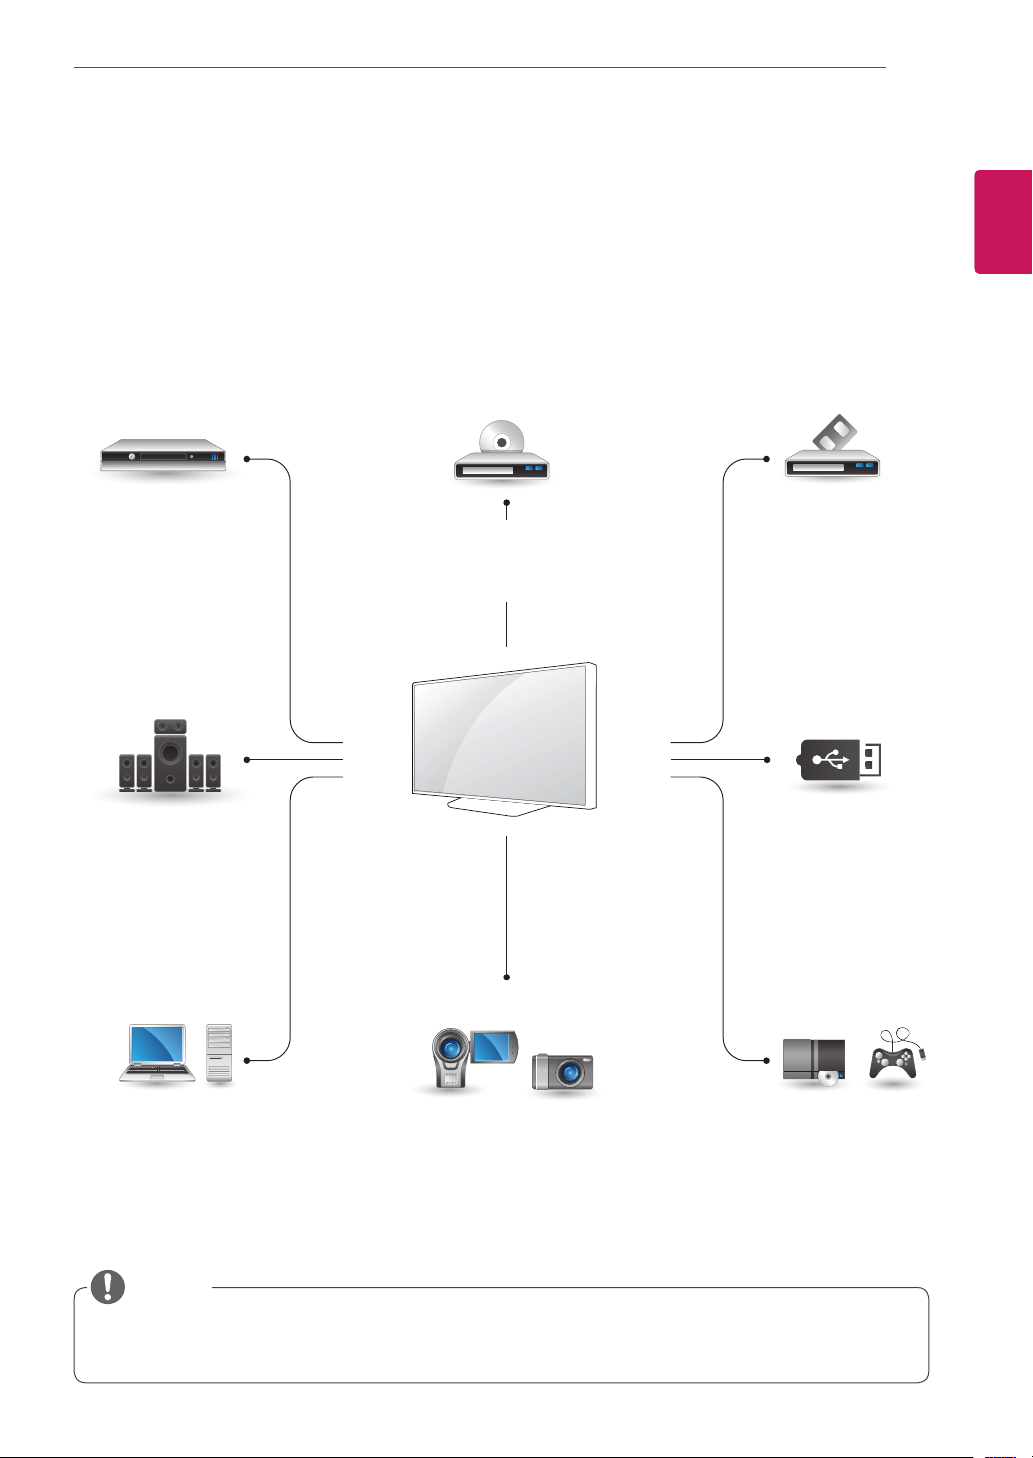
53
ENG
ENGLISH
MAKING CONNECTIONS
AV
COMPONENT
HDMI
DVI-D
RGB
HDMI
DVI-D
Display Port
LAN
AV
COMPONENT
HDMI
DVI-D
AV
COMPONENT
HDMI
DVI-D
AV
COMPONENT
HDMI
DVI-D
AV
COMPONENT
HDMI
MAKING CONNECTIONS
Connectvariousexternaldevicestotheportsonthemonitorset’sbackpanel.
1
Findanexternaldeviceyouwanttoconnecttoyourmonitorsetshownonthefollowingillustration.
2
Checktheconnectiontypeoftheexternaldevice.
3
Gototheappropriateillustrationandchecktheconnectiondetails.
Ifyouconnectagamingdevicetothemonitorset,usethecablesuppliedwiththegamingdevice.
Itisrecommendedyoutousetheoptionalspeakerprovided.
HD Receiver DVD VCR
USB
PC
Camcorder/Camera
Gaming device
Speaker
NOTE
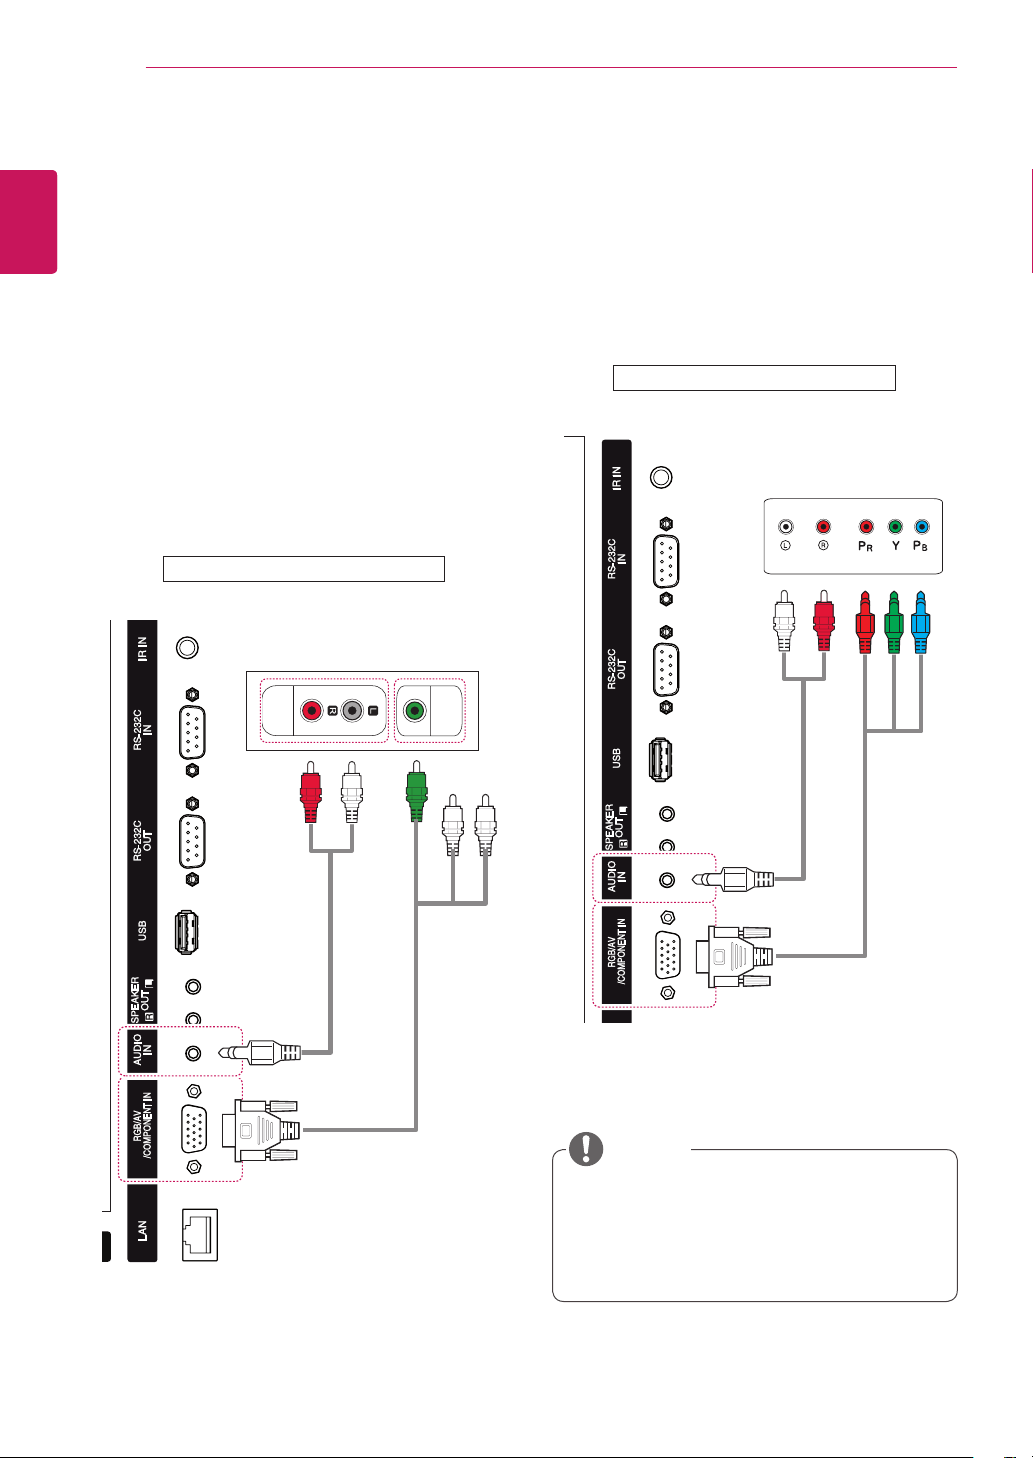
54
ENG
ENGLISH
MAKING CONNECTIONS
AUDIO
OUT
VIDEO
OUT
External Device Connection
ConnectaHDreceiver,DVD,orVCRplayertothe
monitorsetandselectanappropriateinputmode.
(notincluded)
(notincluded)
Backoftheproduct.
COMPONENT Connection
Transmitstheanalogvideoandaudiosignalsfrom
anexternaldevicetothemonitorset.Connectthe
externaldeviceandthemonitorsetwiththe15
pinsignaltoRCAcableasshownonthefollowing
illustration.Todisplayimagesbyusingprogressive
scan,makesuretousethecomponentcable.
Whenconnectingtothecomponentport
usingthesharedinterface,theportmust
matchuptotheinputsource.Otherwise,
noisemayoccur.
NOTE
Backoftheproduct.
(notincluded)
(notincluded)
AV(CVBS) Connection
Transmitstheanalogvideoandaudiosignals
fromanexternaldevicetothemonitor.Connect
theexternaldeviceandthemonitorwiththe15
pinsignaltoRCAcableasshownonthefollowing
illustration.
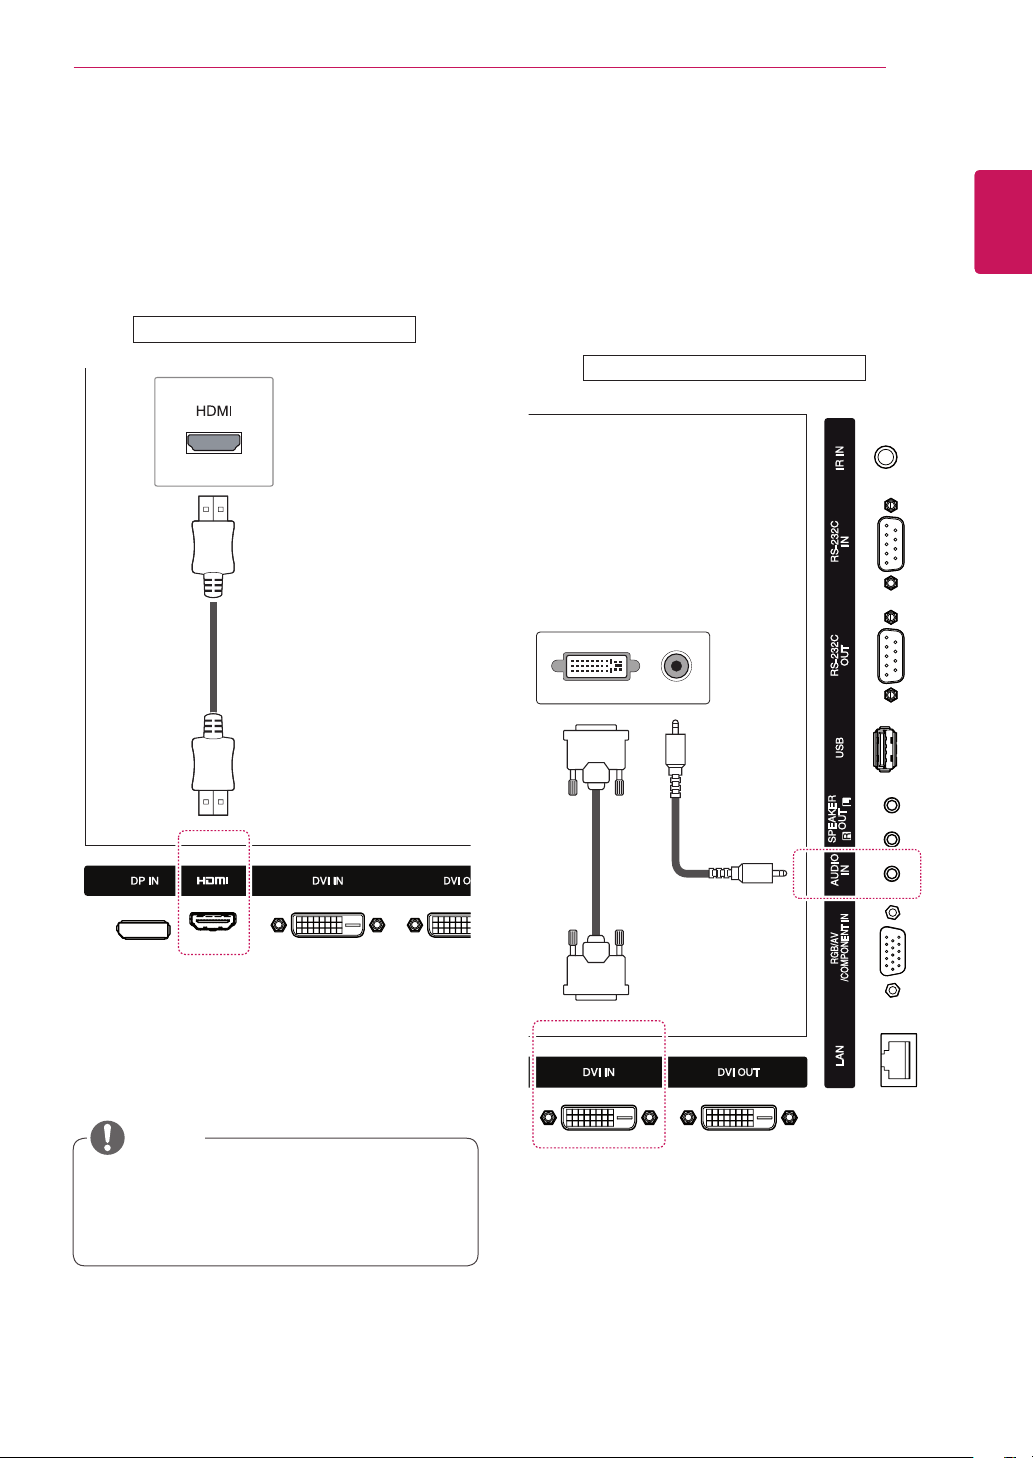
55
ENG
ENGLISH
MAKING CONNECTIONS
HDMI Connection
Transmitsthedigitalvideoandaudiosignalsfrom
anexternaldevicetothemonitorset.Connectthe
externaldeviceandthemonitorsetwiththeHDMI
cableasshownonthefollowingillustration.
UseaHighSpeedHDMI™Cable.
HighSpeedHDMI™Cablesaretestedto
carryanHDsignalupto1080pandhigher.
NOTE
DVI Connection
Transmitsthedigitalvideosignalfromanexternal
devicetothemonitorset.Connecttheexternal
deviceandthemonitorsetwiththeDVIcableas
showninthefollowingillustration.Totransmitan
audiosignal,connectanoptionalaudiocable.
(notincluded)
(notincluded)
Backoftheproduct.
Backoftheproduct.
(notincluded)
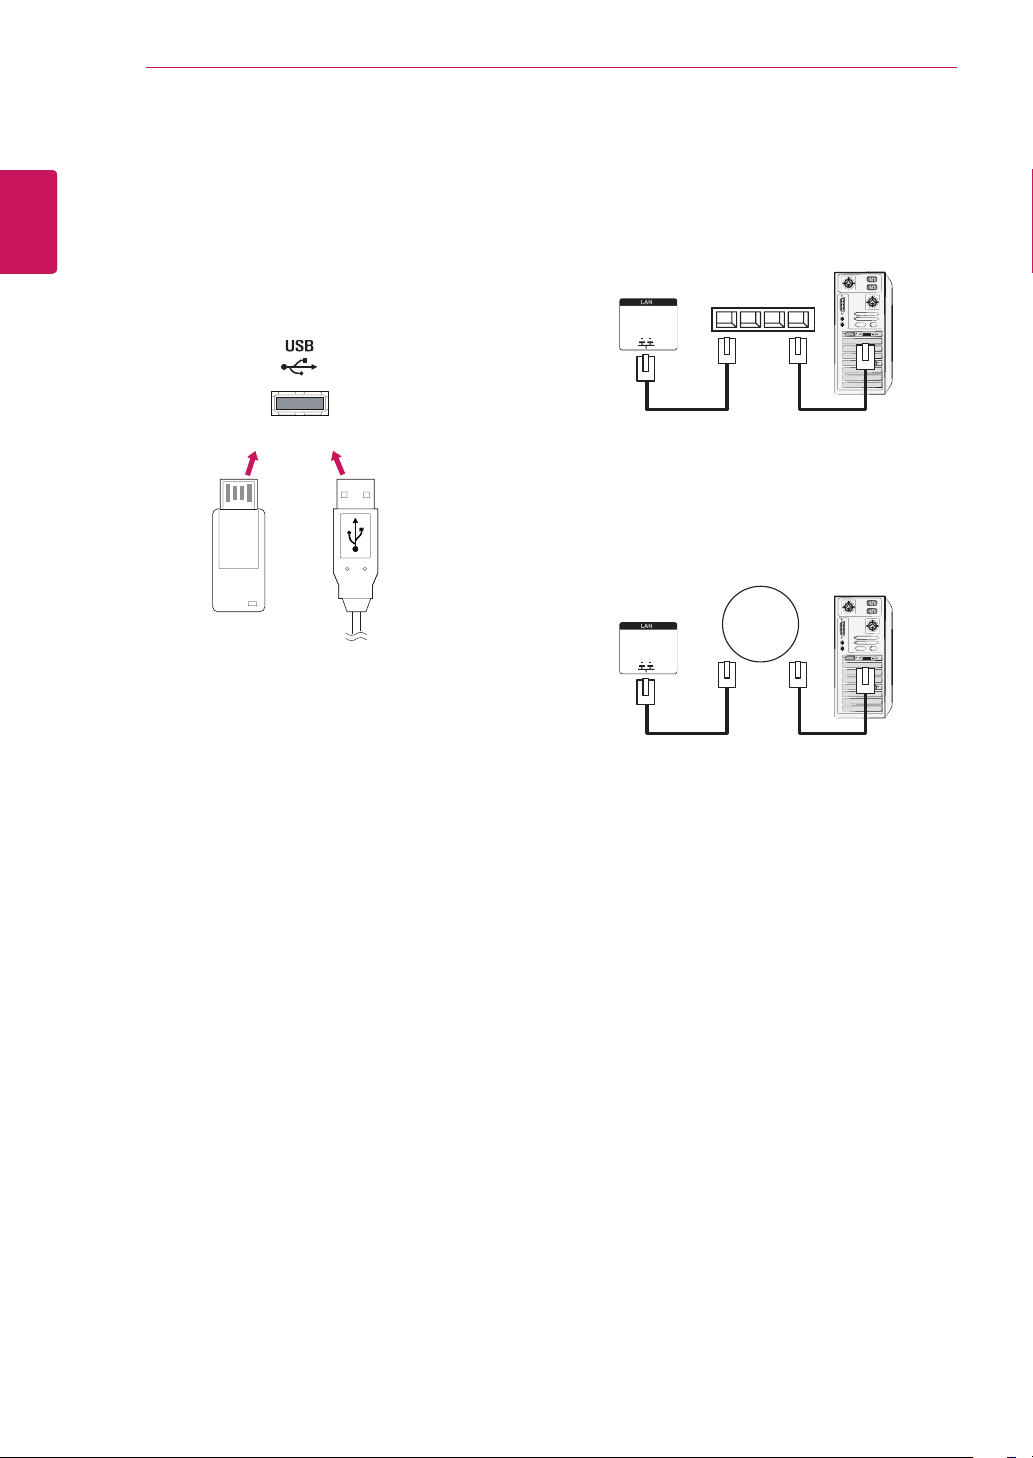
56
ENG
ENGLISH
MAKING CONNECTIONS
LAN Connection
A
Usingarouter(Switch)
MonitorSet
Network
PC
LAN
Switch
MonitorSet
Network
PC
LAN
B
UsingtheInternet.
USB Connection
ConnectaUSBstoragedevicesuchassUSB
flashmemory,externalharddrive,MP3playeror
aUSBmemorycardreadertothemonitorsetand
accesstheUSBmenutousevariousmultimedia
files.
or
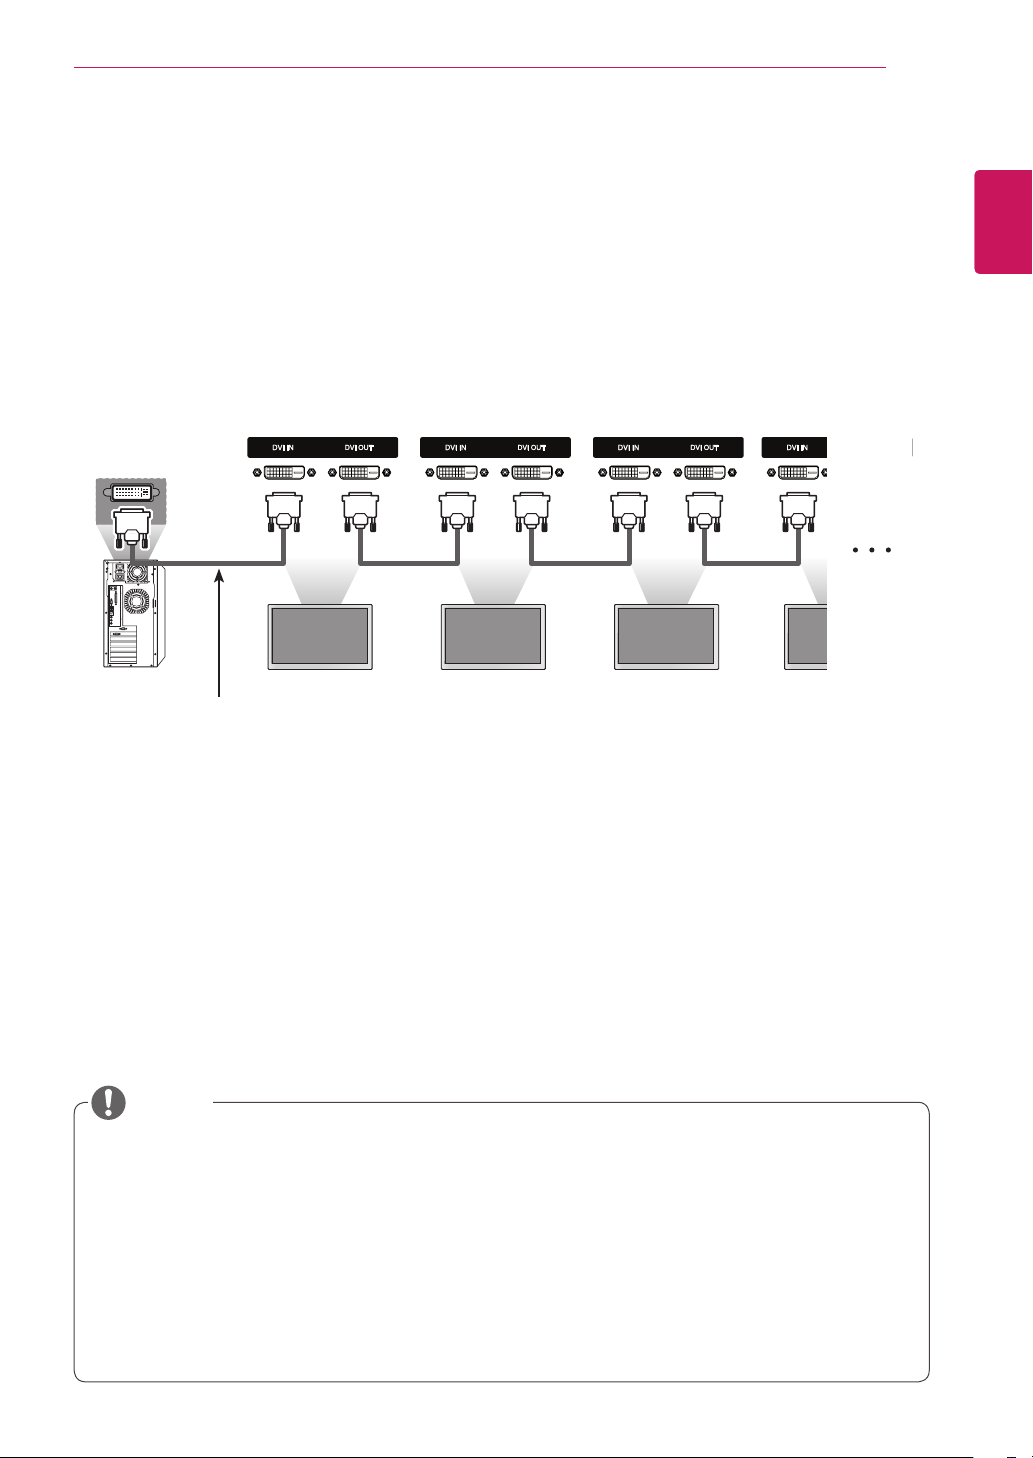
57
ENG
ENGLISH
MAKING CONNECTIONS
Daisy Chain Connection
ThisconnectionisusedasanoutputforthedigitalvideosignalofaPCdisplayedonmultiplemonitors.
MultipleDVIcablesarerequiredtoconnectmultiplemonitors.
1
ConnecttheinputportsofyourPCandMonitor 1usingtheDVIcable.
2
ConnecttheoutputportofMonitor 1andtheinputportofMonitor 2usinganotherDVIcable.
3
Followthesameproceduretoconnecttheothermonitors.
Monitor 1 Monitor 2 Monitor 3
DVI mode
DVICable
(notincluded)
ForDVI,ingeneral,upto12monitorscanbeconnectedviatheDVIOutport(attherecommended
resolution)ifthesignalisstableandthereisnocableloss.Ifyouwanttoconnectmorethanthis
numberofmonitors,werecommendedthatyouuseadistributor.
WhenthetilemodeisconfiguredviaDVIcables,onlythemonitorthatreceivesfirstsignalscanplay
HDCP-encryptedcontent.(TheDVIOutportdoesnotsupportHDCP.)
IfthesignalcablebetweentheproductandyourPCistoolong,makesuretousetheDVIboosteror
DVIopticalcable.
IfinputsignalsarereceivedthroughtheHDMI/DPcable,multiplemonitorscannotbeconnectedvia
theDVIOutport.
NOTE

58
ENG
ENGLISH
TROUBLESHOOTING
TROUBLESHOOTING
No image is displayed
Problem Resolution
Istheproductpowercord
connected?
Seeifthepowercordisproperlyconnectedtotheoutlet.
DoestheOutofrangemessage
appear?
ThesignalfromthePC(videocard)isoutoftheverticalorhorizontal
frequencyrangeoftheproduct.Adjustthefrequencyrangeby
referringtotheSpecificationsinthismanual.
*Maximumresolution:1920x1080@60Hz
DoestheChecksignalcable
messageappear?
ThesignalcablebetweenPCandproductisnotconnected.Check
thesignalcable.
Pressthe'INPUT'menuintheremoteControltochecktheinput
signal.
'Unknown Product' message appears when the product is connected.
Problem Resolution
Didyouinstallthedriver?
Seeiftheplug&playfunctionissupportedbyreferringtothevideo
cardusermanual.
'Key Lock On' message appears.
Problem Resolution
TheKeyLockOnmessage
appearswhenpressingthe
Menubutton.
TheLockfunctionpreventstheOSDsettingsfrombeingchanged
inadvertently.Toreleasethelock,gotoMenuandOptionanddisable
theKeyLockoption.

59
ENG
ENGLISH
TROUBLESHOOTING
The screen image looks abnormal.
Problem Resolution
Isthescreenpositionwrong?
D-Subanalogsignal-PresstheAUTObuttonintheremotecontrolto
automaticallyselecttheoptimalscreenstatusthatfitsintothecurrent
mode.Ifadjustmentisnotsatisfactory,usethePositionOSDmenu.
Seeifthevideocardresolutionandfrequencyaresupportedbythe
product.Ifthefrequencyisoutofrange,settotherecommended
resolutionintheControlPanelDisplaySettingmenu.
Dothinlinesappearonthe
backgroundscreen?
D-Subanalogsignal-PresstheAUTObuttonintheremotecontrolto
automaticallyselectanoptimalscreenstatusthatfitsintothecurrent
mode.Ifadjustmentisnotsatisfactory,usetheClockOSDmenu.
Horizontalnoiseappearsorthe
characterslookblurred.
D-Subanalogsignal-PresstheAUTObuttonintheremotecontrolto
automaticallyselectanoptimalscreenstatusthatfitsintothecurrent
mode.Ifadjustmentisnotsatisfactory,usethePhaseOSDmenu.
Thescreenisdisplayed
abnormally.
Theproperinputsignalisnotconnectedtothesignalport.Connect
thesignalcablethatmatcheswiththesourceinputsignal.
After-image appears on the product.
Problem Resolution
After-imageappearswhenthe
productisturnedoff.
Ifyouuseafixedimageforalongtime,thepixelsmaybedamaged
quickly.Usethescreen-saverfunction.
Whenadarkimageisdisplayedonthescreenafteranimagewith
highcontrast(blackandwhiteorgray),thismaycauseimagesticking.
ThisisnormalforLCDscreen.

60
ENG
ENGLISH
TROUBLESHOOTING
Screen color is abnormal.
Problem Resolution
Screenhaspoorcolorresolution
(16colors).
Setthenumberofcolorstomorethan24bits(truecolor)Select
ControlPanel-Display-Settings-ColorTablemenuinWindows.
Screencolorisunstableor
mono-colored.
Checktheconnectionstatusofthesignalcable.Or,re-insertthePC
videocard.
Doblackspotsappearonthe
screen?
Severalpixels(red,green,whiteorblackcolor)mayappearonthe
screen,whichcanbeattributabletotheuniquecharacteristicsofthe
LCDpanel.ItisnotamalfunctionoftheLCD.
The operation does not work normally.
Problem Resolution
Thepowersuddenlyturnedoff.
Isthesleeptimerset?
Checkthepowercontrolsettings.Powerinterrupted.
The audio function does not work.
Problem Resolution
Nosound?
Seeiftheaudiocableisconnectedproperly.
Adjustthevolume.
Seeifthesoundissetproperly.
Soundistoodull.
Selecttheappropriateequalizesound.
Soundistoolow.
Adjustthevolume.

61
ENG
ENGLISH
SPECIFICATIONS
SPECIFICATIONS
LCDPanel ScreenType 42"class(42.0"/106.7cmdiagonal)
TFT(ThinFilmTransistor)
LCD(LiquidCrystalDisplay)Panel
PixelPitch 0.4833mm(H)x0.4833mm(V)
VideoSignal Max.Resolution 1920x1080@60Hz
-ItmaynotbesupporteddependingontheOSorvideocardtype.
RecommendedResolution 1920x1080@60Hz
-ItmaynotbesupporteddependingontheOSorvideocardtype.
HorizontalFrequency RGB:30kHzto83kHz
HDMI/DVI-D/DP:30kHzto83kHz
VerticalFrequency RGB:50Hzto75Hz
HDMI/DVI-D/DP:56Hzto60Hz
SynchronizationType SeparateSync,CompositeSync,Digital
InputConnector 15-pinD-Sub,DVI,HDMI,DP,Audio,Speaker,IR,USB,
RS-232C,LAN
-UsingaRGBcablecanconnecttheoutputconnectorof
AV(CVBS)orcomponent.
Power RatedVoltage AC100-240V~50/60Hz1.3A
PowerConsumption OnMode:90WTyp.
SleepMode(RGB):≤0.5W
SleepMode(DP):≤0.7W
OffMode:≤0.5W
Environmental
conditions
OperatingTemperature
OperatingHumidity
0°Cto40°C
10%to80%
StorageTemperature
StorageHumidity
-20°Cto60°C
5%to95%
Productspecificationsshownabovemaybechangedwithoutpriornoticeduetoupgradeofproduct
functions.
42WL30MS
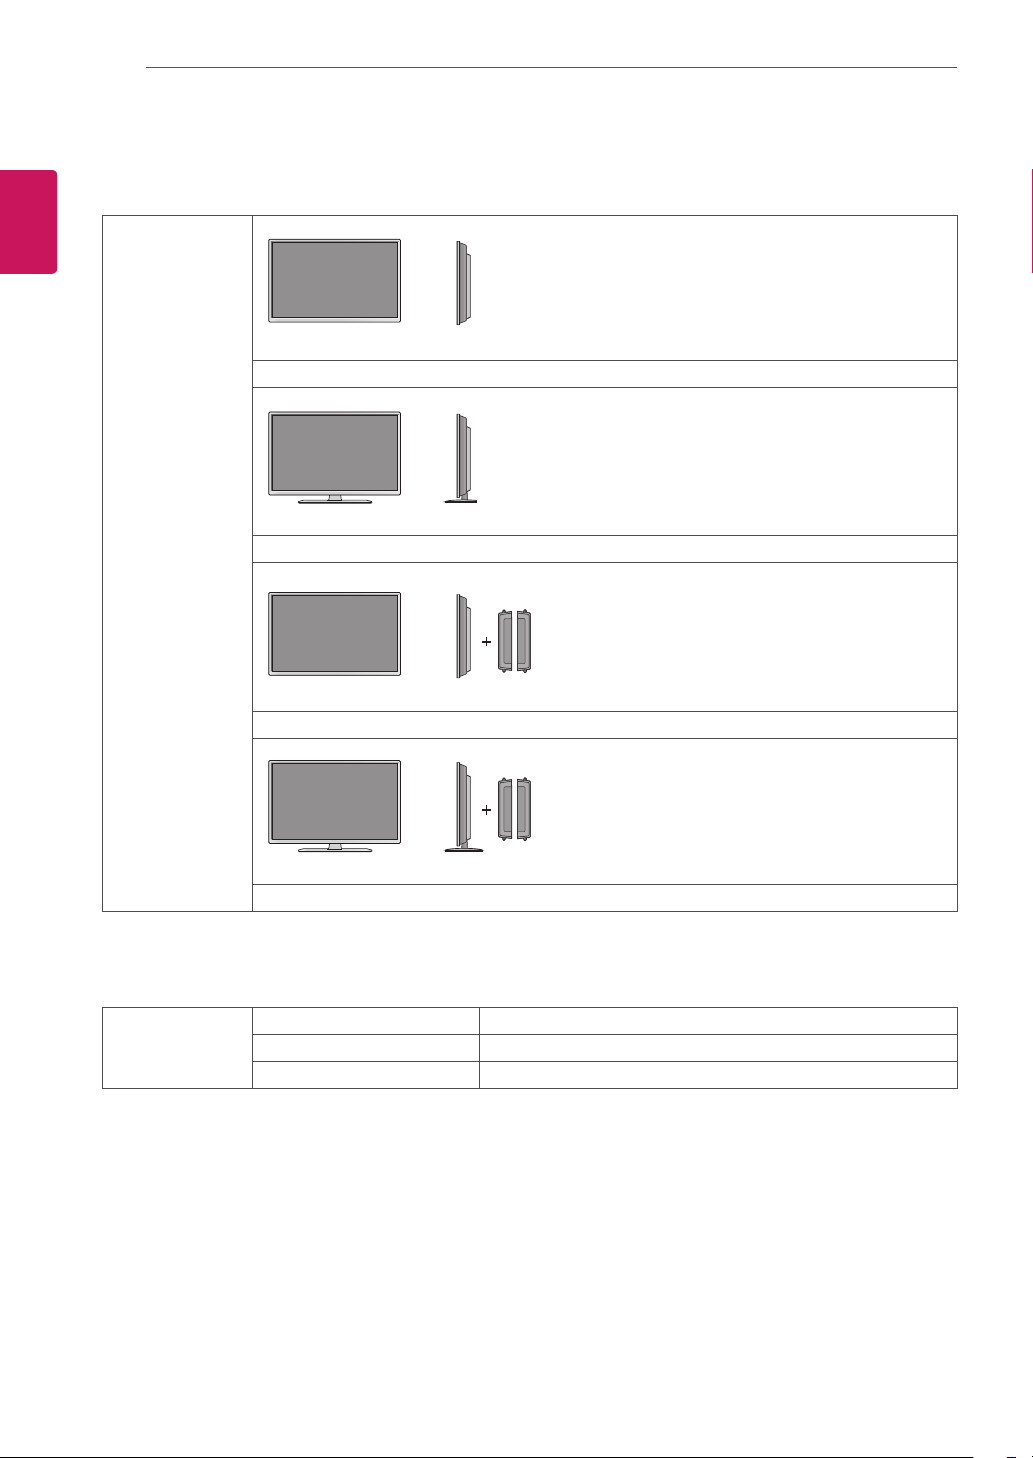
62
ENG
ENGLISH
SPECIFICATIONS
Dimensions
(WidthxHeightx
Depth)/Weight
963.36mmx562mmx79mm/9.04kg
963.36mmx626.1mmx235.1mm/10.18kg
963.36mmx562mmx79mm/9.86kg
963.36mmx626.1mmx235.1mm/11.0kg
* Applicable only for models that support the speakers
Audio RMSAudioOutput 10W+10W(R+L)
InputSensitivity 0.7Vrms
SpeakerImpedance 8Ω
Productspecificationsshownabovemaybechangedwithoutpriornoticeduetoupgradeofproduct
functions.

63
ENG
ENGLISH
SPECIFICATIONS
47WL30MS
LCDPanel ScreenType 47"class(46.9"/119.2cmdiagonal)
TFT(ThinFilmTransistor)
LCD(LiquidCrystalDisplay)Panel
PixelPitch 0.5415mm(H)x0.5415mm(V)
VideoSignal Max.Resolution 1920x1080@60Hz
-ItmaynotbesupporteddependingontheOSorvideocardtype.
RecommendedResolution 1920x1080@60Hz
-ItmaynotbesupporteddependingontheOSorvideocardtype.
HorizontalFrequency RGB:30kHzto83kHz
HDMI/DVI-D/DP:30kHzto83kHz
VerticalFrequency RGB:50Hzto75Hz
HDMI/DVI-D/DP:56Hzto60Hz
SynchronizationType SeparateSync,CompositeSync,Digital
InputConnector 15-pinD-Sub,DVI,HDMI,DP,Audio,Speaker,IR,USB,
RS-232C,LAN
-UsingaRGBcablecanconnecttheoutputconnectorof
AV(CVBS)orcomponent.
Power RatedVoltage AC100-240V~50/60Hz1.3A
PowerConsumption OnMode:100WTyp.
SleepMode(RGB):≤0.5W
SleepMode(DP):≤0.7W
OffMode:≤0.5W
Environmental
conditions
OperatingTemperature
OperatingHumidity
0°Cto40°C
10%to80%
StorageTemperature
StorageHumidity
-20°Cto60°C
5%to95%
Productspecificationsshownabovemaybechangedwithoutpriornoticeduetoupgradeofproduct
functions.

64
ENG
ENGLISH
SPECIFICATIONS
Dimensions
(WidthxHeightx
Depth)/Weight
1075mmx624.8mmx84.5mm/12.3kg
1075mmx693.1mmx263.9mm/13.75kg
1075mmx624.8mmx84.5mm/13.05kg
1075mmx693.1mmx298.3mm/14.5kg
* Applicable only for models that support the speakers
Audio RMSAudioOutput 10W+10W(R+L)
InputSensitivity 0.7Vrms
SpeakerImpedance 8Ω
Productspecificationsshownabovemaybechangedwithoutpriornoticeduetoupgradeofproduct
functions.

65
ENG
ENGLISH
SPECIFICATIONS
55WL30MS
LCDPanel ScreenType 55"class(54.6"/138.7cmdiagonal)
TFT(ThinFilmTransistor)
LCD(LiquidCrystalDisplay)Panel
PixelPitch 0.630mm(H)x0.630mm(V)
VideoSignal Max.Resolution 1920x1080@60Hz
-ItmaynotbesupporteddependingontheOSorvideocardtype.
RecommendedResolution 1920x1080@60Hz
-ItmaynotbesupporteddependingontheOSorvideocardtype.
HorizontalFrequency RGB:30kHzto83kHz
HDMI/DVI-D/DP:30kHzto83kHz
VerticalFrequency RGB:50Hzto75Hz
HDMI/DVI-D/DP:56Hzto60Hz
SynchronizationType SeparateSync,CompositeSync,Digital
InputConnector 15-pinD-Sub,DVI,HDMI,DP,Audio,Speaker,IR,USB,
RS-232C,LAN
-UsingaRGBcablecanconnecttheoutputconnectorof
AV(CVBS)orcomponent.
Power RatedVoltage AC100-240V~50/60Hz1.8A
PowerConsumption OnMode:140WTyp.
SleepMode(RGB):≤0.5W
SleepMode(DP):≤0.7W
OffMode:≤0.5W
Environmental
conditions
OperatingTemperature
OperatingHumidity
0°Cto40°C
10%to80%
StorageTemperature
StorageHumidity
-20°Cto60°C
5%to95%
Productspecificationsshownabovemaybechangedwithoutpriornoticeduetoupgradeofproduct
functions.
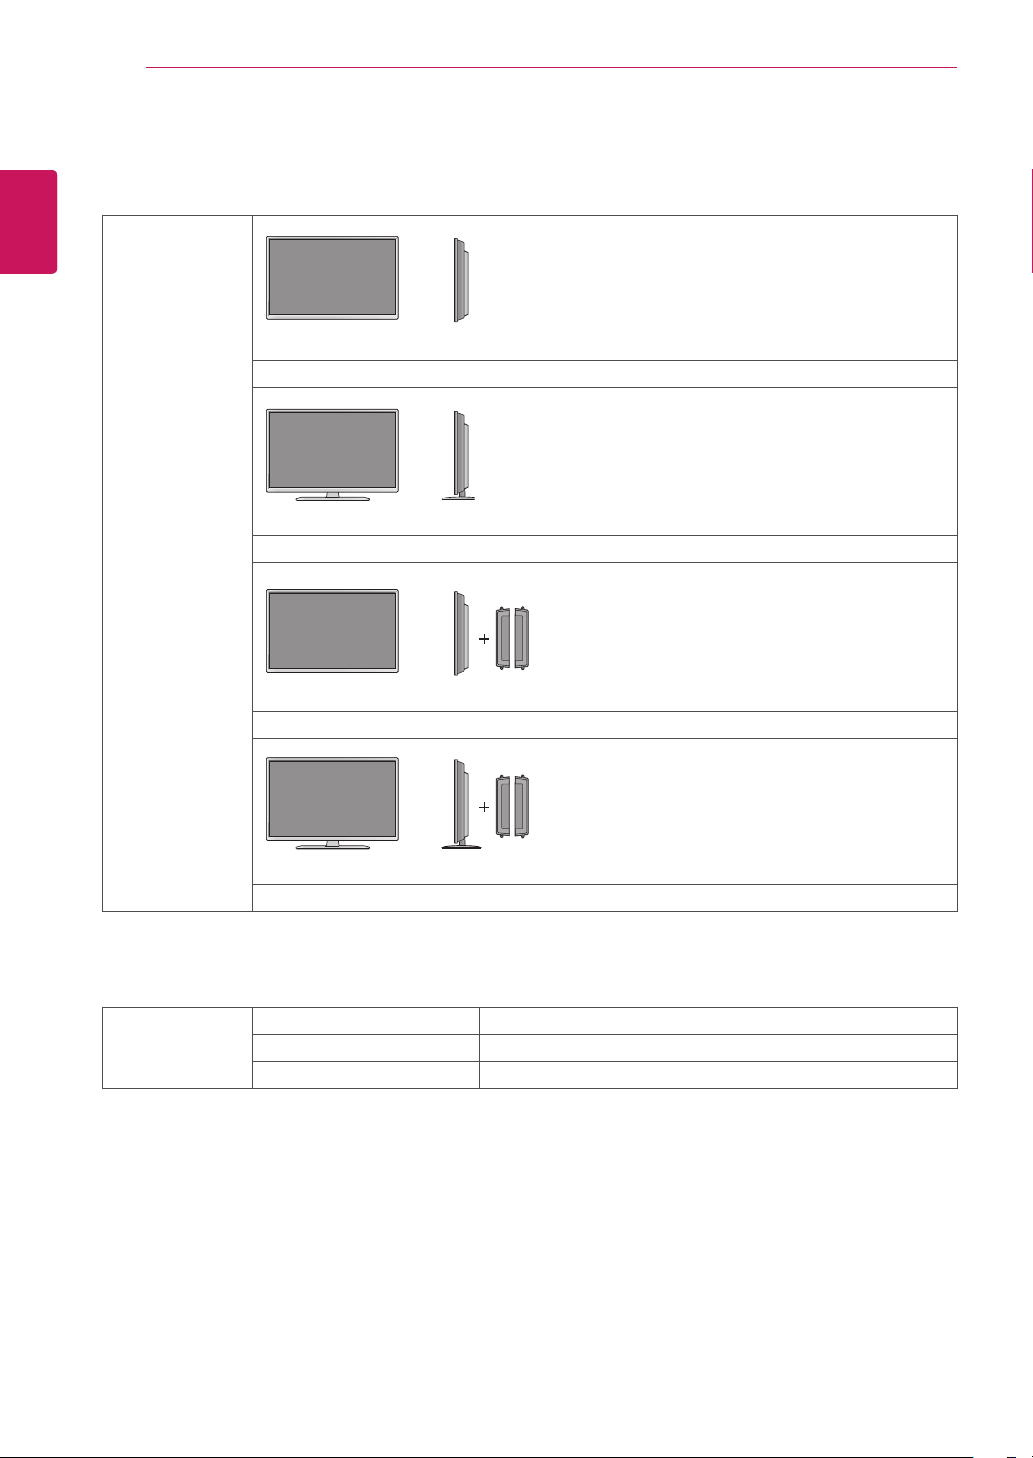
66
ENG
ENGLISH
SPECIFICATIONS
Dimensions
(WidthxHeightx
Depth)/Weight
1244.4mmx719.9mmx82.2mm/18.06kg
1244.4mmx787.8mmx269.4mm/20.2kg
1244.4mmx719.9mmx82.2mm/18.88kg
1244.4mmx787.8mmx269.4mm/21.02kg
* Applicable only for models that support the speakers
Audio RMSAudioOutput 10W+10W(R+L)
InputSensitivity 0.7Vrms
SpeakerImpedance 8Ω
Productspecificationsshownabovemaybechangedwithoutpriornoticeduetoupgradeofproduct
functions.

67
ENG
ENGLISH
SPECIFICATIONS
60WL30MS
LCDPanel ScreenType 60"class(60"/151.3cmdiagonal)
TFT(ThinFilmTransistor)
LCD(LiquidCrystalDisplay)Panel
PixelPitch 0.687mm(H)x0.687mm(V)
VideoSignal Max.Resolution 1920x1080@60Hz
-ItmaynotbesupporteddependingontheOSorvideocardtype.
RecommendedResolution 1920x1080@60Hz
-ItmaynotbesupporteddependingontheOSorvideocardtype.
HorizontalFrequency RGB:30kHzto83kHz
HDMI/DVI-D/DP:30kHzto83kHz
VerticalFrequency RGB:50Hzto75Hz
HDMI/DVI-D/DP:56Hzto60Hz
SynchronizationType SeparateSync,CompositeSync,Digital
InputConnector 15-pinD-Sub,DVI,HDMI,DP,Audio,Speaker,IR,USB,
RS-232C,LAN
-UsingaRGBcablecanconnecttheoutputconnectorof
AV(CVBS)orcomponent.
Power RatedVoltage AC100-240V~50/60Hz2.2A
PowerConsumption OnMode:180WTyp.
SleepMode(RGB):≤0.5W
SleepMode(DP):≤0.7W
OffMode:≤0.5W
Environmental
conditions
OperatingTemperature
OperatingHumidity
0°Cto40°C
10%to80%
StorageTemperature
StorageHumidity
-20°Cto60°C
5%to95%
Productspecificationsshownabovemaybechangedwithoutpriornoticeduetoupgradeofproduct
functions.

68
ENG
ENGLISH
SPECIFICATIONS
Dimensions
(WidthxHeightx
Depth)/Weight
1353.8mmx781.4mmx68.3mm/23.12kg
1353.8mmx849.4mmx293.8mm/25.26kg
1353.8mmx781.4mmx68.3mm/23.94kg
1353.8mmx849.4mmx293.8mm/26.08kg
* Applicable only for models that support the speakers
Audio RMSAudioOutput 10W+10W(R+L)
InputSensitivity 0.7Vrms
SpeakerImpedance 8Ω
Productspecificationsshownabovemaybechangedwithoutpriornoticeduetoupgradeofproduct
functions.
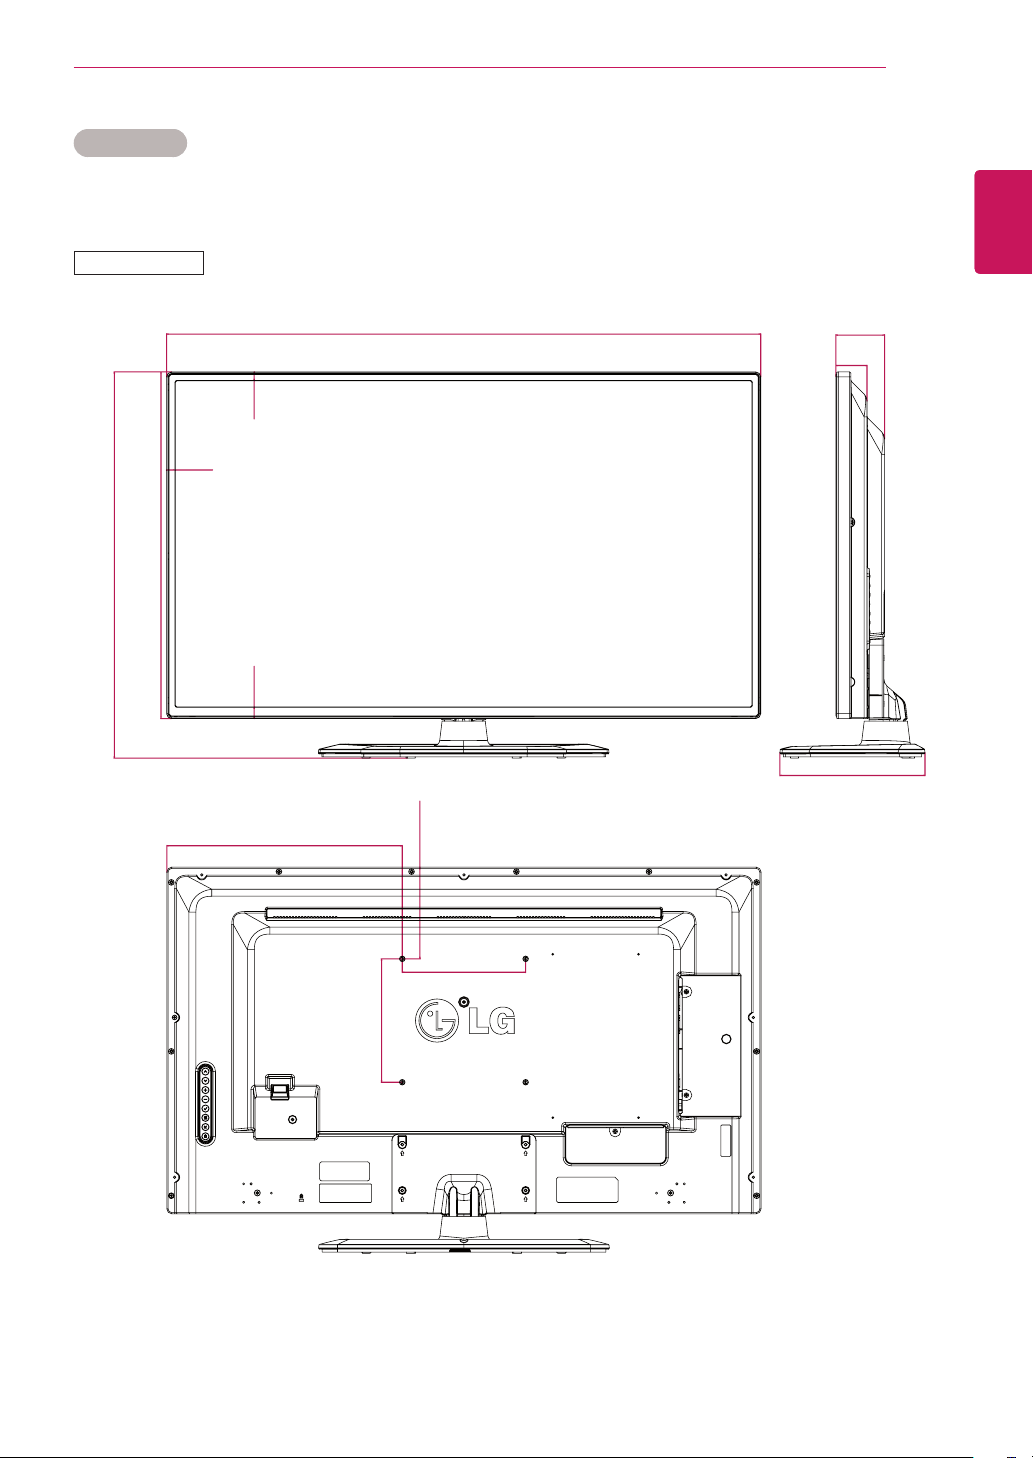
69
ENG
ENGLISH
SPECIFICATIONS
Dimensions
Theillustrationsinthismanualmaydifferfromtheactualproductandaccessories.
PleaseseetheMountingonaWallsectionforsizesofscrews.(Seepage11.)
14.4
148.7
200
19
562
626.1
962.2
381.7
200
235.1
14.4
79
50.5
42WL30MS
Productspecificationsshownabovemaybechangedwithoutpriornoticeduetoupgradeofproduct
functions.
(Unit:mm)
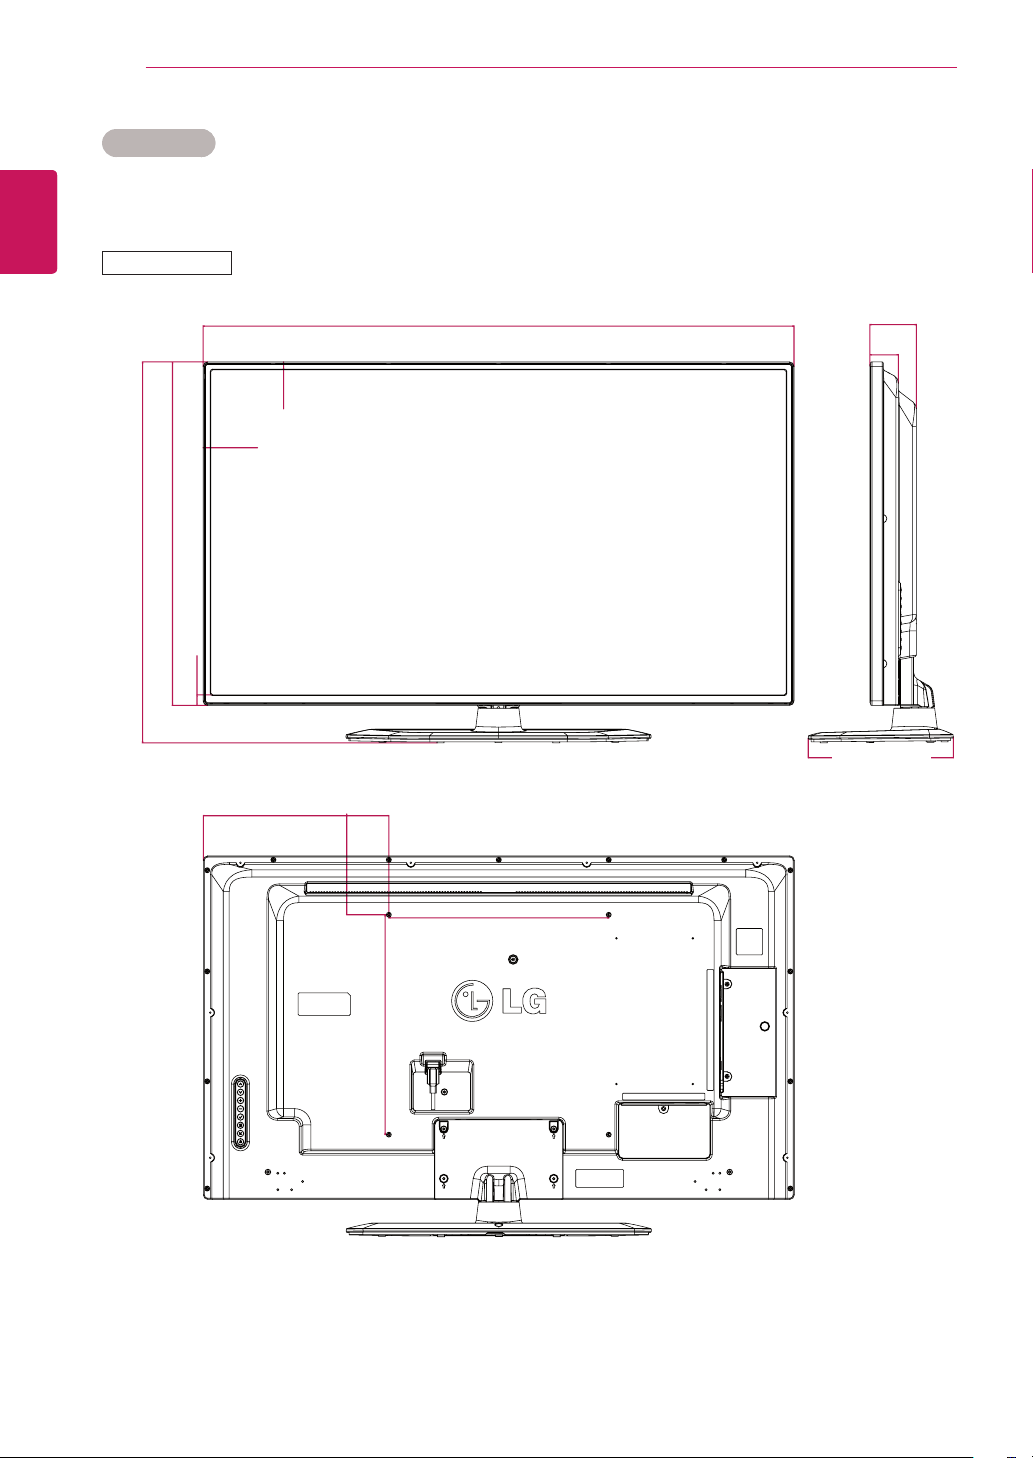
70
ENG
ENGLISH
SPECIFICATIONS
Dimensions
Theillustrationsinthismanualmaydifferfromtheactualproductandaccessories.
PleaseseetheMountingonaWallsectionforsizesofscrews.(Seepage11.)
47WL30MS
Productspecificationsshownabovemaybechangedwithoutpriornoticeduetoupgradeofproduct
functions.
(Unit:mm)
107.1
400
400
337.5
84.5
51.9
263.9
1075
14.4
14.4
19
624.8
693.1
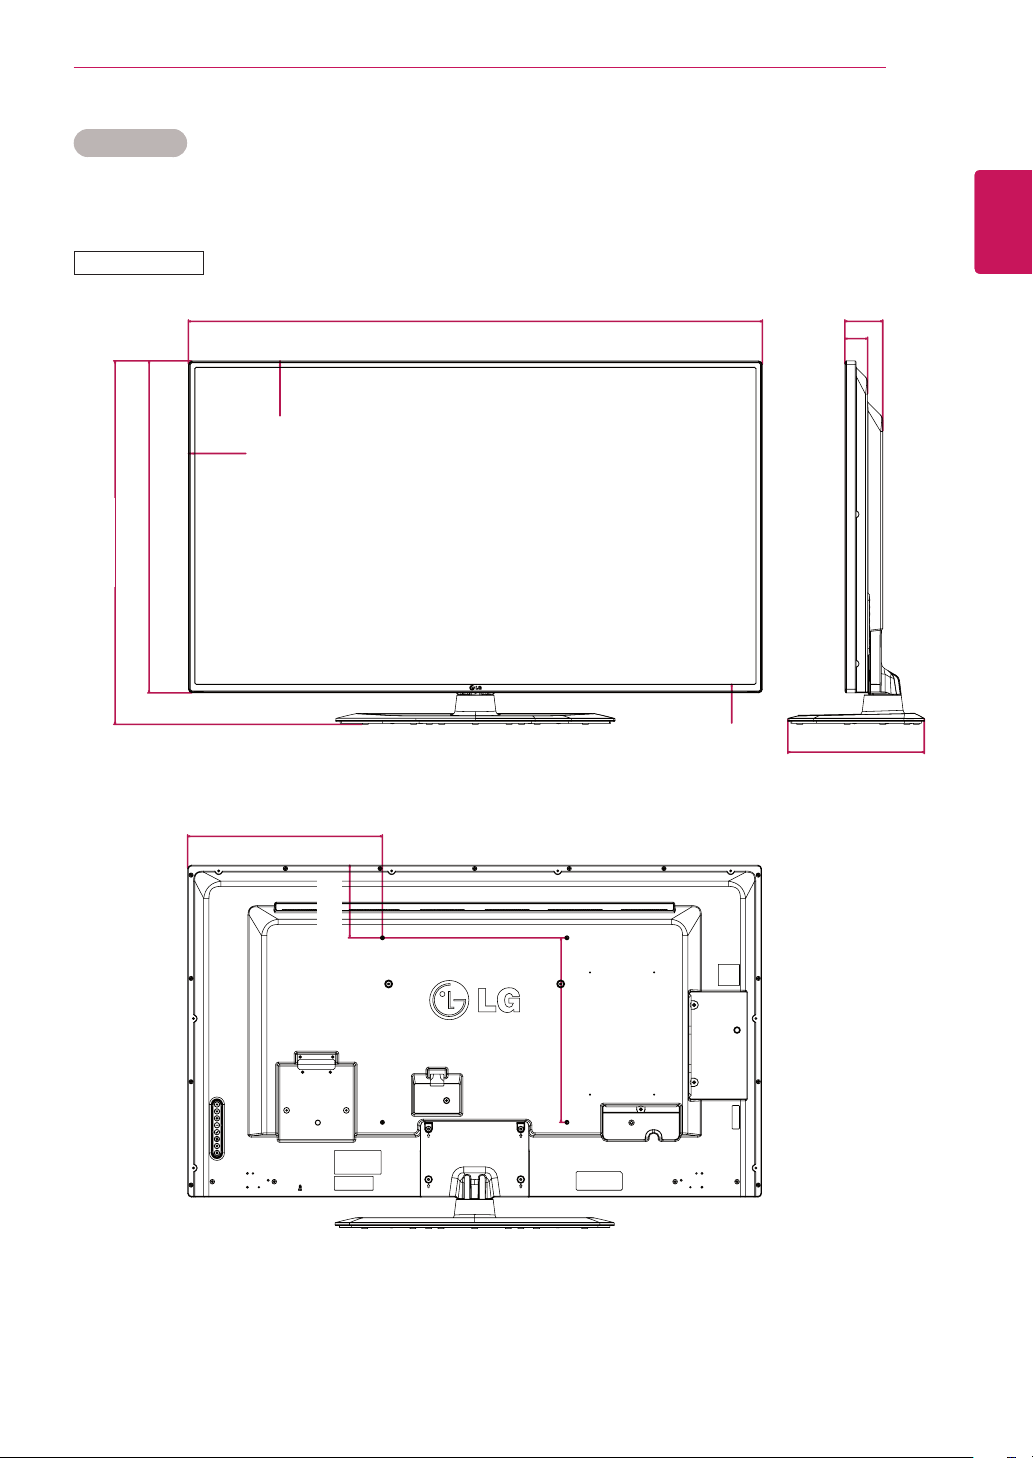
71
ENG
ENGLISH
SPECIFICATIONS
Dimensions
Theillustrationsinthismanualmaydifferfromtheactualproductandaccessories.
PleaseseetheMountingonaWallsectionforsizesofscrews.(Seepage11.)
55WL30MS
Productspecificationsshownabovemaybechangedwithoutpriornoticeduetoupgradeofproduct
functions.
(Unit:mm)
400
157.6
422.2
400
49.5
82.2
295.6
1244.4
14.4
14.4
19
719.8
787.8
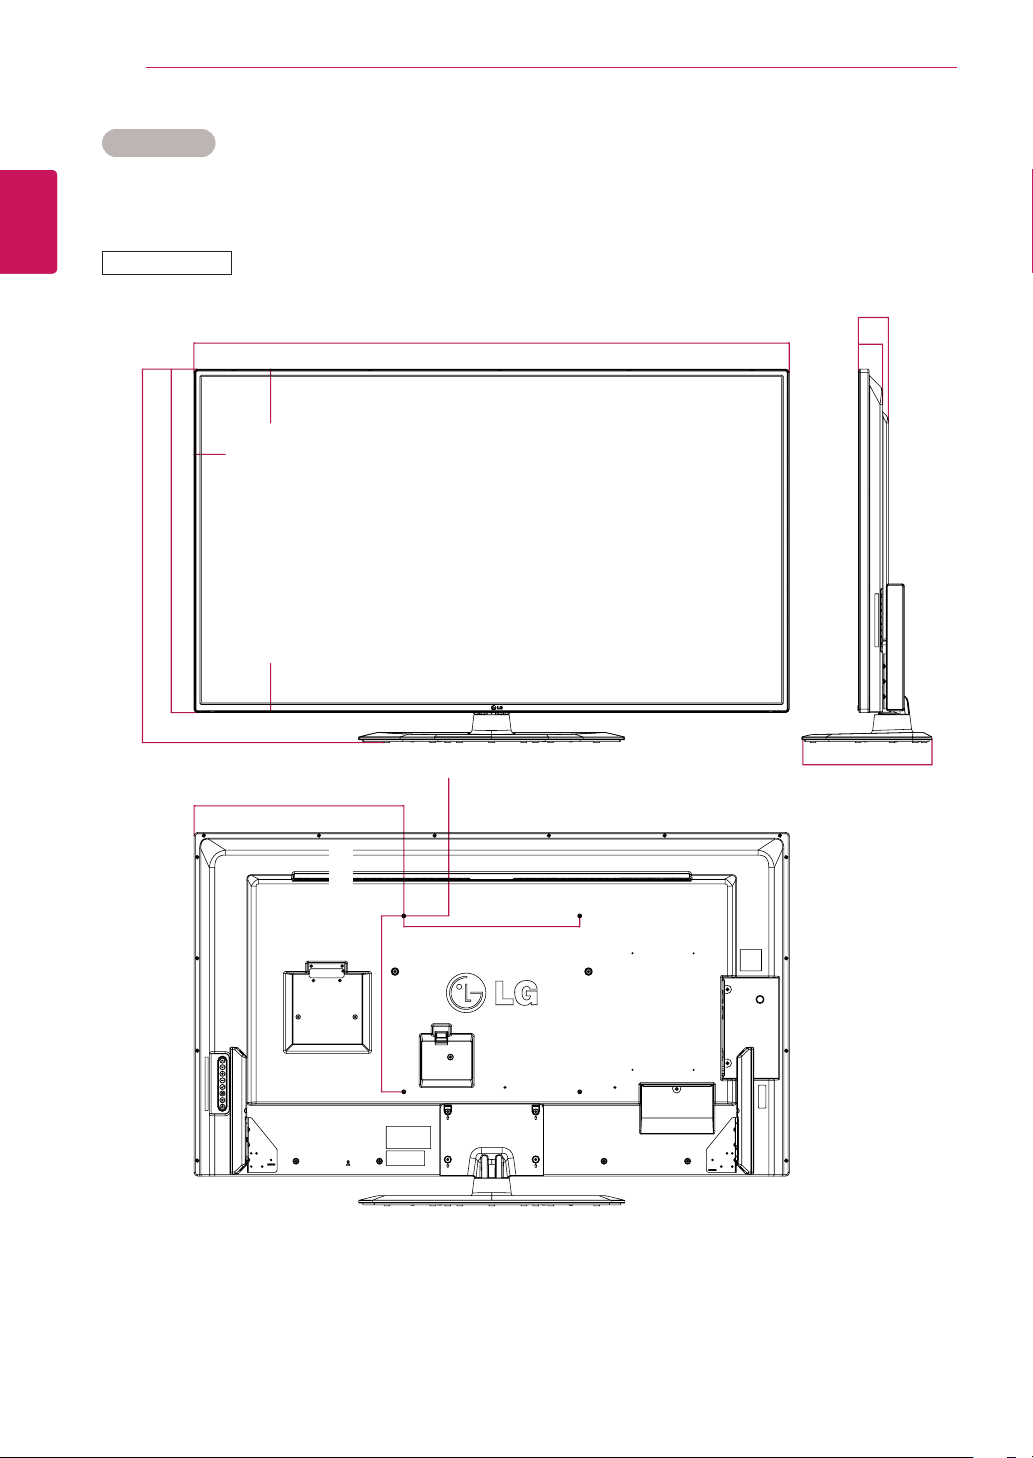
72
ENG
ENGLISH
SPECIFICATIONS
Dimensions
Theillustrationsinthismanualmaydifferfromtheactualproductandaccessories.
PleaseseetheMountingonaWallsectionforsizesofscrews.(Seepage11.)
60WL30MS
Productspecificationsshownabovemaybechangedwithoutpriornoticeduetoupgradeofproduct
functions.
(Unit:mm)
131
400
400
476.9
68.3
55.1
293.8
1353.8
14.4
14.4
19
189.9
849.4
781.4
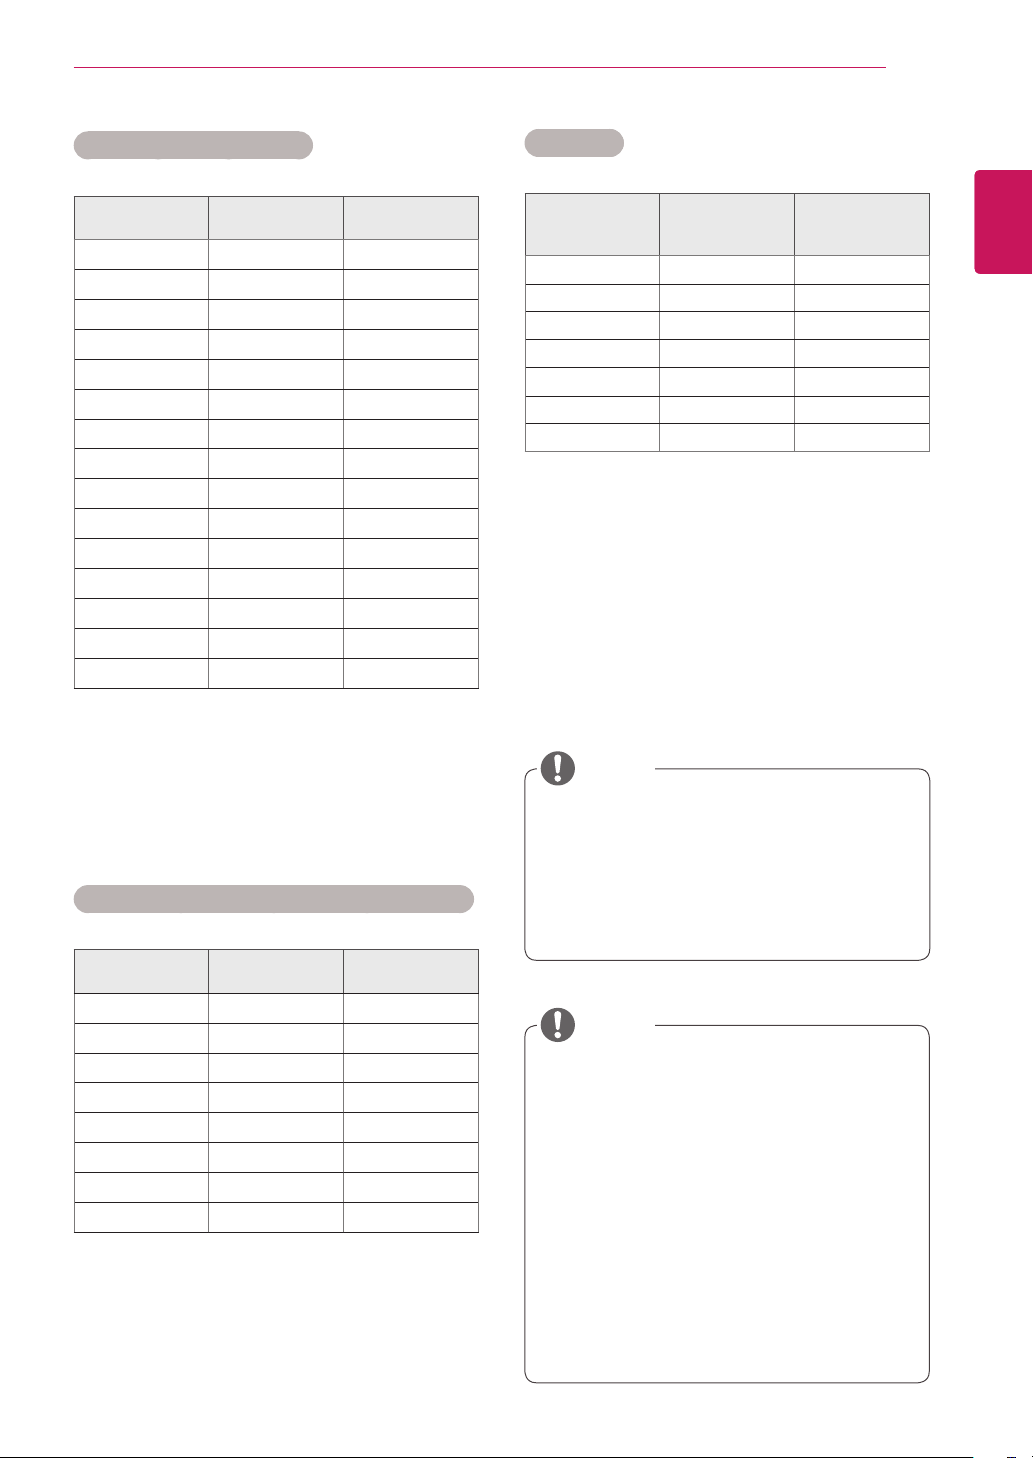
73
ENG
ENGLISH
SPECIFICATIONS
PCresolutionsavailableastheinputlabel
optioninRGBandHDMI/DVI/DisplayPort
inputmode:640x480/60Hz,1280x
720/60Hz,1920x1080/60HzandDTV
resolutions:480p,720p,1080p.
DTV Mode
Resolution Component
HDMI/
Display Port
(DTV)
480i o x
576i o x
480p o o
576p o o
720p o o
1080i o o
1080p o o
NOTE
Verticalfrequency:Toenabletheuserto
watchtheproductdisplay,screenimage
shouldbechangedtensoftimesevery
secondlikeafluorescentlamp.Thevertical
frequencyorrefreshrateisthetimesof
imagedisplaypersecond.TheunitisHz.
Horizontalfrequency:Thehorizontalinterval
isthetimetodisplayoneverticalline.When
1isdividedbythehorizontalinterval,the
numberofhorizontallinesdisplayedevery
secondcanbetabulatedasthehorizontal
frequency.TheunitiskHz.
NOTE
RGB (PC) supported mode
Resolution
Horizontal
Frequency(kHz)
Vertical
Frequency(Hz)
640x350
31.469 70.8
720x400
31.468 70.8
640x480
31.469 59.94
640x480
37.5 75
800x600
37.879 60.317
800x600
46.875 75
832x624
49.725 74.55
1024x768
48.363 60
1024x768
60.123 75.029
1280x720
44.772 59.855
1366x768
47.7 60
1280x1024
63.981 60.02
1280x1024
79.98 75.02
1680x1050
65.290 59.954
1920x1080
67.5 60
HDMI/ DVI/ Display Port (PC) supported mode
Resolution
Horizontal
Frequency(kHz)
Vertical
Frequency(Hz)
640x480
31.469 59.94
800x600
37.879 60.317
1024x768
48.363 60
1280x720
44.772 59.855
1366x768
47.7 60
1280x1024
63.981 60.02
1680x1050
65.290 59.954
1920x1080
67.5 60
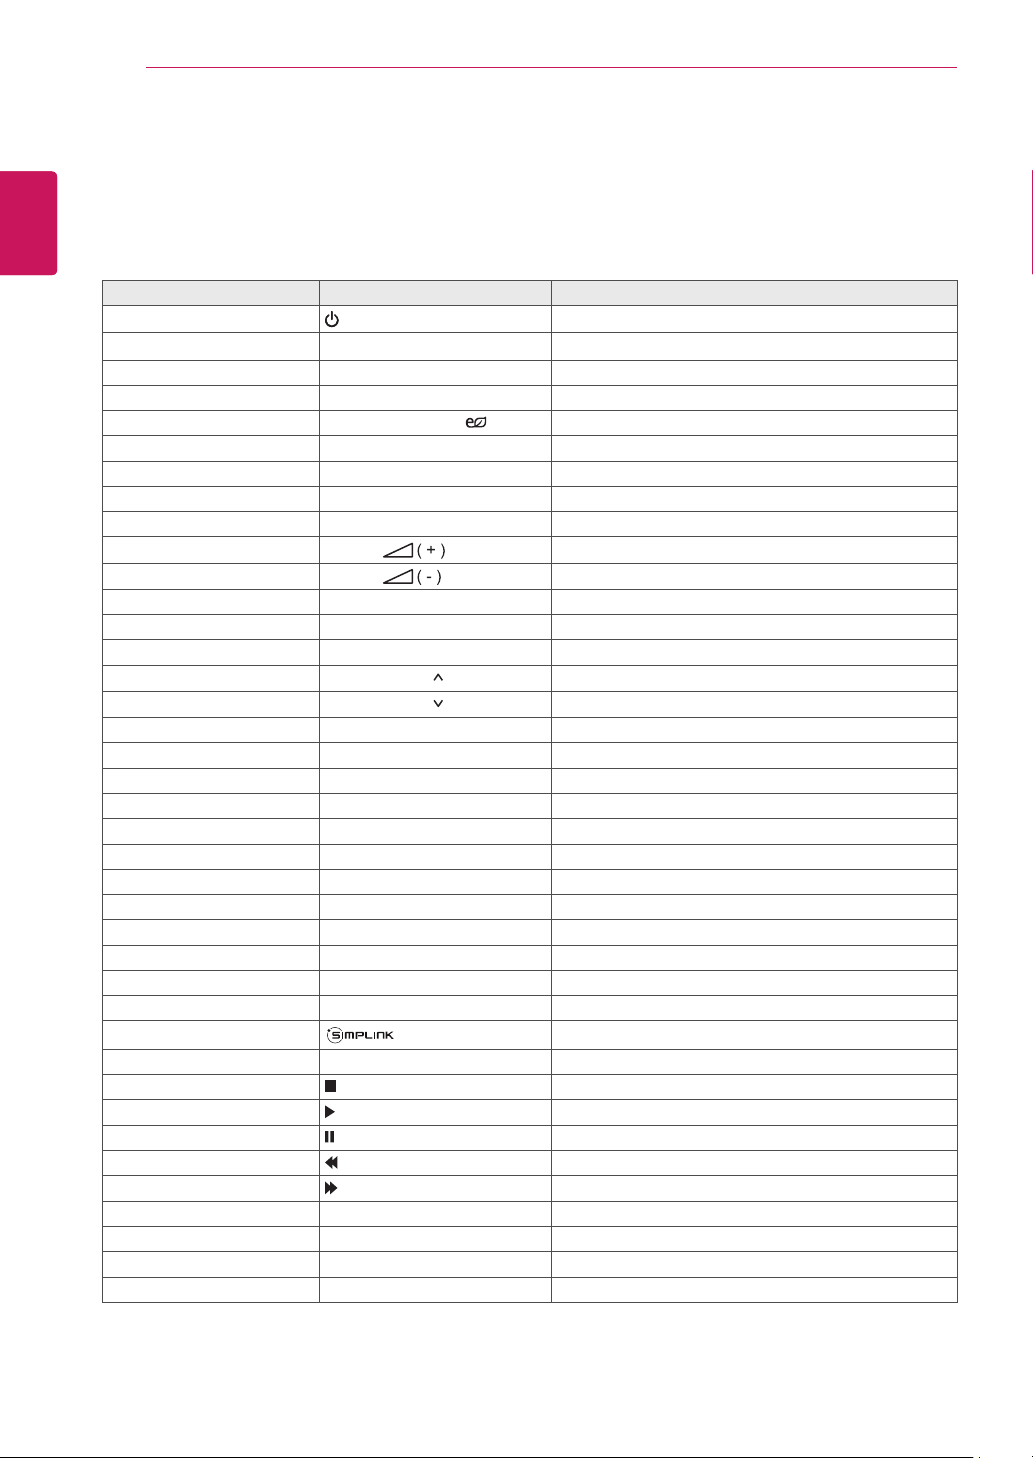
74
ENG
ENGLISH
IR CODES
IR CODES
AllmodelsdonotsupporttheHDMI/USBfunction.
Somekeycodesarenotsupporteddependingonthemodel.
Code (Hexa) Function Note
08
Power
R/CBUTTON
0B INPUT R/CBUTTON
C4 MONITORON R/CBUTTON
C5 MONITOROFF R/CBUTTON
95 ENERGYSAVING( ) R/CBUTTON
DC 3D R/CBUTTON
10to19 NumberKey0to9 R/CBUTTON
53 1/a/A R/CBUTTON
2F CLEAR R/CBUTTON
02
Volume
R/CBUTTON
03
Volume
R/CBUTTON
79 ARC R/CBUTTON
99 AUTO R/CBUTTON
09 MUTE R/CBUTTON
E0 BRIGHTNESS (PageUP) R/CBUTTON
E1 BRIGHTNESS (PageDown) R/CBUTTON
4D PSM R/CBUTTON
AA INFOⓘ R/CBUTTON
5F W.BAL R/CBUTTON
43 SETTINGS R/CBUTTON
40 Up▲ R/CBUTTON
41 Down▼ R/CBUTTON
07 Left◄ R/CBUTTON
06 Right► R/CBUTTON
3F S.MENU R/CBUTTON
44 OK R/CBUTTON
28 BACK R/CBUTTON
5B EXIT R/CBUTTON
7E R/CBUTTON
7B TILE R/CBUTTON
B1 R/CBUTTON
B0 R/CBUTTON
BA R/CBUTTON
8F R/CBUTTON
8E R/CBUTTON
72 RedKey(PICTUREIDON) R/CBUTTON
71 GreenKey(PICTUREIDOFF) R/CBUTTON
63 YellowKey R/CBUTTON
61 BlueKey R/CBUTTON
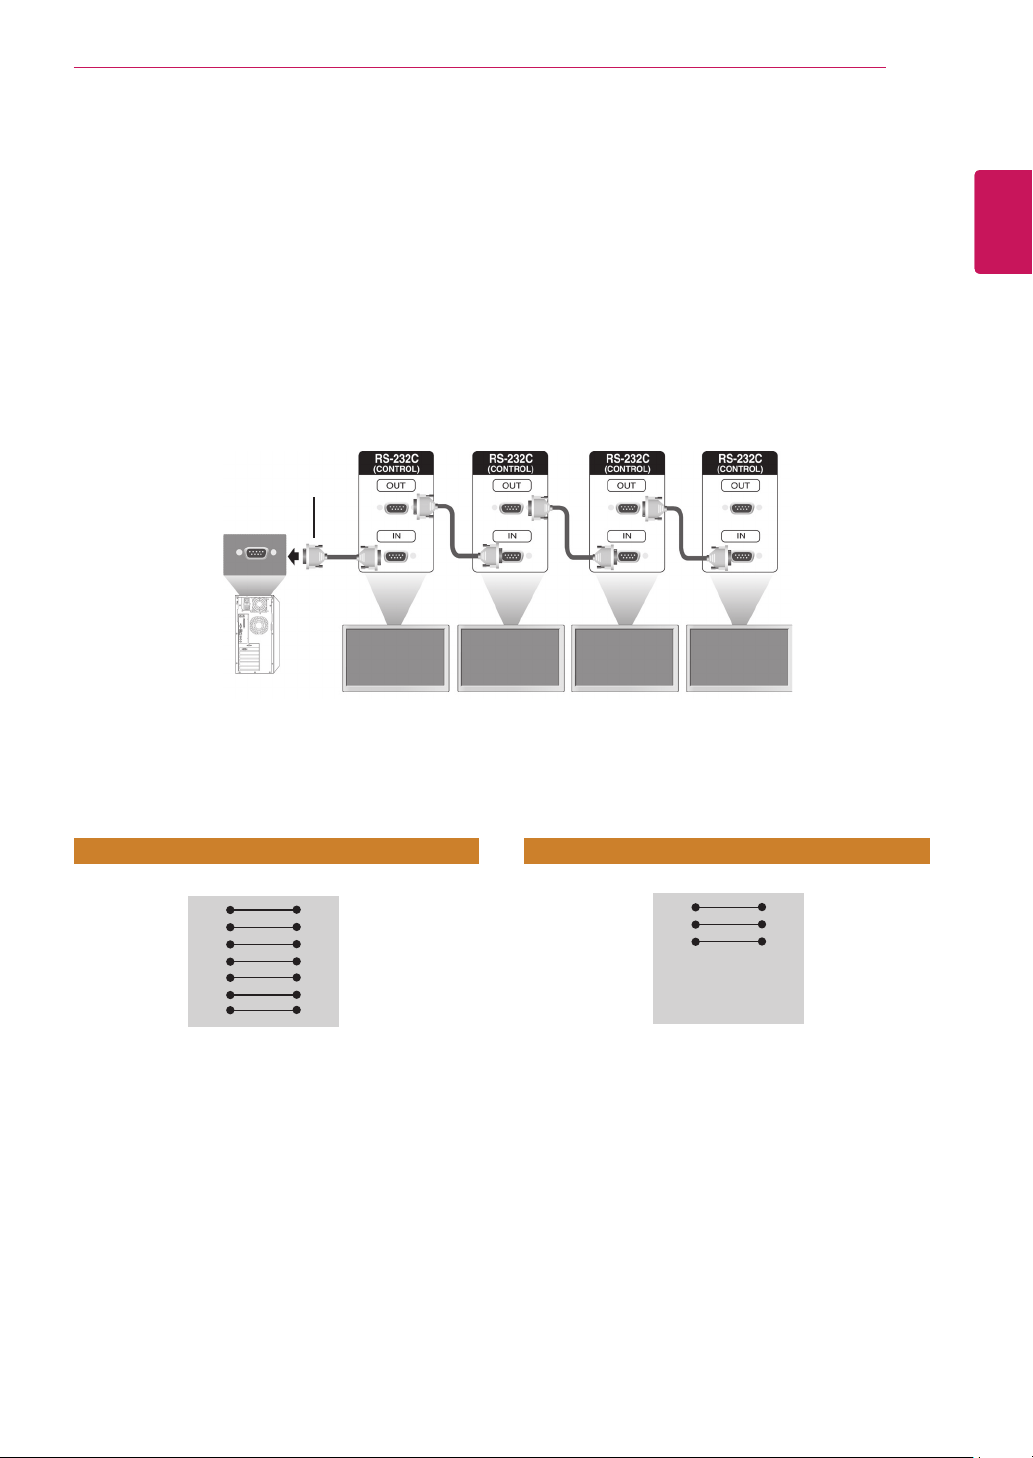
75
ENG
ENGLISH
CONTROLLING THE MULTIPLE PRODUCT
CONTROLLING THE MULTIPLE PRODUCT
UsethismethodtoconnectseveralproductstoasinglePC.Youcancontrolseveralproductsata
timebyconnectingthemtoasinglePC.
IntheOptionmenu,SetIDmustbebetween1and255withoutbeingduplicated.
Connecting the Cable
ConnecttheRS-232Ccableasshowninthepicture.
TheRS-232CprotocolisusedforcommunicationbetweenthePCandproduct.Youcanturnthe
producton/off,selectaninputsourceoradjusttheOSDmenufromyourPC.
Communication Parameter
Monitor1 Monitor2 Monitor3 Monitor4
PC
RS-232CCable
(notincluded)
BaudRate:9600BPS
DataLength:8bit
ParityBit:None
StopBit:1bit
FlowControl:None
CommunicationCode:ASCIIcode
Useacrossed(reverse)cable
RS-232C Configurations
RXD
TXD
GND
DTR
DSR
RTS
CTS
RXD
TXD
GND
DTR
DSR
RTS
CTS
TXD
RXD
GND
DSR
DTR
CTS
RTS
TXD
RXD
GND
DSR
DTR
CTS
RTS
PC Set PC Set
2
3
5
4
6
7
8
3
2
5
6
4
8
7
D-Sub 9 D-Sub 9
(Female) (Female)
D-Sub 9 D-Sub 9
(Female) (Female)
2
3
5
4
6
7
8
3
2
5
6
4
7
8
7-WireConfigurations(StandardRS-232Ccable)
3-WireConfigurations(NotStandard)

76
ENG
ENGLISH
CONTROLLING THE MULTIPLE PRODUCT
Command Reference List
COMMAND
DATA
(Hexadecimal)
1 2
01.Power
k a
00to01
02.InputSelect x b RefertoInputSelect.
03.AspectRatio k c RefertoAspectRatio.
04.EnergySaving
j q
RefertoEnergySaving.
05.Picturemode d x RefertoPicturemode.
06.Contrast k g 00to64
07.Brightness k h 00to64
08.Sharpness k k 00to64
09.Color k i 00to64
10.Tint k j 00to64
11.ColorTemperature x u 00to64
12.HPosition
f q
00to64
13.VPosition f r 00to64
14.HSize
f s
00to64
15.Autoconfiguration
j u
01
16.Balance k t 00to64
17.Soundmode d y RefertoSoundmode.
18.Treble k r 00to64
19.Bass k s 00to64
20.Speaker d v 00to01
21.VolumeMute k e 00to01
22.VolumeControl k f 00to64
23.Time1(Years/Months/Days) f a RefertoTime1.
24.Time2(Hours/Minutes/Seconds) f x RefertoTime2.
25.OffTimer(Repeatmode/Time) f e RefertoOffTimer.
26.OnTimer(RepeatMode/Time) f d RefertoOnTimer.
27.OnTimerInput f u RefertoOnTimerInput.
28.SleepTime f f 00to08
29.PowerOnDelay f h 00to64
30.AutomaticStandby m n 00to01
31.AutoOff f g 00to01
32.Language f i RefertoLanguage.
33.PowerIndicator(StandbyLight) f o 00to01
34.PowerIndicator(PowerLight)
f p
00to01
35.ISMmode j p RefertoISMMethod.
36.FailOverSelect m i 00Hto02H
37.FailOverInputSelect m j RefertoFailOverInputSelect.
38.Reset f K 00to02

77
ENG
ENGLISH
CONTROLLING THE MULTIPLE PRODUCT
COMMAND
DATA
(Hexadecimal)
1 2
39.TileMode
d d
00to01
40.TileModeCheck d z FF
41.TileID d i RefertoTileID.
42.TileHPosition
d e
00to32
43.TileVPosition d f 00to32
44.TileHSize d g 00to32
45.TileVSize d h 00to32
46.NaturalMode(InTilemode) d j 00to01
47.DPMSelect f j 00to01
48.FANControl d o 00Hto03
49.FANFaultCheck d w FF
50.TemperatureValue d n FF
51.RemoteLock/keyLock k m 00to01
52.Key m c RefertoKey.
53.OSDSelect k l 00to01
54.Elapsedtimereturn
d l
FF
55.SerialNo.Check f y FF
56.S/WVersion
f z
FF
57.WhiteBalanceRedGain j m 00toFE
58.WhiteBalanceGreenGain
j
n 00toFE
59.WhiteBalanceBlueGain
j
o 00toFE
60.Backlight
m
g 00to64
61.PCPowerControl
d
t 00to01
62.PCPower
d
s 00to01
63.SmartBLUControlMode
s m
00to01
64.SmartBLUControlSchedule
s s
RefertoSmartBLUControlSchedule
65.Readingluminancevalues
m u
RefertoReadingluminancevalues
66.Statuscheck
s v
RefertoStatuscheck
67.BLUMaintenance
m t
00to01
Note:DuringUSBoperationssuchasDvixorEMF,allcommandsexceptPower(ka)andKey(mc)
arenotexecutedandtreatedasNG.

78
ENG
ENGLISH
CONTROLLING THE MULTIPLE PRODUCT
Transmission / Receiving Protocol
Transmission
[Command1][Command2][][SetID][][Data][Cr]
*[Command1]:Firstcommandtocontroltheset.
*[Command2]:Secondcommandtocontroltheset.
*[SetID]:SetIDwithwhichyouwanttocommunicate.Enter[SetID]=‘00(0x00’tocommunicatewithallsets
regardlessoftheirSetIDnumbers.
*[Data]:Informationpassedtotheset.
*[Data1]:Informationpassedtotheset.
*[Data2]:Informationpassedtotheset.
*[Data3]:Informationpassedtotheset.
*[Cr]:CarriageReturn.ASCIIcode‘0x0D’.
*[]:ASCIIcodespace‘0x20’
Acknowledgement
[Command2][][SetID][][OK/NG][Data][x]
*Whentheproductreceivesdatanormally,itsendsanacknowledgement(ACK)intheformatabove.Ifdatais
inreadmode,itindicatesthedatathatshowsthecurrentstatus.Ifdataisinreadmode,itsimplyindicatesthe
datathatissentfromthePC.
*IfacommandissentwithSetID'00'(=0x00),thedataisreflectedtoallmonitorsetsandtheydosendany
acknowledgement(ACK).
*Ifthedatavalue'FF'issentincontrolmodeviaRS-232C,thecurrentsettingvalueofafunctioncanbe
checked(onlyforsomefunctions).
*Somecommandsarenotsupporteddependingonthemodel.

79
ENG
ENGLISH
CONTROLLING THE MULTIPLE PRODUCT
04. Energy Saving (Command: j q)
TosettheEnergySavingfunction.
Transmission
[j][q][][SetID][][Data][Cr]
Data 00:Off
01:Minimum
02:Medium
03.Maximum
04:Auto
05.ScreenOff
Acknowledgement
[q][][SetID][][OK/NG][Data][x]
**Itmaynotbesupporteddependingonthemodel.
05. Picture Mode (Command: d x)
ToselectthePictureMode.
Transmission
[d][x][][SetID][][Data][Cr]
Data 00:Vivid
01:Standard
02.Cinema
03.Sport
04:Game
Acknowledgement
[x][][SetID][][OK/NG][Data][x]
06. Contrast (Command: k g)
Toadjustthescreencontrast.
Transmission
[k][g][][SetID][][Data][Cr]
Data 00to64:Contrast0to100
Acknowledgement
[g][][SetID][][OK/NG][Data][x]
01. Power (Command: k a)
TocontrolthePowerOn/Offthedisplay.
Transmission
[k][a][][SetID][][Data][Cr]
Data00:Off
01:On
Acknowledgement
[a][][SetID][][OK/NG][Data][x]
*Onlywhenthemonitorsetisfullypoweredon,the
Acknowledgementsignalisreturnedproperly.
*Theremaybeacertaintimeofdelaybetweenthe
TransmissionandAcknowledgementsignals.
02. Input Select (Command: x b)
ToselecttheInputSourcefordisplay.
Transmission
[x][b][][SetID][][Data][Cr]
Data 20:Input(AV)
40:Component
60:RGB
70:DVI-D(PC)
80:DVI-D(DTV)
90:HDMI(HDMI1)(DTV)
A0:HDMI(HDMI1)(PC)
C0:DisplayPort(DTV)
D0:DisplayPort(PC)
91:HDMI2/SDI(DTV)
A1:HDMI2/SDI(PC)
B0:SuperSign
Acknowledgement
[b][][SetID][][OK/NG][Data][x]
*Someinputsignalsmaynotbesupported
dependingonthemodel.
03. Aspect Ratio (Command: k c)
Toadjustthescreenformat.
Transmission
[k][c][][SetID][][Data][Cr]
Data 01:4:3
02:16:9
04:Zoom
(AV,Component,HDMI/DVI-D/DisplayPortDTV)
09:Justscan(720pormore)
(Component,HDMI/DVI-D/DisplayPortDTV)
*RGB,DVI-D,HDMI/DisplayPortPCmode(1:1)
10to1F:CinemaZoom1to16
(AV,Component,HDMI/DVI-D/DisplayPortDTV)
*Availabledatatypesdifferdependingontheinput
signal.Formoreinformation,seetheaspectratio
sectionoftheowner'smanual.
*Theaspectratiomaydifferdependingonthe
model'sinputconfiguration.
Acknowledgement
[c][][SetID][][OK/NG][Data][x]

80
ENG
ENGLISH
CONTROLLING THE MULTIPLE PRODUCT
07. Brightness (Command: k h)
Toadjustthescreenbrightness.
Transmission
[k][h][][SetID][][Data][Cr]
Data 00to64:Brightness0to100
Acknowledgement
[h][][SetID][][OK/NG][Data][x]
08. Sharpness (Command: k k)
Toadjustthescreensharpness.
*ThisfunctionisavailableonlyinAV/Component
input.
Transmission
[k][k][][SetID][][Data][Cr]
Data 00to64:Sharpness0to100
Acknowledgement
[k][][SetID][][OK/NG][Data][x]
09. Color (Command: k i)
Toadjustthescreencolor.
*ThisfunctionisavailableonlyinAV/Component
input.
Transmission
[k][i][][SetID][][Data][Cr]
Data 00to64:Color0to100
Acknowledgement
[i][][SetID][][OK/NG][Data][x]
10. Tint (Command: k j)
Toadjustthescreentint.
*ThisfunctionisavailableonlyinAV/Component
input.
Transmission
[k][j][][SetID][][Data][Cr]
Data 00to64:TintR50toG50
Acknowledgement
[j][][SetID][][OK/NG][Data][x]
11. Color Temperature (Command: x u)
ToadjustthescreenColorTemperature.
Transmission
[x][u][][SetID][][Data][Cr]
Data 00to64:Warm50toCool50
Acknowledgement
[u][][SetID][][OK/NG][Data][x]
12. H Position (Command: f q)
ToadjustthescreenHorizontalPosition.
*ThisfunctionisavailableonlywhentheTileModeis
settoOff.
*Theoperationalrangevariesdependingonthe
RGBinputresolution.
(OnlyavailableforRGB-PCinput.)
Transmission
[f][q][][SetID][][Data][Cr]
Data 00to64:min.-50(Left)tomax.50(Right)
Acknowledgement
[q][][SetID][][OK/NG][Data][x]

81
ENG
ENGLISH
CONTROLLING THE MULTIPLE PRODUCT
13. V Position (Command: f r)
ToadjustthescreenVerticalPosition.
*ThisfunctionisavailableonlywhentheTileModeis
settoOff.
*Theoperationalrangevariesdependingonthe
RGBinputresolution.
(OnlyavailableforRGB-PCinput.)
Transmission
[f][r][][SetID][][Data][Cr]
Data 00to64:min.-50(Bottom)tomax.50(Top)
Acknowledgement
[r][][SetID][][OK/NG][Data][x]
14. H Size (Command: f s)
ToadjustthescreenHorizontalSize.
*ThisfunctionisavailableonlywhentheTileModeis
settoOff.
*Theoperationalrangevariesdependingonthe
RGBinputresolution.
(OnlyavailableforRGB-PCinput.)
Transmission
[f][s][][SetID][][Data][Cr]
Data 00-64:Min.-50(Reduce)-Max.50(Expand)
Acknowledgement
[s][][SetID][][OK/NG][Data][x]
15. Auto Configuration (Command: j u)
Toadjustthepicturepositionandminimizeimage
shakingautomatically.
(OnlyavailableforRGB-PCinput.)
Transmission
[j][u][][SetID][][Data][Cr]
Data01:Set
Acknowledgement
[u][][SetID][][OK/NG][Data][x]
16. Balance (Command: k t)
Toadjustthesoundbalance.
Transmission
[k][t][][SetID][][Data][Cr]
Data 00to64:Left50toRight50
Acknowledgement
[t][][SetID][][OK/NG][Data][x]
17. Sound Mode (Command: d y)
ToselecttheSoundMode.
Transmission
[d][y][][SetID][][Data][Cr]
Data 01:Standard
02:Music
03:Cinema
04:Sport
05.Game
Acknowledgement
[y][][SetID][][OK/NG][Data][x]
18. Treble (Command: k r)
ToadjusttheTreblevalues.
Transmission
[k][r][][SetID][][Data][Cr]
Data 00to64:Treble0to100
Acknowledgement
[r][][SetID][][OK/NG][Data][x]

82
ENG
ENGLISH
CONTROLLING THE MULTIPLE PRODUCT
22. Volume Control (Command: k f)
Tosettheplaybackvolume.
Transmission
[k][f][][SetID][][Data][Cr]
Data 00to64:Volume0to100
Acknowledgement
[f][][SetID][][OK/NG][Data][x]
23. Time 1(Year/ Month/ Day) (Command: f a)
TosettheTime1(Year/Month/Day)values.
Transmission
[f][a][][SetID][][Data1][][Data2][][Data3][Cr]
Data100to14:2010to2030
Data201to0C:JanuarytoDecember
Data301to1F:1to31
*Enter“fa[SetID]ff”forcheckingTime1(Year/
Month/Day)values.
Acknowledgement
[a][][SetID][][OK/NG][Data1][Data2][Data3][x]
24. Time 2(Hour/ Minute/ Second) (Command: f x)
TosettheTime2(Hour/Minute/Second)values.
Transmission
[f][x][][SetID][][Data1][][Data2][][Data3][Cr]
Data1 00to17:00to23hours
Data2 00to3B:00to59minutes
Data3 00to3B:00to59seconds
*Enter“fx[SetID]ff”forcheckingTime2(Hour/
Minute/Second)values.
**Thiscommandwon’tworkifTime1(Year/Month/
Day)hasnotbeensetinadvance.
Acknowledgement
[x][][SetID][][OK/NG][Data1][Data2][Data3][x]
19. Bass (Command: k s)
ToadjusttheBassvalues.
Transmission
[k][s][][SetID][][Data][Cr]
Data 00to64:Bass0to100
Acknowledgement
[s][][SetID][][OK/NG][Data][x]
20. Speaker (Command: d v)
Toselectthespeakeron/off.
Transmission
[d][v][][SetID][][Data][Cr]
Data00:Off
01:On
Acknowledgement
[v][][SetID][][OK/NG][Data][x]
21. Volume Mute (Command: k e)
TocontroltheVolumeMuteon/off.
Transmission
[k][e][][SetID][][Data][Cr]
Data00:Mute(VolumeOff)
01:Currentvolume(VolumeOn)
Acknowledgement
[e][][SetID][][OK/NG][Data][x]

83
ENG
ENGLISH
CONTROLLING THE MULTIPLE PRODUCT
25. Off Timer(Repeat Mode/ Time) (Command: f e)
TosettheOffTimer(RepeatMode/Time)function.
Transmission
[f][e][][SetID][][Data1][][Data2][][Data3][Cr]
Data1
1.F1toF7(Readdata)
F1:Readthe1stOffTimedata
F2:Readthe2ndOffTimedata
F3:Readthe3rdOffTimedata
F4:Readthe4thOffTimedata
F5:Readthe5thOffTimedata
F6:Readthe6thOffTimedata
F7:Readthe7thOffTimedata
2.E1toE7(Deleteoneindex),E0(Deleteall
indexes)
E0:DeleteallOffTimedata
E1:Deletethe1stOffTimedata
E2:Deletethe2ndOffTimedata
E3:Deletethe3rdOffTimedata
E4:Deletethe4thOffTimedata
E5:Deletethe5thOffTimedata
E6:Deletethe6thOffTimedata
E7:Deletethe7thOffTimedata
3.01to0C(SetthedayofweekforOffTime)
00:Off
01:Once
02.Daily
03:MondaytoFriday
04:MondaytoSaturday
05:SaturdaytoSunday
06.Sunday
07.Monday
08.Tuesday
09.Wednesday
0A.Thursday
0B.Friday
0C.Saturday
Data200to17:00to23Hours
Data300to3B:00to59Minutes
*ToreadordeletetheOffTimelist,setFFHfor
[Data2]and[Data3].
(Example1:fe01f1ffff-Readthe1stOffTime
data.)
(Example2:fe01e1ffff-Deletethe1stOffTime
data.)
(Example3:fe01040203-SettheOffTimeto
"MondaytoSaturday,02:03".)
*Thisfunctionissupportedonlywhen1(Year/Month/
Day)and2(Hour/Minute/Second)areset.
Acknowledgement
[e][][SetID][][OK/NG][Data1][Data2][Data3][x]
26. On Timer(Repeat Mode/ Time) (Command: f d)
TosettheOnTimer(Repeatmode/Time)function.
Transmission
[f][d][][SetID][][Data1][][Data2][][Data3][Cr]
Data1
1.F1toF7(Readdata)
F1:Readthe1stOnTimedata
F2:Readthe2ndOnTimedata
F3:Readthe3rdOnTimedata
F4:Readthe4thOnTimedata
F5:Readthe5thOnTimedata
F6:Readthe6thOnTimedata
F7:Readthe7thOnTimedata
2.E1toE7(Deleteoneindex),E0(Deleteall
indexes)
E0:DeleteallOnTimedata
E1:Deletethe1stOnTimedata
E2:Deletethe2ndOnTimedata
E3:Deletethe3rdOnTimedata
E4:Deletethe4thOnTimedata
E5:Deletethe5thOnTimedata
E6:Deletethe6thOnTimedata
E7:Deletethe7thOnTimedata
3.01to0C(SetthedayofweekforOnTime)
00:Off
01:Once
02.Daily
03:MondaytoFriday
04:MondaytoSaturday
05:SaturdaytoSunday
06.Sunday
07.Monday
08.Tuesday
09.Wednesday
0A.Thursday
0B.Friday
0C.Saturday
Data200to17:00to23Hours
Data300to3B:00to59Minutes
*ToreadordeletetheOffTimelist,setFFHfor
[Data2]and[Data3].
(Example1:fd01f1ffff-Readthe1stOnTime
data.)
(Example2:fd01e1ffff-Deletethe1stOnTime
data.)
(Example3:fd01040203-SettheOnTimeto
"MondaytoSaturday,02:03".)
*Thisfunctionissupportedonlywhen1(Year/Month/
Day)and2(Hour/Minute/Second)areset.
Acknowledgement
[d][][SetID][][OK/NG][Data1][Data2][Data3][x]

84
ENG
ENGLISH
CONTROLLING THE MULTIPLE PRODUCT
27. On Timer Input (Command: f u)
ToselectanexternalinputforthecurrentOnTime
settingandaddanewscheduleorchangethe
existingschedule.
Transmission
[f][u][][SetID][][Data1][Cr]
[f][u][][SetID][][Data1][Data2][Cr]
Data(Addschedule)
20:Input(AV)
40:Component
60.RGB
70:DVI-D
90:HDMI(HDMI1)
C0:DisplayPort
91:HDMI2/SDI
B0:SuperSign
Data1(Changeschedule)
1.F1toF7(Readdata)
F1:Selectthe1stscheduleinput
F2:Selectthe2ndscheduleinput
F3:Selectthe3rdscheduleinput
F4:Selectthe4thscheduleinput
F5:Selectthe5thscheduleinput
F6:Selectthe6thscheduleinput
F7:Selectthe7thscheduleinput
Data2
20:Input(AV)
40:Component
60:RGB
70:DVI-D
90:HDMI(HDMI1)
C0:DisplayPort
91:HDMI2/SDI
B0:SuperSign
*Toreadthescheduleinput,enterFFHfor[Data2].
Ifnoscheduleisavailablefor[Data1]when
attemptingtoreadorchangethescheduledata,the
textNGwillbedisplayedandtheoperationfails.
(Example1:fu0160-Moveeachscheduleinput
downonerowandsavethe1stscheduleinputin
RGBmode.)
(Example2:fu01f1ff-Readthe1stscheduleinput.)
(Example3:fu01f320-Changethe3rddata
scheduleinputtothecurrentOnTimeandAVinput.
Ifthereisnothirdschedule,thetextNGwillbe
displayedandtheoperationfails.)
*Thisfunctionissupportedonlywhen1(Year/Month/
Day),2(Hour/Minute/Second),OnTime(Repeat
Mode/Time)areset.
**Itmaynotbesupporteddependingonthemodel.
Acknowledgement
[u][][SetID][][OK/NG][Data][x]
[u][][SetID][][OK/NG][Data1][Data2][x]
28. Sleep Time (Command: f f)
TosettheSleepTime.
Transmission
[f][f][][SetID][][Data][Cr]
Data 00:Off(SleepTimeroff)
01:10min.
02:20min.
03:30min.
04:60min.
05:90min.
06:120min.
07:180min.
08:240min.
Acknowledgement
[f][][SetID][][OK/NG][Data][x]
29. Power On Delay (Command: f h)
Tosetthescheduledelaywhenthepoweristurned
on.(Unit:Second)
Transmission
[f][h][][SetID][][Data][Cr]
Data 00to64:min.0tomax.100(sec.)
Acknowledgement
[h][][SetID][][OK/NG][Data][x]
30. Automatic Standby (Command: m n)
TosettheAutomaticStandbyfunction.
Transmission
[m][n][][SetID][][Data][Cr]
Data 00:Off(Nooffafter4hours)
01:4Hours(Offafter4hours)
Acknowledgement
[n][][SetID][][OK/NG][Data][x]

85
ENG
ENGLISH
CONTROLLING THE MULTIPLE PRODUCT
31. Auto Off (Command: f g)
TosettheAutoOfffunction.
Transmission
[f][g][][SetID][][Data][Cr]
Data 00:Off(Nooffafter15minutes)
01:15min.(Offafter15minutes)
Acknowledgement
[g][][SetID][][OK/NG][Data][x]
32. Language (Command: f i)
TosetthelanguageforOSD.
Transmission
[f][i][][SetID][][Data][Cr]
Data 00:Czech
01:Danish
02:German
03:English
04:Spanish(EU)
05:Greek
06:French
07:Italian
08:Dutch
09:Norwegian
0A:Portuguese
0B:Portuguese(BR)
0C:Russian
0D:Finnish
0E:Swedish
0F:Korean
10:Chinese(Mandarin)
11:Japanese
12:YueChinese(Cantonese)
Acknowledgement
[i][][SetID][][OK/NG][Data][x]
33. Power Indicator (Standby Light) (Command: f o)
TosetthePowerIndicator(StandbyLight)function.
Transmission
[f][o][][SetID][][Data][Cr]
Data 00:Off
01:On
**Itmaynotbesupporteddependingonthemodel.
Acknowledgement
[o][][SetID][][OK/NG][Data][x]
34. Power Indicator (Power Light) (Command: f p)
TosetthePowerIndicator(PowerLight)function.
Transmission
[f][p][][SetID][][Data][Cr]
Data 00:Off
01:On
**Itmaynotbesupporteddependingonthemodel.
Acknowledgement
[p][][SetID][][OK/NG][Data][x]
35. ISM mode (Command: j p)
ToselectISMmethodforavoidinghavingafixed
imageremainonscreen.
Transmission
[j][p][][SetID][][Data][Cr]
Data 01:Inversion
02:Orbiter
04:WhiteWash
08.Normal
Acknowledgement
[p][][SetID][][OK/NG][Data][x]
36. Fail Over Select (Command: m i)
TosettheFailOverfunction.
Transmission
[m][i][][SetID][][Data][Cr]
Data 00:Off
01:Auto
02:Manual
Acknowledgement
[i][][SetID][][OK/NG][Data][x]

86
ENG
ENGLISH
CONTROLLING THE MULTIPLE PRODUCT
37. Fail Over Input Select (Command: m j)
Toselecttheinputsourceforautoswitch.
*Thiscommandisonlyavailablewhenthefailover
(auto)modeissettoCustom.
Transmission
[m][j][][SetID][][Data1][][Data2][][Data3][Cr]
[][Data4][][Data5][Cr]
Data 1to5(Priority1to5)
60:RGB
70:DVI-D
90:HDMI(HDMI1)
C0:DisplayPort
91:HDMI2/SDI
*Thenumberofdataitemsdiffersdependingonthe
model.
Acknowledgement
[j][][SetID][][OK/NG][Data1][Data2][Data3][Data4]
[][Data5][x]
38. Reset (Command: f k)
ToexecutethePicture,Screen,AudioandFactory
resetfunction.
(ScreenResetcanonlybeperformedinRGBinput
mode.)
Transmission
[f][k][][SetID][][Data][Cr]
Data 00:PictureReset
01:ScreenReset
02:FactoryReset
03:AudioReset
Acknowledgement
[k][][SetID][][OK/NG][Data][x]
39. Tile Mode (Command: d d)
TosetaTileModeandTileColumn/Rowvalues.
Transmission
[d][d][][SetID][][Data][Cr]
Data 00toFF:1stbyte-TileRow
2ndbyte-TileColumn
*00,01,10,11meansTileModeOff
**Itmaynotbesupporteddependingonthemodel.
Acknowledgement
[d][][SetID][][OK/NG][Data][x]
40. Tile Mode Check (Command: d z)
TocheckTileModestatus.
Transmission
[d][z][][SetID][][Data][Cr]
Data FF:CheckTileModestatus.
**Itmaynotbesupporteddependingonthemodel.
Acknowledgement
[z][][SetID][][OK/NG][Data1][Data2][Data3][x]
Data1 00:TileModeOff
01:TileModeOn
Data2 00to0F:TileRow
Data3 00to0F:TileColumn
41. Tile ID (Command: d i)
TosetTileID.
Transmission
[d][i][][SetID][][Data][Cr]
Data 01toE1: TileID01to225**
FF:CheckTileID
**Datacouldnotbesetover(TileColumn)x(Tile
Row).
**Itmaynotbesupporteddependingonthemodel.
Acknowledgement
[i][][SetID][][OK/NG][Data][x]
*NGwillbereturnifdataisover(TileColumn)x(Tile
Row),except0xFF.
42. Tile H Position (Command: d e)
ToadjusttheTileHorizontalposition.
*ThisfunctionisavailableonlywhentheNatural
optionoftheTileModeissettoOffwhiletheTile
ModesettoOn.
Transmission
[d][e][][SetID][][Data][Cr]
Data 00to32:-50(Left)to0(Right)
*Left/RightvaluesdependonTileHsize.
**Itmaynotbesupporteddependingonthemodel.
Acknowledgement
[e][][SetID][][OK/NG][Data][x]

87
ENG
ENGLISH
CONTROLLING THE MULTIPLE PRODUCT
43. Tile V Position (Command: d f)
ToadjusttheTileVerticalposition.
*ThisfunctionisavailableonlywhentheNatural
optionoftheTileModeissettoOffwhiletheTile
ModesettoOn.
Transmission
[d][f][][SetID][][Data][Cr]
Data 0to32:0(Bottom)to50(Top)
*Bottom/TopvaluesdependonTileVerticalsize.
**Itmaynotbesupporteddependingonthemodel.
Acknowledgement
[f][][SetID][][OK/NG][Data][x]
44. Tile H Size (Command: d g)
ToadjusttheTileHorizontalSize.
*SetTileHPositionto0x32beforesettingTileH
Size.
*ThisfunctionisavailableonlywhentheNatural
optionoftheTileModeissettoOffwhiletheTile
ModesettoOn.
Transmission
[d][g][][SetID][][Data][Cr]
Data 00to32:0to50
**Itmaynotbesupporteddependingonthemodel.
Acknowledgement
[g][][SetID][][OK/NG][Data][x]
45. Tile V Size (Command: d h)
ToadjusttheTileVerticalsize.
*SetTileVPositionto0x00beforesettingTileV
Size.
*ThisfunctionisavailableonlywhentheNatural
optionoftheTileModeissettoOffwhiletheTile
ModesettoOn.
Transmission
[d][h][][SetID][][Data][Cr]
Data 00to32:0to50
**Itmaynotbesupporteddependingonthemodel.
Acknowledgement
[h][][SetID][][OK/NG][Data][x]
46. Natural Mode (In Tile Mode) (Command : d j)
Todisplaytheimagenaturally,thepartoftheimage
thatwouldnormallybedisplayedinthegapbetween
themonitorsisomitted.
Transmission
[d][j][][SetID][][Data][Cr]
Data 00:Off
01:On
Acknowledgement
[j][][SetID][][OK/NG][Data][x]
47. DPM Select (Command: f j)
TosettheDPM(DisplayPowerManagement)
function.
Transmission
[f][j][][SetID][][Data][Cr]
Data 00:Off
01:On
*Datasettingsmayvarydependingonyourmodel
asbelow.
Data 00:Off
01:5sec.
02:10sec.
03:15sec.
04:1min.
05:3min.
06:5min.
07:10min.
Acknowledgement
[j][][SetID][][OK/NG][Data][x]
48. FAN Control (Command : d o)
TosettheFanmode.
Transmission
[d][o][][SetID][][Data][Cr]
Data 00:Auto
01:On
02:Manual
03:Off
**Itmaynotbesupporteddependingonthemodel.
Acknowledgement
[o][][SetID][][OK/NG][Data][x]

88
ENG
ENGLISH
CONTROLLING THE MULTIPLE PRODUCT
49. FAN Fault Check (Command: d w)
Tocheckthefanerrors.
Transmission
[d][w][][SetID][][Data][Cr]
DataFF:Readthestatus
Acknowledgement
[w][][SetID][][OK/NG][Data][x]
Data 00:Fanfault
01:FanOK
02:ModelwithoutaFan
50. Temperature Value (Command: d n)
Tochecktheinsidetemperaturevalue.
Transmission
[d][n][][SetID][][Data][Cr]
DataFF:Checkthestatus
Acknowledgement
[n][][SetID][][OK/NG][Data][x]
[n][][SetID][][OK/NG][Data1][Data2][Data3][x]
*Temperatureisdisplayedinhexadecimal.
51. Remote Controller Lock/ Key Lock
(Command: k m)
Whentheremotecontrolandfrontkeysarelockedin
standbymode,thepowercannotbeturnedonusing
theremotecontrolorfrontpowerbutton.
Transmission
[k][m][][SetID][][Data][Cr]
Data 00:Off(LockOff)
01:On(LockOn)
*Displaywillnotbeturnedonbypoweronkeyof
remotecontrollerandfrontpanelcontrolkeys,ifkey
islockedoninstandbymode.
Acknowledgement
[m][][SetID][][OK/NG][Data][x]
**Itmaynotbesupporteddependingonthemodel.
52. Key (Command: m c)
TosendakeycodeoftheIRremotecontrol.
Transmission
[m][c][][SetID][][Data][Cr]
Data IR_KEY_CODE
Acknowledgement
[c][][SetID][][OK/NG][Data][x]
Forakeycode,seetheIRCode.
*Somekeycodesarenotsupporteddependingon
themodel.
53. OSD Select (Command: k l)
ToselectOSD(OnScreenDisplay)on/off.
Transmission
[k][l][][SetID][][Data][Cr]
Data 00:Off
01:On
Acknowledgement
[l][][SetID][][OK/NG][Data][x]
54. Elapsed time return (Command: d l)
Tocheckthepanelusedtime.
Transmission
[d][l][][SetID][][Data][Cr]
Data FF:Readthestatus
Acknowledgement
[l][][SetID][][OK/NG][Data][x]
*Returneddatameansusedhoursinhexadecimal.

89
ENG
ENGLISH
CONTROLLING THE MULTIPLE PRODUCT
55. Serial No.Check (Command: f y)
TochecktheSerialNumbers.
Transmission
[f][y][][SetID][][Data][Cr]
Data FF:ChecktheproductSerialNumber
Acknowledgement
[y][][SetID][][OK/NG][Data][x]
*DataisASCIIcode.
56. S/W Version (Command: f z)
TochecktheSoftwareVersion.
Transmission
[f][z][][SetID][][Data][Cr]
Data FF:ChecktheSoftwareversion
Acknowledgement
[z][][SetID][][OK/NG][Data][x]
57. White Balance Red Gain (Command: j m)
TosettheWhiteBalanceRedGain.
Transmission
[j][m][][SetID][][Data][Cr]
Data 00toFE:RedGain0to254
Acknowledgement
[m][][SetID][][OK/NG][Data][x]
58. White Balance Green Gain (Command: j n)
TosettheWhiteBalanceGreenGain.
Transmission
[j][n][][SetID][][Data][Cr]
Data 00toFE:GreenGain0to254
Acknowledgement
[n][][SetID][][OK/NG][Data][x]
59. White Balance Blue Gain (Command: j o)
TosettheWhiteBalanceBlueGain.
Transmission
[j][o][][SetID][][Data][Cr]
Data 00toFE:BlueGain0to254
Acknowledgement
[o][][SetID][][OK/NG][Data][x]
60. Backlight (Command: m g)
Toadjustthescreenbacklight.
Transmission
[m][g][][SetID][][Data][Cr]
Data 00to64:Backlight0to100
Acknowledgement
[g][][setID][][OK/NG][Data][x]
**Itmaynotbesupporteddependingonthemodel.

90
ENG
ENGLISH
CONTROLLING THE MULTIPLE PRODUCT
61. PC Power Control (Command: d t)
TocontrolthePCpowerifthePCandthemonitor
aresynchronized.
Transmission
[d][t][][SetID][][Data][Cr]
Data
00:Synchronized(Whenthemonitorisoff,thePCis
alsoturnedoff.)
01:Notsynchronized(ThemonitorisoffbutthePC
ison.)
**Itmaynotbesupporteddependingonthemodel.
Acknowledgement
[t][][SetID][][OK][Data][x]
62. PC Power (Command: d s)
ControlthePCpower.
Transmission
[d][s][][SetID][][Data][Cr]
Data 00:PCisturnedoff.
01:PCisturnedon.
**Itmaynotbesupporteddependingonthemodel.
Acknowledgement
[s][][SetID][][OK][Data][x]
63. Easy Brightness Control Mode (Command: s m)
SelectsON/OFFofEasyBrightnessControlMode.
Transmission
[s][m][][SetID][][Data][Cr]
Data 00:EasyBrightnessControlOFF
01:EasyBrightnessControlON
*Itdoesnotworkifthecurrenttimeisnotsetup.
**Itmaynotbesupported,dependingonthemodel.
Acknowledgement
[m][][SetID][][OK/NG][Data][x]
64. Easy Brightness Control Schedule (Command: s
s)
SetstheEasyBrightnessControlSchedule.
Transmission
[s][s][][SetID][][Data1][][Data2][][Data3][Cr]
Data1
1.F1-F6(DataReadingFunctions)
F1:Readsthedataofthe1stEasyBrightness
Control
F2:Readsthedataofthe2ndEasyBrightness
Control
F3:Readsthedataofthe3rdEasyBrightness
Control
F4:Readsthedataofthe4thEasyBrightness
Control
F5:Readsthedataofthe5thEasyBrightness
Control
F6:Readsthedataofthe6thEasyBrightness
Control
2.E1-E6(DeletesOneIndex),E0(DeleteAll
Indexes)
E0:DeletesallEasyBrightnessControls
E1:Deletesthe1stEasyBrightnessControl
E2:Deletesthe2ndEasyBrightnessControl
E3:Deletesthe3rdEasyBrightnessControl
E4:Deletesthe4thEasyBrightnessControl
E5:Deletesthe5thEasyBrightnessControl
E6:Deletesthe6thEasyBrightnessControl
3.00-17:00-23:00
Data200-3B:00-59minutes
Data300-64:backlight0-100
*ToreadordeletetheconfiguredEasyBrightness
Controllist,set[Data2][Data3]toFF.
(ex1:ss01f1ffff-Readsthe1stindexdatafromthe
EasyBrightnessControl.
ex2:ss01e1ffff-Deletesthe1stindexdatafrom
theEasyBrightnessControl.
ex3:ss01071E70-Addsascheduletothe
backlight70at07:30.)
Acknowledgement
[s][][SetID][][OK/NG][Data1][Data2][Data3][x]
**Itmaynotbesupported,dependingonthemodel.

91
ENG
ENGLISH
CONTROLLING THE MULTIPLE PRODUCT
65. Reading luminance values (Command: m u)
Readsluminancevalues.
Transmission
[m][u][][SetID][][FF][Cr]
Acknowledgement
[u][][SetID][][OK/NG][Data1][Data2][Data3][Data4][Data5][x]
Data100-64backlight0-100
Data200-ff:Upper2-byteofCA210measuredvalue
Data300-ff:Lower2-byteofCA210measuredvalue
CA210measuredvalueHex:0000-ffff,Decimal:0-
65535
Data400-ff:Upper2-byteofBLUmeasuredvalue
Data500-ff:Lower2-byteofBLUmeasuredvalue
Data600-ff:Upper2bytesofBLUNo.2sensor
measuredvalue
Data700-ff:Lower2bytesofBLUNo.2sensor
measuredvalue
BLUmeasuredvalueHex:0000-ffff,Decimal:0-65535
*CA210measuredvalueisenteredthroughthe
calibrationprocedureduringfinalassembly.Default
valueis0beforecalibration.
**Itmaynotbesupported,dependingonthemodel.
66. Status check (Command: s v)
Checkvariousstatuses.
Transmission
[s][v][][SetID][][Data][][FF][Cr]
Data 05:CheckthenormaloperationofNo.1and
No.2luminancesensors.
06:luminancesensorbeingused:
07:Checkthenormaloperationoftop,bottom,
ormaintemperaturesensors.
Acknowledgement
[v][][SetID][][OK/NG][Data][Data1][x]
WhentheDatais05
Data100:Allnormal
01:BLUsensor1normal,BLUsensor2fail
02:BLUsensor1fail,BLUsensor2normal
03:Allfail
WhentheDatais06
Data100:No.1luminancesensorisbeingused
01:No.2luminancesensorisbeingused
WhentheDatais07
Data100:Alltemperaturesensorsfail
01:Topnormal,Bottomfail,Mainfail
02:Topfail,Bottomnormal,Mainfail
03:Topnormal,Bottomnormal,Mainfail
04:Topfail,Bottomfail,Mainnormal
05:Topnormal,Bottomfail,Mainfail
06:Topfail,Bottomnormal,Mainfail
07:Alltemperaturesensorsnormal
WhentheDatais08
Acknowledgement
[v][][SetID][][OK/NG][Data][Data1][Data2][Data3][x]
Data1:Temperatureofthetopsensorareawhenthe
setispoweredoff.
Data2:Temperatureofthebottomsensorareawhen
thesetispoweredoff.
Data3:Temperatureofthemainsensorareawhen
thesetispoweredoff.
WhentheDatais09
Acknowledgement
[v][][SetID][][OK/NG][Data][Data1][Data2][x]
Data100-ff:Upper2-byteofFanSpeed
Data200-ff:Lower2-byteofFanSpeed
FanSpeed:Hex0-20D0,Decimal0-8400
**Itmaynotbesupported,dependingonthemodel.

92
ENG
ENGLISH
CONTROLLING THE MULTIPLE PRODUCT
67. BLU Maintenance (Command: m t)
SelectON/OFFofBLUMaintenance.
Transmission
[m][t][][SetID][][Data][Cr]
Data00:BLUMaintenanceOFF
01:BLUMaintenanceON
**Itmaynotbesupported,dependingonthemodel.
Acknowledgement
[t][][SetID][][OK/NG][Data][x]
68. Screen mute (Command: k d)
Turnsthescreenonoroff.
Transmission
[k][d][][SetID][][Data][Cr]
Data 00:Turnsthescreenon.
01:Turnsthescreenoff.
Acknowledgement
[d][][SetID][][OK/NG][Data][x]


As an ENERGY STAR Partner LGE U. S. A.,Inc. has
determined that this product meets the ENERGY
STAR guidelines for energy efficiency.
EN ERG Y STAR i s a set of power -
saving guidelines issued by the U.S.
Environmental Protection Agency(EPA).
Make sure to read the Safety Precautions
before using the product.
Keep the Owner's Manual (CD) in an
accessible place for future reference.
The model and serial number of the SET is
located on the back and one side of the SET.
Record it below should you ever need service.
MODEL
SERIAL
TemporarynoiseisnormalwhenpoweringON or
OFFthisdevice.
WARNING-Thisisa classAproduct.Inadomestic
e nv ir on me n t t h i s p r o d u c t m a y c a u s e ra d i o
interferenceinwhichcase theuser mayberequired
totakeadequatemeasures.
To obtain the source code under GPL, LGPL,
MPL and other open source licenses, that is
contained in this product, please visit http://
opensource.lge.com.
In addition to the source code, all referred
license terms, warranty disclaimers and
copyright notices are available for download.
LG Electronics will also provide open source
code to you on CD-ROM for a charge covering
the cost of performing such distribution (such
as the cost of media, shipping, and handling)
upon email request to opensource@lge.com.
This offer is valid for three (3) years from the
date on which you purchased the product.

CHILD SAFETY:
It Makes A Difference How and Where
You Use Your Flat Panel Display.
Congratulations on your purchase! As you enjoy your new product,
please keep these safety tips in mind:
THE ISSUE
• The home theater entertainment experience is a growing trend and larger flat
panel displays are popular purchases. However, flat panel displays are not always
supported on the proper stands or installed according to the manufacturer’s
recommendations.
• Flat panel displays that are inappropriately situated on dressers, bookcases,
shelves, desks, speakers, chests or carts may fall over and cause injury.
THIS MANUFACTURER CARES!
• The consumer electronics industry is committed to making home entertainment
enjoyable and safe.
TUNE INTO SAFETY
• One size does NOT fit all. Follow the manufacturer’s recommendations for the
safe installation and use of your flat panel display.
• Carefully read and understand all enclosed instructions for proper use of this
product.
• Don’t allow children to climb on or play with furniture and television sets.
• Don’t place flat panel displays on furniture that can easily be used as steps,
such as a chest of drawers.
• Remember that children can become excited while watching a program,
especially on a “lager than life” flat panel display. Care should be taken to place
or install the display where it cannot be pushed, pulled over, or knocked down.
• Care should be taken to route all cords and cables connected to the flat panel
display so that they cannot be pulled or grabbed by curious children.
WALL MOUNTING: IF YOU DECIDE TO WALL
MOUNT YOURS FLAT PANEL DISPAY, ALWAYS:
• Use a mount that has been recommended by the display manufacturer and/ or
listed by an independent laboratory (such as UL, CSA, ETL).
• Follow all instructions supplied by the display and wall mount manufacturers.
• If you have any doubts about your ability to safely install your flat panel display,
contact your retailer about professional installation.
• Make sure that the wall where you are mounting the display is appropriate.
Some wall mounts are not designed to be mounted to walls with steel studs or
old cinder block construction. If you are unsure, contact a professional installer.
• A minimum of two people are required for installation. Flat panel displays can
be heavy.