Owner's Guide Mobile
Basics
Accessories
These accessories are available for use with your device.
- Travel Adapter
- Quick Start Guide
- USB Cable
- Battery
NOTE
- Items described above may be optional.
- Always use genuine LG accessories. The supplied items are designed only for this device and may not be compatible with other devices.
- The items supplied with the device and any available accessories may vary depending on the region or service provider.
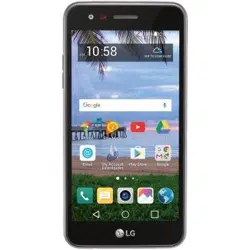
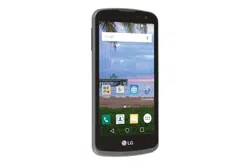
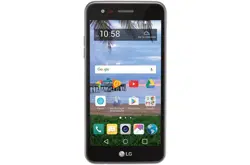
Device layout
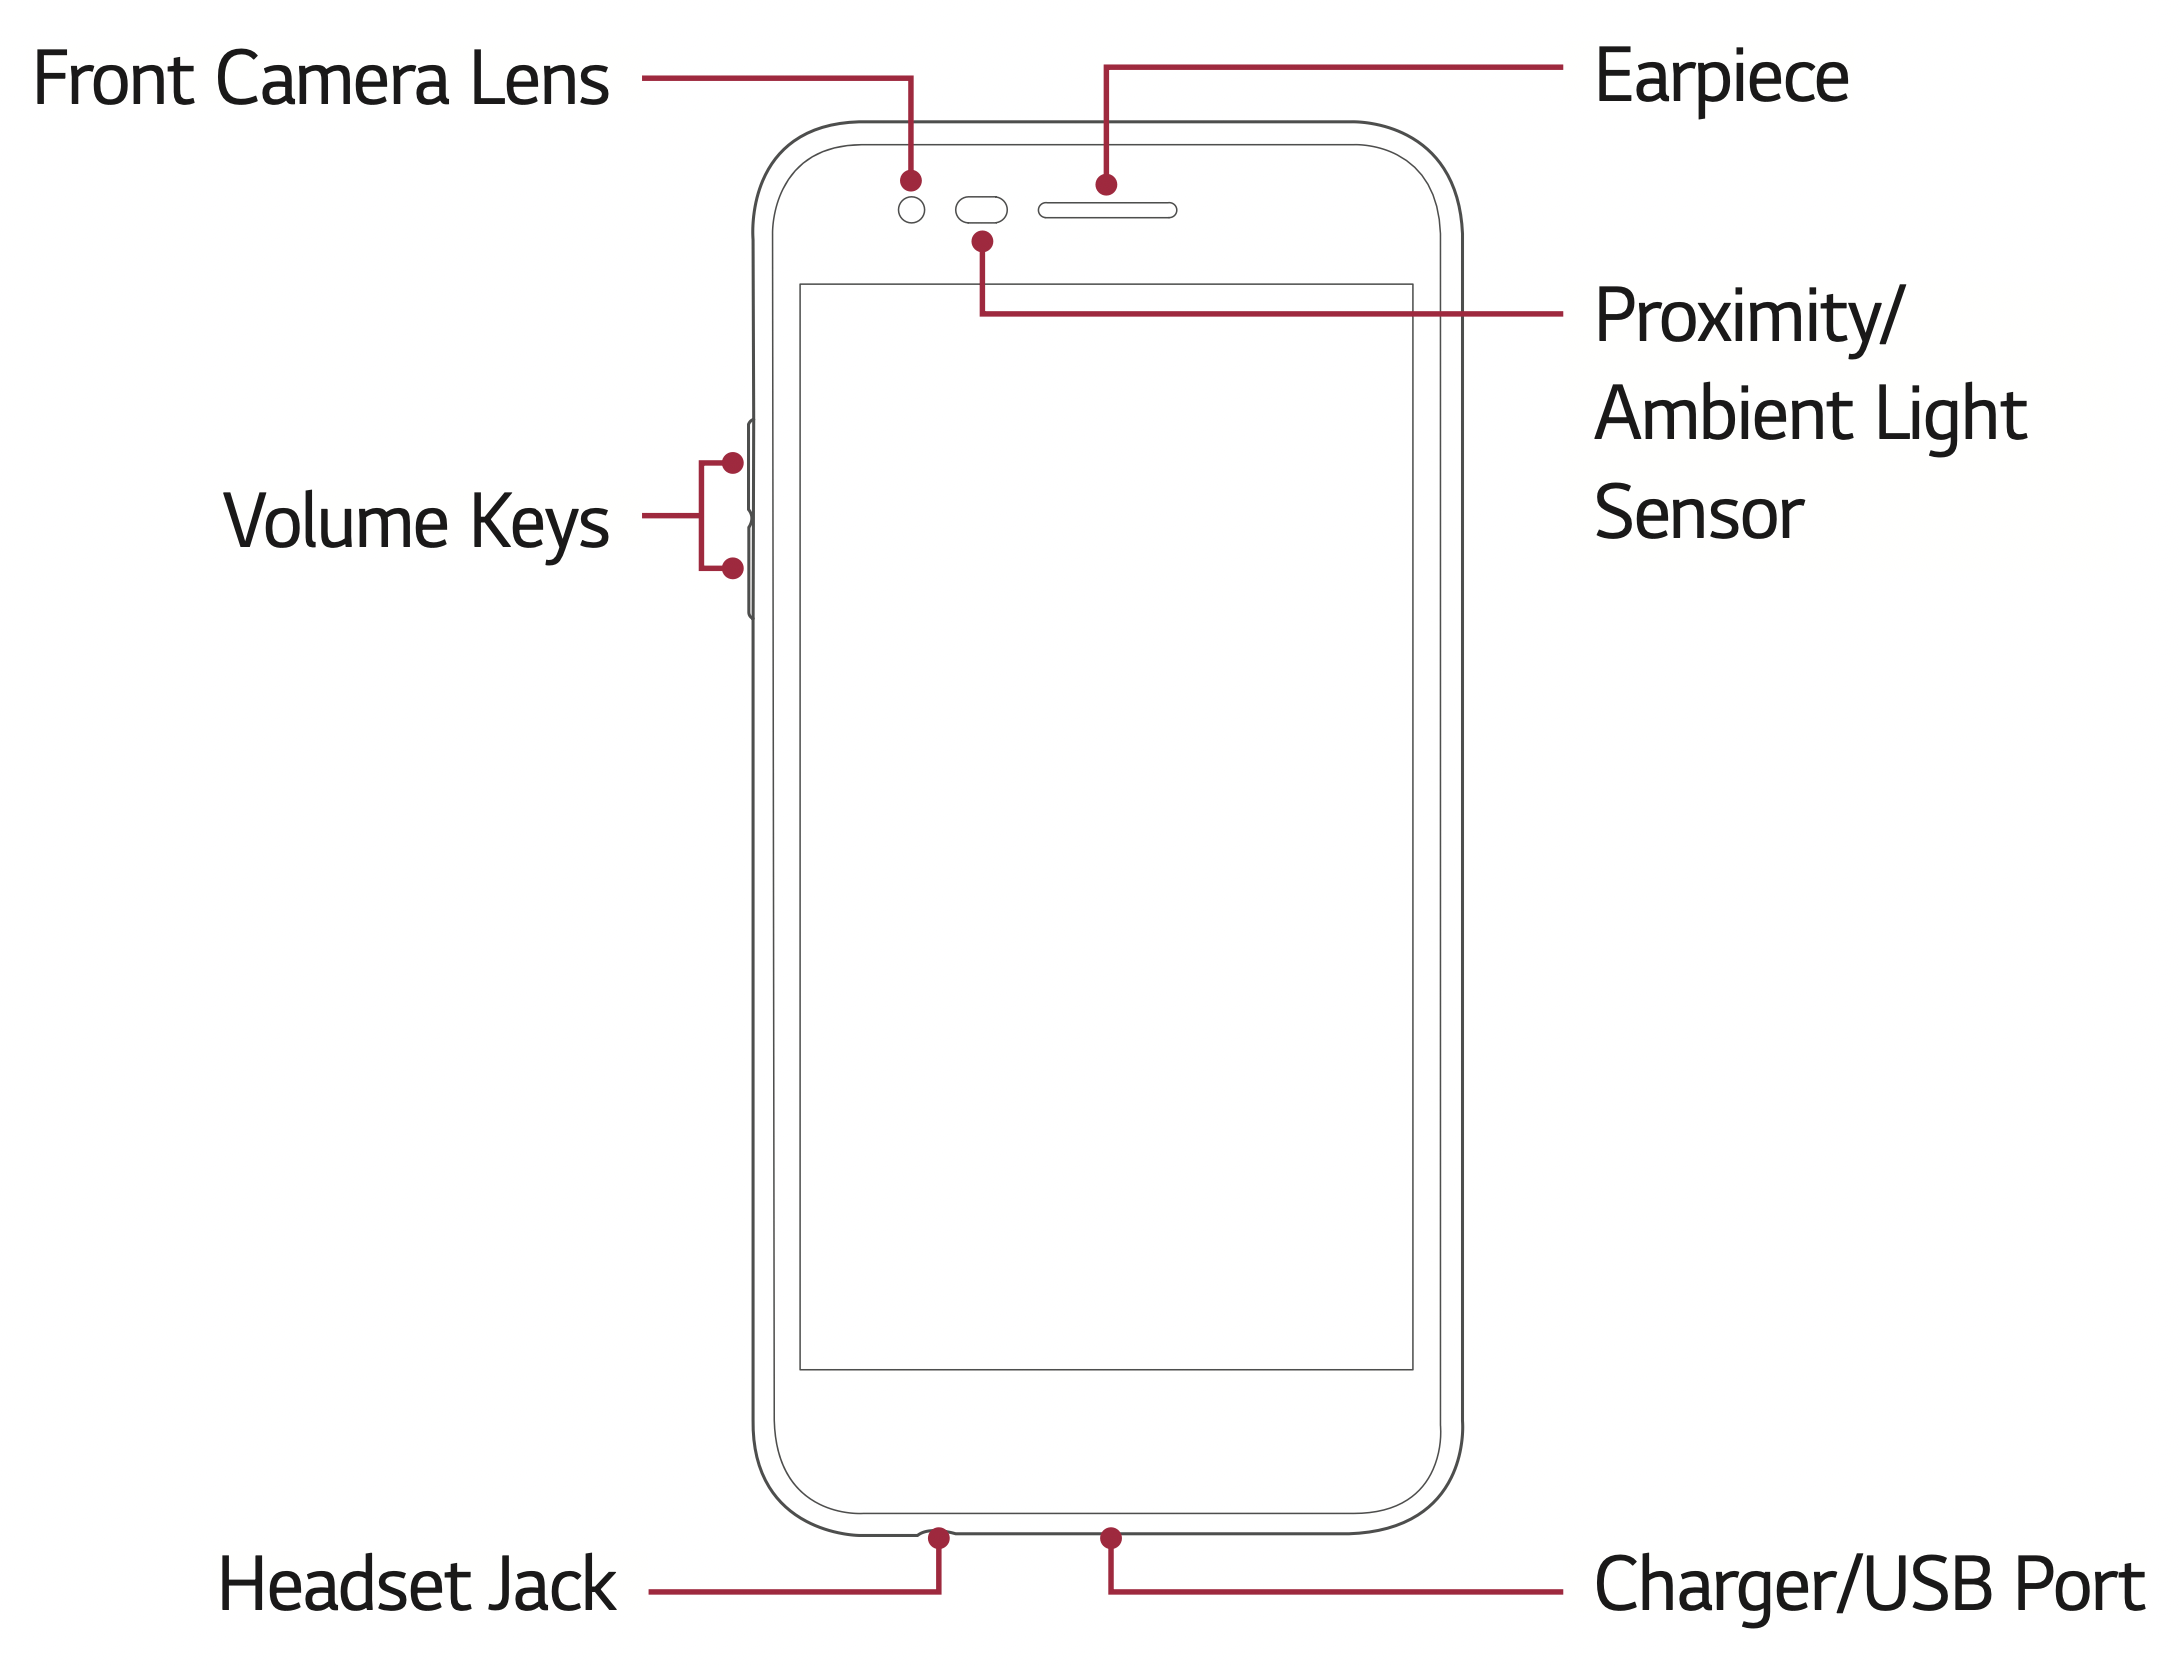
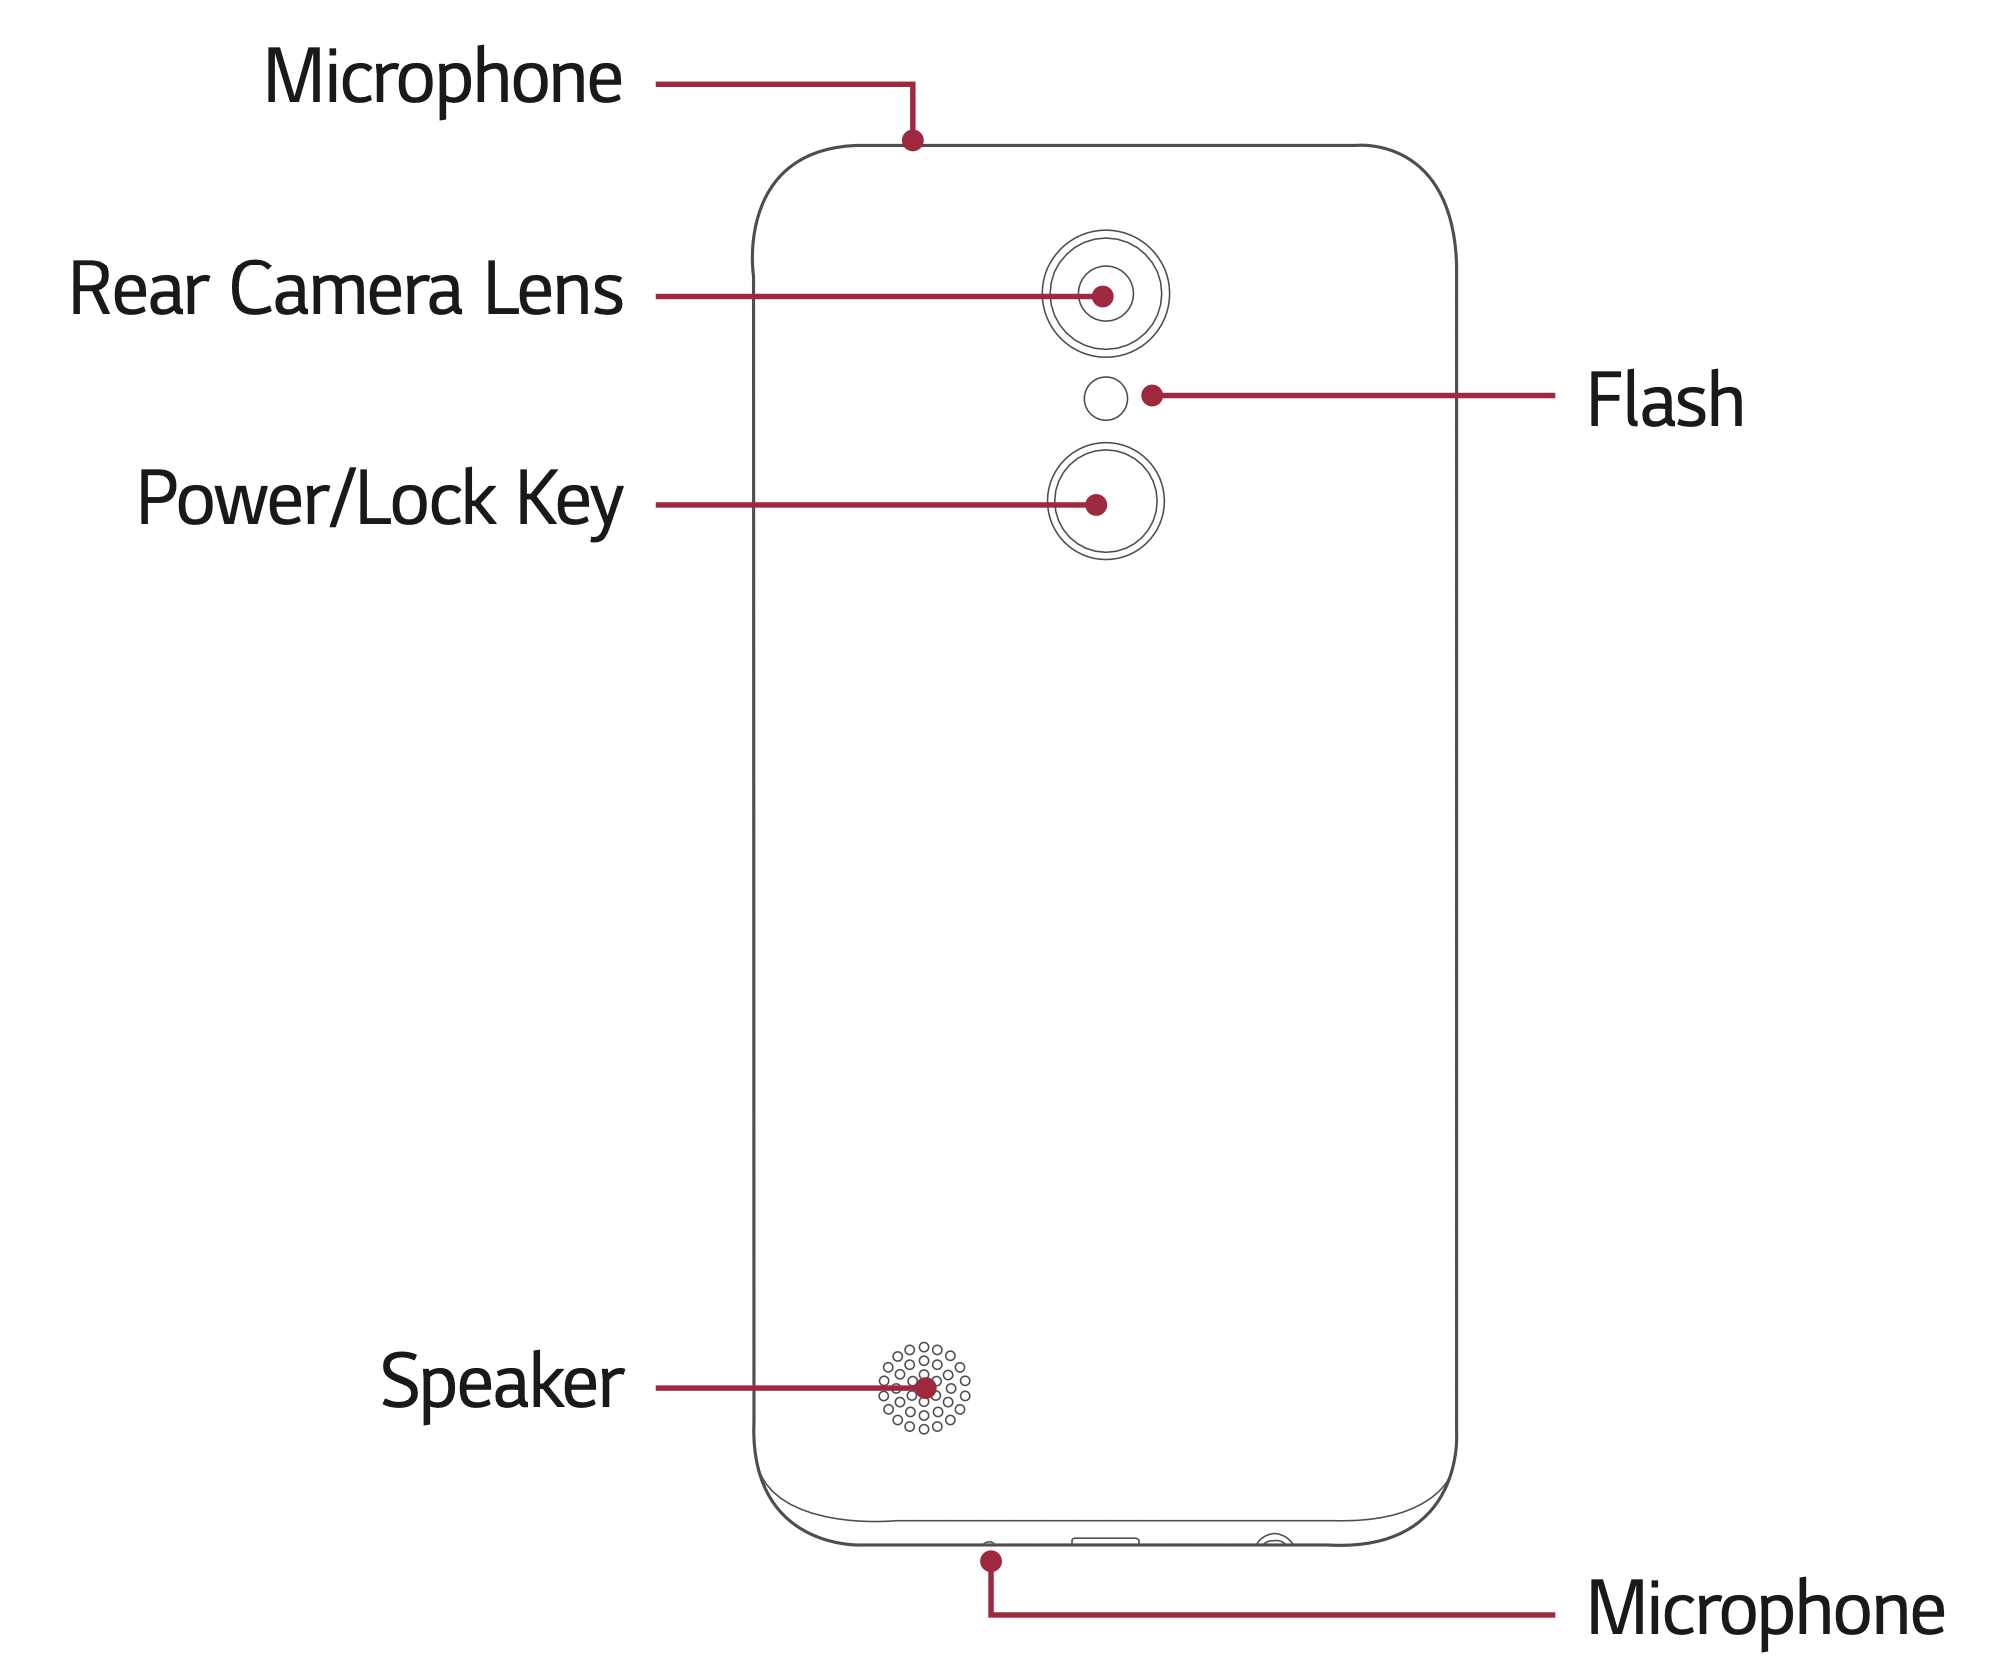

NOTE: Proximity Sensor
- When receiving and making calls, the proximity sensor automatically turns the backlight off and locks the touch screen by sensing when the phone is near your ear. This extends battery life and prevents you from unintentionally activating the touch screen during calls.
WARNING
- Placing a heavy object on the phone or sitting on it can damage the display and touch screen functions.
- Do not cover the proximity sensor with screen protectors or any other type of protective film. This could cause the sensor to malfunction.
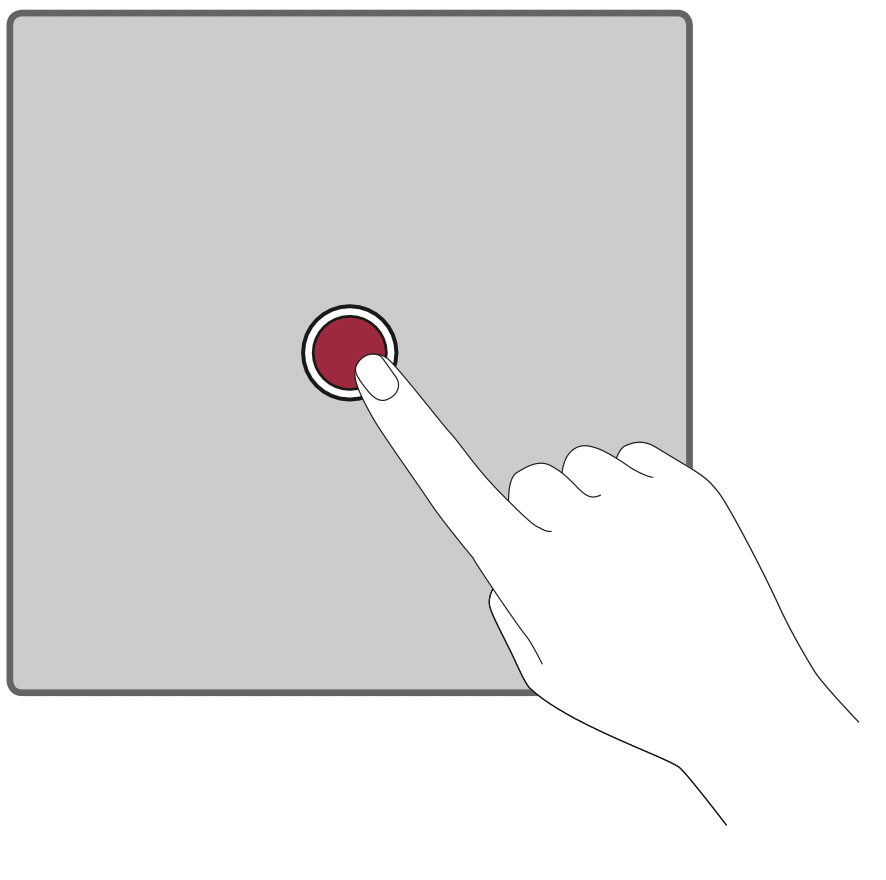
Turning Your Device On and Off
Turning your device on
Press and hold the Power/Lock Key on the back of the device for a couple of seconds until the screen turns on.
Turning your device off
- Press and hold the Power/Lock Key on the back of the device until the Device options menu appears.
- Tap Power off in the Device options menu.
- Tap POWER OFF to confirm that you want to turn off the device.
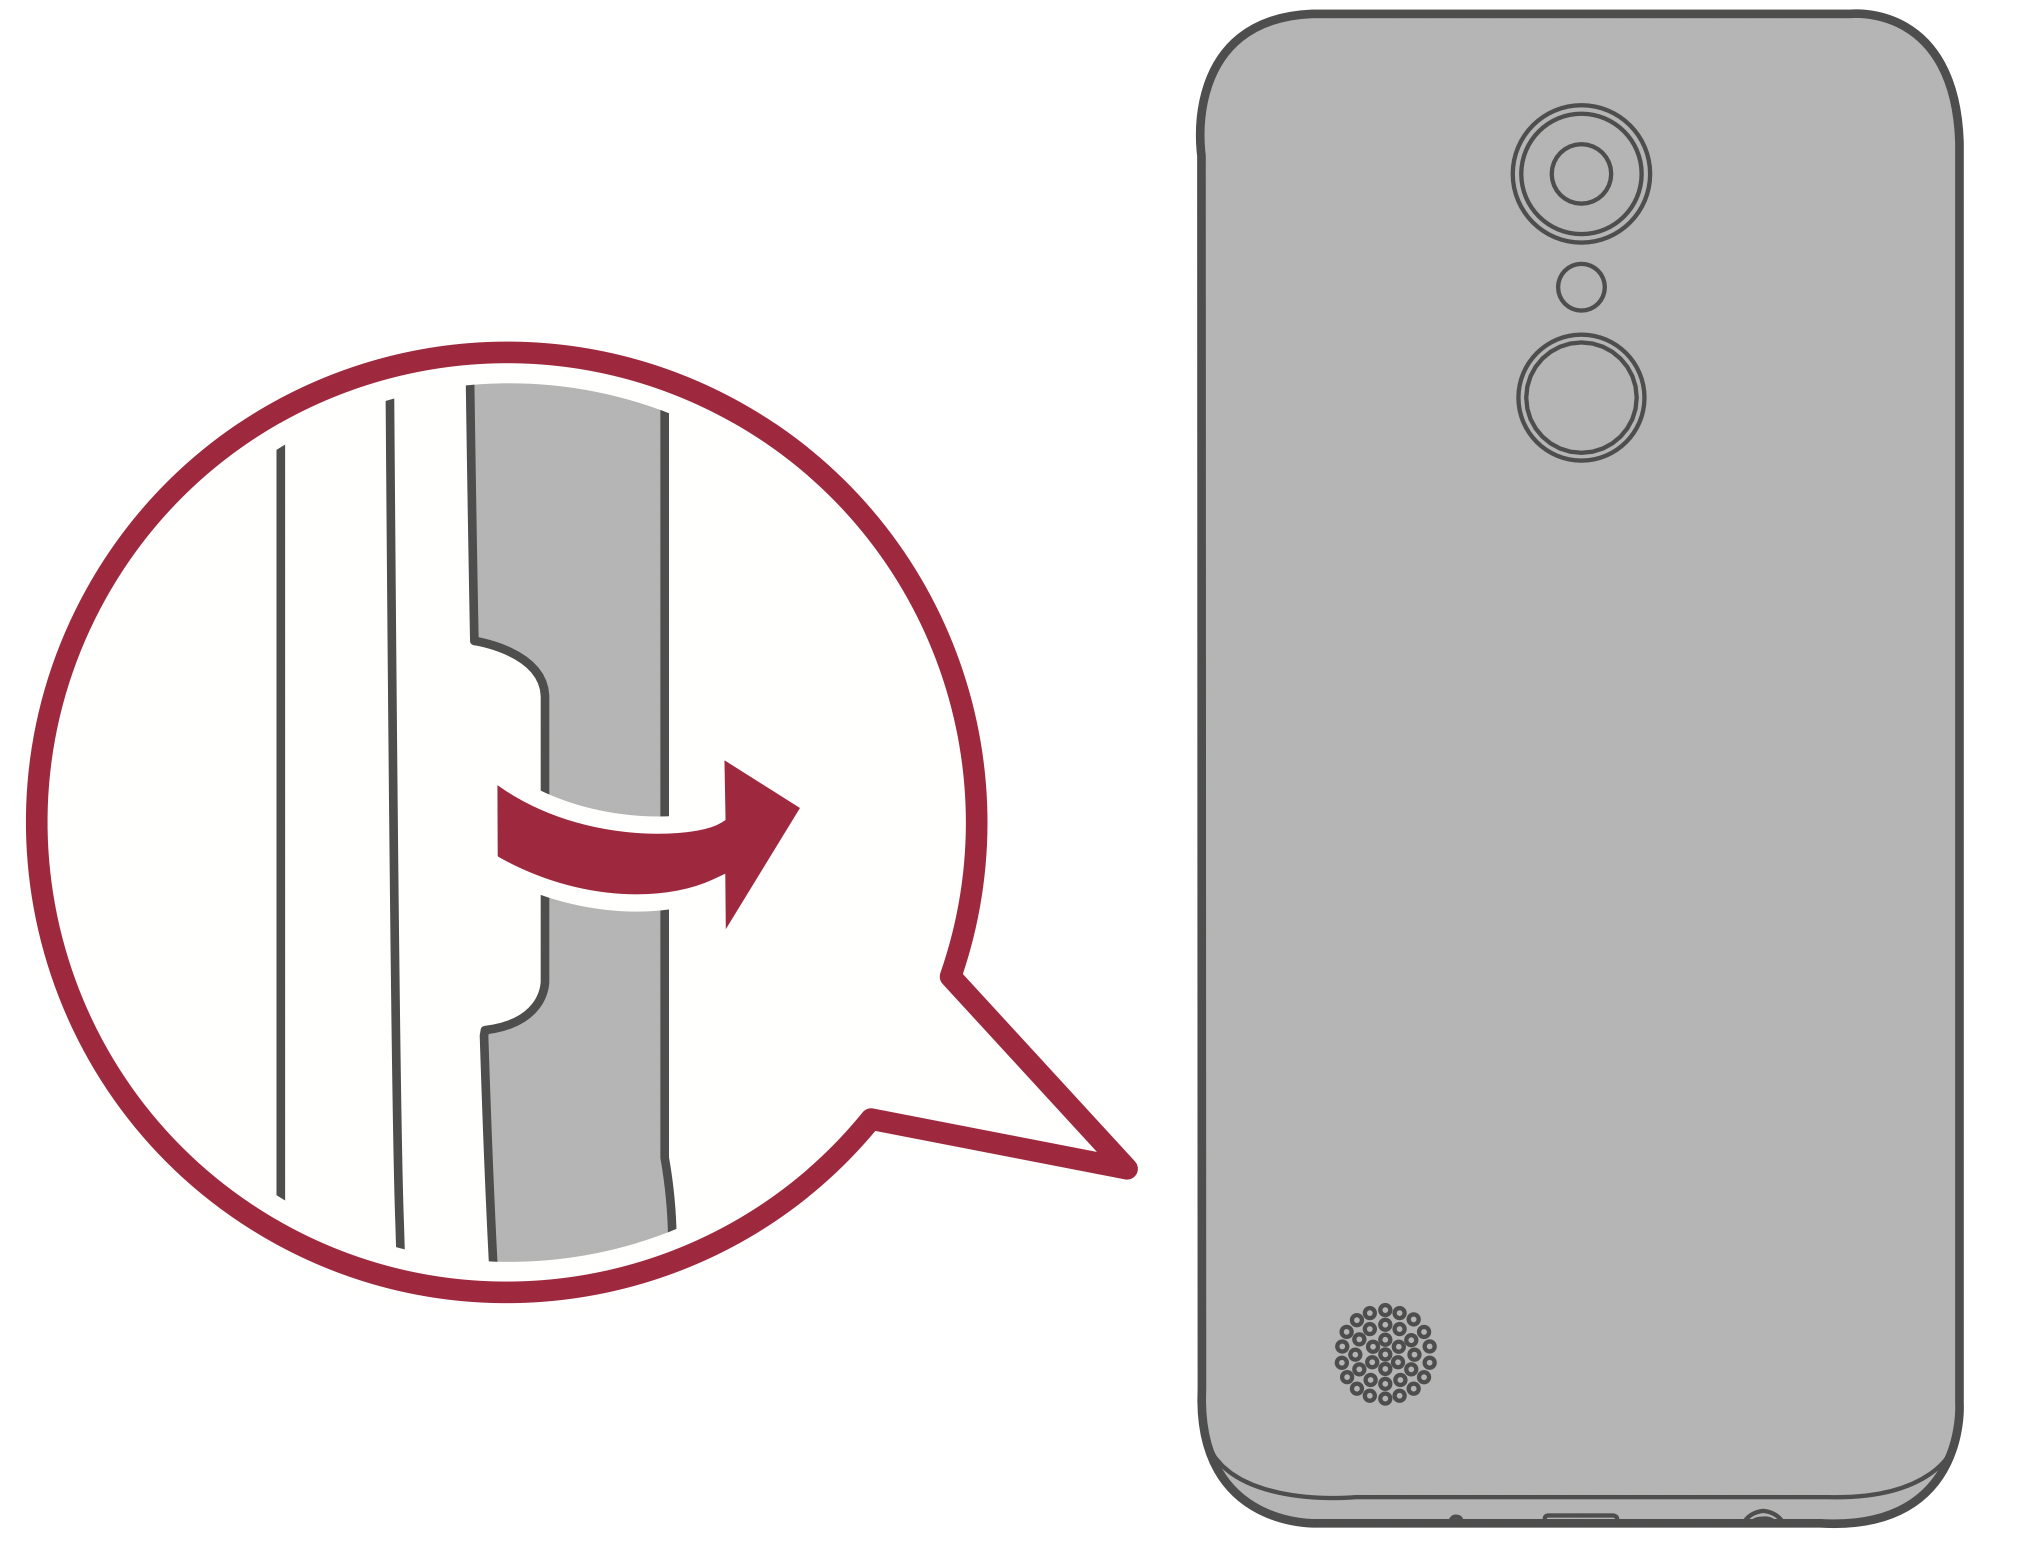
Installing the battery
Before you can start exploring your new device, you'll need to set it up.
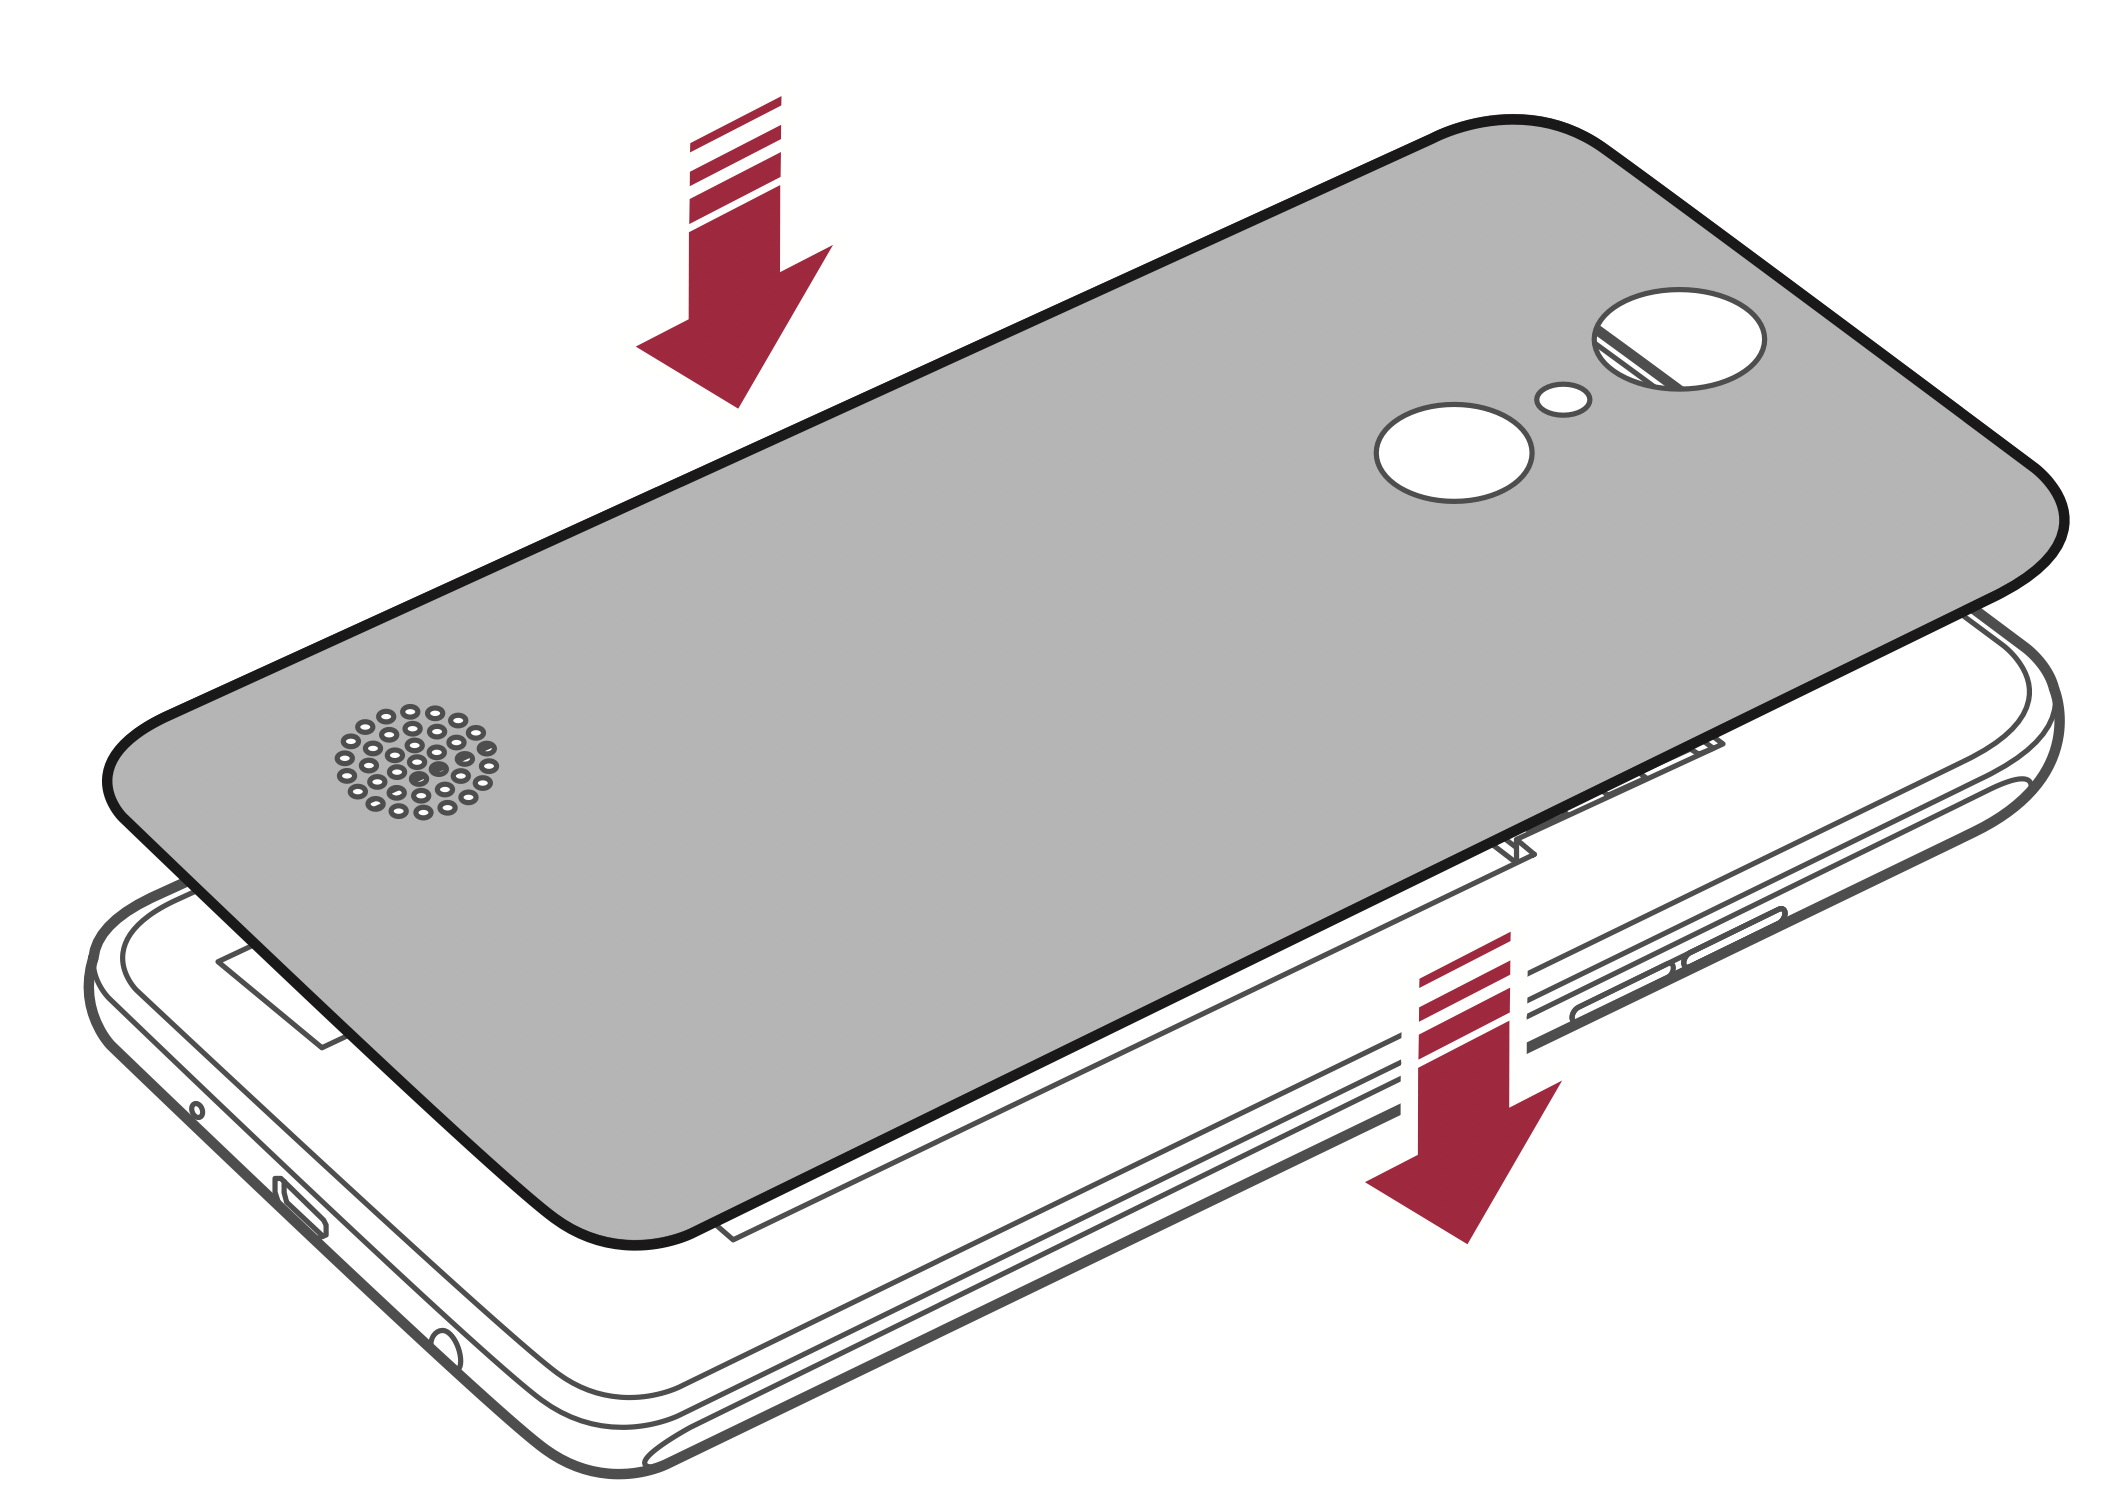
- To remove the back cover, hold the device firmly in one hand. With your other hand, lift off the back cover with your thumbnail as shown in the figure below.
- Insert the battery.
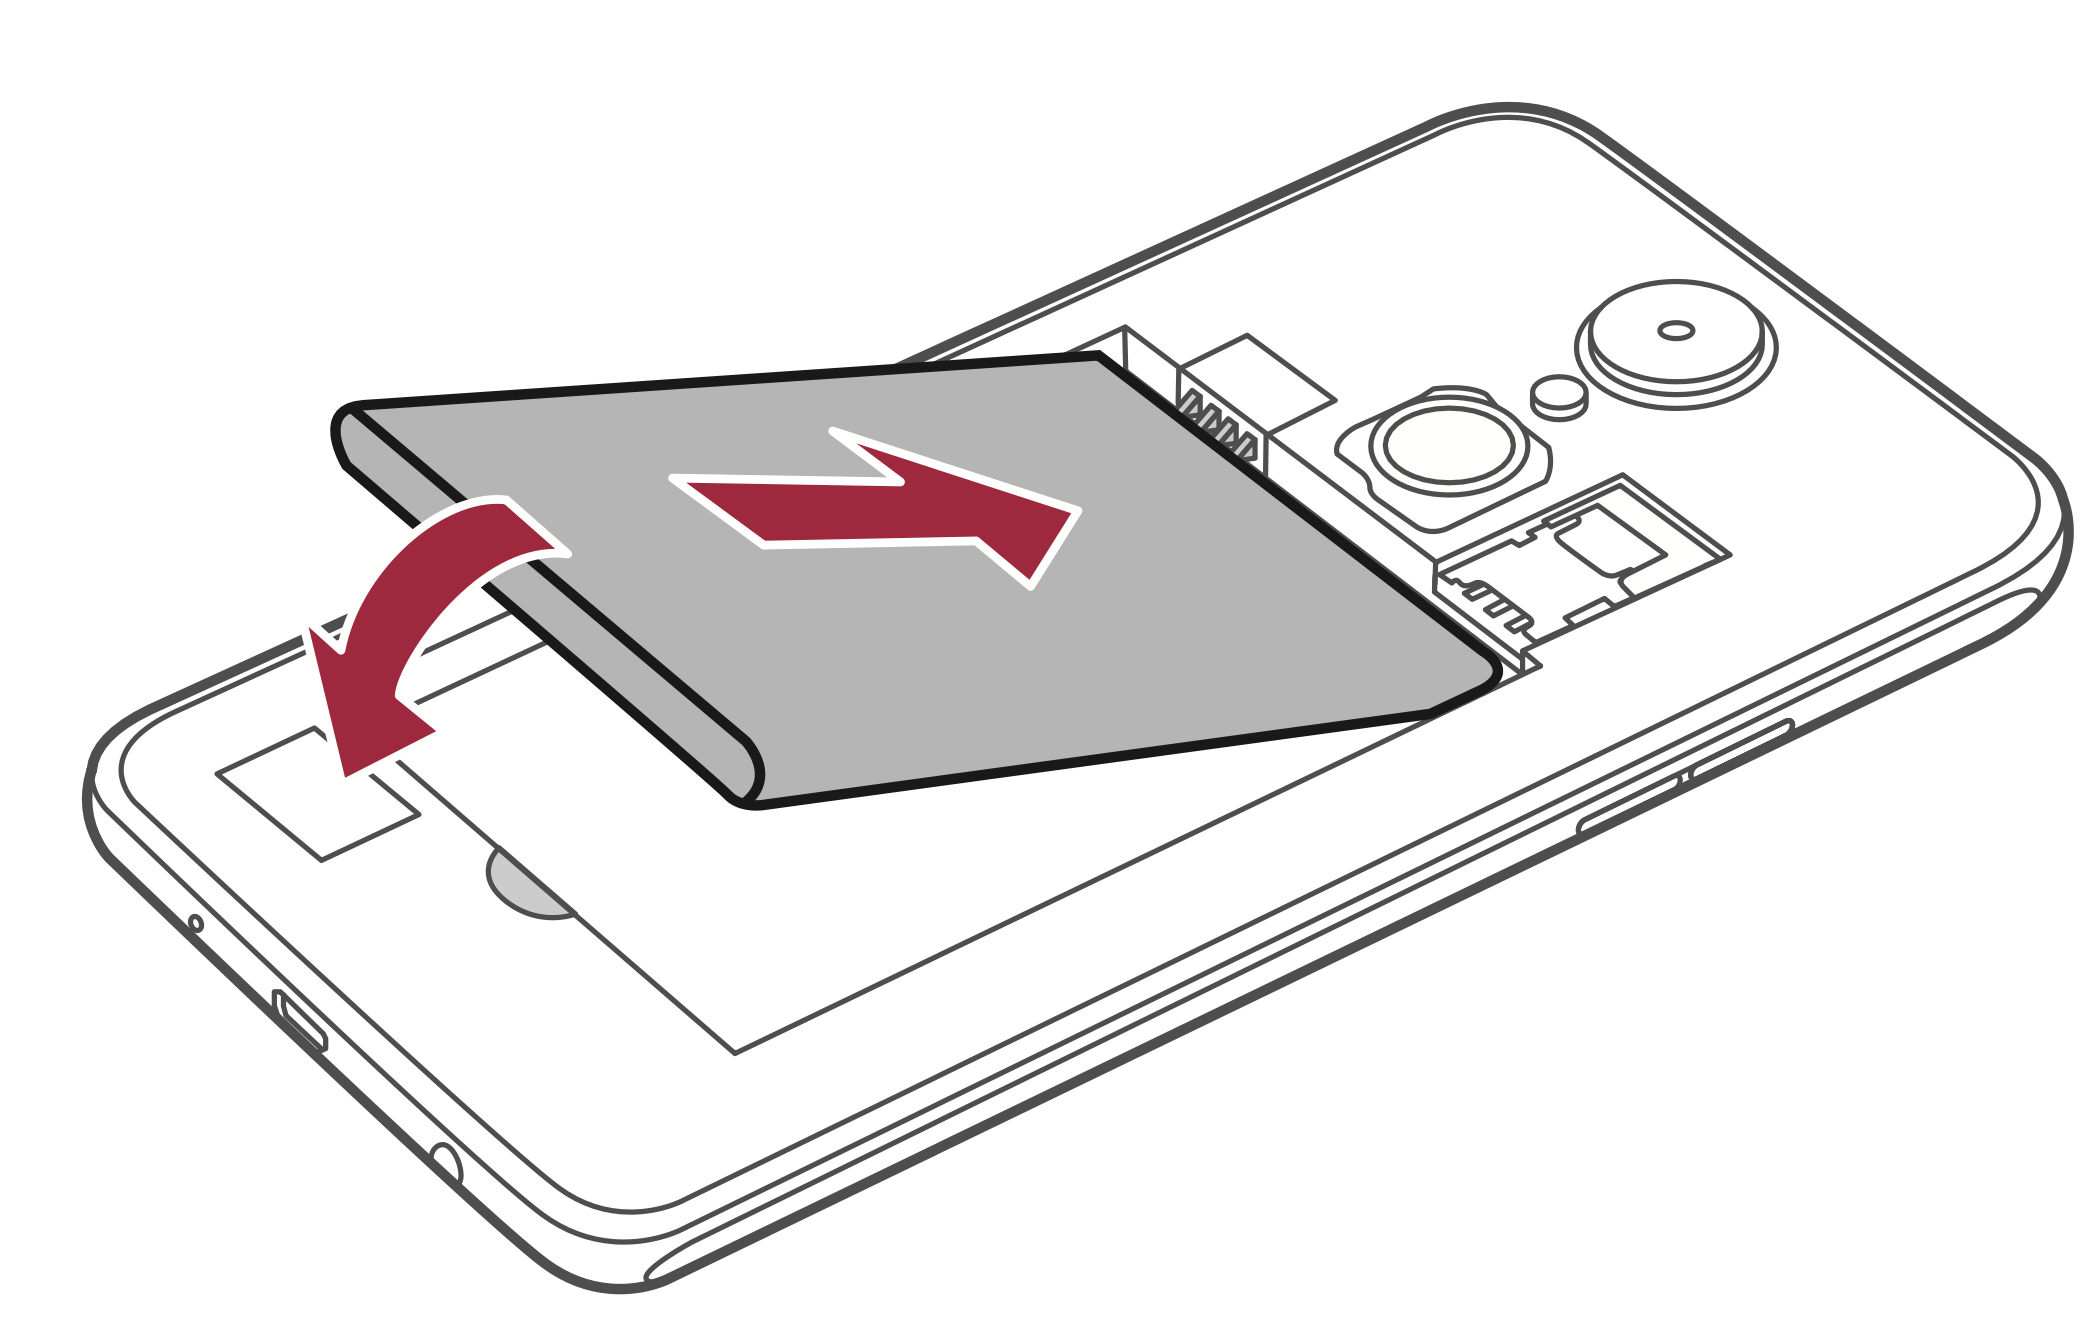
- To replace the cover onto the device, align the back cover over the battery compartment and press it down until it clicks into place.
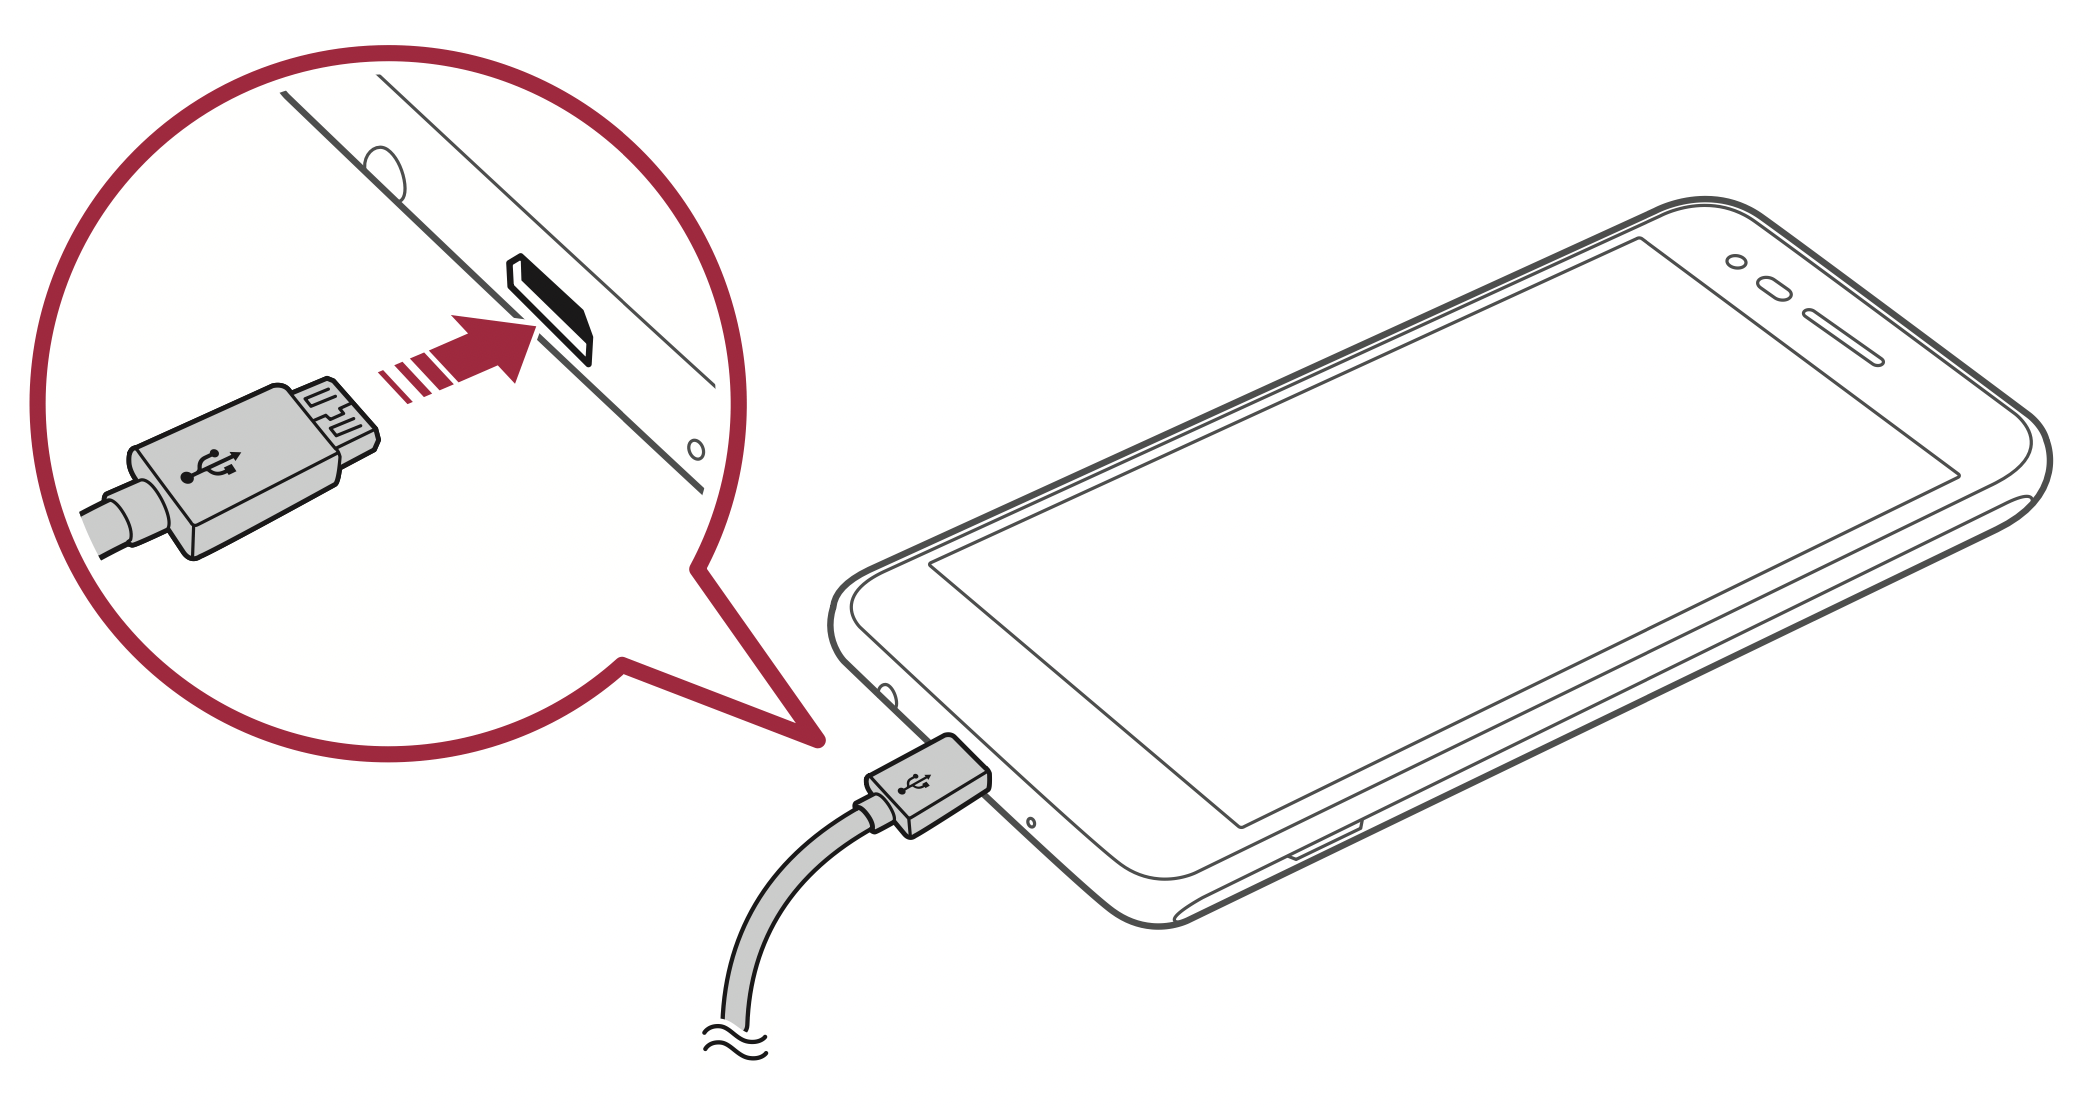
Charging the battery
Charge the battery before using it for first time. Use the charger that came with your device to charge the battery. A computer can also be used to charge the battery by connecting the device to it using the USB cable.
WARNING: Use only LG-approved chargers, batteries and cables. The use of unapproved chargers, batteries or cables may cause a battery charging delay. It can also cause the battery to explode or damage the device, which are not covered by the warranty.
The charger connector is located at the bottom of the device. Insert the charger and plug it into a power outlet.
NOTE: Do not open the back cover while your device is charging.
Inserting a memory card
Your device supports up to a 32 GB microSD card. (Not included) Depending on the memory card manufacturer and type, some memory cards may not be compatible with your device.
WARNING: Some memory cards may not be fully compatible with the device. If you use an incompatible card, it may damage the device or the memory card, or corrupt the data stored in it.
NOTE: If you write and erase data too frequently, it will shorten the memory card lifespan.
- Remove the back cover.
- Insert a memory card with the gold-colored contacts facing downwards.
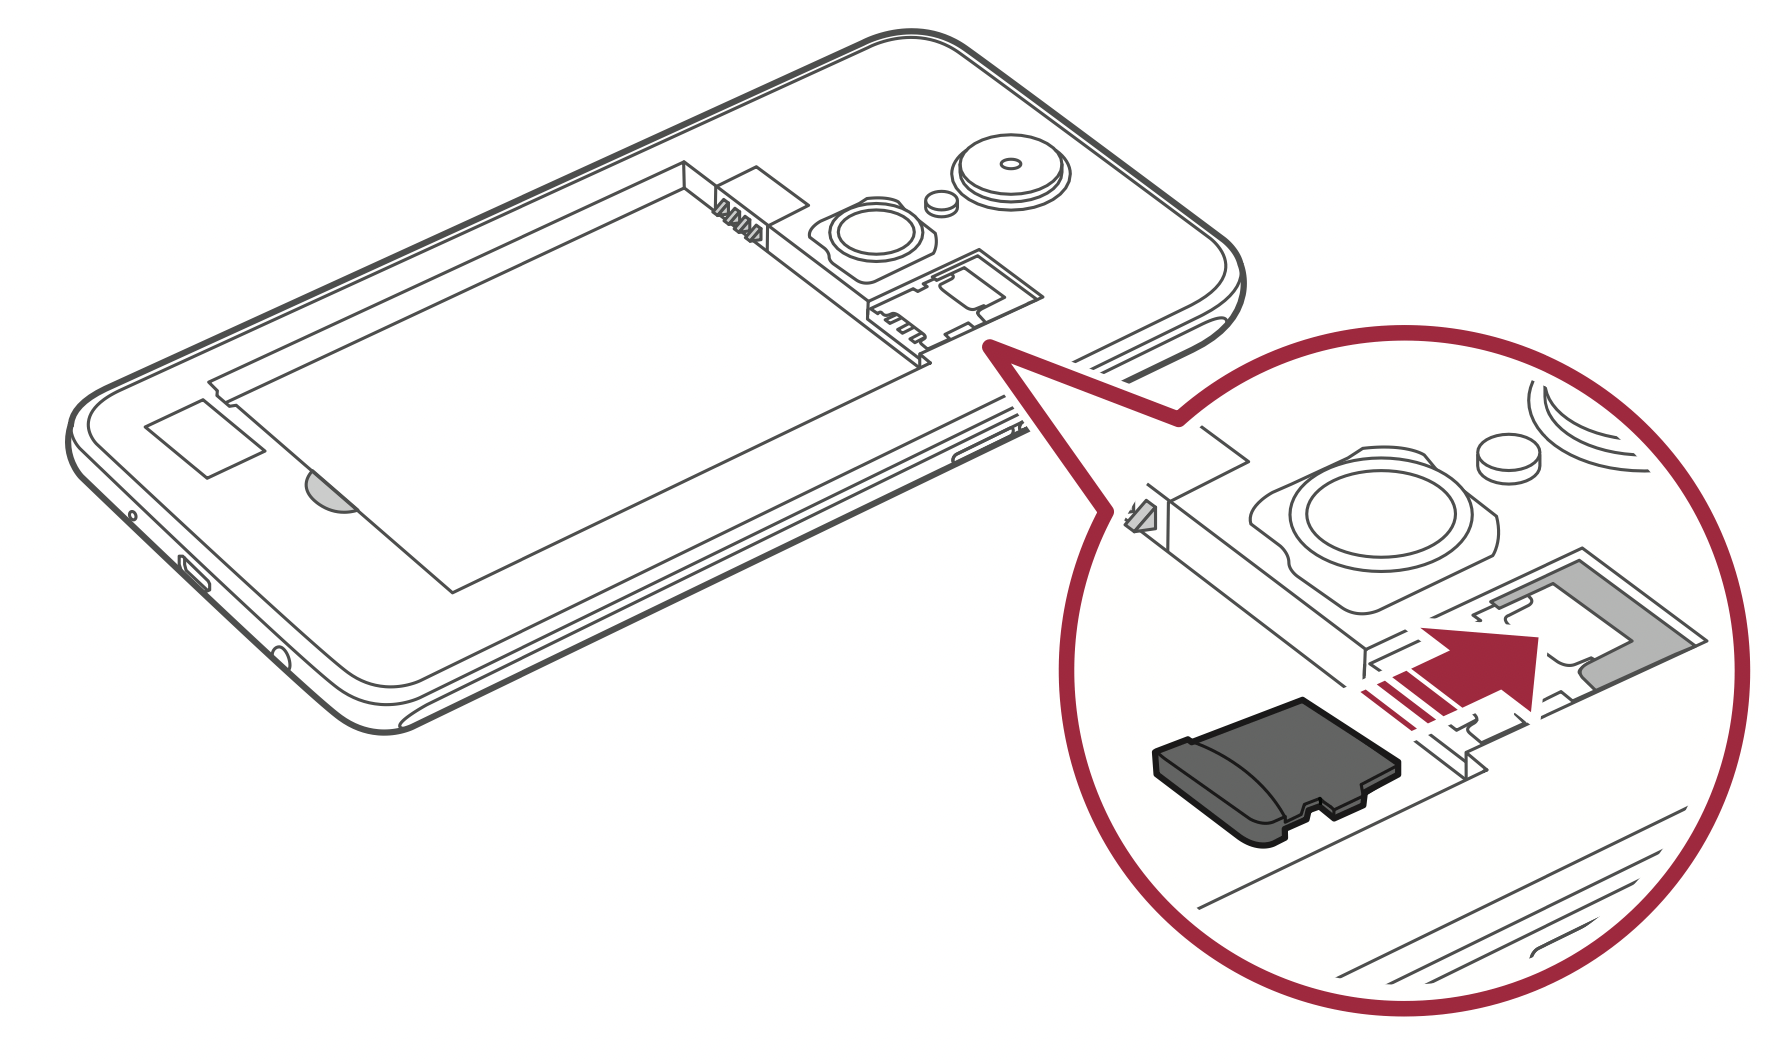
- Replace the back cover.
Removing the memory card
Before removing the memory card, first unmount it for safe removal.
- Tap
 >
>  > Storage & USB >
  .
.
- Remove the back cover and pull out the memory card.
WARNING: Do not remove the memory card while the device is transferring or accessing information. This behavior can cause data to be lost or corrupted or can damage the memory card or the device. LG is not responsible for losses that result from the abuse or improper use of memory cards, including the loss of data.
Touch screen tips
Here are some tips on how to navigate on your device.
NOTE
- Do not press too hard; the touch screen is sensitive enough to pick up a light, yet firm tap.
- Use the tip of your finger to tap the option you want. Be careful not to tap any other buttons.
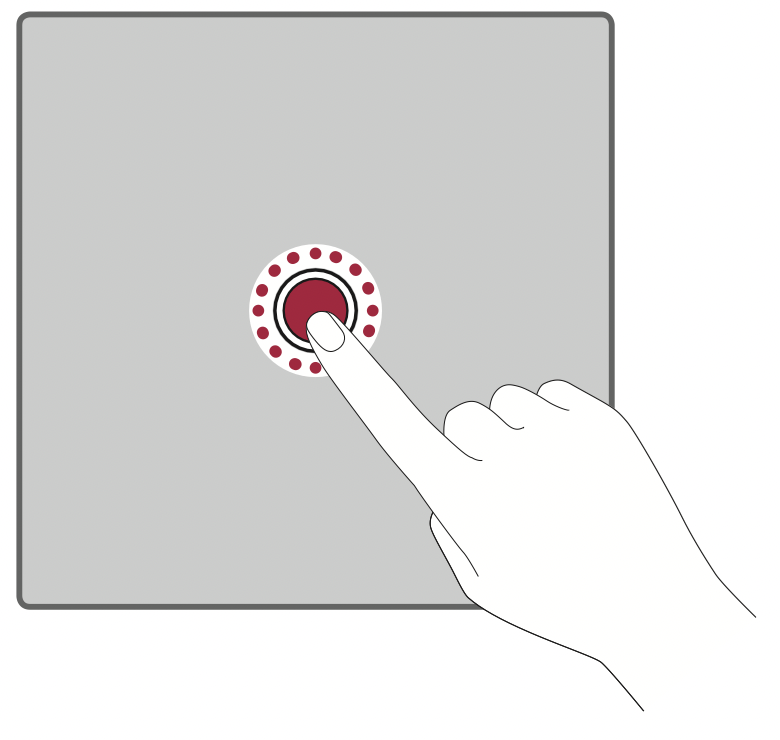
Tap or touch
Tap or touch to activate your chosen item, link, shortcut, or letter on the on-screen keyboard.
Touch and hold
Touch and hold an item on the screen by touching it and not lifting your finger until an action occurs.
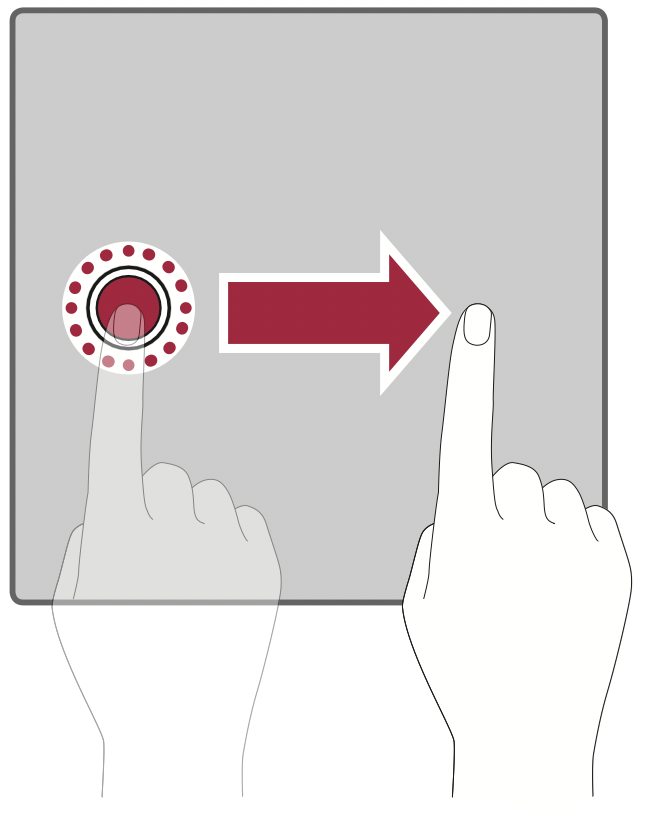
Drag
Touch and hold an item for a moment and then, without lifting your finger, move your finger on the screen until you reach the target position. You can drag items on the Home screen to reposition them.
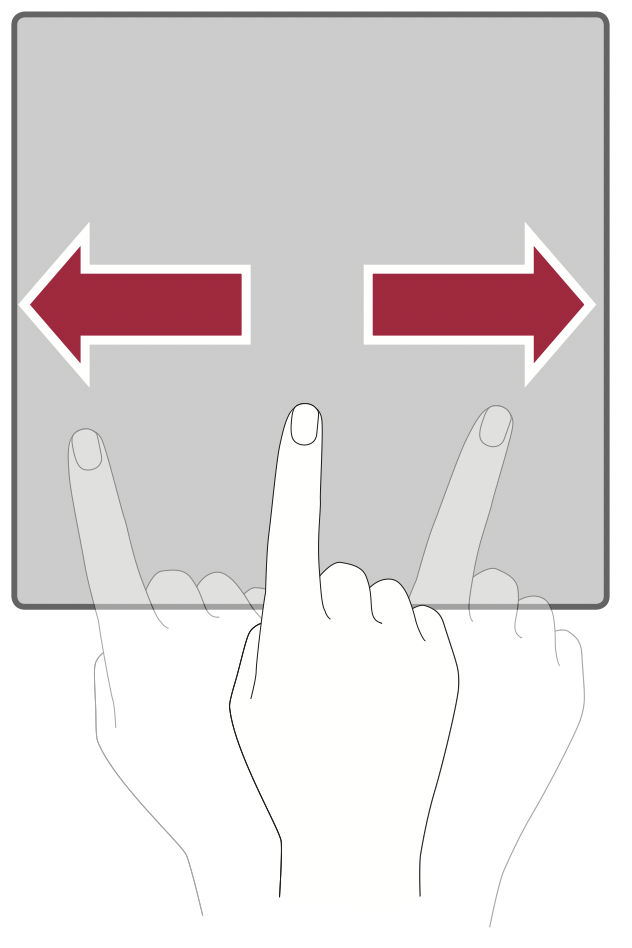
Swipe or slide
To swipe or slide, quickly move your finger across the surface of the screen, without pausing when you first tap it (so you don't drag an item instead).
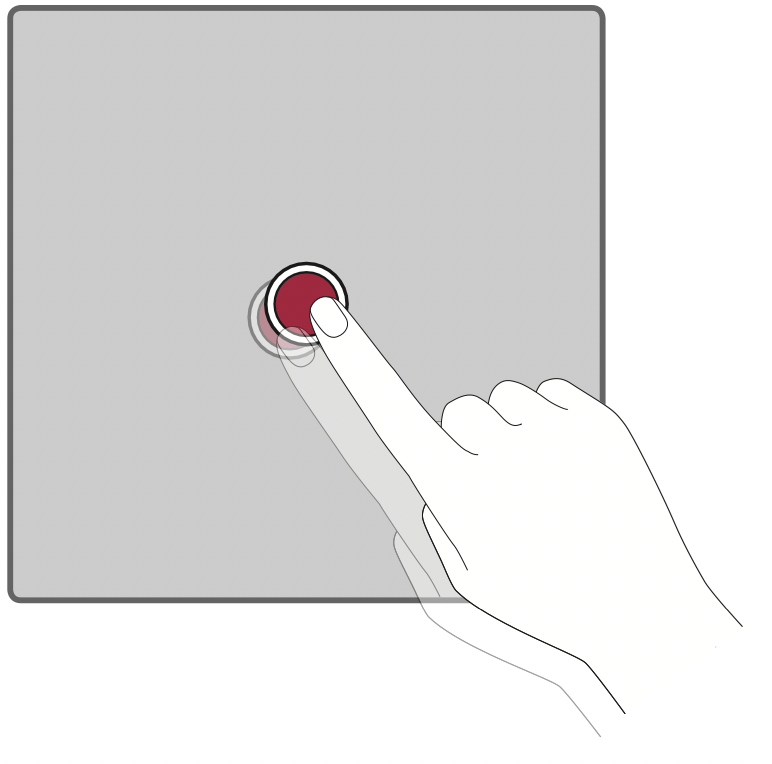
Double-tap
Double-tap to zoom on a webpage or a map.
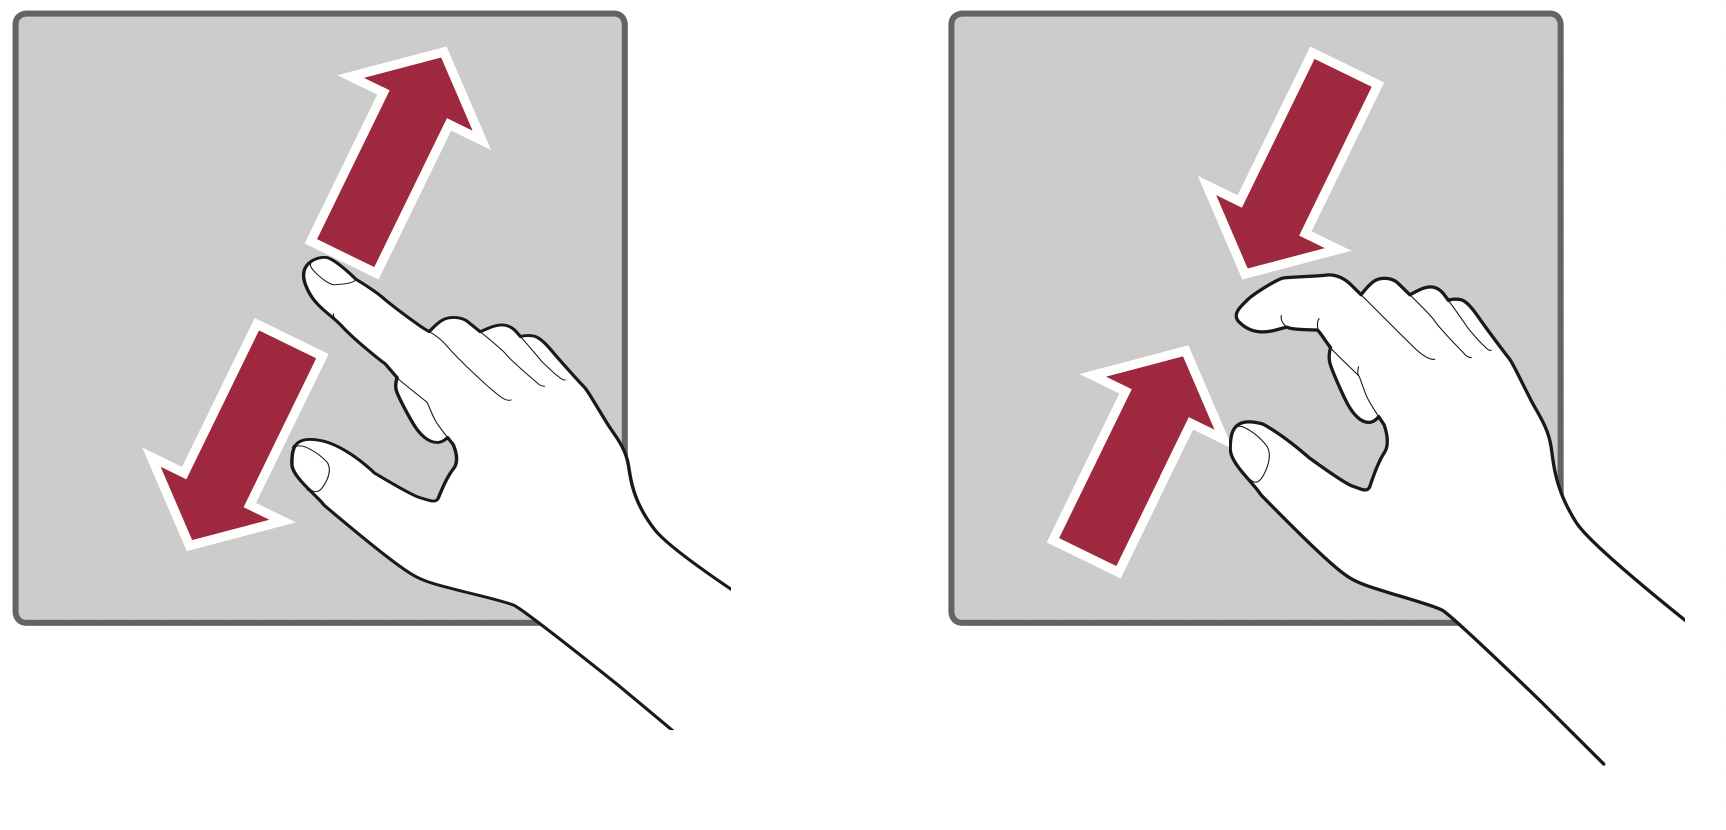
Pinch-to-Zoom
Use your index finger and thumb in a pinching or spreading motion to zoom in or out when using the browser, Maps, or when viewing pictures.
Google account setup
The first time you open a Google application on your device, you will be required to sign in with your existing Google account. If you do not have a Google account, you will be prompted to create one.
Creating your Google account
- Tap
 >
>  > Accounts & sync.
- Tap ADD ACCOUNT > Google > Or create a new account.
- Enter your first and last name, then tap NEXT.
- Enter your birthday and gender, then tap NEXT.
- Enter a username and tap NEXT. Your device will communicate with Google servers and check for username availability.
- Enter your password and tap NEXT.
- Follow the instructions and enter the required and optional information about the account. Wait while the server creates your account.
Signing into your Google account
- Tap
 >
>  > Accounts & sync.
- Tap ADD ACCOUNT > Google.
- Enter your email address and tap NEXT.
- Enter your password and tap NEXT.
- After signing in, you can use Gmail and take advantage of Google services on your device.
After signing in, your device will sync with your Google services, such as Gmail, Contacts, and Google Calendar. You can also use Maps, download applications from Play Store, back up your settings to Google servers, and take advantage of other Google services on your device.
Locking and unlocking the device
Pressing the Power/Lock Key turns off the screen and puts the device into lock mode. The device automatically gets locked if it is not used for a specified period. This helps to prevent accidental taps and saves battery power.
To unlock the device, press the Power/Lock Key and swipe the screen in any direction.
Changing the screen lock method
You can change the way that you lock the screen to prevent others accessing your personal information.
- Tap
 >
>  > Lock screen > Select screen lock.
- Select a desired screen lock from None, Swipe, Knock Code, Pattern, PIN and Password.
NOTE: Remember the Backup PIN you created when creating your pattern lock.
Smart Lock
You can use Smart Lock to make unlocking your device easier. You can set it to keep your device unlocked when you have a trusted Bluetooth® device connected to it, when it's in a familiar location like your home or work, when it recognizes your face or voice, or when it detects you're carrying it.
Setting up Smart Lock feature
- Tap > > Lock screen > Smart Lock.
- Follow the instructions on the screen.
NOTE: Before you add any trusted items or on-body detection, you need to set up a screen lock (Knock Code, Pattern, PIN or Password).
Home screen
The Home screen is the starting point for many applications and functions. It allows you to add items like app shortcuts and Google widgets to give you instant access to information and applications. This is the default canvas and accessible from any menu by tapping .
Getting to Know the Home Screen
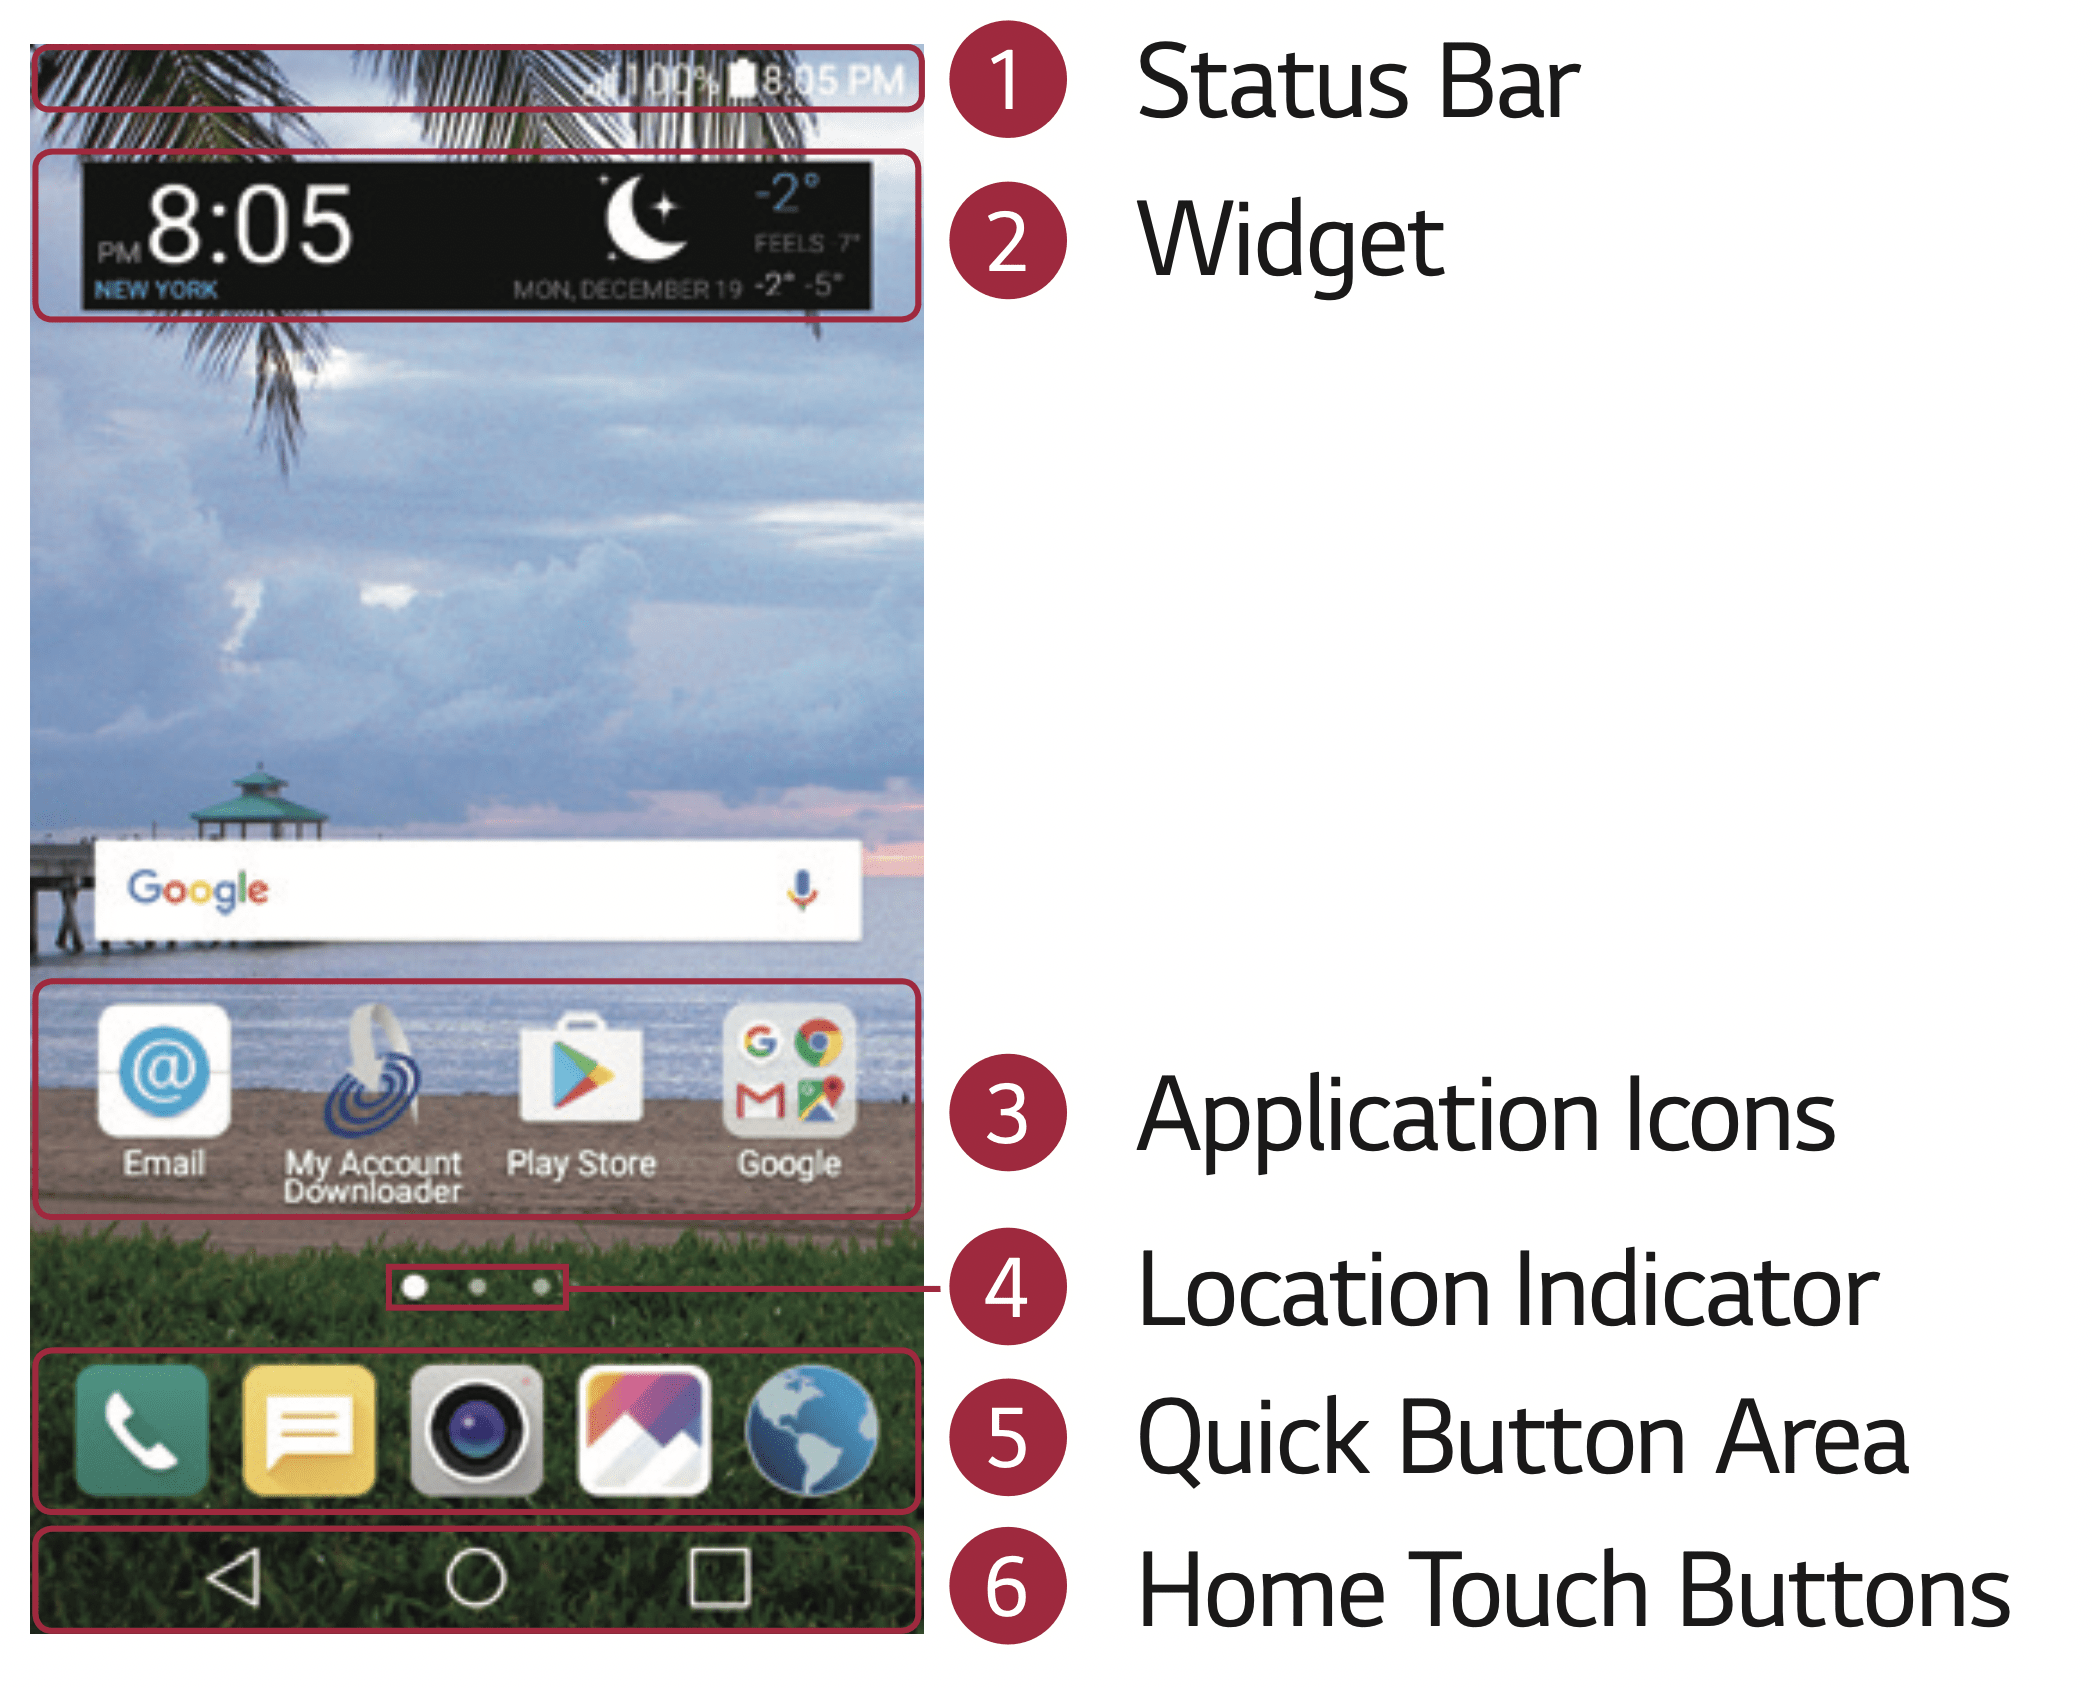
- Status Bar - Shows the device's status information, including the time, signal strength, battery status and notification icons.
- Widget - Widgets are self-contained applications that can be accessed through the Home screen. Unlike a shortcut, the Widget can function as an on-screen application.
- Application Icons - Tap an icon (application, folder, etc.) to open and use it.
- Location Indicator - Indicates which Home screen canvas you are currently viewing.
- Quick Button Area - Provides one-touch access to the function in any Home screen canvas.
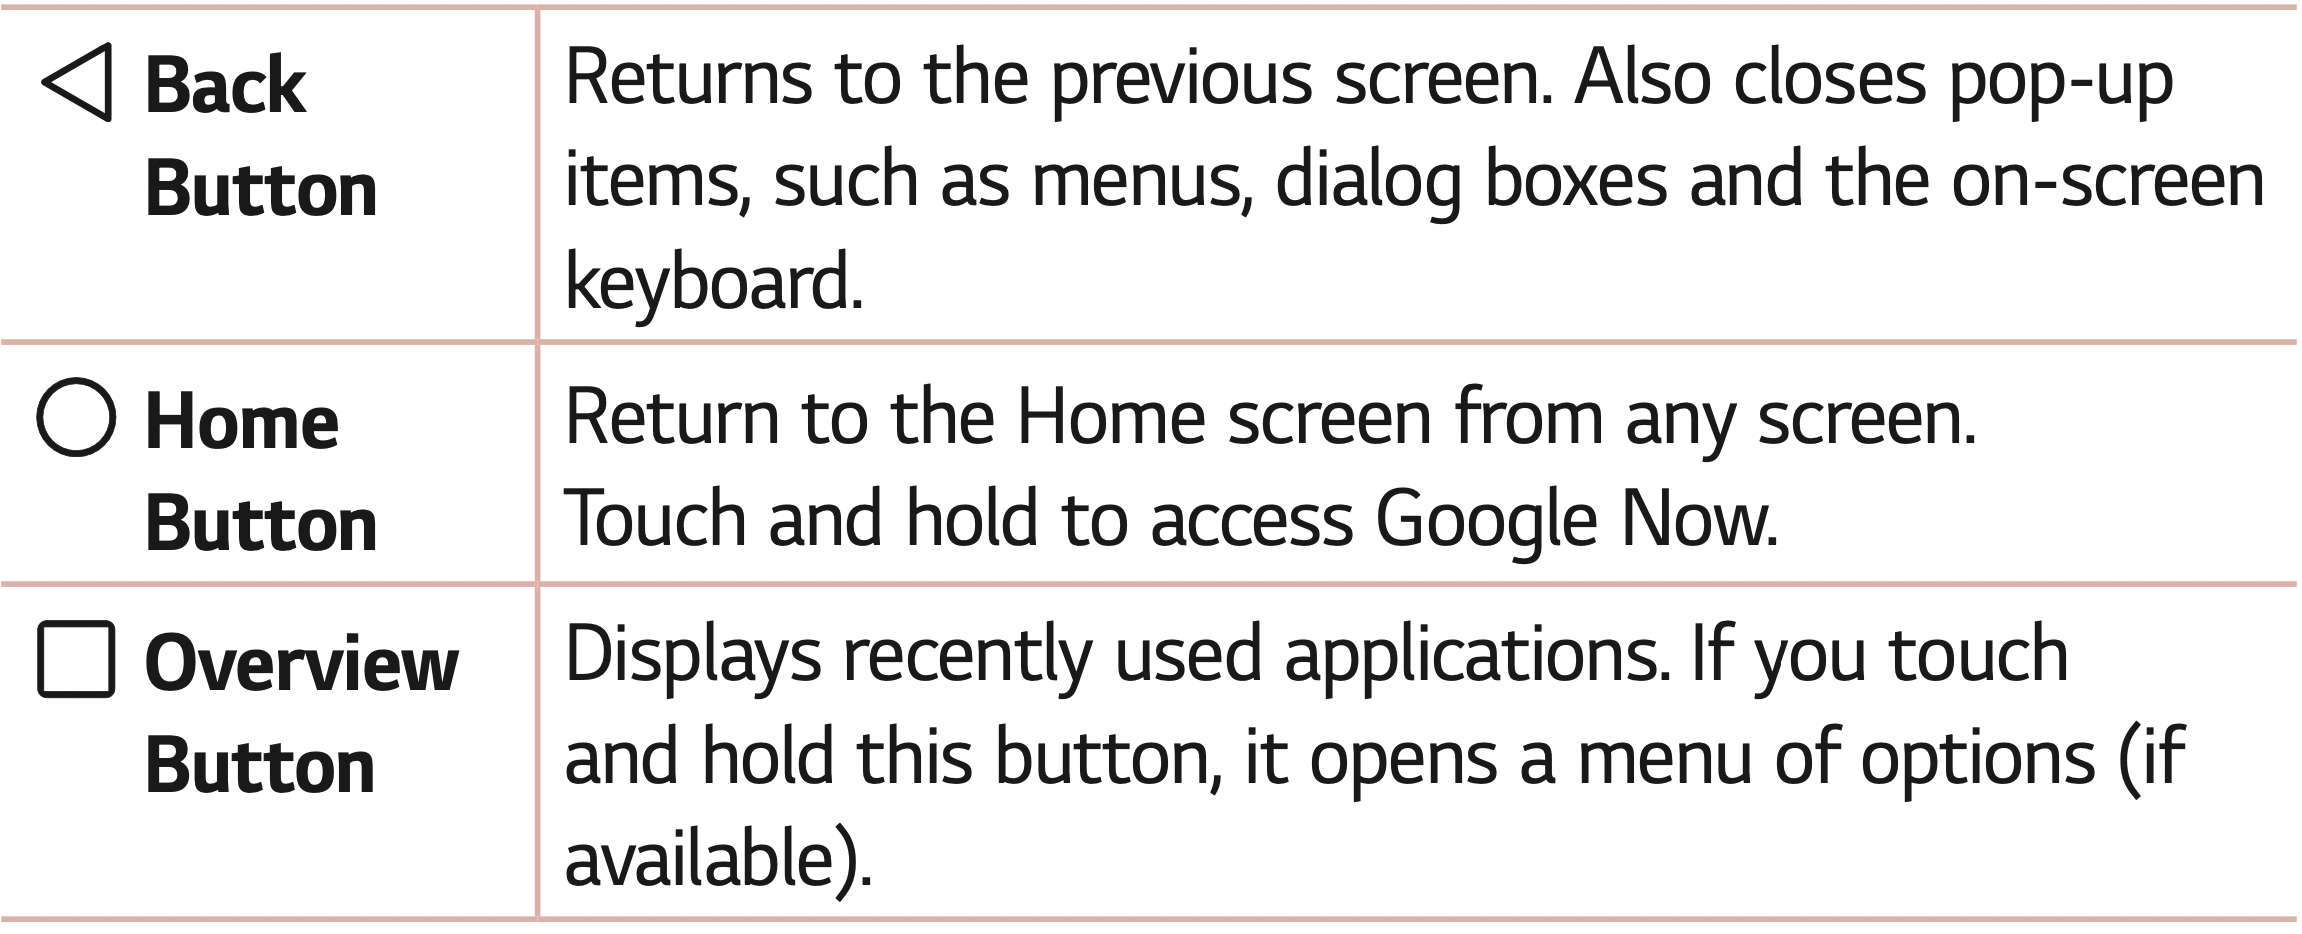
- Home Touch Buttons
To view other Home screen panels
Multiple Home screen canvases are available to provide more space for adding icons, widgets and more.
- Slide your finger left or right across the Home screen to access additional canvases.
Returning to recently-used applications
Multitasking is easy with Android; you can keep more than one application running at the same time. There is no need to quit an application before opening another. Use and switch between several open applications. Android manages each application, stopping and starting them as needed to make sure that idle applications don't consume resources unnecessarily.
- Tap
 . A list of recently used applications will be displayed.
- Tap the application you want to access. This does not stop the previous app from running in the background. Make sure to tap
 to back out of an app after using it.
- To close an app from the recent apps list, swipe the app preview to the left or right. To clear all apps, tap Clear all.
Customizing the Home screen
You can customize your Home screen by adding widgets and changing Home screen settings.
Editing the Home screen
On the Home screen, touch and hold on an empty space of the Home screen.
- To rearrange the Home screen canvases, touch and hold on a canvas, then drag it to another location.
- To add widgets to the Home screen, tap Widgets and drag a widget to the Home screen.
- To change the Home screen settings, tap Home screen settings and customize the desired options.
- To view a list of apps that have been uninstalled in the previous 24 hours, tap Uninstalled apps.
Moving apps on the Home screen
On the Home screen, touch and hold an app, then drag it to another location.
- To keep frequently used apps at the bottom of the Home screen, touch and hold an app, then drag it to the quick access area at the bottom.
- To remove an icon from the quick access area, drag the icon to the Home screen.
Using folders from the Home screen
Creating folders
On the Home screen, touch and hold an app, then drag it over another app.
- A new folder is created and the app is added to the folder.
Editing folders
On the Home screen, tap a folder and then do one of the following:
- To edit the folder name and color, tap the folder name.
- To remove an app from the folder, touch and hold the app and drag it to the outside the folder. If only one app is left in the folder, the folder disappears automatically.
Notifications panel
Notifications alert you to the arrival of new messages, calendar events and alarms, as well as ongoing events, such as when you are on a call.
Opening the notifications panel
Swipe down from the status bar to open the notifications panel. To close the notifications panel, swipe the screen upwards or tap  .
.
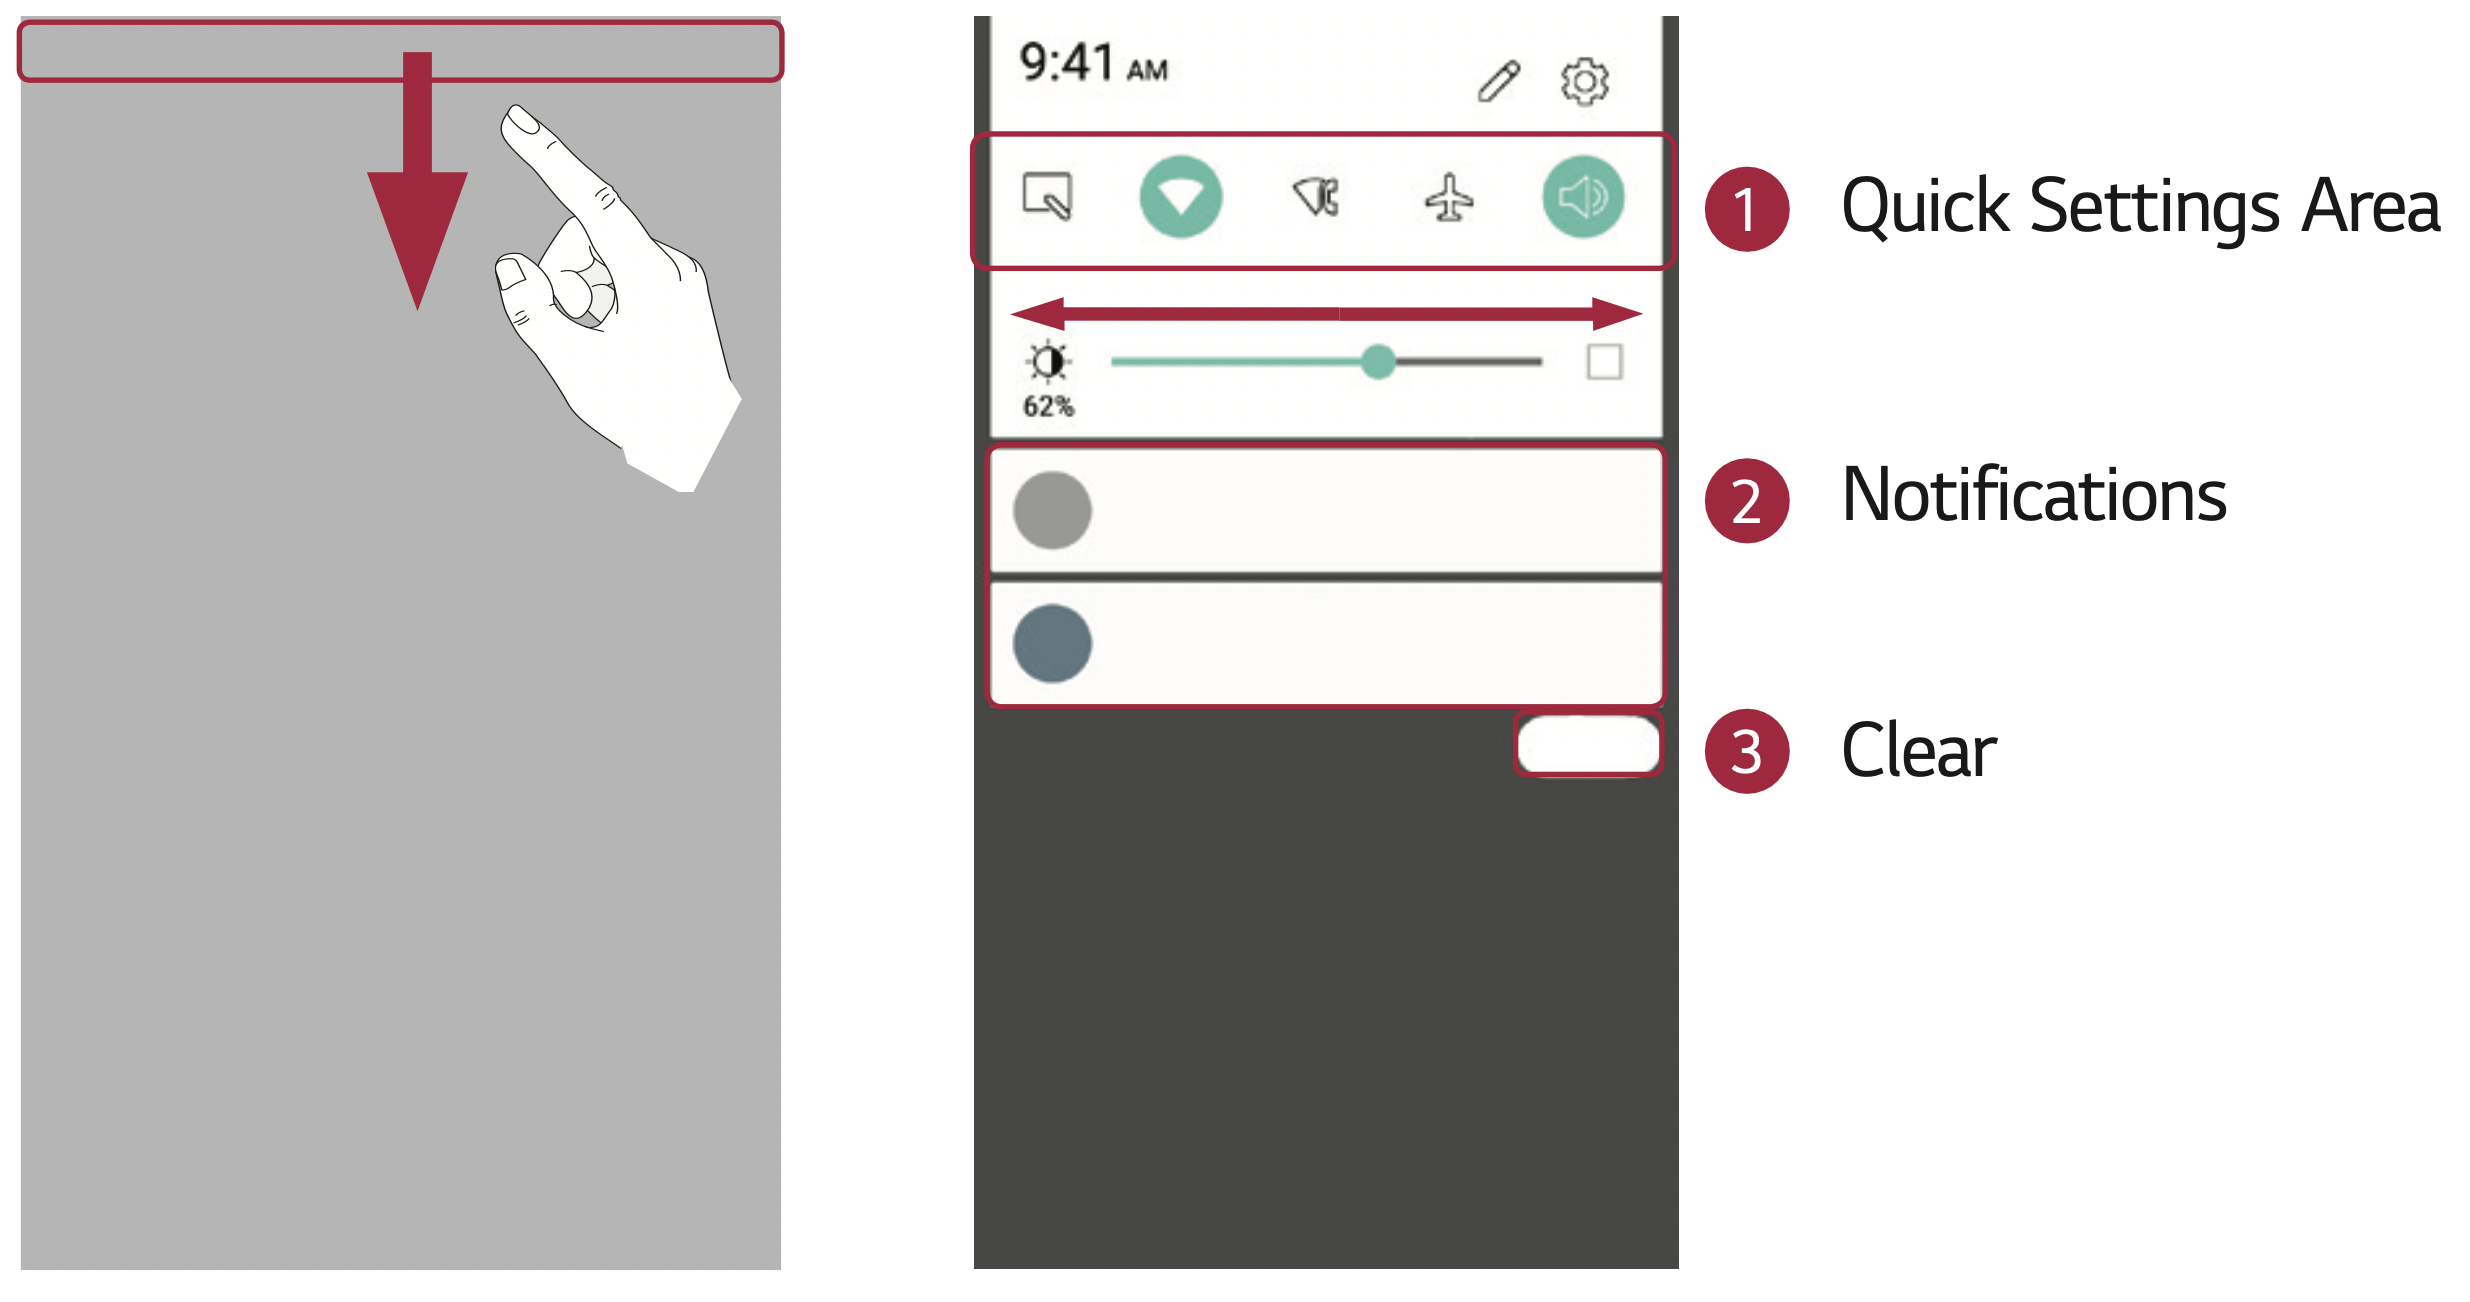
- Tap each quick setting button to toggle it on/off. Touch and hold the desired button to directly access the settings menu for the function. To see more toggle buttons, swipe left or right. Tap
 to remove, add or rearrange the quick setting buttons.
- Current notifications are listed, each with a brief description. Tap a notification to view it.
- Tap to clear all the notifications.
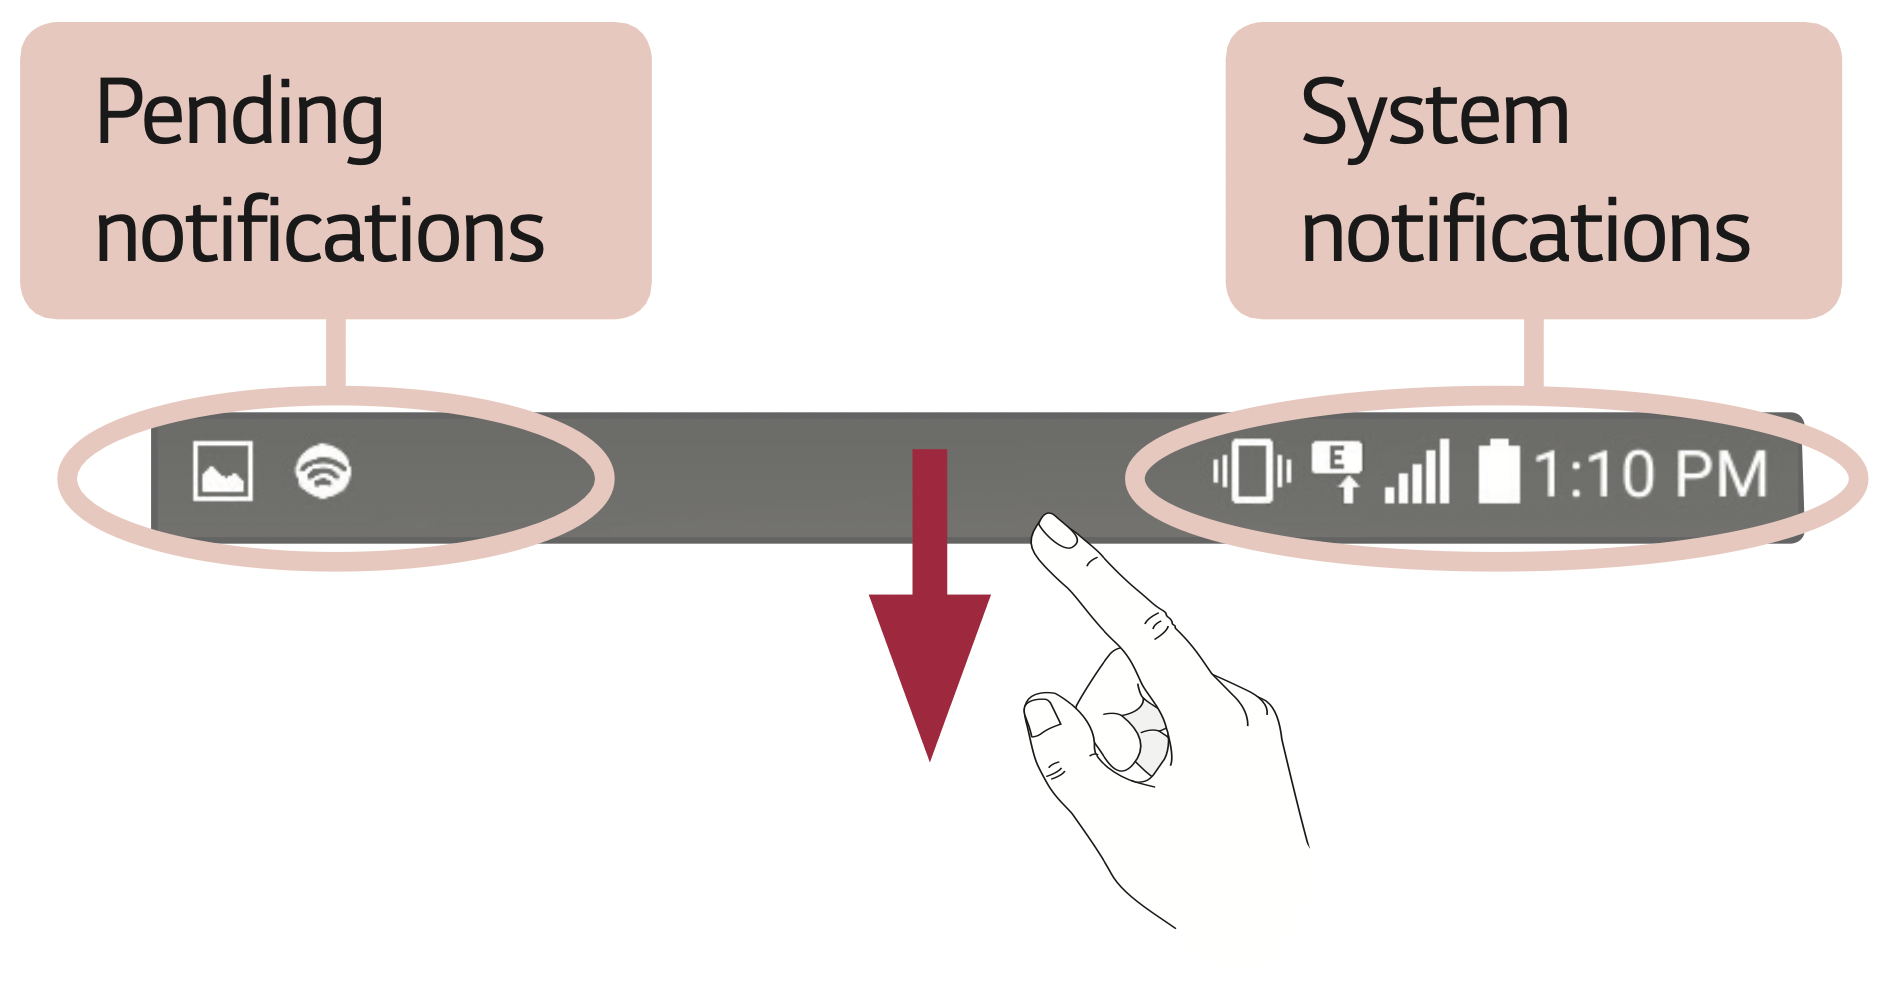
When a notification arrives, its icon appears at the top of the screen. Icons for pending notifications appear on the left, and system icons, such as Wi-Fi and battery strength are shown on the right.
Indicator icons on the Status Bar
Indicator icons appear on the status bar at the top of the screen to report missed calls, new messages, calendar events, device status and more.
The icons displayed at the top of the screen provide information about the status of the device. The icons listed in the table below are some of the most common ones.
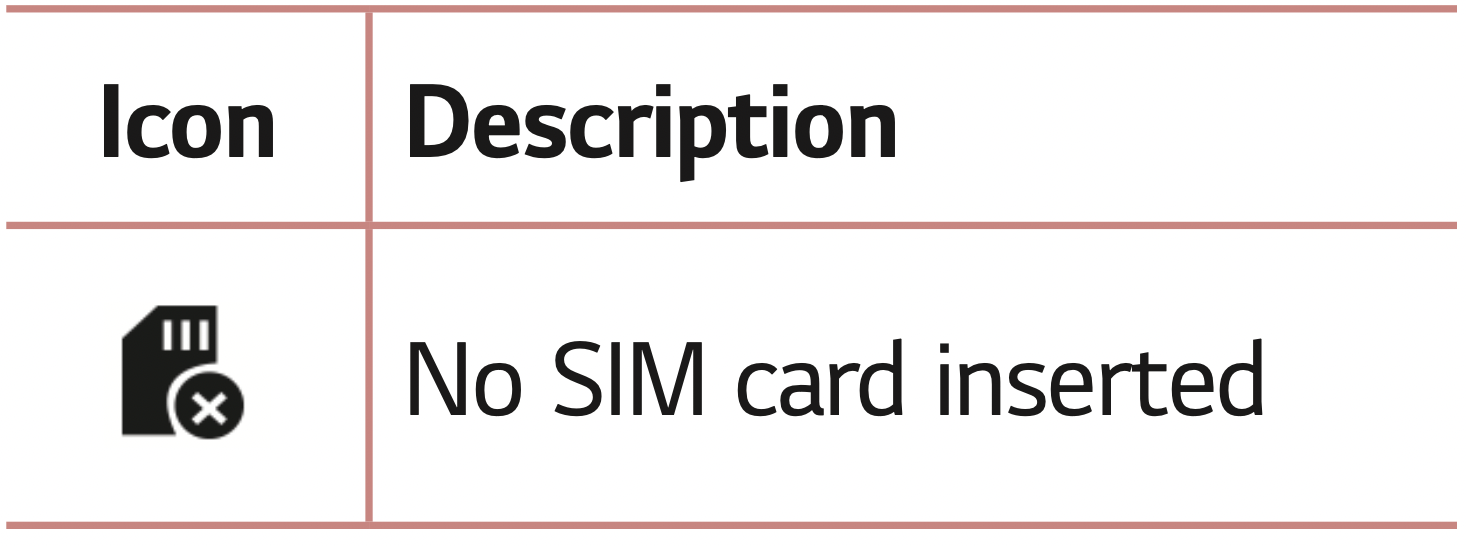
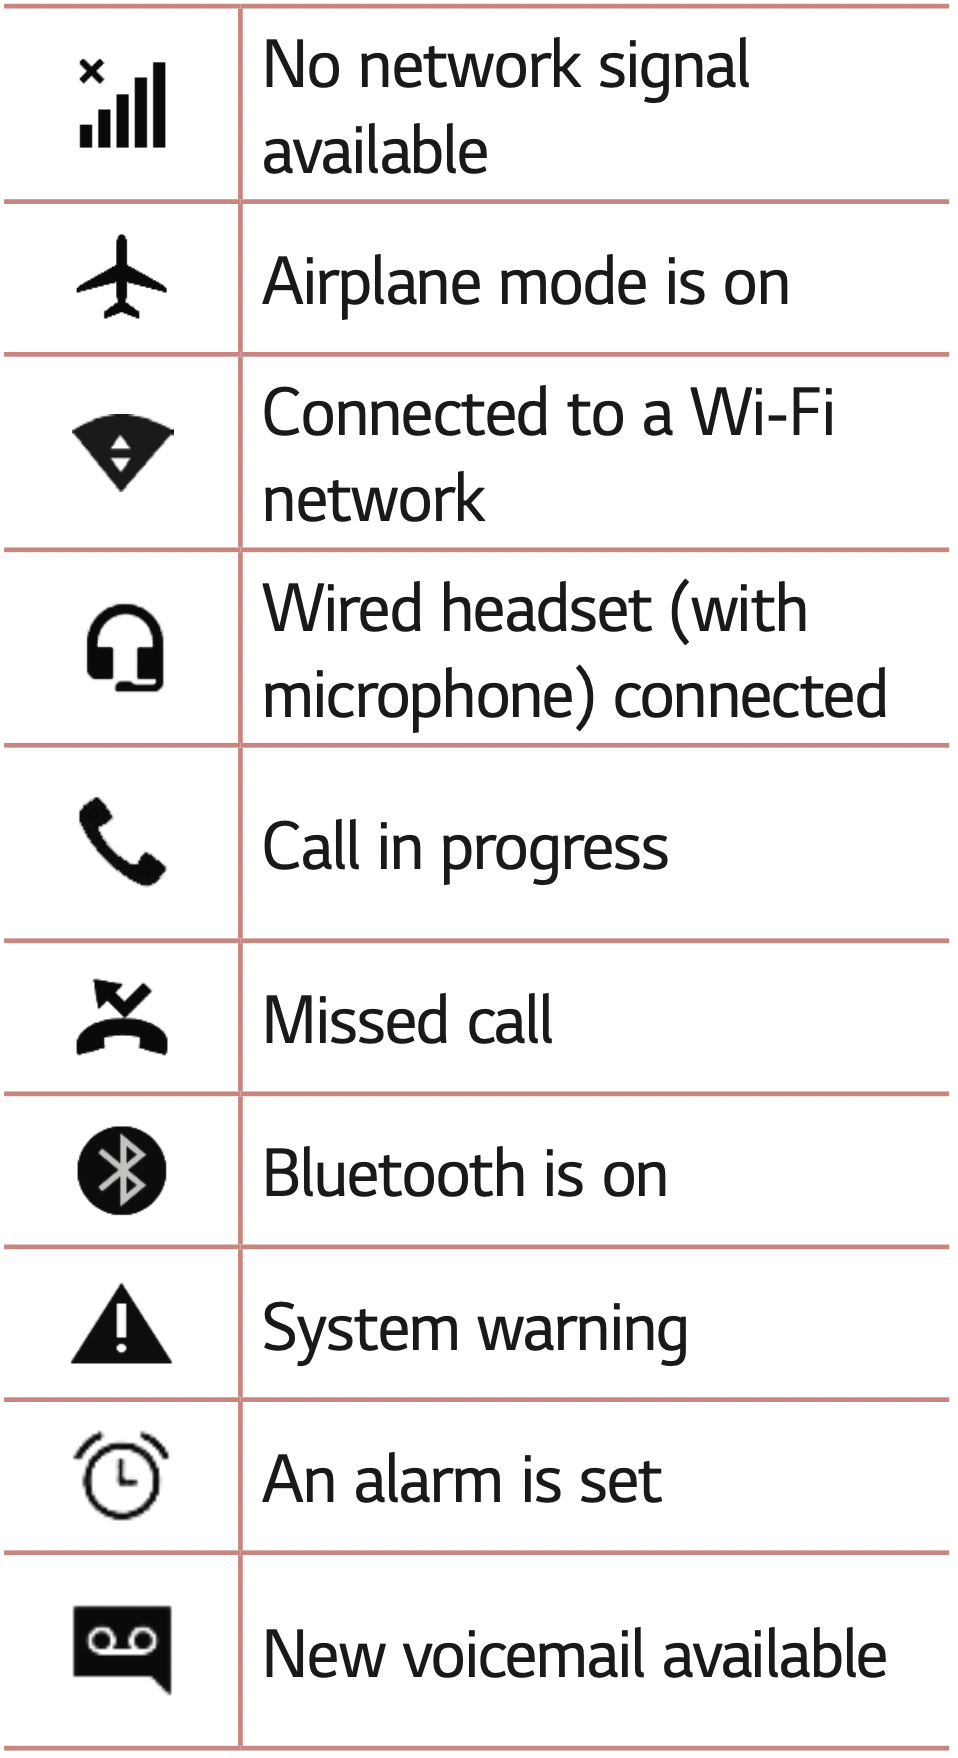
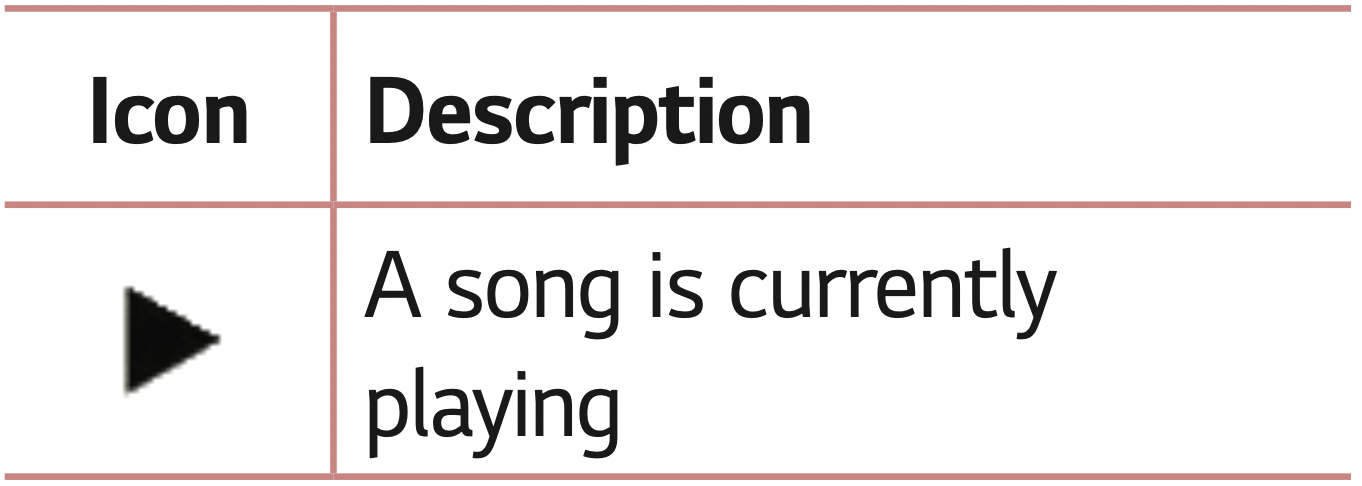
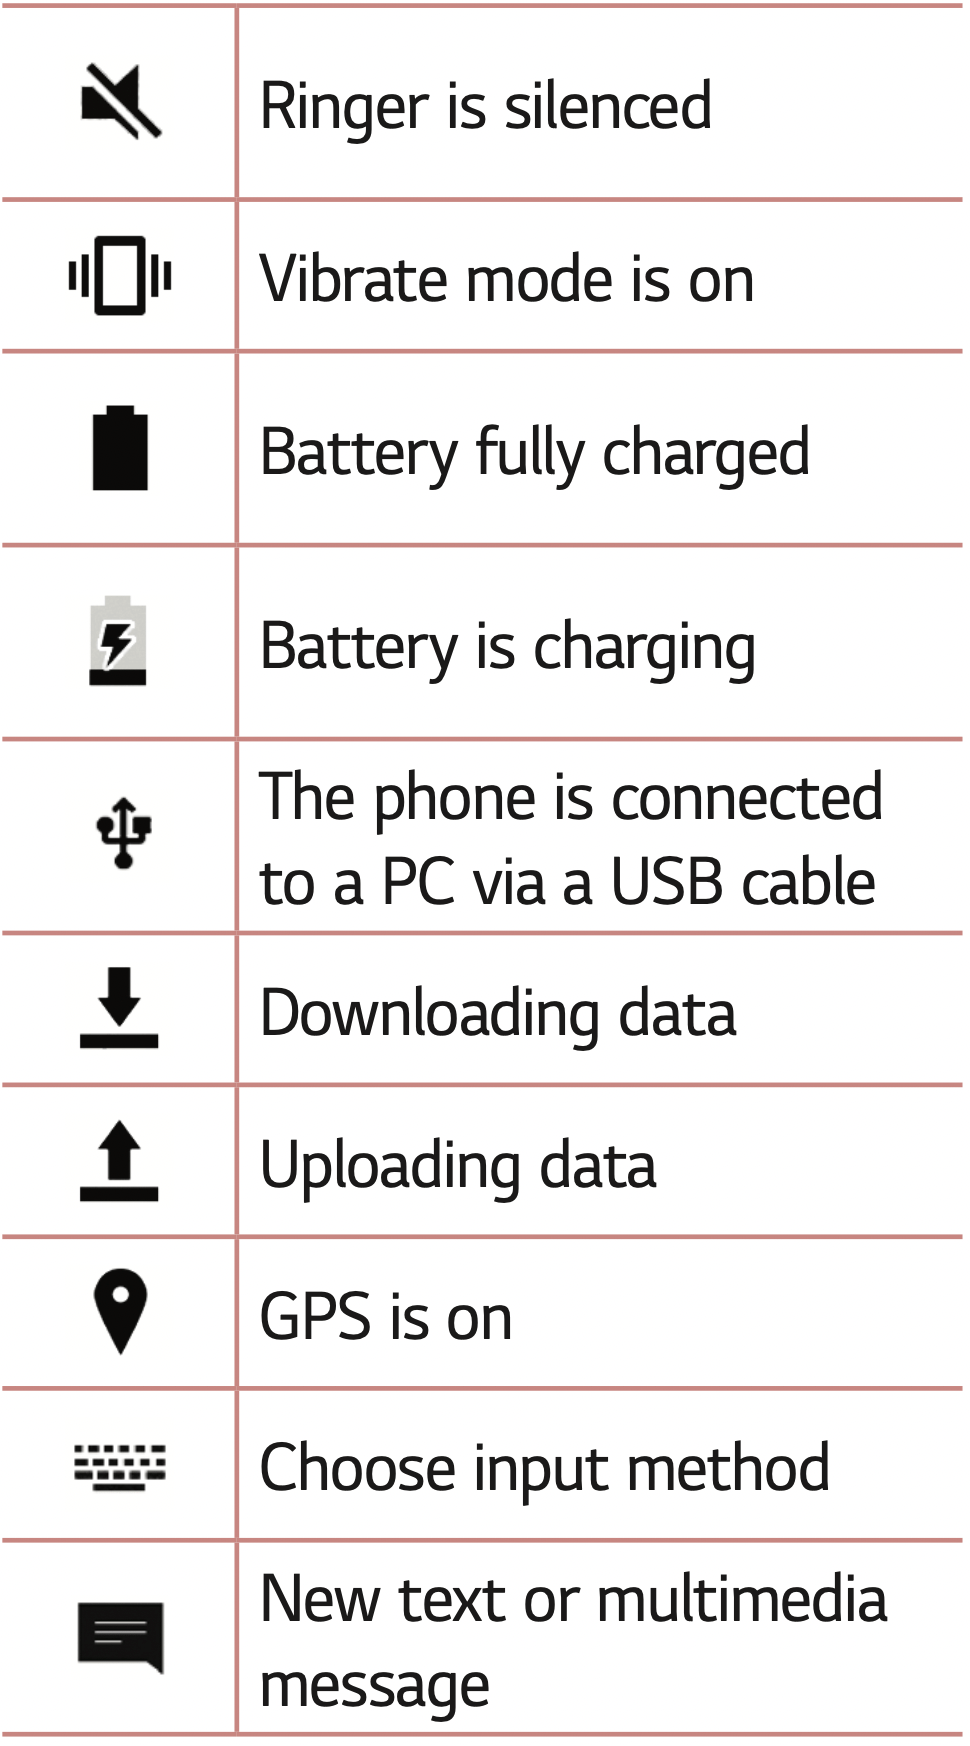
NOTE: The icon's location in the status bar may differ depending on the function or service.
Capturing a screenshot
Press and hold the Volume Down Key and the Power/Lock Key at the same time for 2 seconds to capture a screenshot of the current screen. To view the captured image, tap >  > the Screenshots folder.
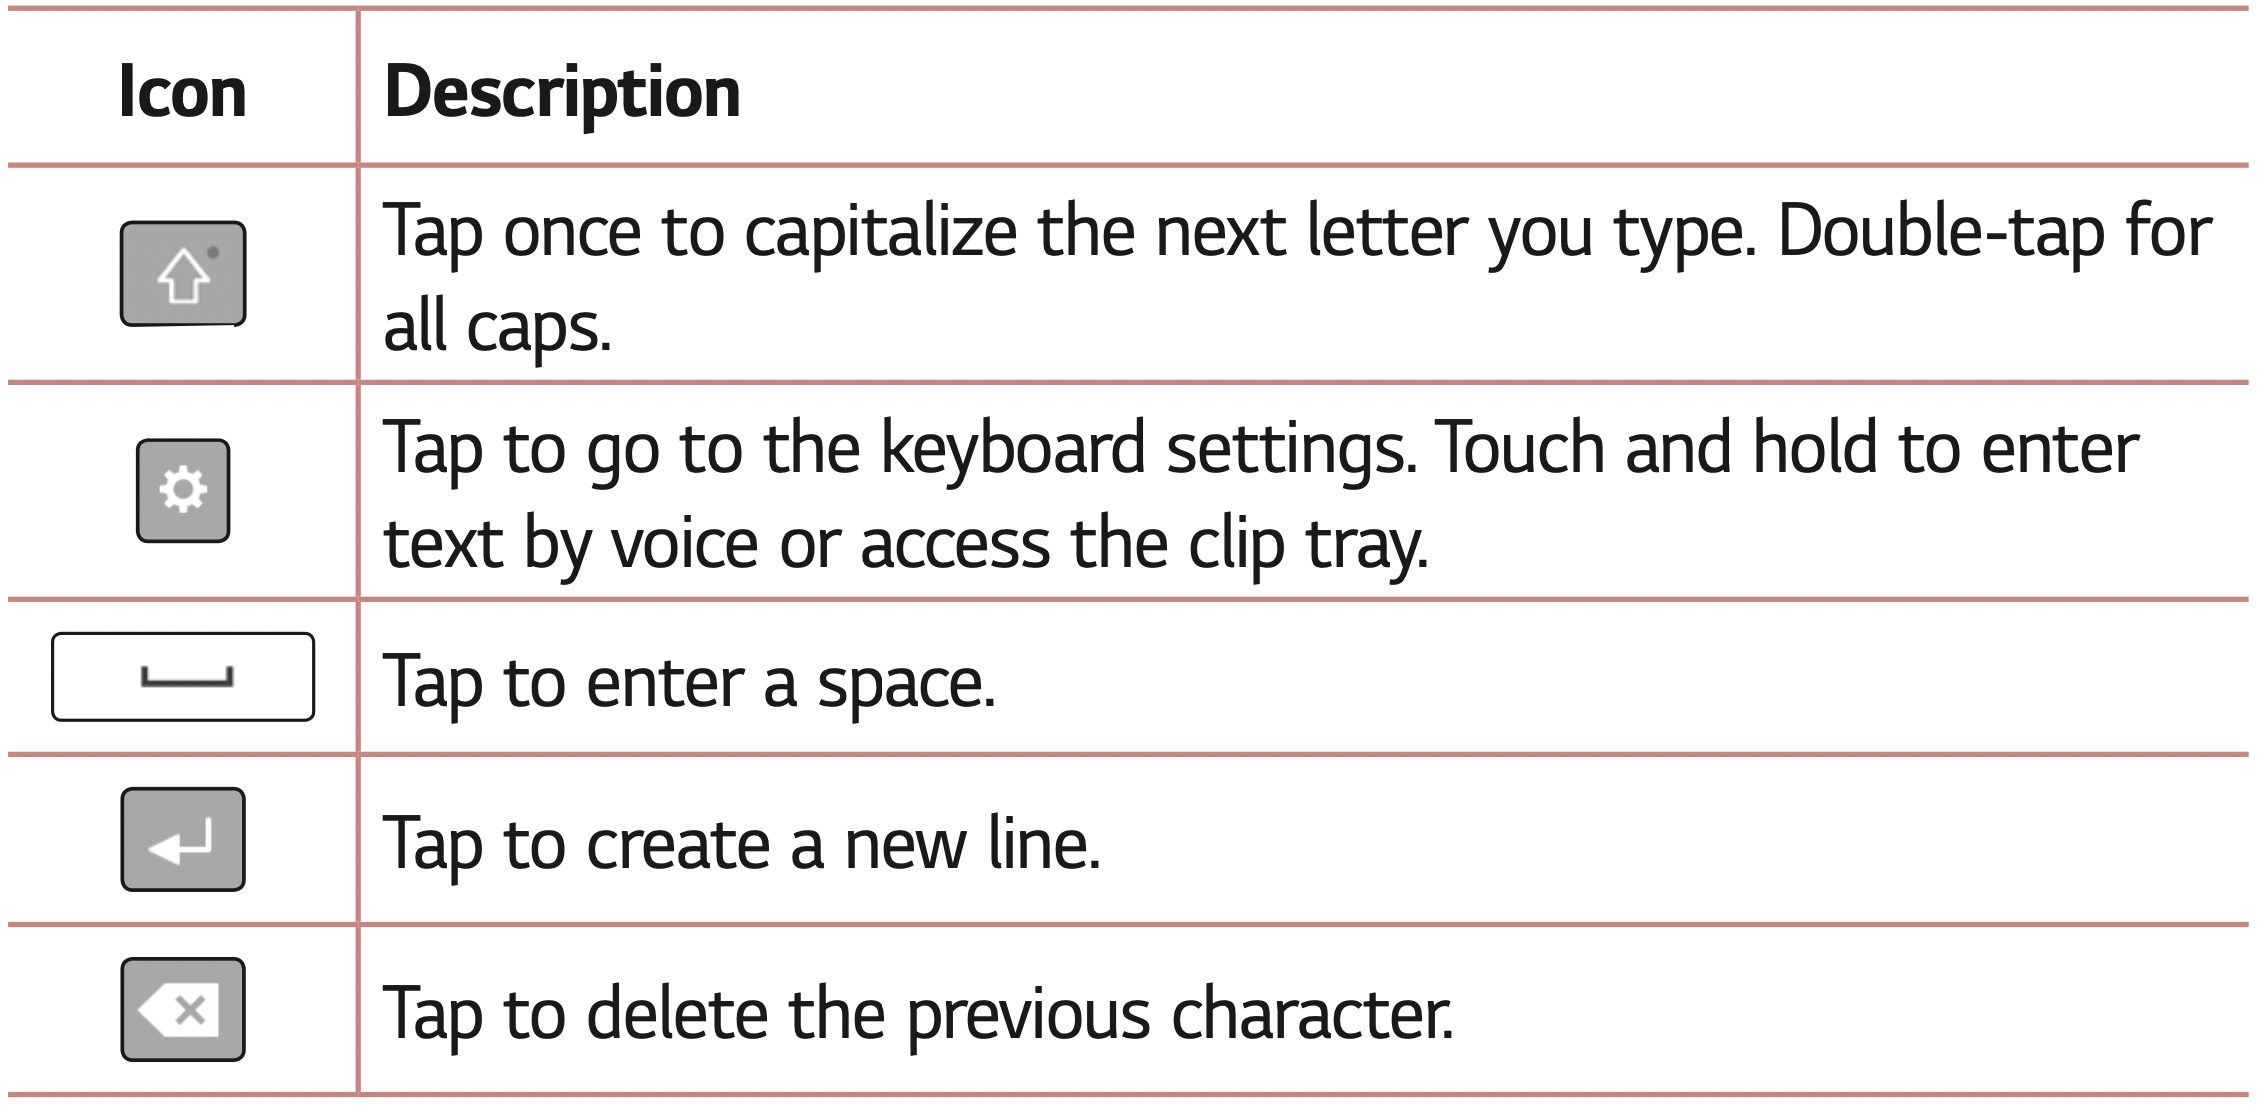
On-screen keyboard
You can enter text by using the on-screen keyboard. The on-screen keyboard appears on the screen when you tap an available text entry field.
Using the keypad and entering text
Entering special characters
The on-screen keyboard allows you to enter special characters.
For example, to input "á", touch and hold the "a" button until the pop-up appears and displays related special characters. Without lifting the finger, drag your finger to the desired special character. Once it's highlighted, lift your finger.
NOTE: A symbol at the top right corner of a key indicates that additional characters are available for that key.
Transferring data between a PC and the device
You can copy or move data between a PC and the device.
Transferring data using USB connection
- Connect your device to a PC using the USB cable that came with your device.
- Open the Notifications panel, tap the current connection type, and select File transfer.
- A window will pop-up on your PC, allowing you to transfer the desired data.
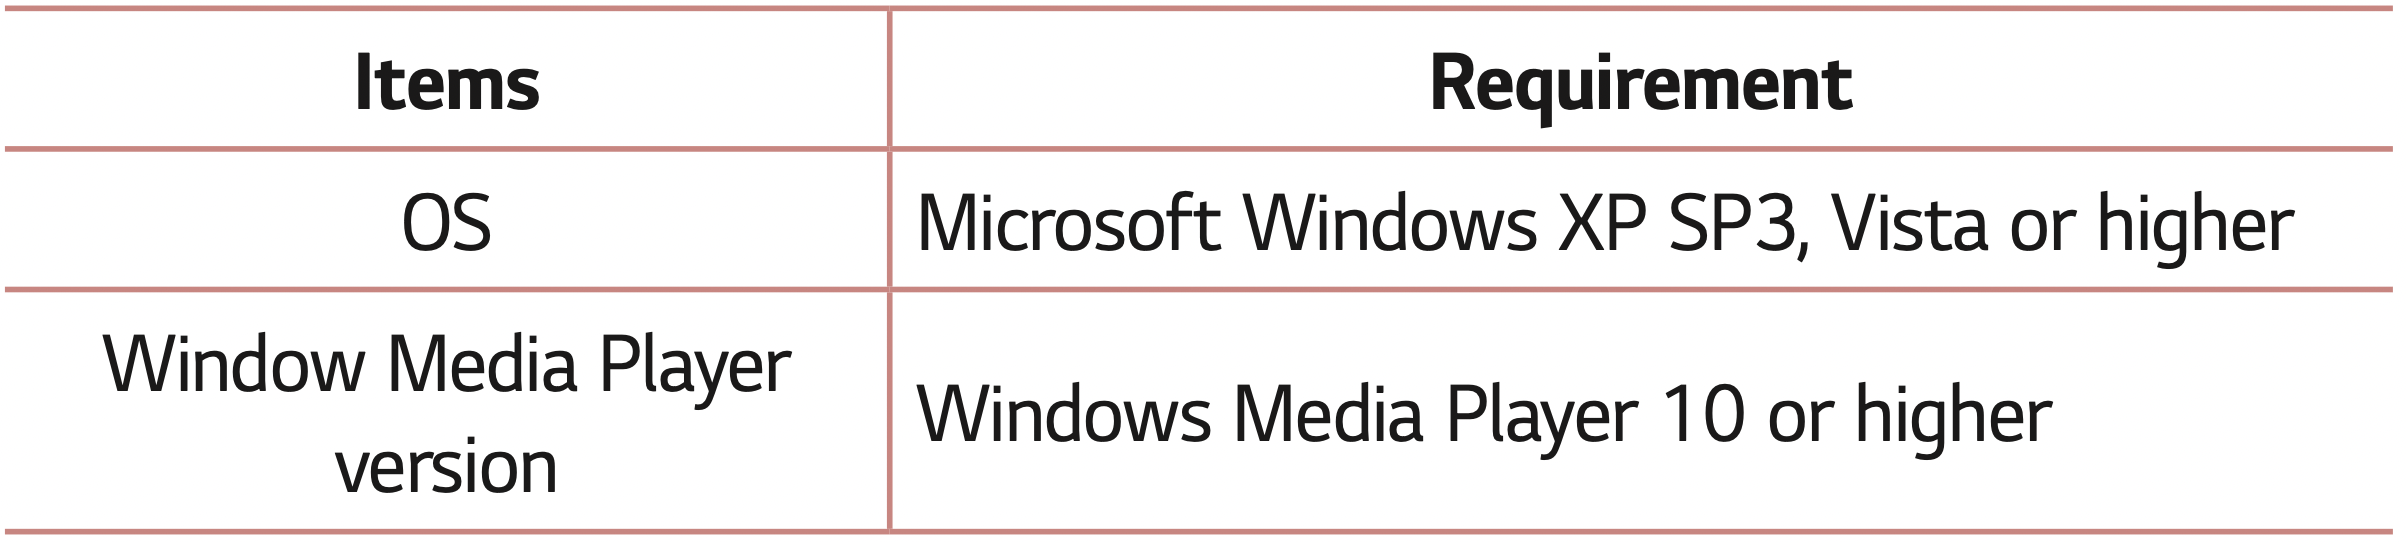
NOTE
- The LG Android Platform Driver is required to be installed on your PC to be able to detect the device.
- Check the requirements for using File transfer.
Apps
Installing or uninstalling apps
Play Store allows you to browse and search for free and paid applications.
To open the Play Store app
Tap >  .
.
To open a screen with details about an app
At any time while browsing in Play Store, tap an app to open its details screen.
The App details screen includes a description, ratings, comments, and related information about the app. From this screen, you can download, install, uninstall, rate the app, and more.
To uninstall applications
- Tap > > Apps.
- Once all applications appear, scroll to and select the application you want to uninstall.
- Tap Uninstall.
Calls
You can enjoy clear calling across the region.
Making a call
- Tap >
 .
.
- Enter the number by using the dialer. To delete a digit, tap
 .
.
- After entering the desired number, tap
 to place the call.
- To end the call, tap
 .
.
NOTE: To enter "+" to make international calls, touch and hold  .
.
Calling your contacts
- Tap >
 >
>  .
.
- Scroll through the contact list. You can also enter the contact's name in the Search field or scroll along the alphabet letters on the right edge of the screen.
- In the list that is displayed, tap
 next to the contact you want to call.
Answering and rejecting a call
- Swipe
 in any direction to answer an incoming call.
- Swipe
 in any direction to decline an incoming call.
NOTE: Swipe  if you want to decline a call and send a message to the caller.
Making a second call
- During your first call, tap
 and enter the number.
- Tap
 . Your initial call is locked and put on hold.
- To end all calls, tap
 .
.
NOTE
- You may be charged for each call you make. Contact your service provider for more information.
- To merge both calls into a conference call, tap
 .
.
Viewing your call logs
- Tap >
 > Call logs tab.
- A list of all dialed, received and missed calls is displayed.
NOTE
- Tap any call log entry to view the date, time and duration of the call.
- Tap
 > Delete all to delete all of the recorded items.
Change your call settings
You can configure device call settings, such as call forwarding, as well as other special features offered by your carrier.
- Tap > .
- Tap > Call settings and configure the desired options.
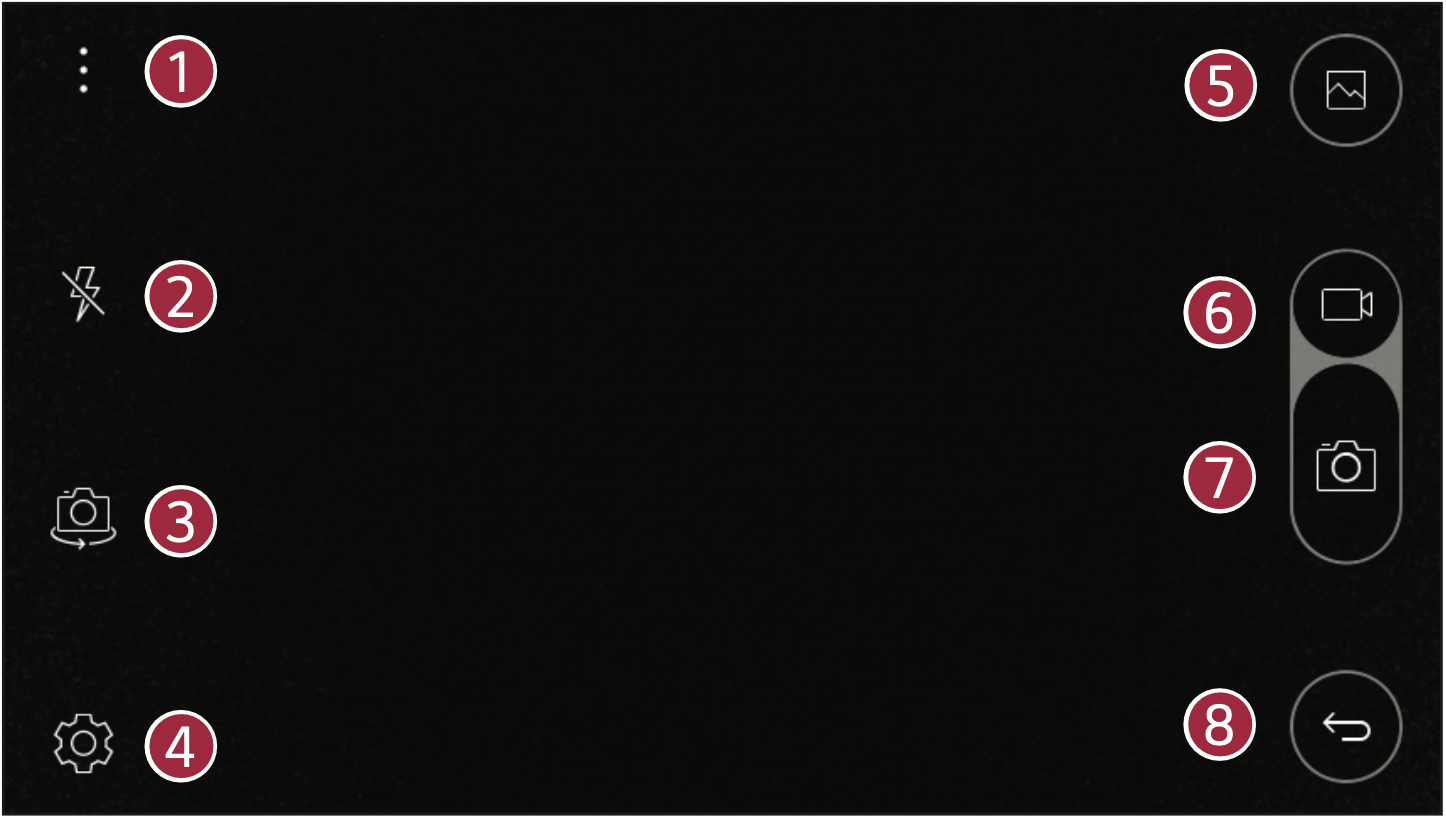
Camera
You can use the camera or camcorder to take and share pictures and videos.
- Tap >
 .
.
Taking a photo
- Frame your subject on the screen.
- Green squares around the subject indicates that the camera has focused.
- Tap
 to take a photo. Your picture will be automatically saved to the Gallery.
Viewfinder options

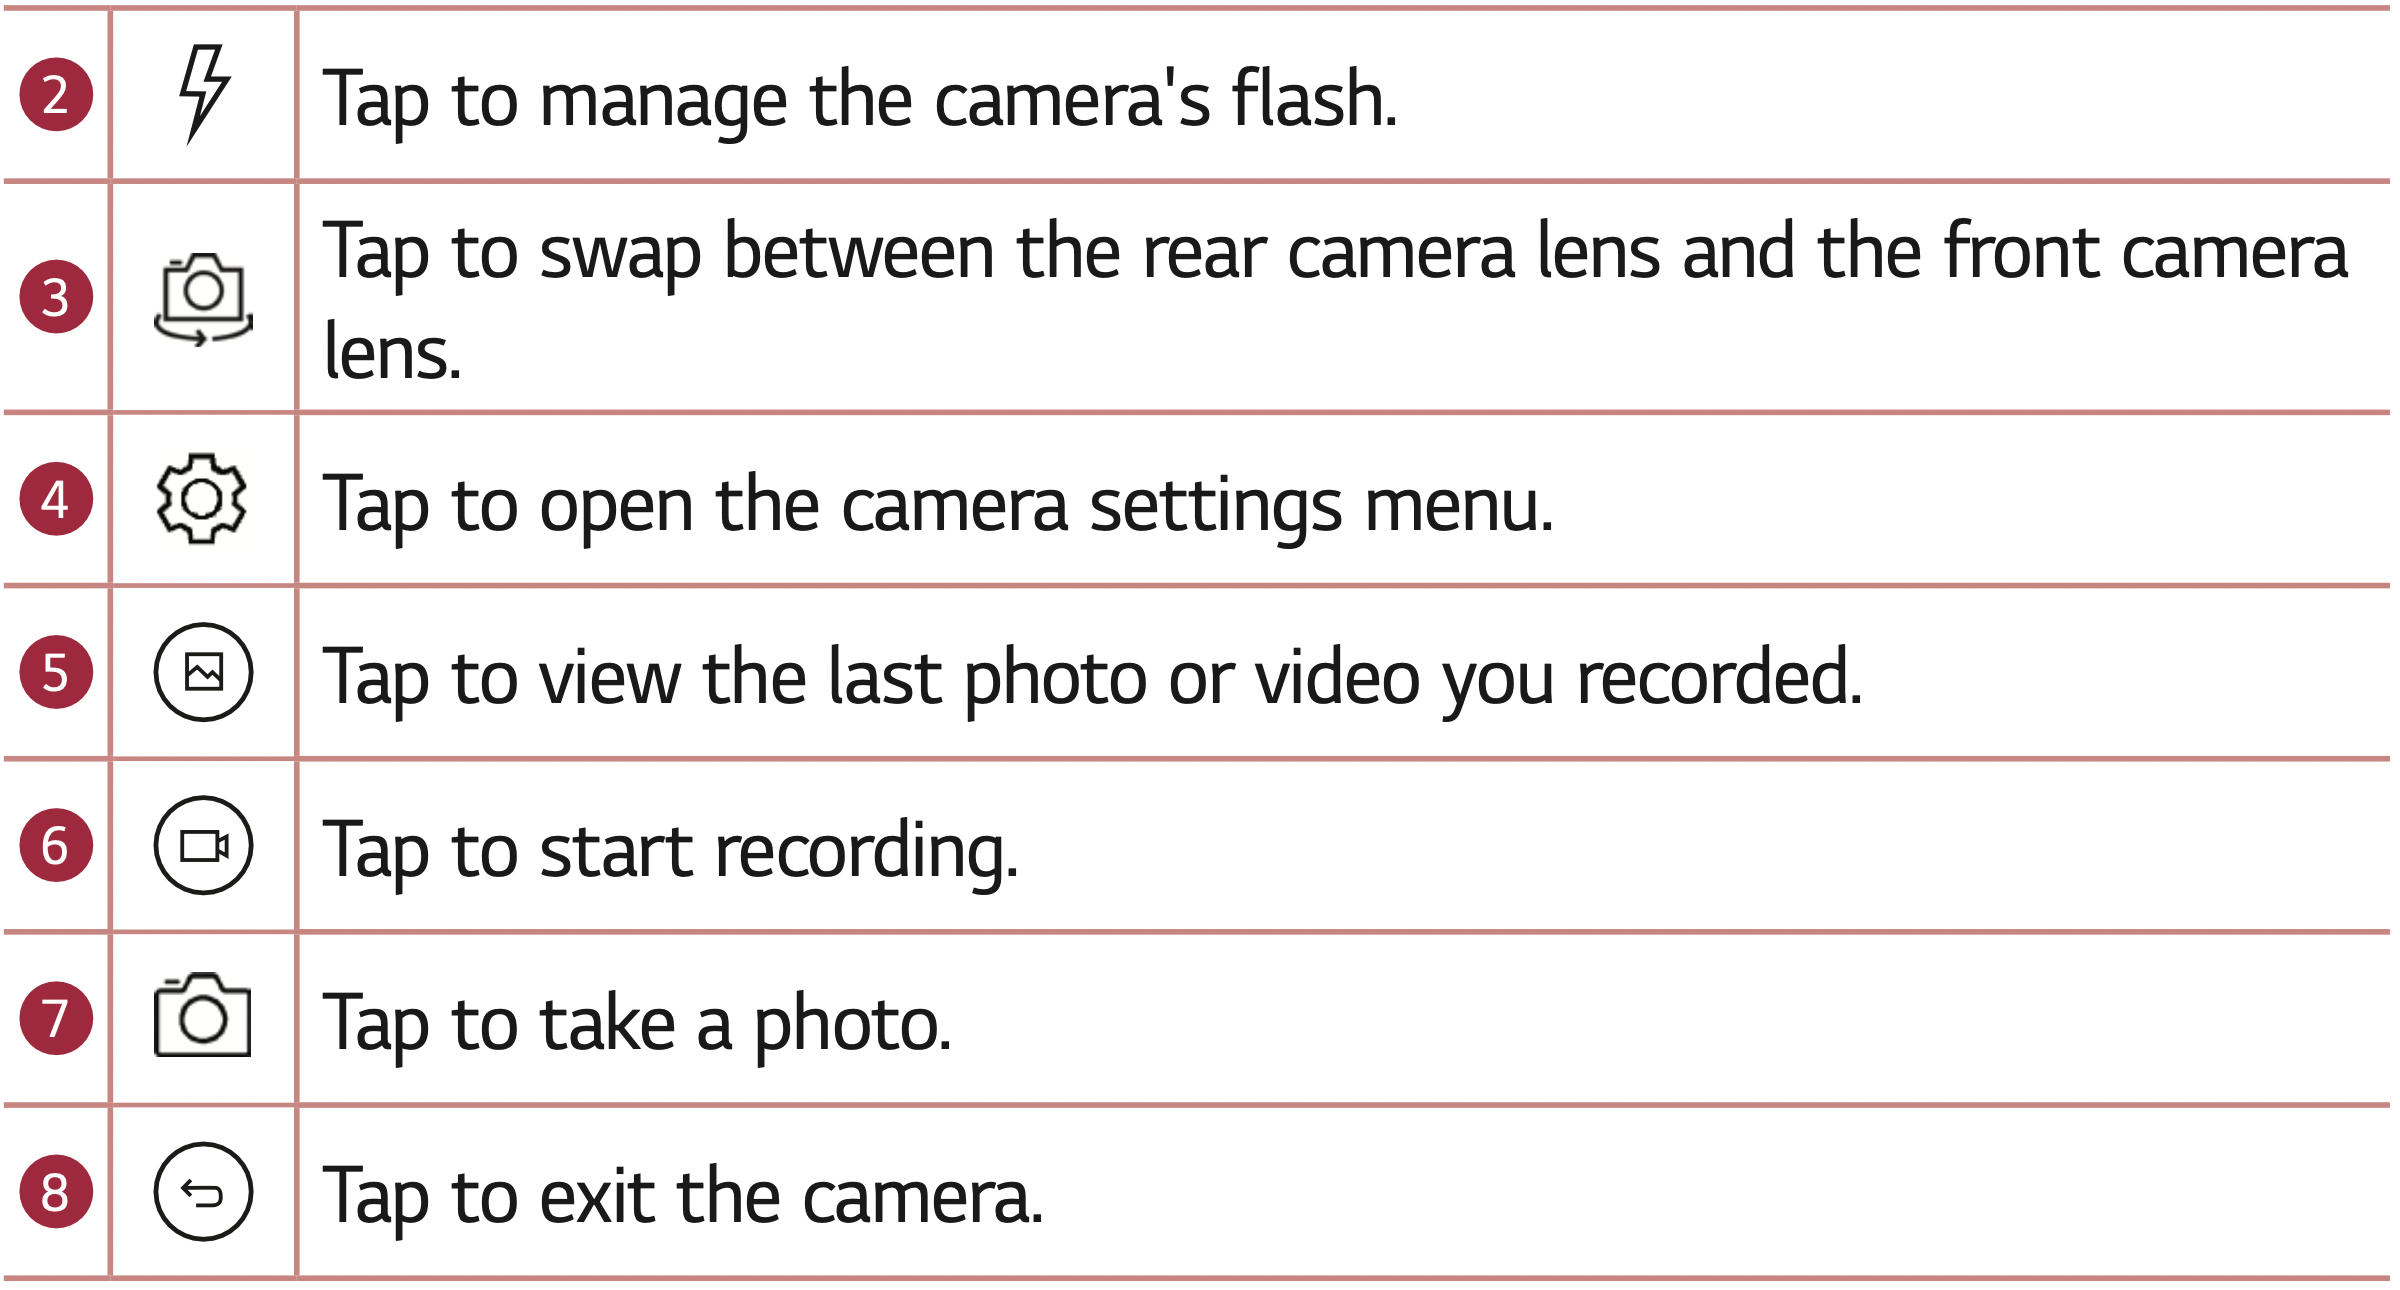
Interval shot
You can take Interval shots using the front camera lens. Touch and hold  to automatically take 4 selfies in a row.
Burst shot
You can take Burst shots using the rear camera lens. Touch and hold  to take up to 30 photos in a row or until the Capture button is released. The viewfinder displays the number of shots taken. When viewing Burst shots in the Gallery, tap
  to display each shot in sequence (similar to a viewing flipbook).
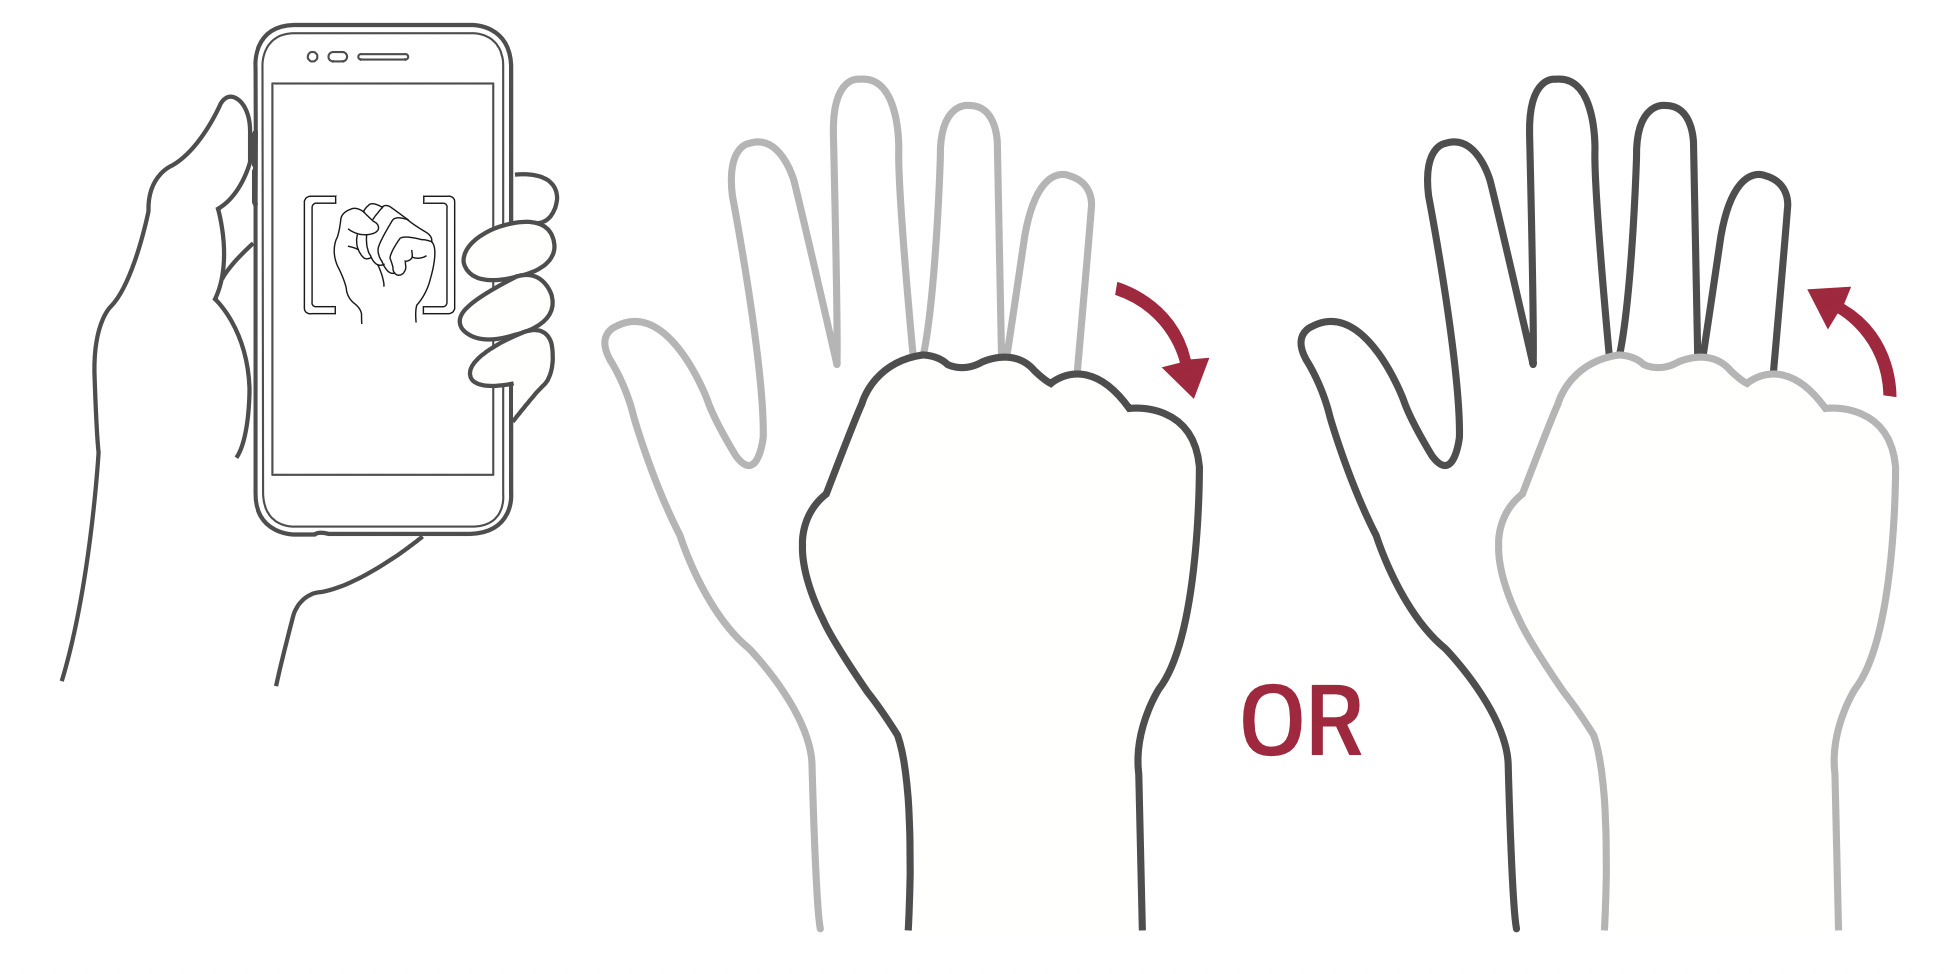
Gesture shot
The Gesture shot feature allows you to take a picture with a hand gesture using the front camera.
Using a gesture to take photos
There are two methods for using the Gesture shot feature.
- Raise your hand, with an open palm, until the front camera detects it and a box appears on the screen. Then close your hand into a fist to start the timer, allowing you time to get ready.
OR
- Raise your hand, in a clenched fist, until the front camera detects it and a box appears on the screen. Then unclench your fist to start the timer, allowing you time to get ready.
Multi-point Auto-focus
When you take a picture, the Multi-point Auto-focus (AF) function operates automatically and will allow you to see a clear image.
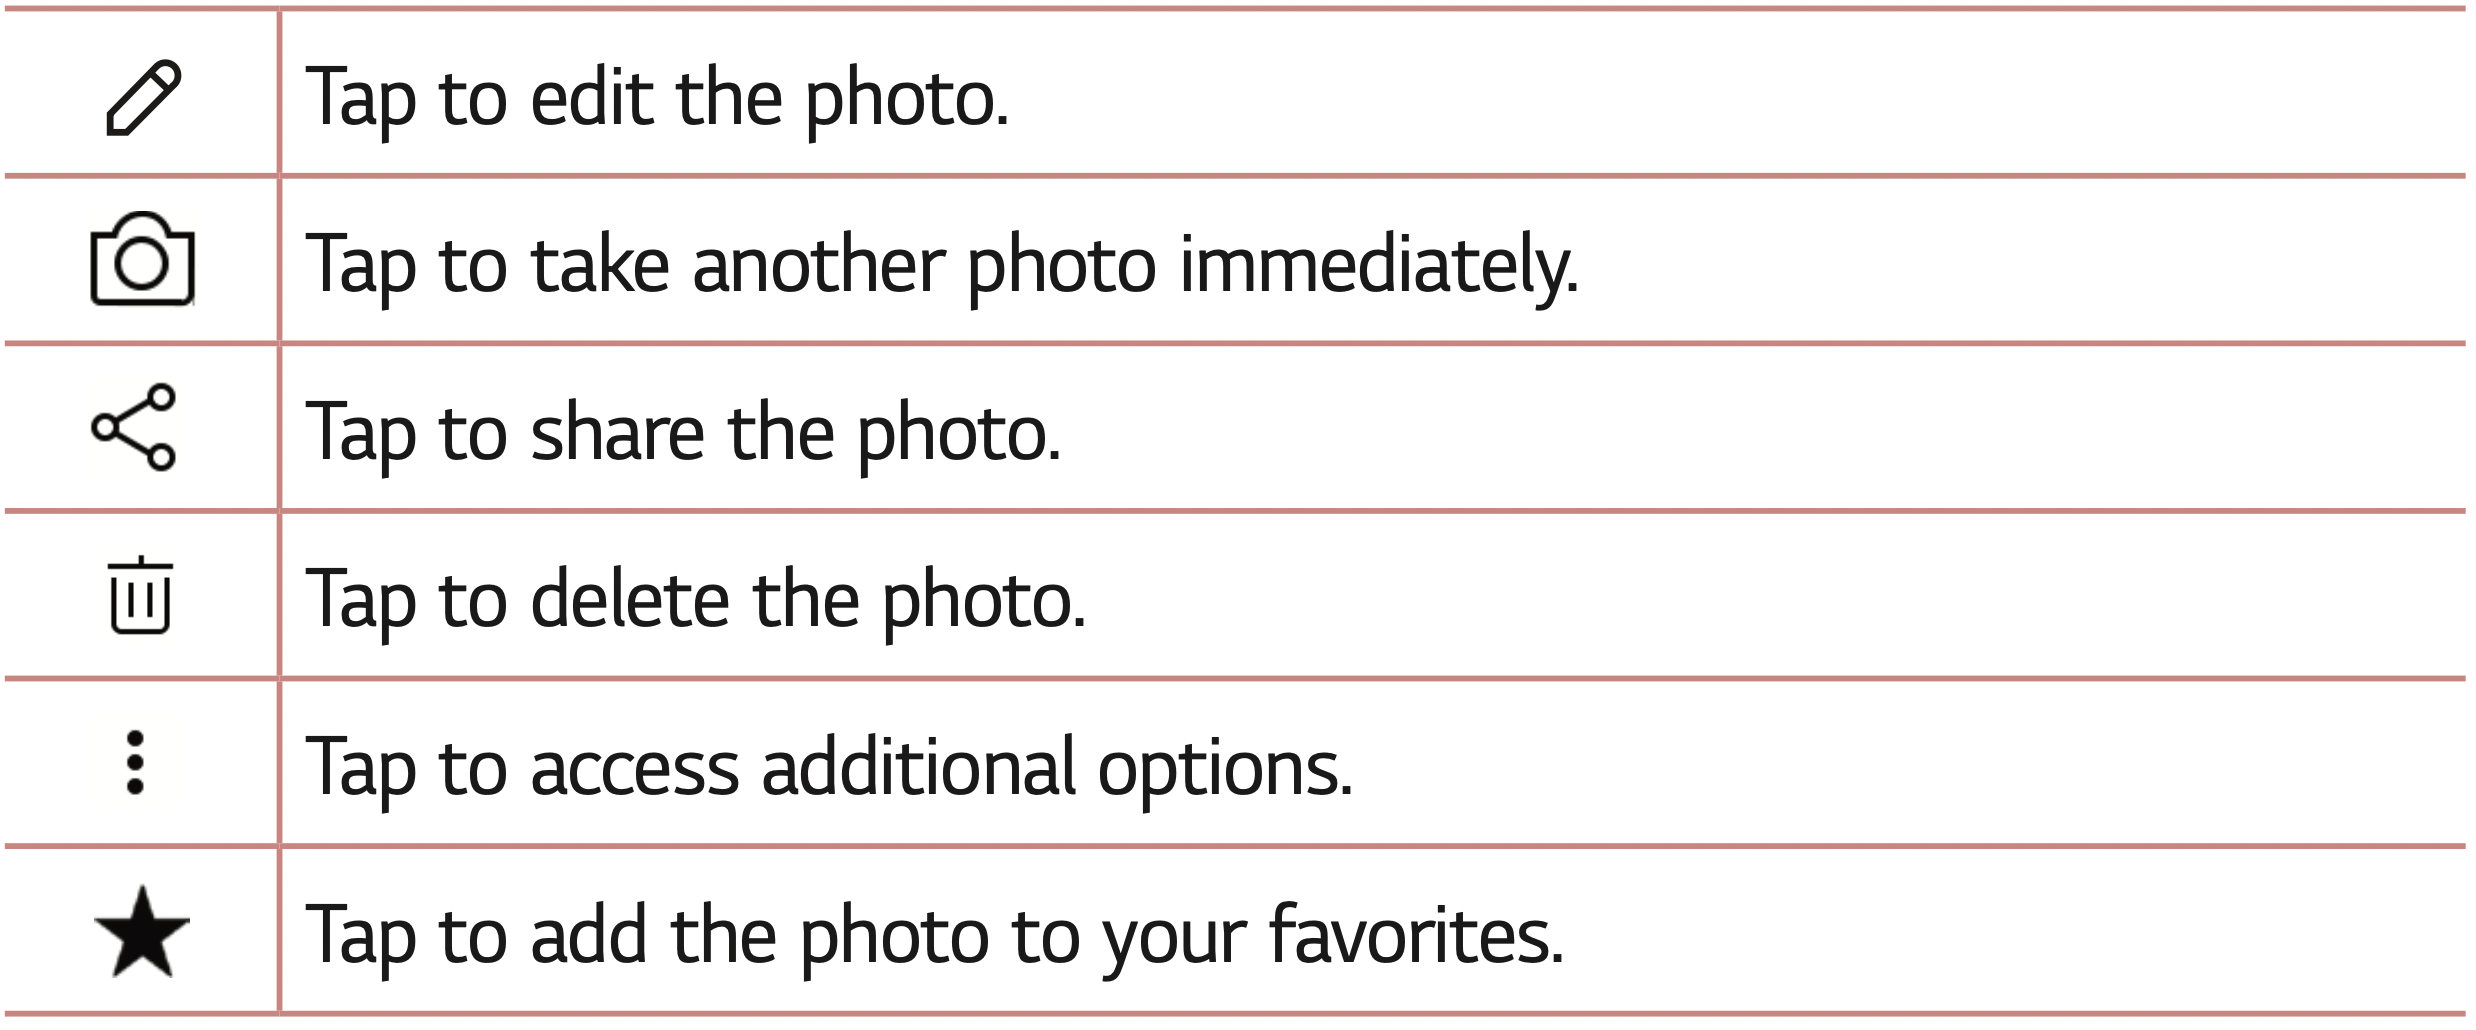
Once you have taken a photo
Tap the image thumbnail on the screen to view the last photo you took.
Recording a video
- Tap >
 .
.
- Frame your subject on the screen.
- Tap
 to start recording the video. The length of the recording is displayed at the top of the screen.
NOTE: Tap  to take pictures while recording video.
- Tap
 to pause the recording. You can resume recording by tapping
  .
.
OR
Tap  to stop recording. Your video will be automatically saved to the Gallery.
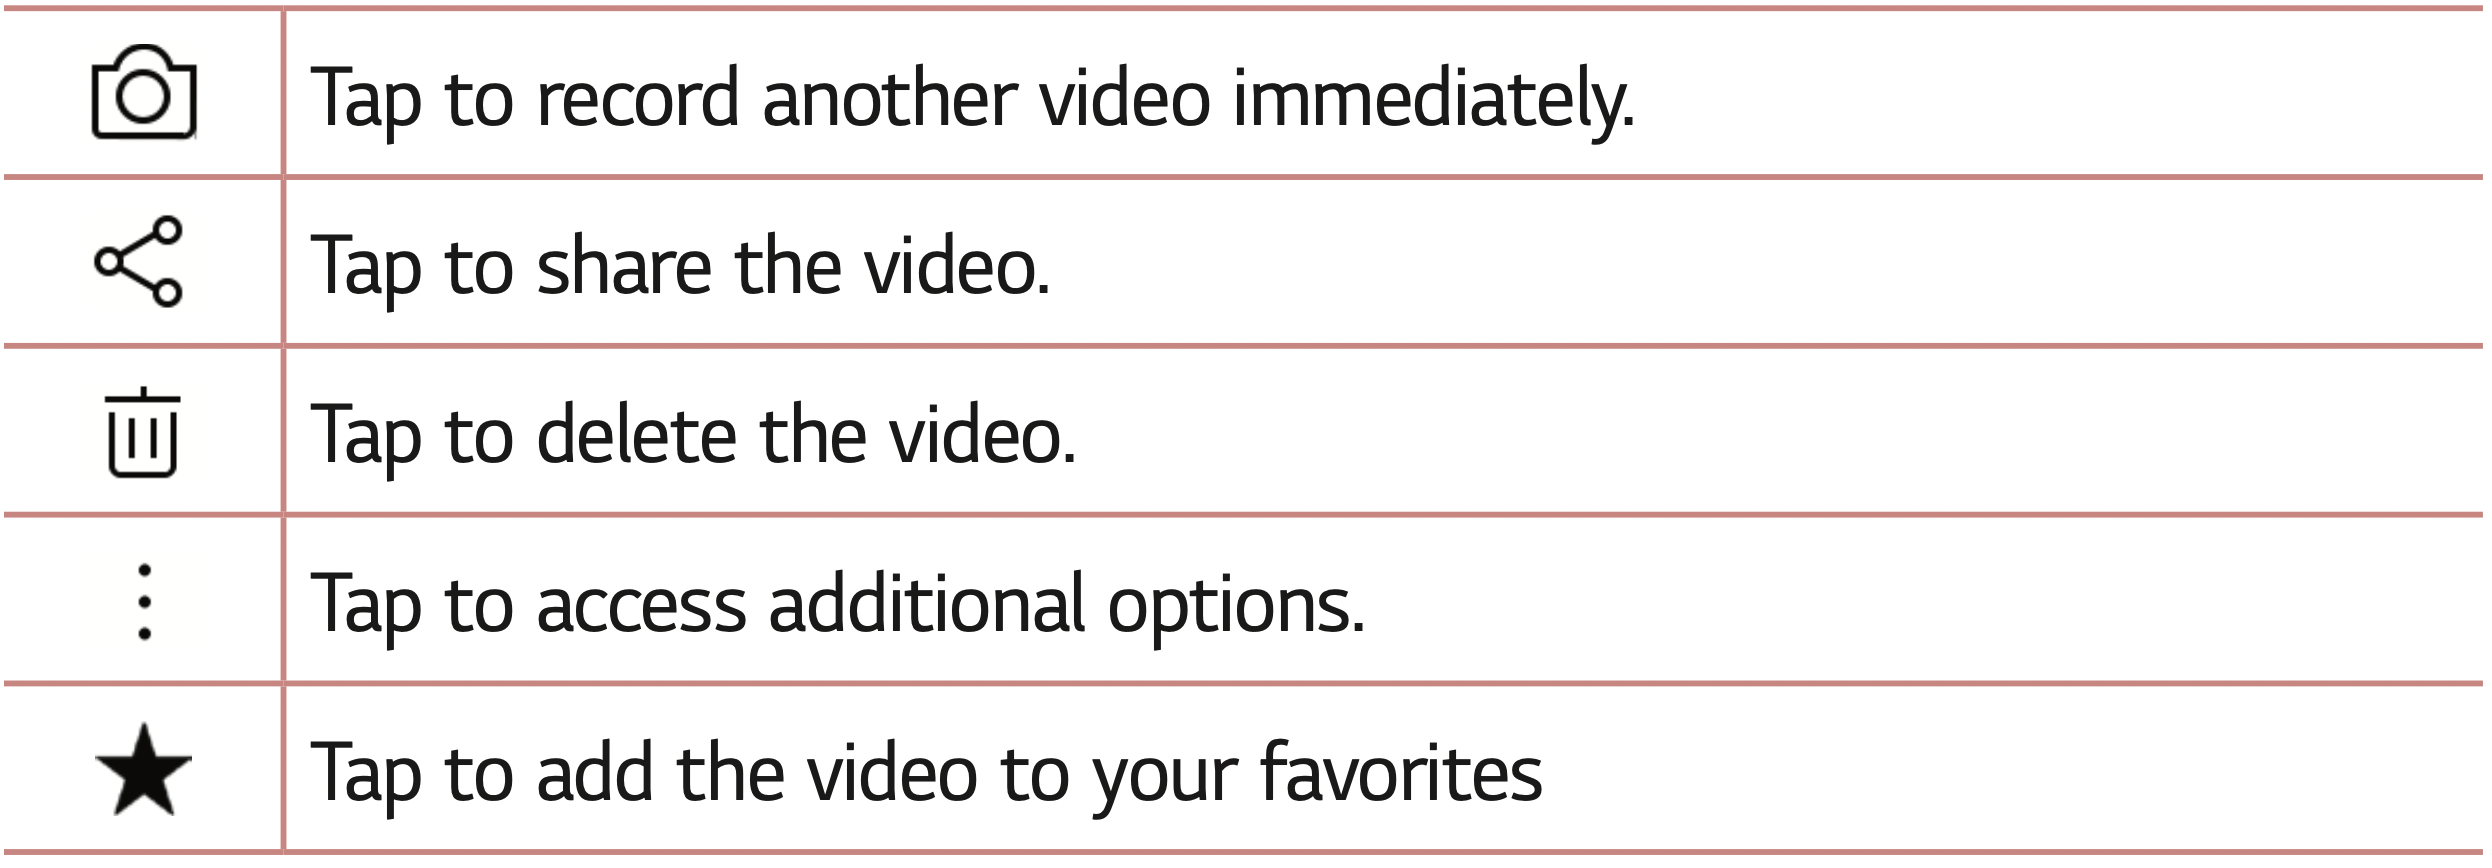
After recording a video
Tap the video thumbnail on the screen to view the last video you recorded.
Gallery
The Gallery application presents the pictures and videos in your storage, including those you've taken with the Camera application and those you downloaded from the web or other locations.
- Tap > .
- Tap an album to open it and view its contents. (The pictures and videos in the album are displayed in chronological order.)
- Tap a picture in an album to view it.
NOTE
- Depending on the software installed, some file formats may not be supported.
- Some files may not play properly due to their encoding.
- If the file size exceeds the available memory, an error can occur when you open files.
Viewing pictures
The Gallery displays your pictures in folders. When an application, such as Email, saves a picture, a folder is automatically created to contain the picture.
Pictures are displayed by the date they were created. Select a picture to view it full screen. Scroll left or right to view the next or previous image.
Editing photos
While viewing a photo, tap .
Setting wallpaper
While viewing a photo, tap > More > Set image as to set the image as wallpaper or assign it to a contact.
Zooming in and out
Use one of the following methods to zoom in on an image:
- Double-tap anywhere to zoom in and out.
- Spread two fingers apart on any place in the picture zoom in. Pinch in to zoom out.
Playing a video
- Tap > .
- Select the video you want to watch.
Video options
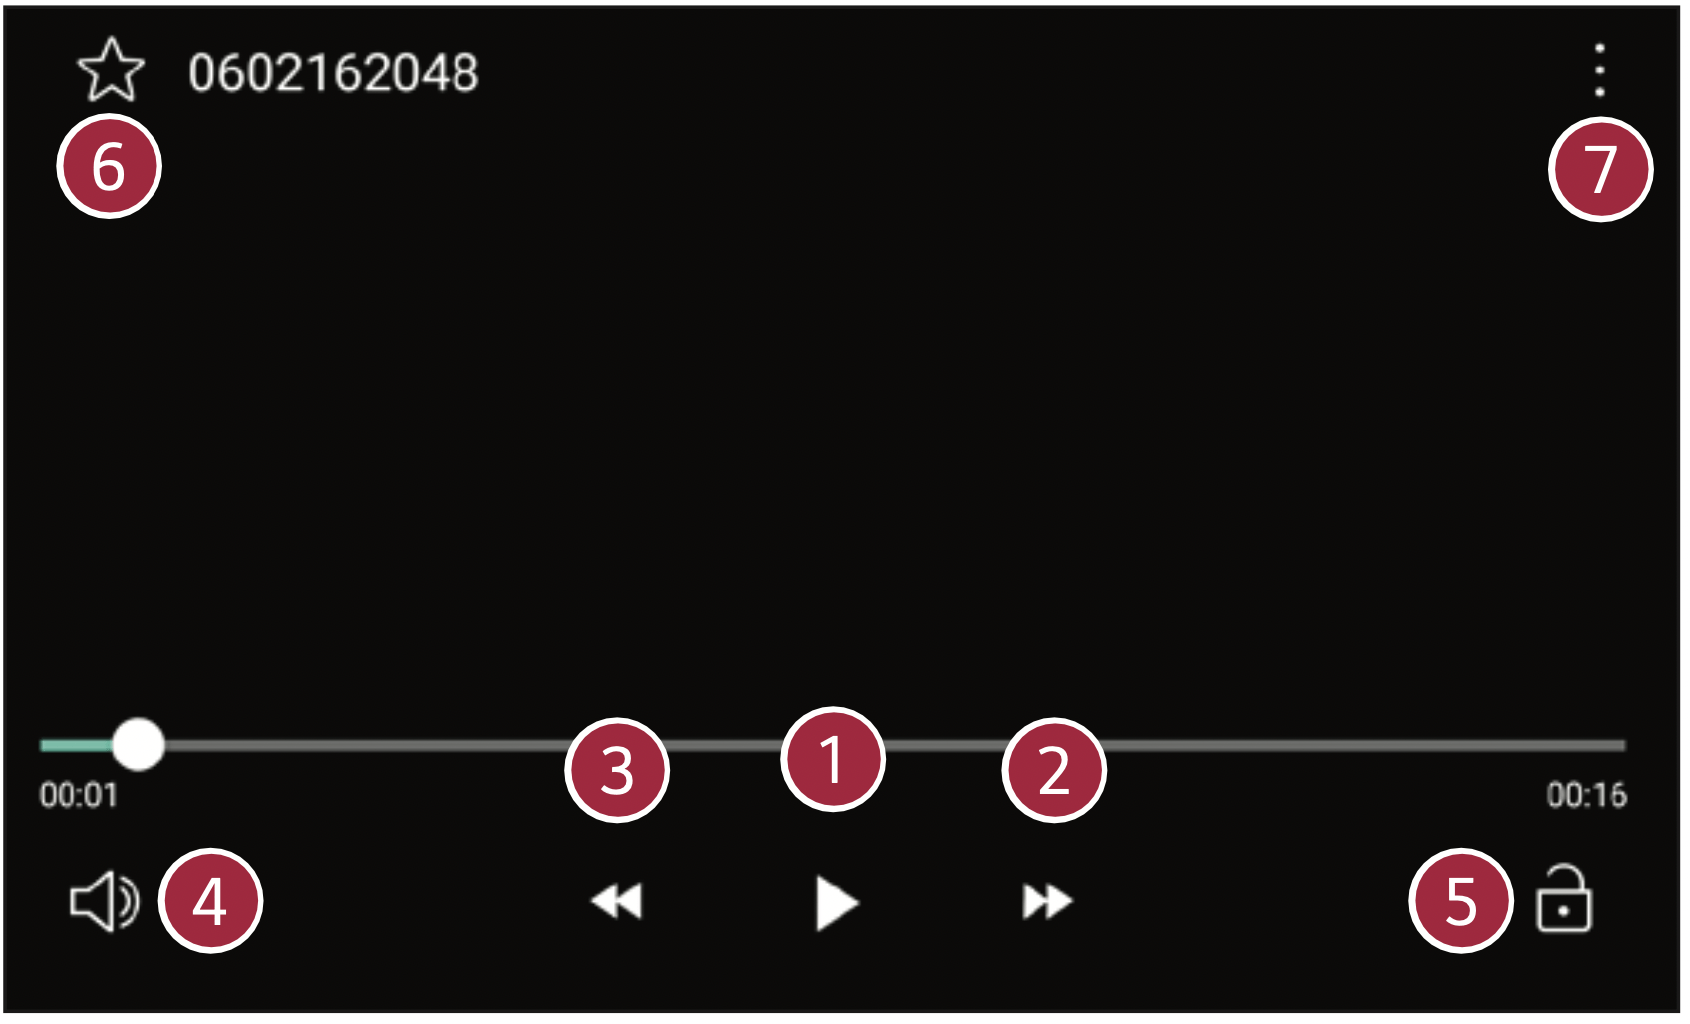
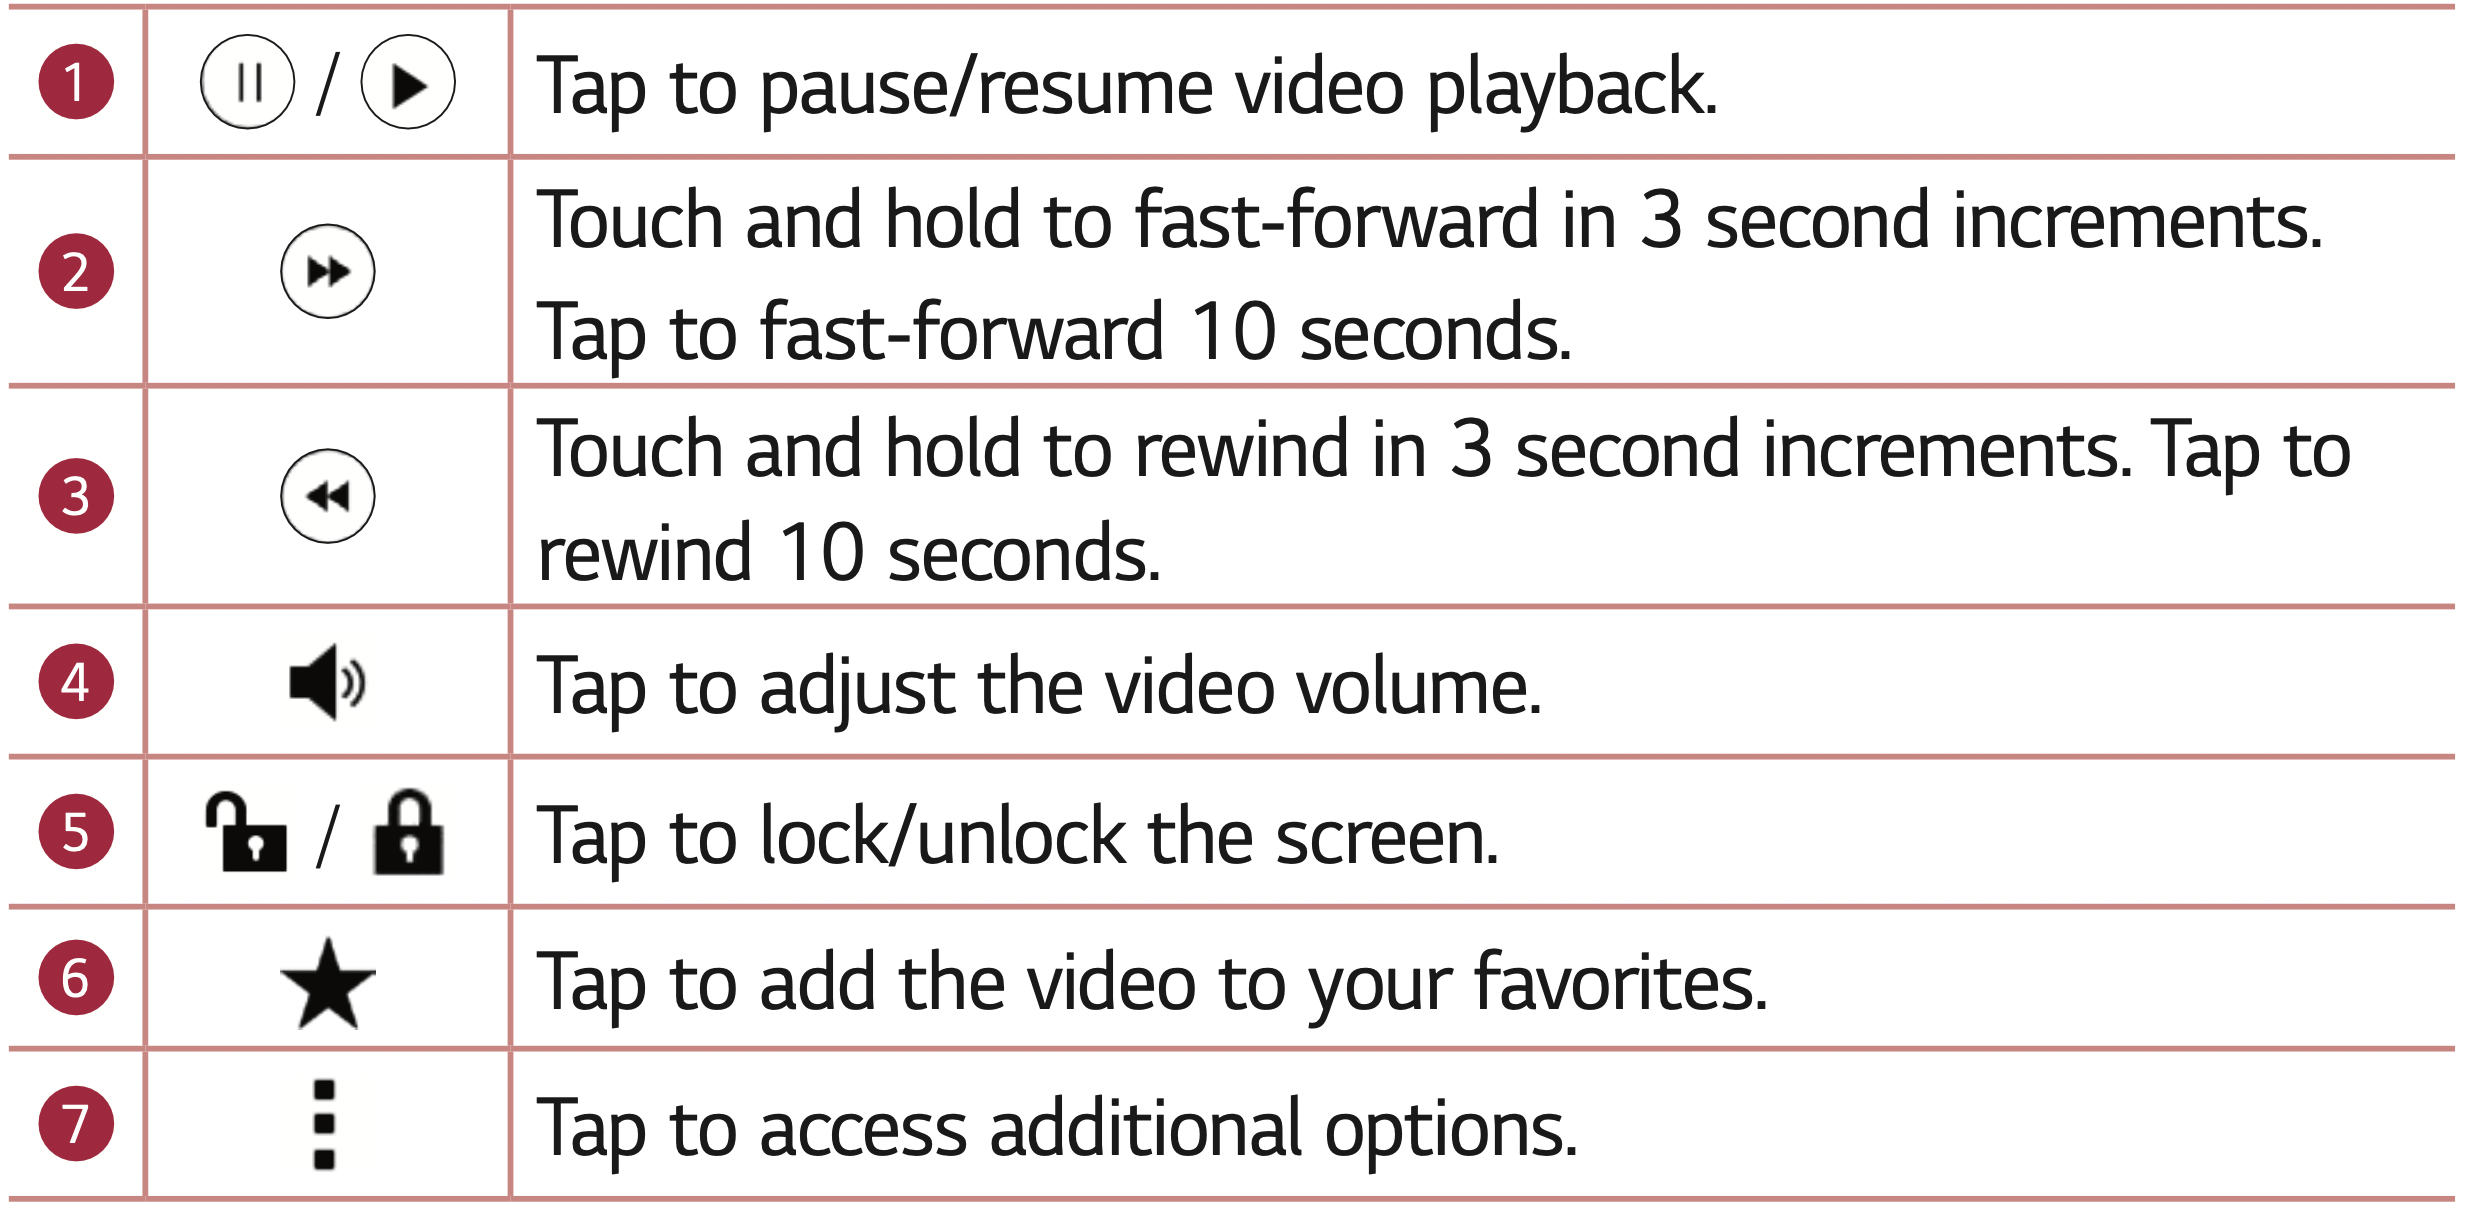
NOTE
- While playing a video, slide the right side of the screen up or down to adjust the sound.
- While playing a video, slide the left side of the screen up or down to adjust the brightness.
- While playing a video, slide your finger from left to right (or vice versa) to fast-forward and rewind.
Deleting photos/videos
Use one of the following methods:
- While in a folder, tap
 , select the photos/videos and then tap DELETE.
- While viewing a photo, tap
 .
.
Settings
Access the Settings menu
The Settings app allows you to customize and personalize your device.
Opening the settings app
- Tap > touch and hold > System settings.
OR
- Tap >
Wireless Networks
Airplane mode
Allows you to use many of your device's features, such as games, and music, when you are in an area where making or receiving calls or data use is prohibited. When you set your device to Airplane Mode, it cannot send or receive any calls or access online data.
On the Settings screen, tap Airplane mode.
Wi-Fi
You can use high-speed Internet access while within the coverage of the wireless access point (AP).
On the Settings screen, tap Wi-Fi.
- Tap
 to turn Wi-Fi on and start scanning for available Wi-Fi networks.
- Tap a network to connect to it.
- If the network is secured with a lock icon, you will need to enter a security key or password.
- The status bar displays icons that indicate Wi-Fi status.
NOTE: If you are out of the Wi-Fi zone or have set Wi-Fi to Off, the device may automatically connect to the Web using mobile data, which may incur data charges.
Device
Sound & notification
Allows you to change settings for various sounds on the device. On the Settings screen, tap Sound & notification.
- Sound profile – Allows you to set your device's sound profile.
- Volume – Adjust the device's volume settings to suit your needs and environment.
- Ringtone – Allows you to set the ringtones for calls. You can also add and delete ringtones.
- Ringtone ID – Allows you to compose ringtones based on the incoming call's phone number.
- Sound with vibration – Enable to set the device to vibrate in addition to the ringtone when you receive calls.
- Vibration type – Allows you to choose the type of vibration.
- Do not disturb – Allows you to set a schedule when to prevent interruptions from notifications. You can set to allow certain features to interrupt when Priority only is set.
- Lock screen – Allows you to choose if you want to show or hide notifications on the lock screen.
- Apps – Allows you to set notifications for individual apps including preventing them from displaying notifications and setting priority.
- Notification sound – Allows you to set the notification sound. You can also add and delete notification sounds.
- Vibrate on tap – Enable to vibrate when tapping the Home touch buttons and during other UI interactions.
- Sound effects – This menu lets you select whether you hear tones when tapping numbers on the dial pad, selecting on-screen options, when locking and unlocking the screen, and the emergency tone behavior.
- Message/call voice notifications – Allows your device to read out incoming calls and message events automatically.
Display
Allows you to set other display settings. On the Settings screen, tap Display.
- Font type – Select the desired font type.
- Font size – Select the desired font size.
- Bold text – Bold the text on the screen.
- Brightness – Adjust the screen brightness by using the slider.
- Auto-rotate screen – Set to switch orientation automatically when you rotate the device.
- Screen timeout – Set the time delay before the screen automatically turns off.
- Home touch button combination – Set the Home touch buttons displayed at the bottom of all screens.
- Daydream – Select the screen saver to be displayed when the device is sleeping while docked and/or charging.
- Motion sensor calibration – Allows you to improve the accuracy of the tilt and speed of the sensor.
Home screen
Allows you to set your home screen settings. On the Settings screen, tap Home screen.
- Select Home – Select the desired Home theme.
- Wallpaper – Sets the wallpaper to use on your Home screen.
- Screen swipe effect – Choose the desired type of effect to display when you swipe from one Home screen canvas to the next.
- Sort apps by – Sort apps by names or download date on the Home screen.
- Grid – Change the app arrangement mode for the Home screen.
- Hide apps – Select the apps you want to hide from the Home screen.
Lock screen
Allows you to set your lock screen settings. On the Settings screen, tap Lock screen.
- Select screen lock – Allows you to set a screen lock type to secure your device.
- Smart Lock – Sets to keep your device unlocked with trusted device or a place. If you need more information, please refer to Smart Lock section in Locking and unlocking the device.
- Screen swipe effect – Sets the effect used when swiping the lock screen.
- Wallpaper – Select the wallpaper to display for your lock screen.
- Shortcuts – Allows you to choose the shortcuts available on the lock screen.
- Contact info for lost phone – Allows you to display the owner information on the lock screen in case the device is lost.
- Lock timer – Allows you to set the amount of time before the screen automatically locks after the screen has timed-out.
- Power key instantly locks – Enable to instantly lock the screen when the Power/Lock Key is pressed. This setting overrides the lock timer setting.
System
Shortcut keys
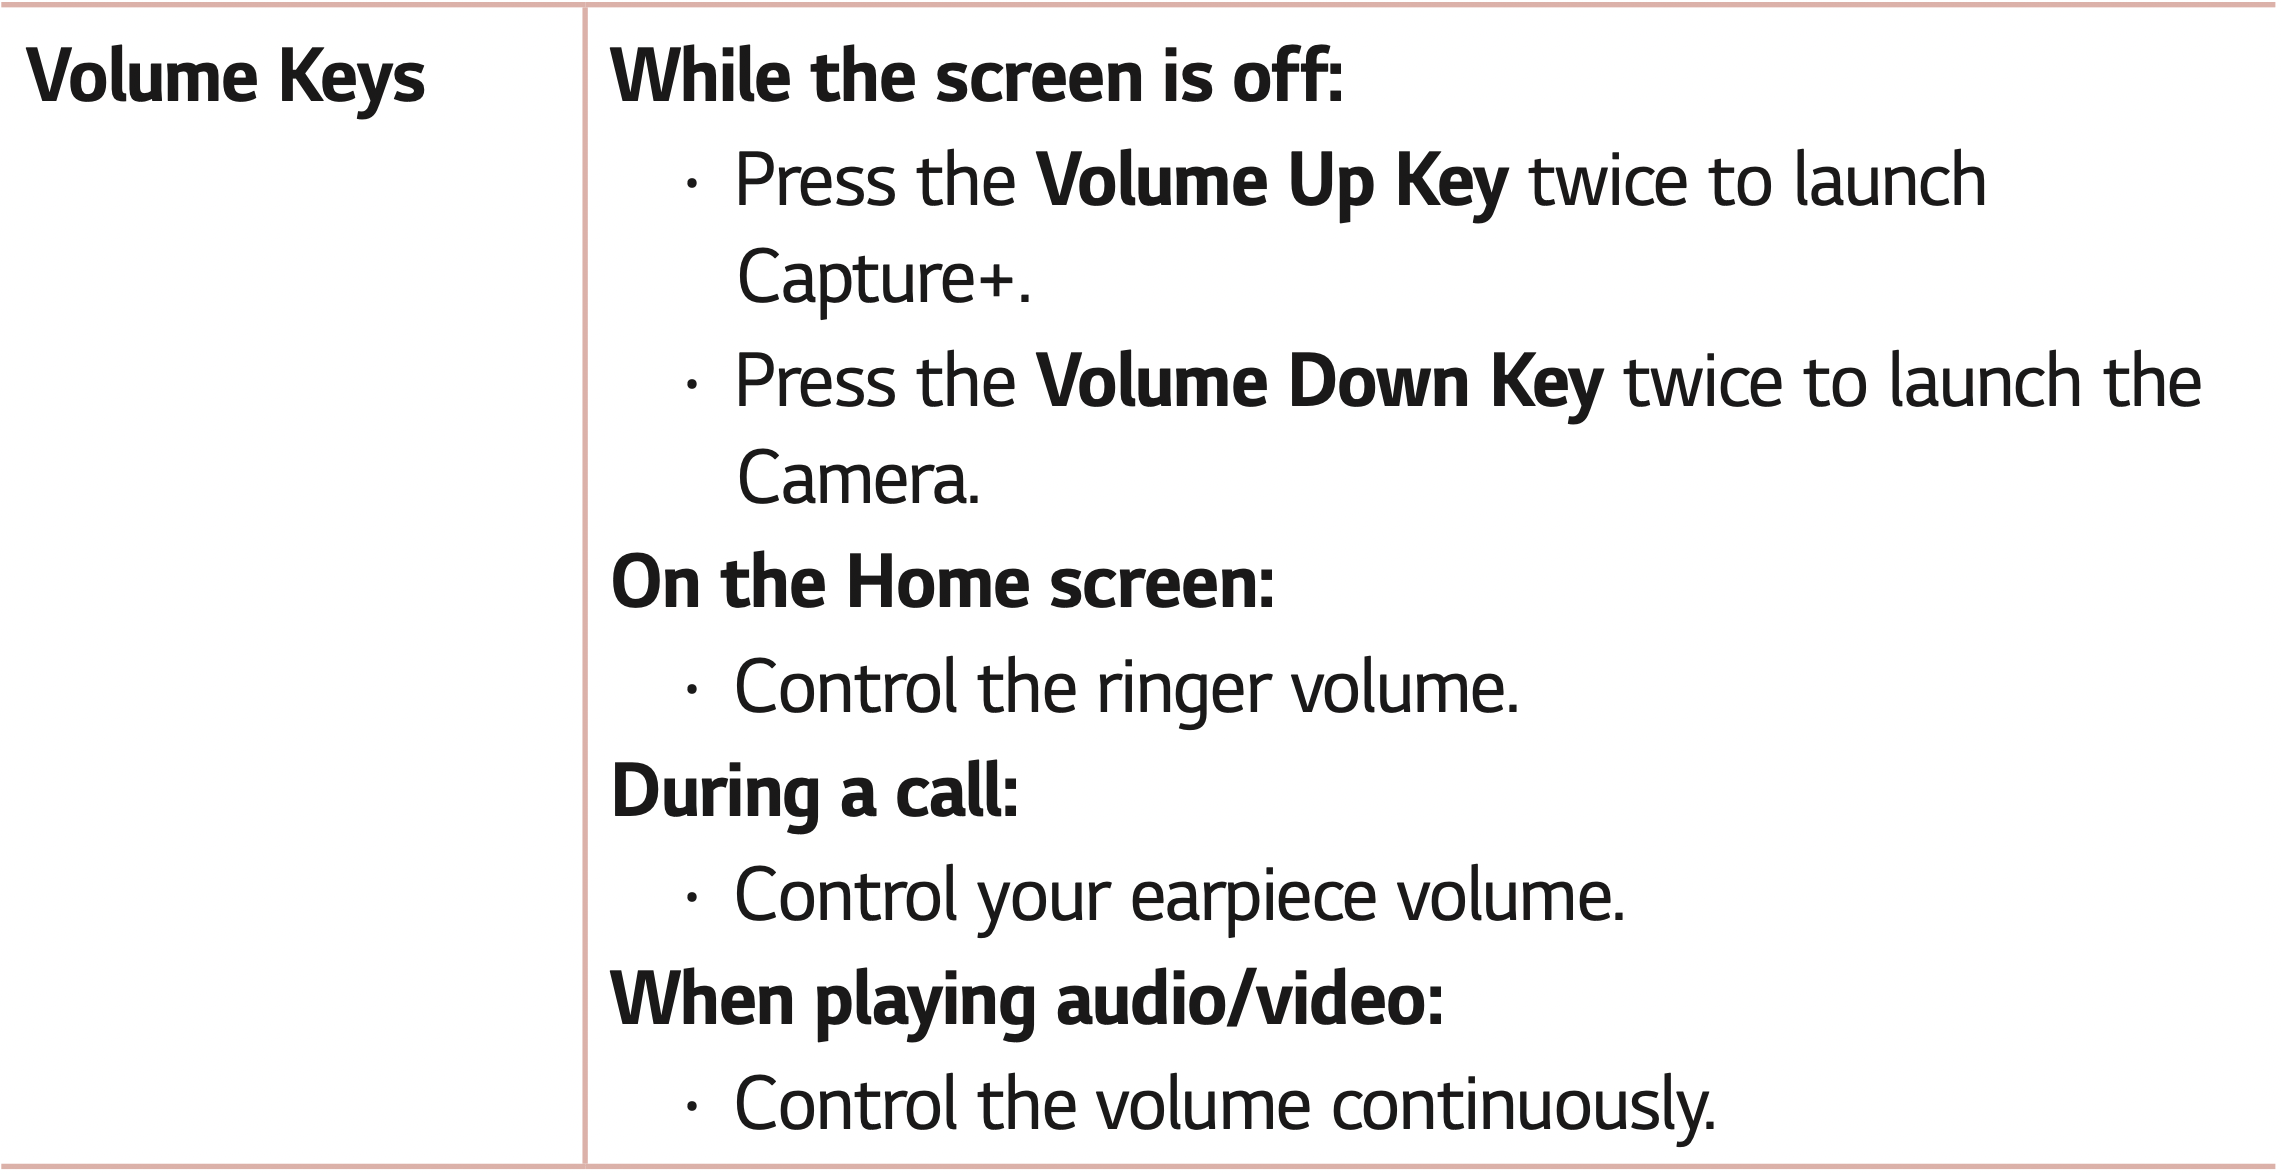
Get quick access to apps by pressing the Volume Keys twice when the screen is off or locked.
On the Settings screen, tap Shortcut keys.
- Press the Volume Up Key twice when the screen is off or locked to open the Capture+ app.
- Press the Volume Down Key twice when the screen is off or locked to open the Camera app.
Date & time
Set your preferences for how the date and time is displayed. On the Settings screen, tap Date & time.
Accessibility
Use the Accessibility settings to configure accessibility plug-ins you have installed on your device.
On the Settings screen, tap Accessibility.
- Vision – Sets options for people with impaired sight.
- TalkBack – Allows you to set up the TalkBack function which assists people with impaired vision by providing verbal feedback.
- Message/call voice notifications – Enable to allows you to hear automatic spoken alerts for incoming calls and messages.
- Font size – Sets the font size.
- Bold text – Bold the text on the screen.
- Touch zoom – Allows you to zoom in and out by triple-tapping the screen.
- Screen color inversion – Enable to invert the color of the screen and content.
- Screen color adjustment – Allows you to adjust the color of screen and content.
- Grayscale – Switch the screen to grayscale mode.
- End calls with the Power key – Enable so that you can end voice calls by pressing the Power/Lock Key.
- Hearing – Sets options for people with impaired hearing.
- Captions – Allows you to customize caption settings for those with hearing impairments.
- Flash alerts – Enable to set the flash to blink for incoming calls and notifications.
- Turn off all sounds – Enable to turn off all device sounds.
- Audio type – Sets the audio type.
- Sound balance – Sets the audio route. Move the slider on the slide bar to set it.
- Motor & cognition – Sets options for people with impaired motor skills.
- Touch assistant – Show a touch board with easy access to common actions.
- Touch and hold delay – Adjust the touch input time.
- Touch and hold for calls – Answer or decline calls by tapping and holding the call button instead of dragging it.
- Screen timeout – Sets the amount of time before the backlight turns off automatically.
- Touch control areas – Allows you to select an area of the screen to limit touch activation to just that area of the screen.
- Accessibility features shortcut – Allow you to access selected features quickly when triple-tapping the Home button.
- Auto-rotate screen – Enable to allow the device to rotate the screen depending on the physical device orientation (portrait or landscape).
- Switch Access – Allows you to interact with your device using one or more switches that work like keyboard keys. This menu can be helpful for users with mobility limitations that prevent them from interacting directly with the your device.
About phone
View legal information, check device status and software versions, and perform a software update.
On the Settings screen, tap About phone.
FAQ
This chapter lists some problems you might encounter when using your device. Some problems require you to call your service provider, but most are easy to fix yourself.
| Message |
Possible causes |
Possible corrective measures |
|
SIM card error
|
There is no SIM card in the device or it is inserted incorrectly.
|
Make sure that the SIM card is correctly inserted.
|
|
No network connection/ Dropped network
|
Signal is weak or you are outside the carrier network.
|
Move toward a window or into an open area. Check the network operator coverage map.
|
|
Operator applied new services.
|
Check whether the SIM card is more than 6~12 months old. If so, change your SIM or USIM card at your network provider's nearest branch. Contact your service provider.
|
|
Codes do not match
|
To change a security code, must need to confirm the new code by re-enteringit.
|
If you forget the code, contact your service provider.
|
|
The two codes you entered do not match.
|
|
No applications can be set
|
Not supported by service provider or registration required.
|
Contact your service provider.
|
|
Downloaded application causes a lot of errors.
|
Remove the application.
|
- Tap >
- Tap Apps.
- Tap the app > Uninstall.
|
|
Calls not available
|
Dialing error
|
New network not authorized.
|
|
New SIM card inserted.
|
Check for new restrictions.
|
|
Pre-paid charge limit reached.
|
Contact service provider or reset limit with PIN2.
|
|
Device can not be turned on
|
On/Off key pressed too briefly.
|
Press the On/Off key for at least two seconds.
|
|
Battery is not charged.
|
Charge battery. Check the charging indicator on the display.
|
|
Charging error
|
Battery is not charged.
|
Charge battery.
|
|
Outside temperature is too hot or cold.
|
Make sure device is charging at a normal temperature.
|
|
Contact problem
|
Check the charger and its connection to the device.
|
|
No voltage
|
Plug the charger into a different outlet.
|
|
Charger defective
|
Replace the charger.
|
|
Wrong charger
|
Use only original LG accessories.
|
|
Impossible to receive/ send SMS & photos
|
Memory full
|
Delete some data, such as applications or messages from your device to make more memory available.
|
|
Files do not open
|
Unsupported file format
|
Check the supported file formats.
|
|
No sound
|
Vibration mode
|
Check the settings status in the sound menu to make sure you are not in vibration or no interruptions mode.
|
|
Hangs up or freezes
|
Intermittent software problem
|
If the screen freezes or the device does not respond when you try to operate it, remove the battery and reinsert it. Then power the device back on.
OR
Try to perform a software update through the website.
|