Owner's Guide Electric Cooktop
Getting familiar with the appliance
In this section we describe the control panel, elements and displays.
These instructions apply to more than one cooktop, your appliance might vary slightly.
Page 2 contains a list of models and dimensions.
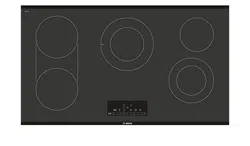
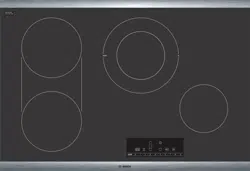
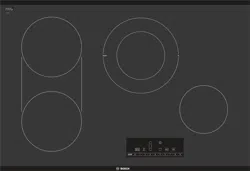
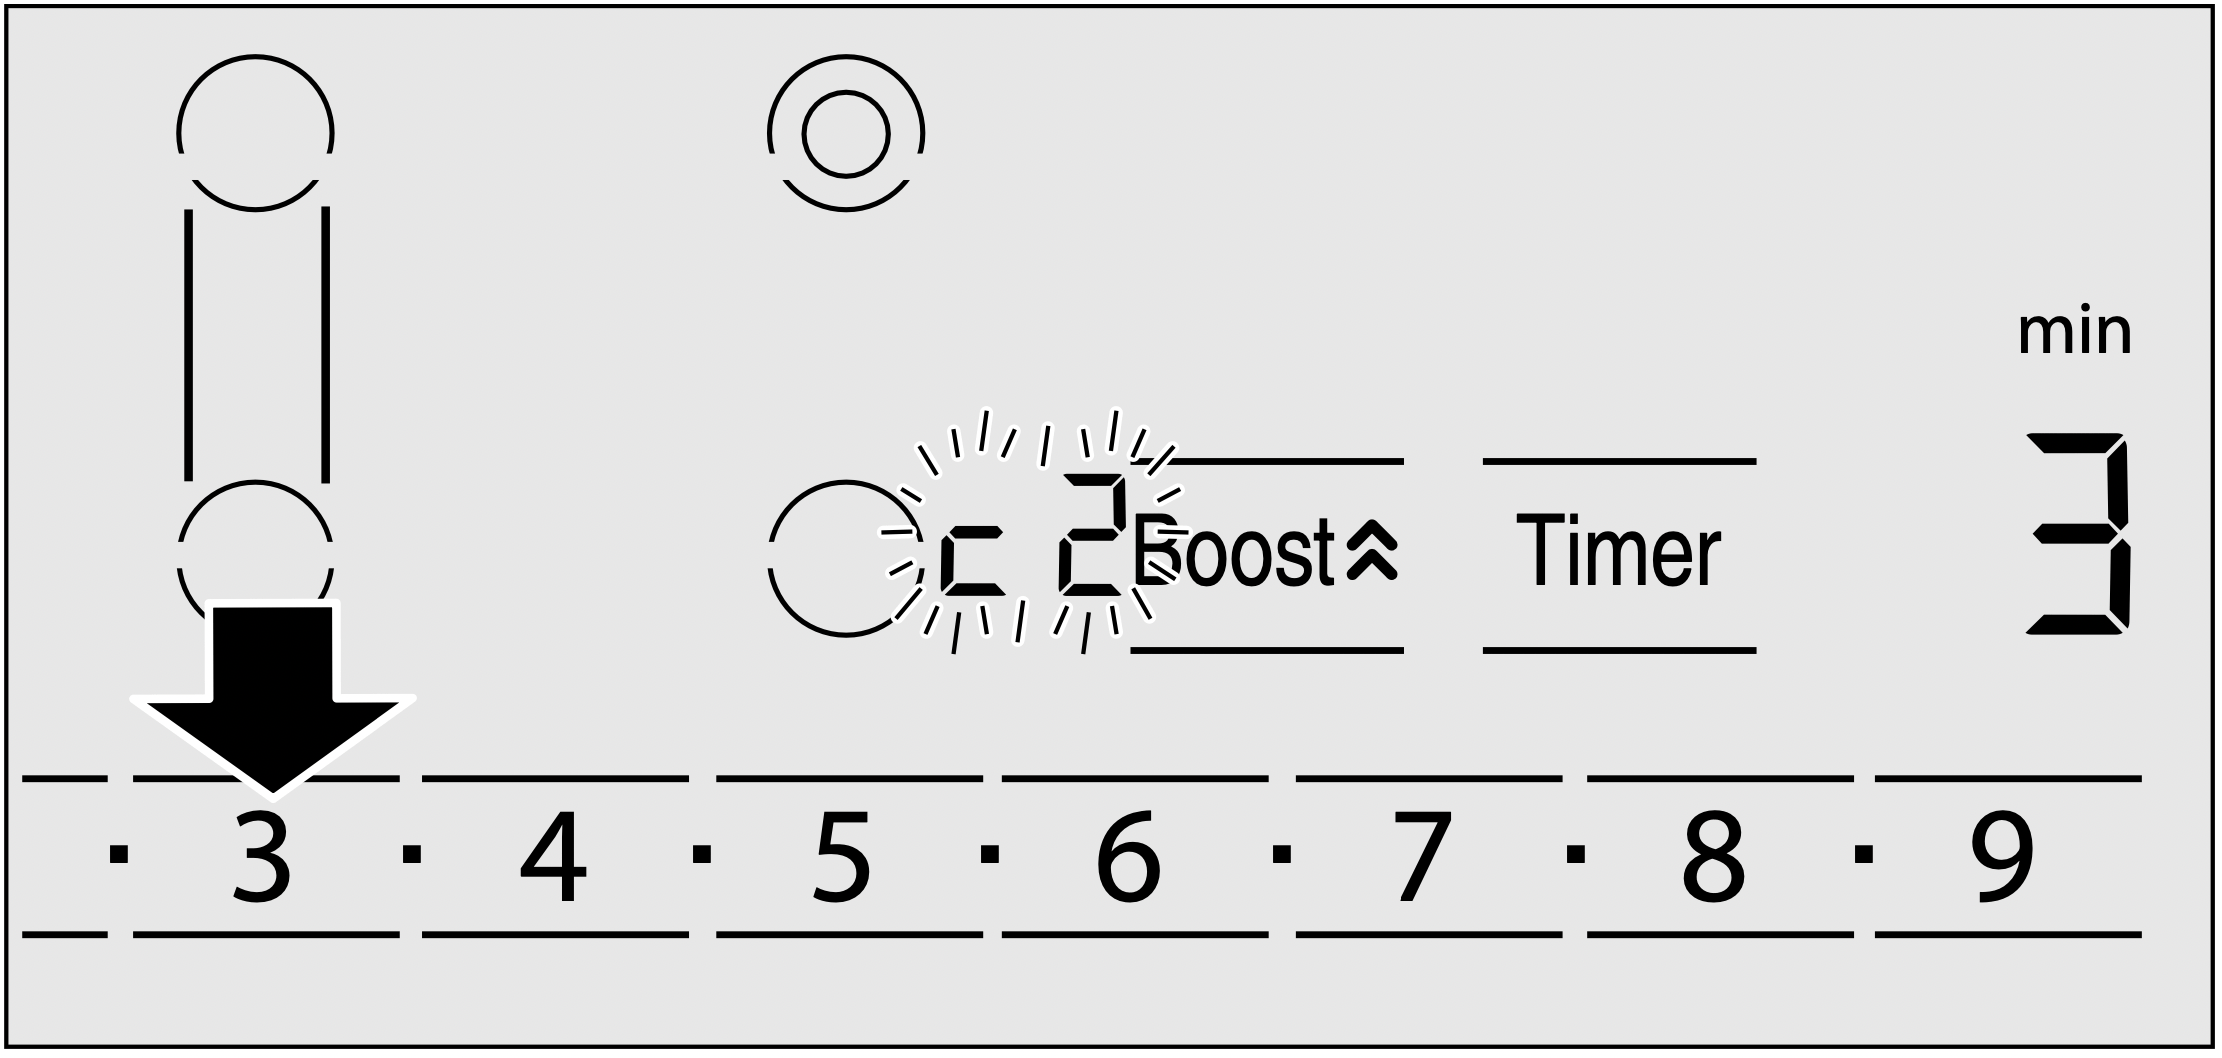
Control Panel
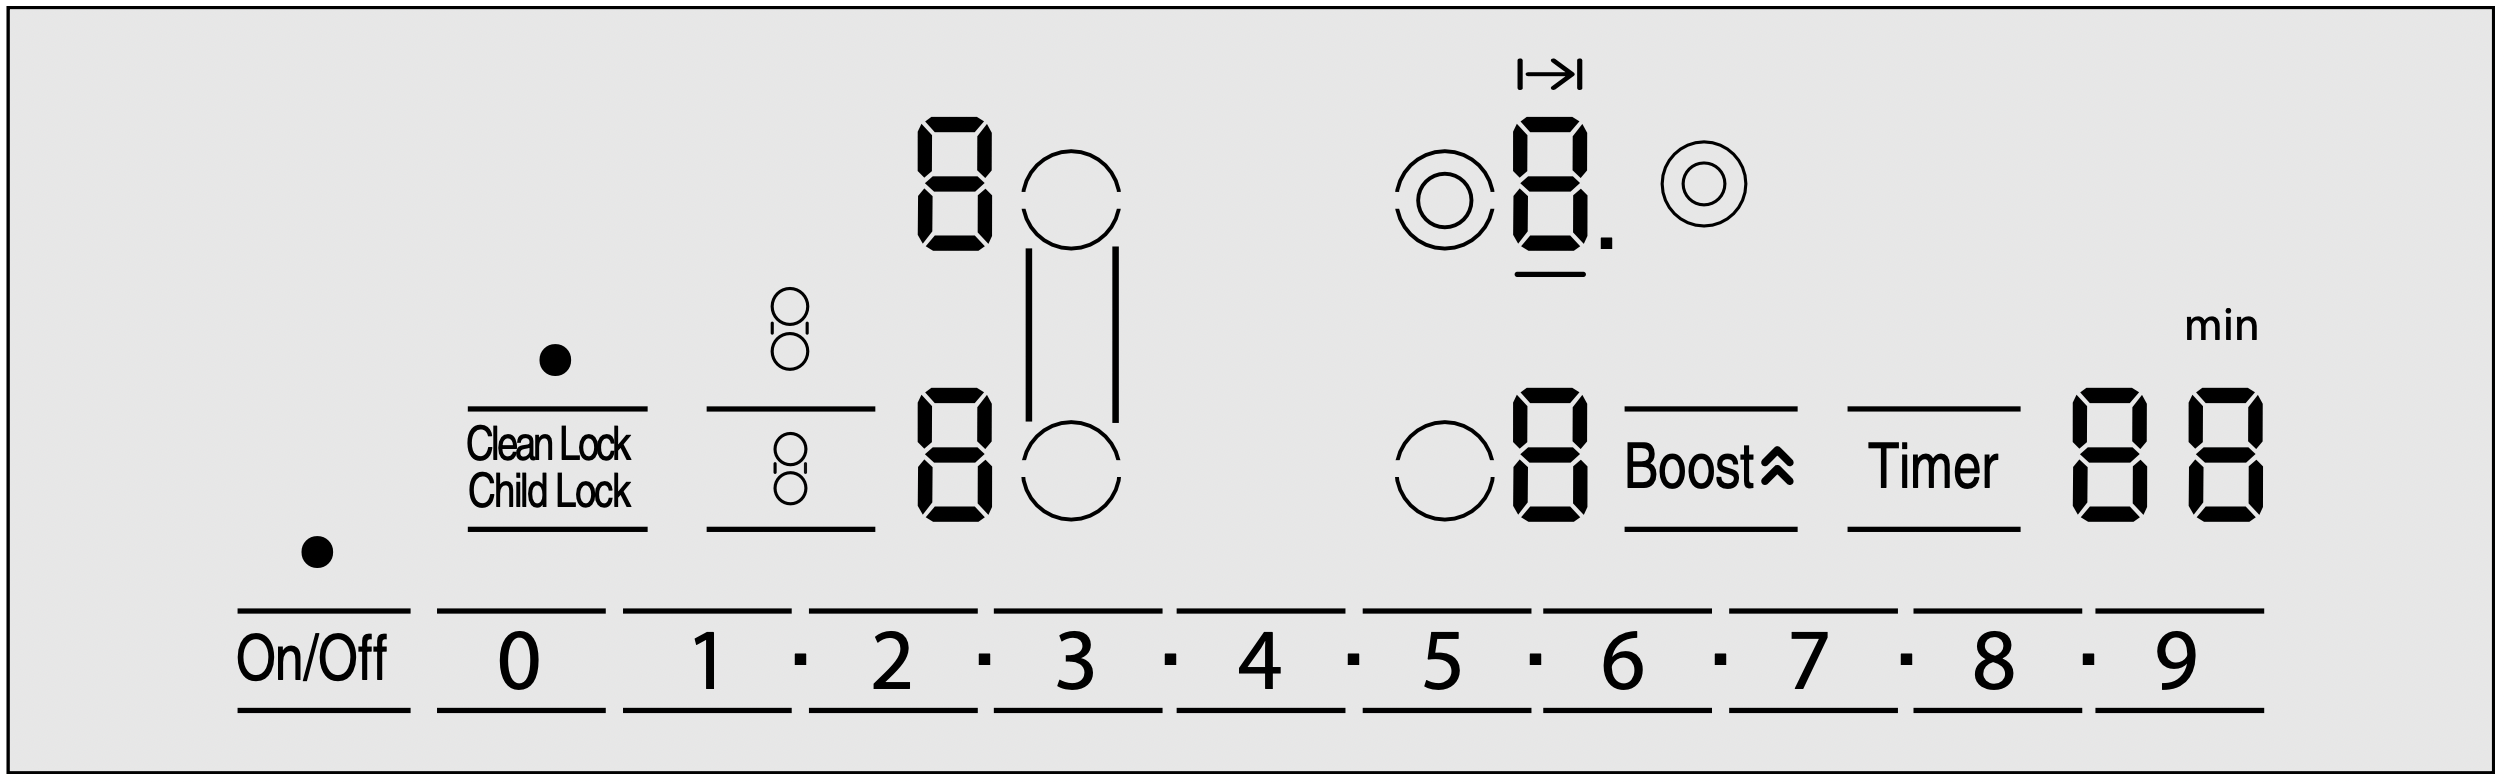

Touch control zone
When you touch a symbol, the corresponding function will be activated.
Notes
- When you touch several symbols at once, for example when food spills over, the settings will not change.
- Always keep the touch control zones clean and dry.
- Moisture and dirt can affect proper functioning.
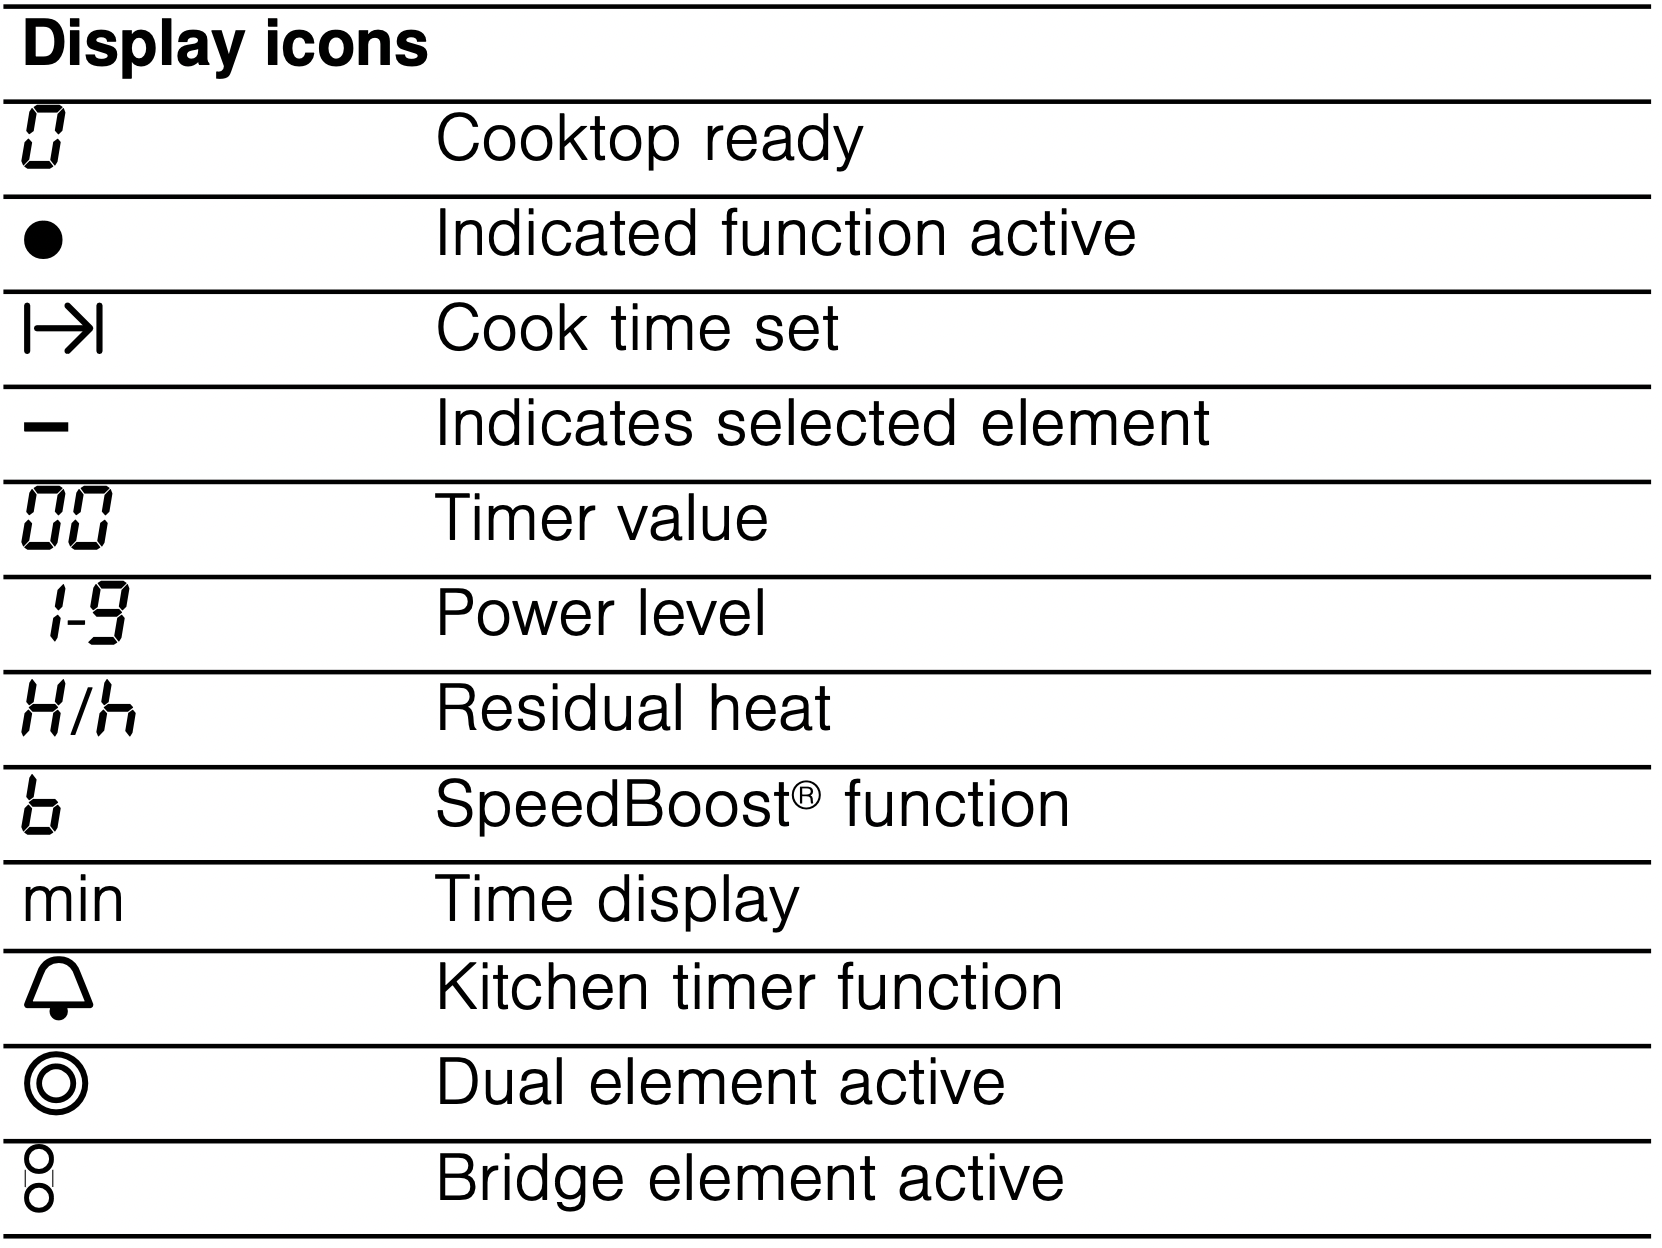
Heating elements

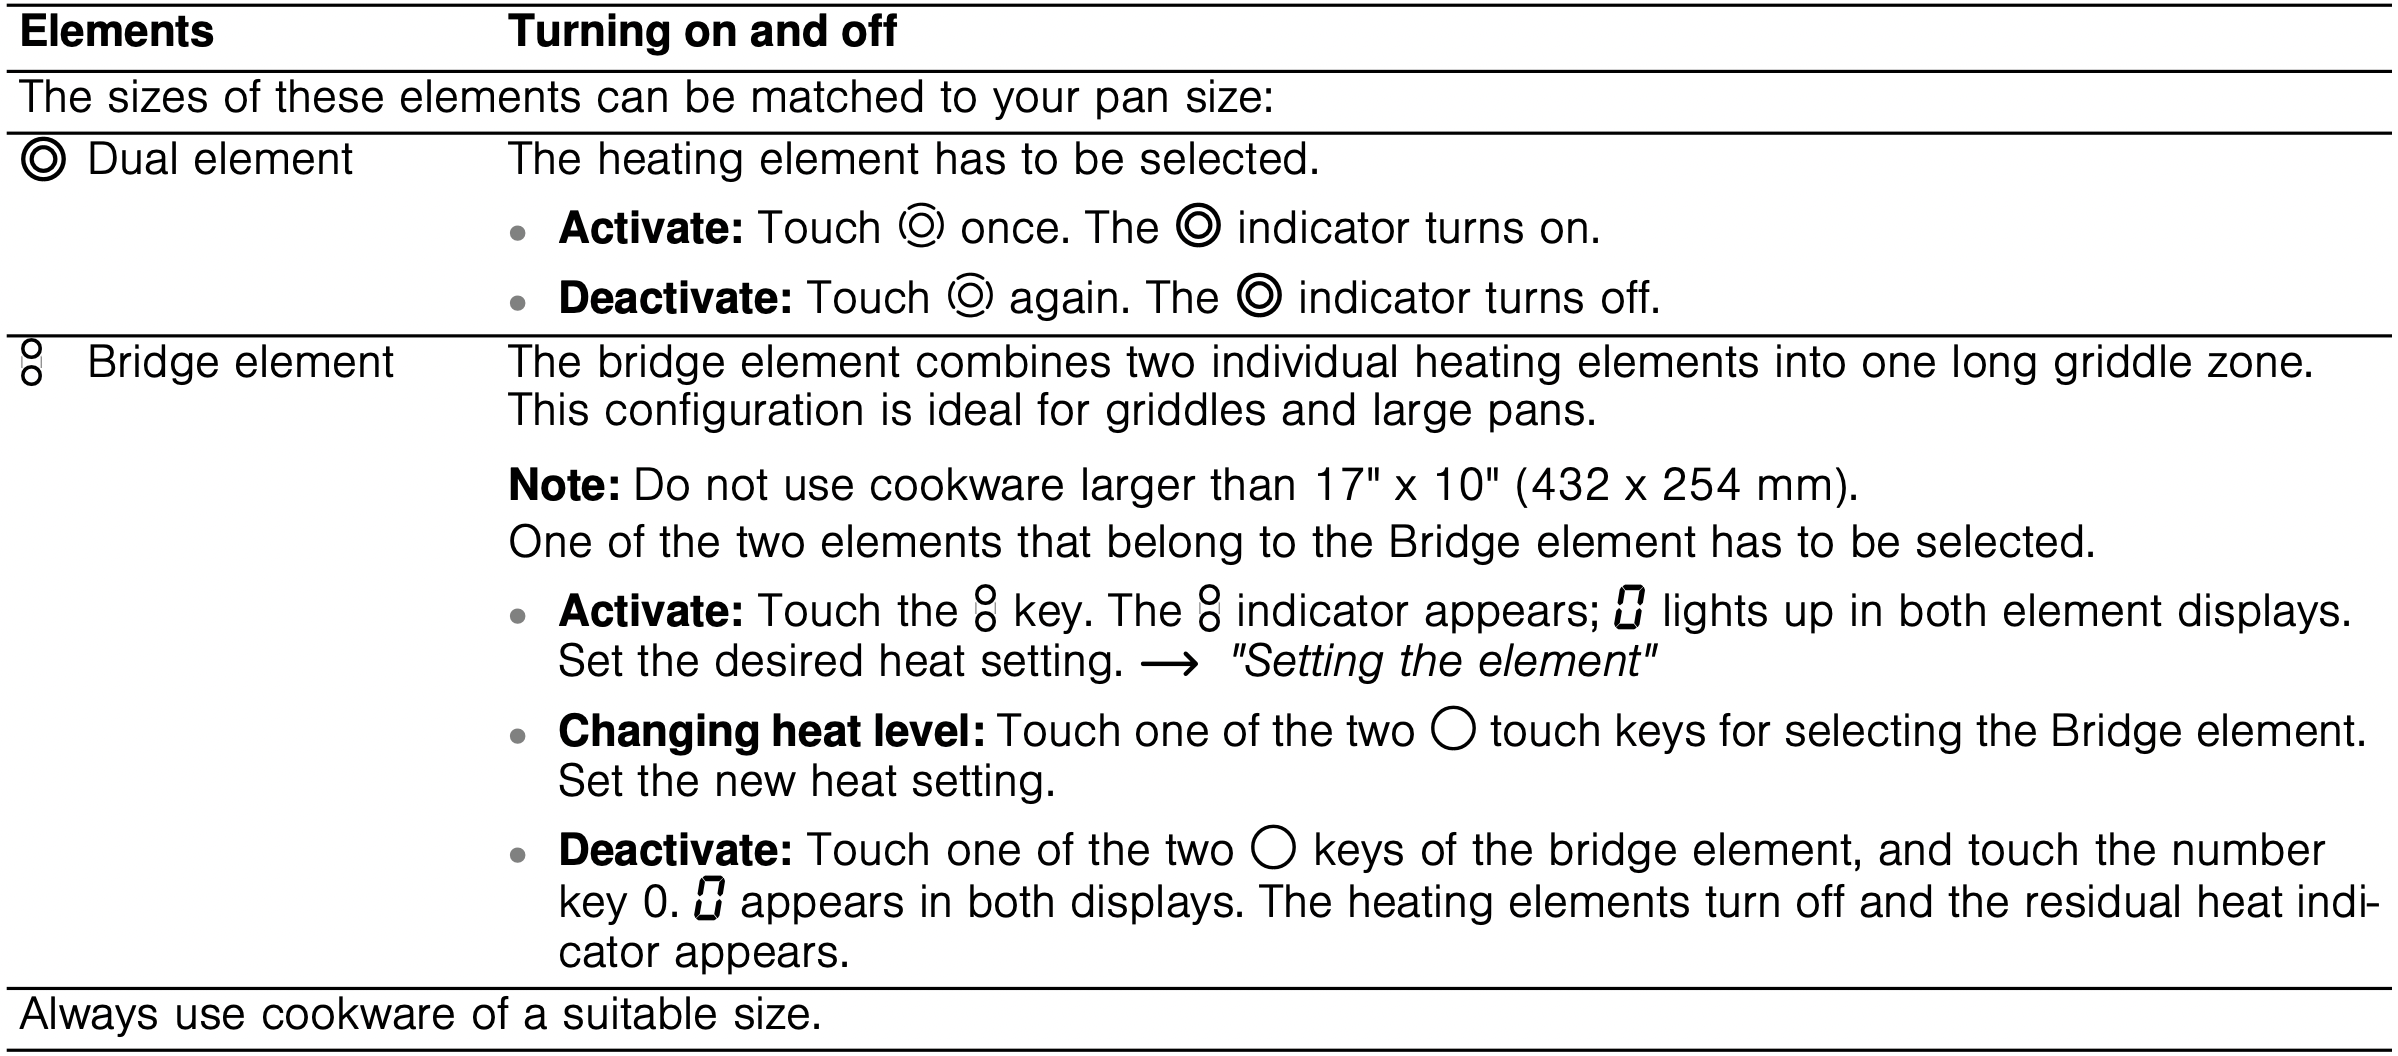
Residual heat indicator
The cooktop is equipped with a residual heat indicator for each element. It shows you which elements are still hot. Avoid touching the indicated elements.
If an  is shown on the display, the element is still hot. You could use it, for example, to keep a small quantity of
food warm or to melt a chocolate coating. As the element continues to cool, the display changes to  . The display goes out once the element has cooled sufficiently.
The residual heat indicator will automatically come on after a power failure. The display lights up for approximately 30 minutes.
Operation
Main power switch
Use the main switch to turn on the electronic circuitry for the control panel. The cooktop is now ready to use.
Turning the cooktop on
Touch the On/Off touch key until the indicator above the main switch and the temperature level indicators  next to the heating elements turn on.
Turning the cooktop off
Touch the On/Off touch key. The indicator above the On/ Off key goes out. The cooktop is switched off. The residual heat indicators will remain on until the elements have cooled off sufficiently.
Notes
- The cooktop switches off automatically when all the elements have been switched off for more than 10 seconds.
- The residual heat indicator remains lit until the elements have cooled down sufficiently.
 is displayed next to the corresponding element symbol.
Setting the cooktop
This section will show you how to set the elements. The table contains details on the heat settings for a variety of dishes.
Setting the element
Select the desired heat level using the number keys 1 to 9.
Heat level 1 = minimum power
Heat level 9 = maximum power
Each heat setting has an intermediate level. This level is indicated by . in the element display and is set by touching the  symbols between the number keys.
Selecting the heat level
The cooktop must be turned on.
- Touch the
 key for the desired element. The
  and _ indicators light up.
- Within the following 10 seconds set the desired heat setting using the number keys. To set an intermediate level touch the
 symbols between the number keys.
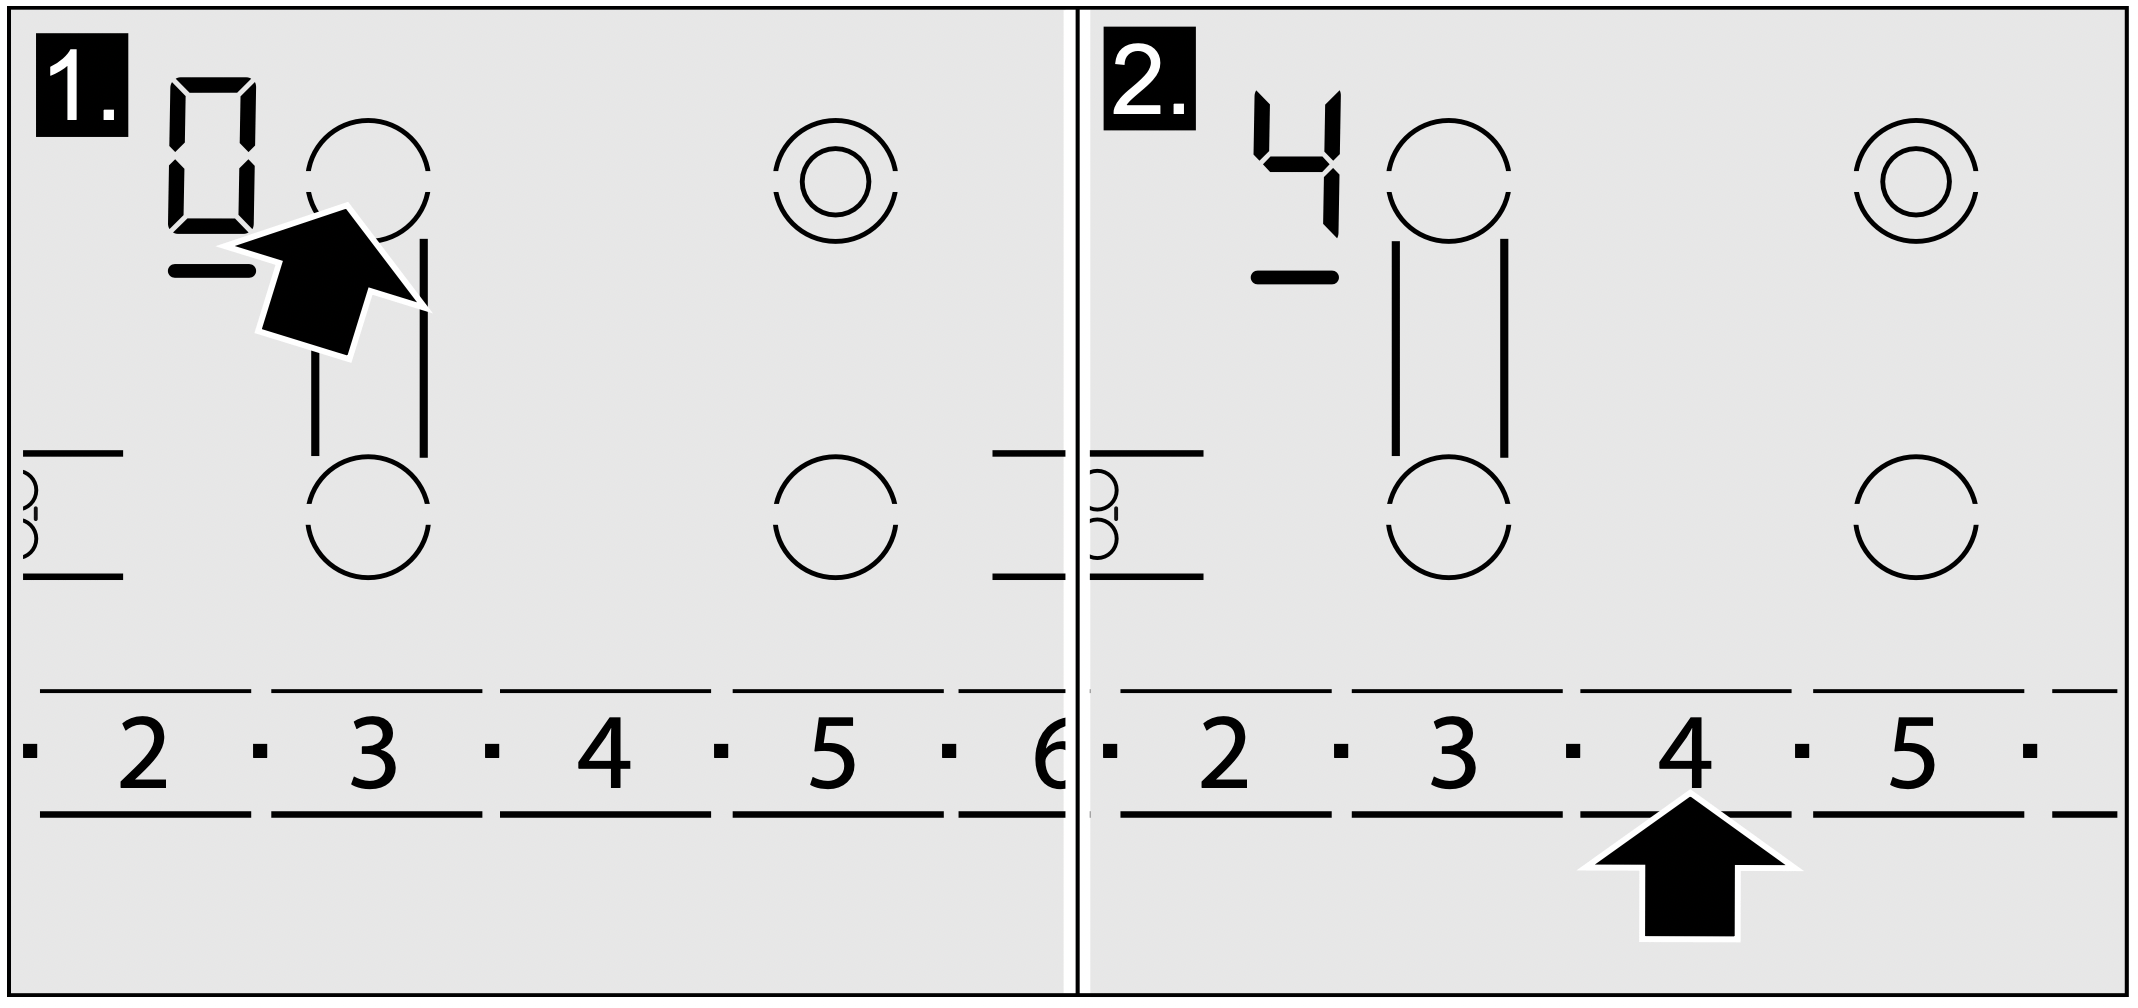
Changing the heat level
Select the element and set the desired heat level using the number keys.
Turning off the element
Select the element and set the heat level to 0. The element is turned off and the residual heat indicator is displayed.
Note: The heat is turned on and off to regulate the temperature of the element; this means that the red glow below the element is not always visible. When you select a low heat setting, the element turns off for longer intervals, while at a higher setting these intervals are very short. Even at the highest level, the element turns on and off.
Settings table
The following table provides some examples. Cooking times may vary depending on the type of food, its weight and quality. Deviations are therefore possible.
Set the element to heat setting 9 for bringing to the boil or initial frying, then switch back to appropriate setting (not for melting).
Stir thick liquids occasionally. Food that needs to be seared quickly or food which loses a lot of liquid during initial frying is best seared in several small portions. Tips for energy-saving cooking can be found in section -> "Protecting the Environment"
CAUTION: During cooking, stews or liquid meals such as soups, sauces or drinks can heat up too quickly unnoticed and overflow or spatter. For this reason we recommend that you stir continuously, gradually heating the food at a suitable power level.
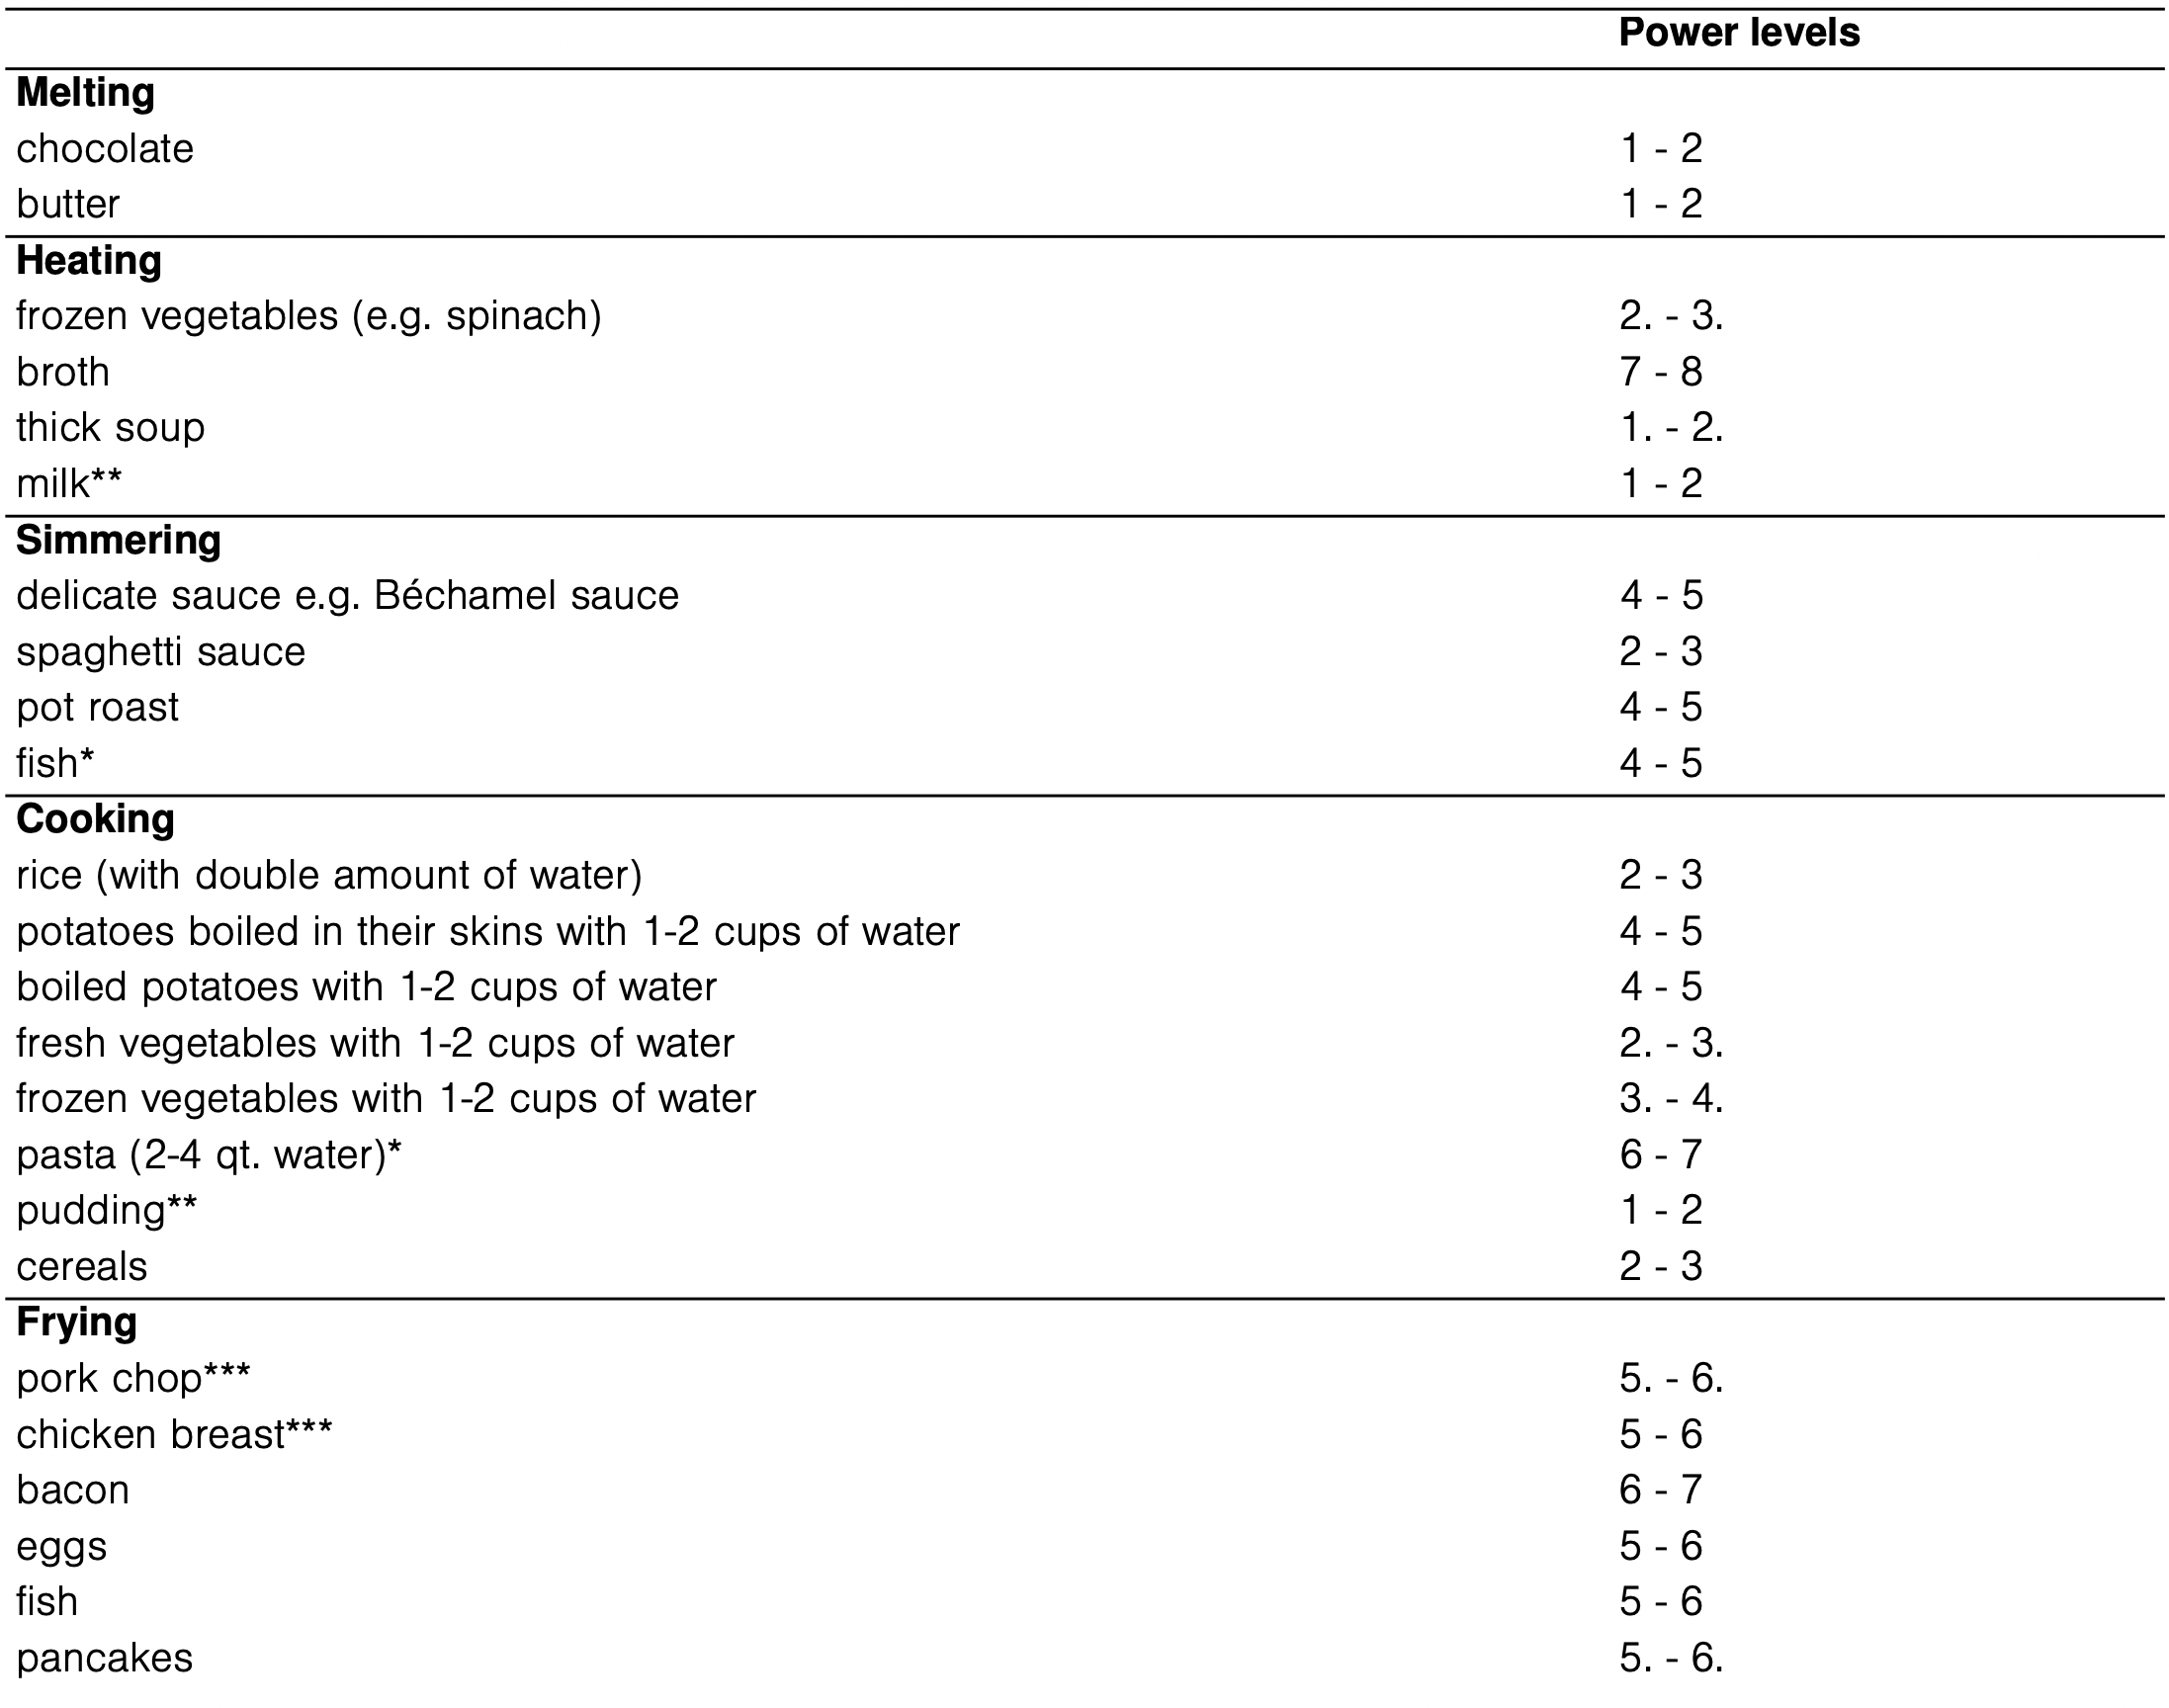

* ongoing cooking without lid
** without lid
*** turn several times
Cook time
You can use the timer function to set a cook time for any element. The element will turn off automatically once the set time has elapsed.
CAUTION:
- When using the timer, always keep an eye on the cooktop and do not allow anything to boil over or burn. Boilovers can cause smoke and foods and oils may catch on fire if left on high temperature settings.
- This function should not be used for long periods of time, especially at high heat settings.
- Make sure the cooktop is turned off with the main power switch after each use.
Setting the cook time
The cooktop must be turned on.
- Select the desired element and heat level.
- Touch the Timer key. The indicators
 and min light up and timer value
  is indicated in the timer display.
- Within the next 10 seconds set the desired cook time using the number keys.
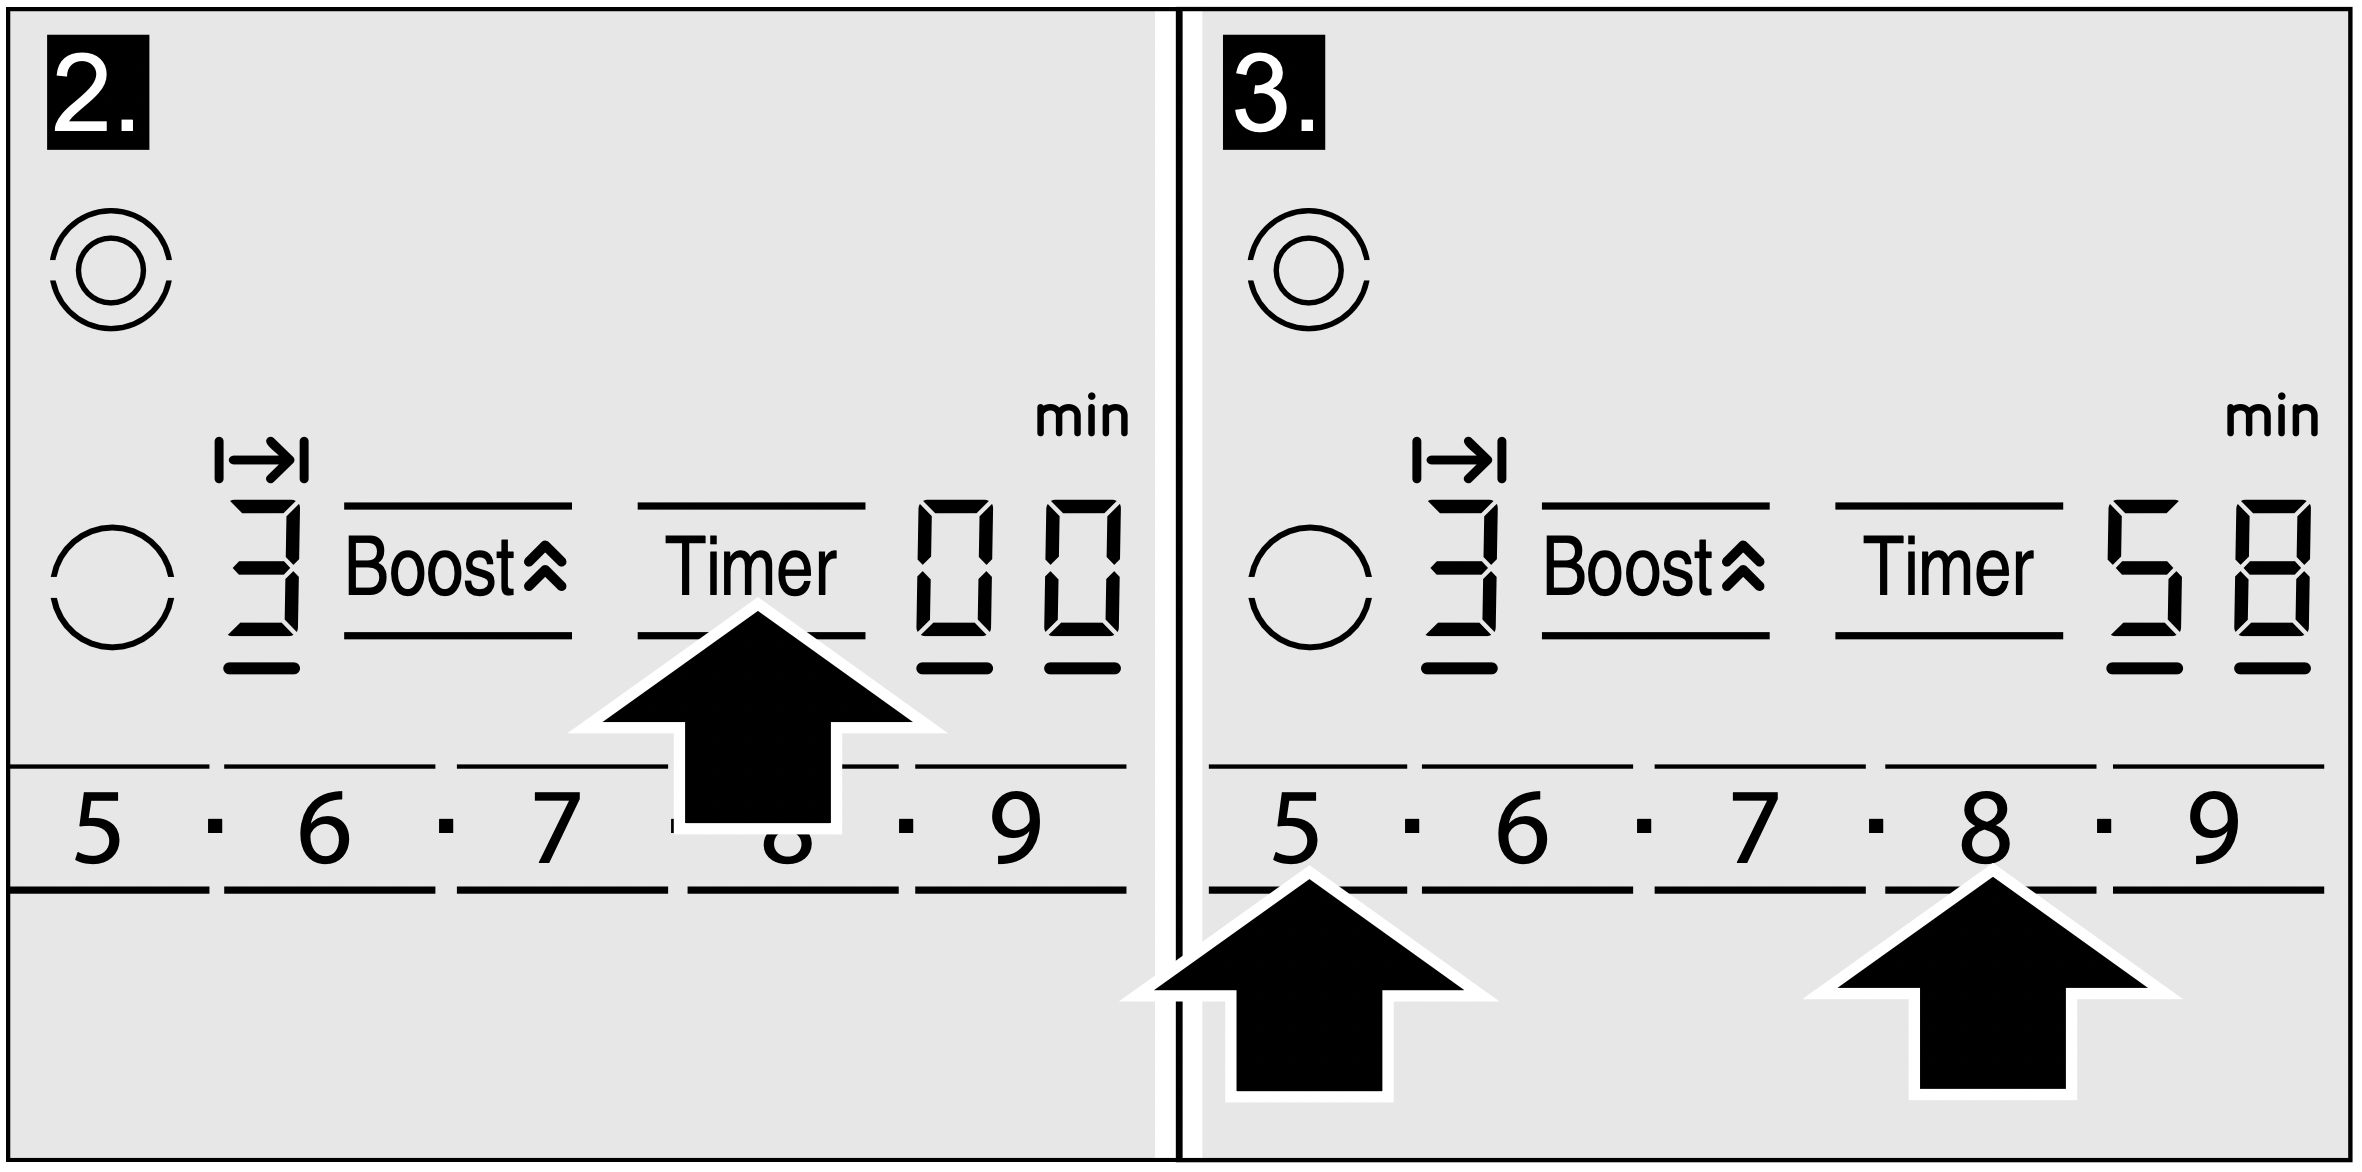
The timer starts to count down.
Changing or cancelling cook time
- Select the desired element and touch the Timer key.
- Adjust the cook time using the number keys. To cancel cook time set the timer to
 .
.
Once the cook time has elapsed
The element turnes off once the set cook time has elapsed. You will hear a beep. The indicator appears in the element display and the timer display shows  for 10 seconds. The
  indicator in the element display stays on.
Touch any key to turn off the indicators and the beep
Notes
- If a cooking time was set for several elements, the time information for the selected element is shown in the timer display.
- Select the relevant element to call up the remaining cooking time.
- You can set a cooking time of up to
 minutes.
Automatic timer
With this function you may select a cook time for all elements. Once an element is turned on, the selected time will begin to count down. The element will automatically turn off when the cook time has elapsed. Instructions on activating the automatic timer are found in the chapter "Basic settings".
Note: The cook time can be changed or cancelled for any element:
Select the desired element. Touch the Timer key. Adjust the cook time using the number keys, or deactivate it by setting the timer value to .
Kitchen timer
The timer can be set for periods of up to 99 minutes. It is independent of the other settings. You can also use the kitchen timer when the cooktop is turned off or locked. This function does not automatically switch off an element.
Setting the kitchen timer
- Touch the Timer key until the
 indicator lights up.
 and min appear on the timer display.
- Set the desired time using the number keys.
The timer start to count down after a few seconds.
Changing or deleting the time
Touch the Timer key repeatedly until the  indicator lights up.
Change the time using number keys, or set  in order to delete the programmed time.
When the time has elapsed
A beep sounds.  appears on the timer display and the
  indicator lights up. The displays go out after 10 seconds.
Touch any key to turn off the indicators and the beep.
SpeedBoost® function
This function enables you to heat up large quantities of water faster than when using heat setting  .
.
To see which element is equipped with this feature check the cooktop for the printings boost  .
.
For dual elements, the outer ring has to be activated in order to use this function.
Setting the SpeedBoost® function
- Select the element with the SpeedBoost® function.
- Touch the Boost key. A signal sounds and
 lights up in the display.
The function is activated.
Cancelling the SpeedBoost® function
- Select the element with the SpeedBoost® function.
- Touch the Boost key. A signal sounds and the indicator goes out. The element switches to heat level .
You can also cancel the function by setting a heat level for ongoing cooking. A signal sounds and the indicator goes out. The element switches to the set heat level.
The function is deactivated.
Note: The duration of the SpeedBoost® function is restricted. After 20 minutes the element will switch automatically to heat level .
WARNING - RISK OF FIRE: Oil and fat heat up quickly with the SpeedBoost function. Overheated oil or fat may ignite, never leave the cooktop unattended while cooking with the SpeedBoost® function.
Child lock
You can use the child lock to prevent children from accidentally turning the cooktop on.
Turning the child lock on
The cooktop must be turned off.
Touch Clean Lock/Child Lock for 4 seconds. The indicator lights up for several seconds. The cooktop is now locked.
Turning the child lock off
Touch Clean Lock/Child Lock for 4 seconds. The cooktop is now unlocked.
CAUTION: The child lock may be accidentally turned on and off due to:
- water spilled during cleaning
- food that has overflowed
- objects being placed on the Clean Lock/Child Lock touch key.
Automatic child lock
With this function, the child lock is automatically activated whenever you switch off the cooktop.
Turning on and off
See "Basic settings" section.
Wipe Protection
Cleaning the control panel while the cooktop is on may change the settings. In order to avoid this the cooktop has a wipe protection function.
To activate:
Touch the Clean Lock/Child Lock key. The indicator above the key lights up. The control panel is locked for 35 seconds.
You can now clean the surface of the control panel without risk of changing the settings.
To deactivate:
To deactivate the function before the time has elapsed, touch the Clean Lock/Child Lock key. The indicator above the key turns off, the function is deactivated.
Notes
- An acoustic signal sounds 30 seconds after activation.
This indicates that the function is about to finish.
- The wipe protection lock does not lock the main switch. The cooktop can be switched off at any time.
Automatic time limitation
If the element is used for prolonged periods of time without changes in the settings being made, the automatic time limitation function is triggered.
The element stops heating.  and the residual heat indicator flash alternately in the display.
The indicator goes out when any symbol is pressed. The element can now be reset.
When the automatic time limitation is activated depends on the selected heat level (from 1 to 10 hours).
Basic Settings
The appliance has various basic settings. You can adjust these settings to the way you usually cook.
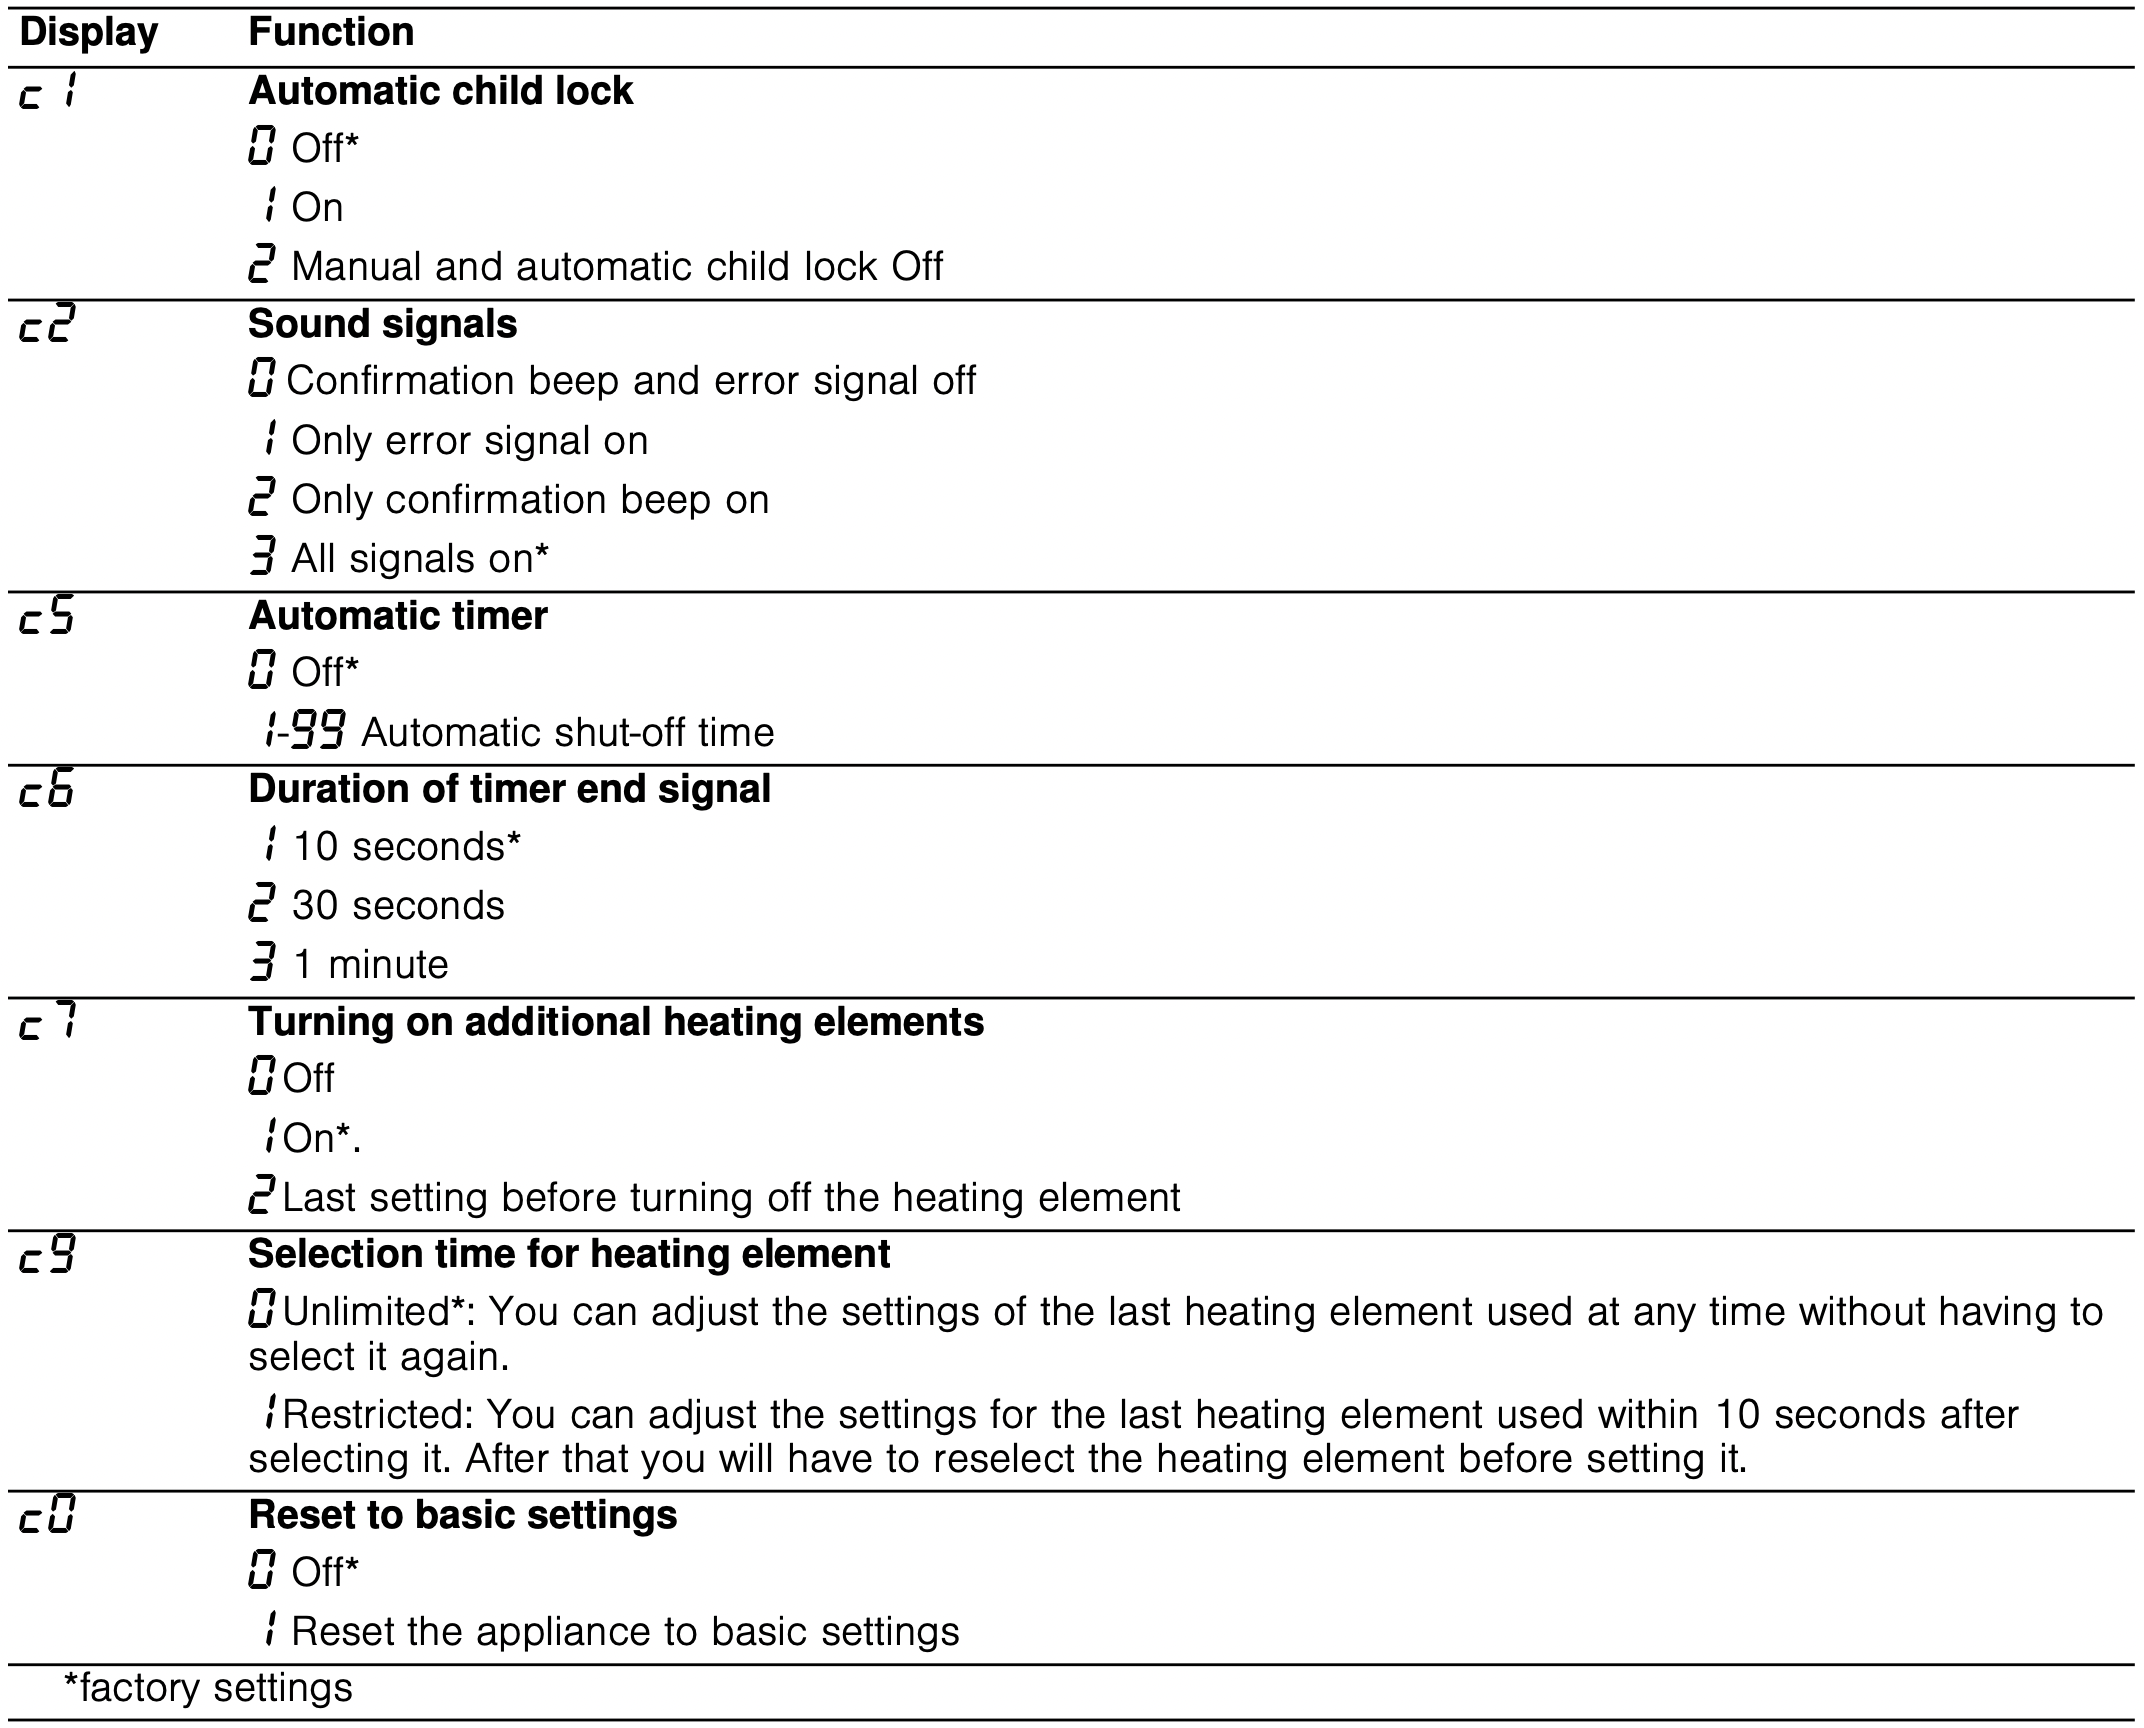
Changing the basic settings
The cooktop must be turned off.
- Turn on the cooktop with the main switch.
- Within the next 10 seconds, touch the Timer key for 4 seconds.
In the left display the symbols  and
and  alternate. lights up on the timer display.
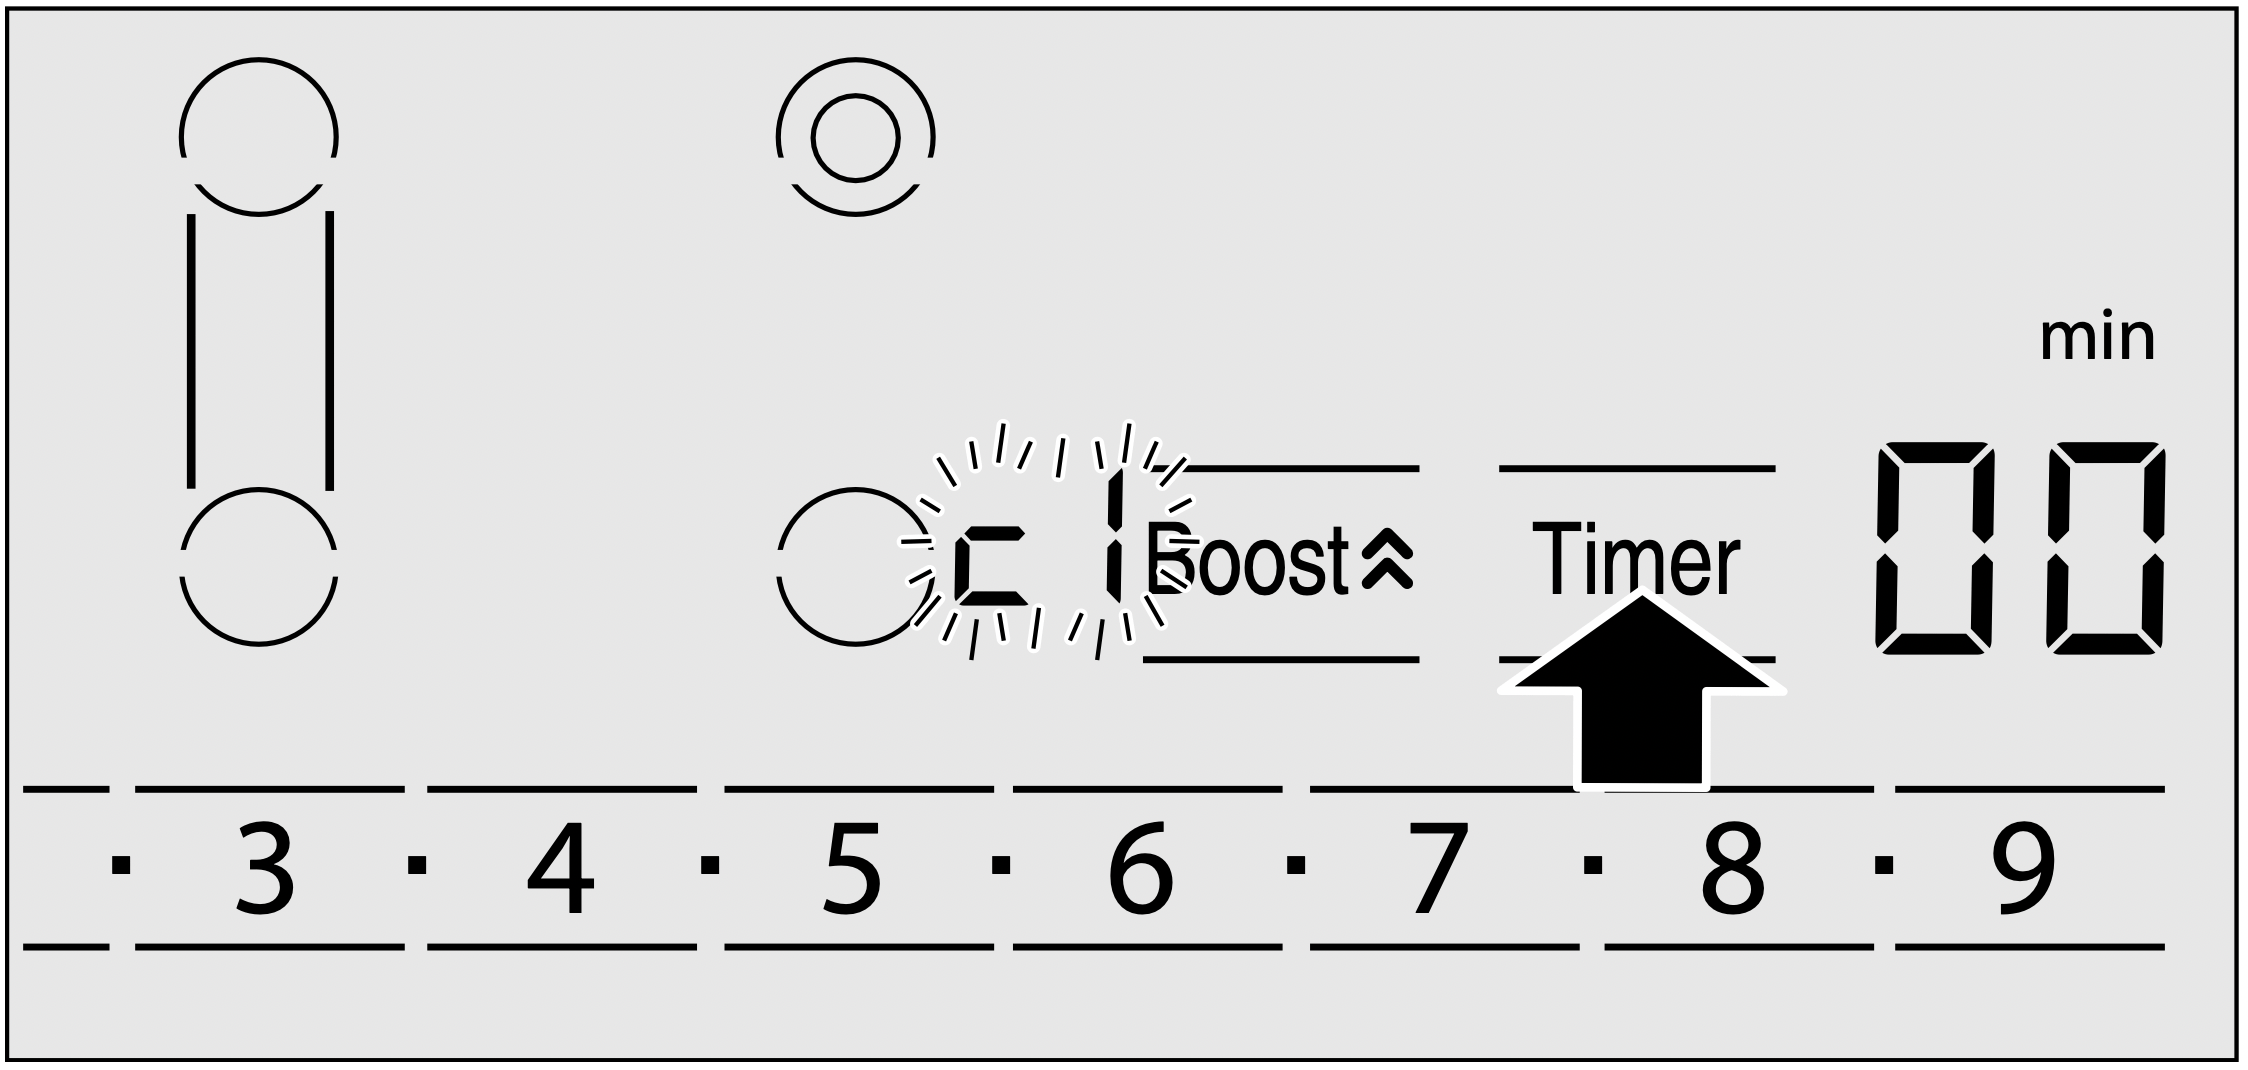
- Touch the Timer key until the desired indicator appears on the left display.
- Select the required setting using the number keys.
- Touch the Timer key again for 4 seconds. The setting is activated.
Leaving the basic settings
Turn off the cooktop with the main switch.
Cleaning and Maintenance
Daily Cleaning
Note: Bosch cleaners have been tested and approved for use on Bosch appliances. Other recommended cleaners do not constitute an endorsement of a specific brand.
Glass ceramic cooktop
CAUTION: Do not use any kind of cleaner on the glass while the surface is hot, use only the razor blade scraper. The resulting fumes can be hazardous to your health. Heating the cleaner can chemically attack and damage the surface.
Clean the surface when it is completely cool with the following exception: remove dry sugar, sugar syrup, tomato products and milk immediately with the razor blade scraper (see cleaning chart).
Wipe off spatters with a clean, damp sponge or a paper towel. Rinse and dry. Use white vinegar if smudge remains; rinse.
Apply a small amount of the glass ceramic cooktop cleaner. When dry, buff surface with a clean paper towel or cloth.
Stainless steel side trim
Wipe with the grain when cleaning. For moderate/heavy soil, use BonAmi® or Soft Scrub® (no bleach).
Wipe using a damp sponge or cloth, rinse and dry.
Cleaning guidelines
When using a cleaner, use only a small amount; apply to a clean paper towel or cloth. Wipe on the surface and buff with a clean dry towel.
Avoid these cleaners
- Glass cleaners which contain ammonia or chlorine bleach. These ingredients may damage or permanently stain the cooktop.
- Caustic cleaners - cleaners such as Easy Off® may stain the cooktop surface.
- Abrasive cleaners.
- Metal scouring pads and scrub sponges such as Scotch Brite® can scratch and/or leave metal marks.
- Soap-filled scouring pads such as SOS® can scratch the surface.
- Powdery cleaners containing chlorine bleach can permanently stain the cooktop.
- Flammable cleaners such as lighter fluid or WD-40.
Cleaning chart
| Type of Soil |
Possible Solution |
| Dry sugar, sugar syrup, milk or tomato spills. Melted plastic film or foil. All these items REQUIRE IMMEDIATE REMOVAL. Failure to remove these immediatly can permanently damage the surface. |
Remove these types of spills while the surface is hot using the razor blade scraper. Use a new, sharp razor in the scraper. Remove pan and turn off the element. Wearing an oven mitt, hold scraper at 30° angle, using care not to gouge or scratch the glass. Push soil off the heated area. After the surface has cooled, remove the residue and apply the glass ceramic cooktop cleaner.
WARNING - RISK OF INJURY: The blade is extremely sharp. Risk of cuts. Protect the blade when not in use. Replace the blade immediately when any imperfections are found. Follow manufacturer’s instructions.
|
| Burned-on food soil, dark streaks, and specks |
Soften by laying a damp paper towel or sponge on top of soil for 30 minutes. Use a plastic scrubber and glass ceramic cooktop cleaner or use the razor blade scraper. Rinse and dry.
|
| Greasy spatters |
Use a soapy sponge or cloth to remove grease; rinse thoroughly and dry. Apply glass ceramic cooktop cleaner.
|
| Metal marks: Iridescent stain |
Pans with aluminum, copper or stainless steel bases may leave marks. Treat immediately after surface has cooled with glass ceramic cooktop cleaner. If this does not remove the marks, try a mild abrasive (Bon Ami®, Soft Scrub® without bleach) with a damp paper towel. Rinse and reapply glass ceramic cooktop cleaner. Failure to remove metal marks before the next heating makes removal very difficult.
|
|
Hard water spots:
Hot cooking liquids dripped on surface
|
Minerals in some water can be transferred onto the surface and cause stains. Use undiluted white vinegar, rinse and dry. Recondition with glass ceramic cooktop cleaner. Remove boilovers and stains before using the cooktop again.
|
|
Surface scratches:
Small scratches are common and do not affect cooking. They become smoother and less noticeable with daily use of the glass ceramic cooktop cleaner.
|
Apply glass ceramic cooktop cleaner before using to remove sand-like grains and grit such as salt and seasoning. Scratches can be reduced by using pans with bases that are smooth, clean, and dry before use. Use recommended glass ceramic cooktop cleaner daily.
NOTICE: Diamond rings may scratch the surface.
|
Maintenance
This appliance requires no maintenance other than daily cleaning. For best results, apply cooktop cleaning cream daily.
Service
Before Calling for Service
Before calling Customer Service, consider the suggestions and instructions below:
CAUTION: Repairs should only be done by an authorized servicer.
Improper repair of your appliance may result in risk of severe physical injury or death.
The electronics of your cooktop are underneath the control panel. For various reasons, the temperature in this area may rise sharply.
In order that the electronics do not overheat, the cooking zones are switched off as and when necessary. The  ,
,  or
or  indicator appears alternately with the [IMAGE] or [IMAGE] residual heat indicator.
| Indicator |
Error |
Task |
| None |
There is no power supply. |
Check the household fuse for the appliance. Check whether there is a power outage by trying other electronic appliances.
|
|
All indicators flash
|
The touch controls are wet or an object is resting on them.
|
Dry the controls or remove the object.
|
|
Several cooking zones have been used over a prolonged period at high power settings. To protect the electronics, the cooking zone has been switched off. |
Wait a while. Touch any control. When goes out, the electronics have cooled down sufficiently. You can continue cooking.
|
|
Despite the switch-off by , the electronics have become hot again. All cooking zones have therefore been switched off. |
Wait a while. Touch any control. When goes out, you can continue cooking.
|
|
and the heat setting flash alternately. An audible signal can be heard
|
Warning: There is a hot pot in the area of the control panel. There is a risk that the electronics will overheat. |
Remove the pot. The fault display goes out shortly afterwards. You can continue cooking.
|
| and audible signal |
There is a hot pot in the area of the control panel. To protect the electronics, the cooking zone has been switched off. |
Remove the pot. Wait a while. Touch any control. When goes out, you can continue cooking.
|
|
The cooking zone was in operation for too long and has switched itself off. |
You can switch the cooking zone back on again immediately.
|
Notes
- The cooktop regulates the heating element temperature by turning the heat source on and off; this means that the reddish glow of the heat source beneath the heating element may not always be visible. If you select a low heat setting, the heat source is frequently off; at higher settings it is seldom off. The source turns on and off even at the highest settings.
- You may hear a quiet hum when the heating elements are in the heating phase. The heating elements may glow with different levels of brightness. Depending on the angle from which you are looking at the heating element, this glow may be visible over the marked edge of the heating element. These are technical characteristics. They have no effect on quality and function.
- Glass ceramic may have uneven areas on the surface due to the nature of the material itself. Because of the mirror-like finish on the cooking surface, even extremely small bubbles less than 1 mm in diameter may be visible. These bubbles will not have any adverse effect on the operation of the cooktop nor on the durability of the glass ceramic cooking surface.
- Depending on the countertop that is present in the kitchen, an uneven gap between the cooktop unit and the countertop can occur. For this reason, a flexible seal is provided around the entire cooktop unit.