Use and Care Manual for Induction Cooktop
Getting familiar with the appliance
In this section we describe the control panel, elements and displays.
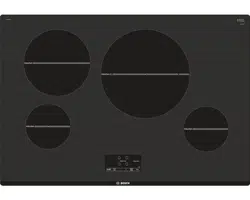
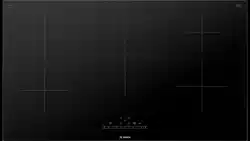
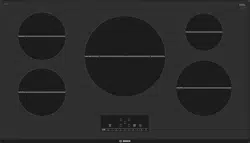
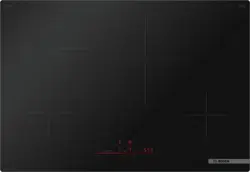
Page 2 contains a list of models and dimensions.
Control panel
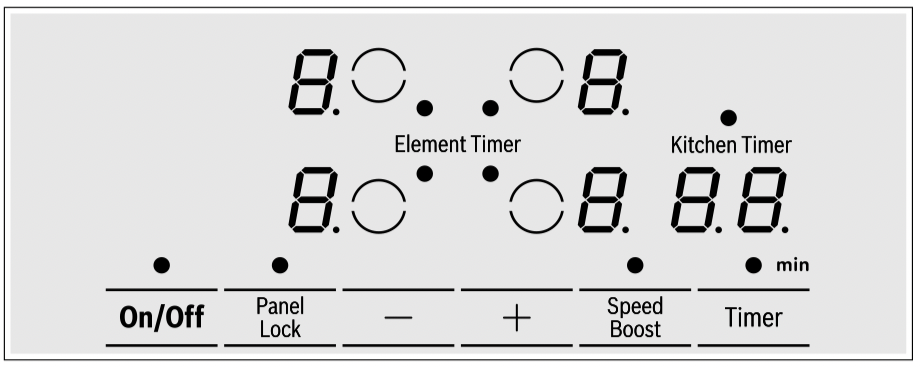
Touch control zone When you touch a symbol, the corresponding function will be activated.
NOTICE: Always keep the touch control zones clean and dry. Moisture and dirt can affect proper functioning.
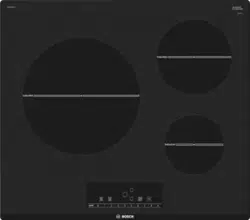
The elements

Residual heat indicator
The cooktop has a residual heat indicator for each element. This indicates that an element is still hot. Do not touch an element while the residual heat indicator is lit up.
The following indicators are shown depending on the amount of residual heat:
- Display
 : High temperature
- Display
 : Low temperature
If you remove the cookware from the element during cooking, the residual heat indicator and the selected heat setting will flash alternately.
When the element is switched off, the residual heat indicator will light up. Even after the cooktop has been switched off, the residual heat indicator will stay lit for as long as the element is still warm.
Operation
Main power switch
Use the main switch to turn on the electronic circuitry for the control panel. The cooktop is now ready to use.
Turning the cooktop on
Touch the On/Off touch key until the indicator above the main switch and the temperature level indicators  next to the heating elements turn on.
Turning the cooktop off
Touch the On/Off touch key. The indicator above the On/ Off key goes out. The cooktop is switched off. The residual heat indicators will remain on until the elements have cooled off sufficiently.
Notes
- The cooktop switches off automatically when all the cooking zones have been switched off for more than 20 seconds.
- The settings will be stored for 4 seconds after turning off the cooktop. If you turn the cooktop back on during that time the cooktop will continue with those settings.
Setting the cooktop
This section will show you how to set the elements. The table contains details on the heat settings for a variety of dishes.
Setting the element
Select the desired heat level using the touch keys + and - .
Heat level 1 = minimum power
Heat level 9 = maximum power
Each heat level has an intermediate level. This level is displayed as a dot.
Selecting the heat level
The cooktop must be turned on.
1. Select the desired element with by touching the  symbol on the control panel. In the display next to the element symbol lights up.
2. Within the following 10 seconds, touch the + or - key.
The default settings appear.
+ key = power level 9
- key = power level 4
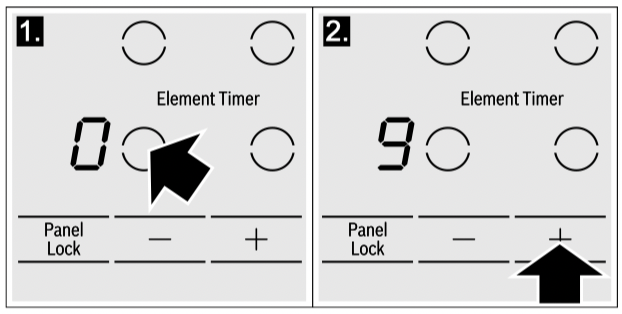
3. To change the power level, touch the + or - key until the desired power level is displayed.
Note: The selected power level will flash if no pan is placed on the induction element. After a certain time, the element turns itself off.
Changing the heat setting
Select the cooking zone and touch the + or - symbol until the required heat setting appears.
Turning off the element Touch the + or - key until appears. The element turns off and the residual heat indicator is displayed.
Notes
- If there is no cookware on the induction cooking zone, the heat setting display blinks. After a while, the cooking zone will switch itself off.
- If cookware has been placed on the cooking zone before you turn on the cooktop, it will be detected within 20 seconds after you have touched the main switch and the cooking zone will be selected automatically. Once detected, set the power level within the next 20 seconds, otherwise the cooking zone will turn off.
Even if there are several pots and pans on the cooktop when it is switched on, only one piece of cookware is detected.
Recommendations
- When heating up puree, cream soups and thick sauces, stir occasionally.
- Set heat setting 8 to 9 for preheating.
- When cooking with the lid on, turn the heat setting down as soon as steam escapes between the lid and the cookware.
- After cooking, keep the lid on the cookware until you serve the food.
- To cook with the pressure cooker, observe the manufacturer's instructions.
- Do not cook food for too long, otherwise the nutrients will be lost. The kitchen timer can be used to set the optimum cooking time.
- For healthier cooking results, oil or grease should not be heated until it smokes.
- To brown food, fry small portions in succession.
- Cookware may reach high temperatures while the food is cooking. We recommend that you use pot holders.
- You can find recommendations for energy-efficient cooking in section
 "Protecting the environment"
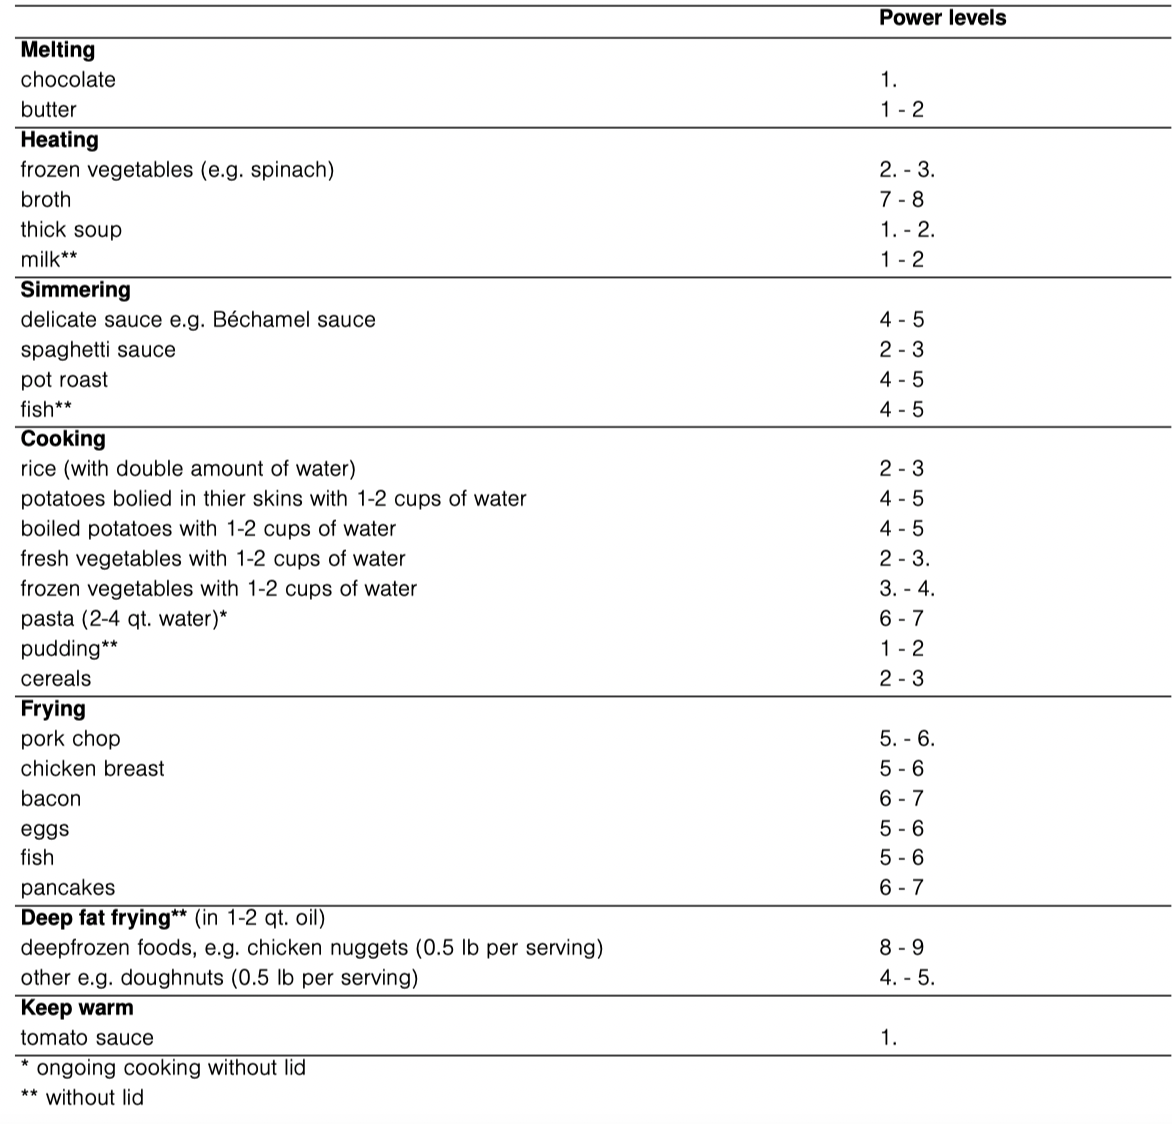
Settings table
The following table provides some examples. Cooking times may vary depending on the type of food, its weight and quality. Deviations are therefore possible.
CAUTION
During cooking, stews or liquid meals such as soups, sauces or drinks can heat up too quickly unnoticed and overflow or spatter. For this reason we recommend that you stir continuously, gradually heating the food at a suitable power level.
Cook time
You can use the timer function to set a cook time for any element. The element will turn off automatically once the set time has elapsed.
CAUTION
- When using the timer, always keep an eye on the cooktop and do not allow anything to boil over or burn. Boilovers can cause smoke and foods and oils may catch on fire if left on high temperature settings.
- This function should not be used for long periods of time, especially at high heat settings.
- Make sure the cooktop is turned off with the main power switch after each use.
Setting the cook time
The cooktop must be turned on.
1. Select the desired element and power level.
2. Touch the Timer key. The  indicators light up next to the element and
  is shown in the timer display.
3. Touch the + or - key in the timer display. The basic settings are displayed:
+ key = 30 minutes
- key = 10 minutes
4. Touch the + or - key to set the desired time. After a few seconds the timer will start to count down.
Changing or cancelling cook time
Touch the Timer key until the indicator lights up next to the desired element. Adjust the cooking time using the + or - keys. To cancel cook time set the timer to with the - key.
Once the cook time has elapsed
The element turnes off once the set cook time has elapsed. You will hear a beep. The indicator appears in the element display and the timer display shows for 10 seconds. The indicator next to the element stays on. Once you touch the Timer key, the indicators and the beep are turned off.
Notes
- If a cooking time was programmed for several elements, the time information for the selected element is shown in the timer display.
- You can set a cooking time of up to 99 minutes.
Automatic timer
With this function you may select a cook time for all elements. Once an element is turned on, the selected time will begin to count down. The element will automatically turn off when the cook time has elapsed. Instructions on activating the automatic timer are found in the chapter "Basic settings".
Note: The cook time can be changed or cancelled for any element:
Touch the Timer key several times until the indicator of the desired element lights up. Adjust the cook time with the + or - key, or deactivate it by setting the the timer value to .
The kitchen timer
You can use the kitchen timer to set a time of up to 99 minutes.
This works independently from the elements and from other settings. This function does not automatically switch off an element.
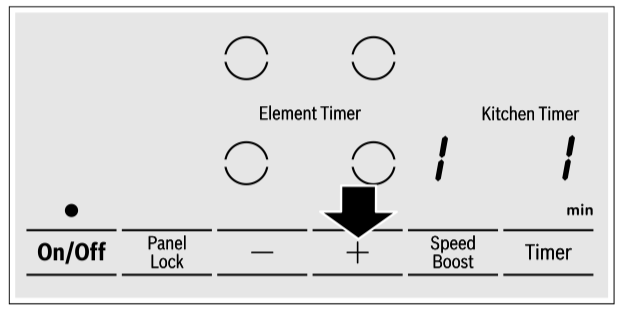
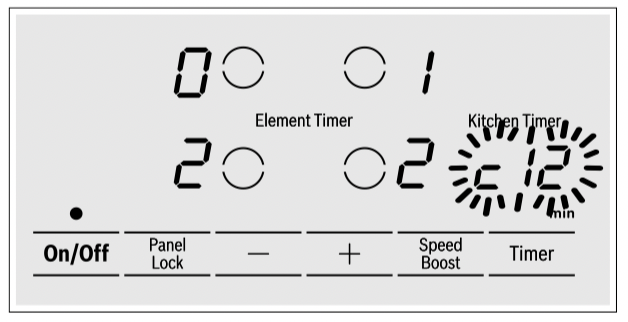
Setting the kitchen timer
1. The kitchen timer can be set in two different ways:
-
If an element has been selected, touch the Timer key twice.
-
If not element is selected, touch the Timer key. The indicator lights up over kitchen timer. appears in the timer display.
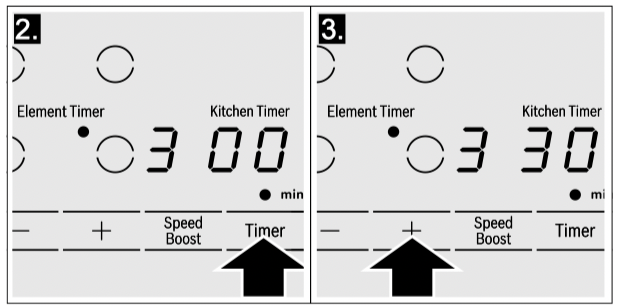
2. Touch the + or - key. The basic settings are displayed.
+ key = 10 minutes
- key = 05 minutes
3. Set the desired time using the + or - key. The timer starts to count down after a few seconds.
Changing or cancelling the kitchen timer
Touch the Timer key repeatedly until the indicator lights up over kitchen timer. Adjust the time using the + or - key. To cancel set the timer to .
Once the time has elapsed
A beep sounds. The timer display shows. After 10 seconds the indicators turn off.
Touch the Timer key to turn off the indicator and the beeping.
SpeedBoost ® function
The SpeedBoost ® function can be used to heat large amounts of water faster than by using heat level  .
.
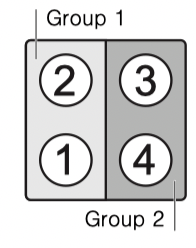
Limitation on use This function is available on all elements, provided that no other element in the same group is operating, (see picture). If this is not the case, the  and symbols will flash on the selected element display; then it will automatically set the power level .
Activation
1. Select an element.
2. Touch the Speed Boost key. lights up on the display. The function is activated.
Deactivation
1. Select the element on which SpeedBoost is set.
2. Touch the Speed Boost key.goes out on the display and the element switched back to heat setting . The function is deactivated.
Note: In certain circumstances, the function may be deactivated automatically to protect the internal electronic components of the cooktop.
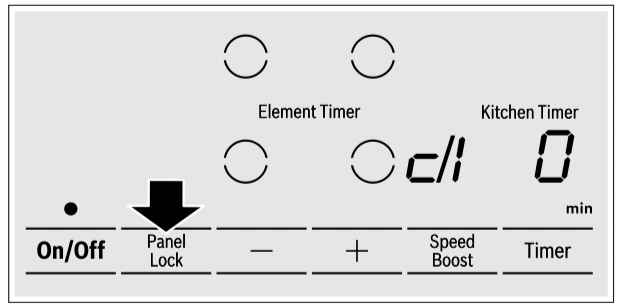
Panel lock
You can use the child safety panel lock to prevent children from accidentally turning the cooktop on.
Turning the panel lock on
The cooktop must be turned off.
Touch Panel Lock for 4 seconds. The indicator over Panel Lock lights up for 10 seconds. The cooktop is now locked.
Turning the panel lock off
Touch Panel Lock for 4 seconds. The child lock is now deactivated.
CAUTION
The child lock may be accidentally turned on and off due to:
- water spilled during cleaning
- food that has overflowed
- objects being placed on the Panel Lock key.
Automatic panel lock
With this function, the panel lock is automatically activated whenever you turn off the cooktop.
Switching on and off: You can find out how to switch the automatic panel lock on in the section "Basic settings"
Automatic time limitation
If the element is used for prolonged periods of time without changes in the settings being made, the automatic time limitation function is triggered.
The element stops heating.  and the residual heat indicator
  flash alternately in the display.
The indicator goes out when any symbol is pressed. The element can now be reset.
When the automatic time limitation is activated depends on the selected heat level (from 1 to 10 hours).
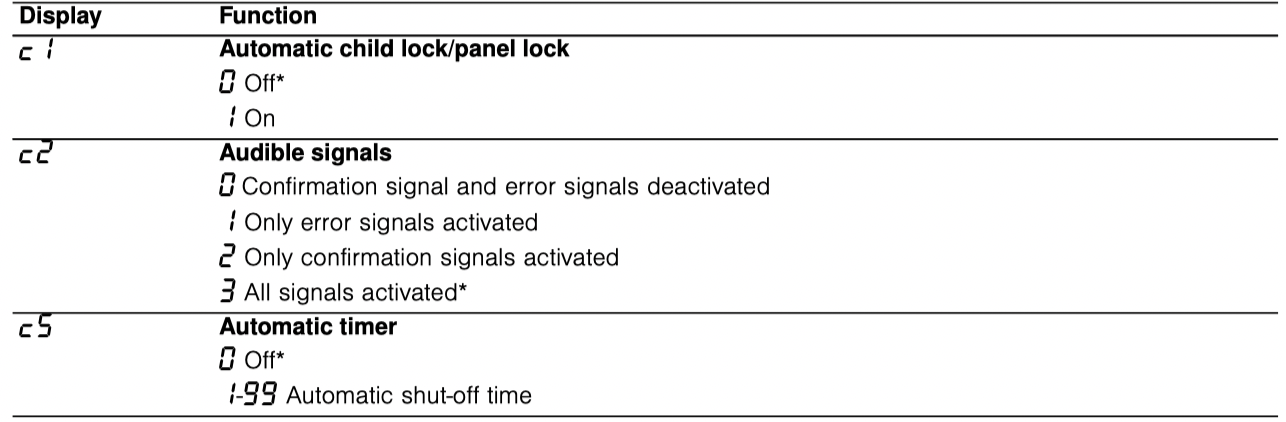
Basic settings
The appliance has various basic settings. You can adjust these settings to the way you usually cook.

Changing the basic settings
The cooktop must be turned off.
1. Turn on the cooktop with the main switch.
2. Within10 seconds, touch the Panel Lock key for about 4 seconds. The first four displays provide product information. Touch the settings area to view the individual displays.

3. Touching the Panel Lock key again takes you to the basic settings.  and
and  blink alternatingly in the element display and lights up on the timer display.
4. Touch Panel Lock repeatedly until the indicator for the desired function appears in the element display.
5. Use the + and - keys until the desired setting appears in the timer display.
6. Touch Panel Lock again for 4 seconds. The setting is stored.
Quit basic settings
Turn the cooktop off with the main switch.
Cleaning and Maintenance
Daily Cleaning
Note: Bosch cleaners have been tested and approved for use on Bosch appliances. Other recommended cleaners do not constitute an endorsement of a specific brand.
Glass ceramic cooktop
CAUTION Do not use any kind of cleaner on the glass while the surface is hot, use only the razor blade scraper. The resulting fumes can be hazardous to your health. Heating the cleaner can chemically attack and damage the surface.
Clean the surface when it is completely cool with the following exception: remove dry sugar, sugar syrup, tomato products and milk immediately with the razor blade scraper (see special care chart).
Wipe off spatters with a clean, damp sponge or a paper towel. Rinse and dry. Use white vinegar if smudge remains; rinse.
Apply a small amount of the glass ceramic cooktop cleaner. When dry, buff surface with a clean paper towel or cloth.
Cleaning guidelines
When using a cleaner, use only a small amount; apply to a clean paper towel or cloth. Wipe on the surface and buff with a clean dry towel.
For best results, use a glass cooktop cleaner such as the Bosch Glass Cooktop Cleaner (part number 12010030), which can be ordered online at bosch-home/ us/store (for U.S. customers only). Other cleaners include Bon Ami®, Soft Scrub® (without bleach), and white vinegar.
Avoid these cleaners
- Glass cleaners which contain ammonia or chlorine bleach. These ingredients may damage or permanently stain the cooktop.
- Caustic cleaners - cleaners such as Easy Off® may stain the cooktop surface.
- Abrasive cleaners.
- Metal scouring pads and scrub sponges such as Scotch Brite® can scratch and/or leave metal marks.
- Soap-filled scouring pads such as SOS® can scratch the surface.
- Powdery cleaners containing chlorine bleach can permanently stain the cooktop.
- Flammable cleaners such as lighter fluid or WD-40.
Cleaning charts
| Type of Soil |
Possible Solution |
| Dry sugar, sugar syrup, milk or tomato spills. Melted plastic film or foil. All these items REQUIRE IMMEDIATE REMOVAL. Failure to remove these immediatly can permanently damage the surface. |
Remove these types of spills while the surface is hot using the razor blade scraper. Use a new, sharp razor in the scraper. Remove pan and turn off the element. Wearing an oven mitt, hold scraper at 30° angle, using care not to gouge or scratch the glass. Push soil off the heated area. After the surface has cooled, remove the residue and apply the glass ceramic cooktop cleaner.
WARNING
RISK OF INJURY The blade is extremely sharp. Risk of cuts. Protect the blade when not in use. Replace the blade immediately when any imperfections are found. Follow manufacturer’s instructions.
|
| Burned-on food soil, dark streaks, and specks |
Soften by laying a damp paper towel or sponge on top of soil for 30 minutes. Use a plastic scrubber and glass ceramic cooktop cleaner or use the razor blade scraper. Rinse and dry. |
| Greasy spatters |
Use a soapy sponge or cloth to remove grease; rinse thoroughly and dry. Apply glass ceramic cooktop cleaner. |
| Metal marks: Iridescent stain |
Pans with aluminum, copper or stainless steel bases may leave marks. Treat immediately after surface has cooled with glass ceramic cooktop cleaner. If this does not remove the marks, try a mild abrasive (Bon Ami®, Soft Scrub® without bleach) with a damp paper towel. Rinse and reapply glass ceramic cooktop cleaner. Failure to remove metal marks before the next heating makes removal very difficult. |
|
Hard water spots:
Hot cooking liquids dripped on surface
|
Minerals in some water can be transferred onto the surface and cause stains. Use undiluted white vinegar, rinse and dry. Recondition with glass ceramic cooktop cleaner. Remove boilovers and stains before using the cooktop again. |
|
Surface scratches:
Small scratches are common and do not affect cooking. They become smoother and less noticeable with daily use of the glass ceramic cooktop cleaner.
|
Apply glass ceramic cooktop cleaner before using to remove sand-like grains and grit such as salt and seasoning. Scratches can be reduced by using pans with bases that are smooth, clean, and dry before use. Use recommended glass ceramic cooktop cleaner daily.
NOTICE: Diamond rings may scratch the surface.
|
Maintenance
This appliance requires no maintenance other than daily cleaning. For best results, apply cooktop cleaning cream daily.
Service
Frequently-asked questions and answers (FAQ)
Using the appliance
Why can't I switch on the cooktop and why is the child lock symbol lit?
The child lock is activated.
You can find information about this function in section "Panel lock"
Why are the displays flashing and why can I hear an acoustic signal?
Remove any liquid or food remains from the control panel. Remove any objects from the control panel.
You can find instructions on how to deactivate the audible signal in the section on "Basic settings"
Noises
Why I can hear noises while I'm cooking?
Noises may be generated while using the cooktop depending on the base material of the cookware. These noises are a normal part of induction technology. They do not indicate a defect.
Possible noises:
A low humming noise like the one a transformer makes:
Occurs when cooking at a high heat setting. The noise disappears or becomes quieter when the heat setting is reduced.
Low whistling noise:
Occurs when the cookware is empty. This noise disappears when water or food is added to the cookware.
Crackling:
Occurs when using cookware made from different layers of material or when using cookware of different sizes and different materials at the same time. The volume of the noise can vary depending on the quantity of food being cooked or the cooking method.
High-pitched whistling noises:
Can occur when two elements are used on the highest heat setting at the same time. The whistling noises disappear or become quieter when the heat setting is reduced.
Fan noise:
The cooktop is equipped with a fan that switches on automatically at high temperatures. The fan may continue to run even after you have switched off the cooktop if the temperature detected is still too high.
Cleaning
How do I clean the cooktop?
Using a special glass-ceramic cleaning agent produces the best results. We advise against using harsh or abrasive cleaning agents, dishwater detergent (concentrated) or scouring pads.
You can find more information about cleaning and caring for your cooktop in the section on.
Fixing Malfunctions
Malfunctions are usually due to small details. Before calling the Technical Assistance Service, you should consider the following advice and warnings.
CAUTION
Repairs should only be done by an authorized servicer. Improper repair of your appliance may result in risk of severe physical injury or death.
| Display |
Possible cause |
Solution |
| None |
The power supply has been disconnected.
The device has not been connected in accordance with the connection diagram.
Electronics error.
|
Use other electrical devices to check whether a short-circuit has occurred in the power supply.
Ensure that the device has been connected in accordance with the connection diagram.
If the error cannot be eliminated, inform the technical after-sales service.
|
| The displays flash |
The control panel is damp or an object is covering it. |
Dry the control panel or remove the object. |
| The - indicator flashes in the element displays |
An error has occurred in the electronics. |
To confirm the error, cover the control panel with your hand. |
|


|
The electronics have overheated and have switched off the corresponding element.
The electronics have overheated and have switched off all elements.
|
Wait until the electronics have cooled down sufficiently. Then touch any symbol on the cooktop. If the warning persists, call the Technical Assistance Service. |
 + heat setting and acoustic signal + heat setting and acoustic signal |
There is a hot pan in the area of the control panel. There is a risk that the electronics will overheat. |
Remove the pan. The error display goes out shortly afterwards. You can continue to cook. |
| and acoustic signal |
There is a hot pan in the area of the control panel. To protect the electronics, the element has been switched off. |
Remove the pan. Wait for a few seconds. Touch any control. If the error display goes out, you can continue to cook. |
 |
The element has overheated and switched itself off to protect the work surface. |
Wait until the electronics have cooled down sufficiently and switch the element on again. |
|
The element was operating for an extended period without interruption. |
The automatic safety switch-off function has been activated. See section “Automatic time limitation” |
 |
The supply voltage is incorrect; outside of the normal operating range. |
Contact your electrical utility provider. |
 |
The cooktop is not connected properly. |
Disconnect the cooktop from the power supply. Ensure that it has been connected in accordance with the connection diagram. |
| Do not place hot pans on the control panel. |
Notes
- If
 appears on the display, the sensor for the element in question must be held down in order to be able to read off the fault code.
- If the fault code is not listed in the table, disconnect the cooktop from the power supply, wait 30 seconds, and then reconnect it again. If the display appears again, contact Technical Assistance Service and tell them the precise fault code.
Suitability test of cookware
This function can be used to check the speed and quality of the cooking process depending on the cookware. The result is a reference value and depends on the properties of the cookware and the element being used.
1. With the cookware still cold, fill it with approx. 8 oz. (200 ml) of water and place it on the center of the cooking zone with the diameter that most closely matches that of the base of the cookware.
2. Go to the basic settings and select the  setting.
3. Touch the settings range. A will flash on the cooking zone display. The function has now been activated.
After 10 seconds, the result for the quality and speed of the cooking process will appear on the cooking zone display.
Check the result using the table below:
Result
The cookware is not suitable for the element and will therefore not heat up.*
The cookware is taking longer to heat up than expected and the cooking process is not going as well as it ought to.*
 The cookware is heating up correctly and cooking is progressing well.
* If there is a smaller element available, try the cookware again on the smaller element.
To activate the function again, touch the + or - symbol.
Notes
- If the diameter of the used cooking zone is much smaller than the diameter of the cookware, only the middle of the cookware can be expected to heat up. This may result in the cooking results not being as good as expected or being less than satisfactory.
- You can find information on this function in the section "Basic settings"
- You can find information on the type, size and positioning of the cookware in the section