User Manual Air Conditioner
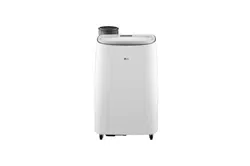
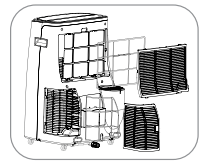
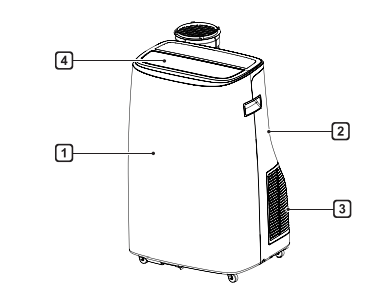
PRODUCT OVERVIEW
Key Parts and Components
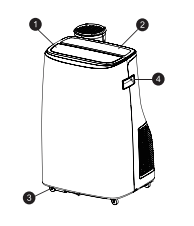
1. AIR DISCHARGE
The adjustable louvered air discharge opens automatically when the air conditioner is turned on, and closes when it is turned off. It can also be set to oscillate to distribute air more evenly through the room.
2. CONTROL PANEL AND DISPLAY
Easy-to-read digital display shows the set temperature, and indicator lights show the operating mode. Simple push buttons make changing settings quick and easy.
3.SWIVELING CASTERS
Swiveling casters allow you to move the air conditioner easily on most floor surfaces.
4. INTEGRATED HANDLES
Integrated handles provide a convenient grip when lifting the air conditioner.
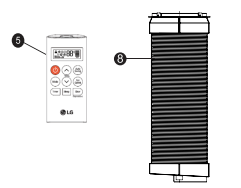
5. REMOTE CONTROLLER
The remote controller allows you to adjust the temperature and operate most functions of the air conditioner from across the room.
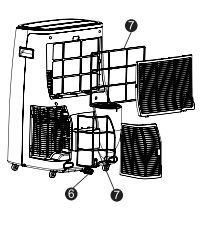
6. BOTTOM DRAIN PORT
Before moving the air conditioner, drain the internal water in the collection tank completely using the bottom drain port.
7. AIR FILTER
8. HOSE AND DIFFUSER
Use the diffuser and hose to connect the air conditioner to the window installation kit to vent exhaust air outside.
INSTALLATION
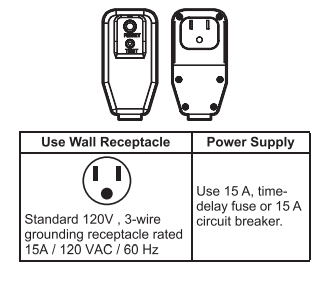
Electrical Data
Power cord may include a current interrupter device. TEST and RESET buttons are provided on the plug case. The device should be tested on a periodic basis by first pressing the TEST button and then the RESET button. If the TEST button does not trip or if the RESET button will not stay engaged, discontinue use of the air conditioner and contact a qualified service technician.
for 120 V
Before Installation the Air Conditioner
PREPARING FOR OPERA TION
Refer to the Installation Instructions Included In this manual before using the air conditioner.
Once the air conditioner has been properly assembled and Installed:
1. Plug the power cord into its own dedicated properly grounded outlet. Do not plug other appliances into the same outlet.
Doing so could overload the outlet and create a fire hazard.
2. Make sure the air conditioner and cord are positioned where they do not create a tripping hazard and will receive adequate ventilation. Do not place the appliance near furniture or objects that could block the vent openings.
3. Make sure that any items that could be blown over or damaged by the airflow from the fan are out of the airflow path.
UNPACKING THE AIR CONDITIONER
Remove and store packing materials for reuse. Remove any shipping tape before using the air conditioner. If the tape leaves behind any adhesive, rub a small amount of liquid dish soap onto it and wipe with a damp cloth. Do NOT use sharp instruments, alcohol, thinners, or abrasive cleaners to remove adhesive.
They could damage the finish.
Wireless Remote Control
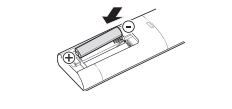
Inserting Batteries
If the display screen of the remote control begins to fade, replace the batteries. Insert AAA (1.5 V) batteries before using the remote control.
1. Remove the cover on the back of the remote control.

2 Insert the new batteries and make sure that the + and - terminals of the batteries are installed correctly.
PREPARING FOR INSTALLATION
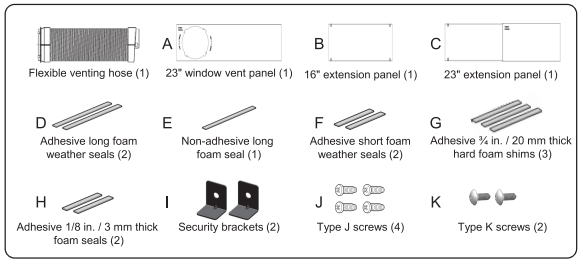
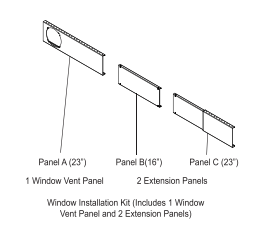
Contents of Installation Kit
Tools and Materials Needed

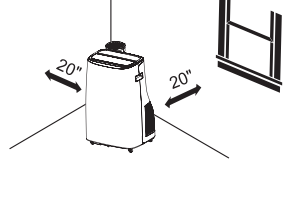
SELECTION OF INSTALLATION LOCATION
1. Place the unit on a level floor
2. For best performance, allow at least 20" of air space on all sides of the unit for good air circulation
3. Place the unit near a window. The hose and diffuser will be used to connect the air conditioner to the window installation kit to vent exhaust air outside.
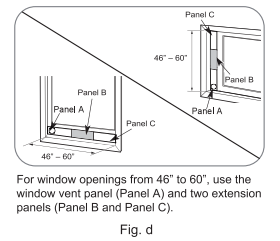
WINDOW VENT PANELAND EXTENSIONS
The window installation kit allows you to install the air conditioner in most vertical-sliding windows 23” to 60” wide, or horizontal-sliding windows from 23” to 60” high
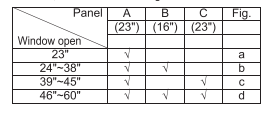
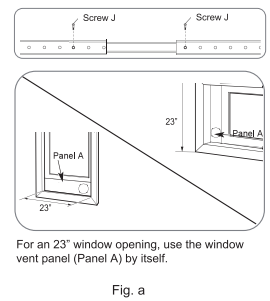
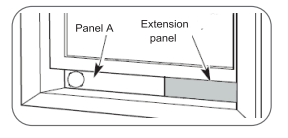
1. For window openings shorter than 23", trim panel A to fit the opening
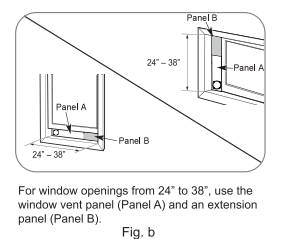
2. For longer window openings, assemble and adjust the panels to fit the window opening. Use type J screws (included) to fix the panels together at the proper length.

1 Hard Foam Shims (For Some Installations)
To determine whether you need to install the hard foam shims, place the panel assembly in the bottom sash channel and slide it until it sits tightly against the exterior side of the channel. Close the sash until it holds the panel assembly in place. Align the vent hose with the panel opening. If the inside window frame interferes with the proper alignment of the vent hose, follow the instructions below to install the hard foam shims. Otherwise, continue to step 3.
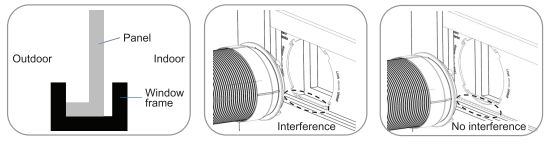
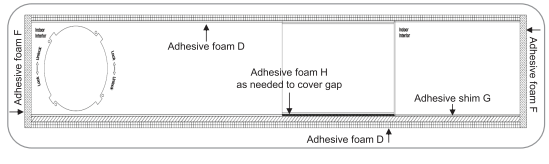
To install hard foam shims: If any extension panels are used, attach foam seal(s) H to the bottom side of extension panel B or C to minimize gaps. Then attach the hard-foam shim(s) G along the bottom side of the window panel assembly to allow the vent hose to clear the window frame. (See image in step 3.)
2 Attaching Foam Weather Seals
Attach the foam weather seals D to the top and bottom sides of the panel assembly. Attach the short foam weather seals F to the right and left sides of the panel assembly.
(Attaching the foam weather seals to the panel assembly rather than the window sash and frame makes for easier cleanup when removing the panel assembly.)
NOTE: Take care not to block drain holes in the exterior sill. If necessary, cut slots in the foam seal to allow any moisture to drain out the window sill drains.
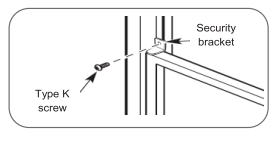
3 Inserting Panel Assembly
Insert the panel assembly in the bottom sash channel as In step 2. Use care when installing the assembly, which will now fit very tightly in the opening. Close the sash tightly against the top of the panel assembly. For a tighter seal, use ‘no residue’ duct tape (not included) to seal any gaps around the installed panel assembly.
• If needed, install the included security bracket with a type K screw.
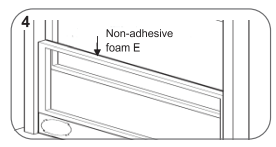
4 Sealing Gap between Sashes
Measure and cut the included non-adhesive foam E to fit the window opening. Stuff it between the window sashes to prevent air and insects from getting into the room.
Tip: For a tighter seal, use “no residue” duct tape to seal the gap between the sashes.
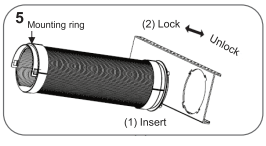
5 Connecting Vent Hose
Align the tabs on the diffuser end of the vent hose to the slots in the panel assembly opening. Insert the diffuser and rotate it to lock it in place.
• If disconnected, reconnect the other end of the vent hose to the product by inserting the vent hose into the product with the mounting ring facing out. If the hose doesn’t snap into place, rotate it slightly so the 2 lines at the front align.
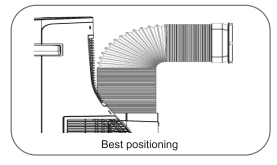
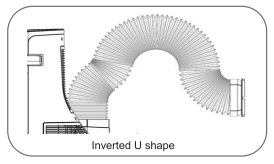
6 Positioning Vent Hose
For best results, keep the vent hose as short and straight as possible. However, shape the diffuser end of the vent hose into an inverted U shape just inside the window to allow any rain or condensation to drain out the window.
OPERATION
Control Panel and Remote Control
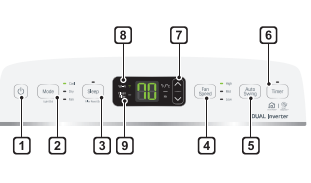
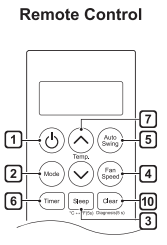
1. Power
Press to turn the air conditioner ON or OFF
2. Operation Mode
Press the Mode button to cycle between 3 types of air conditioner operation: Cool/ Fan / Dry.
Cool - This mode is ideal on hot days to cool and dehumidify the room quickly. Use the ^ | v buttons to set the desired room temperature and use the Fan Speed button to set the desired fan circulation speed.
Fan - In this mode the fan circulates air but the compressor does not run. Use the Fan Speed button to set fan speed to High, Mid or Low. In this mode, you cannot adjust the set temperature.
Dry - This mode is ideal for rainy and damp days to dehumidify the room rather than cooling it significantly. Humidity is removed from the room by the combination of compressor operation and the fan speed fixed at Low. The compressor and fan turn off once the set temperature is reached.
Fan speed cannot be adjusted in Dry mode.
3. Sleep Mode
This mode keeps operating noise to a minimum and turns the air conditioner off after a set time. The timer can be set from 1 to 7 hours. In this mode, the control panel turns off.
• In the Sleep Mode, the setting temperature increases by 2 °F after 30 minutes and additional 2 °F after another 30 minutes for a more comfortable sleep.
• The setting temperature increases up to 4 °F from the preset temperature.
NOTE :
Press Sleep button of remote controller for 5 seconds, the temperature display can be switched between degrees Fahrenheit (°F) and degrees Celsius (°C).
4. Fan Speed
Press to set the fan speed to Low (F1),
Mid (F2), or High (F3).
5. Auto Swing
This function adjusts the direction of the air flow vertically. Press Auto Swing button repeatedly and select the desired direction
6. Delay ON/OFF Timer
Delay ON - When the air conditioner is off,
set it to automatically turn on from 1 to 24
hours later, at its previous mode and fan
settings.
Delay OFF - When the air conditioner is on, set it to automatically turn off from 1 to 24 hours later.
NOTE : Each press of the Timer button advances the timer by 1 hour. After the last press of the Delay OFF Timer the display returns to the temperature setting.
7. Temperature Control
To adjust the desired room temperature in Cool or Dry mode. The desired room temperature can be set between 60°F-86“F (16 °C-30 °C). Press  or
or  arrows to increase or decrease temperature setting.
NOTE : Pressand button together on the control panel for 3 seconds, the temperature display can be switched between degrees Fahrenheit (°F) and degrees Celsius (°C).
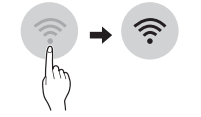
8. Wi-Fi
Enables connection of the air conditioner to the home Wi-Fi.
To connect Wi-Fi, press the Fan Speed button on the control panel for 3 seconds.
9. Clean Filter
The Clean Filter LED lights up to notify you that the filter needs to be cleaned. After cleaning the filter, press Sleep button on the control panel for 3 seconds to turn off the Clean Filter light.
NOTE
• The filter reset must be done using the control panel, not the remote control.
• This feature is a reminder to clean the air filter for more efficient operation. The LED light turns on after 250 hours of operation.
10. Clear
Cancel Sleep and Timer settings.
NOTE : Press the Clear button on remote controller for 5 seconds, the Smart Diagnosis function works.
Removing Condensation Buildup
Condensation can build up inside the unit when the Cool and Dry modes are used. The fan can be set to run for a short period after the product is turned off to help keep the inside of the appliance dry. This option is off by default.
Turning Condensation Fan On
1. Turn on the product, set it to Cool mode and let it run for at least 10 seconds.
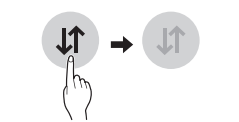
2 Press and hold the Auto Swing button for 3 seconds until On appears in the display.
3 The condensation fan is now turned on. When the appliance is turned off, Co appears in the display and the fan will continue to run for 10 minutes. The appliance will then shut down as normal.
Turning Condensation Fan Off
1 When the product is powered ON, press and hold the Auto Swing button for 3 seconds until OF appears in the display.
2 The condensation fan is now turned off. The appliance will shut down immediately when it is turned off.
SMART FUNCTIONS
LG SmartThinQ Application
Things to check before using LG SmartThinQ
• For appliances with the logo.
logo.
1. Check the distance between the appliance and
the wireless router (Wi-Fi network).
• If the distance between the appliance and the wireless router is too far, the signal strength becomes weak. It may take a long time to register or installation may fail.
2 Turn off the Mobile data or Cellular Data on
your smartphone.
• For iPhones, turn data off by going to Settings —► Cellular —► Cellular Data
3. Connect your smartphone to the wireless router.
Installing LG SmartThinQ
Search for the LG SmartThinQ application from the Google Play Store or Apple App Store on a smart phone. Follow instructions to download and install the application.
Wi-Fi Function
• For appliances with the logo Communicate with the appliance from a smart phone using the convenient smart features.
Smart Diagnosis™
If you use the Smart Diagnosis function, you will be provided with the useful information such as a correct way of using the appliance based on the pattern of use.
Settings
Allows you to set various options on the appliance and in the application.
Smart Diagnosis™ Using a Smart Phone
• For appliances with the  or
or  logo
logo
Use this function if you need an accurate diagnosis by an LG Electronics customer information center when the appliance malfunctions or fails.
Smart Diagnosis™ can not be activated unless the appliance is connected to power. If the appliance is unable to turn on, then troubleshooting must be done without using Smart Diagnosis™.
NOTE : Be sure to keep ambient noise to a minimum or the phone may not correctly receive the buzzer beeps from the indoor unit.
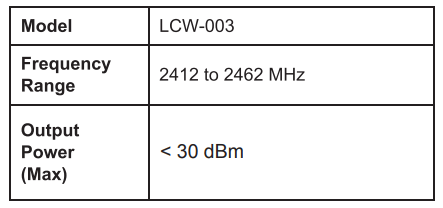
FCC RF Radiation Exposure Statement
This equipment complies with FCC radiation exposure limits set forth for an uncontrolled environment. This transmitter must not be colocated or operating in conjunction with any other antenna or transmitter.
This equipment should be installed and operated with a minimum distance of 20 cm (7.8 inches) between the antenna and your body. Users must follow the specific operating instructions for satisfying RF exposure compliance.
Open Source Software Notice Information
To obtain the source code under GPL, LGPL, MPL, and other open source licenses, that is contained in this product, please visit http://opensource.lge.com.
In addition to the source code, all referred license terms, warranty disclaimers and copyright notices are available for download.
LG Electronics will also provide open source code to you on CD-ROM for a charge covering the cost of performing such distribution (such as the cost of media, shipping, and handling) upon email request . This offer is valid for a period of three years after our last shipment of this product. This offer is valid to anyone in receipt of this information.
FCC Notice (For transmitter module contained in this product)
This equipment has been tested and found to comply with the limits for a Class B digital device, pursuant to Part 15 of the FCC Rules. These limits are designed to provide reasonable protection against harmful interference in a residential installation. This equipment generates, uses, and can radiate radio frequency energy and, if not installed and used in accordance with the instructions, may cause harmful interference to radio communications. However, there is no guarantee that interference will not occur in a particular installation. If this equipment does cause harmful interference to radio or television reception, which can be determined by turning the equipment off and on, the user is encouraged to try to correct the interference by one or more of the following measures:
• Reorient or relocate the receiving antenna.
• Increase the separation between the equipment and the receiver.
• Connect the equipment to an outlet on a circuit different from that to which the receiver is connected.
• Consult the dealer or an experienced radio/TV technician for help.
This device complies with part 15 of the FCC Rules. Operation is subject to the following two conditions:
1) This device may not cause harmful interference and
2) This device must accept any interference received, including interference that may cause undesired operation of the device.
Any changes or modifications in construction of this device which are not expressly approved by tWireless LAN Module Specificationshe party responsible for compliance could void the user’s authority to operate the equipment.
MAINTENANCE
Emptying the Water Collection Tank
When the internal water collection tank is full, the LED display will show FL and the air conditioner will turn off until the tank is emptied.
• Unplug the air conditioner, disconnect the exhaust hose from the back, and move the air conditioner to a suitable drain location or outdoors. You may also place a pan under the drain that will hold up to 2 pints of water.
• Remove the drain cap from the drain outlet.
• Once the water collection tank is drained, reinstall the drain cap, making sure it is on securely.
• Place the air conditioner in the desired location, reconnect the exhaust hose, and plug in the air conditioner.
NOTE : If you want to disconnect the hose from the product, grasp the mounting bracket on the hose, turn it clockwise or counterclockwise, and then disconnect it easily. (Reference 11 page)
Cleaning the Case
Wipe the case with a slightly damp cloth, then
wipe dry with a dry cloth or towel.
• To prevent damage to the finish, do not use gasoline, benzene, thinner, etc., or any abrasive cleansers to clean the air conditioner; they may damage the finish.
• Never pour water onto or into the air conditioner. It could damage internal components and create a shock and fire hazard.
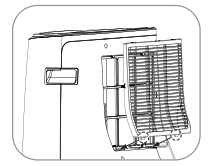
Cleaning the Air Filter
The air filters should be cleaned every two weeks; depending on indoor air quality, more frequent cleaning may be needed. A dirty air filter will decrease airflow and reduce efficiency.
1. Pull out each air filter by the handle.
2. Use a vacuum cleaner to clean the filter.
If the filters are heavily soiled, they can be washed in warm water using a mild detergent.
• Do not use harsh cleaners or very hot water.
• Do not wash in a dishwasher.
3. Dry the filter in the shade.
4. Reinsert the filters.

TROUBLESHOOTING
Before Calling for Service
The appliance is equipped with an automatic error-monitoring system to detect and diagnose problems at an early stage. If the appliance does not function properly or does not function at all, check the following before you call for service
Normal Sounds You May Hear
1. High-pitched Sound
High efficient inverter compressor may occur high-pitched sound during operation.
2. Sound of Rushing Air
At the front of the unit, you may hear the sound of rushing air being moved by the fan.
3. Gurgle/Hiss
Gurgling or hissing noise may be heard due to refrigerant passing through evaporator during normal operation.
4. Pinging or Swishing
Droplets of water hitting condenser during normal operation may cause pinging or swishing sounds.
Problem
|
Possible Cause
|
Solutions
|
| Air conditioner does not start. |
The air conditioner is unplugged |
Make sure the air conditioner plug is pushed completely into the outlet.
|
The fuse is blown/circuit breaker is tripped.
|
Check the house fuse/circuit breaker box and replace the fuse or reset the breaker |
Power failure.
|
If power failure occurs, turn the mode control to off. When power is restored, wait 3 minutes to restart the air conditioner to prevent tripping of the compressor overload |
The current interrupter device is tripped.
|
Press the RESET button located on the power cord plug. If the RESET button will not stay engaged, discontinue use of the air conditioner and contact a qualified service technician |
FL appears in the display.
|
The water collection tank is full. Drain the tank and reset your settings.
|
| Air conditioner does not cool as it should. |
Airflow is restricted.
|
Make sure there are no curtains, blinds, or furniture blocking the front of the air conditioner.
|
The temp control may not be set correctly.
|
Set the desired temperature to a level lower than the current temperature.
|
The air filter is dirty.
|
Clean the filter at least every 2 weeks. See the 'MAINTENANCE' section.
|
| The room may have been hot |
When the air conditioner is first turned on, you need to allow time for the room to cool down |
Cold air is escaping.
|
Check for open furnace floor registers and cold air returns |
Cooling coils have iced up.
|
See 'Air conditioner freezing up' below.
|
| Air conditioner freezing up |
The cooling coils are iced over.
|
Ice may block the airflow and obstruct the air conditioner from properly cooling the room. Set the mode control at High Fan or High Cool.
|
Water collects in base pan.
|
Moisture removed from air and drains into base pan |
This is normal for a short period In areas with little humidity; normal for a longer period in very humid areas.
|
| Air conditioner turns on and off rapidly. |
Dirty air filter - air restricted.
|
Clean air filter.
|
| Outside temperature extremely hot |
Refer to installation instructions or check with installer.
|
Noise when unit is cooling.
|
Air movement sound.
|
This is normal. If too loud, adjust the fan speed low.
|
Remote sensing
deactivating
prematurely. |
Remote control not located within range.
|
Place remote control within 20 feet & 120° radius of the front of the unit |
| Remote control signal obstructed |
Remove obstruction.
|
Room too cold.
|
Set temperature too low.
|
Increase set temperature.
|
| Can't connect the LG SmartThinQ App. to the air conditioner |
Air conditioner is turned off.
|
Turn the air conditioner on.
|
Wireless router is turned off.
|
Turn the router on.
|
| The air conditioner is not connecting to the Wi-Fi. |
The Wi-Fi router is too far from the air conditioner.
|
Move the router closer to the air conditioner or purchase and install a Wi-Fi repeater (signal booster).
|
| You do not have permission to use the router or it is incompatible |
Make sure you are selecting the correct wireless router from the list. The router must be set to 2.4 GHz.
|
| Trouble connecting appliance and smartphone to Wi-Fi network |
The password for the Wi-Fi network was entered incorrectly.
|
Delete your home Wi-Fi network and begin the registration process again |
| Mobile data for your smartphone is turned on |
Turn off the Mobile data on your smartphone before registering the appliance.
|
| The wireless network name (SSID) is set incorrectly |
The wireless network name (SSID) should be a combination of English letters and numbers. (Do not use special characters.)
|
| The router frequency is not 2.4 GHz |
Only a 2.4 GHz router frequency is supported. Set the wireless router to 2.4 GHz and connect the appliance to the wireless router. To check the router frequency, check with your Internet service provider or the router manufacturer.
|
The distance between the appliance and the router is too far.
|
If the appliance is too far from the router, the signal may be weak and the connection may not be configured correctly. Move the router closer to the appliance or purchase and install a Wi-Fi repeater.
|