Owner 's Manual Portable Air Conditioner
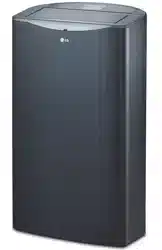
PARTS AND FEATURES
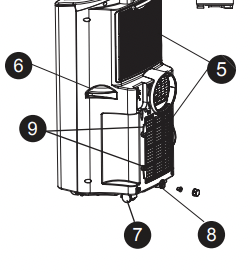
KEY PARTS AND COMPONENTS
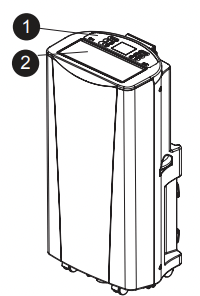
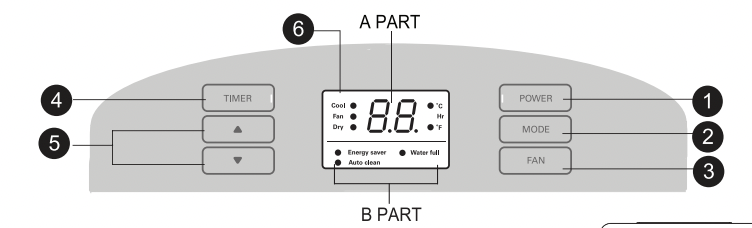
 CONTROL PANEL AND DISPLAY
Easy-to-read white LED display shows the operating state. Digital touch buttons make changing settings quick and easy.
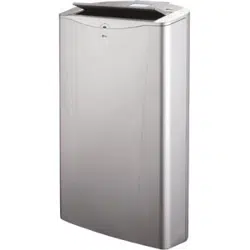
 MOTORIZED AIR DISCHARGE
The adjustable louvered air discharge opens automatically when the air conditioner is turned on, and closes when it is turned off. It can also be set to oscillate to distribute air more evenly through the room.
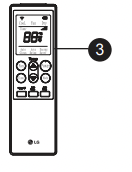
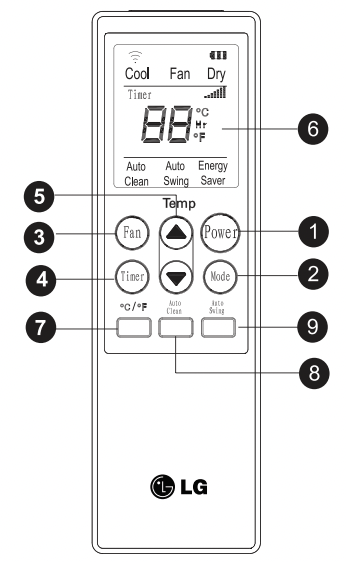
 INFRARED REMOTE CONTROL
The LCD remote control allows you to adjust the temperature and operate most functions of the air conditioner from across the room.
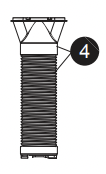
 HOSE AND DIFFUSER
Use the diffuser and hose to connect the air conditioner to the window installation kit to vent exhaust air outside.
 FILTER
You can pull out and insert the filter easily.
 HANDLES
The handles provide a convenient grip when lifting the air conditioner.
 SWIVELING CASTERS
Swiveling casters allow you to move the air conditioner easily on most floor surfaces.
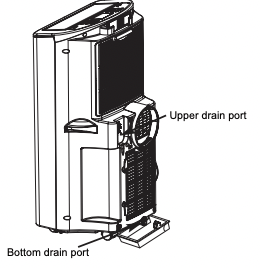
 BOTTOM DRAIN PORT
Before moving the air conditioner, drain the internal water in collection tank completely using bottom drain port.
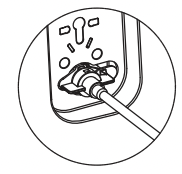
 POWER SUPPLY CORD HOLDER
Wrap the power supply cord around the holders for your convenience.
CONTROL PANEL AND REMOTE
Operation of functions is the same when using the remote or the control panel, unless otherwise stated. For detailed instructions on each function, see the following pages.
POWER ON/OFF
Turns the air conditioner on and off. When turning on, a rising tone will sound to confirm. When turning off, a descending tone will sound.
MODE
Switches the air conditioner between COOL, FAN, DRY, ENERGY SAVER modes. The active mode will be shown in the LED display.
FAN
Adjusts the circulation fan speed among low (F1), medium (F2), and high (F3).
TIMER
Allows you to set a delay from 1 to 24 hours that will turn the air conditioner on or off automatically.
 /
/  (TEMP/TIMER)
Use these buttons to adjust the set temperature up or down. or to adjust the timer delay time.
LED DISPLAY
APART shows the set temperature (°C or °F). fan speed. or the selected TIMER delay.
B PART shows the active mode (COOL. FAN. DRY ENERGY SAVER ). Auto clean. Water full.
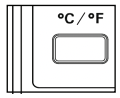
°C/°F
Use this button. the temperature display can be switched between degrees Celsius (°C) and degrees Fahrenheit (°F).
AUTO CLEAN
The AUTO CLEAN function is used to remove moisture from the heat exchangers and helps prevent odor from forming. This function can be activated from the remote only.
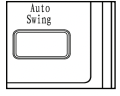
AUTO SWING
Sets the motorized air discharge to oscillate. improving air circulation in the room. This function can be activated from the remote only.

AUTO RESTART
During operation in failure of electric power. the unit runs as previous setting operation.
HOW TO USE
BEFORE USING YOUR AIR CONDITIONER
PREPARING FOR OPERATION
Refer to the Installation Instructions included in this manual before using the air conditioner. Once the air conditioner has been properly assembled and installed:
Plug the power cord into its own dedicated properly grounded outlet. Do not plug other appliances into the same outlet;it could overload the outlet and create a fire hazard.
Make sure the air conditioner and cord is positioned where it does not create a tripping hazard and will receive adequate ventilation. Do not place it directly next to furniture or objects that could block the vent openings
Make sure that any items that could be blown over or damaged by the airflow from the fan are out of the airflow path.
IMPORTANT:
- Do not remain in the direct airflow from the air conditioner for extended periods of time.
- When used at the same time as stoves, fireplaces, and other combustion devices, make sure there is a sufficient flow of fresh air into the room. Do not use in tightly enclosed spaces with these types of devices.
- This air conditioner is intended for household use as a consumer comfort appliance. Do not use it as a precision climate control system, or for purposes such as cooling precision equipment, food, pets, plants, artwork, etc. Such items could be damaged.
- Do not bend the hose downward when window installation kit is not applied. It may cause failure of air conditioner or performance deterioration.
UNPACKING THE AIR CONDITIONER
Remove and store packing materials for reuse. Remove any shipping tape before using the air conditioner. If the tape leaves behind any adhesive, rub a small amount of liquid dish soap onto it and wipe with a damp cloth. Do NOT use sharp instruments, alcohol, thinners, or abrasive cleaners to remove adhesive. They could damage the finish.
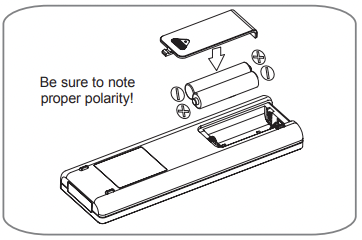
INSERTING BATTERIES IN THE REMOTE
Before using your remote, install the provided AAA batteries.
Press and glide the battery cover on the back of the remote, then you can remove the cover.
Insert two new alkaline AAA batteries into the battery compartment, being sure to note the proper polarity.
Reattach the battery cover, making sure the locking tab clicks into place.
NOTES:
- Use only alkaline batteries. Do not use rechargeable batteries.
- When replacing batteries, always replace both batteries with new batteries. Do not mix old and new batteries.
- If the air conditioner will not be used for an extended period of time, remove the batteries from the remote.
REMOTE STORAGE
Your air conditioner has a special place for convenient storage the remote control. See the drawing to the right.
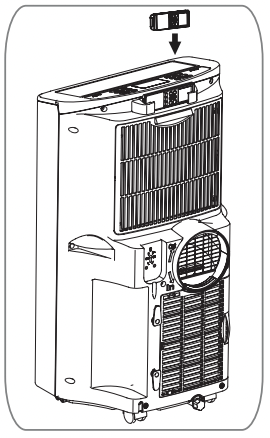
NOTE:
In order to avoid losing the remote, please put the remote inside of the storage place when you not use it.
 CAUTION
• If the liquid fromthe batteries getsonto your skin or clothes, wash it well with clean water. Do not use the remote if the batteries have leaked.
• If you eat the liquid from the batteries, brush your teeth and see doctor. The chemicals in batteries could cause burns or other health hazards.
USING THE CONTROLS
Control panel buttons shown. Operation using the remote control is the same, unless specifically noted.
NOTE: The remote sensor is located under the air discharge and on the front panel.
POWER
Press the POWER button to turn the air conditioner ON or OFF. When you turn the air c tone will play and the LED display will show the set temperature and any active onditioner on, an ascending mode.The air discharge on the top of the air conditioner will automatically open. When turning the air conditioner off, you will hear a descending tone and the air discharge on the top of the air conditioner will close. Any control settings such as Mode, Set Temperature, Auto Swing, etc. will be retained in memory when the power is off.
NOTE: When turned on after being unplugged, the air conditioner will automatically reset to COOL mode, with a temperature setting of 72°F. Any settings will need to be re-entered.
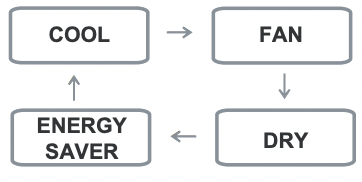
MODE
Press the MODE button to select the operating mode (COOL, FAN, DRY , ENERGY SAVER) for the air conditioner. And you can see the active mode through the LED Display. The default setting is COOL. Press the MODE button to change to FAN, press again to change to DRY, again to change to ENERGY SAVER, again to change to HEAT and again to return to COOL.
Always point the remote at the sensor. The remote may not work if the sensor is in bright light or if there is not a clear path between the remote and the sensor.
Mode --- Features
- COOL --- Compressor runs and cools the room. Use the
 /
/ and FAN buttons to set the desired temperature and circulation fan speed.
- FAN --- Fan circulates air but compressor does not run. Use the FAN button to set the desired fan speed.
- DRY --- Dry mode is used to remove humidity from the room without additional cooling. Once the set temperature is reached, the compressor and circulation fan turns off and only the exhaust fan will run. Fan speed is pre-set and can not be adjusted.
- ENERGY SAVER ---- Under normal operation, the exhaust fan cycles on and off with the compressor, and the circulation fan runs at the set speed. The mode helps reduce power consumption by automatically turning off the circulation fan as well as the exhaust fan when the compressor is off. The air conditioner will automatically cycle both fans on and off with the compressor as needed for cooling.
FAN
Pressing the FAN button cycles the circulation fan speed from low (F1) to medium (F2) to high (F3).The selected fan speed will be shown in the LED display. The function can be used in either COOL or FAN modes. When changing fan speeds, there is a brief delay before the fan motor changes speed.
 /
/ (TEMP/TIMER)
In COOl , and DRY modes, the / (TEMP/TIMER) buttons adjust the set temperature up to 86°F or down to 60°F ,in one degree increments. The temperature can be switched between degrees Fahrenheit and degrees Celsius, pressing the button and button at the same time,or pressing °C °F button on the remote.
When the TIMER function is selected, use the /(TEMP/TIMER) buttons to adjust the delay time from 1 to 24 hours, in one hour increments. If you press and hold the / (TEMP/TIMER) buttons, the set temperature or time will change automatically after a few seconds.
NOTE: The displayed temperature is the SET t DRY, emperature, not the room temperature. In COOL, ENERGY SAVER mode, the thermostat in the air conditioner will run the compressor until the set temperature is reached, then cycle the compressor on and off to maintain the set temperature.
TIMER
When theTIMER function is selected, you can set the air conditioner to either automatically turn OFF or turn ON after a delay of up to 24 hours. The display will show 0. Use the buttons to adjust the delay time from 1 to 24 hours, in one hour increments.
To set an automatic off delay, press the TIMER button while the air conditioner is running and use the / (TEMP/TIMER) buttons to adjust the delay time. The air conditioner will automatically turn OFF after the set delay.
To set an automatic on delay, press the TIMER button while the air conditioner is off and use the/ (TEMP/TIMER) buttons to adjust the delay time.
The display will show the number of hours remaining until the unit is set to come on. The air conditioner will automatically turn ON after the set delay.
If you want to know how many hours you have set, press the TIMER button and then you can see the time through the LED display. If you want to change the set timer, press the TIMER button and adjust the time when the number is flickering.
To cancel the Timer function, press the TIMER button and adjust the number to 0 when the number is flickering, then the function will be canceled in a few seconds.
Another better method is press the TIMER button and press this button again when the number is still flickering.
NOTE: Do not unplug the air conditioner when using the timer function.
AUTO CLEAN
- To turn the AUTO CLEAN function on, press the AUTO CLEAN button while the air conditioner is running in COOL, DRY, ENERGY SAVER mode. This function can only be selected from the remote; it is not available from the control panel. It must be set each time you wish to run the AUTO CLEAN function.
AUTO CLEAN is used to remove moisture from the heat exchange coils. This helps prevent the formation of mildew and odors.
To use AUTO CLEAN With the air conditioner running in COOL, DRY,ENERGY SAVER mode, press the AUTO CLEAN button.
AUTO CLEAN will be displayed in the LED diplay. Press the POWER button to turn the air conditioner off. AUTO CLEAN will run the circulation and exhaust fans with the compressor off for a few minutes after the power is turned off.
To cancel AUTO CLEAN, or to stop an AUTO CLEAN cycle in process, simply press the AUTO CLEAN button again. The AUTO CLEAN function will not operate if the air conditioner is already off.
AUTO SWING
AUTO SWING function can only be activated with the remote. When this function is on, the air discharge will oscillate to circulate air more evenly through the room. To turn this function off, simply press the AUTO SWING button with the remote again.
With AUTO SWING off, you may also manually adjust the air discharge to the desired position. It will maintain this position until the air conditioner is turned off or AUTO SWING is activated.
°C/°F
When the displayed temperature is °C (or °F), you can press this button to swith to °F (or °C).
INSTALLATION INSTRUCTIONS
SELECTION OF INSTALLATION LOCATION
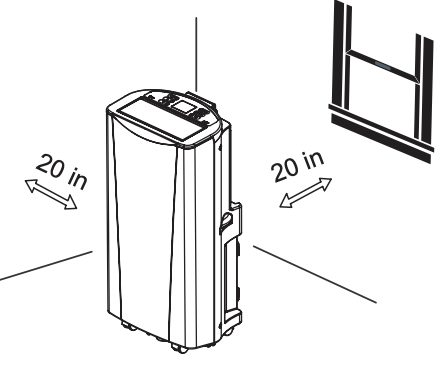
Place the unit on a level floor.
For best performance,allow at least 20 in of air space on back side of the unit for good air circulation.
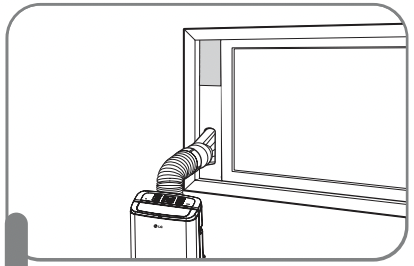
Place the unit near a window. The hose and diffuser will be used to connect the air conditioner to the window installation kit to vent exhaust air outside.
WINDOW VENT PANEL AND EXTENSIONS
The window installation kit allows you to install the air conditioner in most vertical-sliding windows 18" to 50" wide, or casement-style windows from 18" to 50" high.
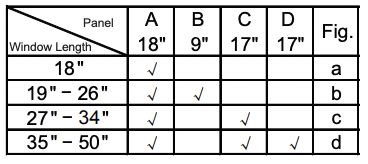
1. Please check your window length and choose the fit panels from the above tabel.
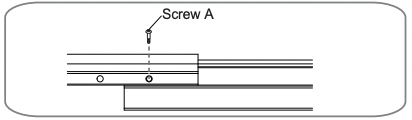
2. If your window length need more than 2 panels. after adjust the length. please use type A screw to fix them.
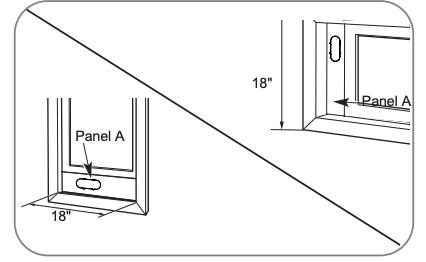
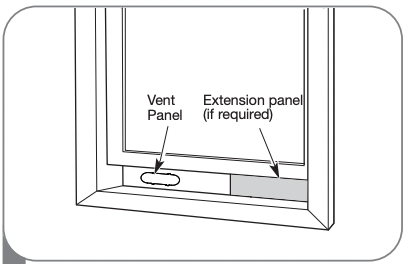
For an 18" window opening, use the window vent panel by itself.
Fig. “a”
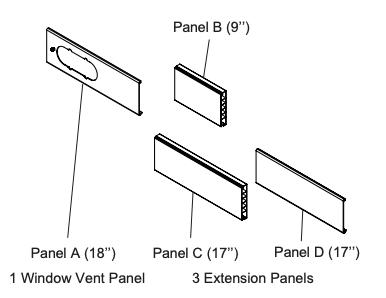
Window Installation Kit (includes 1 Window Vent Panel and 3 Extension Panels)
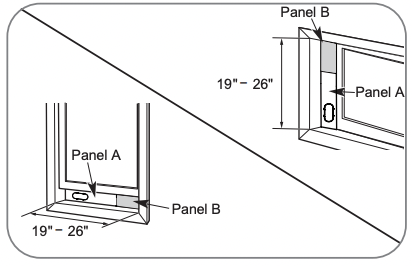
For window openings from 19" to 26", use the window vent panel (Panel A) and a extension panel (Panel B).
Fig. “b”
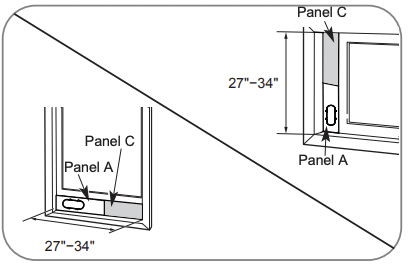
For window openings from 27 "to 34", use the window vent panel (Panel A) and a extension panel (Panel C).
Fig. “c”
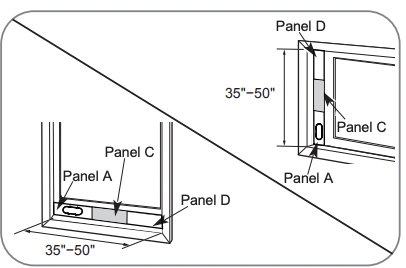
For window openings from 35 " to 50", use the window vent panel and two extension panels (Panel C and Panel D).
Fig. “d”
INSTALLATION IN VERTICAL SLIDING WINDOWS
NOTE: The window installation kit can be used with vertical sliding windows between 18" and 50" wide.
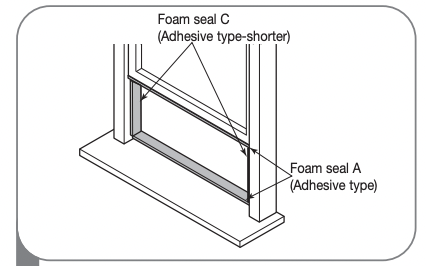
1 Cut the foam seal A (adhesive type) & C (adhesive type-shorter) to the proper length, and attach it to the window sash and frame.
2 Insert the vent panel assembly, including extension panels, if needed, into the window opening. Extend the extension panels, if used.
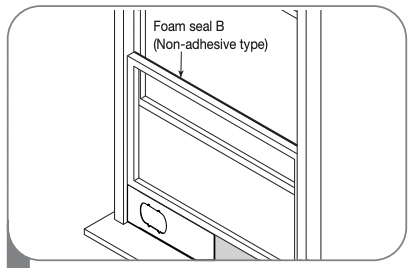
3 Cut the foam seal B (Non-adhesive type) to the window width. Stuff the foam seal B between the glass and the window to prevent air and insects from getting into the room.
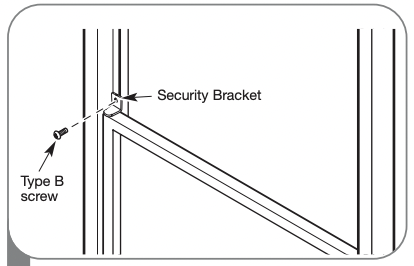
4 Install the security bracket with a type B screw as shown if you need.
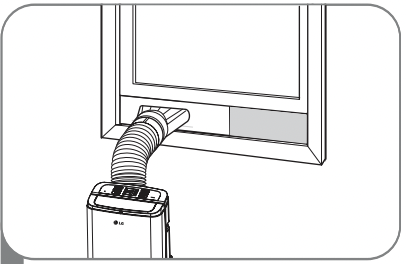
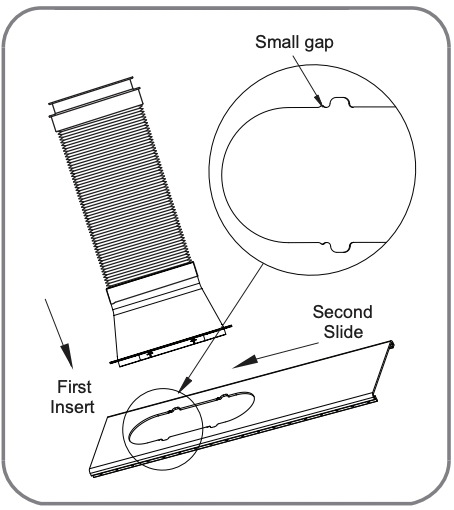
5 Insert the diffuser into the Vent Panel. And then slide.

First insert to the vent panel fully and then slide for locking.
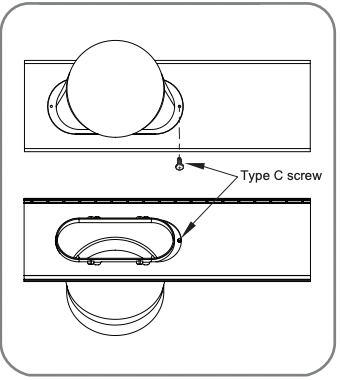
If you want fix the diffuser more firmly, use the type C screw.
INSTALLATION IN CASEMENT STYLE WINDOWS
NOTE: The window installation kit can be used with casement windows between 18″and 50″tall.
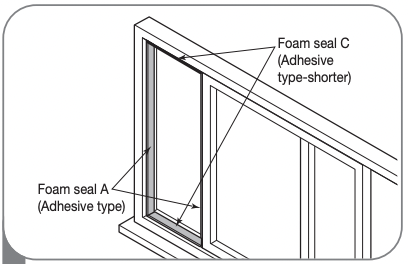
1 Cut the foam seal A (adhesive type) & C (adhesive type-shorter) to the proper length, and attach it to the window sash and frame.
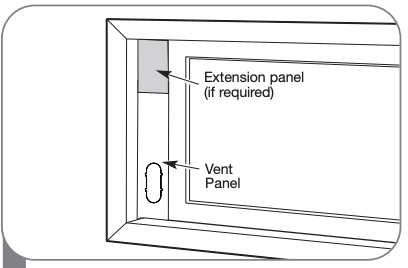
2 Insert the vent panel assembly, including extension panels, if needed, into the window opening. Extend the extension panels, if used.
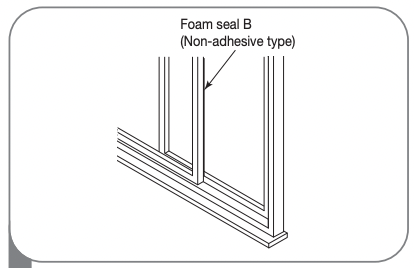
3 Cut the foam seal B (Non-adhesive type) to the window height. Stuff the foam seal B between the glass and the window to prevent air and insects from getting into the room.
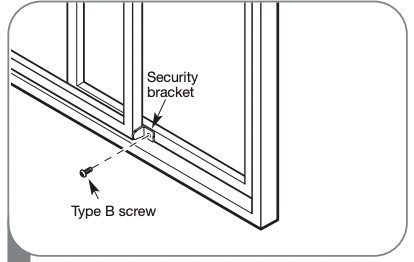
4 Install the window security bracket with a type B screw as shown.
5 Insert the diffuser into the Vent Panel. And then slide.
First insert to the vent panel fully and then slide for locking.
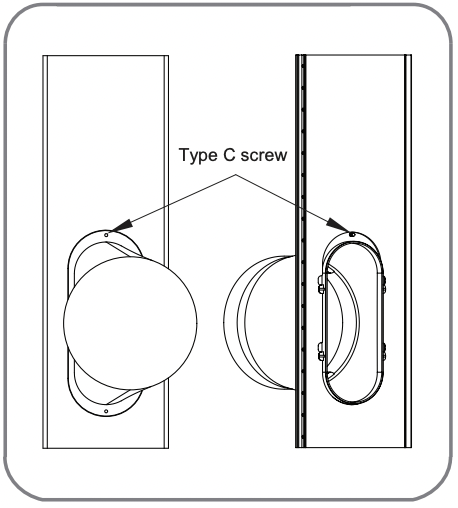
If you want fix the diffuser more firmly, use the type C screw.
CARE AND CLEANING
Your air conditioner is designed for year-round operation with only minimal cleaning and maintenance.
For maximum efficiency, it is recommended that you have the cooling coils inspected and cleaned annually. Your local LG Authorized Service Center can provide this inspection and cleaning service for a nominal fee.
 WARNING
• Unplug the air conditioner before cleaning or performing any maintenance or servicing.
• Be careful when cleaning coils or removing or reinstalling the filter-the cooling fins are sharp!
Failure to follow the above precautions could result in electrical shock or personal injury
CLEANING THE CASE
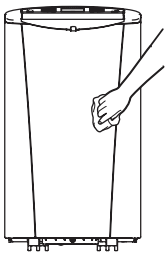
Wipe the case with a slightly damp cloth, then wipe dry with a dry cloth or towel.
• To prevent damage to the finish, do not use gasoline, benzene, thinner, etc., or any abrasive cleansers to clean the air conditioner; they may damage the finish.
• Never pour water onto or into the air conditioner. It could damage internal components and create a shock and fire hazard.
CLEANING THE AIR FILTER
The air filter should be cleaned every two weeks; depending on indoor air quality, more frequent cleaning may be needed. A dirty air filter will decrease airflow and reduce efficiency
Do not operate the air conditioner without the air filter in place.

 Grasp the grip which is in the center and on the top of the top filter(①) & in the center and on the top of the bottom filter(②) and pull out the filter directly.
 Use a vacuum cleaner to clean the filter. If the filter is heavily soiled, it can be washed in warm water using a mild detergent.
Do not use harsh cleaners or very hot water. Do not wash in a dishwasher.
 Allow the filter to dry completely before reinstalling.
 Reinsert the filter, making sure that the filter are between the tabs and the coil guard. Reinstall the filter cover, making sure it clips into place.
EMPTYING THE WATER COLLECTION TANK
When the internal water collection tank is full, FL will appear in the display and the air conditioner will turn off until the tank is emptied.
Using the upper drain port
Remove the water plug firstly on the back of the product.

Install end point of the drain pipe to the unit, and put the other end of the pipe into a bucket. (Bigger than 28oz)

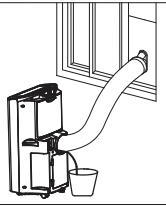
Press TIMER and DOWN ( ) buttons simultaneously to activate drain pump inside of product.
This pump will be activated during 3 minutes. (If you want to stop draining before 3 minutes, you can press TIMER and DOWN (  ) buttons simultaneously again.)
 Pull out drain pipe from the product.
 Reassemble the drainage cover.
Using the bottom drain port
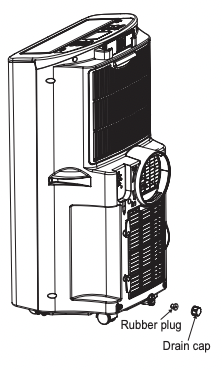
Unplug the air conditioner, disconnect the exhaust hose from the back, and move the air conditionerto a suitable drain location or outdoors. You may also place a pan under the drain that will hold up to 3 pints of water.
Remove the drain cap and the rubber plug from the drain outlet.
Once the water collection tank is drained, reinstall the rubber plug and the drain cap, making sure it is on securely.
Place the air conditioner in the desired location, reconnect the exhaust hose, and plug in the air conditioner.
Use Drain hose when use the DRY mode
When need running in high humidity, or during the DRY mode remove the drain cap and the exhaust from the back of the unit.
Install a drain hose (11/16" [18mm] inside diameter) and place the open end of the hose a suitable drain location or outdoors.
 FL apperars in the display
The water collection tank is full, drain the tank and restart the air conditioner.
NOTES: When turned on after being unplugged, the air conditioner will automatically reset to COOL mode, with a temperature setting of 72°F.
STORING THE AIR CONDITIONER
If the air conditioner will not be used for an extened period of time:
To drain the water collection tank completely, leave the bottom drain cap off long enough to allow any residual water to drain out. Once the tank is completely drained and no more water flows out, reinstall the cap.
Remove and clean the filter, allow it to dry completely, then reinstall it.
Remove the batteries from the remote.
Store the air conditioner in a cool, dry location, away from direct sunlight, extreme temperatures, and excessive dust.
Before using the air conditioner again:
Make sure the filter and drain cap are in place
Check the power cord to make sure it is in good condition, with no cracks or damage.
Place new batteries in the remote.
Install the air conditioner as described in the Installation Instructions.
TROUBLESHOOTING
BEFORE CALLING FOR SERVICE
Before you call for service, review this list. It may save you time and expense. This list includes common occurrences that are not the result of a defect in workmanship or materials.
Air conditioner does not start
The air conditioner is unplugged.
- Make sure the air conditioner plug is pushed completely into the outlet.
The fuse is blown/circuit breaker is tripped.
- Check the house fuse/circuit breaker box and replace the fuse or reset the breaker.
Power failure.
- If power failure occurs, turn the mode control to Off. When power is restored, wait 3 minutes to restart the air conditioner to prevent tripping of the compressor overload.
The current interrupter device is tripped.
- Press the RESET button located on the power cord plug. If the RESET button will not stay engaged, discontinue use of the air conditioner and contact a qualified service technician.
FL appears in the display.
- The water collection tank is full. Drain the tank and reset your settings.
Room temperature is less than the set temperature.
- This is normal. The air conditioner automatically shuts off when the room equals or is less than the set temperature. Adjust the temperature setting, if needed.
Air conditioner does not cool as it should
Airflow is restricted.
- Make sure there are no curtains, blinds, or furniture blocking the front of the air conditioner.
The temp control may not be set correctly.
- In COOL model,press the DECREASE pad.
The air filter is dirty.
- Clean the filter at least every 2 weeks. See the Care and Cleaning section.
The room may have been hot.
- When the air conditioner is first turned on, you need to allow time for the room to cool down.
Air conditioner freezing up
The cooling coils are iced over.
- Ice may block the air flow and obstruct the air conditioner from properly cooling the room. Set the mode control at High Fan or High Cool.
Air conditioner runs too often or too long
Area to be cooled is too large for the air conditioner.
- Consult your dealer for the air conditioner capacity necessary to cool the desired area.
Doors or windows are open.
- Make sure doors and windows are closed.
Code appears in the display.F1,F2 or F3
Air conditioner is in FAN mode and the number shown is the set fan speed.
- This is normal. The air conditioner is working properly.
FL
The water collection tank is full.
- Empty the water collection tank. See the Care and Cleaning section.
CH01
Short or open circuit in the indoor air thermistor.
- Unplug the air conditioner and contact your authorized LG service center.
CH02
Short or open circuit in the indoor pipe thermistor.
- Unplug the air conditioner and contact your authorized LG service center.