1. Overview
The Woowind Bora Plus is a portable, multi-function device designed for roadside assistance and emergency power. It combines three primary functions into one compact unit:
- A jump starter for vehicle batteries.
- A portable air compressor for tires and inflatables.
- A high-capacity power bank for electronic devices.
The device is intended for use with 12V vehicles, including passenger cars, SUVs, trucks, motorcycles, and other inflatables like sports balls.

Model: Bora Plus (V01)
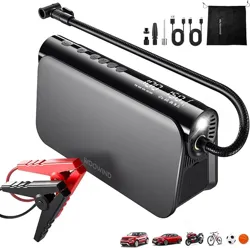
2. Package Contents
Ensure the following items are present in your package:
- Woowind Bora Plus 3-in-1 main unit.
- Carrying pouch.
- 30 cm (approx. 12 inch) braided Schrader valve air hose.
- Jumper cable clamps (red and black).
- USB-C charging cable.
- USB-A charging cable.
- Set of five inflation adapters:
- Dunlop valve adapter
- Presta valve adapter
- Nozzle adapter
- Fast Clip adapter
- Needle adapter (for balls, etc.)
- User manual (this document).

3. Key Features & Components
3.1 Physical Layout and Controls
The main unit features an intuitive interface:
- LCD Digital Display: Shows tire pressure (PSI), battery level, and operational status.
- Control Buttons: For power, mode selection, and pressure adjustment.
- Air Compressor Nozzle: Connection point for the air hose.
- Jumper Cable Ports: Clearly marked positive (+) and negative (-) ports for the clamps.
- LED Flashlight: Located on the front, with steady and SOS strobe modes.
- Power Bank Ports: USB-C (65W PD) and USB-A (QC3.0) output ports for charging devices.
- USB-C Input Port: For recharging the internal battery.
3.2 Core Specifications
- Internal Battery: 16,000mAh Lithium-Ion
- Jump Start Peak Current: 1000A
- Compatible Engines: Up to 6.0L Gasoline / 3.0L Diesel
- Air Compressor Pressure: Up to 150 PSI (10.3 BAR)
- Airflow: 35 L/min
- Power Bank Output: 65W USB-C PD, QC3.0 USB-A
- Flashlight: LED with SOS mode
- Dimensions: 8.19" x 4.33" x 2.6" (208mm x 110mm x 66mm)
- Weight: 2.18 lbs (989 g)
3.3 Safety Protections
- Spark-proof connection technology.
- Reverse polarity protection.
- Over-current, over-voltage, and short-circuit protection.
- Auto shut-off for the air compressor upon reaching the preset pressure.
4. Initial Setup and Charging
4.1 Charging the Internal Battery
Before first use, fully charge the device.
- Connect the provided USB-C cable to the USB-C Input Port on the device.
- Connect the other end to a compatible USB-C wall charger (not included) or a computer USB port.
- The LCD display will show the charging progress. A full charge may take several hours.
Note: Use only the provided cable or a certified high-quality USB-C cable and power adapter capable of delivering sufficient power for efficient charging.
4.2 Checking Battery Level
Press the power button briefly. The battery level indicator (typically a battery icon with bars) will be shown on the LCD display. Ensure the battery has sufficient charge (at least 50% is recommended) before attempting a jump start.
5. Using the Jump Starter
WARNING: Improper use can cause injury or damage. Read all instructions carefully. Ensure the vehicle's battery is a 12V system. Do not use on 24V systems or electric vehicles (EVs) with high-voltage traction batteries.
5.1 Preparation
- Turn off the vehicle's ignition and all electronics (lights, radio, etc.).
- Place the Woowind Bora Plus on a stable, flat surface away from the vehicle's battery and engine moving parts.
- Ensure the jump starter's power switch is in the OFF position.
5.2 Connecting the Cables
- Connect the red jumper clamp to the positive (+) terminal on the vehicle's dead battery.
- Connect the black jumper clamp to a clean, unpainted metal part of the engine block or chassis (a solid ground), away from the battery and fuel lines. Do not connect to the negative (-) battery terminal.
- Double-check that the clamps are secure and not touching each other or any other metal surface.
5.3 Starting the Vehicle
- Turn the Woowind Bora Plus power switch to the ON position. The display may illuminate.
- Wait a moment for the device to initialize.
- Start the vehicle's engine. It should start normally.
- Once the engine is running smoothly, turn the Woowind Bora Plus power switch OFF.
5.4 Disconnecting the Cables
- Disconnect the black (negative) clamp from the vehicle's ground.
- Disconnect the red (positive) clamp from the battery terminal.
- Store the jumper cables neatly.
- Allow the device to cool down if it feels warm. Recharge it at your earliest convenience.
Note: If the vehicle does not start after 2-3 attempts of 3-5 seconds each, stop. The battery may be deeply discharged or faulty, or the vehicle may have another issue. Recharge the jump starter before attempting again.
6. Using the Air Compressor
6.1 Preparation and Connection
- Ensure the device's internal battery has sufficient charge.
- Screw the braided air hose firmly onto the compressor nozzle on the device.
- Select the appropriate adapter for your item (e.g., Schrader for car tires, Presta for bikes) and attach it to the other end of the hose.
- Remove the valve cap from the tire or inflatable and attach the adapter/hose assembly securely to the valve stem.
6.2 Setting the Target Pressure
- Turn on the device and select the Air Compressor mode (if applicable).
- Use the "+" and "-" buttons to set your desired pressure (PSI) on the LCD display. Refer to your vehicle's manual or tire sidewall for the correct pressure.
- The device offers five smart presets for common items (Car, Motorcycle, Bike, Ball, Custom).
6.3 Inflating
- Press the Start/Stop button to begin inflation.
- The display will show the current pressure rising. The compressor will run automatically.
- The compressor will automatically shut off when the preset target pressure is reached.
- Quickly disconnect the hose from the valve stem and replace the valve cap.
- Turn off the device.
Note: The compressor motor may become warm during extended use. Allow it to cool between inflating multiple tires. Do not run the compressor continuously for more than 10 minutes at a time.
7. Using the Power Bank & Flashlight
7.1 Charging Devices
- Use the provided USB-C or USB-A cable, or your own compatible cable.
- Plug the cable into the appropriate output port on the device (USB-C for fast charging, USB-A for standard charging).
- Connect the other end to your phone, tablet, or laptop.
- Charging will begin automatically. The LCD may show the remaining battery capacity.
USB-C Port: Supports Power Delivery (PD) up to 65W, suitable for many laptops and fast-charging phones.
USB-A Port: Supports Quick Charge 3.0 (QC3.0) for compatible devices.
7.2 Using the LED Flashlight
- Press and hold the flashlight button (or cycle the mode button) to turn on the LED light.
- A single press may cycle between steady light and SOS strobe mode.
- Press and hold again to turn the light off.
8. Maintenance and Storage
- Recharging: Recharge the device fully every 3-6 months if not in use to maintain battery health.
- Cleaning: Wipe the exterior with a dry, soft cloth. Do not use liquids or solvents.
- Storage: Store in the provided carrying pouch in a cool, dry place. Avoid extreme temperatures (below 32°F/0°C or above 104°F/40°C).
- Accessories: Keep all cables and adapters organized in the pouch to prevent loss.
- Inspection: Periodically inspect the jumper clamps and cables for any signs of damage, cracking, or exposed wire. Do not use if damaged.
9. Troubleshooting
| Problem |
Possible Cause |
Solution |
| Device does not turn on. |
Battery is completely depleted. |
Connect to a USB-C charger for at least 30 minutes, then try again. |
| Vehicle does not jump start. |
1. Jump starter battery low.
2. Clamps connected incorrectly.
3. Vehicle battery is damaged or frozen.
4. Vehicle has an issue other than the battery. |
1. Recharge the device.
2. Review connection steps (Section 5.2).
3. Seek professional assistance for the vehicle.
4. Consult a mechanic. |
| Air compressor does not start or stops quickly. |
1. Target pressure is already reached.
2. Hose/adapter not connected securely.
3. Internal battery is low.
4. Motor overheated. |
1. Check current pressure on display.
2. Reconnect all fittings securely.
3. Recharge the device.
4. Allow device to cool for 15-20 minutes. |
| Power bank does not charge device. |
1. Output port or cable faulty.
2. Connected device is not compatible or faulty. |
1. Try a different cable and/or port.
2. Try charging a different device to isolate the problem. |
| LCD display is dim or unreadable. |
Low battery or extreme cold. |
Recharge the device. Allow it to warm to room temperature if used in cold conditions. |
10. Warranty and Support
The Woowind Bora Plus is backed by a 24-month limited warranty from the date of purchase.
For warranty service, troubleshooting, or product questions, contact Woowind's U.S.-based customer support team. Contact details are typically provided with the product packaging or on the seller's website (e.g., the official Woowind Store on Amazon).
Note: The warranty covers defects in materials and workmanship under normal use. It does not cover damage from misuse, accidents, unauthorized modifications, or improper care. Please retain your proof of purchase.