User Manual Air Purifier
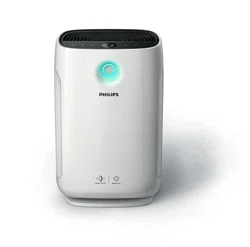
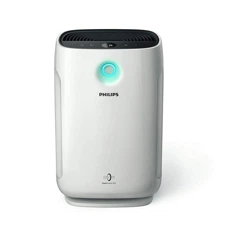
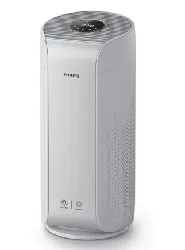
Your air purifier
Congratulations on your purchase, and welcome to Philips!
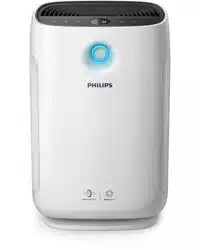
Product overview
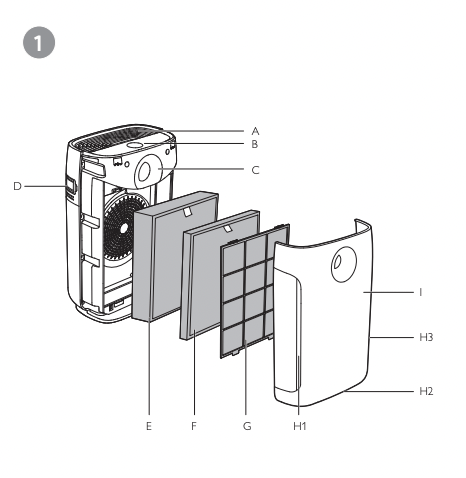
A Air outlet
B Control panel
C Air quality light
D Air quality sensors
E NanoProtect True HEPA filter (FY2422)
F NanoProtect Active Carbon filter (FY2420)
G Pre-filter
H H1, H2 and H3 air inlets
I Front panel
Controls overview
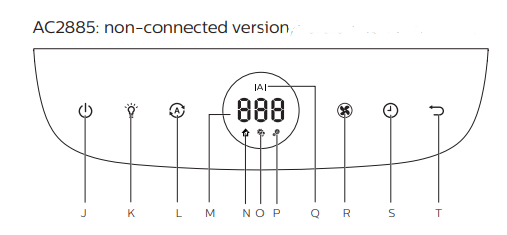

J On/Off button
K Light dimming button
L Auto mode button
M Display screen
N General mode icon
O Allergen mode icon
P Bacteria & Virus mode icon
Q For non-connected version: Indoor Allergen Index indicator
For connected version: Wi-Fi indicator
R Fan speed button
S Timer button
T Reset button
Getting started
Installing the filters
Note
• Make sure the air purifier is unplugged from the electrical outlet before installing the filters.
• Make sure the side of the filter with the tag is pointing towards you
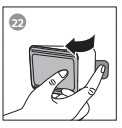
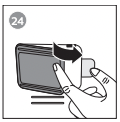
1. Pull the bottom part of the front panel to remove it from the air purifier
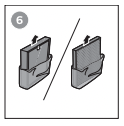
2. Press the two clips down (1) and pull the pre-filter towards you (2)
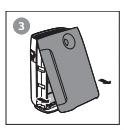
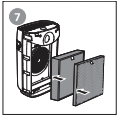
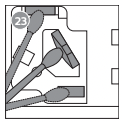
3. Remove all filters
4. Remove all packaging materials from the filters
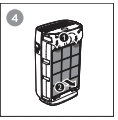
5. Place the thick HEPA filter (FY2422) into the air purifier and then the thin AC (activated carbon) filter (FY2420). The model numbers are shown on each filter.
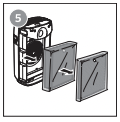
6. Attach the pre-filter back into the air purifier
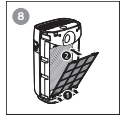
Note: Make sure the side with the two clips is pointing towards you, and that all hooks of the pre-filter are properly attached to the purifier
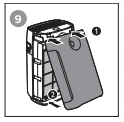
7. Reattach the front panel by pressing the top part of the panel onto the top of the air purifier (1). Then, gently push the panel against the body of the air purifier (2).
8. Wash your hands thoroughly after installing filters.
Wi-Fi setup for AC2889
Setting up the Wi-Fi connection for the first time
1. Download and install the 'Air Matters' App developed by FreshIdeas Studio from the App Store or Google Play.

2. Put the plug of the air purifier in the wall outlet and touch to turn on the air purifier
 The Wi-Fi indicator
 is not displayed on the screen when using the air purifier for the first time
3. Touch and
and simultaneously for 3 seconds until you hear a beep.
The air purifier goes to pairing mode.
The Wi-Fi indicator blinks orange.
4. Make sure that your mobile device is successfully connected to your Wi-Fi network.
5. Launch the 'Air Matters' App and follow the onscreen instructions to connect the air purifier to your network.
6. After the successful pairing and connection, the Wi-Fi indicator will light up white. If pairing is not successful, consult the troubleshooting section, or the help section in the 'Air Matters' App for extensive and up-to-date troubleshooting tips.
Note
- This instruction is only valid when the air purifier is being set up for the first time. If the network has changed or the setup needs to be performed again, consult section “Setting up the Wi-Fi connection when the network has changed” on page 10.
- You cannot set up two air purifiers at the same time. If you want to set up more than one air purifier, you can only do it successively.
- Make sure that the distance between your mobile device and the air purifier is less than 33 ft/10 m without any obstructions.
- This App supports Android 4.4 version and above or iOS 9.0 version and above
Setting up the Wi-Fi connection when the network has changed
Note:This applies when your default network connected with your air purifier has changed.
1. Put the plug of the air purifier in the wall outlet and touch to turn on the air purifier.
The Wi-Fi indicator blinks white.
2. Touch and simultaneously for 3 seconds until you hear a beep.
The air purifier goes to pairing mode.
The Wi-Fi indicator blinks orange.
3. Enter your Wi-Fi network name and password in the App on your mobile device. The network name and password are case-sensitive.
4. Follow the steps 5-6 in "Setting up the Wi-Fi connection for the first time" section
Using the air purifier
Understanding the air quality light
Indoor Allergen Index (IAI) is a real-time numerical display that provides visual and immediate feedback on indoor allergen level.
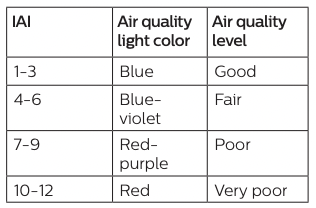
The air quality light automatically goes on when the air purifier is switched on, and lights up all colors in sequence. After approximately 30 seconds, the air quality sensors select the color that corresponds to the surrounding air quality of airborne particles.
Turning on and off
Note
- Always place the air purifier on a stable, horizontal, and level surface with the front of the unit facing away from walls or furniture.
- For optimum purification performance, close doors and windows.
- Keep curtains away from the air inlet or air outlet.
1. Put the plug of the air purifier in the wall outlet.
2. Touch to switch on the air purifier

The air purifier beeps.
The air purifier operates under the allergen mode by default.
When the air purifier is warming up, " " displays on the screen. After measuring the particulate matter only in the air, the air purifier shows the IAI level and operates in the auto mode with
 displayed on the screen
After measuring the air quality for approximately seconds, the air quality sensor automatically selects the appropriate air quality light color.
3. Touch and hold for 3 seconds to switch off the air purifier.
Note: If the air purifier stays connected to the electrical outlet after turning OFF, the air purifier will operate under the previous settings when turned ON again.
Changing the Auto mode setting
You can choose the Allergen mode ( ), the General mode ( )or the Bacteria & Virus mode (
 ).
).
Allergen mode
The extra-sensitive allergen mode is designed to react to even a small change in allergen levels in the surrounding air.
• Touch the Auto mode button to select the Allergen mode
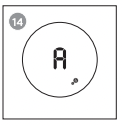
Auto (A) and display on the screen.
General mode
A smart auto-setting that automatically adjusts the air purifier’s settings to the ideal level.
- Touch the Auto mode button to select the General mode
Auto (A) and display on the screen.
Bacteria & Virus mode
The bacteria & virus mode boosts the airflow to quickly reduce bacteria & viruses.
- Touch the Auto mode button to select the Bacteria & Virus mode
Auto (A) and display on the screen.
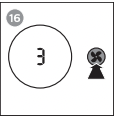
Changing the fan speed
In addition to the Auto modes, there are several fan speeds available. When using the manual fan speed settings, the purifier will still monitor the air quality, but it will not automatically adjust the fan speed if it detects changes in the air quality
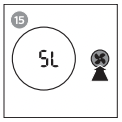
Sleep (SL)
In sleep mode, the air purifier operates quietly on a very low speed.
• Touch the fan speed button  to select the sleep mode (SL)
Note
- All lights will go off in sleep mode.
- You can turn on the lights manually by touching the light dimming button
Manual
• Touch the fan speed button repeatedly to select the fan speed you need
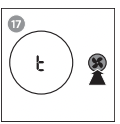
Turbo (t)
In turbo mode, the air purifier operates on the highest speed.
• Touch the fan speed button to select the turbo mode (t)
Setting the timer
With the timer, you can have the air purifier operate for a set number of hours. When the set time has elapsed, the air purifier will automatically switch off.
Touch the timer button repeatedly to choose the number of hours you want the air purifier to operate

The timer is available from 1 to 12 hours.
To deactivate the timer, touch the timer button repeatedly until "---"displays on the screen.
Note
• If you set the timer once, next time you use the timer, it starts from the previous setting time.
Using the light on/off function
With the light dimming button, you can switch on or off the air quality light, the display screen and the function indicator if desired.
- Touch the light dimming button once, the air quality light will be dimmed.
- Touch the light dimming button again, the air quality light will go off.
- Touch the light dimming button for the third time, all lights will be on again.
Switching the display mode
The air purifier has dual display mode, IAI display and PM2.5 display
Note: The air purifier operates in IAI display mode by default.
1. Touch the light dimming button for 3 seconds to switch to PM2.5 display mode
 blinks twice.
The actual PM2.5 level displays on the screen.
2. Touch the light dimming button for 3 seconds again to switch back to IAI display mode
 blinks twice.
The IAI level displays on the screen.
Cleaning
Note
- Always turn the air purifier off and unplug from the electrical outlet before cleaning.
- Never immerse the air purifier in water or any other liquid.
- Never use abrasive, aggressive, or flammable cleaning agents such as bleach or alcohol to clean any part of the air purifier.
- Only the pre-filter is washable. The HEPA and AC air filters are not washable.
- Do not attempt to clean the filters or air quality sensor with a vacuum.
Cleaning the body of the air purifier
Regularly clean the inside and outside of the air purifier to prevent dust from collecting.
- Use a soft, dry cloth to clean both the interior and exterior of the air purifier.
- The air outlet can also be cleaned with a dry, soft cloth.
Cleaning the air quality sensor
Clean the air quality sensor every 2 months for optimal functioning of the purifier.
Note
- If the air purifier is used in a dusty environment, it may need to be cleaned more often.
- If the humidity level in the room is very high, condensation may develop on the air quality sensor and the air quality light may indicate a more poor air quality even though the air quality is actually good. If this occurs, clean the air quality sensor or use the air purifier on a manual speed setting.
1. Switch off the air purifier and unplug from the wall outlet.
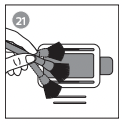
2. Clean the air quality sensor inlet and outlet with a soft brush
3. Remove the air quality sensor cover
4. Clean the air quality sensor, the dust inlet and the dust outlet with a damp cotton swab
5. Dry all parts thoroughly with a dry cotton swab.
6. Reattach the air quality sensor cover
Cleaning the pre-filter
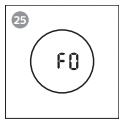
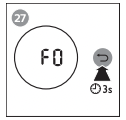
Clean the pre-filter when F0 is displayed on the screen
1. Switch off the air purifier and unplug from the wall outlet.
2. Pull the bottom part of the front panel to remove it from the air purifier
3. Press the two clips down (1) and pull the pre-filter towards you (2)
4. If the pre-filter is very dirty, use a soft brush to brush away the dust
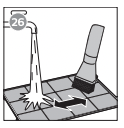
Then wash the pre-filter under running tap water.
5. Allow the pre-filter to air dry thoroughly before placing back in the air purifier
Note: To optimize the lifetime of the prefilter, make sure it air dries completely after cleaning. Wash your hands after handling the filter.
6. Put the pre-filter back into the air purifier
Note: Make sure the side with the two clips is pointing towards you, and that all hooks of the pre-filter are properly attached to the air purifier.
7. To reattach the front panel, press the top part of the panel onto the top of the air purifier (1). Then, gently push the panel against the body of the air purifier (2)
8. Put the plug of the air purifier in the wall outlet.
9. Touch and hold the reset button for 3 seconds to reset the pre-filter cleaning time
10. Wash your hands thoroughly after installing filters.
Replacing the filters
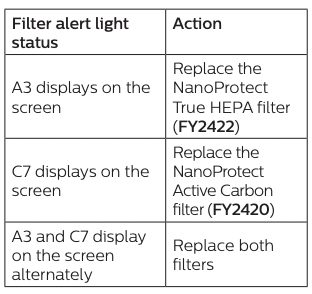
Filter replacement indicator
This air purifier is equipped with a filter replacement indicator to make sure that the air purification filter is in optimal condition when the air purifier is operating. When the filters need to be replaced, the filter code displays on the screen (see Filter alert chart). If the filters are not replaced in 14 days, the air purifier will stop operating and automatically lock to protect the air quality in the room. Replace the filters as soon as possible according to the filter code.
Replacing the filters
Note
- The HEPA and AC air filters are not washable or reusable.
- Always turn off the air purifier and unplug from the electrical outlet before replacing the filters.
- Do not clean the filters with a vacuum.
- If the pre-filter is damaged, worn or broken, do not use. Visit philips/support or call for assistance.
1. Turn off the air purifier and unplug from the wall outlet.
2. Take out the used air filter according to the filter alert light status displayed on the screen. Discard used filters.
Note: Do not touch the pleated filter surface, or smell the filters as they have collected pollutants from the air.
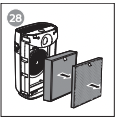
3. Remove all packaging material from the new filters
4. Place the new filters into the air purifier
5. Put the plug of the air purifier in the wall outlet.
6. Touch and hold the reset button for 3 seconds to reset the filter lifetime counter
Note
- Wash your hands after changing a filter.
- This air purifier has no other userserviceable parts. For assistance, call 1-866-309-8817.
Filter reset
You can replace filters even if there is no filter replacement code displayed on the screen. After replacing a filter, you need to reset the filter lifetime counter manually.
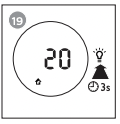
1. Touch and simultaneously for 3 seconds to enter the filter reset mode
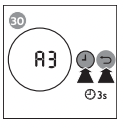
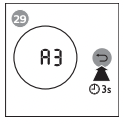
Code (A3) of the NanoProtect True HEPA filter displays on the screen.
2. Touch and hold for 3 seconds to force reset the filter lifetime counter of the NanoProtect True HEPA filter
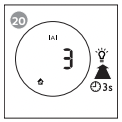
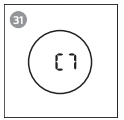
3. Code (C7) of the NanoProtect Active Carbon filter displays on the screen after the lifetime counter of the NanoProtect True HEPA filter has been reset
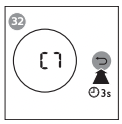
4. Touch and hold for 3 seconds to force reset the filter lifetime counter of the NanoProtect Active Carbon filter and exit the filter reset mode
Storage
- Turn off the air purifier and unplug from the wall outlet.
- Clean the air purifier, air quality sensor and pre-filter (see chapter "Cleaning’).
- Let all parts air dry thoroughly before storing.
- Wrap the filters and pre-filter separately in air tight plastic bags.
- Store the air purifier, filters and prefilter in a cool, dry location.
- Always thoroughly wash hands after handling filters.
Troubleshooting
This chapter summarizes the most common problems you could encounter with the air purifier. If you are unable to solve the problem with the information below, visit philips/support or call 1-866-309-8817 for assistance.
The air purifier does not work even though it is plugged into the wall outlet and switched on.
- The timer is set to a specific time interval. Reset or turn off the timer.
- Try a different electrical outlet or check the wall switch.
- The filter alert status is displaying the filter code. Replace the corresponding filter and reset the filter lifetime counter see chapter "Replacing the filters").
- If the problem persists, visit philips/support or call 1-866-309-8817 for assistance.
The air purifier does not work even though it is switched on.
- The filter replacement indicator has been on continuously but you have not replaced the corresponding filter, and the air purifier is now locked. In this case, replace the filter and reset the filter lifetime counter.
The air purifier accidentally powers off.
- The air purifier restarts automatically and goes to the previous mode when the power resumes.
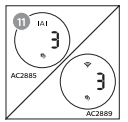
How can I know whether my device is connected version or nonconnected version?
- Please check the type plate at the backside of the device, model AC2889 is the connected version while model AC2885 is non-connected version.
The airflow that comes out of the air outlet is significantly weaker than before.
- The pre-filter is dirty. Clean the pre-filter (see chapter "Cleaning").
The air quality does not improve, even though the air purifier has been operating for a long time.
- One of the filters has not been placed in the air purifier or a filter is not placed properly. Make sure that all filters are properly installed in the following order, starting with the innermost filter: 1) NanoProtect True HEPA filter (FY2422); NanoProtect Active Carbon filter (FY2420); 3) pre-filter.
- The air quality sensor is wet. Make sure that the air quality sensor is clean and dry (see chapter "Cleaning").
The color of the air quality light always stays the same.
- The air quality sensor is dirty. Clean the air quality sensor (see chapter "Cleaning").
The air purifier produces a unpleasant smell.
- The first few times you use the air purifier, it may produce a plastic smell. This is normal. The air purifier may also produce an unpleasant smell when the filter is dirty. In this case, clean or replace the appropriate filter.
- If the air purifier produces a burnt odor, switch OFF and unplug from the electrical outlet. Call 1-866-309-8817 for assistance.
The air purifier is loud.
- If the air purifier is too loud, change the fan speed to a lower fan speed level. When using the air purifier in a bedroom at night, choose the sleep mode.
The air purifier still indicates that I need to replace a filter, but I already did.
Perhaps you did not reset the filter lifetime counter. Plug in the air purifier, touch to switch on the air purifier, and touch and hold the reset button for 3 seconds (see Filter force reset section).
Error codes "E1","E2", "E3" or "E4" displays on the screen.
- The air purifier has malfunctions. Visit philips/ support or call 1-866-309-8817 for assistance.