OWNER'S MANUAL AIR CONDITIONER
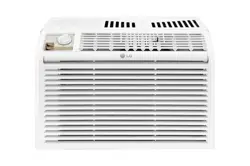
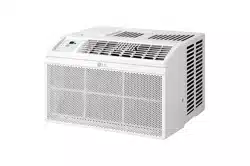
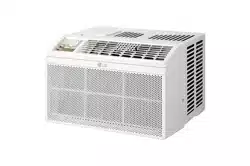
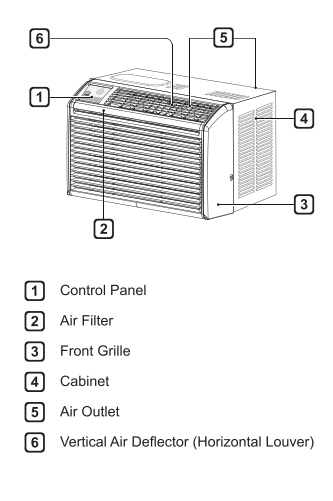
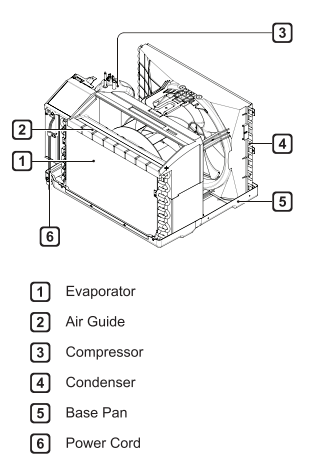
PRODUCT OVERVIEW
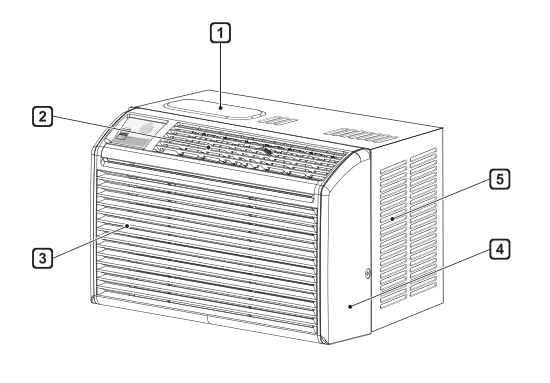
Exterior Parts
Interior Parts
INSTALLATION
Electrical Data
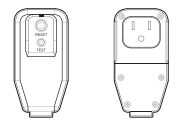
Power cord may include a current interrupter device. TEST and RESET buttons are provided on the plug case. The device should be tested on a periodic basis by first pressing the TEST button and then the RESET button. If the TEST button does not trip or if the RESET button will not stay engaged. discontinue use of the air conditioner and contact a qualified service technician.
for 120 V
Use Wall Receptacle

Standard 120 V. 3-wire grounding receptacle rated
15 A/ 120 VAC / 60 Hz
Power Supply
Use 15 A. time delay fuse or 15A. circuit breaker.
WARNING
- This appliance should be installed in accordance with the National Electrical
- Code.
- Use of extension cords could cause serious injury or death.
- Do not use an extension cord with this window air conditioner.
- Do not use surge protectors or multi-outlet adapters with this window air conditioner.
- Never push the TEST button during operation. Doing so can damage the plug
- Do not remove. modify. or immerse this plug. If this device trips. the cause should be corrected before further use.
CAUTION
- The conductors inside this cord are surrounded by shields, which monitor leakage current. These shields are not grounded. Periodically examine the cord for any damage. Do not use this product in the event the shields become exposed. Avoid shock hazard. This unit cannot be user-serviced. Do not open the tamper-resistant sealed portion. All warranties and performance will be voided. This unit is not intended to be used as an ON/OFF switch.
Installation Overview
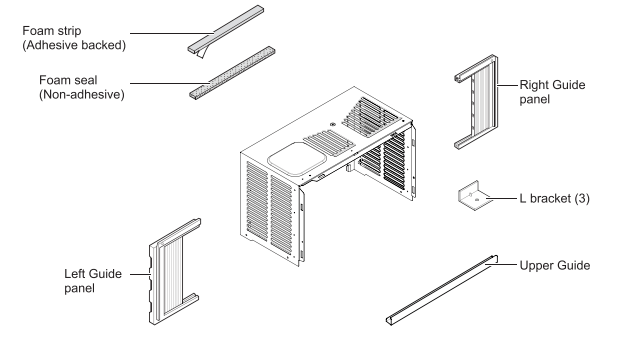
Accessories

Tools Needed

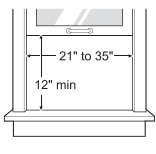
Window Requirements
This unit designed for installation in standard double hung windows with actual opening widths from 21" to 3
The top and bottom window sashes must open sufficiently to allow a clear vertical opening of
42" from the bottom of the upper sash to the Inside sill.
NOTE
- This product is a WINDOW AIR CONDITIONER. As such. a standard single-hung or double-hung window is required for proper installation. No-window installations. including using sleeves. holes in walls. and other installations are not. recommended.
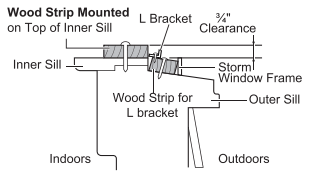
Clearance
Proper clearance enhances the cooling efficiency of the product.
- If a storm window presents interference. fasten a 2" wide wood strip to the inner
- Window sill across the full with of the sill. The wood strip should be thick enough to raise the height of the window sill so that the unit can be installed without interference by the storm window frame.
- (See drawing) The top of the wood strip on the inside sill should be approximately
 higher than the storm window frame or wood IP on the outside sill to help condensation to drain property othe outside.
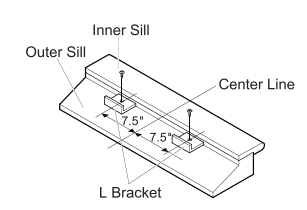
lf necessary, install a second wood strip (same thickness as first strip) in the center of sill flush against the back off the inner sill. This will rise the L bracket as shown in the drawing.
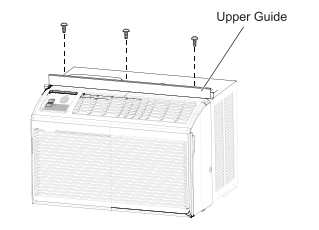
Preparation of Chassis
1. Install the upper guide with 3 Type A screws from the outside of the case.
2 Insert the guide panels into the upper and bottom guide
Fasten the curtains to the unit with 4 type A screws on each side.
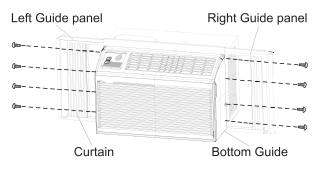
NOTE
- Use a long screwdriver and installing the serows will be easier.
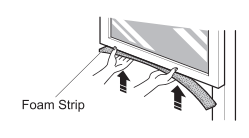
3. Cut the adhesive-backed foam strip to the window width. Remove the backing from the foam strip and attach the foam strip to the underside of the bottom window.
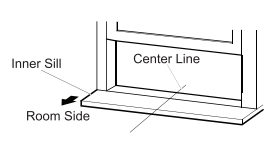
4. Open the window and mark center line in the center of the inner sill.
5. Install the L bracket behind the inner window sill. with short side of bracket as shown. Use the 2 Type A screws provided.
NOTE
- The bracket helps to hold unit securely in place. Be sure to place bracket edge flush against back of inner sill.
Unit Installation
CAUTION
During the flowing step. old unit firmly unit window sash is lowered to tp channel behind do panel frames. Personal injury 0 property damage may result if unit falls from window.
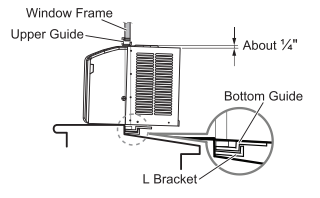
1. Set the air conditioner in the window so that is centered. Place the air conditioner so that front edge of the bottom guide is against the back edge of the sill. Bring the window down so that the font edge of the upper guide is in front of the window. Make sure that air conditioner is level of ting slighty to the outside.
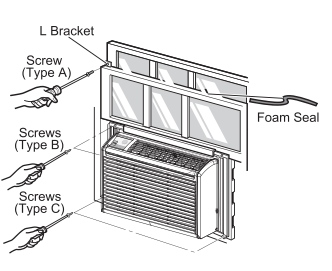
2.Extend the guide panels to il the window opening using 2 Type B screws and 2 Type C screws to secure them.
3. Cut the foam strip to the window width. Stuff the foam seal between the glass and the window to prevent air and insects from getting into the room. Fasten the L bracket using a Type A screw.
CAUTION
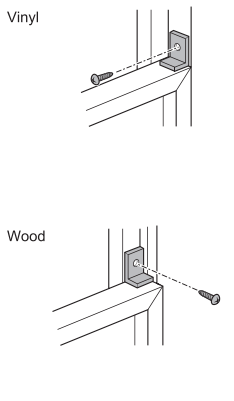
To prevent broken glass or damage to windows. on vinyl or other similarly constructed windows. attach the window locking bracket to the window side jamb with one Type A screw.
NOTE
- Fasten the remaining L bracket to the outer window sash with 1 type A screw as shown.
- See the "Electrical Data’ section for information on attaching the power cord ton electrical out.
OPERATION
Control Panel

 Power
Power
Tums the air conditioner on or off
 Fan Speed
Use to set the fan speed to LOW or HI.
 ModerTemp Control Knob
Use to set the air conditioner to the Fan Only or the Cool On mode.
Fan Only - Use Fan Only at Hl or LOW Fan Speed to provide air circulation and filtering without cooling.
Coo! on - Use Cool On with HI or LOW Fan Speed for cooling. Tum the konb toward the Cooler area for the indoor air to become cooler. Turn the Konb toward the Cool On area for the indoor air to become warmer. The Mode/Temp control is used to maintain the room temperature. When set in the Cool on mode. the compressor will cycle on and, off to keep the room at the same level of comfort.
NOTE
- If you move the Mode/Temp contr Konb from the Cool On setting to the Fan Only setting. wait at least 3 minutes before switching back to a Cool On setting.
Additional Features
Air Direction
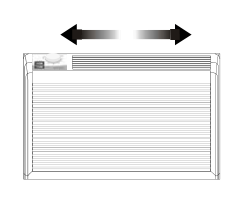
Adjusting the air direction using the horizontal or deflector control
Using the control tabs. the airflow can be directed to the left, right, straight ahead, or any combination of these directions.
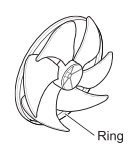
Slinger Fan
This air conditioner is equipped with a singer fan. (See drawing.) The fan's outer ring picks up the condensed water from the base pan if the water level gets high enough. The water is then picked up by the {an and expelled through the condenser, making the ai conditioner more efficient.
MAINTENANCE
WARNING
Before cleaning or performing maintenance, disconnect the power supply and wait until the fan stops.
Air Filter
Check the air filter at least twice a month to see if cleaning is necessary. Trapped particles in the filter can build up and block the airflow. reducing cooling capacity and causing an accumulation of frost on the evaporator.
Cleaning the Air Filter
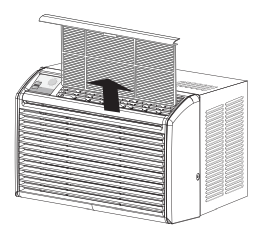
1. Remove the air filter from the front grille by paling the filter forward and then up slightly.
2. Wash the filter using lukewarm water below 40°C (104 *F)
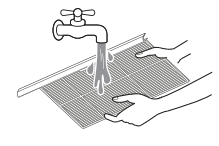
3. Gently shake the excess water from the filter and replace.
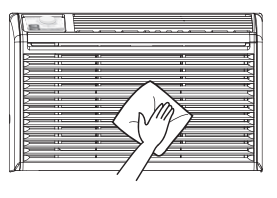
Cleaning the Air Conditioner
- Wipe the front grille and inlet grille with a cloth dampened in a mild detergent solution.
- Wash the cabinet with mild soap or detergent and lukewarm water. then polish using liquid appliance wax.
NOTE
- To ensure continued peak efficiency. the condenser coils (outside of uni) should be checked periodically and cleaned if clogged with soot or dirt from outside air.
- For repair and maintenance. contact an Authorized Service Center. See the warranty page for details or call 1-800-243-0000. Have your model number and serial number available. They should be written on page 20 of this manual
TROUBLESHOOTING
Before Calling for Service
The appliance is equipped with an automatic error-monitoring system to detect and diagnose problems. at an early stage. I the appliance does not function properly or does not function at al. check the following before you call for service.
Normal Sounds You May Hear
 High Pitched Chatter
Today's high efficiency compressors may have a high pitched chatter during the cooing cycle
 Sound of Rushing Air
At the font of the unit. you may hear the sound of rushing air being moved by the fan
 Gurgle/Hiss
Surgieniss urging o hissing noise may be heard due to refrigerant passing through evaporator during normal operation
 Vibration
Unit may vibrate and make noise because of poor wall or window construction or incorrect installation.
 Pinging of Swishing
Droplets of water hitting condenser during normal operation may cause pinging or swishing sounds
Air conditioner does not start.
- The air conditioner unplugged.
- Make sure the air conditioner plug is pushed completely into the outlet.
- The fuse is blown circuit breaker is tripped.
- Check the house fuseléiroult breaker box and replace the fuse or reset the breaker.
- Power failure.
- If power failure occurs. turn the mode control to of. When power is restored. wait 3 minutes to restart the air conditioner to prevent tripping of the compressor overload.
- The current interrupter device is tripped.
- Press the RESET button located on the power cord plug. If the RESET button will not stay engaged. discontinue use of the air conditioner and contact a qualified service technician.
Air conditioner does not cool as it should.
- Airflow is restricted.
- Make sure there are no curtains. blinds. or furniture blocking the front (ofthe air conditioner.
- The temp control may not be set correctly.
- Sel the desired temperature to level lower than the current temperature.
- The air filter is dirty.
- Clean the filter at least every 2 weeks. See the ''MAINTENANCE” section.
- The room may have been hot.
- When the air conditioner is first turned on. you need to allow time for the room to cool down.
- Cold air is escaping.
- Check for open furnace floor registers and cold air returns.
- Cooling coils have iced up.
- See "Air conditioner freezing up” below.
Air conditioner freezing up.
- The cooling coils are iced over.
- Ice may block the air low and obstruct the air conditioner from properly cooling the room. Set the mode control at High Fan or HighCool.
Water drips outside.
Water drips indoors.
- The air conditioner is not titled to the outside
- For proper water disposal, make sure the air conditioner slants slightly from cabinet front to the rear.
Water collects in base pan
- Moisture removed from air and drains into base pan
- This is normal for a short period in areas with little humidity; normal for a longer period in very humid areas.
Air conditioner turns on and off rapidly.
- Ditty air filter - air restricted.
- Outside temperature extremely
- Refer to installation instructions or hot. check with installer.
Noise when unit is cooling.
- Air movement sound.
- This is normal. If too loud, set to lower FAN setting.
- Window vibration - poor installation
- Refer to installation instructions or check with installer.
Room too cold.
- Set temperature too low.
- Increase set temperature.
NOTE
- You can refer to the Energy Star program in detail at www.eneraystar gov.