Loading ...
Loading ...
Loading ...
R
odelshown
]] rV/ seilustrael modeloconorificio
I['"l J/ devenUlaci6ndelantero
II I
module_ _vent avantillustr6
Stand dishwasher upright. Ponga el lavavajillas en posici6n vertical. Placerle lave-vaisselledebout.
The dishwasher must be secured to the
cabinet. There are two brackets O on
top of the dishwasher that usually can
be attached to the countertop, tf this is
not possible, the brackets may be
moved to the sides of the dishwasher.
If you are going to attach the
dishwasher to the countertop, skip to
step 13.
If you are going the attach the
dishwasher to the sides of the cabinet,
follow steps 8 through 12.
El lavavajillas debe asegurarse al
gabinete. En la parte superior del
lavavajillas hay dos soportes O que
usualmente pueden fijarse a la
encimera. Si esto no fuera posible, los
soportes pueden colocarse a los lados
del lavavajillas.
Siva a fijar el lavavajillas a la encimera,
contint_e con paso 13.
Siva a fijar el lavavajillas a los lados del
gabinete, siga los pasos del 8 a112.
Le lave-vaisselledolt 8tre bienfix6 au
placard. II existedeux attachesO au
sommet du lave-vaissellequi peuvent8tre
habituellementfixdes au comptoir. Si ce
n'est paspossible, les attaches peuvent
_,treddplacdesau c6t6 du lave-vaisselle.
Si vous devezfixer le lave-vaisselleau
comptoir, omettez I'dtape13.
Si vous devezfixer le lave-vaisselleaux
c0tds du placard, suivre les dtapes8 &12
inclusivement.
To remove the brackets from the top,
flatten tab 0 at back of brackets with
pliers, and pull the brackets out of the
slots _.
8. Para quitar los soportes de la parte
superior del lavavajillas, levante con la
pinza la leng{ieta 0 que se encuentra
en la parte trasera de los soportes, y
tire de los soportes para sacarlos de las
ranuras Q.
Pourenlever lesattaches du sommet,
aplatir la languette_ & I'arri_re des
attaches& I'aide de pinces, et tirer les
attaches hors desfentes _).
mR
Break off the end of the bracket along
the scored line _).
Partaelextremodelsoportea Io largo
dela Ifneamarcada_).
Briser le bout de I'attache le long dela
ligne marqu6e_).
10.
:_liR
Open dishwasher door and place towel
Oover pump assembly and spray arm
of dishwasher. This will prevent screws
from falling into pump area when
securing dishwasher to countertop.
Abra la puerta del lavavajillas y coloque
una toalla Osobre el conjunto de la
bombay el brazo rociador del
lavavajillas. Esto evitar_ que los tornillos
caigan en el _rea de la bomba al
asegurar el lavavajillas a la encimera.
Ouvrir la porte du lave-vaisselleet placer
une serviette Osur le montagede la
pompe et le brasd'aspersion du lave-
vaisselle. Ceciemp_cherales vis de
tomber darts leszones de la pompe
Iorsqu'on fixe le lave-vaisselleau
comptoir.
Open dishwasher door and push the
plastic buttons O out of the side of
the tub.
NOTE:Savethe buttons to cover the
holes after dishwasher is installed.
Abra la puerta del lavavajillas y saque
los botones pldsticos 0 del costado de
la tina.
NOTA:guarde los botones para cubrir
los orificios correspondientes despu6s
de instalar el lavavajillas.
Ouvrir la porte du lave-vaisselleet
appuyer sur les boutons en plastiqueO
hors du c0td dela cuvette.
REMARQUE: Conserverces boutons
pour couvrir lestrous apr_sI'installation
du lave-vaisselle.
17
12. et
\
\
\
i
J
Push bracket into slot O on the side of
dishwasher, and bend tab in towards
the side of the dishwasher so that it
keeps the bracket in place.
Empuje el soporte en la ranura 0 en el
costado del lavavajillas, y doble la
leng(Jetahacia el costado del lavavajillas
para que mantenga el soporte en su
lugar.
Pousser I'attachedans la fenteO au c0t6
du lave-vaisselleet plier la languettevers
I'int6rieur du lave-vaissellede sorte qu'elle
maintienne I'attacheen place.
If you are installing the FACTORY
SUPPLIED STAINLESSOR PAINTEDfull
front panel, go to Step 13.
If you are installing a CUSTOMfull front
panel, go to Step 14.
Si usted va a instalar un panel
delantero completo tNOXIDABLE O
PINTADOPROVISTODEFABRICA,vaya
al Paso 13.
Si usted va a instalar un panel
delantero completo HECHOA MEDIDA,
vaya al Paso 14.
Si vous installez le panneau avant
complet en INOX OU PEINTFOURNI
PARL'UStNE, passez _ 1'6tape13.
Si vous installez un panneauavant
complet PERSONNALISE,passez
I'dtape 14.
13.
Models with a FACTORYSUPPLIED
STAINLESSOR PAINTEDfull front
panel.
Remove the carton containing the
factory supplied full front panel.
Remove the handle package from the
front of the shipping base.
Modelos con orificio de ventilaci6n
superior con panel delantero completo
INOXlDABLEO PINTADOPROVISTOPOR
LA F,_BRICA.
Saque la caja de cart6n con el panel
delantero completo de metal.
Saque el paquete con la manija del
frente de la base para envfo.
Pour les modules_ 6vent sup6rieur
panneauavant complet D'ORIGINEEN
AClERINOXYDABLEOUPEINT.
Retirer le carton contenant le panneau
avant complet en m6tal.
Retirer le paquetde la poign6ede I'avant
de la based'exp6dition.
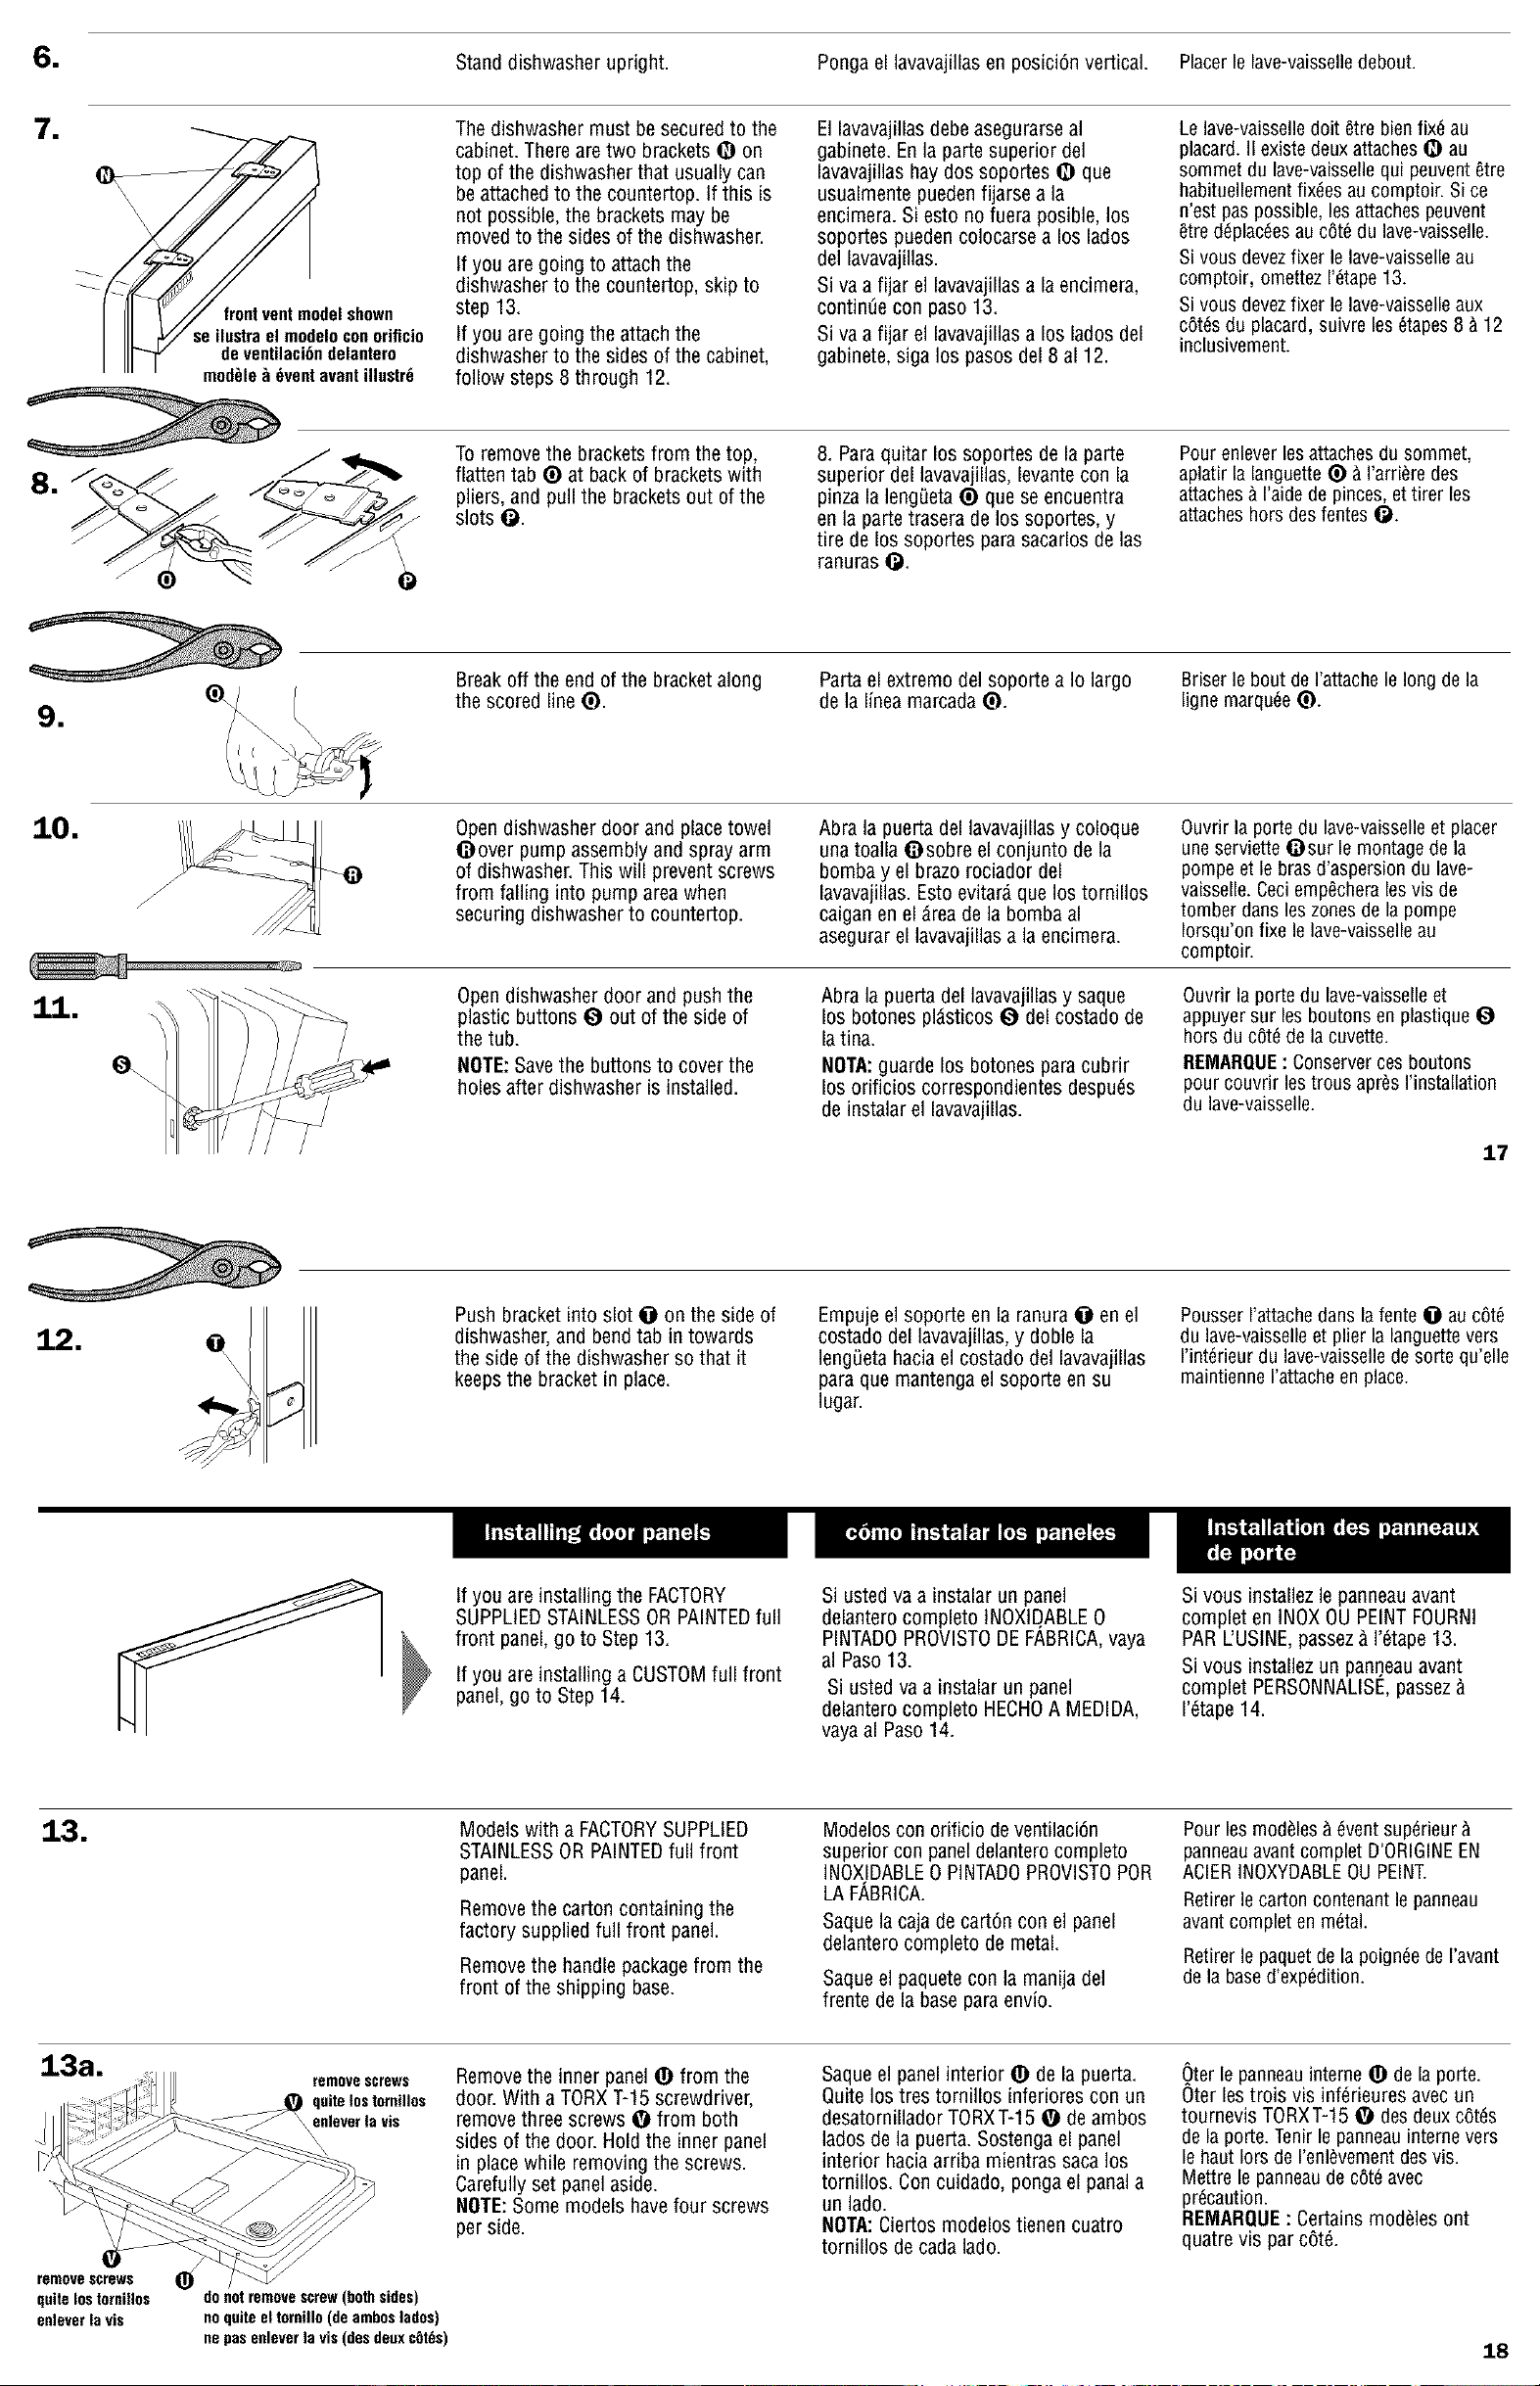
13a.
removescrews
quitelostornillos
enleverlavis
removescrews
quitelostornillos
enleverlavis
Remove the inner panel _) from the
door. With a TORX i-15 screwdriver,
remove three screws O from both
sides of the door. Hold the inner panel
in place while removing the screws.
Carefully set panel aside.
NOTE:Some models havefour screws
per side.
Saque el panel interior _) de la puerta.
Quite los tres tornillos inferiores con un
desatornillador TORXT-15 O de ambos
lados de la puerta. Sostenga el panel
interior hacia arriba mientras saca los
tornillos. Con cuidado, ponga el panal a
un lado.
NOTA:Ciertos modelos tienen cuatro
tornillos de cada lado.
Oter le panneauinterne _) de la porte.
Oter les trois vis inf6rieures avec un
tournevis TORXT-15 O desdeux c0tds
de la porte.Tenir le panneauinterne vers
le haut Iors de I'enl_vementdesvis.
Mettre le panneaude c6t6 avec
prdcaution.
REMARQUE: Certains modules ont
quatre vis par cot6.
do not removescrew(both sides)
no quite el tomillo (de ambos lados)
ne pas enleverla vis (des deuxcbt_s) 18
Loading ...
Loading ...
Loading ...