Operating and Installation Instructions
Steam Oven
To prevent accidents and machine damage, read these instructions be‐
fore
installation or use.
en-US, CA M.-Nr. 09 800 830

Contents
2
IMPORTANT SAFETY INSTRUCTIONS................................................................. 6
Overview ...............................................................................................................
15
Steam oven front view ........................................................................................... 15
Included accessories ............................................................................................. 16
Control panel........................................................................................................
17
Sensor buttons....................................................................................................... 18
Symbols ................................................................................................................. 19
Description of functions......................................................................................
20
Water container...................................................................................................... 20
Drip tray ................................................................................................................. 20
Temperature ........................................................................................................... 20
Cooking duration ................................................................................................... 20
Noises .................................................................................................................... 20
PreHeating phase................................................................................................... 21
Cooking phase....................................................................................................... 21
Steam reduction..................................................................................................... 21
Oven interior lighting.............................................................................................. 21
Before using for the first time.............................................................................
22
General settings..................................................................................................... 22
Cleaning for the first time....................................................................................... 23
Setting the water hardness level............................................................................ 24
Setting the correct boiling point for water ............................................................. 24
Modes / Programs / Menus.................................................................................
25
Operation ..............................................................................................................
26
Quick Guide ........................................................................................................... 26
Interrupting operation ............................................................................................ 27
Additional functions ............................................................................................... 28
Setting additional durations.............................................................................. 28
Turning on and off automatically....................................................................... 28
Sequence of an automatic cooking process .................................................... 29
Changing settings during a cooking process ................................................... 29
Canceling cooking ................................................................................................. 30
Sous-vide (vacuum) cooking...............................................................................
31
MasterChef ........................................................................................................... 36
List of food types ................................................................................................... 36
Using the MasterChef programs............................................................................ 37

Contents
3
Favorites ...............................................................................................................
38
Creating a Favorite................................................................................................. 38
Starting a Favorite.................................................................................................. 39
Changing Favorites ................................................................................................ 40
Changing cooking stages ................................................................................. 40
Changing the name........................................................................................... 40
Deleting a Favorite ................................................................................................. 41
Timer .....................................................................................................................
42
Setting the timer..................................................................................................... 42
Resetting the timer................................................................................................. 42
Canceling the timer................................................................................................ 42
General notes .......................................................................................................
43
The advantages of cooking with steam................................................................. 43
Suitable containers ................................................................................................ 43
Cooking pan ..................................................................................................... 43
Your own containers ......................................................................................... 43
Drip tray ................................................................................................................. 43
Shelf level............................................................................................................... 44
Frozen food ............................................................................................................ 44
Temperature ........................................................................................................... 44
Cooking duration ................................................................................................... 44
Cooking with liquid ................................................................................................ 44
Your own recipes ................................................................................................... 44
Steam cooking .....................................................................................................
45
Vegetables ............................................................................................................. 45
Meat....................................................................................................................... 48
Sausage ................................................................................................................. 50
Fish ........................................................................................................................ 50
Shellfish.................................................................................................................. 53
Mussels.................................................................................................................. 54
Rice........................................................................................................................ 55
Pasta ...................................................................................................................... 56
Dumplings.............................................................................................................. 57
Grains..................................................................................................................... 58
Legumes ................................................................................................................ 59
Eggs....................................................................................................................... 61
Fruit ........................................................................................................................ 62
Menu Cooking - Manual ........................................................................................ 63
Special modes......................................................................................................
65
Reheat.................................................................................................................... 65

Contents
4
Defrost ................................................................................................................... 66
Canning.................................................................................................................. 69
Juicing.................................................................................................................... 72
Menu Cooking........................................................................................................ 73
Making Yogurt........................................................................................................ 74
Proofing.................................................................................................................. 75
Dissolving Gelatine ................................................................................................ 76
Melting Chocolate.................................................................................................. 76
Skinning Fruits and Vegetables.............................................................................. 77
Preserving Apples ................................................................................................. 77
Blanching ............................................................................................................... 78
Sweating Onions.................................................................................................... 78
Rendering Fat......................................................................................................... 79
Sanitizing Cookware ............................................................................................. 79
Heating Damp Towels............................................................................................ 80
Decrystallizing Honey ............................................................................................ 80
Preparing Custard Royale...................................................................................... 80
Settings................................................................................................................. 81
Accessing the "Settings" menu ............................................................................. 81
Changing and saving settings .......................................................................... 81
Settings overview................................................................................................... 82
Language ............................................................................................................
83
Time of day ............................................................................................................ 83
Display .............................................................................................................. 83
Clock format ..................................................................................................... 83
Set..................................................................................................................... 83
Date........................................................................................................................ 84
Lighting .................................................................................................................. 84
Display brightness ................................................................................................. 84
Acoustic tone information...................................................................................... 84
Melody .............................................................................................................. 84
Solo tone........................................................................................................... 84
Keypad tone........................................................................................................... 85
Units of measurement............................................................................................ 85
Weight............................................................................................................... 85
Temperature...................................................................................................... 85
Keeping Warm ....................................................................................................... 86
Default temperatures.............................................................................................. 86
Safety..................................................................................................................... 87
System lock ..................................................................................................
87
Sensor lock ...................................................................................................... 87
Water hardness...................................................................................................... 87

Contents
5
Showroom Program ............................................................................................... 88
Demo Mode ...................................................................................................... 88
Factory default ....................................................................................................... 88
Cleaning and care................................................................................................
89
Important information on cleaning and care.......................................................... 89
Appliance front....................................................................................................... 90
Oven interior........................................................................................................... 91
Water container...................................................................................................... 91
Accessories ........................................................................................................... 92
Shelf runners.......................................................................................................... 92
Descaling ............................................................................................................... 93
Door ....................................................................................................................... 95
Frequently asked questions................................................................................
97
Optional accessories...........................................................................................
99
Cooking pan........................................................................................................... 99
Cleaning and care products................................................................................. 101
Additional accessories......................................................................................... 101
IMPORTANT SAFETY INSTRUCTIONS - INSTALLATION................................
102
Detailed dimensions of oven front ...................................................................
103
Installation dimensions......................................................................................
104
Installation into a tall cabinet ............................................................................... 104
Undercounter installation..................................................................................... 105
Installation in combination with an oven.............................................................. 106
Installation ..........................................................................................................
107
Electrical connection......................................................................................... 108
Power Supply.................................................................................................. 108
Caring for the environment...............................................................................
109
Technical service, data plate, warranty ...........................................................
110
MieleCare............................................................................................................
111

IMPORTANT SAFETY INSTRUCTIONS
6
When using the steam oven, follow basic safety precautions, including the
following:
Read all instructions before installation and use of the appliance to prevent
accidents and machine damage.
This appliance conforms to current safety requirements. Inappro‐
priat
e use can, however, lead to personal injury and damage to
property.
To avoid the risk of accidents and damage to the appliance,
please read these instructions carefully before installing or using it
for the first time.They contain important notes on installation, safe‐
ty, use and maintenance.
Keep these instructions in a safe place and pass them on to any
future owner.

IMPORTANT SAFETY INSTRUCTIONS
7
Use
This appliance
is intended for residential use only.
The st
eam oven is not suitable for outdoor use.
This st
eam oven is intended for domestic use only as described in
these operating instructions.
Any other usage is not supported by the manufacturer and could be
dangerous.
P
ersons who lack physical, sensory or mental abilities, or experi‐
ence with the appliance should not use it without supervision or in‐
struction by a responsible person.

IMPORTANT SAFETY INSTRUCTIONS
8
Children
Activat
e the system lock to ensure that children cannot switch on
the steam oven inadvertently.
Chil
dren must not be allowed to clean the steam oven unsuper‐
vised.
Please super
vise children in the vicinity of the steam oven and do
not let them play with it.
Dange
r of suffocation! Ensure that any plastic wrappings, bags,
etc. are disposed of safely and kept out of the reach of children.
Dange
r of burning. Children's skin is far more sensitive to high
temperatures than that of adults. Make sure that children do not at‐
tempt to open the door when the appliance is in operation. Keep
children well away from the appliance until it has cooled down and
there is no danger of burning.
Risk of inju
ry! The maximum allowable weight on the door is
17.5 lbs (8 kg).
Do not allow children to hang, lean or sit on the door when open.
Chil
dren should not be left alone or unattended in the area where
the steam oven is in use. They should never be allowed sit or stand
on any part of the appliance.

IMPORTANT SAFETY INSTRUCTIONS
9
Technical safety
Installatio
n, repair and maintenance work should be performed by
a Miele authorized service technician in accordance with national
and local safety regulations and the provided installation instruc‐
tions. Contact Miele’s Technical Service Department for examina‐
tion, repair or adjustment. Repairs and other work by unauthorized
persons could be dangerous and may void the warranty.
A d
amaged appliance is dangerous. Check the appliance for any
visible damage. Never install or attempt to use a damaged appli‐
ance.
Reliable
and safe operation of this steam oven can only be assur‐
ed if it has been connected to the mains electricity supply.
Be cer
tain your appliance is properly installed and grounded by a
qualified technician. To guarantee the electrical safety of this appli‐
ance, continuity must exist between the appliance and an effective
grounding system. It is imperative that this basic safety requirement
be met. If there is any doubt, have the electrical system of the house
checked by a qualified electrician.
Befor
e connecting the appliance to the mains supply, ensure that
the connection data on the data plate (voltage and frequency) match
the mains electricity supply.
This data must correspond in order to avoid the risk of damage to
the appliance. Consult a qualified electrician if in any doubt.
Do not use an extension cord to connect this appliance to the
power supply. Extension cords do not guarantee the required safety
of the appliance.
For safety reasons, this appliance may only be used after it has
been built in.
This st
eam oven must not be used in a non-stationary location
(e.g. on a ship).

IMPORTANT SAFETY INSTRUCTIONS
10
T
ampering with electrical connections or components and me‐
chanical parts is highly dangerous to the user and can cause opera‐
tional faults. Do not open the outer casing of the appliance.
While the appliance
is under warranty, repairs should only be per‐
formed by a Miele-authorized service technicians. Work by unquali‐
fied persons could be dangerous and may void the warranty.
Defective co
mponents should be replaced by Miele original parts
only. Only with these parts can the manufacturer guarantee the safe‐
ty of the appliance.
If
the plug has been removed or the power cord is not supplied
with a plug, the steam oven must be connected to the power supply
by a suitably qualified electrician.
Do not oper
ate the appliance if the power cord is damaged. It
must be replaced by a suitably qualified electrician with a H 05 VV-F
(PVC-insulated) type power cord, available from Miele.
Befor
e installation, maintenance, and repair work, the steam oven
must be disconnected from the electrical supply. It is only complete‐
ly isolated from the electrical supply if: the fuse has been removed
(where applicable), the main circuit breaker has been tripped, or the
power cord has been unplugged from the wall outlet. Always be sure
ti pull the plug not the cord.
If
the steam oven is installed behind a cabinet door, do not close
the door while the appliance is in operation. Heat and moisture can
build up behind the closed door and cause damage to the range and
to the surrounding cabinets and flooring. Do not close the door until
the appliance has completely cooled down.
Do not r
epair or replace any part of the appliance unless specifi‐
cally recommended in the manual. All other servicing should be re‐
ffered to a qualified technician.

IMPORTANT SAFETY INSTRUCTIONS
11
Do not oper
ate any appliance with a damaged cord or plug, or if
the appliance has been damaged in any manner. Contact Miele’s
Technical Service Department.

IMPORTANT SAFETY INSTRUCTIONS
12
Proper use
Dange
r of burning. The steam oven becomes hot when in use.
You could burn yourself on the heating elements, oven interior,
cooked food, oven accessories or hot steam. Use pot holders when
placing food in the oven or removing it and when adjusting oven
shelves etc. in a hot oven.
Take care when putting cooking pans into the oven or removing
them not to spill the contents.
Danger of burning. There will be some residual hot water in the
steam generator at the end of a cooking process. This will be pump‐
ed back into the water container. Take care not to spill the contents
when taking the water container out of the appliance.
Do not heat up food in closed containers e.g. tins or sealed jars in
the st
eam oven, as pressure will build up in the container, causing it
to explode.
Plastic dishes which
are not heat- and steam resistant melt at
high temperatures and can damage the appliance.
Use temperature- (up to 212°F / 100°C) and steam-resistant plastic
dishes. Follow the manufacturer's instructions.
F
ood which is left in the oven to be kept hot can dry out and the
moisture released can lead to corrosion damage in the appliance.
Do not use the steam oven for keeping food warm and do not use
utensils in the appliance which could corrode.
Do not leave the appliance door open unnecessarily as someone
may trip over it or be injured by it.
The door can
support a maximum weight of 17.5 lbs (8 kg). Do
not sit, lean or place heavy items on the open oven door. Also be
sure nothing can get trapped between the door and the oven cavity.
The steam oven could get damaged.

IMPORTANT SAFETY INSTRUCTIONS
13
When using
an electrical appliance, e.g., a hand-held mixer, near
the steam oven, make sure that the power cord does not get caught
in the door. The insulation on the cord could become damaged, giv‐
ing rise to an electric shock hazard.
The st
eam oven should be installed at a safe height for users to
safely access all cooking levels and pans. Otherwise spills could
cause burns or scalding and children may be put at risk by the hot
appliance door.
Flamma
ble materials should not be stored in an oven or in the vi‐
cinity of the cooktop.
Use car
e when opening the door - let hot air or steam escape be‐
fore removing or replacing food.
Never use the st
eam oven for warming or heating the room.
K
eep the oven vent ducts open.
W
ear proper apparel - Loose-fitting or hanging garments should
never be worn while using the appliance.
Always place oven r
acks and containers in desired location while
the oven is cool. If they must be removed while the oven is hot, do
not let the potholders contact hot heating elements in the oven.

IMPORTANT SAFETY INSTRUCTIONS
14
Cleaning and care
Do not use a st
eam cleaner to clean this oven.
Steam could penetrate electrical components and cause a short cir‐
cuit.
Scr
atches on the door glass can cause the glass to break.
Do not use abrasive cleaners, hard sponges, brushes or sharp metal
tools to clean the door glass.
The side runn
ers can be removed for cleaning purposes (see
"Cleaning and care").
Ensure that they are replaced correctly and do not use the oven
without them in place.
T
o avoid corrosion on the stainless steel surfaces of the Speed
Oven, remove any splashes on the interior walls of the oven from
food or liquids containing salt.
Accessories
Use only ge
nuine original Miele parts. If parts or accessories from
other manufacturers are used, the warranty will become void.
Overview
15
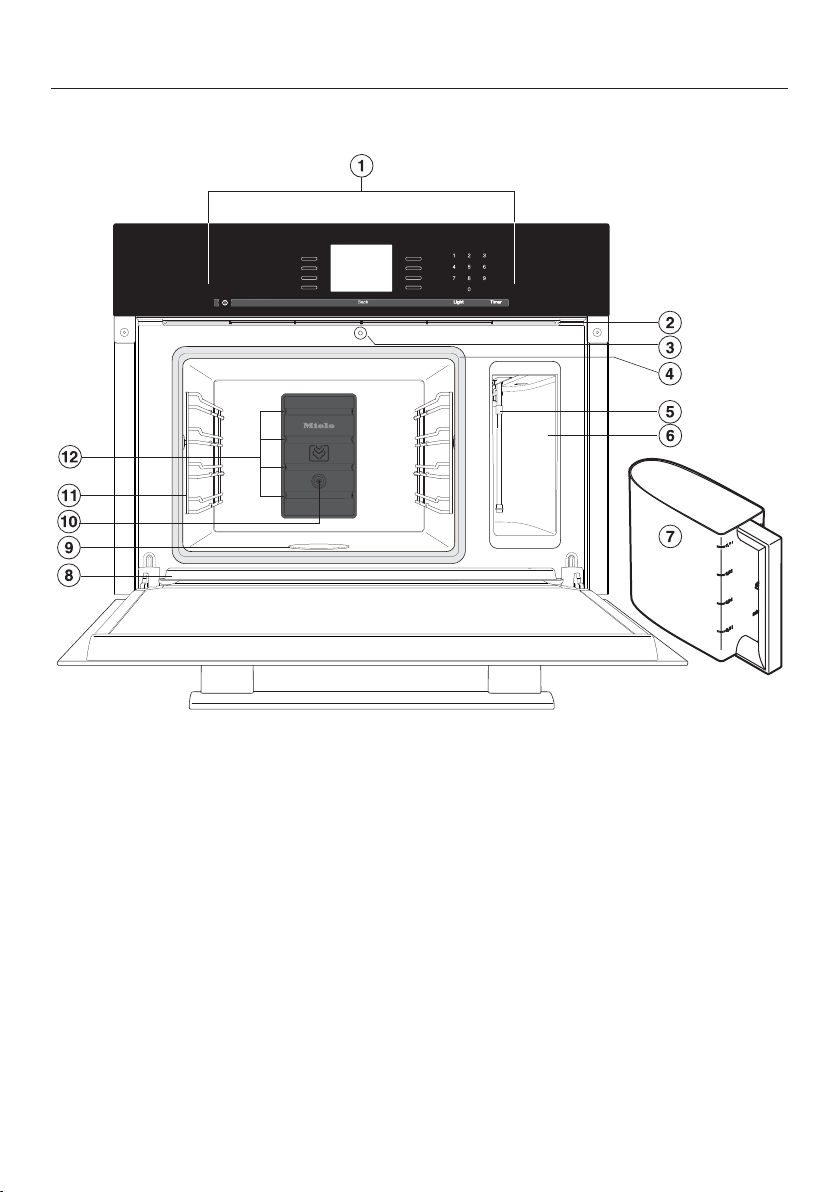
Steam oven front view
a
Control panel
b
Ventilation outlet
c
Automatic door release for steam re‐
duction
d
Door seal
e
Suction tube
f
Compartment for water container
g
Water container
h
Drip channel
i
Floor heating element
j
Temperature sensor
k
Shelf runners
l
Steam inlet

Overview
16
Included accessories
The accessories supplied with your ap‐
pliance
, as well as a range of optional
ones, are available to order from Miele
(see "Optional accessories").
DGG 21
1 drip tray for collecting excess mois‐
tu
re, can also be used as a cooking
pan.
12 3/4" x 17" x 1 ½" (W x D x H) / 325 x
430 x 40 mm (W x D x H)
DGGL 8
1 perforated cooking pan
12 3/4" x 10 ½" x 1 ½" (W x D x H) /
325 x 265 x 40 mm (W x D x H)
DGGL 1
2 perforated cooking pans
12 3/4" x 7" x 1 ½" (W x D x H) / 325 x
175 x 40 mm (W x D x H)
Wire oven rack
1 rack for your own cooking pans
Descaling tablets
For descaling the appliance
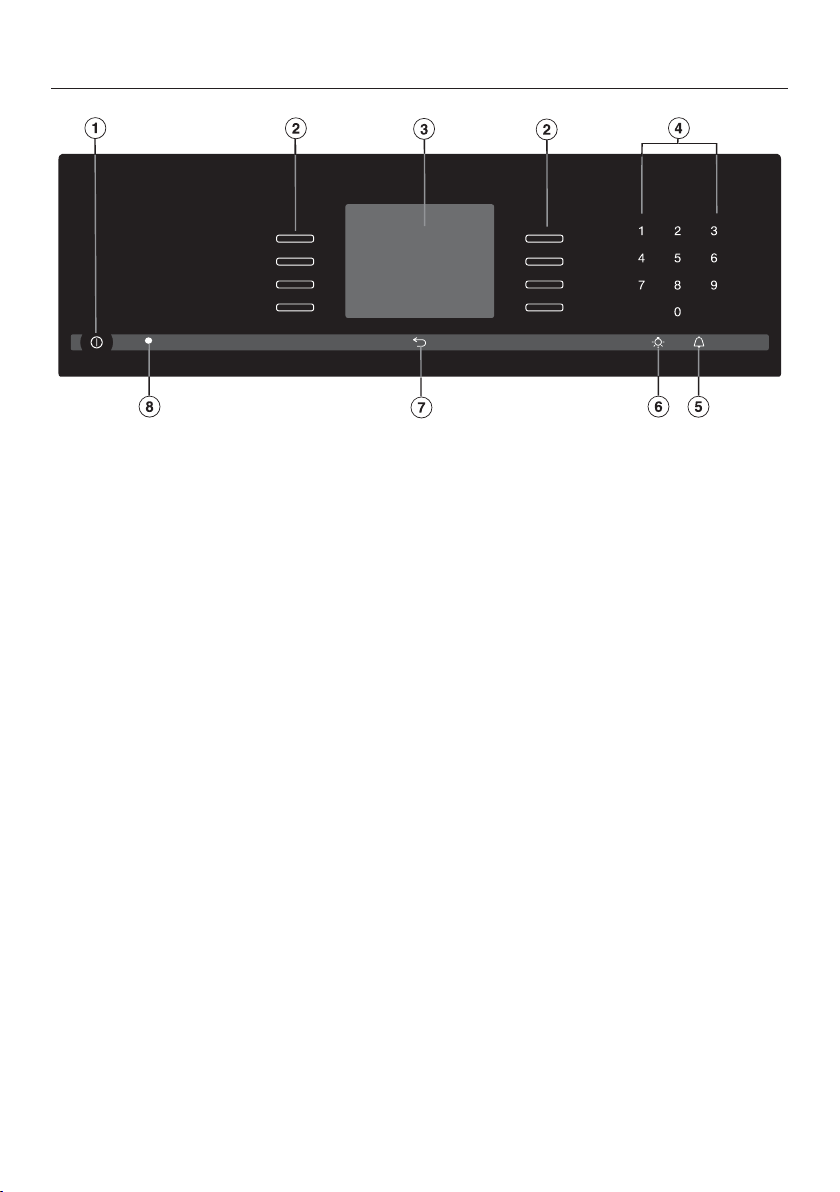
Control panel
17
a
Recessed On / Off butt
on
To turn the appliance on and off
b
Sensor buttons
To select operating modes, settings and menu items
c
Display
Displays the time of day and information on operation
d
Sensor buttons 0-9
Numeric keypad to enter values
e
sensor butt
on
To set the timer
f
sensor butt
on
To turn the oven interior lighting on and off
g
sensor butt
on
To go back one step at a time
h
Optical interface
(for service technician use only)

Control panel
18
Sensor buttons
The sensors react to touch. Each touch is confirmed with an audible tone. This
t
one can be turned off (see "Settings – Keypad tone").
Sensor
b
utton
Function Notes
For selecting op‐
tions and scrolling
through the list of
options.
A menu items can be selected by touching the illu‐
minated sensor button next to it.
0–9 Numerical keypad
for setting values
The numerical keypad is used to set values, e.g.
temperatures and durations.
Timer For setting the tim‐
er
If a list of options is showing on the display or if a
cookin
g process is running, a timer duration (e.g.
when boiling eggs) can be set at any point.
If the display is dark, the "Timer" sensor button
will not r
eact until the steam oven is turned on.
Light For turning the
oven int
erior light‐
ing on and off
If a menu appears on the display or if a cooking
pr
ocess is running, touching "Light" will turn the
interior light on or off.
If the display is dark, the "Light" sensor button will
not r
eact until the steam oven is turned on.
The oven interior lighting turns off after 15 sec‐
onds d
uring cooking or remains constantly turned
on, depending on the setting selected.
Back To go back a step

Control panel
19
A menu it
em can be selected by touching the illuminated sensor next to the
menu item.
Options can then
be accessed by touching the illuminated sensor next to
OK.
Symbols
The following symbols may appear in the display:
Symbol Description
Allocates an illuminated Sensor button to an option and indi‐
cates that the option can be selected.
If more than four options are available a bar will appear on the
right-h
and side of the display. Use the allocated sensors to scroll
through the list.
The end of a list is indicated by a dotted line. By scrolling down
fur
ther, you will reach the beginning of the list again.
/ This will only appear if an entry is possible or necessary (e.g., en‐
tr
y of the date).
A check indicates the option which is currently selected.
This symbol indicates that there is additional information and ad‐
vice about using the oven. Select OK to access the information.
Start time
Program finished
Timer
Some settings, e.g. display brightness and buzzer volume, are
selected using a bar chart.

Description of functions
20
Water container
The maximum amount of water is ap‐
pr
ox. ½ gallon (2 liters), the minimum is
approx. ½ pint (0.5 liters). These levels
are indicated on the container. Never
exceed the maximum level.
The amount of water depends on the
type of food and
the duration of cook‐
ing. You may need to refill the water
container during the cooking proce‐
dure. Opening the door will increase the
amount used.
Fill the water container to the maximum
level
before each use.
At the end of the cooking process, re‐
sidual wat
er in the steam generator is
pumped back into the water container.
The water container should be emptied
after each use.
Drip tray
When you are using perforated contain‐
ers, place the drip
tray on the lowest
shelf level to collect any drops of liquid
and allow them to be removed easily.
You can also use the drip tray as a
coo
king pan if necessary.
Temperature
Some programs have a default recom‐
mended t
emperature. This temperature
can be altered for the program in use or
for every use of that program (see "Set‐
tings - Recommended Temperatures").
Cooking duration
You can set a duration between 1 mi‐
nut
e (0:01) and 10 hours (10:00). If the
duration exceeds 59 minutes you have
to enter it in hours and minutes. Exam‐
ple: Duration 80 minutes = 1:20.
Noises
You will hear a pumping sound when
the appliance is turned on, during use
and aft
er turning it off. This is the sound
of water being pumped through the
system and is quite normal.
When the steam oven is in use, you will
hear a fan noise.

Description of functions
21
PreHeating phase
During the preheating phase, the dis‐
play will show the risin
g temperatures
and PreHeating (exception: MasterChef,
Menu Cooking, and Descale).
The duration of the preheating phase
will depend on the quantity and the
t
emperature of the food. In general this
phase will last for approx. 5 minutes.
The duration will be longer if you are
preparing refrigerated or frozen food.
Cooking phase
The cooking phase begins when the set
t
emperature is reached. During the
cooking phase, the time left will be
shown on the display.
Steam reduction
The appliance door will open a fraction
just befor
e the end of a cooking pro‐
gram to release some of the steam from
the cabinet. Steam Reduction will appear
on the display. The door will then close
automatically.
Steam reduction can be turned off (see
"Settings - S
team Reduction"). If deac‐
tivated, steam will be emitted from the
oven cavity when the door is opened.
Oven interior lighting
The oven light has been set at the fac‐
t
ory to go out when cooking starts.
If you want it to stay on all the time the
oven is o
n you will need to alter the de‐
fault setting (see "Settings - Lighting").
If the door is left open at the end of a
coo
king program, the oven lighting will
turn off automatically after 5 minutes.
The lighting can be turned on for
15 seco
nds by pressing the button
on the control panel.

Before using for the first time
22
General settings
The st
eam oven must not be op‐
erated until it has been correctly in‐
stalled.
The steam oven will turn on automati‐
call
y when it is connected to the pow‐
er supply.
Welcome screen
A welcome screen is displayed. You will
then be asked to select some basic set‐
tings which are needed before the ap‐
pliance can be used.
F
ollow the instructions on the display.
Set the language
Scr
oll through the list until the de‐
sired language appears.
T
ouch the illuminated sensor but‐
ton next to the language you want to
select.
Confirm with OK.
Set the country
Scr
oll through the list until the de‐
sired country appears.
T
ouch the illuminated sensor but‐
ton next to the country you want to
select.
Confirm with OK.
Set the date
Use or t
o set the year, month
and day.
Confirm with OK.
Set the time of day
Use the numerical keypad to set the
time of day in hours and minutes (e.g.
1-2-1-5 for 12:15).
Confirm with OK.
The time of day can be displayed in
12-h
our format (see "Settings - Time
of Day - Clock Format").

Before using for the first time
23
Time of day format
You will then be asked when you want
the time of day t
o show on the display
when the steam oven is turned off (see
"Settings - Time of Day - Display"):
– On
The time is always visible on the dis‐
play
.
– Off
The display appears dark to save en‐
er
gy. Some modes are limited.
– Night Dimming
The time only shows on the display
between 5:00 am and 11:00 pm. It
turns off at night t
o save energy.
Selec
t the desired option.
Confirm with OK.
Information regarding energy consump‐
tion will
appear on the display.
Confirm with OK.
Set up Successfully Completed is dis‐
played.
Confirm with OK.
The steam oven is ready for use.
If you accidentally select the wrong
language, follow the instructions de‐
scribed in "Settings - Language ."
Please
adhere the extra data plate for
the appliance supplied with this doc‐
umentation in the space provided in
the "Technical service, data plate,
warranty" section of this manual.
Remo
ve any protective foil and stick‐
ers.
The appliance has undergone a func‐
tion t
est in the factory. Residual water
from this testing may have dripped
from the lines into the oven cavity dur‐
ing transportation.
Cleaning for the first time
Water container
T
ake the water container out of the
appliance and rinse it by hand.
Accessories / Oven interior
Remo
ve all accessories from the
steam oven.
W
ash the accessories in a mild solu‐
tion of warm water and liquid dish
soap or in the dishwasher.
The interior of the steam oven has
been tr
eated at the factory with a con‐
ditioning agent.
To remove this, clean the oven interi‐
or with a mild solution of warm water
and liquid dish soap and then dry
thoroughly with a soft cloth.

Before using for the first time
24
Setting the water hardness lev‐
el
The steam oven is factory set for Hard
wat
er. It must be adjusted to local water
hardness to ensure trouble-free opera‐
tion and to ensure that descaling is car‐
ried out at the correct interval. The
harder the water, the more often it will
need to be descaled.
Che
ck the hardness of your local wa‐
ter supply and adjust the water hard‐
ness as necessary (see "Settings -
Water Hardness").
Setting the correct boiling
poi
nt for water
Before cooking food for the first time,
you must set the boili
ng point for water,
as this varies depending on the altitude
the appliance is located at. This proce‐
dure also flushes out the waterways.
This procedure must
be carried out
to ensure efficient functioning of your
appliance.
Y
ou should then run the steam oven
with Steam Cooking (212°F / 100°C) for
15 minutes. Proceed as described in
"Operation."
Resetting the correct boiling point
for wat
er
If you move, the appliance will need to
be r
e-set for the new altitude if this dif‐
fers from the old one by 300 m or more.
To do this, descale the appliance (see
"Cleaning and care / Maintenance /
Descaling").

Modes / Programs / Menus
25
Recommend‐
ed t
empera‐
ture
Temperature
r
ange
Steam Cooking
Retains the flavor and nutrients of the food without
added fats or oils
212°F / 100°C 105-212°F /
40–100°C
Sous-vide
Cooking food in a vacuum bag
150°F / 65°C 115-195°F /
45–90°C
MasterChef
The list of available MasterChef programs is displayed.
Special Modes
Menu Cooking
Simultaneous cooking of various foods
– –
Defrost
For gentle defrosting of frozen foods
140°F / 60°C 120-140°F /
50–60°C
Reheat
For gentle reheating of cooked food
212°F / 100°C 175-212°F /
80–100°C
Blanching
– –
Canning
195°F / 90°C 175-212°F /
80–100°C
Sanitize Cookware
– –
Proof
– –
Favorites
Create and save your favorite dishes
Settings
Changing the factory default settings
Descale
— —

Operation
26
Quick Guide
T
urn the steam oven on .
The main menu appears on the display.
Only use cold tap water
(less than
68°F / 20°C). Never use distilled or
mineral water or other liquids.
P
ush the water container into the ap‐
pliance until it engages.
P
ut the food in the oven.
Select Steam Cooking.
Set the Temperature appears on the dis‐
play.
Adjust the r
ecommended tempera‐
ture if necessary.
The recommended temperature will be
aut
omatically accepted within a few
seconds.
If necessary, select to go back to
the temperature setting (see "Addi‐
tional Functions - Changing the Tem‐
perature").
Confirm with OK.
Set the Duration
appears on the display.
Set the coo
king duration. Any time
between 1 minute and 10 hours can
be set.
Confirm with OK.
The cooking process begins. The steam
condenser, lighting, and fan turn on.
If you are cooking at a temperature of
appr
ox. 175°F / 80°C, Steam Reduction
will appear on the display shortly be‐
fore the end of the cooking time and
the door will open a little.
At the end of the cooking time
– Program Finished
appears on the dis‐
play.
– The fan remains on.
– A buzzer or melody will sound (see
"Settings - Aco
ustic tone informa‐
tion").
You have the option to save the pro‐
gr
am as a Favorite (see "Favorites") or
to increase the cooking duration using
ändern. Select to go back to the
main menu.
Burn hazar
d!
You could burn yourself on the oven
in
terior walls, spilled food and ac‐
cessories
Use pot holders when removing hot
foo
d from the oven.
W
ait until Steam Reduction goes out
on the display before opening the
door and removing the food.
Turn the steam oven off .
A new cooking process can only be
star
ted if the automatic door opener is
retracted into its original position. Do
not push it in manually as this could
damage it.
After use
Remo
ve the drip tray and empty it.

Operation
27
Remo
ve the water container and
empty it.
Aft
er each use, clean and dry the
whole appliance as described in
"Cleaning and Care."
Leave the appliance door open until
the oven interior is completely dry.
Insufficient water
If the steam oven runs out of water dur‐
ing
operation, an audible tone will
sound and the display will prompt you
to fill the water container with fresh tap
water.
Remo
ve the water container and fill it
with fresh tap water.
P
ush the water container into the ap‐
pliance until it connects.
Clo
se the door.
Operation will continue.
Interrupting operation
Operation is interrupted as soon as the
door is opened. The heating will be
turned off and the cookin
g duration re‐
maining stored in memory.
Burn hazar
d!
Steam can escape when the door is
opened.
Step back and wait until the steam
has dissipat
ed.
Burn hazar
d!
You could burn yourself on the oven
in
terior walls, spilled food and hot
steam.
Use pot holders when inserting, re‐
moving or turning hot food, or when
adjusting shelves, etc. in a hot oven.
Operation will resume when the door is
closed.
When the door is closed, the pressure
has t
o equalize, which can cause a
whistling sound.
The oven will heat up again and the dis‐
play will show the t
emperature of the
cooking compartment as it rises.
Once the set temperature has been
reached, the display will change to
show the cooking duration remaining as
it counts down.
The cooking process will be ended
early if the door is opened during the
last minu
te of cooking (55 seconds
standing time).

Operation
28
Additional functions
Setting additional durations
You have placed the food in the oven,
sele
cted a temperature and a duration.
Select Change.
Additional menu items will appear. You
can select or change these options for
the coo
king program:
– Ready at
– Start at
You can set the program to turn off or
on and off aut
omatically by entering
Ready at or Start at.
– Ready at
You specify the time you want cook‐
ing t
o stop.
– Start at
You specify the time you want cook‐
ing t
o start.
Cooking results can be impaired if
ther
e is a long delay between the
food being placed in the oven and
the start of cooking. Fresh food can
change its color and even deterio‐
rate.
If the temperature in the oven is too
hig
h, e.g. directly after another pro‐
gram, you will not be able to use this
function. Ready at and Start at will not
appear on the display if this is the
case. Open the oven door until the ap‐
pliance has cooled down.
Turning on and off automatically
To turn a cooking program on and off
aut
omatically, you have a choice of
how to enter the time parameters:
– Duration and Ready at
– Duration and Start at
Example: It is now 11:45 am. The food
tak
es 5 minutes to cook and needs to
be ready at 12:30 pm.
Select Change.
Select Duration and set a d
uration of
"00:05."
Select Ready at and set "12:30."
Confirm with OK.
Start at is cal
culated automatically. The
cooking duration entered is added to
the preheating time calculated by the
steam oven.
Start at 12
:18 appears on the display.
The cooking process will start automat‐
ically at this time.

Operation
29
Sequence of an automatic cooking
pr
ocess
Up until the start time the mode, the
select
ed temperature, Start at and the
start time will appear in the display.
After the program has started you
can foll
ow the preheating phase on the
display until the required temperature
has been reached.
As soon as this temperature is reached,
a buzz
er or melody will sound (see
"Settings - Acoustic tone information").
After the preheating phase, the cook‐
ing time (time left) will count down on
the display
. The last minute counts
down in seconds.
Shortly before the end of the cooking
pr
ocedure, Steam Reduction appears
(only in case of a temperature from
about 175°F / 80°C).
At the end,
the steam generator and
light turn off. Program Finished appears
and a buzzer or melody will sound (see
"Settings – Acoustic tone information").
You have the option to save the pro‐
gr
am as a Favorite (see "Favorites") or
to increase the cooking duration using
Change. Select "Back" to go back to
the main menu.
Changing settings during a cooking
p
rocess
Select Change.
The following will appear on the dis‐
play:
– Temperature
– Duration
– Ready at
– Start at
If the temperature in the oven is too
high Ready at and Start at
are not dis‐
played.
– Change Mode
Changing the temperature
Select Temperature.
Cha
nge the temperature.
Confirm with OK.
The program will restart with the
chan
ged temperature.
You can also permanently reset the
r
ecommended temperature to suit
your personal cooking habits (See
"Settings - Recommended Tempera‐
tures").
Changing the cooking duration
Select Duration.
Cha
nge the duration.
Confirm with OK.
The program will restart using the new
dur
ation.

Operation
30
Deleting a finish time
Select Ready at.
Select Reset.
Confirm with OK.
The finish time is now deleted.
The program will start using the dura‐
tion set.
Changing the oven mode
You can switch to the Steam Cooking
and Sous-vide modes.
Select Change Mode.
Select the desired mode.
The new mode will appear on the dis‐
play t
ogether with its recommended
temperature.
Cha
nge the temperature, if necessa‐
ry.
Confirm with OK.
Change the cooking duration, if nec‐
essary.
Confirm with OK.
The oven mode has been changed.
The Change Mode function is available
in the following special applications:
– Defrost
– Reheat
– Blanching
– Canning
– Sanitize Cookware
– Proof
Canceling cooking
Select .
Cancel Cooking? appears on the display
.
Select Yes.
The Main Menu will appear. Any cook‐
ing
durations set will be deleted.

Sous-vide (vacuum) cooking
31
This gentle cooking method allows food
t
o be cooked slowly at a low, constant
temperature in vacuum packaging.
With vacuum cooking, moisture does
not evapor
ate and all nutrients and fla‐
vors are retained.
The result is flavorful and cooked even‐
ly
.
Only use food that is fresh and in
good condition.
Ensure hygienic conditions and that
food has not been out of the refriger‐
ator too long, e.g. during transporta‐
tion.
Use only heat-stable, boiling-resist‐
ant vacuum bags.
Do not cook food in the manufactur‐
ers packaging, such as vacuum-
pack
ed frozen food. It is possible
that an unsuitable vacuum bag was
used.
Use the vacuum bag only once.
Vacuum-seal the food only with a
sous-vide vacuum sealer that guar‐
ant
ees a full vacuum of 99.8%.

Sous-vide (vacuum) cooking
32
Important usage information
To obtain an optimum cooking result,
obser
ve the following information:
– Use less herbs and spices than for
conventional cooking since the influ‐
enc
e on the taste of the food is more
intensive.
You can also prepare the food un‐
seasoned and add seasonings after
cooking.
– The cooking duration reduces when
salt, suga
r, and liquids are added.
– The food becomes firmer with the
addition o
f acidic ingredients, such
as lemon or vinegar.
– Do not use alcohol or garlic as an un‐
pleasan
t taste may result.
– Only use vacuum bags that match
the siz
e of the food. If the vacuum
bag is too big, too much air may re‐
main inside.
– If you want to cook several foods in
one vacuum bag, put the food in the
bag one
next to the other.
– If you want to cook several vacuum
bags at once, put the bags on the
shel
f one next to the other.
– The cooking durations depend on the
thickness of the food.
– In case of higher temperatures
and/or lo
nger cooking durations, a
lack of water may occur. Check the
display now and then.
– Keep the door closed during the
coo
king procedure. Opening the
door extends the cooking process
and can change the cooking result.
Tips
– Freeze liquids such as marinades be‐
for
e vacuum-sealing to prevent them
from escaping from the vacuum bag.
– Fold the edges of the vacuum bag
ou
twards for filling in order to obtain
clean, perfect weld seams.
– If you do not want to eat the food di‐
r
ectly after cooking, put it in an ice
bath and then store it at a maximum
of 37°F / 3°C. In this way, you can
maintain quality and taste while ex‐
tending the life of the food..
– After cooking, cut the vacuum bag
on
all sides to access the food better.
– Briefly sear meat and fish before
serving.
– Serve the food on preheated plates.

Sous-vide (vacuum) cooking
33
Method
P
ut the food in a vacuum bag and
add spices or liquid if desired.
V
acuum-seal the food with the sous-
vide vacuum sealer.
Lay the vacuum-sealed food on the
shel
f (next to each other in the case
of several bags).
Select Sous-vide.
Adjust the recommended tempera‐
ture if necessary.
Confirm with OK.
Set the coo
king duration. Any time
between 1 minute and 10 hours can
be set.
Confirm with OK.
Possible causes for poor re‐
sults
The vacuum bag opened:
– The weld seam was not clean or sta‐
ble enough and dissolved.
– The bag was damaged by a sharp
bone.
The food has an unpleasant or strange
taste:
– The food was stored incorrectly.
– Your hands or counter were not per‐
fectly clean.
– Too much spice was used.
– The bag or weld seam were dam‐
aged.
– The vacuum was under 99.8%
– The food was not immediately eaten
or cooled after cooking.

Sous-vide (vacuum) cooking
34
Food Added in advance
[°F / °C]
Cooking time in
minut
es
Sugar Salt
Fish
Cod filet, 1" (2.5 cm) thick x 130 / 54 35
Salmon filet, 1 1/4" (3 cm)
thick
x 125 / 52 30
Monkfish filet x 145 / 62 18
Vegetables
Cauliflower florets, medium to
lar
ge
x 185 / 85 40
Red kuri squash in slices x 185 / 85 15
Kohlrabi in slices x 185 / 85 30
Asparagus, white, whole x x 185 / 85 22–27
Sweet potatoes in slices x 185 / 85 18
Fruit
Pineapple in slices x 185 / 85 75
Apple in slices x 175 / 80 20
Baby bananas, whole 145 / 62 10
Peaches, halved x 145 / 62 25–30
Plums, halved x 160 / 70 10–12
Other food
Beans, white, soaked at a 1:2
r
atio
(beans to liquid)
x 195 / 90 240
Shrimp, peeled and deveined x 135 / 56 19–21
Egg, whole 149-151 / 65–66 60
Scallops, removed from shell 125 / 52 25
Shallot, whole x x 185 / 85 45–60
Squid tubes 165 / 75 330
T
emperature / Cooking duration

Sous-vide (vacuum) cooking
35
Food Added in ad‐
vance
[°F / °C]
Cooking time
in mi
nutes
Sugar Salt Medium* Done*
Meat
Duck breast, whole x 151 / 66 162 / 72 35
Rack of lamb 136 / 58 144 / 62 50
Beef filet steak, 1 3/4" (4
cm) thick
133 / 56 142 / 61 120
Pork tenderloin, whole x 145 / 63 153 / 67 60
Temperature / Cooking duration
* Degree of doneness
The "done" degree of doneness has a higher core temperature than "medium," but is not
coo
ked through in the classical sense.

MasterChef
36
Your steam oven has a number of
Mast
erChef programs that enable you
to achieve excellent cooking results
with ease. Simply select the appropri‐
ate program for the type of food you
are cooking and follow the instruc‐
tions on the display.
List of food types
The programs can be found under Mas-
terChef.
– Vegetables
– Fish
– Meat
– Rice
– Grain
– Pasta
– Legumes
– Eggs
– Dessert
– Fruit
– Mushrooms
– Sausage
– Mussels
– Special

MasterChef
37
Using the MasterChef pro‐
gr
ams
Select MasterChef.
A list of food types will appear on the
display
.
Selec
t the desired food category.
The MasterChef programs available for
the food cat
egory selected will appear.
Selec
t the desired MasterChef pro‐
gram.
Each step you need to take before
starting the MasterChef program will
appear on the display.
In some programs, you will be prompt‐
ed on when t
o add food to the oven.
Follow and confirm these instructions.
Notes on using these programs
– The degree of doneness and brown‐
ing
levels are shown in a bar graph
with seven segments.The factory de‐
fault is always the middle setting. It
will be highlighted. To change the
setting simply move the highlighting
to the left or the right.
– The weights shown refer to the
weigh
t per piece. You can cook a
piece of salmon with a weight of ½ lb
(250 g) or 10 pieces of salmon with a
weight of ½ lb (250 g) at the same
time.
– The oven interior needs to be at room
temperature before starting a Master‐
Chef program.
– When placing food in an already hot
st
eam oven, be very careful when
opening the door. Hot steam can es‐
cape. Step back from the steam oven
and wait until the steam has dissipat‐
ed. When putting cooking pans or
the drip tr
ay into the oven or taking
them out, take care not to spill the
contents. Avoid contact with hot
steam, and do not touch the hot
oven interior walls. Danger of burning
and scalding.
– To end a MasterChef early, turn the
st
eam oven off completely by touch‐
ing .
Cancel Cooking? will appear on the
display
. If ja is selected, the main
menu will be shown again.
– If the food is not cooked enough by
the end of a Mast
erChef program,
select Cont. Cooking.
– MasterChef programs can also be
saved as Favorites.

Favorites
38
You can create and save up to 20 of
your own pr
ograms.
– Each one can have up to 10 cooking
stage
s. This enables you to save
your favorite or most frequently used
recipes very accurately. You can
make individual settings for each
stage.
– You can enter a program name for
your recipe.
When you next select the program, it
will star
t automatically.
There are different ways of creating a
F
avorite:
– At the end of running a MasterChef
P
rogram, save it as a separate pro‐
gram.
– After running a program with a set
dur
ation, select Save.
Then name the program.
Creating a Favorite
Select Favorites.
When first creating a program Create
Program will
appear on the display.
If the Favorite already exists, the pro‐
gr
am name will appear with Edit Program
underneath.
Select Edit Program.
Select Create Program.
You can now specify the settings for
cooking stage 1.
Follow the instructions on the display:
Select and confirm the cooking func‐
tion
, temperature, and duration.
The settings for the first cooking stage
have now been set.
You can add additional cooking stages,
e.g., if you would like to continue to
cook at another temperature:
Select Add Cooking Stage and pr
oceed
as for the first cooking stage.
When you
have completed setting
the cooking stages. select Complete
Program.
A summary of your settings will appear
on the display.
Check the settings and confirm with
Accept or select Change t
o correct the
settings or to add further cooking
stages.
Select Save.
Ent
er the program name.
The following symbols appear next to
the alphabet:

Favorites
39
Sym‐
bol
Description
␣ Space
Alphabet in upper case
Alphabet in lower case
Numbers 0 to 9 and hyphen -
T
ouch the sensors next to the sym‐
bols to highlight the desired charac‐
ter.
T
ouch Select.
The letter or number you have selected
will appear in the t
op line of the display.
A maximum of 10 characters can be
used.
You can delete the characters one at a
time with .
Fi
nish creating the program name.
Once you ha
ve entered the program
name select Save.
A message will appear on the display
confi
rming that your program has been
saved.
Confirm with OK.
You can start the saved program imme‐
diat
ely, delay the start or change the
cooking stages.
More information regarding Change
Cooking Stages
can be found in
"Changing favorites".
Starting a Favorite
P
ut the food in the oven.
Select Favorites.
The display shows the program names
and Edit Program at the bott
om.
Selec
t the desired program.
You can start the saved program imme‐
diat
ely, delay the start, or show the
cooking stages.
– Start Now
The program will start right away and
the oven heating will turn on.
– Ready at
You can set the time at which the
cooking program should end.
– Start at
You can set the time at which the
cooki
ng program should start.
– Change Cooking Stages
The setting specified for a cooking
stage can be corr
ected (see "Chang‐
ing favorites") or more cooking
stages can be added to the program.
Selec
t the desired mode.
The program will start according to the
specified star
t or finish time.

Favorites
40
Changing Favorites
Changing cooking stages
Cooking stages in a MasterChef pro‐
gr
am that have been saved under a
different name cannot be changed.
Select Favorites.
The display shows the program names
and Edit Program at the bott
om.
Select Edit Program.
Select Change Program.
Selec
t the desired program.
Select Change Cooking Stages.
A summary of your settings will appear
on the display.
The setting specified for a cooking
stage can
be changed or more cooking
stages can be added to the program.
Cha
nge the program as desired (see
"Creating favorites") and confirm by
touching OK.
A summary of your settings will appear
on the display.
Select Save.
If necessar
y, change the name (see
"Creating favorites) and select Save.
The changes made to the program will
be saved.
Changing the name
Select Favorites.
The display shows the program names
and Edit Program at the bott
om.
Select Edit Program.
Select Change Program.
Selec
t the desired program.
Select Change Name.
Cha
nge the name (see "Creating fa‐
vorites) and select Save.
A message will appear on the display
confirming that the name has been
saved.
Confirm with OK.

Favorites
41
Deleting a Favorite
Select Favorites.
The display shows the program names
and Edit Program at the bott
om.
Select Edit Program.
Select Delete Program.
Selec
t the desired program.
Co
nfirm if the program should be de‐
leted with Yes.
The program is deleted.
You can delete all of your Favorites at
the same time (see "Settings - F
actory
Default - Favorites").

Timer
42
The timer can be used to time any ac‐
tivity in the kitchen, e.g. boiling eggs.
The timer can also be used at the same
time as a coo
king program if a start and
finish time have been set, e.g. a re‐
minder to stir the dish or add season‐
ing.
A maximum timer duration of 9 hours,
59 minu
tes and 59 seconds can be set.
Setting the timer
If you want to use the timer and Time |
Show | Off has been set, you will need
t
o switch the steam oven on before
you can set the timer. The timer can
then be seen counting down on the
display when the steam oven is
switched off.
Example: You are boiling eggs so you
set the timer for 6 minut
es and 20 sec‐
onds.
Select .
"0 : 00 : 00" (h : min : sec) will appear
on the display
.
Use the nu
merical keypad to enter a
different duration (6-2-0).
Confirm with OK.
The duration counts down on the dis‐
play when the st
eam oven is turned off.
If a cooking program is running at the
same time, the timer dur
ation will ap‐
pear at the bottom of the display.
At the end of the timer
– flashes in
the display.
– The time starts counting upwards.
– A buzzer or melody will sound (see
"Settings - Aco
ustic tone informa‐
tion").
Select or the il
luminated sensor
button next to the timer to turn off the
acoustic and optical signals.
Resetting the timer
T
ap or the illuminated sensor but‐
ton next to the timer duration that is
counting down.
The set timer appears on the display.
Set the new timer dur
ation using the
numeric keypad.
Confirm with OK.
The changed timer is saved and will
star
t to count down immediately.
Canceling the timer
T
ap or the illuminated sensor but‐
ton next to the timer duration that is
counting down.
The set timer appears on the display.
Select Reset.
The timer has been canceled.

General notes
43
The "General Notes" section contains
gene
ral information. You will find more
detailed information about particular
foods and how to cook them in the oth‐
er sections.
The advantages of cooking
with
steam
Almost all vitamins and minerals are re‐
tained as the food is not immersed in
wat
er.
Cooking with steam also retains the
true tast
e of the food better than con‐
ventional cooking. We therefore recom‐
mend seasoning the food after it has
been cooked. Food also retains its
fresh, original color.
Suitable containers
Cooking pan
This steam oven is supplied with stain‐
less st
eel cooking pans. Other contain‐
ers, in a variety of sizes, both perforat‐
ed and solid, are available as optional
extras (see "Optional accessories").
This enables you to choose the most
suitable container for the food you are
preparing.
It is best to use perforated containers
for st
eam cooking. The steam can
reach the food from all sides and the
food is cooked evenly.
Your own containers
You can also use your own containers.
Howeve
r, please note the following:
– Containers must be heat-resistant to
212
°F / 100°C and able to withstand
hot steam. With plastic containers
please check with the manufacturer
that they are suitable for use in a
steam oven.
– Thick-sided containers made from
por
celain, china or stoneware, for ex‐
ample, are not so suitable for steam
cooking. They do not conduct heat
well and as a result cooking dura‐
tions will be considerably longer than
those given in the charts.
– Place the cooking pans on the rack
and not on
the oven floor.
– Ensure that there is a gap between
the upper rim of the container and
the t
op of the cooking compartment
to allow sufficient steam into the con‐
tainer.
Drip tray
When you are using perforated contain‐
ers, place the drip
tray on the lowest
shelf level to collect any drops of liquid
and allow them to be removed easily.
You can also use the drip tray as a
coo
king pan if necessary.

General notes
44
Shelf level
You can select any shelf level. You can
a
lso cook on several levels at the same
time. This will not alter the cooking du‐
ration.
When using more than one deep con‐
tai
ner at the same time it is best to off‐
set them on their runners and to leave
at least one level free in between them.
Always insert cooking pans and the
r
ack between the rails of the side run‐
ners so that they cannot tip.
Frozen food
The heating up phase for frozen food is
lon
ger than for fresh food. The greater
the quantity of frozen food, the longer
the preheating phase.
Temperature
A maximum temperature of 212°F /
100°C is reached when steam cooking
is taking place. Most types of food will
cook at this temperature. Some more
delicate types of food, such as soft
fruit, must be cooked at lower tempera‐
tures as otherwise they will burst. More
information is given in the relevant sec‐
tion.
Combination with a food warming
drawer
When the warming
drawer is in use the
oven cavity in the steam oven can get
up to 104°F / 40°C. If, in this case, you
set a temperature of 104°F / 40°C, no
steam will be produced because the
oven cavity is too warm.
Cooking duration
In general, the cooking durations for
coo
king with steam are the same as for
cooking food in a saucepan. More in‐
formation about any factors which may
affect the cooking duration is given in
the relevant sections.
The quantity of food does not affect the
cooking time. 1 lb of potatoes will take
the same time to cook as ½ lb.
The durations given in the charts are
gui
delines only. We recommend select‐
ing the shorter cooking duration quoted
to start with. If food is not cooked suffi‐
ciently after the shorter time it can be
put back in the oven and cooked for
longer.
Cooking with liquid
When cooking with liquid only fill the
coo
king pan ²/₃ full to prevent the liquid
spilling when the cooking pan is re‐
moved from the oven.
Your own recipes
Food and recipes which are prepared in
pot or a pan can also be cook
ed in the
steam oven. The cooking times in the
steam oven will be the same. Please
note that food will not be brown or crisp
when cooking with steam.

Steam cooking
45
Vegetables
Fresh food
Prepare fresh vegetables in the usual
way, i.e. wash, clean and cut them up.
Frozen food
Frozen vegetables do not need to be
defr
osted beforehand unless the vege‐
tables have been frozen together in a
block.
To cook frozen vegetables, program the
same time as for fr
esh ones.
Break up the larger, frozen together
pieces. Please r
efer to the cooking
times on the packaging.
Cooking pan
Food such as peas or asparagus
spears, which have little or no space
between them, will tak
e longer to cook
because the steam has less space to
work in. For an even result, it is best to
use a shallow container for these types
of food, and only fill it about 1-2"
(3-5 cm) deep. When cooking large
quantities divide the food between 2 or
3 shallow containers rather than using
one deep one.
Different types of vegetables which
tak
e the same length of time to cook
can be cooked together in one cooking
pan.
Use solid containers for vegetables
which ar
e cooked in liquid, e.g. cab‐
bage.
Shelf level
When cooking vegetables with a dis‐
tinctive
color (e.g. beets) in a perforated
container at the same time as cooking
other foods in other containers, place
the drip tray directly underneath the
perforated container to catch any drips
and therefore avoid any color transfer.
Cooking duration
As with conventional methods, when
cooking vegetables with steam, the
cooking duration will depend on the
size and also whether you want the
vegetables to be al dente or soft/well
done. Example:
firm potatoes, cut into quarters
= approx. 18 minutes
firm potatoes, cut in half
= approx. 22 minutes
Brussels sprouts, large, al dente =
approx. 12 minutes
Brussels sprouts, small, soft
= approx. 12 minutes
Settings
MasterChef | Vegetables | ... | Steam
Cooking
or
Steam Cooking
T
emperature: 212°F / 100°C
Duration: see chart

Steam cooking
46
The durations given in the charts for fresh vegetables are guidelines only. We rec‐
ommen
d selecting the shorter cooking duration quoted to start with. If vegetables
are not cooked sufficiently after the shorter time, they can be put back in the
steam oven and cooked some more.
Vegetables
[min]
Artichokes 32–38
Cauliflower, whole 27–28
Cauliflower, florets 8
Beans, green 10–12
Broccoli, florets 3–4
Carrots, whole 7–8
Carrots, halved 6–7
Carrots, chopped 4
Chicory, halved 4–5
Chinese cabbage, chopped 3
Peas 3
Fennel, halved 10–12
Fennel, cut into strips 4–5
Kale, chopped 23–26
Waxy potatoes, peeled
whole
halved
quar
tered
27–29
21–22
16–18
Fairly waxy potatoes, peeled
whole
halved
quar
tered
25–27
19–21
17–18
Floury potatoes, peeled
whole
halved
quar
tered
26–28
19–20
15–16
Kohlrabi, cut into batons 6–7

Steam cooking
47
Vegetables
[min]
Pumpkin, diced 2–4
Corn on the cob 30–35
Swiss chard, chopped 2–3
Peppers, diced / cut into strips 2
Potatoes cooked in skins, firm 30–32
Mushrooms 2
Leeks, chopped 4–5
Leek, halved lengthwise 6
Romanesco, whole 22–25
Romanesco, florets 5–7
Brussels sprouts 10–12
Red beets, whole 53–57
Red cabbage, chopped 23–26
Black salsify, whole 9–10
Celery root, cut into batons 6–7
Green asparagus 7
White asparagus, whole 9–10
Carrots, chopped 6
Spinach 1–2
Pointed cabbage, chopped 10–11
Celery, chopped 4–5
Rutabaga, chopped 6–7
White cabbage, chopped 12
Savoy cabbage, chopped 10–11
Zucchini, sliced 2–3
Snap peas 5–7
Cooki
ng duration

Steam cooking
48
Meat
Fresh food
Prepare the meat as usual.
Frozen food
Meat should be thoroughly defrosted
befor
e cooking in the steam oven (see
"Defrosting").
Preparation
For meat which needs to be seared be‐
for
e being cooked, e.g. for a stew, sear
the meat in a pan on the cooktop first.
Cooking duration
The cooking time depends on the thick‐
ness and consi
stency of the food. The
thicker the meat, the longer the cooking
time.
Tips
– Use a perforated container to retain
the flavor when cooking meat. Place
a soli
d container underneath to catch
the juices. You can use these to
make a gravy or freeze them for later
use.
– Boiling chicken, pork rind, meat, ribs
and meat bones can be used t
o
make stock. Place the meat together
with some mixed vegetables in a sol‐
id cooking pan and add cold water.
The longer the cooking duration, the
stronger the stock.
Settings
MasterChef | Meat | ... | Steam Cooking
or
Steam Cooking
T
emperature: 212°F / 100°C
Duration: see chart

Steam cooking
49
The cooking times given in the chart are guidelines only. We recommend selecting
the shor
ter cooking time to start, additional time can be added if necessary.
Meat Cooking time in minutes
Shank, covered with water 110–120
Pork knuckle 135–140
Chicken breast filet 8–10
Leg (Joint) 105–115
Prime rib, covered with water 110–120
Veal strips 3–4
Smoked pork chops 6–8
Lamb stew 12–16
Spring chicken 60–70
Roulade of turkey 12–15
Turkey breast 4–6
Cross rib, covered with water 130–140
Beef stew 105–115
Whole chicken, covered with water 80–90
Boiled beef 110–120
Cooking time

Steam cooking
50
Sausage
Settings
MasterChef | Sausage | ... | Steam Cooking
or
Steam Cooking
Temperature: 195°F / 90°C
Duration: see chart
Sausage Cooking
time in
m
inutes
Boiled sausage 6–8
Pork sausage 6–8
Veal sausage 6–8
Cooking time
Fish
Fresh food
Prepare fresh fish in the usual way, i.e.
clean, gut and filet.
Frozen food
Frozen fish should be slightly defrosted
befor
e cooking.
Preparing for use
Add some lemon or lime juice to fish
befor
e cooking. The citric acid helps
the flesh stay firm.
It is not necessary to season fish when
cooking with steam as this method re‐
tains the minerals which give the fish its
unique flavor.
Cooking pans
If using a perforated pan, grease it first.
Shelf level
When cooking fish in a perforated con‐
tainer at the same time as cooking oth‐
er types of food in other containers,
place the
container with the fish directly
above the tray to catch any liquid and
so avoid any transfer of tastes to other
food.

Steam cooking
51
Temperature
185° F – 195° F / 85° C – 90° C
F
or gently cooking delicate types of
fish, such as sole.
212° F / 100 °C
F
or cooking firmer types of fish, e.g.
cod and salmon.
Also for cooking fish in sauce or stock.
Cooking duration
The cooking duration depends on the
thickn
ess and the consistency of the
food, and not on the weight.
The longer fish cooks, the firmer its
flesh will become. Use the cooking du‐
r
ations given in the chart. If you find
that the fish is not cooked sufficiently
only cook it for a few minutes more.
When cooking fish in sauce or stock,
we recommend that you increase the
cooking duration quoted by a few mi‐
nutes.
Tips
– Adding herbs and spices, such as
dill, will help bring out the full flavor of
the fish.
– Cook large fish in the swimming posi‐
tion
. To help maintain the shape of
the fish, place a small cup or similar
upside down in the cooking pan, and
arrange the fish bellyside down over
the cup.
– You can use any fish scraps, e.g. fish
heads, bones, tails etc t
o make a fish
stock. Place the fish scraps together
with some mixed vegetables in a sol‐
id cooking pan and add cold water.
Cook at 212°F / 100°C for 60 to 90
minutes. The longer the cooking du‐
ration, the stronger the stock.
– Blue fish is fish which is co
oked in
water and vinegar. It is important not
to damage the skin of the fish. This
method is suitable for cooking carp,
trout, tench, eel, and salmon. (Follow
recipe instructions for the ratio of wa‐
ter to vinegar).
Settings
MasterChef | Fish | ... | Steam Cooking
or
Steam Cooking
T
emperature: see chart
Duration: see chart

Steam cooking
52
The durations given in the chart are guidelines for fresh fish. We recommend se‐
lecti
ng the shorter cooking duration quoted to start with. If the fish is not cooked
sufficiently after the shorter time, it can be put back in the steam oven and cooked
some more.
Fish
[°F / °C]
Cooking time
in min
utes
Eel 212 / 100 5–7
Perch filet 212 / 100 8–10
Mahi Mahi filet 185 / 85 3
Trout, 1/2 lb (250 g) 195 / 90 10–13
Halibut filet 185 / 85 4–6
Cod filet 212 / 100 6
Carp, 3 lbs (1.5 kg) 212 / 100 18–25
Salmon filet 212 / 100 6–8
Salmon steak 212 / 100 8–10
Rainbow trout 195 / 90 14–17
Pangasius filet 185 / 85 3
Ocean Perch filet 212 / 100 6–8
Haddock filet 212 / 100 4–6
Flounder filet 185 / 85 4–5
Monkfish filet 185 / 85 8–10
Sole filet 185 / 85 3
Turbot filet 185 / 85 5–8
Tuna filet 185 / 85 5–10
Pike Perch filet 185 / 85 4
T
emperature / Cooking duration

Steam cooking
53
Shellfish
Preparation
Defrost frozen shellfish before cooking with steam.
Peel, clean and wash the shellfish.
Cooking pan
If using a perforated pan, grease it first.
Cooking duration
The longer shellfish are cooked, the tougher they become. Use the cooking dura‐
tion
s given in the chart.
When cooking shellfish in sauce or stock, we recommend that you increase the
cooki
ng duration quoted by a few minutes.
Settings
MasterChef | Shellfish | ... | Steam Cooking
or
Steam Cooking
T
emperature: see chart
Duration: see chart
[°F / °C]
Cooking time
in min
utes
Shrimp 195 / 90 3
Small shrimp 195 / 90 3
King prawns 195 / 90 4
Crab 195 / 90 3
Crayfish 200 / 95 10–15
Large shrimp 195 / 90 3
T
emperature / Cooking duration

Steam cooking
54
Mussels
Fresh food
W
arning - danger of food poisoning.
Only cook mussels which are closed. Do not eat mussels which have not
opened after being cooked.
Steep fresh mussels in water for a few hours before cooking to rinse out any sand.
Then scrub the mussels thoroughly to clean them.
Frozen food
Defrost frozen mussels before cooking.
Cooking duration
The longer mussels are cooked, the tougher they become. Use the cooking dura‐
tion
s given in the chart.
Settings
MasterChef | Mussels | ... | Steam Cooking
or
Steam Cooking
T
emperature: see chart
Duration: see chart
[°F / °C]
Cooking time
in min
utes
Barnacles 212 / 100 2
Cockles 212 / 100 2
Bearded mussels 195 / 90 12
Scallops 195 / 90 5
Razor clams 212 / 100 2–4
Clams 195 / 90 4
T
emperature / Cooking duration

Steam cooking
55
Rice
Rice swells when cooked and needs to be cooked in liquid. The proportion of rice
t
o liquid will vary depending on the type of rice.
The rice absorbs all the liquid. Therefore none of the nutrients are lost.
Settings
MasterChef | Rice | ... | Steam Cooking
or
Steam Cooking
Temperature: 212°F / 100°C
Duration: see chart
Ratio
Rice t
o liquid
[min]
Basmati rice 1 : 1.5 15
Parboiled rice 1 : 1.5 23–25
Round grain rice
Pudding rice
Risotto rice
1 : 2.5
1 : 2.5
30
18–19
Brown rice 1 : 1.5 26–29
Wild rice 1 : 1.5 26–29
Cooking time

Steam cooking
56
Pasta
Dry pasta
Dry pasta swell when cooked and needs to be cooked in liquid. The liquid must
cover the pasta. Using
hot liquid gives better results.
Increase the cooking time stated by the manufacturer by approx. ¹/₃.
Fresh food
Fresh noodles and pasta, for example, from the store refrigerator, do not swell.
F
resh pasta should be cooked in a greased perforated pan.
Separate any pieces of pasta which have stuck together and spread them out in
the cooking pan.
Settings
MasterChef | Pasta | ... | Steam Cooking
or
Steam Cooking
T
emperature: 212°F / 100°C
Duration: see chart
Fresh food Cooking time in mi‐
nu
tes
Gnocchi 2
Round Knoepfli 1
Ravioli 2
Spaetzle 1
Tortellini 2
Dry pasta,
cover
ed with water
Flat pasta 14
Soup pasta 8
Cooking time

Steam cooking
57
Dumplings
Ready-made dumplings in wrappers need to be covered completely with water.
O
therwise they will not absorb enough water and will fall apart, even if steeped in
water prior to cooking.
Cook fresh dumplings in a greased, perforated container.
Settings
MasterChef | Pasta | ... | Steam Cooking
or
Steam Cooking
T
emperature: 212°F / 100°C
Duration: see chart
Cooking time in mi‐
nu
tes
Steamed dumplings 30
Yeast dumplings 20
Boil-in-the-bag potato dumplings 20
Boil-in-the-bag bread dumplings 18–20
Cooking time

Steam cooking
58
Grains
Grain swells when cooked and needs to be cooked in liquid. The proportion of
gr
ain to liquid will vary depending on the type of grain.
Grain can be cooked whole or cracked.
Settings
MasterChef | Grain | ... | Steam Cooking
or
Steam Cooking
Temperature: 212°F / 100°C
Duration: see chart
Ratio
Gr
ain to liquid
Cooking time
in min
utes
Amaranth 1 : 1.5 15–17
Bulgur 1 : 1.5 9
Green spelt, whole 1 : 1 18–20
Green spelt, cracked 1 : 1 7
Oats, whole 1 : 1 18
Oats, cracked 1 : 1 7
Millet 1 : 1.5 10
Polenta 1 : 3 10
Quinoa 1 : 1.5 15
Rye, whole 1 : 1 35
Rye, cracked 1 : 1 10
Wheat, whole 1 : 1 30
Wheat, cracked 1 : 1 8
Cooking time

Steam cooking
59
Legumes
Soak legumes for at least 10 hours in cold water before cooking. Soaking makes
the leg
umes more digestible and shortens the cooking duration required. Soaked
legumes must be covered with liquid during cooking.
Lentils
do not need to be soaked before cooking.
With unsoaked legumes, a certain ratio of pulses to liquid is required depending
on type.
Settings
MasterChef | Legumes | ... | Steam Cooking
or
Steam Cooking
T
emperature: 212°F / 100°C
Duration: see chart
Soaked
Cooking time in mi‐
nu
tes
Beans
Kidney beans 55–65
Azuki beans 20–25
Black beans 55–60
Pinto beans 55–65
White beans 34–36
Peas
Yellow peas 40–50
Green peas, shelled 27
Cooking time

Steam cooking
60
Unsoaked
Ratio
L
egumes to liquid
Cooking time
in min
utes
Beans
Kidney beans 1 : 3 130–140
Azuki beans 1 : 3 95–105
Black beans 1 : 3 100–120
Pinto beans 1 : 3 115–135
White beans 1 : 3 80–90
Lentils
Brown lentils 1 : 2 13–14
Red lentils 1 : 2 7
Peas
Yellow peas 1 : 3 110–130
Green peas, shelled 1 : 3 60–70
Cooking time

Steam cooking
61
Eggs
Use a perforated container to prepare boiled eggs in the steam oven.
The eggs do not need to be pierced before cooking as they are gradually warmed
duri
ng the preheating phase and so do not burst when they are cooked with
steam.
When using a solid container for making egg dishes such as scrambled eggs, re‐
mem
ber to grease it first.
Settings
MasterChef | Eggs | ... | Steam Cooking
or
Steam Cooking
T
emperature: 212°F / 100°C
Duration: see chart
Cooking time in mi‐
nu
tes
Small
soft
medium
har
d
3
5
9
Medium
soft
medium
har
d
4
6
10
Large
soft
medium
har
d
5
6–7
12
Extra large
soft
medium
har
d
6
8
13
Cooking time

Steam cooking
62
Fruit
Cook fruit in a solid container so that none of the juice is lost. If you wish to cook
fruit in a per
forated container, place a solid container directly underneath it to col‐
lect the juice.
Tip: Y
ou can use the collected juice to prepare a glaze.
Settings
MasterChef | Fruit | ... | Steam Cooking
or
Steam Cooking
T
emperature: 212°F / 100°C
Duration: see chart
Cooking time in mi‐
nu
tes
Apple chunks 1–3
Pears chunks 1–3
Cherries 2–4
Mirabelle plums 1–2
Nectarine / Peach chunks 1–2
Plums 1–3
Quince, diced 6–8
Rhubarb pieces 1–2
Gooseberries 2–3
Cooking time

Steam cooking
63
Menu Cooking - Manual
Before cooking meals with the "Menu
C
ooking" function, turn off the steam
reduction system (see "Settings").
"Menu Cooking" is intended for cook‐
ing a whole meal containing types of
fo
od which have different cooking dura‐
tions, e.g., fish filet with rice and broc‐
coli. Each dish is placed in the oven at
different times so that they are all ready
at the same time.
Shelf level
When cooking fish or food with a dis‐
tinctive color (e.g. beetroot) in a perfo‐
rated container, place the perforated
container directly above the drip tray /
universal tray (depending on model) to
avoid any transfer of flavor or color to
other food and to prevent liquid drip‐
ping onto food below it.
Temperature
Whole meals should be cooked at a
temperature of 212°F / 100°C as this is
the temperature required to cook the
majority of foods.
Do not cook a whole meal at the lowest
temperature when different tempera‐
tures are required for different types of
food, e.g. 185°F / 85°C for seabream
and 212°F / 100°C for potatoes.
If the recommended cooking tempera‐
tur
e for the food is 185°F / 85°C, for ex‐
ample, try cooking it at 212°F / 100°C
and testing the result. Some delicate
types of fish with a soft structure, e.g.
sole and plaice will become very firm
when cooked at 212°F / 100°C.
Cooking duration
If you are increasing the recommended
t
emperature, shorten the cooking dura‐
tion by approx. ¹/₃.
Example
Rice 20 minutes
Tilapia filet 6 minutes
Broccoli 4 minutes
20 minutes minus 6 minutes = 14 mi‐
nut
es (first cooking duration: rice)
6 minutes minus 4 minutes = 2 minutes
(second coo
king duration: tilapia filet)
Time left = 4 minutes (third cooking du‐
ration: broccoli)
Cook‐
ing du‐
r
ations
20 min. - rice
6 min. - tilapia fil‐
et
4 min. -
br
occoli
Setting 14 min. 2 min. 4 min.

Steam cooking
64
Method
Plac
e the rice in the steam oven first.
Set the first coo
king duration: 14 mi‐
nutes.
Aft
er 14 minutes, place the tilapia in
the steam oven.
Set the seco
nd cooking duration: 2
minutes.
Aft
er 2 minutes, place the broccoli in
the steam oven.
Set the thir
d cooking duration: 4 mi‐
nutes.

Special modes
65
Reheat
The steam oven is very effective at re‐
heating f
ood gently, without drying it
out or cooking it further. The food re‐
heats evenly and does not need to be
stirred during the reheating process.
You can reheat individual dishes or
plat
ed meals which have been prepared
previously (e.g. meat, vegetables and
potatoes).
Suitable containers
Small quantities can be reheated on a
p
late, larger quantities should be
placed in a cooking pan.
Duration
The number of plates or containers has
no bearin
g on the duration.
The durations listed in the chart relate
t
o an average portion per plate/contain‐
er. Increase the duration for larger
quantities.
Tips
– Do not reheat large items, such as a
jo
int of roast meat, whole. Divide it
into portions and reheat these as
plated meals.
– Compact items, such as stuffed pep‐
pers or r
oulades, should be cut in
half.
– Please note that breaded items will
not r
etain their crispness when they
are reheated.
– Reheat sauces separately, except for
dishes such
as stew and casseroles
where the sauce is part of the dish.
Method
Co
ver the food with a deep plate, a
lid, or with foil that is resistant to tem‐
peratures up to 212°F / 100°C and to
steam.
Th
en place the plate on the rack in
the oven.
Settings
Special Modes | Reheat
or
Steam Cooking
Temperature: 212°F / 100°C
Dur
ation: see chart
Cooking
time in
m
inutes
Side dishes (pasta, rice,
etc.)
8–10
Casserole 8–10
Fish filet 6–8
Meat 8–10
Poultry 8–10
Vegetables 8–10
Soup 8–10
Plated meals 8–10
d
uration

Special modes
66
Defrost
It is much quicker to defrost food in the
st
eam oven than at room temperature.
Temperature
140°F / 60°C is the best temperature for
defr
osting.
Exception: 122°F / 50°C for minced
meat and game
Before and after defrosting
Remove all packaging before defrost‐
ing.
Ex
ceptions: Leave bread and baked
goods in their packaging as otherwise
they will absorb moisture and become
soft.
Allow defrosted food to stand at room
t
emperature after removing it from the
oven. The standing time is necessary to
allow the even distribution of heat.
Cooking pan
Danger of salmonella poisoning.
Do not use the liquid from defrosted
meat or poultry. Dispose and wash
the container, the sink and your
hands.
Use a perforated container with a solid
conta
iner underneath it when defrosting
food which will drip, such as poultry.
This way food will not be lying in de‐
frosted liquid.
Foods which don't drip can be defrost‐
ed in a solid cooking pan.
Tips
– Fish does not need to be fully de‐
fr
osted before cooking. Defrost so
that the surface is sufficiently thawed
to take herbs and seasoning. De‐
pending on the thickness of the fish,
2–5 minutes should be enough.
– When defrosting food which has fro‐
z
en together, e.g. berries, chops, fish
filets etc. separate it about half-way
through the defrosting time.
– Do not refreeze food once it has
thawed.
– Defrost frozen ready meals according
t
o the instructions on the packaging.
Settings
Special Modes | Defrost
or
Steam Cooking
Temperature: see chart
Defr
osting duration: see chart

Special modes
67
Food to be defrosted Quantity
[°F / °C]
Cooking
time in mi‐
nu
tes
Standing
time in mi‐
nut
es
Dairy products
Sliced cheese 125 g/1/4 lb. 140 / 60 15 10
Quark 1/2 lb / 250 g 140 / 60 20–25 10–15
Cream 1/2 lb / 250 g 140 / 60 20–25 10–15
Soft cheese 100 g/3.5 oz. 140 / 60 15 10–15
Fruit
Apple sauce 1/2 lb / 250 g 140 / 60 20–25 10–15
Apple chunks 1/2 lb / 250 g 140 / 60 20–25 10–15
Apricots 1 lb / 500 g 140 / 60 25–28 15–20
Strawberries 10.6 oz / 300 g 140 / 60 8–10 10–12
Raspberries / Black currants 10.6 oz / 300 g 140 / 60 8 10–12
Cherries 5.3 oz / 150 g 140 / 60 15 10–15
Peaches 1 lb / 500 g 140 / 60 25–28 15–20
Plums 1/2 lb / 250 g 140 / 60 20–25 10–15
Gooseberries 1/2 lb / 250 g 140 / 60 20–22 10–15
Vegetables
Frozen in a block 10.6 oz / 300 g 140 / 60 20–25 10–15
Fish
Fish filets 14 oz / 400 g 140 / 60 15 10–15
Trout 1 lb / 500 g 140 / 60 15–18 10–15
Lobster 300 g/10.6 oz. 140 / 60 25–30 10–15
Shrimp 10.6 oz / 300 g 140 / 60 4–6 5
Ready meals
Meat, vegetables, side
dishes / st
ew / soup
17 oz / 480 g 140 / 60 20–25 10–15
Meat
Roast meat, sliced 4.4-5.3 oz. /
125–150 g each
140 / 60 8–10 15–20
Ground meat 1/2 lb / 250 g 125 / 50 15–20 10–15

Special modes
68
Food to be defrosted Quantity
[°F / °C]
Cooking
time in mi‐
nu
tes
Standing
time in mi‐
nut
es
Ground meat 1 lb / 500 g 125 / 50 20–30 10–15
Stew 1 lb / 500 g 140 / 60 30–40 10–15
Stew 2 lbs / 1000 g 140 / 60 50–60 10–15
Liver 1/2 lb / 250 g 140 / 60 20–25 10–15
Saddle of hare 1 lb / 500 g 125 / 50 30–40 10–15
Saddle of venison 2 lbs / 1000 g 125 / 50 40–50 10–15
Cutlets / chops / sausage 28 oz / 800 g 140 / 60 25–35 15–20
Poultry
Chicken 2 lbs / 1000 g 140 / 60 40 15–20
Chicken thighs 5.3 oz / 150 g 140 / 60 20–25 10–15
Chicken filet 1 lb / 500 g 140 / 60 25–30 10–15
Turkey drumsticks 1 lb / 500 g 140 / 60 40–45 10–15
Baked goods
Puff pastries / Yeast baked
goods
– 140 / 60 10–12 10–15
Cakes and cookies 14 oz / 400 g 140 / 60 15 10–15
Bread / Rolls
Rolls – 140 / 60 30 2
Rye bread, sliced 1/2 lb / 250 g 140 / 60 40 15
Whole grain bread, sliced 1/2 lb / 250 g 140 / 60 65 15
White bread, sliced 5.3 oz / 150 g 140 / 60 30 20
T
emperature / Duration / Standing time

Special modes
69
Canning
Only use unblemished, fresh produce
which is in good condition.
Glass jars
Use clean glass jars and accessories
and check them for any defects. Glass
jars with twist off lids or glass lids with
a rubber seal ar
e suitable.
Make sure that all the glass jars are the
same siz
e so that bottling is carried out
evenly.
After you have filled the jars with the
bottled pr
oduce, clean the glass rims
with a clean cloth and hot water and
then seal the jars.
Fruit
Sort fruit carefully, rinse it briefly but
thor
oughly and allow it to drain. Take
great care when cleaning soft fruit as it
is very delicate.
Remove any peel, stalks, cores or pits.
Cut up lar
ge fruit. For example, cut ap‐
ples into slices.
If you are bottling fruit with pits (e.g.
plums, apricots) without r
emoving the
pits, pierce the fruit several times with a
fork or wooden skewer as otherwise it
will burst.
Vegetables
Rinse, clean and cut up vegetables.
Vegetables should be blanched before
bottling
to help them retain their color
(see "Blanching").
Fill volume
Fill the glass jars with produce up to a
maximum of 1 1/4" (3 cm) below the
rim. Do not pack down as this would
d
amage the cell walls of the produce.
Bang the jar gently on a cloth to help
distribute the contents evenly.
Use a sugar solution for fruit and a salt
or vinegar solution for vegetables.
Meat and sausage
Briefly fry or cook the meat before bot‐
tling. Use the juices with some added
wat
er, or the broth in which the meat
was cooked, as the liquid content of the
jars. Make sure there is no grease on
the rim of the jars.
When bottling sausage, only fill the jars
to halfway as the meat will rise during
the bottling process.
Tips
– Make use of residual heat by leaving
the jars in
the oven for 30 minutes af‐
ter it has switched off.
– Then cover the jars with a cloth and
all
ow to cool for approx. 24 hours.
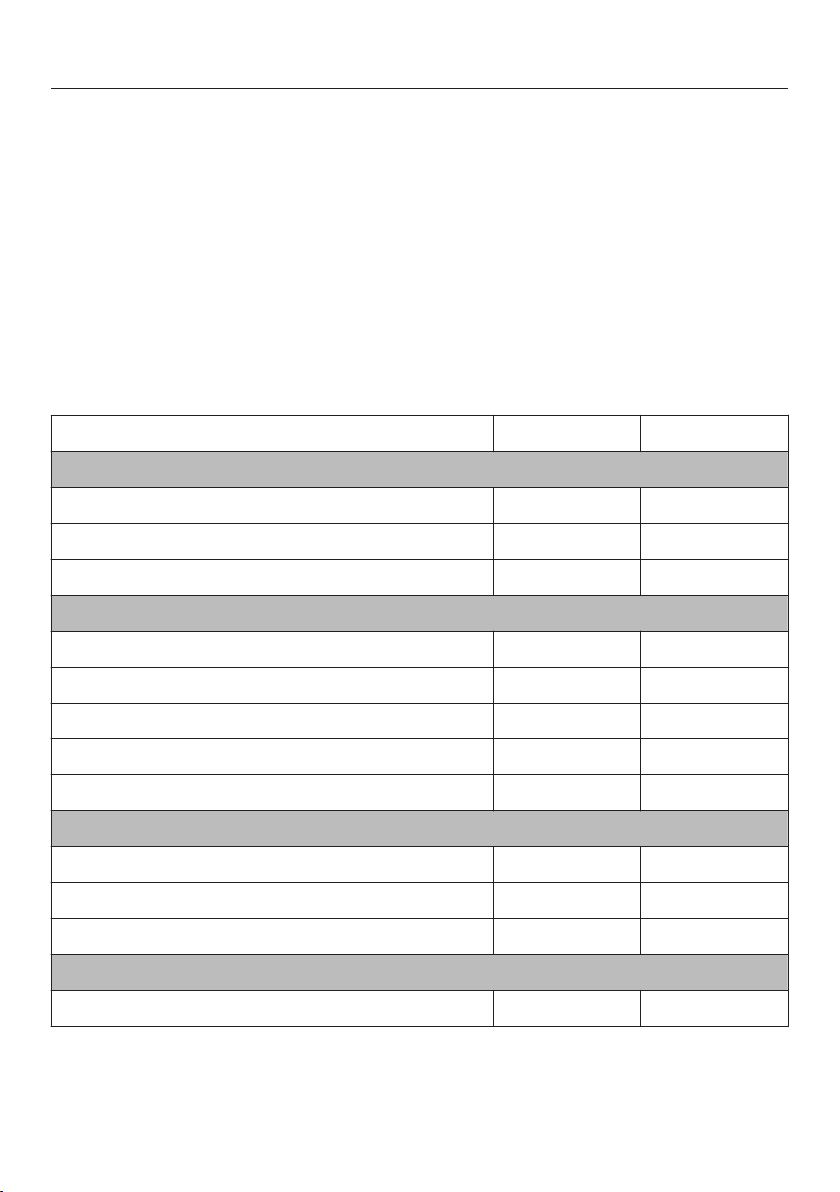
Special modes
70
Method
Place the rack on the lowest shelf level.
Place the jars on the rack (all the same size). Ensure that they do not touch one
anothe
r.
Settings
Special Modes | Canning
or
Steam Cooking
Temperature: see chart
Bottling duration: see chart
Canned goods
[°F / °C] * [min]
Berries
Currants
175 / 80 50
Gooseberries
175 / 80
55
Cranberries
175 / 80
55
Fruit with stones
Cherries 185 / 85 55
Mirabelle plums 185 / 85 55
Plums 185 / 85 55
Peaches 185 / 85 55
Greengage plums 185 / 85 55
Fruit with pips
Apples 195 / 90
50
Apple sauce 195 / 90 65
Quinces 195 / 90 65
Vegetables
Beans 212 / 100 120

Special modes
71
Canned goods
[°F / °C] * [min]
Broad beans 212 / 100 120
Gherkins 195 / 90 55
Beetroot 212 / 100
60
Meat
Pre-cooked 195 / 90
90
Roasted 195 / 90
90
Temperature / Duration
* The durations quoted are for 1.0 liter /1 qt. jars. If using 0.5 liter/1 pt. jars, reduce the dura‐
tion by about 15 minut
es. If using 0.25 liter/1 cup jars, reduce the duration by about 20 mi‐
nutes.

Special modes
72
Juicing
This appliance is ideal for extracting
ju
ice from soft, firm and hard fruit.
It is best to use overripe fruit, as the rip‐
er the
fruit the greater the quantity of
juice produced. Very ripe fruit will also
produce a more intense flavor.
Preparation
Sort and rinse the fruit. Cut out any
blemishes.
Remove the stalks from grapes and
cherri
es as these are bitter. The stalks
do not need to be removed from ber‐
ries.
Cut larger fruit into chunks approx. 1" (2
cm) in siz
e. The harder the fruit the
smaller the pieces should be.
Tips
– Try experimenting with mild and tart
flavors.
– The juice quantity and aroma are im‐
pr
oved if sugar is added to the fruit
and is allowed to soak in for several
hours. We recommend 1/4 - ½ cup
(50-100 g) sugar per 2 lbs (1 kg) of
sweet fruit and ½ - 3/4 cup (100-150
g) sugar for 2 lbs (1 kg) tangy fruit.
– If you wish to bottle the juice rather
than co
nsume it straight away, while
still hot pour it into clean bottles and
seal immediately.
Method
P
ut the prepared fruit (cleaned, wash‐
ed, chopped etc.) into a perforated
cooking pan.
Place
a solid pan or the drip tray un‐
derneath to catch the juice.
Settings
Steam Cooking
T
emperature: 215°F / 100°C
Duration: 40–70 minutes

Special modes
73
Menu Cooking
You can cook up to three different types
of food, e.g. fish with a side dish and
vegetables.
The food can be select
ed in any order
you like. The appliance will automatical‐
ly sort them out in order of cooking du‐
ration required. The one with the lon‐
gest duration goes in the oven first.
The Ready at and Start at f
unctions are
not available for "Menu Cooking."
Method
T
urn the steam oven on.
Fi
ll the water container and push it
back in so that it engages.
The
n place the drip tray / universal
tray (depending on model) in the ap‐
pliance.
Select Special Modes | Menu Cooking
Select the type of food.
Depending on the food, you will be
ask
ed about the size and the degree of
doneness.
Selec
t or enter the values required
and then confirm your selection with
OK.
Select Add next ingredient.
Selec
t the food you want and pro‐
ceed in the same way as with the first
ingredient.
Repeat the pr
ocedure, if necessary,
for the third ingredient.
After you have confirmed Start Menu
Cooking, the display will t
ell you which
food to put in the oven. At the end of
the preheating phase, the display will
show when the ne
xt food type is to be
placed in the oven. When the time for
the next food type to be placed in the
oven is reached, the display will show
the food type and the shelf runner. This
process will be repeated for the third
food type.
You can still cook food types not listed
on the display t
ogether. See "Menu
Cooking - manually" for details on
how to do this.

Special modes
74
Making Yogurt
To make yogurt, you will need either
fr
esh live yogurt or yogurt culture, ob‐
tainable from health food stores.
Use natural yogurt with live culture and
without additives. Do not use heat-
tr
eated yogurt.
The yogurt must be fresh (short storage
time).
You can use either pasteurized or fresh
whole mil
k. Pasteurized milk can be
used without any further treatment.
Fresh milk must first be heated to
195° F / 90° C (not boiled!) and then
cooled down to 95° F / 35° C. Fresh
milk will give a firmer yogurt than long-
life milk.
The yogurt and milk should have the
same per
centage fat.
Do not move or shake the jars while the
yogu
rt is thickening.
After preparing the yogurt, it must be
immediat
ely placed in the refrigerator to
cool down.
The firmness, fat content and cultures
used in the yogu
rt starter all affect the
consistency of homemade yogurt. Not
all yogurts are equally suitable as yo‐
gurt starters.
Possible causes for poor results
Yogurt is not set:
Incorr
ect storage of the yogurt starter,
too much time out of the refrigerator,
packaging was damaged, milk was in‐
sufficiently heated.
Liquid has not been removed:
Jars wer
e moved, yogurt was not
cooled down quickly enough.
Yogurt is grainy:
Milk was overh
eated or in poor condi‐
tion, milk and starter yogurt not evenly
stirred.
Tip: When usi
ng yogurt enzyme, yogurt
can be made from a milk / cream mix‐
ture. Mix ³/₄ liter/3 cups milk with ¹/₄ li‐
ter/1 cup cream.

Special modes
75
Method
Mix ½ cup (100 g) yog
urt with 4 cups
(1 liter) of milk or make up the mixture
with yogurt starter powder, following
the instructions on the packaging.
P
our the mixture into glass jars and
seal them.
Place the sealed jars in a cooking
pan. Ensur
e that they do not touch
one another.
Immediat
ely after the yogurt has
been made, place the jars in the re‐
frigerator, taking care not to move
them unnecessarily.
Settings
MasterChef | Special | Make Yogurt
or
Steam Cooking
T
emperature: 105°F / 40°C
Duration: 5 hours
Proofing
Method
P
repare the dough according to the
recipe.
Plac
e the dough in a covered bowl
on the rack.
Settings
Special Modes | Proof
Dur
ation: as per recipe instructions
or
Steam Cooking
T
emperature: 105°F / 40°C
Duration: as per recipe instructions

Special modes
76
Dissolving Gelatine
Method
Gelatine sheets: Complet
ely cover
the gelatine sheets with cold water
and leave to soak for 5 minutes. Re‐
move the gelatine sheets from the
bowl and squeeze them out. Empty
the bowl. Place the squeezed gelat‐
ine sheets back in the bowl.
Gelatine powder: Place the gelatine
p
owder in a bowl and add water ac‐
cording to the instructions on the
packaging.
Cover the bowl and place on the
rack.
Settings
MasterChef | Special | Dissolve Gelatine
or
Steam Cooking
T
emperature: 195°F / 90°C
Duration: 1 minute
Melting Chocolate
You can use the steam oven for melting
any type of choco
late.
Method
Br
eak the chocolate into small
pieces. Leave chocolate cake cover‐
ing in its packaging, and place in a
perforated cooking pan.
Place
large quantities in a solid con‐
tainer and small quantities in a cup or
a bowl.
Cover the container or the dish with a
lid or with foil tha
t is resistant to tem‐
peratures up to 212°F / 100°C and to
hot steam.
S
tir large quantities once during
cooking.
Settings
MasterChef | Special | Melt Chocolate
or
Steam Cooking
T
emperature: 150°F / 65°C
Duration: 20 minutes

Special modes
77
Skinning Fruits and Vegetables
Method
Cut a cr
oss in the top of tomatoes,
nectarines etc. This will allow the peel
to be removed more easily.
Place
the food in a perforated con‐
tainer.
F
or almonds, it is important to plunge
them into cold water as soon as they
are taken out of the oven otherwise
the skin cannot be removed.
Settings
Steam Cooking
T
emperature: 212°F / 100°C
Duration: see chart
Food Duration in mi‐
nut
es
Apricots 1
Almonds 1
Nectarines 1
Bell Peppers 4
Peaches 1
Tomatoes 1
d
uration
Preserving Apples
You can treat homegrown apples in the
st
eam oven to increase the length of
time for which you can store them.
Once treated, the apples will keep for 5
to 6 months when stored in a dry, cool
and well-ventilated place. This method
is only suitable for apples and not for
other types of fruit.
Settings
MasterChef | Fruit | Apples | Whole | Pre-
serving
or
Steam Cooking
Temperature: 125°F / 50°C
Duration: 5 minutes

Special modes
78
Blanching
Blanch fruit and vegetables before
fr
eezing them. Blanching helps maintain
the quality of the produce when it is fro‐
zen.
Blanching vegetables also helps them
r
etain their original color.
Method
P
ut the prepared vegetables
(cleaned, washed, chopped etc.) into
a perforated cooking pan.
Once blanched, plunge the vegeta‐
bles int
o ice cold water to cool them
down quickly. Drain them well.
Settings
Special Modes | Blanching
or
Steam Cooking
T
emperature 212°F / 100°C
Duration: 1 minute
Sweating Onions
Sweating means cooking the onions in
their own juices, with the addition of a
little fat if necessa
ry.
Method
Cut the o
nions up into small pieces
and place them in a solid cooking
pan with a little butter.
Cover the container or the dish with a
lid or with foil tha
t is resistant to tem‐
peratures up to 212°F / 100°C and to
hot steam.
Settings
MasterChef | Special | Steam Onions
or
Steam Cooking
T
emperature: 212°F / 100°C
Duration: 4 minutes

Special modes
79
Rendering Fat
The bacon will not become brown.
Method
Plac
e the bacon (diced or rashers) in
a solid cooking pan.
Cover the container with a lid or with
foil
that is temperature resistant up to
212°F / 100°C and to steam.
Settings
MasterChef | Special | Render Fat
or
Steam Cooking
T
emperature: 212°F / 100°C
Duration: 4 minutes
Sanitizing Cookware
The steam oven will sanitize baby bot‐
tles and other co
okware. Check before‐
hand that the manufacturer guarantees
all components are to be heat resistant
to 212° F / 100 °C and also steam re‐
sistant follow manufacturers instruc‐
tions.
Dismantle, clean and thoroughly rinse
baby bottles. Reassemble the bottles
onl
y after they have completely dried.
This prevents recontamination.
Method
Plac
e the individual parts in a perfo‐
rated cooking pan, ensuring that they
do not touch one another (on their
sides or with the opening facing
downwards). This will allow the steam
to reach the parts from all sides.
Place the cooking pan on the lowest
shelf level.
Settings
Special Modes | Sanitize Cookware
Dur
ation: 1 minute to 10 hours
or
Steam Cooking
212°F / 100°C
Dur
ation: 15 minutes

Special modes
80
Heating Damp Towels
Method
Moi
sten the towels and then roll them
up.
Place them beside one another in a
per
forated cooking pan.
Settings
MasterChef | Special | Heat Damp Towels
or
Steam Cooking
T
emperature: 160°F / 70°C
Duration: 2 minutes
Decrystallizing Honey
Method
L
oosen the lid and place the jar of
honey in a perforated cooking pan.
S
tir the honey once during the cook‐
ing procedure.
Settings
MasterChef | Special | Decrystallize Honey
or
Steam Cooking
T
emperature: 140°F / 60°C
Duration: 90 minutes (irrespective of the
size of jar or the amount of honey in the
jar)
Preparing Custard Royale
Method
Mix 6 eggs with 1/2 cups / 375 ml
milk (do not beat until foamy).
Seaso
n the egg/milk mixture and
pour into a solid cooking pan greased
with butter.
Settings
Steam Cooking
T
emperature: 212°F / 100°C
Duration: 4 minutes

Settings
81
Accessing the "Settings" menu
Select Settings .
A list of settings will appear in the dis‐
play
.
They can be checked and changed, if
needed.
A check next to an option shows
which setting is active.
Settings cannot be altered while a
coo
king program is in progress.
Changing and saving settings
Select Settings .
Scr
oll through the list until the de‐
sired setting appears.
T
ouch the sensor next to the setting.
The desired setting may appear in a
sub menu.
Change the setting.
Confirm with OK.
T
ap "Back" until the main menu ap‐
pears or select another setting.

Settings
82
Settings overview
Option Available settings
Language ... / deutsch / english / ...
Country
Time Show
On
/ Off * / Night Dimming
Clock Format
24 h / 12 h *
Set
Date
Lighting On
/ On for 15 Seconds *
Display Brightness
Audible tone information Melody
Solo Tone
Keypad Tone
Units of Measurement Weight
g
* / lb / lb/oz
Temperature
°C * / °F
Keeping Warm On / Off *
Steam Reduction On * / Off
Default Temperature
Safety System Lock
On
/ Off *
Sensor Lock
On / Off *
Water Hardness Soft
Medium
Hard *
Showroom Program Demo Mode
On
/ Off *
Factory Default Settings
Favorites
Default Temperature
* Factory default

Settings
83
Language
The desired country and language can
be set.
After selecting and confirming your
choi
ce, the language selected will ap‐
pear in the display.
Tip: If you accidently select a language
you do not understand, select the
symbol t
o return to the submenu.
Time of day
Display
Select how you would like the time of
day to show on the display when the
steam oven is turned off:
– On
The time of day will always appear in
the display
. To turn the lighting on
and off or use the touch the rele‐
vant sensor.
– Off
The display is turned off to save en‐
er
gy. The steam oven has be to be
turned on before you can use it. This
also applies when using the light
and timer functions.
– Night Dimming
To save energy, the time is only visi‐
ble on the display between 5:00 am
and 11:00 pm.
The rest of the time it
is not visible.
Clock format
You can select the clock format for the
time of day:
– 24 h
The time of day is shown in a 24 hour
clock format.
– 12 h
The time of day is shown in a 12 hour
clock format.
Set
Set the hours and the minutes.
If there is an interruption to the power
supply,
the current time of day will re‐
appear once power has been re‐
stored. The time is stored in memory
for about 200 hours.

Settings
84
Date
Set the date.
When the steam oven is turned off,
the dat
e will only appear on the dis‐
play if the Time | Show | On is selected.
Lighting
– On
The interior lighting is turned on dur‐
ing the en
tire cooking period.
– On for 15 Seconds
The oven lighting turns off 15 sec‐
onds after a program starts. Touch‐
ing turns it on for another 15 sec‐
onds.
Display brightness
The display brightness is represented
by a bar with seven segments.
Select Darker or Brighter
to change the
brightness of the display.
Acoustic tone information
Melody
At the end of a process, a melody will
sou
nd several times in intervals.
The volume of the melody is represent‐
ed by a bar with seven segments.
Maximum volume is selected when all
segments are filled. If none of the seg‐
ments are filled, the melody is turned
off.
Select Quieter or Louder,
to adjust the
volume.
Select On
or Off, to turn the melody
on or off.
Solo tone
At the end of a process, a continuous
t
one will sound for period of time.
The pitch of this tone is represented by
a segmen
t bar.
Select Lower or Higher, t
o change the
pitch.

Settings
85
Keypad tone
An audible tone is heard with each
t
ouch of a sensor.
The volume of the keypad tone is repre‐
sent
ed by a bar with seven segments.
Maximum volume is selected when all
segmen
ts are filled. If none of the seg‐
ments are filled, the volume is turned
off.
Select Quieter or Louder,
to adjust the
volume.
Select On or Off, to turn the keypad
tone on or off.
Units of measurement
Weight
– g
The weight of food in MasterChef
pr
ograms is shown in grams.
– lb
The weight of food in MasterChef
pr
ograms is shown in pounds.
– lb
/oz
The weight of food in MasterChef
pr
ograms is shown in pounds and
ounces.
Temperature
– °C
The temperature is displayed in Cel‐
sius.
– °F
The temperature is displayed in Fah‐
r
enheit.

Settings
86
Keeping Warm
Please note that delicate food, espe‐
cially fish, can continue cooking while
being k
ept warm.
– On
The "Keeping Warm" function is acti‐
vat
ed as standard with the Steam
Cooking mode if a minimum tempera‐
ture of about 175°F / 80°C is used for
cooking. If food is not removed from
the steam oven at the end of a pro‐
gram, this function will automatically
start after approx. 5 minutes. Keeping
Warm will appear in the display and
the food will be kept warm for ap‐
prox. 15 minutes at a temperature of
160°F / 70°C. The warming function
is canceled when the illuminated
sensor button or is tapped or
when the door is opened.
– Off
The "Keeping Warm" function is de‐
activat
ed.
Steam Reduction
– On
If a temperature of about 175°F /
80°C was used for cooking, the door
of the st
eam oven will automatically
open slightly shortly before the end
of the cooking duration. This is to
prevent a large amount of steam es‐
caping when the door is opened. The
door will close again automatically.
– Off
If steam reduction is turned off the
Keeping Warm f
unction is also auto‐
matically turned off. If steam reduc‐
tion is turned off a large amount of
steam will escape when the door is
opened.
Default temperatures
If you often cook with temperatures that
differ fr
om the default, it makes sense
to change the default temperatures.
After selecting this option, a list of oven
modes will appear in the display
.
Select the desired mode.
The default temperature is displayed
alon
g with the available temperature
range.
Cha
nge the default temperature.
Confirm with OK.

Settings
87
Safety
System lock
The system lock prevents the appliance
being turned
on by mistake.
The timer can still be used when the
syst
em lock is active.
The system lock will remain activated
even aft
er a power failure.
– On
The system lock is now active. If you
want t
o use the steam oven after ac‐
tivation, press and hold the sensor
button next to OK for at least 6 sec‐
onds.
– Off
The system lock is not active. You
can use the st
eam oven as normal.
Sensor lock
The sensor button lock prevents you
fr
om accidently turning the oven off or
changing a cooking program.
– On
The sensor lock is active. Press and
hold OK f
or at least 6 seconds to use
the sensors again. The sensor lock is
then deactivated for a short period of
time.
– Off
The sensor lock is not active. All sen‐
sors react to touch as normal.
Water hardness
The steam oven is factory set for Hard
wat
er. It must be adjusted to local water
hardness to ensure trouble-free opera‐
tion and to ensure that descaling is car‐
ried out at the correct interval. The
harder the water, the more often it will
need to be descaled.
– Soft
< 8.7 °gr/gal, < 1.5 mmol/l
– Medium
8.7 - 14.6 °gr/gal, 1.5 - 2.5 mmol/l
– Hard
> 14.6 °gr/gal, > 2.5 mmol/l

Settings
88
Showroom Program
This mode enables the oven to be dem‐
onstr
ated in showrooms without heat‐
ing up. It should not be set for domestic
use.
Demo Mode
If demo mode is activated Demo mode
active. The appliance will not heat up will
a
ppear when the steam oven is turned
on.
– On
Press and hold OK for at least 4 sec‐
onds t
o activate demo mode.
– Off
Press and hold OK for at least 4 sec‐
onds t
o deactivate demo mode. The
steam oven can then be used as nor‐
mal.
Factory default
– Settings
Any settings that have been altered
will be r
eset to the factory default
setting.
– Favorites
All Favorites will be deleted.
– Default Temperature
Any default temperatures that have
been chang
ed will reset to the facto‐
ry default settings.

Cleaning and care
89
Important information on
cleaning
and care
Risk of injur
y!
The steam from a steam cleaner
could reach electrical components
and cause a short circuit.
Do not use a steam cleaner to clean
the st
eam oven.
Unsuitable cleaning agents can dis‐
co
lor and damage the surfaces of
the appliance. Only use a solution of
liquid dish soap and warm water ap‐
plied with a soft sponge or cloth.
All surfaces are susceptible to
scr
atching. Scratches on glass surfa‐
ces may cause a breakage.
Immediately remove any residues left
by cleaning agents.
Do not use cleaning agents or dish‐
washing liquids containing aliphatic
hydr
ocarbons as these could cause
the seals to swell.
Disconnect the appliance from the
power supply and allow it to cool
down to a safe temperature before
cleaning.
The appliance and accessories
should be cleaned and dried thor‐
oug
hly after each use.
L
eave the appliance door open until
the oven interior is completely dry.
If the appliance is not going to be
used for a longer period of time, e.g.
while on vacation, it should be thor‐
oug
hly cleaned and dried beforehand
to prevent the build-up of odors, etc.
Leave the door open afterwards.

Cleaning and care
90
Appliance front
To better maintain your appliance
avoid the following:
To avoid damaging surfaces when
cleaning, do not use:
– Cleaners containing soda, ammonia,
thinners, or chlorides
– Descaling agents
– Abrasive cleaning agents (e.g., pow‐
der or cr
eam cleansers, pumice
stones)
– Solvent-based cleaners
– Stainless steel cleaners
– Dishwasher cleaners
– Glass cleaning agents
– Ceramic cooktop cleaners
– Hard, abrasive brushes or sponges
(e.g. pot scrubbers or scrub spong‐
es, sponges which
have previously
been used with abrasive cleaning
agents)
– Eraser sponges
– Sharp metal scrapers
– Steel wool
– Stainless steel spiral pads
– Spot cleaners
– Oven sprays
Cle
an the front with a solution of
warm water and liquid dish soap ap‐
plied with a clean sponge or cloth. A
clean, damp microfiber cloth without
cleaning agent can also be used.
Aft
er cleaning dry the front of the ap‐
pliance with a soft cloth.

Cleaning and care
91
Oven interior
Remove:
– Condensate using a sponge or ab‐
sorbent cloth
– Light, greasy soiling with a sponge
and a solution of liquid dish soap and
ho
t water
After prolonged use, the floor heating
element can become discolo
red.
Disc
oloration of the floor heating ele‐
ment can be removed using the Orig‐
inal Miele ceramic and stainless steel
cleaner (see "Optional accessories").
Aft
er cleaning, wipe with clean water
to remove any detergent residues.
The
n dry the oven interior and the in‐
side of the door with a cloth.
The door seal is design
ed to last the
lifetime of the appliance. Should it for
any reason need replacing please
contact Miele Service (see the end of
these operating instructions).
Automatic door opener
Ensure that the door opener does
no
t become soiled with food resi‐
dues.
Wipe away light soiling immediately
with a clean sponge and a solution of
liquid dish soap and warm water.
Aft
er cleaning, wipe with clean water
to remove any detergent residues.
Water container
Remo
ve and empty the water con‐
tainer after each use.
Remo
ve and empty the water con‐
tainer after each use. Rinse it by hand
and then dry it to prevent limescale.
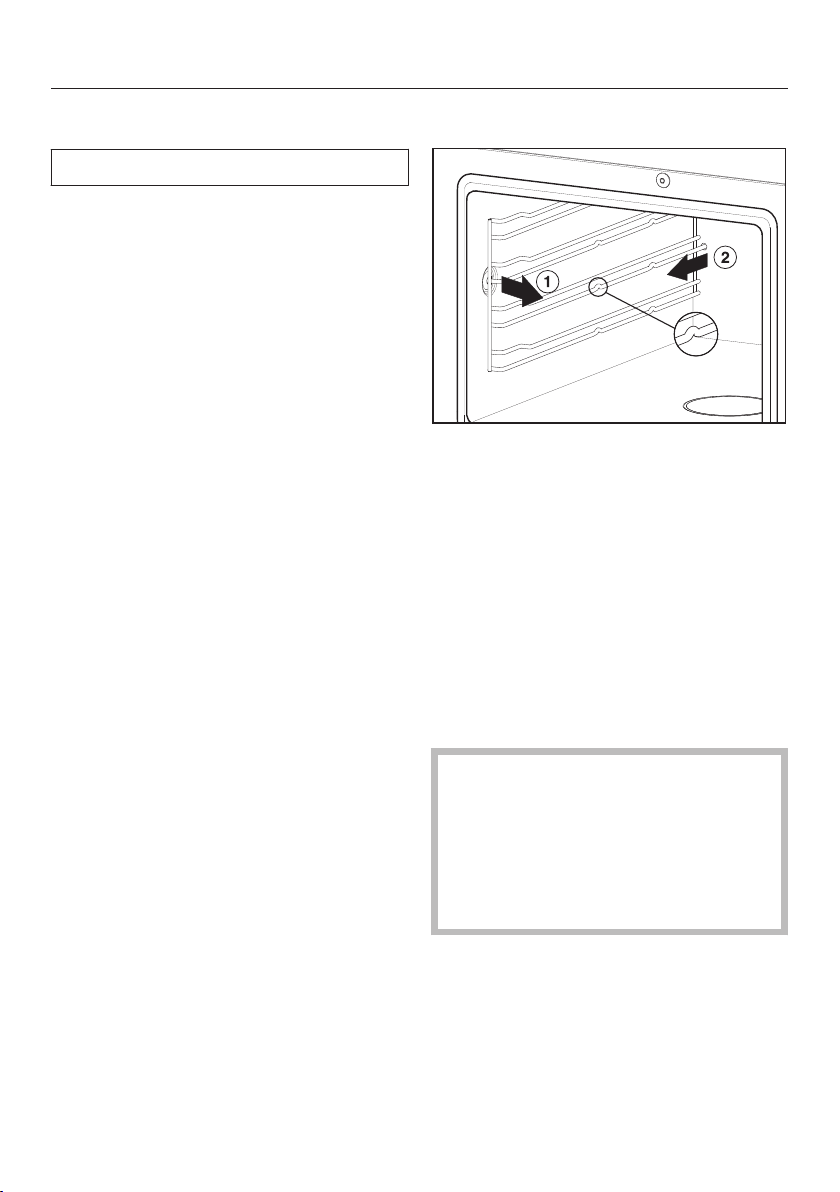
Cleaning and care
92
Accessories
All accessories are dishwasher safe.
Drip tray, rack and cooking pans
W
ash and dry the drip tray, rack and
cooking pans after each use.
Bluish d
iscoloration from cooking
pans and limescale deposits on the
filter in the floor of the oven can be
easily removed using the Miele ce‐
ramic and stainless steel cleaner (see
"Optional accessories").
Rin
se cooking pans thoroughly with
clean water to remove any detergent
residues.
Shelf runners
P
ull the side runners out first at the
side , then at the back of the
steam oven.
The side runners can be washed in
the dishwasher or by hand with a sol‐
utio
n of warm water and liquid dish
soap applied with a clean sponge or
cloth.
P
ush the side runners firmly back in
after cleaning. When putting them
back in, make sure they are correctly
inserted (see illustration).
If the side runners are not correctly
in
serted there is no anti-tip protec‐
tion, items could be pulled out of the
steam oven inadvertently and the
temperature sensor could be dam‐
aged when cooking pans are placed
in the steam oven.

Cleaning and care
93
Descaling
We recommend that you use Miele
Descal
ing Tablets (see "Optional ac‐
cessories") for descaling the appli‐
ance. They have been specifically de‐
signed for optimal descaling of Miele
products. Other descaling agents,
which - in addition to citric acid - may
contain other acids and/or other un‐
desirable substances such as chlor‐
ides, might damage the product. Also,
the desired effect cannot be guaran‐
teed if the descaling solution does not
have the required concentration.
Descaling solution is acidic.
Do not spill descaling agent onto
metal
surfaces. This can cause
marks to appear.
However, should any descaling
ag
ent get onto these surfaces, wipe
it away immediately.
The steam oven needs to be descaled
aft
er a certain number of operating
hours. When the steam oven needs to
be descaled, a number will appear on
the display indicating the number of
cooking processes remaining before
the appliance locks out. After the last
remaining cooking process, the appli‐
ance will lock out.
We recommend that you descale the
appliance befor
e it locks out.
The water container will need emptying,
rinsing and refilling with fresh tap water
during descaling.
The Ready at and Start at f
unctions are
not available for descaling.
T
urn the steam oven off and select
Descale.
A message will appear on the display:
Fi
ll the water container with cold wa‐
ter to the marking and add 2 Miele
descaling tablets.
P
ush the water container into the ap‐
pliance until it engages.
Confirm with OK.
The descaling process will now begin,
and the time left will count down on the
display
.
It is only possible to cancel the desca‐
ling
process during the first 6 minutes.
Do not turn the appliance off during
the descaling process. If it is turned
off before the end of the process, the
whole process will have to be started
from the beginning again.
During the course of the descaling
pr
ocess, the water container needs to
be rinsed and filled with fresh water.
F
ollow the instructions on the display.
When the descaling process has finish‐
ed, a message will appear on the dis‐
play
.

Cleaning and care
94
After descaling
T
urn the steam oven off.
Remo
ve, empty and dry the water
container.
Dr
y the oven compartment.
L
eave the appliance door open until
the oven interior is completely dry.
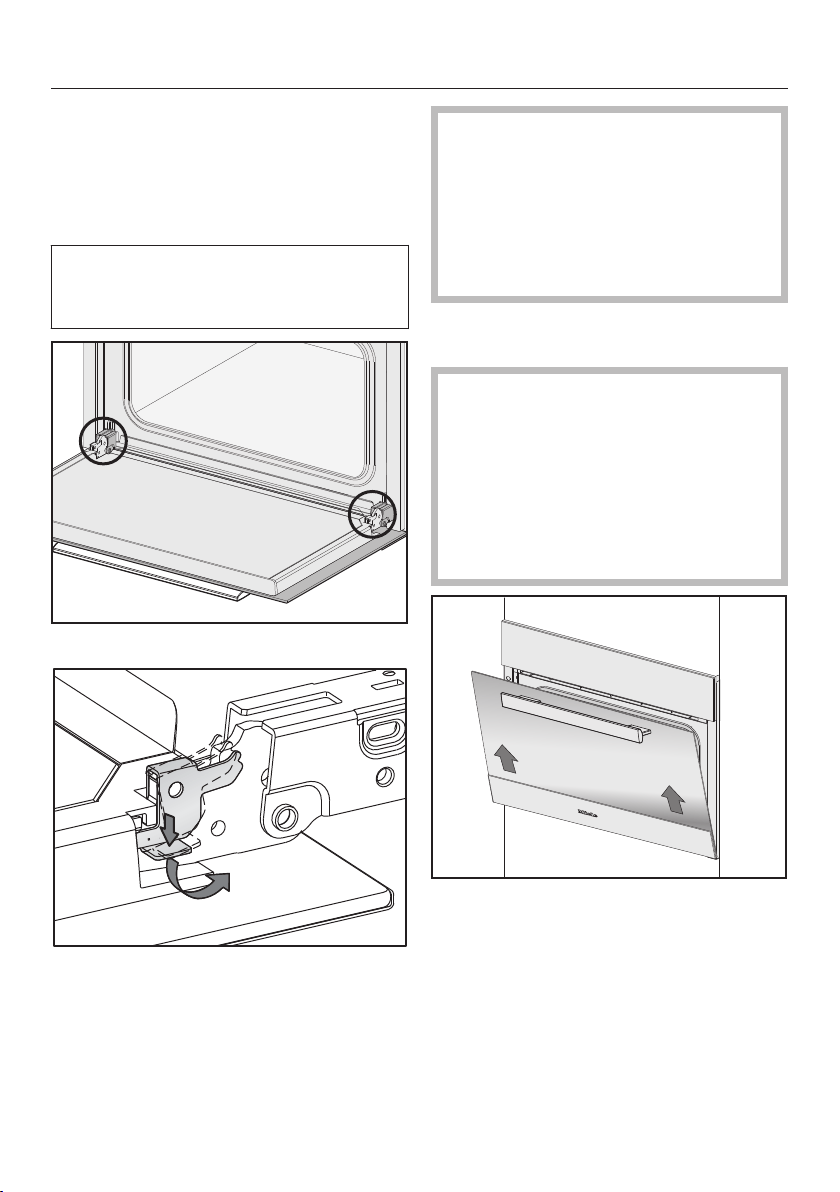
Cleaning and care
95
Door
Removal
P
repare a suitable underlay for the
door, such as a soft cloth.
Before removing the door, the locking
clamps on both hing
es have to be re‐
leased.
Open the door fully
.
Release the locking clamps on the
hin
ges by pushing them down. Turn
them as far as they will go in an an‐
gled position.
Danger of inj
ury due to the hinge
guides!
The hinge guides retract to the
steam oven.
Never attempt to pull the door off the
hi
nge guides from a horizontal posi‐
tion.
Clo
se the door until it rests partially
open.
Risk of damage to the door!
The door handle could break off and
the glass could be damaged.
The door should be gripped firmly at
the sides and not at the handle when
being
removed.
Make sure that the door is not tilted
during
removal.
Hold the door on either side and pull
diago
nally upwards from the hinge
guides.
Lay the applian
ce on the previously
prepared underlay.
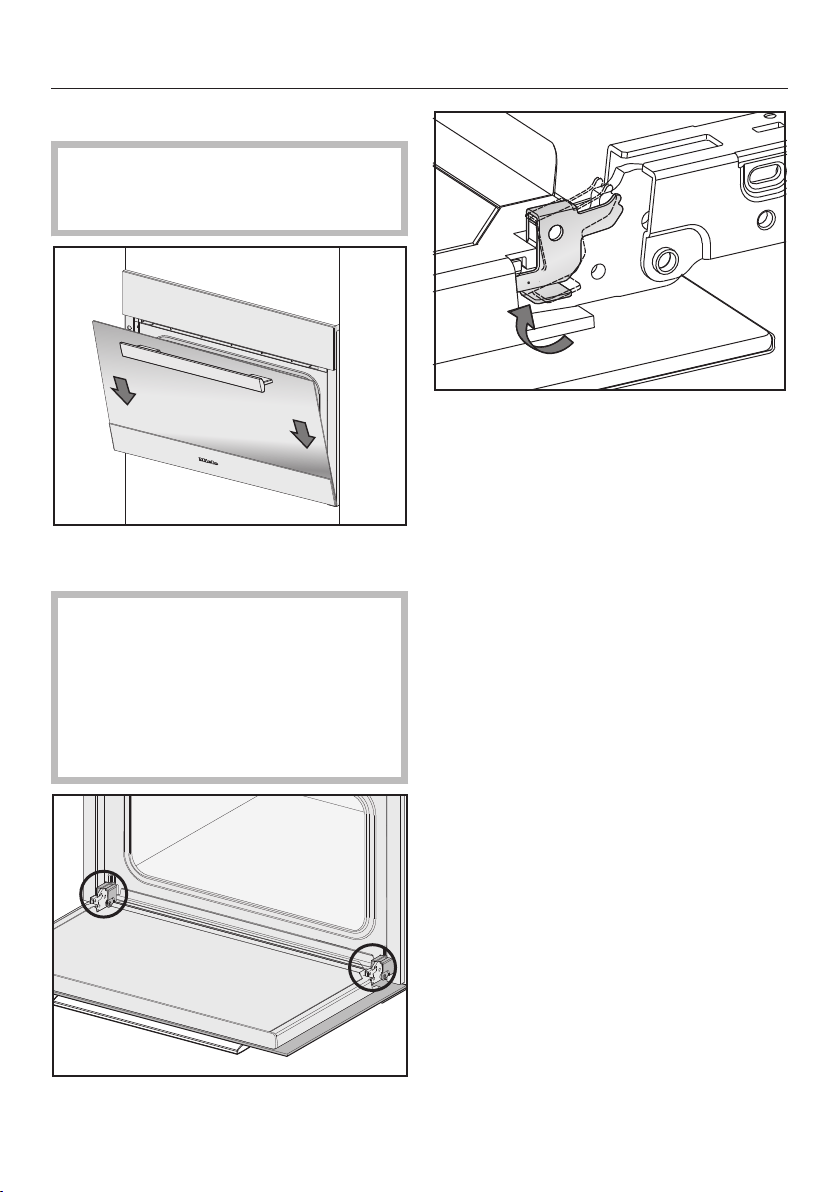
Cleaning and care
96
Refitting the door
Risk of damage to the door!
Make sure that the door does not
cant when
being refitted.
Sli
de the door onto the hinge guides
again.
Risk of damage to the door!
If the locking clamps are not locked,
the door can easily become detach‐
ed fr
om the hinge guides and be
damaged.
You must make sure that the locking
cla
mps are locked again.
Open the door fully
.
T
o relock the locking clamps, turn
them back up to the horizontal posi‐
tion as far as they will go.

Frequently asked questions
97
The following faults can be corrected without contacting the Miele Service Depart‐
ment.
If in doubt, please contact Miele.
Risk of injur
y! Improperly performed installation, maintenance or repair
work can pose a serious danger to users of the appliance.
Installation, maintenance and repairs may only be carried out by Miele author‐
ized technicians.
Do not attempt to open the housing.
Problem Possible cause and solution
You cannot turn the ap‐
pliance on.
The circuit breaker has tripped.
Rese
t the circuit breaker (see data plate for the
correct fuse rating).
There may be a technical fault.
Discon
nect the appliance from the power supply
for approx. 1 minute:
– tripping the relevant circuit breaker or screwing
the fuse out complet
ely, or
– tripping the ground fault circuit interrupter
(GFCI).
If
the steam oven still will not turn on, contact a
qualified electrician or Miele Service.
The steam oven does
not heat up.
Demonstration mode is active
Deac
tivate Demo mode (see "Settings – Show‐
room Program").
The fan can still be
hear
d after the appli‐
ance has been turned
off.
The fan is still running.
The appliance
is fitted with a fan which removes
steam from the oven. The fan will continue to run for
a while after the appliance has been switched off. It
will turn itself off automatically after a while.
A humming sound can
be
heard after switch‐
ing on the appliance,
during operation and af‐
ter turning off the appli‐
ance.
This is not a fault. It is made by water being pumped
thr
ough the system.

Frequently asked questions
98
Problem Possible cause and solution
After moving house the
appliance no longer
turns fr
om the heating-
up phase to the cooking
phase.
The boiling temperature of the water has changed as
the altitude of the new location for the appliance dif‐
fers fr
om the old one by at least 984' / 300 m.
T
o adjust the boiling temperature, you need to
descale the appliance (see "Cleaning and care -
Descaling").
During operation, an
unu
sually large amount
of steam escapes or
steam escapes from
parts of the steam oven
where it does not usual‐
ly.
The door is not properly closed.
Close
the door.
The door seal is not correctly fitted.
If
necessary, press it in all the way round the door
to make sure it is fitted evenly.
The door seal is damaged, e.g. cracked.
Contac
t Miele Service.
A whistling sound is
hea
rd when the appli‐
ance is turned on again.
When the door is closed, the pressure has to equal‐
iz
e, which can cause a whistling sound. This is not a
fault.
The Start at and Ready at
functions have not
work
ed.
The oven cavity temperature is too high, e.g. after a
pr
ogram has finished.
L
eave the door open to cool down the oven cavity.
These functions are not generally available with Menu
Cooking and Descale.
The oven lighting does
not come on.
The lamp needs to be replaced.
Contac
t Miele Service to have the lamp replaced.
F 44 Communication fault
T
urn the steam oven off and then back on again
after a few minutes.
If the same message appears again, contact Miele
Ser
vice.
F and other fault codes Technical fault
T
urn the appliance off and contact Miele.
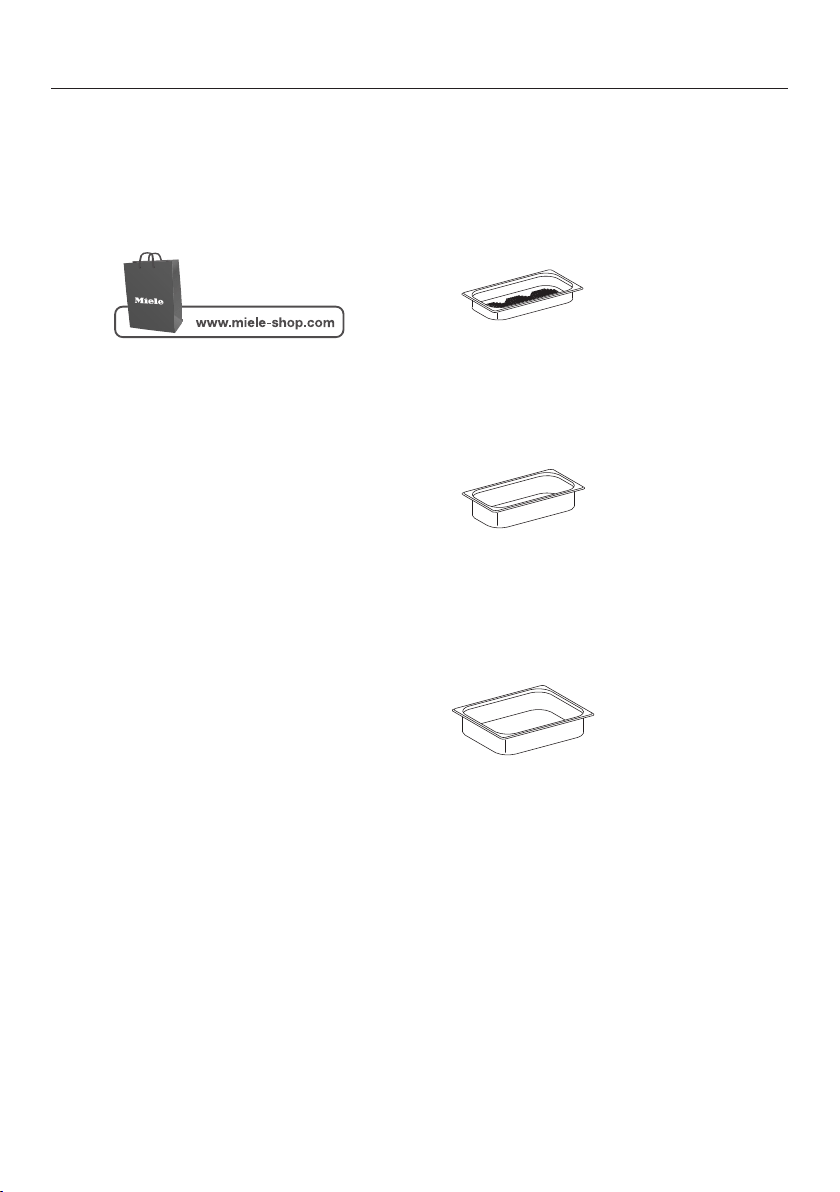
Optional accessories
99
Miele offers a range of useful accesso‐
ries, as well as cleaning and condition‐
ing
products for your appliance.
Depending on country, these can be or‐
der
ed online from Miele.
You can also obtain these products
fr
om Miele Service (see end of this
booklet for contact details) or your
Miele dealer.
Cooking pan
There is a wide range of perforated and
so
lid cooking pans available in different
sizes:
DGGL 1
Perforated cooking pan
12 3/4" x 7" x 1 1/2" (WxDxH)
325 x 175 x 40 mm (WxDxH)
DGG 2
Solid cooking pan
12 3/4" x 7" x 2 ½" (WxDxH)
325 x 175 x 65 mm (WxDxH)
DGG 3
Solid cooking pan
12 3/4" x 10 ½" x 2 ½" (WxDxH)
325 x 265 x 65 mm (WxDxH)

Optional accessories
100
DGGL 4
Perforated cooking pan
12 3/4" x 10 ½" x 2 ½" (WxDxH)
325 x 265 x 65 mm (WxDxH)
DGGL 5
Perforated cooking pan
12 3/4" x 7" x 2 ½" (WxDxH)
325 x 175 x 65 mm (WxDxH)
DGGL 6
Perforated cooking pan
12 3/4" x 7" x 4" (WxDxH)
325 x 175 x 100 mm (WxDxH)
DGG 7
Solid cooking pan
12 3/4" x 7" x 4" (WxDxH)
325 x 175 x 100 mm (WxDxH)
DGGL 8
Perforated cooking pan
12 3/4" x 10 ½" x 1 1/2" (WxDxH)
325 x 265 x 40 mm (WxDxH)
DGGL 13
Perforated cooking pan
12 3/4" x 14" x 1 1/2" (WxDxH)
325 x 350 x 40 mm (WxDxH)
Lid for cooking pans
DGD 1/3
Lid for 12 3/4" x 7" (325 x 175 mm)
cooking pans
DGD 1/2
Lid for 12 3/4" x 10 ½" (325 x 265 mm)
cooking pans
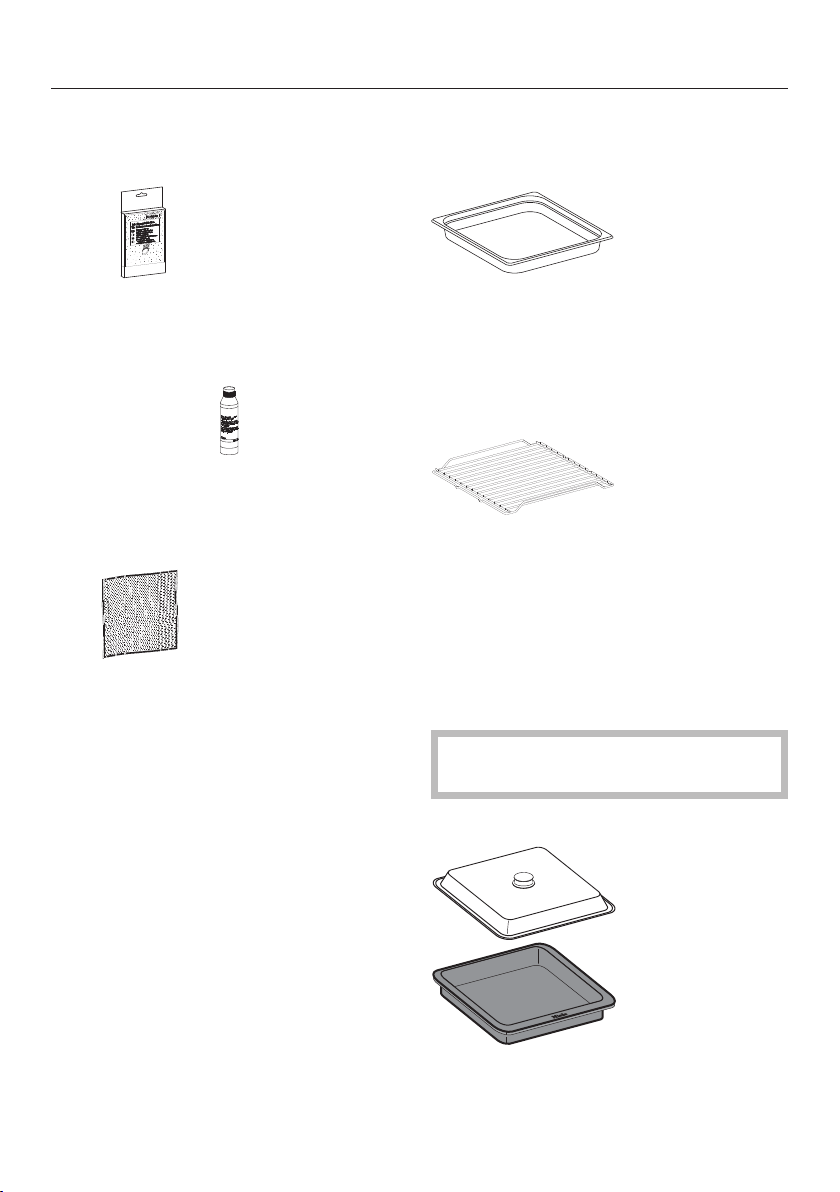
Optional accessories
101
Cleaning and care products
Descaling tablets (Qty 6)
For descaling the appliance
Ceramic and stainless steel cleaner
250
ml/8 oz.
Removes discoloration from cooking
pans.
Microfiber cloth
Removes finger marks and light soiling.
Additional accessories
DGG 21
Drip tray for collecting excess moisture,
can also be used as a cooking pan.
12 3/4" x 17" x 1 1/2" (WxDxH) 325 x
430 x 40 mm (WxDxH)
Wire oven rack
For placing your own cooking pans
Multi casserole dish
Die-cast aluminum casserole dish with
non
-stick surface and stainless steel lid.
Also suitable for use on an extended
zone of induction cooktops and in all
Miele ovens.
Not suitable for use on gas cook‐
t
ops.
KMB 5000-S
12 3/4" x 10 1/4" x 2 3/8" (WxDxH)
325 x 260 x 60 mm (WxDxH)

IMPORTANT SAFETY INSTRUCTIONS - INSTALLATION
102
Incorrect installation can result in personal injury and damage
to property.
Before connecting the appliance to the mains supply, ensure that
the connection data on the data plate (voltage and frequency) match
the mains electricity supply.
This data must correspond in order to avoid the risk of damage to
the appliance. Consult a qualified electrician if in any doubt.
Do not use an
extension cord to connect this appliance to elec‐
tricity. Extension cords do not guarantee the required safety of the
appliance.
The ele
ctrical outlet should be easily accessible after the appli‐
ance has been installed.
The appliance must be positioned so that you can see the con‐
t
ents of a cooking pan placed on the top level Otherwise you may
risk scalding or burning yourself with hot water and food when tak‐
ing containers out of the oven.
All dimensions in this instruction booklet are given in mm and inches.
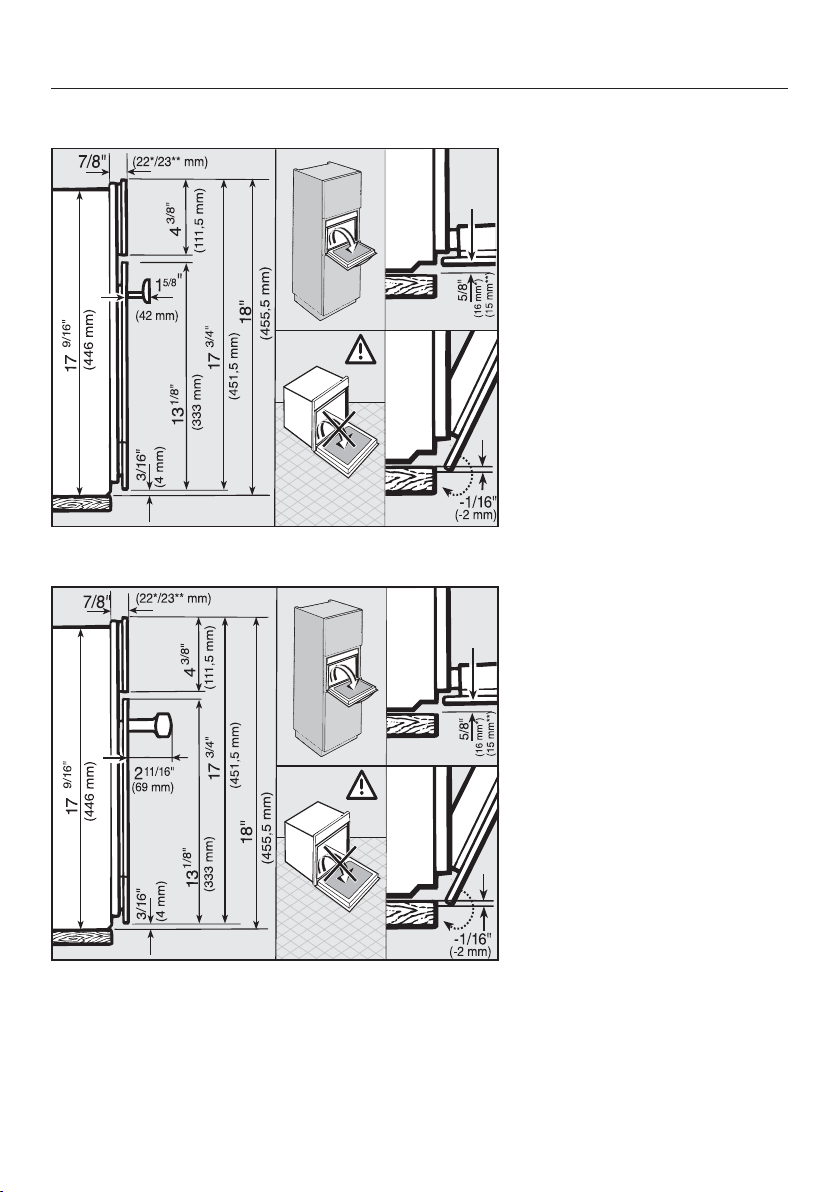
Detailed dimensions of oven front
103
PureLine front
ContourLine front
* Glass front / ** Metal front
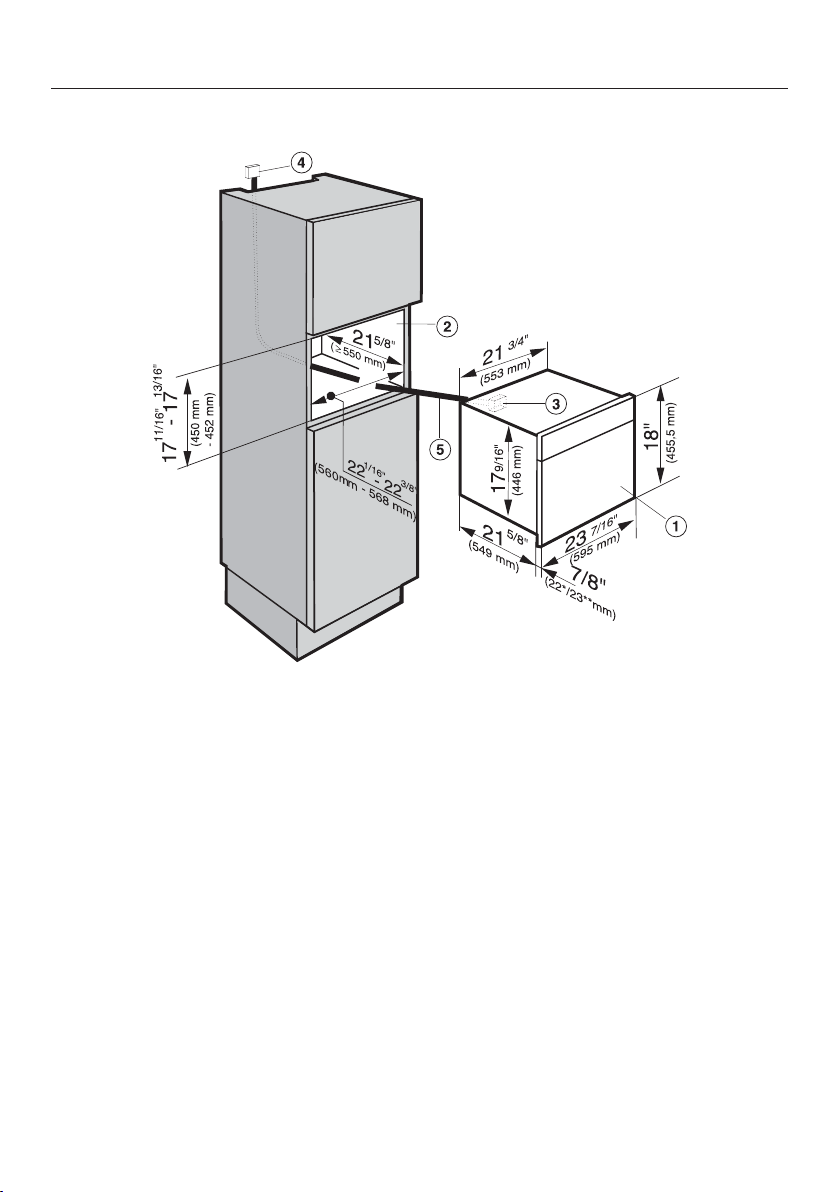
Installation dimensions
104
Installation into a tall cabinet
a
Steam oven
b
Niche
c
Pass-through for the power cord
d
Recommended position for electrical outlet
e
Power cord
* Glass front / ** Metal front
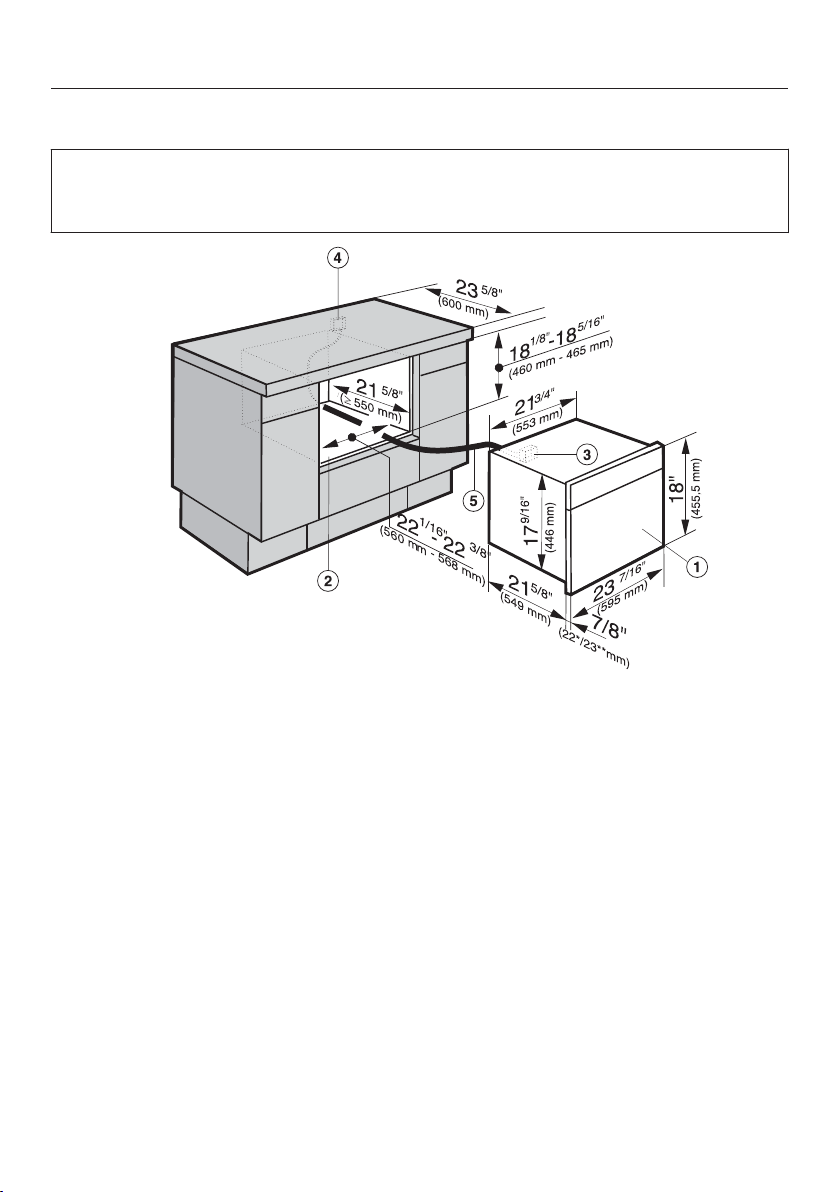
Installation dimensions
105
Undercounter installation
When building the appliance into a base unit underneath a cooktop, please also
obser
ve the installation instructions for the cooker and its respective installation
depth (see the installation instructions for the cooktop).
a
Steam oven
b
Niche
c
Pass-through for the power cord
d
Recommended position for electrical outlet
e
Power cord
* Glass front / ** Metal front
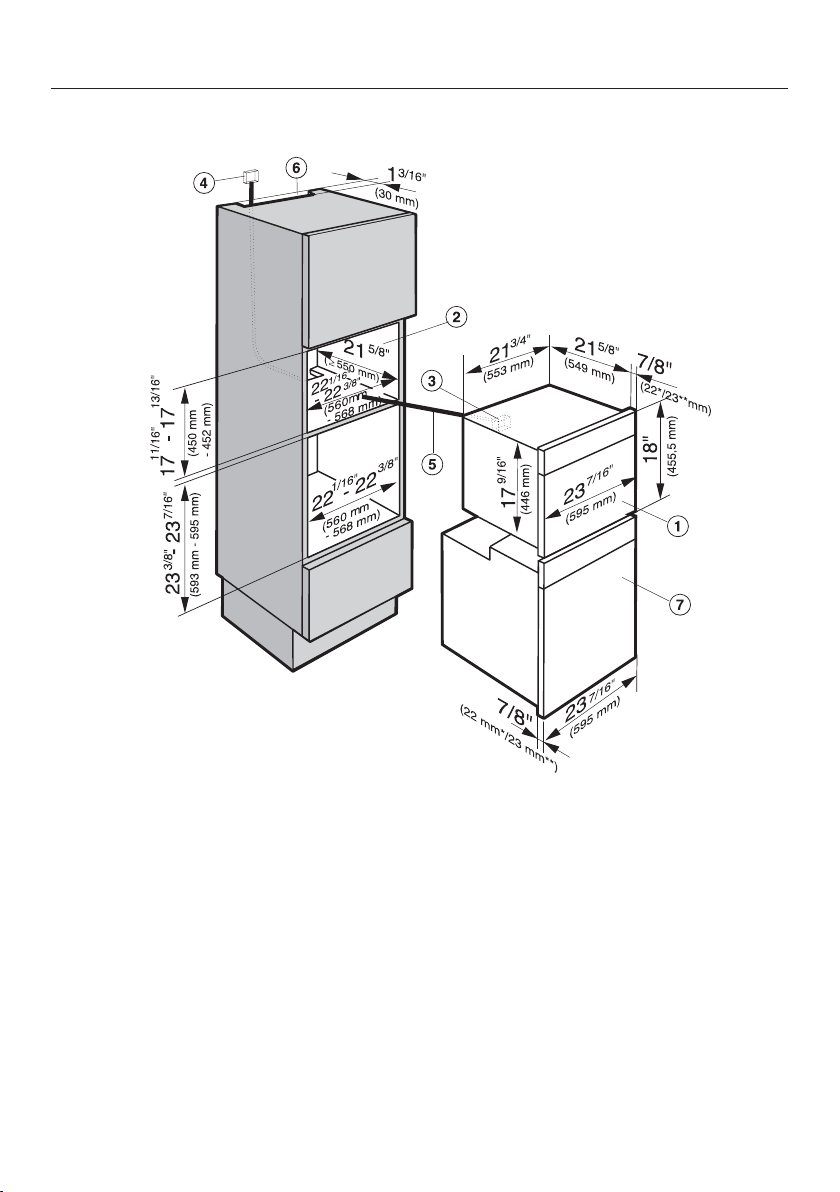
Installation dimensions
106
Installation in combination with an oven
a
Steam oven
b
Niche
c
Pass-through for the power cord
d
Recommended position for electrical outlet
e
Power cord
f
Cut-out for ventilation (only necessary when installing above a Self Cleaning
oven)
g
Oven
* Glass front / ** Metal front
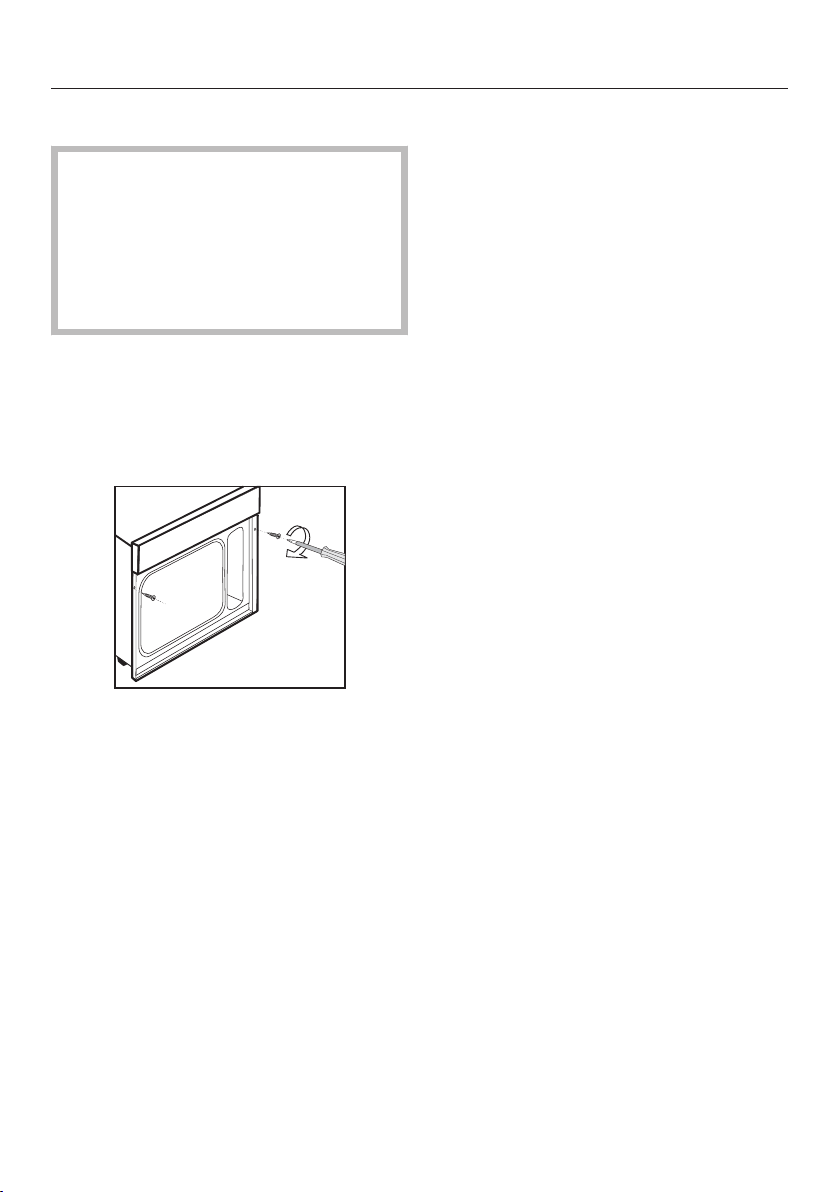
Installation
107
Installing the steam oven
A malfunction can occur if the appli‐
anc
e is not correctly aligned.
For correct functioning of the steam
ge
nerator please make sure that the
appliance is horizontally level.The
maximum deviation should not ex‐
ceed 2°.
P
ush the appliance into position in
the niche and align it. Make sure that
the power cord and water intake and
drain hoses do not get pinched or
damaged when doing so.
Secur
e the appliance left and right
using the screws supplied (1/8" x 1" /
3.5 mm x 25 mm) to the sides of the
unit, as illustrated.
Che
ck the appliance for correct func‐
tion in accordance with the operating
instructions.

Electrical connection
108
A
TTENTION:
Before installation or servicing, dis‐
connect the power supply by either
r
emoving the fuse, manually "trip‐
ping" the circuit breaker or unplug‐
ging the appliance. Pull the plug not
the cord.
Installation work and repairs should
on
ly be performed by a qualified
technician in accordance with all ap‐
plicable codes and standards. Re‐
pairs and service by unqualified per‐
sons could be dangerous and the
manufacturer will not be held re‐
sponsible. Installation, repair, and
maintenance work should only be
performed by a Miele-authorized
service technician. Work by unquali‐
fied persons can cause considerable
danger to users. Miele cannot be
held liable for any damage arising as
a result of such work.
Before connecting the appliance to
the power supply, mak
e sure that the
voltage and frequency listed on the
rating label correspond with the
household electrical supply. This da‐
ta must correspond to prevent appli‐
ance damage.
Consult an electrician if in doubt.
For safety reasons, the steam oven
may only be used when it has been
fully installed.
Installer:
Please leave these instructions with
the cust
omer.
Connection
Ensu
re that the connection data on
the data plate (voltage, frequency,
and fuse rating) match those of your
electrical supply.
Power Supply
This appliance is equipped with a 5 ft
(1.5 m)
long power cord with a NEMA
6-20P three-prong grounding plug
ready for connection.
208/240 V / 20 A / 60 Hz
Make sure that the connecting socket is
accessi
ble after the installation of the
steam oven.

Caring for the environment
109
Disposal of the packing mate‐
rial
The cardboard box and packing materi‐
als pr
otect the appliance during ship‐
ping. They have been designed to be
biodegradable and recyclable.
Ensure that any plastic wrappings,
bags, etc. ar
e disposed of safely and
kept out of the reach of children. Dan‐
ger of suffocation!
Disposal of your old appliance
Old electrical and electronic appliances
oft
en still contain valuable materials.
However, they also contain harmful
substances that were essential for the
proper functioning and safe use of the
equipment. Handling these materials
improperly or disposing of them in your
household waste can be harmful to
your health and the environment.
Therefore, please do not dispose of
your old appliance with regular house‐
hold waste.
Old appliances may contain materials
that can be recycled. Please contact
your local recycling authority about the
possibility of recycling these materials.
Please be sure that your old appliance
do
es not pose a danger to children
while being stored for disposal.

Technical service, data plate, warranty
110
After sales service
In the event of a fault which you cannot easily correct yourself, please contact:
– your Miele dealer, or
– the Miele Technical Service Department.
See back cover for contact details.
Please quote the model and serial number of your appliance when contacting
Miele.
Data plate
Adhere the extra data plate supplied with the appliance here. Ensure that the mod‐
el number is the same as the on
e on the back of these operating instructions.
Warranty
For further information, please refer to your warranty booklet.

MieleCare
111
This service is available in USA only.
MieleCare, our Ext
ended Service Con‐
tract program, gives you the assurance
of knowing that your appliance invest‐
ment is covered by 5 years of worry
free ownership.
MieleCare is the only Extended Service
Contract in the industry that guarantees
repairs by a Miele Authorized Service
Provider using genuine Miele parts. On‐
ly genuine Miele parts installed by fac‐
tory trained professionals can guaran‐
tee the safety, reliability, and longevity
of your Miele appliance.
Please note that unless expressly ap‐
pr
oved in writing by Miele’s Service de‐
partment, Extended Service Contracts
offered by other providers for Miele
products will not be recognized by
Miele. Our goal is to prevent unauthor‐
ized (and untrained) service personnel
from working on your Miele products,
possibly doing further damage to them,
you and/or your home.
To learn more about MieleC
are Extend‐
ed Service Contracts, please contact
your appliance dealer or visit us online
at:
www.mieleusa.com/mielecare


9 Independence Way
Princeton, NJ 08540
Phone:
Fax:
www.mieleusa.com
U.S.A.
Miele, Inc.
National Headquarters
Please have the model and serial number
of your appliance available before
contacting Technical Service.
Canada
Importer
Miele Limited
Headquarters and Miele Centre
800-843-7231
609-419-9898
609-419-4298
Technical Service & Support
Nationwide
Phone:
Fax:
161 Four Valley Drive
Vaughan, ON L4K 4V8
www.miele.ca
800-999-1360
888-586-8056
Customer Care Centre
Phone:
800-565-6435
905-532-2272
Germany
Manufacturer
Miele & Cie. KG
Carl-Miele-Straße 29
33332 Gütersloh
112

M.-Nr. 09 800 830 / 06en-US, CA
DG 6500 / DG 6600