1. Important Safety Instructions.......................................................................2
........................................6
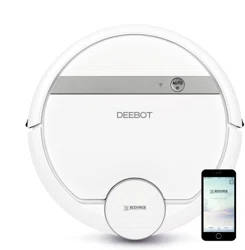
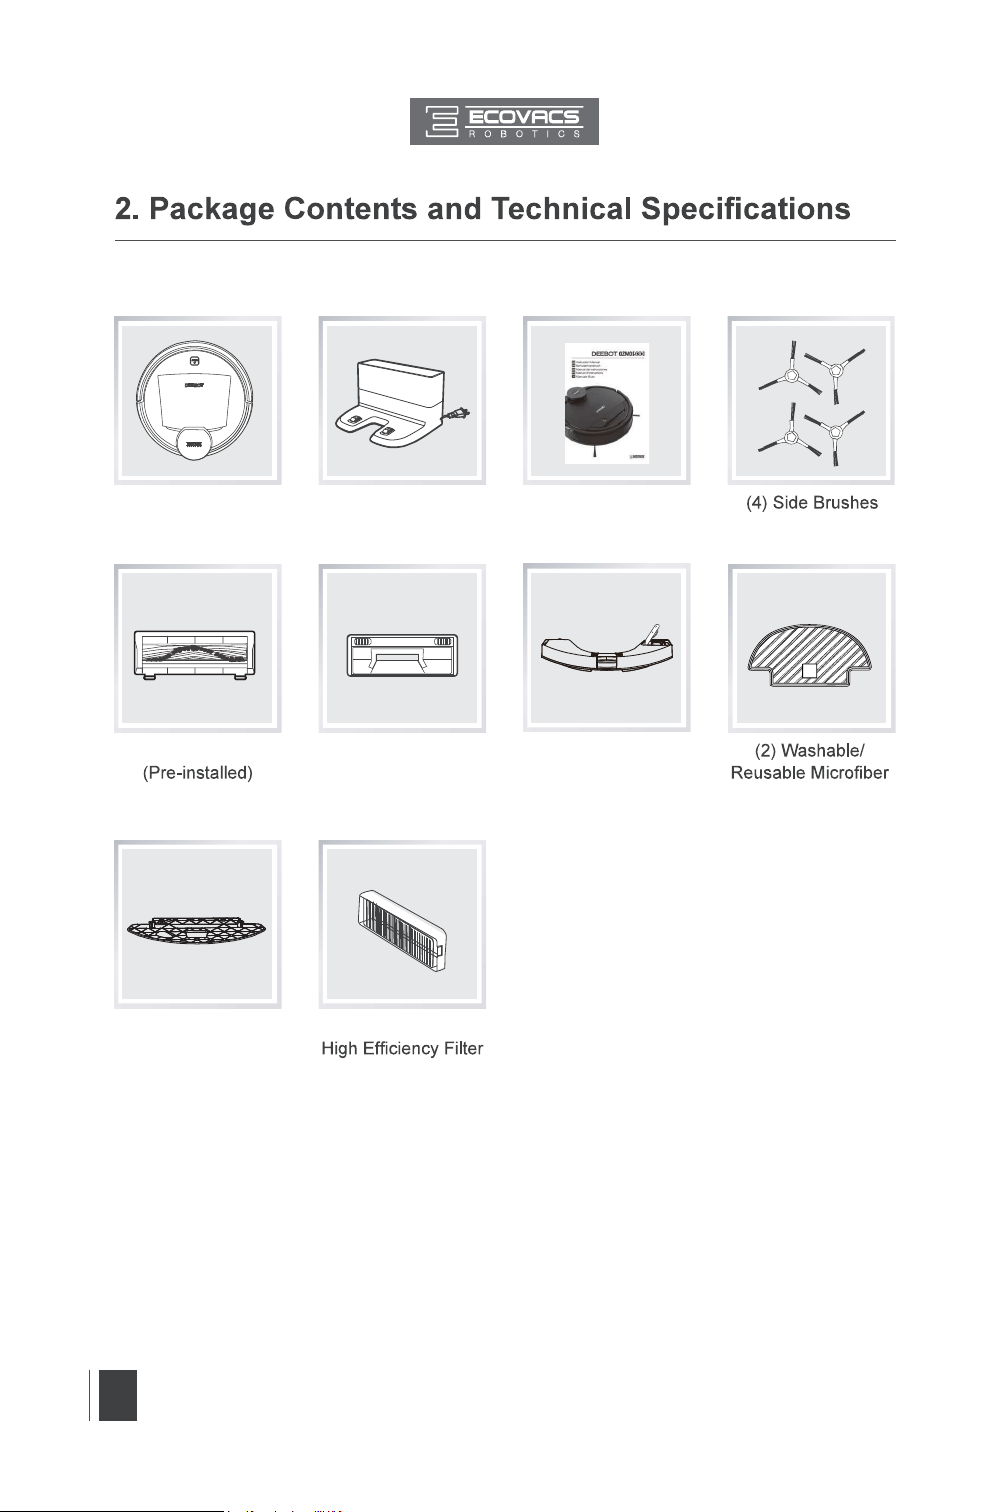
2.1 Package Contents.....................................................................................6
2.3 Product Diagram........................................................................................8
3. Operating and Programming......................................................................10
3.1 Notes Before Cleaning.............................................................................10
3.2 Quick Start...............................................................................................12
3.3 Cleaning Mode Selection.........................................................................15
3.4 Programming the Robot...........................................................................15
3.5 Additional Settings...................................................................................15
3.6 Optional OZMO Mopping System............................................................16
3.7 Choosing a Suction Option......................................................................17
4. Maintenance................................................................................................19
4.1 OZMO Mopping System..........................................................................19
4.2 Dust Bin and Filters.................................................................................20
4.3 Main Brush, Direct Suction Option and Side Brushes..............................21
4.4 Other Components..................................................................................22
4.5 Regular Maintenance..............................................................................24
5. Troubleshooting..........................................................................................25
Contents
2
EN
1. Important Safety Instructions
When using an electrical appliance, basic precautions should
always be followed, including the following:
READ ALL INSTRUCTIONS BEFORE USING THIS
APPLIANCE.
SAVE THESE INSTRUCTIONS
1. This Appliance can be used by children aged from 8 years
and above and persons with reduced physical, sensory or
mental capabilities or lack of experience and knowledge if they
have been given supervision or instruction concerning use
of the Appliance in a safe way and understand the hazards
involved. Children shall not play with the Appliance. Cleaning
and user maintenance shall not be made by children without
supervision.
2. Clear the area to be cleaned. Remove power cords and small
rug fringe under the rug base, and lift items such as curtains
3. If there is a drop off in the cleaning area due to a step or
stairs, you should operate the Appliance to ensure that it can
detect the step without falling over the edge. It may become
necessary to place a physical barrier at the edge to keep the
unit from falling. Make sure the physical barrier is not a trip
hazard.
4. Only use as described in this manual. Only use attachments
recommended or sold by the manufacturer.
5. Please make sure your power source voltage matches the
power voltage marked on the Docking Station.
6. For INDOOR household use ONLY. Do not use the Appliance
in outdoor, commercial or industrial environments.
7. Use only the original rechargeable battery and Docking Station
provided with the Appliance from the manufacturer. Non-
rechargeable batteries are prohibited. For battery information,
3
EN
1. Important Safety Instructions
9. Do not operate the Appliance in an area where there are lit
candles or fragile objects.
10. Do not use in extremely hot or cold environments (below
11. Keep hair, loose clothing, fingers, and all parts of body away
from any openings and moving parts.
12. Do not operate the Appliance in a room where an infant or child
is sleeping.
13. Do not use Appliance on wet surfaces or surfaces with standing
water.
14. Do not allow the Appliance to pick up large objects like stones,
large pieces of paper or any item that may clog the Appliance.
15. Do not use Appliance to pick up flammable or combustible
materials such as gasoline, printer or copier toner, or use in
areas where they may be present.
16. Do not use Appliance to pick up anything that is burning or
smoking, such as cigarettes, matches, hot ashes, or anything
17. Do not put objects into the suction intake. Do not use if the
suction intake is blocked. Keep the intake clear of dust, lint, hair,
18. Take care not to damage the power cord. Do not pull on or
carry the Appliance or Docking Station by the power cord, use
the power cord as a handle, close a door on the power cord,
or pull power cord around sharp edges or corners. Do not run
Appliance over the power cord. Keep power cord away from hot
surfaces.
19. If the power cord is damaged, it must be replaced by the
manufacturer or its service agent in order to avoid a hazard.
20. The power supply is not to be repaired and not to be used any
longer if it is damaged or defective.
21. Do not use with a damaged power cord or receptacle. Do not
use the Appliance or Docking Station if it is not working properly,
has been dropped, damaged, left outdoors, or come in contact
with water. It must be repaired by the manufacturer or its service
agent in order to avoid a hazard.
4
EN
22. Turn OFF the power switch before cleaning or maintaining the
Appliance.
23. The plug must be removed from the receptacle before cleaning
or maintaining the Docking Station.
24. Remove the Appliance from the Docking Station, and turn OFF
the power switch to the Appliance before removing the battery
for disposal of the Appliance.
25. The battery must be removed and discarded according to local
laws and regulations before disposal of the Appliance.
26. Please dispose of used batteries according to local laws and
regulations.
27. Do not incinerate the Appliance even if it is severely damaged.
28. When not using the Docking Station for a long period of time,
please unplug it.
29. The Appliance must be used in accordance with the directions
in this Instruction Manual. ECOVACS ROBOTICS cannot be
held liable or responsible for any damages or injuries caused by
improper use.
30. The robot contains batteries that are only replaceable by skilled
persons. To replace the robot’s battery, please contact Customer
Service.
31. If the robot will not be used for a long time, power OFF the robot
for storage and unplug the Docking Station.
32. WARNING: For the purposes of recharging the battery, only
use the detachable supply unit CH1630A provided with the
appliance.
1. Important Safety Instructions

5
EN
Correct Disposal of this Product
This marking indicates that this product should not be disposed of with
other household waste throughout the EU. To prevent possible harm to the
environment or human health from uncontrolled waste disposal, recycle it
responsibly to promote the sustainable reuse of material resources. To recycle
your used device, please use the return and collection systems or contact the
retailer where the product was purchased. They can safely recycle this product.
For EU Countries
1. Important Safety Instructions
Class II
Short-circuit-proof safety isolating transformer
Switch mode power supply
For indoor use only
6
EN
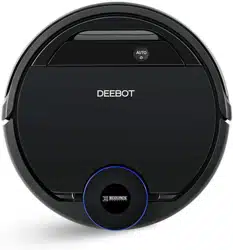
2.1 Package Contents
Robot
Main Brush Option
Docking Station
Direct Suction Option
Cleaning Cloth Plate Sponge Filter and
Reservoir
Cleaning Cloths
Instruction Manual

7
EN
*
Output power of the WIFI module is less than 100mW.
Model DG3G
Working Voltage
14.8V DC
Docking Station Model CH1630A
Input 100-240V AC , 50/60Hz, 25W Output
20V DC, 0.8A
Battery S01-LI-148-3200, Lithium 3200mAh, 14.8V
Laser
max. power: 2.5mW
Frequency: 1.8KHz
Rotate Speed: 300±5 circle/min
Frequency bands 2412-2472MHz
8
EN
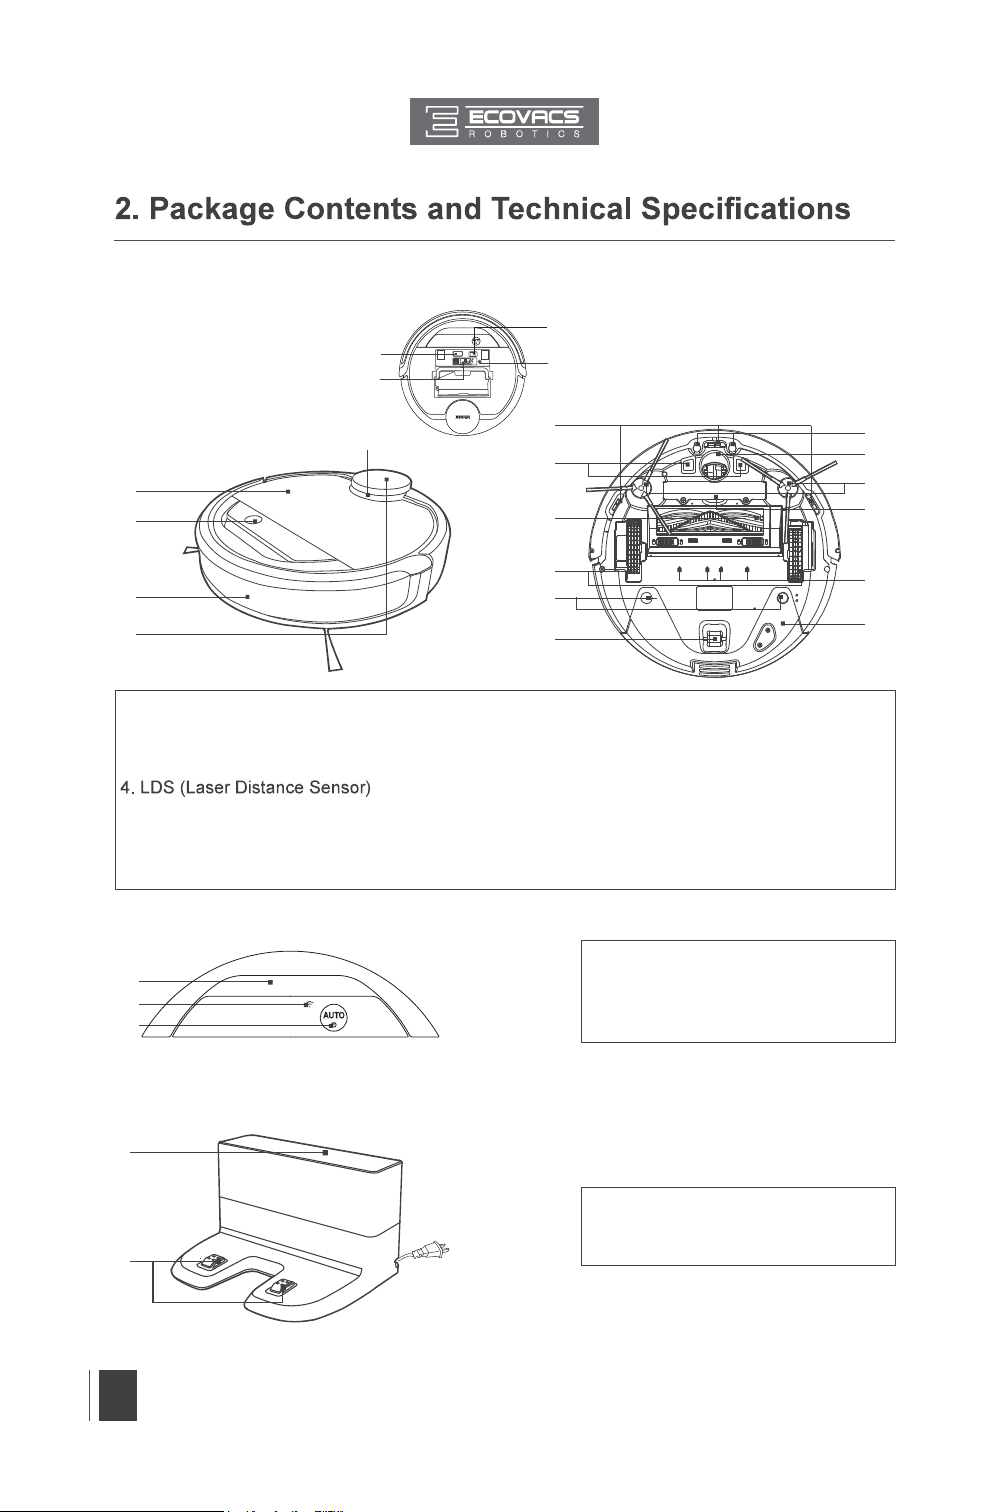
1. Status Indicator Light
2. Wi-Fi Indicator Light
3. AUTO Mode Button
1. Infrared Signal Generators
2. Docking Station Pins
Control Panel
2.3 Product Diagram
Robot
1. Top Cover
2. Control Panel
3. Anti-Collision Sensors and Bumper
5. LDS Bumper
6. Anti-Drop Sensors
7. Charging Contacts
8. Main Brush Option
9. Driving Wheels
10. Reservoir Slots
11. Roller Wheel
12. Universal Wheel
13. Side Brushes
14. Battery Pack
15. Reservoir
16. Carpet Detection Sensor
17. Water Outlets
18. Power Switch
19. Upgrade Port
20. Multi-Function Cleaning Tool
21. RESET Button
1
5
2
3
4
6
7
8
9
10
11
12
13
14
15
17
16
21
18
19
20
1
2
3
Docking Station
1
2
9
EN
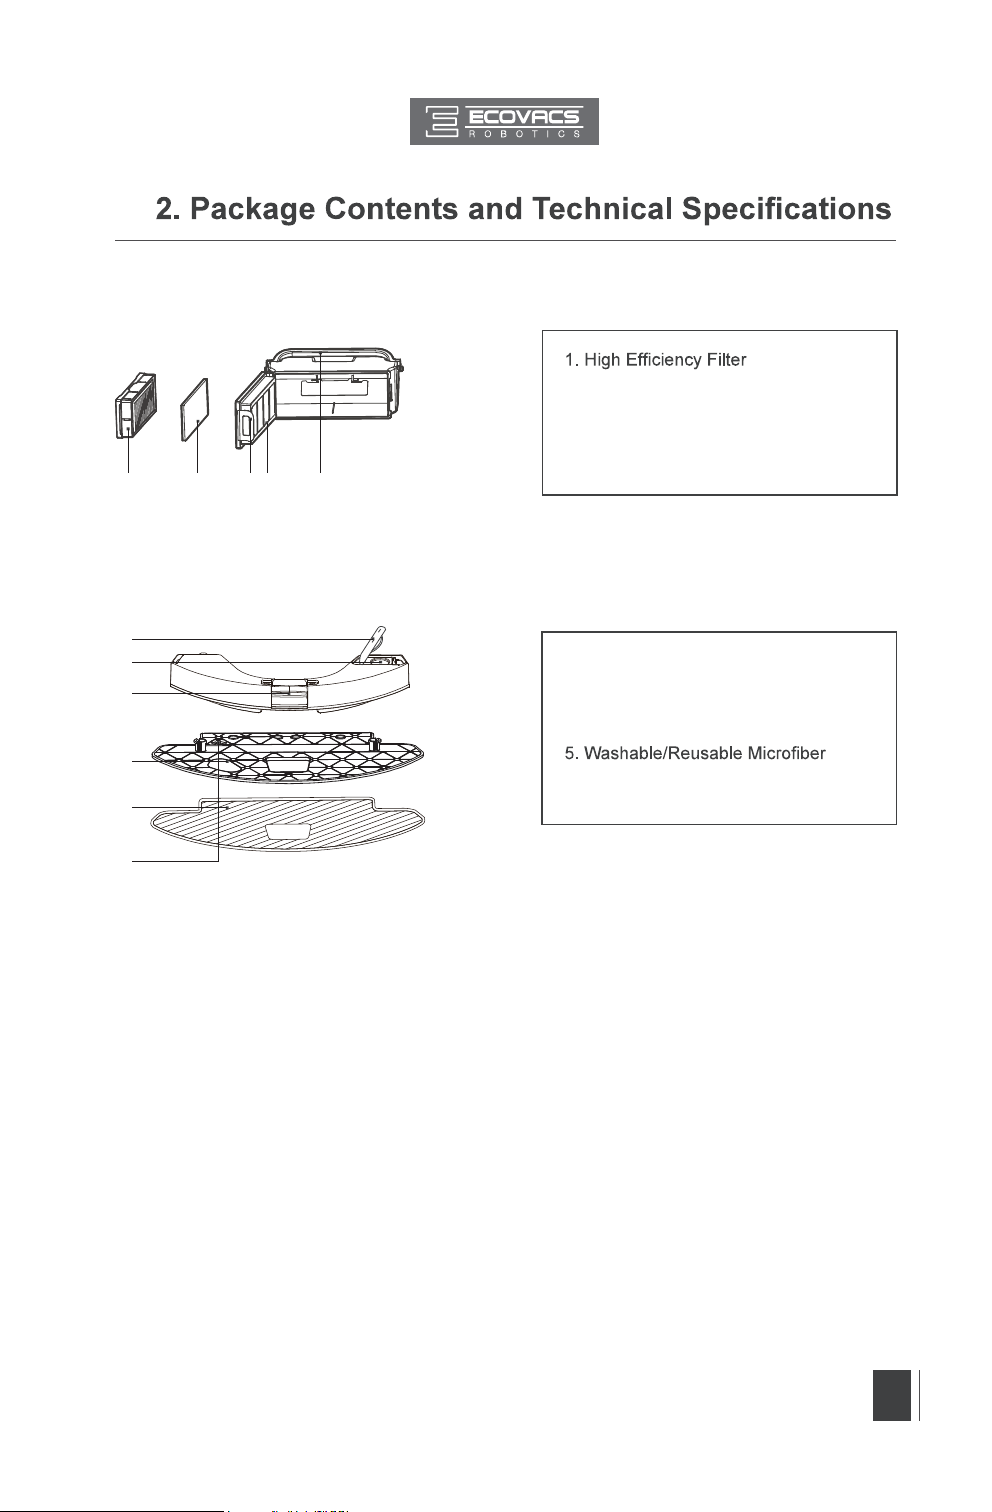
Dust Bin
2. Sponge Filter
3. Dust Bin Lock
4. Dust Bin Cover
5. Dust Bin Handle
1. Water Inlet Cover
2. Water Inlet
3. Reservoir Release Button
4. Cleaning Cloth Plate
Cleaning Cloth
6. Magnet
Advanced OZMO Mopping System
4 5
1
2 3
1
2
3
4
5
6

10
EN
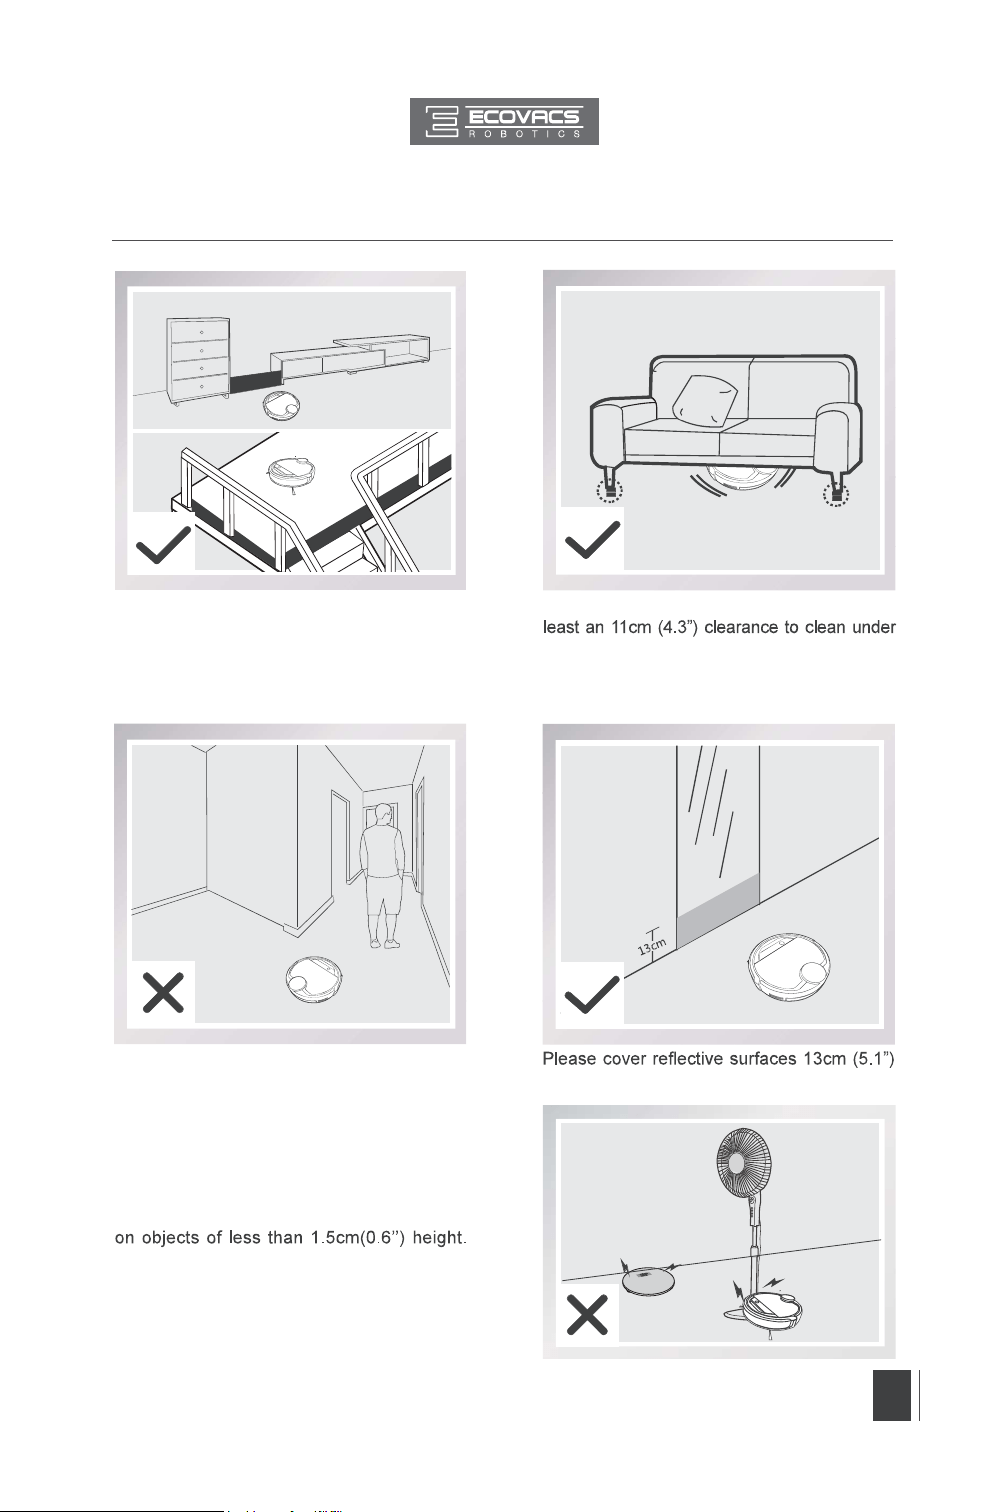
3.1 Notes Before Cleaning
WARNING: Do not use DEEBOT on wet surfaces or surfaces with standing
water.
DEEBOT uses SMART NAVI technology (a proprietary laser scanning and
operating DEEBOT, take a few moments to survey the area to be cleaned and
remove any obstacles.
Before using the product on an area rug with
tasseled edges, please fold area rug edges
under themselves.
Please supervise DEEBOT during its first
cleaning and assist should there be a
problem.
the cleaning area to put furniture like chairs in their proper place.
3. Operating and Programming
11
EN
3. Operating and Programming
Please be aware that DEEBOT needs at
furniture without complications.
If there is a step or stairs in the cleaning
area, please operate DEEBOT to ensure its
Anti-Drop Sensors can detect the drop off. It
may be necessary to place a physical barrier
at the edge of the drop off to keep the unit
from falling over the edge.
from the ground.
If there is a step or stairs in the cleaning
Please do not stand in narrow spaces, such
as hallways, or DEEBOT may fail to identify
the area to be cleaned.
Please be aware that DEEBOT may climb
Please remove these objects if possible.
12
EN
3. Operating and Programming
3.2 Quick Start
Remove the protection strip from the
robot’s Bumper before use.
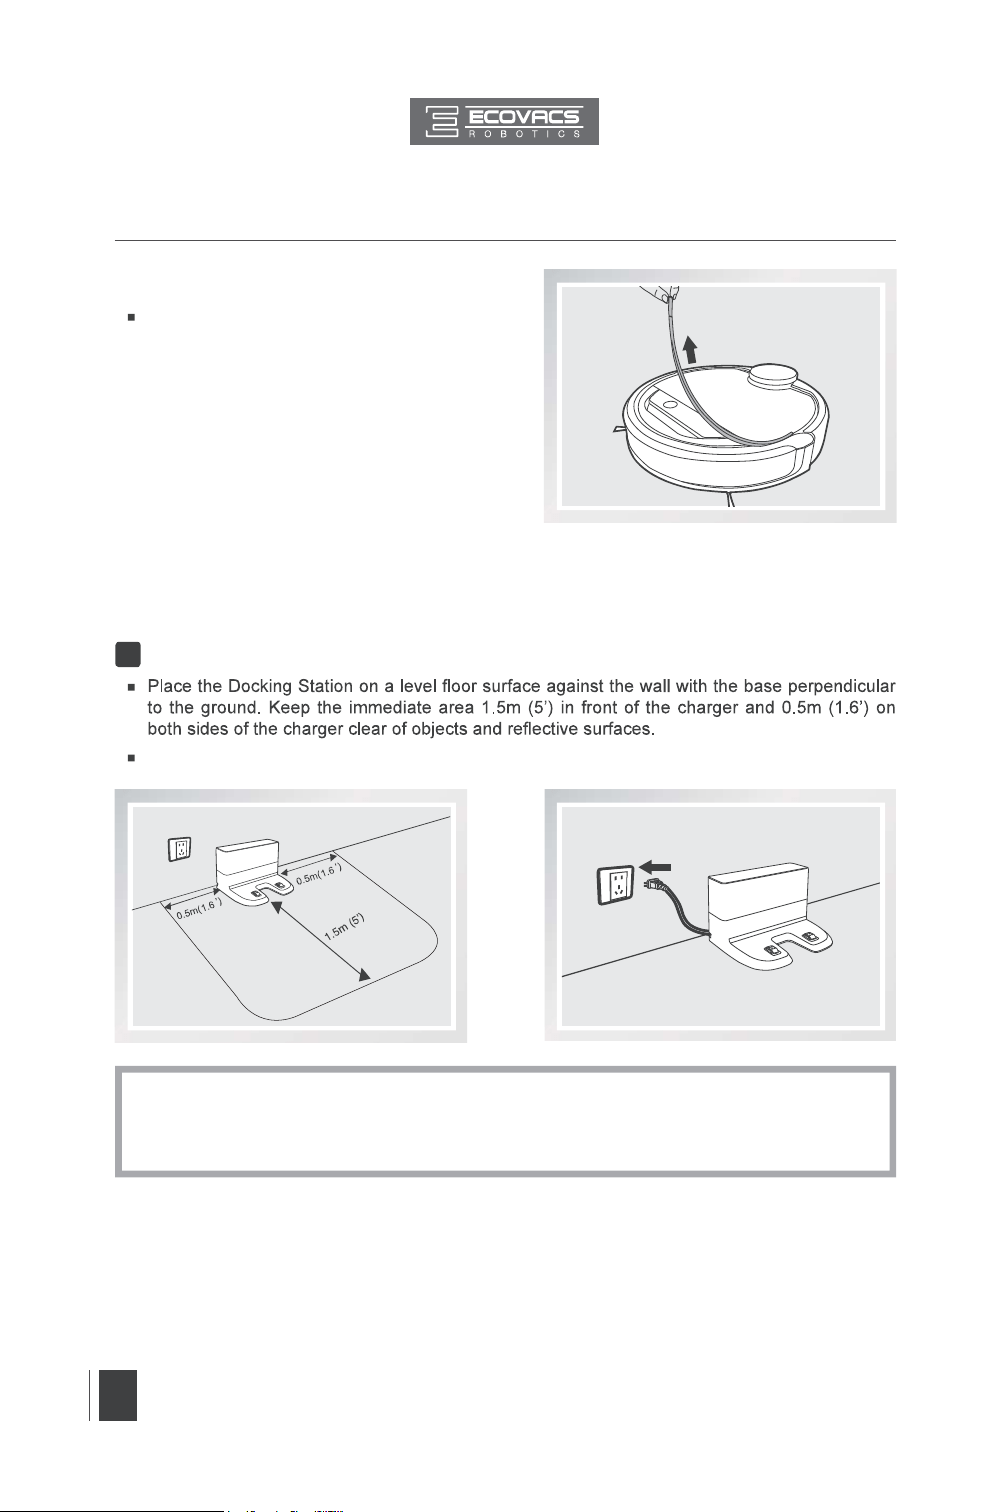
Docking Station Placement
Plug the Docking Station in.
1
*
Do not change the location of the Docking Station once DEEBOT has scanned the
environment. If it is necessary to relocate Docking Station, power OFF DEEBOT and then
power back ON so DEEBOT can re-scan the environment. Alternatively, use the ECOVACS
App to direct the robot to rescan the environment.
13
EN
3. Operating and Programming
Place DEEBOT on the Docking Station
making sure the Charging Contacts on
DEEBOT and the Docking Station Pins make
a connection.
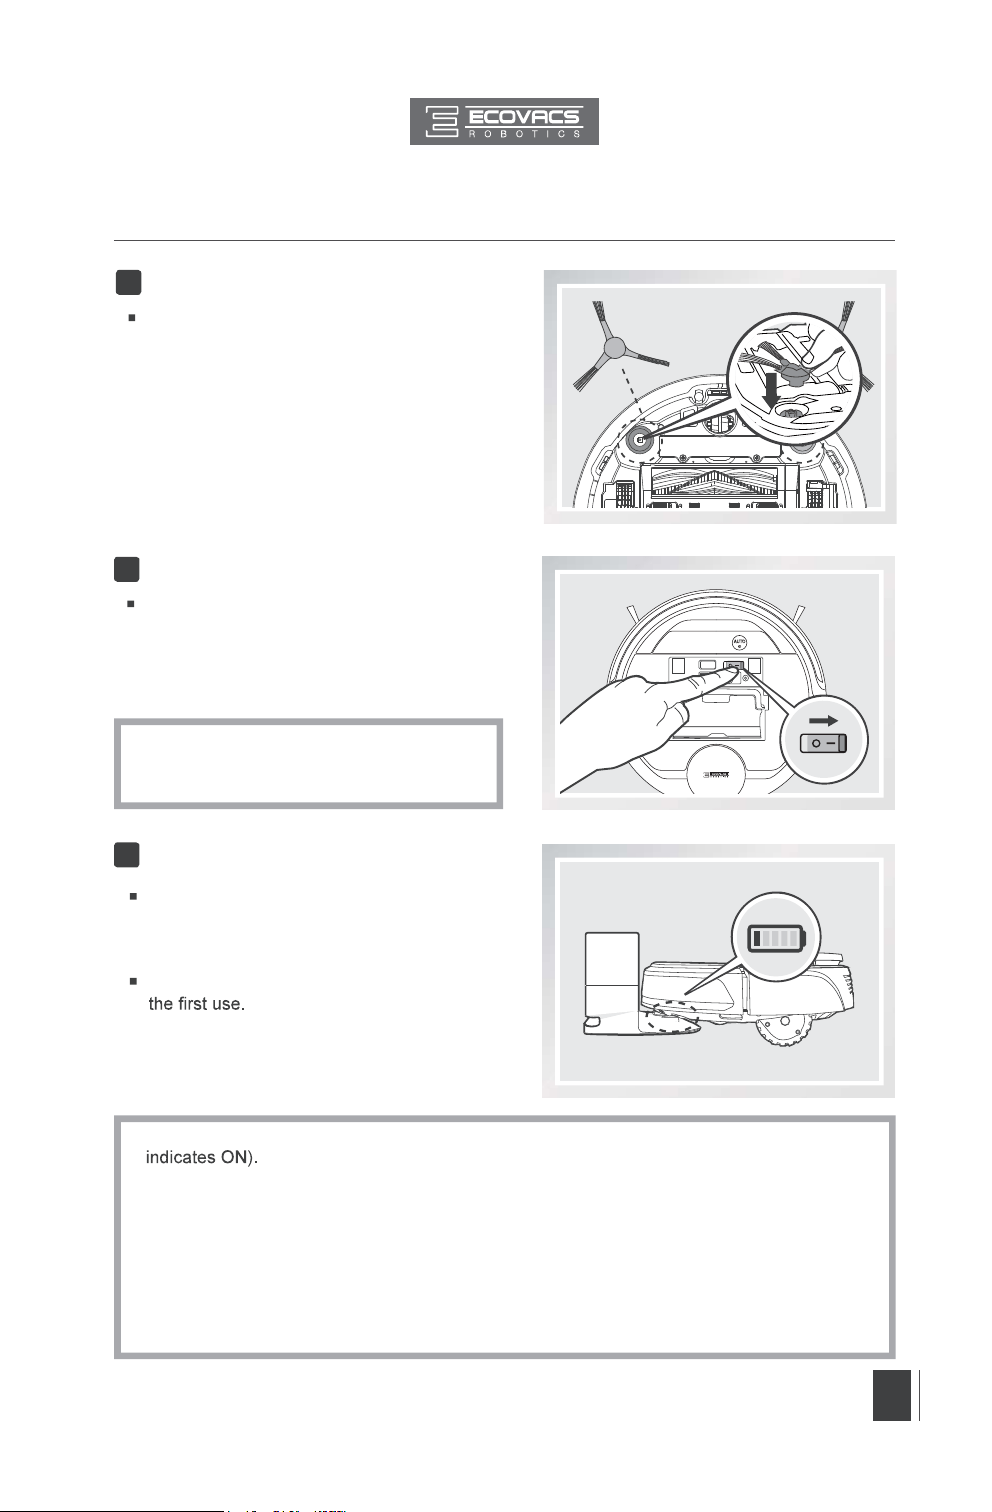
Charge DEEBOT for at least 4 hours before
4
Charge DEEBOT
*
*
*
*
Please make sure the Power Switch is turned ON before charging. (“O” indicates OFF and “I”
AUTO Mode Button blinks slowly when DEEBOT is charging. AUTO Mode Button stops
glowing when DEEBOT is fully charged.
When DEEBOT completes the cleaning cycle or when battery power gets low, DEEBOT
automatically returns to the Docking Station to recharge itself. DEEBOT can also be sent
back to the Docking Station at any time by using ECOVACS App or by pressing the AUTO
Button on the robot for 3 seconds.
Empty any remaining water from the Reservoir and remove the Cleaning Cloth Plate before
charging DEEBOT.
Power ON
Open the Top Cover. Move the Power Switch to
the ON position. “I”=power ON; “O”=power OFF.
The Control Panel illuminates, and DEEBOT
plays a musical tune. DEEBOT is powered ON
when the Control Panel stays illuminated.
3
*
When DEEBOT is not c leanin g, it is
suggested to keep it powered ON and
charging instead of powered OFF.
Install Side Brushes
Attach Side Brushes to the bottom of
DEEBOT by pressing a brush into each
slot with the matching color until it clicks.
2

14
EN
3. Operating and Programming
*
The robot’s Control Panel stops glowing
after the robot is paused for more than
10 minutes. Press AUTO Mode Button on
DEEBOT to wake up the robot.
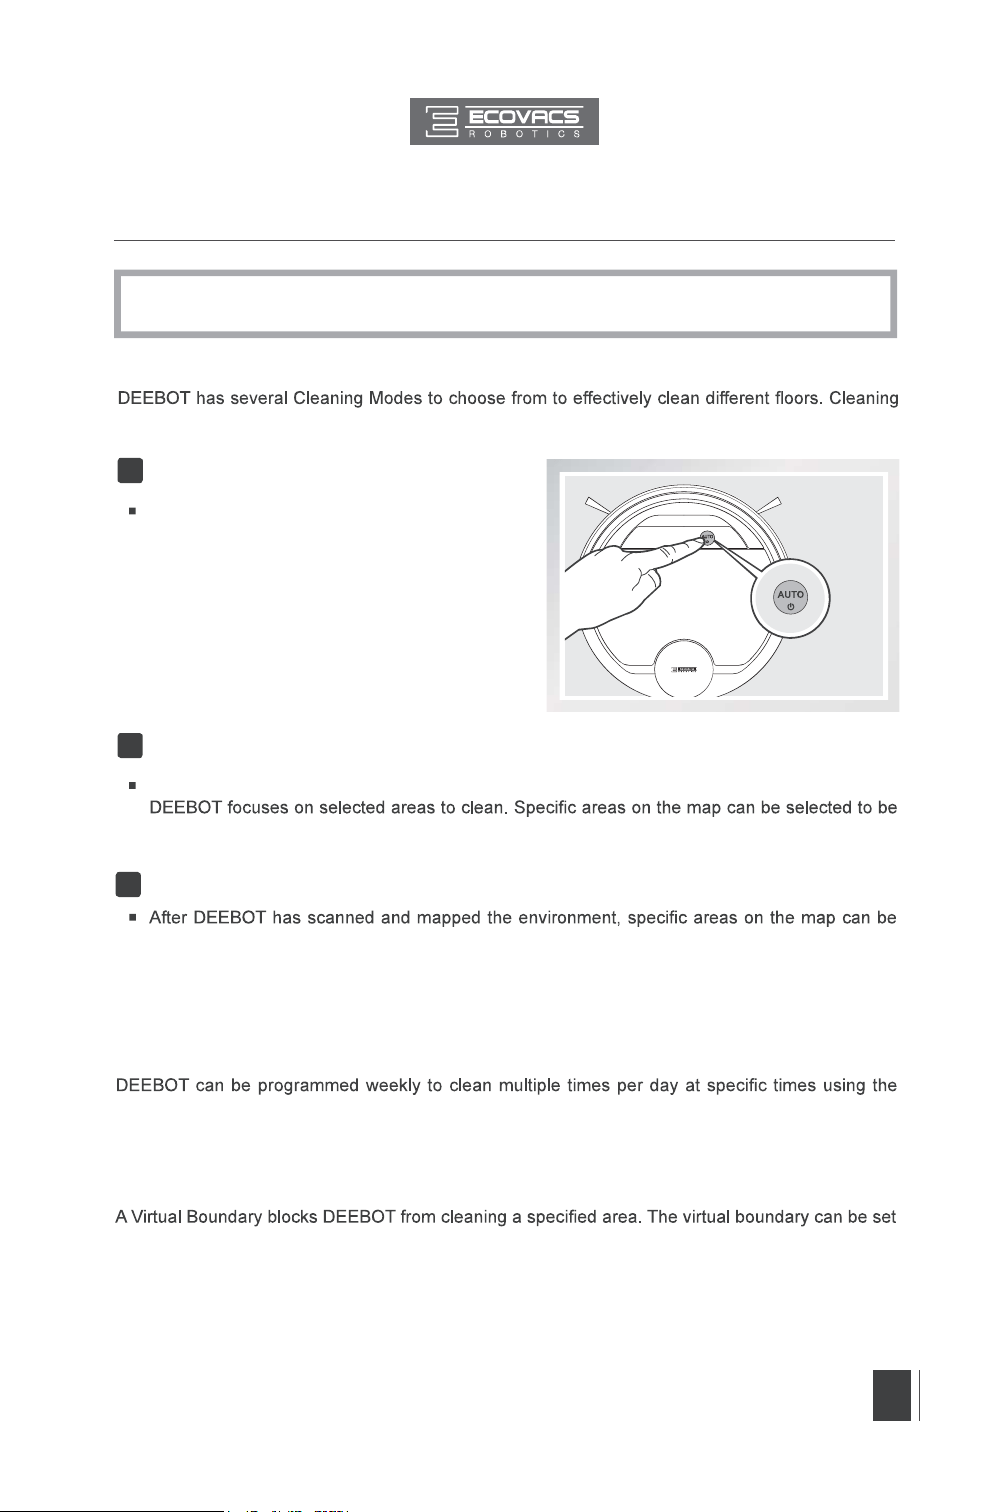
Pause DEEBOT by pressing the AUTO Mode
Button on the robot.
6
Pause
Press the AUTO Mode Button on DEEBOT.
DEEBOT moves around to scan the environment
and build the map, and starts to work in AUTO
Cleaning Mode at the same time.
5
Start
*
*
*
*
DEEBOT must be powered ON to clean.
To choose another Cleaning Mode, please refer to section 3.3 Cleaning Mode Selection for
details.
Do not manually move the robot when it is cleaning or charging.
To add water into the Reservoir when DEEBOT is cleaning, pause the robot. Do not manually
move it. Press the Reservoir Release Button, and draw out the Reservoir.
Pause DEEBOT. Open the robot’s Top Cover.
Move the Power Switch to the OFF position
to power OFF. “I”=power ON; “O”=power
OFF.
7
Power OFF
*
When DEEBOT is not working, it is suggested
to keep it powered ON and charging.
15
EN
3. Operating and Programming
This is the most commonly used mode. In
AUTO Cleaning Mode, DEEBOT cleans in a
back and forth straight-line pattern.
This mode is applicable for areas of highly concentrated dirt or dust. In Spot Cleaning Mode,
cleaned with Spot Cleaning Mode using ECOVACS App.
AUTO Cleaning Mode1
3.3 Cleaning Mode Selection
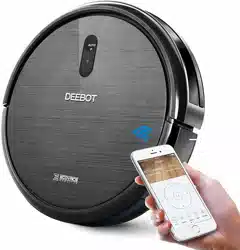
Modes are selected using the ECOVACS App.
Spot Cleaning Mode2
Area Cleaning Mode3
selected to be cleaned with Area Cleaning Mode using ECOVACS App.
3.4 Programming the Robot
using ECOVACS App.
3.5 Additional Settings
Virtual Boundary
When Continued Cleaning function is turned on, once DEEBOT is fully recharged, it automatically
returns to and continues to clean the uncleaned area not completed during the last cleaning task.
Continued Cleaning Function
Time Scheduling
ECOVACS App.
*
For models with app-connectivity, various functions can be performed using the ECOVACS
App.
16
EN
3. Operating and Programming
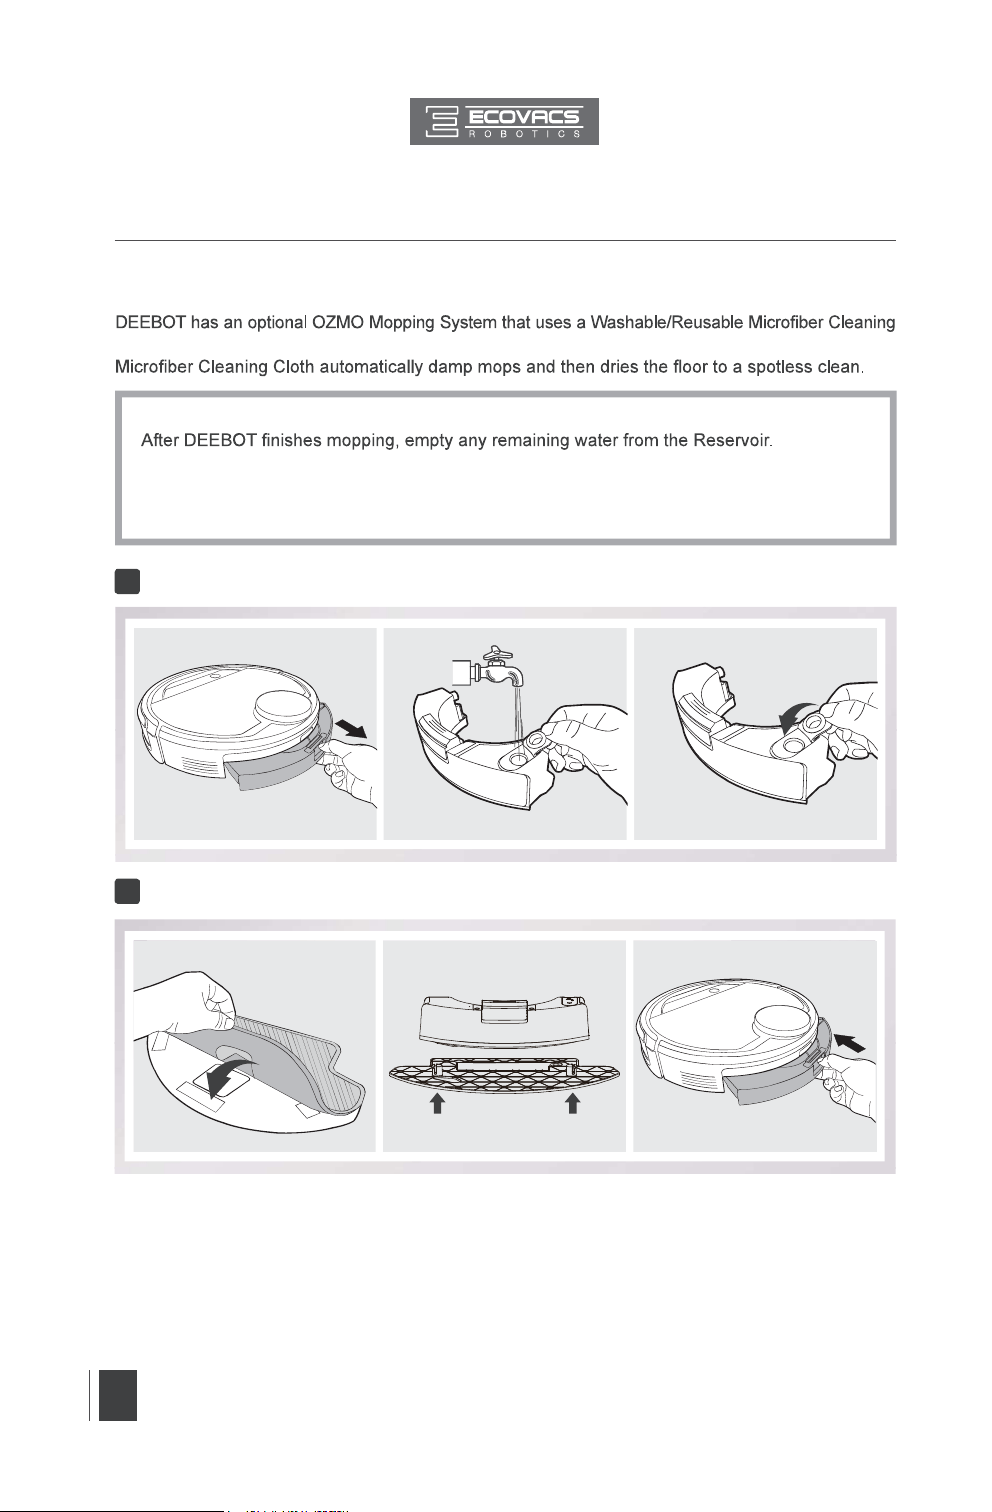
3.6 Optional OZMO Mopping System
*
When using the mopping system, DEEBOT automatically detects and avoids the rug.
*
*
Empty any remaining water from the Reservoir and remove the Cleaning Cloth Plate before
charging DEEBOT.
*
Always keep the Reservoir installed when the robot is cleaning or charging.
Cloth and a Cleaning Cloth Plate attached to a proprietary Reservoir. The Washable/Reusable
Add Water into the Reservoir
Attach Cleaning Cloth; Install the Cleaning Cloth Plate and the Reservoir.
1
2
17
EN
3. Operating and Programming
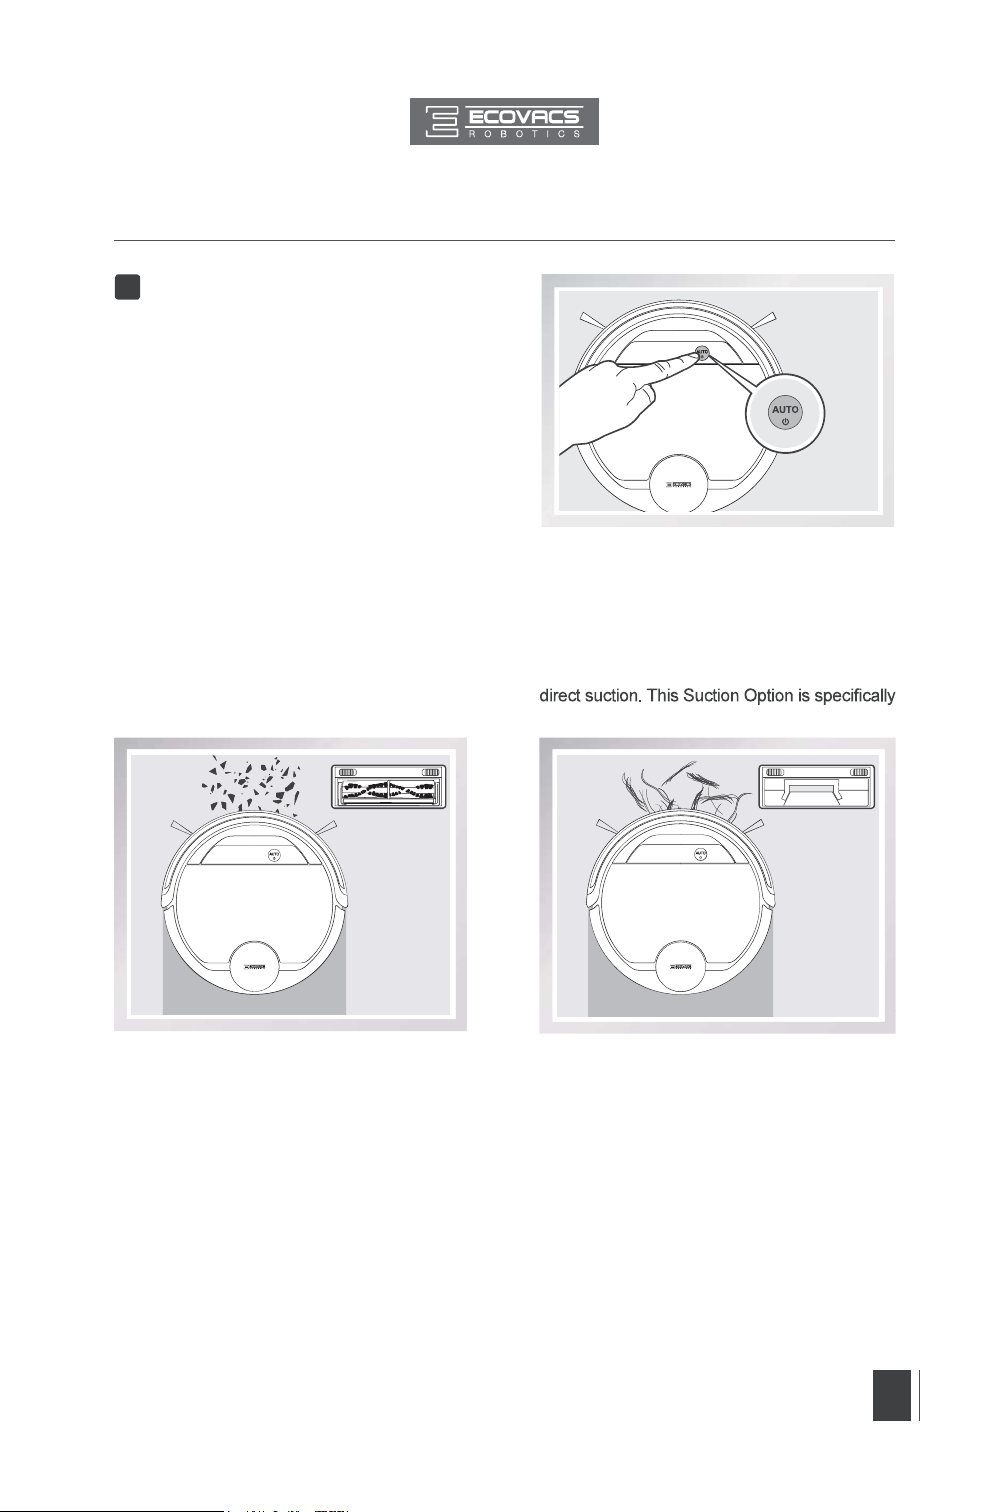
The robot has 2 interchangeable suction options for your convenience.
Main Brush Option: The best choice for deep
cleaning with a combination of the Main Brush
and strong suction. The Main Brush Option
comes pre-installed in DEEBOT.
Direct Suction Option: The best choice for
daily cleaning with the Main Brush removed for
designed to pick up hair without tangling.
3.7 Choosing a Suction Option
Select the desired Cleaning Mode. DEEBOT
sweeps, lifts, vacuums, mops and dries in the
selected mode.
Start3
18
EN
3. Operating and Programming
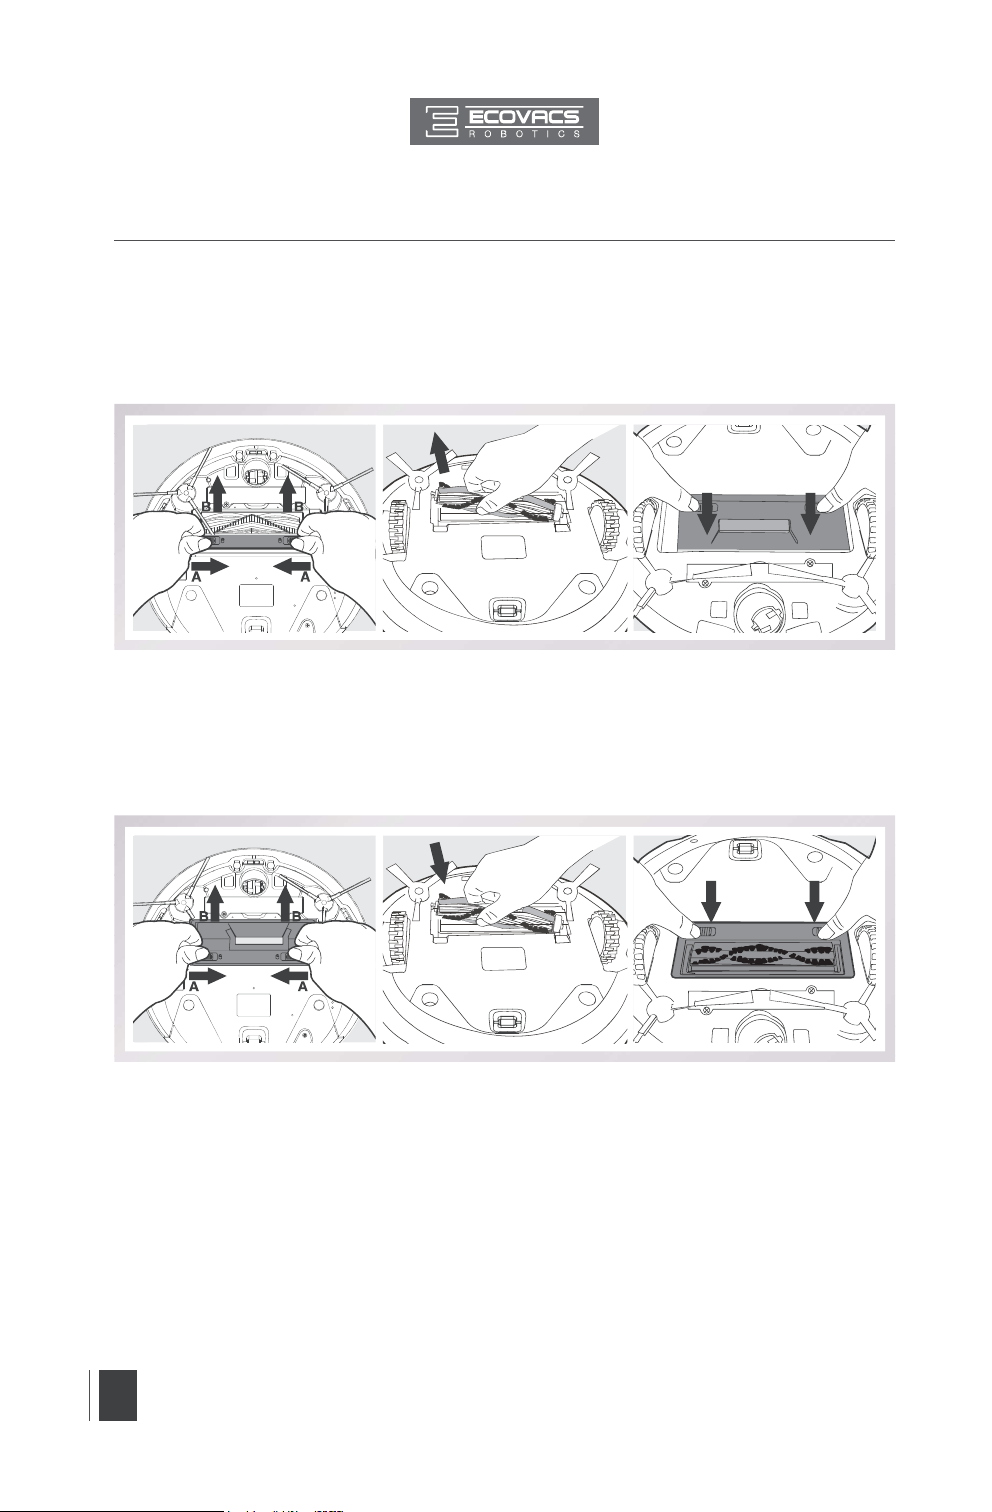
Install the Direct Suction Option
Turn the robot over. Push both buttons on the Main Brush Option and remove the Main Brush
Cover. Remove the Main Brush.
Line up the Direct Suction Option tabs with the slots on the bottom of the robot. Press until the
component clicks into place.
Install the Main Brush Option
Turn the robot over. Push both buttons on the Direct Suction Option and remove Direct Suction Option.
Insert the Main Brush into the bottom of the robot.
Line up the Main Brush Cover tabs with the slots on the bottom of the robot. Press until the component
clicks into place.

19
EN
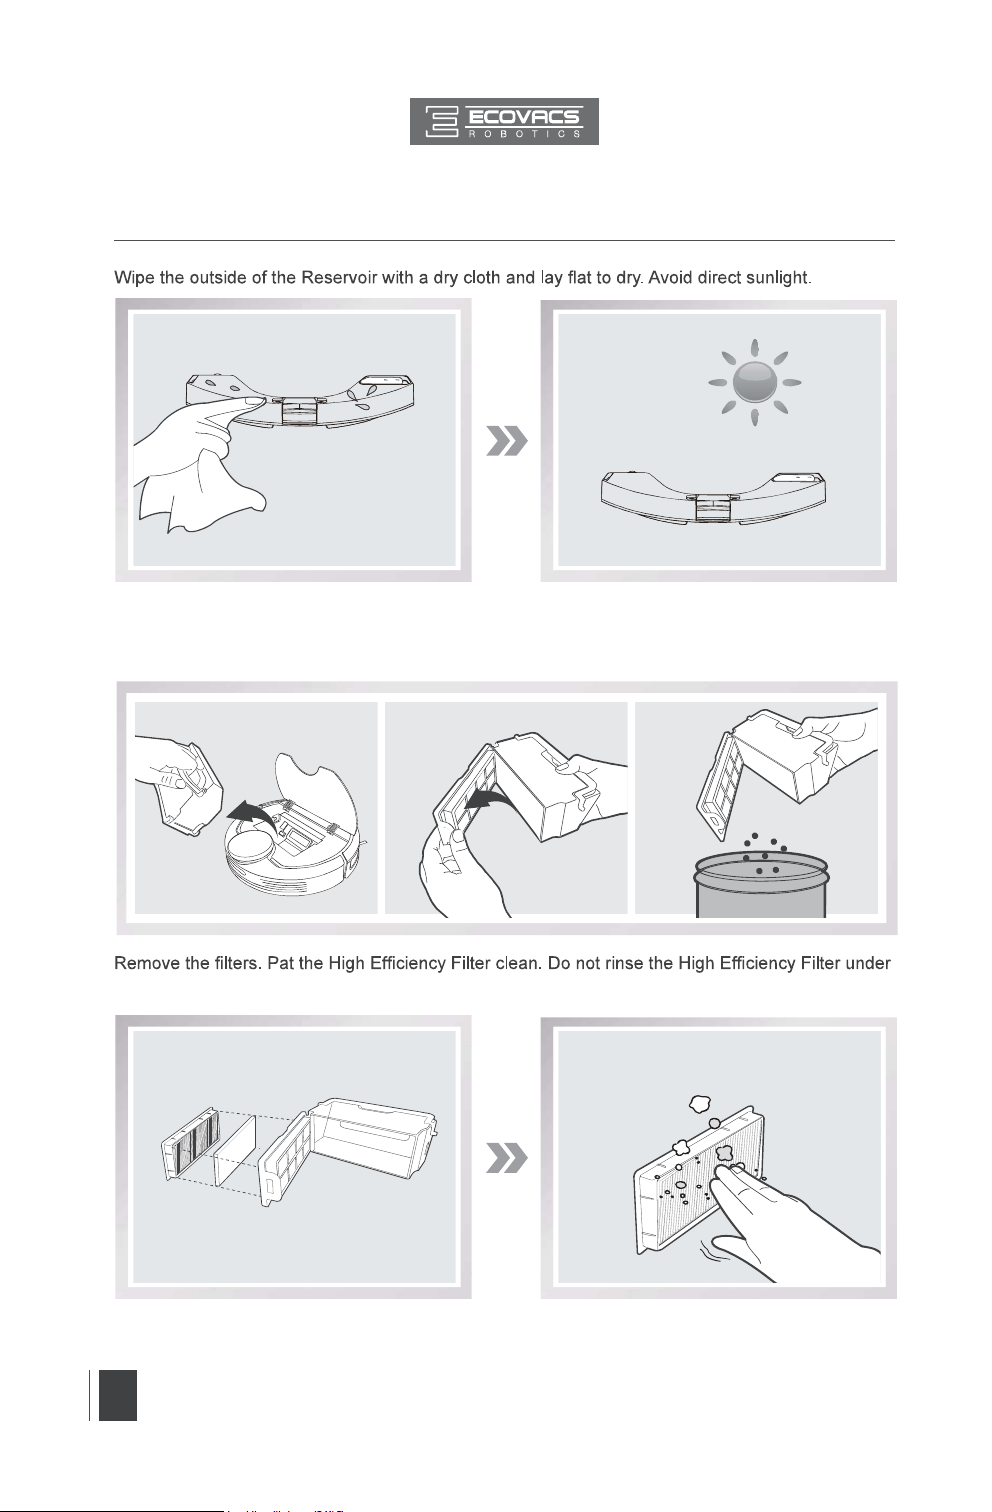
After DEEBOT finishes mopping, remove the Reservoir from DEEBOT, and maintain the
Reservoir, the Cleaning Cloth and the Cleaning Cloth Plate immediately.
Press the Release Button and pull to remove the Reservoir. Remove the Cleaning Cloth Plate and
the Cleaning Cloth.
Empty any remaining water from the Reservoir.
4.1 OZMO Mopping System
Before performing cleaning and maintenance on DEEBOT, power OFF the robot and unplug
the Docking Station.
4. Maintenance
20
EN
4. Maintenance
Open the robot’s Top Cover and remove the Dust Bin. Open the Dust Bin Lock and empty the Dust Bin.
water.
4.2 Dust Bin and Filters

21
EN
4. Maintenance
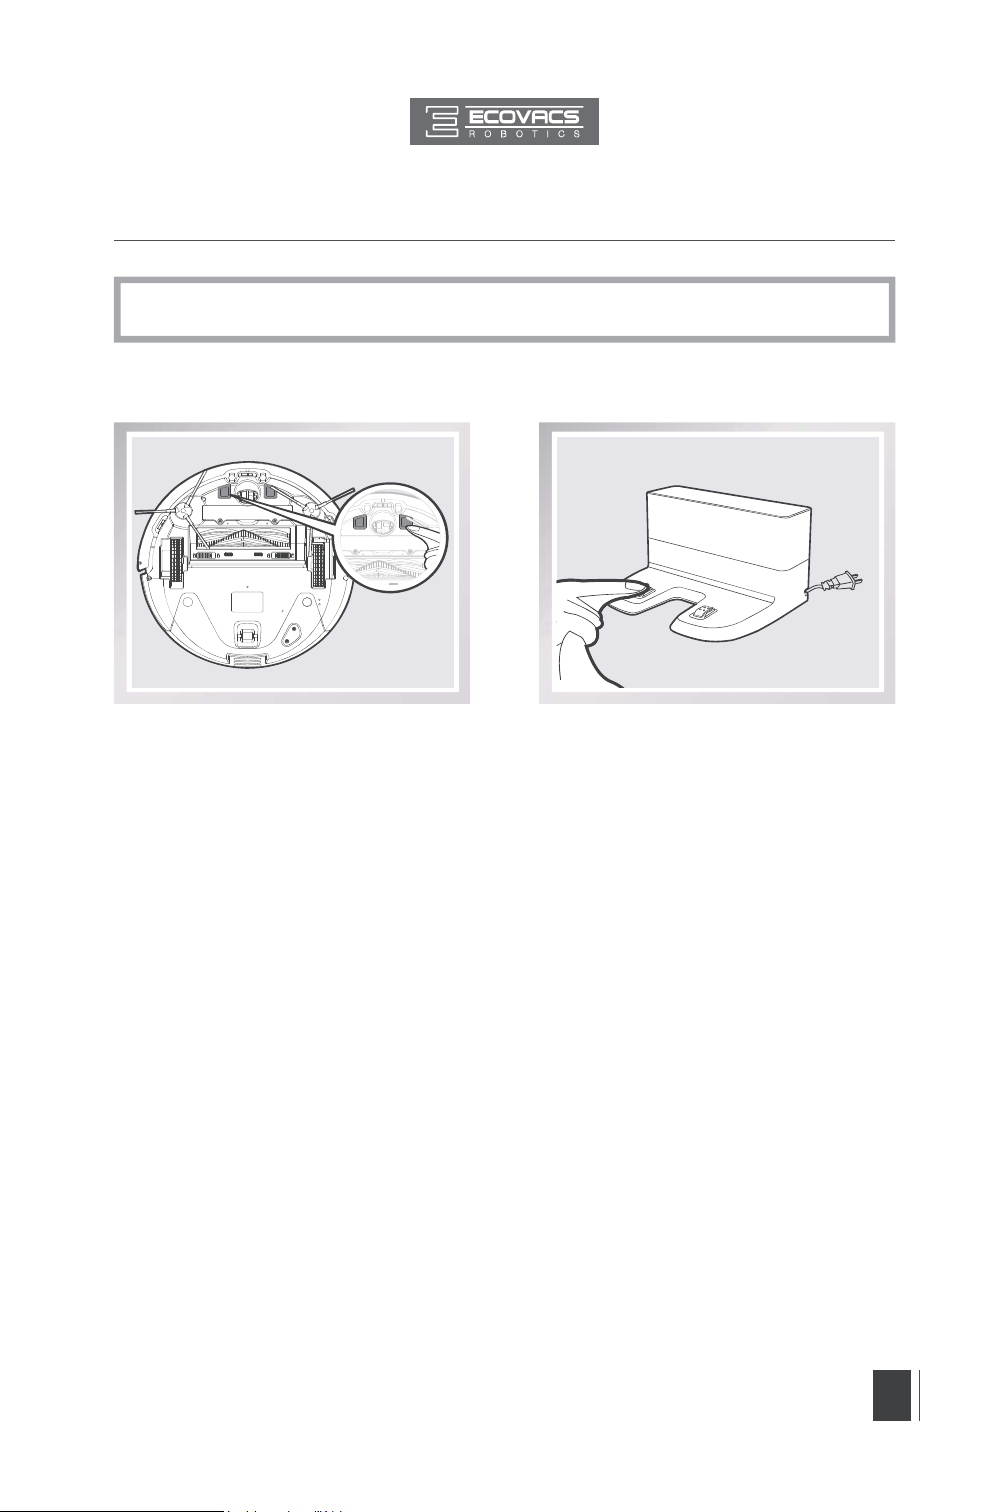
Rinse the Dust Bin and Filter Net under
running water.
Dry the Dust Bin and Filter Net completely
before reinstalling.
Main Brush
Turn the robot over. Push both buttons on the Main Brush Option and remove the Main Brush
cover. Remove the Main Brush. Use the Multi-Function Cleaning Tool to cut off and remove any
hair tangled around the Main Brush. Clean any tangled hair or debris from the Main Brush.
4.3 Main Brush, Direct Suction Option and Side Brushes
*
A Multi-Function Cleaning Tool is provided for easy maintenance. Handle with care, this
cleaning tool has sharp edges.
Direct Suction Option
Wipe the Direct Suction Option clean with a dry
cloth.
22
EN
4. Maintenance
Wipe the Anti-Drop Sensors with the brush of
the Multi-Function Cleaning Tool to maintain
their effectiveness.
Wipe the Bumper with the brush of the Multi-
Function Cleaning Tool.
Side Brushes
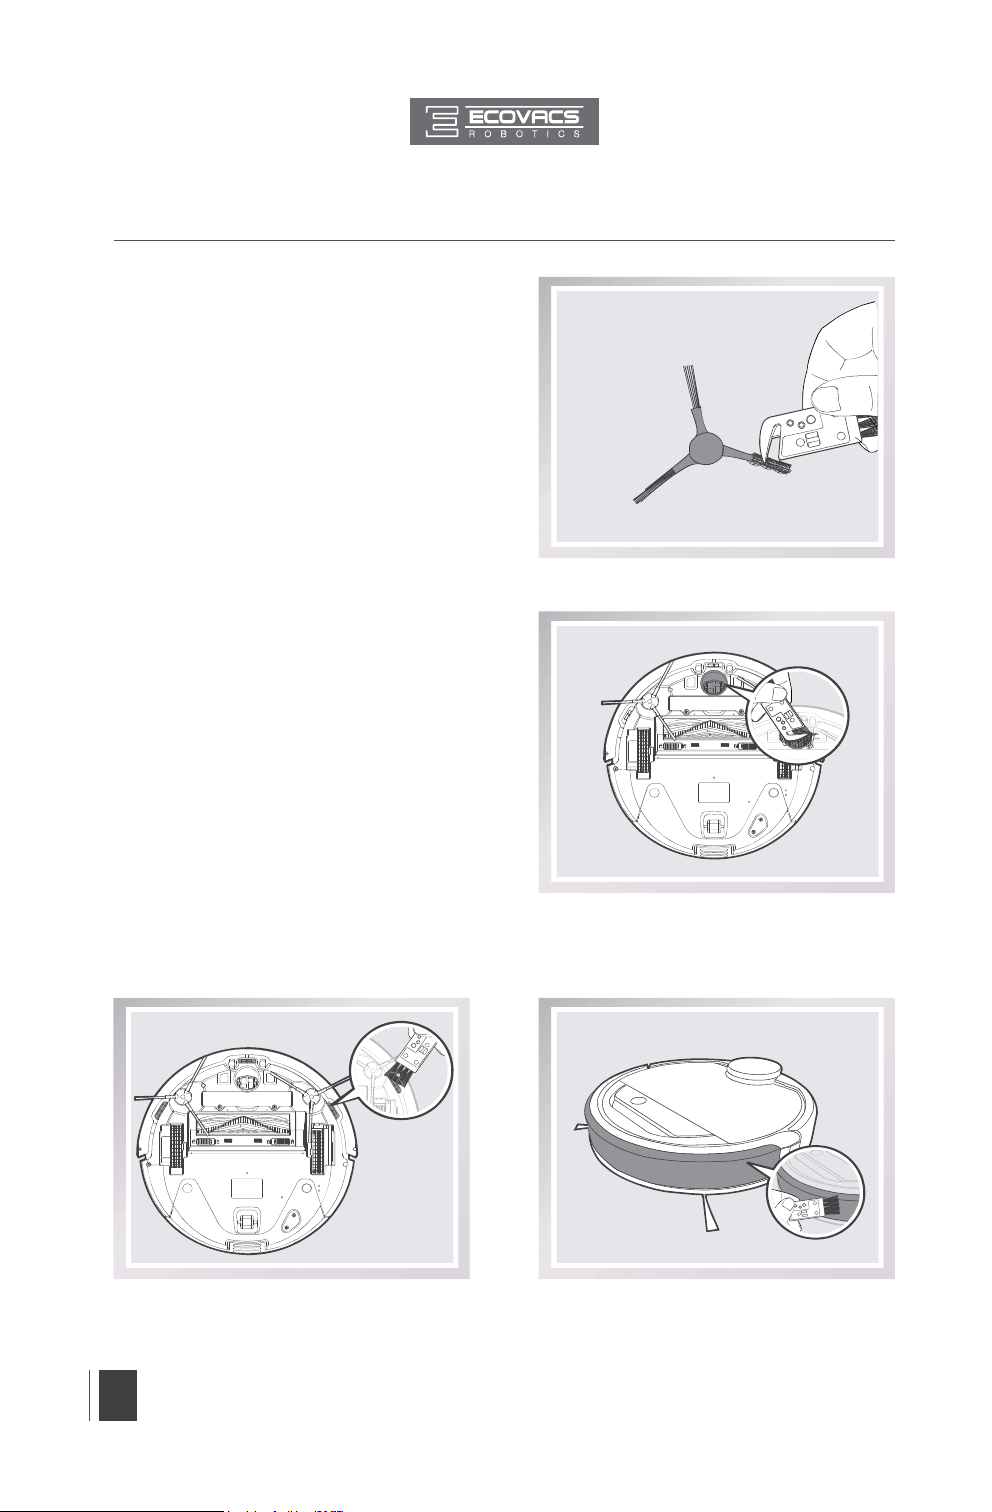
Remove the Side Brushes. Remove any hair or
debris tangled around the Side Brushes with the
provided Multi-Function Cleaning Tool, and wipe
their slots with a clean cloth.
4.4 Other Components
Use the Multi-Function Cleaning Tool to cut off
and remove any hair tangled around the Universal
Wheel.
23
EN
4. Maintenance
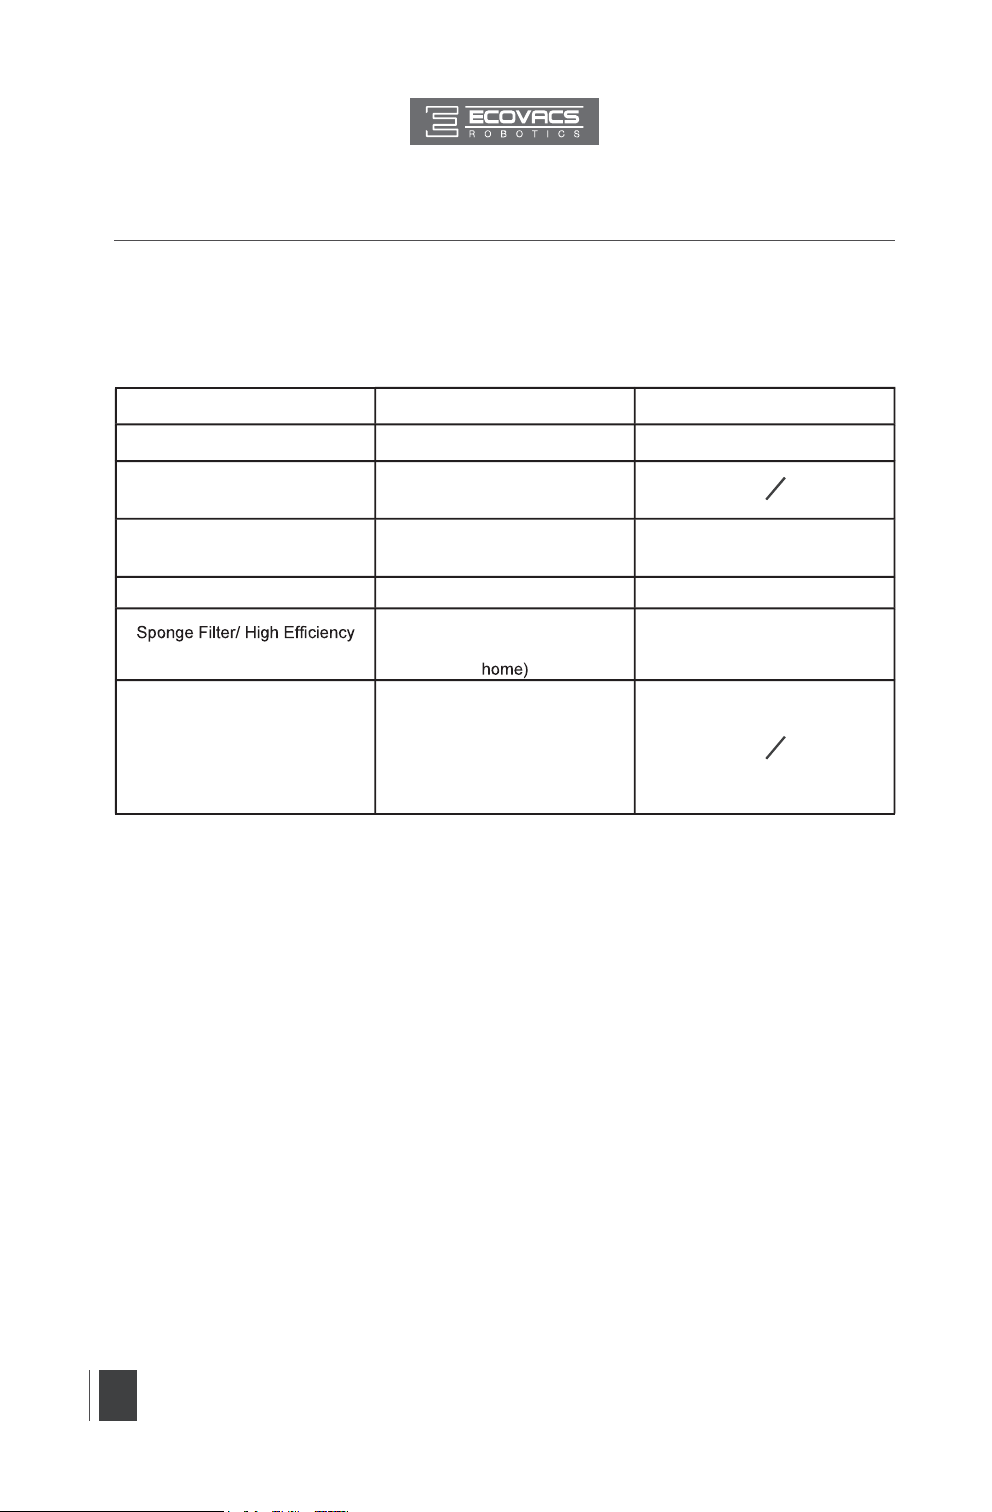
*
Before cleaning the robot’s Charging Contacts and Docking Station Pins, power OFF the robot
and unplug the Charging Dock.
Wipe the robot’s Charging Contacts and Docking Station Pins with a dry cloth to maintain their
effectiveness.
24
EN
4. Maintenance
4.5 Regular Maintenance
To keep DEEBOT running at peak performance, perform the maintenance and replacement
according to the following frequency. A multi-Function Cleaning Tool is provided for easy
maintenance. Handle with care, this cleaning tool has sharp edges.
Note: ECOVACS manufactures various replacement parts and assemblies. Please contact
Customer Service for more information on replacement parts.
Robot Part Maintenance Frequency Replacement Frequency
Cleaning Cloth After each use Every 50 washings
Dust Bin/Reservoir/Cleaning Cloth
Plate
After each use
Side brush Once every 2 weeks Every 3-6 months
Main Brush Once per week Every 6-12 months
Filter
Once per week
(twice per week with pets in Every 4-6 months
Universal Wheel
Anti-Drop Sensors
Bumper
Charging Contacts
Docking Station Pins
Once per week
25
EN
No. Malfunction Possible Causes Solutions
1
DEEBOT will
not charge.
DEEBOT is not powered ON. Power ON DEEBOT.
DEEBOT has not made a
connection with the Docking
Station.
Be sure that the robot’s Charging
Contacts have made a connection with
the Docking Station Pins. You may
move the robot manually to make the
connection if necessary.
Docking Station is unplugged while
DEEBOT is powered ON, which
causes battery consumption.
Plug in the Docking Station and ensure
DEEBOT is powered ON. Keep DEEBOT
on the Docking Station to make sure it
has a full battery to work at any time.
The battery is completely
discharged.
Re-activate the battery. Power ON.
Place DEEBOT on the Docking Station
by hand, remove after charging for 3
minutes, repeat 3 times; then charge
normally.
2
DEEBOT
cannot return
to the Docking
Station.
The Docking Station is not placed
properly.
Refer to section 3.2 to place the Docking
Station properly.
3
DEEBOT gets
into trouble
while working
and stops.
DEEBOT is tangled with something
drooping curtains, carpet fringe
DEEBOT will try various ways to get
itself out of trouble. If it is unsuccessful,
manually remove the obstacles and
restart.
4
DEEBOT
returns to
the Docking
Station before it
ng.
When battery power gets low,
DEEBOT automatically switches
to Return to Charger Mode and
returns to the Docking Station to
recharge itself.
This is normal. No solution necessary.
Working time varies according to
the selected Cleaning Mode.
This is normal. No solution necessary.
5
DEEBOT
will not clean
automatically
at scheduled
time.
Intelligent Scheduling or Time
Scheduling function is cancelled.
Please refer to section 3.4 for details.
Continued Cleaning function is
turned ON. DEEBOT has just
cleaning area.
This is normal. No solution necessary.
DEEBOT is powered OFF. Power ON DEEBOT.
The robot’s battery is low.
Keep DEEBOT powered ON and on the
Docking Station to make sure it has a full
battery to work at any time.
The robot’s Suction Intake is
blocked and/or its components are
tangled with debris.
Power OFF DEEBOT, clean the Dust Bin,
and invert the robot. Clean the robot’s
Suction Intake, Side Brushes and the
Main Brush as described in section 4.
5. Troubleshooting
26
EN
5. Troubleshooting
No. Malfunction Possible Causes Solutions
6
DEEBOT
misses
cleaning area.
The cleaning area needs tidying
up.
Please remove small objects from the
before DEEBOT starts cleaning.
7
The water is
not coming
out of the
Reservoir
when
DEEBOT is
mopping.
The Magnet on the Cleaning Cloth
Plate comes off.
Please contact Customer Service.
The Reservoir runs out of water. Add water into the Reservoir.
The water outlets on the bottom of
DEEBOT are clogged.
Check the water outlets on the bottom
and clean.
8
DEEBOT is
not able to
connect to
home Wi-Fi
network.
Incorrect home Wi-Fi username or
password entered.
Enter the correct home Wi-Fi username
and password.
DEEBOT is not within range of
your home Wi-Fi signal.
Make sure DEEBOT is within range of
your home Wi-Fi signal.
Network setup started before
DEEOBT was ready.
Turn ON Power Switch. Press the
RESET Button using a needle for 3
seconds. DEEBOT is ready for network
setup when DEEBOT plays a musical
slowly.
Your smartphone’s operating
system needs to be updated.
Update your smartphone’s operating
system. The ECOVACS App runs on iOS
9.0 and above, Android 4.0 and above.