Owners' Guide Deep Fryers
SAVE THESE INSTRUCTIONS
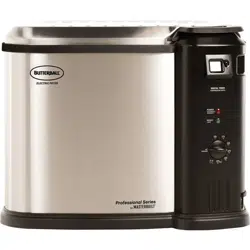
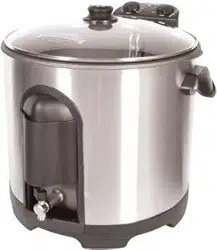
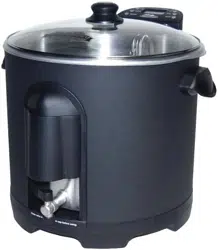
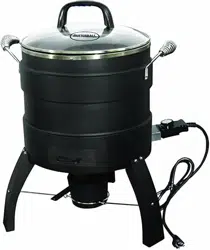
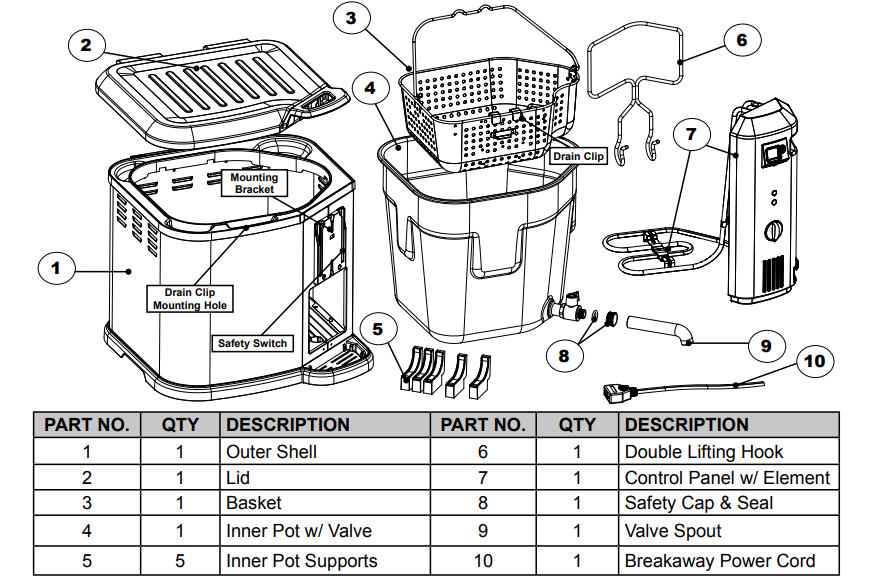
PARTS LIST
REPLACEMENT PARTS LIST

ASSEMBLY INSTRUCTIONS
Step 1
Insert hinge on lid (2) into outer shell (1). Lid will snap into place when assembled correctly. Note: To remove lid push tabs together on outer shell, and pull lid up.

Step 2
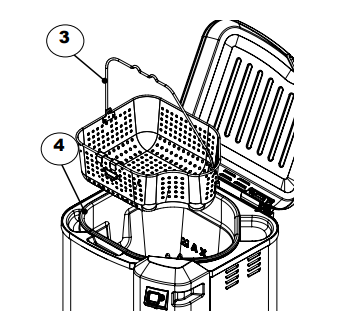
Insert inner pot (4) into outer shell (1). Insert inner pot at an angle to fit valve into side opening of outer shell. Step 4 Place basket (3) inside inner pot (4).

Step 3
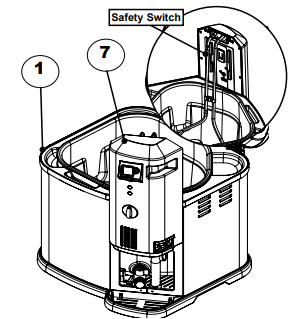
Slide control panel and element (7) down onto mounting bracket (shown in Step 2) on side of outer shell (1). Note: The control panel is correctly attached when the heating element is positioned inside the inner pot. Control panel must be correctly attached for appliance to operate. A built in safety switch on control panel will prevent element from heating if not mounted properly.
Step 4
Place basket (3) inside inner pot (4).
Step 5
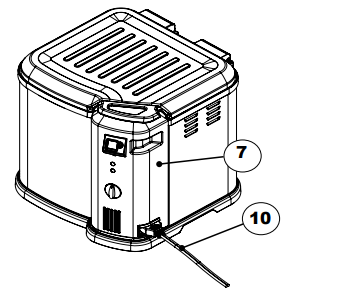
Insert breakaway power cord (10) into connection on control panel (7). Make sure “This Side Up” is shown on top for proper connection.
OPERATING INSTRUCTION
Step 1
Mount control panel and element onto bracket on outer shell (see Step 3 on pg. 3). Note: The control panel is correctly attached when the heating element is positioned inside the inner pot and fully submerged in cooking oil or water during use.
Step 2
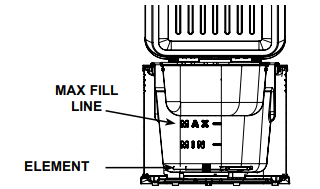
Add oil or water to the MIN 1.5 gallons (6 qts.) or MAX 2.75 gallons (11 qts.) fill line (see pg. 7). Note: Always fill oil to bottom of MAX fill line.
Step 3
Attach breakaway power cord to control panel (see Step 5 on pg. 3). Plug breakaway power cord into an outlet (refer to “Warnings & Important Safeguards” section of manual). POWER light will illuminate indicating the unit is plugged in and element is mounted correctly to the mounting bracket.
Step 4
Turn dial to set temperature. READY light will illuminate when unit has reached set temperature and is ready for use.
Step 5
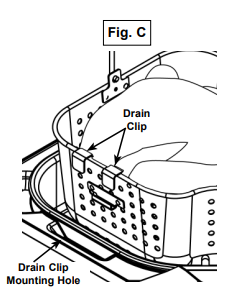
Push timer button to set to desired time. Once time has been set, release button and the timer will start. Timer counts down by minutes only until less than 1 minute remaining. Numbers will flash while counting down. Timer will beep when time has expired. To reset timer to 0, press and hold timer button while numbers are flashing. Release and press again to reset. Allow excess oil or water to drain by hooking the drain clip on basket into drain clip mounting hole (see Fig. C on pg. 6)
STARTER TIPS
FOR BEST RESULTS, read the following start up tips before using this product. Remember this is an ELECTRIC unit and has different characteristics than a gas unit. Note: Watch “Butterball Electric Fryer (XL): Features and Benefits” on www.masterbuilt.com.
FOR SAFETY, heating element only heats up when properly attached to mounting bracket (see previous page for instructions). This is a powerful heating element and may cause circuit breaker to trip. Minimize occurrences by operating any additional appliances on separate circuit. Tripping circuit breaker will NOT damage unit or electrical system.
PRE-HEATING oil or water may take up to 45 minutes. Take advantage of this time to prepare foods for cooking. For optimum performance, completely pre-heat unit to cooking temperature before frying or boiling foods. Keep lid CLOSED during pre-heating and cooking. This will reduce heating time and keep temperature more consistent.
POWER LIGHT (orange) will illuminate indicating breakaway power cord is plugged into outlet.
READY INDICATOR LIGHT (green) will turn ON when set temperature is reached. Indicator light will turn on and off to reflect set temperature.
CAUTION
- Do not use appliance without water or oil in pot. Unit can be severely damaged if heated while empty.
- Place unit on level and stable surface to prevent tipping.
- Hot when in use.
- Do not overfill pot past max fill line.
- Do not mix different types of oil at the same time.
- Never melt fat or lard on the heating element or in basket.
- Risk of fire and electric shock. Replace only with manufacturer’s cord set, part number 9001150010.
TURKEY PREPARATION
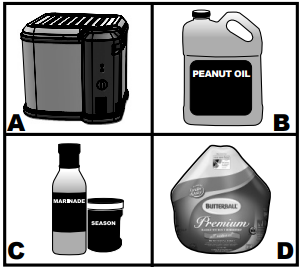
A. Butterball ® Electric Fryer
B. 2.75 gallons (11 qts.) of oil. Peanut oil is recommended because of the great taste and higher smoke point but any common cooking oil may be used.
C. Your favorite marinade and season
D. Butterball® 16-18 lb. (7.26-8.16 kgs.) turkey
Rinse thoroughly with warm water or soak in a warm water bath for no more than 30 minutes to ensure cavities are free of ice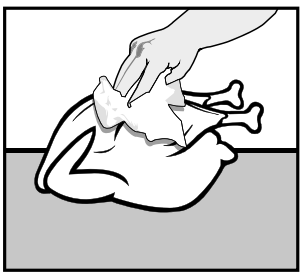
Pat turkey complete dry on outside with paper towels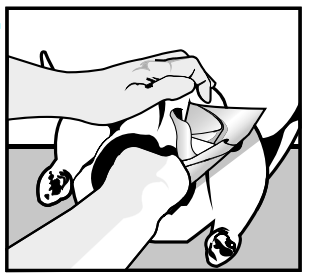
Dry inside cavities using paper towel as shown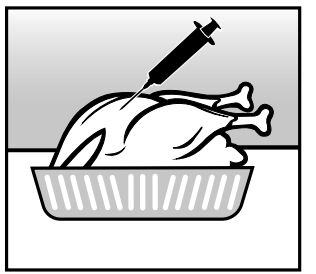
If desired inject with marinade (not included). Insert 4-8 oz. into each side of turkey breast, thigh, leg, and wing for a total of 8-16 oz.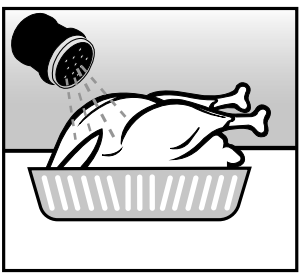
Season inside and outside with your favourite seasoning (not included)
HOW TO FRY A TURKEY IN THE BUTTERBALL ® ELECTRIC FRYER
DEEP FRIED WHOLE TURKEY
A 16-18 lb.(7.26-8.16 kgs.)turkey is recommended.However, you can deep fry up to a 20 Ib (9.07 kgs.)turkey in this unit.DO NOT EXCEED 20 lbs(9.07 kgs.). Frozen turkeys that are to be used for deep frying should be thoroughly defrosted 35°-40°F(1.6°-4.4℃). The turkey must be rinsed thoroughly or soaked in a warm water bath for no more than 30 minutes to remove any possibility of remaining ice crystals and then dried thoroughly with paper towels before immersing in hot oil.This will reduce splatter.
THAWING TURKEY
Allow approximately 24 hours for every 4 lbs.(1.8 kgs.)of turkey thawed in the refrigerator.
COOKING INSTRUCTIONS
- Ensure that the turkey is completely thawed and free of ice and water.Remove neck and giblet bag.Pay special attention to inner cavity area when checking for ice or water.
- Make sure drain valve is closed.Fill pot with oil to the bottom of max fill line.
- Set control dial to 375°F(191\'C)(pre-heating time may take up to 45 minutes).
- Close lid on the fryer.
- While oil is pre-heating,prepare the turkey (see pg.5).Inject with your favorite marinade and season the outside of the turkey with your favorite seasoning.
- CALCULATE COOKING TIME The formula for calculating turkey cooking time is to fry turkey 3.5-4 minutes per pound(0.45 kg.). Using a meat thermometer check turkey breast to ensure it has reached the appropriate cooking temperature 165°F-170°F (74°C-77°C). If you do not have a meat thermometer then fry turkey 4 minutes per pound (0.45 kg.).
- Ready indicator light(green) will illuminate when temperature is reached.
- Place turkey horizontally in basket, breast side up (Fig. A).

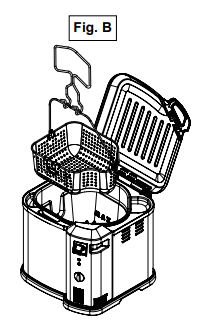
- Wearing protective gloves or mitts,hook the basket handle with the lifting hook and VERY SLOWLY lower the basket into the hot oil (Fig.B).
- With basket in place,close lid.
- Set digital timer to calculated time (see Operating Instructions pg.4).
- Be certain to cook for complete calculated time.
- When time is up, turn the turkey fryer to OFF and unplug from outlet.Lift the basket from the hot oil slowly,hooking the drain clip on basket into drain clip mounting hole (Fig.C).
- Allow turkey to rest in basket for 10 minutes before removing for carving and serving.The turkey can remain in the basket to cool until ready to serve.
NOTE:·Cooking conditions vary.Insert a food thermometer 2 inches (5.08 cm) into the deepest part of turkey breast and make sure an intermal temperature of 165°F (74°C) is reached. Unit uses slightly less than 3 gallons (12 qts.) of oil but ensure you have at least
2.75 gallons (11 qts.)of oil on hand. Butterballturkey is recommended,however if you have another brand please remove the pop-up cooking indicator and leg ties.
DEEP FRIED TURKEY BREAST
Follow the above directions and safety precautions and adjust formula to 7 minutes per pound (0.45 kg-).Start at 375\'F (191°℃) after lowering turkeybreast into unit reduce temperature to 325°F (163°C) for entire cooking time.
6 lbs
X
7 min
42 min Total Cooking Time
NOTE:·Reducing temperature to 325°F (163°℃) is for cooking a turkey breast ONLY
Do not reduce the temperature when cooking a whole turkey.
HOW TO STEAM USING APPLIANCE
- Add water to Max fill line.Do not add water past this line.Do not allow water to completely evaporate.This will cause element to overheat and damage the unit. Make sure basket is in place, as shown on left,to steam.
- Water will boil at 212°F (100°C). When steaming or boiling turn dial to 375°F (191℃) to ensure unit will not cycle and water will continue boiling.
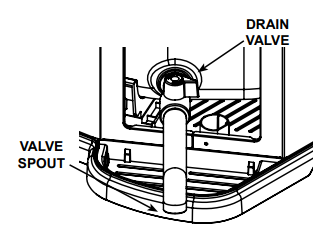
DRAIN VALVE
- Valve must be in OFF position.
- Remove safety cap on drain valve.
- Screw valve spout attachment onto drain valve. Do not oovertighten. This could damage threads and cause leakage. If spout becomes snug in the up position turn ccounterclockwise until it is in the down position.
- Align spout over container with opening facing downward.
Open valve to drain.
- Close valve when complete.
- Do NOT store water in appliance.
RESET FUNCTION
- Your appliance is equipped with an overheat safety feature.
- If appliance overheats it will shut off automatically.
- • To reset appliance, unplug from outlet and remove control panel. Insert a toothpick into small hole found on inside of control panel. Push button. This will reset unit.

CAVITIES
- Cavities in unit are designed to catch grease and condensation from steam. Wipe out cavities using damp cloth after each use.
- When steaming, cavities may become full before finished cooking, drain with sponge or other absorbent material. Caution! Water will be hot.

HOW TO CLEAN UNIT
WARNING
Do not place control panel under running water. Immersing control panel and cord can cause electrocution.
Masterbuilt recommends cleaning unit prior to use.
Clean lid, inner pot, valve spout, lifting hook and basket with a damp cloth or sponge using a mild detergent. Rinse and dry thoroughly.
Clean outer shell, cord, control panel and element with a damp cloth or sponge using a mild detergent. Dry thoroughly. NEVER put these parts in a dishwasher or submerge in water.
STORAGE & MAINTENANCE
CAUTION
- Disconnect electric cord from outlet, before cleaning, servicing and/or re moving heating element. Electrical shock can result in personal injury or death.
- Do not pour used oil in sink. Drain it back into oil containers.
Turn appliance off, unplug and let cool for 2 hours if using water, 5 hours if using oil before cleaning or storing.

TROUBLESHOOTING GUIDE
| SYMPTOM |
CAUSE |
POSSIBLE SOLUTION |
|
Power light won’t come on.
|
Unit not plugged into wall.
|
Check wall connection
|
| Breakaway power cord is loose or not connected. |
Disconnect and reconnect breakaway power cord sections. |
| Control panel is not attached to outer shell correctly |
Remove and reinstall. Make sure control panel is mounted onto the outer shell bracket to engage safety switch. |
| Fuse tripped. |
Make sure other appliances are not operating on the same electrical circuit. Check fuses |
| Reset tripped on controller. |
See reset function on pg. 7 |
| Power light is on, unit isn’t heating |
Temperature dial has not been set.
|
Unit will not begin heating until temperature is set.
|
| Temperature setpoint already reached. |
Allow unit to cool below setpoint or enter higher setpoint. |
| Unit takes excessive amount of time to heat up (longer than 1 hr 15 mins) |
Unit plugged into an extension cord.
|
Place unit close to an outlet so an extension cord is not needed.
|
| Lid not in place. |
Close lid on unit to retain heat. |
| Appliance overheats, then shuts off. |
Temperature sensor malfunctioning, overheat sensor shutting unit off.
|
Contact Masterbuilt at 1-800-215-7204
|
| No oil or water in pot. |
Fill pot and reset controller (see reset function pg. 7). |
FREQUENTLY ASKED QUESTIONS
Why won’t my fryer turn on?
The control panel features a “Safety Switch” that must be mounted properly on the mounting bracket of the outer shell for unit to power on (see pg.3). Power light will illuminate when control panel is mounted correctly and power cord is properly attached.
How much oil do I need to use?
Fryer will require approximately 2 gallons (8 qts) of oil max. The MAX fill line is the maximum amount of liquid that can safely be used in this unit. Filling to the line is more than enough water or oil to prepare most food in this (see pg. 7).
What type of oil should I use?
Peanut oil is recommended because of the great taste and higher smoke point but any common cooking oil may be used.
How hot will the oil become?
Oil will reach 375°F (191°C) in approximately 35 minutes. Oil temperature will decrease when food is placed in fryer.
Should I keep the lid on during use?
Yes, the lid helps retain heat, and keeps splatter inside unit.
Can an extension cord be used with this unit?
No, extension cords will lose electric current resulting in increased cooking time and decreased performance. Extension cords can also pose a trip hazard. I followed the formula and the food did not fully cook.
What went wrong?
Cooking conditions may vary. Food could have been cold. Bring food to room temperature before frying. Sometimes a cold or frozen spot does not allow that section to cook properly