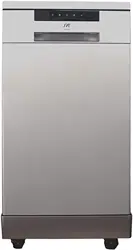
Documents: Go to download!
- Owner's manual - (English)
- USING YOUR DISHWASHER
- PROGRAMMING THE DISHWASHER
- MAINTENANCE AND CLEANING
- TROUBLESHOOTING TIPS
Table of contents
Washers & Dryers User Manual
USING YOUR DISHWASHER
Control Panel
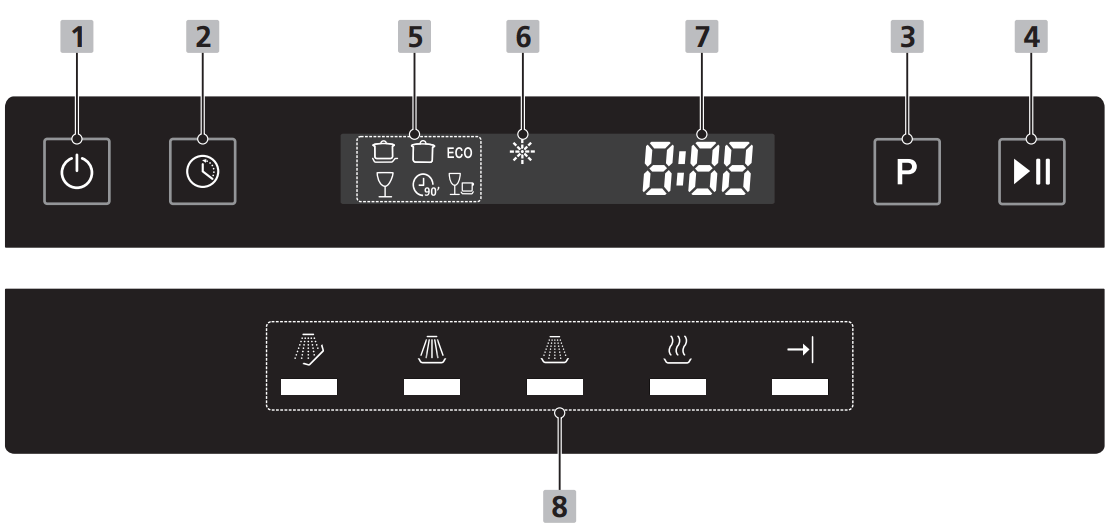
1. | Power | Press this button to turn on your dishwasher, the screen lights up. |
2. | Delay start | Press the Delay button to increase the delay start time. Delay a cycle for up to 24 hours in one-hour increments. After setting the delay time, press the Start/Pause button to start. |
3. | Program | Select the appropriate washing program, the selected program indicator will be lit. |
4. | Start/Cancel |
|
Display
5. Cycle indicator |
For heavily soiled items include pots and pans. With dried on food.
This is the standard program suitable for normally soiled loads, such as pots, plates, glasses and lightly soiled pans ECO ECO For normally soiled loads, such as pots, plates, glasses and lightly soiled pans.
For lightly soiled crockery and glass.
For normally soiled loads that need light up quick wash.
A shorter wash for lightly soiled loads that do not need drying. |
6. Rinse aid indicator | If the |
7. | To show the reminding time, delay time, error code etc. |
8. Progress indicator | The progress light that corresponds to the current operation turns on to show the progress of the cycle.
|
Function Of The Rinse Aid And Detergent
The rinse aid is released during the final rinse to prevent water from forming droplets on your dishes, which can leave spots and streaks. It also improves drying by allowing water to roll off the dishes. Your dishwasher is designed to use liquid rinse aids.
WARNING
Only use branded rinse aid for dishwasher. Never fill the rinse aid dispenser with any other substances (e.g. Dishwasher cleaning agent, liquid detergent). This would damage the appliance.
When to refill the rinse aid dispenser
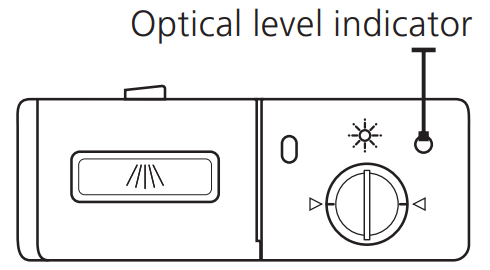
Unless the rinse-aid warning light (  ) on the control panel is on, you can always estimate the amount from the color of the optical level indicator located next to the cap. When the rinse-aid container is full, the indicator will be fully dark. The size of the dark dot decreases as the rinse-aid diminishes. You should never let the rinse aid level be less than 1/4 full.

Function of detergent
The chemical ingredients that compose the detergent are necessary to remove, crush and dispense all dirt out of the dishwasher. Most of the commercial quality detergents are suitable for this purpose.
WARNING
- Proper Use of Detergent
Use only detergent specifically made for dishwashers use. Keep your detergent fresh and dry.
Don't put powdered detergent into the dispenser until you are ready to wash dishes.
- Dishwasher detergent is corrosive! Keep dishwasher detergent out of the reach of children.
Filling The Rinse Aid Reservoir
| 1. Remove the rinse aid reservoir cap by rotating it counterclockwise | 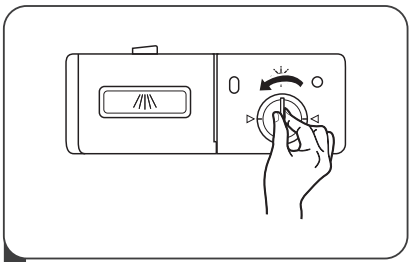 |
| 2. Carefully pour in the rinse-aid into its dispenser, whilst avoiding it to overflow. | 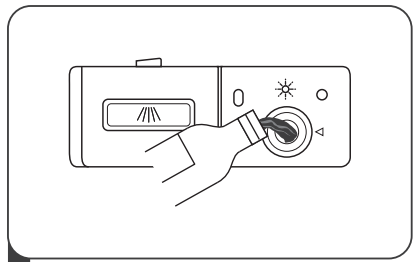 |
| 3. Carefully pour in the rinse-aid into its dispenser, whilst avoiding it to overflow. | 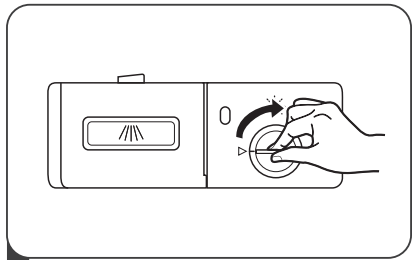 |
NOTE: Clean up any spilled rinse aid with an absorbent cloth to avoid excessive foaming during the next wash.
Adjusting the rinse aid reservoir
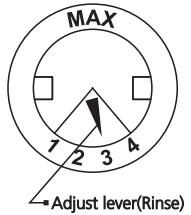 | Turn the rinse aid indicator dial to a number between 1 and 4. The higher the number, the more rinse aid the dishwasher uses.If the dishes are not drying properly or are spotted, adjust the dial to the next higher number until your dishes are spot-free. Reduce it if there are sticky whitish stains on your dishes or a bluish film on glassware or knife blades. |
Filling The Detergent Dispenser
| 1. Press the release catch on the detergent dispenser to open the cover. | 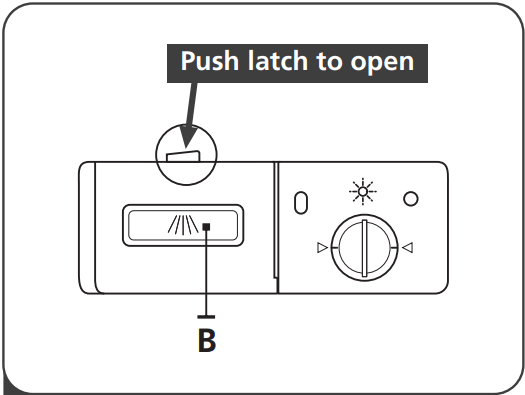 |
| 2. Add detergent into the larger cavity (A) for the main wash cycle . For more heavily soiled wash loads, also add some detergent into the smaller cavity (B) for the pre-wash cycle. | 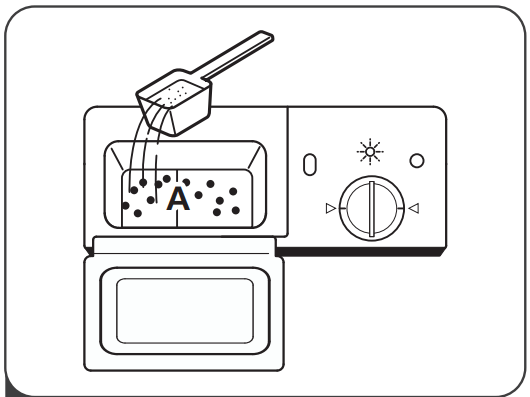 |
| 3. Close the cover and press on it until it locks into place. | 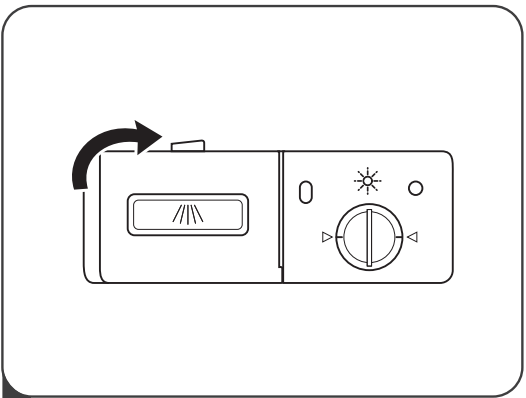 |
NOTE:
- Be aware that depending on the soiling of water, setting may be different.
- Please observe the manufacturer's recommendations on the detergent packaging.
Basket Used Tips
Adjusting the upper basket
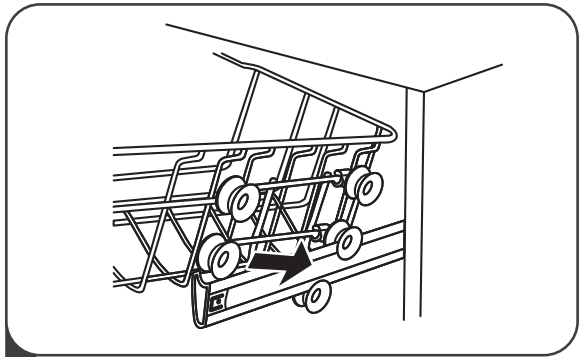
The height of the upper basket can be easily adjusted to accommodate taller dishes in either the upper or lower basket.
To adjust the height of the upper rack, follow these steps:
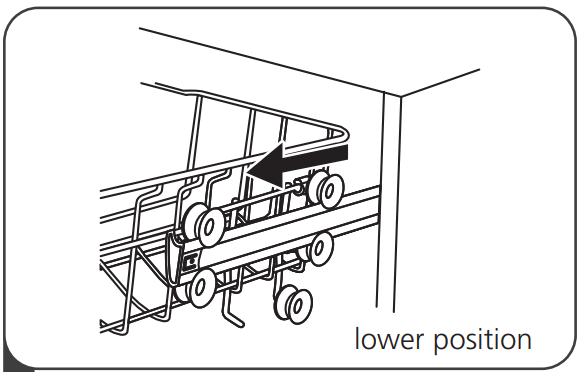 | 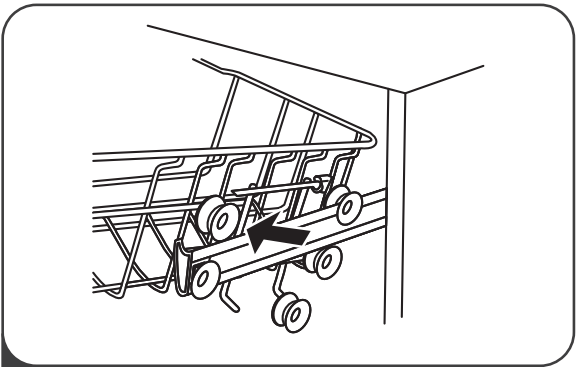 |
| 1. Pull out the upper basket. | 2. Remove the upper basket. |
 | 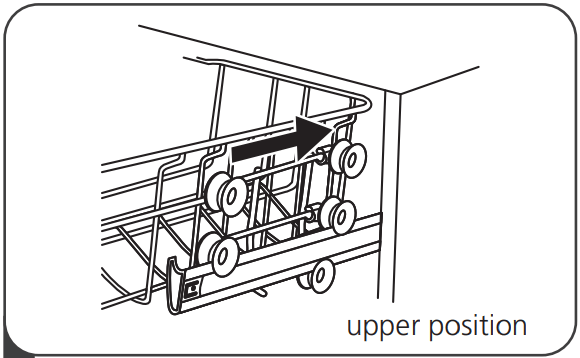 |
| 3. Re-attach the upper basket to upper or lower rollers. | 4. Push in the upper basket. |
Folding back the cup shelves
To make room for taller items in the upper basket, raise the cup rack upwards. You can then lean the tall glasses against it. You can also remove it when it is not required for use.

Preparing And Loading Dishes
- Consider buying utensils which are identified as dishwasher-proof.
- For particular items, select a program with the lowest possible temperature.
- To prevent damage, do not take glass and cutlery out of the dishwasher immediately after the program has ended.
For washing the following cutlery/dishes
Are not suitable
- Cutlery with wooden, horn china or mother-of-pearl handles
- Plastic items that are not heat resistant
- Older cutlery with glued parts that are not temperature resistant
- Bonded cutlery items or dishes
- Pewter or cooper items
- Crystal glass
- Steel items subject to rusting
- Wooden platters
- Items made from synthetic fibres
Are of limited suitability
- Some types of glasses can become dull after a large number of washes
- Silver and aluminum parts have a tendency to discolor during washing
- Glazed patterns may fade if machine washed frequently
Recommendations for loading the dishwasher
Scrape off any large amounts of leftover food. Soften remnants of burnt food in pans. It is not necessary to rinse the dishes under running water.
For best performance of the dishwasher, follow these loading guidelines.
(Features and appearance of baskets and cutlery baskets may vary from your model.)
- Place objects in the dishwasher in following way:
- Items such as cups, glasses, pots, pans, etc. are faced downwards.
- Curved items, or ones with recesses, should be loaded aslant so that water can run off.
- All utensils are stacked securely and can not tip over.
- All utensils are placed in the way that the spray arms can rotate freely during washing.
- Load hollow items such as cups, glasses, pans etc. With the opening facing downwards so that water cannot collect in the container or a deep base.
- Dishes and items of cutlery must not lie inside one another, or cover each other.
- To avoid damage, glasses should not touch one another.
- The upper basket is designed to hold more delicate and lighter dishware such as glasses, coffee and tea cups.
- Long bladed knives stored in an upright position are a potential hazard!
- Long and sharp items of cutlery such as carving knives must be positioned horizontally in the upper basket.
- Please do not overload your dishwasher. This is important for good results and for reasonable consumption of energy.
NOTE: Very small items should not be washed in the dishwasher as they could easily fall out of the basket.
PROGRAMMING THE DISHWASHER
Wash Cycle Table
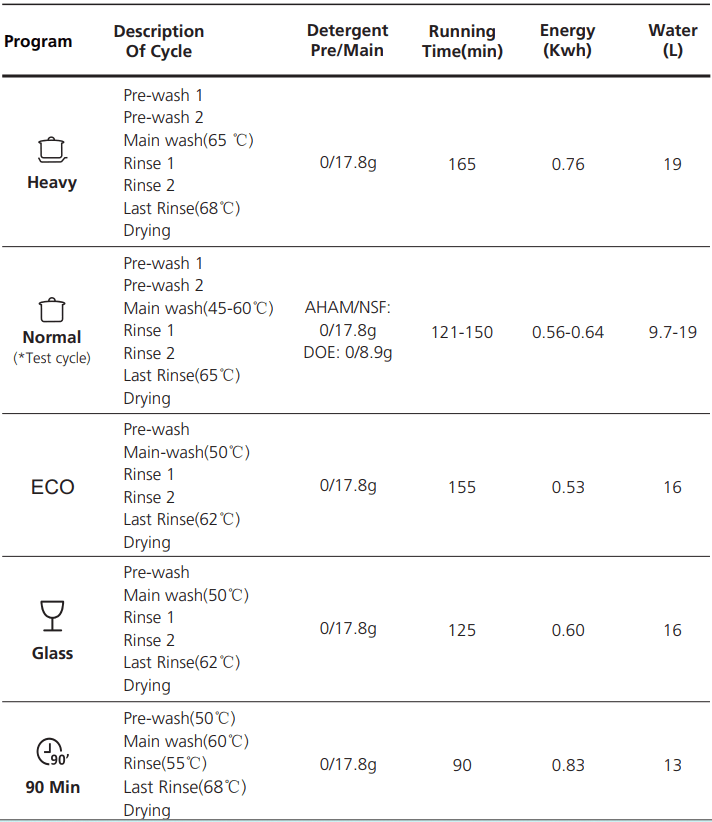

Starting A Wash Cycle
- Pull out the lower and upper basket, load the dishes and push them back. It is recommended to load the lower basket first, then the upper one.
- Pour in the detergent.
- Insert the plug into the socket. Make sure that the water supply is turned on to full pressure.
- Open the door, press the power button to switch on the machine.
- Choose a program, the response light will turn on.
- Press the Start/Cancel button, then close the door within four seconds, the dishwasher will start its cycle.
Changing The Program Mid-cycle
A wash cycle can only be changed if it has been running for a short time otherwise, the detergent may have already been released and the dishwasher may have already drained the wash water. If this is the case, the dishwasher needs to be reset and the detergent dispenser must be refilled. To reset the dishwasher, follow the instructions below:
- Open the door a little to stop the dishwasher, after the spray arm stop working, you can open the door completely.
- Press Start/Cancel button for more than 3 seconds to cancel the program.
- Press the Program button to select the desired program.
- Press the Start/Cancel button, then close the door within four seconds, the dishwasher will start after 10 seconds.

Forget To Add A Dish?
A forgotten dish can be added any time before the detergent dispenser opens. If this is the case, follow the instructions below:
- Open the door a little to stop the dishwasher, after the spray arm stop working, you can open the door completely.
- Add the forgotten dishes.
- Press the Start/Cancel button, then close the door within four seconds, the dishwasher will start after 10 seconds.

| WARNING It is dangerousto open the door mid-cycle, as hot steam may scald you. |  |
NOTE: If you close the door more than 4 seconds after pressed the Start/Cancel button, the cycle will pause and not run.
MAINTENANCE AND CLEANING
External Care
The door and the door seal
Clean the door seals regularly with a soft damp cloth to remove food deposits.
When the dishwasher is being loaded, food and drink residues may drip onto the sides of the dishwasher door. These surfaces are outside the wash cabinet and are not accessed by water from the spray arms. Any deposits should be wiped off before the door is closed.
The control panel
If cleaning is required, the control panel should be wiped with a soft damp cloth only.
WARNING
- To avoid penetration of water into the door lock and electrical components, do not use a spray cleaner of any kind.
- Never use abrasive cleaners or scouring pads on the outer surfaces because they may scratch the finish. Some paper towels may also scratch or leave marks on the surface.
Internal Care
Filtering system
The filtering system in the base of the wash cabinet retains coarse debris from the washing cycle. The collected coarse debris may cause the filters to clog. Check the condition of the filters regularly and clean them if necessary under running water.
Follow the steps below to clean the filters in the wash cabinet.
NOTE:
Pictures are only for reference, different models of the filtering system and spray arms may be differen
| 1. Hold the coarse filter and rotate it counter-clockwise to unlock the filter. Lift the filter upwards and out of the dishwasher. | 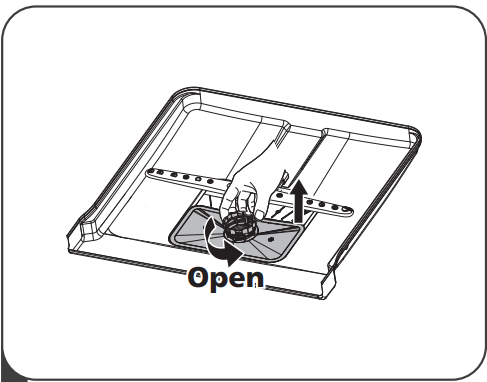 |
| 2. The fine filter can be pulled off the bottom of the filter assembly. The coarse filter can be detached from the main filter by gently squeezing the tabs at the top and pulling it away. | 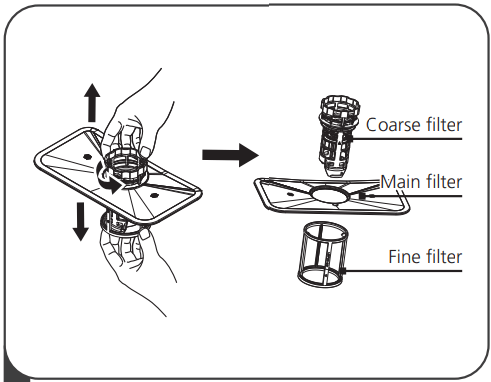 |
| 3. Larger food remnants can be cleaned by rinsing the filter under running water. For a more thorough clean, use a soft cleaning brush. | 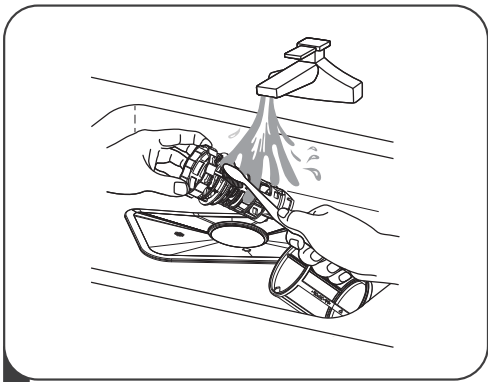 |
| 4. Reassemble the filters in the reverse order of the disassembly, replace the filter insert, and rotate clockwise to the close arrow. | 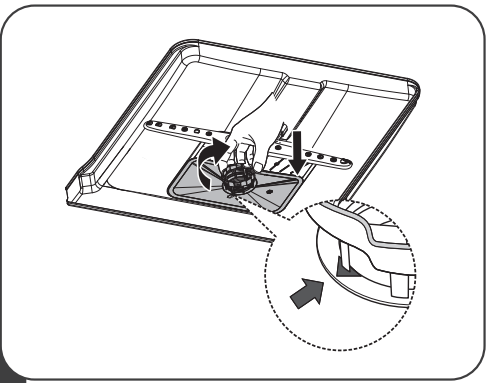 |
WARNING
- Do not over tighten the filters. Put the filters back in sequence securely, otherwise coarse debris could get into the system and cause a blockage.
- Never use the dishwasher without filters in place. Improper replacement of the filter may reduce the performance level of the appliance and damage dishes and utensils.
Spray arms
It is necessary to clean the spray arms regularly for hard water chemicals will clog the spray arm jets and bearings.
To clean the spray arms, follow the instructions below:
| 1. To remove the upper spray arm, hold the nut in the center still and rotate the spray arm counterclockwise to remove it. | 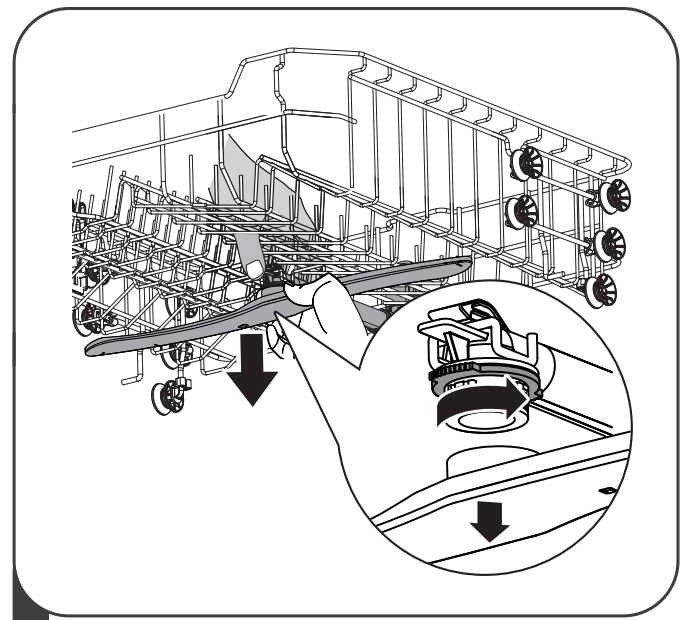 |
| 2. To remove the lower spray arm, pull out the spray arm upward. | 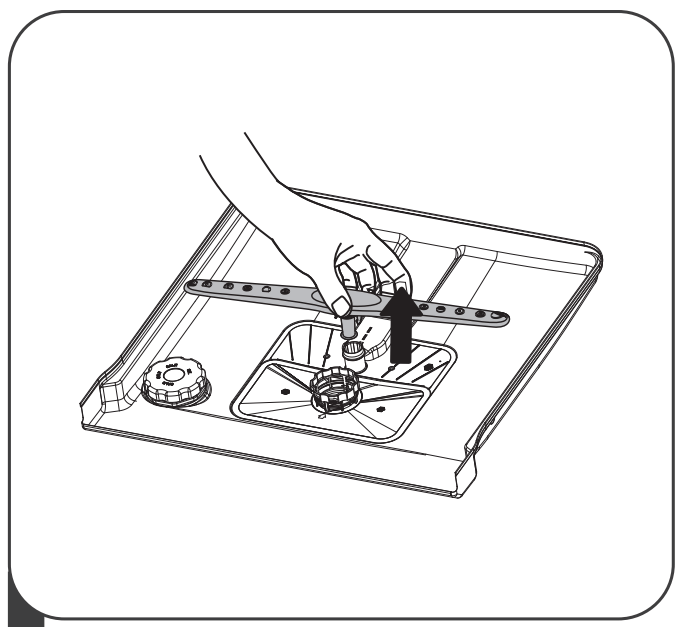 |
| 3. Wash the arms in soapy and warm water and use a soft brush to clean the jets. Replace them after rinsing them thoroughly. | 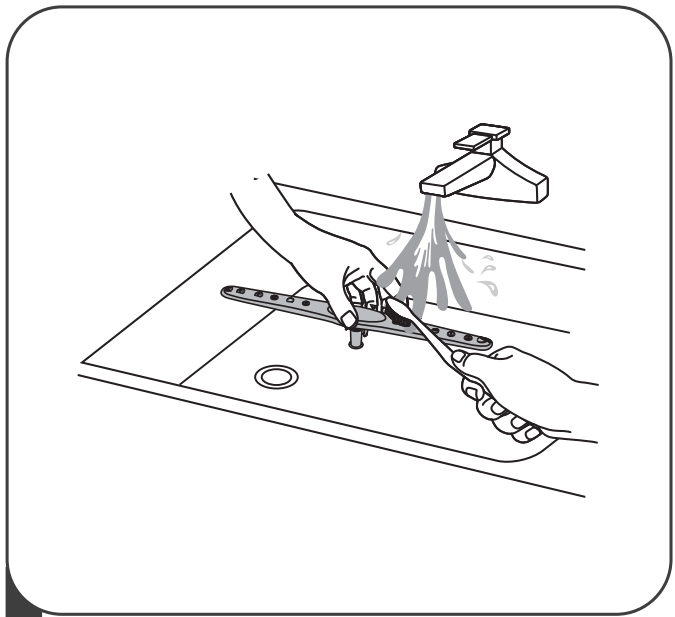 |
Caring For The Dishwasher
Frost precaution
Please take frost protection measures on the dishwasher in winter. Every time after washing cycles, please operate as follows:
- Cut off the electrical power to the dishwasher at the supply source.
- Turn off the water supply and disconnect the water inlet pipe from the water valve.
- Drain the water from the inlet pipe and water valve. (Use a pan to gather the water)
- Reconnect the water inlet pipe to the water valve.
- Remove the filter at the bottom of the tub and use a sponge to soak up water in the sump.
After every wash
After every wash, turn off the water supply to the appliance and leave the door slightly open so that moisture and odors are not trapped inside.
Remove the plug
Before cleaning or performing maintenance, always remove the plug from the socket.
No solvents or abrasive cleaning
To clean the exterior and rubber parts of the dishwasher, do not use solvents or abrasive cleaning products. Only use a cloth with warm soapy water.
To remove spots or stains from the surface of the interior, use a cloth dampened with water an a little vinegar, or a cleaning product made specifically for dishwashers.
When not in use for a longtime
It is recommend that you run a wash cycle with the dishwasher empty and then remove the plug from the socket, turn off the water supply and leave the door of the appliance slightly open. This will help the door seals to last longer and prevent odors from forming within the appliance.
Moving the appliance
If the appliance must be moved, try to keep it in the vertical position. If absolutely necessary, it can be positioned on its back.
Seals
One of the factors that cause odors to form in the dishwasher is food that remains trapped in the seals. Periodic cleaning with a damp sponge will prevent this from occurring.
TROUBLESHOOTING TIPS
Problem | Possible Causes | What To Do |
|---|---|---|
| Dishwasher doesn't start | Fuse blown, or the circuit break tripped. | Replace fuse or reset circuit breaker. Remove any other appliances sharing the same circuit with the dishwasher. |
| Power supply is not turned on. | Make sure the dishwasher is turned on and the door is closed securely. Make sure the power cord is properly plugged into the wall socket. | |
| Water pressure is low | Check that the water supply is connected properly and the water is turned on. | |
| Door of dishwasher not properly closed. | Make sure to close the door properly and latch it. | |
| Water not pumped from dishwasher | Twisted or trapped drain hose. | Check the drain hose. |
| Filter clogged. | Check the coarse filter. | |
| Kitchen sink clogged. | Check the kitchen sink to make sure it is draining well. If the problem is the kitchen sink that is not draining, you may need a plumber rather than a serviceman for dishwashers. | |
| Suds in the tub | Wrong detergent. | Use only the special dishwasher detergent to avoid suds. If this occurs, open the dishwasher and let suds evaporate. Add 1 gallon of cold water to the bottom of the dishwasher. Close the dishwasher door, then select any cycle. Initially, the dishwasher will drain out the water. Open the door after draining stage is complete and check if the suds have disappeared. Repeat if necessary. |
| Spilled rinse-aid. | Always wipe up rinse-aid spills immediately. | |
| Stained tub interior | Detergent with colourant may have been used. | Make sure that the detergent has no colourant. |
| White film on inside surface | Hard water minerals. | To clean the interior, use a damp sponge with dishwasher detergent and wear rubber gloves. Never use any other cleaner than dishwasher detergent otherwise, it may cause foaming or suds. |
| There are rust stains on cutlery | The affected items are not corrosion resistant. | The items should be corrosion resistant. |
| Knocking noise in the dishwasher | A spray arm is knocking against an item in a basket | Interrupt the program and rearrange the items which are obstructing the spray arm. |
| Rattling noise in the dishwasher | Items of crockery are loose in the dishwasher. | Interrupt the program and rearrange the items of crockery. |
| Knocking noise in the water pipes | This may be caused by on-site installation or the cross-section of the piping. | This has no influence on the dishwasher function. If in doubt, contact a qualified plumber. |
| The dishes are not clean | The dishes were not loaded correctly. | See notes in "Loading & unloading your dishwasher". |
| The program was not powerful enough. | Select a more intensive program. | |
| The dishes are not clean. | Not enough detergent was dispensed. | Use more detergent, or change your detergent. |
| Items are blocking the movement of the spray arms. | Rearrange the items so that the spray can rotate freely. | |
| The filter combination is not clean or is not correctly fitted in the base of wash cabinet. This may cause the spray arm jets to get blocked. | Clean and/or fit the filter correctly. Clean the spray arm jets. | |
| Cloudiness on glassware. | Combination of soft water and too much detergent. | Use less detergent if you have soft water and select a shorter cycle to wash the glassware and to get them clean. |
| Black or grey marks on dishes | Aluminium utensils have rubbed against dishes | Use a mild abrasive cleaner to eliminate those marks. |
| Detergent left in dispenser | Dishes block detergent dispenser | Re-loading the dishes properly. |
| The dishes aren't drying | Improper loading | Load the dishwasher as suggested in the directions. |
| Too little rinse-aid | Increase the amount of rinse-aid/refill the rinse-aid dispenser. | |
| Dishes are removed too soon | Do not empty your dishwasher immediately after washing. Open the door slightly so that the steam can come out. Take out the dishes until the inside temperature is safe to touch. Unload the lower basket first to prevent the dropping water from the upper basket. | |
| Wrong program has been selected. | With a short program, the washing temperature is lower, decreasing cleaning performance. Choose a program with a long washing time. | |
| Use of cutlery with a low-quality coating. | Water drainage is more difficult with these items. Cutlery or dishes of this type are not suitable for washing in the dishwasher. |
Error Codes
| Codes | Meanings | Possible Causes |
|---|---|---|
| E1 | Longer inlet time. | Faucets is not opened, or water intake is restricted, or water pressure is too low. |
| E3 | Not reaching required temperature. | Malfunction of heating element |
| E4 | Overflow. | Some element of dishwasher leaks. |
WARNING
- If overflow occurs, turn off the main water supply before calling a service.
- If there is water in the base pan because of an overfill or small leak, the water should be removed before restarting the dishwasher.
See other models: SU-2081B SD-9252SS SPT


 Main-wash
 Drying
 Program end