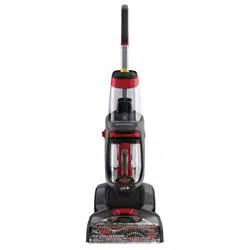
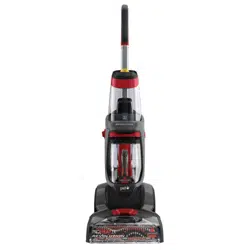
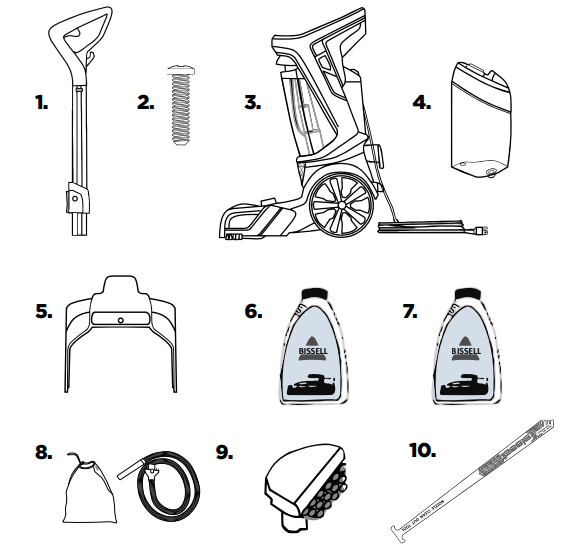
Your deep cleaner comes in four easy-to-assemble components and an accessory bag.
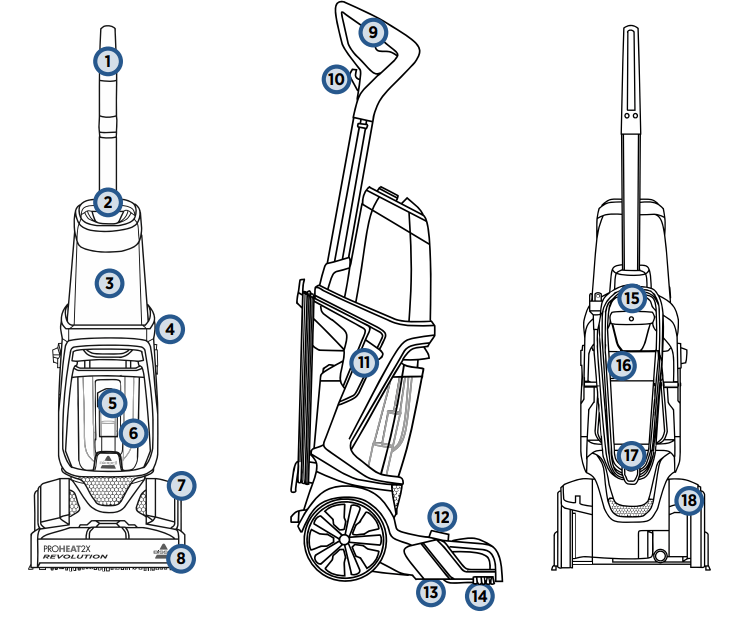
Base
Upper Handle
Clean Water Tank
Carry Handle
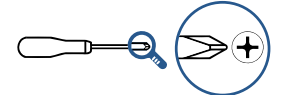
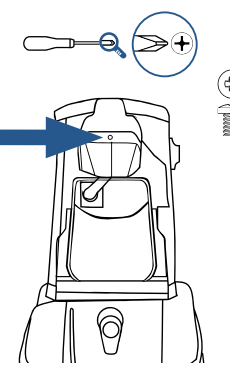
In step 3, you will need to use a Phillips screwdriver.
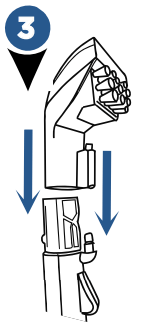
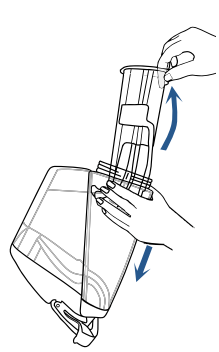
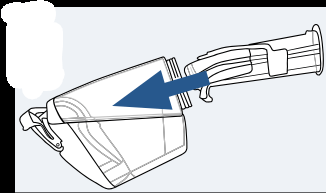
First, insert the Upper Handle at the top of the base until you hear a “click”.
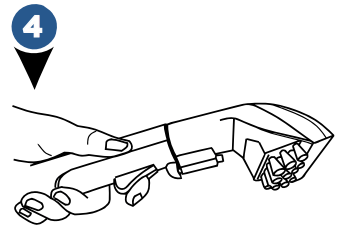
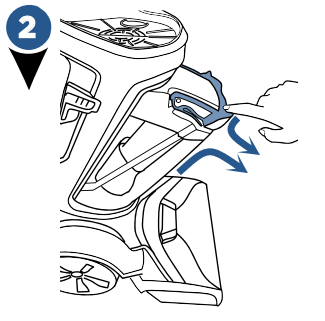
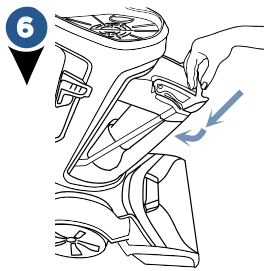
Next, align the Carry Handle with the slots on either side of the base (behind the Power Switch and Cleaning Mode Switch). The Carry Handle will “click” into place. Important: Do NOT put the clean tank on the machine until step 4.
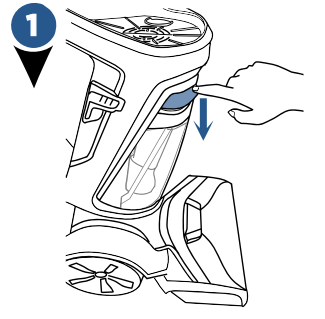
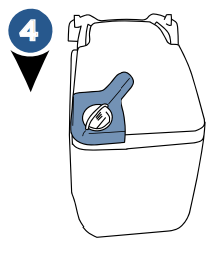
Using a Phillips-head screwdriver, secure the Carry Handle and the Upper Handle with the screw that’s taped to the Upper Handle.
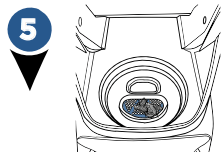
Wrap the cord around the carry handle and quick release hook.
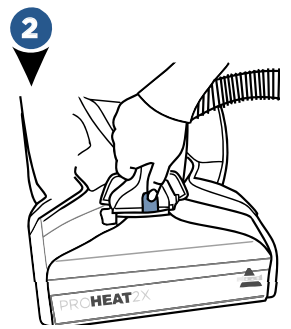
At the bottom of the Upper Handle, align the Clean Water Tank with the grooves and slide the tank into place.
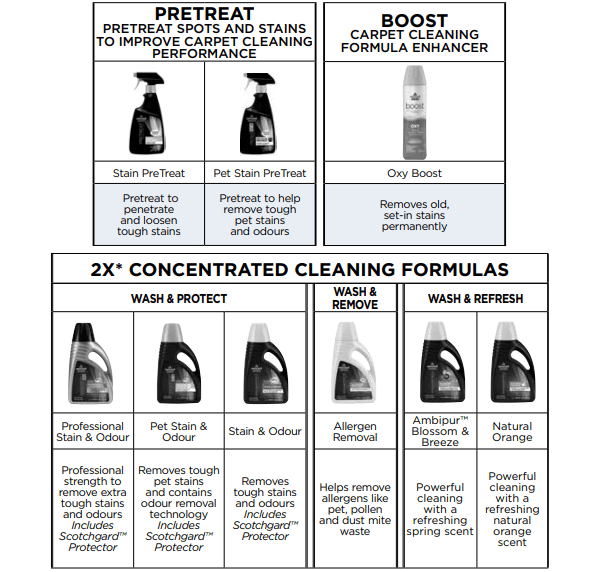
Cleaning Formulas
Keep plenty of genuine BISSELL 2X®* formula on hand so you can clean and protect whenever it fits your schedule.
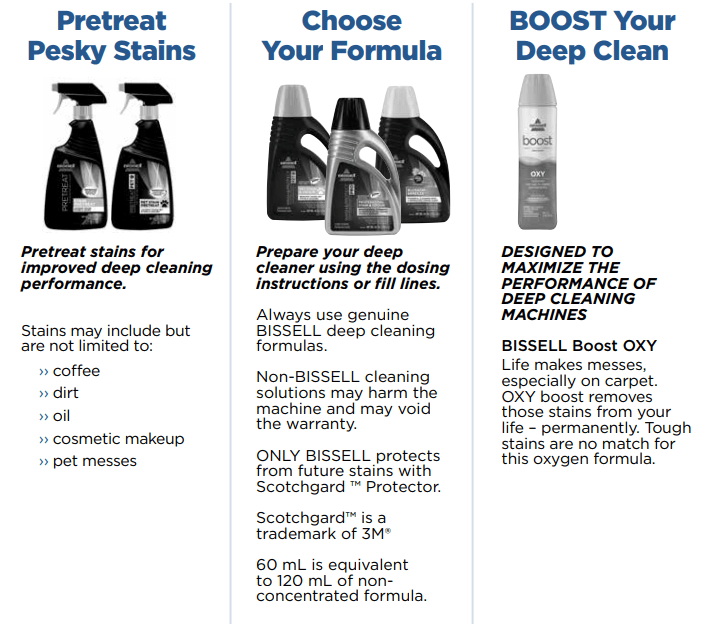
Always use genuine BISSELL deep cleaning formulas. Non-BISSELL cleaning formulas may harm the machine and may void the warranty.
ONLY BISSELL Wash & Protect formulas protect from future stains with Scotchgard™ Protector. Scotchgard™ is a trademark of 3M®. *60 mL of 2X concentrated formula is equivalent to 120 mL of non-concentrated formula
Tips Before Carpet Cleaning
If cleaning an entire room, consider moving your furniture to another area.
Use a dry vacuum cleaner over area before using your deep cleaner.
Pretreat stains with BISSELL Pretreat to improve performance on coffee stains and ground-in dirt.
Customize Your Clean & Maximize Your Results
Filling Your Clean Water Tank
2X Concentrated Formula
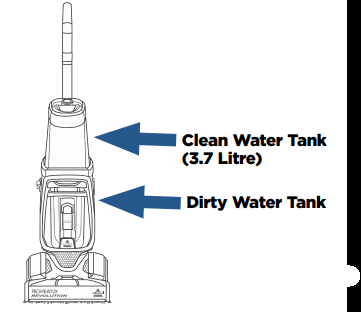
The Clean Water Tank is at the top of the machine.
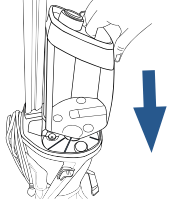
Lift the Clean Water Tank straight up to remove from the machine.
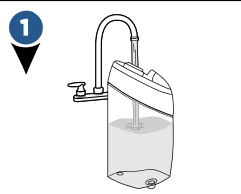
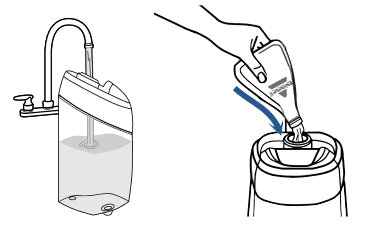
Unscrew the cap from the clean water tank. Add hand hot tap water to the water fill line. Next, reference the chart below for formula amounts to add to the tank. Twist cap back into place.
At the bottom of the upper handle, align the clean water tank with the grooves and slide the tank into place.
FORMULA FILLING INSTRUCTIONS BISSELL 2X Concentrated Formulas
DEEP CLEAN MODE Fill water to the Water Fill Line, then add 74 mL or one cap full of formula.
EXPRESS CLEAN MODE Fill water to the Water Fill Line, then add 37 mL or one half cap full of formula.
Pour in more power with BISSELL Oxy Boost
Fill tank with water and 2X formula (Step 3 above).
Add 60 mL of BISSELL Oxy Boost per 3.7 L of water.
The ProHeat 2X Revolution has a 3.7 L clean water tank
Cleaning Your Carpet
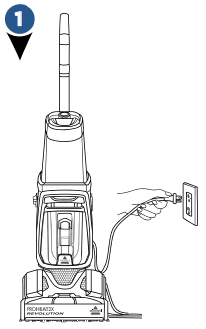
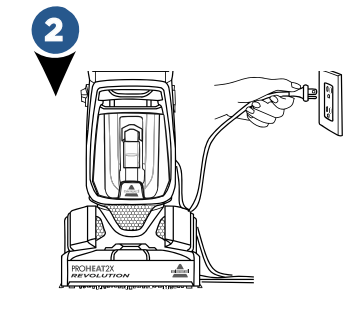
1. Plug into a properly grounded outlet.
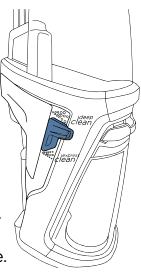
2. Select Cleaning Mode
Deep Clean
Delivers a deep clean to your carpet.
Express Clean
Provides a lighter clean with about 1 hour of dry time.
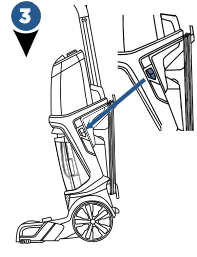
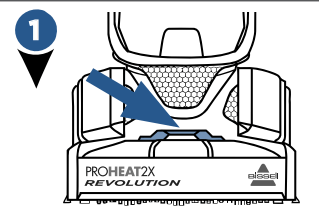
3. Press the power button to turn the machine on. To recline your machine for use, press the recline pedal with your foot.
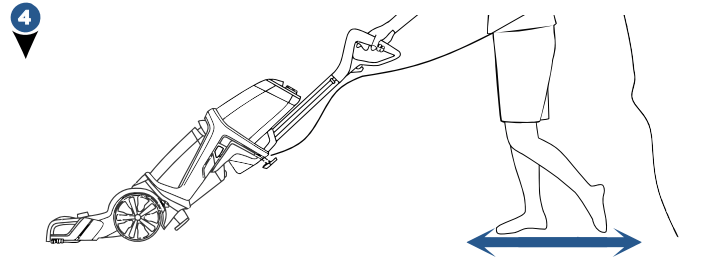
4.
Deep Clean Mode:
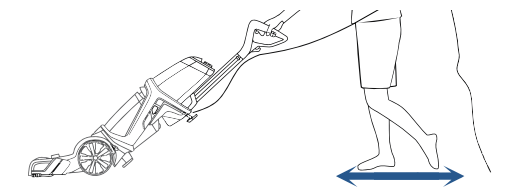
Press the spray trigger to apply solution while making 2 slow wet passes - 1 forward and 1 back.
Release the trigger.
Make 2 slow dry passes - 1 forward and 1 back, to suck up the dirty solution. (Do not hold down the trigger for this step.)
NOTE: For best cleaning performance, clean with your machine in Deep Clean Mode.
Express Clean Mode:
Press the spray trigger to apply solution while making 2 wet passes - 1 forward and 1 back.
Release the trigger.
Make 2 dry passes - 1 forward, 1 back to suck up the dirty solution. (Do not hold down the trigger for this step.)
NOTE: In Express Clean Mode, the dirty tank will not get as full as when cleaning with Deep Clean Mode.
ATTENTION: To prevent damage to Berber carpets, avoid repeated strokes in the same area.
Cleaning Area Rugs
IMPORTANT: Please check manufacturer’s tag before cleaning area rugs for any specialised cleaning instructions. Not for use on silk or delicate area rugs.
Select Express Clean Mode.
Test in a small inconspicuous area first for colorfastness.
Important: Keep the foot of the deep cleaner perpendicular to the rug’s edge with each cleaning pass to prevent damage.
Helpful Cleaning Tips
Regularly clean your high-traffic area rugs in Express Clean mode to remove the forgotten dirt.
Clean on a day with low humidity to help carpets dry faster.
While Cleaning
Turn on any available ceiling fans and make sure the room is well ventilated to help the airstream in your home.
Additional dry strokes will aid in faster drying of carpet. The exception is when using Express Clean Mode. With this exception, the directions need to be followed exactly.
After Cleaning
Use a portable fan directed towards the surface of the carpet and/or a dehumidifier to aid in drying carpet.
Adjust your heat up a few degrees in the winter and use your air conditioning for dryer air in the summer.
On warm dry days, simply opening the windows can be an eco-friendly option to assist in drying carpet.
When the carpet feels dry to the touch, return furniture that was removed. To be sure to avoid staining, place wax paper or aluminum foil under the legs. Wait at least another three hours before removing wax paper or foil.
Cleaning with the Bare Floor Tool
(select models only)
*The Bare Floor Tool that is compatible with the ProHeat 2X® Revolution™ is not included. It is available for purchase by contacting our team by phone or visting us online
Turn off and unplug your machine. Attach the bare floor tool to the foot’s bottom by lining the tool to the edge of the nozzle. Rotate down until it clicks into place. Follow filling instructions on page 8 using the Wash & Shine Hard Floor Cleaner formula and switch cleaning mode to Express Clean.
Plug into a properly earthed outlet and turn the machine on. Clean by pressing the spray trigger for 1 wet pass forward, 1 wet pass back, and then release the spray trigger and make 1 dry pass forward, 1 dry pass back.
When finished, unplug the machine and remove the bare floor tool by rotating the tool up to unhook from the nozzle. Rinse and let dry before storing.
WARNING: To reduce the risk of fire and electric shock when cleaning a hard floor, the BISSELL Bare Floor Tool must be used, and is only to be used with BISSELL Wash & Shine Hard Floor Cleaner formula intended for use with this appliance.
Cleaning with Hose and Tool
Keep hair, loose clothing, fingers, and all parts of body away from openings and moving parts. Brushroll continues to rotate when in the upright position.
Brushroll continues to turn while product is turned on and handle is in upright position. To avoid damage to carpet, rugs, furniture and flooring, avoid tipping cleaner or setting it on furniture, fringed area rugs, or carpeted stairs during tool use.
With brushroll on, do not allow cleaner to sit in one location for an extended period of time, as damage to floor can result.
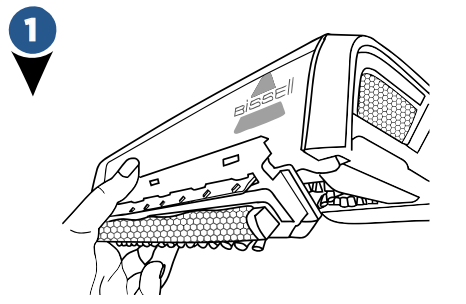
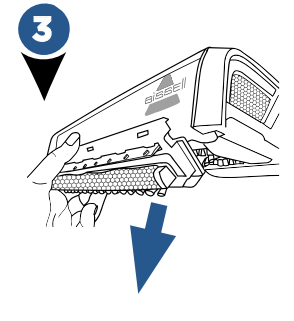
Turn the machine off and unplug from the earthed outlet. Lift accessory hose door on top of foot on the front of the machine. The door flips toward the machine to open.
Insert the hose and snap into place. Be sure the coloured hose release clip is facing out, away from machine. Important: Prime the hose by holding at ground level and pressing the spray trigger until solution starts to dispense out of the spray tip. Then, release the spray trigger and proceed to step 3.
Attach the tool to the end of the hose (tools may vary by model). Plug into a properly earthed outlet and press the power button to turn machine on.
Press the spray trigger button to spray the soiled area, then slowly move tool back and forth over the area. Release the spray trigger to suck up the dirty solution. Work in small sections until the area is clean. When finished cleaning, suction up warm clean water from a tap or bowl to rinse the inside of the hose and tool. Detach the hose and tool and close the accessory hose door. Let the hose and tool air dry before storing.
NOTE: If using a Deep Reach Tool (select models only), be sure the needles of the tool are pressed down into the carpet so the spray gets into the carpet fibres
Emptying the Dirty Water Tank
To remove dirty water tank, press down on the coloured tank handle.
Tilt the tank slightly toward you. Grab the handle and tank with both hands.
Pull dirty water tank up and away to remove (continue to step 4).
Quick Empty:
Pull the rubber tab (located at the corner of the top of the tank) and tilt to pour. When closing the rubber tab, make sure all edges are sealed tight.
For final clean and rinse: Unscrew the ring at the bottom of tank.
Final Rinse & Clean:
Unscrew ring at bottom of tank by turning counterclockwise. Gently remove the float stack, rinse and clean. Once clean, return float stack into the tank by lining up the arrows to point at each other. With the arrows aligned, the float stack will lock into place. Return the ring and twist clockwise to lock. Water may leak if the ring is not fully tightened.
Clean the red filter below the dirty tank by wiping off any remaining dirt or debris
Return Dirty Tank:
Angle the tank and insert bottom first. Then tilt the tank toward the machine and push the top in until it clicks into place.
Did You Know? The Float Stack is what prevents your dirty tank from overflowing.
Maintenance
Cleaning Machine After Use
First, fill the clean water tank with warm tap water and then empty it all to rinse. Then fill again with warm tap water and return the tank to the machine.
Twist cap back on tightly.
To flush and rinse machine:
Turn the machine on and press the spray trigger for 15 seconds while making back and forth passes on a section of carpet. Release the spray trigger and suck up the water. See page 13 to clean the water that was just sucked up from the dirty tank. Empty the clean water tank and let dry before storing. Wipe your machine’s exterior with a soft cloth
Cleaning the Nozzle
If pet hair or debris become clogged in the nozzle, it can be cleaned out of the nozzle with the nozzle clean out tool. Turn off and unplug the machine from the earthed outlet.
Remove the nozzle from the foot by flipping the accessory hose door open, then lifting the accessory hose door and nozzle up and away from the foot.
Hold the nozzle and insert the nozzle clean out tool into the thin slot on the bottom of the nozzle that touches the floor. Move the nozzle clean out tool up and down, back and forth to clean.
Return the nozzle back onto the foot of the machine by lining up the three hooks on the nozzle to the bottom of the foot (see arrows for location). Rotate the nozzle up and click into place. Close the accessory hose door.
Cleaning the Brush Rolls
Turn off and unplug the machine from the earthed outlet.
Lay the machine down on its back or side.
Use the comb to brush out the debris or hair from the brush rolls.
Replacing Small Belt, Large Belt, or Brush Rolls
What you will need: 1 Phillips-head screwdriver & 1 flat-head screwdriver
Unplug the machine. Remove both tanks from the machine. Press the recline pedal and lay the machine on its back. Use a flathead screwdriver to help lift and remove the Belt Access Door. .
Here you should see one (1) belt. This is the Flat Pump Belt. If the Flat Pump Belt is broken, gently remove it from the machine. We will replace this belt in Step 5.
Turn the machine on its side. The Power Button should be facing up. Remove the 3 screws on the Belt/Brush Access Plate using a Phillips screwdriver. Remove the Access Plate to expose the Brush Cover and Cogged Large Pump Belt.
Remove the Brush Cover by lifting straight up. Remove the Cogged Large Pump Belt. The brush rolls can be replaced or cleaned at this time, if needed.
Now, if the Flat Pump Belt was broken, place a new Flat Pump Belt around the red area of the large pulley. Then use your thumb to stretch it toward the back of the machine and transfer it onto the metal axle.
Spin either brush. If they both spin, continue to Step 7. If only one spins, the opposite belt is broken and you must remove both brushes and replace the Small Cogged Brush Belt. Place the new belt around both brush gears and slide them onto the thin metal axles.
To replace the Cogged Large Pump Belt, make sure your Revolution is completely reclined. Begin by wrapping the Cogged Large Pump Belt around the small metal-toothed pulley. While wrapped around the pulley, stretch and wrap around the nearest brush gear.
Return the Brush Cover. Make sure that the brushes are aligned and the cover is secure.
Return the Belt/Brush Access Plate to the end of the brush rolls by securing with the 3 screws. .
Turn the machine to lay on its back. Lastly, slide the Belt Access Door back into place. You should hear it “click” into place.
Troubleshooting
WARNING To reduce the risk of electric shock, turn OFF and disconnect plug from electrical outlet before performing maintenance or troubleshooting checks.
Problem
Possible causes
Remedies
Reduced spray OR no spray
Clean Water Tank may be empty.
Refill tank.
Clean Water Tank may not be seated completely
Turn power OFF. Remove and reseat tank
Pump may have lost prime in Hose Cleaning Mode.
Hold end of hose below water level in tank to prime.
Loss of suction power
Tanks may not be seated properly
Pick up both tanks and reseat them so they fit properly on the unit .
Dirty Water Tank has picked up maximum amount of dirty water and has reached full line.
Empty Dirty Water Tank.
Clean Water Tank is empty.
Check fluid levels in the Clean Water Tank. Refill the tank if it is empty.
Rubber tab on Dirty Water Tank is not sealed tight.
Check the rubber tab on the Dirty Water Tank and press firmly on all edges to secure it tightly (see step 4 on page 14 for details).
Accessory Hose Door may not be closed tightly in place
Check the Accessory Hose Door and make sure it is closed tightly – it should be locked into place.
Nozzle may be clogged from pet hair or debris.
Use the Nozzle Clean Out Tool and follow steps on page 15 for “Cleaning Nozzle”.


 Pour in more power with BISSELL Oxy Boost