If the appliance is damaged, check immediately with the supplier before installation and operation.
Warning:
This appliance must not be used in a bathroom.
Do not use this heater in the immediate surroundings of a bath, a shower or a swimming pool.
This heater must not be located immediately below a fixed socket outlet.
Do not use in areas where petrol, paint or flammable liquids are used or stored.
Follow these instructions carefully.
The heater carries a warning ‘Do Not Cover’ to alert the user to the risk of firer that exists if the heater is accidentally covered.
The appliance is not intended for use by young children or infirm persons without supervision unless they have been adequately supervised by a responsible person to ensure that they can use the appliance safely.
Young children should be supervised to ensure they do not play with the appliance.
If the mains lead is damaged, it must be replaced by the manufacturer or its service agent or a similarly qualified person in order to avoid a hazard.
Unplug the heater when not required for long periods.
Momentary contact with any part of the heater should not cause injury. However aged, infirm persons or young children should not be left unsupervised in the vicinity of the heater.
Please note - We recommend that you open a window to ventilate the room when using the heater for the first time.
The heater carries the warning symbol indicating that it must not be covered.
General
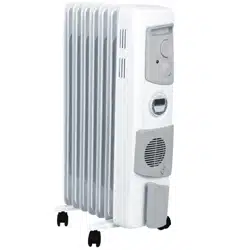
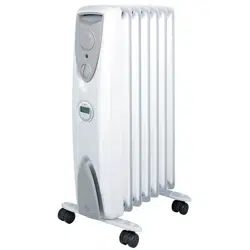
The radiator is designed for operation on an AC electricity supply, and is suitable for use in domestic dwellings and similar indoor locations.
Always ensure that the appliance is stood on a firm, level base near to, but nor directly beneath, a suitable fixed socket outlet.
The radiator is fitted with castors and a handle for ease of movement. Selector switched provide a choice of heat output and an adjustable thermostat enables the room temperature to be controlled accordingly. It is supplied with a cord and plug ready for use.
The supply cord should be uncoiled before use (see ‘Storage’).
DO NOT pull the radiator along by the mains lead.
Important: The radiator must only be operated with the wheels and castor fitted and in the upright position as shown in Fig 1.
Warning: The heater complies with stringent safety standards but to ensure efficient operation SURFACES OF THE HEATER WILL BECOME HOT AND CONTACT WITH THESE AREAS SHOULD BE AVOIDED, particularly between the fins on the top and sides.
The control panel area is designed to be at a far lower temperature to allow the safe operation of the controls at any time.
WARNING - THIS APPLIANCE MUST BE EARTHED
Fitting the castors
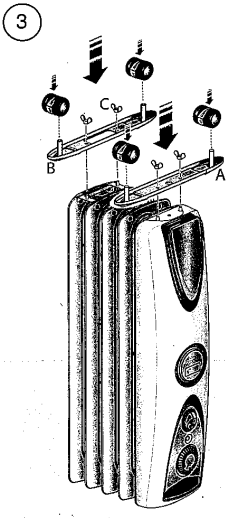
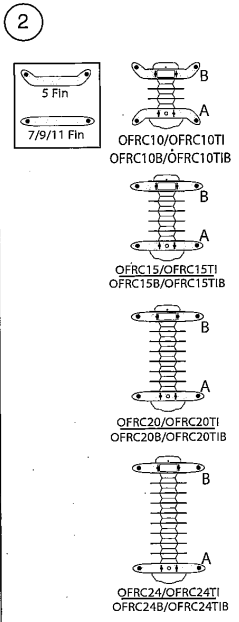
Remove the carton containing the castor assemblies from the packing. Fit the castors to the stub axles by applying hand pressure until each castor clicks into position - see Fig. 3. Note that the castors are designed to be a tight fit on the axles but will rotate in use.
The castors can only be fitted between the outer fins (as shown in Fig. 2). Turn the radiator upside down on a carpet or other soft surface to avoid damage.
WARNING: THE RADIATOR IS HEAVY- ENSURE THAT IT IS SUPPORTED TO PREVENT IT FROM TOPPLING Ask a second person to help with this if necessary. Position castor bracket (see Fig. 3) onto the threaded pins on the control panel. Place the winged nut 'C' on the thread and tighten it securely.
Repeat the process for castor bracket 'B' onto the last fin.
Note: The 5 fin column radiator models OFRC10 & OFRC10TI use curved castor brackets and must be fitted as shown in Fig. 2.
Lift the radiator clear of the floor, then turn it back upright and stand it on its castors as shown in Fig. 1. It is now ready for use.
Positioning the Heater
Select the position for the radiator ensuring there is clearance from any furniture and fittings of at least 300mm above the heater and 150mm each side. The radiator should only be operated on a flat stable surface.
Operation
IMPORTANT - Objects or clothing must not be placed on this heater. Before using the heater ensure that all warnings and instructions have been read carefully.
To bring the heater into use plug it in. Neon indicating lights located at the controls area will glow when the appliance is plugged into the mains.
Controls
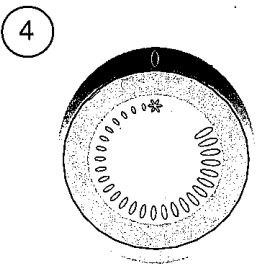
Thermostat (see Fig. 4)
The Thermostat (see Fig. 4) controls the heat output according to the room temperature. This ensures that the heater will not produce heat unnecessarily when the room is warm. To set the temperature you require, turn the thermostat knob clockwise until the required setting is reached. Alternatively to heat a cold room quickly, turn the thermostat knob up fully. When the room has reached the desired temperature, turn the thermostat knob anti-clockwise until the thermostat just clicks off. The heater will now automatically operate at this temperature. With the thermostat set to and the heat selection switch set to the required heat output the appliance switches on automatically when the temperature falls below +5°C to +8°C.
Note: Should the heater fail to come on when the thermostat is at a low setting, this may be due to the room temperature being higher than the thermostat setting.
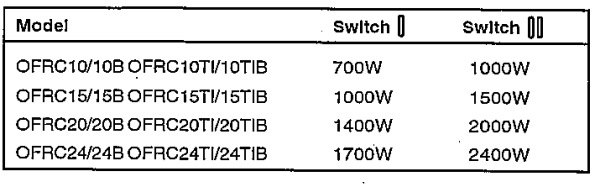
Heat Selector Switches (see Fig. 5)
Selector switches located on the control panel provide a choice of heat output to suit varying conditions and for economy of operation.
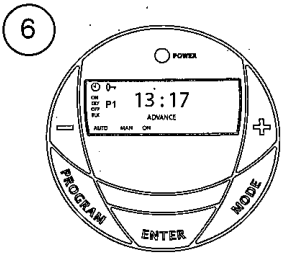
Digital Timer Operation (see Fig. 6)
IMPORTANT: Remember to observe all safety warnings when operating the heater on auto setting, either attended or unattended.
The timer allows you to select 'AUTO' or 'MAN ON' by pressing the 'MODE' button until the required MODE appears at the bottom of the timer display.
'AUTO' MODE allows the heater to switch ON and OFF according to a set 24 Hour program period (see 'Setting Programs' section below).
'MAN ON' MODE allows power to the heater uninterrupted by the program settings. Key Lock:
If 'ENTER' and 'MODE' are pressed within 1 second, the keys will be locked. The user will know the keys are locked as the lock symbol '0' will be displayed on the top left hand corner of the screen. To unlock the keypad, press 'ENTER' and then 'MODE' within 1 second.
Initial Operation
For initial use, plug the heater into a regular household power point and turn the power on. The timer is now ready to be set up for use.
Setting Current Time
1. Press the 'PROGRAM' button ONCE. The clock symbol appears on the top left hand side of the screen. The user can now set the clock.
2. The hour digit will flash. To adjust the hour use the ' & '+' buttons. Confirm the hour digit by pressing 'ENTER'.
3. Once 'ENTER' has been pressed the minutes will flash. To adjust the minutes use the ' & '+' buttons. Confirm the minute digit by pressing 'ENTER'.
4. The timer now returns to the default display.
5. To reset incorrect time, repeat previous steps.
Once the correct time is set, a total of four ON/OFF time programs can be set for operation.
Setting Programmes
Press the 'PROGRAM' key twice to set the programs.
You are now setting the programs starting with P1 'ON'.
SETTING P1 ON TIME:
1. To set the hour use the ' & '+' buttons. Confirm the hour digit by pressing 'ENTER'.
2. To set the minutes use the ' & '+' buttons. Confirm the minute digit by pressing 'ENTER'.
Note: The minutes can only be set in 10 minute blocks in programme 'MODE'.
SETTING P1 OFF TIME:
3. To set the hour use the ' & '+' buttons. Confirm the hour digit by pressing 'ENTER'.
4. To set the minutes use the ' & '+' buttons. Confirm the minute digit by pressing 'ENTER'.
Repeat steps 1 to 4 to programme P2, P3 & P4. After programming P4 'OFF' you automatically exit to the default display.
At any time while programming the timer you can press the 'PROGRAM' button to exit to the default display.
Note: If the 'ON' time is the same as the 'OFF' time the appliance will ignore the program.
The Advance Function
When in 'AUTO' MODE, if the '+' button is pressed for longer than 2 seconds the programme will ADVANCE to the next setting programmed and will only revert back to the program when the subsequent programme time is reached. When the 'ADVANCE' function is running the 'ADVANCE'. segment will be displayed on the LCD screen. If the button is pressed when the 'ADVANCE' programme is running the 'ADVANCE' feature will be automatically cancelled and the programme will run as normal.
Note - Timer Memory Back Up Batteries - Once the heater has been left plugged in with the socket switched on for at least 72 hours the timer's memory back up batteries will be fully charged.
Once the timer batteries are fully charged, if there is a power cut or if the heater is disconnected from the mains for less than six months, then the timer will continue to keep time & the settings in the memory will remain intact.
If however the timer back up batteries have not been charged fully, or if the heater is deprived of power for longer than six months, then the time and the programme settings are likely to be lost and you may therefore need to reset the time and the programme before using the AUTO MODE again.
Storage
If the radiator is not required for long periods, for example during the summer, it should be stored in a dry place and preferably covered to prevent the accumulation of dirt and dust. The supply cord should be neatly coiled around the cable wrap (see Fig. 1) ensuring that the plug does not trail on the floor.
IMPORTANT: The heater must be kept plugged in at the mains to retain the time and the programmed settings. If unplugged from the mains, resetting the time and the programmed settings will be necessary.
Cleaning
WARNING - ALWAYS DISCONNECT THE POWER SUPPLY BEFORE CLEANING THE HEATER.
Do not use detergents, abrasive cleaning powder or polish of any kind on the body of the heater.
Allow the heater to cool, then wipe with a dry cloth to remove dust and a damp cloth (not wet) to clean off stains. Be careful not to allow moisture in to the heater.
After Sales Service
Please see the separate Warranty leaflet for details of your Warantee & after sales service including contact details.
Should you require after sales service, please get in touch with the supplier through whom you purchased the appliance, or the contact number on your Warranty leaflet.
 The heater carries the warning symbol indicating that it must not be covered.
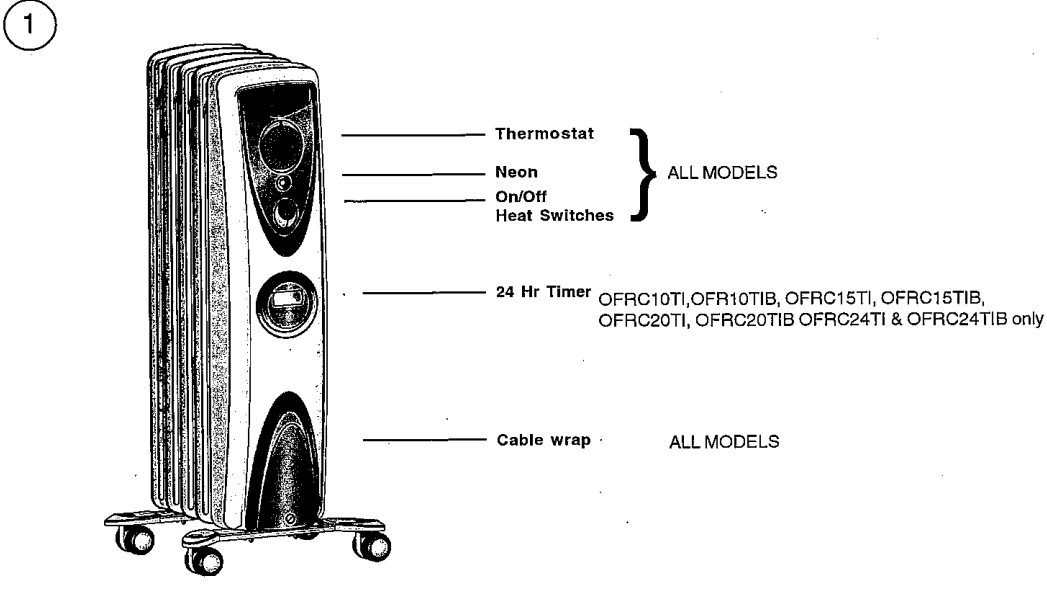
 and the heat selection switch set to the required heat output the appliance switches on automatically when the temperature falls below +5°C to +8°C.
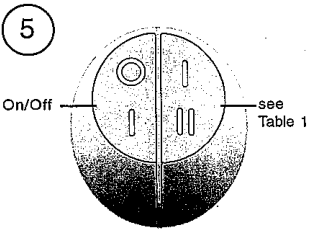
 appears on the top left hand side of the screen. The user can now set the clock.