Synology Router User's Guide
Set up Your Synology Router
Set up Synology Router Manager (SRM)
- Use a computer or wireless device connected to the Synology Router's local network. If you use a wireless device, scan and join the Wi-Fi network (SSID: SynologyRouter; Password: synology).
- Open a web browser, and enter either URL into the address bar:
- http://router.synology.com
- http://192.168.1.1:8000
- Once connected, click Start to launch the SRM Setup Wizard.

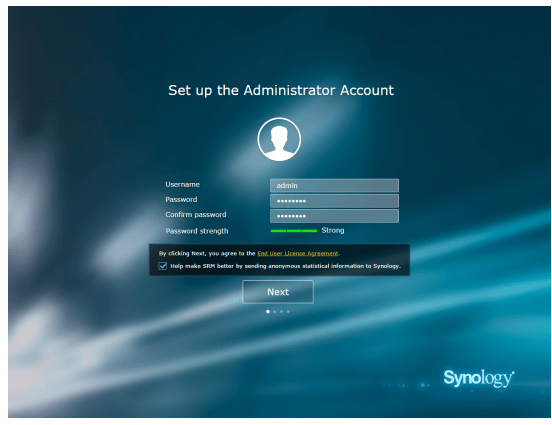
- Fill in the information to set up the administrator account. Click Next to continue.
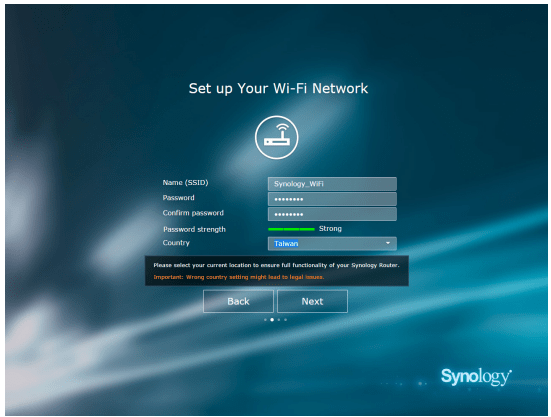
- Fill in the information to set up the Wi-Fi network. Click Next to continue.
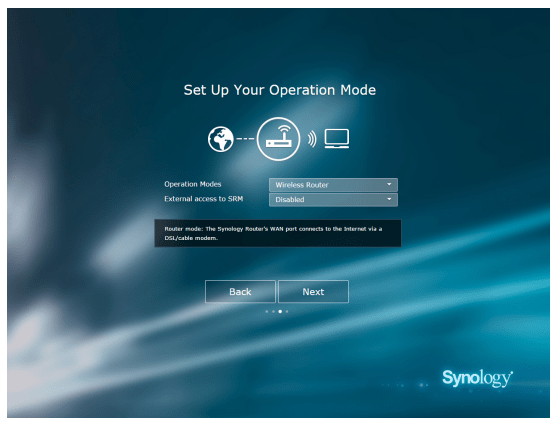
- Set up the operation mode. When choosing the Wireless Router mode, you can also enable External access to SRM so that only external access via the HTTP(S) port (e.g. 8000/8001) can reach SRM.
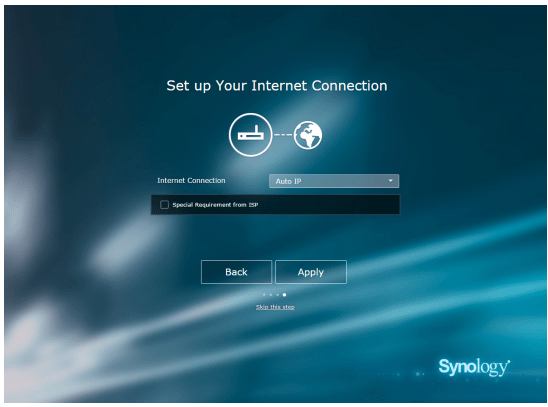
- Choose an Internet connection type:
- PPPoE: Choose this option if you have obtained PPPoE credentials from the ISP.
- Manual IP: Choose this option if you have obtained an available IP address for use.
- Auto IP: Choose this option if you rely on an ISP modem for automatic IP assignment.
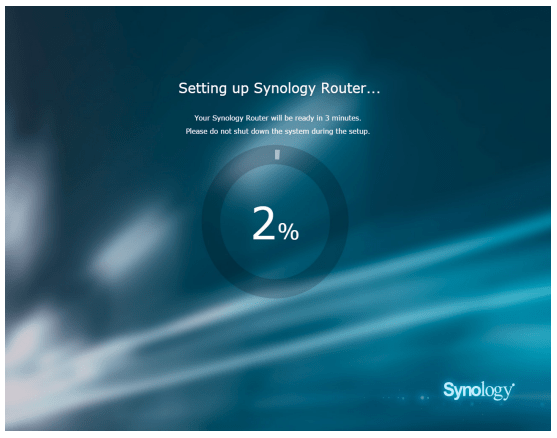
- The wizard will continue to set up your Synology Router, and it may take up to three minutes to complete the setup.
- After the setup is complete, click Launch Synology Router to enjoy SRM and its various features.
Note:
- Above is a general demonstration of the SRM setup steps. The steps and available options may somewhat vary depending on your device type (e.g. PC or wireless device), access type (LAN, WAN, or Wireless LAN), and chosen operation mode (Wireless Router, Wireless AP, or Wireless Client).
- If the setup is completed with a wireless device, remember to download DS router for anywhere management of your Synology Router. To know more about this mobile application, see "DS router".
Set up Desktop Wallpaper
SRM allows you to customize the desktop with default wallpapers or with your own images. You can also customize other desktop elements (e.g. text color and icon size).
Click Options (the person icon) on the top-right corner, and go to Options > Desktop:
- To change the desktop wallpaper: Select Customize wallpaper and click Select image. Click Default Wallpaper or My Images depending on the image source.
- To customize other desktop elements: Change relevant settings to suit your needs.
Reset Synology Router
If you forgot the administrator/Wi-Fi password or the Synology Router becomes unreachable, you can fix the situations by pressing the RESET button on the bottom shell.
- Use a pencil or ball pen to press and hold the RESET button.
- Press and hold the RESET button for four or ten seconds:
- For four seconds (Soft Reset): The system will reset passwords of the admin and the administrator with equal privileges but other users' credentials will remain unchanged. The system will also reset the following settings (firewall, DHCP services, Wi-Fi, Parental Control, and Traffic Control) and start the SRM Setup Wizard.
Note: During Soft Reset, the LED indicators behave as below:
1. The STATUS LED turns static orange on the RT1900ac model, and blinking orange on the RT2600ac model. The other LEDs become inactive for up to 30 seconds until the reset is complete.
2. The STATUS LED turns green (Soft Reset is complete), and the other LEDs become active and behave as stated in the respective Hardware Installation Guide. - For ten seconds (Hard Reset): The system will be reset to the factory default. The data stored in the external storages will remain intact.
Note: During Hard Reset, the LED indicators behave as below:
1. The STATUS LED turns blinking orange on the RT1900ac model, and static orange on the RT2600ac model. The other LEDs become inactive for up to four minutes until the reset is complete.
2. The STATUS LED turns green (Hard Reset is complete), and the other LEDs become active and behave as stated in the respective Hardware Installation Guide.
Choose the Operation Mode
This chapter introduces the three wireless operation modes available to your Synology Router to suit your networking needs. To find the operation modes, please go to Network Center > Operation Modes.
Wireless Router
Under this mode, your Synology Router works as a regular router that transfers data between two networks (e.g. between a local network and the Internet) and finds the optimal path for data delivery. This mode also provides wireless connection to wireless devices for continuous access.
Wireless Router is recommended in the scenarios below:
- When you need extra connection security (e.g. firewall, NAT, and DMZ)
- When the connected client devices need wireless connection
- When you need to create subnets within the local network
Below are the suggested usages:
If you have an ISP modem:
- Connect your Synology Router (at the WAN port) with a network cable to the ISP modem (at the LAN port).
- Configure basic network settings:
- Decide how your Synology Router obtains the IP address (at Network Center > Internet > Connection > Primary Interface > Connection Type).
- Decide whether your Synology Router assigns IP addresses to its clients (at Network Center > Local Network > General > DHCP Server).
- Configure advanced network settings (at Network Center > Internet or Local Network). For setting details, refer to the SRM help.
If you do not have an ISP modem:
- Connect your Synology Router (at the WAN port) to the Internet (e.g. the Internet port on the wall/ground) with a network cable.
- Decide how your Synology Router obtains the IP address (at Network Center > Internet > Connection > Primary Interface > Connection Type).
- Configure advanced network settings (at Network Center > Internet). For setting details, refer to the SRM help.
Wireless AP (Access Point)
Under this mode (also known as the Bridge mode), your Synology Router bridges all network interfaces (LAN, wireless LAN, and WAN) and therefore has five LAN ports (LAN 1-4 and WAN) available to wired clients.
As a wireless AP, the router cannot assign IP addresses to the clients (the DHCP Server is disabled) and works only as a wireless transmission device, sending/receiving data via Wi-Fi between wireless and wired networks.
Wireless AP (Access Point) is recommended in the scenarios below:
- When your Synology Router (at LAN 1-4 or WAN port) is already connected to an ISP modem (at the LAN port) for Internet access
- When the connected devices need wireless connection
Note: Under this mode, the Synology Router will not provide the following functions/settings under Network Center: Port Forwarding, Local Network, Traffic Control, and Parental Control.
Wireless Client
Under this mode, your Synology Router works as a Wi-Fi Ethernet adapter and connects to the Wi-Fi signal from another router or access point for Internet access. Wireless Client is recommended in the scenario below:
- When you need Internet access, but a wired connection is hard to set up between your Synology Router and another router/ISP modem
Below is the suggested usage:
- Clients have to connect to the Synology Router (at the LAN port) with a network cable for Internet access.
Note:
- This operation mode is available on RT1900ac.
- Under this mode, your Synology Router must be within the range of the Wi-Fi source. A poor signal from the Wi-Fi source may result in unstable or poor connection quality.
- Wireless client devices cannot connect to the Synology Router to access the Internet.
Set up Your Wi-Fi Connection
This chapter introduces how to create Wi-Fi networks hosted by your Synology Router. Two types of Wi-Fi networks can be created: 2.4GHz and 5GHz.
- 2.4GHz: A 2.4GHz Wi-Fi network is used by most wireless devices and tends to have broader signal coverage than a 5GHz Wi-Fi network. However, signal interference is likely to occur because most wireless devices rely on this wireless frequency.
- 5GHz: The 5GHz band allows for potentially faster connection speeds and reduced interference compared with the 2.4GHz band. However, the signal coverage is not as broad.
Enable Smart Connect
Smart Connect allows you to connect your devices to the combined SSID with the shared Wi-Fi settings for both 2.4GHz and 5GHz bands. SRM will determine whether to switch between the two frequency bands (i.e. 2.4GHz and 5GHz) according to your specified policy and network conditions to ensure the best wireless connectivity for your devices. Smart Connect does not switch between channels (e.g. 1 and 10) within each band for your devices.
- Go to Network Center > Wireless > Wi-Fi.
- Turn on 2.4GHz/5GHz auto selection.
- Specify the settings for the Smart Connect Wi-Fi network. Click Advanced options to make more adjustments.
- Use your wireless device to scan and join the Wi-Fi network hosted by your Synology Router.
Create Wi-Fi Networks (2.4GHz & 5GHz)
You can create a 2.4GHz or 5GHz Wi-Fi network:
- Make sure your Synology Router is powered on and well-connected to the Internet.
- Make sure the Wi-Fi button is "ON" on your Synology Router.
- Go to Network Center > Wireless > Wi-Fi.
- Select Enable wireless radio under 5GHz/2.4GHz, and continue the setup. Click Advanced options to make more adjustments.
- Use your wireless device to scan and join the Wi-Fi network hosted by your Synology Router.
Create Guest Wi-Fi Networks (2.4GHz & 5GHz)
A guest Wi-Fi network allows visitors or non-regular users to securely access the Internet without having access to the rest of your network devices. Guest networks can be isolated and set to be valid for only a certain amount of time.
To set up a guest Wi-Fi network, go to Network Center > Wireless > Guest Network for the setup.
Create WPS Networks (2.4GHz & 5GHz)
WPS (Wi-Fi Protected Setup) is a standard promoted by the Wi-Fi Alliance to simplify Wi-Fi security settings for users. Though the setup is quick, the WPS network may not be secure. To keep the WPS network safe, you can use a push button or a PIN code.
Three ways are available to quickly set up a Wi-Fi network via WPS:
By push button:
- Go to Network Center > Wireless > WPS, and select Enable WPS. Alternatively, press the WPS button on your Synology Router.
- Enable the WPS function on your wireless device. Your wireless device and the Synology Router will be paired up.
By AP PIN code:
- Go to Network Center > Wireless > WPS > Device PIN > By AP PIN code, and click Enable to generate an AP PIN code.
- Enter the generated PIN code into your wireless device. Your wireless device and the Synology Router will be paired up.
By client PIN code:
- Enter the PIN code of your wireless device at Network Center > Wireless > WPS > Device PIN > By client PIN code.
- Click Register. Your wireless device and the Synology Router will be paired up.
Note: Client iOS devices cannot join a WPS network because iOS does not support WPS.
Manage Internet Connection
This chapter introduces various features for easy and safe access to the Internet.
Internet Connection Types
At Network Center > Internet > Connection > Primary Interface, you can choose how to connect your Synology Router to the Internet:
- Auto: Choose this option if you rely on an ISP modem for automatic IP assignment.
- PPPoE: Choose this option if you have obtained PPPoE credentials from the ISP.
- Manual: Choose this option if you have obtained an available IP address for use.
You can enable the secondary interface to operate in the failover or load-balancing mode. Go to Network Center > Internet > Connection > Secondary Interface (LAN 1) to enable this interface.
ISP/VPN/IPv6 Settings
ISP Settings
This function allows you to send the MAC address of your Synology Router to the ISP for successful registration. To do so, go to Network Center > Internet > Connection > Primary Interface > ISP settings.
VPN Settings
A VPN (Virtual Private Network) helps secure data transfer between your device and a remote location.
To use your Synology Router as a VPN client, go to Network Center > Internet > Connection > Primary Interface > VPN settings to modify the settings.
Note: Synology Router can only connect to OpenVPN servers which support tun-style tunnels on Layer 3.
IPv6 Settings
To set up IPv6 on your Synology Router, please go to Network Center > Internet > Connection > Primary Interface > IPv6 setup.
Smart WAN
At Network Center > Internet > Smart WAN, you can configure two defined outward-facing internet interfaces (e.g. PPPoE and WAN). You can choose either mode to determine their roles in network connectivity:
- Failover: When one of the interfaces is down, the other will be responsible for all the network connectivity to ensure stable connection at all times.
- Load Balancing + Failover: When both interfaces are well-functioning, this mode allows you to distribute network traffic to the interfaces for optimal network traffic flow; when one of the interfaces is down, the other will be responsible for all the network connectivity to ensure stable connection at all times.
Smart WAN also allows you to regulate network traffic by setting up policy routes for specific devices. Such devices will be able to access the Internet and receive Internet traffic only through the defined interface.
QuickConnect & DDNS
At Network Center > Internet > QuickConnect & DDNS, you can enable the services below for easy connection to your Synology Router.
QuickConnect
QuickConnect is a connection technology developed by Synology that helps you effortlessly access your Synology Router from anywhere with your personal QuickConnect ID.
Enter the URL as shown below in a web browser to access your Synology Router via QuickConnect:
- quickconnect.to/QuickConnect_ID (Example: quickconnect.to/synologist)
For more information about QuickConnect, refer to the white paper.
DDNS
DDNS (Dynamic Domain Name Service) matches the hostname and the IP address of your Synology Router for quick access even if you do not have a static IP address from your ISP. If you do not have a hostname, register one from Synology or other DDNS providers.To find your Synology Router with its DDNS hostname (e.g. john. synology.me), please enter the registered hostname in the web browser.
DMZ
A DMZ (as a “demilitarized zone”) is part of the network directly exposed to the Internet or other external untrusted networks. All external access will be directed to the host device in the DMZ. The DMZ host can directly connect to the Internet and is free from firewall limitations and protection. It is useful to set up servers as the DMZ host.
To enable DMZ, go to Network Center > Port Forwarding > DMZ for the setup.
Note: To connect to a host in the DMZ from an external network, you need the host’s external IP address retrieved by your Synology Router.
Port Forwarding
Port forwarding redirects data flow between different ports and has the following advantages:
- It can improve performance for applications which might otherwise rely on a relay service.
- It protects the ports for services/client devices from direct exposure to cyber threats.
- It can offer open ports to resolve port conflicts between multiple services/client devices
To set up port forwarding rules, go to Network Center > Port Forwarding > Port Forwarding.
Port Triggering
Port triggering requires you to set up one static port (the outgoing/trigger port) and one dynamic port (the incoming port) for a service/device in the local network for data transmission. Once the data come out to an external host through the trigger port, the incoming port is then triggered and opened to receive data from the host. If no data come out, the incoming port turns off, shutting down a possible opening for malicious attacks.
To set up port triggering rules, go to Network Center > Port Forwarding > Port Triggering.
IPv6 Tunneling
IPv4 and IPv6 are two protocols not mutually compatible. To help IPv6 devices communicate with each other over an IPv4 network, via IPv6 tunneling you can wrap up IPv6 data within IPv4 packets, so that IPv6 data can travel through an IPv4 network.
To enable IPv6 tunneling, go to Network Center > Internet > IPv6 Tunneling.
Note: Your external IPv6 address may be automatically updated by the service provider. However, your Synology Router will not remove the old IPv6 address immediately
Manage Local Network Connection
The chapter introduces various features to efficiently manage the local network.
Set up an IPv6 Router
By default, your Synology Router works as an IPv4 router assigning IPv4 addresses to client devices. It can also become a mixed IPv4/IPv6 router to assign IPv6 addresses.
To set up your Synology Router as an IPv6 router, go to Network Center > Local Network > IPv6.
Note: Only IPv6-supported devices can receive IPv6 addresses assigned by your Synology Router.
Set up DHCP Services
As a DHCP (Dynamic Host Configuration Protocol) server, your Synology Router can assign dynamic IP addresses to DHCP clients (i.e. network devices) within your local network.
To find a list of DHCP clients and their network configurations (e.g. MAC and IP addresses), go to Network Center > Local Network > DHCP Clients.
To reserve the assigned IP addresses for the clients, go to Network Center > Local Network > DHCP Reservation.
Note: Your Synology Router can assign both IPv4 and IPv6 IP addresses. To assign IPv6 IP addresses to DHCP clients, please enable the IPv6 function at Network Center > Internet > Connection > Primary Interface > IPv6 setup first.
Set up Static Routes
A static route is a routing path manually configured to pass data to and from a specific destination service/device. The static route does not automatically change with the network configuration, and its routing information is not exchanged between other routers.
Setting up static routes can benefit you in the following scenarios:
- When the network (e.g. a home local network) is small and may not grow fast into a complex network
- When you do not wish to share routing information (e.g. IP addresses and network configuration) with other routers for security reasons
To set up static routes, go to Network Center > Local Network > Static Route.
Note:
- We advise you not to use static routes when the network is large and complex, because maintaining static routes in this environment can be time-consuming.
- You can set up IPv6 static routes after enabling the IPv6 function on your Synology Router.
Set up IPTV & VoIP
The IPTV & VoIP services allow you to connect an STB (set-top box) or VoIP phone to your Synology Router for multimedia services from the ISP or for phone communication. Before using the services, you need to have the VLAN ID provided by the ISP for the setup.
To set up the IPTV & VoIP services, go to Network Center > Local Network > IPTV & VoIP.
Install & Manage USB/SD Storage
With a connected USB/SD storage device, you can install add-on packages that allow you to easily share and stream files on your network.
At Control Panel > Storage > Storage, you can find out the total available external storage (e.g. USB drives & SD cards) on your Synology Router. There you can also format and manage the device to suit your needs.
Note:
- Please refer to the compatibility list for supported USB/SD device.
- Some system services and packages may create temporary files on USB/SD storage devices. To safely eject the USB/SD storage for system stability and to prevent accidental data loss, press the Eject button on your Synology Router or eject the storage at Control Panel > Storage > Storage.
Define User/Folder Privileges
After external storage is established on your Synology Router, you can create shared folders for public use (e.g. “public”) and home folders for individual users.
To create shared folders, go to Control Panel > Storage > Shared Folder. There you can also set users’ access privileges to the folder.
To create users, go to Control Panel > User > User. There you can also set the user’s access privilege to shared folders.
Install & Manage Network Printers
Your Synology Router can become a printer server, allowing you to connect a non-networked printer to be shared with other devices. You can also set up Google Cloud Print to print out needed documents from everywhere.
To install a network printer, please attach it to the USB slot.
To manage a network printer connected to your Synology Router, go to Control Panel > Device > Printer.
Note: Please refer to the compatibility list for supported network printers.
Install & Manage 3G/4G Dongles
With a 3G/4G dongle, your Synology Router can still provide Internet access to client devices via a cellular network.
To install a 3G/4G dongle to your Synology Router, please attach it to the USB slot.
To manage the dongle settings, go to Network Center > Internet > 3G & 4G.
Note: Please refer to the compatibility list for supported 3G/4G dongles.
This chapter introduces the features on your Synology Router to diagnose system and connection problems.
Check Connection Status
For an overview of wired and wireless connections to the Synology Router, go to Network Center > Status. There you can also view the real-time network status and system resource usage.
For a detailed traffic log of devices and applications, please go to Network Center > Traffic Control > Monitor.
Check Notifications
The Synology Router sends instant notifications on system/connection errors via various media (e.g. SRM desktop, SMS, and email).
To customize notifications, go to Control Panel > Notification.
Ping
Ping is a utility used to quickly verify connectivity. Ping works by sending out a request packet to a target website or IP address and calculating the time lapse for receiving a response packet from the target.
- Normal connection: The response packet comes from the target instantly.
- Slow connection: The response packet comes from the target with significant delay or with high variance in response times.
Delayed or unresponsive targets may be due to the following:
- The target is busy dealing with huge traffic to and from other hosts/clients
- The target website/IP address is down/not working.
- The Internet/local network connection of your Synology Router is not properly configured.
- The ISP service is down.
If the problem is external to your Synology Router, you should consult your ISP or other relevant service providers for assistance. To diagnose connection problems with Ping, please go to Network Tools > Ping.
Traceroute
Traceroute is a utility used to examine the Internet pathway taken to reach a specific destination. The physical route will be displayed on a Google Map, along with the time lapse spent between two adjacent route points.
With Traceroute, you can better understand how your traffic is being routed.
To diagnose connection problems with Traceroute, please go to Network Tools > Traceroute.
Contact Technical Support
Go to Support Center or Synology's official website to contact Synology Technical Support.
FAQ
SRM Operation
Why can't I log in to SRM?
- Make sure you use the correct IP/QuickConnect/DDNS address. Add the correct port number if you use customized ports or have enforced specific security policies.
- Make sure you use the correct username and password.
- Check if the network connection between the router and the connecting device is operational and configured properly.
What can I do if I forgot my SRM password?
- As the administrator:
Perform Soft Reset to reset the administrator password. - As a non-administrator user:
- Ask the administrator to select Allow non-administrator users to reset forgotten passwords via email.
- The user should go to the SRM login page, and click Forgot your password?.
- Open the SRM-issued email at the previously specified email address and continue to reset the password.
Why can't I update SRM successfully?
- Check if the update is newer than the current version running on the router.
- Check if you use a .pat update file officially released by Synology.
What is the difference between Soft Reset and Hard Reset?
Please see "Reset Synology Router".
How can I eject the USB/SD storage from my router?
To safely eject the external storage, please see "Install & Manage USB/SD Storage".
How can I get the best Wi-Fi experience with my RT1900ac?
We recommend placing your router upright with the stand kit included for optimal wireless results and better ventilation.
Its EJECT button will be hidden with the front panel facing down. In this situation, you can go to Control Panel > Storage > Storage, and click Eject to perform this operation.
Network
Why can’t I access the Internet?
- Make sure your wireless device is not banned under Traffic Control.
- Make sure your device's Internet access is not scheduled to be unavailable under Parental Control.
- Go to Network Center > Status > Internet Connection, and check if the status is "Connected".
Why can’t I connect to certain sites or send/receive emails when connecting through my router?
If your device has been added to Parental Control, check its level of protection and if the websites in question have been added to the Custom web-filter.
Why is the upload/download traffic slow?
- Check if your device's custom speed settings have been modified. Go to Network Center > Traffic Control > General and click the Custom speed icon to modify the settings.
- If you have created a large number of firewall or port forwarding rules, your network transmission performance may become slower. To remove firewall rules, go to Network Center > Security > Firewall. To remove port forwarding rules, go to Network Center > Port Forwarding > Port Forwarding.
- If Traffic Control is enabled on RT1900ac, network speed promotion will be disabled and general transmission speed may be lower. To disable Traffic Control, go to Network Center > Traffic Control > Advanced > Settings for management.
What can I do if port-forwarding doesn't work properly?
- Go to Network Center > Port Forwarding > DMZ, enable DMZ, and specify the DMZ host IP address. Then, see if the devices in the DMZ can be accessed from the Internet. As a specialized form of port forwarding, DMZ helps you find out whether the problem lies in port forwarding itself.
- If firewall is enabled on the router, suspend the firewall function for a while.
- Contact the ISP to know if the service port is blocked.
Why can't I find my router via router.synology.com?
- You can only access your router via router.synology.com when the connecting device is in the router's local network.
- Make sure the connecting device (e.g. your PC) and the router are well-connected to each other via network cables or Wi-Fi connection.
- Simplify the network configuration by connecting your router and the PC directly, without hubs/switches in between, and try again.
Why do I have abnormal incoming/outgoing traffic?
- Go to Network Center > Traffic Control > Monitor, and select Enable traffic statistics and Enable application detection to check which device/application overuses network bandwidth. Locate the device/ application in question and disconnect/stop it.
- Go to Security Advisor and perform system scan to see if there may be potential security issues.
Does the router have SPI firewall?
Yes. SPI firewall is always enabled. No related management options are provided.
Can the VPN Server package work on my router if I use IPv6 connection?
If the router provides IPv6 connection, you can only use VPN Server as an OpenVPN server. The other types of VPN (PPTP and L2TP/IPSec) are not supported.
What can I do if I can't connect to the router via VPN connection?
Make sure you enable the VPN pass-through function and select the corresponding options of the VPN protocols (PPTP, L2TP, IPSec) that you use.
Why does a message pop up notifying me I do not have a valid certificate when I visit certain HTTPS websites?
When you visit an HTTPS website, the website will continuously send a request to SRM for a valid certificate. If the website or some of its elements is in the block list, SRM cannot respond to the request with a valid certificate.
To work around this issue (due to the HSTS concerns), you can add the website to the allow list (at Network Center > Parental Control > Web-filter > Edit Allow List).
Wi-Fi
What can I do if I forgot the Wi-Fi SSID and its password?
- As the administrator, log in to SRM via wired connection and go to Network Center > Wireless > Wi-Fi to find out the Wi-Fi SSID and password.
- If you forgot the administrator's login credentials, you may perform Soft Reset to reset the Wi-Fi SSID and its password. For more information, please see "Reset Synology Router".
Why did my Wi-Fi SSID disappear?
- Check if the Wi-Fi network is enabled (at Network Center > Wireless > Wi-Fi) and if the Wi-Fi switch is set "ON" on the Synology Router.
- Check if the SSID name is set to "Show" (at Network Center > Wireless > Wi-Fi). If it is already set to be shown, disable the Wi-Fi network and enable it again.
Why can't my device connect to the Synology Router wirelessly?
- Check if the Wi-Fi button on your router is set "ON", the Wi-Fi feature is enabled in SRM, and the antennas are properly installed.
- Check if the device is too far away from the router or if there are any obstacles or signal sources that may interfere with wireless transmission.
- Check if your wireless device is connected to the correct Wi-Fi network hosted by the router. If the device is not in the router's local network, you cannot access SRM via router.synology.com or its local IP address.
- Move your wireless device closer to the router and reconnect again. • If you do not have both Wi-Fi bands enabled, ensure that your client device supports the enabled Wi-Fi frequency.
Why can't my wireless devices communicate with each other though they are in the same Wi-Fi network?
AP isolation may have been enabled (at Network Center > Wireless > Wi-Fi > Advanced options). AP isolation prevents wireless client devices that join the same Wi-Fi network (2.4GHz or 5GHz) from communicating with each other.
If the network is a guest network, wireless devices cannot see each other if they are located on different bands. You may enable this functionality at Network Center > Wireless > Guest Network by enabling Allow local network access for the guest network.
Why is the Wi-Fi signal weak and how can I improve it?
Weak Wi-Fi signal may come from the following reasons:
- The router is too far from the client devices.
- The router's Wi-Fi transmit power is not strong enough. Go to Network Center > Wireless > Wi-Fi > Advanced options, and change the Transmit power level (Low, Middle, High).
- There might be interfering barriers (e.g. concrete or metall walls) that can severely reduce Wi-Fi signals. 5GHz Wi-Fi is more sensitive to barriers than 2.4GHz. Refer to "Set up Your Wi-Fi Connection" for more information.
- Nearby devices (e.g. microwaves/wireless phones, USB 3.0 devices, and other routers) may interfere with the router's 2.4GHz Wi-Fi transmission.
To improve Wi-Fi signal strength, you may try the following solutions:
- For RT1900ac, adjust the antennas to make them 45 degrees apart from each other. If the Wi-Fi strength is not boosted, you may try other angles to find out the best antenna placement.
- Relocate your router to the center of the area where the client devices are placed, or to a position where the router and the devices are within a visible distance without interfering barriers. Optimal placement depends heavily on the actual environment and may be influenced by interference sources.
- If there are radio transmitting devices near the router, to avoid channel overlapping, re-assign their operation channels to channels 1, 6, or 11 (for devices using 2.4GHz Wi-Fi); to any non-overlapping channels (for devices using 5GHz Wi-Fi).
- If set to "Auto", SRM will try to determine a less congested channel.
Why can't I boost a device's signal with beamforming?
- Only six devices can concurrently receive beamforming.
- Make sure your device supports beamforming too. This means the device must conform to the 802.11ac standards.
- RT2600ac performs beamforming for all supported Wi-Fi connections by default.
Which Wi-Fi frequency (2.4GHz and 5GHz) should I choose?
Please see "Set up Your Wi-Fi Connection".
Why can't I find the router's 5GHz Wi-Fi network?
Due to previous NCC (National Communications Commission) regulations, in Taiwan wireless devices manufactured before 2009 cannot make use of the 5GHz Wi-Fi channels 36-48. To help such wireless devices connect to the 5GHz Wi-Fi network, you should use alternative channels rather than channels 36-48 (at Network Center > Wireless > Wi-Fi > 5GHz > Advanced options).