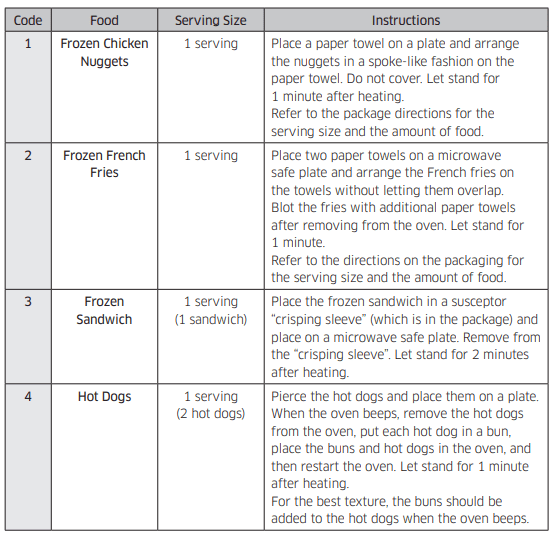
User Manual Microwave
Installation
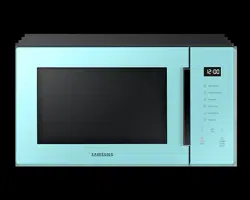
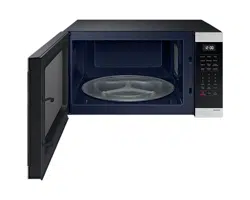
What’s included
Make sure all parts and accessories are included in the product package. If you have a problem with the oven or accessories, contact a local Samsung customer center or your retailer.
Oven at a glance
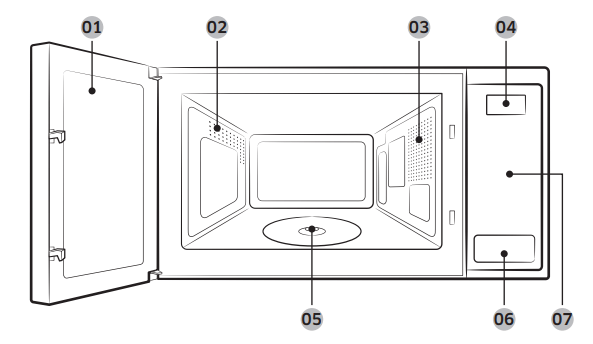
01 Door
02 Vent
03 Oven light
04 Display
05 Coupler
06 Push button door opener
07 Feature pane
Accessories
The oven comes with different accessories that help you prepare different types of food.
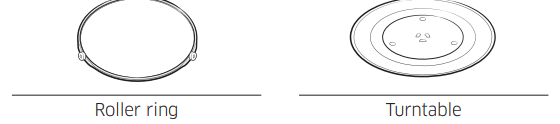
Roller ring : Put in the center of the base. It supports the turntable.
Turntable : Put on the roller ring with the center fitting the coupler on the microwave’s floor. It serves as a cooking base.
NOTE :Do not operate the oven without the turntable on the roller ring
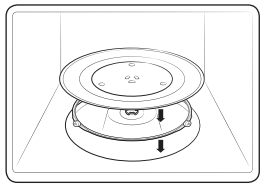
Turntable
Remove all packing materials inside the oven.Install the roller ring and turntable. Check that the turntable rotates freely
Maintenance
Cleaning
Clean the oven regularly to prevent impurities from building up on or inside the oven. Also pay special attention to the door, door sealing, and turntable and roller ring (applicable models only). If the door won’t open or close smoothly, first check if the door seals have built up impurities. Use a soft cloth and soapy water to clean both the inner and outer sides of the oven. Rinse and dry well.
To remove stubborn impurities with bad smells from inside the oven
1. With the oven empty, put a cup of diluted lemon juice on the center of the turntable.
2. Heat the oven for 10 minutes at maximum power
3. When the cycle is complete, wait until the oven cools down. Then, open the door and clean the cooking chamber.
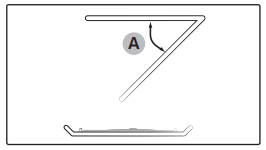
To clean inside swing-heater models
To clean the upper area of the cooking chamber, lower the top heating element by 45° (A) as shown. This will help you clean the upper area. When done, reposition the top heating element.
CAUTION
- Keep the door and door sealing clean and ensure the door opens and closes smoothly. Otherwise, the oven’s lifecycle may be shortened.
- Take caution not to spill water into the oven vents.
- Do not use any abrasive or chemical substances for cleaning.
- After each use of the oven, use a mild detergent to clean the cooking chamber after waiting for the oven to cool down.
Replacement (repair)
WARNING : This oven has no user-removable parts inside. Do not try to replace parts or repair the oven yourself.
- If you encounter a problem with hinges, sealing, and/or the door, contact a qualified technician or a local Samsung service center for technical assistance.
- If you want to replace the light bulb, contact a local Samsung service center. Do not replace it yourself.
- If you encounter a problem with the outer housing of the oven, first unplug the power cord from the power source, and then contact a local Samsung service center.
Care during an extended period of disuse
- If you don’t use the oven for an extended period of time, unplug the power cord and move the oven to a dry, dust-free location. Dust and moisture that builds up inside the oven may affect the performance of the oven.
Before you start
Before you use the microwave for the first time, there is some basic information you should know. This information starts below.
NOTE : Before or during any cooking mode, you can set/change the clock or the kitchen timer.
Current time
It is important to set the correct clock time to ensure correct automatic operations.
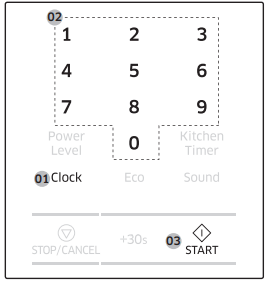
1. Press Clock.
2. Use the number buttons to enter the current time. For example, press 5, 0, and 0 in sequence for 5:00 o’clock.
3. Press START to confirm your settings. The colon (:) indicator blinks several times.
Power saving
To reduce power consumption when not using the oven, use the power saving function of the oven
Auto power saving
- After 25 minutes of user inactivity, the oven automatically enters power saving mode. Any previous function will be cancelled, and the current time will be displayed.
- To activate power saving, press Eco to turn off the display.
- To deactivate power saving, open the door or press Eco again. The display turns back on showing the current time.
- If you open the door and leave it open, the oven light will turn off after 5 minutes.
Child lock
To prevent accidents, Child Lock disables all controls except for the Eco button. Hold down STOP/CANCEL for 3 seconds to activate. Hold down STOP/CANCEL again for 3 seconds to deactivate.

Sound On/Off
You can mute or unmute the sounds (beeps or melody) made by the oven.
- To mute the sounds, press Sound until “OFF” appears in the display. Then, press START.
- To unmute the sounds, press Sound again until “ON” appears in the display. Then, press START.

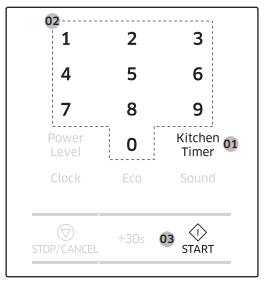
Kitchen timer
1. Press Kitchen Timer.
2. Press the number buttons to set the length of time. For example, press 3 - 0 - 0 to set the timer to 3 minutes.
3. Press START. The Kitchen Timer counts down the time.
About microwave energy
Microwaves are high-frequency electromagnetic waves. The magnetron built into the oven generates microwaves which cook or reheat food without deforming or discolouring it.
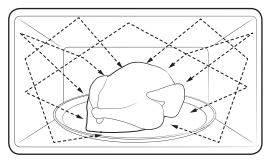
1. The microwaves generated by the magnetron are distributed uniformly by the microwave's distribution system. This is why the food cooks evenly.
2. The microwaves are absorbed by the food to a depth of approx. 1 inch (2.5 cm). Then, the microwaves dissipate inside the food as cooking continues.
3. The cooking time is affected by the following conditions of the food:
- Quantity and density
- Moisture content
- Initial temperature (especially, when frozen)
NOTE : The cooked food retains heat in its core after cooking is complete. This is why you must observe the standing times specified in this manual, which ensures food cooks evenly down to the core.
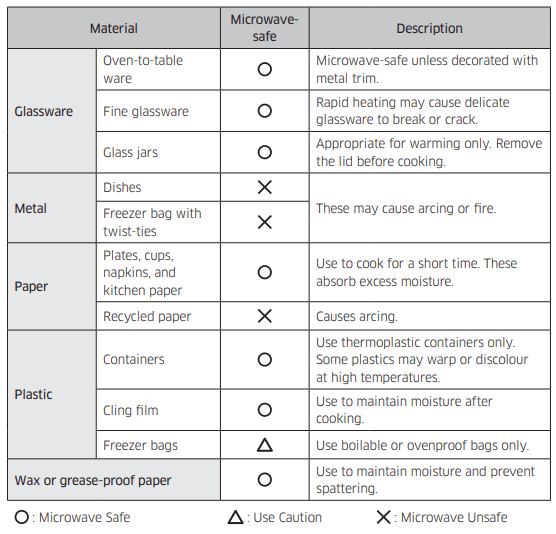
Cookware for microwaving
Cookware used for Microwave Mode must allow microwaves to pass through and penetrate food. Metals such as stainless steel, aluminum, and copper reflect microwaves. Therefore, do not use cookware made of metallic materials. Cookware marked microwave - safe is always safe for use. For additional information on appropriate cookware, refer to the following guide. Requirements:
- Flat bottom and straight sides
- Tight-fitting lid
- Well-balanced pan with handles that weigh less than the main pan

Operations
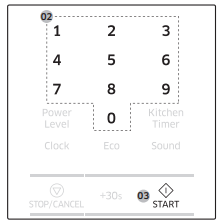
Feature panel
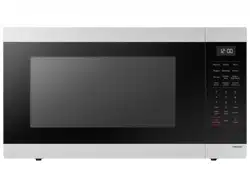
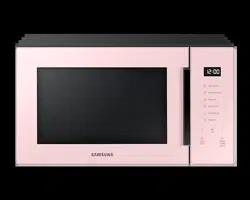
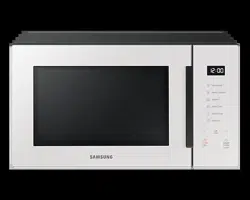
The front panel comes in a wide range of materials and colors. For improved quality, the actual appearance of the oven is subject to change without notice.

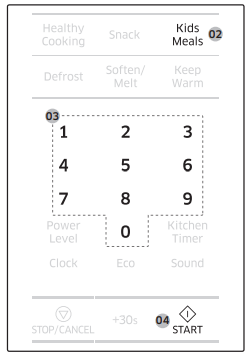
01 Sensor Cook
02 Healthy Cooking
03 Snack
04 Kids Meals
05 Defrost
06 Soften/Melt
07 Keep Warm
08 Number
09 Power Level
10 Kitchen Timer
11 Clock 12 Eco
13 Sound
14 STOP/CANCEL
15 +30s
16 START
Simple steps to start
To cook food
1. Put the food in a microwave-safe container, and then put the container in the center of the turntable.
2. Use the number buttons to set the cooking time.
3. Press START.
NOTE : When cooking is complete, the oven beeps 4 times. Use oven gloves to take out the food
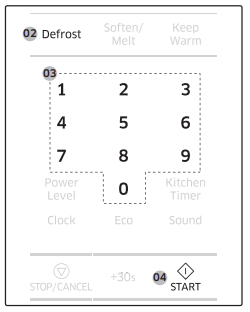
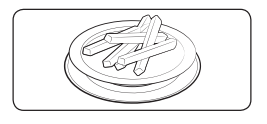
To defrost frozen food
1. Put the frozen food in a microwave-safe container, and then put the container in the center of the turntable.
2. Press Defrost.
3. Use the number buttons to set the serving size.
4. Press START.
NOTE : For more information, see the Defrost section on page 41.
Manual mode
Microwave This is the basic function of this microwave oven. The power level is set to High by default
1. Put food in a microwave-safe container, and then place the container on the turntable.
2. Use the number buttons to set the cooking time (max: 99 min 99 sec). For example, to set the time to 10 minutes, press 1 and 0 for the minutes, and 0 and 0 for the seconds (10:00).
3. To change the default power level, press Power Level, and then select a different level. See the Power level section on page 30 for details.
4. Press START.
5. When cooking is complete, the oven beeps 4 times. Use oven gloves to take out the food.
Common settings
Cooking time
Follow these steps to set or change the cooking time. By default, the power level is set to High.
Use the number buttons to set the cooking time (max: 99 min 99 sec). The time area consists of the minute and second elements. To set a cooking time of 25 minutes, for example, press 2 and 5 for the minutes, then 0 and 0 for the seconds.
NOTE :
- To change the cooking time during operation, press STOP/CANCEL twice, and then repeat the steps above.
- To stop cooking, simply open the door, or press STOP/CANCEL. To resume operation, close the door and press START.
- To cancel cooking, press STOP/CANCEL twice.
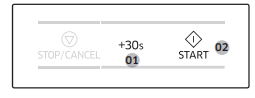
Time increment
You might want to add extra time to the current cooking time while cooking is in progress. Time can be added in 30 second intervals.
1. Before or during cooking, press +30s as many times as needed. For example, to add 2 minutes to the current cooking time, press the button 4 times.
2. Press START. The oven continues to operate for the changed time.
NOTE : This button is not enabled when you use Auto mode.
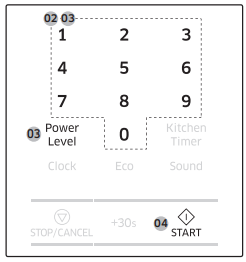
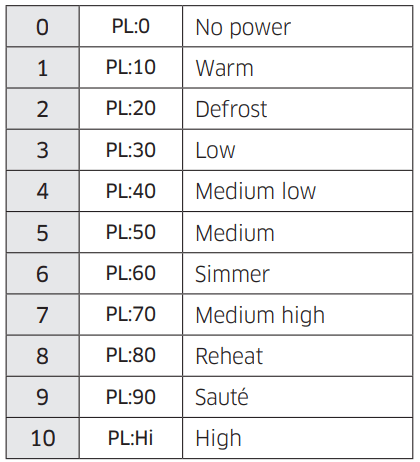
Power level
Select the cooking time, and then choose the power level before pressing the Start button.
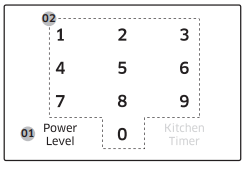
1. Press Power Level.
2. Use the number buttons to select a specific power level. Available levels range from No power (0) to High (10). See the table below
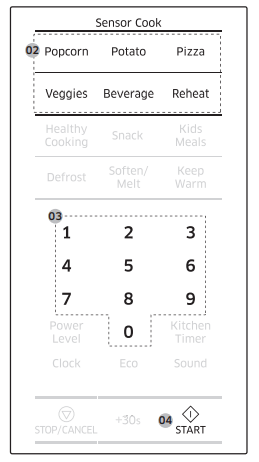
Sensor mode
Sensor Cook
For inexperienced cooks, the oven offers a total of 9 Sensor Cook programs in 6 different categories. Take advantage of this feature to save time or shorten your learning curve. The cooking time and temperature will be adjusted according to the selected recipe.
1. Put food in a microwave-safe container, and then put the container in the center of the turntable. 04 02 03
2. Select a category by pressing Popcorn, Potato, Pizza, Veggies, Beverage, or Reheat.
3. Press the selected button again or the number buttons to select a specific program.
4. Press START.
5. When cooking is complete, the oven beeps 4 times. Use oven gloves to take out the food
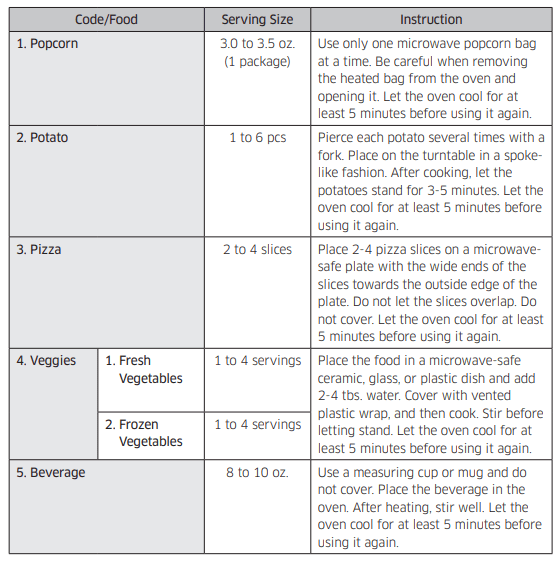
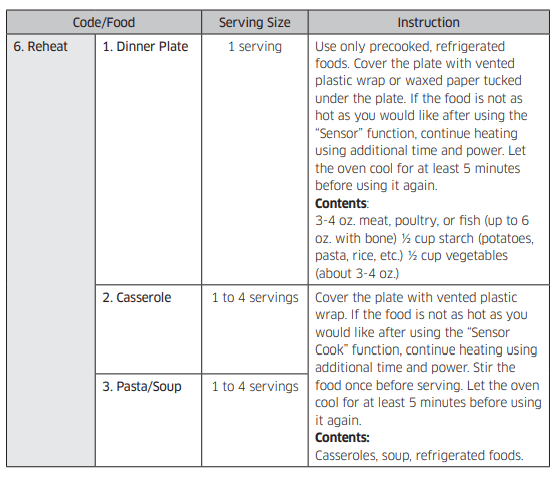
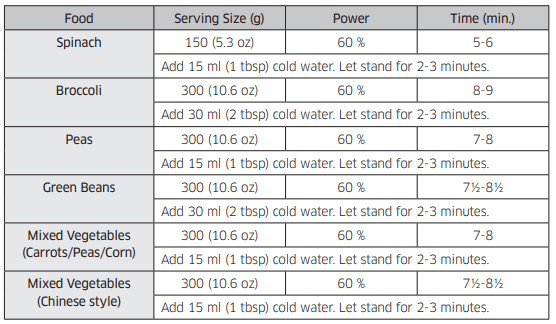
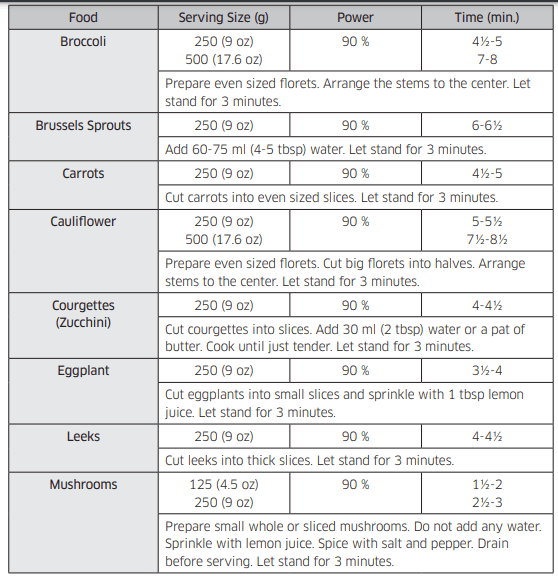
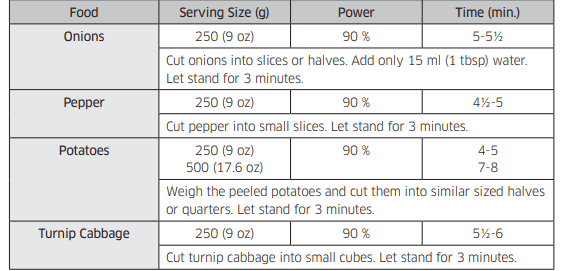
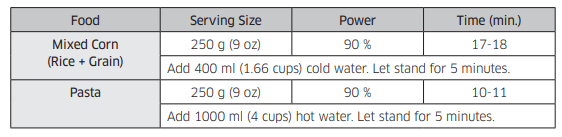
Sensor cook guide
The following table presents auto programs for cooking, roasting, and baking. The table contains food quantities, weight ranges, and appropriate recommendations. Cooking modes and times have been pre-programmed for your convenience.
Auto mode
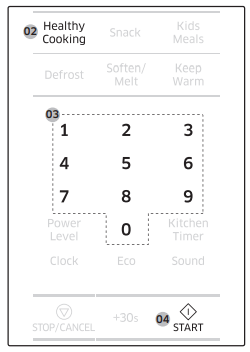
Healthy Cooking
For healthier alternatives, the oven offers a total of 10 Healthy Cook programs. Take advantage of this feature to save time or shorten your learning curve. The cooking time and temperature will be adjusted according to the selected recipe.
1. Put food in a microwave-safe container, and then put the container in the center of the turntable. 04 03 02
2. Press Healthy Cooking.
3. Press the Healthy Cooking button again or the number buttons to select a specific program.
4. Press START.
5. When cooking is complete, the oven beeps 4 times. Use oven gloves to take out the food.
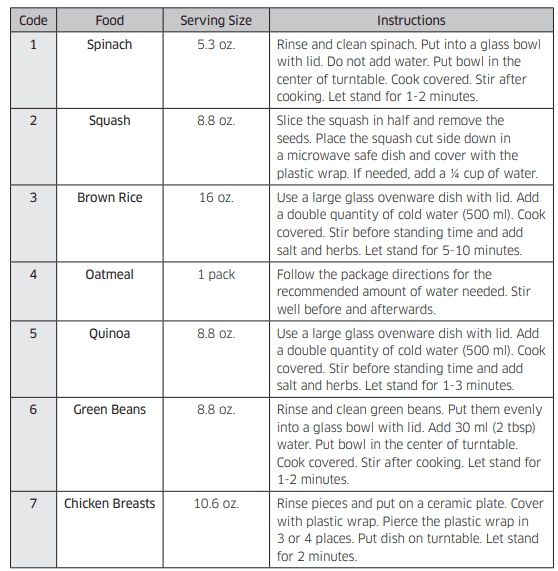
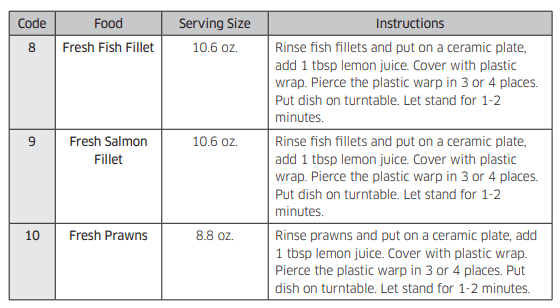
Healthy Cooking guide
The following table lists auto programs for cooking. The table contains food quantities, weight ranges, and appropriate recommendations. Cooking modes and times have been preprogrammed for your convenience.
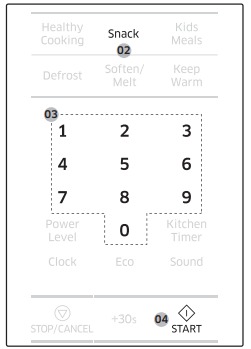
Snack
The Snack feature has 5 pre-programmed cooking times. You do not need to set either cooking times or the power level
1. Put food in the center of the turntable, and then close the door.
2. Press Snack.
3. Press the Snack button again or the number buttons to select a specific program.
4. Press START.
5. When the cycle is complete, the oven beeps 4 times. Use oven gloves to take out the food.
Snack guide
The following table lists auto programs for heating snack foods. The table contains food quantities, weight ranges, and appropriate recommendations.
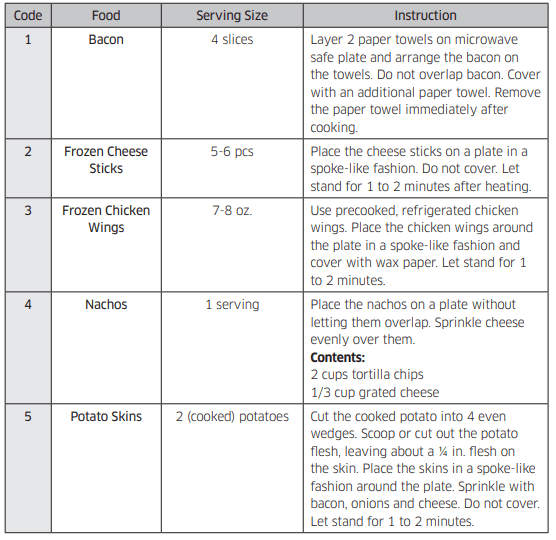
Kids Meals
Kids meals feature has 4 pre-programmed cooking times. You do not need to set either cooking times or the power level.
1. Put food in the center of the turntable.
2. Press Kids Meals.
3. Press the Kids Meals or number buttons to select a specific program.
4. Press START.
5. When cooking is complete, the oven beeps 4 times. Use oven gloves to take out the food.
CAUTION : Before inserting food in the oven, remove any metal or plastic cover or lid from the food.
Kids meals guide
Convenience
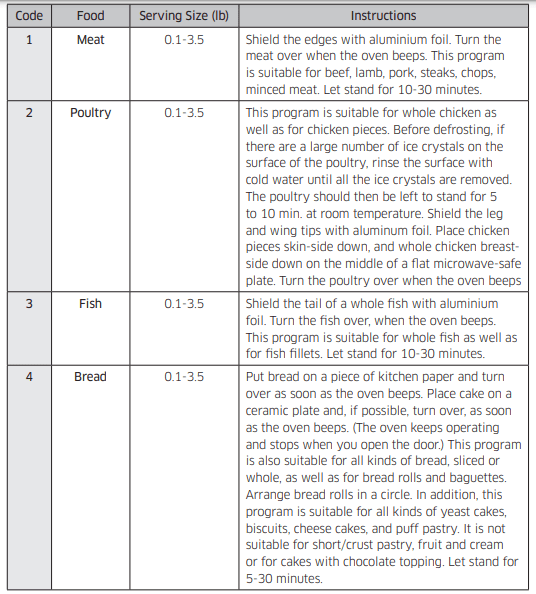
Defrost
This is useful to defrost frozen meat, poultry, fish, or bread. The operating time and power level will be adjusted according to the selected program
1. Put food in the center of the turntable, and then close the door.
2. Press Defrost to select a category.
3. Use the number buttons to select a weight.
4. Press START.
5. When the cycle is complete, the oven beeps 4 times. Use oven gloves to take out the food.
NOTE
- The oven beeps in the middle of the cycle to remind you to turn the food over. Turn the food over, and then press Start again to continue. When the cycle is complete, the oven beeps 4 times.
- You can defrost food manually. To do this, set a time, press the 2 button (20 % power), and then press START. For more information, see the Power level section on page 30.
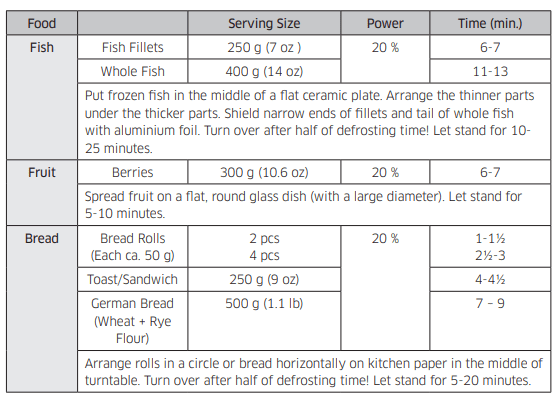
Defrost guide
The following table lists auto programs for defrosting food. The table contains food quantities, weight ranges, and appropriate recommendations.
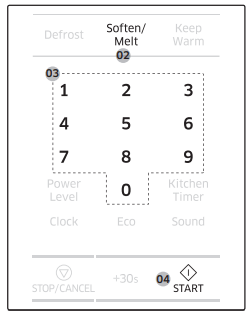
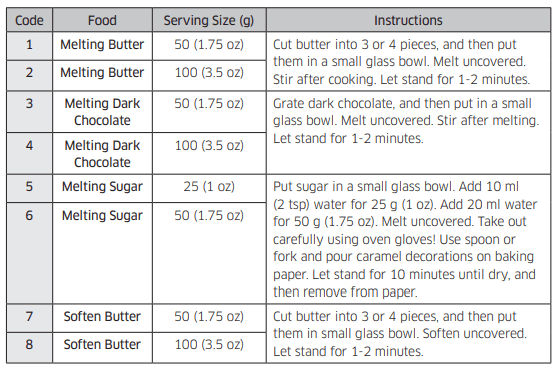
Soften/Melt
This is useful to soften or melt soft food or confections such as butter, chocolate, and sugar.
1. Put food in the center of the turntable.
2. Press Soften/Melt.
3. Press the Soften/Melt button again or the number buttons to select a specific program.
4. Press START.
5. When the cycle is complete, the oven beeps 4 times. Use oven gloves to take out the food
Soften/Melt guide
The following table lists auto programs for softening or melting specific kinds of food. The table contains food quantities, weight ranges, and appropriate recommendations.
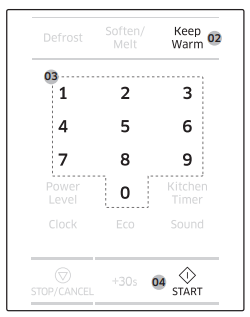
Keep Warm
If you want to keep cooked foods warm until serving, use this function. The operating time and power level will be adjusted according to the selected program.
1. Put food in the center of the turntable, and then close the door.
2. Press Keep Warm. The default time is 99 minutes.
3. Use the number buttons to set the warming time (max: 99 min 99 sec.).
4. Press START.
5. When the cycle is complete, the oven beeps 4 times. Use oven gloves to take out the food.
CAUTION
- Do not use this function to reheat cold food. Use this only for keeping food that has just been cooked warm.
- Do not keep food for more than 1 hour. The food surface may dry up.
- Do not put food covered with lids or plastic wrap in the oven.
Cooking Smart
We provide these cooking guides to help you make the most out of this oven. Experience our cooking know-how to add convenience and richness to your life.
Microwave cooking guide
- Cover the food for the entire time it is cooking. The vaporised moisture from the food cycles through inside and helps cook the food evenly.
- When cooking is complete, let stand for the specified time. This allows the food to cook evenly throughout. • Use only microwave-safe cookware.
Frozen vegetables
- Use a suitable glass Pyrex container with a lid.
- Stir twice during cooking and once after cooking, and then add the seasoning of your preference.
Fresh vegetables
- Use a suitable glass Pyrex container with a lid.
- Cut ingredients into as small pieces as possible to reduce the cooking time.
- Add 2-3 tbls (30-45 ml) of cold water to every 250 g (9 oz) unless otherwise specified.
- Stir once during cooking and once after cooking, and then add seasoning to your preference.
Rice and pasta
Rice
- Use a large-sized glass Pyrex container with a lid. Note that rice doubles in volume during cooking.
Pasta
- Use a large-sized glass Pyrex container. Cook uncovered.
- Add boiling water and a little salt, and stir well. Stir several times during and after cooking.
- Cover with a lid while letting stand, and then drain well.

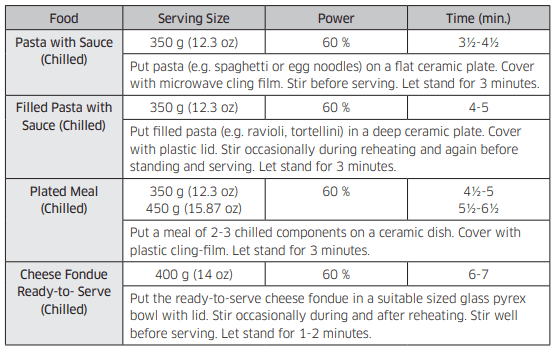
Reheating guide
General
This reheating guide is based on the following standards: That the temperature of liquid at room temperature is between 64.4 °F and 68 °F (18 °C and 20 °C) and that the temperature of chilled food is between 41 °F and 44.6 °F (5 °C and 7 °C). Follow the operating time, power level, and standing times specified in this table.
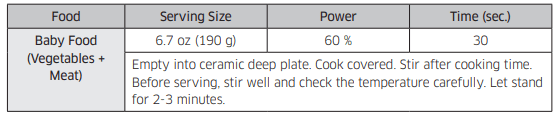
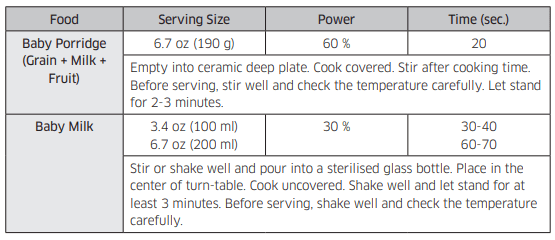
Special care for baby food
To prevent accidents such as burns, special care must be taken with baby food before serving. Make sure to strictly follow this reheating guide for baby food. Baby food
- Use a deep ceramic plate and cover it with a plastic lid.
- Recommended serving temperature is 86-104 °F (30-40 °C). Baby milk
- Use a sterilised glass bottle and reheat it uncovered.
- Remove the nipple before reheating. Otherwise, the milk in the bottle can boil over.
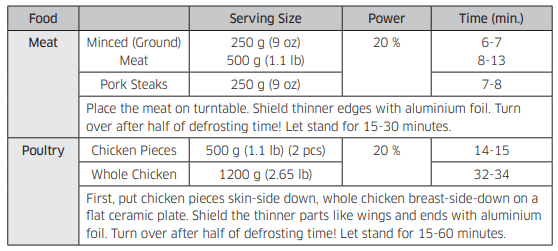
Defrosting guide
This defrosting guide is based on the following standard: That frozen food has an internal temperature between 0 °F and -4 °F (-18 °C and -20 °C). The standing time varies depending on the food type (meat or vegetables) and serving size (thinner or thicker pieces of food).
- Put frozen food in a microwave-safe container uncovered.
- Turn it over halfway through defrosting time and drain well when complete.
Quick & easy
Melting crystallized honey
Put 7 oz (20 g) crystallized honey into a small deep glass dish. Heat for 20-30 seconds using 30 %, until honey is melted.
Melting gelatine
Put dry gelatine sheets (10 g/3.5 oz) into cold water for 5 minutes. Put drained gelatine into a small glass pyrex bowl. Heat for 1 minute using 30 %. Stir after melting.
Cooking glaze/icing (for cake and gateaux)
Mix instant glaze (approximately 14 g/5 oz) with 40 g (1.5 oz) sugar and 250 ml (8.5 oz) cold water. Cook uncovered in a glass pyrex bowl for 3½ to 4½ minutes using 90 %, until glaze/ icing is transparent. Stir twice during cooking.
Cooking jam
Put 600 g (1.3 lb) fruit (for example mixed berries) in a suitably sized glass pyrex bowl with lid. Add 300 g (10.5 oz) preserving sugar and stir well. Cook covered for 10-12 minutes using 90 %. Stir several times during cooking. Empty directly into small jam glasses with twist-off lids. Let stand for 5 minutes.
Cooking pudding/ custard
Mix pudding powder with sugar and milk (500 ml/2 cups) by following the manufacturers instructions and stir well. Use a suitably sized glass pyrex bowl with lid. Cook covered for 6½ to 7½ minutes using 90 %. Stir well several times during cooking.
Browning almond slices
Spread 30 g (1 oz) sliced almonds evenly on a medium sized ceramic plate. Stir several times during browning for 3½ to 4½ minutes using 60 %. Let stand for 2-3 minutes in the oven. Use oven gloves while taking out!
Troubleshooting
Checkpoints
| Problem |
Cause |
Action |
| General |
|
|
| The buttons cannot be pressed properly. |
Foreign matter may be caught between the buttons. |
Remove the foreign matter and try again. |
| For touch models: Moisture is on the exterior. |
Wipe the moisture from the exterior |
| Child lock is activated. |
Deactivate Child lock. |
| The time is not displayed. |
Power is not supplied. |
Make sure power is supplied. Confirm the microwave is plugged in. Check your fuses or circuit breakers. |
| The Eco (power-saving) function is set. |
Turn off the Eco function. |
| The oven does not work. |
Power is not supplied. |
Make sure power is supplied. Confirm the microwave is plugged in. Check your fuses or circuit breakers |
| The door is open |
Close the door and try again |
| The door open safety mechanisms are covered in foreign matter. |
Remove the foreign matter and try again. |
| The oven stops while in operation. |
The user has opened the door to turn food over. |
After turning over the food, press the Start button again to start operation. |
| The power turns off during operation. |
The oven has been cooking for an extended period of time. |
After cooking for an extended period of time, let the oven cool. |
| The cooling fan is not working. |
Listen for the sound of the cooling fan. |
| Trying to operate the oven without food inside. |
Put food in the oven. |
| There is not enough ventilation space around the oven. |
There are intake/exhaust outlets on the front and rear of the oven for ventilation. Check the installation guide and make sure that the microwave is far enough away from walls and cabinets for proper ventilation |
| Several appliances or devices are plugged into the same outlet |
Unplug all other appliances or devices from the outlet. |
| There is no power to the oven. |
Power is not supplied. |
Make sure power is supplied. Confirm the microwave is plugged in. Check your fuses or circuit breakers |
| There is a popping sound during operation, and the oven doesn't work |
Cooking sealed food or using a container with a lid may causes popping sounds. |
Do not use sealed containers as they may burst during cooking due to expansion of the contents |
| The oven exterior gets too hot during operation. |
There is not enough ventilation space around the oven. |
There are intake/exhaust outlets on the front and rear of the oven for ventilation. Check the installation guide and make sure that the microwave is far enough away from walls and cabinets for proper ventilation. |
| Objects are on top of the oven |
Remove all objects on the top of the oven. |
| The door cannot be opened properly |
Food residue is stuck between the door and oven interior. |
Clean the oven and then open the door. |
| The oven does not heat. |
The oven may not work, too much food is being cooked, or improper cookware is being used. |
To test the oven, put one cup of water in a microwave-safe container, put the container in the oven, and then run the microwave for 1-2 minutes to check whether the water is heated. If the water is heated, reduce the amount of food and start the function again. Use a cooking container with a flat bottom |
| Heating is weak or slow |
The oven may not work, too much food is being cooked, or improper cookware is being used. |
To test the oven, put one cup of water in a microwave-safe container, put the container in the oven, and then run the microwave for 1-2 minutes to check whether the water is heated. If the water is heated, reduce the amount of food and start the function again. Use a cooking container with a flat bottom. |
| The warm function does not work. |
The oven may not work, too much food is being cooked, or improper cookware is being used. |
To test the oven, put one cup of water in a microwave-safe container, put the container in the oven, and then run the microwave for 1-2 minutes to check whether the water is heated. If the water is heated, reduce the amount of food and start the function again. Use a cooking container with a flat bottom. |
| The thaw function does not work. |
The oven may not work, too much food is being cooked, or improper cookware is being used. |
To test the oven, put one cup of water in a microwave-safe container, put the container in the oven, and then run the microwave for 1-2 minutes to check whether the water is heated. If the water is heated, reduce the amount of food and start the function again. Use a cooking container with a flat bottom. |
| The interior light is dim or does not turn on. |
The door has been left open for a long time. |
The interior light may automatically turn off when the Eco function operates. Close and reopen the door or press the “Cancel” button. |
| The interior light is covered by foreign matter. |
Clean the inside of the oven and check again. |
| A beeping sound occurs during cooking |
If the Auto Cook function is being used, this beeping sound means it's time to turn over the food during thawing. |
After turning over the food, press the Start button again to restart operation. |
| The oven is not level. |
The oven is installed on an uneven surface. |
Make sure the oven is installed on flat, stable surface.
|
| There are sparks during cooking. |
Metal containers are used during the oven/thawing functions. |
Do not use metal containers |
| When power is connected, the oven immediately starts to work. |
The door is not properly closed |
Close the door and check again. |
| There is electricity coming from the oven. |
The power or power socket is not properly grounded. |
Make sure the power and power socket are properly grounded. |
| There is water dripping. |
Water or steam may be generated by the cooking or defrosting process, depending on the food. This is not an oven malfunction. |
Let the oven cool and then wipe with a dry dish towel. |
| Steam leaks from the door. |
Water or steam may be generated by the cooking or defrosting process, depending on the food. This is not an oven malfunction. |
Let the oven cool and then wipe with a dry dish towel. |
| There is water left in the oven. |
Water or steam may be generated by the cooking or defrosting process, depending on the food. This is not an oven malfunction |
Let the oven cool and then wipe with a dry dish towel. |
| The brightness inside the oven varies. |
Changes in brightness reflect changes in power output. Power output changes depending on the functions in use. |
Power output changes during cooking are not malfunctions. |
| Cooking is finished, but the cooling fan is still running. |
To ventilate the oven, the cooling fan continues to run for about 5 minutes after cooking is complete. |
This is not an oven malfunction. |
| Pressing the +30sec button operates the oven. |
This happens when the oven was not operating. |
The microwave oven is designed to start operating when you press the +30 sec button if it was not operating. |
| Turntable |
|
|
| While turning, the turntable comes out of place or stops turning. |
There is no roller ring, or the roller ring is not properly in place. |
Install the roller ring and then try again. |
| The turn table drags while turning. |
The roller ring is not properly in place, there is too much food, or the container is too large and touches the inside of the microwave. |
Adjust the amount of food and do not use containers that are too large. |
| The turn table rattles while turning and is noisy |
Food residue is stuck to the bottom of the oven. |
Remove any food residue stuck to the bottom of the oven. |
Information code
| Code |
Description |
Action |
| C-d0 |
Control buttons are pressed over 10 seconds. |
Clean the keys and check if there is water on the surface around the keys. If this occurs again, turn off the microwave oven for more than 30 seconds, and then try setting again. If this code appears again, call your local Samsung service center. |
| C-10 |
The GAS Sensor is open. |
Unplug the power cord of the oven, and then contact a local Samsung service center |
| The GAS Sensor is shorted. |
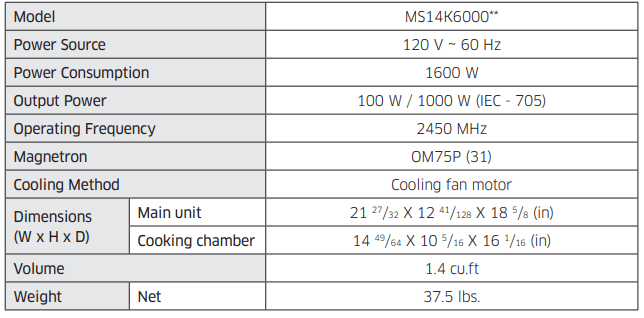
Technical specificcation