Operating Instructions
Toaster Oven (Household Use Only)
Model No.
NB-W250
Preheat
Convection
POWER
Function
Time/+30s
Slice/Size
Light/Dark
Temp.

2
Contents
IMPORTANT SAFEGUARDS 3
Safety Precautions 5
Part Names and Instructions 8
Handling Instructions 10
Before use 10
Preparations 10
How to use 10
Cooking guide ( Auto mode ) 12
Cooking guide ( Manual mode ) 14
Accessories Instructions 16
Care & Cleaning 16
Troubleshooting 17
Contact Information 18
Specications 18
Limited Warranty 19
Thank you for purchasing this Panasonic product.
• This product is intended for household use only.
• Please read these instructions thoroughly to use product correctly and safely.
• Please retain this Operating Instructions for future use.
• Panasonic will not accept any liability if the appliance is subject to improper use,
or failure to comply with these instructions.

3
IMPORTANT SAFEGUARDS
The following basic safety precautions apply when using electrical appliances:
1. Read all instructions.
2. Do not touch hot surfaces. Use handles or knobs.
3. To protect against electrical shock do not immerse cord, plugs, or appliance
water or other liquid.
4. Close supervision is necessary when any appliance is used by or near
children.
5. Unplug from outlet when not in use and before cleaning. Allow to cool
before putting on or taking off parts.
6. Do not operate any appliance with a damaged cord or plug or after the
appliance malfunctions or has been damaged in any manner. Return
appliance to the nearest authorized service facility for examination, repair,
or adjustment. (See P.18)
7. The use of accessory attachments not recommended by the appliance
manufacturer may cause injuries.
8. Do not use outdoors.
9. Do not let cord hang over edge of table or counter, or touch hot surfaces.
10. Do not place on or near a hot gas or electric burner, or in a heated oven.
11. Extreme caution must be used when moving an appliance containing hot oil
or other hot liquids.
12. Always attach plug to appliance first, then plug cord into the wall outlet. To
disconnect, turn any control to
“
off
”
, then remove plug from wall outlet.
13. Do not use appliance for other than intended use.
14. Oversize foods or metal utensils must not be inserted in the appliance as
they may create a fire or risk of electric shock.
15. A fire may occur if the oven is covered or touching flammable material,
including curtains, draperies, walls, and the like, when in operation. Do not
store any item on top of the appliance when in operation.
16. Do not clean with metal scouring pads. Pieces can break off the pad and
touch electrical parts involving a risk of electric shock.
17. Extreme caution should be exercised when using containers constructed of
other than metal or glass.
18. Replace cardboard lids on food containers with aluminum foil;
cardboard lids may burn. When using aluminum foil, keep foil from touching
heating elements.
19. Do not store any materials, other than manufacturer’ s recommended
accessories, in this oven when not in use.

4
20. Do not place any of the following materials in the oven: paper, cardboard,
plastic and the like.
21. Do not cover crumb tray or any part of the oven with metal foil. This will
cause overheating of the oven.
22. Remove plug from outlet when the appliance is not in use, before putting on
ortakingoparts,andbeforecleaning.Allowtocoolbeforehanding.
23. Use extreme caution when removing tray or disposing of hot grease.
24.Toturnotheappliance,pressthepowerbutton.Thedisplaywindowwill
turnoanddisableanycookingfunction.
SAVE THESE INSTRUCTIONS
A. A short power supply cord is provided to reduce the risk resulting from
becoming entangled in or tripping over a longer cord.
B. The cord should be arranged so that it will not drape over the countertop or
tabletop where it can be pulled on by children or tripped over unintentionally.
C. Do not use an extension cord.
5
In order to prevent accidents or injuries to the user, other people,
and damage to property, please follow the instructions below.
■
The following chart indicates the degree of damage caused by improper
operation.
WARNING :
Indicates potential hazard that could result in serious injury
or death.
CAUTION :
Indicates potential hazard that could result in minor injury or
property damage.
■
The symbols are classified and explained as follows.
Safety Precautions
Please make sure to
follow these instructions.
WARNING
To avoid risk of electric shock, re due to short circuit, burns or serious injury.
●
Do not disassemble, repair or modify this appliance.
Consult the place of purchase or customer care center for repairs.
(See P.18)
●
Do not damage the power cord or power plug.
Following actions are strictly prohibited. Modifying or placing near
heating elements, bending, twisting, pulling along, pulling over sharp
edges, putting heavy object on top, bundling the power cord and
carrying the appliance by the power cord.
●
Do not use the appliance if the power cord or power plug is damaged or
the power plug is loosely connected to the outlet.
If the power cord is damaged, it must be replaced by the manufacturer,
itsserviceagentorasimilarlyqualiedpersoninordertoavoidhazards.
(See P.18)
●
Do not plug or unplug the power plug with wet hands.
●
Do not let the power cord hang over the edge of table or worktop, or
touch hot surfaces.
●
Do not allow children to use the oven. Do not use the oven within the
reach of children.
●
Do not allow infants and children to play with packaging material.
●
Do not use this appliance near any combustible materials or under the
curtains.
This symbol indicates prohibition.
This symbol indicates requirement that must be followed.
6
WARNING
To avoid risk of electric shock, re due to short circuit, burns or serious injury.
●
This appliance is not intended for use by persons (including children)
with reduced physical, sensory or mental capabilities, or lack of
experience and knowledge, unless they have been given supervision or
instruction concerning use of the appliance by a person responsible for
their safety. Children should be supervised to ensure that they do not
play with the appliance.
●
Discontinue using the appliance immediately and unplug in the unlikely
event that this appliance stops working properly.
Example for abnormal occurrences or breaking down :
●Thepowerplugandthepowercordbecomeabnormallyhot.
●Thepowercordisdamagedortheappliancepowerfails.
●Themainunitisdeformed,hasvisibledamageorisabnormallyhot.
●Thereisanotherabnormalityorfailure.
Unplug the appliance immediately and contact to the customer care
center for the check or the repair. (See P.18)
●
Make sure the voltage indicated on the label of the appliance is the
same as your local supply. Also avoid plugging other devices into the
same outlet to prevent electric overheating. However, if you are
connecting a number of power plugs, make sure the total wattage does
not exceed the rated wattage of the outlet.
●
Insertthepowerplugrmly.
●
Dustothepowerplugregularly.
Unplug the power plug, and wipe with a dry cloth.
CAUTION
●
Do not immerse the appliance, power cord and power plug in water or
splash it with water
/
any liquid.
●
Never leave the appliance unattended during operation.
●
Do not touch hot surfaces, such as the top of the oven body, the baking
tray and the cooking rack while the oven is in use or just after use. The
oven is easy to become hot during use, and the surface temperature
during use is very high. Let it cool down before cleaning after use.
●
Do not touch the appliance with wet hands.
●
Do not touch, block or cover the appliance during use.
●
Donotputorinsertammablematerialson
/
under the oven.
●
Do not use a knife or sharp tool, as these may cause damage to the
heating elements.
●
Do not directly heat cans or glass bottles.
●
Do not use the appliance near wall, furniture, or in enclosed spaces
such as a built
-
in cupboard.
To avoid risk of electric shock, smoke, re, burns, injury or property damage.
7
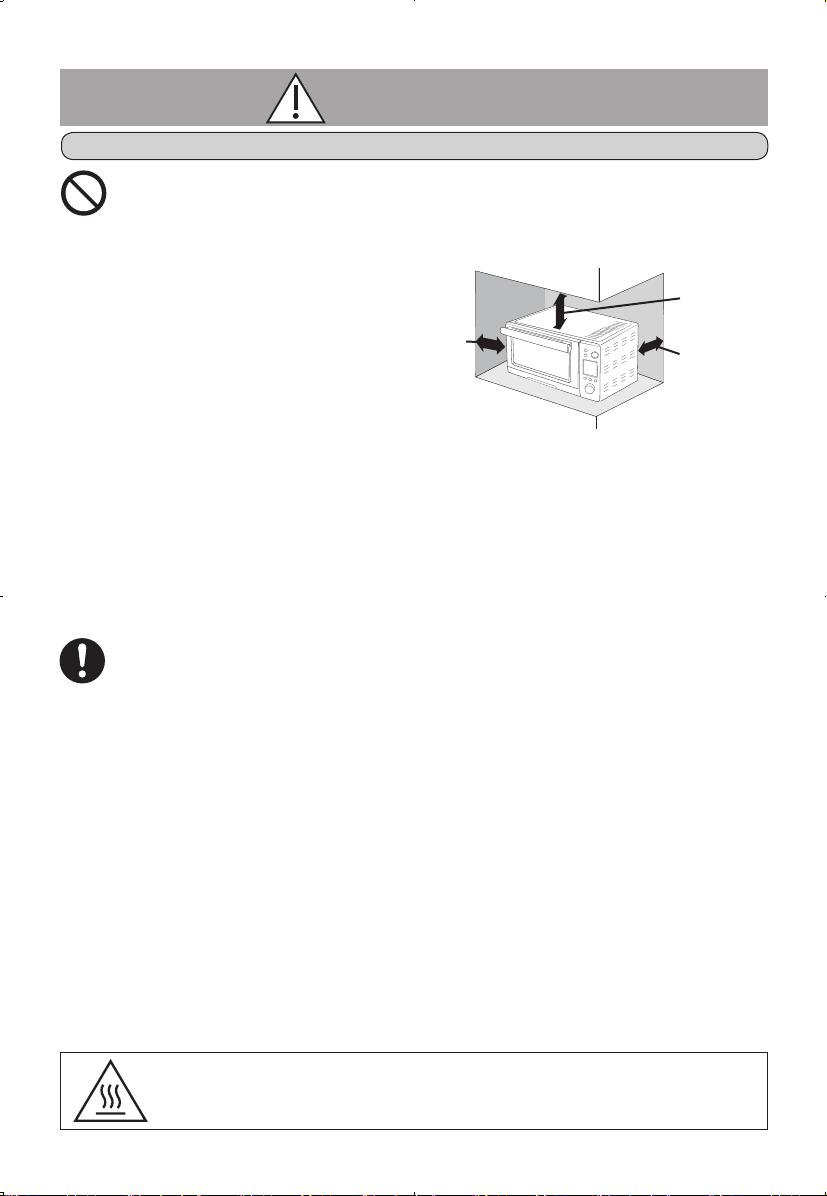
●
Do not use the appliance on following places.
●Onunevensurfaces,oncarpet,non
-
heat
-
resistant surface or
tablecloths etc.
●Placeswhereitmaybesplashedwithwaterornearaheatsource.
●Nearanyopenwatersources
such as sinks, or the like.
➜
Placeonaat,stable
surface. To have
sucientairow,i.e.
10 cm
(4")*1
at one side,
15 cm
(6")*1
clear over the top,
10 cm
(4")*1
at the rear.
●
Do not use an external timer etc.
●Thisapplianceisnotintendedtobeoperatedbymeansof
an external timer or separate remote
-
control system.
●
Donotopenthedoorwhenthefoodgeneratesmokeorcatchesre.
(beforetheregoesout.)
●Turnothepowerandremovethepowerplugimmediately.
●Donotextinguishtherewithwater.
●
Do not place oil in the baking tray for heating.
●
To ensure continued protection against risk of electric shock, connect to
properly grounded outlets only.
●
Unplug the power plug from the outlet when the appliance is not in use,
before moving, and before cleaning.
●
Make sure to clean the appliance including cooking rack and
baking tray after every use. (See P.16)
●
Make sure the crumb tray is clean and set correctly when using the
appliance.
●
Beware not to be tripped over or get caught in the power cord while in
use.
●
Make sure to hold the power plug when unplugging it. Never pull on the
power cord.
●
Be sure to set the cooking rack into the middle position when using the
menu of “Toast” and “Bagel”.
●
To prevent dropping ingredients such as cheese, butter or baking batter
onto the lower heater when using cooking rack, place aluminum foil or
its likes over the cooking ruck, then place the food.
●
This product is intended for household use only.
CAUTION
This symbol on the products indicates “hot surface and
should not be touched without caution” as it may lead to
burns or cause injury.
More than
10 cm (4")
More than
15 cm (6")
More than
10 cm (4")
To avoid risk of electric shock, smoke, re, burns, injury or property damage.
*1 (")
:
inches
8
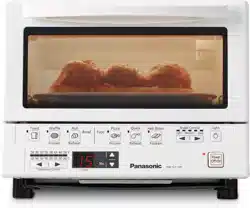
TOAST BAGEL PIZZA
●Slice:1–6
●Crustcolorlevel:1–6
●Slice(halves):2,4,6
●Crustcolorlevel:1–6
: Convection air circulation
●Size(inch):6,9,12
●Temperature(°F) : 300
–
450
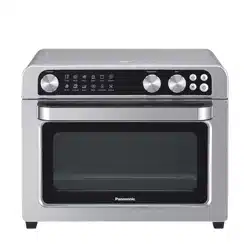
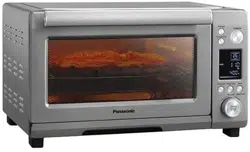
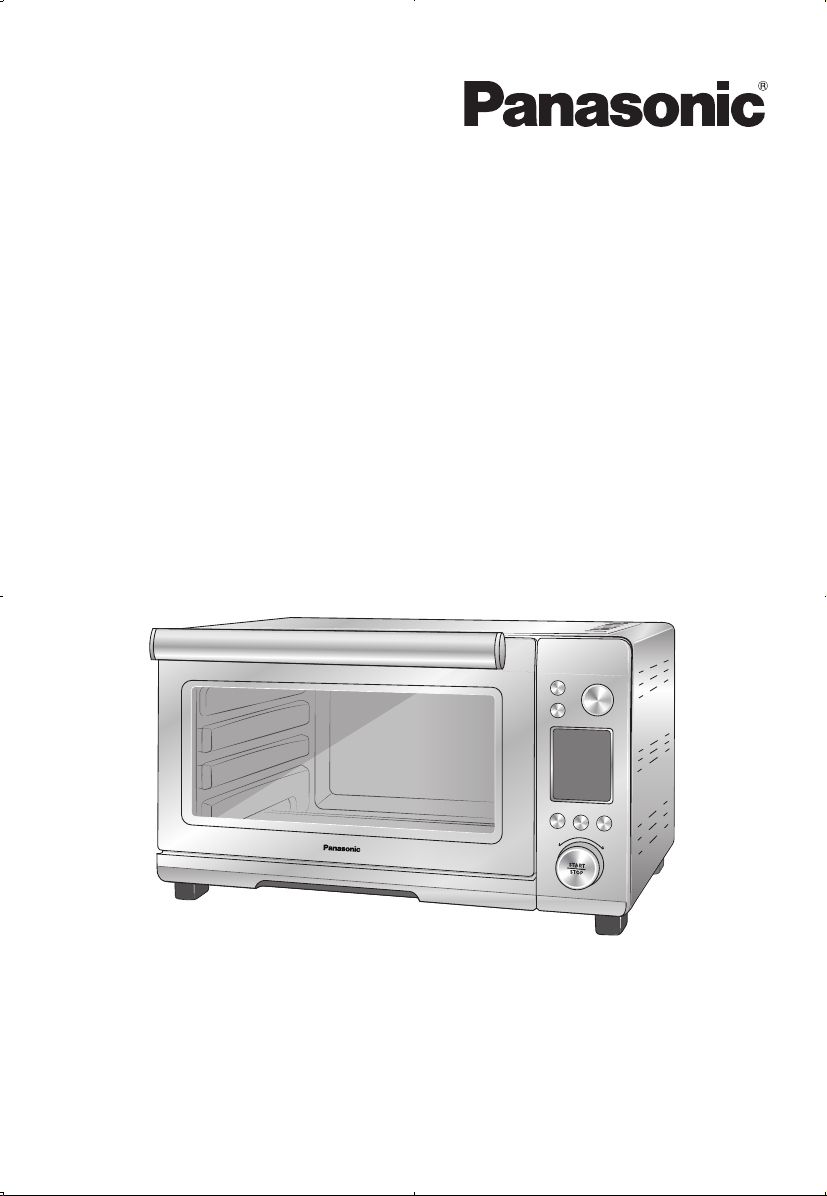
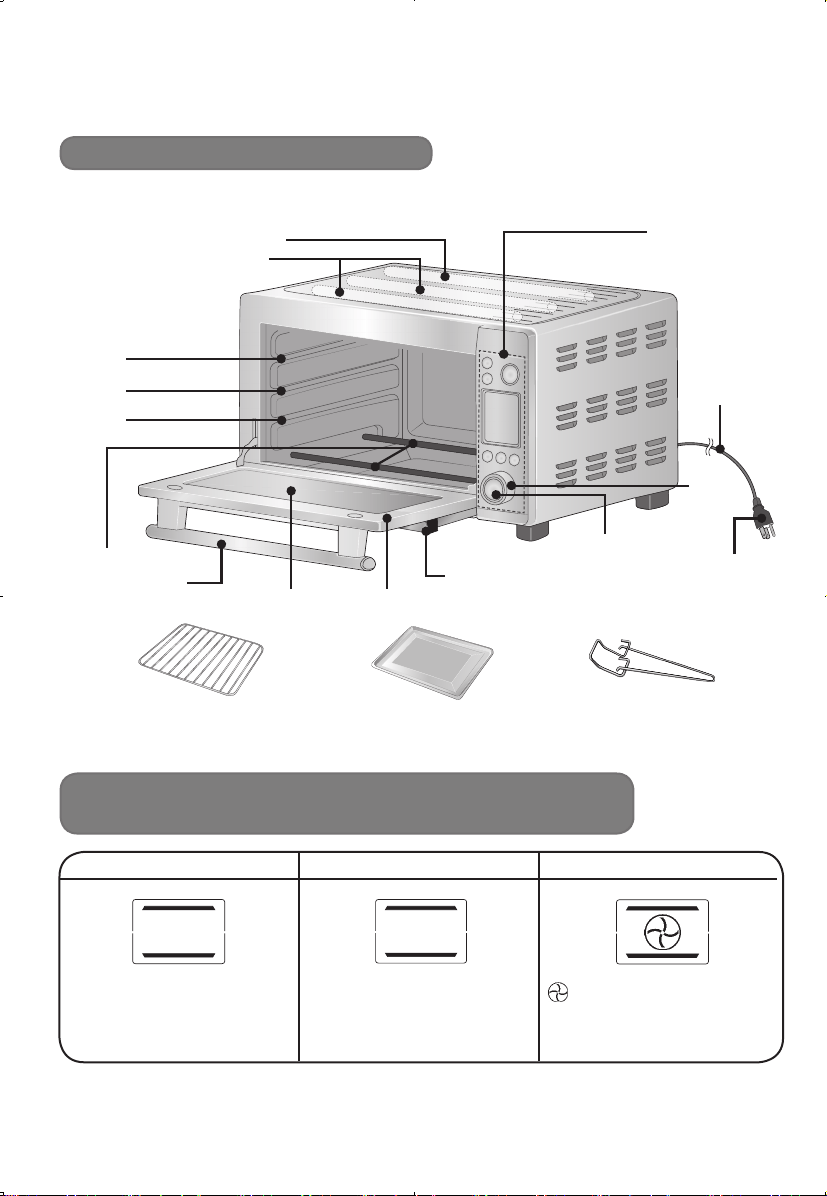
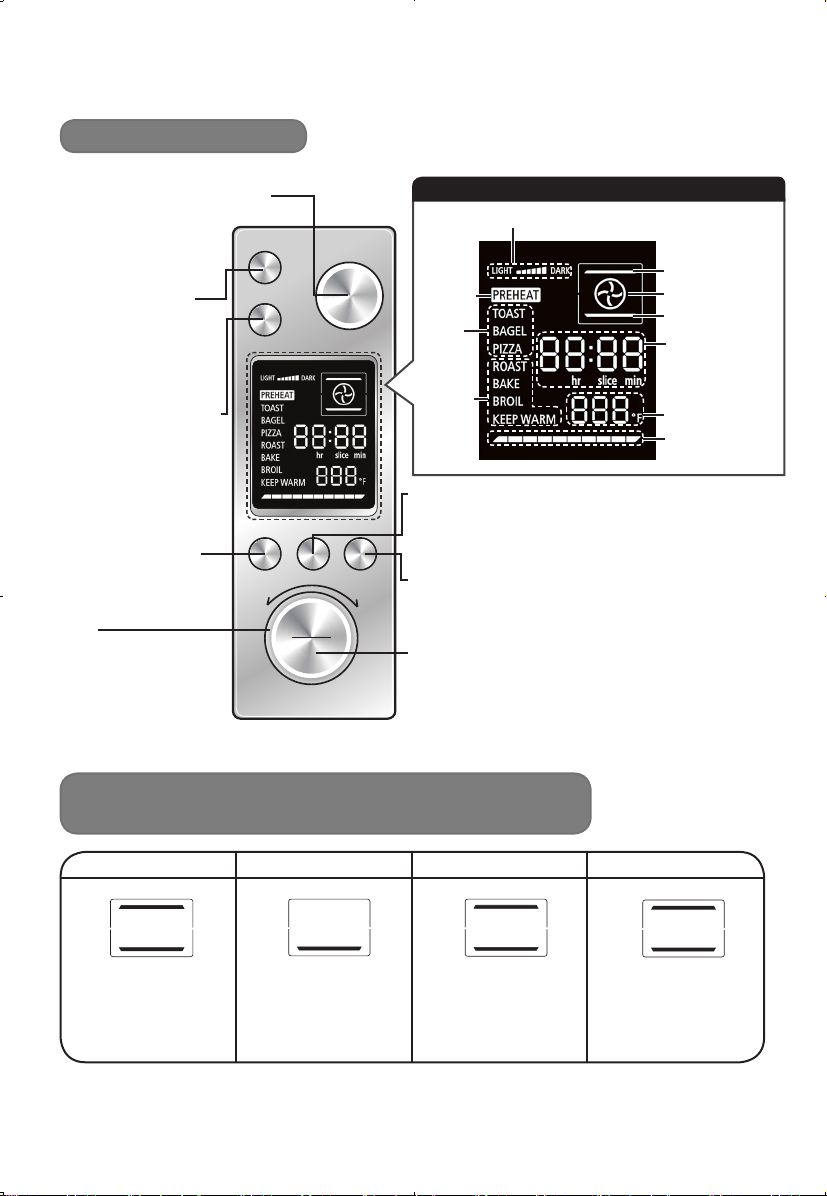
Part Names and Instructions
Main unit & Accessories
Heating function and Setting (Auto mode)
Upper
Far-infrared ray heater
Near-infrared ray heater
Middle
Lower
Lower heater
Upper heater
Rack / Tray position
Handle
Door
Cooking rack Baking tray
Holding rack
Crumb tray (removable)
●
Besuretoslideinrmlybeforeuse.
Start
/
Stop
Dial
Power cord
Control panel
Power plug
Glass window
■ The heater automatically turns on and off during cooking to control the temperature.
*1
Can be changed after start.
*1
9
ROAST BAKE BROIL KEEP WARM
●Time:1–120min
●Temperature(°F) :
150
–
450
●Time:1–120min
●Temperature(°F) :
150
–
450
●Time:1–120min
●Temperature(°F) :
300
–
450
●Time:1–120min
●Temperature(°F) :
100
–
200
Preheat
Convection
POWER
Function Time/+30s Temp.
STOP
START
Slice/Size Light/Dark
Heating function and time /
Temperature setting (Manual mode)
Control Panel
• Illustrators may vary actual product design.
Time
/
+30s button
●SelectthenumberofslicesforToastandBagel.
●SelectsizeforPizza.
●Setthetimeformanualmode.
Temperature button
●SelectthecrustcolorlevelforToastandBagel.
●Setthetemperatureforpizzaandmanualmode.
Dial
●Selecttimeor
temperature by
turning to the right
or left.
Function button
●Selectmenu.
Start
‧
Stop
/
Indicator
●Startandstopcooking.
Preheat button
●Setthisiftherecipe
required “Preheat”.
(See P.10)
[Only for manual
mode.]
Convection button
●Set to have
convection air
circulation before or
during cooking.
(See P.10)
[Only for manual
mode.]
*2
The temperature may drop during cooking. (See P.11)
Power button
/
Indicator
●Set to be in a standby
status. (See P.10)
●Stop the program.
Crust color level
Upper heater
Convection
Lower heater
Time
/
Slice
/
Size
/
Time remaining
until ready
Temperature(°F)
Status indicator
Preheat
Auto
mode
Manual
mode
Display window
*2 *2
*2

10
1 Insert the power plug into the outlet
●Thepowerindicator,srart‧stop indicator and display window are turned
on when plugged in (standby status). If the control panel is left for more than
3 seconds, the srart‧stopindicatoranddisplaywindowwillturno
automatically, and if it is left for more than 1 minute, the power indicator will
turnoautomatically.
➜ Press “Power” button to return to a standby status. (Power and start‧stop
indicators will be turned on and the display window will be showed up.)
2 Select menu
● Press “Function” button continuously to select the desired menu.
(Also by turning “Dial” to select menu.)
3 Select quantity or set cooking time
●Press“Time/+30s”buttonthenturn“Dial”toselect;
desired slice (Toast or Bagel), size (Pizza),
or set time to cook (manual mode).
4 Select crust color level or set temperature
●Press“Temp.”buttonthenturn“Dial”toselect; desired crust
color level (Toast or Bagel), or set temperature (other menu).
5 Set additional setting (only manual mode)
Preheat :
1. Press “Preheat” then “START” button. The beep will sound when oven has
reached the set temperature.
2. Open the door and put the food placed on the cooking rack or baking tray.
Convection :
Press “Convection” if desired. It can be available before or after start.
Handling Instructions
■ Install the baking tray or cooking rack into the correct position. (See P.12, 14)
Put the food inside unit.
■ The recipes required “Preheat”.
Do not set a cooking rack or baking tray before setting. (See step 5 below)
■ For the first time use, remove packing material and clean the main unit
/
accessories. (See P.16)
■ Clean the main unit
/
accessories when you have not used for a long time.
Function
Time/+30s
Slice/Size
Temp.
Light/Dark
Before use
Preparation
How to use

11
6 Press “START” button to start cooking
●Theremainingtimewillbedisplayedonthedisplaywindow.
●Ifthecontrolpanelisleftmorethan1minutebeforepressing
“START”button,thepowerwillbeturnedoautomatically
evenduringsetting.(Displaywindowwillbeturnedo.)
➜ Press “Power” button to return to a standby status and
start from step 2.
7 Take out the food when you hear beep sounds
● Take out the cooking rack or baking tray with the holding rack.
Slide
-
out rack or tray about 3 inches (10 cm) using the holding rack.
Then use oven mitts to remove the food from the main unit.
(Use your dry oven mitts.)
If the cooking is not complete :
Auto mode :
① Press “Time
/
+30s”button. Additional cooking for 30 seconds is started.
(Avairable within 1 minute)
② If it is still not complete, repeat step ①.
Manual mode :
Back to step 2.
8
Press “Power” button to turn o and remove the power plug
●Powerindicatorwillbeturnedoautomaticallyafter1minutefromtheend
of cooking.
■
Continuous cooking or main unit still having residual heat :
Evenusingautomode,bakingconditionwillnotbethesameasrsttime
.
(See P.12)
■
The white smoke may appear if the food contains a lot of moisture or cooking
amount is large. It is the moisture from the food and not abnormal.
■
In the manual mode, when the temperature is set to over 390 °F, this setting
will last for approximately 14 minutes, and then automatically lower to 380 °F.
Using “Convection”, when the temperature is set to over 350 °F, it automatically
turnsoafter10minutesfromthestart.Incaseofaninsucientbaking,
perform additional baking if necessary.
■
Do not open the door during cooking. (Cooking will be uneven.)
■
Do not pour water or cold liquid on the glass window when it is hot.
(The glass might break.)
Note
Important
STOP
START
Additional cooking
12
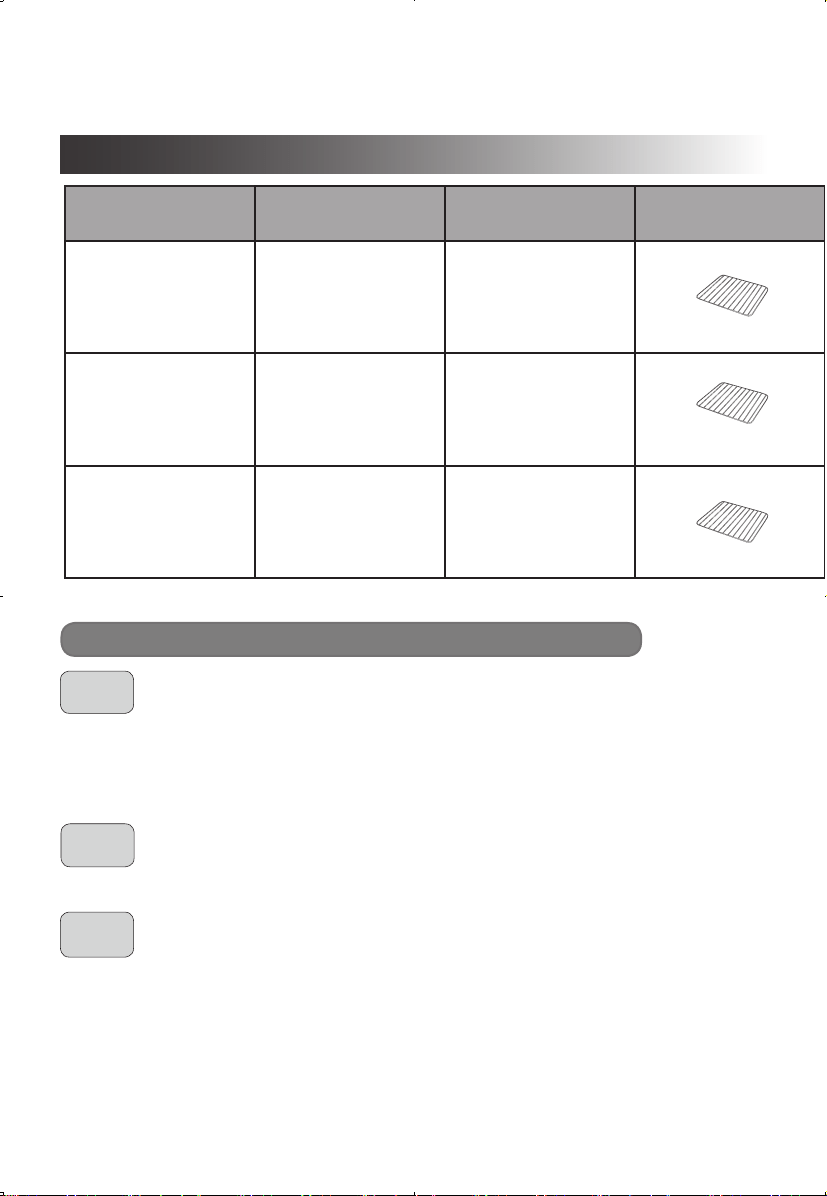
Menu Recipes Quantity Accessory
Tray
Position
Baking time
(approximately)
Temperature
setting (°F)
Tips
TOAST
Toast 1–6slices
Only middle
2 slices : 2 min 25 s
6 slices : 3 min 10 s
Crust color level : 4
N/A
Toast size : Approx.
4 inches, half inch
thickness
BAGEL
Bagel
2, 4 or 6 slices
(halves)
Only middle
4 halves : 3 min 40 s
6 halves : 4 min 10 s
Crust color level : 4
N/A
Half cut horizontally.
Place on with the cut
sides facing up.
PIZZA
Frozen Pizza Size : 6, 9 or 12 (inch)
Middle
6 in : 6 min
9 in : 9 min
12 in : 14 min
300–450°F –
TOAST
BAGEL
PIZZA
■ Select desired “slice” and “crust color level”.
Baking time and baking temperature cannot be changed.
■ If the bread contains a lot of sugar or butter, select less “crust color level”
to prevent burning.
■ The color of browning varies with type, size, and thickness of bread.
■ Select the desired “halves” and “crust color level”.
■ Baking temperature cannot be changed.
■ Select size of frozen pizza.
■ Baking time and temperature can be changed after start.
Please adjust it by thickness or topping.
Key points for cooking (Auto mode)
Handling Instructions
Cooking guide (Auto mode)

13
Menu Recipes Quantity Accessory
Tray
Position
Baking time
(approximately)
Temperature
setting (°F)
Tips
TOAST
Toast 1–6slices
Only middle
2 slices : 2 min 25 s
6 slices : 3 min 10 s
Crust color level : 4
N/A
Toast size : Approx.
4 inches, half inch
thickness
BAGEL
Bagel
2, 4 or 6 slices
(halves)
Only middle
4 halves : 3 min 40 s
6 halves : 4 min 10 s
Crust color level : 4
N/A
Half cut horizontally.
Place on with the cut
sides facing up.
PIZZA
Frozen Pizza Size : 6, 9 or 12 (inch)
Middle
6 in : 6 min
9 in : 9 min
12 in : 14 min
300–450°F –
Note
■
Place the food on the center of cooking rack.
■
Continuous heating or main unit still having residual heat :
Theinsucientorovercookmayhappen.Inthosecases,werecommendtouse“Roast”
menu with 450 °F for Toast and Bagel, 400 °F for Pizza. Check food baking process
through the glass window.
*1
Can be changed after start.
*1
14
ROAST
Handling Instructions
BAKE
■ Cook the food with both upper and lower heaters in this function.
It can be used for a wide range of cooking.
■ Lower heaters are used for lower than 350 °F, and upper heaters will be
used as auxiliary for cooking over 360 °F.
■ When bakeing cookies with baking tray, the bottom of the cookies may bake
too much due to continuous heating by lower heaters. In this case, try to :
●Set over 360 °F, and bake a shorter time.
●Setbakingtrayintotheupperpositionat320–330°F, and bake a longer
time.
●Select"ROAST"menuandbakewith320–340°F.(Accordingtorecipes)
Key Points for Cooking (Manual mode)
Menu Recipes Weight
/
Quantity Accessory
Rack
/
Tray
Position
Preset time
Temperature
setting (°F)
Preheat Convection Note
ROAST
Roast beef 3 lb. (1.5 k
g
)
Middle
Set 450°F for 15 min,
then320°Ffor30–50min
(It depends on the thickness of meat.)
√
– Up to 3 lb (1.5 k
g
)
Frozen chicken
nugget
1 lb. (450
g
)
18–20min 450°F – – Up to 1 lb (450
g
)
BAKE
Yellow cake 9 inch round cake pan
Middle
30–40min 350°F
√
–
Less than 9 inch
round cake pan.
Apple pie
9 inch pie plate
Set 430°F for 15 min,
then380°Ffor60–65min
Less than 10 inch pie
plate.
Mun 6 standard size
18–25min 360°F
Munpanfor
6 standard size.
Cookie
Approx.18–20pieces
( 2 inch
/
each)
10–13min 360°F
√
A capacity of a baking
tray.
Lasagna
7–8inchsquarecasserole,
servefor4–6
30–45min 400°F –
Baking time will be
changed by ingredients,
temperature or total
quantity.
BROIL
Steak
2 steaks
( 0.5 lb.
/
250
g
, each)
Upper : cooking
rack (foods)
Lower : baking tray
Setfor7–10min,
take it out and turn
over, then cook for
3–5min
450°F
√
–
1–2pieces(0.5lb.
/
250
g
, each, less than
1 inch thickness
/
each)
Broilshllets
2 pieces
(7–8oz.
/
200–250
g
,
each)
Setfor4–7min,
take it out and turn
over, then cook for
5–7min
450°F
1–2pieces(7–8oz.
/
220–250
g
, each, less
than 1 inch thickness
/
each)
KEEP
WARM
Cooked lasagna – Middle
Depend on the
condition
150–180°F – –
When “keep warm”
time is long, the surface
dries slightly.
&
Cooking guide (Manual mode)

15
Menu Recipes Weight
/
Quantity Accessory
Rack
/
Tray
Position
Preset time
Temperature
setting (°F)
Preheat Convection Note
ROAST
Roast beef 3 lb. (1.5 k
g
)
Middle
Set 450°F for 15 min,
then320°Ffor30–50min
(It depends on the thickness of meat.)
√
– Up to 3 lb (1.5 k
g
)
Frozen chicken
nugget
1 lb. (450
g
)
18–20min 450°F – – Up to 1 lb (450
g
)
BAKE
Yellow cake 9 inch round cake pan
Middle
30–40min 350°F
√
–
Less than 9 inch
round cake pan.
Apple pie
9 inch pie plate
Set 430°F for 15 min,
then380°Ffor60–65min
Less than 10 inch pie
plate.
Mun 6 standard size
18–25min 360°F
Munpanfor
6 standard size.
Cookie
Approx.18–20pieces
( 2 inch
/
each)
10–13min 360°F
√
A capacity of a baking
tray.
Lasagna
7–8inchsquarecasserole,
servefor4–6
30–45min 400°F –
Baking time will be
changed by ingredients,
temperature or total
quantity.
BROIL
Steak
2 steaks
( 0.5 lb.
/
250
g
, each)
Upper : cooking
rack (foods)
Lower : baking tray
Setfor7–10min,
take it out and turn
over, then cook for
3–5min
450°F
√
–
1–2pieces(0.5lb.
/
250
g
, each, less than
1 inch thickness
/
each)
Broilshllets
2 pieces
(7–8oz.
/
200–250
g
,
each)
Setfor4–7min,
take it out and turn
over, then cook for
5–7min
450°F
1–2pieces(7–8oz.
/
220–250
g
, each, less
than 1 inch thickness
/
each)
KEEP
WARM
Cooked lasagna – Middle
Depend on the
condition
150–180°F – –
When “keep warm”
time is long, the surface
dries slightly.
BROIL
To avoid smoke or fire :
■ Keep the aluminum foil away from the heating tube.
■ Do not use parchment paper or cooking sheet other than for putting on to a baking pan.
■ Do not use a cake pan made of paper.
■ When an upper side of food is cooked, take it out and turn over. Then bake it
again. Upper heaters are operated mainly in this menu.
(Lowers will be used as auxiliary.)
■ Use ingredients which are less than 1 inch thickness or height. Otherwise, it
may cause fire or smoke due to getting close to the upper heater.
■ If the baking color is insufficient, darker color on the surface can be achieved
by additional cooking. It will happen very quickly, so please pay close
attention.
Note

16
Care & Cleaning
■
Before cleaning, unplug from outlet and allow the unit to completely cool.
●
Do not use benzine, thinner, alcohol, bleach, polishing powder, metal brush
or nylon brush, otherwise the surface will be damaged.
●After every use, clean the main unit, crumb tray thoroughly.
Exterior
●Wipe with a well
-
wrung cloth.
Interior
●Wipe with a well
-
wrung cloth. When the interior is severely stained or dirty,
wipe with a towel saturated with a diluted solution of a mild dishwashing liquid.
●Do not wipe the heating tubes to avoid damaging.
●Washwithdiluteddishsoap(neutral)andsoftsponge.Dryitwelland
setitbacktothemainunitrmly.
●
Wash with diluted dish soap (neutral) and soft sponge. Dry it well.
●
Do not use a dishwasher.
Accessories Instructions
Cooking rack
Make sure the bottom hooks
on both sides, and are stuck
on the rack, then pull it out.
Baking tray
Make sure the upper hook
stickstothetrayrmly,then
pull it out.
Bottom hook
Bottom hook
Upper hook
Upper hook
How to use "Holding rack"
Crumb tray
Holding rack
Baking tray / cooking rack
17
Troubleshooting
Problems Cause and solution
The power indicator
or display window
does not turn on
even though it is
plugged in.
●
The plug is not inserted properly.
➜
Insert the power plug firmly into the outlet.
●
If the main unit is left for more than 1 minute, the
power will be turned off automatically.
➜
Press “Power” button to return to standby status.
If power indicator does not turn on even after
pressing, contact to the customer care center.
(See P.18)
Cooking does not
complete even main
unit was started.
●
There is a problem with the main unit.
➜
Contact to the customer care center. (See P.18)
Has a burnt smell.
● The baking time is too long.
➜ Turn off the main unit.
● The fats and gravy on the baking tray or the
cooking rack may cause smoke during cooking
especially using broil menu.
➜ Clean the baking tray or cooking rack after
every use.
● There are any dripping gravy, ingredients or
crumbs on the crumb tray.
➜ Clean the crumb tray.
Heater tubes turn off
during cooking.
●
The heater tubes turn on/off to control temperature.
It is not a malfunction.
Smoke comes out.
●
The fat from the food sticking to the heater may
cause smoke during cooking especially using “Broil”
menu.
➜
Set lower temperature if necessary.
H01 or H02 appears on
the display window.
●
The display indicates a problem.
➜
Contact to the customer care center. (See P.18)
18
Specifications
Contact Information
Power supply 120 V 60 Hz
Power consumption 1
750 W
Capacity 0.9 CU FT / 25 L
Temperature setting
of cavity center
(approximately)
100
–
450 ℉ (38
–
233 ℃)
Automatic thermolator Temperature sensor
Timer 1
–
120 minutes
Rated power
(approximately)
Upper heater 950 W
Lower heater 800 W
Size (approximately)
Weight
6.9 kg (15.2 lbs)
Power cord length
1 m (39.4 inches)
External
dimension
(W×D×H)
45.9 × 38.3 × 27.0 cm (18.0 × 15.0 × 10.6 inches)
Internal
dimension
(W×D×H)
33.3 × 31.8 × 23.2 cm (13.1 × 12.5 × 9.1 inches)
Cooking rack
(internal dimension)
(W×D×H)
33.0 × 28.5 × 1.7 cm (13.0 × 11.2 × 0.7 inches)
Baking tray
(internal dimension)
(W×D×H)
33.5 × 30.0 × 4.2 cm (13.2 × 11.8 × 1.7 inches)
For product information and operation assistance :
In USA contact :
Customer Care Center : 1-800-211-PANA (7262)
Directly Online : http://shop.panasonic.com/support

19
Limited Warranty
Limited Warranty (ONLY FOR U.S.A.)
Panasonic Products Limited Warranty
Li
mited Warranty Coverage (For USA Only)
I
f your product does not work properly because of a defect in materials or
w
orkmanship, Panasonic Consumer Electronics Company (referred to as
“
the warrantor”) will, for the length of the period indicated on the chart below,
w
hich starts with the date of original purchase (“warranty period”), at its
op
tion either (a) repair your product with new or refurbished parts, (b) replace
i
t with a new or a refurbished equivalent value product, or (c) refund your
pur
chase price. The decision to repair, replace or refund will be made by the
w
arrantor.
Product or Part Name Labor Parts
Kitchen Appliances 1 yr. 1 yr.
Large Capacity Rice Cookers
(SR-42 series)
6 Months 6 Months
D
uring the “Labor” warranty period there will be no charge for labor. During
t
he “Parts” warranty period, there will be no charge for parts.
T
his warranty only applies to products purchased and serviced in the United
S
tates. This warranty is extended only to the original purchaser of a new
produ
ct which was not sold “as is”.
M
ail-In Service – Online or Telephone Repair Request
O
nline Repair Request
T
o submit a new repair request, and for quick repair status visit our Web Site
a
t: http://shop.panasonic.com/support
W
hen shipping the unit, carefully pack and send it prepaid in the original (or
s
upplied) carton. Include a letter detailing the complaint along with the bill of
s
ales and provide a daytime phone number where you can be reached. A
v
alid registered receipt is required under the Limited Warranty.
W
hen shipping Lithium Ion batteries please visit our web site at
h
ttp://shop.panasonic.com/support
as Panasonic is committed to providing
t
he most up to date information.
I
F REPAIR IS NEEDED DURING THE WARRANTY PERIOD, THE
P
URCHASER WILL BE REQUIRED TO FURNISH A SALES
R
ECEIPT/PROOF OF PURCHASE INDICATING DATE OF PURCHASE,
A
MOUNT PAID AND PLACE OF PURCHASE. CUSTOMER WILL BE
C
HARGED FOR THE REPAIR OF ANY UNIT RECEIVED WITHOUT SUCH
P
ROOF OF PURCHASE.
Li
mited Warranty Limits And Exclusions
T
his warranty ONLY COVERS failures due to defects in materials or
w
orkmanship, and DOES NOT COVER glass, plastic parts, temperature
probe
s (if included) and normal wear and tear or cosmetic damage. The
w
arranty ALSO DOES NOT COVER damages which occurred in shipment,
or
failures which are caused by products not supplied by the warrantor, or
f
ailures which result from accidents, misuse, abuse, neglect, bug infestation,
m
ishandling, misapplication, alteration, faulty installation, set-up
ad
justments, maladjustment of consumer controls, improper maintenance,
po
wer line surge, lightning damage, modification, or commercial use (such
a
s in a hotel, office, restaurant, or other business), rental use of the product,
s
ervice by anyone other than a factory service center or other authorized
s
ervicer, or damage that is attributable to acts of God.
T
HERE ARE NO EXPRESS WARRANTIES EXCEPT AS LISTED UNDER
“
LIMITED WARRANTY COVERAGE”.
T
HE WARRANTOR IS NOT LIABLE FOR INCIDENTAL OR
C
ONSEQUENTIAL DAMAGES RESULTING FROM THE USE OF THIS
P
RODUCT, OR ARISING OUT OF ANY BREACH OF THIS WARRANTY.
(
As examples, this excludes damages for lost time, travel to and from the
s
ervicer, loss of or damage to media or images, data or other memory or
re
corded content. The items listed are not exclusive, but for illustration only.)
ALL EXPRESS AND IMPLIED WARRANTIES, INCLUDING THE
WARRANTY OF MERCHANTABILITY, ARE LIMITED TO THE PERIOD
OF THE LIMITED WARRANTY.
Some states do not allow the exclusion or limitation of incidental or
consequential damages, or limitations on how long an implied warranty lasts,
so the exclusions may not apply to you.
This warranty gives you specific legal rights and you may also have other
rights which vary from state to state. If a problem with this product develops
during or after the warranty period, you may contact your dealer or Service
Center. If the problem is not handled to your satisfaction, then write to:
Consumer Affairs Department
Panasonic Corporation of North America
661 Independence Pkwy
Chesapeake, VA 23320
PARTS AND SERVICE, WHICH ARE NOT COVERED BY THIS LIMITED
WARRANTY, ARE YOUR RESPONSIBILITY.
As of March 2018

BZ51A203
MD0818K0
Printed in China
© Panasonic Taiwan Co., Ltd. 2018
Panasonic Corporation of North America
Two Riverfront Plaza, Newark, NJ 07102-5490
www.panasonic.com