Operating Instructions
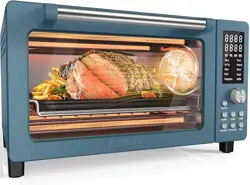
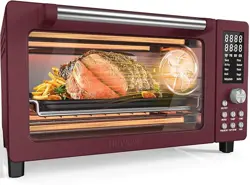
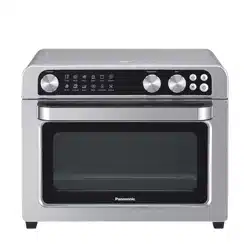
Air Fry Toaster Oven
(Household Use)
Model No. NB-G210
NB-G211
NB-G212

2
Contents
IMPORTANT SAFEGUARDS 3
Safety Precautions 5
Part Names and Instructions 8
How to use 10
Recipe 12
Cleaning & Care 14
Troubleshooting 15
Specications 16
Limited Warranty 17
Thank you for purchasing this Panasonic product.
• This product is intended for household use only.
• Please read these instructions thoroughly to use product correctly and safely.
• Please retain this Operating Instructions for future use.
• Panasonic will not accept any liability if the appliance is subject to improper use, or
failure to comply with these instructions.

3
IMPORTANT SAFEGUARDS
The following basic safety precautions apply when using electrical appliances:
1. Read all instructions.
2. Do not touch hot surfaces. Use handles or knobs.
3. To protect against electrical shock do not immerse cord, plugs, or appliance in
water or other liquid.
4. Close supervision is necessary when any appliance is used by or near children.
5. Unplug from outlet when not in use and before cleaning. Allow to cool before
putting on or taking off parts.
6. Do not operate any appliance with a damaged cord or plug or after the
appliance malfunctions or has been damaged in any manner. Return appliance
to the nearest authorized service facility for examination, repair, or adjustment.
(See P.17)
7. The use of accessory attachments not recommended by the appliance
manufacturer may cause injuries.
8. Do not use outdoors.
9. Do not let cord hang over edge of a table or counter, or touch hot surfaces.
10. Do not place on or near a hot gas or electric burner, or in a heated oven.
11. Extreme caution must be used when moving an appliance containing hot oil or
other hot liquids.
12. Always attach plug to appliance first, then plug cord into the wall outlet. To
disconnect, turn any control to "off " , then remove plug from wall outlet.
13. Do not use appliance for other than intended use.
14. Oversize foods or metal utensils must not be inserted in the appliance as they
may create a fire or risk of electric shock.
15. A fire may occur if the oven is covered or touching flammable material, including
curtains, draperies, walls, and the like, when in operation. Do not store any item
on top of the appliance when in operation.
16. Do not clean with metal scouring pads. Pieces can break off the pad and touch
electrical parts involving a risk of electric shock.
17. Extreme caution should be exercised when using containers constructed of
other than metal or glass.
18. Replace cardboard lids on food containers with aluminum foil as cardboard lids
may burn. When using aluminum foil, keep it from touching heating elements.
19. Do not store any materials, other than manufacturer’s recommended
accessories, in this oven when not in use.

4
20. Do not place any of the following materials in the oven: paper, cardboard,
plastic and the like.
21. Do not cover crumb tray or any part of the oven with metal foil. This will cause
overheating of the oven.
22. Use extreme caution when removing tray or disposing of hot grease.
23. To turn off the appliance, press the power button. The display window will turn
off and disable any cooking function.
SAVE THESE INSTRUCTIONS
A short power-supply cord is provided to reduce the risk resulting from becoming
entangled in or tripping over a longer cord.
● Do not use a longer detachable power-supply cord or extension cord.
IMPORTANT SAFEGUARDS
5
Safety Precautions
Please make sure to
follow these instructions.
In order to prevent accidents or injuries to the user, other people, and damage to
property, please follow the instructions below.
■
The following chart indicates the degree of damage caused by improper
operation.
WARNING:
Indicates potential hazard that could result in serious injury
or death.
CAUTION:
Indicates potential hazard that could result in minor injury
or property damage.
■
The symbols are classified and explained as follows:
This symbol indicates prohibition.
This symbol indicates requirement that must be followed.
WARNING
To reduce the risk of electric shock, burns, re, or injury to persons:
●
Do not disassemble, repair or modify this appliance.
➜
Contact Service Center for inspection or repair.
●
Do not damage the power cord or power plug.
The following actions are strictly prohibited:
Modifying, touching on or placing near heating elements or hot surfaces,
bending, twisting, pulling, hanging / pulling over sharp edges, putting
heavy objects on top, bundling the power cord or carrying the appliance by
the power cord.
●
Do not use the appliance if the power cord or power plug is damaged or
the power plug is loosely connected to the outlet.
➜
If the power cord is damaged, it must be replaced by the manufacturer,
itsservicecenterorsimilarlyqualiedpersoninordertoavoidahazard.
➜
Insertthepowerplugrmly.
●
Do not plug or unplug the power plug with wet hands.
●
Do not immerse the appliance, power cord and power plug in water, or
splash them with water and/or any liquid.
●
Do not let the power cord hang over the edge of table or worktop, or touch
hot surfaces.
●
Do not allow children to use the oven. Do not use the oven within the
reach of children.
●
Do not allow infants and children to play with packaging material.
●
Do not use this appliance near any combustible materials or under the
curtains.
6
Safety Precautions
Please make sure to
follow these instructions.
WARNING
To reduce the risk of electric shock, burns, re, or injury to persons:
●
This appliance is not intended for use by persons (including children) with reduced physical,
sensory or mental capabilities, or lack of experience and knowledge, unless they have been
given supervision or instruction concerning use of the appliance by a person responsible for
their safety. Children should be supervised to ensure that they do not play with the appliance.
Keep the appliance and its power cord out of reach of children.
●
Discontinue using the appliance immediately and unplug in the unlikely event
that this appliance stops working properly.
e.g. for abnormal occurrences or breaking down
● The power plug or the power cord become abnormally hot.
● The appliance power fails.
● The main unit is deformed, has visible damage or is abnormally hot.
● There is an unpleasant odor.
● There is abnormal turning noise while in use.
● There is another abnormality or failure.
➜
Contact Service Center for inspection or repair.
●
Make sure the voltage indicated on the label of the appliance is the same as your local supply.
Also avoid plugging other devices into the same outlet to prevent electrical overloading. If you
connect a number of appliances to the same outlet, ensure the total wattage does not exceed
the rated wattage of the outlet.
●
Insert the power plug firmly.
●
Dust off the power plug regularly.
➜
Unplug the power plug, and wipe with a dry cloth.
CAUTION
To reduce the risk of electric shock, burns, re, or injury to persons:
●
Never leave the appliance unattended during operation.
●
Do not touch hot surfaces, such as the top of the oven body, control panel, metal surface of
the door frame, the Air fryer basket, baking pan, crumb tray, wire rack and the pizza stone
(only for NB-G212) while the oven is in use or just after use. The oven is easy to become
hot during use, and the surface temperature during use is very high. Let it cool down before
cleaning after use.
●
Do not touch the appliance with wet hands.
●
Do not touch, block or cover the appliance during use.
●
Do not put or insert flammable materials on / under the oven.
●
Do not use a knife or sharp tool, as these may cause damage to the heating elements.
●
Do not directly heat cans or glass bottles.
●
Do not use the appliance near wall, furniture, or in enclosed spaces such as a built-in cupboard.
7
CAUTION
To reduce the risk of electric shock, burns, re, or injury to persons:
●
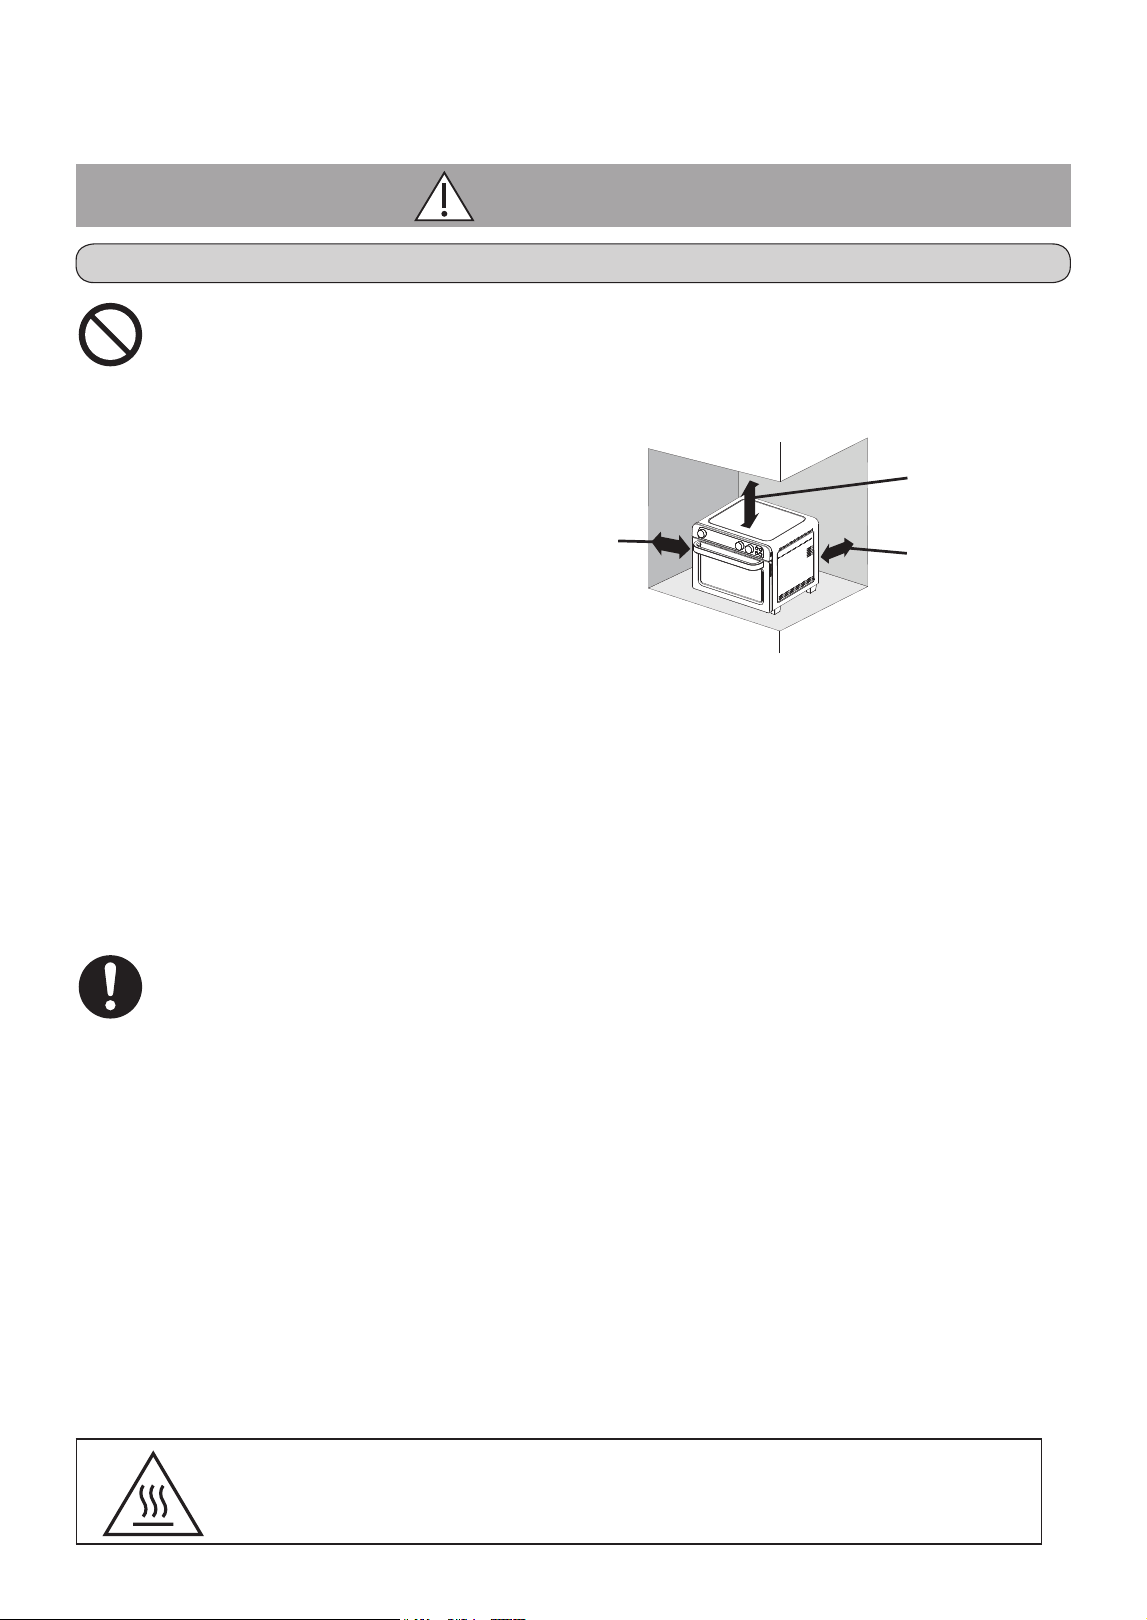
Do not use the appliance on following places.
● On uneven surfaces, on carpet, non-heat-resistant surfaces or
tablecloths etc.
● Places where it may be splashed with water or near a heat source.
● Near any open water sources
such as sinks, or the like.
➜
Placeonaat,stable
surface. To have
sucientairow,i.e.
10 cm (4")*
1
at one side,
30 cm (12'')*
1
clear over the top,
10 cm (4")*
1
at the rear.
●
Do not use an external timer etc.
● This appliance is not intended to be operated by means of an external
timer or separate remote control system.
●
Do not open the door when the food generates smoke or catches fire.
(Before the fire goes out.)
● Turn off the power and remove the power plug immediately.
● Do not extinguish the fire with water.
●
Do not place oil in the baking pan for heating.
●
To ensure continued protection against risk of electric shock, connect to
properly grounded outlets only.
●
Always disconnect the appliance from the supply if it is left unattended and
before assembling, disassembling, moving or cleaning.
●
Ensure to operate and rest the appliance as stated on specification table.
(SeeP.16"Specifications")
●
Ensure to clean the appliance especially surfaces in contact with food after
use. (See P.14 "Cleaning & Care")
●
Make sure the crumb tray is clean and set correctly when using the appliance.
●
Beware not to be tripped over or get caught in the power cord while in use.
●
Make sure to hold the power plug when unplugging it. Never pull on the power cord.
●
Be sure to set the wire rack into the middle position when using the menus of "Toast" and "Bagel".
●
To prevent dropping ingredients such as cheese, butter or cooking batter onto the lower heater
when using the wire rack, place aluminum foil or the like over the wire rack, then place the food.
●
This product is intended for household use only.
This symbol on the products indicates "Hot surface and should
not be touched without caution".
More than
10 cm (4")
More than
30 cm (12'')
More than
10 cm (4")
*
1
(") : inches
8
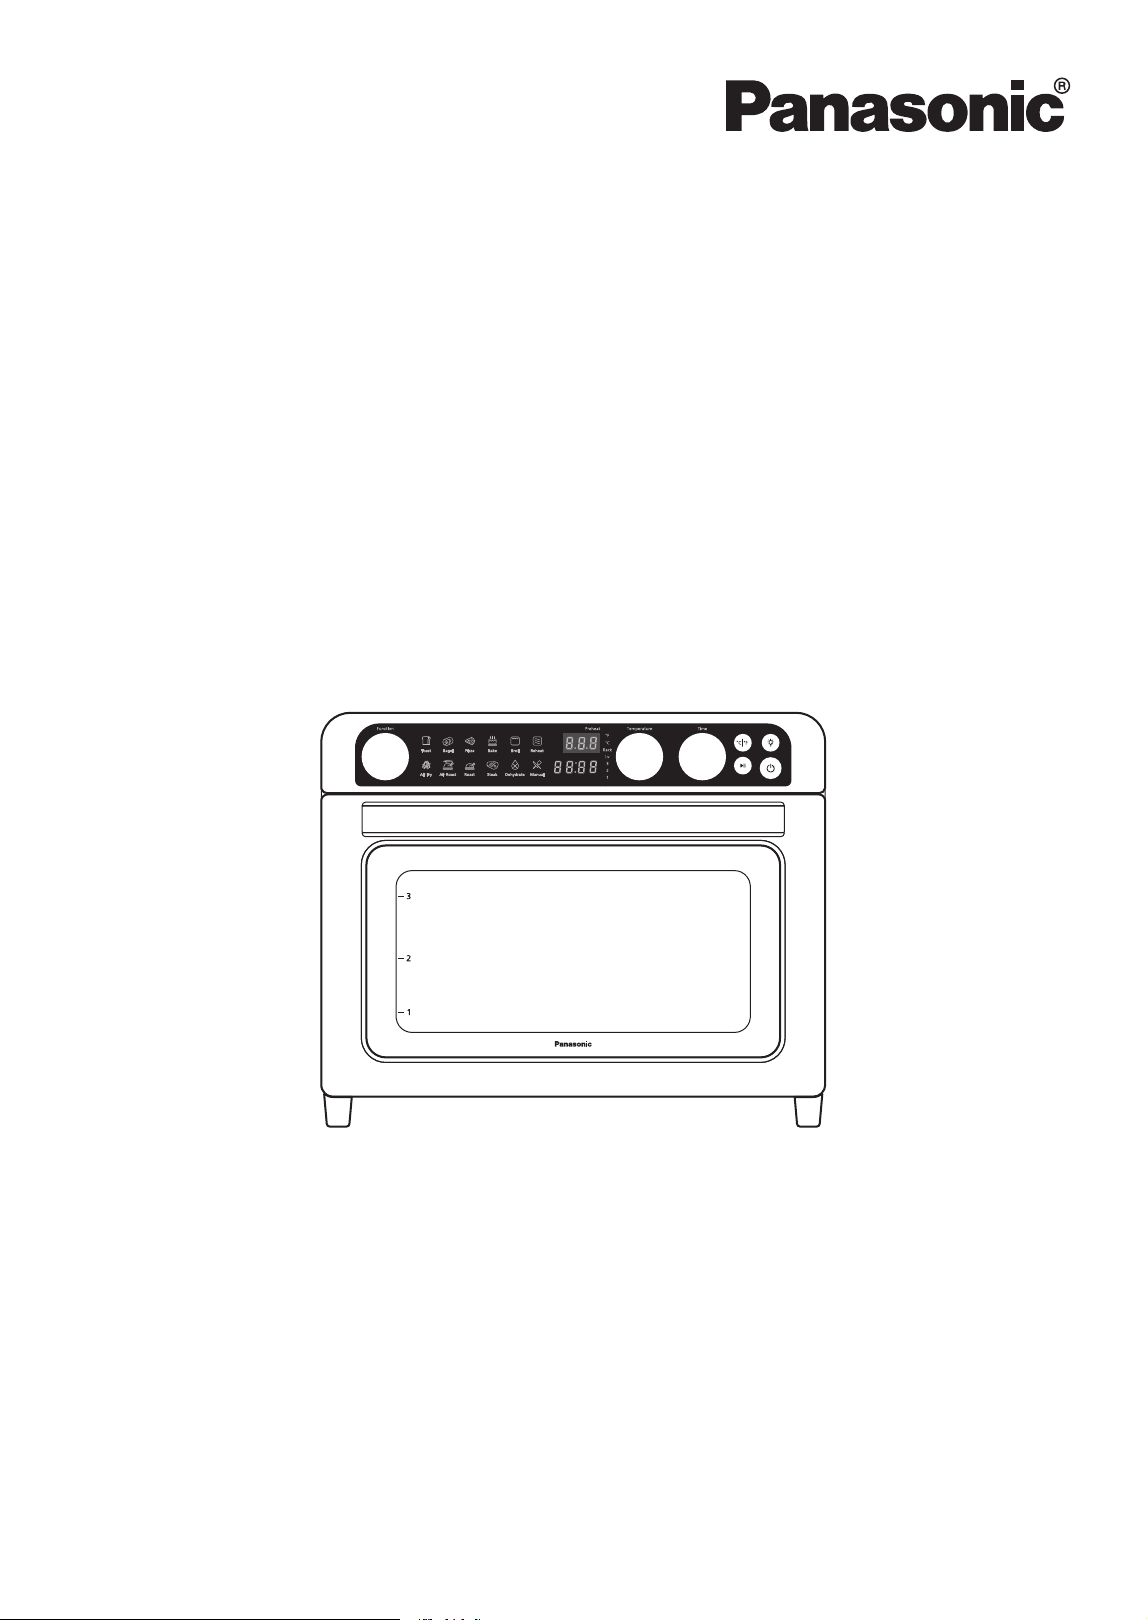
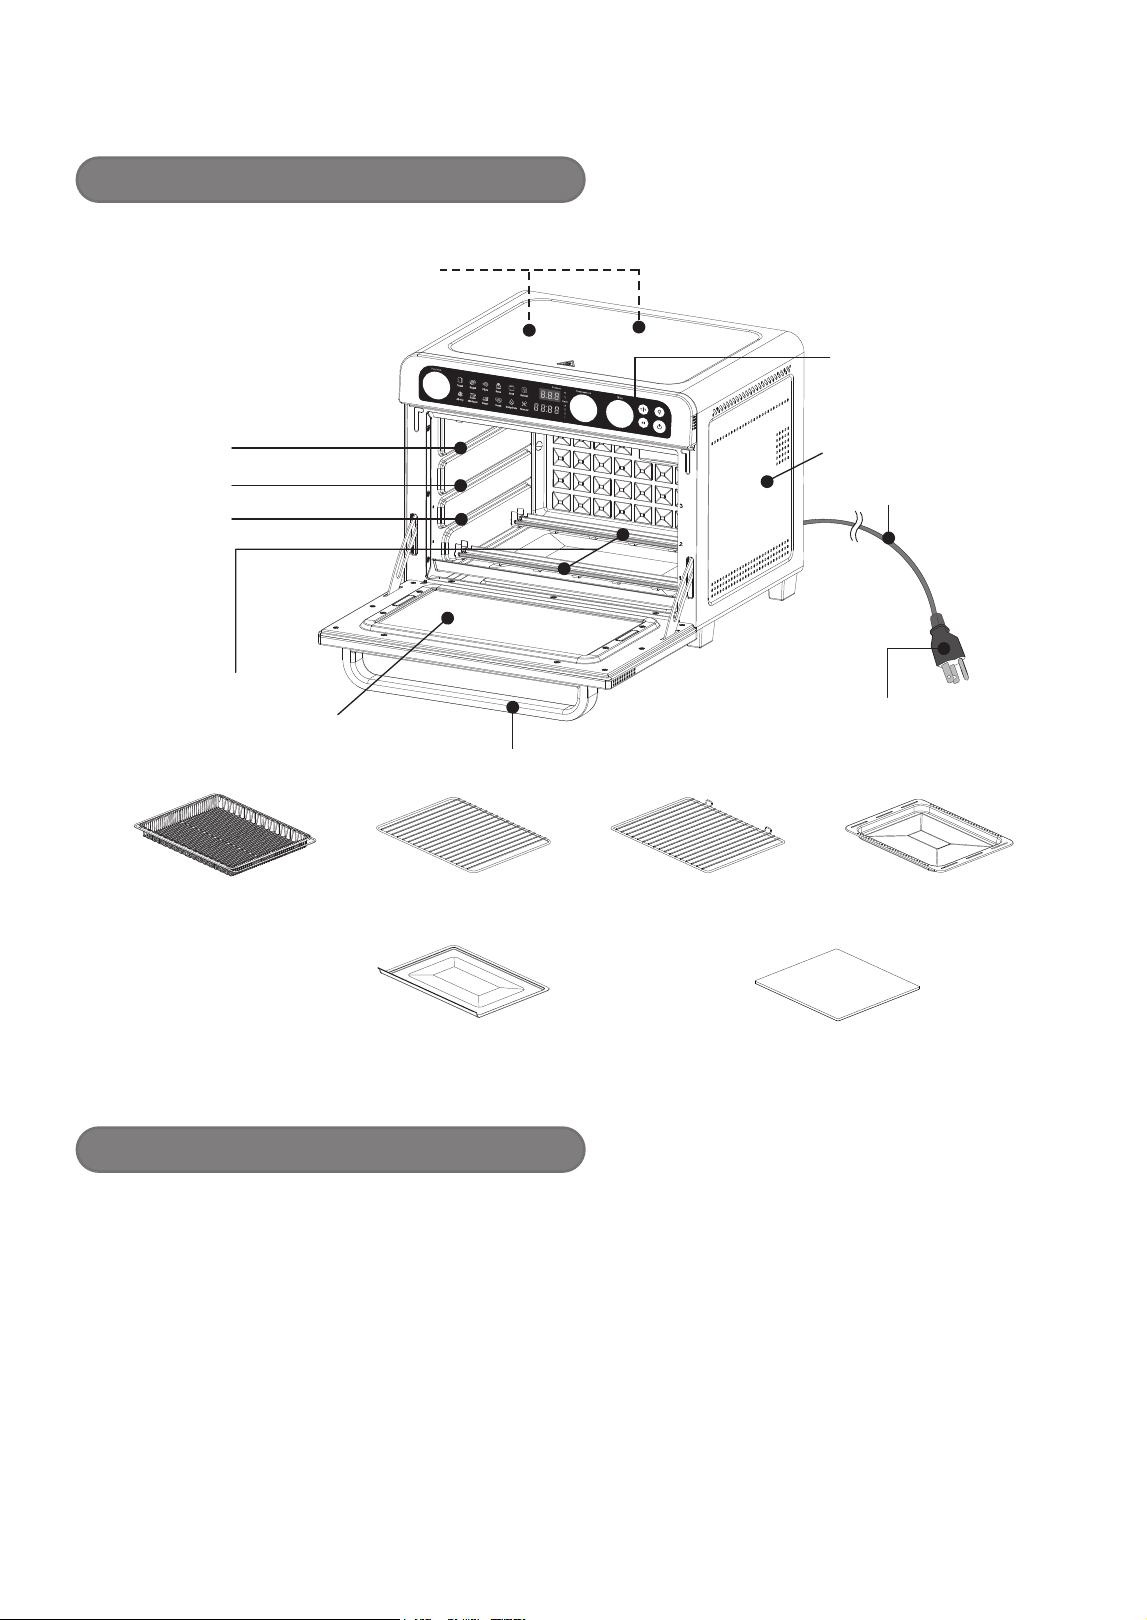
Part Names and Instructions
Main unit & Accessories
Lower heater
Upper heater
Body
Power cord
Control panel
Power plug
Door handle
Glass door
Lv3
Lv2
Lv1
Rack
Air Fryer Basket
Baking Pan
Wire Rack
(only for NB-G210 and NB-G211)
Wire Rack
(only for NB-G212)
Crumb Tray
Crumb Tray
Place a crumb tray in the bottom of the oven, to catch food
crumb residue and small amount of grease.
Pizza Stone
(only for NB-G212)
Before use
●
Dispose of the packaging materials (of the main unit and all accessories, including
Air fryer basket, baking pan, crumb tray, wire rack, and pizza stone), and wash the
main unit / accessories when using for the first time. (See P.14)
●
Clean the main unit / accessories when you have not used for a long time.
●
The first time you use it, use the air frying function first for 10-15 minutes of empty
heating. It is a normal phenomenon that the product may emit a strange odor.
●
It is normal for the product to make a sound during empty heating for the first time.
●
Smoke and odor will be released when the product is heated empty. Please open
the door of the product to let the smoke dissipate easily. Once the smoke and
odor are released, they will not be emitted when the product is used.
●
After empty heating, wait until the product has cooled down before using it again.
9
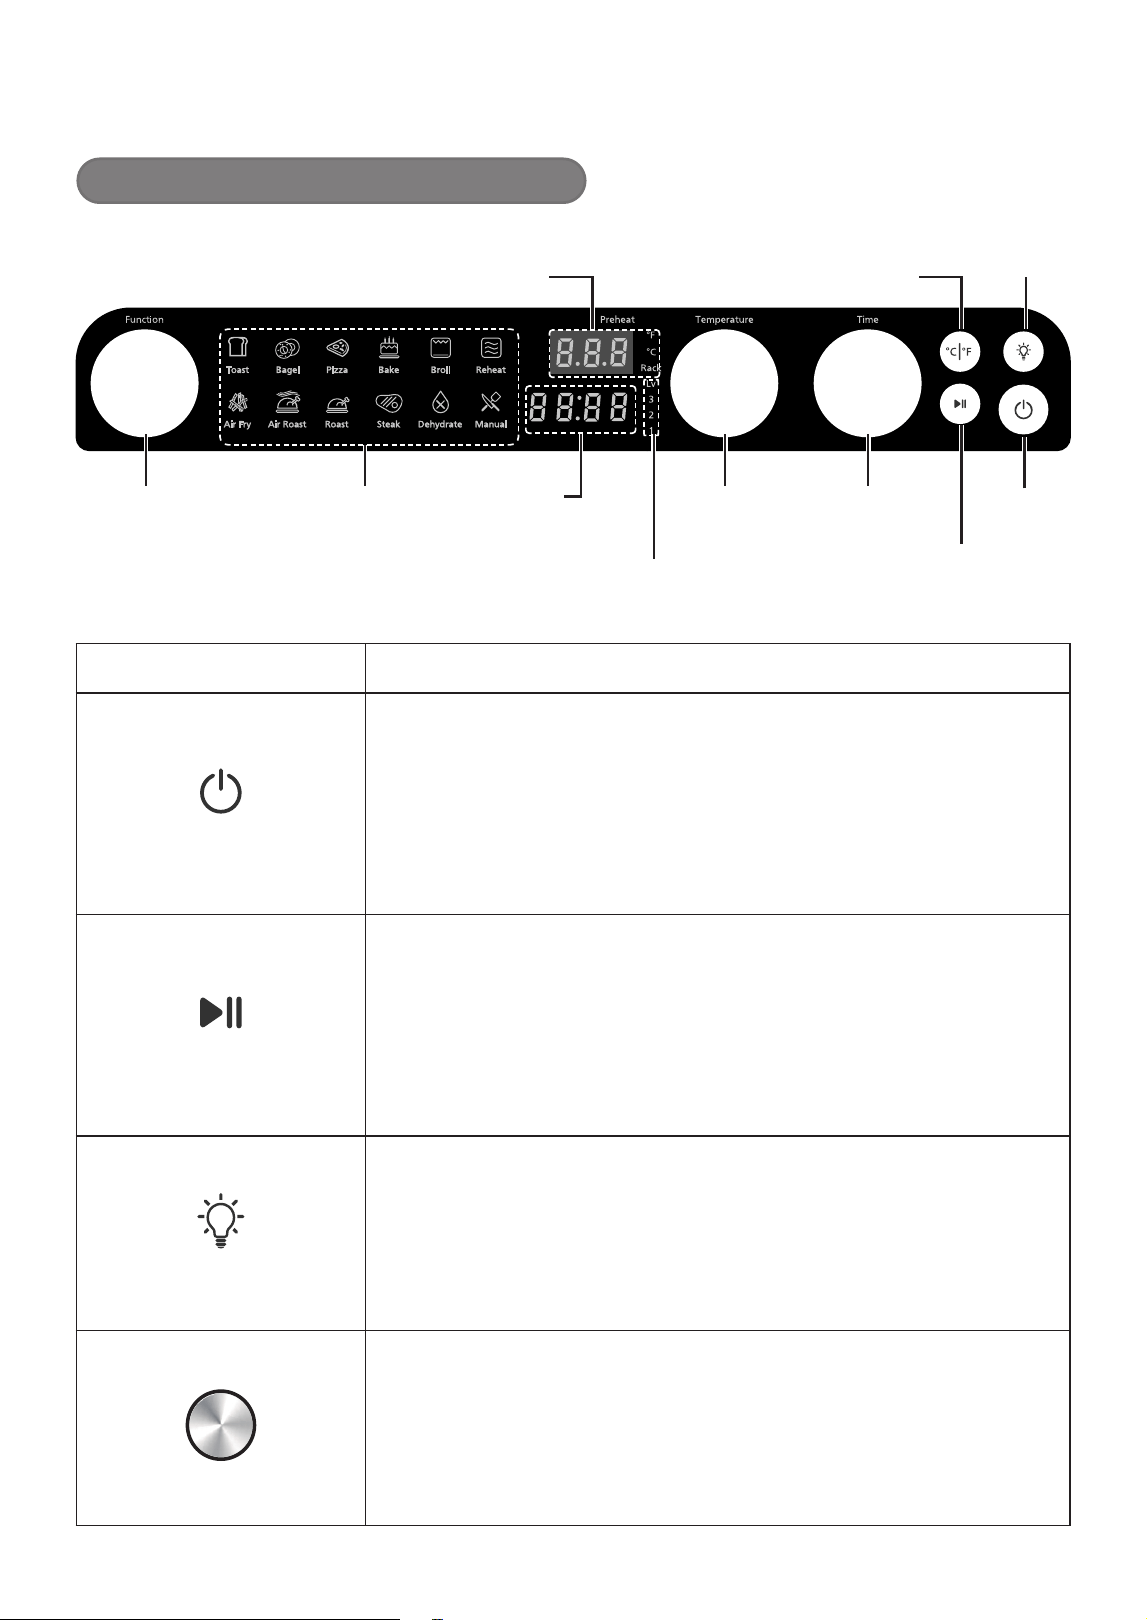
Control Panel
11 Auto Presets
+ Manual Mode
● Rotate the "Function"
dial to select the
preferred menu.
Accessory Placement Layer
● Lv varies depending on the menu.
Time Display
Temperature Display
Button Name Function or Display Description
"Power" button
1. After the power supply is connected and the control panel is fully
illuminated, the temperature and time display goes out, the menu is
fully illuminated and the product enters the standby mode. If there
is no operation within 10 minutes, the product enters the shutdown
mode.
2. In any mode, press the "Power" button to enter the shutdown mode.
3. In the shutdown mode, press the "Power" button to enter the
standby mode.
"Start/Pause" button
1. After selecting the menu, press the "Start/Pause" button to start
preheating or cooking. Press the "Start/Pause" button again to
pause preheating or cooking.
2. It is not effective to press the "Start/Pause" button in standby mode.
3. When preheating is completed, press the "Start/Pause" button to
start cooking.
4. If there is no operation during pause within 10 minutes, the product
will enter Shutdown mode.
"Lighting" button
1. The "Lighting" button is the switch to control the oven light. After the
power supply is connected, press this button under the power-on
state, and you can light up or extinguish the oven light at any time.
2. The light will turn on during the cooking or pause period. If the light
is OFF during cooking, it will remain OFF during pause. If the menu
contains preheating, the light will turn ON when the preheating is
completed.
Temperature
"Temperature" dial
1. You can rotate the "Temperature" dial during setup. The
Temperature character is always ON during setup and it flashes
when you stop rotating. The temperature setting can be cycled.
2. You can also rotate the "Temperature" dial during the cooking
process. When you stop rotating, the temperature character will
blink and then light up.
3. The temperature setting can be increased or decreased by 5 °F.
"Temperature unit
switching" button
"Lighting"
button
"Power"
button
"Start/Pause" button
"Temperature"
dial
"Time" dial
"Function"
dial
10
How to use
■ Install the Air fryer basket, baking pan, wire rack or pizza stone into the correct position.
(See P.12) Put the food inside unit.
■ When using a pizza stone, preheat the stone well and avoid cooking oily foods and
meats directly on it.
1 Insert the power plug into the outlet and the product will enter
Standby mode.
● In any mode, press the "Power" button to enter the shutdown
mode.
● In the shutdown mode, press the "Power" button to enter the
standby mode.
2 Select menu
Function
● Rotate the "Function" dial continuously to select the desired
menu.
3 Set cooking temperature
Temperature
● Rotate the "Temperature" dial to set the appropriate cooking
temperature. It is recommended to use the default temperature.
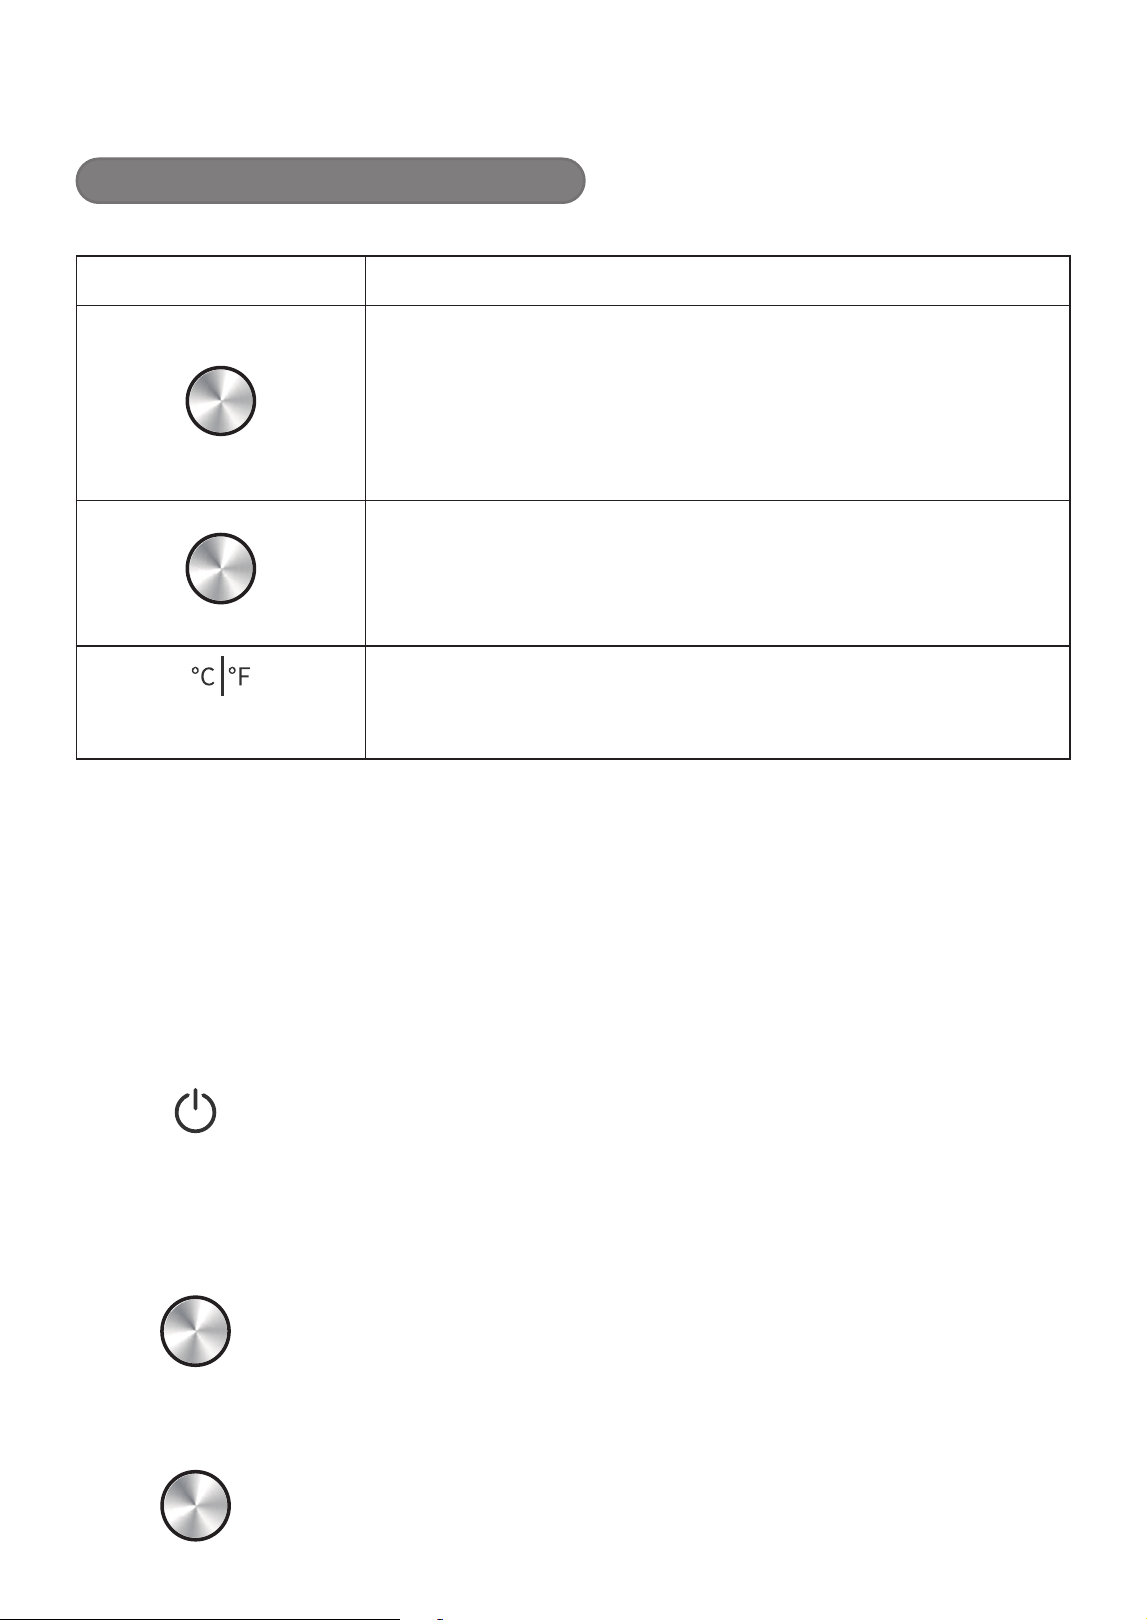
Button Name Function or Display Description
Time
"Time" dial
1. You can rotate the "Time" dial during setup. The Time character is
always ON during setup and it flashes when you stop rotating. The
time setting can be cycled.
2. You can also rotate the "Time" dial during the cooking process. When
you stop rotating, the time character will blink and then light up.
3. When you rotate in fast or slow motion, the time increase or
decrease will vary depending on the menu. (See P.13)
Function
"Function" dial
1. After entering the standby mode, you can select the preferred
menu by rotating the "Function" dial. The function setting can be
cycled.
2.The selected menu blinks and other menus are always illuminated.
"Temperature unit
switching" button
Switch between °C and °F on the display.
Part Names and Instructions
Control Panel

11
4 Set cooking time
Time
● Rotate the "Time" dial to set the appropriate cooking time.
It is recommended to use the default time.
5 Preheat (only required for preheat menu, skip this step if
without preheat menu (See P.13)
Press the "Start/Pause" button to start preheating.
● During preheating, the display shows the preheating temperature of the menu.
● The display time shows a dynamic cycle of "---".
● During preheating, the temperature can be set freely according to
the properties of the food and personal preference.
● When the preheating temperature is reached, beep sounds will
be heard, indicating that the preheating is completed. When the
preheating is completed, the light will turn ON and the "Preheat",
temperature and time displays on the display will blink.
● After the preheating is completed, the product will enter Standby
mode without any operation within 10 minutes.
6 Start cooking
Press the "Start/Pause" button to start cooking.
The ":" symbol of the time display is blinking, the menu, temperature
and time are always illuminated and the time is counting down.
● During the cooking process, the temperature and time can be set
freely according to the properties of the food and your personal
preferences.
● If you want to pause, press the "Start/Pause" button. You can
also set the temperature and time during the pause.
●
When the cooking is finished, the product enters the standby mode.
7 Take out the food when you hear beep sounds
● Use oven mitts to remove the air fryer basket, wire rack, baking pan or pizza stone.
(Use your dry oven mitts.)
■ Continuous cooking or main unit still having residual heat:
Even using auto mode, cooking condition will not be the same as the first time.
■ The white smoke may appear if the food contains a lot of moisture or cooking amount is
large. It is the moisture from the food and is not abnormal.
■ Do not open the door during cooking. (Cooking will be uneven.)
■ Do not pour water or cold liquid on the glass window when it is hot.
(The glass might break.)
Note

12
Recipe
Function Menu Quantity Accessories
Layer of
placement
Time
Adjustment
range
Temperature
(°C)
Temperature
(°F)
Adjustment
range (°C)
Adjustment
range (°F)
Time Setup
Speed
(Quick/Slow)
Preheating Note
Toast
Thick Sliced
Toast
4 slices Wire Rack 2 6 min 1-12 min 220 430 200-230 395-445 1 min —
The color of browing varies with type, size, and
thickness of bread.
Bagel Bagel
2 cross-cut halves
(about 250 g)
Wire Rack 2 10 min 1-20 min 180 355 160-200 320-395 1 min —
1.Use halved bagels.
2. The color of browing varies with type, size, and
thickness of bagel.
Pizza Pizza
12 inches
(Approx. 435 g)
Wire Rack
or
Wire Rack +
Pizza Stone
(Pizza Stone
only for G212)
2 12 min 1-24 min 190 375 170-230 340-445 1 min
4
1.Use frozen pizza.
2.
The preset temperature and time values may vary
depending on the toppings and crust type of the pizza.
Adjust according to the actual situation.
3.
If you are using a pizza stone, place it on a wire
rack and preheat in the oven in Manual mode at
445 °F for 15 minutes, and then immediately use
the Pizza mode. After preheating is complete, place
the pizza on the pizza stone for cooking.
4. The recommended cooking time for microfrozen
pizza is 8 minutes, and for handmade pizza is 8
minutes. If the color of browing needs adjusting,
you can adjust the cooking time by yourself.
Bake Cookies 16 pcs Baking Pan 2 15 min 1-30 min 175 350 155-195 310-385 1 min
4
The thickness is about 0.5 inch. Adjust the cooking
time again if the thickness of the cookies is less
than or more than 0.5 inch.
Broil
Salmon Fillet
2 pcs
(Approx. 600 g)
Baking Pan 2
30 min
1-60 min 200
395 180-220 355-430 5 min / 1 min —
1.
Adjust the cooking time if you are using
marinades that are easy to color, such as soy
sauce, to avoid burning.
2. Add some milk to the macaroni and cheese, mix
well. Sprinkle shredded cheese on the surface,
and bake until the cheese melts on the surface.
Macaroni Cheese
1 box of macaroni
and cheese
(about 200 g)
12 min
Reheat
Fried Chicken
Leg
3 pcs Baking Pan 2 12 min 1-24 min 160
320 140-180 285-355 1 min —
1. If the reheating ingredients are different, you can
also use Manual mode, and choose the right
temperature and time for heating.
2. This refers to the reheating of refrigerated
ingredients. If frozen ingredients are used, adjust
the time accordingly or use Manual mode.
Air Fry
French Fries
Approx. 350 g
Middle Air Fryer
Basket (for food)
Lower Baking
Pan (for grease)
2
12 min
1-36 min 230
445 210-230 410-445 5 min / 1 min
4
1. When heating meat, fish or other greasy foods, put
the baking pan on the lower level to prevent the fat
from dripping directly onto the heating tubes.
2. Adjust the cooking time if you are using
marinades that are easy to color, such as soy
sauce, to avoid burning.
Chicken Nugget
12 min
Chicken Wing
12 pcs (Approx. 420 g)
15 min
Chicken Leg
12 pcs (Approx. 660 g)
18 min
Air Roast Grilled Vegetable Approx. 450 g Baking Pan 2 12 min 1-24 min 220
430 200-230 395-445 1 min
4
1. The preset temperature and time values may
vary depending on the type and quantity of
vegetable to be roasted.
2. Cut the vegetable to the appropriate size and
drizzle with a good amount of olive oil to make
them more evenly roasted.
Roast Grilled Chicken Approx. 1.8 kg Baking Pan 1 80 min
1 min-
2 h 40 min
190 375 170-210 340-410 10 min / 1 min
4
Adjust the cooking time if you are using marinades that
are easy to color, such as soy sauce, to avoid burning.
Steak Steak
2 pcs
(Approx. 500 g)
Baking Pan 2 18 min 1-36 min 230 445 210-230 410-445 5 min / 1 min
4
The thickness is about 0.8 inch. Adjust the cooking
time again if the thickness of the steak is less than
or more than 0.8 inch.
Dehydrate Dried Mango Approx. 500 g Air Fryer Basket 3 4 h 10 min-8 h 90 195 70-110 160-230
30 min / 10 min
—
Cut into strips of 0.4 inch thick and 0.8 inch wide.
Try not to overlap, but turn them over as needed.
Manual — — — — — 1 min-2 h 90 195 70-230 160-445 10 min / 1 min —
To avoid smoke or fire:
■ Keep the ingredients and aluminum foil away from the heating tube.
Note

13
Recipe
Function Menu Quantity Accessories
Layer of
placement
Time
Adjustment
range
Temperature
(°C)
Temperature
(°F)
Adjustment
range (°C)
Adjustment
range (°F)
Time Setup
Speed
(Quick/Slow)
Preheating Note
Toast
Thick Sliced
Toast
4 slices Wire Rack 2 6 min 1-12 min 220 430 200-230 395-445 1 min —
The color of browing varies with type, size, and
thickness of bread.
Bagel Bagel
2 cross-cut halves
(about 250 g)
Wire Rack 2 10 min 1-20 min 180 355 160-200 320-395 1 min —
1.Use halved bagels.
2. The color of browing varies with type, size, and
thickness of bagel.
Pizza Pizza
12 inches
(Approx. 435 g)
Wire Rack
or
Wire Rack +
Pizza Stone
(Pizza Stone
only for G212)
2 12 min 1-24 min 190 375 170-230 340-445 1 min
4
1.Use frozen pizza.
2.
The preset temperature and time values may vary
depending on the toppings and crust type of the pizza.
Adjust according to the actual situation.
3.
If you are using a pizza stone, place it on a wire
rack and preheat in the oven in Manual mode at
445 °F for 15 minutes, and then immediately use
the Pizza mode. After preheating is complete, place
the pizza on the pizza stone for cooking.
4. The recommended cooking time for microfrozen
pizza is 8 minutes, and for handmade pizza is 8
minutes. If the color of browing needs adjusting,
you can adjust the cooking time by yourself.
Bake Cookies 16 pcs Baking Pan 2 15 min 1-30 min 175 350 155-195 310-385 1 min
4
The thickness is about 0.5 inch. Adjust the cooking
time again if the thickness of the cookies is less
than or more than 0.5 inch.
Broil
Salmon Fillet
2 pcs
(Approx. 600 g)
Baking Pan 2
30 min
1-60 min 200
395 180-220 355-430 5 min / 1 min —
1.
Adjust the cooking time if you are using
marinades that are easy to color, such as soy
sauce, to avoid burning.
2. Add some milk to the macaroni and cheese, mix
well. Sprinkle shredded cheese on the surface,
and bake until the cheese melts on the surface.
Macaroni Cheese
1 box of macaroni
and cheese
(about 200 g)
12 min
Reheat
Fried Chicken
Leg
3 pcs Baking Pan 2 12 min 1-24 min 160
320 140-180 285-355 1 min —
1. If the reheating ingredients are different, you can
also use Manual mode, and choose the right
temperature and time for heating.
2. This refers to the reheating of refrigerated
ingredients. If frozen ingredients are used, adjust
the time accordingly or use Manual mode.
Air Fry
French Fries
Approx. 350 g
Middle Air Fryer
Basket (for food)
Lower Baking
Pan (for grease)
2
12 min
1-36 min 230
445 210-230 410-445 5 min / 1 min
4
1. When heating meat, fish or other greasy foods, put
the baking pan on the lower level to prevent the fat
from dripping directly onto the heating tubes.
2. Adjust the cooking time if you are using
marinades that are easy to color, such as soy
sauce, to avoid burning.
Chicken Nugget
12 min
Chicken Wing
12 pcs (Approx. 420 g)
15 min
Chicken Leg
12 pcs (Approx. 660 g)
18 min
Air Roast Grilled Vegetable Approx. 450 g Baking Pan 2 12 min 1-24 min 220
430 200-230 395-445 1 min
4
1. The preset temperature and time values may
vary depending on the type and quantity of
vegetable to be roasted.
2. Cut the vegetable to the appropriate size and
drizzle with a good amount of olive oil to make
them more evenly roasted.
Roast Grilled Chicken Approx. 1.8 kg Baking Pan 1 80 min
1 min-
2 h 40 min
190 375 170-210 340-410 10 min / 1 min
4
Adjust the cooking time if you are using marinades that
are easy to color, such as soy sauce, to avoid burning.
Steak Steak
2 pcs
(Approx. 500 g)
Baking Pan 2 18 min 1-36 min 230 445 210-230 410-445 5 min / 1 min
4
The thickness is about 0.8 inch. Adjust the cooking
time again if the thickness of the steak is less than
or more than 0.8 inch.
Dehydrate Dried Mango Approx. 500 g Air Fryer Basket 3 4 h 10 min-8 h 90 195 70-110 160-230
30 min / 10 min
—
Cut into strips of 0.4 inch thick and 0.8 inch wide.
Try not to overlap, but turn them over as needed.
Manual — — — — — 1 min-2 h 90 195 70-230 160-445 10 min / 1 min —
■ Do not use parchment paper or cooking sheet other than for putting on to a baking pan.
■ Do not use a cake pan made of paper.
■ The preset temperature and time values may vary depending on the temperature, type, quantity or container
of the ingredients. Adjust the values according to the actual cooking level.

14
Cleaning & Care
■
Before cleaning, unplug from outlet and allow the unit to completely cool.
● Do not use benzine, thinner, alcohol, bleach, polishing powder, metal brush or
nylon brush, otherwise the surface will be damaged.
● After every use, clean the main unit and crumb tray thoroughly.
● The aluminum base of the heating tube is sharp. Cleaning gloves are
recommended when cleaning the interior.
● The pizza stone is made of cordierite mixed with sintered mineral materials. Its
porous structure is highly absorbent of water and oil. After using pizza stone to
cook food, due to the differences in ingredients, the color may change to some
degree. It is a normal phenomenon and does not affect its performance.
● Pizza stone belongs to consumables. Long-term use will cause different
degrees of appearance changes on the surface. This is a normal phenomenon.
Exterior
● Wipe with a well-wrung cloth.
Interior
● Wipe with a well-wrung cloth. When the interior is severely stained or dirty, wipe
with a towel saturated with a diluted solution of a mild dishwashing liquid.
● Do not wipe the heating tubes to avoid damaging.
Crumb tray
● Wash with diluted dish soap (neutral) and soft sponge. Dry it well and set it back
to the main unit firmly.
Air fryer basket/wire rack/baking pan
● Wash with diluted dish soap (neutral) and soft sponge. Dry it well.
● The baking pan is dishwasher safe. Do not use the dishwasher to clean this
product and other accessories.
● Always use specific cleaners for dishwasher and drying.
Pizza stone
● Make sure the pizza stone is completely cooled down before cleaning.
● Do not immerse the pizza stone in water.
● Do not use detergents, etc. It is recommended to clean it with water. After
cleaning, bake it in the oven or stove for 30 minutes. Take out and store it in a
ventilated, dry location. (Using without thoroughly drying may cause the risk of
cracking, and the slate is susceptible to mold when wet.)
● Do not use sharp, rough tools to clean the pizza stone.
15
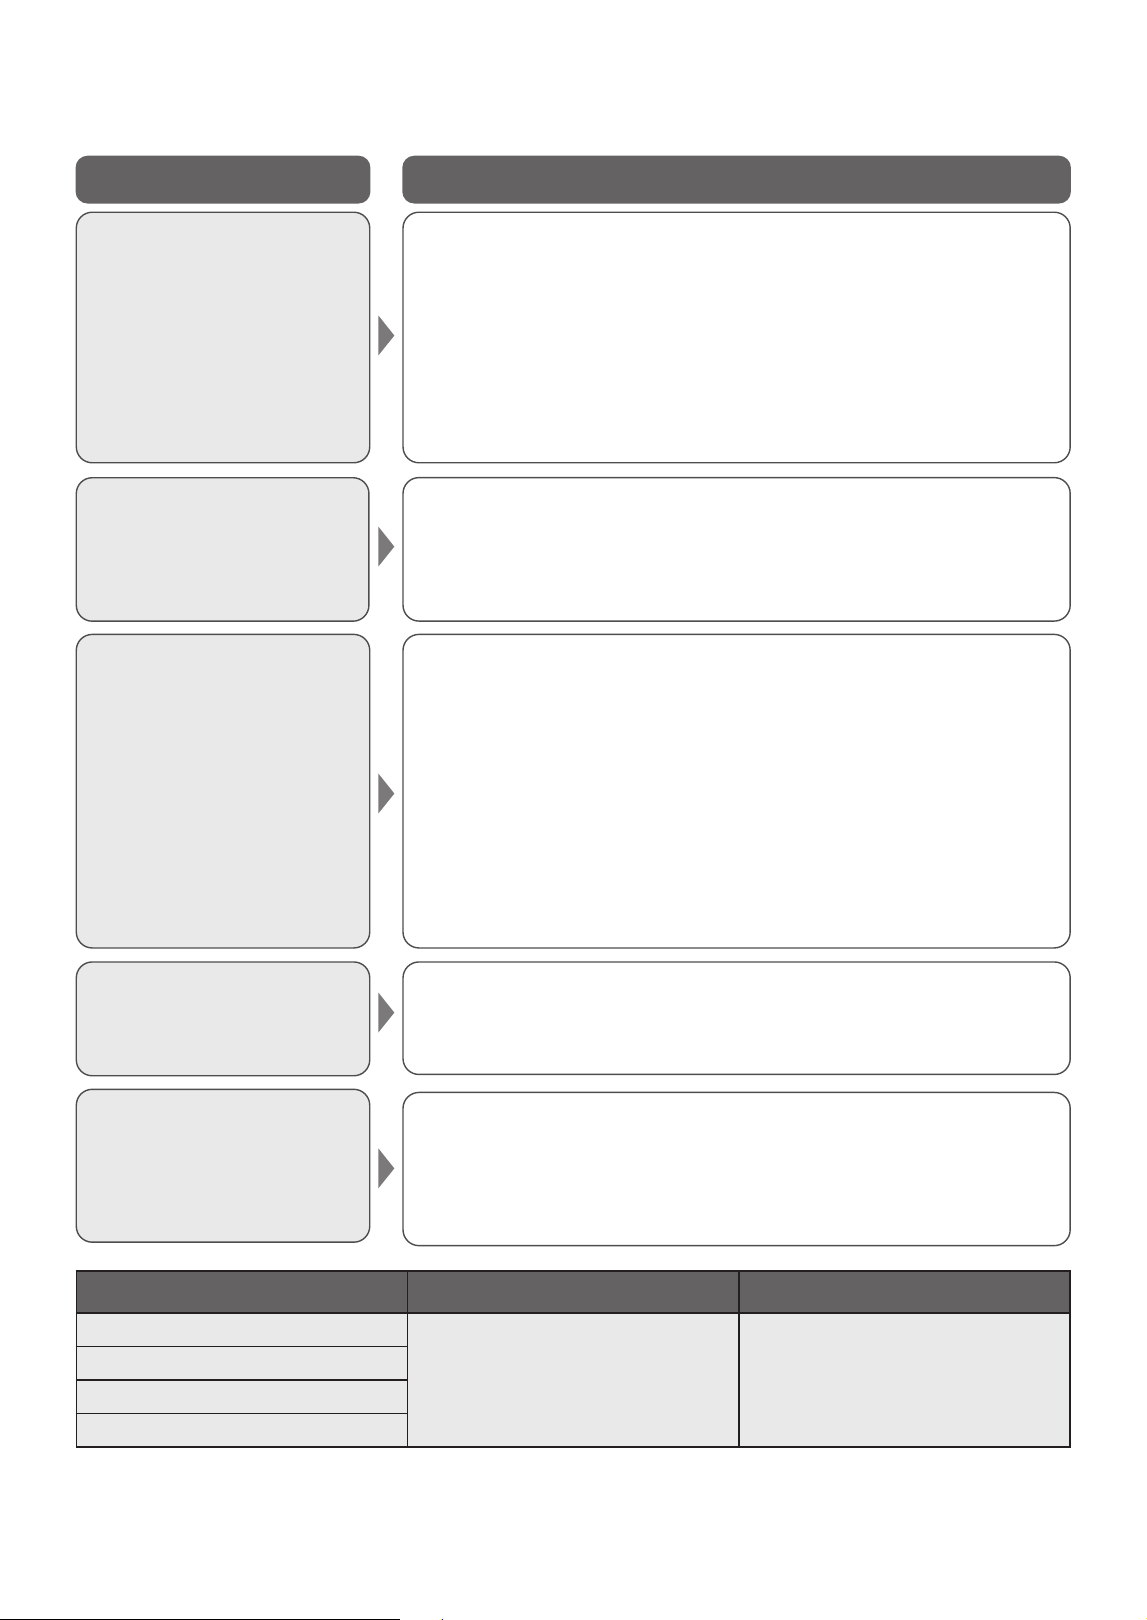
Troubleshooting
Problems Cause and solution
The power indicator
or display window
does not turn on even
though it is
plugged in.
●
The plug is not inserted properly.
➜
Insert the power plug firmly into the outlet.
●
If the main unit is idle for more than 10 minutes, the
power will be turned off automatically.
➜
Press "Power" button to return to standby status.
If power indicator does not turn on even after
pressing, contact Service Center for inspection or
repair. (See P.17)
Cooking does not
complete even when
the main unit has
started.
●
There is a problem with the main unit.
➜
Contact Service Center for inspection or repair.
(See P.17)
There is a burnt
smell.
● The cooking time is too long.
➜ Turn off the main unit.
● The fats and gravy on the air fryer basket, wire rack,
baking pan or the pizza stone may cause smoke during
cooking, especially when using "Broil" menu.
➜ Clean the air fryer basket, wire rack, baking pan or
the pizza stone after every use.
● There is dripping gravy, ingredients or crumbs on the
crumb tray.
➜ Clean the crumb tray.
Heater tubes turn off
during cooking.
●
The heater tubes turn on/off to control temperature.
It is not a malfunction.
Smoke comes out.
●
The fat from the food sticking to the heater may cause
smoke during cooking, especially when using "Broil"
menu.
➜
Set lower temperature if necessary.
Code Root Cause Analysis Solution
H01
This is malfunctioning.
Contact Service Center for
inspection or repair.
H02
H03
H51

16
Specifications
Power supply 120 V 60 Hz
Power consumption 1800 W
Capacity (approximately) 0.99 CU FT / 28 L
Temperature setting
of cavity center
(approximately)
160
-445 °F (70-230 °C)
Timer 1 min
-6 h
Weight (approximately)
11.9 kg (26.2 lbs) (only for NB-G210 and NB-G211)
13.4 kg (29.5 lbs) (only for NB-G212)
Power cord length
(approximately)
0.95 m (37.4 inches)
Size (approximately)
External dimension
(W×D×H)
43.0 × 40.3 × 35.3 cm (16.9 × 15.8 × 13.9 inches)
Internal dimension
(W×D×H)
36.8 × 30.7 × 24.8 cm (14.4 × 12.1 × 9.7 inches)
Air fryer basket
(internal dimension)
(W×D×H)
33.8 × 29.7 × 2 cm (13.3 × 11.6 × 0.8 inches)
Wire rack
(internal dimension)
(W×D×H)
36.6 × 29.7 × 0.4 cm (14.4 × 11.6 × 0.15 inches)
(only for NB-G210 and NB-G211)
36.6 × 29.8 × 1.5 cm (14.4 × 11.7 × 0.6 inches)
(only for NB-G212)
Baking pan
(internal dimension)
(W×D×H)
36.6 × 29.7 × 2.05 cm (14.4 × 11.6 × 0.8 inches)
Pizza stone
(internal dimension)
(W×D×H)
30.2 × 30.2 × 1 cm (11.9 × 11.9 × 0.4 inches)

17
Limited Warranty (ONLY FOR U.S.A.)
Panasonic Products Limited Warranty
Limited Warranty Coverage (For USA Only)
If your product does not work properly because of a defect in materials
or workmanship, Panasonic Consumer Electronics Company (referred to
as "the warrantor") will, for the length of the period indicated on the chart
below, which starts with the date of original purchase ("warranty period"),
at its option either (a) repair your product with new or refurbished parts, (b)
replace it with a new or a refurbished equivalent value product, or (c) refund
your purchase price. The decision to repair, replace or refund will be made
by the warrantor.
Product or Part Name Labor Parts
Kitchen Appliances 1 yr. 1 yr.
Large Capacity Rice Cookers (SR-42 series) 6Months 6Months
During the "Labor" warranty period there will be no charge for labor. During
the "Parts" warranty period, there will be no charge for parts.
This warranty only applies to products purchased and serviced in the United
States. This warranty is extended only to the original purchaser of a new
product which was not sold "as is".
Mail-In Service – Online or Telephone Repair Request
Online Repair Request
To submit a new repair request, and for quick repair status visit our Web Site
at: http://shop.panasonic.com/support
When shipping the unit, carefully pack and send it prepaid in the original (or
supplied) carton. Include a letter detailing the complaint along with the bill
of sales and provide a daytime phone number where you can be reached. A
valid registered receipt is required under the Limited Warranty.
When shipping Lithium Ion batteries please visit our web site at
http://shop.panasonic.com/support as Panasonic is committed to providing
the most up to date information.
IF REPAIR IS NEEDED DURING THE WARRANTY PERIOD, THE
PURCHASER WILL BE REQUIRED TO FURNISH A SALES RECEIPT/
PROOF OF PURCHASE INDICATING DATE OF PURCHASE, AMOUNT
PAID AND PLACE OF PURCHASE. CUSTOMER WILL BE CHARGED
FOR THE REPAIR OF ANY UNIT RECEIVED WITHOUT SUCH PROOF
OF PURCHASE.
Limited Warranty Limits And Exclusions
This warranty ONLY COVERS failures due to defects in materials or
workmanship, and DOES NOT COVER glass, plastic parts, temperature
probes (if included) and normal wear and tear or cosmetic damage. The
warranty ALSO DOES NOT COVER damages which occurred in shipment,
or failures which are caused by products not supplied by the warrantor,
or failures which result from accidents, misuse, abuse, neglect, bug
infestation, mishandling, misapplication, alteration, faulty installation, set-up
adjustments, maladjustment of consumer controls, improper maintenance,
power line surge, lightning damage, modification, or commercial use (such
as in a hotel, office, restaurant, or other business), rental use of the product,
service by anyone other than a factory service center or other authorized
servicer, or damage that is attributable to acts of God.
THERE ARE NO EXPRESS WARRANTIES EXCEPT AS LISTED UNDER
"LIMITED WARRANTY COVERAGE".
THE WARRANTOR IS NOT LIABLE FOR INCIDENTAL OR
CONSEQUENTIAL DAMAGES RESULTING FROM THE USE OF THIS
PRODUCT, OR ARISING OUT OF ANY BREACH OF THIS WARRANTY.
(As examples, this excludes damages for lost time, travel to and from the
servicer, loss of or damage to media or images, data or other memory or
recorded content. The items listed are not exclusive, but for illustration only.)
ALL EXPRESS AND IMPLIED WARRANTIES, INCLUDING THE
WARRANTY OF MERCHANTABILITY, ARE LIMITED TO THE PERIOD OF
THE LIMITED WARRANTY.
Some states do not allow the exclusion or limitation of incidental or
consequential damages, or limitations on how long an implied warranty
lasts, so the exclusions may not apply to you.
This warranty gives you specific legal rights and you may also have other
rights which vary from state to state. If a problem with this product develops
during or after the warranty period, you may contact your dealer or Service
Center. If the problem is not handled to your satisfaction, then write to:
Panasonic Corporation of North America
Consumer Affairs Department
Two Riverfront Plaza
Newark NJ 07102-5490
PARTS AND SERVICE, WHICH ARE NOT COVERED BY THIS LIMITED
WARRANTY, ARE YOUR RESPONSIBILITY.
As of February 2024

Panasonic Corporation of North America
Two Riverfront Plaza, Newark, NJ 07102-5490
https://www.panasonic.com
© Panasonic Manufacturing (Xiamen) Co.,Ltd. 2024
Printed in China
BZ51A216
MX0524W0